

Page 1
J
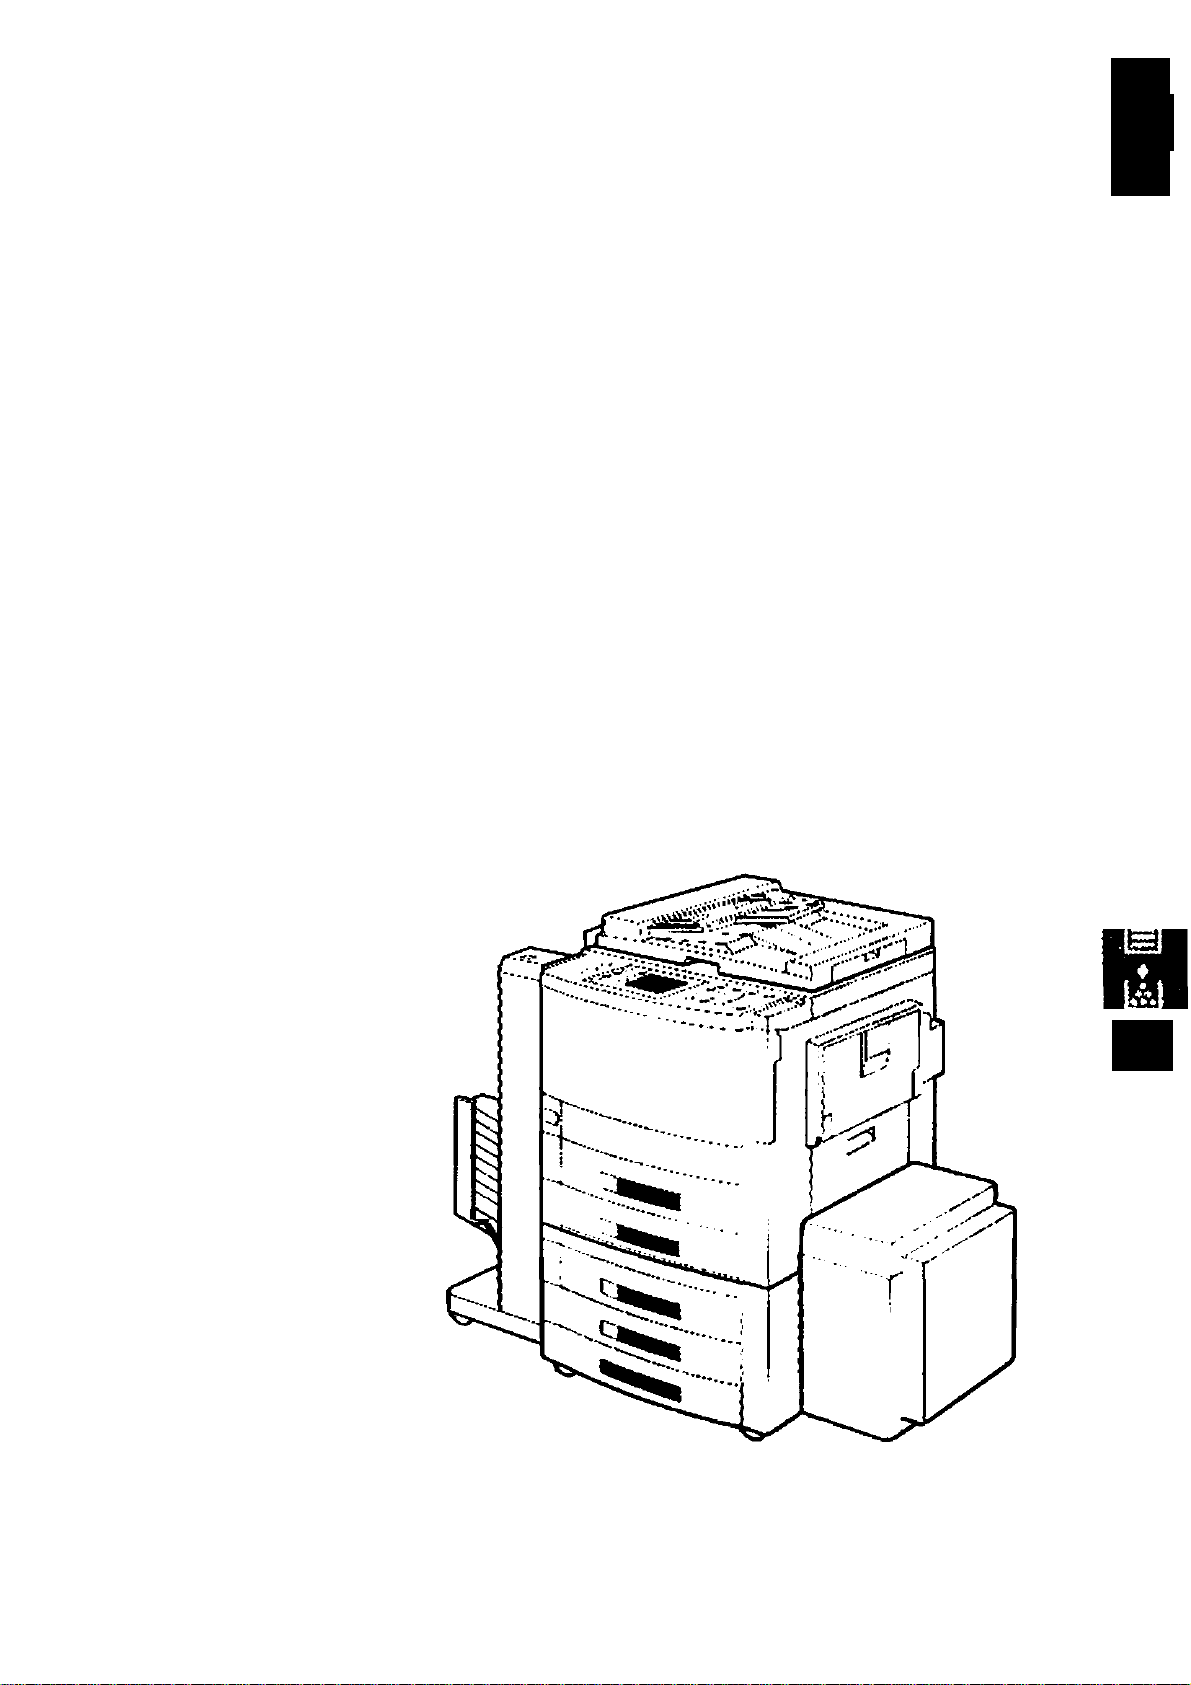
Plain Paper Copier
FP-7735MX/7742/7750
Options
i-ADF (FA-A888VADF (FA-A505)/Sorter (FA-S575/S680/S685/S690)
System Console (FA-DS72/DS82VLCC (FA-MA301)
Operating Guide
w
c tr
0> Q
C -C
O O
Of
Before operating this copier, jpSease read
these instructions completely and keep
this operating guide forfutrjre reference.
8V
The FP-7736MX/7742/7750
with options (See P.42)
Page 2
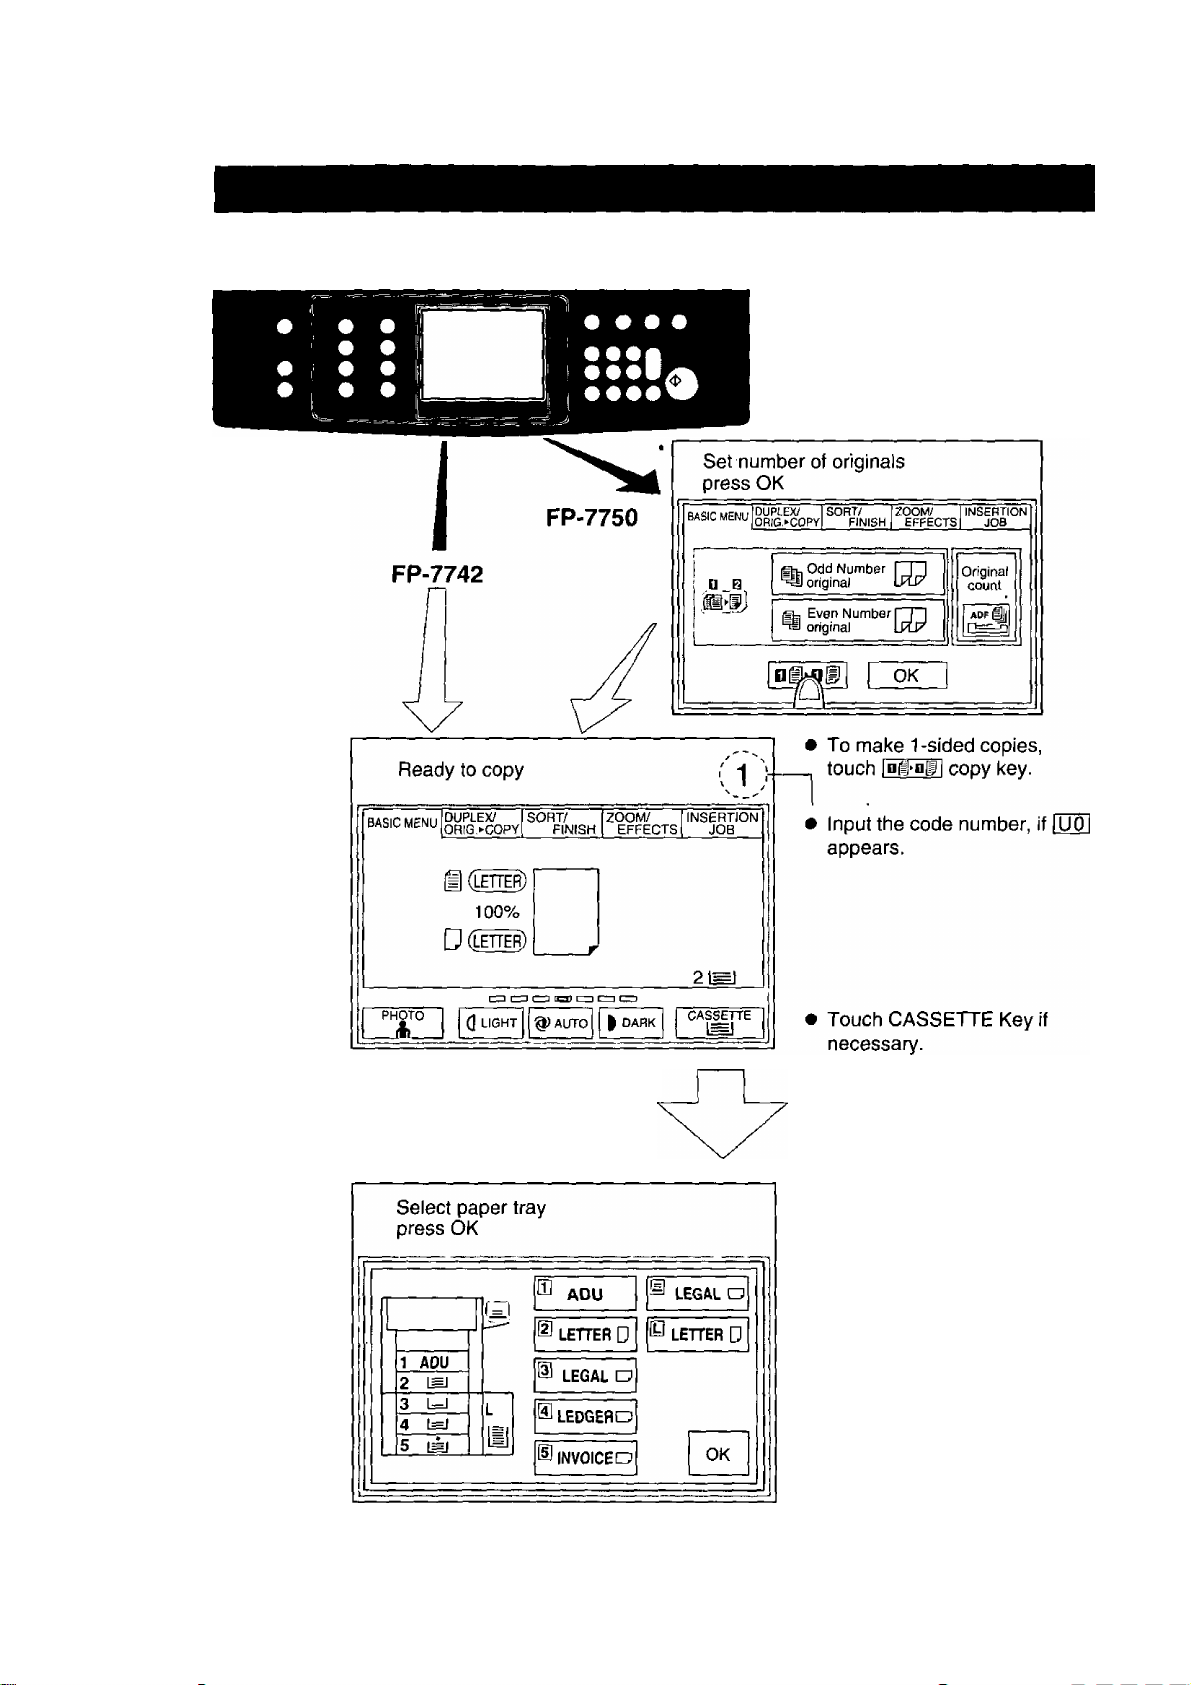
Operation Chart
Common features and usage
Basic Operation
(Touch Panel Display)
• I , •
• ' •
Load paper
Turn Power
Switch On
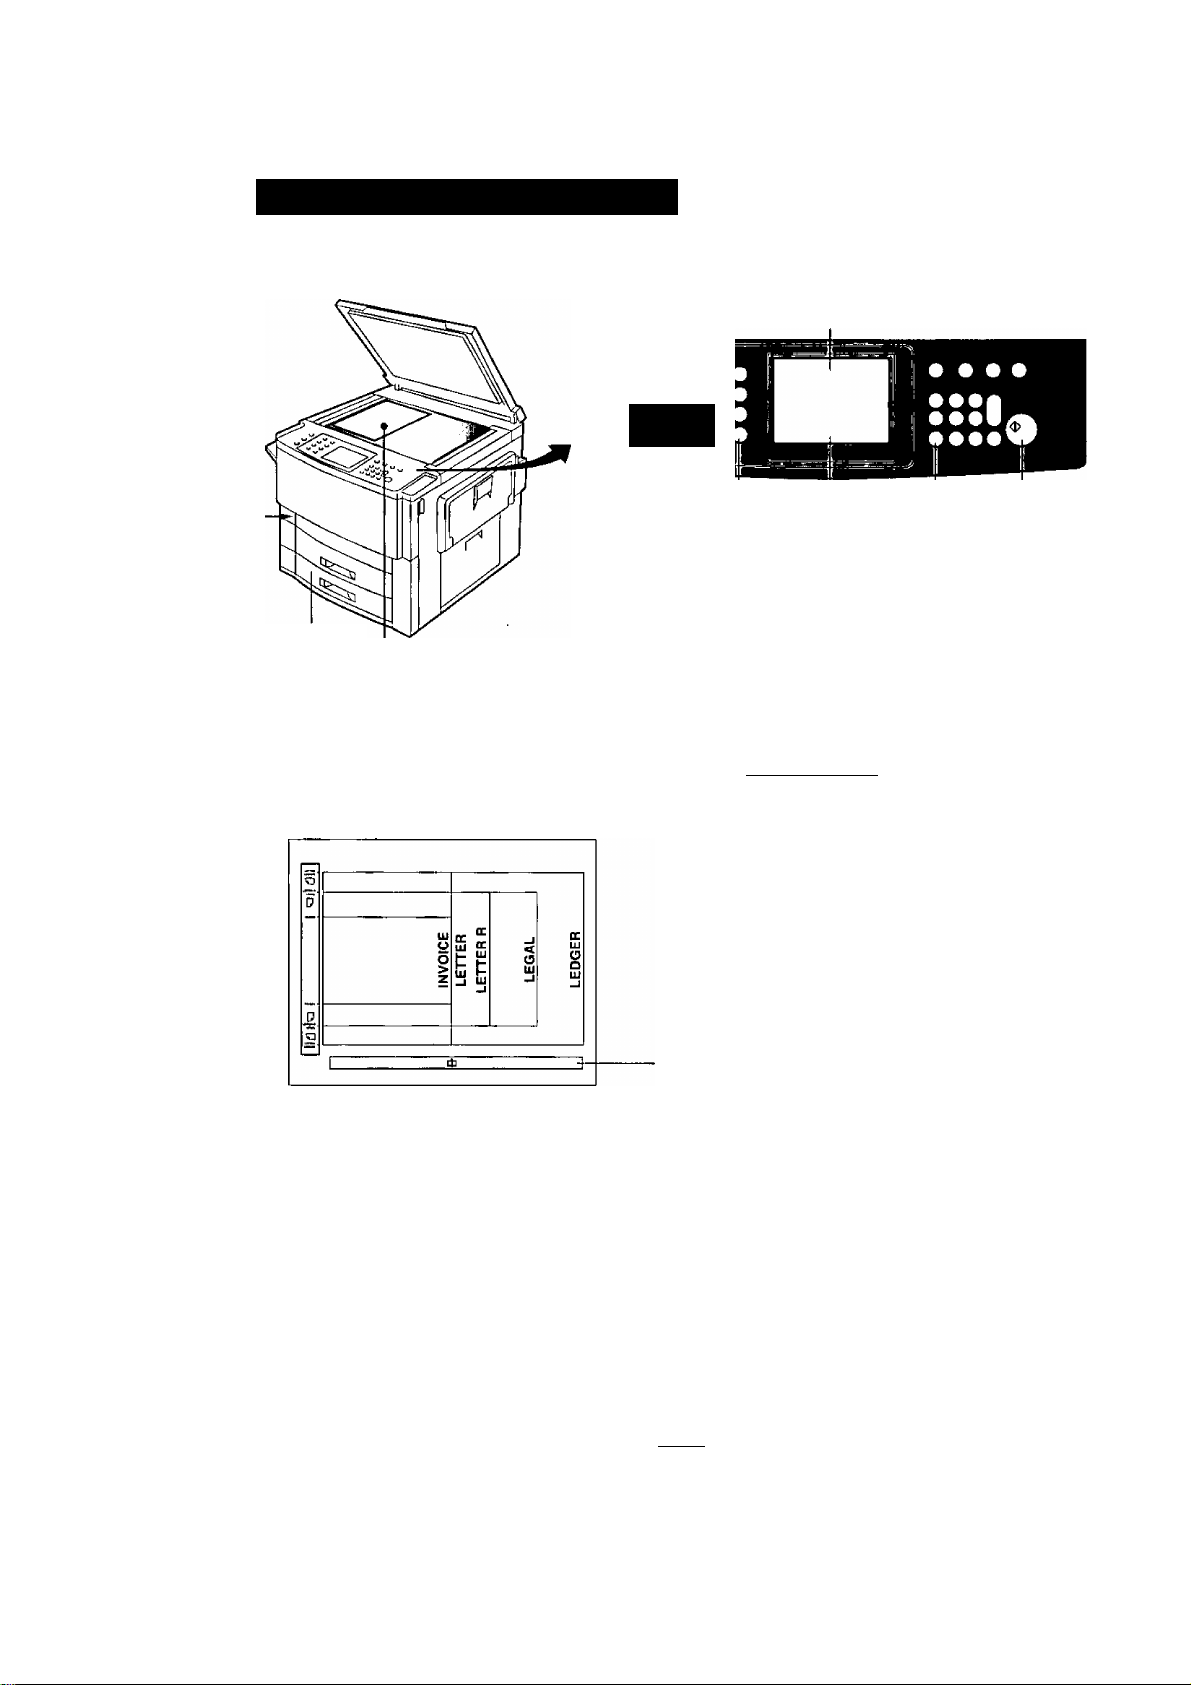
Position of the original
Common Features
Follow these steps for each copy job.
1
Position original
2
Copy size
Number of copies
4
(3) .5
Cancel duplexing mode* Press Print
(FP-7750 only)
• Face Down on platen and in ADF (FA-A505).
Face Up in i-ADF (FA-A888).
• If the original is not positioned properly, a
portion of the original may not be copied.
For originals smaller than invoice size, align with
center of left original guide and select invoice.
Original Guide
____________________
Full Size Copying
HI (See P.11)
/pn Reduction or Enlargement
IlJ/LJ (See P.12)
f noTF ^ FP-7750 is initially set to duplexing mode. (1:2)
^ When copying one-sided copies, touch Inj-njl key to cancel the duplexing mode.
(See P.10)
1—^(3)-4-5
1-2-(3)-4-5
Page 3
Touch Panel Display
Function Categories
DUPLEX/ SORT/ ZOOM/
OfllG>'COPY FINISH EFFECTS
A
PHOTO g ^ I CA^TTE
100%
Di
& e
B
Q.
CO O
INSERTION
JOB
o
e
21^
©
Basic Menu (See P.10)
0 Photo Mode Key
0 Exposure Control keys
@ Auto Exposure Key
0 Current feed location selected
(D Cassette Selection Key
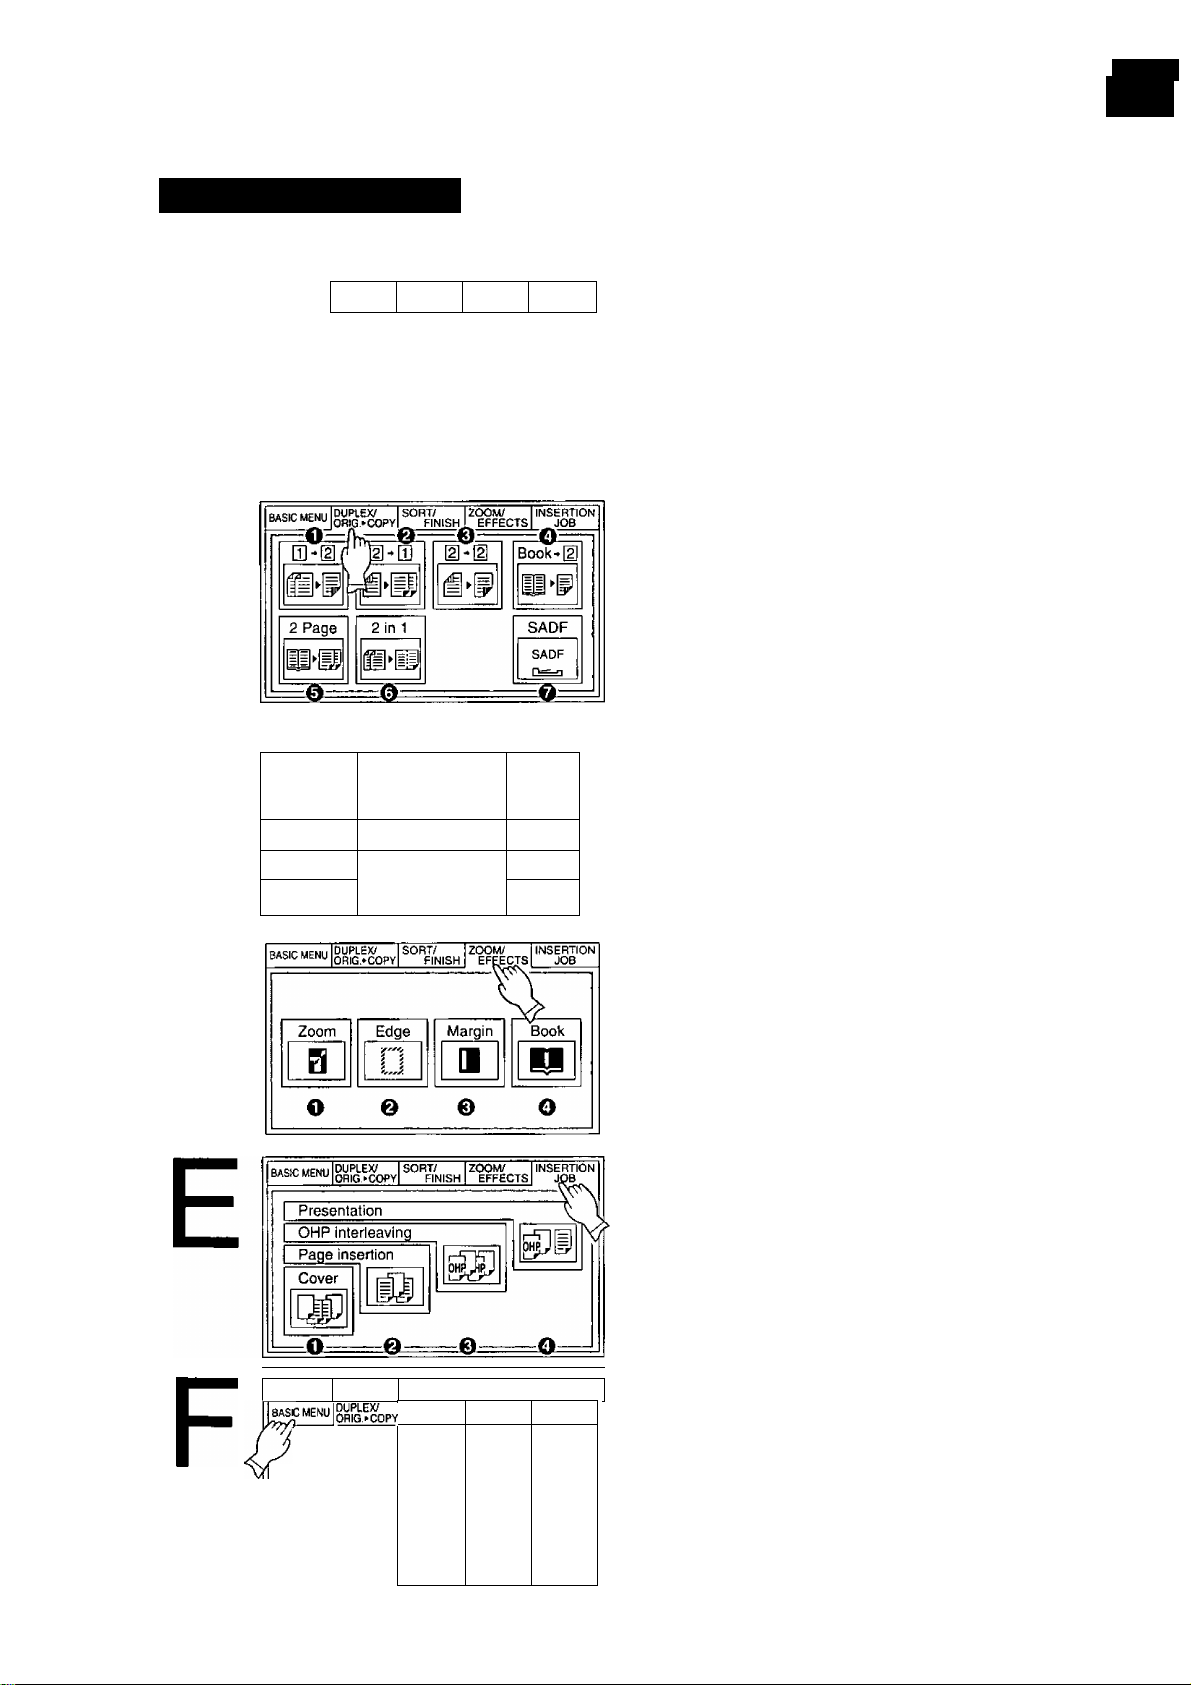
Duplex/Original ^ Copy (See P.14)
0 [H ^ [2] Copy Key
0 [2] ^ [T] Copy Key
(D [2] ^ [2] Copy key
0 Book ^ [2] Copy Key ^
0 2 Page Copy Key
0 2 in 1 Copy Key
0 SADF Key
c
D
duplex; sort/ zoom/ insertion
OBIG>-COPY FINISH EFFECTS JOB
№
|0Nonsort I;
|0 Punch
} Sort 0 (
U
15 @ ®
^ Group
SELECT
Sort/Finishing (See P.19)
0 Nonsort Mode Key
0 Sort Mode Key
0 Staple Sort Mode Key
0 Group Mode Key
0 Hole Punch Mode Key
0 Staple Position Select Key
Zoom/Effects (See P.22)
0 Zoom Key
0 Edge Mode Key
0 Margin Mode Key
0 Book Mode Key
Insertion job (See P.26)
0 Cover Mode Key
0 Page Insertion Mode Key
0 OHP Interleaving Mode Key
0 Presentation Mode Key
SAOF[^D
01*0
BooK-a H»[p
2 PAGE
SORT/
ZOOM/
FINISH
NON SORT ZOOM COVER
SORT
STAPLE SORT
EFFECTS
a
EOGE
0
MARGIN
INSERTION
INSERTION
INTERLEAV.
■
GROUP
BOOK PRESEN.
a
JOB
uu
ft
gg)
Basic Menu Selection
• Displays all functions when touching
Basic Menu Key.
• Touch Basic Menu Key again to return
to the basic screen.
Page 4

Energy Star
The FP-7742 & FP-7750 copiers comply with Tier 2 of the Environmental Protection Agency’s
Energy Star Program. This voluntary program specifies certain energy consumption and
usage standards for copiers. Specifically, the FP-7750 will automatically default to duplexing
or two-sided copying mode when more than one original is placed in the document feeder. In
addition, both the FP-7742 & FP-7750 will automatically “power down” after a specified period
of non-use. The use of these Energy Star compliant copiers will reduce energy consumption
and ultimately benefit the environment.
The default functions can be adjusted depending on your office requirements. Please see
your authorized Panasonic copier dealer for more details.
Page 5

Table of Contents
Precautions....................................................................................................................................... 6
■ Control Panel........................................................................................8
Making Copies
Basic Menu......................................................................................................................................10
■ Full Size Copying
■ Reduction or Enlargement Copying
■ Using the Sheet Bypass......................................................................13
Duplex/Original ► Copy...................................................................................................................14
■ Q]-► [2]/[2l-► m Copy
■ [£]-► [2]/2 Page Copy
■ Book [2] Copy.....................................................................................17
■ 2 in 1 Copy..........................................................................................18
Sort/Finishing.................................................................................................................................. 19
■ Procedure...........................................................................................20
Zoom/Effects....................................................................................................................................22
■ Zoom Copying.....................................................................................23
■ Edge/Margin/Book Mode....................................................................24
Insertion Job.....................................................................................................................................26
■ Cover...................................................................................................27
■ Page Insertion.....................................................................................28
■ OHP Interleaving/Presentation
Other Features ■ Program Copy Job..............................................................................30
■ Skyshot Mode.....................................................................................31
■ Energy Saver/Interrupt........................................................................32
■ Changing Paper Size..........................................................................33
Combining Function Table...............................................................................................................35
User Preset......................................................................................................................................36
■ User Access........................................................................................40
...............................................................................
...................................................
.......................................................................
........................................................................
...........................................................
11
12
15
16
29
Options
Components........................................................................................42
i-ADF/ADF...........................................................................................43
Sorter..................................................................................................45
Maintenance
Handling ■ Adding Paper
■ Adding Toner
■ Removing a Paper Misfeed
Checking ■ T roubleshooting
......................................................................................
......................................................................................
Specifications
FP-7735MX/7742/7750. FA-A888/A505.............................................60
FA-S575/S680, FA-DS72/DS82, FA-MA301
FA-S685/S690....................................................................................64
................................................................
.................................................................................
.....................................
5
48
50
52
62
61
Page 6
Precautions
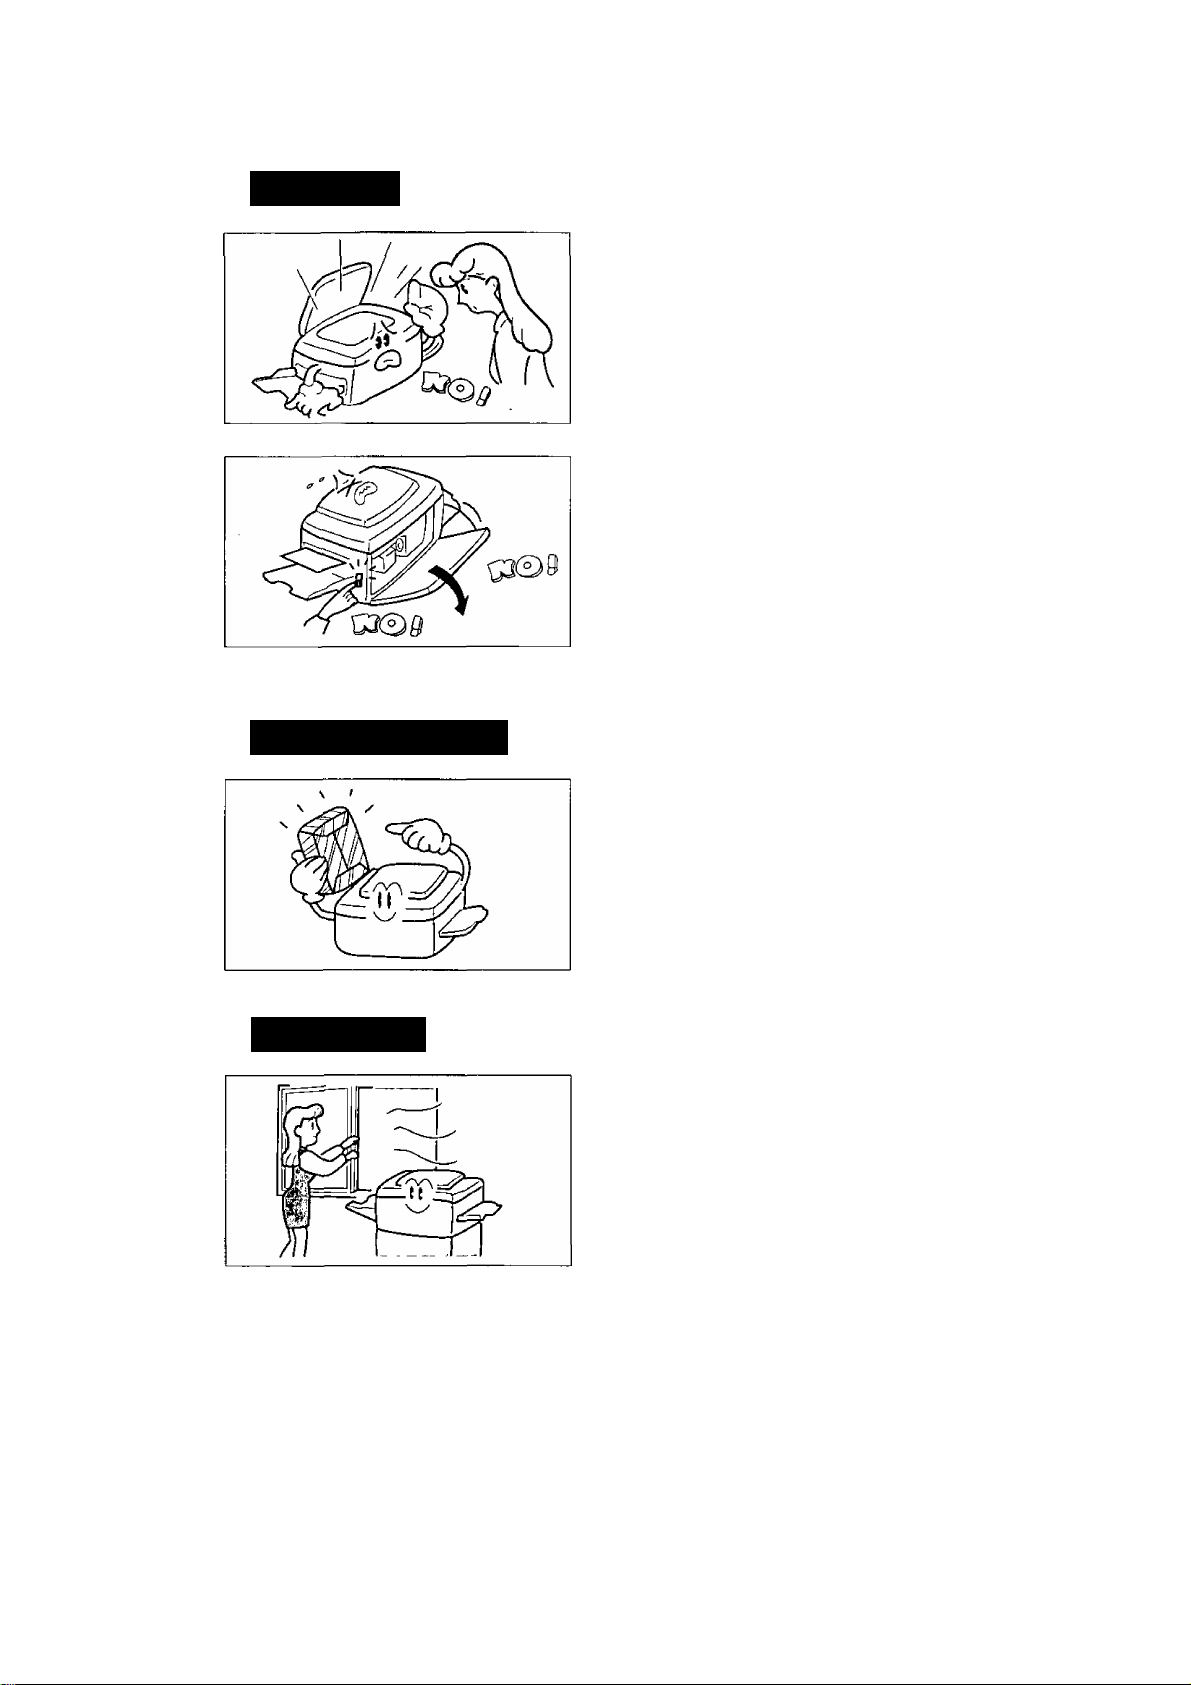
Handling
Do not look directly at exposure lamp when
copying.
■ Do not turn the power switch off or open the front
panel during copying.
• Do not drop paper clips or other metal objects into
the copier.
Toner and Paper
Ventilation
■ Store toner, developer and paper in cool areas
with low humidity.
• High quality paper of 16 lbs. - 24 lbs. (15-30 lbs.
via sheet bypass) may be used.
• For optimum performance, it is recommended that
only Panasonic Brand supplies be used in the copier.
The copier should be installed in a well-ventilated
area, to minimize the ozone density in the air.
Page 7
Installation
The copier should not be installed in areas with the
following conditions:
Extremely high or low temperature and humidity.
Ambient conditions
Temperature: 50T - 86T
Relative humidity: 30% - 80%
Area where temperature and humidity can change
rapidly.
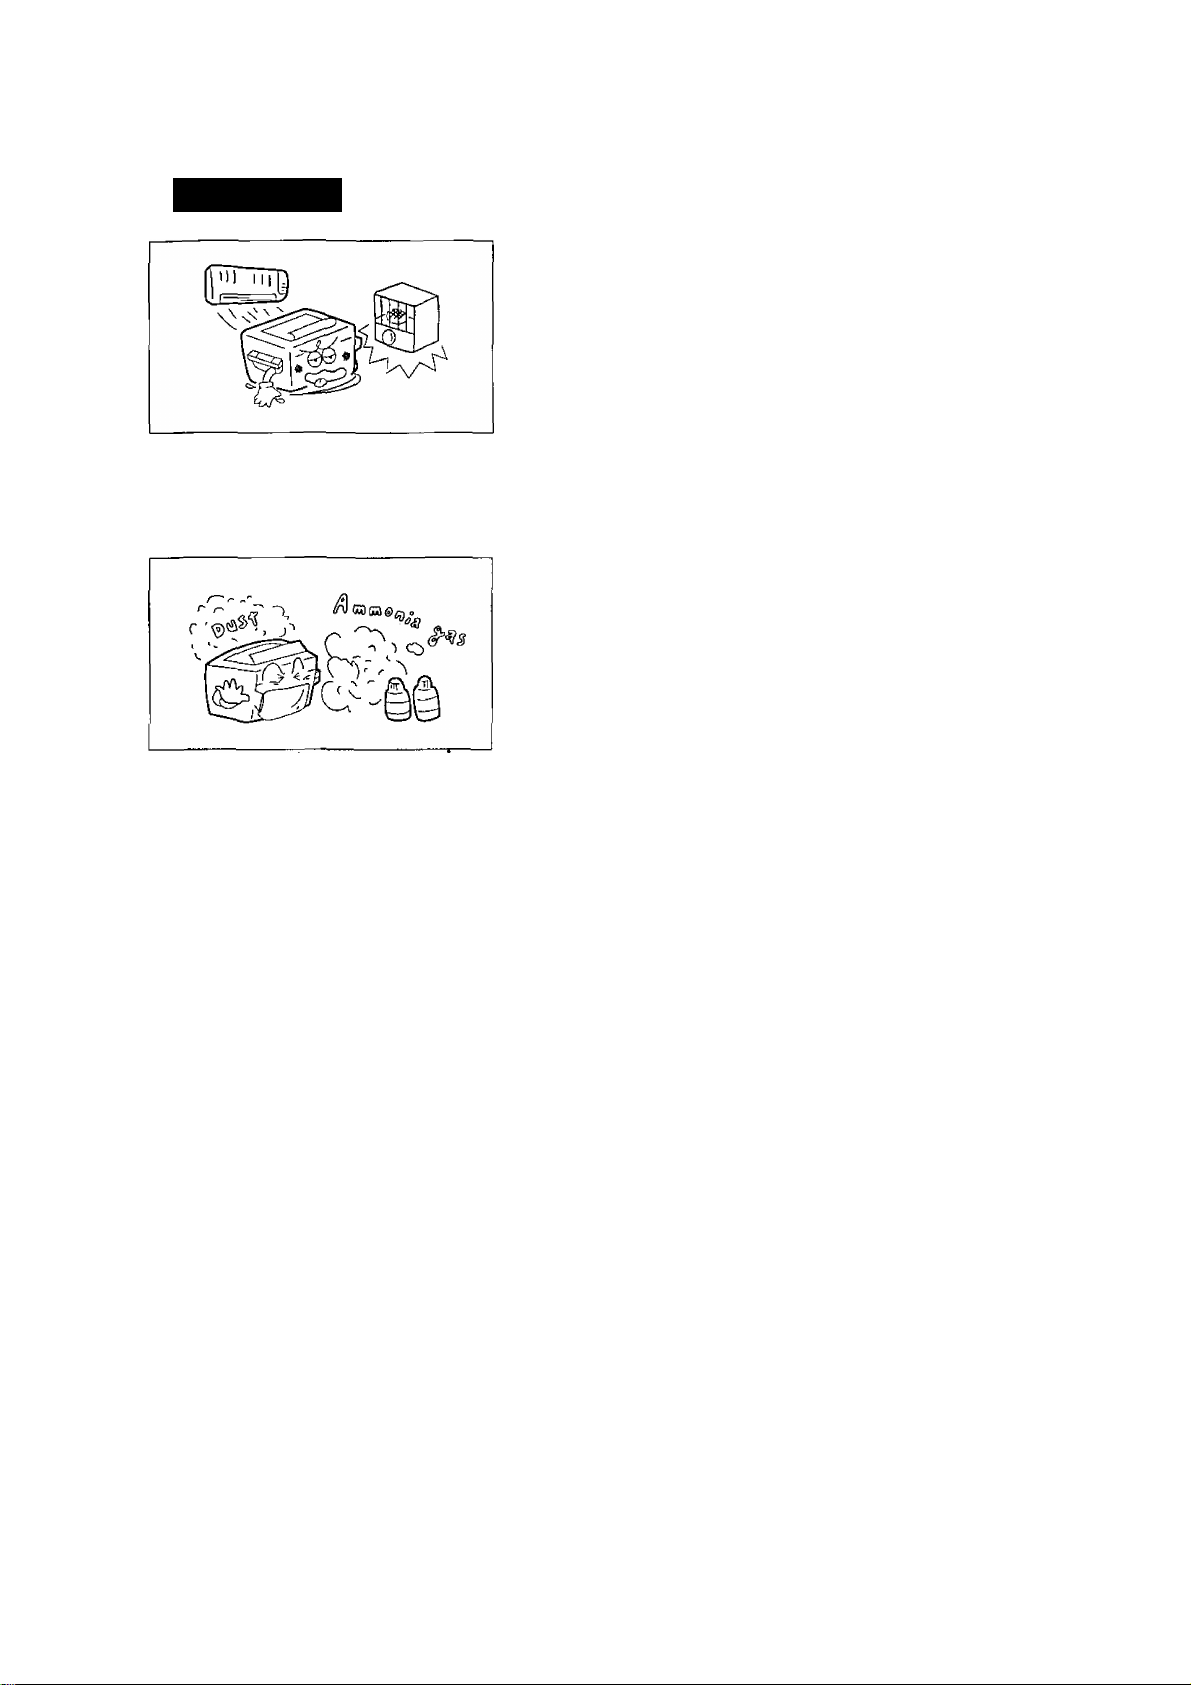
Direct exposure to sunlight.
Directly in air conditioning flow.
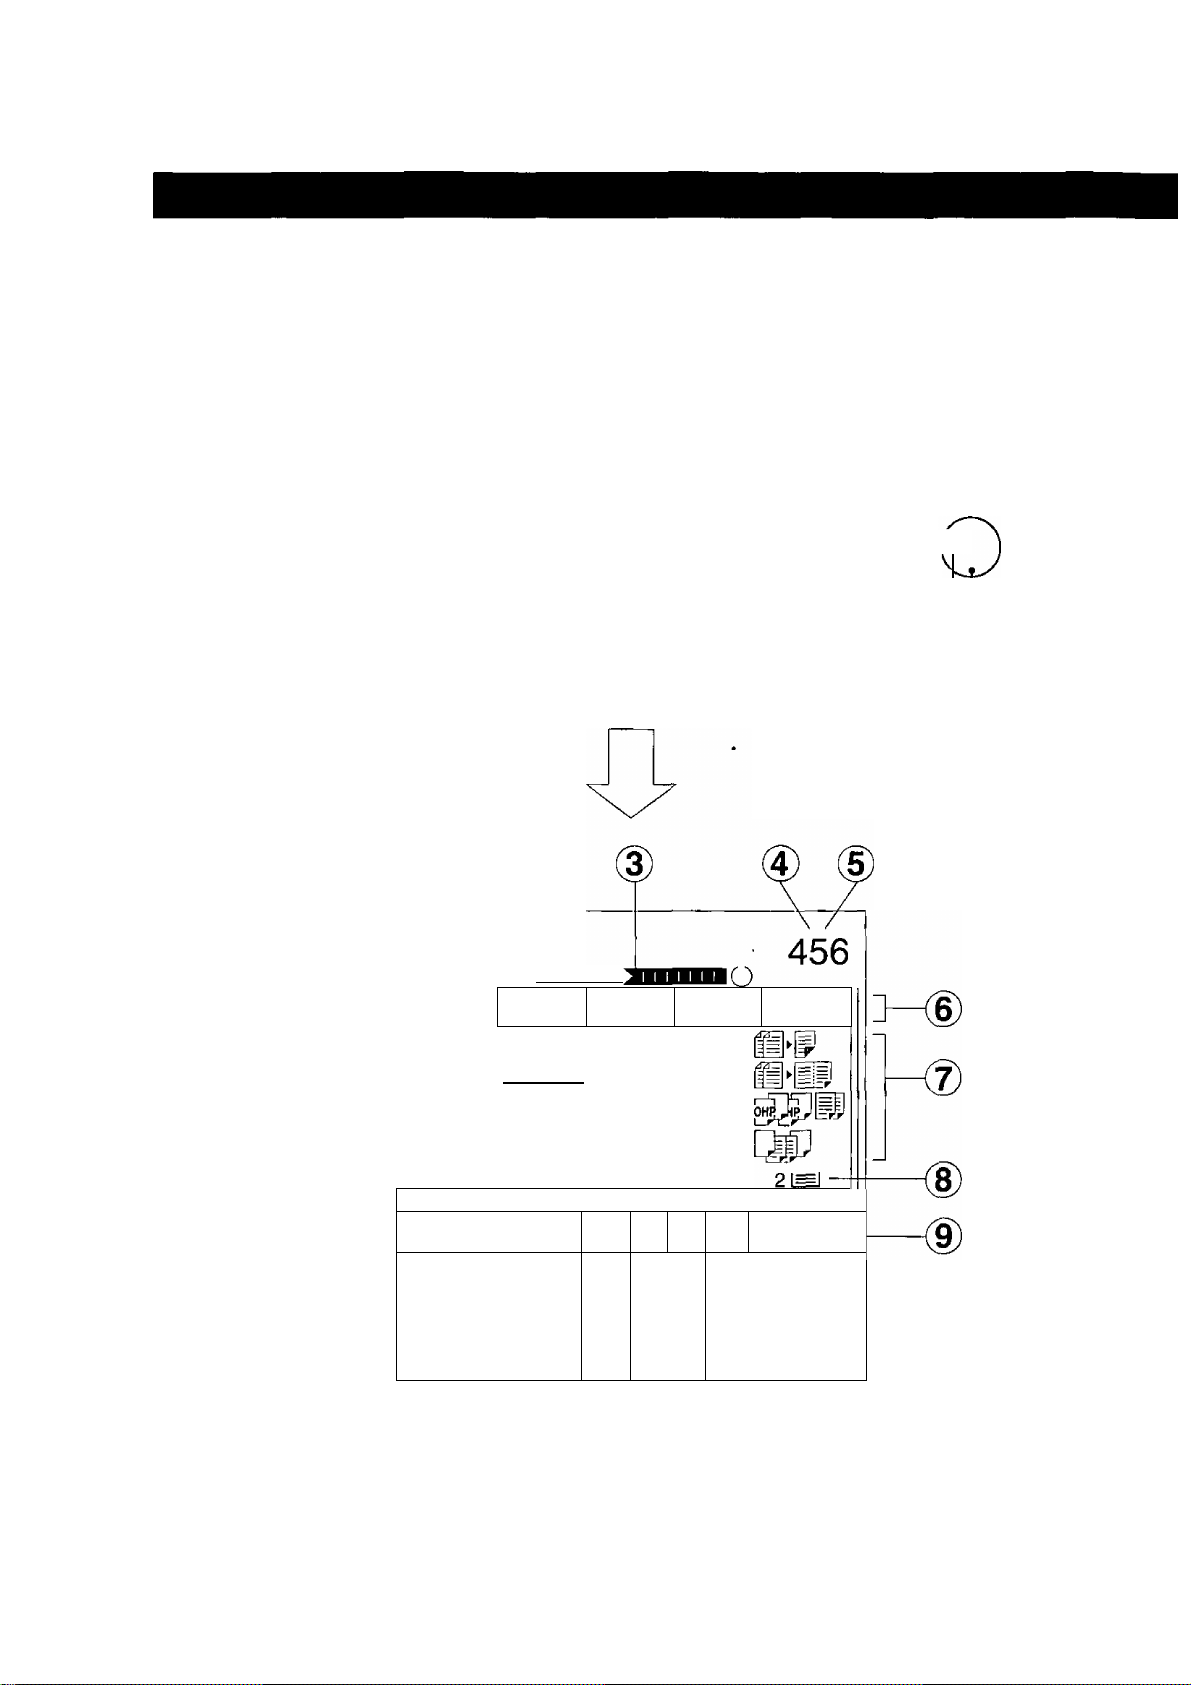
In areas of high dust concentration.
In areas of poor ventilation.
In areas with chemical fume concentration.
In areas with extreme vibration.
With unstable or uneven conditions (floors, etc.).
The FP-7742/7750 power consumption is 1.5 kW. A properly wired (with ground), dedicated,
15A, 120V AC outlet is required. Do not use an extension cord.
For U.S.A.
This equipment has been tested and found to comply with the limits for a Class A digital device,
pursuant to part 15 of the FCC Rules. These limits are designed to provide reasonable
protection against harmful interference when the equipment is operated in a commercial
environment. This equipment generates, uses, and can radiate radio frequency energy and, if
not installed and used in accordance with the instruction manual, may cause harmful
interference to radio communications. Operation of this equipment in a residential area is likely
to cause harmful interference in which case the user will be required to correct the interference
at his/her own expense.
Any unauthorized changes or modifications to this equipment would void the users authority to
operate this device.
Page 8
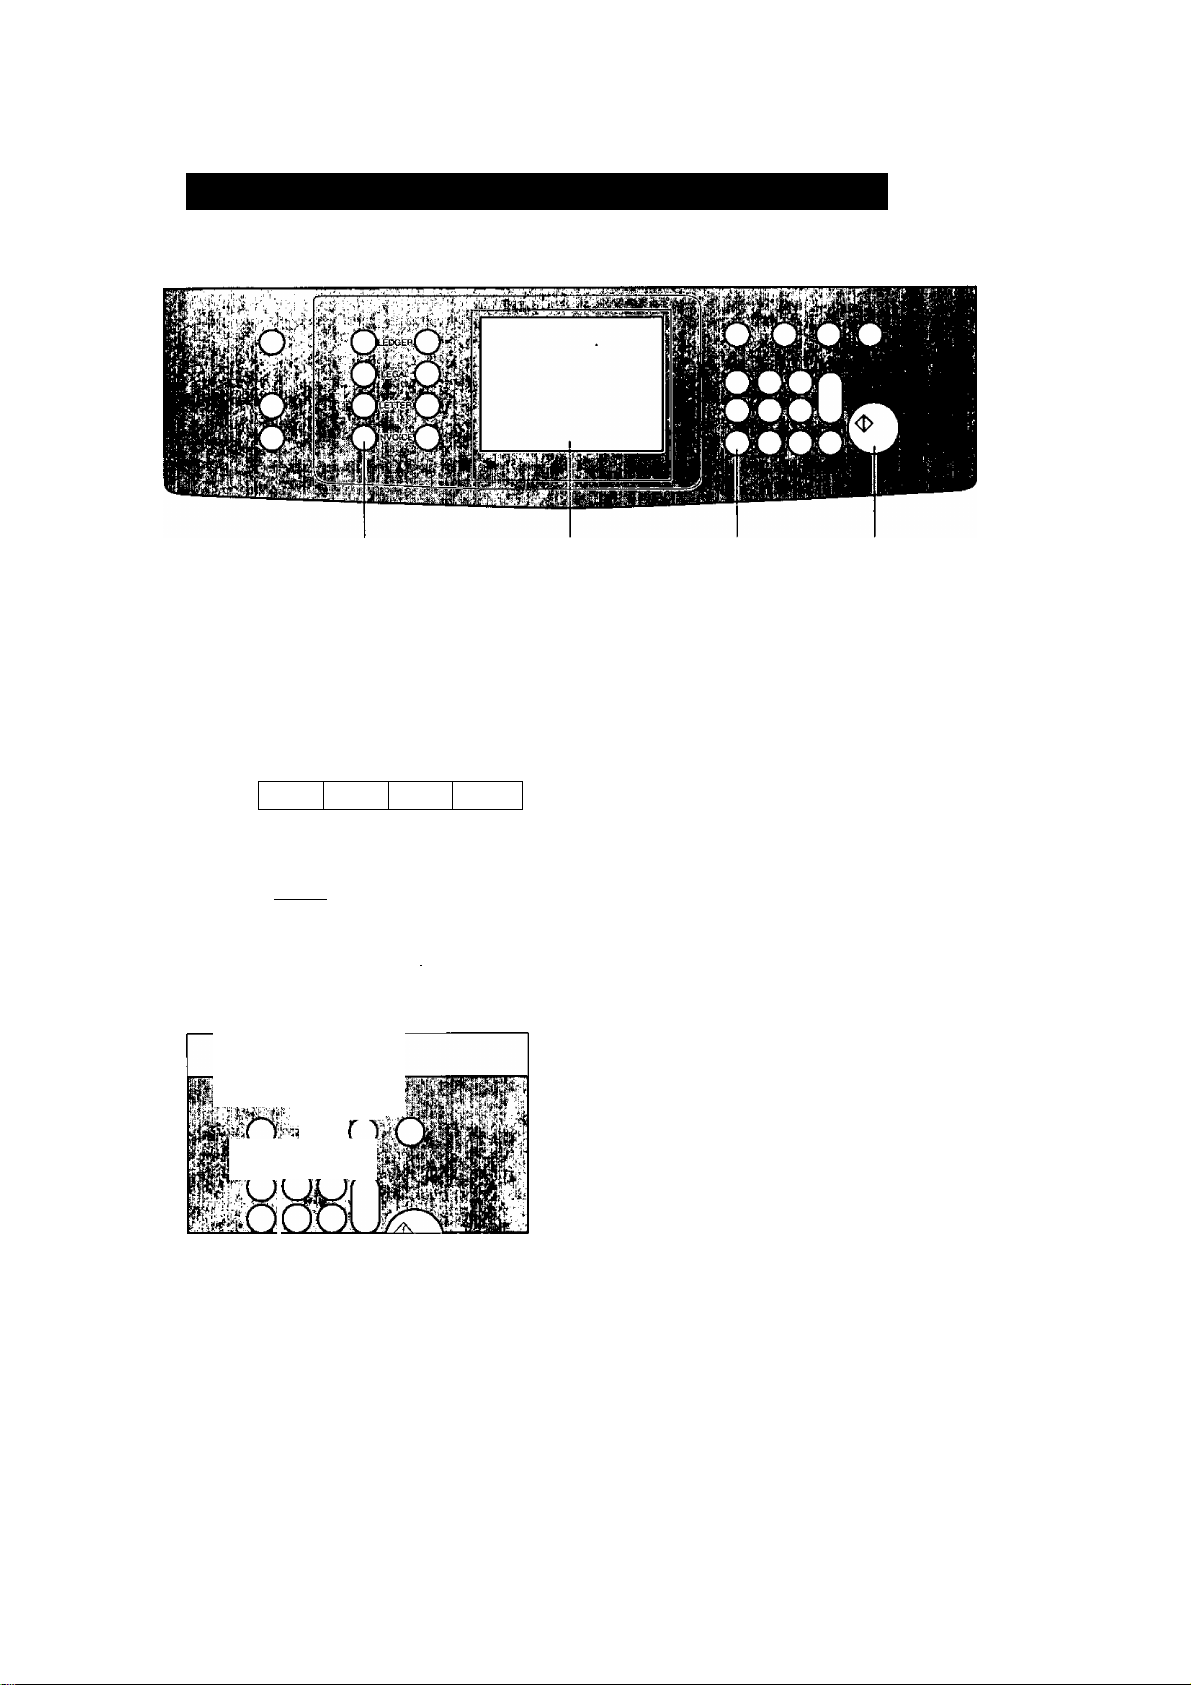
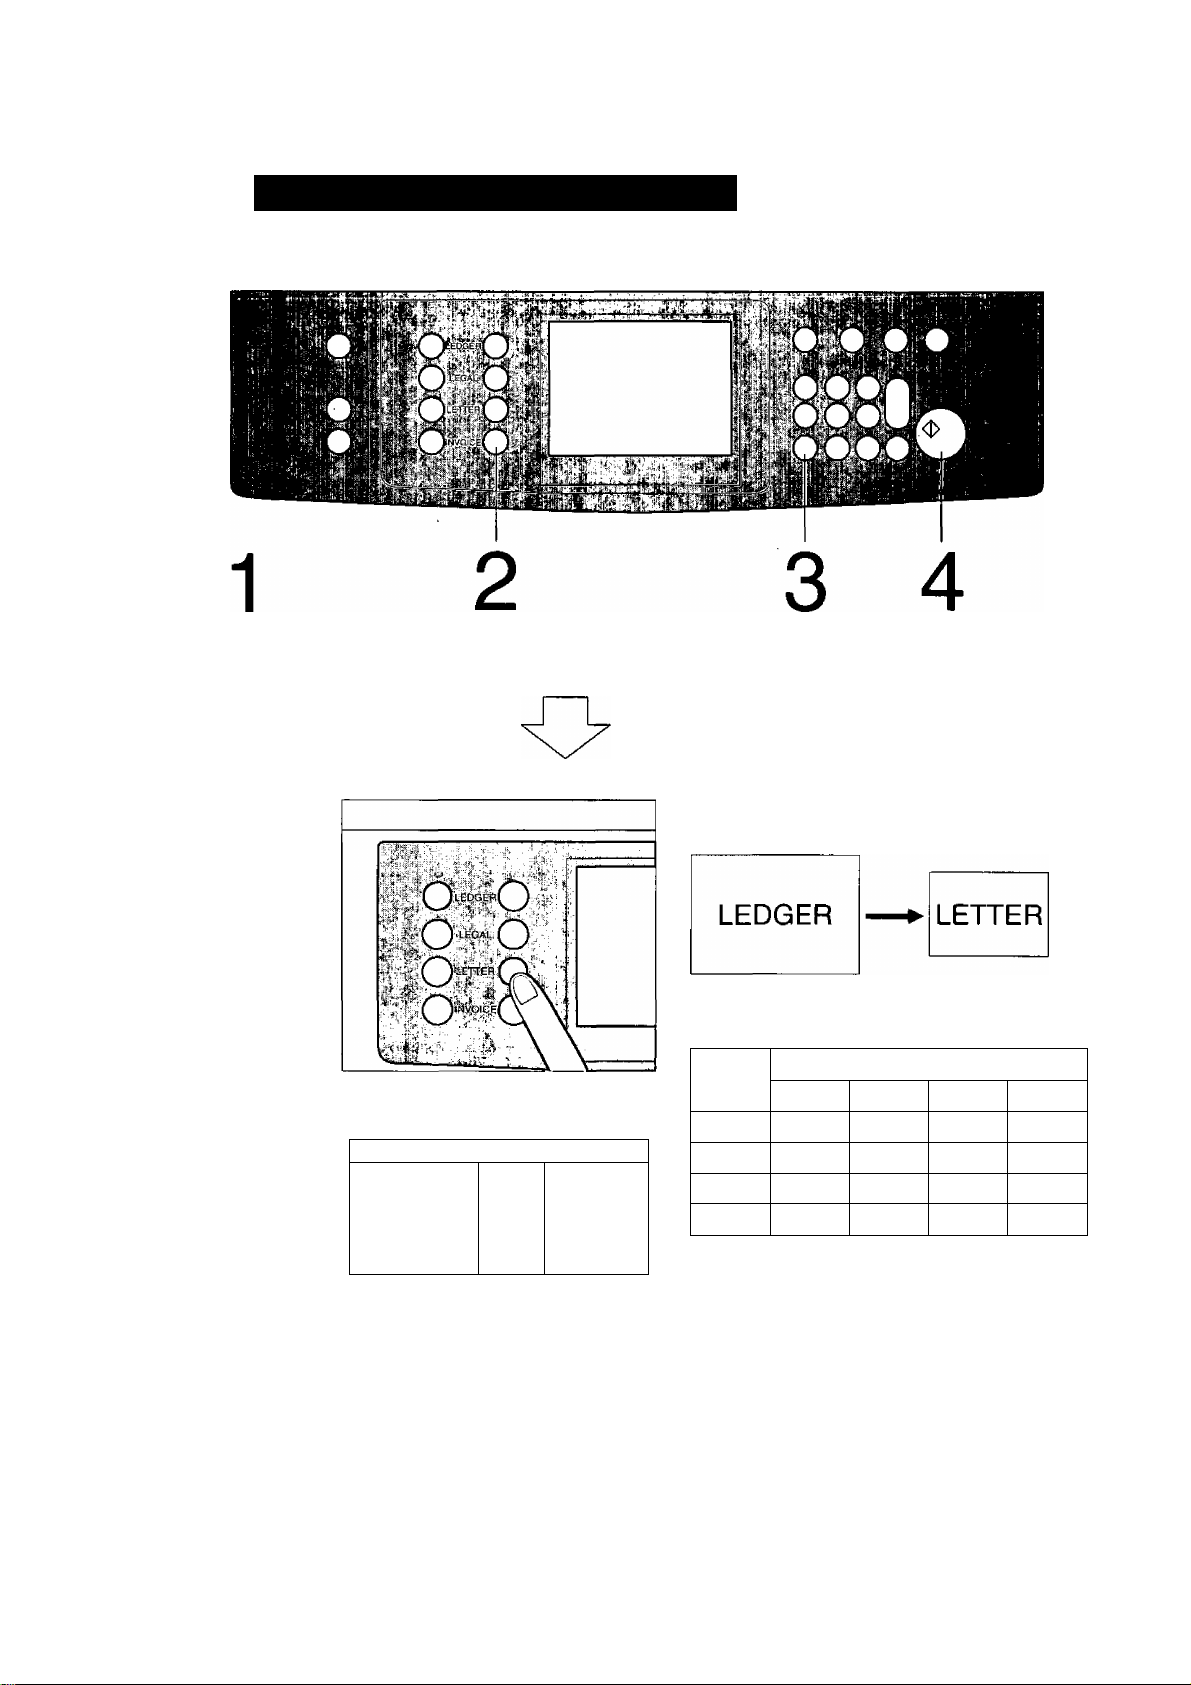
Control Panel
User Preset Key
(See P.36,40)
6
O
Q
Multi-size Feed Key
(See P.44)
Job Memory Key
(See P.30)
Energy Saver Key
{See P.32)
O
O
0‘
O
O
Q"
Original Size Keys
Copy Size Keys Quantity Keys
Touch Panel Display
Interrupt Key
(See P.32)
Manual Key
(See P.11)
^666
©(D@f4
©(D@U
Ready Indicator
Reset Key
Press to reset all features
to initial power-on state.
Clear/Stop Key
Press to stop copy run or
clear copy count in display.
Print Key
® (D
i
1111 m
BASIC MENU
note ^ * Adjusting the touch panel display contrast
^ Adjust brightness of the display by repeatedly pressing Ledger or Invoice original size
key as necessary while pressing and holding the Clear/Stop key.
To make the display brighter: Ledger size key
To make the display darker : Invoice size key
DUPLEX/
ORIG.i-COPY
(g] (LEDGE'fj)
/ II 1 ^ L_^J Cm I ''V
SORT/ ZOOM/ INSERTION
FINISH EFFECTS
100%
. .. ..
D T
A
UTO
f) ^
1 D
A^
?)
JOB
\ CASSETTE
\ 1=1 —J
8
Page 9
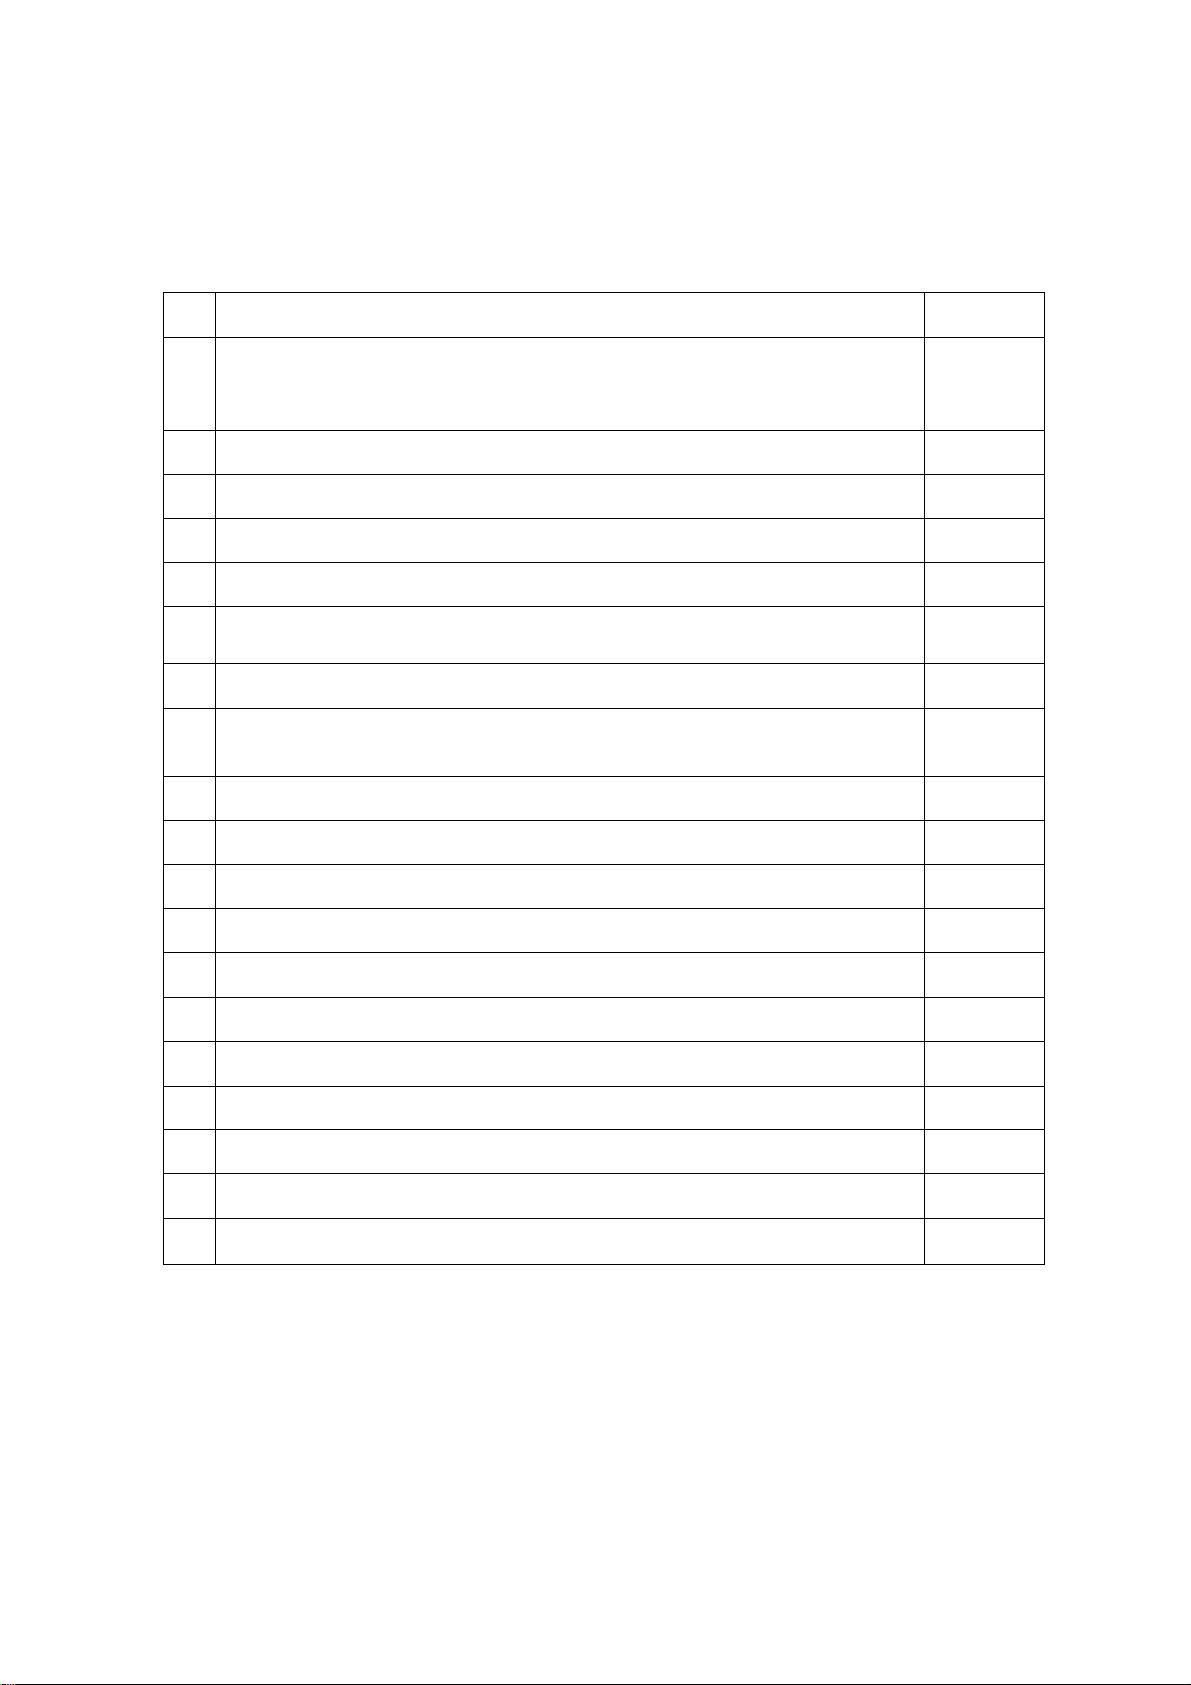
Touch Panel Display Indications
No
®
(2)
®
. ®
®
(D
®
®
aj) Programmed Functions-2
Contents
Warning indications
• The copier will be disabled after this display is on for some time,
[¿j: Add toner, Replace waste toner bottle, f: Call service.
Message area
Warm-up Time indication
Number of copies
Machine/User Error Code indication (El-01, U13, etc.,)
Function Categories
Programmed Functions-1
Selected Paper Tray and Paper Status indication
2: Tray position, i^: Normal, y: Low paper, ¿j: Add paper
Cassette Selection key
Sorter Functions P.19, 45
Refer to
P.51,52
P.62
P.10,14,
19, 22, 26
P.14, 26
P.47
P.10
P.22
P.11
P.11
l13)
U4)
05)
06)
08)
09)
PHOTO Mode Selection key
Original Direction and Size indication
Copy Paper Direction and Size indication
Copy Ratio indication
Manual Exposure Select keys (Light and Dark) P.11
Auto Exposure key
Copy Image indication
Paper size and direction indication
( CAUTION ') • finger pressure only to activate touch Screen panel. DO NOT USE
^ SHARP OBJECTS such as pens, fingernails etc., as this may damage the
panel.
Page 10
Basic Menu
Initial Screen
(When placing Letter size originals)
10
• Select paper tray required.
• Touch OK key.
Page 11
Full Size Copying
When copying the same size as the original (1:1)
Copy size and copy density are automatically selected.
^ Original Size Keys Touch Panel Display
Position original
Number of copies Press Print
Up to 999
■ When manually selecting exposure control or original size:
Ready to copy
duplex; SORT/ ZOOM/ INSERTION
ORIG.fCOPY FINISH EFFECTS
S(LlnE)
100%
n Cletter)
I 0 ^HT ^AUTO t
Manual Key
illPiFip
1
JOB
21^
Select exposure control
® Press the Light or Dark key.
(2) Press the Photo key to copy photos and
halftones.
Select original size.
(T) Press Manual key.
-------
Lights up (Manual mode)
(2) Select original size with Original Size key.
• Benefits of Quantum^“ Technology:
The FP-7742/7750 features Quantum^'^ Technology which utilizes an advanced form of artificial
intelligence to ensure optima! copy quality and performance under varying environmental
conditions, from a wide range of originals.
C note ^ * When message ADD PAPER appears, place selected paper into paper
^ drawer/tray.
11
Page 12
Reduction or Enlargement
When copying with preset ratios
There are 5 preset reduction and 4 preset enlargement modes.
Position original
RASir UFNll llXiPLEX/ I SORT/ I ZOOM/ | INSERTION
““"'"'^"^toRiG-copYl finish! effectsI JOa
Ready to copy
m Ledger)
65%
D
(leher)
Select the copy size
{Landscape for letter size)
__________
r
2LMJ
Number of
Press Print
copies
Example: Reduction
Original size
Copy size
The correct ratio is automatically selected.
Reduction and enlargement ratios (%)
Original
size
Ledger
Legal
Letter
Invoice 200 155
Ledger
100 77
121
129
Copy size
Legal
100
100
Letter
65
79 61
100
129
Invoice
50
65
.100
• When changing the paper size, touch
Cassette key.
Paper Tray (CASSETTE) Key
WiP • Part of the image may be deleted if the direction of the original and copy paper do not
correspond. (See the image indications on page 8.)
NOTE ^ * When copy size is different from paper size of paper drawer/tray, use sheet bypass.
12
Page 13
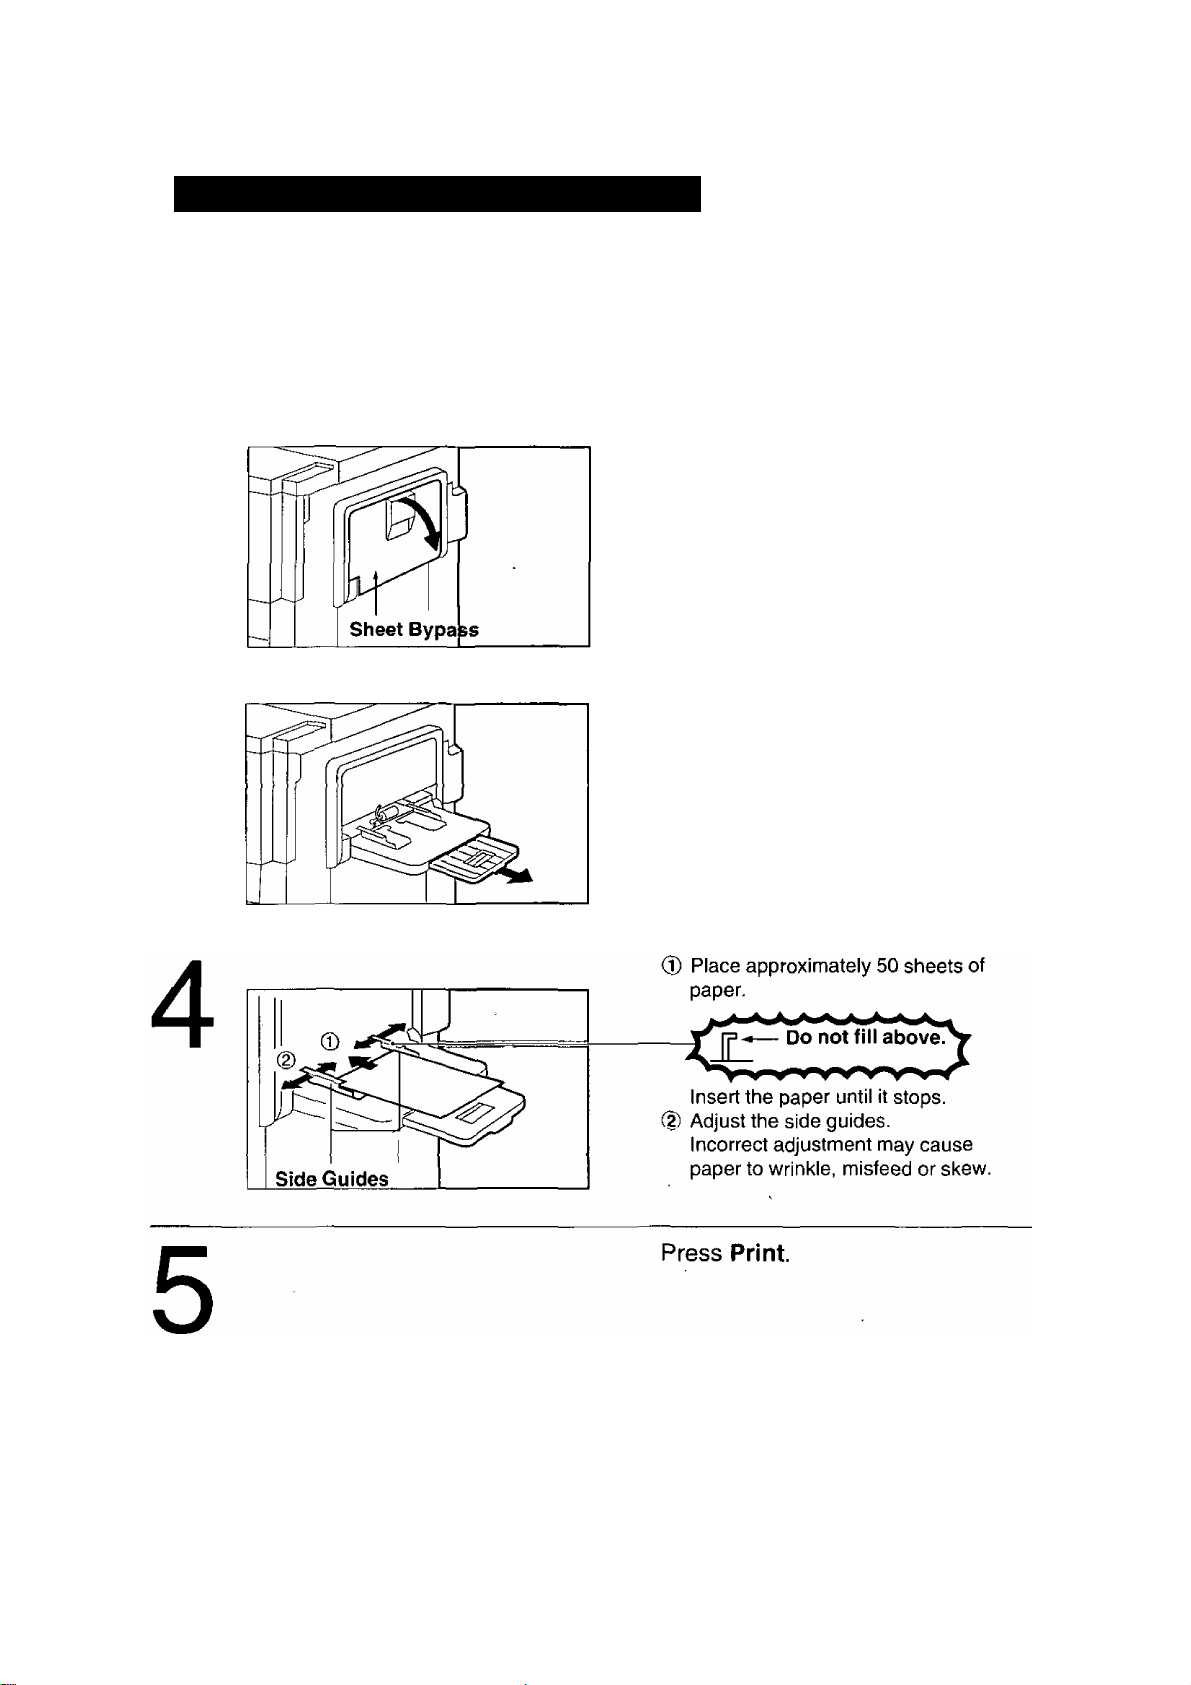
Using the Sheet Bypass
When copying on special paper, etc.
To copy on letterhead, mailing labels, transparencies and odd-size paper, etc., or to use bypass as an additional paper source.
Position original.
1
Open sheet bypass.
Pull out bypass tray until it stops.
3
( NOTE )
The bypass has priority over the paper drawers/trays. The copier
automatically selects the sheet bypass when paperjs placed in the empty
bypass tray.
Some types of mailing labels and transparency film may damage your
machine. Please contact your service provider for advice regarding
non-standard paper types.
13
Page 14
Duplex/Ohginal ^ Copy
When touching DUPLEX/ORIG. ► COPY key
Initial Screen
Select function
BASIC MENU
DUPLEX/
ORIG.'-COPY
SORT/ ZOOM/ INSERTION
U
= = ►
•i
2 Page
• Touch the desired key to select the function.
Q]
2 in 1
►ii
r#
From 1-sided originals to 2-sided
copies.
From 2-sided originals to 1 -sided
copies.
FINISH EFFECTS
2^2
* •
Book-^f2
JOB
SADF
SADF
See P.15
=> See P.15
From 2-sided originals to 2-sided
2
Book^ 2
2 Page
2 in 1
SADF
• 2-sided originals may be handled either manually or automatically using the i-ADF
(FA-A888).
• To reset Duplex/Original ► Copy mode, press Reset key.
• Press the reset key to feed out last copy existing in the ADU {Automatic Duplex Unit).
copies.
From book originals to 2-sided copies
Copying two facing pages of a ledger
size original on two separate letter
size sheets.
From two 1-sided originals side by
side to 1-sided copies.
A special original (like thin paper etc.,)
can be fed from the ADF/i-ADF
original tray.
=> See P.16
=>See P.17
=> See P.16
=> See P.18
=> See P.44
J
14
Page 15
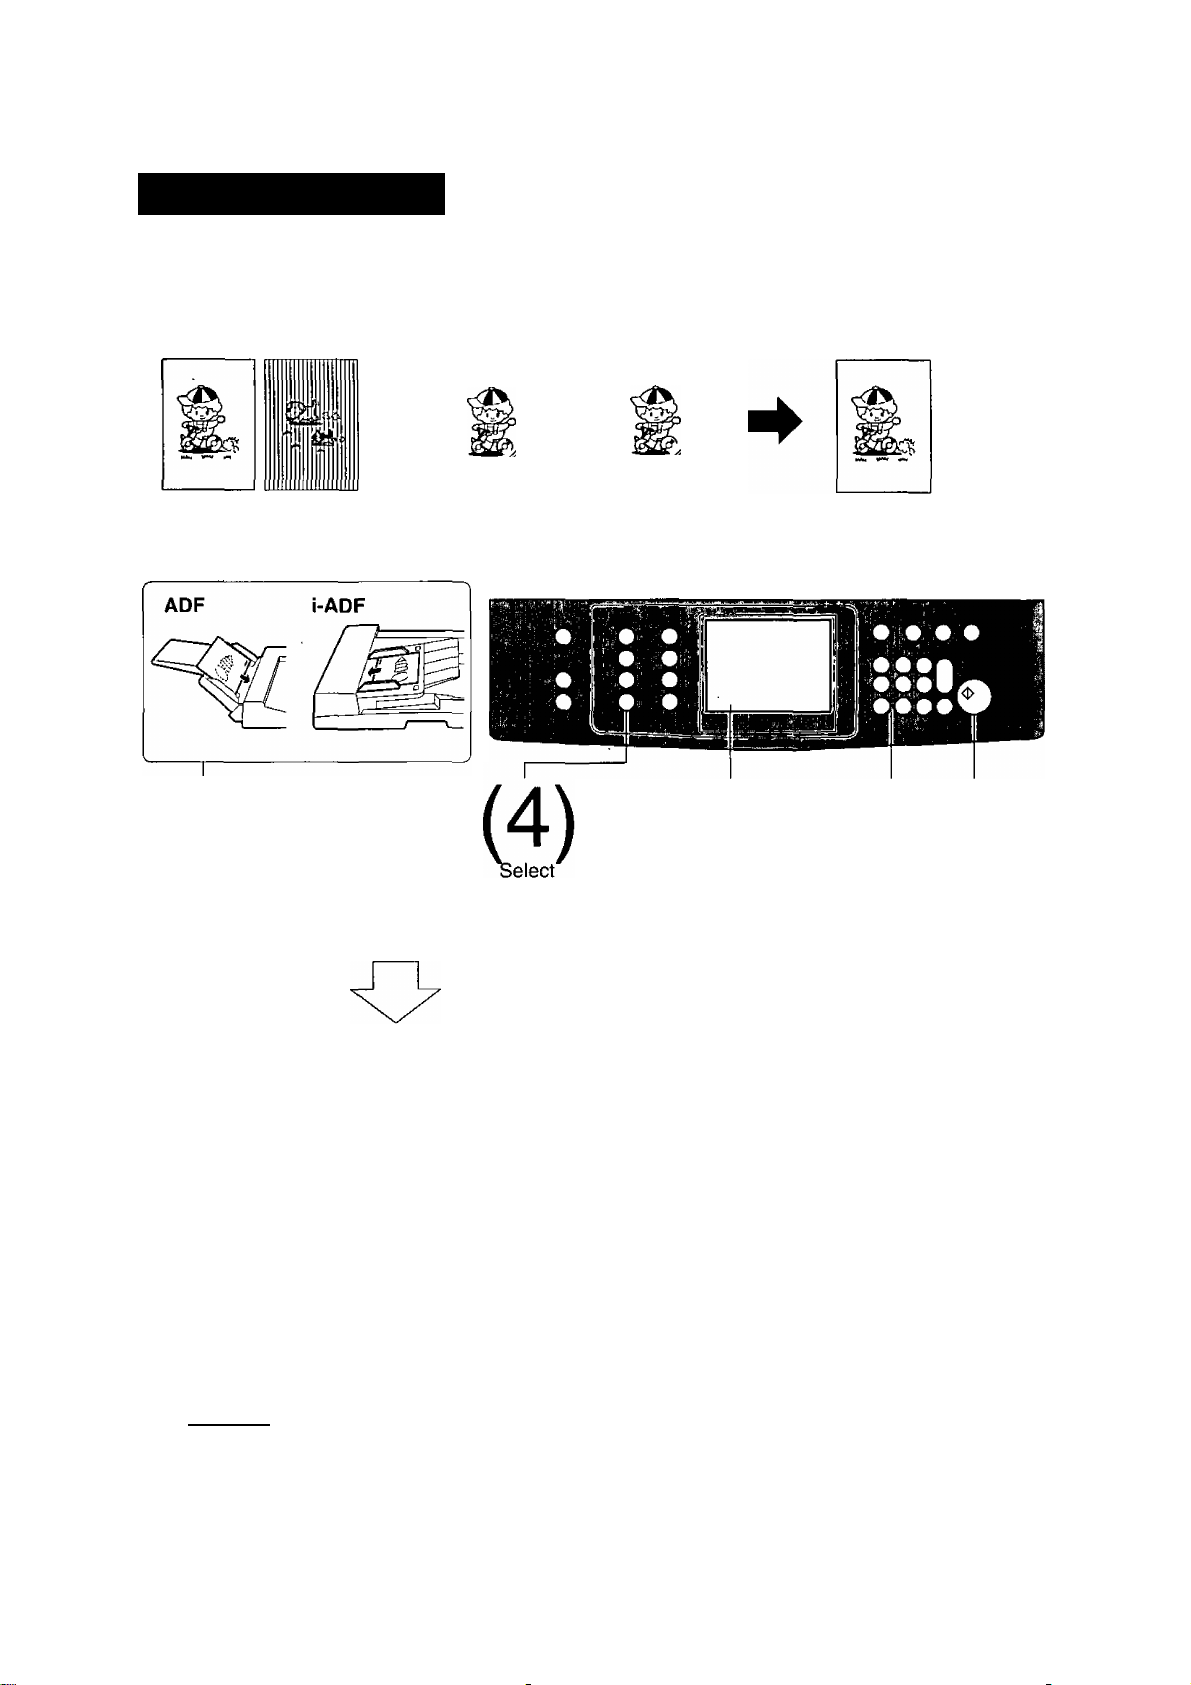
Q]-► EMS]-► Q]
[H ^ Ei Copy
From 1-sided originals to 2-sided copies.
From Copier Platen & i-ADF/ADF
Procedure
2
Position
originals
3
Count
originals
(Q] -► [2] only)
original size or [2] [T] mode
(ADF)
[2] ^ [T] Copy
From 2-sided originals to 1-sided copies.
Using i-ADF
Touch Q] ^ [2]
5
Number of
copies
(Up to 50)
6
Press
Print
Set number of originals
press OK
nAdirUFwii DUPLEX/ SORT/ ZOOM/ INSERTION
ORIG.-COPY FINISH EFFECTS JOB
Odd number
original
Even number
original
CANCEL
NOTE ") * mode menu, touch Cancel key on the touch panel.
W
W
OK
• Press the reset key to feed out last copy existing in the ADU {Automatic
Duplex Unit).
Original
count
ADF yjl
0 For odd/even originals, touch Odd/Even key.
(2) If number of originals is unknown, touch
Original Count key.
(3) Touch OK key.
0 Return Originals to the i-ADF.
15
Page 16
Duplex/Original ^ Copy
[2]/2 Page Copy
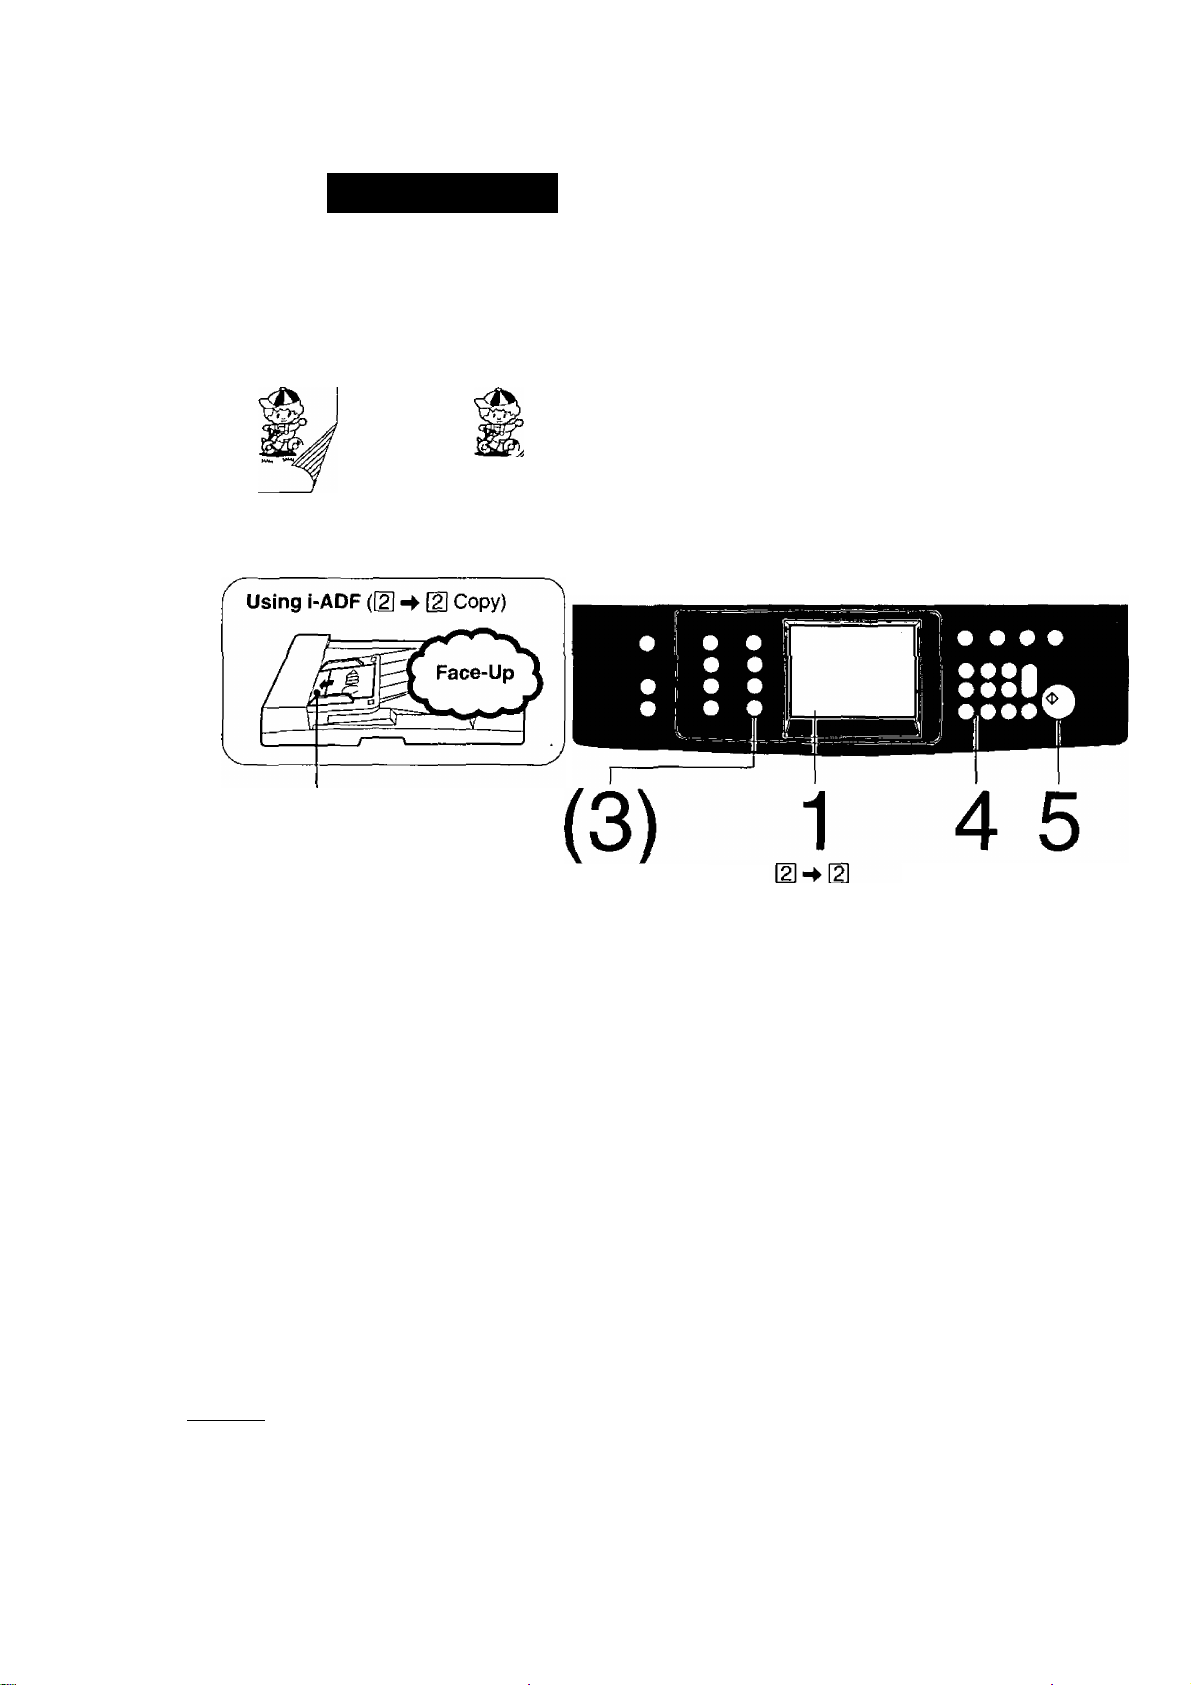
E -► El Copy
From 2-sided originals to 2-sided copies.
Using i-ADF
Procedure
2
Position
originals
Select copy
size*
2-Page Copy
Copying two facing pages of a ledger size
original on two separate letter size sheets.
QO
Ledger size originals only.
Touch
or 2 Page mode
Number of
copies
Up to 50
I^UptoSO >1
in
Press
Print
Book on the platen (2-Page Copy)
Ledger size original
n
—^tr—
Center—-'
Center book
by length
and width
according to
center marks.
♦
Book mark
NOTE ^ ^ For reduction or enlargement copy only.
• To reset each mode menu, touch Cancel key on the touch panel.
• Press the reset key to feed out last copy existing in the ADU (Automatic Duplex Unit).
* •
16
Page 17
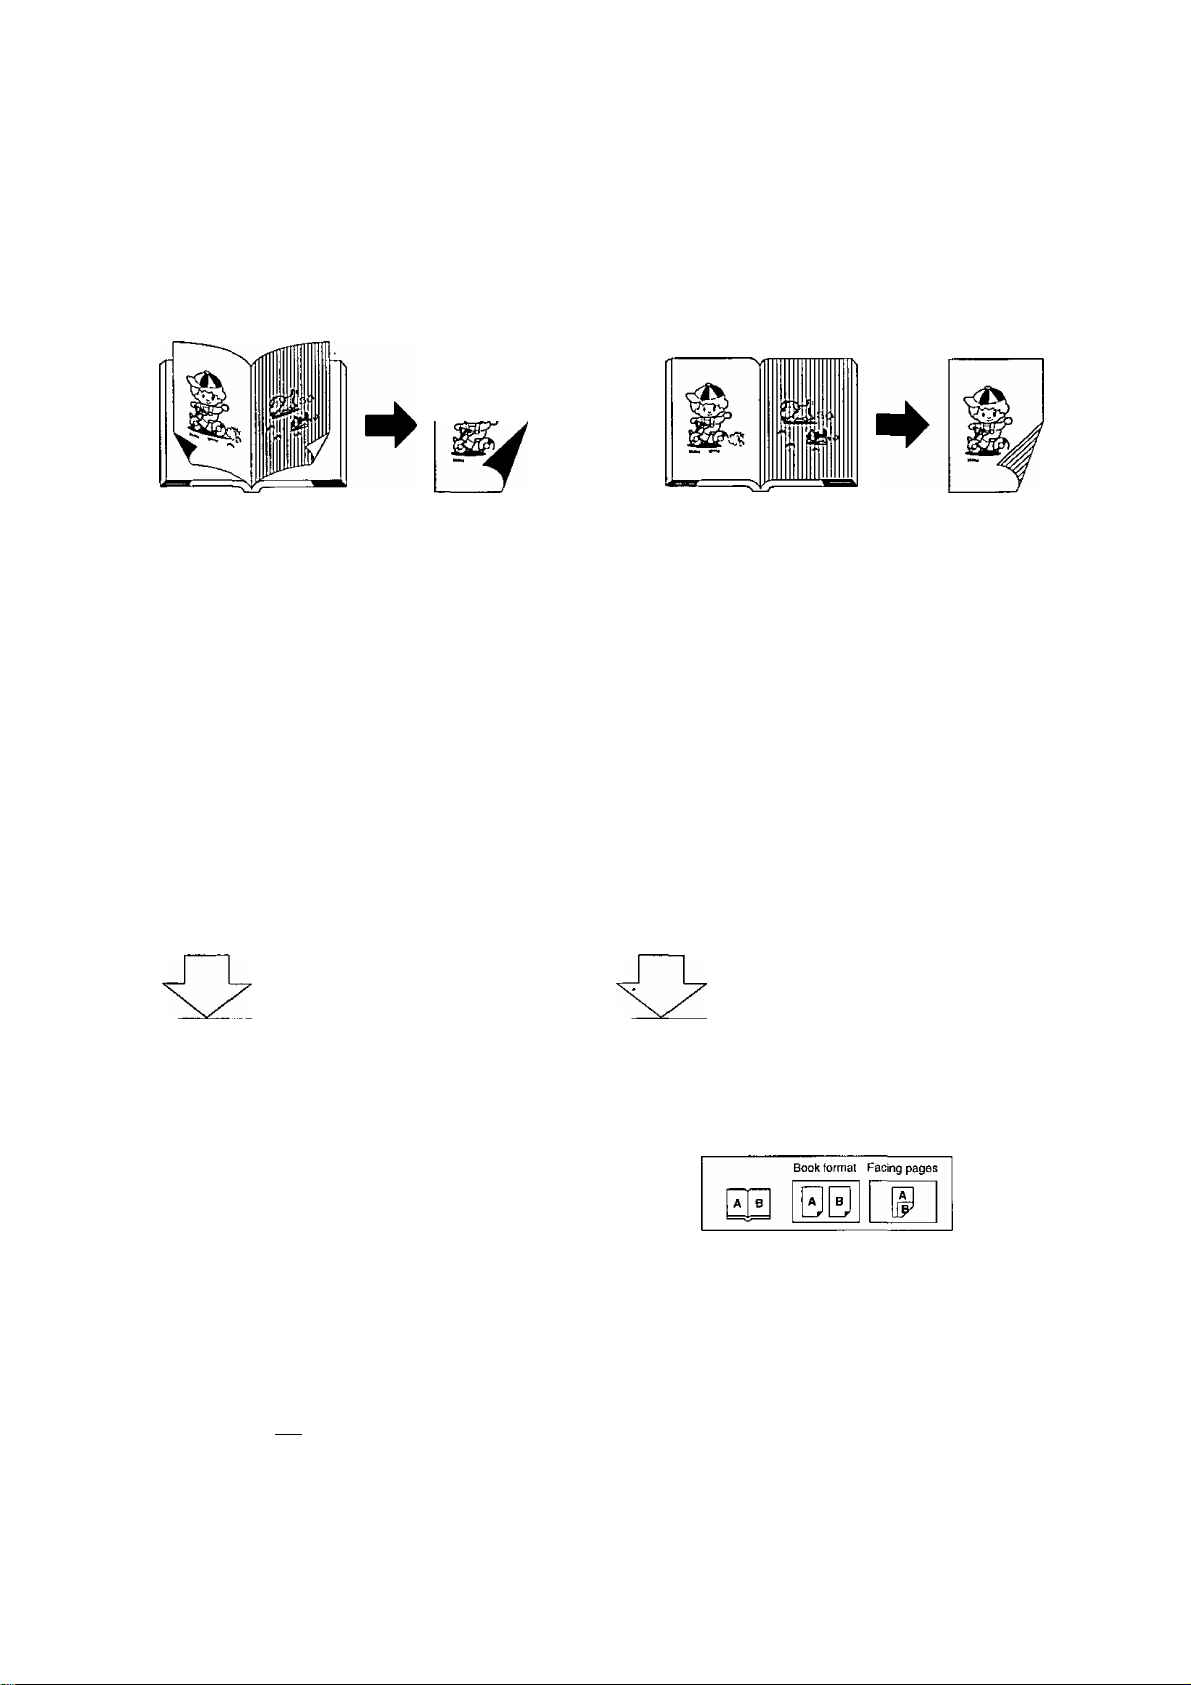
Book ^ Copy
From book originals to 2-sided copies
Ledger size originals only.
m
S15'
y-o
1
Position original
on the Platen
Ledger size original
Center-
(Book Format)
o o
0:0
o o
O ' D
2 3
Select the
copy size
I—
4=
Select Book ^ [ mode and Copy format
Center book
by length
. and width
according
to center
marks.
(Facing Pages).
o o o o
ooon
oooU
opo
0©
4 5
Number of Press Print
copies
(Up to 50)
Select facing page or
book format, press OK
RA<!irMPMi DUPLEX/ SORT/ ZOOM/ INSERTION
oRIG.^COPY FINISH EFFECTS JOB
000
Book mark
Make copies from last page in Facing pages
and Book Format mode.
( NOTE ) • '''°
-----------------
4
reset each mode menu, touch Cancel key on the touch panel.
Press the reset key to feed out last copy existing in the ADU (Automatic
Duplex Unit).
CANCEL OK
• Touch OK key.
17
Page 18
Duplex/Original ^ Copy
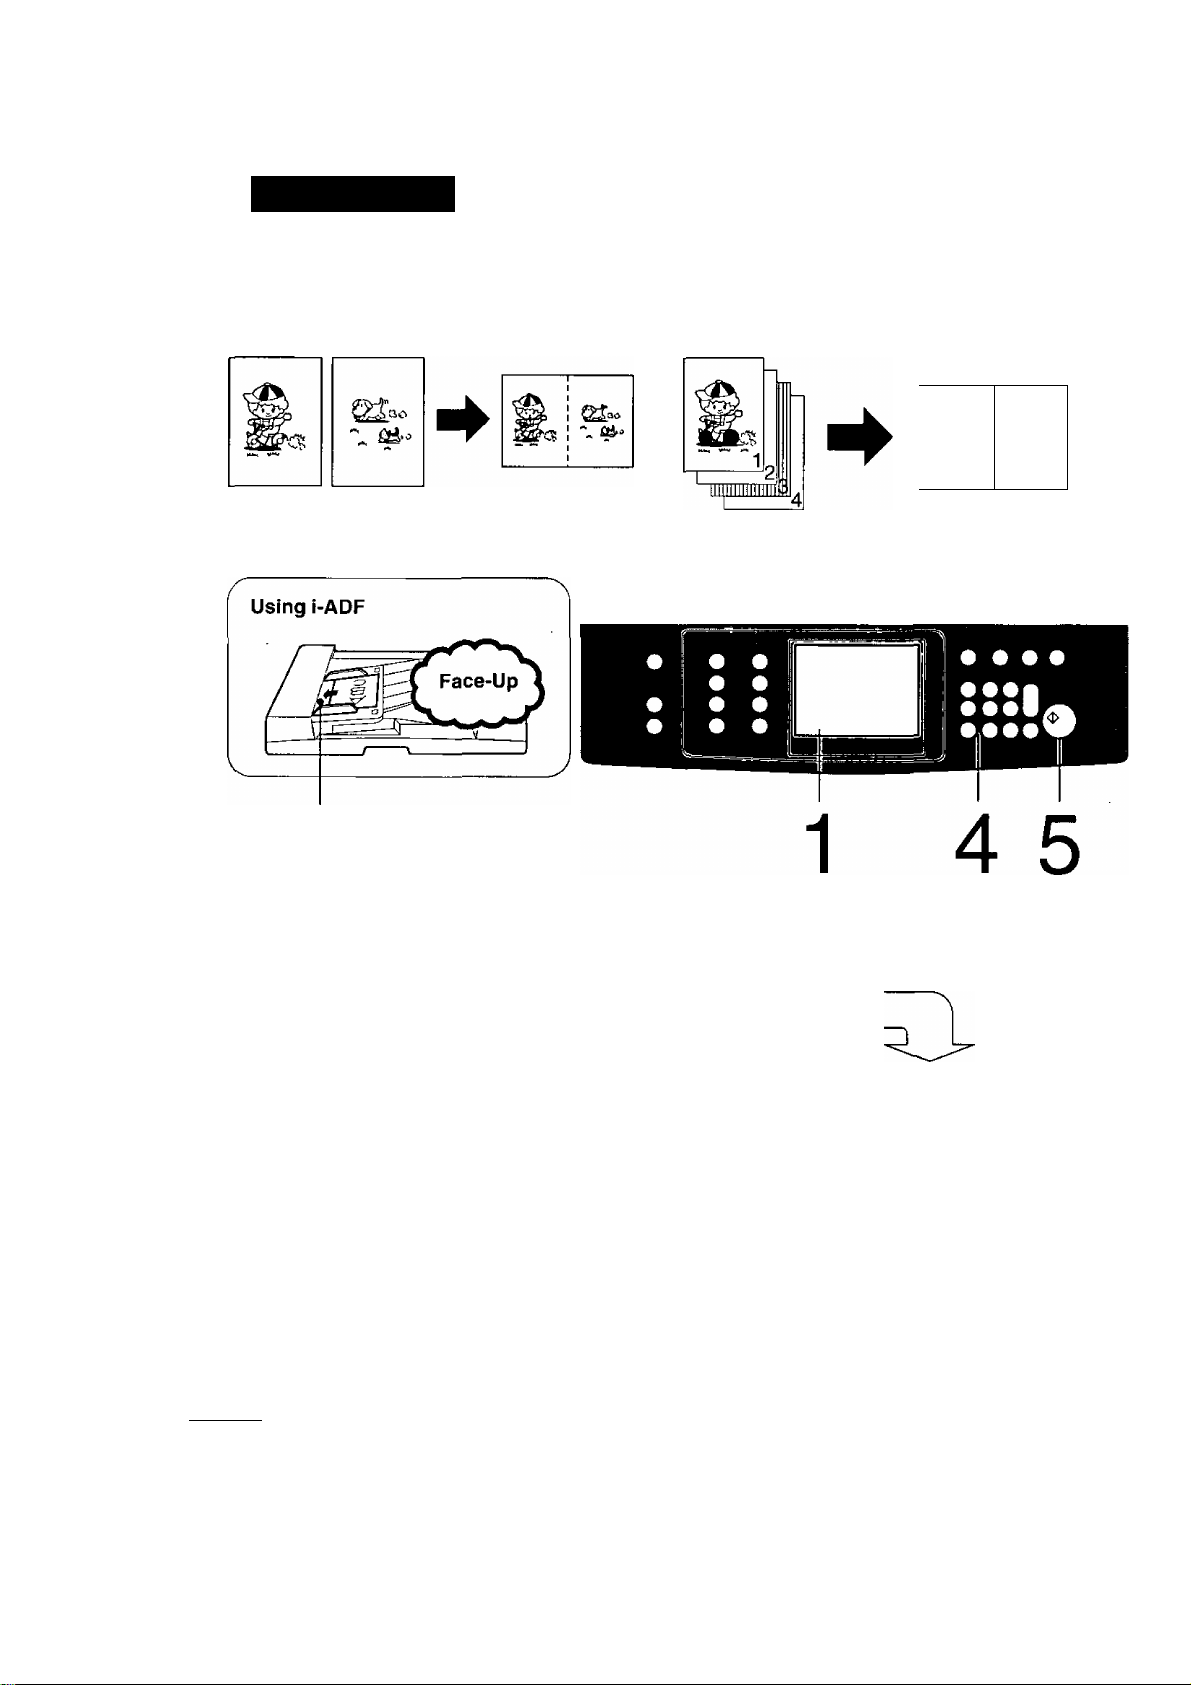
2 in 1 (4 in 1)
2 in 1 Copy
From two 1-sided originals side by side to
1-sided copies.
Procedure
4 in 1 Copy
From four 1-sided originals side by side to
2-sided copies.
11
2
2 3
Position originals Count
(Top side down) originals
For 4 in 1 Copy
4 in 1 Copy
with combined 2 in 1 and Q] ^
Copy mode, 4 in 1 Copy is available.
NOTE ') • 2 in 1 {4 in 1) Copy can only be made from Letter size originals.
(3) Original counting must be done. (See P.15)
(2) Touch DUPLEX/ORIG. ► COPY key.
@ Select [U ^ [2] mode,
d) Return originals to i-ADF.
{|) Perform steps 4 and 5.
Touch 2 in 1 Number of Press
mode copies Print
A
• Press the reset key to feed out last copy existing in the ADU (Automatic Duplex Unit).
18
Page 19
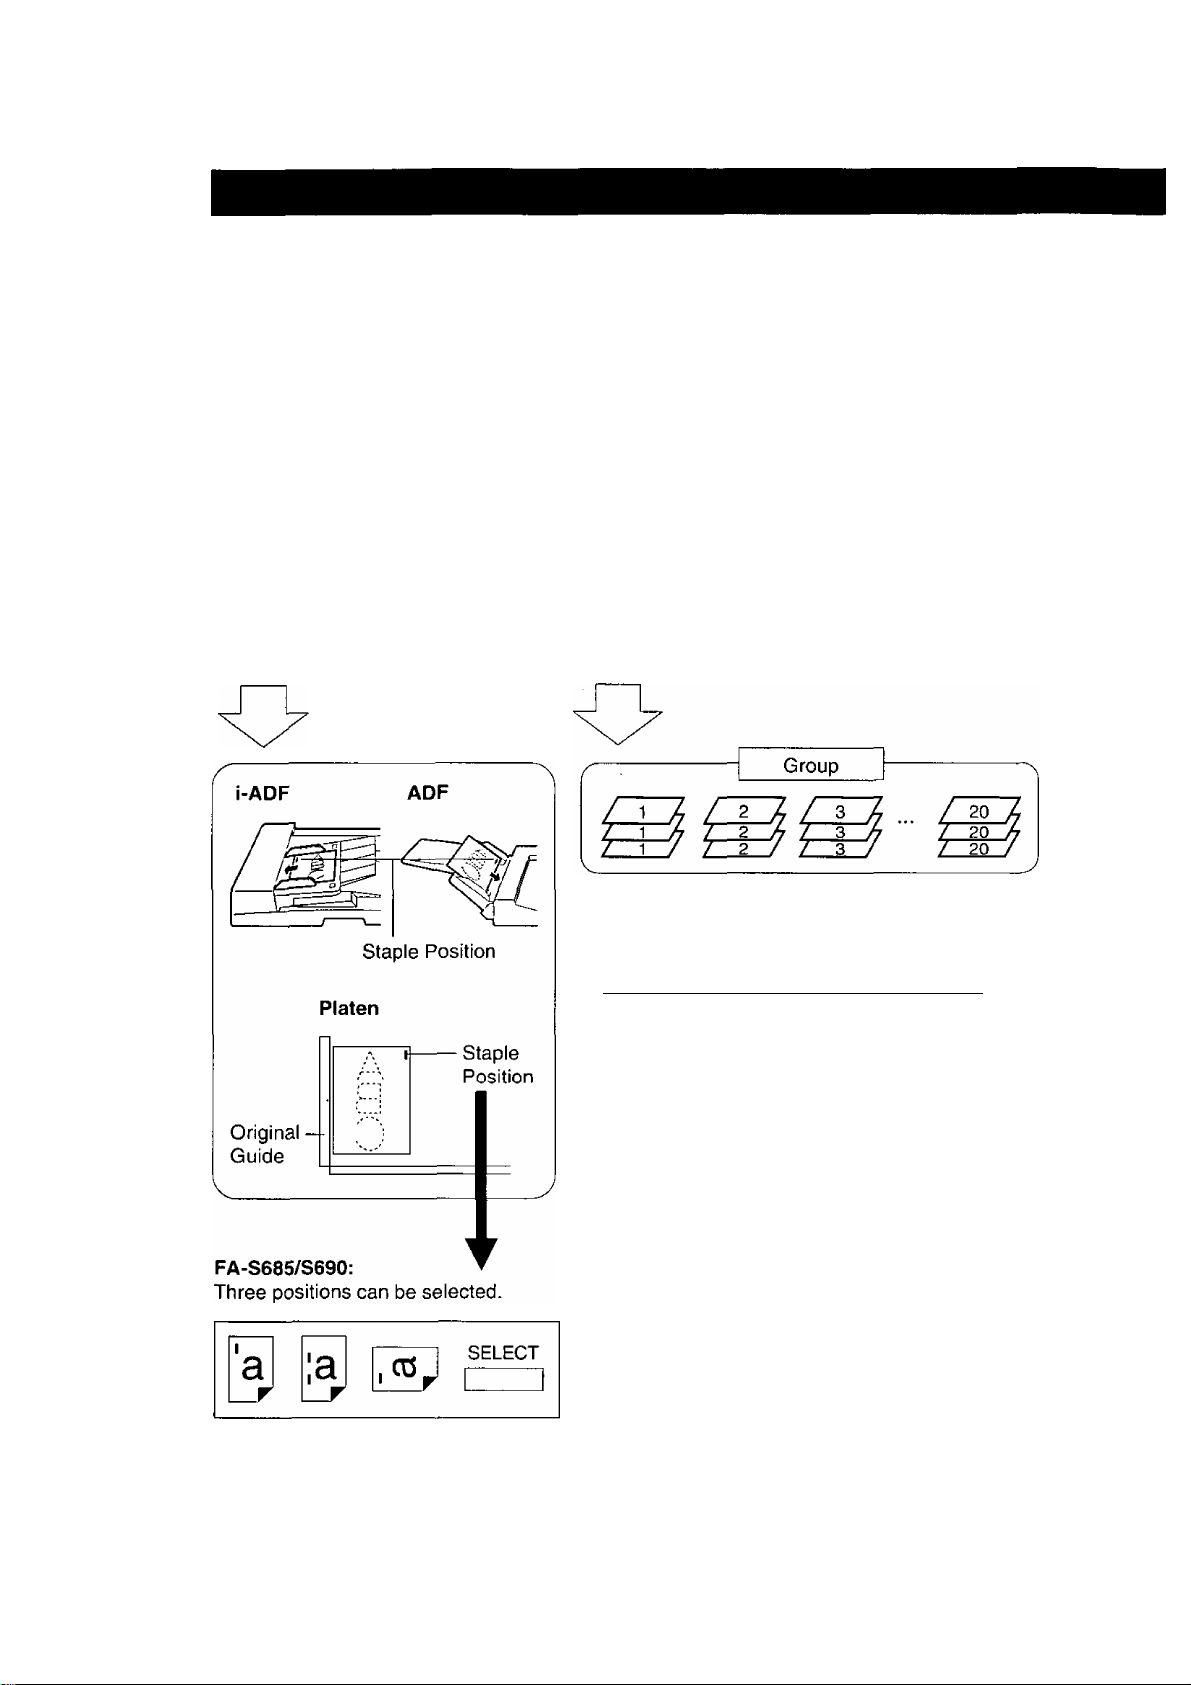
Sort/Finish
When touching SORT/FINISH key
Initial Screen
Select function
BASIC MENU
Nonsort Sort
DUPLEX/
ORIG.»-COPY
SORT/
§■
D
Punch
• Touch the desired key to select the function.
To reset Sort/Finish mode, press Reset key.
All copies are placed in the top bin
Nonsort
Sort
(Nonsort tray/FA-S680/685/690).
1 copy of each original is placed into a
separate bin.
FINISH
ZOOM/ INSERTION
EFFECTS JOB
staple
Sdrt
Displays when selecting Staple Sort.
Group
SELECT
=> See P.20/45
Staple Sort
Group
Hole Punch
( NOTE )
3-hole
3-hole and Staple Sort Yes No Yes
^2-hole (Option) Yes Yes
2-hole and Staple Sort
Sorted copies are stapled
automatically.
(FA-S680/685/690 and i-ADF/ADF)
FA-S685/690 can select three staple
positions.
Multiple copies of each original are
placed into separate bins.
All copies can make with 3-hole (or
2-hole^**) punch (FA-S690 only).
Ledger Legal Letter Letter R
Yes
Yes
No Yes No No
Yes Yes No
Yes Yes
=> See P.20/45
=> See P.20/45
^ See P.20/45
Invoice
No
No
No
No
19
Page 20
Sort/Finish
Procedure
o
o
o
1
Position original
{Up to 50 sheets)
o o
o o
o o
o o
2 3 4
Select nnodes
Number of
copies
o o o o
§§§0©
Press Print
^3 3
p p
/ 50 / / 50 / / 50 / / 50 /
Sort
20 sets
Staple Sort
Staples sorted sets of up to 50 copies
(FA-S680/S685/S690 and i-ADF).
Hole Punch
All copies are made with 3-hole (or 2-hole*)
punch (FA-S690 and i-ADF).
v
__________________________________
2-hole punch unit is available as an option.
(See page 19)
3
20
Page 21

Manual staple copies (FA-S680/S685/S690)
Place copies to be stapled into Nonsort tray of
the sorter and press Manual Staple key.
Size; Invoice to Ledger.
Manual
Staple
Number of copies:
Up to 50 sheets, 20 lbs.
Key
For FA-S685/S690:
Three manual staple modes can be selected
after making copies with sort mode.
(1) Select the desired staple mode {A, B or C)
Staple Mode Select Key
with Staple Mode Select key.
B: except Legal size
(2) Press the Manual Staple key.
Count Down Sorting Function
Enables sorting of up to 999 sets of up to 50 originals (including stapling).
(When copying 50 sets in Sort Mode.)
Ready to copy
BAilC MENU duplex/ sort/ zoom/ insertion
BAi*., MtNU OR1GrCOPY FINISH EFFECTS JOB
50
(1) Input desired number of copies,
and any auxiliary functions.
(2) Select Sort/Finish, sort (f) or
staple sort (3), (D staple position
select.
100%
Di
(3) Position originals in the
document feeder.
(4) Press Print.
The system will process 20 sets
0 LIGHT AUTO
1 DARK
and staple them if selected.
The original number of copies
desired will be reduced by 20
RACiir UFNII duplex/ SORT/ ZOOM/ INSERTION
BASH, Menu Qp,|Q „(^PY finish EFFECTS JOB
(for each cycle) and will be held
in memory.
DC
QNonsort ^ Sort I ^ Group
(5) Remove the copied sets from
the sorter.
(6) Return the originals to the
document feeder.
(7) Repeat steps (4) to (6) until all
0 Punch
desired sets are completed.
i note ^ * When using platen, the copies will not be stapled automatically, press
^ Manual Staple key after copying is complete.
oF
When the overflow Eia indicator appears on the display,
remove excess copies from the bins, then press
SORT/FINISH mode key to reset.
For FA-S680/S685/S690: Remove excess copies from the bin(s).
21
Page 22

Zoom/Effects
When touching ZOOM/EFFECTS key
Initial Screen
Select function
BASIC MENU
Zoom Edge
DUPLEX/ SORT/ ZOOM/
ORIG.^COPY FINISH
s Off}.
Touch the desired key to select the function.
Copies with variable zoom ratios from
Zoom
Edge
50% to 200% in 1% increments.
Creates a blank edge. => See P.24
INSERTION
EFFECTS
Margin Book
1
JOB
U
=> See P.23
V
( NOTE ) •
_____
Margin
Book
reset Zoom/Effects mode, press Reset key.
Shifts image to right. See P.24
Eliminates dark inner binding shadows.
=> See P.24
22
Page 23

Zoom Copying
Procedure
Position original
Set zoom %
2
Press OK
3
Select zoom ratio
Select desired paper size
Zoom Ratio: 50% - 200%
0 Touch Zoom/Effects key.
(2) Touch Zoom key.
(3) Press and hold the Down or Up key.
{Increase in 1% increments.)
H(UP)
H (DOWN)
0 Touch OK key.
Number of
copies
Press Print
For enlargement For reduction
( NOTE )
If a different paper size is desired, press the Paper Tray (CASSETTE) key.
When Copy Size key is pressed, the ratio will return to preset position.
To reset zoom copying, press Reset key.
To reset each mode menu, touch Cancel key on the touch panel.
23
Page 24

Zoom/Effects
Edge/Margin/Book
Edge Mode
Creates a blank edge.
The edge width is initially set at 5 mm.
Range can be set from 5.0 mm to 95 mm in
5.0 mm increments.
Book Mode
Eliminates dark inner binding shadows.
Margin Shift Mode
Shifts image to right.
The margin is initially set at 10 mm.
Range can be set from 2.5 mm to 97.5 mm
in 2.5 mm increments. {See NOTE)
Book mode is initially set at 20 mm. Range
can be set from 2.5 mm to 97.5 mm in
2.5 mm increments.
Position of the original
i note ^ Margin shift mode cuts off right side of image, use Margin reduction mode (95%,
^
--------------------
^ 93% or 91%) to create a margin. (See P.36)
• The Book mode is useful for eliminating dark shadows associated with book or
magazine copying.
• In reduction or enlargement copying margin size changes in proportion to copy size.
24
Page 25

Procedure
1 2
Position original
Edge
0
I cancel] I OK
Margin
I I cancel] ] OK
Book
5.0mm
10.0mm
H
H
H
H
Select modes
3 4
Number of
copies
® Touch Edge, Margin or Book key.
(2) Adjust the width of void area with H H keys.
Initial setting*
Edge mode: 5.0 mm
Margin mode:
Book mode:
Touch OK key.
10.0 mm
20.0 mm
Press Print
J
20.0mm
H
H
CANCEL OK
jyjQj^ A • To reset each mode menu, touch Cancel key on the touch panel.
^
--------------------
^ ^ To change initial setting of default, see page 36.
25
Page 26

Insertion Job
When touching INSERTION JOB key
Initial Screen
Select function
BASIC MENU
■ ■ — ■■ - ■
Presentation
OHP interleaving
Page insertion
Cover
Touch the desired key to select the function.
DUPLEX/ SORT/
ORIG.^COPY FINISH
r
Cover
Page insertion
Adds cover page{s) to the copies. => See P.27
Inserts paper between the copies. 3:^ See P.28
-
---
. . ^
ZOOM/ INSERTION
EFFECTS JOB
^ ..........
OHP pHR
— _
OHP
OHP interleaving
Presentation
V
___ _ __ __
NOTE ^ i-ADF/ADF and Sorter are required for Insertion Job.
__
____ __ __ _
• To reset Insertion job, press reset key.
Inserts paper between OHP film. ^ See P.29
Inserts paper between OHP film and
make copied sets for hand-outs.
^ See P.29
)
•
26
Page 27

Features
Cover
Attaching cover page(s) with
blank/copied paper.
Operation
1
Position
originals
4
Select
paper tray
Blank Paper
Front
Select original
size (ADF only)
Front
Copied Paper
Front
F
Back
3 5 6
Touch
Cover key
Number of
copies
Front
B
Back
Press
Print
<:>
Input number of originals
select paper tray, press OK
|ei| Number of .
^ originals
CCov^r) LETTER D
C Copy ) LETTER 0 .
CANCEL OK
NOTE ^ number of originals is unknown, touch Original Count key. lADFl (See P.15)
1 ^
LISI
• To reset each mode menu, touch Cancel key on the touch panel.
ADF
0
1
1 ^ 1
Select the mode
press OK
27
Page 28

Insertion Job
Page insertion
Feature
Page insertion
Inserting paper between the
copies.
Blank paper, colored
paper or copied paper.
Blank Paper Copied Paper
Operation
1 4
Position
originals
Input number of Originals* * and Select
Paper tray then press OK. (See P.27)
Select original
size (ADF)
Touch Page
insertion key
Color paper
Number of
copies
Press
Print
Select the mode, Blank or Copy, then
Input the position of insert
press OK
Sheet piacement
3 6
31
^ NOTE ^ interleaving position(s) is/are left, cancel the old data with key. {□/□ and
^
--------------------
^ Clear/Stop key)
38
CANCEL OK
• To reset each mode menu, touch Cancel key on the touch panel.
Hi If number of originals is unknown, touch Original Count key. {See P.15)
11
47
15
29
E
press OK.
Color paper is suitable for copy mode.
0 Input the interleaving position with
Quantity keys.
(2) If you input more than 2 places, move the
input position with key. (□/□)
(3) Repeat 0 and (2).
0 Touch OK key.
28
Page 29

OHP interleaving/Presentation
Feature
OHP interleaving
Inserting paper between
OHP film
Blank paper or copied
paper
Presentation
Inserting paper and copies.
Blank paper or copied
paper
Operation
Blank Paper
OHP
2
IQHP
Blank Paper + Copies
OHP
+
OHP
(1)
Copied Paper
1
OHP
I
Copied Paper + Copies
(iy
OHP
(2)
OHP
(1)
OHP
+
(2)
2
(2)
(1)
(2)
1 2 (3) 4 5 6
eOHP Position Select oriqinal Touch OHP interleavinq Number Pres
Place OHP Position
(Sheet Bypass) originals
i ^ Selection of the paper tray.
^ (ex. Presentation mode)
Select the paper tray for page
insertion and copy, then touch
OK key.
Select original Touch OHP interleaving
size. (ADF) or Presentation key
® Select the mode, Blank or Copy, then touch OK.
(2) Select the paper tray.*
( OHP ) LETTER D
GID LETTER D
i ( Copy) LETTER D
CANCEL
29
Number Press
of copies Print
mn
OK
Page 30

Programming Copy Jobs
Five copy jobs can be programmed in memory (M1 to M5) for recaii at a iater time.
Job Memory Key
note ^ memory mode wilt not be deleted even if power switch is turned off.
^ • When storing a new job, the previously stored job will automatically be deleted and
the current job stored in its place.
• To reset Programming job, press reset key.
30
* •
Page 31

Skyshot Mode
By setting a check size (or the size of another original smaller than
Invoice size) in the user preset mode, it is possible to make copies from
small originals without dark areas around the image.
Setting of Skyshot mode by key operator (See P.37, 39)
0 No.1 of 3/4 screen: Select Skyshot mode function.
0 No.5 of 4/4 screen: Input key operator’s code number.
0 No.3 of 3/3 screen: Input a size (M1). (HH)
0 No.4 of 3/3 screen: Input another size (M2) if necessary.
0 Touch OK key.
Above sizes are memorized in M1 and M2.
Operation
1 2
Install the (1) Position original Press Job
check feeder (2) Adjust the guides Memory key
(Option) (i-ADF)
3 4 5 6
Select M1
or M2
Size programming
set dimension, press OK
M1, size
160 mm
Number of
copies
Example:
Ml: i-ADF
M2: Platen
roiTI
Press
Print
^ • When using the skyshot mode (M1 and M2 are turned ON), the other job
^---------------------^ memory cannot be used.
• In the Skyshot mode, letter size paper is selected automatically.
• To reset Skyshot mode, press Reset key.
31
Job memory
select Mem. in or Mem. #
( SIZE-1)
( SIZE-0
(B 160mm x70mm M 1
(i| 220rraiix95mm
n
I
M2
M3
I M4 I
M 5
Page 32

Energy Saver/Interrupt
Energy Saver Key Interrupt Key
■ These modes can save power while the copier
is not in use.
Energy Saver Mode
0 To enter this mode
Press Energy Saver key or automatically enter
after 15 minutes from the last copy. The
indicator will flash.
(2) To cancel this mode and make copies
Press Energy Saver key again.
Print Key
( NOTE )
Auto Off Mode
0 Automatically enters after 60 minutes (or
1.5 hours/FP-7750) from the last copy. Copier
power will drop and the indicator will light.
(2) To make copies, press Energy Saver key.
r
INTERRUPT
I
Energy saver time (15 minutes) and Auto off time (60 or 90 minutes) can be changed
by key operator. (See P.38, 41)
Interrupt Mode
• This mode can interrupt other copy jobs while
making copies.
0 Touch Interrupt key, then indicator will light.
(2) Make other copy job.
(3) Touch Interrupt key again to continue original
job.
32
Page 33

Changing Paper Size
Paper Drawer/Tray (Copier Main Unit)
The paper drawer/trays are designed to accommodate invoice, letter,
legal and ledger size paper. To change the paper size, consult your
service technician for proper instructions.
Perform following steps as shown below after any locking screws have been removed.
2
3
User preset mode
select item
1 Paper size
1 -► 1
-.j----------
-
Letter
2 Paper size priority
3 Margin value default 10 mm
4 Edge value default 5 mm
5 Book value default 20 mm
--------- --------------
1 <- 1 (1/4)
OK
Touch Paper size (1) Key.
a'
bs
1
1
-
Touch a paper drawer required.
Paper size is changed* by touching the
key until the required size appears.
^ • Automatic Duplex Unit (ADU) is ^ Paper size is changing as follows.
^--------------------^ installed in the first {1) drawer.
33
r'LEDGER D>-* LEGAL €? — LEHER [?■
— INVOICE C?
-----------
LEHER C? —
Page 34

Changing Paper Size
4
Select paper tray
press OK
User preset mode
select item
1 Paper size |
2 Paper size priority
3 Margin value default
4 Edge value default
5 Book value default 20 mm l_
1 ♦- 1 Cl/4)
Letter 1
10 mm I
5 mm I
I I
Repeat, if necessary, to set another
paper drawer.
After setting all paper drawers, touch OK
key to return to the initial User Preset
screen.
Touch OK key to return to the Basic
Menu screen.
-i
I
_
I
I
(T) Adjust paper guide @ to the
paper length.
(2) Adjust paper guide ® to the
paper width.
( NOTE )
Squeeze the stopper to move the paper
guide CS) to the desired paper size.
Change the paper size indicator.
Take out and re-insert the indicator so
the correct paper size is shown.
(Invoice size is on the back side)
^ If the paper drawer is not installed or is not
inserted completely, the paper size indication
will not appear, (ex. 5th tray.)
Page 35

Combining Function Table
\ Later
\ Selections
First
Selections \
[11^12
>
(2^111
0.
O
Ü
E-»(2
Book ^ [2]
3 cc
Q O
CO Ü-
2 Page A
2 in 1 O
Nonsort
Sort o O O
Si
Staple Sort
o ?
Group
DUPLEX/
ORIG. ► COPY
0
0
0
0
0
t
t
0
0
A
A
\
A A
\
A A
A A
A A
O O
O
o O
o O O
t
t
o
o
CO
A
A X
A
A A A o O O O O O
A
A
A A O o O o O
A A O o o o O
O O O
O O O A A A o O
O
O O O
O O O
0
O)
CO
CL
CM CM
X X
X X
SORT/
FINISH
c
o
•c
z
O o O
O O O o O
O
CO
o
CO
c
o
CD
a
r
eg
o
CO
w
O o O O
<D
o O o O
A A A O A
A A A
A A A o A
INSERTION
JOB
CD
c
c
.c
Ü
c
3
CL
CL
u
2
CD
CD
>
o
O
X
O
o
■■c
CD
tn
0)
O)
CO
□_
o
■>
CO
CL
X
o
A A
o O O o
O
o A A o O o o
A
A A A
A
A
O O o
O
O A A o O o o
A O A o O o o O
A
O
o
o
o A o o o o o
A A
A
ZOOM/
EFFECTS
c
o
TO
c
CD
Q_
CD
E
(n
o
CD
T3
o
m
N
o O o
O o o A
o O
O Ö o A
o o o o A
O
o o o o
c
o
CO
o
CD
o A
o o A
Q.
3
o
A
A
A
A
Is
— -3
CO
_ 1-
^ L)
O LL
O Ü.
N LÜ
Interrupt
Hole Punch o O O O
Cover
Page Insertion
OHP Interleaving
Presentation X
Zoom o O o
Edge o O o o
Margin
Book
O O
o
o O O
X
X
O
X
O
o o o o o o o
o
o O
O o
o
X X X
O: Combination use possible.
X: Combination use not accepted.
A: No combination use possible. (Last selection takes priority)
o o o o o o o o O
o o o o o o o o
O o O
X X
X X
X
o
X o X
o
X o
o
o
X
o o
X
o
O O O
X
X
o
X
O O
O O
X
O o
X o
X o o
X
X
X
o o o o O
X X X A X
\
o A
o
o O
O
O O O o o o o
O A A o o o o
\
A A o o o o
\
A
A
A A
O O O o o o
O O o o o
O O o
O
O O o o o o
X X X
A
\
o o o
o
\
o o o A
o o
o o o A
o o
( NOTE ) * When pressing Interrupt key twice, interrupt mode is cancelled.
A
A
A
o A
A
o A
A
*
35
Page 36

User Preset
User Preset modes can change the initial copy mode, if necessary.
{See P.40, 41)
User preset mode
select item
1 Paper size | |
2 Paper size priority Letter I I
3 Margin value default
4 Edge value default
5 Book value default 20 mm I [
I <- I GS)
Screen
No.
. ... .r.r . .
Modes Function
1. Paper size
2. Paper size priority Specifies the paper size of most frequent
1/4
3. Margin value default Selects the margin shift value
4. Edge value default Selects the edge width
OK
10 mm I I
5 mm I I
.........................
User preset mode
select item
1 Margin reduction default
2 Sorter mode default Nonsort j
3 Duplex mode default
4 2 in 1 default
5 Auto edge default
1 ^ 1 (2/4J
100% 1^
m-^12] □
Reduc. 1
ON 1^
Sets the paper size of each paper drawer
(Ledger, Legal, Letter, Letter R or Invoice
size).
usage.
(5 mm, 10 mm, 15 mm or 20 mm).
(5 mm, 10 mm, 15 mm or 20 mm).
OK
1
1
1
1
1
Initial Setting
See P.33
Letter
10 mm
5 mm
5. Book value default Selects the book void width
1. Margin reduction
default
2. Sorter mode default
2/4
3. Duplex mode default
4. 2 in 1 Copy ratio Selects whether to copy full size or
5. Auto Edge default Selects whether or not to disable Auto
NOTE ^ Edge Deletion
^ To copy from the platen with the original cover or i-ADF open. Normally, this makes a
copy with a solid (black) area around the original if the original is smaller than the
copy paper. This mode eliminates the solid area automatically.
(15 mm, 20 mm, 25 mm or 30 mm).
Selects the reduction ratio in margin mode
(100%, 95%, 93% or 91%).
Determines the most frequent usage mode
(None, sort, staple sort or group).
Determines most frequent usage mode,
(No, Q] -► [2], [2] ^ [U or book -► [2]).
reduction in the 2 in 1 mode.
Edge Deletion* *.
20 mm
100%
None
(Nonsort)
7750/[I|^[I]
7742/No
Reduction
ON
• Item numbers (1,2, 3, 4, 5) and (Reserved) are not indicated on the display.
36
Page 37

User preset mode
select item
1 Skyshot mode default
2 Manual add toner
3 Departmental counter
4
5
Screen
No.
1. Skyshot mode default
2. Manual add toner
3. Departmental counter
3/4
OFF
OFF \2
C
I
I
□
I
□
I
I
I ^ I (3/4)
Modes Function
Enables or disables the use of skyshot
mode.
(OFF, Ml ON, M2 ON, Ml, M2 ON)
Allows the addition of toner as determined
by the operator.
Select ON, and touch OK on the screen.
Monitors copy usage of each department.
(1) Total copy usage of all departments.
(2) Total copy usage of a specified
department. (Up to 100 departments)
(3) Total copy limit of a specified
department.
Initial Setting
OFF
OFF
Consult your
service
technician.
4/4
(NOTE) Above items (2) and (3) are
required to input the department
code number.
4. Reserved
5. Reserved
1. Reserved
2. Reserved
3. Reserved
4. Reserved
5. Set key operator code Inputs key operator code number.
37
Page 38

User Preset
User Preset modes for Key operator.
User preset mode
select item
1 Auto reset time
2 Energy saver time 15 min j
3 Auto off time
4 Exposure default
5 Language default
1 ^ ] 0/3)
Screen
No.
Modes
1. Auto reset time
2. Energy saver time Selects the Energy saver time
3. Auto off time Selects the Auto off time
1/3
4. Exposure default Determines whether to use Auto Exposure
1 min j
60 min \2.
Manual 1_
English 1
OK
1
1
1
1
1
User preset mode
select item
1 special Paper Tray 1
2 Special Paper Tray 1 None 1 1
3 Interleaving default
4 Page insertion default Blank 1 1
5 Cover mode default
■ (27^
Function Initial Setting
Selects the reset time
{None, 45 seconds, 1 minute or 2 minutes).
(15/30/60 minutes, 1.5/2/3/4 hours).
(No, 30/60 minutes, 1.5/3/4 hours).
(No, Auto or Manual).
OK
None 1 1
Blank [ 1
F, blank 1 1
1 minute
15 minutes
60 minutes or
1.5 hours
(FP-7750)
Manual
2/3
ikW
5. Language default Selects the message language of the
English
display (English, German, French, Italian,
Spanish, Swedish, Finnish, Dutch,
Portuguese).
1. Special paper tray 1 Sets the paper drawer for special (color)
None
paper.
2. Special paper tray 2 Sets another paper drawer for special
None
(color) paper.
3. Interleaving default Selects OHP Interleaving paper
Blank
(blank or copied).
4. Page insertion default Selects Page Insertion (blank or copied).
5. Cover mode default Selects Cover paper (blank or copied).
Blank
F, blank
(F, blank/F, copy/FB, blank/FB, copy)
F: Front, FB: Front and back
• The Screens from 1/3 to 3/3 are only available after inputting Key Operator’s code
• Item numbers (1,2, 3, 4, 5) and (Reserved) are not indicated on the display.
38
Page 39

User preset mode
select item
OK
1 SADF default OFF
2 Maximum copy setting
3 Ml, Check size
4 M2, Check size
5 Dept, counter mode | |
1 4- 1 C3/3)
Screen
No.
Modes Function
1. SADF default
2. Maximum copy setting Determines whether to limit number of
3. M1, Check size
3/3
4. M2, Check size
5. Dept, counter mode Checks or changes all or specified
OFF \2
160X70 \2
220X95
1
1
1
1
Enables or disables the use of SADF
function.
copies (1 -99) or not.
Inputs a size in memory 1 for frequent
usage size.
Inputs another size in memory 2 for
frequent usage.
departments for copy usage, copy limit
and code numbers.
Initial Setting
OFF
OFF
160 X 70 mm
220 X 95 mm
Consult your
service
technician.
39
Page 40

User Preset
User Access (1/4 to 4/4 screen)
Example: when changing the duplex mode default to [2] ^ [2] copy.
User Preset Key —
Touch Panel Display Input the code number
Press User Preset key.
Reset Key
2
3
4
User preset mode
select item
1 Paper size | |
2 Paper size priority
3 Margin value default
4 Edge value default
5 Book value default
User preset mode
select item
1 Margin reduction default
2 Sorter mode default
3 Duplex mode default
4 2 in 1 default
5 Auto edge default
1 1 4-J (2/4) ! - 1 1
User preset mode
change selection, press OK
No 1 to 2
Letter 1
10 mm 1
5 mm 1
20 mm 1
100% 1 1
Nonsort 1 1
Reduc. 1 ^ 1
on I
OK
OK
User preset mode
select item
1 Margin reduction default
1
1
1
1
5
2 Sorter mode default
3 Duplex mode default
4 2 in 1 default
5 Auto edge default
1 r^nUTir 1-1 1
100% 1 V
Nonsort 1 1
2to2r
Reduc, 1 1
on 1__ 1
f
.
...
.....1'
---------
1
6
( NOTE )
Bk to 2
Use S key to step back by one screen at a time.
To reset the user preset mode, press Reset key.
40
Page 41

Key Operator Access (1/3 to 3/3 screen)
Example: when changing the Energy saver time to 3 hours.
Press User Preset key.
1
1 Paper size | |
2
2 Paper size priority
3 Margin vaiue defauit
4 Edge vaiue defauit
5 Book vaiue defauit
Letter I I
10 mm 1 1
5 mm 1
20 mm 1 1
_____
6
1
3
4
5
User preset mode
input identification
•••
CANCEL
1 Auto reset time
2 Energy saver time
3 Auto off time 60 min
4 Exposure default Auto 1 1
5 Language defauit English 1 1
1 r^TcWT
1 min
15 min
j=5J
__________
7
1 min
Auto j 1
English 1 1
L^J
_________
1
8
1 Auto reset time
2 Energy saver time 3 hour 1 1
3 Auto off time 60 min 1 1
4 Exposure defauit
5 Language defauit
1 r^noTSy
Ready to copy
9
1
c
NOTE
3
Input the key operator’s code number to No.5 of 4/4 screen first, in order to
see key operator access screens 1/3 - 3/3.
41
Page 42

Options
Components
ADF, Automatic Document
Feeder(FA-A505)
• To feed originals automatically.
i-ADF, Inverting Automatic
Document Feeder {FA-A888)
• To feed originals automatically.
• For multi-size feeding.
• For duplex copying.
• For 2 in 1 copying.
20 Bin Sorter
(FA-S575/S680/S685/S690)
• To sort, group or non-sort
copies.
• To staple copies.
(FA-S680/S685/S690)
• To hole punch copies.
(FA-S690)
System Console
(FA-DS72 for FP-7735MX)
Storage Drawer X 1
System Console
(FA-DS82 for FP-7742/7750)
Paper Drawer X 1
(550 sheets)
Storage Drawer X 1
Option for system console
Paper Drawer (FA-MA505)
• 550 sheets
3000 Sheet Large Capacity
Cassette
{FA-MA301)
• 3000 sheets
System Consoie
(FA-DS72/DS82)
• To increase paper feed sources
and capacity.
The paper drawer/tray is
designed to accommodate
invoice, letter, letter R, legal
and ledger size paper. To
change the paper size, see
page 33.
42
Page 43

i-ADF (FA-A888), ADF (FA-A505)
1. Features
0 Automatic original feeding
• The i-ADF/ADF tray can hold up to 50 originals of 20 lbs. paper. {30 originals/legal. ledger)
It can accommodate originals from invoice to ledger size.
• Automatic original size detection.
(2) Duplexing (FA-A888)
The i-ADF allows you to perform two different types of duplexing automatically. (See P.15-17)
(D Multi-size feeding. (FA-A888)
Different size originals to be copied full size (1:1) or same size.
Originals
Full size
Legal Legal
Letter R Letter R
Ledger Ledger Letter R
Letter Letter
0 2:1 Copy (FA-A888)
2-sided originai to 1-sided copies. (See P.15)
(5) 2 in 1 copy (FA-A888)
To make a 1-sided copy (full size or reduction), from two 1-sided originals side-by-side.
(See P.18)
(D SADF (Single Automatic Document Feeder) Function
A special original (like thin paper etc.,) can be fed from the ADF/i-ADF original tray and copied
continuously with manual operation.
Copies
Reduction Enlargement
Letter R/Invoice Ledger
Letter R/Invoice
Letter
Ledger
2. Components
FA-A505
FA-A888
Gam Inappropriate originals
• Paper with a smooth surface such •
as glossy and coated papers •
• Transparencies
• Originals with a lead edge that is •
“creased”, “folded”, “punched” or •
“glued"
Paste-ups
Pressure sensitive or carbon
backed papers
Paper with excessive curl
Stapled originals
43
Page 44

Options
i-ADF (FA-A888), ADF (FA-A505)
3. Usage
■ Procedure
1
Position
original
Procedure
Select Multi-size
feeding (FA-A888)
(2) (3) 4 5
2:1 Copy
2:2 Copy
2 in 1 copy
{See P.15,16, 18)
Number of
copies
1-5 2 3 4
Position originals
one at a time
Select ISADF
function
Number of Press Print
copies
Press Print
( NOTE )
The SADF function can be combined with 2-page copy and sorter modes (without
staple sort).
If the next original is not placed within 5 seconds of the completion of the last copy
then SADF function will be canceled.
44
Page 45

Sorter (FA-S575/S680/S685/S690)
1. Features
/ 50 / / 50 / / 50 / / 50 /
This figure shows letter size
(20 lbs.) originals and copies.
Staples sorted sets of up to 50 copies
(FA-S680/S685/S690 and i-ADF).
Group
/20
/ 20
p p
Sort
20 sets
Staple Sort
Hole Punch
2. Components
{FA-S575)
All copies are made with 3-hole (or 2-hole* *)
punch {FA-S690 and i-ADF).
^ See page 19
(FA-S680/S685/S690)
Manual Staple Key
( note )
When the overflow laa indicator appears on the display, remove excess
copies from the bins, then press SORT/FINISH mode key to reset.
For FA-S680/S685/S690: Remove excess copies from the bin{s).
• If paper misfeeds or irregular paper alignment occurs in the sorter, turn the paper in
the drawer upside down or replace with a new package of paper.
45
Page 46

Options
FA-S680
3. Adding staples.
1
2
Add staples
BASIC MENU
Nonsort
D
Punch
DUPLEX/ I SORT/
Orig.-copyI finish
00
Sort
ZOOM/
EFFECTS
00
<^J W r—1
INSERTION
00
Group
SELECT
When the staple cartridge is empty, indicator flashes. {«)
JOB
Pull sorter towards the left slowly until it stops.
0 Take out empty staple cartridge,
(g) Install the new cartridge.
Do not touch or move the staples.
(D Re-insert sorter.
Check operations.
0 Place some paper on the nonsort tray.
3
NOTE ^ * Order staple cartridges through your servicing dealer.
• When staples are jammed, call service.
0 Press the Manual Staple key several
times until it staples.
46
Page 47

FA-S685/S690
When the staple cartridge is empty, indicator flashes. {See page 46)
Pull sorter towards the left slowly until it stops.
1
® Turn the stapler handle.
(2) Take out the stapler unit.
2
® Take out empty staple cartridge.
(f) Take out staples if remained in the
stapler.
(D Install the new cartridge.
Do not touch or move the staples.
® Re-install the stapler unit until it stops.
(2) Re-insert sorter.
4
Check operations. (See page 46)
5
NOTE ^ * Order staple cartridges through your servicing dealer.
• When staples are jammed, call service.
47
Page 48

Adding Paper ([=j)
550 Sheet Paper Drawer/Tray
Pull paper drawer/tray out of
copier.
1
Do not load ADD with paper.
Place paper into paper
drawer/tray.'
special papers, like glossy paper,
mailing labels and transparencies cannot
be used in the paper drawer/tray. Use
bypass.
Make sure paper is not loaded
above overfill indicator located in
the paper drawer/tray.
Overfill Indicator
c-------
-------
Up to 550 sheets,
20 lbs.
( NOTE )
4
____
Push paper drawer/tray back into
copier.
When the staple sorter is used:
Some paper may not be suitable for stapling. Please consult your service technician if
you are unsure about the type of paper you are using.
The paper drawer/trays are designed to accommodate invoice, letter, letter R, legal
and ledger size paper. To change the paper size, consult your service technician for
proper instructions.
J
48
Page 49

3000 Sheet Large Capacity Cassette (LCC)
® Open the door.
(2) The paper feed tray will go down.
1
3
Do not touch the tray while it is moving.
Add paper.
After tray stops, place paper neatly on to
tray.
Letter size only (portrait).
Do not fill above red line,
up to 3000 sheets, 20 lbs.
4
Close the door.
49
Page 50

Adding Toner ([4]/U13)
Open front panel.
Turn toner hopper assembly.
0 Turn empty toner bottle until it stops.
(2) Slide empty toner bottle towards you
and remove.
5
Shake well before using.
10-15 times until the toner inside is
evenly distributed.
Remove the cap from the bottle.
Do not turn the shutter.
0 Insert new toner bottle to the hopper
assembly.
0 Turn the bottle until it stops, and
arrows are aligned.
©
►
Return the toner hopper assembly
to original position.
Close front panel.
optimum copy quality use the recommended Panasonic toner. Store toner in a
cool dark place. Do not unseal toner before use. Use it as fast as possible after
unsealing.
50
Page 51

Replacing the Waste Toner Bottle (fyl/U14)
Open waste toner bottle cover.
Slowly pull waste toner bottle straight out.
Do not squeeze the bottle.
4
5
Close bottle with cap.
Install new bottle.
Do not insert the bottle from the top.
Close waste toner bottle cover.
Do not use toner in waste toner bottle.
^ jvjQjg ^ • If you have no replacement waste toner bottle, please contact your service
^ provider.
51
Page 52

Removing a paper misfeed (8A^)
When paper misfeed has occured, the misfeed indicator and misfeed
position(s) will be indicated on the touch panel display.
52
Page 53

Paper exit area
1
0 Open front panel.
C2)
Move the sorter to the left if installed.
(See P.46)
(3) Open exit cover.
0 Turn the left paper clearing knob.
(2) Remove misfed paper.
4
Left Paper Clearing Knob
Caution: this fuser area may be hot.
0 Open the fuser guide.
(2) Check that no misfed paper is
remaining.
(3) Close the fuser guide.
0 Close exit cover.
(2) Close front panel.
8Ar
• The fusing area may be hot, so use caution when removing misfed paper.
The front panel must be opened prior to opening the exit cover.
53
Page 54

Removing a paper misfeed (8A/^)
Paper transport and paper entry areas
Open front panel.
1
2
3
0 Lower lever
(2) If copy paper is fed far into the copier,
turn the right paper clearing knob,
d) Remove misfed paper.
0 Close front panel.
Right Paper
Lever @ Clearing Knob
0 Open entry cover.
(|) Remove misfed paper.
(3) Close the entry cover.
54
Page 55

Automatic Duplex Unit
1
2
:a'
■:c;
Pull out automatic duplex unit.
© open paper guide plate.
(2) Remove misfed paper.
(© Close paper guide plate.
3
4
If misfeed is too far into the automatic
duplex unit:
© Open paper transport section, until it
stops.
(2) Remove misfed paper.
(D Close paper transport section.
Push back automatic duplex unit.
8Ar
• When the misfeed indicators light at A, C and D, remove misfed paper from
A and C first then remove it in the ADU (D).
55
Page 56

Removing a paper misfeed (8A^)
System console/Large Capacity Cassette
System Console
® Open the paper feed cover.
(2) Remove misfed paper.
1
(3) Close the paper feed cover.
Large Capacity Cassette
(1) Hold the latch and slide the large
capacity cassette to the right.
(2) Remove misfed paper.
(D Open the door.
(2) Remove misfed paper.
(3) Close the door.
(4) Return the large capacity cassette to
original position.
56
Page 57

Removing a paper misfeed
Entry Area
1
2
0 Open entry cover.
0 Remove misfed paper.
0 Close entry cover.
0 Open the i-ADF.
0 Open entry cover.
0 Remove misfed paper.
0 Close entry cover and the i-ADF.
Exit Area
0 Open the i-ADF.
0 Remove misfed paper.
If paper is remaining on the platen
glass, remove it.
57
If paper can not be removed:
0 Close the i-ADF.
0 Remove misfed paper.
8Ar
Page 58

Removing a paper misfeed (J^)
Open the ADF.
1
Entry Area Platen Area Exit Area
Platen Area
0 Remove misfed paper.
@ Close the ADF.
Entry Area
0 Push the Release key and remove
misfed paper.
0 Close the ADF.
Exit Area
0 Remove misfed paper.
(2) Close the ADF.
58
Page 59

Removing a paper misfeed (^D)
Sorter
Pull the sorter toward the left
slowly until it stops.
1
For FA-S575
0 Open transport cover.
[0 Remove misfed paper.
0) Close transport cover.
3
4
For FA-S680/S685/S690
Remove misfed paper.
For FA-S680/S685/S690
0 Open transport cover.
0 Check that paper is removed
completely.
0 Close transport cover.
Slide the sorter against the copier.
59
Page 60

Specifications
FP-7735MX/7742/7750
Type:
Process;
Multi Copy Speed:
Maximum Copy Size:
Copy Size:
Reduction Ratios:
Enlargement Ratios;
Paper Feed:
Paper Selection:
Paper Weight:
Quantity Selector:
Desktop
UltraMagnefine™ Toner
35 letter size copies per minute (FP-7735MX)
42 letter size copies per minute (FP-7742)
50 letter size copies per minute {FP-7750)
11"x 17" (Ledger size)
Void Area: max. 5.0 mm
Invoice, Letter, Letter R, Legal, Ledger via paper drawer/tray
4" X 6" — 11" X 1T via sheet bypass
Preset: 50%, 61%, 65%, 77%, 79%
Variable: from 99% to 50% in 1% increments
Preset: 121%, 129%, 155%, 200%
Variable: from 101% to 200% in 1% increments
550 sheet paper drawer plus 50 sheet Bypass
Automatic Switching
Automatic Duplex Unit holds up to 50 sheets.
Automatic
16 - 24 lbs. (15 - 30 lbs. via sheet bypass)
1 - 999, Automatic Repeat, Automatic Reset to 1
Exposure Control:
Toner Supply:
Dimensions:
Weight:
Electrical Requirement:
Automatic/Manual plus Photo Mode
Automatic
23.9" (W) X 26.0" {D)x 22.9" (H)
150 lbs. (FP-7735MX), 161 lbs. (FP-7742), 161.5 lbs. (FP-7750)
AC 120V, 60Hz, 12A
i-ADF (FA-A888), ADF (FA-A505)
Original Capacity:
Paper Size:
Paper Weight:
Electrical Requirement:
Dimensions:
Weight:
Specifications are subject to change without notice.
30 sheets/legal, ledger 50 sheets/invoice, letter
Invoice, Letter, Letter R, Legal, Ledger
14-28 lbs.
Supplied from copier
22.8" (W) X 18.9" (D) x 3.7" (H) without Tray (FA-A505)
23.6" (W) X 20.4" (D) X 4.7" (H) without Tray (FA-A888)
22.0 lbs. (FA-A505)
26.4 lbs. (FA-A888)
60
Page 61

20 Bin Sorter (FA-S575/S680)
FA-S575
Paper Size: Letter/LetterR/Legal/Ledger/Invoice Letter/LetterR/Legal/Ledger/lrivoice
Paper Weight: 16-24 lbs.
Number of Bins: 20 20 Plus stack tray
Bin Capacity:
Nonsort
Staple sort
Sort
Group
Electrical Requirements:
Dimensions:
Weight:
Top bin: 150 sheets
(90 Sheets/ADU)
Bins 2-20: 50 sheets
50 sheets
Top bin: 150 sheets
Bins 2-20: 50 sheets
. Supplied from copier Supplied from copier
14.2" (W) X 19.2" (D) X 38.4" (H)
72.6 lbs.
* When more than 100 copies are selected,
20.9" (W) X 22.3" (D) x 38.3" (H)
75 copies are stacked in the Nonsort tray
and the balance in the sort bins.
FA-S680 (Staple)
16-24 lbs.
Nonsort tray: 100 (75*) sheets
Bins 1-20: 30 sheets
(25 Sheets/Ledger)
50 sheets (30 Sheets/Ledger)
(Except Invoice size)
50 sheets
(30 Sheets/Ledger)
30 sheets
(25 Sheets/Ledger)
99.0 lbs.
System Console (FA-DS72/DS82)
Combination:
Paper Size: Invoice, Letter, Letter R, Legal, Ledger
Paper Weight:
Electrical Requirements:
Dimensions: 23.9" (W) X 25.0" (D) x 16.4" (H)
Weight: 47.7 lbs. (DS72)/58.7 lbs. (DS82)
550 Sheet Paper Drawer x 1 (DS82)
Storage Drawer x 1
16-24 lbs.
Supplied from copier
Large Capacity Cassette (FA-MA301)
Paper Size: Letter
Paper Weight:
Paper Capacity:
Electrical Requirements:
Dimensions: 11.4" (W) X 17.5" (D) X 20.4" (H)
Weight:
Maximum 3000 sheets, 20 lbs.
Supplied from system console
16-24 lbs.
30.8 lbs.
Specifications are subject to change without notice.
61
Page 62

Troubleshooting
Before you call service
C
Unit does not operate
Does the display light?
(See P.8)
Does the Energy saver key flash (or light)
and displays are turned OFF?
(See P.8)
Do any of UOO codes and messages
appear on display?
(U0;U4, U10, U14....etc.,)
Do the over flow indicator and message
appear on display? f[ oFl)
(See P.45)
Check
j
Action
Check if the Power Switch is turned on
and if the power plug is inserted into the
outlet.
Press Energy saver key on control panel.
Perform actions in accordance with each
message.
Remove copies from the sorter bin(s),
and press the sorter mode select keys.
For FA-S680/S685/S696
Remove copies from the sorter bin(s).
(See P.45)
]
Do the add staples indicator and
message appear on display? (<=^)
(See P.46)
Do the add paper indicator and message
appear on display? (¿j)
(See P.48-49)
Do paper misfeed indicator and message
appear on display? (8Ar)
(See P.52-59)
Do any of EO-00 indicator and message
appear on display?
(See P.8-9)
If staples are not empty, call service.
(Staples are jammed.)
Add paper. (See P.48^9)
Remove misfed paper. (See P.52-59)
Turn copier off, then on. If error code
does not go off, call service.
62
Page 63

Check Action
Copies are light
Does the exposure indicator say “light”?
(See P.11)
Do the add toner indicator and message
appear on displays? (See P.50)
Copies are marked
Is me copier platen glass or platen cover ^ clean it. (See below)
If the measures outlined above do not solve the problem, call Service.
•4
Touch the “dark” key or touch the “Auto”
key to choose the auto mode. (See P.11)
Add toner. (See P.50)
■ Care of Copier
As a rule, clean weekly.
Platen/Platen Cover
® Wipe marks off with cloth and
neutral detergent.
(2) Wipe again with dry cloth.
Platen
63
Page 64

Specifications(Continued from page 61)
20 Bin Sorter (FA-S685/S690)
FA-S685 FA-S690
Paper Size:
Paper Weight:
Invoice - Ledger
16-24 lbs.
Number of Bins: 20
Bin Capacity;
Nonsort
Nonsort tray: 100 (50*) sheets ^
Bins 1-20: 30 sheets
(25 Sheets/Ledger)
Staple sort
50 sheets (30 Sheets/Ledger)
(Except Invoice Size)
Sort
50 sheets (30 Sheets/Ledger)
Group 30 sheets (25 Sheets/Ledger)
Hole Punch
Electrical Requirements:
Dimensions:
Weight:
20.9" (W) X 22.3" (D) x 38.3" (H)
92 lbs.
Supplied from copier
'[= When more than 100 copies are selected, 50 copies are stacked in the
Nonsort tray and the balance in the sort bins.
According to selected sorter mode
(Nonsort, Staple Sort, Sort or Group)
23.7" (W) X 22.3" (D) x 38.3" (H)
103 lbs.
WARRANTY
“PANASONIC OFFICE PRODUCTS COMPANY MAKES NO WARRANTIES, GUARANTEES OR
REPRESENTATIONS, EXPRESSED OR IMPLIED, TO CUSTOMER WITH RESPECT TO THIS
PANASONIC COPIER, INCLUDING BUT NOT LIMITED TO, ANY IMPLIED WARRANTY OF
MERCHANTABILITY OR FITNESS FOR A PARTICULAR PURPOSE.
PANASONIC OFFICE PRODUCTS COMPANY ASSUMES NO RISK AND SHALL NOT BE
SUBJECT TO LIABILITY FOR ANY DAMAGE, INCLUDING, BUT NOT LIMITED TO DIRECT,
INDIRECT. SPECIAL, INCIDENTAL OR CONSEQUENTIAL DAMAGES OR LOSS OF PROFITS
SUSTAINED BY THE CUSTOMER IN CONNECTION WITH THE USE OR APPLICATION OF THIS
PANASONIC COPIER. SEE YOUR DEALER FOR DETAILS OF DEALER’S WARRANTY.”
For Service Call:
Panasonic Office Products Company
A unit of Matsushita Electric Corporation of America
Plain Paper Copier Division
Two Panasonic Way, Secaucus, N.J. 07094
Panasonic Canada Incorporation
5770 Ambler Drive, Mississauga,
Ontario L4W 2T3
FFPTD0846B Printed in Japan
February 1998
S0298-1038
 Loading...