

Page 1

Service Mode Function
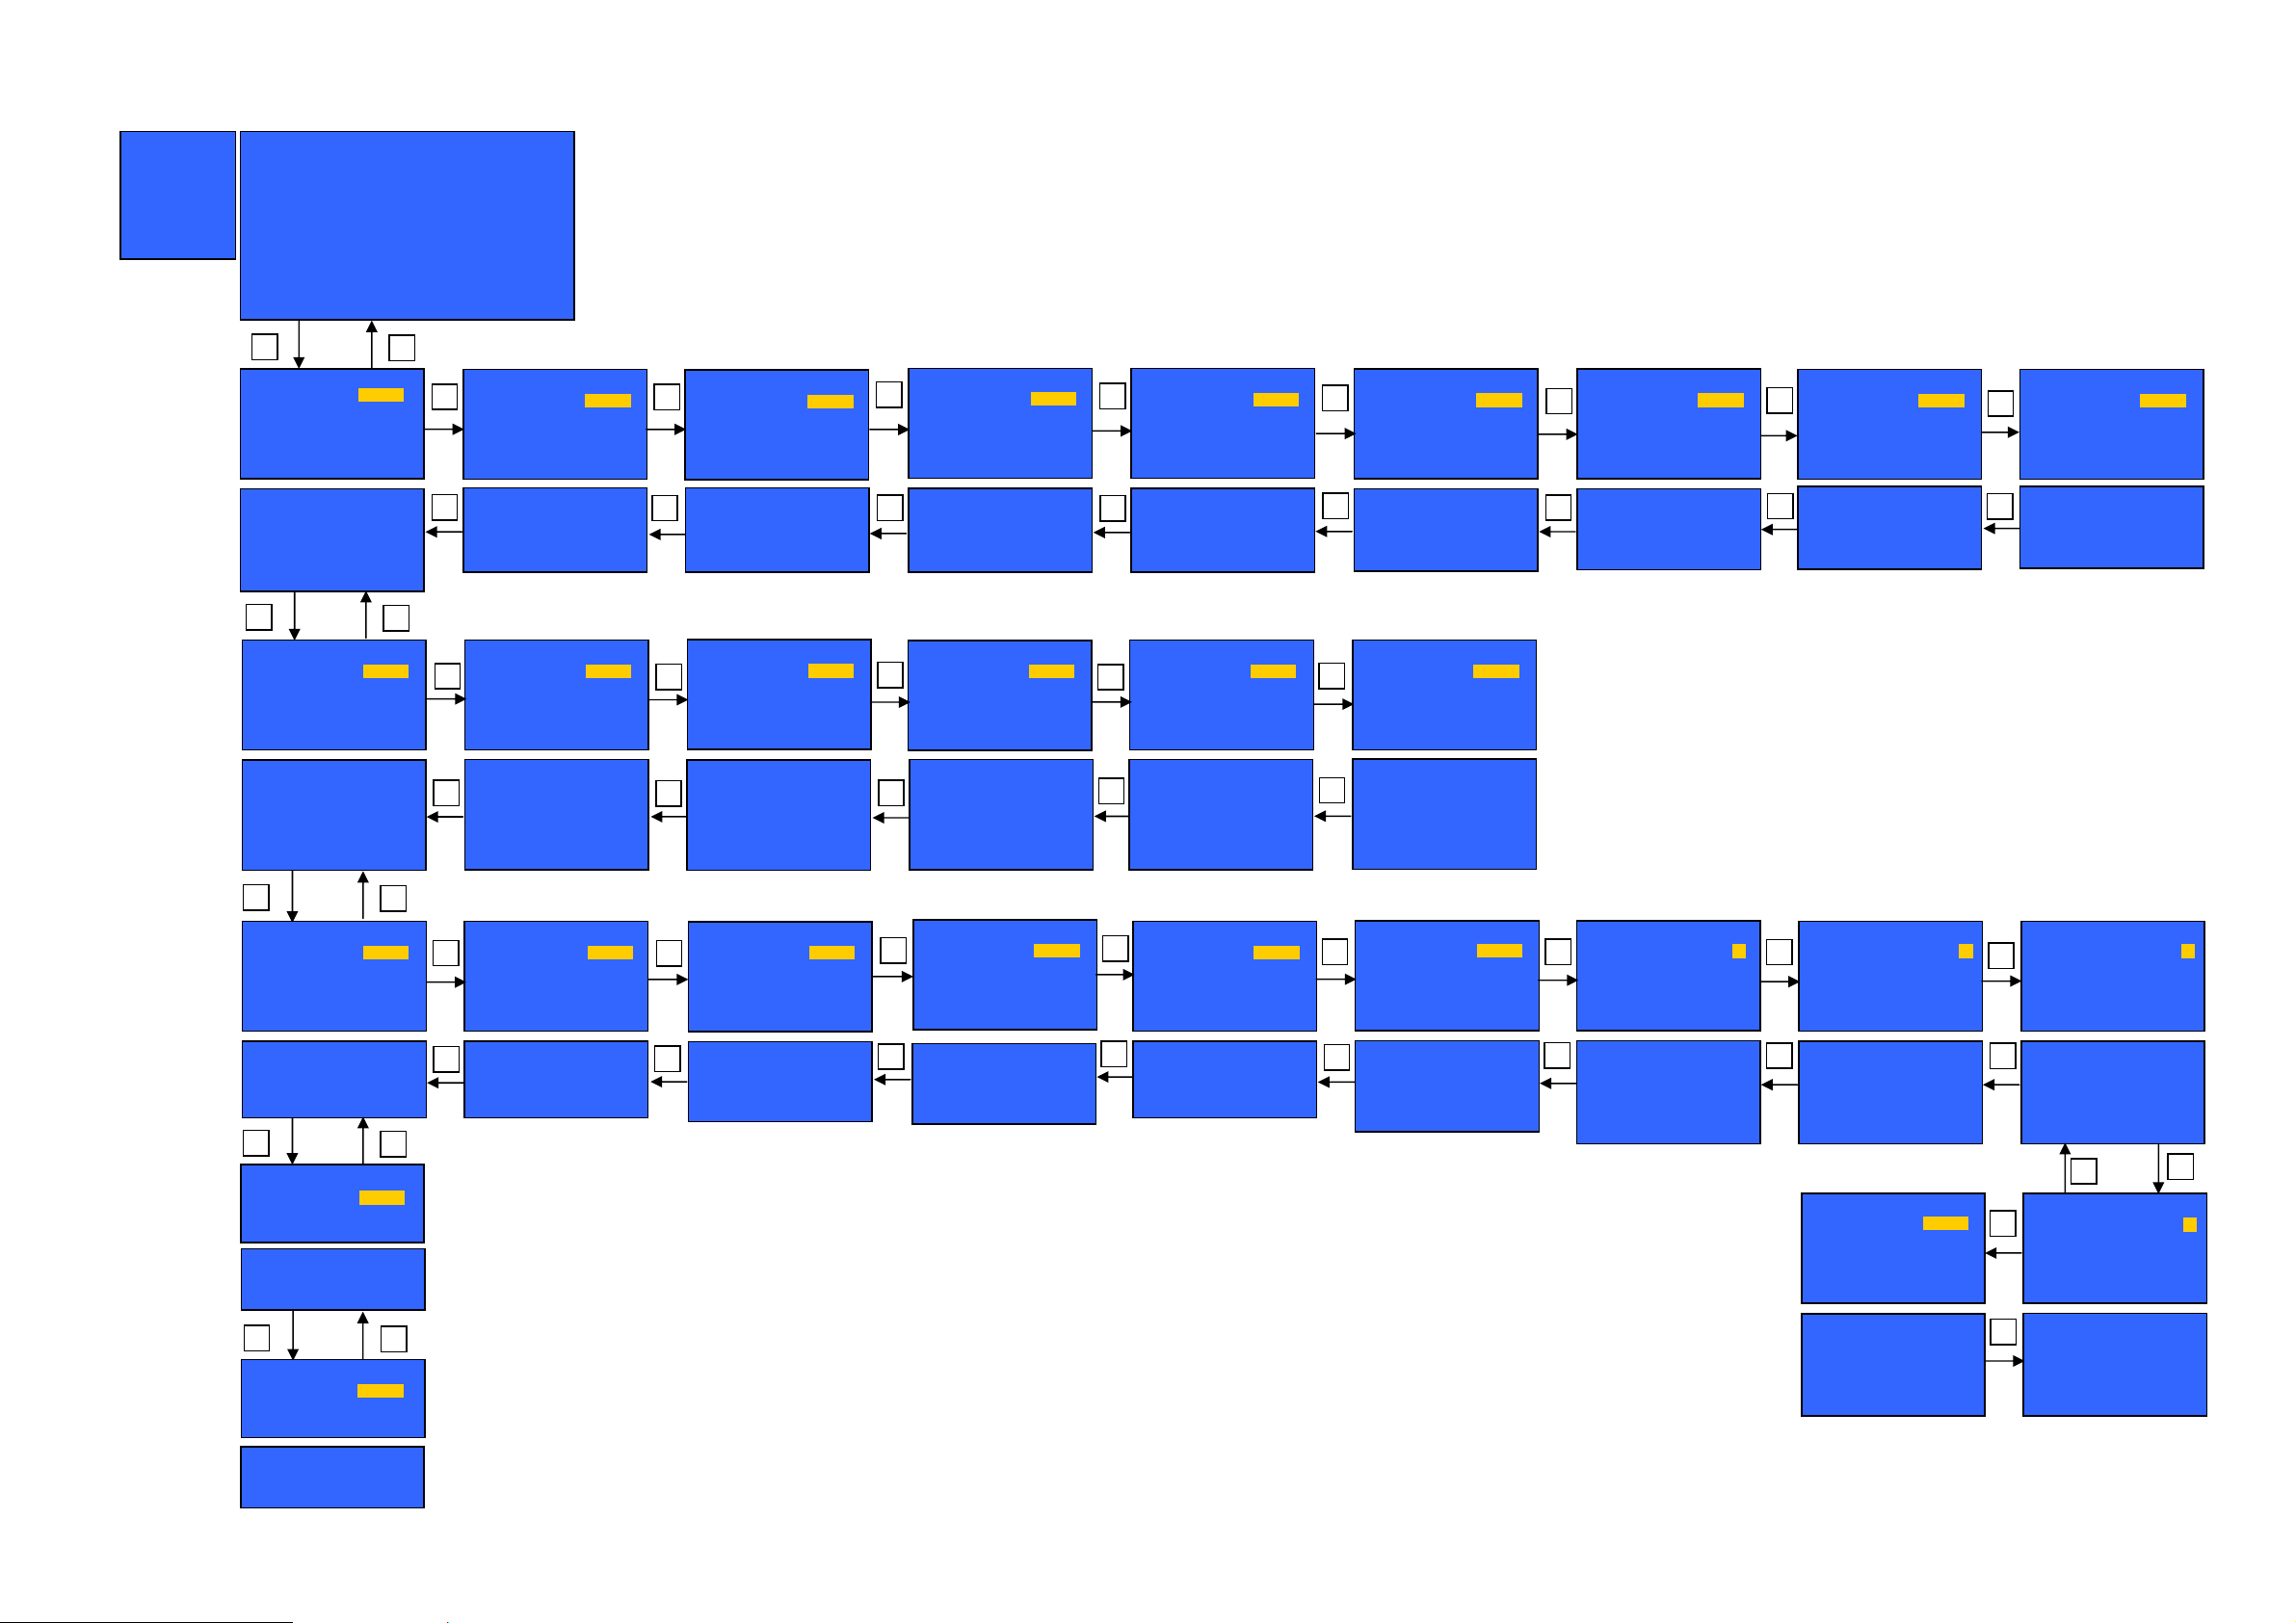
MPU controls the functions switching for each IICs through IIC bus in this chassis. The following setting and adjustment can
be adjusted by remote control in Service Menu
How to enter into Service Mode
While pressing [VOLUME ( - )] button on the main unit, press the [RED] button on the remote control for 3 times within
2 seconds.
How to exit
Switch off the power with the [POWER] button on the main unit or the [POWER] button on the remote control.
Page 2
SERVICE
A
A
A
A
A
SERVICE
ADJUST
WB-ADJ
OPTION
SRV-TOOL
DRV CHECK
Peaks SOFT 3.008 OPTION 1 04
Peaks EEP 01.00.0206 OPTION 2 ee
S e r v i c e 1
LSI PACKAGE 0.00c OPTION 3 01
LSI DATA 0.00.08 OPTION 4 02
STBY SOFT 1.00.02 MODEL ID 0b
STBY EEP 1.00.0021 030001b1
STBY ROMCOR 0.00.00 00000400
Ajax_CE 0.70.2 R/E Cnt 000/000/000
INV Cnt 0000
AVSW --
1
ADJUST DYNAMIC
CONTRAST
YMAX
1,2:MAIN SELECT
3,4:SUB SELECT
9:PICTURE MENU SELECT
YELLOW:AUTO ADJUST
VOL :ADJUST
OK :WRITE
000
2
ADJUST DYNAMIC
3
COLOR
1,2:MAIN SELECT
4
3,4:SUB SELECT
9:PICTURE MENU SELECT
VOL :ADJUST
OK :WRITE
1 2
WB-ADJ DYNAMIC
R-GAIN
BEFORE 80
METHOD 02
COLOR TEMP NORMAL
1,2:MAIN SELECT
3,4:SUB SELECT
7:COLOR TEMP SELECT
9:PICTURE MENU SELECT
0:WB METHOD SELECT
VOL :ADJUST
OK :WRITE/WB DIFF ADJ
80
WB-ADJ DYNAMIC
G-GAIN
3
BEFORE 75
METHOD 02
COLOR TEMP NORMAL
1,2:MAIN SELECT
3,4:SUB SELECT
4
7:COLOR TEMP SELECT
9:PICTURE MENU SELECT
0:WB METHOD SELECT
VOL :ADJUST
OK :WRITE/WB DIFF ADJ
1 2
OPTION DYNAMIC
Boot
1,2:MAIN SELECT
3,4:SUB SELECT
9:PICTURE MENU SELECT
VOL :ADJUST
ROM
OPTION DYNAMIC
STBY-SET
3
1,2:MAIN SELECT
4
3,4:SUB SELECT
9:PICTURE MENU SELECT
OK :POWER OFF
1 2
SRV-TOOL DYNAMIC
1,2:MAIN SELECT
9:PICTURE MENU SELECT
OK:ENTER
00
1 2
DRV-CHECK DYNAMIC
USBHDD CHECK
1,2:MAIN SELECT
9:PICTURE MENU SELECT
OK 3sec:HDD CHK START
00
75
33
00
216
DJUST DYNAMIC
3
TINT
1,2:MAIN SELECT
4
3,4:SUB SELECT
9:PICTURE MENU SELECT
VOL :ADJUST
OK :WRITE
WB-ADJ DYNAMIC
B-GAIN
3
BEFORE 7D
METHOD 02
COLOR TEMP NORMAL
1,2:MAIN SELECT
3,4:SUB SELECT
4
7:COLOR TEMP SELECT
9:PICTURE MENU SELECT
0:WB METHOD SELECT
VOL :ADJUST
OK :WRITE/WB DIFF ADJ
OPTION DYNAMIC
CLK MODE
3
1,2:MAIN SELECT
4
3,4:SUB SELECT
9 :PICTURE MENU SELECT
VOL:ADJUST
OK:WRITE
Key Command
Press the 3/4 button to change the adjustment values or function.
Press the 1/2 button to step up/down through the functions and adjustments
Press the numerical button VOLUME (+/-) to change of each option item.
Press the OK button after each adjustment has been made to store the required values.
7D
00
00
ADJUST DYNAMIC
3
SUB-BRT
1,2:MAIN SELECT
4
3,4:SUB SELECT
9:PICTURE MENU SELECT
VOL :ADJUST
OK :WRITE
WB-ADJ DYNAMIC
R-CENT
3
BEFORE 87
METHOD 02
COLOR TEMP NORMAL
1,2:MAIN SELECT
3,4:SUB SELECT
4
7:COLOR TEMP SELECT
9:PICTURE MENU SELECT
0:WB METHOD SELECT
VOL :ADJUST
OK :WRITE/WB DIFF ADJ
OPTION DYNAMIC
CLOCK
3
4
1,2:MAIN SELECT
3,4:SUB SELECT
9 :PICTURE MENU SELECT
VOL:ADJUST
OK:WRITE
800
87
000
DJUST DYNAMIC
3
BACKLGT
1,2:MAIN SELECT
4
3,4:SUB SELECT
9:PICTURE MENU SELECT
VOL :ADJUST
OK :WRITE
WB-ADJ DYNAMIC
G-CENT
3
BEFORE 80
METHOD 02
COLOR TEMP NORMAL
1,2:MAIN SELECT
3,4:SUB SELECT
4
7:COLOR TEMP SELECT
9:PICTURE MENU SELECT
0:WB METHOD SELECT
VOL :ADJUST
OK :WRITE/WB DIFF ADJ
OPTION DYNAMIC
3
Emergency
4
1,2:MAIN SELECT
3,4:SUB SELECT
9 :PICTURE MENU SELECT
VOL:ADJUST
FFF
80
ON
DJUST DYNAMIC
H-POS
3
1,2:MAIN SELECT
4
3,4:SUB SELECT
9:PICTURE MENU SELECT
VOL :ADJUST
OK :WRITE
WB-ADJ DYNAMIC
B-CENT
3
BEFORE 84
METHOD 02
COLOR TEMP NORMAL
1,2:MAIN SELECT
3,4:SUB SELECT
4
7:COLOR TEMP SELECT
9:PICTURE MENU SELECT
0:WB METHOD SELECT
VOL :ADJUST
OK :WRITE/WB DIFF ADJ
OPTION DYNAMIC
Y/C Delay
3
1,2:MAIN SELECT
4
3,4:SUB SELECT
9:PICTURE MENU SELECT
VOL :ADJUST
OK :WRITE
84
0
DJUST DYNAMIC
0
H-AMP
3
1,2:MAIN SELECT
4
3,4:SUB SELECT
9:PICTURE MENU SELECT
VOL :ADJUST
OK:WRITE
OPTION DYNAMIC
OPT 1
3
1,2:MAIN SELECT
4
3,4:SUB SELECT
5,6:BIT SELECT
9:PICTURE MENU SELECT
VOL :ADJUST
OK :WRITE
0
00000100
ADJUST DYNAMIC
V-POS
3
1,2:MAIN SELECT
4
3,4:SUB SELECT
9:PICTURE MENU SELECT
VOL :ADJUST
OK :WRITE
OPTION DYNAMIC
OPT 2
3
1,2:MAIN SELECT
4
3,4:SUB SELECT
5,6:BIT SELECT
9:PICTURE MENU SELECT
VOL :ADJUST
OK :WRITE
OPTION DYNAMIC
EDID-CLK
HDMI 1
1,2:MAIN SELECT
3,4:SUB SELECT
7 :HDMI SELECT
9 :PICTURE MENU SELECT
OK:WRITE
11101110
MID
DJUST DYNAMIC
0
V-AMP
3
1,2:MAIN SELECT
4
3,4:SUB SELECT
9:PICTURE MENU SELECT
VOL :ADJUST
OK :WRITE
OPTION DYNAMIC
OPT 3
3
1,2:MAIN SELECT
4
3,4:SUB SELECT
5,6:BIT SELECT
9:PICTURE MENU SELECT
VOL :ADJUST
OK :WRITE
4
OPTION DYNAMIC
OPT 4
3
1,2:MAIN SELECT
4
3,4:SUB SELECT
5,6:BIT SELECT
9:PICTURE MENU SELECT
VOL :ADJUST
OK :WRITE
0
00000001
3
00000010
Page 3

Service Tool Mode
How to access
1. Select [SRV-TOOL] in Service Mode.
2. Press [OK] button on the remote control.
Display of Flash ROM maker code
Display of SOS History
SRV-TOOL
Flash ROOM: AD – F1
PTCT:00.00.00.00.00 Time 00051:30 On/Off 0000042
Display of SOS History
SOS History (Number of LED blinking) indication.
From left side; Last SOS, before Last, three occurrence before, 2
This indication will be cleared by [Self/check indication and forced to factory shipment setting].
nd
occurrence after shipment, 1st occurrence after shipment.
Power ON Time, On/Off
Note: To display TIME/COUNT menu, highlight position, then press MUTE for 3sec.
Time: Cumulative power on time, indicated hour: minute by decimal.
On/Off: Number of On/Off switching by decimal.
Note: This indication will not be cleared by either of the self-checks or any other command.
Exit
Disconnect the AC cord from wall outlet or switch off the power with [Power] button on the main unit.
POWER ON TIME/COUNT
Press [MUTE] button (3sec)
Page 4
Hotel Mode
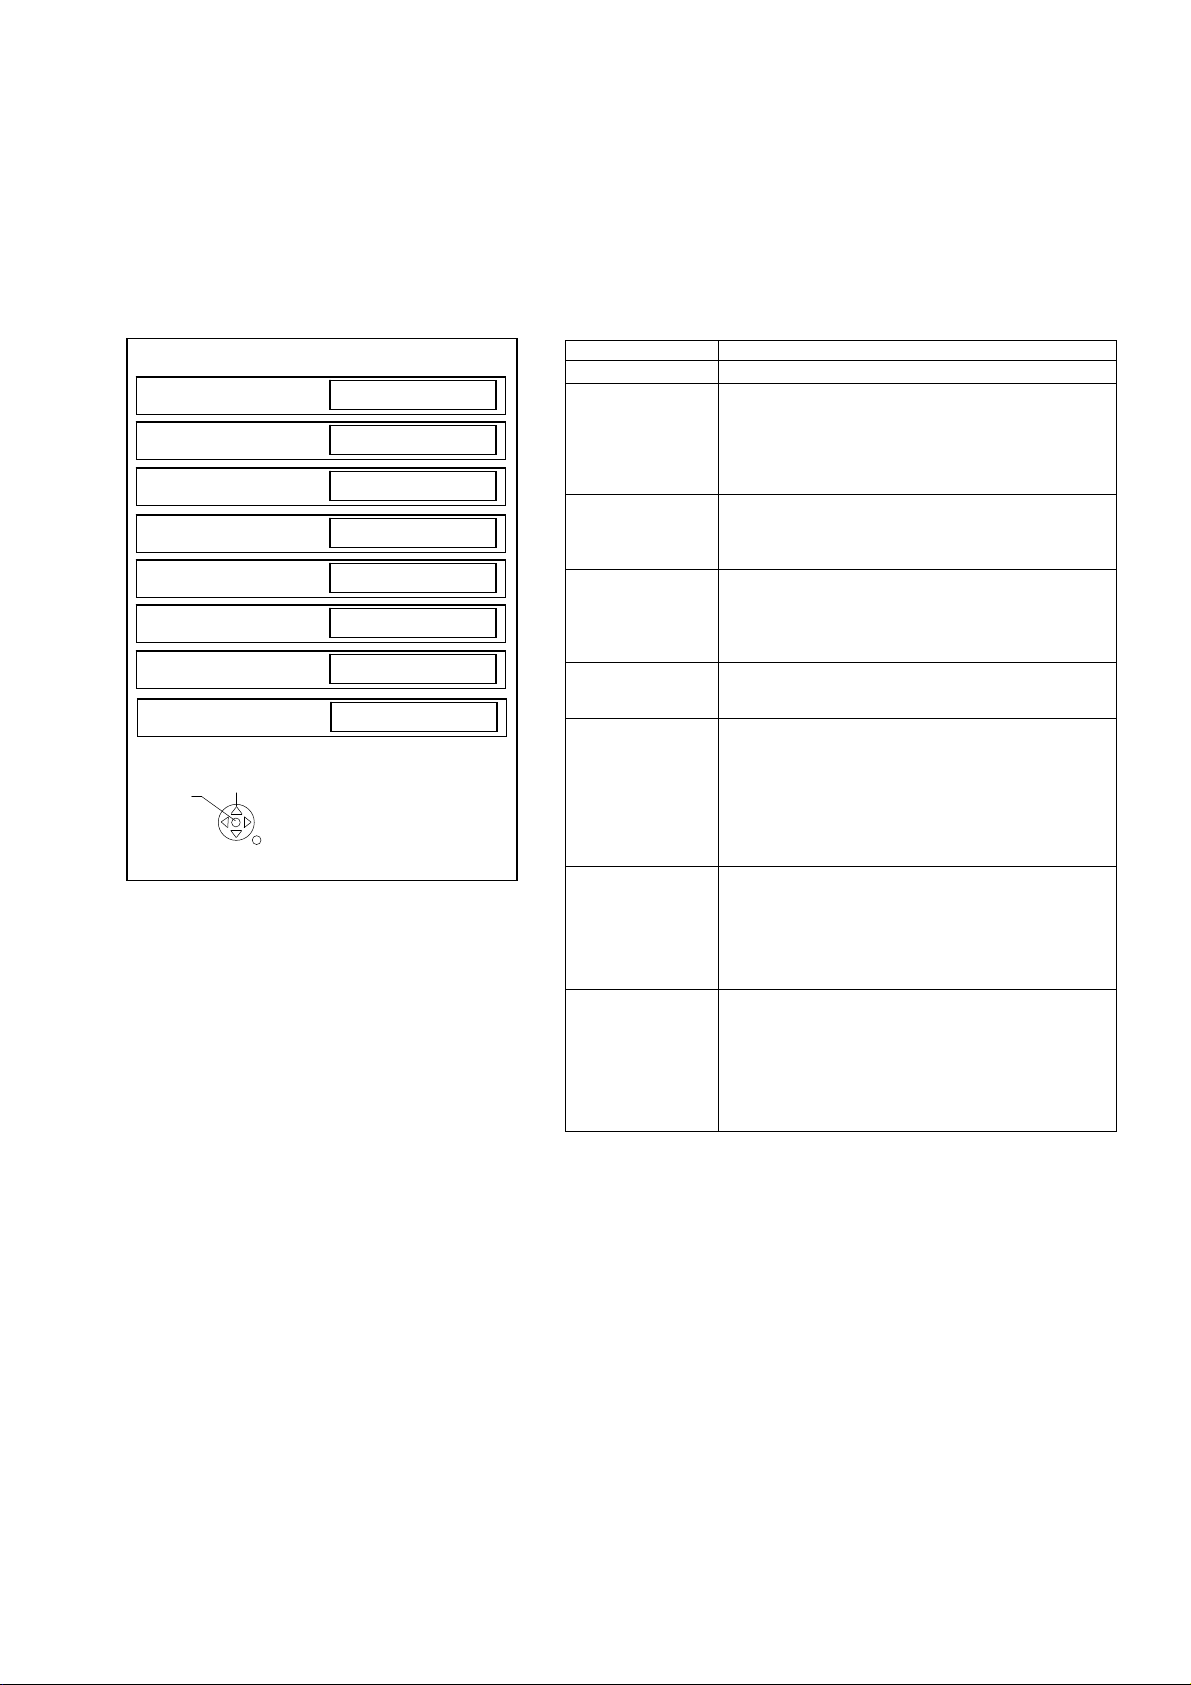
1. Purpose
Restrict a function for hotels.
2. Access command to the Hotel mode setup menu.
In order to display the Hotel mode setup menu,
please enter the following command (within 2 second).
[TV] : Vol.[Down] + [REMOTE] : AV (3 times)
Then, the Hotel mode setup menu is displayed.
Hotel mode
Hotel mode
Initial INPUT
Initial POS
Off
Off
Off
Initial VOL Level
Maximum VOL Level
Button Lock
Remote Lock
Off
100
Off
Off
Private Information
Keep
Change
Select
RETURN
3. To exit the “Hotel mode”:
Switch off the power with the [POWER] button
on the main unit or the [POWER] button
on the remote control or pressing [EXIT] button
on the remote control.
4. Explain the Hotel mode setup menu.
ITEM Function
Hotel Mode Select hotel mode ON/OFF
Initial INPUT Select input signal modes.
Initial POS Select programme number.
Initial VOL Level Adjust the volume when each time power is
Maximum VOL
Level
Button Lock Select local key conditions.
Remote Lock Select remote control key conditions.
Private
Information
Set the input, when each time power is switched on.
Selection:
Off/Analog/DVB-T/AV1/AV2/HDMI1/HDMI2
*Off: give priority to the last memory. However, Euro
Model is compulsorily set to TV.
Selection:
Off/0 to 99
*Off: give priority to the last memory
switched on.
Selection/Range:
Off/0 to 100
*Off: give priority to the last memory
Adjust maximum volume.
Range:
0 to 100
Selection:
Off/SETUP/MENU
*Off: altogether valid
*Setup: only F-key is invalid
(Tuning guide (menu) can not be selected.)
*MENU: only F-key is invalid
(only Volume/Mute can be selected.)
Selected”
Off/SETUP/MENU
*Off: altogether valid
*Setup: only Setup menu is invalid
MENU: Picture/Sound/Setup menu are invalid
Select private information for VIERA Cast is Keep or
Reset if Hotel mode is set to [On] when TV power
on.
Selection :
Keep/Reset
•Keep: private information for VIERA Cast is keep
•Reset: private information for VIERA Cast is reset
Page 5
Data Copy by USB Memory
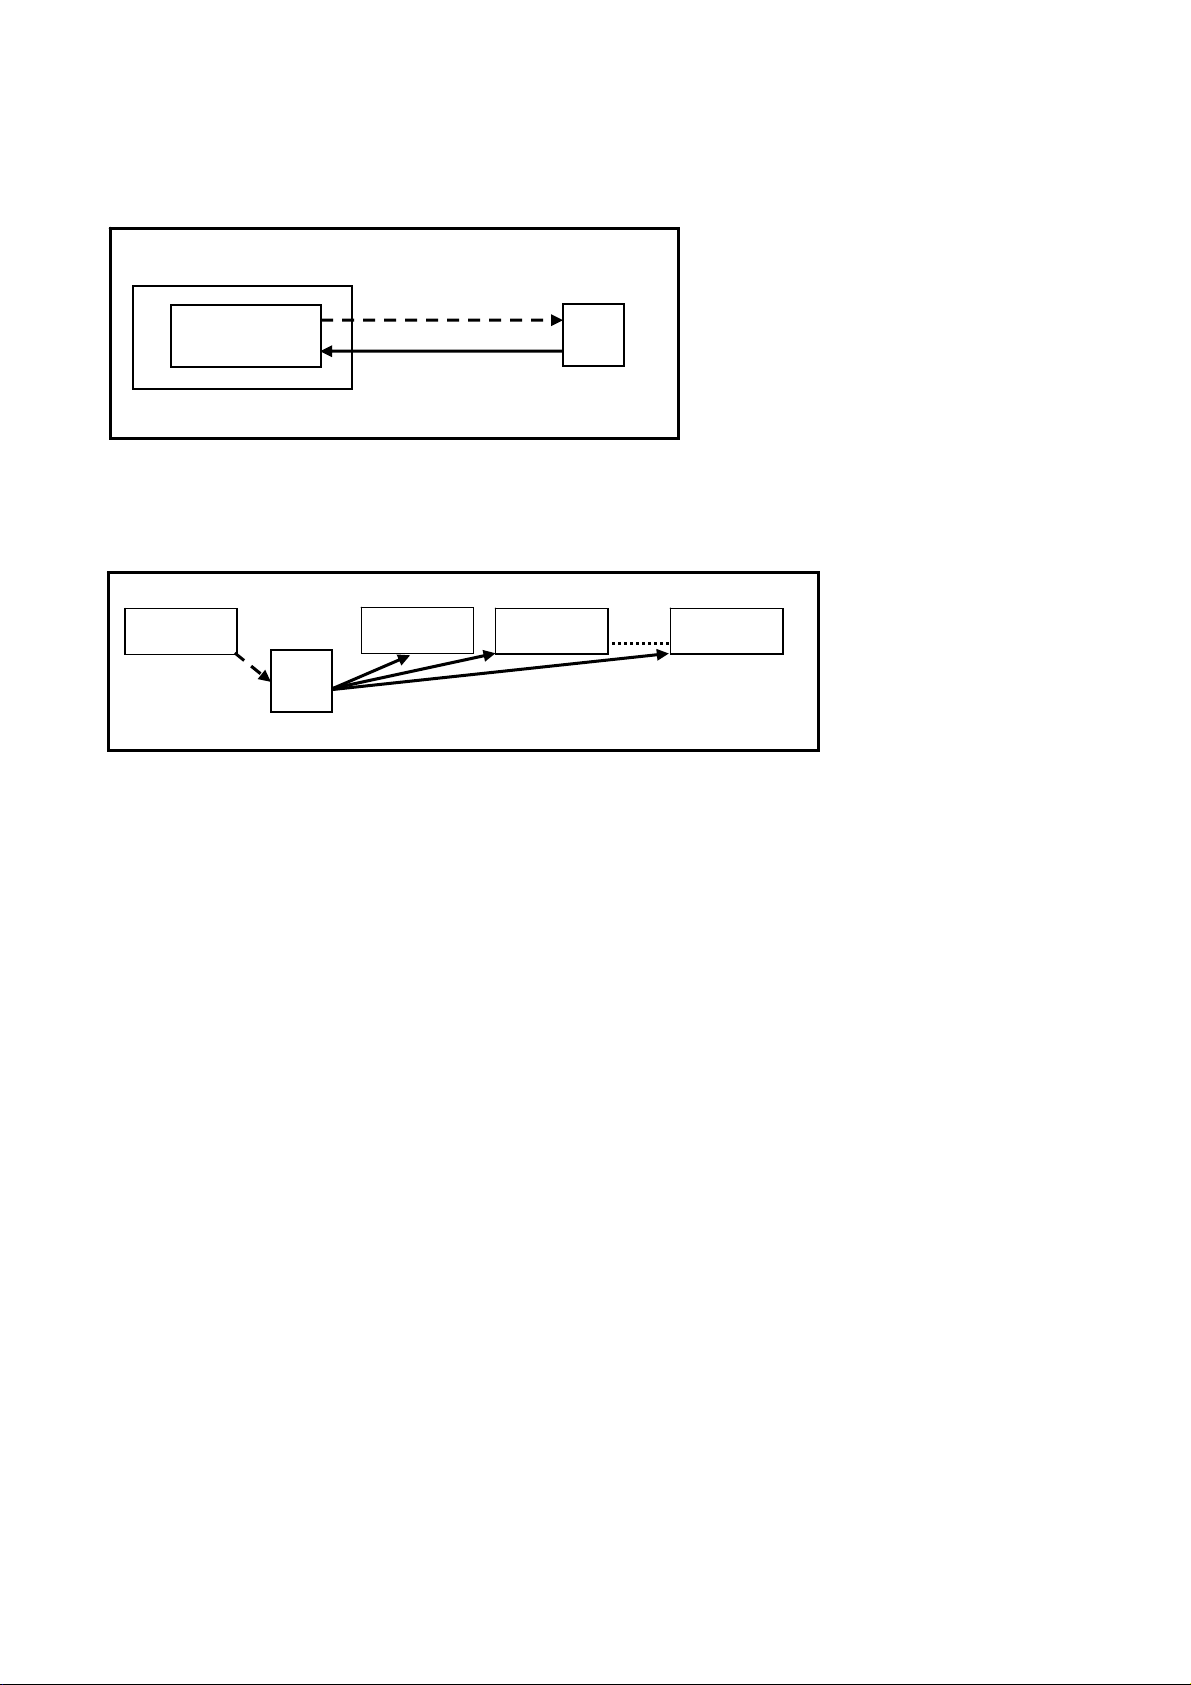
Purpose
a) Board replacement (Copy the data when exchanging A-board):
When exchanging A-board, the data in original A-board can be copied to USB Memory and then copy to new A-board.
TV
A-board
(Before exchanging)
Copy to USB Memory
Memory
(After exchanging)
Copy back from USB Memory
USB
Following data can be copied.
User setting data
(inc. Hotel mode setting data)
Channel scan data
Adjustment and factory preset data
b) Hotel (Copy the data when installing a number of units in hotel or any facility):
When installing a number of units in hotel or any facility, the data in master TV can be copied to USB Memory and the
copy
to other TVs.
Master TV
Copy to USB Memory
USB
Memory
Other TV
Copy from USB Memory
Other TV
Other TV
Following data can be copied.
User setting data
(inc. Hotel mode setting data)
Channel scan data
Preparation
Make pwd file as startup file for (a) or (b) in an empty USB Memory.
1. Insert an empty USB Memory to your PC.
2. Right-click a blank area in a USB Memory window, point to New, and then click text document. A new file is created
by default (New Text Document.txt).
3. Right-click the new text document that you just created and select rename, and then change the name and
extension of the file to the following file name (a) or (b) and press ENTER.
File name:
(a) For Board replacement: boardreplace.pwd
(b) For Hotel: hotel.pwd
Note:
Please make only one file to prevent the operation error.
No any other file should be in USB Memory.
Page 6
Data Copy from TV set to USB Memory
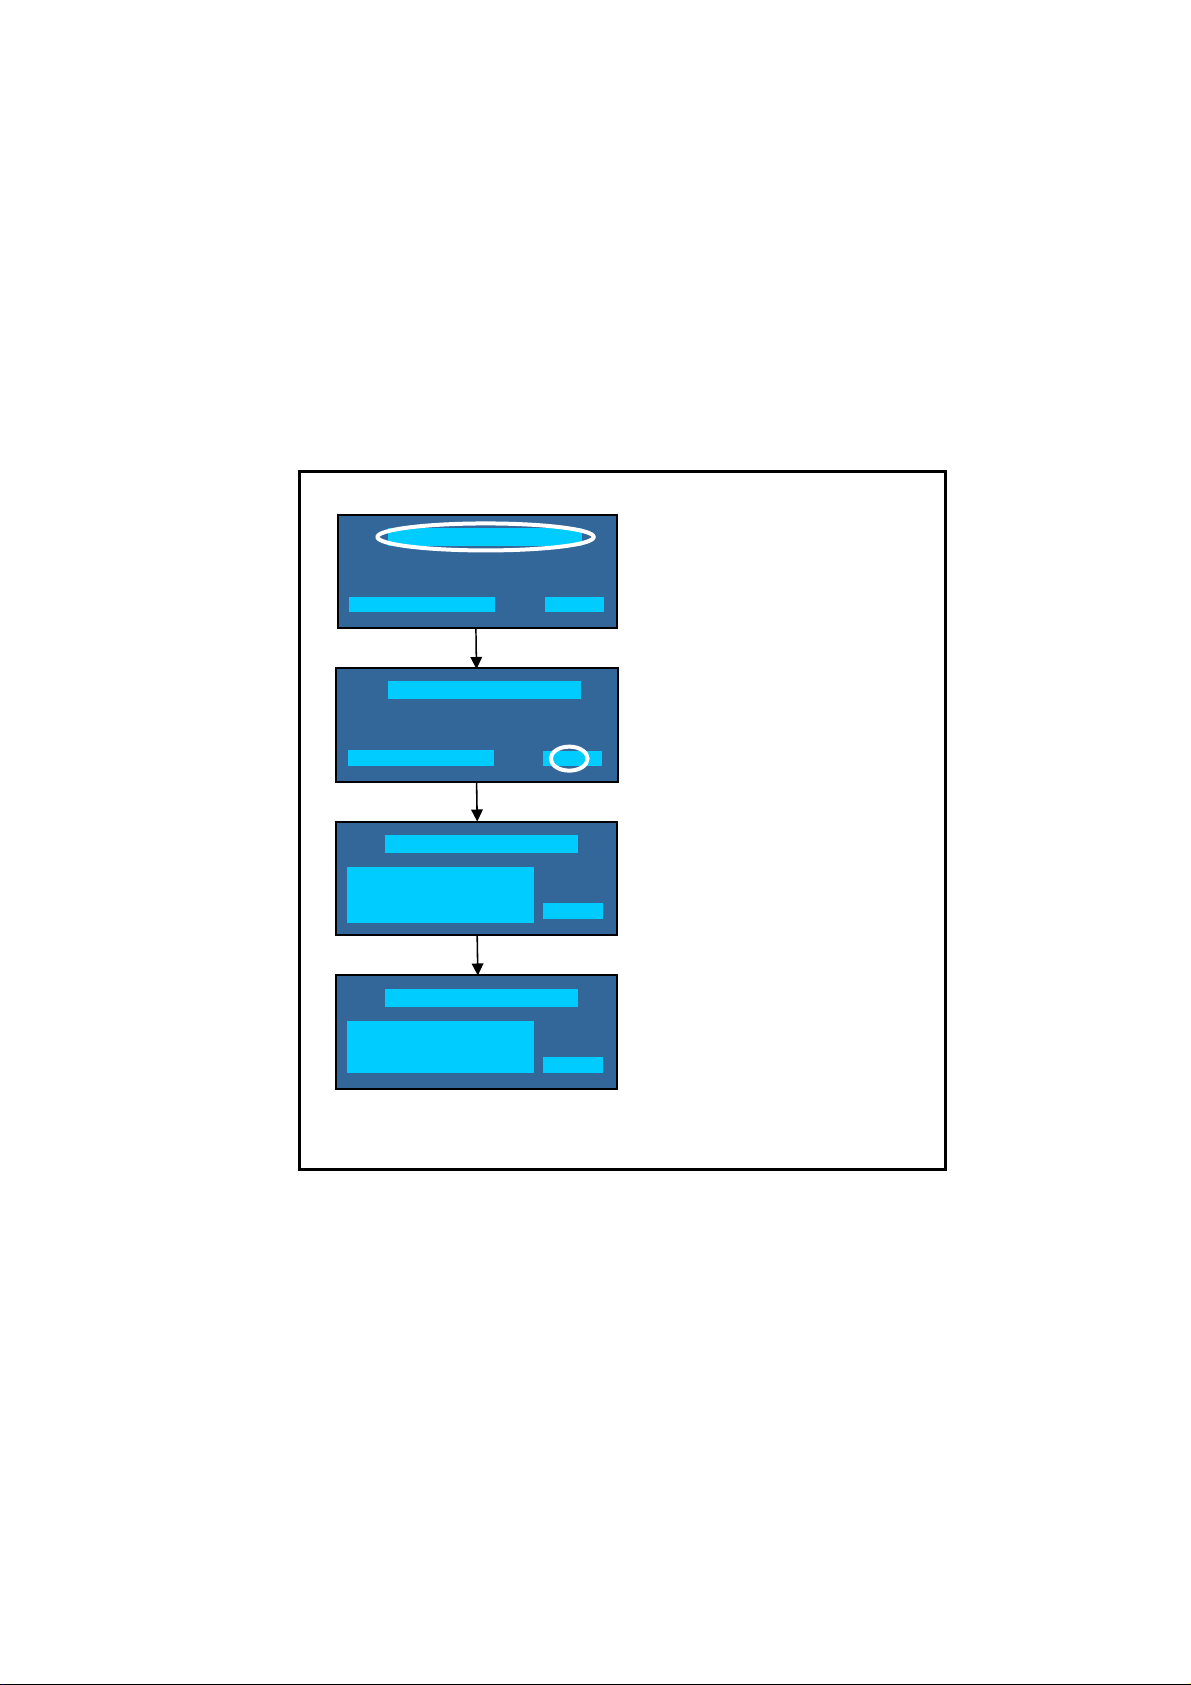
1. Turn on the TV set.
2. Insert USB Memory with a startup file (pwd file) to USB Terminal.
On-screen Display will be appeared according to the startu p file automatically.
3. Input a following password for (a) or (b) by using remote control.
(a) For Board replacement: 2770
(b) For Hotel: 4850
Data will be copied from TV set to USB Memory.
It takes around 2 to 6 minutes maximum for copying.
4. After the completion of copying to USB Memory, remove USB Memory from TV set.
5. Turn off the TV set.
Note:
Following new folder will be created in USB Memory for data from TV set.
(a) For Board replacement: user_setup
(b) For Hotel: hotel
Please do not remove the Media
Data copy has been successful
Data Copy(Board replacement )
Input password
Data Copy(Board replacement )
Input password
Data Copy(Board replacement )
Copy TV to Media
Please wait for a while
Data Copy(Board replacement )
Performing
Please remove Media
Data copy
(Board replacement) or (Hotel)
-----
Input Password
2770 or 4850
-----
Performing
GETTING
Completion
FINISH
Page 7
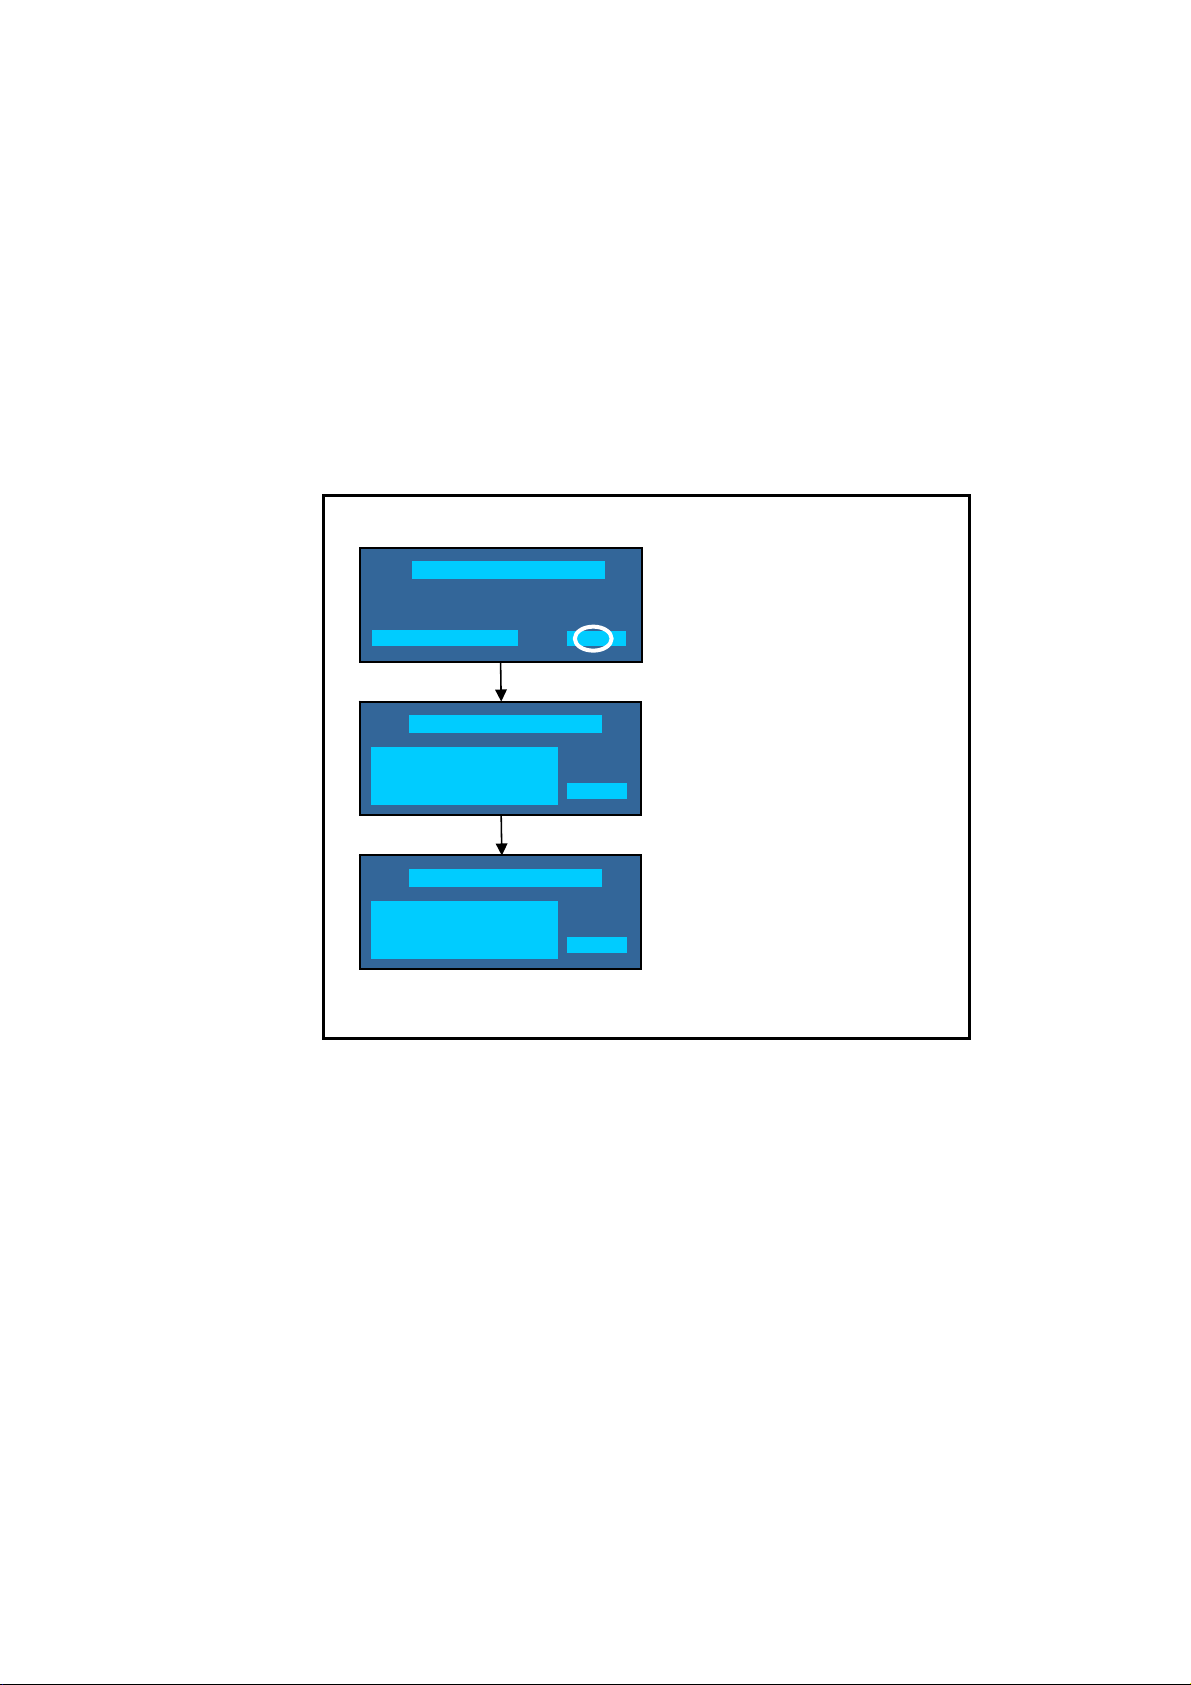
Data Copy from USB Memory to TV set
1. Turn on the TV set.
2. Insert USB Memory with Data to USB Terminal.
On-screen Display will be appeared according to the Data folder automatically.
3. Input a following password for (a) or (b) by using remote control.
(a) For Board replacement: 2771
(b) For Hotel: 4851
Data will be copied from USB Memory to TV set.
4. After the completion of copying to USB Memory, remove USB Memory from TV set.
(a) For Board replacement: Data will be deleted after copying (Limited one copy).
(b) For Hotel: Data will not be deleted and can be used for other TVs.
5. Turn off the TV set.
Note:
1. Depending on the failure of boards, function of Data for board replacement does not work.
2. This function can be effective among the same model numbers.
Data Copy(Board replacement )
Input Password
Input password
Performing
Data Copy(Board replacement )
Copy Media to TV
Please wait for a while
Please do not remove the Media
Data Copy(Board replacement )
Performing
Data copy has been successful
Please turn off the TV for system
initializing
Input Password
2771 or 4851
-----
Performing
WRITING
Completion
FINISH
Page 8
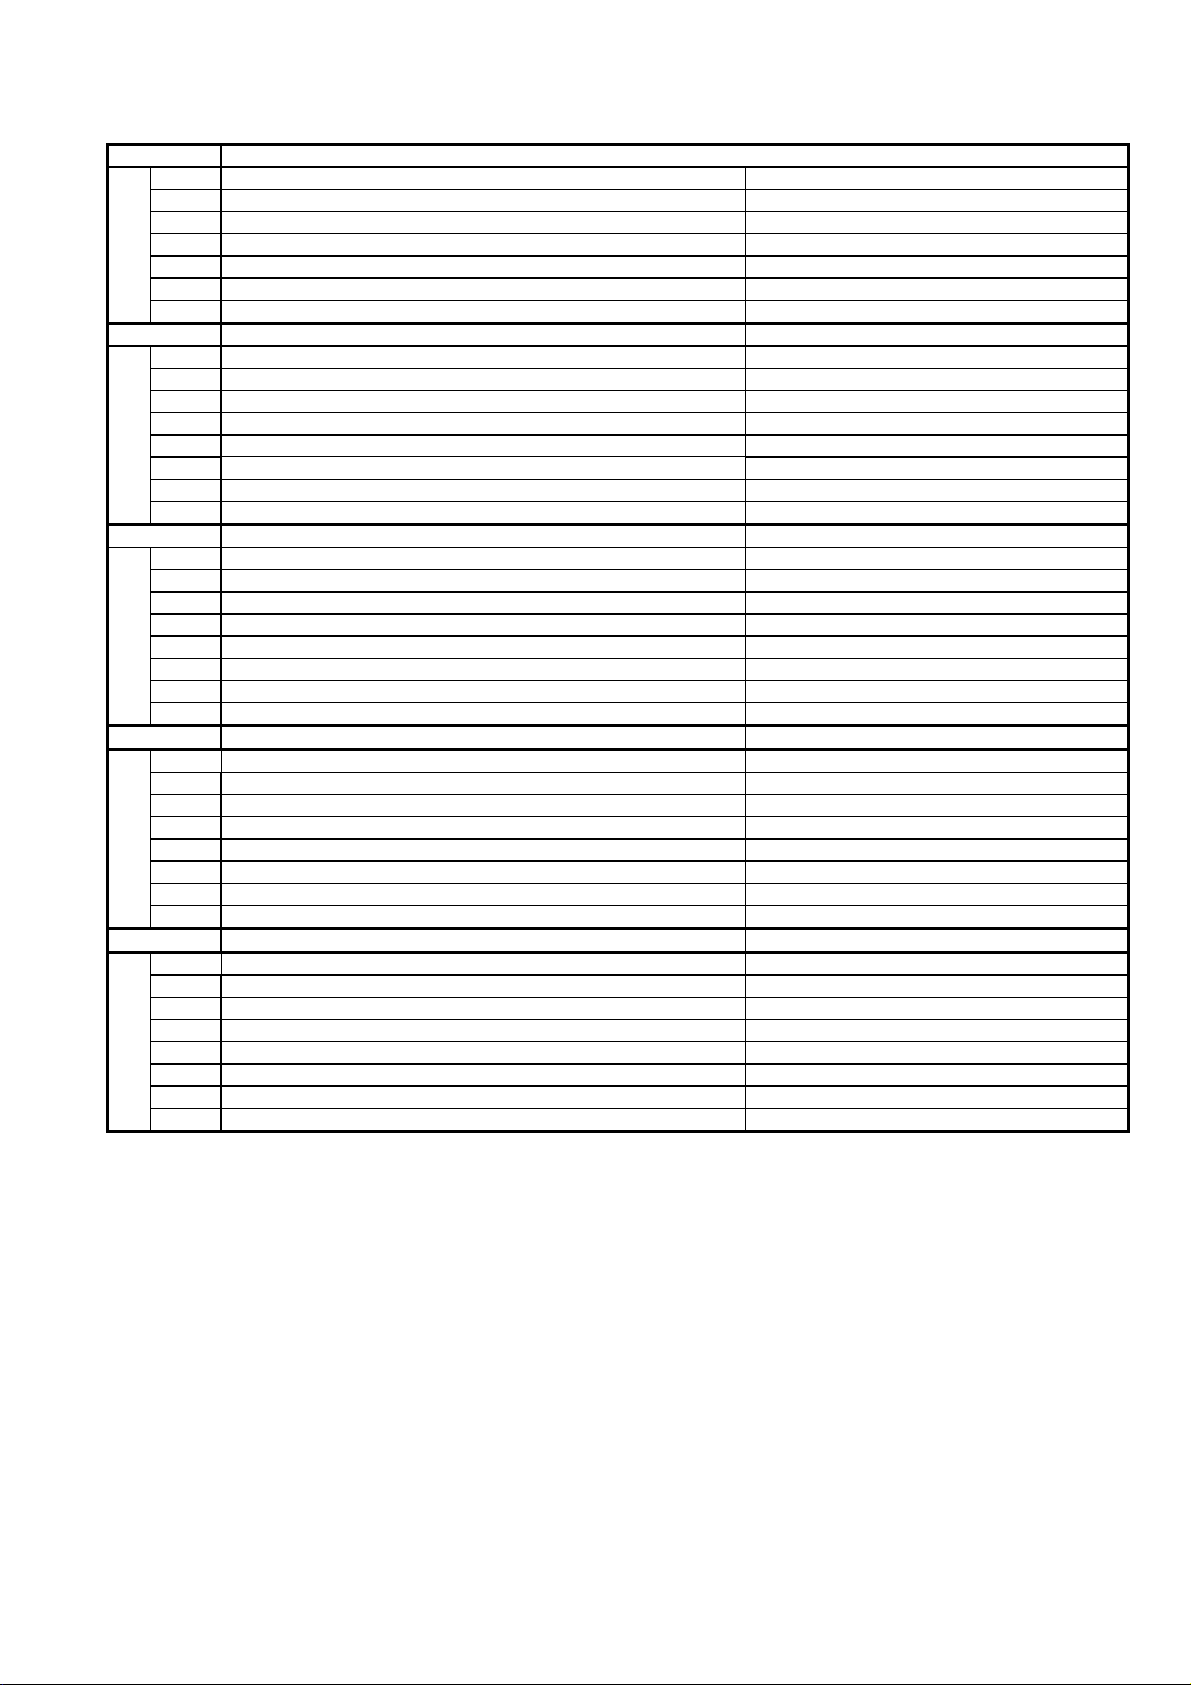
Option Bytes Description
OPTION1
b1 TEXT Ch Refresh ON (1) / OFF (0)
b2 ID-1 ON (1) / OFF (0)
b3 Macrovision Auto-judge ON (1) / OFF (0)
b4 Reserved b5 Reserved b6 Enable HDMI force reset ON (1) / OFF (0)
b7 Reserved OPTION2
b0 Adjust Igain enable ON (1) / OFF (0)
b1 A2 BG enable (5.5MHz) ON (1) / OFF (0)
b2 A2 DK1 enable (6.26MHz) ON (1) / OFF (0)
b3 A2 DK3 enable (5.742MHz) ON (1) / OFF (0)
b4 NICAM scan ON (1) / OFF (0)
b5 NICAM BG enable (5.5MHz) ON (1) / OFF (0)
b6 NICAM I enable (6.0MHz) ON (1) / OFF (0)
b7 NICAM DK enable (6.5MHz) ON (1) / OFF (0)
OPTION3
b0 NICAM priority ON (1) / OFF (0)
b1 Reserved -
b2 Reserved -
b3 A2 DK2 enable ON (1) / OFF (0)
b4 Inhibition of countermeasure for SIF signal drop ON (1) / OFF (0)
b5 Get onid from physical CH (CHINA) ON (1) / OFF (0)
b6 SSU search enable for HOTEL model ON (1) / OFF (0)
b7 SASO mute (ASIA) ON (1) / OFF (0)
OPTION4
b0 Countermeasure for Taiwan NTSC noise sound ON (1) / OFF (0)
b1 Enable Compatible with Video and Sound for Analog VIF ON (1) / OFF (0)
b2 3DYC color motion detect ON (1) / OFF (0)
b3 RF Clamp Current minimum (TAIWAN) ON (1) / OFF (0)
b4 Reserved -
b5 Reserved -
b6 Reserved -
b7 Enable workaround for Polsat CAM problem (POLAND) ON (1) / OFF (0)
OPTION16
b0 PIP (derivate models) ON (1) / OFF (0)
b1 “Bass Boost” sound menu enable (derivate models) ON (1) / OFF (0)
b2 “Digital Remaster” sound menu enable (derivate models) ON (1) / OFF (0)
b3 “XR-Audio Pro Surround” sound menu enabel (derivate models) ON (1) / OFF (0)
b4 “Ambience” sound menu enable (derivate models) ON (1) / OFF (0)
b5 Reserved -
b6 Reserved b7 Reserved -
 Loading...