

Page 1
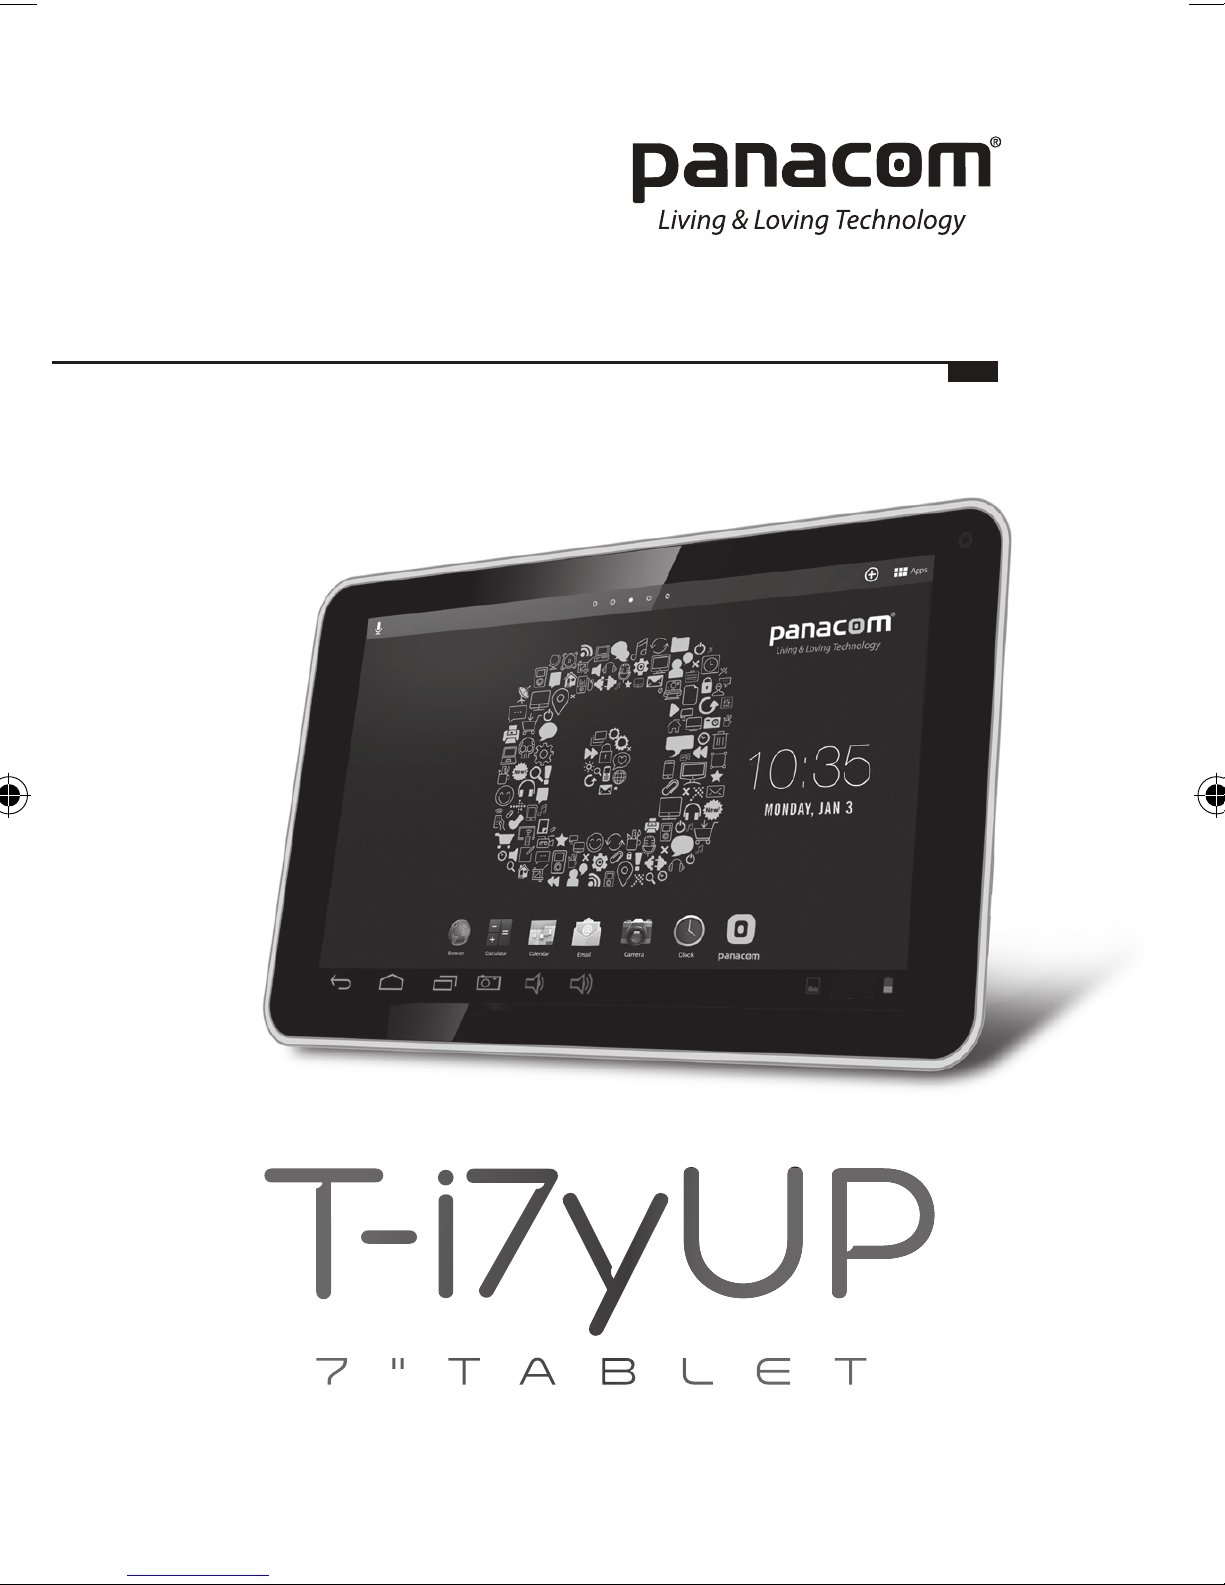
T-i7yUP User Manual
T-i7yUP Manual del Usuario
Page 2

Pg. 2
Thanks for purchasing 7” TABLET T-i7yUP PANACOM.
Please read this manual carefully before using this Tablet.
DO NOT ALLOW WATER OR FOREIGN OBJECTS TO ENTER
THE UNIT.
I. NOTE:
1. Avoid the unit being dropped. Avoid the display been shake
seriously, or the display will be damaged or unusual.
2. Do not use metal object to touch the device to prevent it from
short circuit.
3. Please backup your data in case your important data is lost,
especially before you upgrade the rmware. The company will
not take charge in any loss that caused by lost of data.
4. Do not disassemble. Do not wipe the surface of the unit by
alcohol, thinner or benzene.
5. Do not disconnect the unit while it is formatting or uploading/
downloading, or the procedures may lead to errors
6. We do not take responsibility to the ash damage caused by
product broken, repair or other reasons. Please operate strictly
as per the user guide.
7. Avoid water or foreign objects enter the unit.
8. Do not use the unit in places that are extremely hot, cold, dusty,
or humid.
9. Specications are subject to change and improvement without
notice
Page 3
Pg. 3
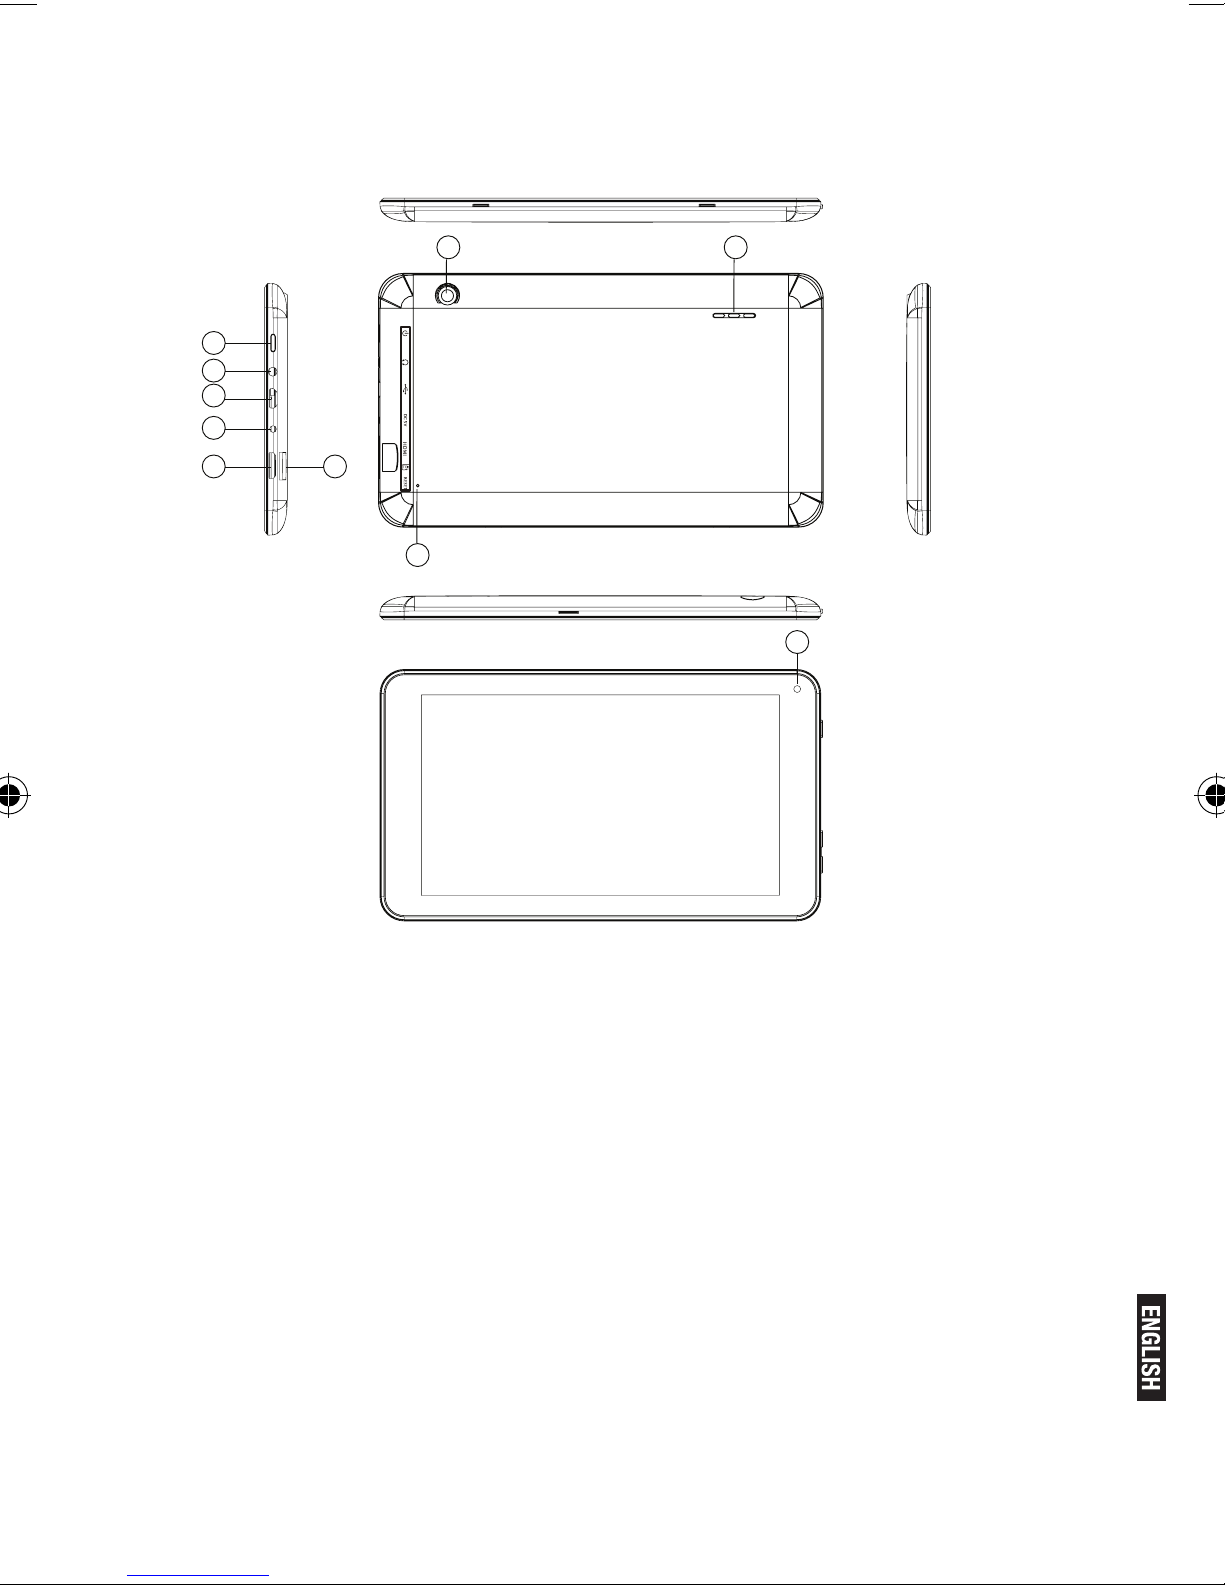
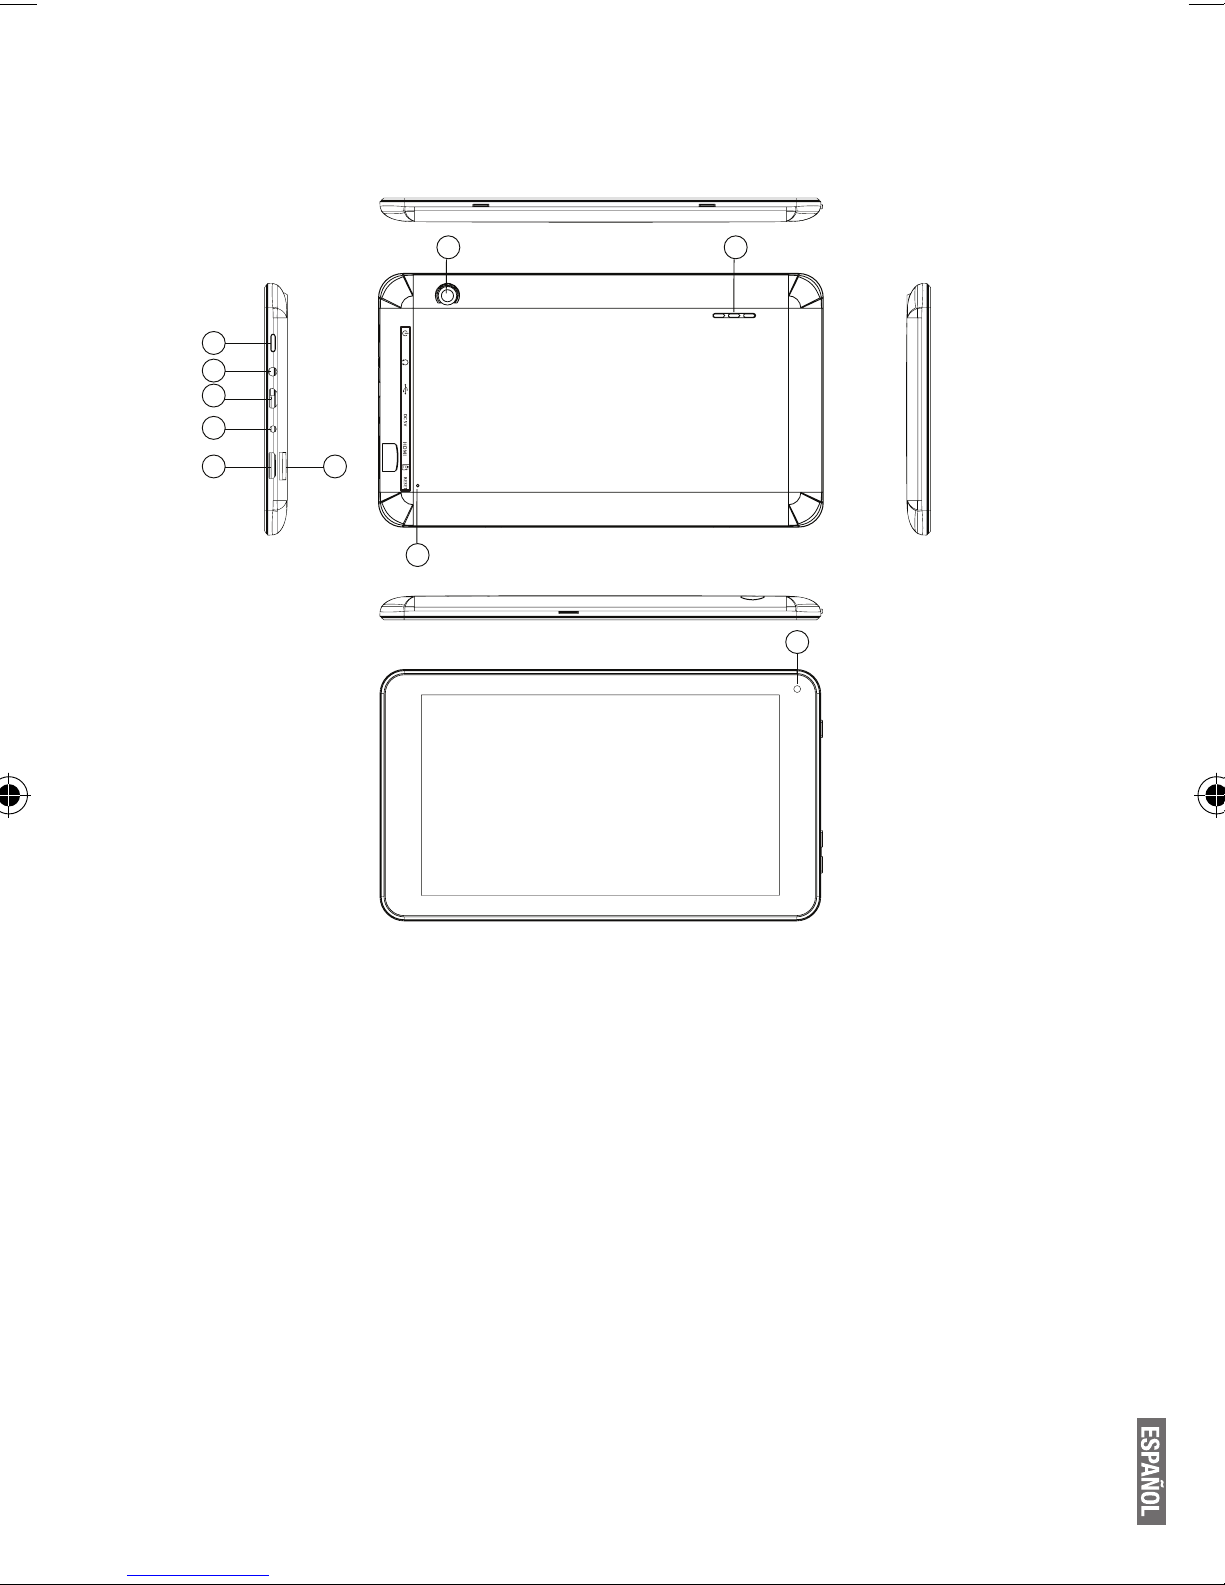
II. INTRODUCTION OF COVER:
8 9
1
2
3
4
5 6
7
9
1. Power on/off
2. Earphone Jack
3. Micro USB interface
4. DC charger interface
5. Volume+, Volume –
6. TF-CARD interface
7. Reset
8. Back Camera
9. Loudspeaker
10. Front Camera
Page 4
III. OPERATION INSTRUCTION
1. Basic Operation
1.1. Power on/Power off
Power on:
Press and hold the power switch for 5 seconds; the unit displays the
start-up logo and enters the working mode.
Power off:
Press and hold the power switch for 3 seconds to turn the unit off.
Sleep:
While the device is at working status, press the power switch, it
enters the sleeping mode, and the screen will be off then. Press the
power switch again, it shift to the normal mode. You may use this
function when you don’t’ use the device temporary to save power.
1.2. Charging
When the device prompts low battery, please charge it by provided
charger.
Note:
To improve the longevity of the battery, you may charge for another
15 minutes after it prompts the battery is full.
1.3. Main menu
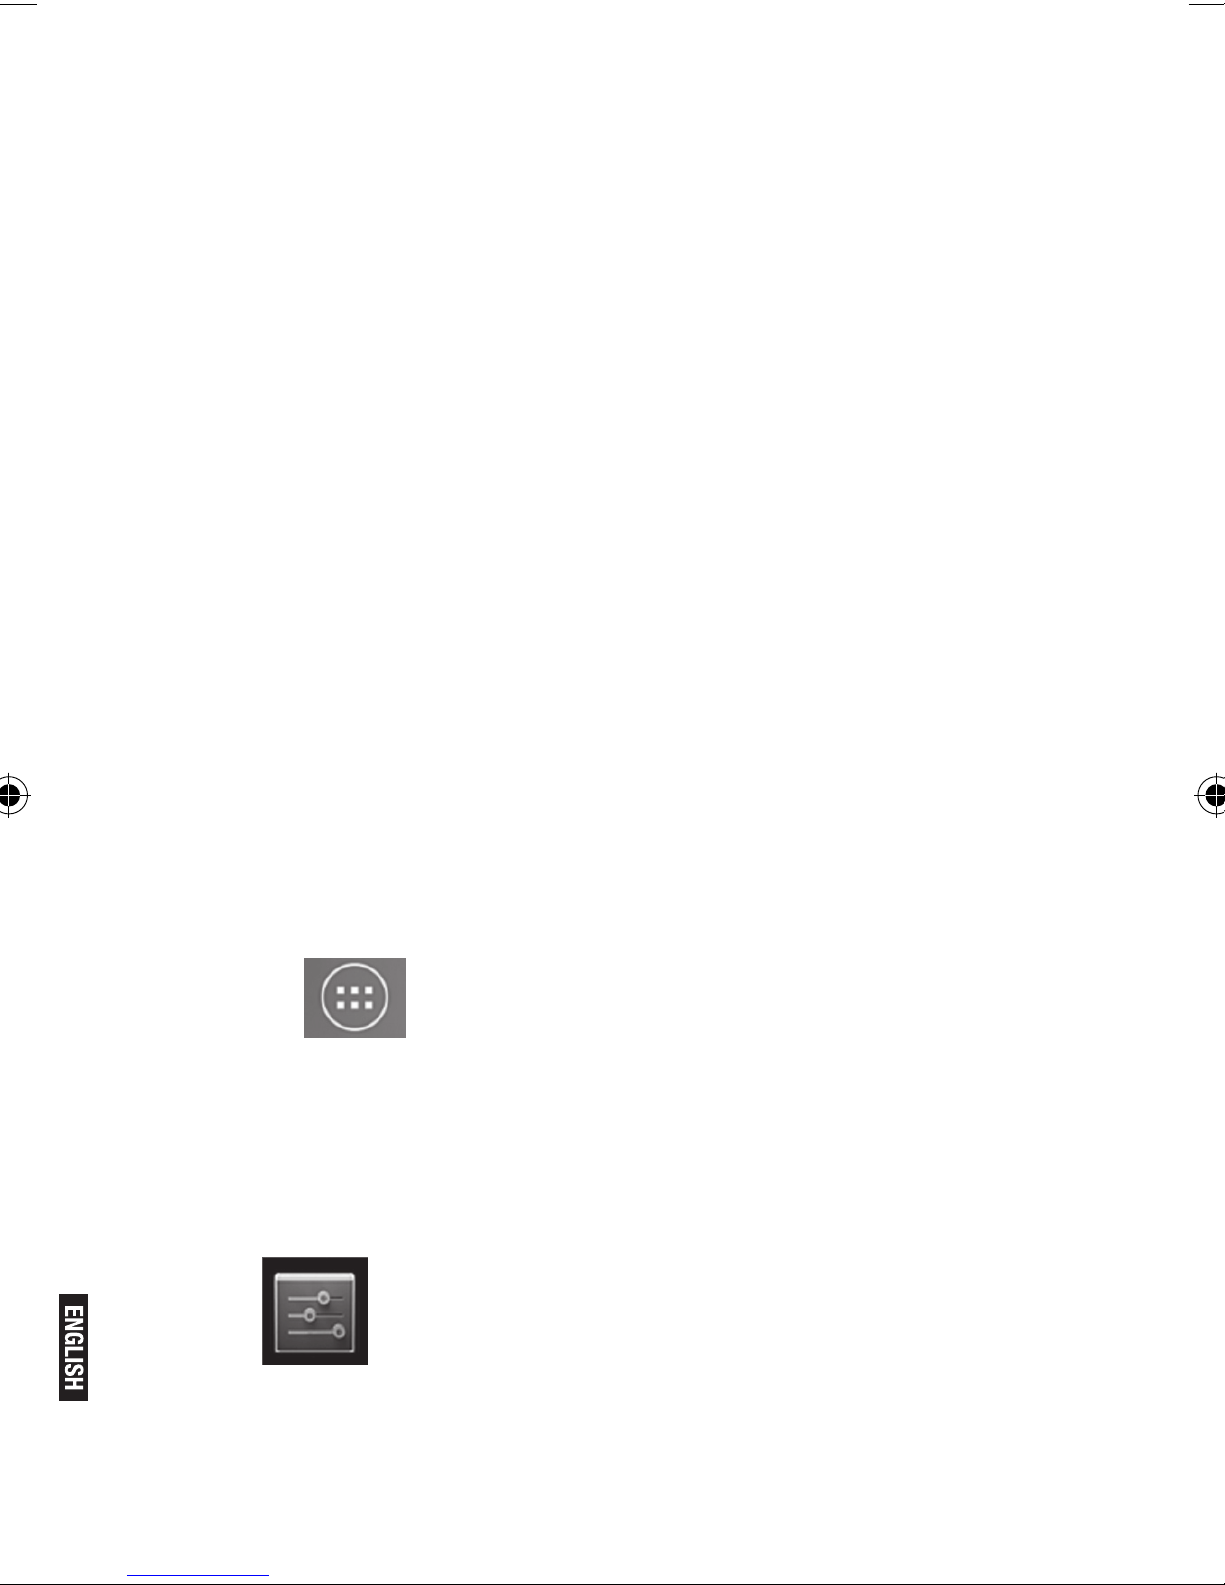
Click the icon in the main interface, the main menu is
appeared. It including the system setting, music playback, video
playback, web browser and other applications you installed in the
main menu.
2. Settings
Click “ ” in the main interface to enter the setting interface.
Click the corresponding setting items to operate.
Pg. 4
Page 5
Pg. 5
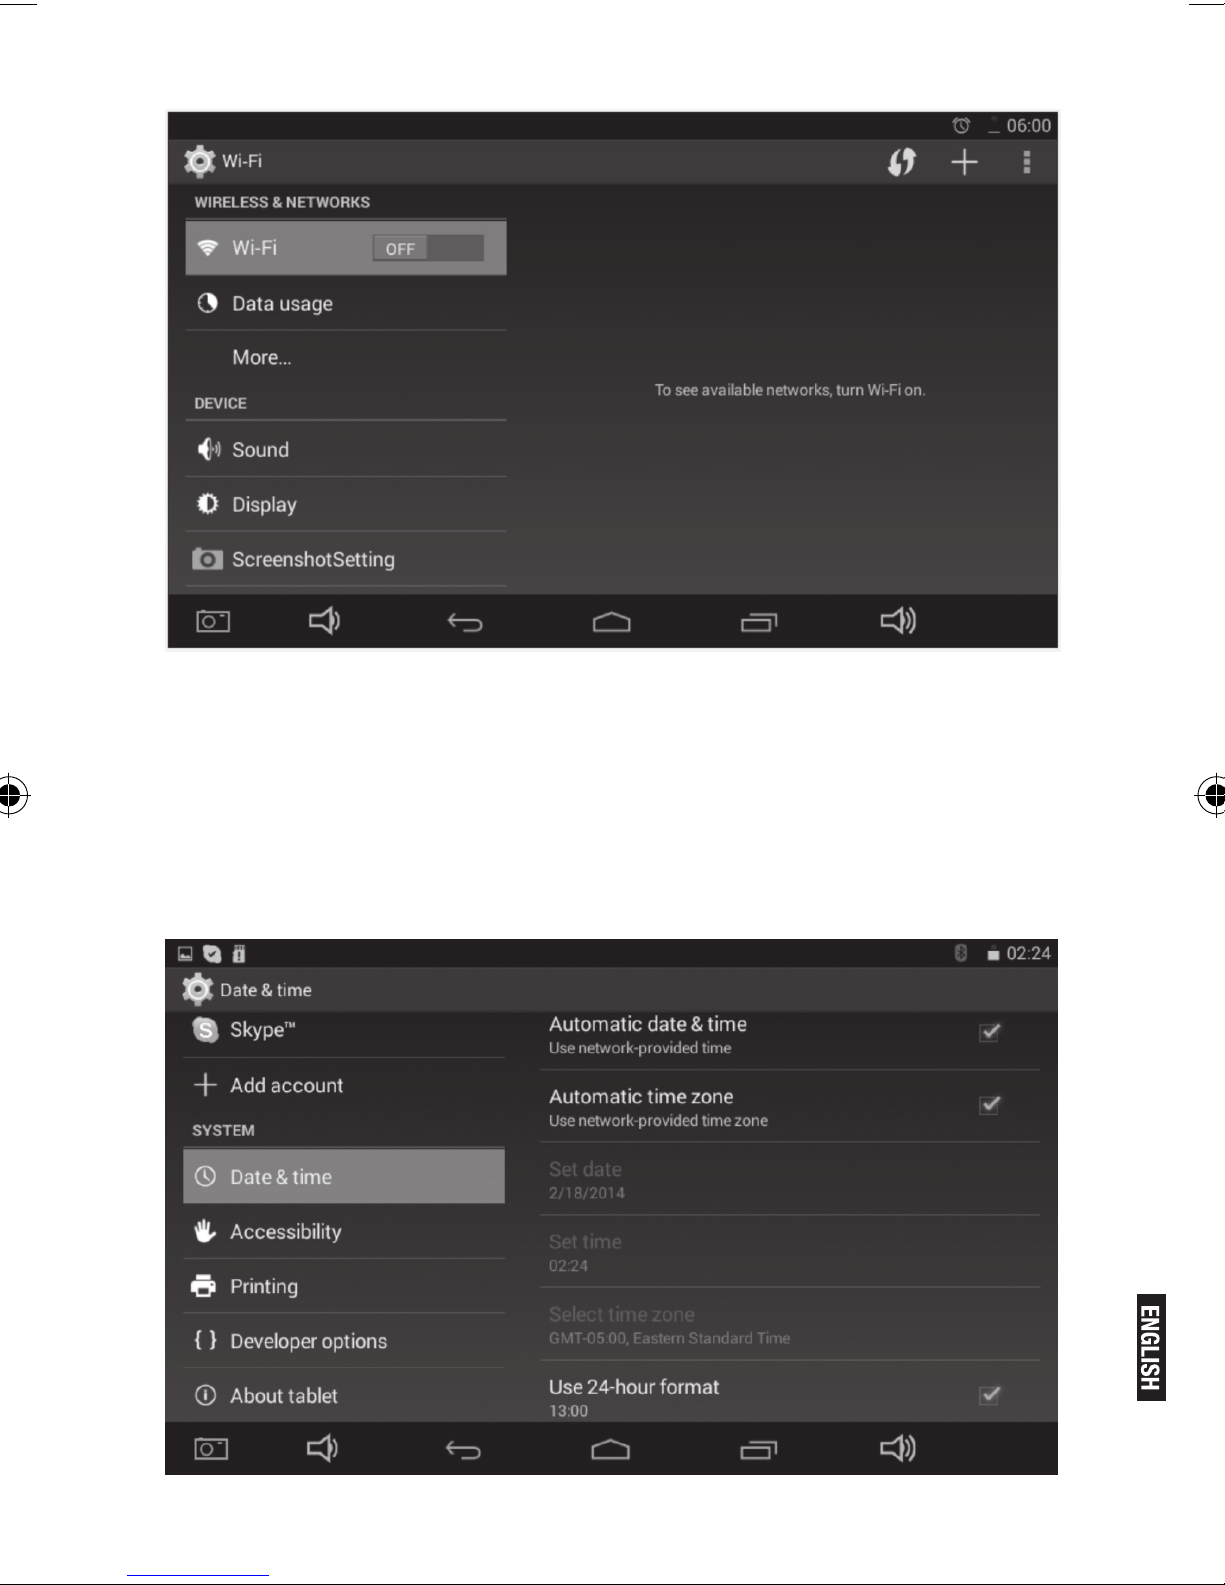
2.1. Date and Time Setting
Click “Date & Time” in the setting interface to set the date and time.
You may set the date, time zone, time, time format and date format
etc. in the menu.
Page 6
Pg. 6
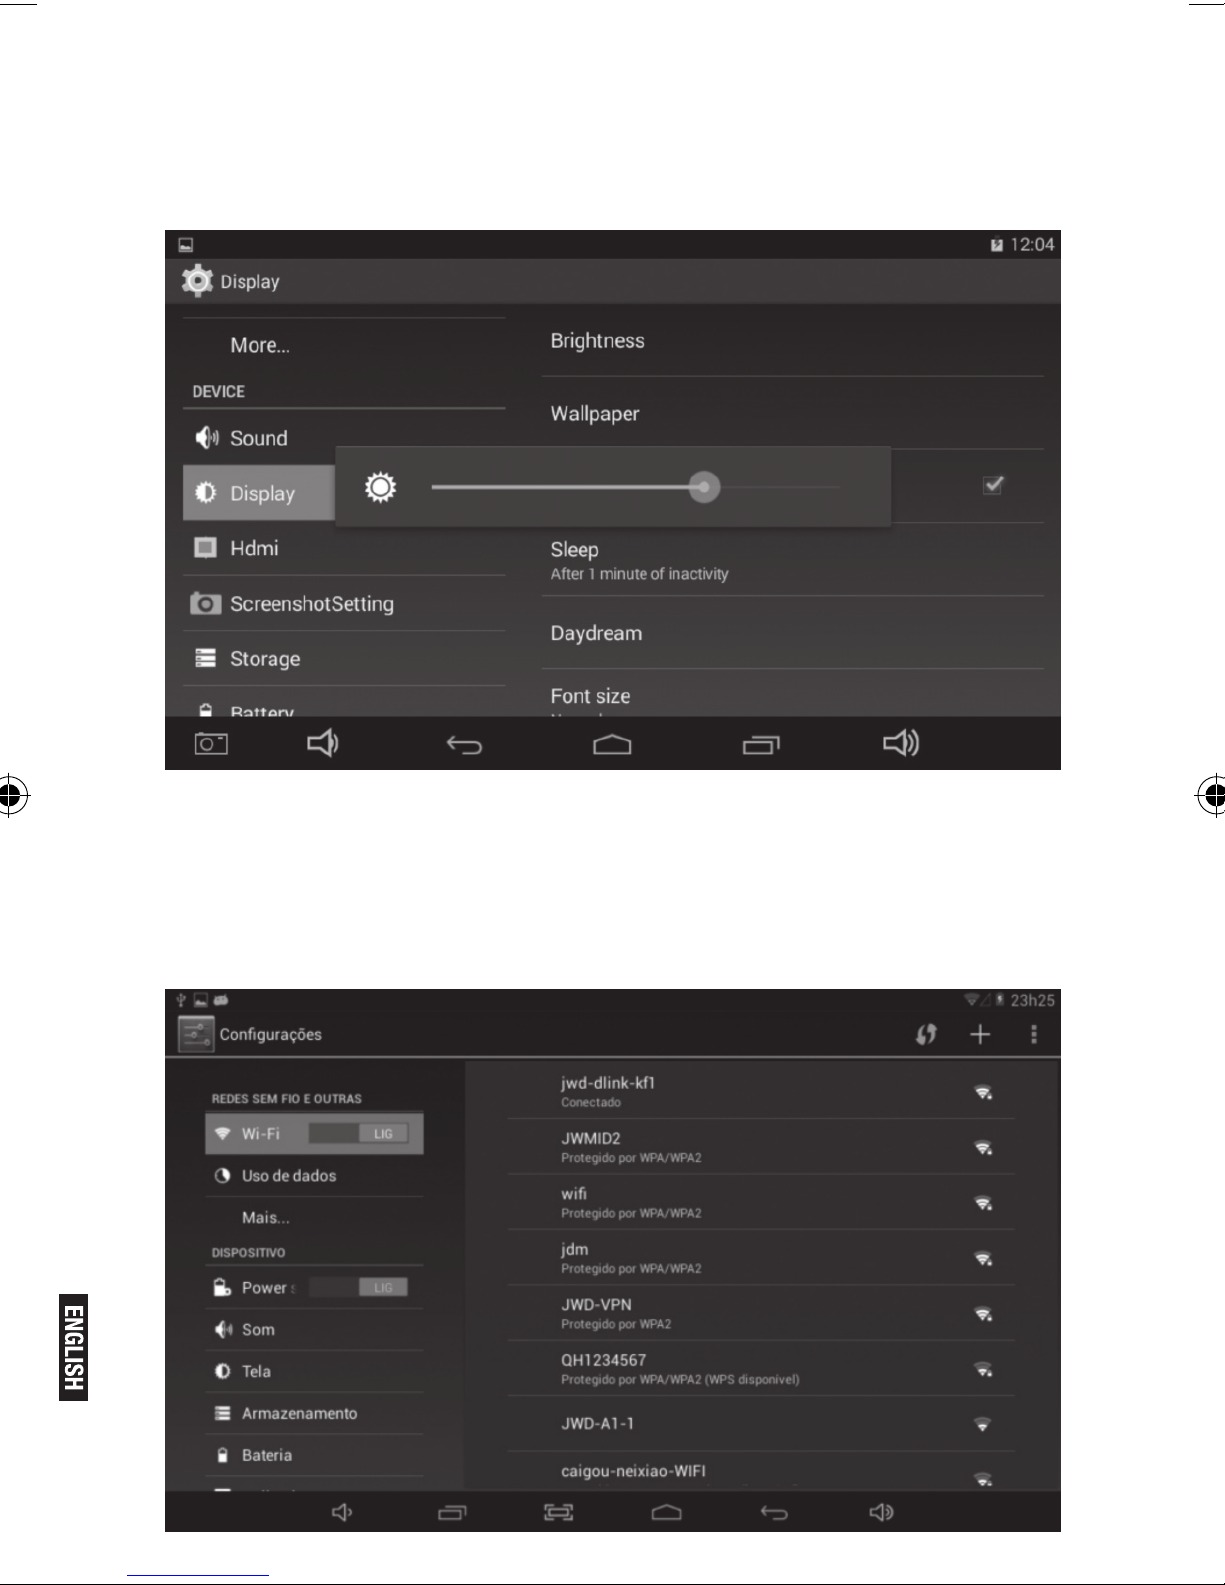
2.2. Brightness
Select “Display” in the setting interface. Click “Brightness” to
enter, and slide the bar to adjust the brightness.
3. Wi-Fi connection
Click “Settings” in the main interface and click “Wireless &
network” to enter the wireless and network setting interface. Click
Wi-Fi to turn on the WIFI. Click Wi-Fi setting to set and manage
wireless access.
Page 7

Pg. 7
Click “Network Notication”, it lists the open network it searched.
Click the name of the network; it pops up the setting window. You
may connect it to WIFI according to the prompts. You need to
input the user name and password if networks are encrypted.
4. Explorer to install App
4.1 Install
There are many ways to install applications under Android, such
as via USB, by third party program. We introduce installation by
Apps Installer here.
Click the “APKInstaller” in the main interface to enter the “install
and manage” interface.
Select the APK le you want and enter the application installation
interface. Click “Install” to install the application automatically.
After installation, it prompts “Open” and “Finish”. Click “Open” to
open the application. Click “Finish” to exit.
4.2 Uninstall
You may use the corresponding third party software management
tool or the installed application management software of the
device to install applications.
Select “Setting/Applications/Manage applications” to select the
installed applications and check the attribute of it or uninstall it.
5. Connect to internet
5.1. After connecting with WIFI, open the browser and input the
web address, you can browse the web then.
5.2. Click the icon to enter the bookmark to view the browse
history. Click the web page you want to open it.
To save the web page into bookmark, you may click to enter
and click “add” to save it.
Page 8
6. Audio and video playback
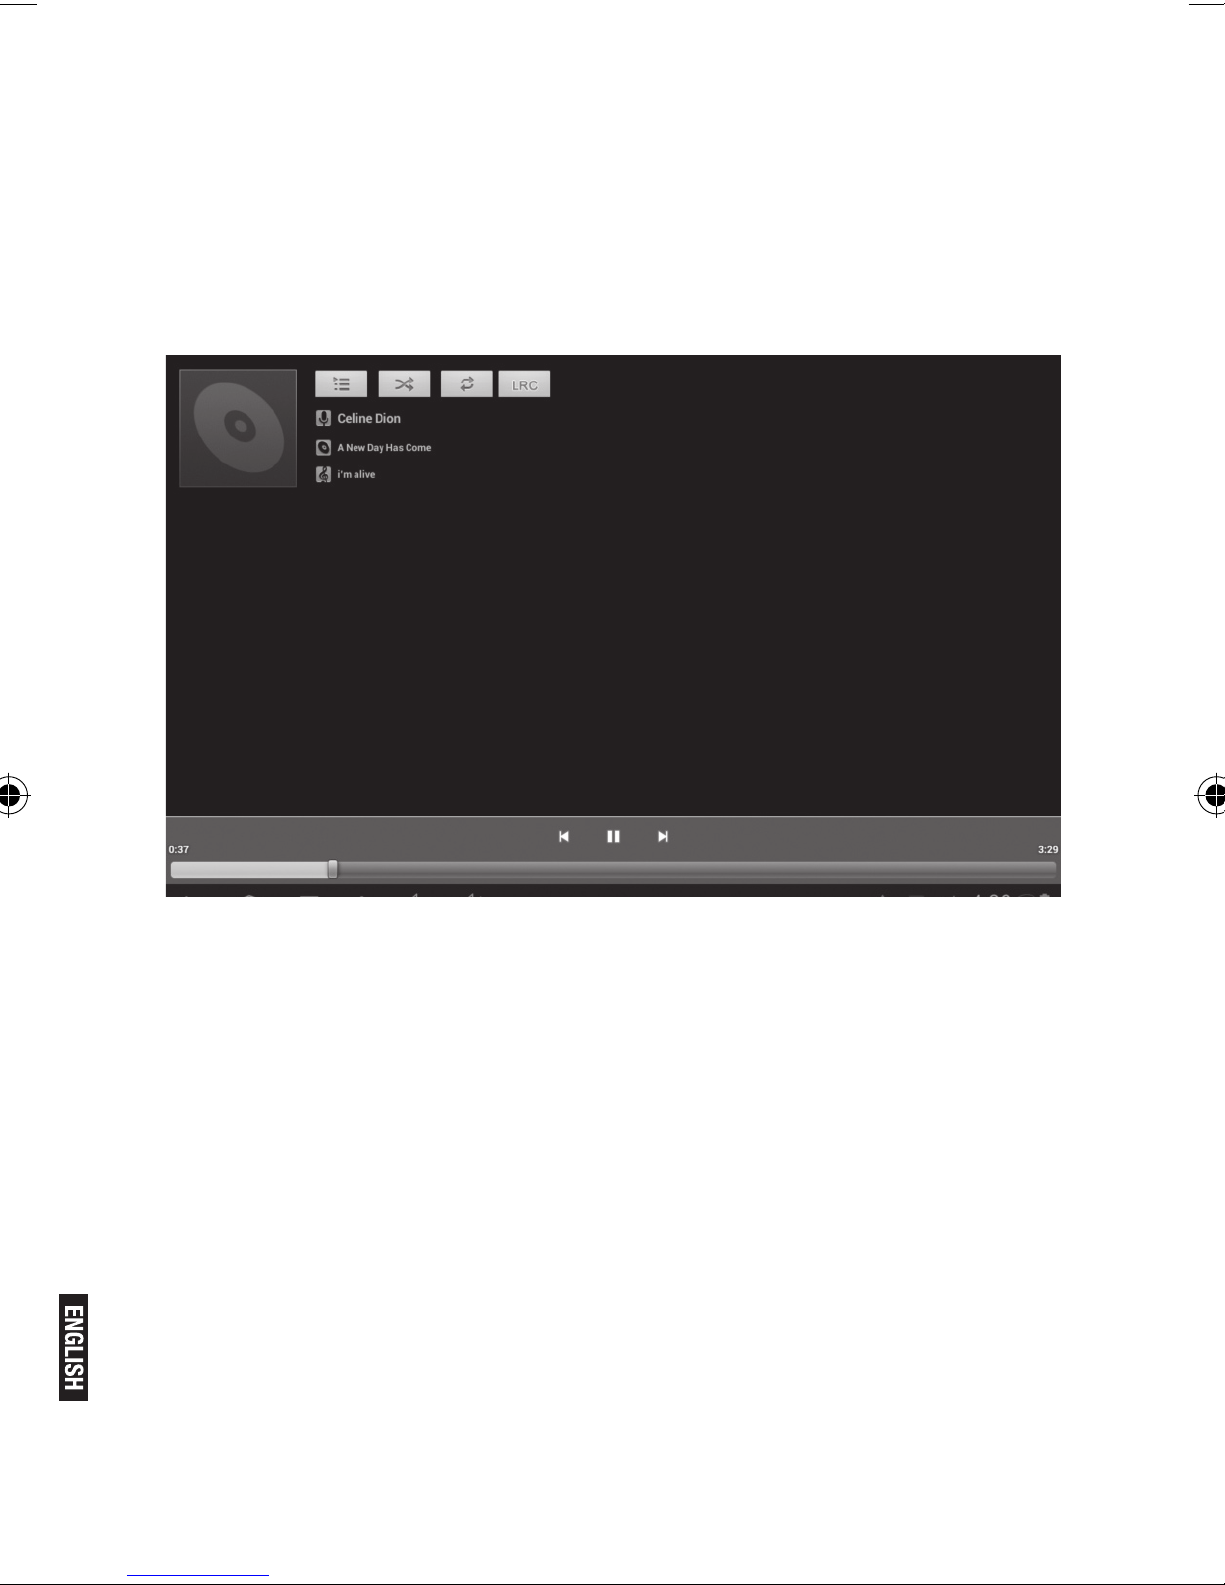
6.1. Audio playback
Click the “Music” in the main menu to enter the audio playback
interface. It lists the audio les in the device, and you may click the
le name to play it. in the audio playing interface, click the icons to
play/pause/ increase volume/ decrease voluem/ FF/ REW….
Pg. 8
Page 9
Pg. 9
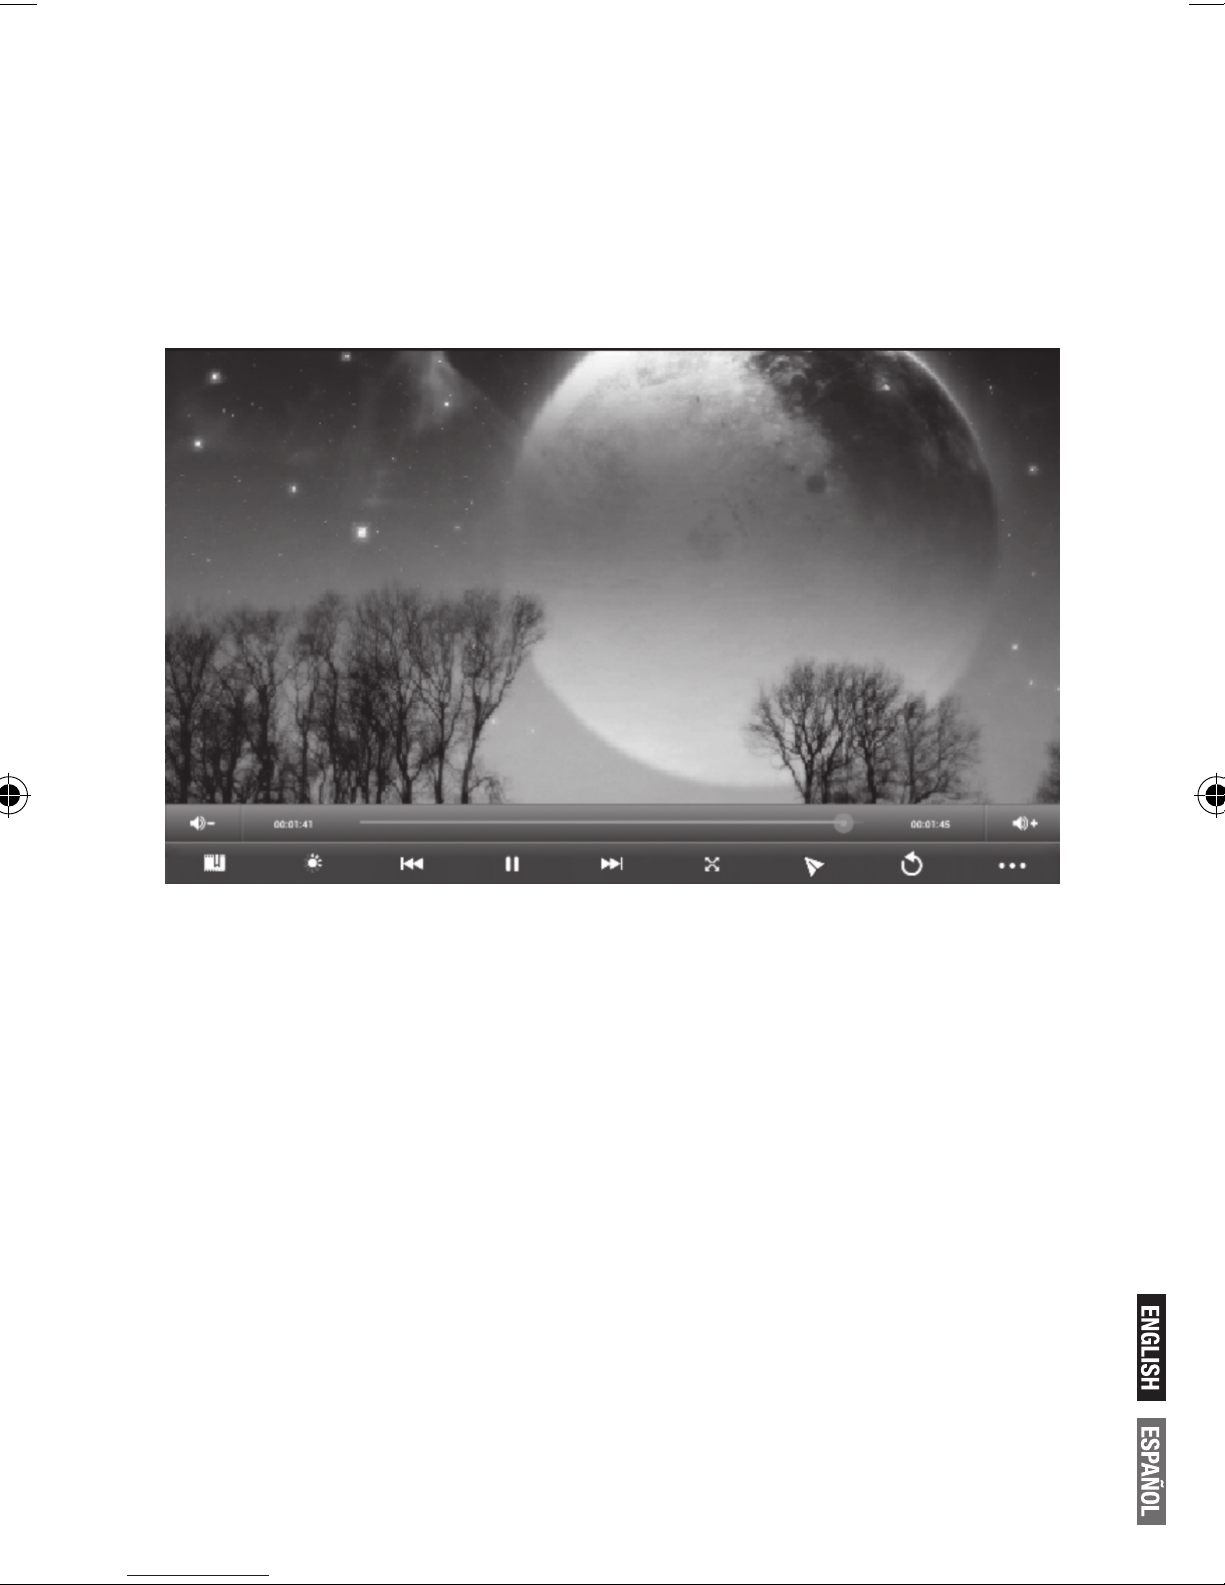
6.2. Video Playback
Click the “Gallery or Video” in the main menu to enter the video playback
interface. It lists the video les in the device, and you may click the
le name to play it. in the video playing interface, touch the screen to
pop-up the operation icons and click the icons to play/pause/ increase
volume/ decrease volume/ skip to next le/skip to previous le….
Page 10
Pg. 10
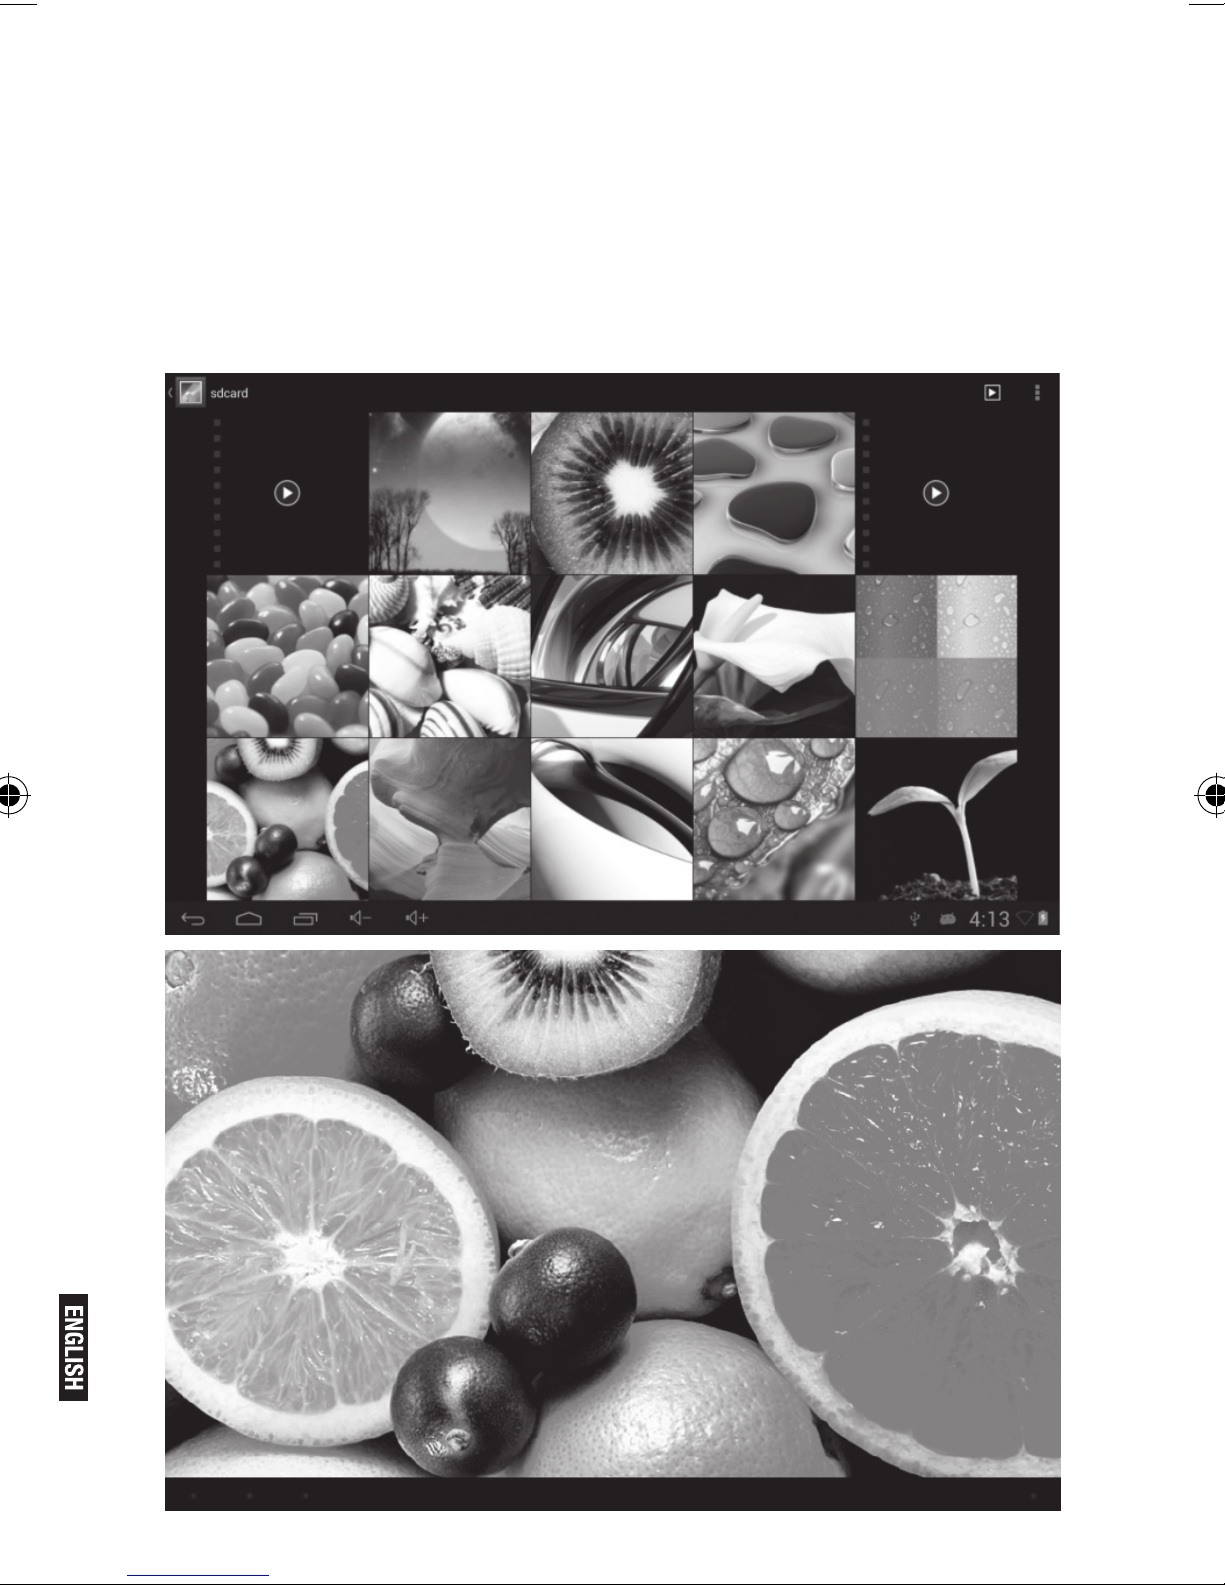
7. Picture viewing
Click “2160P(Gallery)” in the main menu to enter the picture folder list.
Select and click the folder you want to enter, it displays the . click the
thumbnail of the picture to view it.
Touch the screen to pop-up the operation icons while viewing the
picture, you may zoom in/zoom out/ skip to next picture/skip to
previous picture/ rotate/ delete the picture…
Page 11
Pg. 11
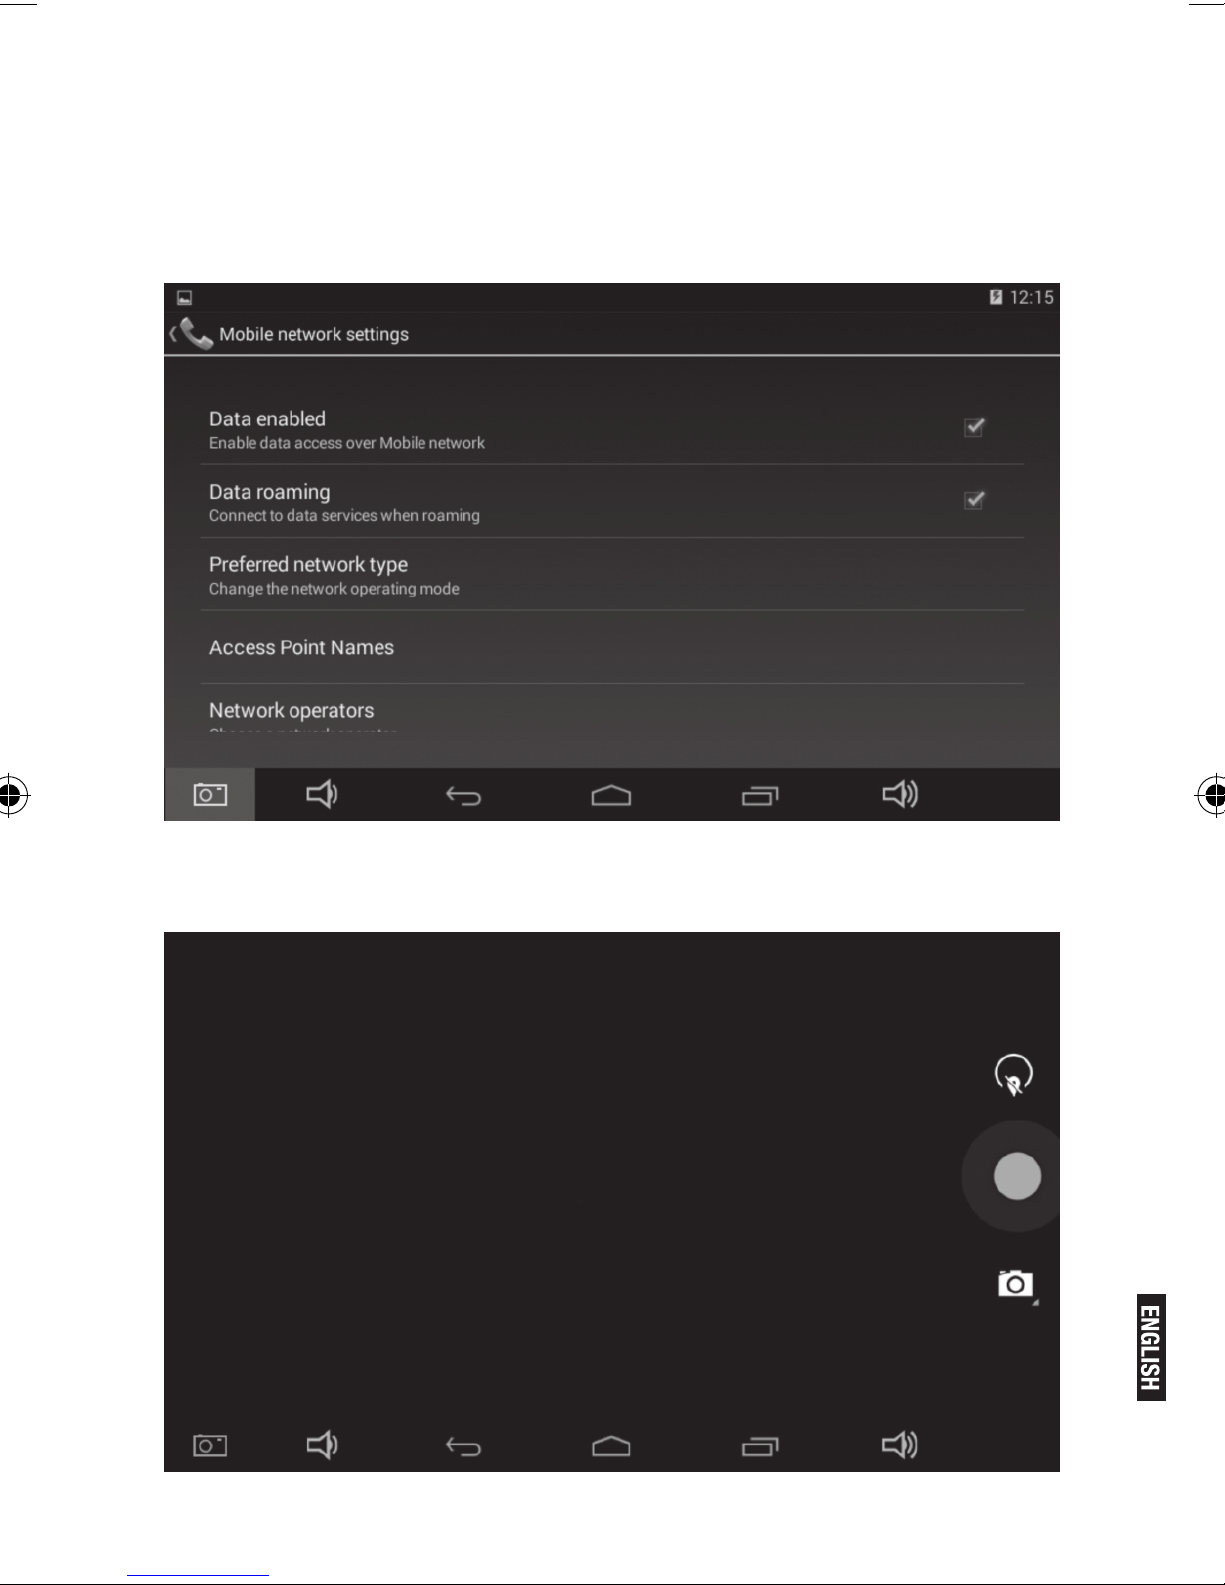
8. 3G DONGLE
The device supports external BT Dongle, connect the BT dongle to the
device via the external transfer cable, after the dongle indicator lights,
you may use the BT network normally.
9. Camera
Click “Camera” in the main interface.
Page 12
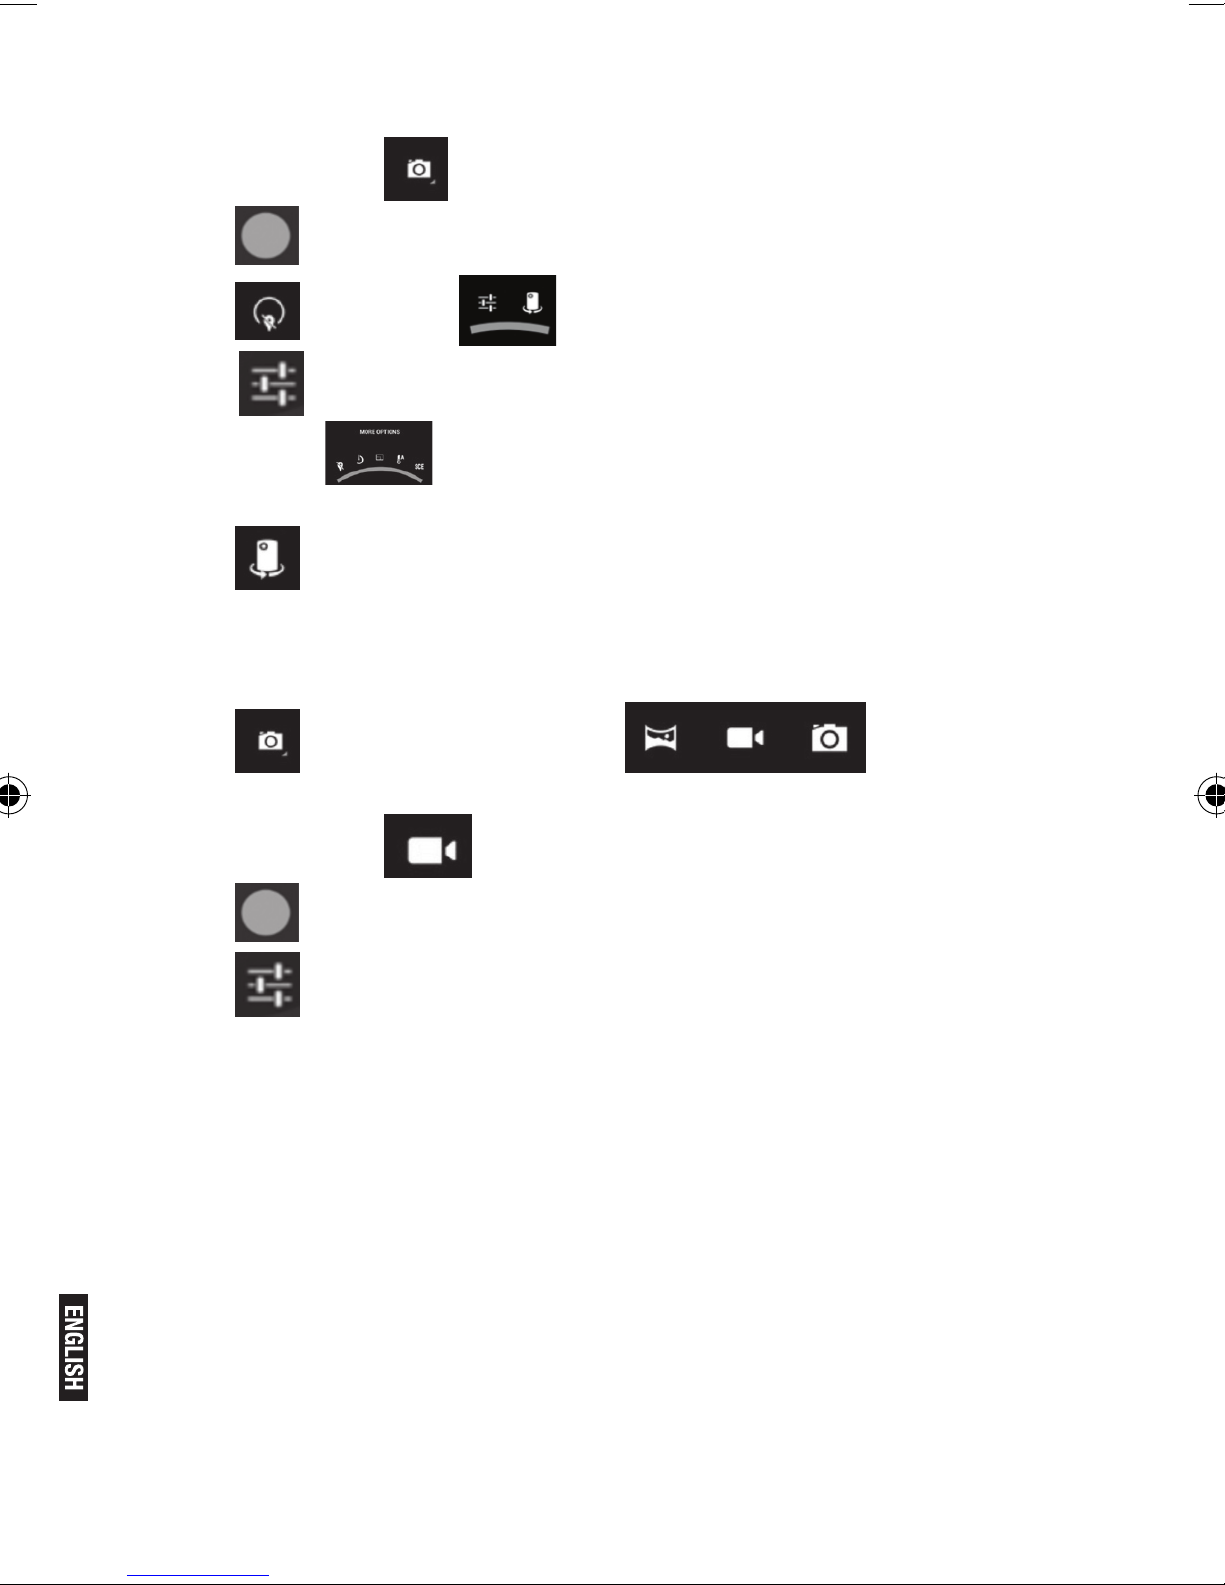
9.1 Camera
If the cursur is at
Click
Click
to take picture.
to enter the setting interface
postion, the device is at Camera mode.
Click to set the scene mode, Picture size, Picture quality, and
color effect.
Click to select back or front camera.
9.2 DV
Click
to enter the mode select interface
If the cursur is at position, the device is at DV mode.
Click to start recording.
Click to set the color effect or restore to default settings.
10. Connect with external device
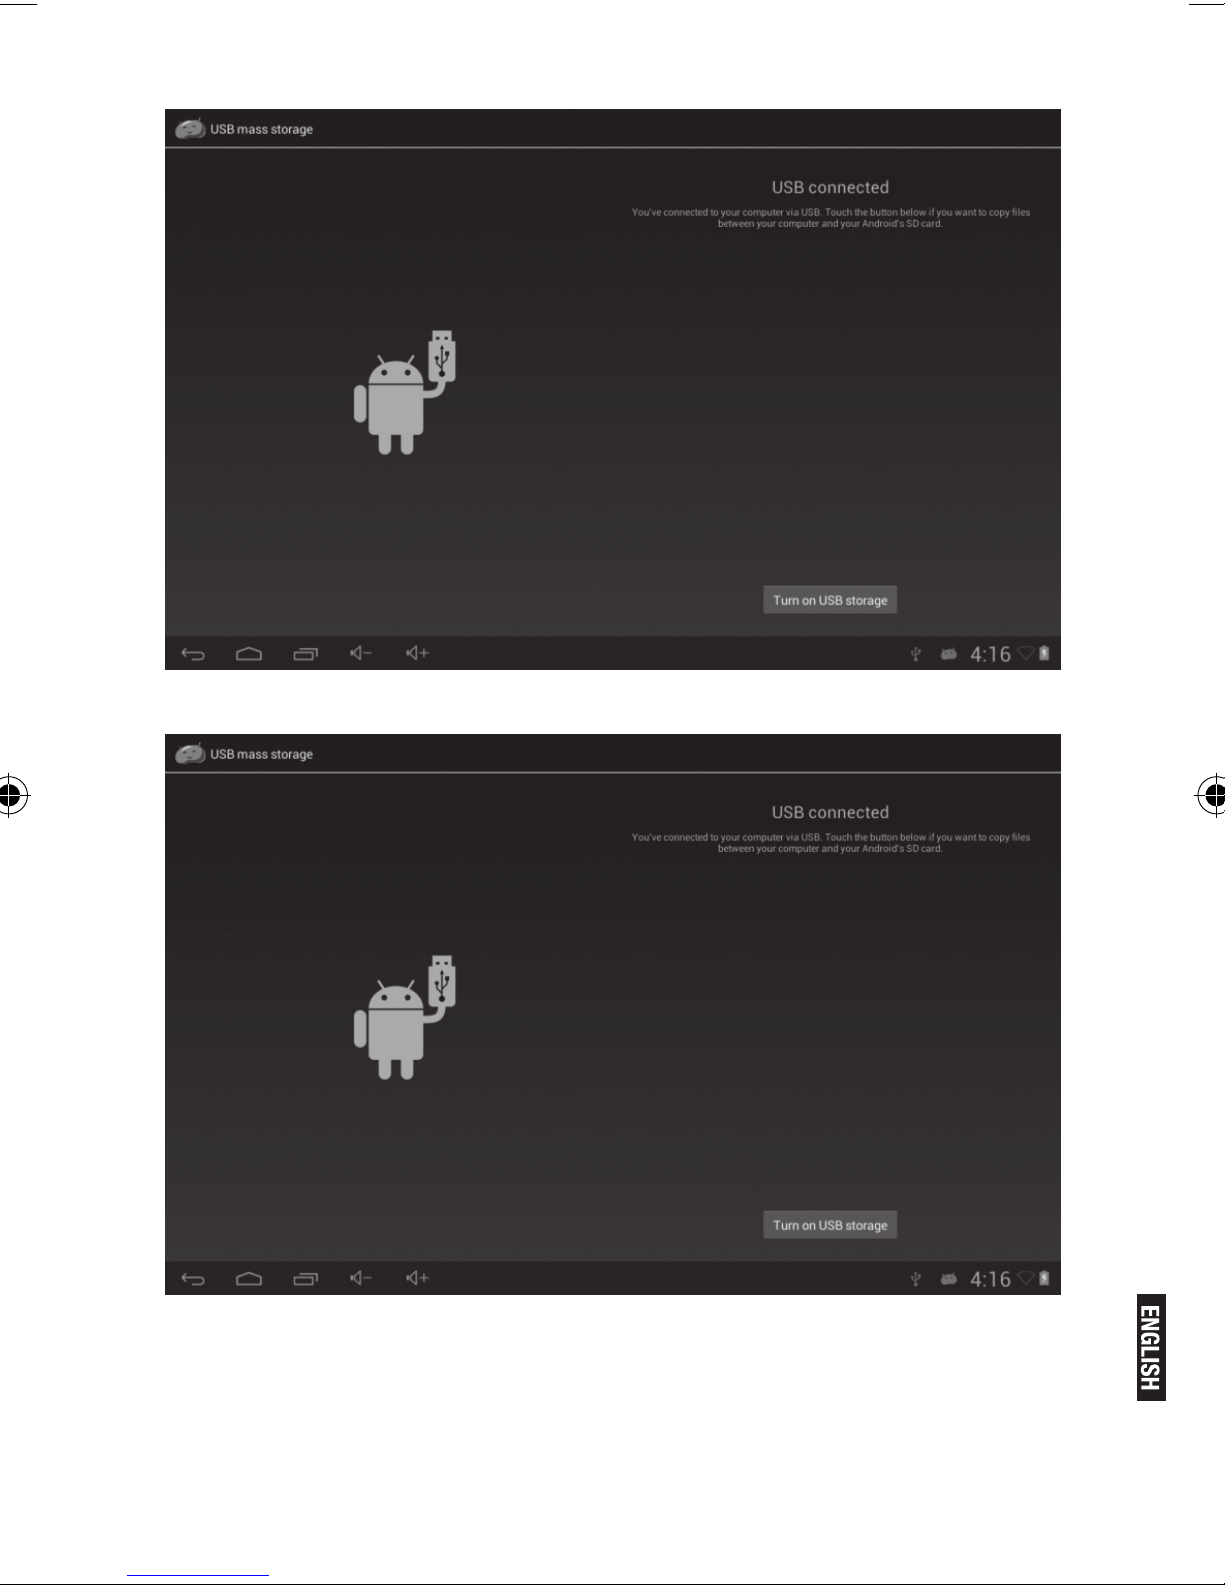
10.1. Connect with PC
Connect the device with the PC via the USB cable. The PC appears
two new disk symbols after connected successfully. One is the TF
card, and the other is the built-in ash.
Pg. 12
Page 13
Pg. 13
Page 14
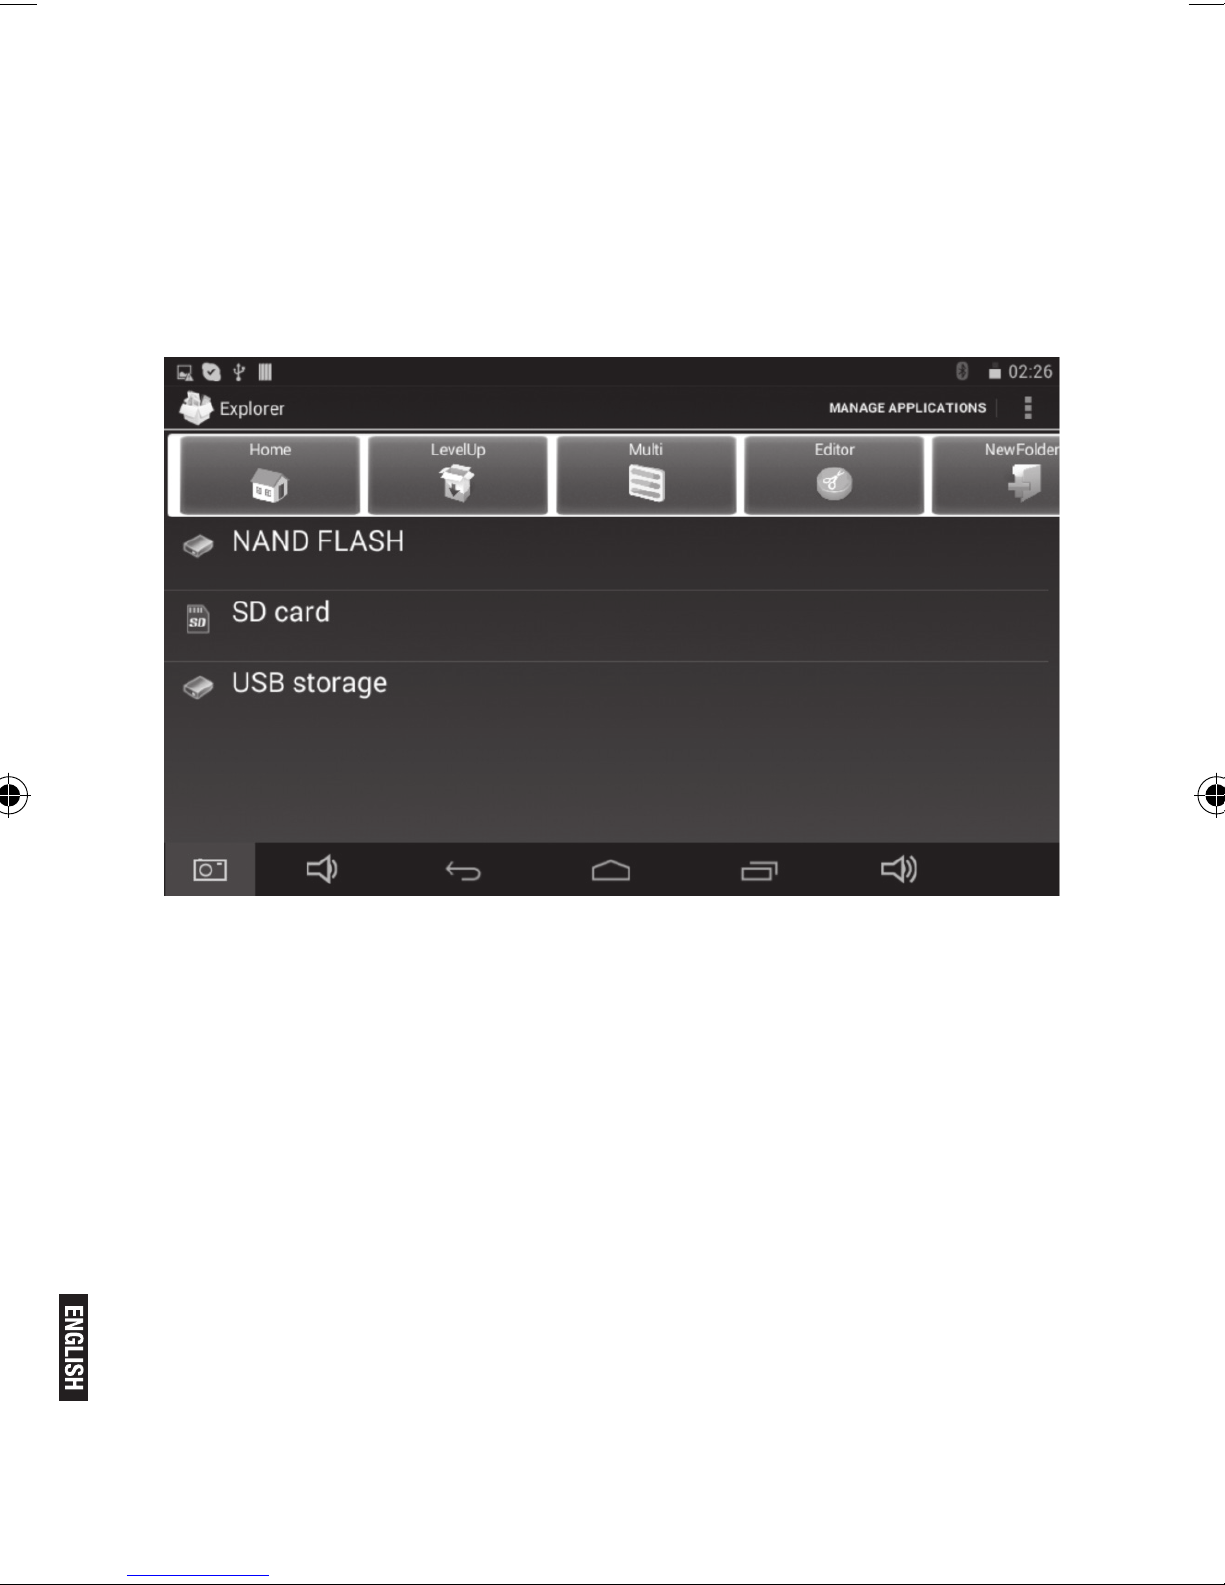
10.2. Use of OTG and USB host
It supports the movable device with FAT32 format, such as U disk and
MP3.
Connect the movable device to the MID. (Note: only OTG could
support USB mouse and keyboard, USB HOST only support USB2.0
High speed device)
10.3. Applications
For convenient usage, we installed some third party software in the
MID. For detailed operation methods, please check the corresponding
instruction. Some of the software may be able to be used in some area
because of network service.
IV. TROUBLESHOOTING
1. What if the device is abnormal during operation?
Answer:
1). Reboot the device to see if it works OK.
2). Charge the device by the charger to activate the battery.
Makesure it has power before you operate it.
3). It is suggested to upgrade the OS of the device by
professional.
Pg. 14
Page 15
Pg. 15
2. Why the standby time is so short sometimes?
Answer: the use time of the battery is all depend on the temperature
and use instance. If the temperature is too high or too low, the use
time of the battery might be effected. It is suggest using the device in
normal temperature.
The using time is also affected by increased volume and frequently
operation.
V. SPECIFICATIONS
Item T-i7yUP
Dimension 190x108x10.5mm
Display 7” 1024 x 600 TFT touch panel
OS Android 4.4
Capacity 8GB
External Capacity TF card, up to 32GB
Audio MP3,WMA,FLAC,APP,OGG.
(support all audio formats)
Video MINI HDMI, MPEG4-SP, ASP, DIVX, WMV, RMVB,
H.264/1080P (support all video formats)
E-book Support
Wireless network Support WIFI / BT
Language Multi-language
USB USB 2.0 high speed
OTG Support
o
Temperature -20
Battery 2400MA poly-lithium battery
RAM 1 GB
Camera front 0.3M + back 2M camera
Processor Rockchip RK3128 Quad Core Cortex-A7, 1.3GHz
C to 60oC
Note: The pictures list in the manual are for reference only!
The design and the specication of the unit are subject to change without
notice.
Page 16

Page 17
Pg. 17
INTERNATIONAL WARRANTY
Terms and Conditions
1. PANACOM warrants the operation of this product to be
free from any manufacturing and/or material defect for a period of 6 months from the date of purchase by the user.
2. This warranty is limited to the repair and/or replacement of
this product, according to our own criterion, free of charge
within the stipulated term and it does not extend to consequential or incidental damages to other products that may be
used with this unit.
3. The warranty shall be voided in the following cases: a)
repair or attempt to repair by third parties not authorized by
the company. b) in case of performing any type of cut in connection cables, plugs, connectors, or other adapters different from the original ones provided by the company.
4. To make this warranty effective, you shall contact the Authorized Service Center of your country and they shall carry
out the pertinent procedure; this information is available at
www.panacom.com. In order to start the necessary procedure to get the warranty, you shall hand in the Original Purchase Invoice where the purchase date, dealer name and
product identication shall be stated clearly.
5. Transportation, freight, stay and/or insurance expenses, if
any, are not covered by this warranty.
Page 18

Pg. 18
Gracias por la compra de su
7” TABLET T-i7yUP PANACOM.
Por favor lea este manual cuidadosamente antes de utilizar esta Tablet
para seguir las mejores pautas tendientes a ofrecer el mejor servicio
No permita que agua o materias extraños entren en el equipo.
I. NOTA:
1. Evitar que la unidad se caiga, se sacuda o dañe en forma
inusual.
2. No usar metal para tocar el dispositivo para evitar que se produzca un cortocircuito.
3. Haga copia de seguridad de sus datos en caso de que los
datos importantes se pierdan, especialmente antes de actualizar el rmware. La empresa no se hará cargo de ninguna
pérdida de datos .
4. No desmonte. No limpie la supercie de la unidad con alcohol, disolventes o benceno.
5. No desconecte la unidad mientras se está formateando o en
carga/descarga, o los procedimientos pueden dar lugar a
errores
6. Nosotros no nos hacemos responsables de los daños causados por el mal uso del producto y reparación no autorizada.
Por favor, operar estrictamente de acuerdo con el manual de
usuario.
7. Evitar el agua u objetos extraños en la unidad.
8. No utilice la unidad en lugares que sean muy calientes, fríos,
polvorientos o húmedos.
9. Las especicaciones están sujetas a cambios y mejoras sin
previo aviso.
Page 19
Pg. 19
II . INTRODUCCIÓN DE LA CUBIERTA:
8 9
1
2
3
4
5 6
7
9
1. Encendido / apagado
2. Toma de auriculares
3. Puerto USB Micro
4. Puerto del cargador DC
5. Volumen + , Volumen -
6. Puerto TF -CARD
7. Resetear
8. Cámara trasera
9. Altavoz
10. Cámara frontal
Page 20
Pg. 20
III . INSTRUCCIÓN DE LA OPERACIÓN
1 . Funcionamiento básico
1.1 . Encendido / apagado de alimentación
Encendido:
Pulse y mantenga pulsado el interruptor de encendido durante 5 segundos; la unidad muestra el logotipo de la puesta en marcha y entra
en el modo de trabajo.
Apagado:
Mantenga pulsado el botón de encendido durante 3 segundos para
apagar la unidad.
Modo Sleep:
Mientras que el dispositivo se encuentra en estado de trabajo, pulse el
interruptor principal, se entra en el modo de sleep y la pantalla se apagará a continuación. Pulse el botón de encendido de nuevo, cambia
al modo normal. Usted puede utilizar esta función cuando no utiliza el
dispositivo temporalmente, para ahorrar energía.
1.2 . carga
Cuando el dispositivo indica batería baja, cárguela siempre con el cargador.
Nota:
Para mejorar la longevidad de la batería, cargue por otros 15 minutos
después de que la batería está llena.
1.3 . menú Principal
Haga clic en el icono
en el menú principal. Incluye la congura-
ción del sistema, la reproducción de música, reproducción de vídeo, el
navegador web y otras aplicaciones instaladas en el menú principal.
2. Configuración
Haga clic en
en el menú principal para entrar en la interfaz de
conguración. Haga clic en los elementos de conguración correspondientes para operar.
Page 21
Pg. 21
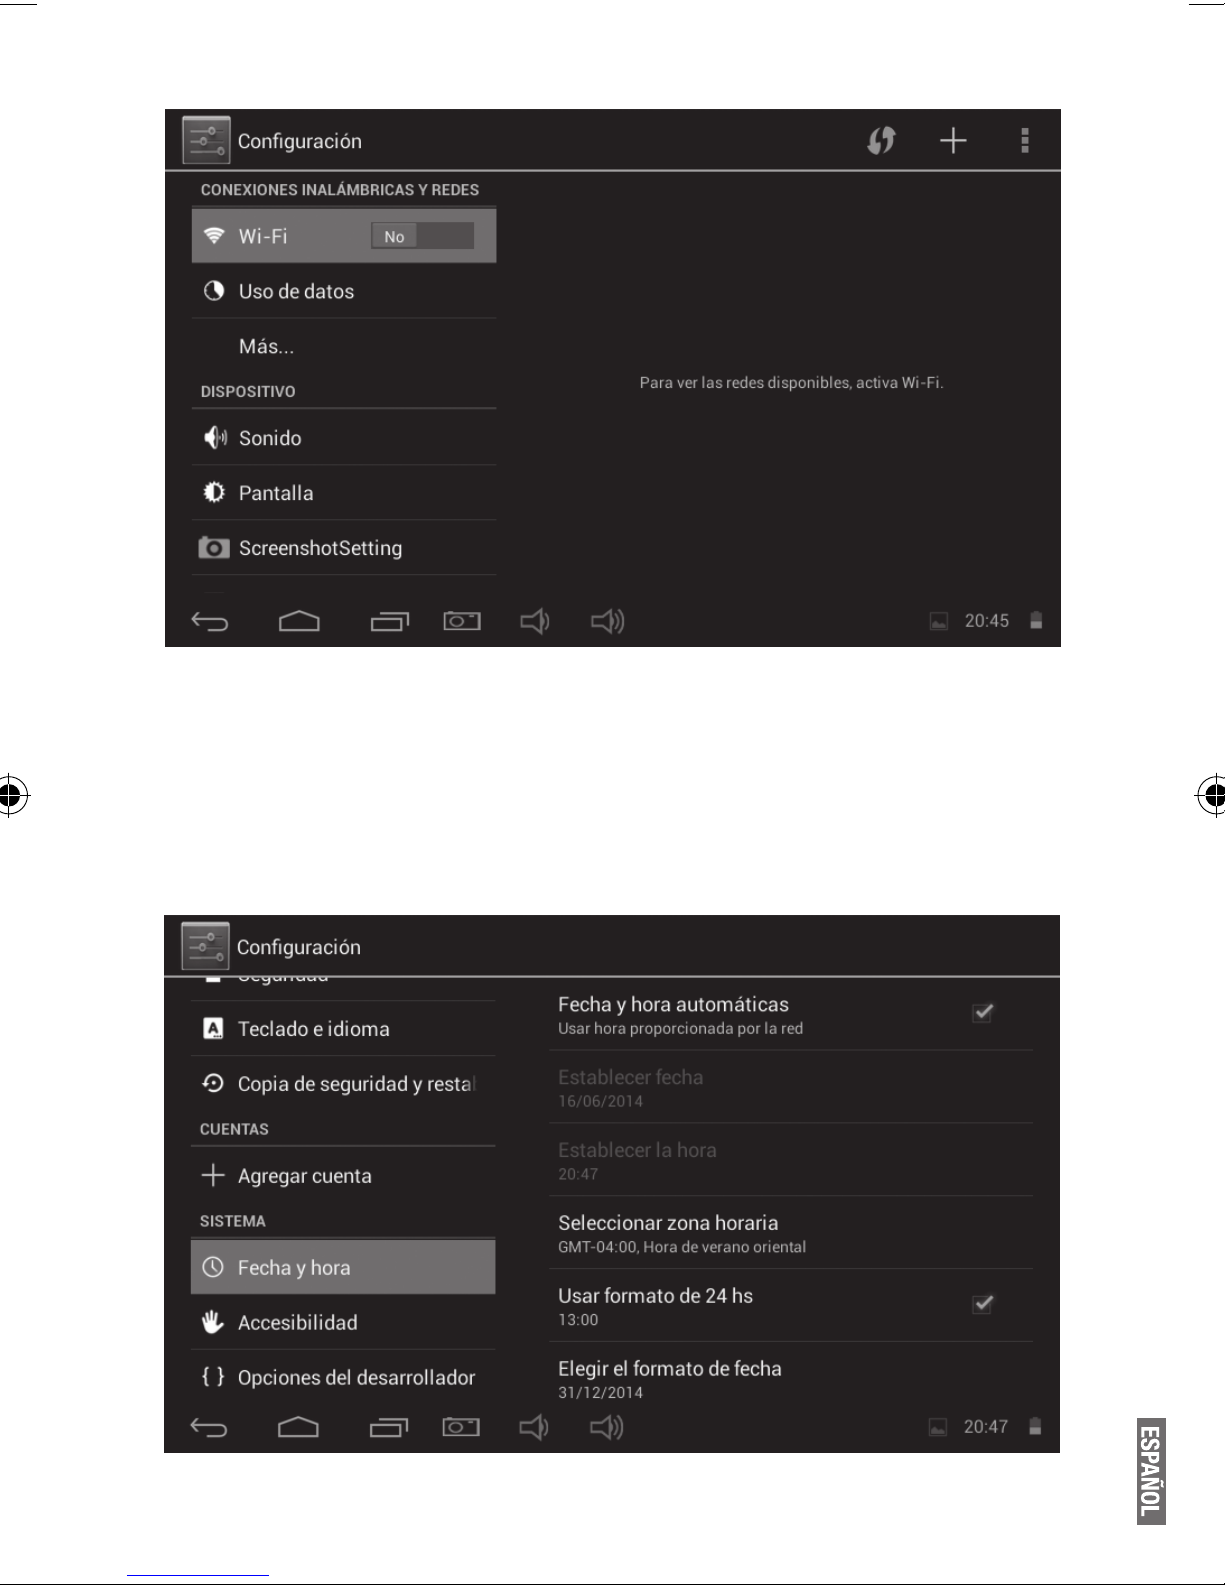
2.1. Fecha y Hora
Haga clic en “ Fecha y hora” en la interfaz de conguración para establecer la fecha y la hora. Usted puede congurar la fecha, la zona
horaria, la hora , el formato de fecha y hora , etc.
Page 22
Pg. 22
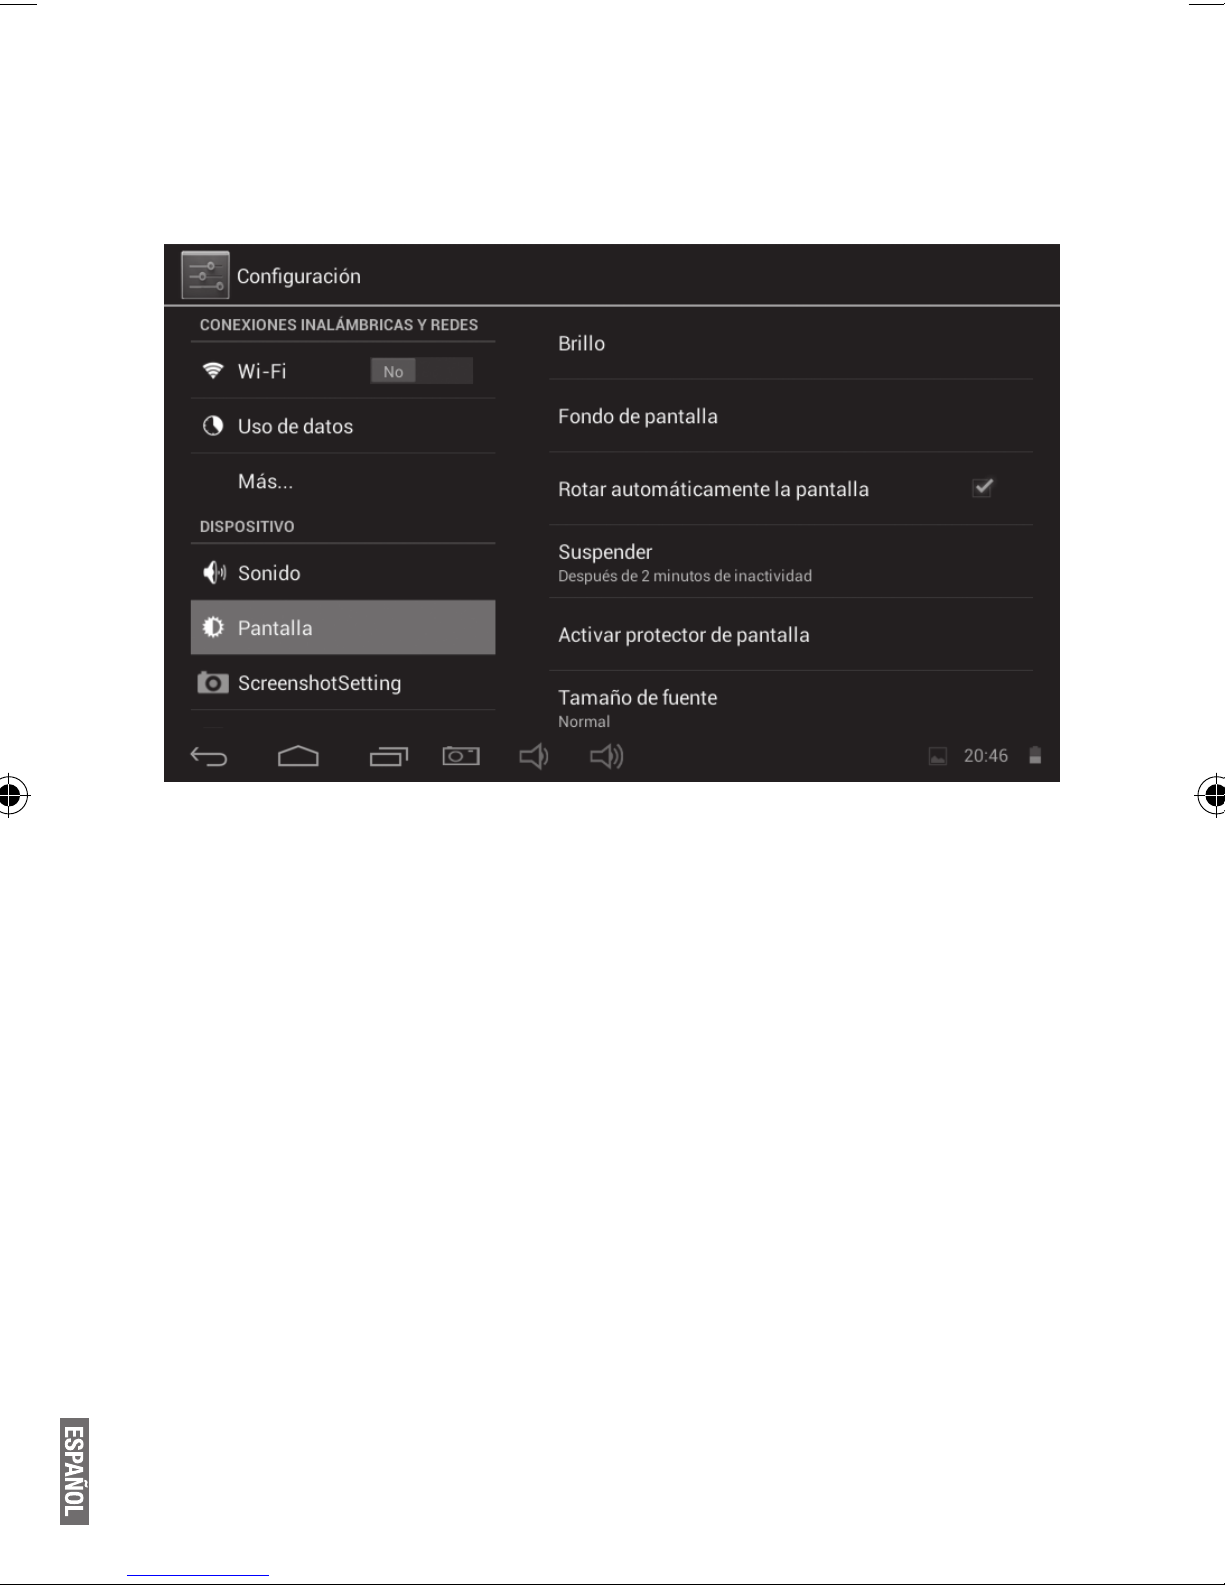
2.2 . Brillo
Seleccione “Ver” en la interfaz de conguración. Haga clic en “ Brillo”
para entrar, y deslice la barra para ajustar el brillo.
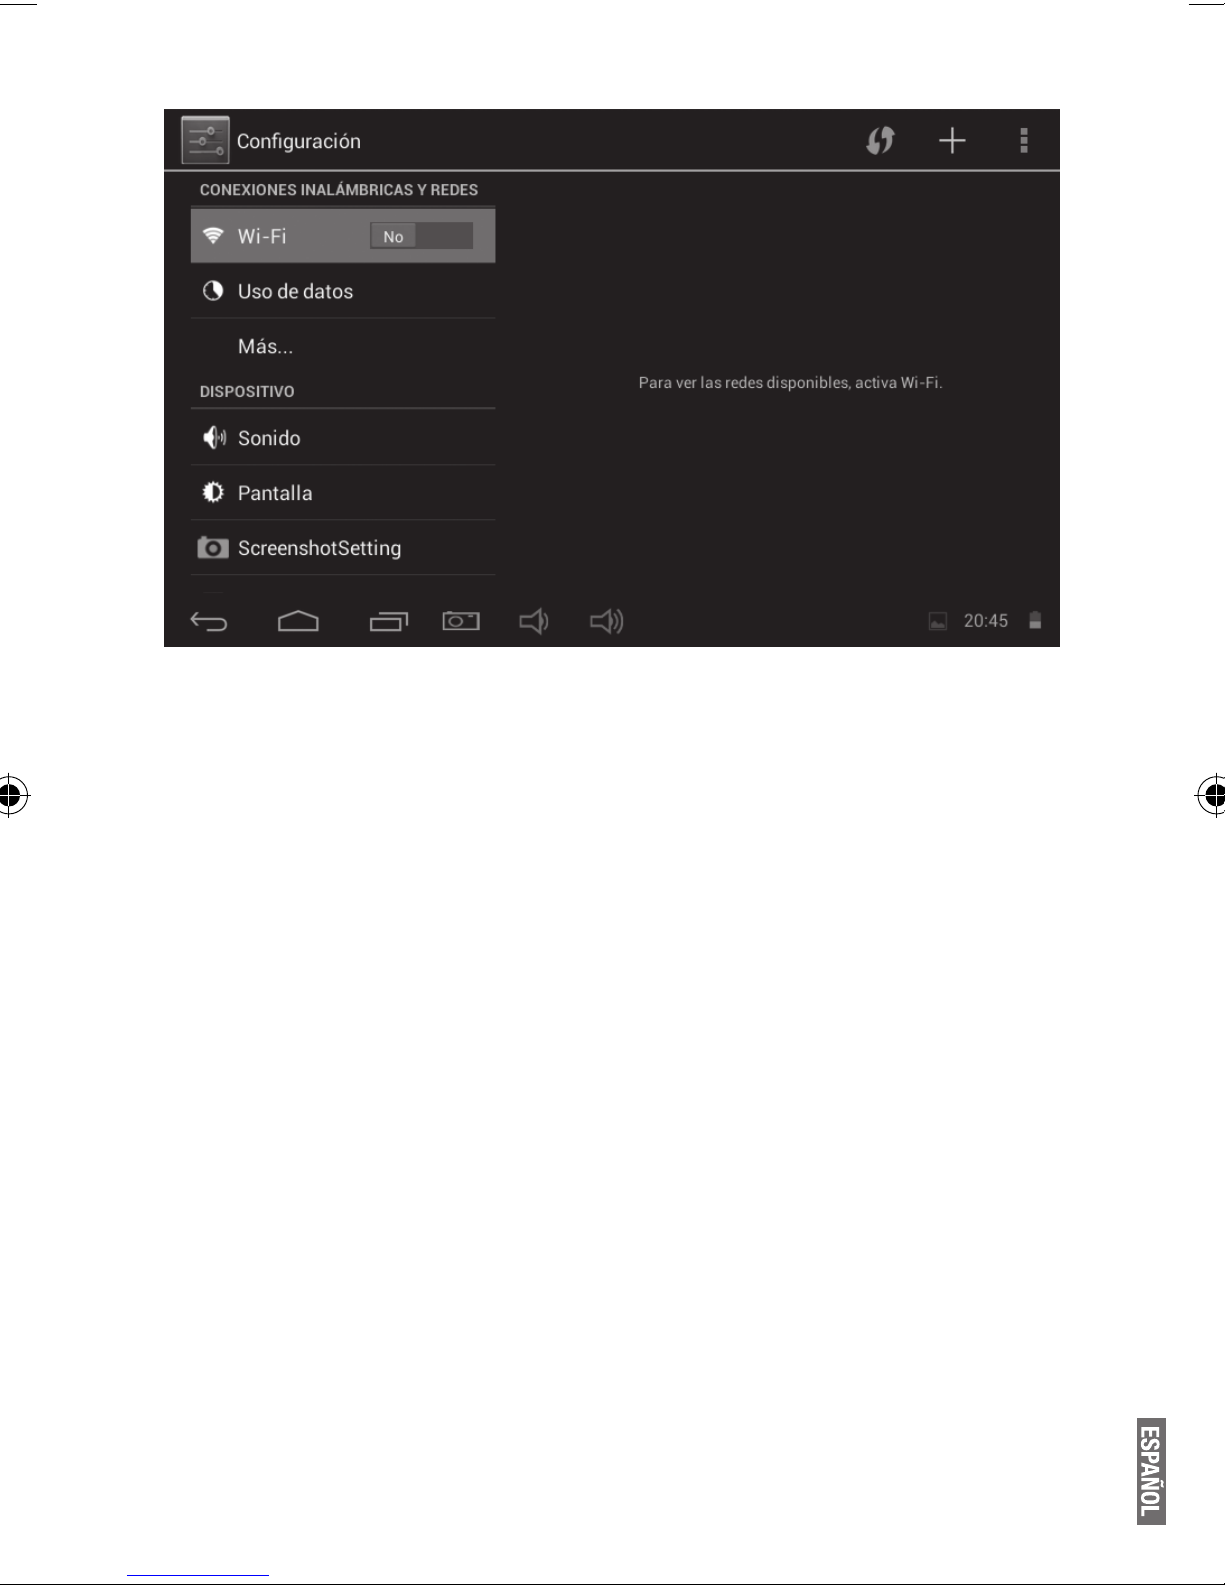
3 . Conexión Wi-Fi
Haga clic en “Conguración” en la interfaz principal y haga clic en
“Conexiones inalámbricas y redes” para entrar en la interfaz de conguración inalámbrica y de red. Haga clic en WiFi para activar la WIFI.
Haga clic en la conguración para congurar y administrar el acceso
inalámbrico WiFi.
Page 23
Pg. 23
Haga clic en “Noticación de red”, enumera la red abierta. Haga clic
en el nombre de la red. Es posible conectarlo a WIFI de acuerdo con
las instrucciones. Tendrá que introducir el nombre de usuario y contraseña.
4 . Explorer para instalar la aplicación
4.1 Instalar
Hay muchas formas de instalar aplicaciones bajo Android, a través
de USB, por el programa de terceros. Introducimos la instalación por
instalador de Apps .
Haga clic en el “ApkInstaller” en la interfaz principal para entrar en la
interfaz de “instalar y administrar”.
Seleccione el archivo APK que desee y entre en la interfaz de instalación de aplicaciones . Haga clic en “Instalar” para instalar la aplicación automáticamente. Después de la instalación, se le pedirá “Abrir”
y “Finalizar”. Haga clic en “Abrir” para abrir la aplicación. Haga clic en
“Finalizar” para salir.
4.2 Desinstalar
Usted puede utilizar la herramienta de gestión de software correspondiente o el software de gestión de aplicaciones instalada del dispositivo para instalar aplicaciones.
Page 24
Pg. 24
Seleccione “Ajustes / Aplicaciones / Administrar aplicaciones” para
seleccionar las aplicaciones instaladas y compruebe el atributo de la
misma o desinstalarla.
5 . Conectar a Internet
5.1. Después de conectar con WIFI, abra el navegador e introduzca la
dirección web.
5.2. Haga clic en el icono para entrar en el marcador para ver el
historial de exploración. Haga clic en la página web que desee para
abrirlo.
Para guardar la página web en favorito, haga clic en para entrar y
“añadir “ para guardarlo.
6 . Reproducción de audio y vídeo
6.1. Reproducción de audio
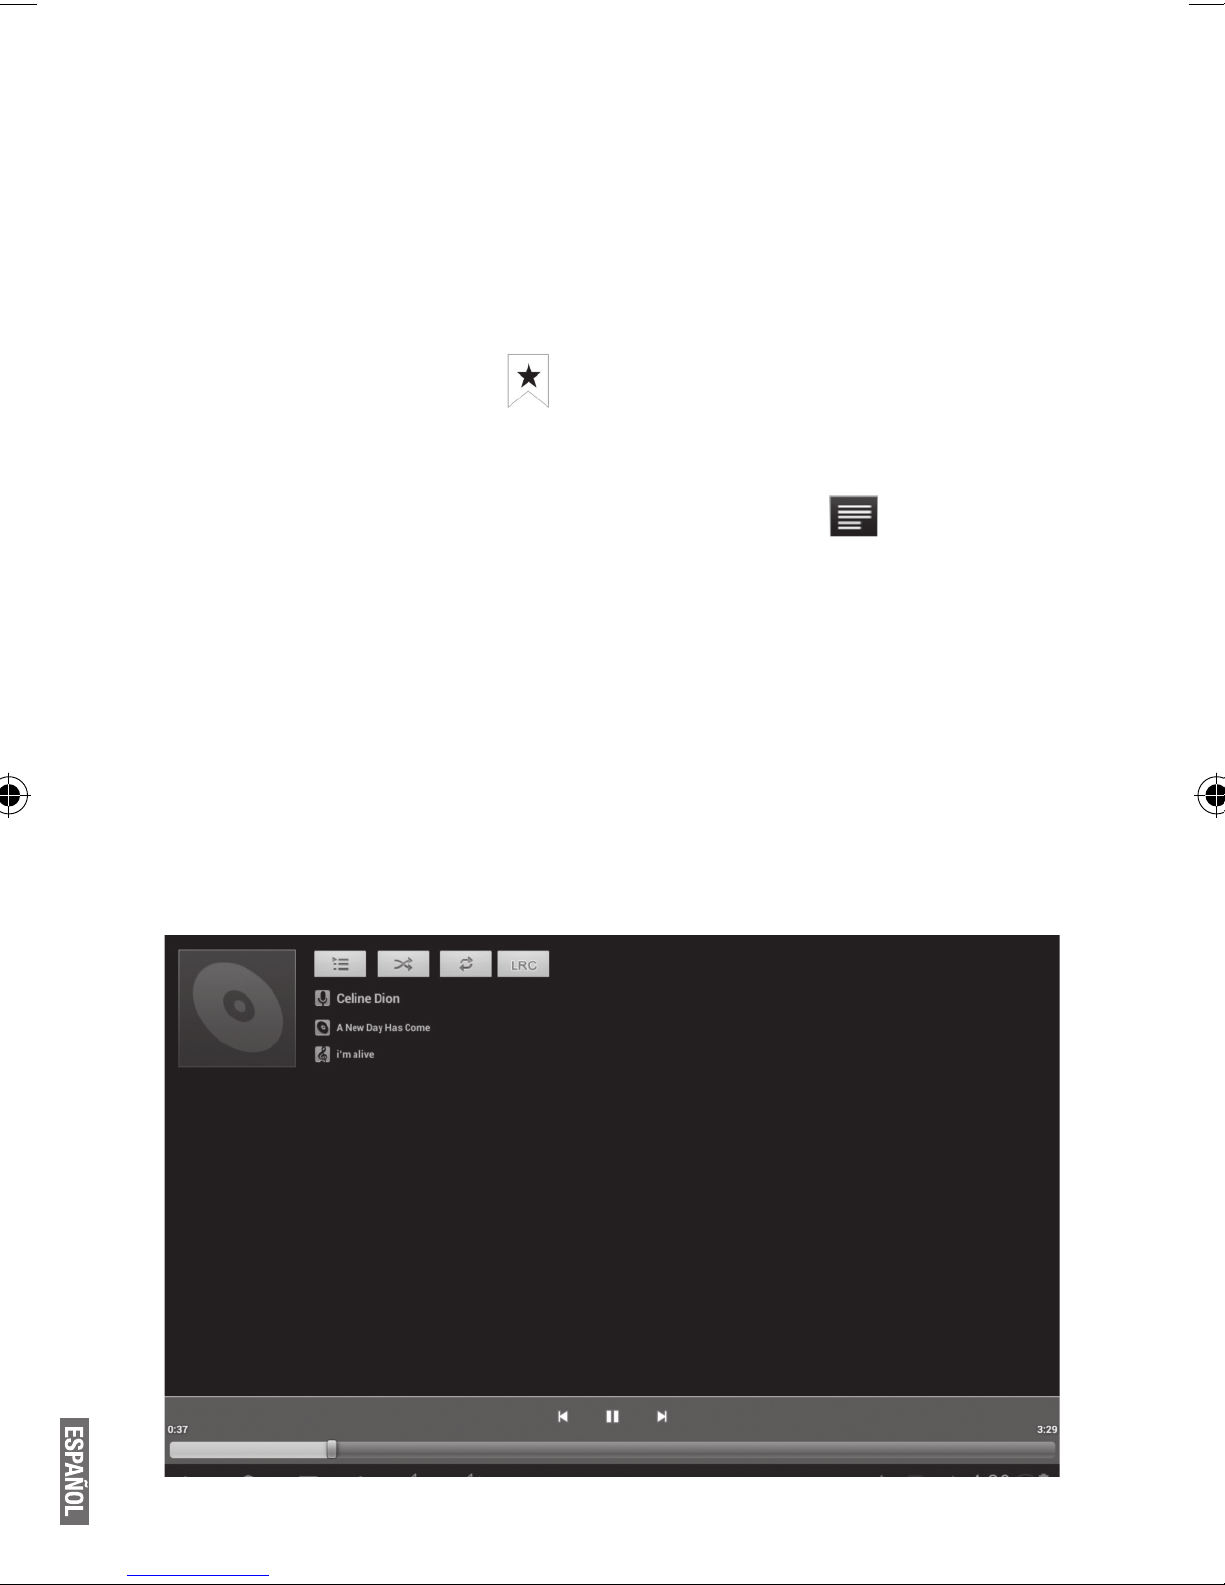
Haga clic en “Music” en el menú principal para entrar en la interfaz de
reproducción de audio. En él se enumeran los archivos de audio en
el dispositivo. Haga clic en el nombre del archivo para reproducirlo.
en la interfaz de reproducción de audio, haga clic en los iconos de
reproducción / pausa / aumentar / disminuir el volumen voluem / FF
/ REW ....
Page 25
Pg. 25
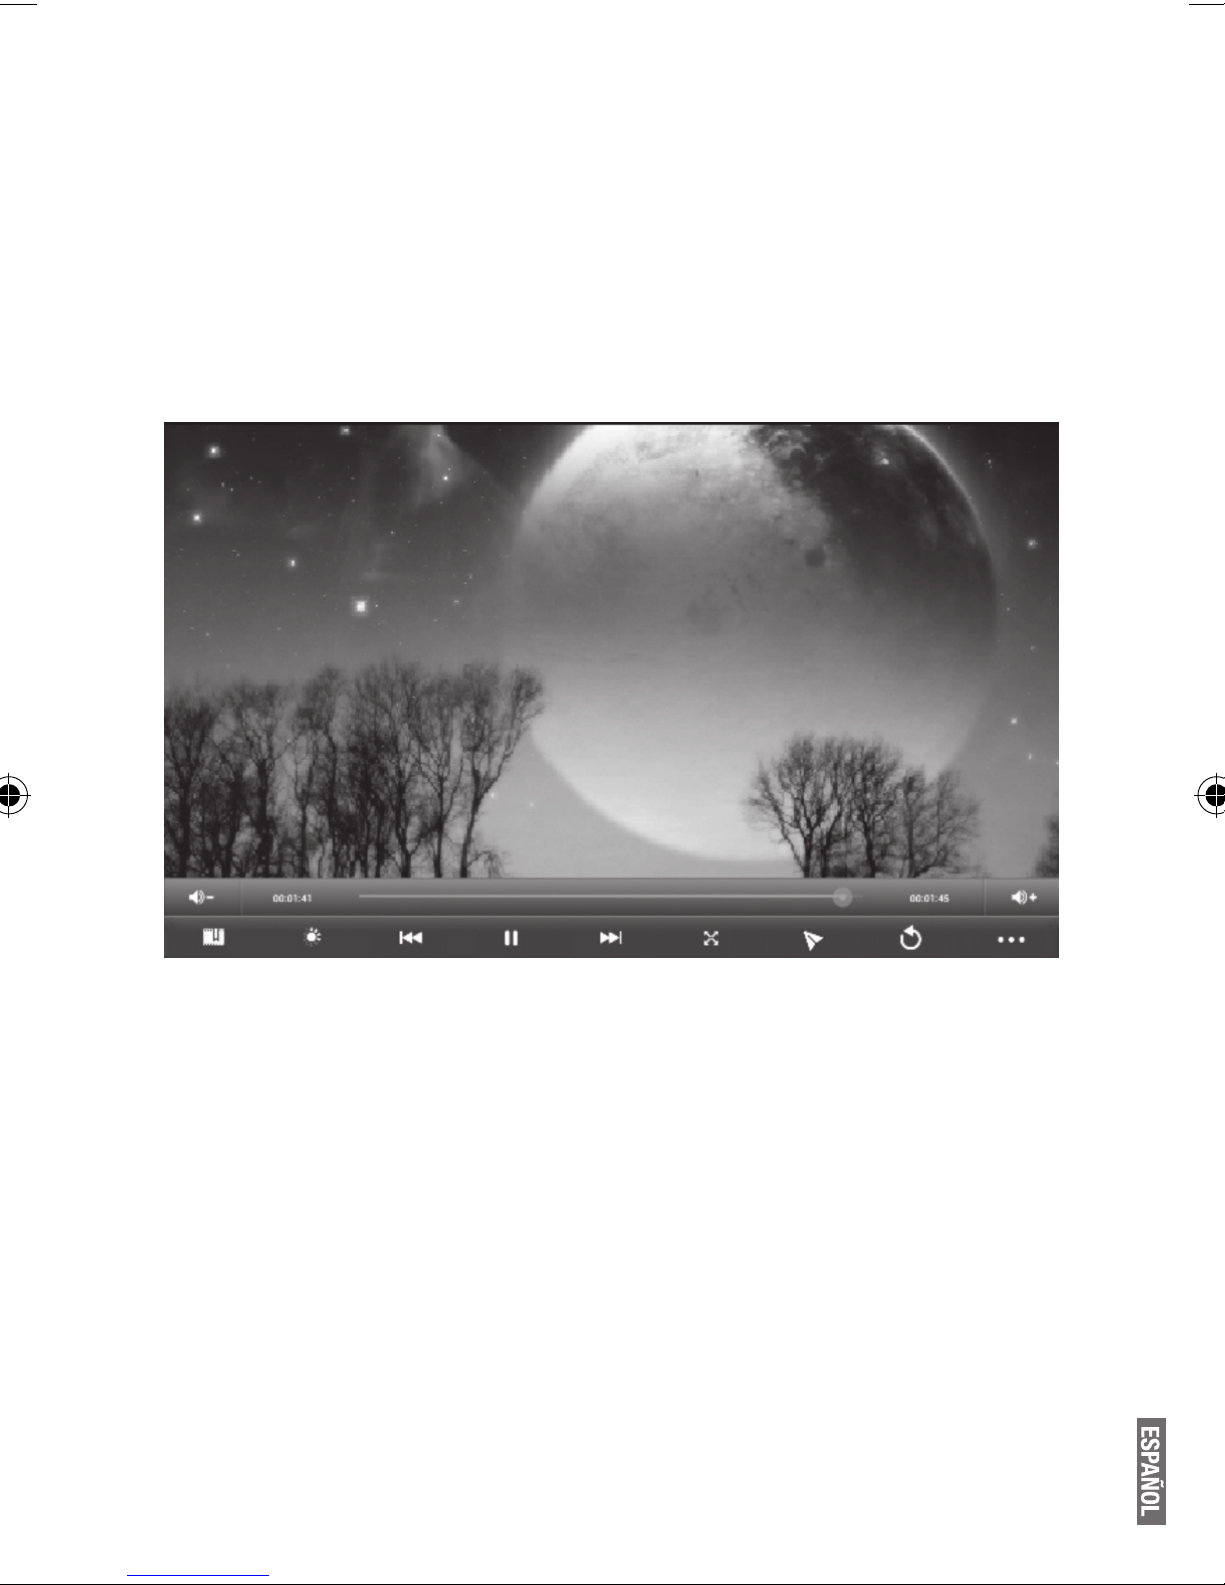
6.2 . Reproducción de vídeo
Haga clic en la “Galería y Video” en el menú principal para entrar en la
interfaz de reproducción de video. En él se enumeran los archivos de
video en el dispositivo. Haga clic en el nombre del archivo para reproducirlo. En la interfaz de reproducción de vídeo, toque la pantalla para
que aparezcan los iconos de funcionamiento y haga clic en los iconos
para reproducir / pausa volumen / aumento de volumen / disminución
/ saltar al siguiente archivo / saltar al archivo anterior ....
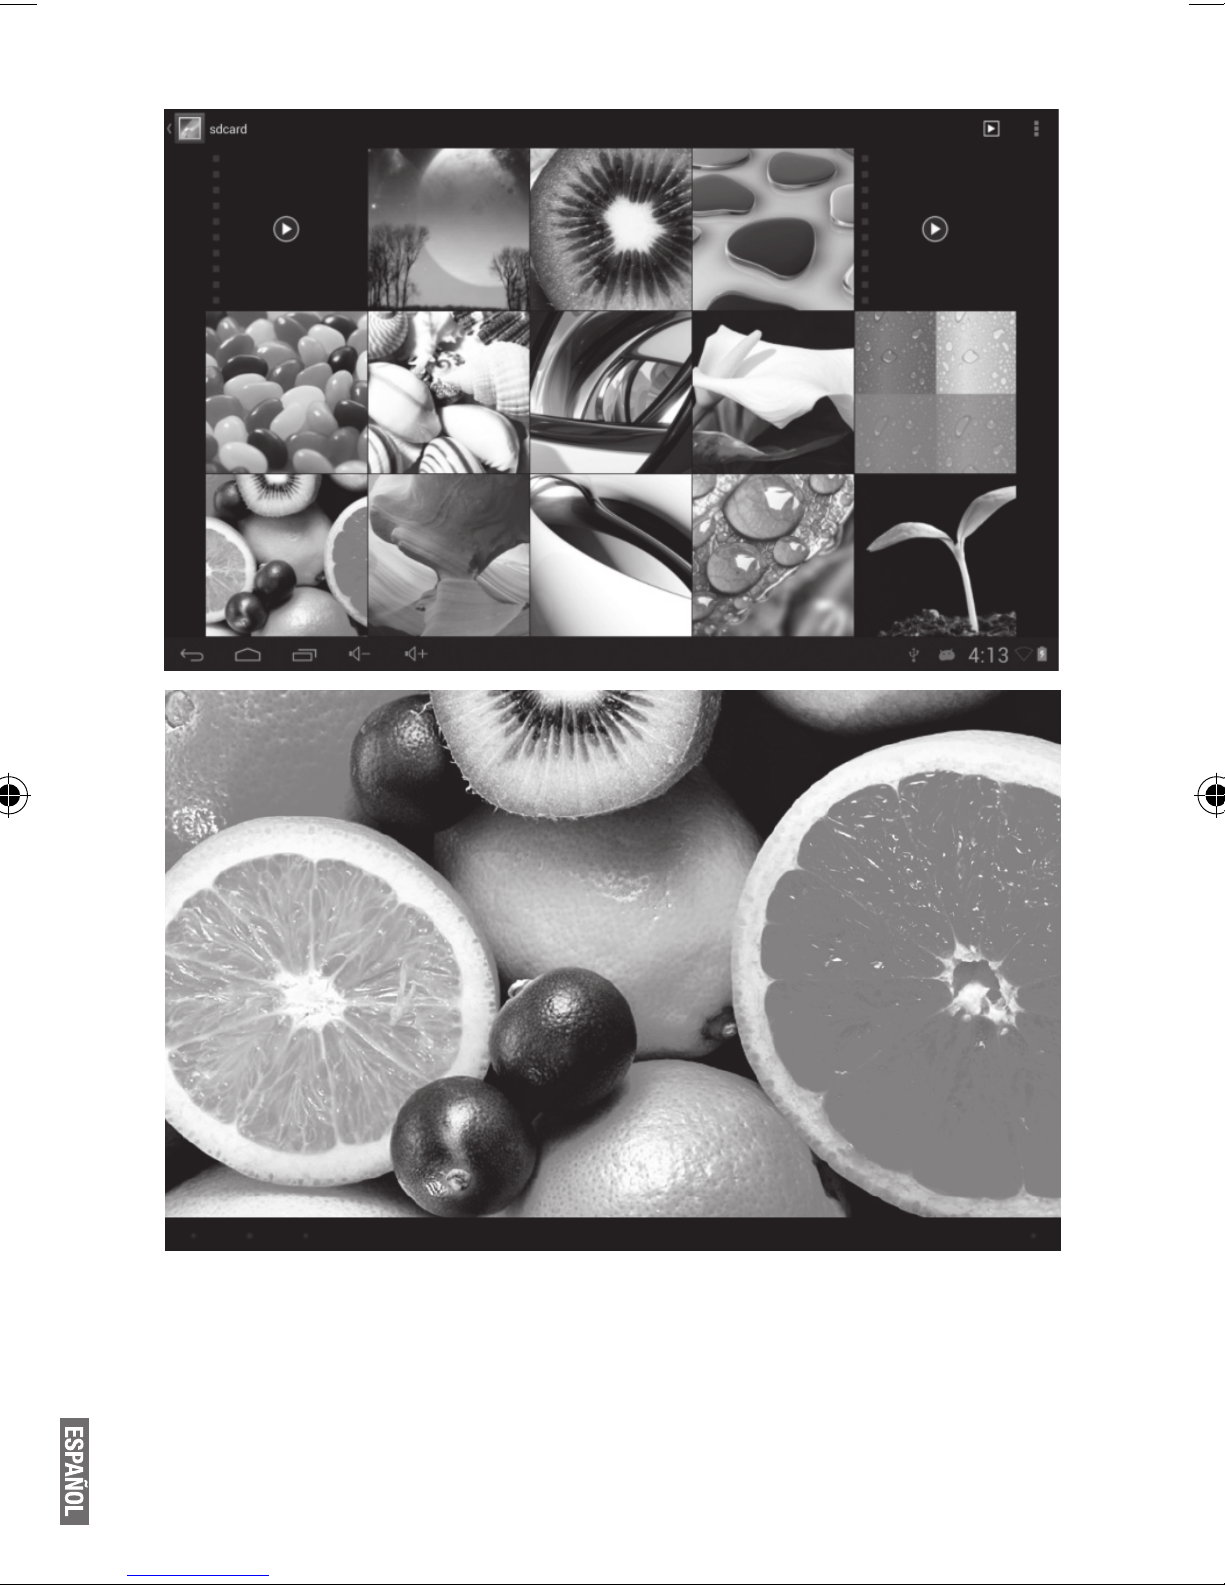
7 . Visualización de imágenes
Haga clic en “2160P(Gallery)” en el menú principal para entrar en la
lista de la carpeta de imágenes. Seleccione y haga clic en la carpeta
que desea introducir, se muestra el archivo. Haga clic en la miniatura
de la imagen para verlo.
Toque la pantalla para que aparezcan los iconos de operación mientras se visualiza la imagen, puede acercar / alejar / saltar a la siguiente
imagen / saltar a la imagen anterior / girar / eliminar la imagen ...
Page 26
Pg. 26
Page 27
Pg. 27
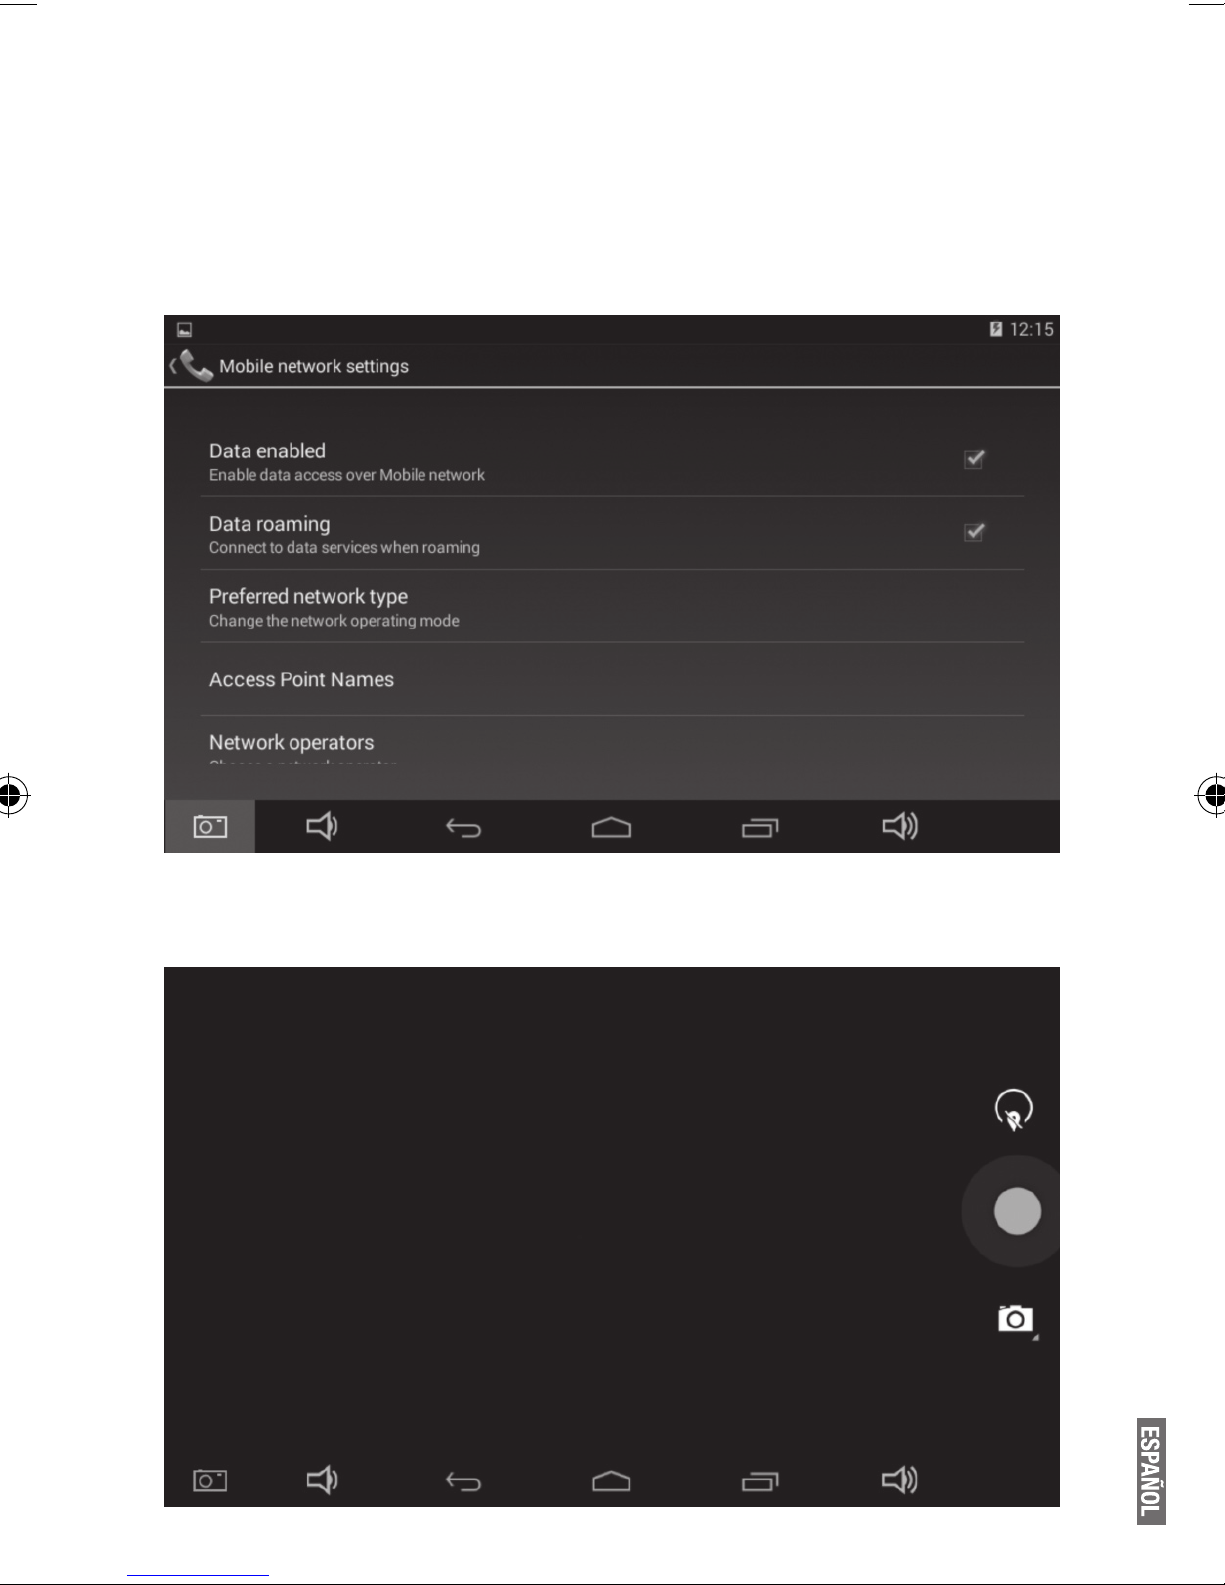
8. 3G DONGLE
El dispositivo es compatible con BT Dongle externo. Conecte el dongle BT con el dispositivo a través del cable de transferencia externa,
después de que las luces indicadoras del dongle se enciendan, es
posible utilizar la red BT con normalidad.
9. Cámara
Haga clic en “Cámara” en la interfaz principal.
Page 28
Pg. 28
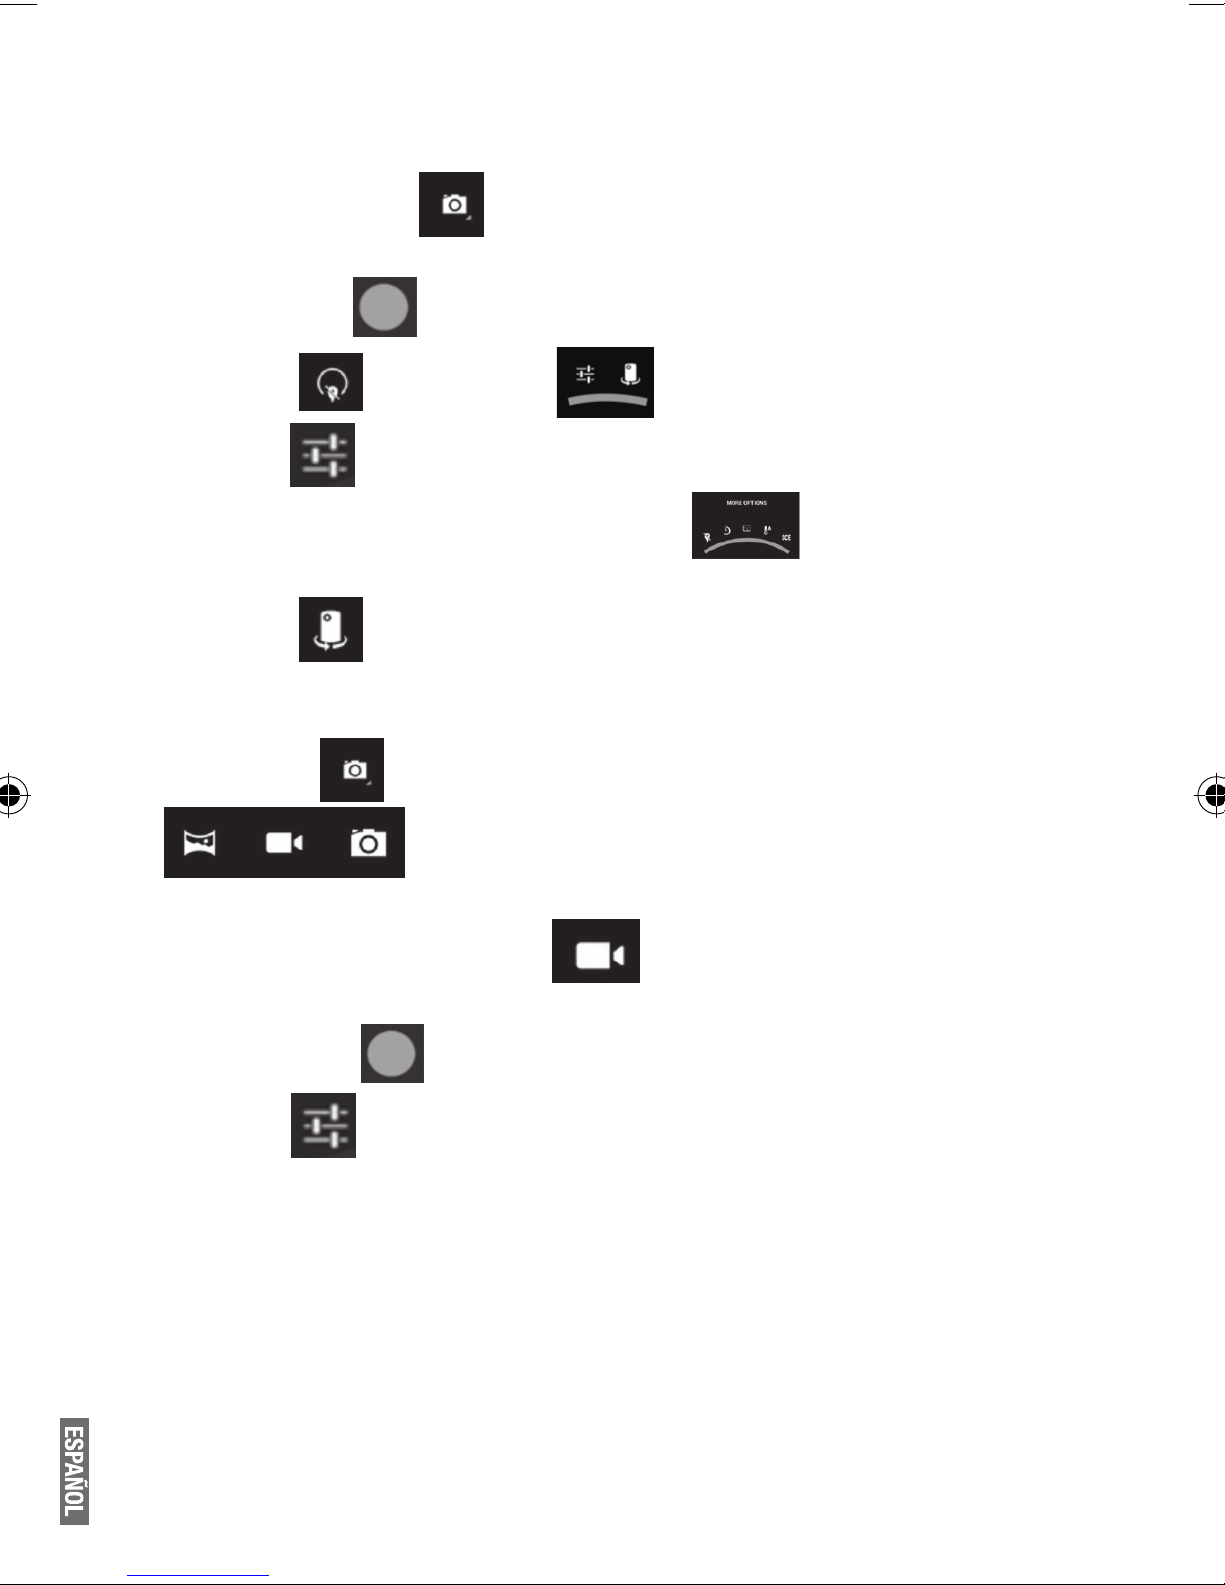
9.1 Cámara
Si el cursor está en posición, el dispositivo está en modo de cámara.
Haga clic aquí para tomar la foto .
Haga clic
para entrar en la interfaz de conguración
Haga clic para establecer el modo de escena, el tamaño de ima-
gen, calidad de imagen y efecto de color.
Haga clic para seleccionar la espalda o cámara frontal.
9.2 DV
Haga clic para entrar en la interfaz de selección de modo
Si el cursor esta en posición , el dispositivo está en el modo
de DV .
Haga clic aquí para comenzar a grabar.
Haga clic tpara establecer el efecto de color o restaurar la conguración predeterminada.
10. Conéctate con dispositivo externo
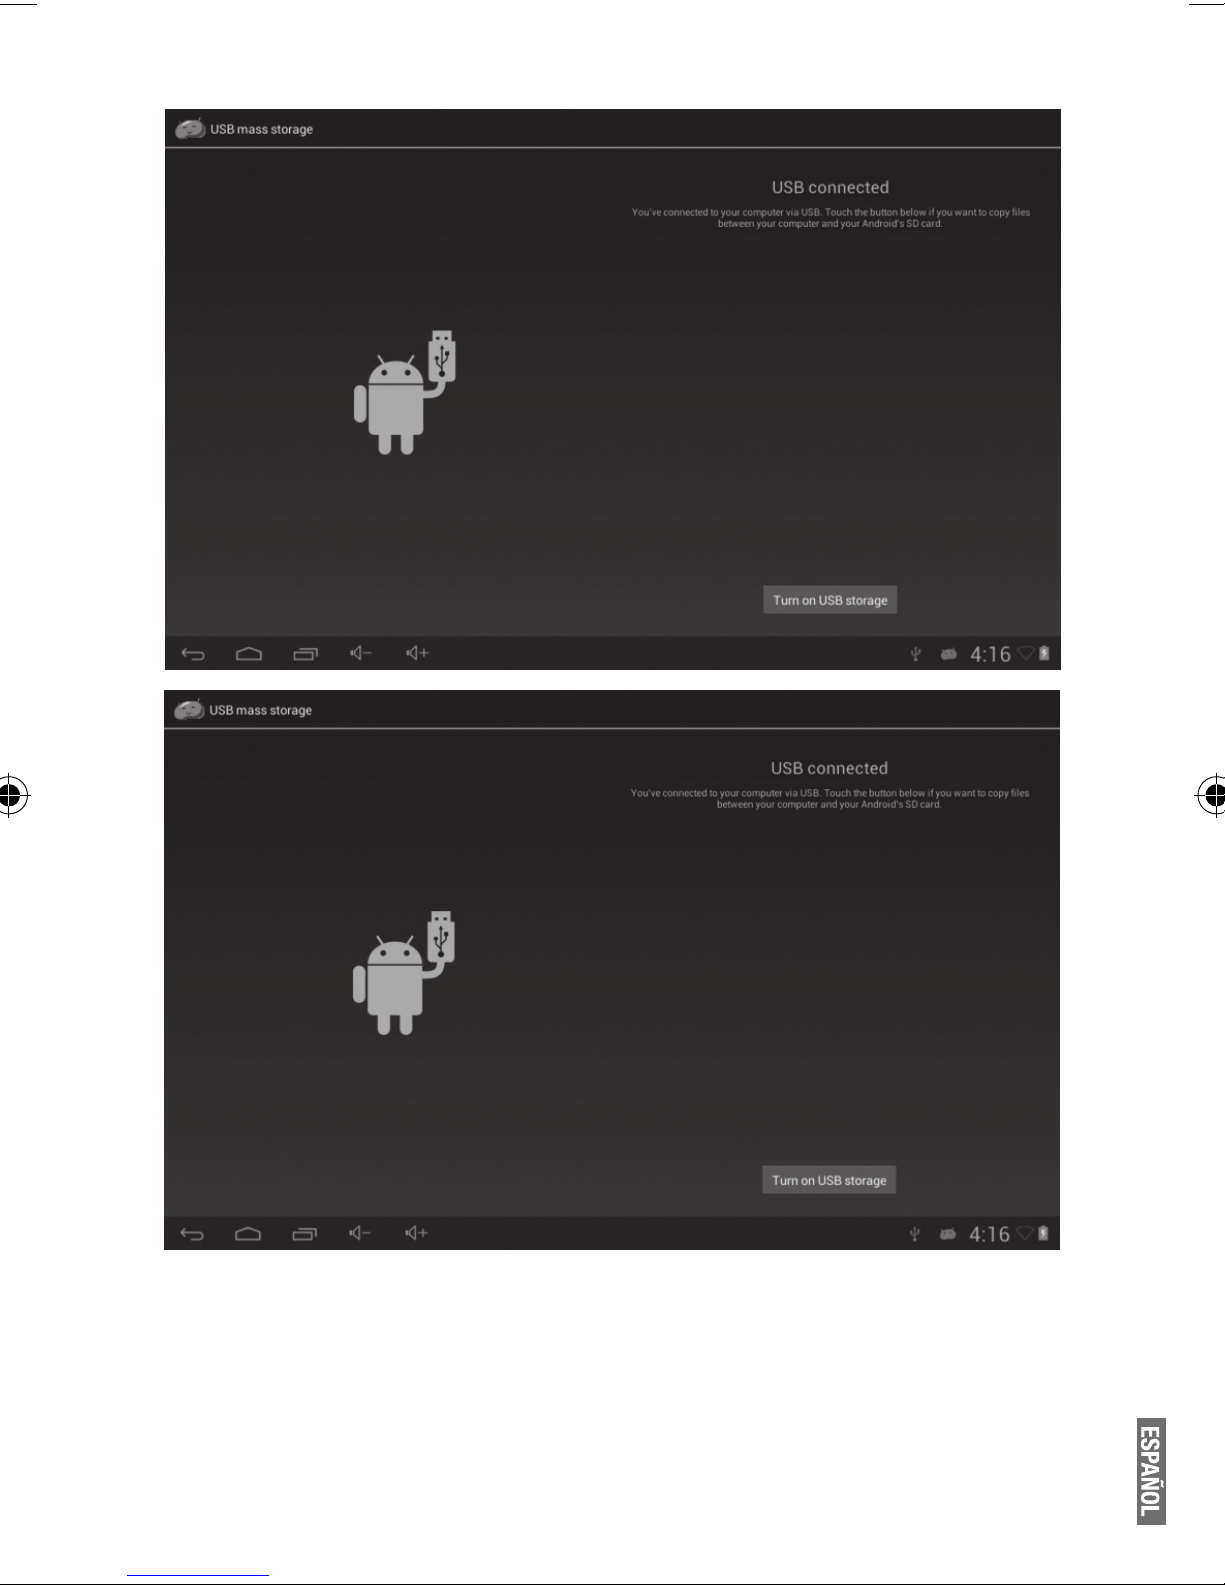
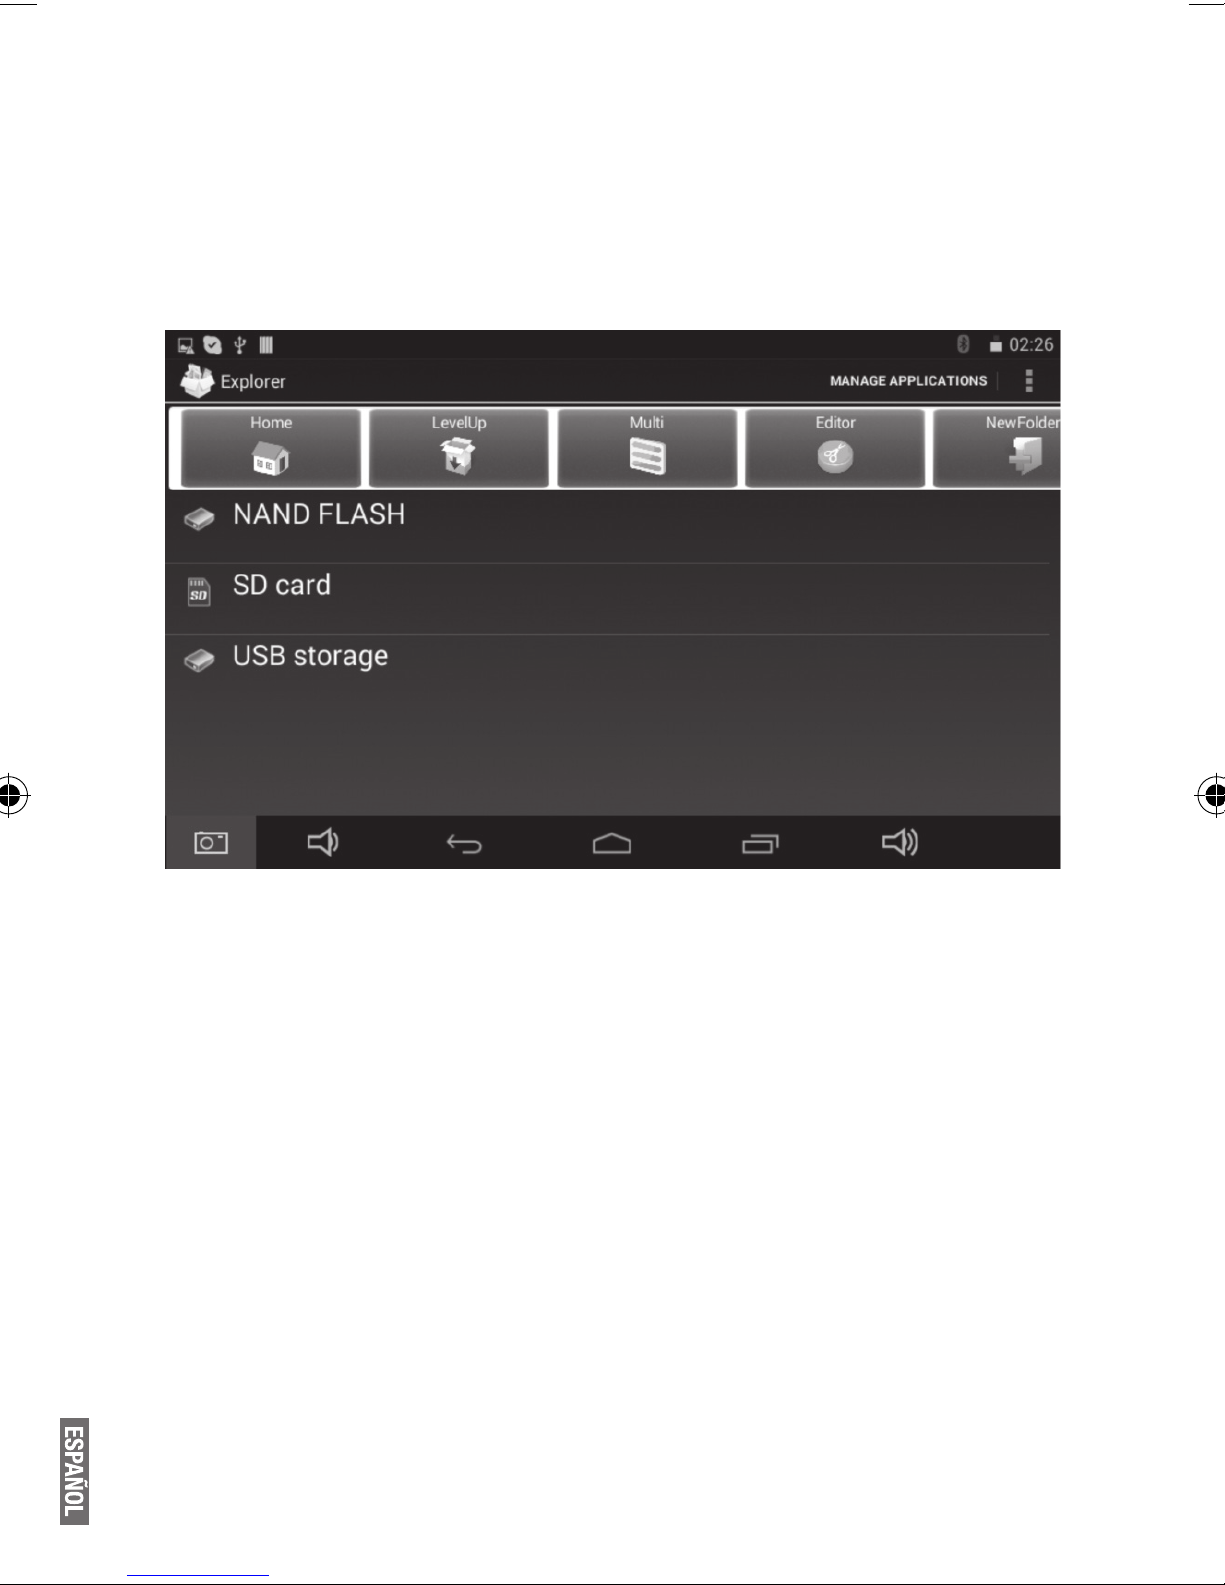
10.1. Conéctate con PC
Conecte el dispositivo con el PC a través del cable USB. En la
PC aparece dos nuevos símbolos de disco después de establecer
la conexión. Uno de ellos es la tarjeta del TF, y el otro es el ash
incorporado.
Page 29
Pg. 29
Page 30
Pg. 30
10.2 . El uso de OTG y USB anfitrión
Es compatible con el dispositivo móvil con formato FAT32, como el
disco U y MP3.
Conecte el dispositivo móvil a la MID. (Nota: sólo OTG podría soportar
mouse y un teclado USB. USB HOST sólo soporta USB 2.0 de alta
velocidad)
10.3 . Aplicaciones
Para el uso conveniente, instalamos algún software de terceros en el
MID. Para los métodos de operación detalladas, por favor consulte la
instrucción correspondiente. Algunos de los software pueden ser capaces de ser utilizados en una cierta área, debido al servicio de red.
IV. SOLUCIÓN DE PROBLEMAS
1 . ¿Qué pasa si el dispositivo es anormal durante la operación?
Respuesta:
1). Reinicie el dispositivo para ver si funciona bien.
2). Cargue el dispositivo por el cargador para activar la batería. Asegúrese
de que tiene energía antes de ponerlo en funcionamiento.
3). Se sugiere que actualizar el sistema operativo del dispositivo por
un profesional.
Page 31
Pg. 31
2. ¿Por qué la carga de la batería dura menos a veces?
Respuesta: el tiempo de uso de la batería depende de la temperatura
el modo de uso. Si la temperatura es demasiado alta o demasiado
baja, el tiempo de uso de la batería podría ser afectada. Se sugiere el
uso del dispositivo a temperatura normal.
El tiempo de uso también se ve afectada por el aumento de volumen y
frecuencia de las operaciones.
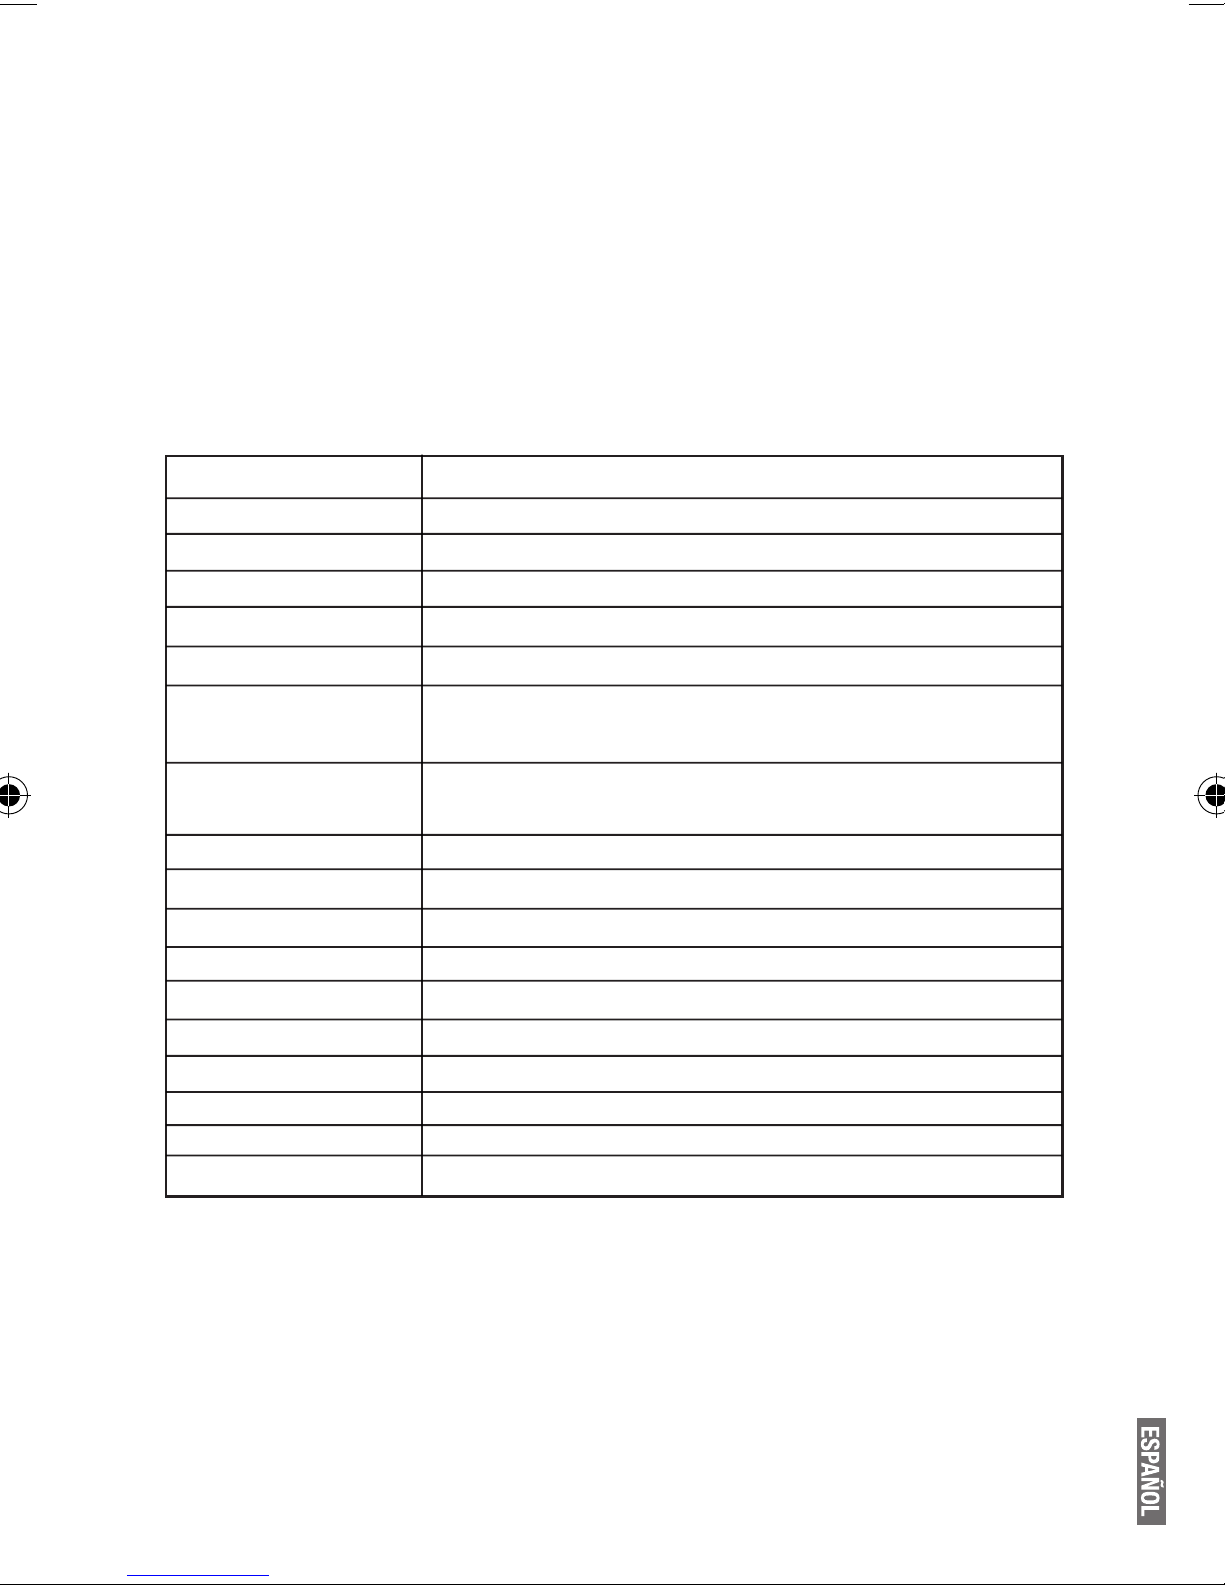
VI . ESPECIFICACIONES
Artículo T-i7yUP
Dimensión 190x108x10.5mm
Pantalla 7” 1024 x 600 TFT touch panel
OS Android 4.4
Capacidad 8GB
Tarjeta externa Tarjeta TF, hasta 32 GB
Audio MP3, WMA, FLAC, APP, OGG
(soporta todos los formatos de audio )
Vídeo MINI HDMI, MPEG4-SP, ASP, DIVX, WMV, RMVB,
H.264/1080P (todos los formatos de vídeo)
E-book Soporta
Redes Wireless WIFI / BT
Idioma Multilingue
USB USB 2.0 de alta velocidad
OTG Soporta
o
Temperatura -20
Batería 2400MA de la batería de litio
RAM 1GB
Cámara Frontal 0.3M + Trasera 2M
Procesador Rockchip RK3128 Quad Core Cortex-A7, 1.3GHz
C to 60oC
Nota: La lista de imágenes en el manual son solo para referencia!
El diseño y la especicación de la unidad están sujetas a cambios sin previo
aviso.
Page 32

Pg. 32
Page 33

Pg. 33
GARANTIA INTERNACIONAL
Términos y Condiciones
1. PANACOM garantiza el funcionamiento de este producto
ante cualquier defecto de fabricación y/o vicio de material por
el término de 6 meses contado a partir de la fecha de compra
por parte del usuario.
2. Esta garantía se limita a la reparación y/o reemplazo de
este producto, a nuestro criterio, sin cargo alguno dentro del
plazo de vigencia y no se extiende a daños concecuentes o
incidentales hacia otros productos que fueran utilizados con
esta unidad.
3. La garantía queda anulada ante: a) reparación o intento de
reparación por terceros no autorizados por la compañía. b)
en el caso de realizar cualqzuier tipo de corte de los cables
de conexión, chas, conectores, u otros adaptadores distintos de los originales de fábrica.
4. Para hacer valer esta garantía se deberá remitir al centro
de servicios autorizado de su país quienes gestionarán la
misma, dicha información se encuentra www.panacom.com.
Para gestionar dicha garantía deberá presentar la Factura
Original de compra en la cual deberá constar claramente la
fecha de compra, nombre del comercio e indenticación del
producto.
5. No quedan cubiertos por esta garantía gastos de traslado,
ete, estadía, y/o seguro si los hubiera.
Page 34

Pg. 34
Page 35

Pg. 35
Page 36

www.panacom.com
 Loading...