

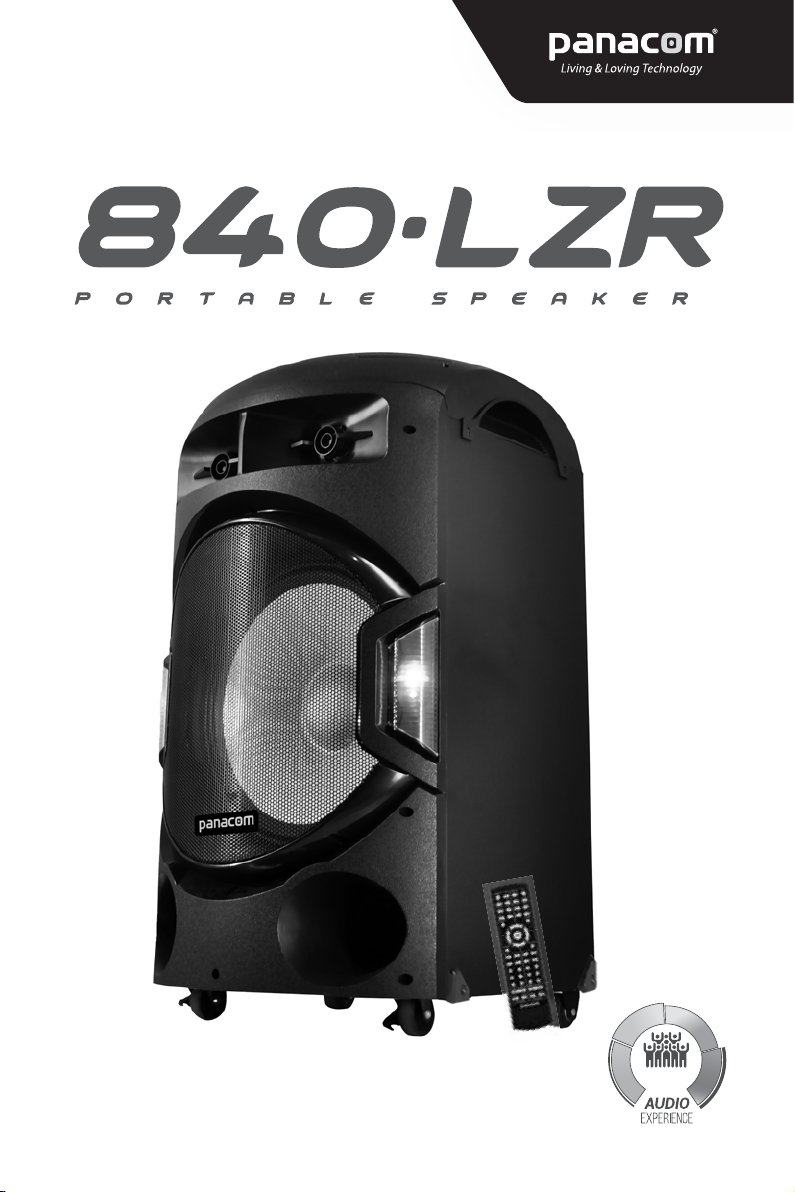
SP-1840 LZR
User Manual
Manual de Usuario
1-120
1
PORTABLE SPEAKER WITH WIRELESS BT CONNECTION
FEATURES
Dual Wireless BT connection
TWS-True Wireless Stereo
FM radio
Remote control
Karaoke
USB/SD
Bass control
Treble control
Volume control
Two Mic in
LED display
Laser ceiling light
200W power output
The lightning flash with the arrowhead symbol within an equilateral triangle is intended to alert the user
to the presence of "uninsulated dangerous voltage" within the product's enclosure that may be of
sufficient magnitude to constitute a risk of electric shock to a person.
The exclamation point within an equilateral triangle is intended to alert the user to the presence of
important operating and maintenance (servicing) instructions in the literature accompanying the unit.
Safety Precautions
Warning: To prevent fire or electric shock, do not expose this appliance to rain or moisture.
SPECIFICATIONS
Speaker size: 15"+Tweeter
Product Size: 45*42*81cm
Packing Size: 50*47*85cm
DUAL
CAUTION
RISK OF ELECTRIC SHOCK
DO NOT OPEN
IN
IMPORTANT SAFEGUARDS
Caution: Please carefully read all of the following important safeguards to ensure safe operation.
1.Read Instructions:
All the safety and operating instructions should be read before the appliance is operated.
2.Retain Instructions:
The safety and operating instructions should be retained for future reference.
3.Follow Instructions:
All operating instructions should be followed.
4.Heed Warnings:
All warnings on the unit and the operating instructions should be adhered to.
5.Power Source:
The appliance should be connected based on instructions.
6.Heat:
Keep the unit away from heat sources such as radiators,refrigerators,stoves or other appliances that
may radiate heat.
7.Non-use Periods:
The power cord of the unit should be unplugged from the outlet when you do not use it for a long time.
8.Damage requiring service:
The unit should be repaired by qualified service personnel in the following cases: a. The power plug or
cable has been damaged;
b. Objects have fallen or liquid has been spilled on the appliance;
c. The appliance has been exposed to rain;
d. The appliance is functioning abnormally.
2
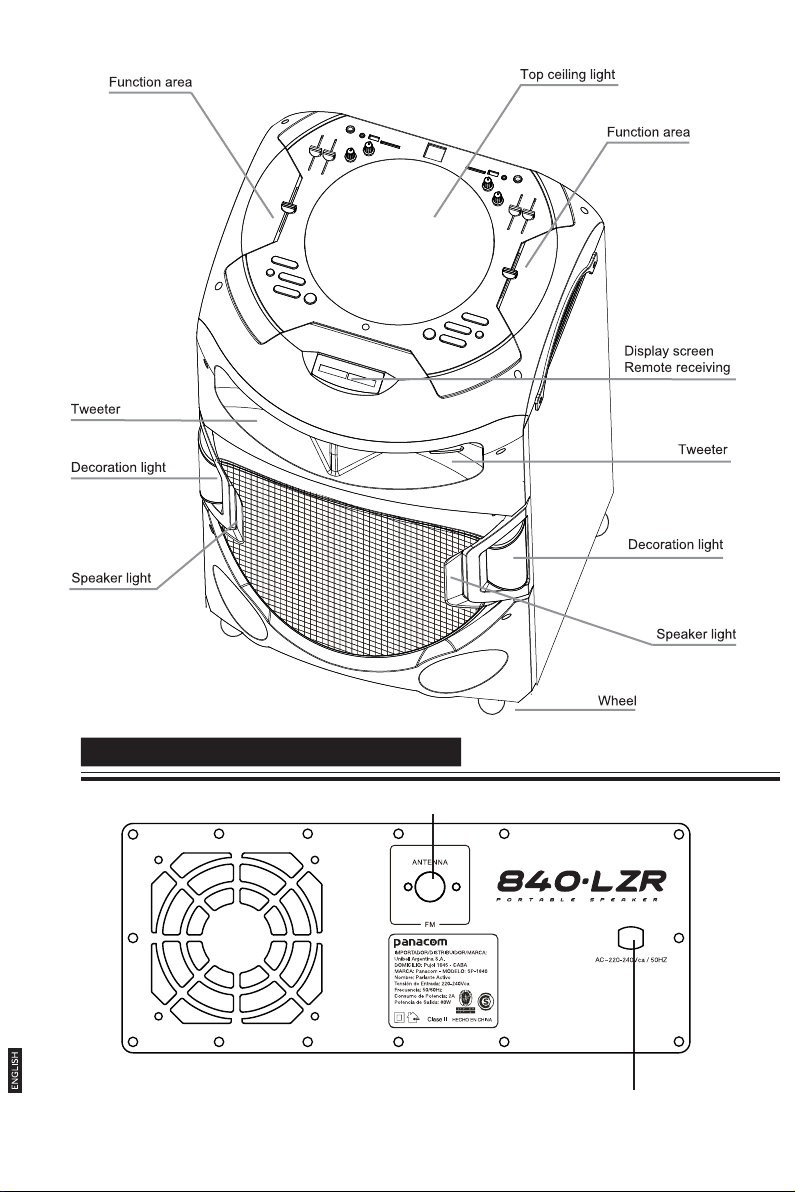
CONNECTIONS
1
1. FM antenna jack
2. Power input
2
3
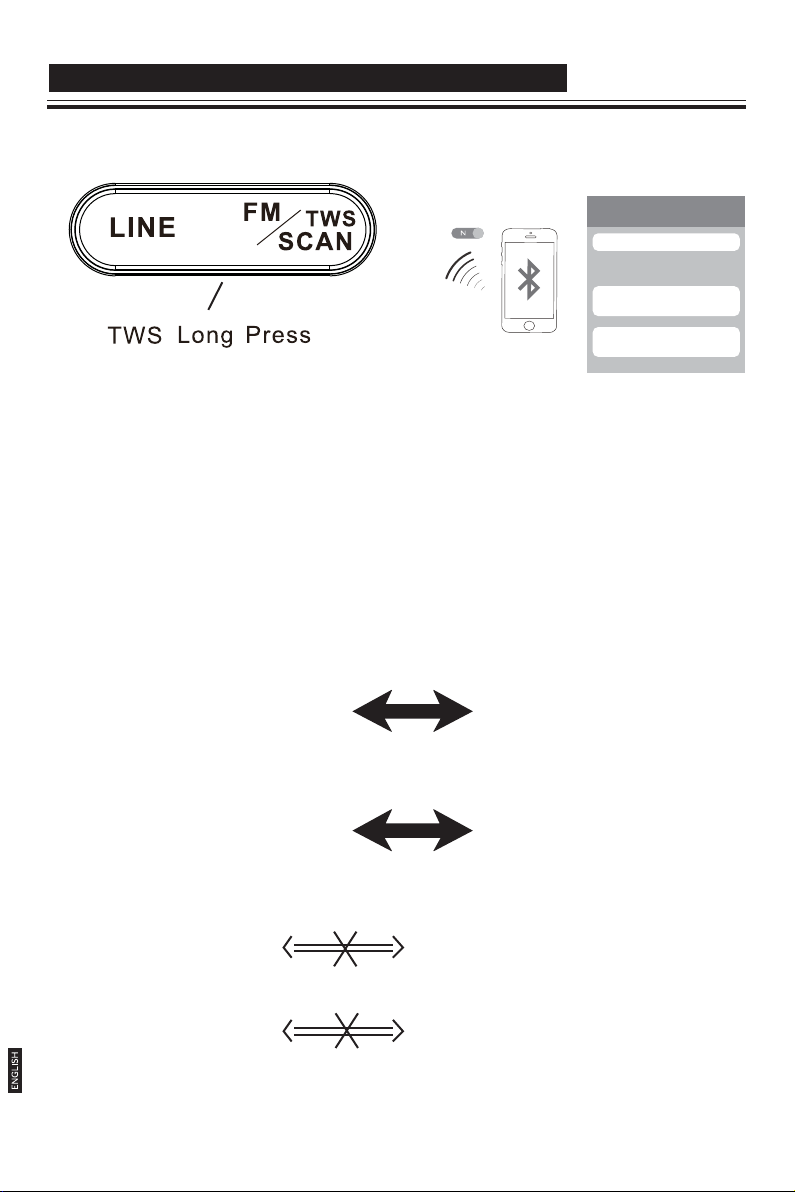
TWS FUNCTION (TRUE WIRELESS STEREO)
BT connection
BT connection
DEVICES
SP-1840A+P LZR2 A
SP-1840A+P LZR2 B
Under BT mode, long press TWS button on the control panel to initiate TWS function. This
function can make one speaker connect to the other one which is also under TWS mode,
to get the effect of using two speakers at the same time and play music under BT 2.0
channel TWS can be only used under BT function,and will not work if the speaker is set AUX
or USB/SD mode.
Under BT mode to build TWS connection,the A channel and B channel should be under
same BT searching name, or they will be failed to connect.
SP-1840 A
SP-1840 B
SP-1840 A
SP-1840 B
SP-1840 B
SP-1840 A
4
SP-1840 A
SP-1840 B
( NOT WORK )
( NOT WORK )

FRONT PANEL-CONTROLS AND FUNCTIONS
8
9
10
11
12
13
14
15
16 17 18
1.Power ON/OFF
2.A System Media card input slot
3.A System USB input slot
4.A System Line input slot
5.Microphone 1 input slot
6.1KHz Equalizer
7.63Hz Equalizer
8.Treble increase/weakers
9.BASS increase/weakers
10.A System Volume control
11.A System B T input key
(BT searching name: SP-1840 A )
12.A System USB/SD card input key
13.A System Line input key
14.A System Play/Pause key
15.A System FM input key
/long press for TWS/FM auto sca n
16.A System Previous key,
long press for volume decrease
17.A System next key,
long press for volume increase
18.Mute of whole unit
19.A System LED display
4 3 2
1567
38 37 36 35
33
34
Top Ceiling light
19
20
20.Remote control receiver
21.B System LED display
22.LED switch ON/OFF:
Unit power is ON ,aLL lights ON
1st press: Top Ceiling light OFF / Speaker Light & Decoration LED ON
2nd press: Top Ceiling light ON / Speaker Light & Decoration LED OFF
3rd Press: All Lights OFF
4th Press: All Lights ON
Rotate Operation
23.B System Previous key, long press for volume decrease
24.B System next key, long press for volume increase
25.B System Line input slot
26.B System Play/Pause key
27.B System FM input key
/long press for TWS/FM auto scan
28.B System BT input key
(BT searching name: SP-1840 B
29.B System USB/SD card input key
30.B System Volume control
31.ECHO increase/weakers
32.Micprohone Volume increase/weakers
33.12KHz Equalizer
34.6KHz Equalizer
35.Microphone 2 input slotase
36.B System Line input slot
37.B System USB input slot
38.B System Media card input slot
22 23 2421
)
32
31
30
29
28
27
26
25
5

REMOTE INSTRUCTION
1 2 3 4
USB/ SD
BT
LINE
FM
VOL
EQ
VOL
REPE ATREPE AT
7
8
12
+
13
31
-
14
16
BT
USB/ SD
6
LINE
5
11
9
30
10
FM
VOL
EQ
+
TWS TWS
-
VOL
A B
15
17
1
3
5
7
9
FM SCA NFM SCA N
0
2
4
6
8
PREVI OUS NEXT
PLAY PAUSE
SYST EM B
1
3
5
7
9
18
0
2
20
22 25
23
26
27
4
6
8
PREVI OUS NEXT
PLAY PAUSE
SYST EM A
19
1. A System USB/SD card input button
2. A System BT input button
3. B System USB/SD card input button
4. B System BT input button
5. A System FM input button
6. A System LINE input button
7. B System FM input button
8. B System LINE input button
9. A System volume increase
10. A System volume decrease
11. A System Equalizer
12. B System Equalizer
13. B System volume increase
14. B System volume decrease
15. A System play again
16. B System play again
17. Mute volume
18. A System auto scan for channels
21
19. B System auto scan for channels
20. A System USB/SD card song select
21. B System USB/SD card song select
22. A System previous song
24
29
28
23. A System next song
24. B System previous song
25. B System next song
26. A System play
27. A System Pause
28. B System play
29. B System Pause
30. A System BT TWS
31. B System BT TWS
Accessories
BT
SB/SD
U
BT
E
LIN
D
SB/S
U
FM
E
+
L
LIN
O
V
M
F
Q
E
-
Q
E
OL
V
+
L
O
V
B
ATRE
E
TWS TWS
P
A
RE
-
OL
V
EAT
P
CAN
FM S
N
1
M SCA
F
0
1
3
0
2
3
5
2
4
5
7
4
6
7
9
6
8
9
US NEXT
O
PREVI
8
T
E
EX
S
N
U
A
P
S
OU
VI
E
AY
R
L
P
P
M B
AUSE
E
P
ST
Y
S
LAY
P
M A
E
ST
SY
REMOTE CONTROL FM ANTENNA
INSTRUCTION
MANUAL
6
AUDIO CABLE

HOW TO USE BT CONNECTION
Dual BT connection Speaker
SYSTEM A
2 ways to enter or restart
BT function
1.Press the “ BT ” input button on
remote control system A
2.Press the “ BT ” button on top
control panel system A
Speaker is in "BT" mode
Auto search and connect
Speaker will enter auto seach:it will
search for the last connected device.
Auto connect to the
connected device
The unit will automatically
connect to the last connected
device that BT is open
with in 20 metres in few
seconds.
(Note: If device cannot be
connected automatically,
press the buttons
“PLAY/PAUSE”, “PREVIOUS”,
“NEXT” to activate BT
and re-connect the device.)
Successful Connection
The BT connection is completed.
When speaker
cannot find the
last connected device
Speaker can be connected
with new device
Use the new device
search and connect to
"SP-1840 A"
SYSTEM B
2 ways to enter or restart
BT function
1.Press the “ BT ” input button on
remote control system B
2.Press the “ BT ” button on top
control panel system B
Speaker is in "BT" mode
Auto search and connect
Speaker will enter auto seach:it will
search for the last connected device.
Auto connect to the
connected device
The unit will automatically
connect to the last connected
device that BT is open
with in 20 metres in few
seconds.
(Note: If device cannot be
connected automatically,
press the buttons
“PLAY/PAUSE”, “PREVIOUS”,
“NEXT” to activate BT
and re-connect the device.)
Successful Connection
The BT connection is completed.
When speaker
cannot find the
last connected device
Speaker can be connected
with new device
Use the new device
search and connect to
"SP-1840 B "
7

PARLANTE PORTÁTIL CON CONEXIÓN INALÁMBRICA BT
CARACTERÍSTICAS
Doble Conexión Inalámbrica BT
TWS-Estéreo Inalámbrico Real
Radio FM
ESPECIFICACIONES
Tamaño del subwoofer: 15"+Tweeter
Tamaño del producto: 45*42*81cm
Tamaño del embalaje: 50*47*85cm
Control remoto
Karaoke
USB/SD
Control de bajos
Control de agudos
Control de volumen
Dos entradas de micrófono
Pantalla LED
Luz de techo láser
Potencia de salida de 200W
CAUTION
RISK OF ELECTRIC SHOCK
DO NOT OPEN
El relámpago con el símbolo de la punta de flecha dentro de un triángulo equilátero tiene por objeto alertar al
usuario de la presencia de "voltaje peligroso no aislado" dentro de la carcasa del producto que puede ser de
magnitud suficiente para constituir un riesgo de descarga eléctrica para una persona.
El signo de exclamación dentro de un triángulo equilátero tiene la intención de alertar al usuario de la
presencia de instrucciones importantes de operación y mantenimiento (servicio) en la literatura que
acompaña a la unidad.
Precauciones de seguridad
Advertencia: para evitar incendios o descargas eléctricas, no exponga este aparato a la lluvia ni a la
humedad.
DUAL
IN
MEDIDAS DE SEGURIDAD
Precaución: Lea atentamente todas las siguientes medidas de seguridad importantes para garantizar un
funcionamiento seguro.
1. Lee las instrucciones:
Todas las instrucciones de seguridad y funcionamiento deben leerse antes de utilizar el aparato.
2.Guardar las instrucciones:
Las instrucciones de seguridad y funcionamiento deben conservarse para referencia futura.
3.Siga las instrucciones:
Deben seguirse todas las instrucciones de funcionamiento.
4.- Preste atención a las advertencias:
Deben seguirse todas las advertencias de la unidad y las instrucciones de funcionamiento.
5.Fuente de energía:
El aparato debe conectarse según las instrucciones.
6.Calor:
Mantenga la unidad alejada de fuentes de calor como radiadores, refrigeradores, estufas u otros aparatos que
puedan irradiar calor.
7. Períodos sin uso:
El cable de alimentación de la unidad debe desenchufarse del tomacorriente cuando no lo use durante mucho
tiempo.
8.Daño que requiere servicio:
La unidad debe ser reparada por personal de servicio calificado en los siguientes casos: a. El enchufe o cable
de alimentación está dañado;
b. Se han caído objetos o se ha derramado líquido sobre el aparato;
ENGLISHESPAÑOL
c. El aparato ha estado expuesto a la lluvia;
d. El aparato funciona de forma anormal.
9

Área funcional
Tweeter
Luz decorativa
Luz de parlante
Luces de techo
Área funcional
Pantalla de visualización
Recepción remota
Tweeter
Luz decorativa
Luz de parlante
ENGLISHESPAÑOL
CONEXIONES
1. Toma de antena FM
2. Entrada de energía
Rueda
1
2
10

FUNCIÓN TWS (ESTÉREO INALÁMBRICO REAL)
BT connection
BT connection
DEVICES
SP-1840A+P LZR2 A
Presión Larga
En el modo BT, mantenga presionado el botón TWS en el panel de control para iniciar la
función TWS. Esta función puede hacer que un parlante se conecte al otro que también está
en modo TWS,
Para obtener el efecto de usar dos altavoces al mismo tiempo y reproducir música en el
canal BT 2.0, TWS solo se puede usar en la función BT y no funcionará si el parlante está
configurado en modo AUX o USB / SD.
En el modo BT para construir la conexión TWS, el canal A y el canal B deben estar bajo el
mismo nombre de búsqueda BT, o no se podrán conectar.
SP-1840 A
SP-1840 B
SP-1840 A
SP-1840 B
SP-1840A+P LZR2 B
ENGLISHESPAÑOL
SP-1840 A
SP-1840 B
SP-1840 B
SP-1840 A
11
( NO CONECTA )
( NO CONECTA )

CONTROLES Y FUNCIONES DEL PANEL FRONTAL
8
9
10
11
12
13
14
15
16 17 18
1.Encendido/apagado
2.Ranura de entrada de la tarjeta
multimedia del sistema A
3.Ranura de entrada USB del sistema A
4.Una ranura de entrada de línea del sistema A
5.Ranura de entrada de micrófono
6. Ecualizador de 6.1KHz
7. Ecualizador de 7,63 Hz
8.Aumento de agudos/debilitamiento
9.Aumento de graves/debilitamiento
10.Control de volumen del sistema A
11.Tecla de entrada BT del sistema A
(Nombre de búsqueda BT: SP-1840 A)
12.Tecla de entrada de la tarjeta USB/SD del sistema A
13.Una tecla de entrada de línea del sistema A
14.Una tecla de reproducción / pausa del sistema A
15.Una tecla de entrada de FM del sistema A
/ pulsación larga para escaneo automático TWS/FM
16.Una tecla anterior del sistema, pulsación larga
para bajar el volumen
17.Una tecla siguiente del sistema, pulsación larga
para aumentar el volumen
18.Silencio de toda la unidad
19.Pantalla LED del sistema A
20.Receptor de control remoto
ENGLISHESPAÑOL
4 3 2
1567
Luces de techo
19
20
21.Pantalla LED del sistema B
22 Interruptor LED ON/OFF:
La unidad está encendida, todas las luces encendidas
1a pulsación: Luz de techo superior apagada / LED de iluminación y decoración
del parlante ENCENDIDO
2a pulsación: Luz de techo superior ENCENDIDA / LED de luz y decoración de
parlante
3a pulsación: todas las luces apagadas
4ta pulsación: todas las luces encendidas
Operación de rotación
23.Tecla anterior del sistema, pulsación larga para bajar el
volumen
24.Tecla siguiente del sistema B, pulsación larga para
aumentar el volumen
25.Ranura de entrada de la línea del sistema B
26.Tecla de reproducción / pausa del sistema B
27.Tecla de entrada de FM del sistema B
/ pulsación larga para escaneo automático TWS / FM
28.Tecla BT de entrada del sistema B
(Nombre de búsqueda de BT: SP-1840 B)
29.Tecla de entrada de la tarjeta USB/SD del sistema B
30.Control de volumen del sistema B
31.ECHO aumenta / se debilita
32.Micprohone Aumento de volumen / se debilita
33.Ecualizador de 12KHz
34.Ecualizador de 6KHz
35 Ranura de entrada de micrófono 2
36.Ranura de entrada de línea del sistema B
37.Ranura de entrada USB del sistema B
38.Ranura de entrada de la tarjeta de medios del sistema B
38 37 36 35
22 23 2421
33
34
32
31
30
29
28
27
26
25
12

CONTROL REMOTO
1 2 3 4
USB/ SD
BT
LINE
FM
VOL
EQ
VOL
REPE ATREPE AT
7
8
12
+
13
31
-
14
16
BT
USB/ SD
6
LINE
5
11
9
30
10
FM
VOL
EQ
+
TWS TWS
-
VOL
A B
15
17
1
3
5
7
9
FM SCA NFM SCA N
0
2
4
6
8
PREVI OUS NEXT
PLAY PAUSE
SYST EM B
1
3
5
7
9
18
0
2
20
22 25
23
26
27
4
6
8
PREVI OUS NEXT
PLAY PAUSE
SYST EM A
19
1. Un botón de entrada de la tarjeta USB/SD del Sistema A
2. Un botón de entrada BT del Sistema A
3. Botón de entrada de tarjeta USB/SD del Sistema B
4. Botón de entrada BT del Sistema B
5. Botón de entrada de FM del sistema A
6. Un botón de entrada LINE del Sistema A
7. Botón de entrada de FM del sistema B
8. Botón de entrada B del Sistema B
9. Aumento de volumen del sistema A
10. Disminución del volumen del sistema A
11. Un ecualizador de sistema A
12. Ecualizador del sistema B
13. Aumento del volumen del sistema B
14. Disminución del volumen del sistema B
15. Reactivación del Sistema A
16. Reactivación del Sistema B
17. Silenciar el volumen
18. Búsqueda automática de canales del sistema A
19. Búsqueda automática de canales del sistema B
21
20. Selección de canción de una tarjeta USB/SD del Sistema A
21. Selección de canción de una tarjeta USB/SD del Sistema B
22. Canción anterior del Sistema A
23. Siguiente canción del Sistema B
24
24. Canción anterior del Sistema B
29
25. Siguiente canción del Sistema B
28
26. Activar sistema A
27. Pausar sistema A
28. Activar sistema B
29. Pausa sistema B
30. BT TWS del Sistema A
31. BT TWS del Sistema B
ENGLISHESPAÑOL
Accesorios
BT
SD
/
USB
BT
E
LIN
SB/SD
U
FM
E
+
IN
L
L
O
V
FM
Q
E
-
Q
L
E
VO
+
L
WS
VO
TR
A
E
TWS T
P
A B
RE
-
OL
V
EPEAT
NFM SCA
A
FM SC
N
1
0
1
3
0
2
3
5
2
4
5
7
4
6
7
9
6
8
T
9
S N EX
U
O
I
V
PRE
8
T
E
EX
N
S
U
O
VI
E
R
LAY PAUS
P
P
AUSE
YSTEM B
S
AY P
L
P
M A
E
ST
Y
S
CONTROL REMOTO ANTENA FM
MANUAL DE
INSTRUCCIONES
CABLE DE AUDIO
13

CÓMO USAR LA CONEXIÓN BT
Parlante de doble conexión BT
SISTEMA A
2 formas de ingresar o
reiniciar en la Función BT
1. Pulse el botón "BT" en el
sistema A del control remoto.
2. Pulse el botón "BT" del panel
de control superior en
el sistema A.
El parlante está en modo "Conexión BT"
Auto búsqueda y conexión
El parlante entrará en búsqueda
automática: buscará el último
dispositivo conectado.
Conexión automática al
dispositivo conectado
La unidad se conectará
automáticamente al último
dispositivo conectado con el que
BT esté abierto en 20 metros en
pocos segundos.
(Nota: si el dispositivo no se
puede conectar
automáticamente, presione los
botones “REPRODUCIR /
PAUSA”, “ANTERIOR”,
“SIGUIENTE” para activar BT y
volver a conectar el dispositivo).
Conexión exitosa
La conexión BT está completa.
Cuando el parlante
no puede encontrar el
último dispositivo conectado
El parlante se puede
conectar con el
nuevo dispositivo.
Utilice la búsqueda del
nuevo dispositivo y
conéctese a
"SP-1840 A"
SISTEMA B
2 formas de ingresar o
reiniciar en la Función BT
1. Pulse el botón "BT" en el
sistema B del control remoto.
2. Pulse el botón "BT" del panel
de control superior en
el sistema B.
El parlante está en modo "Conexión BT"
Auto búsqueda y conexión
El parlante entrará en búsqueda
automática: buscará el último
dispositivo conectado.
Conexión automática al
dispositivo conectado
La unidad se conectará
automáticamente al último
dispositivo conectado con el que
BT esté abierto en 20 metros en
pocos segundos.
(Nota: si el dispositivo no se
puede conectar
automáticamente, presione los
botones “REPRODUCIR /
PAUSA”, “ANTERIOR”,
“SIGUIENTE” para activar BT y
volver a conectar el dispositivo).
Conexión exitosa
La conexión BT está completa.
Cuando el parlante
no puede encontrar el
último dispositivo conectado
El parlante se puede
conectar con el
nuevo dispositivo.
Utilice la búsqueda del
nuevo dispositivo y
conéctese a
"SP-1840 B"
ENGLISHESPAÑOL
14
 Loading...