

Page 1
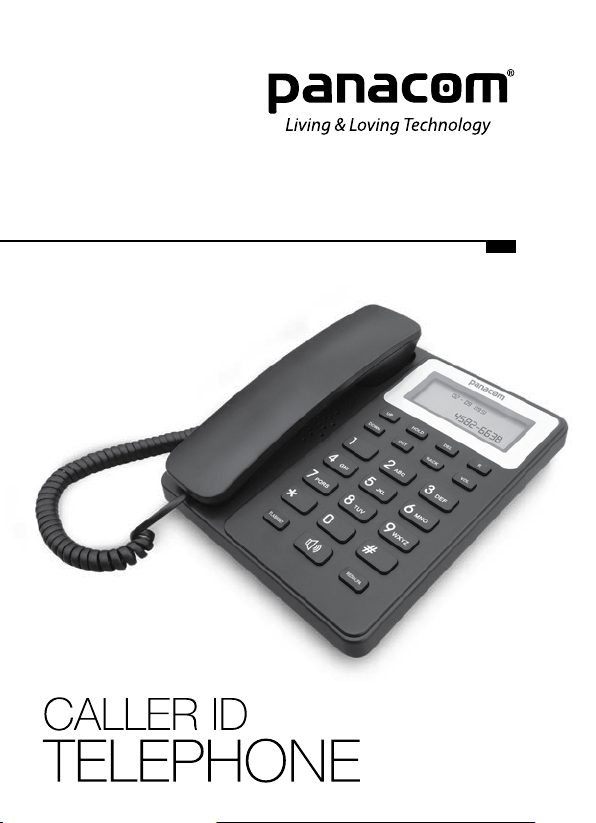
PA-7600 User Manual
PA-7600 Manual del Usuario
Page 2

Page 3

PA-7600 - USER MANUAL
Thanks for purchasing Panacom Telephone PA-7600. Please read this
manual carefully before using this Telephone, which is the best guideline offering best service.
FEATURES
1. Main Functions:
- FSK/DTM Two mode incoming mode display
- 50 groups incoming numbers and time memory (8 digits).
Note: if one or two-key memory store number, Correspondingly
reduced the groups incoming numbers.
- 15 outgoing numbers and talk time memory (8 digits).
- Real time date and weekday display, LCD 5 grades selectable.
- 1~99 hours no-disturb.
- 16 normal rings for selectable.
- Ring volume and Hand-free volume adjustable by software setting Guard against theft set by software; P/T selectable by software.
- Flash time 100ms
- 3 groups of alarm setting with different sounds.
- Auto hook on when forget to hook on (without noise wave disturb)
- Local area code 8 digits setting, Auto ltrate the local area code
in incoming calls
2. Special Keys functions
VOL key:
At on hook state, press the key enter to ring volume
select menu, press up or down key to select; At off hook state,
it is HF volume select key;(there are 4 grades ring volumes and
2 HF volumes for select in circle, default is high ); At incoming
check state, it is for VIP setting.
FLASH/SET key:
At on hook state, press the key enter setting
function; At off hook state, press the key does ash function
Pg. 3
Page 4
BACK/ARD key:
At on hook pre-dial state and incoming
or outgoing check state, press the key is Auto-RD function; At off
hook state, it is redial the former dialed numbers; Press the key for
awhile it will add “0” and do the back call function;
DEL key:
At pre-dial state incoming or outgoing check state and
calculate state, it does the del function; At incoming or outgoing
check state press the key for 2 seconds will delete all the stored
numbers.
At off hook before pre-dial, it doesn’t add Ex-code and do the auto
IP function.
R Key:
The R key’s main function is to give the phone system an order of
100ms delay to hold the call and to dial an extension, pressing the R
key again resend the command to retrieve the call.
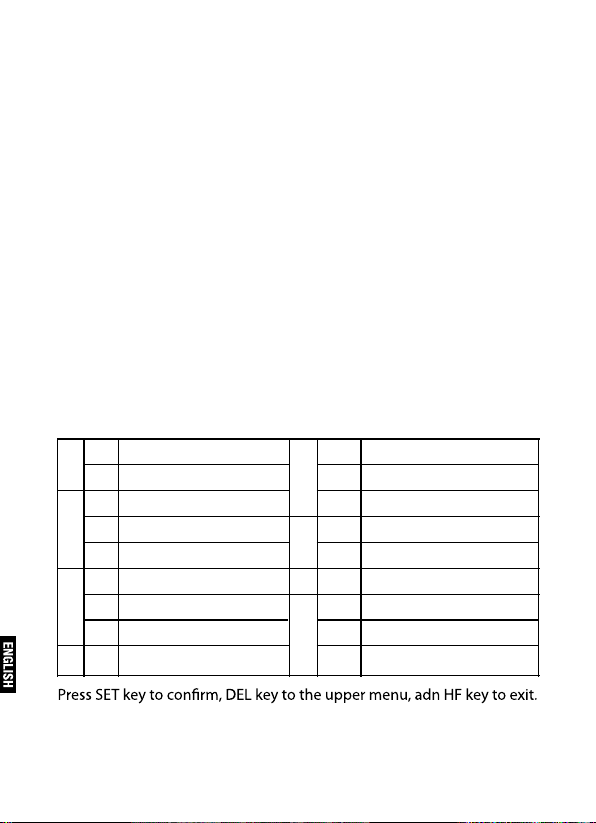
3. Setting function table
11
15
3
4
DATE SETTING FLASH TIME SETTING
TIME SETTING
2
RING SELECT
1
VIP RING SELECT
22
RING VOLUME SELECT
3
NO1 ALARM
1
2
NO2 ALARM
3
NO 3 ALARM
NO DISTURB
6
7
8
P-T EXCHANGE
2
GUAR AGAINS THEFT
3
LO CAL AREA CODE SETTING
1
EX-CODE SETTING
2
1
LCD LIGHT ADJUST
AU TO IP
1
MANUAL IP1
2
MANUAL IP2
3
4. Functions instruction
4.1 Menu function setting
Pg. 4
Page 5

At off hook state, press SET key to enter the setting state, LCD displays SET 12345678, press the digit key or UP/DOWN key to choose
the setting function, and LCD displays the corresponding setting
option, after nish setting, press DEL key to the upper menu and
digit or UP/DOWN to choose the next setting option.(If use the UP/
DOWN key to the setting option, you should enter the sub-menu rst
and then press the UP/DOWN key to choose the setting option, do
as follows: Press SET key and then press the UP/DOWN key. Here
we just introduce to use the digit key to choose the setting option).
Here is the detail step:
4.1.1 Date/Time Setting
Press SET key and choose 1, LCD displays 1—DATE、2—CL. Choose
1 enter to datesetting, the digit
will ash, input the digit directly then press SET key to conrm; After nish date setting, LCD will change the weekday automatically.
Choose 2 enter to time setting, it is the same to the date setting.
Press HF key to exit the setting state.
4.1.2 Ring select and volume adjust
Press SET key and choose 2, LCD displays r 1t 2vip 3vol, choose 1
enter to the normal ring select,LCD displays ring type 01, then press
UP/DOWN key to select the ring sound, press SET key to conrm,
press DEL key to the upper menu; Choose 2 enter to VIP ring select,
LCD displays ring vip 01, the set method is same to the normal ring
select; Choose 3 enter to ring volume adjust setting, LCD displays
ring vol 04, Press UP/DOWN key to select, press HF key to exit.
4.1.3 Alarm setting
Press SET key and choose 3, LCD displays AL 1-2-3, choose 1 enter
to the rst group alarm setting,LCDdisplays ALAROFF, the OFF ashes,
then input the alarm time and press SET key toconrm,When to close the
alarm, press the SET key and the group of the alarm and then press UP/
DOWN key to choose the OFF; The other two group setting are same to
the rst one; The rst one alarms only one time,the other two alarm everyday, press any key will stop alarm during alarming.
4.1.4 No-disturb time setting
Press SET key and choose 4, LCD displays off_r 00-00, input digit
Pg. 5
Page 6

time(00-99)when ashes, press SET key to conrm. When No-disturb function set, LCD displays the no disturb time and count down
to 00-00 then it will auto exit the no-disturb state. Pick up or hand
free also can exit the no-disturb state. It doesn’t ring during the nodisturb state.(VIP is allow.)
4.1.5 Special function choose setting
Press SET key and choose 5, LCD displays 1-f 2-pt 3-d, choose 1
enter to ash time setting, LCD displays ash 600 and ashes, press
UP/DOWN key to choose the time. There are 90-95-100-120-180300-600-1000ms for selectable; Choose 2 enter to P—T exchange,
LCD displays pt tone, press UP/DWON key to choose the dial mode,
the init value is tone dial mode; Choose 3 enter guard against theft
setting, LCD displays defend off, press UP/DOWN key to choose on/
off state.(The passwords are#).
4.1.6 Local area code and Ex-code setting
Press SET key and choose 6, LCD displays 1-LOC 2-OL,choose1enter
to local area code setting, LCD displays lock, input the digits 1~8 for
selectable, then press SET key to conrm, press DEL key to delete
the input numbers, also press SET key to conrm. Choose 2 enter to
Ex-code setting, LCD displays out off, the setting method is same to
the local area code setting. Press UP/DOWN key to choose OFF to
delete the Ex-code.
4.1.7 LCD light adjust
Press SET key and choose 7, LCD displays LCD con 4, press UP/
DOWN key to adjust light grade, default is the 4th grade, there are 5
grades for selectable.
4.1.8 IP function setting
Press SET key and choose 8, LCD displays 1-au 2-3-ip, choose 1
enter to auto IP setting, LCD displays au IP off, press UP/DOWN
key to choose the IP numbers, IP1, IP2,17909, 17908, 193, 17911,
17921,17931,17951,17991, 068, 96300, 96333, 196, 190,17969,197,
off for selectable, default is off. (IP1,IP2 are manual IP setting mode);
Choose 2 enter manual IP1 setting, LCD displays null, input the
numbers directly and press SET key to conrm, LCD displays ip1
Pg. 6
Page 7

code means it is successfully stored the numbers.Choose 3 enter to
manual IP2 setting, it is the same to the manual IP1 setting.
4.2 On hook function operate
4.2.1 Back dial
At pre-dial or incoming call check or outgoings check state, press
the BACK key will dial out the selected numbers; Press DIAL key for
3 seconds will add “0” before the dial numbers.
4.2.2 Incoming call check
At on hook or off hook state, press UP/DOWN key can view the incoming call information; Press # key for 3 seconds will enter to the
incoming call check state fast at on hook state.
4.2.3 Outgoing check
At on hook or off hook state, press CHECKEXCHANGE key enter to
outgoing check state, press UP/DOWN key can view the outgoing
information; Press * key for 3 seconds will enter to the outgoing
check state fast at on hook state.
4.2.4 On hook pre-dial
At on hook state, input the outgoing numbers, use DEL key to delete
the wrong dialed number, pick up or press BACK key will dial out the
numbers when nish inputting the dial numbers (At Hand Free
state, it will auto-RD when the line is busy), press BACK key for 3
seconds will auto add “0” then back all.
4.2.5 DEL function
At input digit state, use DEL key to delete the wrong input number;
At incoming call check or outgoing check state, use DEL key can
delete the information, press DEL key for 3 seconds can delete all
the information.
4.2.6 VIP memory
Press UP/DOWN key to get the incoming call information, press
VOLkey will store the numbers to VIP or cancel it.
4.3 Off hook function operate
4.3.1 AUTO_RD
Pg. 7
Page 8

At hand free state, after dial out and the line is busy, then press
AUTO-RD key enter auto redial back state, it will ring back when get
through.
4.3.2 AUTO IP
USE setting option 8 to set auto IP numbers, at on hook or off hook
state or back dial state, it will dial auto add IP numbers before the
dial numbers when the rst dial number is “0”, if it want to add “0”
to dial back , it also will add the IP numbers rst.
4.3.3 NO IP function
At auto IP is open state, when pick up press DEL key before dial out,
it won’t add IP and dial out directly; IF set Ex-code, press DEL key
before dial out it also will ltrate the Ex-code and dial out directly.
Pg. 8
Page 9

PA-7600 - MANUAL dEL USUARio
Gracias por la compra de su Teléfono de Mesa/Pared PANACOM PA-
7600. Por favor lea este manual cuidadosamente antes de utilizar
este Teléfono, para seguir las mejores pautas tendientes a ofrecer
el mejor servicio.
CARACTERÍSTICAS
1 . FUNCIONES PRINCIPALES:
- Visualización del modo de entrada DTMF / FSK
- 50 grupos de números entrantes y Memoria de 8 dígitos
- 15 números salientes y el tiempo de conversación con memoria de
8 dígitos
- LCD 5 grados seleccionables
- 16 tonos seleccionables
- Volumen de tono y el volumen de manos libres ajustable
- Tiempo de Flash de 90/95/100/120/180/300/600/1000ms seleccionables
- 3 tipos de ajuste de alarma con diferentes sonidos
- Auto corte cuando olvide colgar el teléfono (sin ondulaciones ruido
molestar)
2 . FUNCIONES DE TECLAS ESPECIALES:
Tecla VOL:
Cuando el teléfono este colgado , pulse la tecla Enter para que suene el volumen menú seleccionar, presione hacia arriba o hacia abajo para seleccionar.
Cuando el teléfono este descolgado, es el volumen HF tecla de selección, (hay 4 niveles de volumen para tonos y 2 niveles de volumen
para HF, por defecto es alto) y, al entrante
Comprobar el estado, es para la conguración VIP .
Tecla FLASH / SET:
Cuando el teléfono este colgado pulse la tecla Intro ajuste
Función; En estado descolgado pulse la tecla tiene la función de ash.
Tecla BACK / ARD:
Cuando el teléfono este colgado pre - marcación y llamadas entrantes o el estado de activación de salida, pulse la tecla es la función
Auto - RD ; En el estado descolgado , es volver a marcar los antiguos
Pg. 9
Page 10
números marcados , pulse la tecla durante un tiempo va a añadir “ 0 “
y hacer la función de devolución de llamada.
Tecla DEL:
En el estado de pre-marcado , estado de activación entrante o saliente y calcular el estado , que hace la función del ; En el estado de
vericación de entrada o salida , pulse la tecla durante 2 segundos ,
se borrarán todos los números almacenados .
Tecla “R”:
La Tecla R tiene como función principal enviarle a la Central Telefónica
una orden de retardo de 100ms para retener la llamada y poder discar
un interno, presionando nuevamente la tecla R vuelve a enviar la orden para recuperar el llamado.
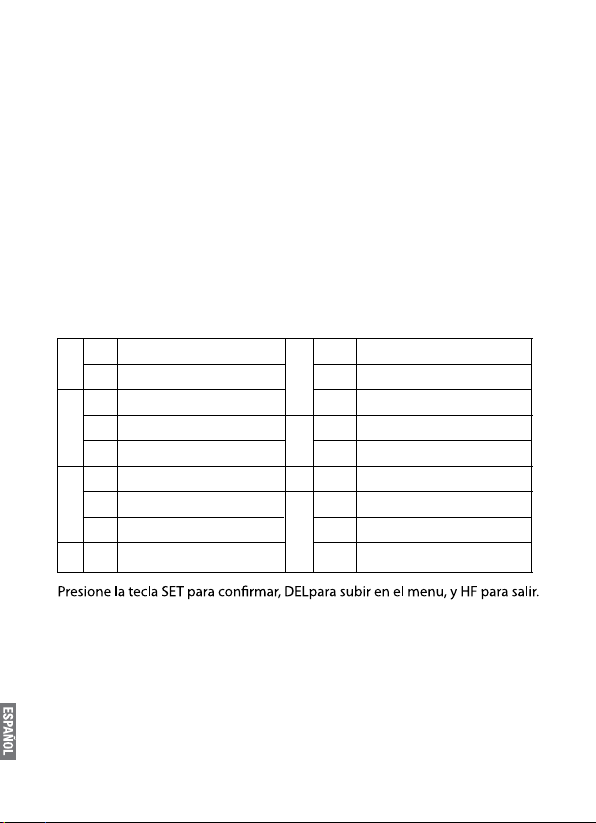
3 . CONFIGURACIÓN DE LA TABLA DE FUNCIONES
15
3
4
AJUSTE DE HORA
2
SELECCIONAR TONO
1
SELECCIONAR TONO VIP
22
SELECCIONAR VOL DE TONO
3
ALARMA NO1
1
2
ALARMA NO2
3
ALARMA NO 3
NO MOLEST A R
6
7
8
CMABIAR P-T
2
ANTI ROBO
3
SETEO DEL COD DE AREA
1
SETEO DEL CODIGO EX
2
1
AJUSTE DE LA LUZ DEL LC D
AU TO IP
1
IP1 MANUAL
2
IP2 MANUAL
3
AJUSTE DE FECHASETEO DEL TIEMPO FLASH
11
4 . INSTRUCCIONES SOBRE LAS FUNCIONES
4.1 Ajuste de la función de menú
En el estado descolgado, presione la tecla SET para entrar en el estado
de conguración, LCD muestra SET 12345678 , pulse la tecla numérica o la tecla UP / DOWN para seleccionar la función de ajuste , y la
pantalla LCD muestra la opción de ajuste que corresponda, después
del fraguado nal , pulse la tecla DEL para En el menú superior y dígito
o ARRIBA / ABAJO para elegir la opción de conguración siguiente.
Pg. 10
Page 11

( Si utiliza los botones UP / DOWN para la opción de conguración ,
debe entrar en el submenú y pulse el primero / ABAJO ARRIBA para
seleccionar la opción de ajuste , haga lo siguiente : Pulse la tecla SET
y pulse el / ABAJO ARRIBA Aquí nos presentamos a utilizar el dígito.
para escoger la opción de ajuste). Aquí está el paso detalle :
4.1.1 Fecha / hora
Pulse la tecla SET y seleccione 1 , pantalla LCD muestra 1 ,2 - FECHA
-CL . Elegir 1 Intro para conguracion de fecha , el dígito parpadea , el
dígito de entrada directamente a continuación, pulse la tecla SET para
conrmar; Después de ajustar la fecha de nalización , LCD cambiará el día de la semana de forma automática. Selecciona 2 Intro para
ajuste de la hora , que es el mismo que el ajuste de la fecha . Clave de
HF Pulse para salir del estado de conguración.
4.1.2 Selección de tono y ajuste de volumen
Pulse la tecla SET y seleccione 2 , LCD muestra r 1t 2vip 3vol , elija 1 entrar al ring normal de selección , la pantalla LCD muestra el tipo de anillo
01 , a continuación, pulse ARRIBA / ABAJO para seleccionar el sonido
del timbre , presione la tecla SET para conrmar , pulse la tecla Supr al
menú superior , elige 2 para entrar VIP anillo de selección , la pantalla LCD
muestra el anillo vip 01 , el método de juego es el mismo que el anillo
normal de seleccionar , elegir 3 enter para ajustar la conguración del volumen del timbre , la pantalla LCD muestra el anillo vol 04 , Pulse ARRIBA
/ ABAJO para seleccionar , pulse la tecla HF para salir.
4.1.3 Ajuste de la alarma
Pulse la tecla SET y seleccione 3 , pantallas LCD AL 1-2-3 , elija 1
entrar a la primera conguración de grupo de alarmas , LCD mostrara
ALAR OFF , a continuación, introduzca la hora de la alarma y pulse
SETun tono conrmara clave , cuando se cierre la alarma, pulse la tecla SET y el grupo de la alarma y luego la tecla ARRIBA / ABAJO para
seleccionar el apagado y el otro ajuste de dos grupos son los mismos
que el primero , el primero alarmas de una sola vez, los otros dos alarma diaria, pulse cualquier llave dejará de alarma durante alarmante.
4.1.4 No molestar - ajuste de la hora
Pulse la tecla SET y seleccione 4 , LCD muestra off 00-00 , el tiempo
de dígitos de entrada ( 00-99 ) cuando parpadee, pulse la tecla SET
Pg. 11
Page 12

para conrmar . Cuando No molestar conjunto de funciones, LCD
muestra el tiempo y no molestar a contar a 00-00 luego que se auto
salga del estado de no molestar . cuando descuelgue el telefono o
oprima manos libres también se puede salir del estado no molestar .
No tocar durante el estado de no- molestar ( VIP es permitir . ) .
4.1.5 Función especial elija la configuración
Pulse la tecla SET y seleccione 5 , la pantalla LCD muestra 1 -f 2 -pt 3
-d , elija 1 entrar a parpadear ajuste de la hora , la pantalla LCD muestra Flash 600 y parpadea , pulse ARRIBA / ABAJO para seleccionar el
tiempo. Hay 90,95,100,120,180,300,600,1000 ms para seleccionar ,
elegir 2 entrar para intercambiar P -T , la pantalla LCD muestra el tono
pt, pulse la tecla ARRIBA / dwon para elegir el modo de marcación ,
el valor de init es el tono disco de modo , elegir 3 Introduzca guardia
contra robo ajuste , la pantalla LCD muestra defender apagado, pulse
ARRIBA / ABAJO para seleccionar on / off ( Las contraseñas son # )
4.1.6 código y código de área Ex seteo local
Pulse la tecla SET y seleccione 6 , LCD muestra LOC 1 - 2 - OL, elija
1entrar para ajuste del código de área local , la pantalla LCD muestra
loc. . . . . . , Ingrese los dígitos 1 ~ 8 para seleccionar, a continuación,
pulse la tecla SET para conrmar , pulse tecla DEL para borrar los
números ingresados , también presione SET para conrmar. Selecciona 2 entrar al ajuste de código Ex , LCD muestra fuera apagado,
el método de conguración es el mismo que el ajuste de código de
área local. Pulse ARRIBA / ABAJO para seleccionar OFF para borrar
el código de Ex .
4.1.7 Ajuste de brillo del LCD
Pulse la tecla SET y seleccione 7 , pantallas LCD LCD con 4 , presione
UP / DOWN para ajustar el grado de luz , por defecto es el cuarto
grado, hay 5 grados para seleccionar.
4.1.8 Ajuste de la función IP
Pulse la tecla SET y seleccione 8 , LCD muestra 1 - 2-3 au -ip , elija 1
Ingrese a la conguración IP automática , pantallas LCD au IP desactivado, pulse ARRIBA / ABAJO para elegir los números IP, IP1 , IP2 ,
17909 , 17908 , 193, 17911 , 17921,17931,17951,17991 , 068 , 96300
, 96333 , 196, 190,17969,197 , fuera de seleccionable, por defecto es
Pg. 12
Page 13

desactivado . ( IP1 , IP2 son el modo de conguración de IP manual) ;
2 Elija introduzca ajuste manual IP1 , LCD muestra null, introducir los
números directamente y pulse la tecla SET para conrmar , la pantalla
LCD muestra ip1 código signica que se almacena con éxito el numbers.Choose 3 Introduzca el manual IP2 ajuste , que es el mismo para
el ajuste manual de IP1 .
4.2 En función de enlace
4.2.1 Volver a marcar:
En el registro de llamadas o gastos comprobar el estado pre - dial o
entrante, pulse la tecla BACK marcará los números seleccionados,
Pulse una tecla durante 3 segundos, se añade “ 0 “ antes de los números de marcación.
Ver 4.2.2 Chequeo de llamada entrante
Colgado o descolgado, pulse ARRIBA / ABAJO se puede ver la información de la llamada entrante , oprima # llave por 3 segundos ,
entrará a la llamada entrante comprobar rápidamente el estado en el
estado de gancho.
4.2.3 Chequeo de llamada saliente
Colgado o descolgado, llave CHECK EXCHANGE pulse Enter para
estado de activación de salida, pulse tecla Arriba / Abajo pueden ver
la salida información; Pulse la tecla * durante 3 segundos entrará a la
salida comprobar rápidamente el estado en el estado de gancho.
4.2.4 Marcación previa
Cuando el telefono este colgado , introduzca los números salientes,
use la tecla DEL para borrar el número marcado mal, recoger o pulse
BACK marcará los números al terminar de introducir los números de
marcación ( At Hand libre estado, que se auto - RD cuando la línea
está ocupada ) , pulse la tecla Atrás para 3 segundo se auto añadir “
0 “ luego de vuelta de todo.
4.2.5 Función DEL
En el estado de dígitos de entrada, utilice la tecla DEL para borrar el
número de entrada incorrecta.
En el registro de llamada entrante o estado de activación de salida,
utilice la tecla DEL puede borrar la información , pulse la tecla DEL
Pg. 13
Page 14

durante 3 segundos se puede eliminar toda la información.
4.2.6 Memoria VIP
Pulse ARRIBA / ABAJO para obtener la información de la llamada
entrante, pulse VOL key almacenará los números VIP o cancelará.
4.3 función de enlace Off
4.3.1 AUTO_RD
Al lado del estado libre, después de marcar hacia fuera y la línea está
ocupada , a continuación, pulse Tecla AUTO - RD entrar remarcación
nuevo estado, volverá a sonar al pasar.
4.3.2 AUTO IP
Utilice la opción 8 para ajustar los números Conguración automática
de IP , en el gancho o descolgado estado o posterior estado de línea
, que marcará auto añadir números de IP antes de la marcar números
en el primer número de línea es “ 0 “ , si quieren añadir “ 0 “ volver a
marcar , también sumará los números IP primero .
4.3.3 Función de NO IP
En IP automática es el estado abierto, al recoger tecla DEL presione
antes de marcar, no se sumará IP y marcar directamente, si SET Código Ex , pulse la tecla Supr antes de marcar también ltrado el
código Ex y marcar directamente .
Pg. 14
Page 15

INTERNATIONAL WARRANTY
Terms and Conditions
1. PANACOM warrants the operation of this product to be free from
any manufacturing and/or material defect for a period of 12 months
from the date of purchase by the user.
2. This warranty is limited to the repair and/or replacement of this
product, according to our own criterion, free of charge within the
stipulated term and it does not extend to consequential or incidental
damages to other products that may be used with this unit.
3. The warranty shall be voided in the following cases: a) repair or
attempt to repair by third parties not authorized by the company. b)
in case of performing any type of cut in connection cables, plugs,
connectors, or other adapters different from the original ones provided by the company.
4. To make this warranty effective, you shall contact the Authorized
Service Center of your country and they shall carry out the pertinent procedure; said information is available at www.panacom.com.
In order to start the necessary procedure to get said warranty, you
shall hand in the Original Purchase Invoice where the purchase date,
dealer name and product identication shall be stated clearly.
5. Transportation, freight, stay and/or insurance expenses, if any, are
not covered by this warranty.
Pg. 15
Page 16

Authorized Service Centers:
Argentina
To ask for our service network please call
0810-888-8642.
Pg. 16
Page 17

GARANTiA iNTERNACioNAL
Términos y Condiciones
1. PANACOM garantiza el funcionamiento de este producto ante cualquier defecto de fabricación y/o vicio de material por el término de 12
meses contado a partir de la fecha de compra por parte del usuario.
2. Esta garantía se limita a la reparación y/o reemplazo de este producto, a nuestro criterio, sin cargo alguno dentro del plazo de vigencia y no se extiende a daños concecuentes o incidentales hacia
otros productos que fueran utilizados con esta unidad.
3. La garantía queda anulada ante: a) reparación o intento de reparación por terceros no autorizados por la compañía. b) en el caso de
realizar cualquier tipo de corte de los cables de conexión, chas, conectores, u otros adaptadores distintos de los originales de fábrica.
4. Para hacer valer esta garantía se deberá remitir al centro de servicios autorizado de su país quienes gestionarán la misma, dicha
información se encuentra www.panacom.com. Para gestionar dicha
garantía deberá presentar la Factura Original de compra en la cual
deberá constar claramente la fecha de compra, nombre del comercio e indenticación del producto.
5. No quedan cubiertos por esta garantía gastos de traslado, ete,
estadía, y/o seguro si los hubiera.
Pg. 17
Page 18

Centro de Servicios Autorizado:
Argentina
Para consultar por nuestra red de servicio
técnico por favor llame al 0810-888-8642.
Pg. 18
Page 19

Page 20

 Loading...