


Thank you for purchasing our product.
Please read this quick guide before
using the product. Change without notice
H.264 4 / 8 / 16CH
DVR Quick guide

- 2 -
◆ CAUTION
Please read this user manual carefully to ensure that you can use the device correctly
and safely
We do not warrant all the content is correct. The contents of this manual are subject to
change without notice
This device should be operated only from the type of power source indicated on the
marking label. The voltage of the power must be verified before using. If not in use for a long
time, pull out the plug from the socket
Do not install this device near any heat sources such as radiators, heat registers, stoves
or other device that produce heat
Do not install this device near water. Clean only with a dry cloth
Do not block any ventilation openings. And ensure well ventilation around the machine
Do not power off the DVR at normal recording condition! The correct operation to shut
off DVR is to stop recording firstly, and then select “shut-down” button at the right of the
menu bar to exit, and finally to cut off the power.
This machine is indoor using equipment. Do not expose the machine in rain or moist
environment. In case any solid or liquid get into the machine’s case, please cut off the
power supply immediately, and ask for qualified technicians to check the machine before
restart
Refer all servicing to qualified service personnel. No any parts repaired by yourself
without technical aid or approval.

- 3 -
1. Product Introduction
Real-time surveillance
High resolution VGA output (Default), HDMI output available
2 way audio
3G Mobile surveillance(Iphone/ Ipad/ Android)
Compression with latest H.264 video compression, better video quality and lower compression
rate.
Storage
1 SATA HDD for 4/8/16 channel dvr(FAT32 file system)
Data Backup with USB thumb drive or USB external DVD burner. Each backup file size is
128MB.
Adjustable record resolution, frame rate and quality
Multi-record mode: manual, schedule, sensor and motion record.
HDD recycle record.
Single or Multi channel playback
Record file lock protection
alarm input/output : 4/1 for 4 channel, 8/1 for 8 channel, 16/1 for 16 channel
Motion detection
Pre and Post event record
Channel related trigger record
PTZ control
Multi PTZ protocol support
Programmable 128 Preset points and 8 cruises
Related trigger preset point control
Authority account setup (1 admin and 15 users account)
USB mouse control
To use USB mouse to control on friendly GUI
Playback search mode: by time or event
Event log and search
Support network function
Multi connection type: STATIC(Fixed IP)、DHCP、PPPOE
Support DDNS
Support event trigger to send E-mail
Remote connection limitation
Auto bandwidth adjustment by network status
Support network remote control
Remote record
Remote playback
Remote PTZ control
Remote configuration
Remote IE surveillance
Remote CMS control
Remote EMAP control
Remote camera color adjustment
Remote snapshot
- 4 -
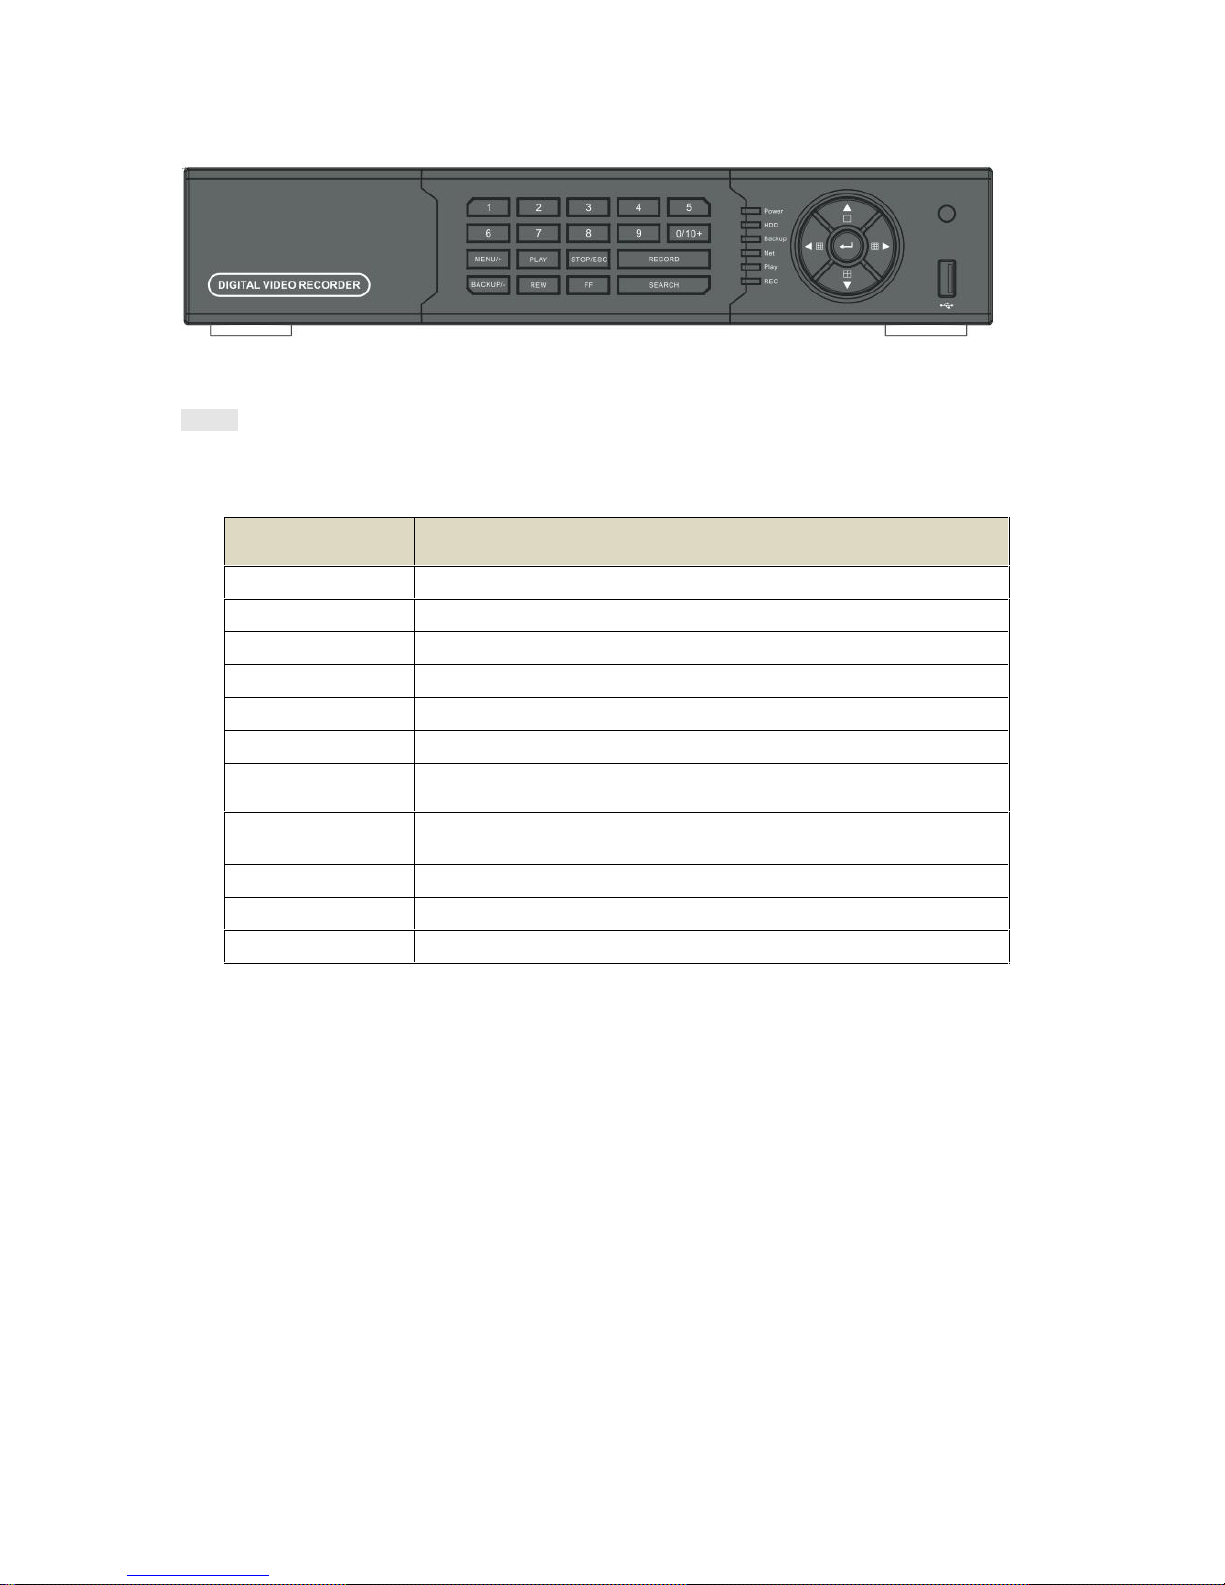
1.2 Front Panel Definition
Notice: The pictures are only for reference; please make the object as the standard.
Label Name
Function
REC / FOCUS
Manual record / focus adjustment(PTZ)
PLAY / IRIS
Enter Playback/ iris adjustment (PTZ)
REW / SPEED
Fast rewind on playback mode /speed adjustment (PTZ)
FF / P.T.Z.
Fast forward on playback mode /enter PTZ mode
MENU / +
Enter menu page / increase value
BACKUP / -
Enter backup page / decrease value
STOP / ESC
Stop playback on playback mode /
Exit menu or jump back to previous page
Split / Direction
Key
Switch split / Move selected item
Enter
Validate action
USB
Connect USB thumb drive or mouse
IR receiver
Remote receiver

- 5 -
1.3 Rear Panel Instructions
Rear Panel for 4-ch
Name
Description
Audio in
4 CH Audio input
RS485
Connect to speed dome or keyboard
ALARM OUT
1-ch relay output. Connect to external alarm
ALARM IN
Connect to external sensor 1-4
Video in
Video input channels from 1-4
Audio out
Audio output, connect to the sound box
Video out
Connect to monitor
HDMI port
Connect to high-definition display device
VGA port
VGA output, connect to monitor
LAN
Network port
USB port
Connect USB mouse or connect external USB devices
DC12V
POWER INPUT
Spot out
Connect to monitor as an AUX output channel by channel. Video
would be displayed without OSD.
GND
Grounding
Rear Panel for 8-ch
Name
Description
Audio in
4 CH Audio input
RS485
Connect to speed dome or keyboard
ALARM OUT
1-ch relay output. Connect to external alarm
ALARM IN
Connect to external sensor 1-8
Video in
Video input channels from 1-8
Audio out
Audio output, connect to the sound box
Video out
Connect to monitor
HDMI port
Connect to high-definition display device
VGA port
VGA output, connect to monitor
LAN
Network port
USB port
Connect USB mouse or connect external USB devices
DC12V
POWER INPUT
Spot out
Connect to monitor as an AUX output channel by channel.
Video would be displayed without OSD.
GND
Grounding

- 6 -
Rear Panel for 16-ch
Name
Description
Audio in
4 CH Audio input
RS485
Connect to speed dome or keyboard
ALARM OUT
1-ch relay output. Connect to external alarm
ALARM IN
Connect to external sensor 1-16
Video in
Video input channels from 1-16
Audio out
Audio output, connect to the sound box
Video out
Connect to monitor
HDMI port
Connect to high-definition display device
VGA port
VGA output, connect to monitor
LAN
Network port
USB port
Connect USB mouse or connect external USB devices
DC12V
POWER INPUT
Spot out
Connect to monitor as an AUX output channel by channel.
Video would be displayed without OSD.
GND
Grounding

- 7 -
1.4 Remote control (Optional)
◆ This remote control use AAA battery, the definition as following:
Remote Controller
Button
Function
Record Button
To record manually
Search Button
To enter into search mode
Menu Button
To enter into menu
Exit Button
To exit the current interface
Direction
button
To move cursor in setup or pan/title PTZ
Enter Button
To confirm the choice or setup
PIP Button
To enter into picture in picture setting mode
Zoom Button
To zoom in the images
To control playback. Play/Pause/Stop/Previous Section/Next
Section/Rewind/Fast Forward
Multi Button
To choose multi screen display mode
Next Button
To switch the live image
SEQ
To enter into auto dwell mode
Info Button
Get information about DVR like firmware version, HDD
information
1.5 Mouse Control
◆Connection: Please connect the USB mouse to USB port on the front or back panel.
◆Mouse functions:
1)Under LIVE mode:
On every channel,you could double click the left button to switch FULL SCREEN and
double click again to switch back to original split mode.
On every channel,you could single click right button to popup MENU page.
2)Under MENU page:
Single click left button on any functional icon could enter the function page and Single
click right button to exit function page or jump back to previous page.
If you want to key in letter or digit, please move mouse to textbox then single click left
button on textbox. The virtual keyboard will pop up as following,

- 8 -
3)Under Backup mode:
Single click left button to select item, single click right button to jump back to previous page.
4)Under PTZ mode:
Single click left button to operate PTZ function, single click right button to jump back to
previous page.
2. Wizard setup
2.1 Wizard for language and time setup
Device Name: to set a name of DVR.
Language: to set a proper language.
Date Format: to set a proper display format of time.
Time Format: to set 24 hour or 12 hour format to display.
Time Zone: to set proper time zone (Ex: US Eastern is GMT-5:00)
*Caution: Please make sure to set time zone correctly.
To prevent getting different time stamps between local and remote site.
System Date: to set current system date time.
Please click “next” to next wizard process.

- 9 -
2.2 Wizard for network setup
HTTP Port: Port for IE connection. (Default is 80)
Server Port: Port for video and audio streaming. (Default is 6036)
Obtain an IP address automatically (DHCP):
Check this function to get network parameters automatically from a router or DHCP server.
*If you check this function, please ignore all the parameter below.
*You can check all network parameters on MENU > Information > Network.
*[If you are using FIXED IP, please do not check this function and key in the
following parameters manually. (Please contact your ISP to have the information.)]
IP Address: FIXED IP Address.
Subnet Mask: Subnet mask in this network environment.
Gateway: Gateway in this network environment.
Preferred DNS Server: Primary DNS in this network environment.
Alternate DNS Server: Secondary DNS in this network environment.
*If you are using PPPOE to connect internet, please click “next” to next step
and setup PPPOE parameters on the Network page.
Please click “next” to next wizard process.

- 10 -
2.3 Wizard for Record setup
You can setup record frame rate and quality for each channel and change record resolution.
Adjustable parameter as following,
Resolution: CIF, HD1 or D1
Frame rate
Number of channel.resolution@NTSC frame rate(PAL frame rate)
4 CH
4CIF@30(25)
4HD1@30(25)
4D1@30(25)
8 CH
8CIF@30(25)
8HD1@30(25)
8D1@18(15) or
4 D1@30(25)+4CIF30(25)
16 CH
16CIF@30(25)
16HD1@30(25)
16D1@7(6)
Quality: Highest/ Higher/ Normal/ Low/ Lower/ Lowest
If you want to change all channel setup at once, please click “All” then setup
resolution, frame rate and quality at right hand side.
Please click “next” to next wizard process.
2.4 Wizard for HDD setup

- 11-
You can format HDD by using “Format” function.
After HDD format completed, it will show “Normal” label on status.
*Please make sure to backup all HDD data before you format the HDD.
All HDD data will be erased after HDD formatted.
Please click “Finish” to get into login page.
Compatible Devices
1. Compatible USB drive after test.
Brand
Capacity
A-DATA
512MB, 1G, 2GB
Transcend
4GB
Kingston
2GB
Toshiba
2GB
SanDisk
4GB
2. Compatible external USB CD/DVD writers after test
Brand
Model
LG
GH24NS90

- 12 -
3. Compatible HDD
Brand
Model number
Capacity
Western Digital
1600AAJS FW:00L7A0
160GB
2500AVVS FW:73M8B0
250GB
3200AVVS
320GB
5000AVDS FW:63U7B0
500GB
5000AVJS FW:63YJA0
500GB
5000AVVS FW:63M8B0
500GB
5000AAKS FW:00V1A0
500GB
5000BUDT (2.5") FW:63G8FY0
500GB
5000AUDX FW:63WNHY0
500GB
10EURS FW:630AB1
1TB
10EVDS FW:63U8B0
1TB
15EARS FW:00Z5B1
1.5TB
15EURS FW:63S48Y0
1.5TB
20EVDS FW:63T3B0
2TB
20EARS FW:00S8B1
2TB
2001FASS FW:00U0B0
2TB
HITACHI
HDS721616PLA380
160GB
HCT721025SLA380
500GB
HCP725050GLA380
500GB
HDP725050GLA360
1TB
SEAGATE
ST500DM002 (SATA3) FW:KC44
500GB
ST3100528AS FW:CC38
1TB
ST31000524AS (SATA3)
FW:JC4B
1TB
ST2000DL003 (SATA3)
FW:CC32, CC3C
2TB
TOSHIBA
HCS5C1050DLE630
FW:620 DT01ABA050V
500GB
DT01ABA100
1TB
DT01ACA100
1TB
85-DH6096-A002G-A
 Loading...