

Page 1

WD805
INSTRUCTION MANUAL
AC 240V 50Hz 35W
Page 2
Compatible with DVD/CD/MP3/WMA/CD-R/CD-RW/MPEG4/USB/SD/iPod
Picture CD readable,digital album browse playing function
Multi-caption,angle screen picture selection function
High sensitivity digital FM/AM radio
Build-in AC-3 & HDCD decoder
Intelligent upgrade, age lock and automatic screen protection function
Digital beam, coaxial and mix-audio(left/right) output
Stereo earphone output
2.0 track power output (2*10W RMS)
7-8
1
System setup
13
14
8-12
The specification in the manual is according to the samples, just for your reference.
If the specification design changed, no further notice.
7. iPod bracket
Page 3

2
WARNING: TO PREVENT FIRE OR SHOCK HAZARD, DO NOT EXPOSE THIS APPLIANCE TO RAIN OR MOISTURE.
CAUTION: TO PREVENT ELECTRIC SHOCK, MATCH SAA AUSTRALIA PLUG CAREFULLY, FULLY INSERT.
DANGER OF EXPLOSION IF BATTERY IS INCORRECTLY REPLACED. REPLACE ONLY WITH THE SAME
OR EQUIVALENT TYPE.
Page 4
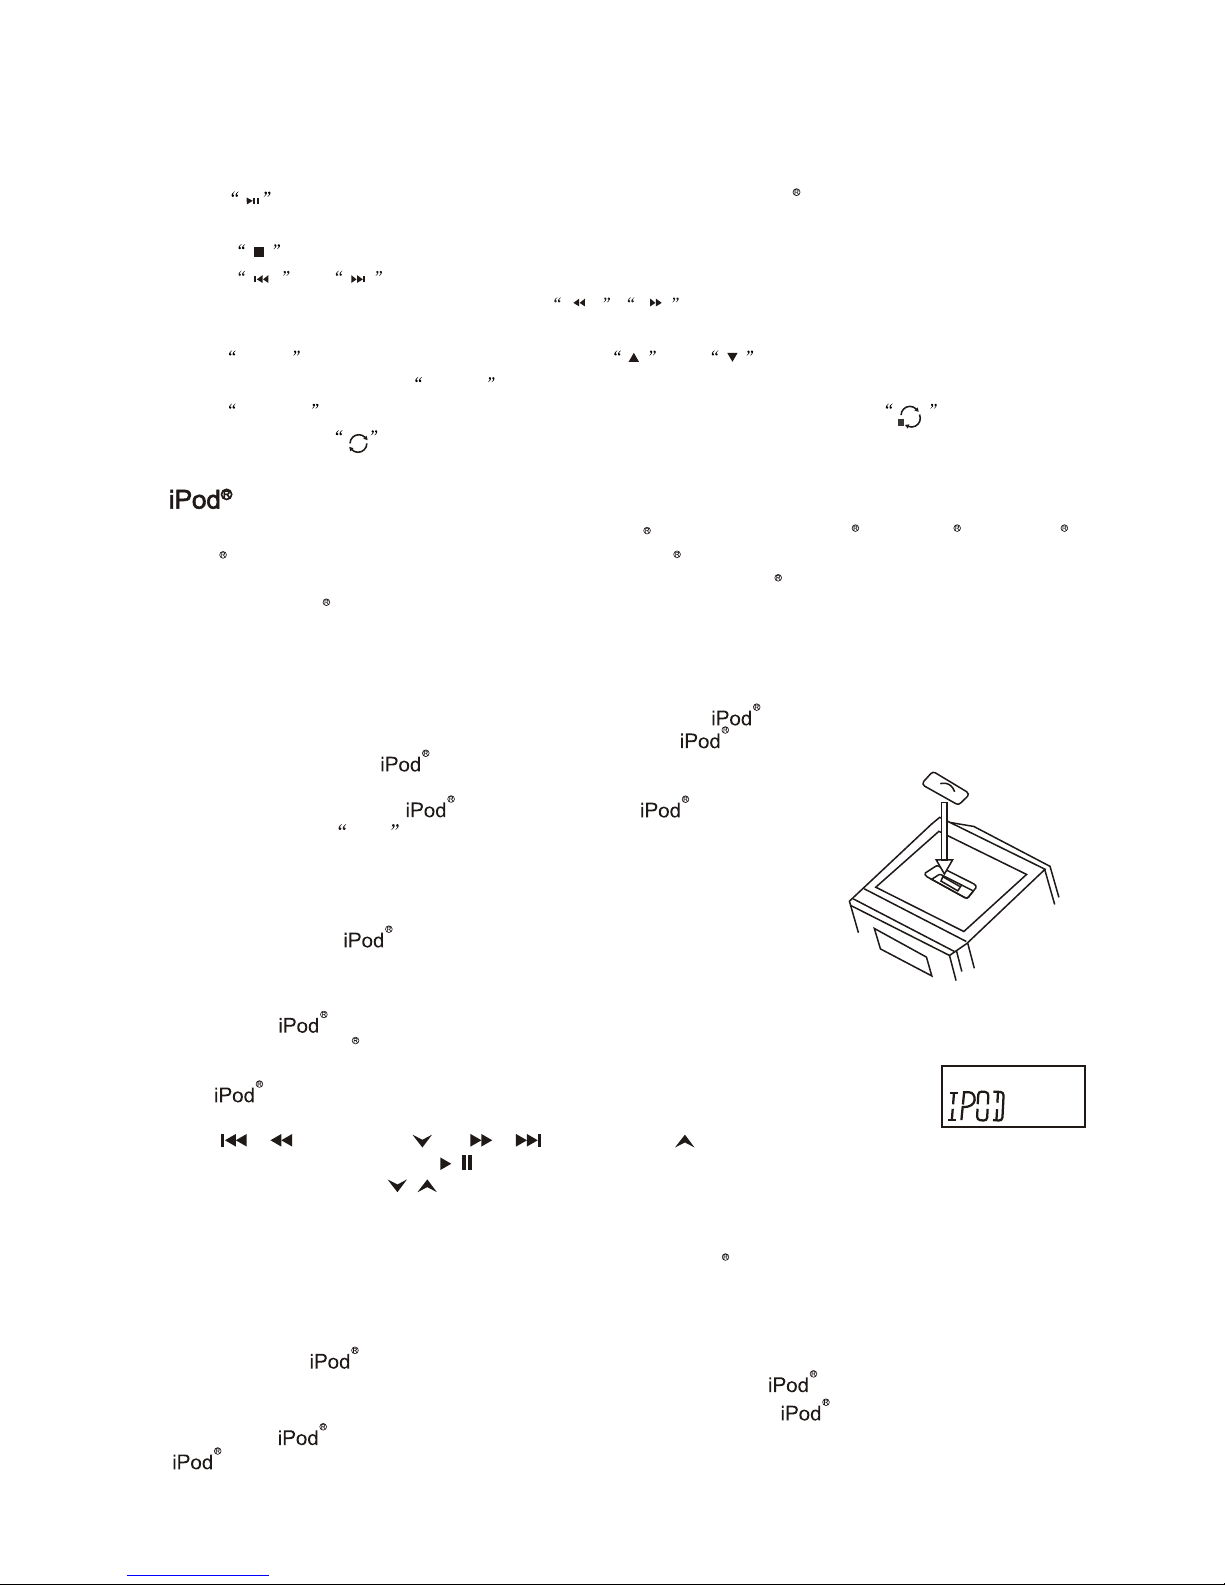
1. is play/pause key, pressing and holding it for 3-5 seconds, iPod will enter standby mode, press it again
to resume use.
2. is stop key.
3. and are previous/next track keys, press and hold it for 2-3 seconds to enter to the quick
forward/ backward functions. (Or press keys to choose the quick forward/backward
functions directly).
4. MENU -after pressing this key, you can use and direction keys to choose the function that
you need, then press ENTER key.
5. REPEAT - when playing disc, press the key to select the desired track to repeat. means one track
repeating. means all tracks repeating.
iPod MANUAL INSTRUCTION
Select a dock adapter, which comes with the unit for your Using
the correct dock adapter ensures the proper fit for your
1. Gently press the dock adapter into the dock at the top of the
unit.
2. Carefully place your into the dock. (The must not be
in acase or Skin ).
First remove your , and then grip the dock adapter and pull gently
upwards.
Operating with the main unit.
1. The display indicates iPod.
2. Select your desired music, photos or videos, etc and play the connected
as usual.
3. You can also select the desired next or previous music tracks by pressing
/ / TUNING or / / TUNING button
repeatedly, and press / PLAY/ PAUSE to play or pause.
4. Press VOLUME button to adjust to desired sound level.
Press the iPod button.
Note:
Charging your .
Note: Please make sure you are using the correct insert for your and that it is propery docked
into the dock adapter. Failure to do so may cause damage to your .
While your is docked in the system, it recharges until fully charged. Note that other non docking
will not charge.
If you want to watch photos and videos from the iPod , the video out must be connected
to your home TV .
OPERATION WITH THE MAIN UNIT
The unit is compatible with all the most popular iPod models, such as iPod mini,iPod nano, iPod Photo,
iPod Video etc., And as a battery charger for the iPod .
The unit comes with 5 removable dock adapters. Ensure your iPod its properly in the dock.
Due to new iPod models, new dock adapters are subject to availability.
To insert a dock adapter
To remove a dock adapter
iPod operation
3
Page 5
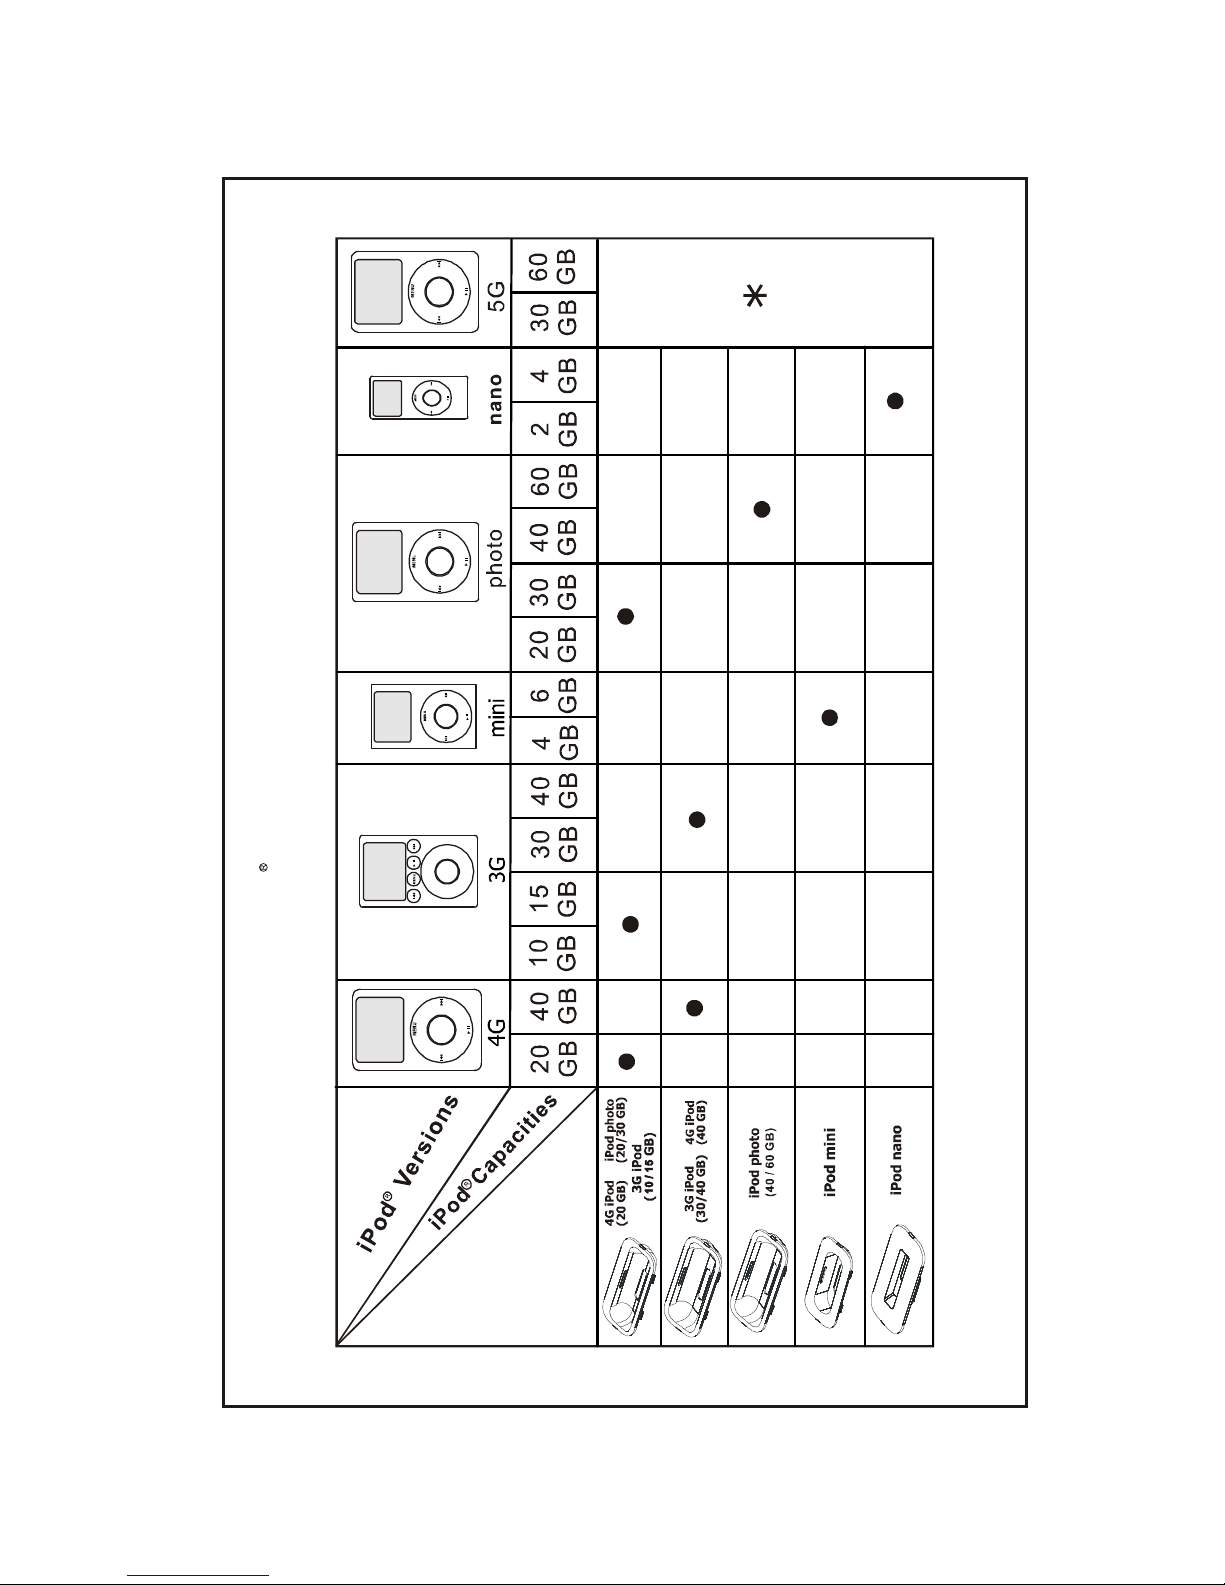
* No 5G adapter provided Please use the adapter that was included with your 5G iPod model at time of purchase
Adapters
iPod Adapter lnformation
iPod operation
4
Page 6
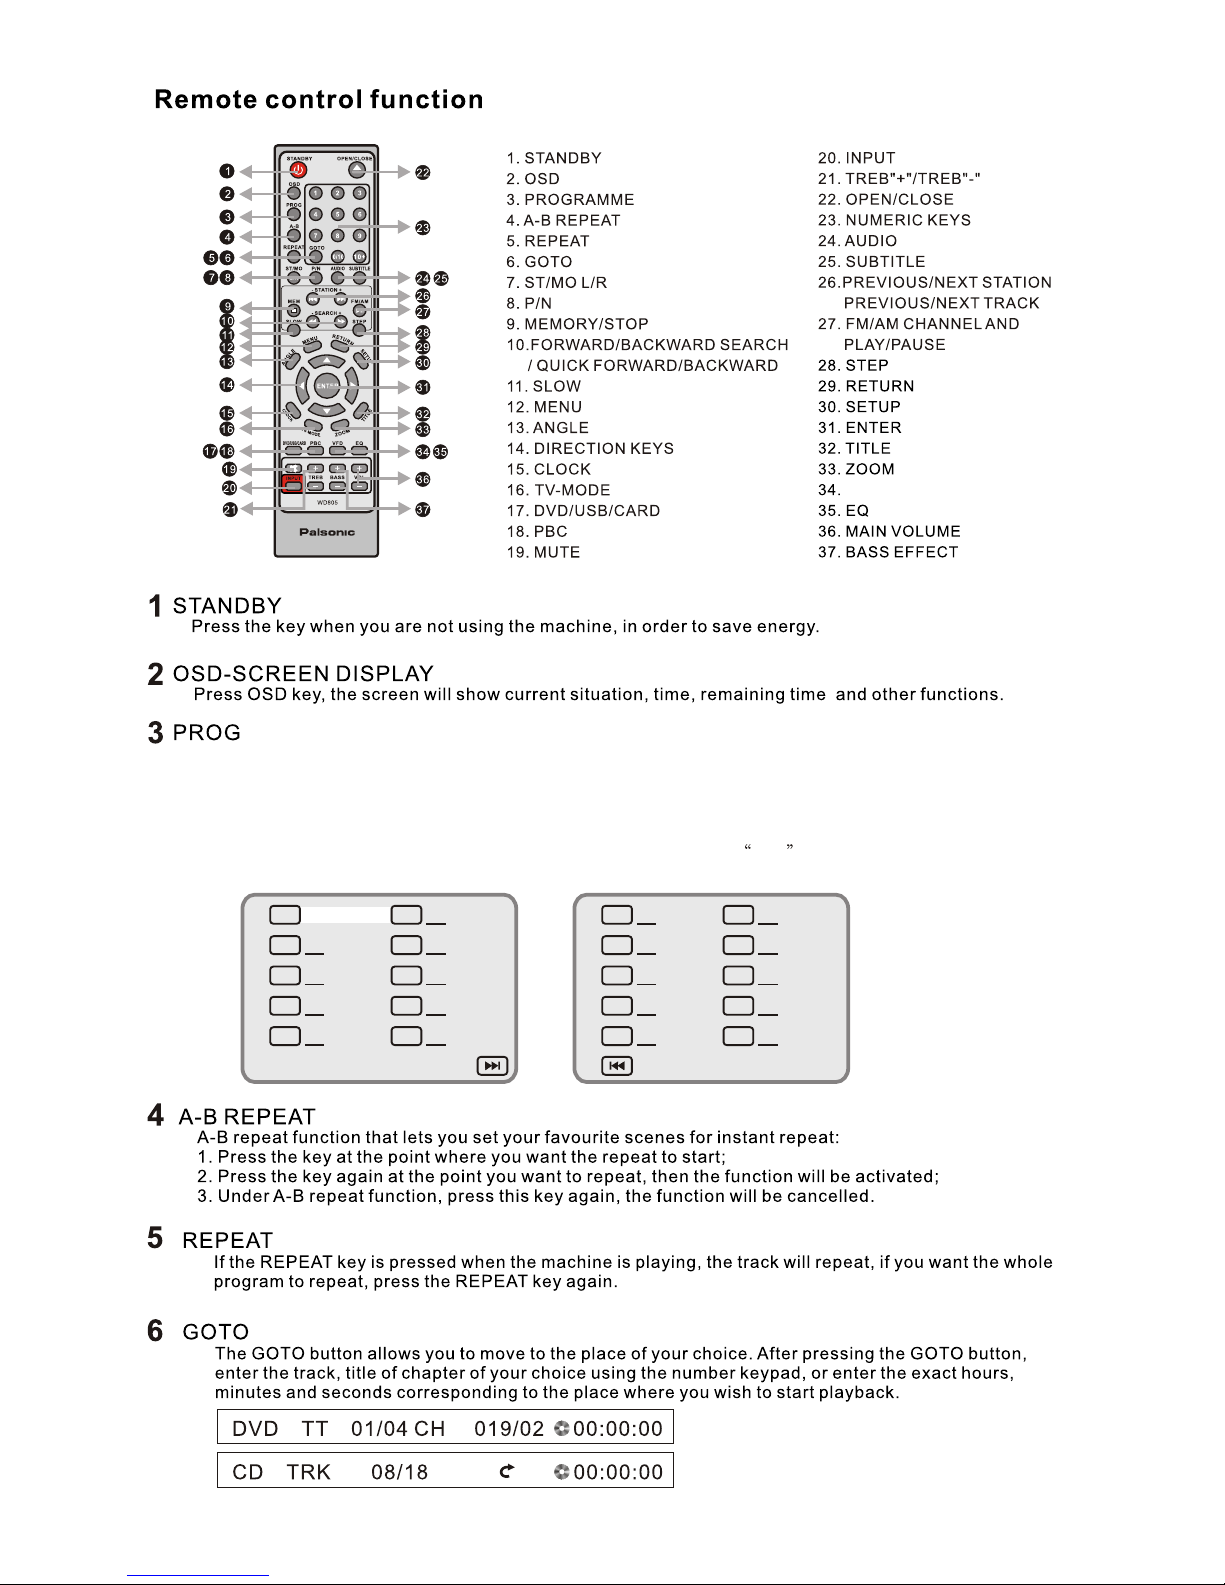
Press PROG, the screen will show the programme menu. The machine can program a sequence of 20 tracks
(VCD) or chapters (DVD).After entering the PROG menu, the green cursor will stay at No.1 place, input the
track (VCD) or chapter (DVD) number that you want to play first by pressing the numeric Key (0-9).Then press
the direction key to move cursor to the place of No.2, the operation is the same as above. If you make a mistake or
if you want to change the order of the programme, you can move the cursor to the place that you want to revise by
pressing the direction key and input new numbers. After setting,press start to start program playing.
Press PROG and exit the PROG picture,then press PLAY key to play normally.
01
02
03
04
05
06
07
08
09
10
11
12
13
14
15
16
17
18
19
20
5
Exit Start Next Exit
Prev
VFD
Page 7

During DVD playback, press this key to choose among the following options:S-VIDEO, YUV, SCART.
Press this key when playing a DVD/VCD disc, it will play at 1/2,1/4,1/8,1/16 of the normal speed.
Then press the PAUSE key to return to normal playback.
Press the key without stop for three seconds to search channel forward and backward.
Press the key,you can choose 2X,4X,8X,16X,32X five kinds of speed to play(no sound) ,press pause key
to recover the normal speed.
NTSC,AUTO.
After searching for a station, press this button to memorise it. You can choose the pre-selection number using
the numeric keypad.
In normal playing state,press this button to go to stop mode, the TV screen will show the start logo. As some
disc, the player can recall the location where stopped, such as DVD. Press STOP twice to stop completely.
6
5-10
/iPod.
Page 8

Press this key when playing a DVD/VCD, the original picture will be increased by 2x,3x,4x.
When the radio is on, press the key to change from FM to AM . In playback mode, press this key to
change to play or pause mode.
Press this key to enter general setup, audio setup, dolby setup, video setup and preference setup.
Follow these step by step instructions for use:
Press SETUP key during playback, and use the direction keys to navigate within the menu and the
screen will display the different menus which enable you to program the machine. After you have made
the adjustments, press the SETUP key to exit this menu,
Note: You can also set up the system while the disc is not playing.
7
(UP/DOWN)
Press this key to adjust the balance (up or down).
VFD
1.
2. Press the key when playing disc, the CD tray will be open after 5-10 seconds for resetting the laser.
Page 9

N111
8
1.
2.
3.
4.
5.
6.
7.
8.
9.
10.
11.
Main Volume
USB input
Channel conversion
VOLUME
INPUT
STANDBY
Standby
PHONE
Stereo earphones
DVD/USB/CARD
SD/MMC card slot
Stop/Memory storage station
/MEM
DVD/USB/CARD
1.
2.
3.
4.
5.
6.
7.
8.
9.
10.
11.
Play/Pause/FM/AM
/BAND
/SEARCH-
/SEARCH+
DVD: Next track Radio: Forward search
DVD: Previous track Radio: search backward
Open/Close
OPEN/CLOSE
Power
1 2
3
4 5 6 7 8 9 10 11
1 2 3
4 5 6 7 8 9 1110
VIDEO1
SPEAKER OUTPUT
Y Cb Cr
SCART OUTPUT
ML/MR
COAXIAL
S VIDEO
OPTICAL
AC240V/50Hz
FM/AM
VIDEO2
DVD & iPod video output
DVD video output
Page 10

1. Connect with Y ,Cb/Pb, Cr/Pr video input socket
2. Connect with DVD & iPod video signal input socket
3. Connect with audio signal input socket (audio, RED/WHITE)
4. Connect with FM antenna
5. Connect with AM antenna
6. Connect with left/right front speaker socket
7. TV SCART
9
Power input :
AC240V/50 Hz
7
N111
6
Page 11

3.1 Connect the system as in the above illustration
Turn on the TV, adjust the TV to the AV channel, then press STANDBY on the machine The display
screen of the system lights up, and the opening machine picture appears on the TV.
3.2 Variety of system function. Carry out the basic settings. After setup, press OPEN/CLOSE and the
disc tray will open automatically. Put a disc in, press OPEN/CLOSE to close the disc tray, and the
machine will play automatically.
3.3 When the main machine is on, all functions can be operated with the keys on the remote control and
the front panel.
3.4 In normal playback mode, press the STANDBY key on the remote control . The machine enters
standby mode, and the time is displayed.
TV Display
Angle Mark
OSD Lang
Captions
Screen Save
HDCD
Last Memory
When you press SETUP key on the remote
control,the setup menu will be displayed.
1. Within the setup menu, you can use UP,
DOWN, LEFT and RIGHT buttons on the
remote control to move the cursor, and then
press the ENTER button to make your selection
Press LEFT can return the previous menu.
2. To exit setup menu, you can press SETUP .
1. GENERAL SETUP PAGE
Setup TV screen format, video type and all DVD
functions.
1. 1 TV DISPLAY
4 3/PS
On
Eng
Off
On
1x
Off
4 3 / PS
4 3 / LB
16 9
General Setup Page
SYSTEM SETUP
The TV Display which select the different ratio of
display format and the screen of TV. There are various
types of display on screen for different matches
between Disc and TV .
Note:
No matter which display format is selected, a
picture recorded in standard 4:3 format always
displays in the 4:3 aspect ratio.
The display format of DVD titles may vary; please
refer to the information that accompanies your
specific DVD title.
If the DVD title is recorded in 16:9 wide display
format while the TV is a standard 4:3 screen,
horizontal compression of the image will result.
Some DVD titles may be recorded in special
formats. In such cases, the DVD titles will always
appear on the screen in their original format,
regardless of which TV display format you select.
10
Page 12

TV Display
Angle Mark
OSD Lang
Captions
Screen Save
HDCD
Last Memory
4 3/PS
On
Eng
Off
On
1X
Off
English
French
German
Spanish
Italian
General Setup Page
TV Display
Angle Mark
OSD Lang
Captions
Screen Save
HDCD
Last Memory
4 3/PS
On
Eng
Off
On
1X
Off
On
Off
General Setup Page
1. 2 ANGLE MARK
ANGLE MARK: Users can select a particular camera
angle when playing a DVD which offers multiple angles.
1. 3 OSD LANGUAGE
On Screen Display (OSD) Language: Users can
select the whole setup menu and on-screen display
language.
TV Display
Angle Mark
OSD Lang
Captions
Screen Save
HDCD
Last Memory
4 3/PS
On
Eng
Off
On
1X
Off
On
Off
General Setup Page
1. 4 CAPTIONS
CAPTIONS: For hearing-impaired people, the picture
can be displayed with recorded explanatory captions.
Note: It is valid for disc that has captions.
TV Display
Angle Mark
OSD Lang
Captions
Screen Save
HDCD
Last Memory
4 3/PS
On
Eng
Off
On
1X
Off
On
Off
General Setup Page
1.5 Screen Saver
Screen Saver: When the unit is in stop mode, a moving
picture will appear several minutes later if screen
saver is set on. Screen saver will protect the TV screen.
1.6 HDCD
TV Display
Angle Mark
OSD Lang
Captions
Screen Save
HDCD
Last Memory
4 3/PS
On
Eng
Off
On
1X
Off
Off
General Setup Page
1X
2X
1.7 Last Memory
TV Display
Angle Mark
OSD Lang
Captions
Screen Save
HDCD
Last Memory
4 3/PS
On
Eng
Off
On
1X
Off
General Setup Page
On
Off
11
Downmix
Front Speaker
LRG
Speaker Setup Page
Stereo
LT/RT
DOWNMIX MODE: Sets front speakers to LT/RT,
STEREO.
2.1 SPEAKER SETUP PAGE
2. AUDIO SETUP PAGE
Page 13

Downmix
Front Speaker
LRG
Speaker Setup Page
Large
Small
2.2 SPDIF OUTPUT
SPDIF OUTPUT MODE: Sets the audio outputs.
Under the status of SPDIF/RAM, can not adjust volume
of DVD, CD, can adjust only under MP3 format.
This DVD player includes three kinds of audio output:
1. SPDIF OFF: An analog surround sound format is
output through the back-panel connections for 2-CH
audio out.
2. SPDIF/RAW or SPDIF/PCM: This surround sound
format is output to a Dolby digital decoder through
the optical and coaxial connectors on the back-panel
of the product.
Spdif Setup Page
Spdif Off
Spdif/Raw
Spdif/Pcm
Spdif Output RAW
Component
TV Mode
Sharpness
Brightness
Contrast
Yuv
Low
00
00
Video Setup Page
S video
Yuv
SCART
Dual Mono
Dynamic
Dolby Digital Setup
3. DOLBY DIGITAL SETUP PAGE
3.1 DUAL MONO
DUAL MONO: If your amplifier/decoder has Dolby
Digital output, you may select stereo, left mono, right
mono, or mixed mono mode for your amplifier decoder.
Dual Mono
Dynamic
Dolby Digital Setup
Stereo
L Mono
R Mono
Mix Mono
3.2 DYNAMIC
DYNAMIC: This function is generally used when playing
high volume programs at night, in order not to disturb
the neighbor. This setting can dynamically lower the
volume and still keep the original tone quality. This is
the range, measured in decibels (dB), between the
loudest and the quietest sound registers in a sound track.
4. VIDEO SETUP PAGE
4.1 COMPONENT
COMPONENT: Sets the video output.
12
Down mix:
1 means LT/RT output
2 means STEREO output
4.2 TV MODE SETUP PAGE
NOTE: The setup is working at YUV/SCART situation only.
Component
TV Mode
Sharpness
Brightness
Contrast
YUV
Low
00
00
Video Setup Page
P Scan
Interlace
SHARPNESS: Sets the sharpness level of video
output.
4.3 SHARPNESS
Page 14

4.4 BRIGHTNESS
BRIGHTNESS: Sets the brightness level of video output.
Video Setup Page
Press right button,the TV will display below.
Component
TV Mode
Sharpness
Brightness
Contrast
Yuv
Low
00
00
Press LEFT/RIGHT button to adjust, then press ENTER
button to confirm and return upon menu.
4.5 CONTRAST
CONTRAST: Sets the contrast level of Video output.
Component
TV Mode
Sharpness
Brightness
Contrast
Yuv
Low
00
00
Video Setup Page
Contrast 0
Press right button, the TV will display below.
Press LEFT/RIGHT button to adjust, then press ENTER
button to confirm and return upon menu.
The preference setting is active only when no disc.
And the setting is effective on each time power on till
exchanging the saved setting.
5. PREFERENCE SETUP PAGE
Brightness 0
13
Component
TV Mode
Sharpness
Brightness
Contrast
Yuv
Low
00
00
Video Setup Page
High
Medium
Low
5.1 TV TYPE
TV TYPE: This player supports different TV output,
including AUTO, NTSC, and PAL systems.
If your TV support only NTSC or PAL and had you
inadvertently selected the wrong TV type, the TV
screen will become flickering and black-and-white.
In this case, you should press the SETUP button
to set as following Note.
TV Type
Audio
Subtitle
Disc Menu
Parental
Password
Default
PAL
Eng
Eng
Eng
Preference Setup Page
Note: How to Set the TV Type?
You may switch the NTSC/PAL setting of the DVD
player to match the video signal of your TV.
The table below shows what kinds of disc are com patible with each setting (AUTO, PAL and NTSC)
Disc
Type
DVD
Format
NTSC
PAL
Output Format
Selected TV System Mode
NTSC
NTSC
PAL
PAL
PAL
AUTO
NTSC
PAL
PAL
AUTO
NTSC
Page 15

5.2 AUDIO
AUDIO: Sets the preferred audio language as the default
when playing DVD. (If DVD support these languages).
TV Type
Audio
Subtitle
Disc Menu
Parental
Password
Default
PAL
Eng
Eng
Eng
Preference Setup Page
TV Type
Audio
Subtitle
Disc Menu
Parental
Password
Default
PAL
Eng
Eng
Eng
5.3 SUBTITLE
SUBTITLE: Sets the preferred subtitle language as the
default when playing DVD. (If DVD support these
languages)
5.4 DISC MENU
DISC MENU: Sets the preferred menu language as the
default when playing DVD. (If DVD support these
languages)
TV Type
Audio
Subtitle
Disc Menu
Parental
Password
Default
PAL
Eng
Eng
Eng
5.5 PARENTAL
Parental: The parental control function works in conjunction
with the different censorship classes assigned to DVDs.
These classes help to control the types of DVDs that the
family watches, There are up to 8 censorship classes for
DVDs.
TV Type
Audio
Subtitle
Disc Menu
Parental
Password
Default
PAL
Eng
Eng
Eng
1 KID SAF
2 G
3 PG
4 PG 13
5 PGR
6 R
7 NC 17
8 ADULT
Preference Setup Page
Preference Setup Page
Preference Setup Page
14
5.6 PASSWORD MODE
PASSWORD CHANGE: You can change the password:
please type 6 numerals as new password.
Note: Be sure remember new passwored.
Change
TV Type
Audio
Subtitle
Disc Menu
Parental
Password
Default
PAL
Eng
Eng
Eng
Reset
TV Type
Audio
Subtitle
Disc Menu
Parental
Password
Default
PAL
Eng
Eng
Eng
Old Password
New Password
Confirm PWD
OK
Note:
If you change this set, you must input password
(lnitial password : 9999).
5.7 DEFAULT
Preference Setup Page
Preference Setup Page
DEFAULT: Resets to all the manufacturer s original settings
for this DVD player (except password), press ENTER to
perform the reset.
,
Eng ish
French
Spanish
Chinese
Japanese
Korean
Russian
Thai
Others
Eng ish
French
Spanish
Chinese
Japanese
Korean
Russian
Thai
Others
English
French
Spanish
Chinese
Japanese
Korean
Russian
Thai
Others
Page 16

About JPEG
The JPEG format adopts the most efficient compression which is widely used as reduce the size of pictures
for storage.
Even if pictures are compressed 15-20 times,the effect is still good. It is supported by most picture
processing software, is suitable for picture storage, it contains a small amount of data and is easy to use.
The system can read JPEG format picture CD discs.
Displaying a picture
1. Insert the disc. The machine will begin to search disc information and the main menu will be displayed on
the screen. The indexes are displayed at the left of the screen and their contents on the right. Navigate
within the menu using the direction keys to underline the required index, then move to the right to select the
first file. A preview of the photo will appear on the left. You can choose to display this photo by pressing
ENTER or by moving from picture to picture using the direction keys or directly, by entering the photo
number using the numeric keypad. In playback mode, in order to move from photo to photo, press the “skip
track” key. Press the stop key to return to the menu.
MENV
ROOT
ROOT 0
PHOTO 1
PHOTO 2
PHOTO 3
PHOTO 4
PHOTO 5
P 01
P 02
P 03
P 04
P 05
Other functions
1.When playing JPEG files, the system has “pause”, “play”and “repeat” functions.
2.You can enlarge a picture by pressing the “zoom” key. Press the key continuously to obtain an enlargement
(x2 x3 x4 ). Press the “zoom” key again to return to normal play mode.
3.When the zoom is not activated, use the direction keys to rotate the image.
ROOT
PHOTO 1
PHOTO 2
PHOTO 3
PHOTO 4
PHOTO 5
MENV
MENV
ROOT
PHOTO 1
PHOTO 2
PHOTO 3
PHOTO 4
PHOTO 5
MPEG-4
MPEG 4 is a new multi-media standard which can record DVD-quality data onto CDs, whilst preserving
image quality.
1.Put an MPEG-4 disc in the CD tray, press play key. The content will appear on the TV screen. You can
now select the file of your choice with the direction key or the numeric keypad.
2.The above mentioned operation steps work when playing most MPEG-4 discs.
USB/CARD function
In DVD mode,
1) If there is no disc, the USB/CARD will play automatically when the USB/CARD is inserted. If press the OPEN key, it will
change to the disc playing situation.
2)Inserting the USB in the condition of disc playing situation, press the DVD/USB/CARD key once turns to USB playing,
press it again turns to SD card playing, and turns to DVD disc playing by pressing at the third time.
Using FM/AM functions
1.Connect the FM/AM antenna to a FM/AM antenna socket.
2.Press the “INPUT” key on the remote control or front panel to enter radio mode.
3.Press the “FM/AM” key to select required wave band.
4.Press the UP/DOWN key to search for the required frequency, press the SEARCH+ or SEARCH- key
continuously in order to start automatic searching.
5.The screen will display the stations frequency when it receives the signal. Press the memory key,
to memorise the radio station and the screen will display the frequency of the radio station, if you want to
store the station under serial number, press the button again; if you want to store the stations in order of
frequency, press the memory key again. If you want to store the station under another number, press the
memory key then choose another number using the numeric keypad. Press UP/DOWN key to select desired serial
number, then press the memory key again .
6.By following steps 3 to 5, the machine can store up to 40 channels.
JPEG/MPEG-4/USB/CARD/FM,AM
15
Page 17

16
AC240V/50 Hz
35W
 Loading...