

Page 1

OWNER’S MANUAL
VIDEO CASSETTE RECORDER
VCR-2110
Page 2

TABLE OF CONTENTS
How to Use This Manual
This instruction Manual explains how to use your VCR and in particular, how to use the remote control unit keys to control the
VCR. There is an “identification of Controls” illustration on page 3 and 4.
CAUTION AND CARE ........................................ E-1
PREPARATION .................................................. E-2
Remote Control Operation............................ E-2
Battery Installation ....................................... E-2
Video Cassette Tape.................................... E-2
Identification of Controls .............................. E-3
Equipment Connection ................................ E-5
Video Channel Setting ................................. E-6
Using the Menu ............................................ E-7
On Screen Display (OSD) ............................ E-7
CHANNEL PRESET............................................ E-8
Selecting AUX Position ................................ E-8
BASIC OPERATION .......................................... E-9
Playback a Video Cassette .......................... E-9
Slow Playback .............................................. E-9
Picture Control ............................................. E-9
Frame Advance ........................................... E-9
Digital Tracking Control ............................
Audio output level adjustment
(2 scart model only) ..................................
1 Minute Skip ............................................
Zero Return ..............................................
Auto Operation Functions .........................
Index Search Function ..............................
E-10
E-10
E-10
E-10
E-10
E-11
ACCESSORIES
RECORDING...................................................... E-12
Recording TV Programmes......................... E-12
One-touch Timer Recording (OTR) ............ E-13
Recording from Another Source ................. E-14
Recording Channels that Require the Decoder
(2 scart model only) .................................... E-14
PROGRAMMABLE TIMER RECORDING......... E-15
Programme Procedure................................ E-15
Auto Speed Adjust....................................... E-16
Confirming the Data .................................... E-16
Clearing the Data ........................................ E-16
Notes on Timer Settings ............................. E-16
NTSC/MESCAM-RECORDED TAPE PLAYBACK....
TROUBLESHOOTING GUIDE .......................... E-18
SPECIFICATIONS.............................................. E-19
E-17
Before installing your VCR, please check if you have the following items.
For your reference, please record the serial number of
Serial Number:
your VIDEO CASSETTE RECORDER and the date you
purchased it in the following space:
Purchase Date:
Page 3

Remote Control Unit
Power on / off
Numeric buttons for channel direct access
(Press 0/AUXfirst for one figure.)
Selects the TV or VCR mode
A Video picture is shown on the TV screen
Selects the external input position
in the VCR mode
(Press twice)
On Screen Display (OSD) call button
Tape counter reset
Clears the data in the TIMER PROGRAM screen
Zero Return in the stop mode
1 Minute Skip during playback
Video enhancement during playback
Starts recording
One touch timer recording
Recording speed selector
Sets/releases TIMER STANDBY mode
Fine tuning
Display selector
(Clock/Counter/Remaining tape time)
MENU screen call button
Press 3 seconds to call RF TEST screen
: Channel position selector
Manual tracking control
Data selection in each MENU
: Moves the CURSOR in each
MENU
Index scan/search
in the stop mode
during
playback or when
: Starts playback
Frame advance during display of
still picture
: Fast forward
Forward search during playback
Rewind
Reverse search during playback
: Still picture during playback
Interrupts recording during
recording
: Stops any playback or recording
Ejects the cassette in the stop
mode
: Slow motion playback during
playback
Rear panel
Page 4
CAUTION AND CARE
NOTICE:
Unauthorized recording of copyrighted television
programmes. films, video tapes and other materials may
infringe on the rights of copyright owners and be contrary
to copyright laws.
WARNING:
TO PREVENT FIRE OR SHOCK HAZARDS, DO NOT
EXPOSE THIS EQUIPMENT TO RAIN OR MOISTURE.
CAUTION:
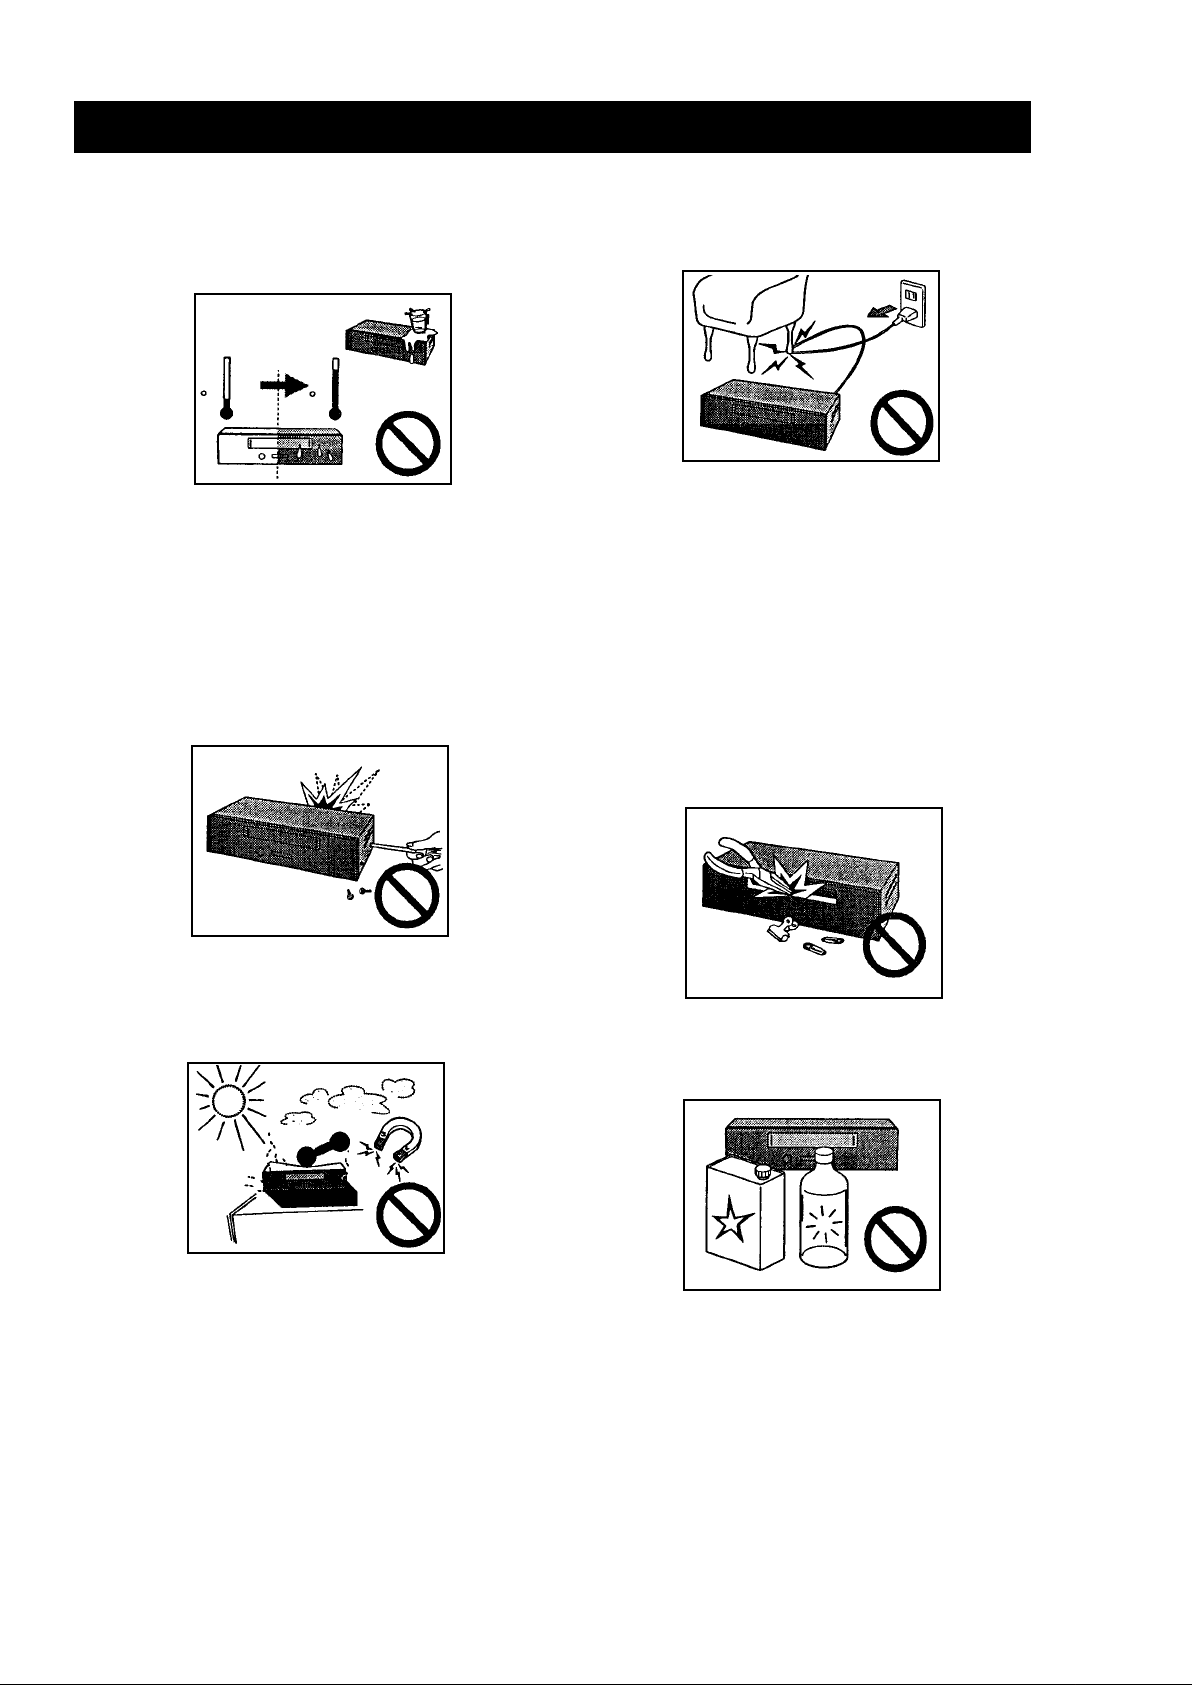
When the VCR is suddenly moved from a cold environment
to a warm environment, some condensation will occur inside the VCR. If the VCR is operated as it is, the tape may
stick to the tape head and damage to the tape and/or the
deck will result. Under such circumstances, leave the Main
power cord connected, but do not operate the VCR for about
2 hours so the VCR will dry out.
OPERATING CONDITIONS
Avoid use near a magnetic field. Doing so will adversely
affect the unit’s performance.
Avoid extreme heat, cold, moisture and dust.
PROTECT THE MAIN POWER CORD
Do not damage the Main Power Cord. Damage to the Main
Power Cord may cause a fire or shock hazard. When unplugging the Main Power Cord, please hold it by the plug
and remove it carefully
WHEN NOT IN USE
When you finish operating the VCR, always unload the cassette and turn OFF the OPERATE button.
UNPLUG THE MAIN POWER CORD AND DISCONNECT
THE ANTENNA CABLES DURING A LONG ABSENCE
When you leave your home for a long period of time, turn
OFF OPERATE button, unplug the Main Power Cord and
disconnect the antenna cables.
Please note that on your return, the calendar, clock data
and TIMER REC DATA will have to be reprogrammed.
CAUTION:
TO REDUCE THE RISK OF ELECTRIC SHOCK, DO NOT REMOVE COVER. NO USER-SERVICEABLE PARTS INSIDE.
REFER SERVICING TO QUALIFIED SERVICE PERSONNEL.
MAINTAIN GOOD VENTILATION
There are many ventilation holes on the bottom of the VCR.
For maximum ventilation, place the VCR on a hard level
surface only.
DO NOT PLACE ANYTHING ON THE VCR
Heavy objects placed on the VCR will cause damage. The
right side of the VCR Is also slotted to provide ventilation.
Do not obstruct these ventilation slots.
NEVER INSERT ANY OBJECT INTO THE CABINET
Do not insert any kind of foreign object into the VCR. This
not only creates a safety hazard but can also cause extensive damage to the mechanism.
CABINET CARE
Clean with a soft cloth slightly moistened with a mild detergent and water. Wipe with a dry cloth.
NEVER USE ANY PETROLEUM BASED SOLUTIONS.
E-1
Page 5
PREPARATION
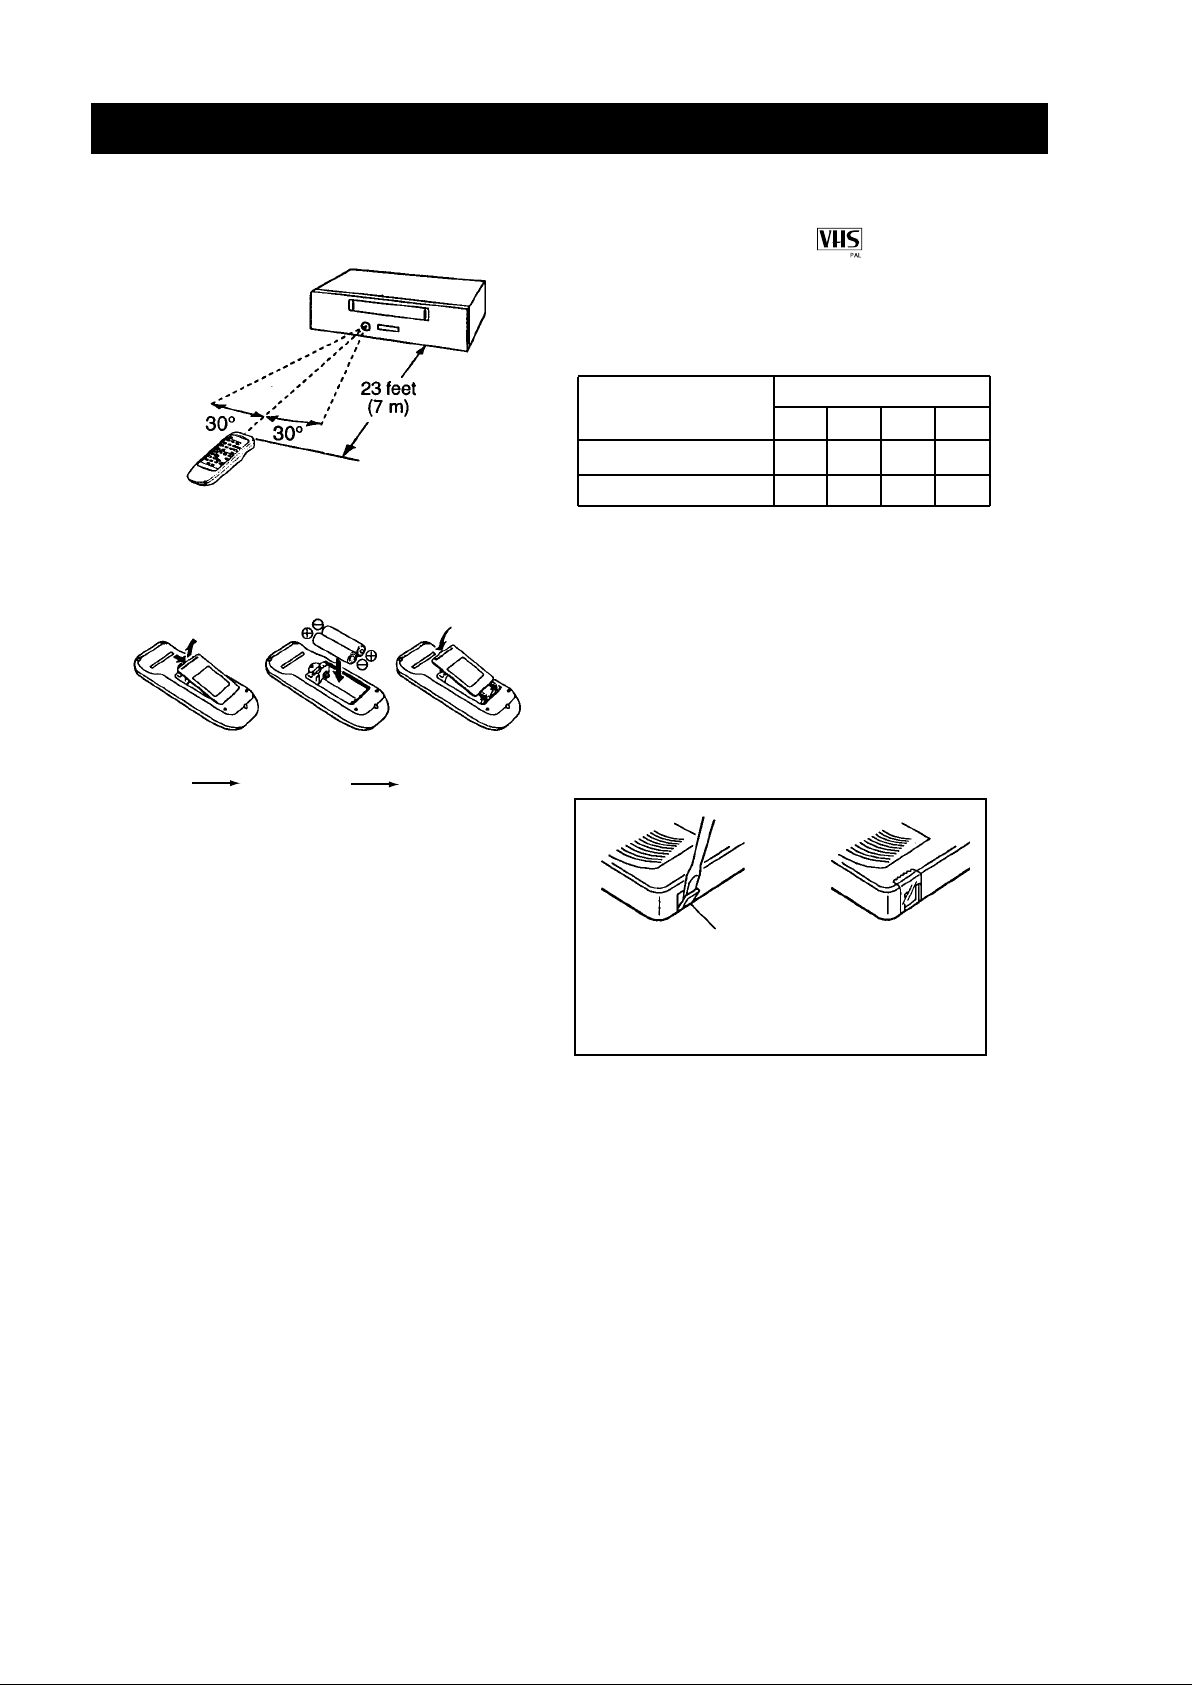
Remote Control Operation
Battery lnstaliation
1. 2. 3.
Video Cassette Tape
Only video cassette tapes with the mark, can be used
in this VCR.
Tape Speeds and Maximum
Recording Playback Time
TYPE OF THE VIDEO CASSETTE TAPE
TAPE SPEED
SP (Standard Play)
LP (Long Play)*
.
2 speed model only
Care of the Video Cassette Tape
.
Avoid violent vibration or shocks.
.
Do not place in a location where there are strong magnetic fields (near a motor, transformer or magnet).
.
Place the video cassette in the cassette case and store
it vertically.
.
Never place or store video cassette tapes in dusty places,
in direct sunlight and/or in humid location.
Safety Tab
E-360 E-240 E-160 E-120
5 hrs 4 hrs 3 hrs 2 hrs
10 hrs 6 hrs 6 hrs
4 hrs
! NOTES
.
Install two size “IEC R6 (AA)” batteries into the battery
compartment.
.
Do not mix a new battery with an old one.
.
Do not heat, disassemble, short or throw used batteries
into a fire.
Precautions on Use
.
Do not place the remote control unit in a location area
where it may become wet or very hot.
.
Dropping the remote control unit on a hard surface may
result in damage.
.
Do not use benzene, thinner or other petroleum based
solvent to clean the remote control unit. To clean. wipe it
with a soft cloth slightly moistened with a mild detergent,
then wipe it dry with a soft cloth.
Safety Tab
Break off the safety to prevent accidental
erasure.
Cover the hole with adhesive tape to record
again.
E-2
Page 6
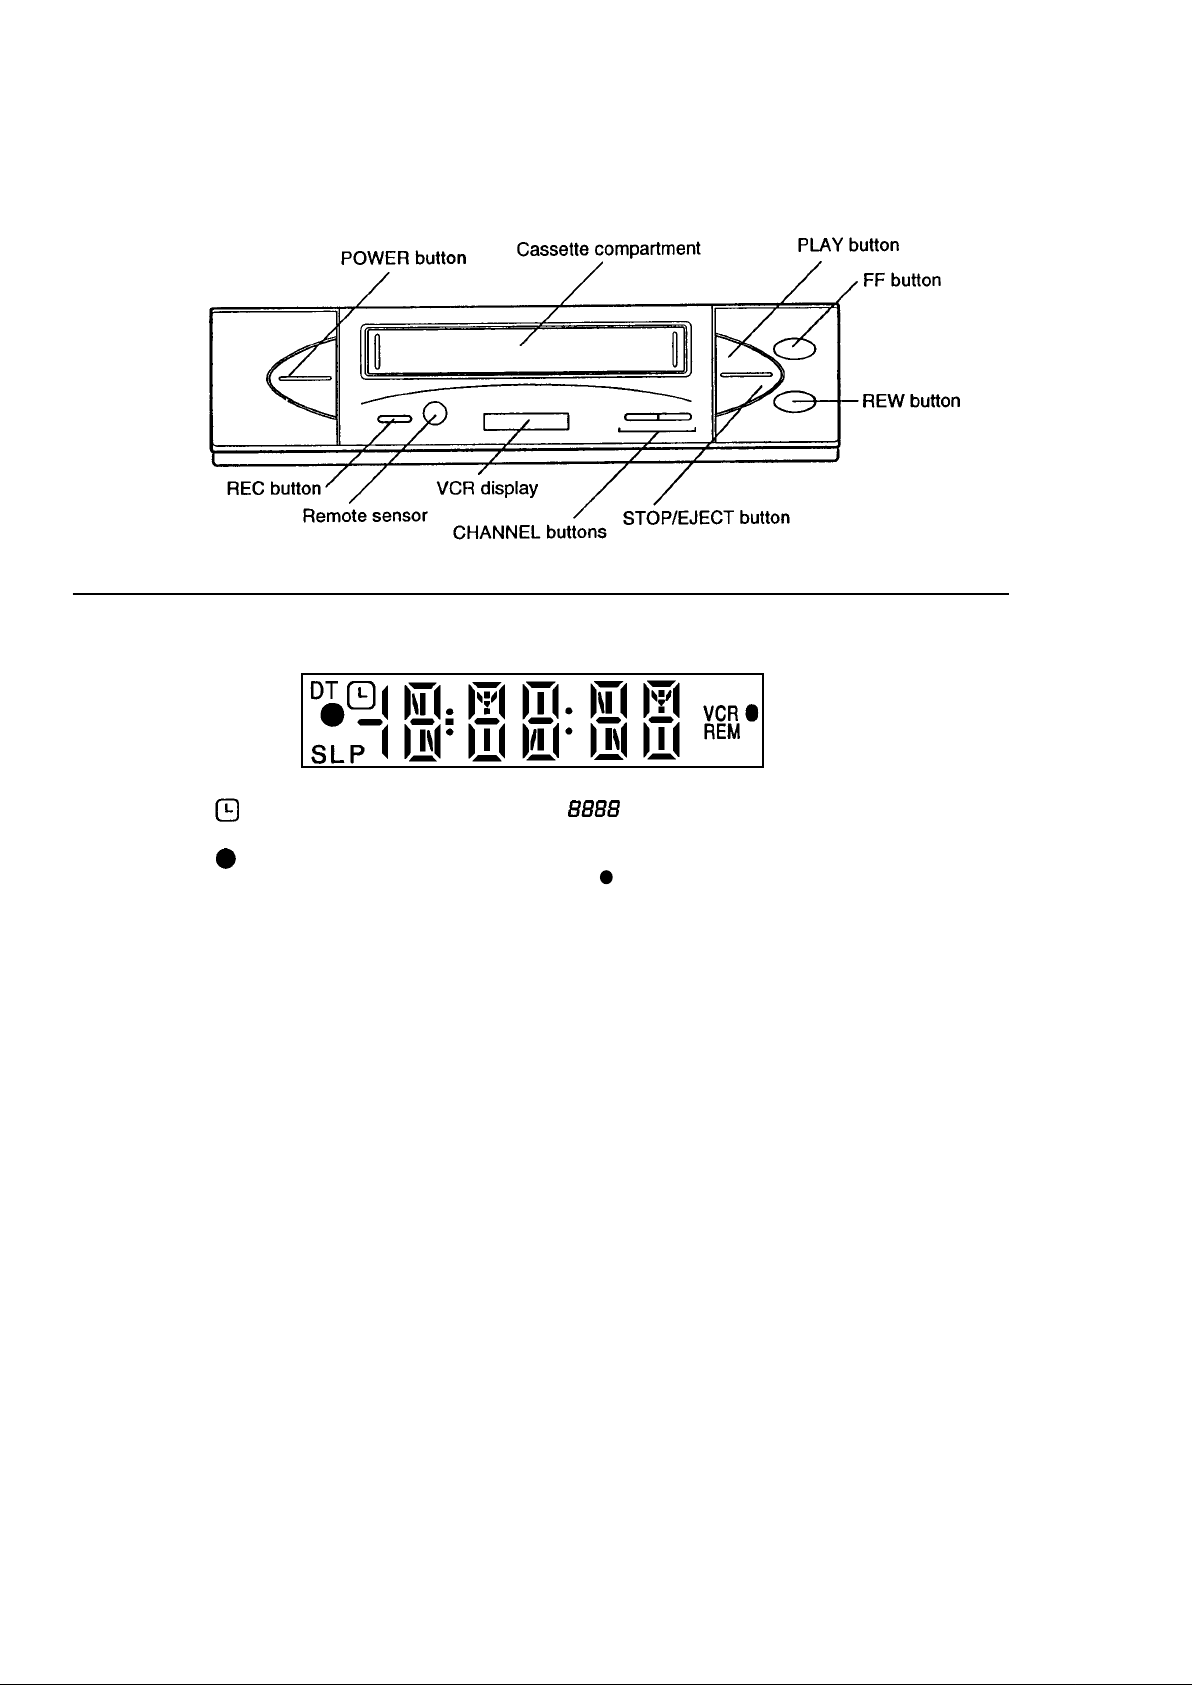
Identification of Controls
Front panel
Multi-display
: OTR/ Timer set indicator
: Digital tracking indicator
DT
: REC indicator
: Tape speed indicator
SLP
(2 speed model only)
: Clock/Tape counter
Status indicator
VCR
: Video mode indicator
: Power indicator
REM
: Tape time remaining indicator
E-3
Page 7
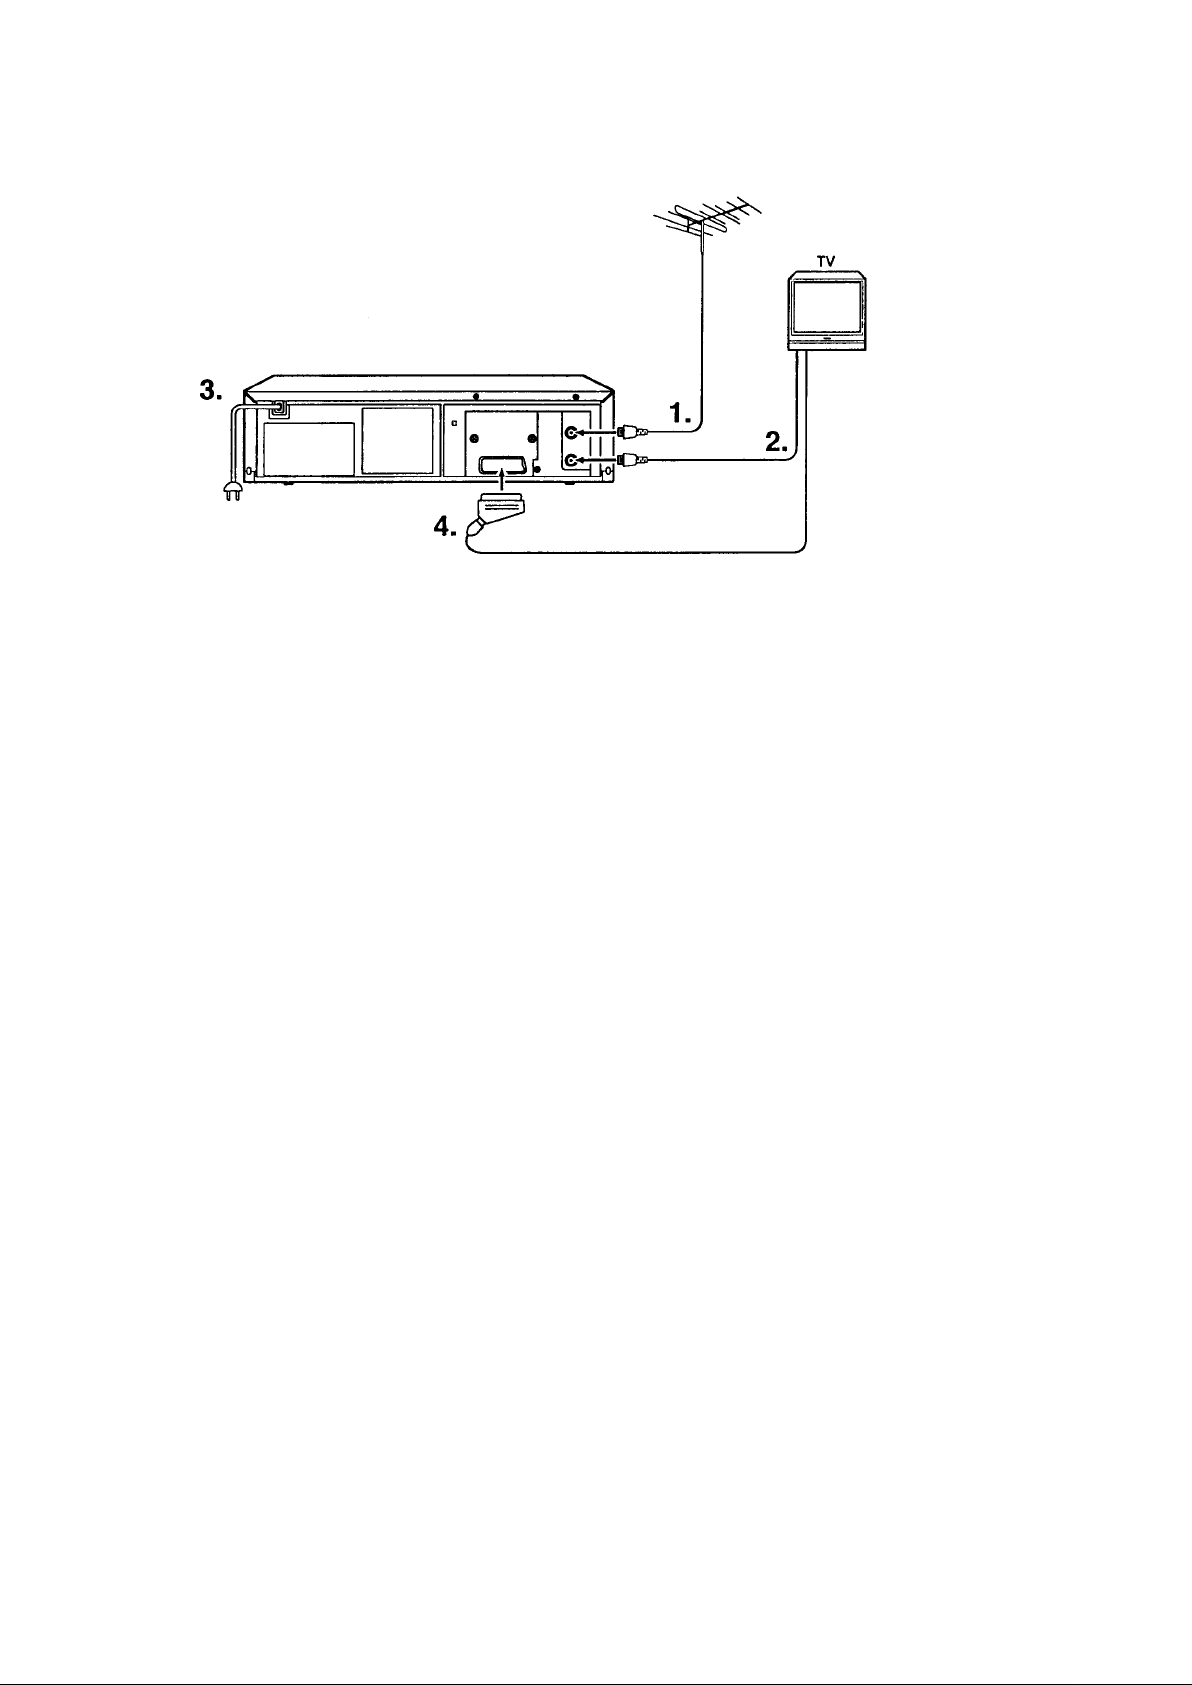
Equipment Connection
RF connection
To watch a picture from the VCR using this connection, it is necessary to set one of the TV channels as the "Video Channel"
See Preparations in “Video Channel Setting” (on Page 6).
1. Connect the antenna (or CATV) connector to the ANT.
IN socket.
2. Connect the coaxial cable (supplied) between the RF
OUT socket and the TV.
3. If you have a stereo receiver or amplifier, connect them
with an Audio cable (Not supplied).
4. Insert the power cord plug into the AC outlet.
NOTE
If you have tuned the VCR and TV set to different TV channels, you can only use the decoder for one of them.
When both the TV and VCR receive signals simultaneously
with the TV/VCR button switched to the TV mode, signal
interruption occurs.
When signal interruption appears on the TV screen, switch
the TV/VCR button to the VCR mode in order to view the
TV clearly.
AV connection
With this cable connection, many televisions automatically
switch to the “EXT” (external) or “AV” (Audio/Video)
programme number when a video cassette is played back.
You will find instructions for this in the operation manual of
your TV set.
1. Connect the antenna (or CATV) connector to the ANT.
IN socket.
2. Connect the coaxial cable (supplied) between the RF
OUT socket and the TV.
3. Insert the power cord plug into the AC outlet.
4. Connect the TV and the AUDIO/VIDEO socket with the
SCART cable (Not supplied).
E-5
Page 8

If your connection is . . . . (see page 5)
.
RF : Start from "Video Channel Setting".
.
AV : Turn on the TV and select the video position
Press the OPERATE button, then start from
"initial Settings" on the next page.
Video Channel Setting
1.
Press the OPERATE button to turn the unit on. Then,
press the MENU button for 3 seconds or more and make
sure that the Multi-display is changed as shown in the
illustration at right.
If your TV receiver does not have a position designed for
Videorecorder use, select a position that is not being used
by a broadcaster, then adjust the tuning on the TV (UHF
channel 32) so that the TEST screen is clearly displayed.
If you TV has the search function for every position, seek a
channel until TEST screen appears and then store it.
Initial Settings.
1. Language
2. AMS
3. Clock
1. Language Setting
1 . Press the button to select a language.
2. Press the MENU button to set the language and proceed with AMS.
2. AMS
Multi-display
IN THE CASE THAT
.
the TEST screen is not clear and makes noise.
.
you couldn’t find the TEST screen.
It could be that the output channel of the VCR is being used
by a broadcaster in your area. Follow the steps below to set
up the output to a different channel and try tuning your TV
again.
The default setting is RF32CH. Each time you press the
button, the selected channel changes as follows:
Initial Setting
NOTE
To make the TEST screen appear after the Initial settings,
keep pressing the MENU button for 3 seconds or longer
when the clock or the counter is shown on the multi-display.
Press the MENU button again to return to the current screen.
.
When you press the RESET button, it will turn OFF.
RF 32CH
1.
Press the SHIFT button to start AMS.
This automatically stores the channels in memory and
assigns positions.
2. If necessary, press the button to select CLOCK
SET, and press the SHIFT button to proceed to the
next step, clock setting.
! NOTES
.
If the power to the unit is cut off because of a power failure or the plug being unplugged from the socket, the initial settings must be made again. However, the channel
preset memory is retained.
.
If a broadcasting station configured for 32CH is found in
your local area, this machines RF OUT’s may interfere
and prevent normal reception.
In this case, press the MENU button for three seconds or
longer to display the TEST screen. Based on the "Video
Channel Setting" on page 6, move RF OUT to an empty
channel. Then execute AMS.
2.
Make sure the TEST screen is displayed properly, then
proceed to the Initial Settings by pressing the MENU
button.
E-6
Page 9

3. Clock Setting
Press the button until it reaches the desired setting. When the setting is done, press the SHIFT button
to return to entry of data.
1. Select HOUR and MINUTE.
2. Select DAY and MONTH.
3. Select YEAR.
! NOTE
When setting dates after the 29th day of the month, set the
month first.
4. Press the MENU button twice to start the clock and to
finish the initial setting and return to the normal screen.
Using the Menu
Press the MENU button. The "MENU" screen appears.
On Screen Display (OSD)
You can display the on-screen information which tells you
the VCR status and channel.
Whenever a function button is pressed (PLAY, STOP, etc) or
the channel is selected, OSD will appear for a few seconds.
: PLAY
: FF/FORWARD SEARCH
: REW/REVERSE SEARCH
Auto repeat
Clock/Counter/Tape time
remaining
0:00:00
SP
: STOP
: EJECT
: REC/OTR
P01
Tape speed
(2 speed model only)
Decoder
Channel
position
E-7
Page 10

CHANNEL PRESET
In case of VPS/PDC model, the TV station names are
automatically recorded in [ ]. If it is necessary, set the
TV station name manually through CHANNEL PRESET.
Place the cursor in [ ] and press the button to
select the letters which will be displayed in the OSD screen.
There are two ways to preset channels: Automatic tuning
with AMS and manual tuning.
AMS Operation
Automatic tuning with AMS is executed during the initial
settings, so normally it is not necessary. AMS is necessary
at such times as when you take the unit to another region.
See Initial Settings AMS (Auto Memory System) on Page 6.
Manual Tuning
Manual tuning is used when there is a channel that was not
preset by AMS or when you want to change the position of
a channel, and when setting the Decoder position.
1. Call the MENU screen, then press the and
SHIFT buttons to select CHANNEL PRESET.
Cursor
! NOTE
When the AUX (auxiliary input) position is selected, or during playback or recording, the CHANNEL PRESET and AMS
screen cannot be seleted. This message will appear, and
the normal TV screen will return.
MENU
TIMER PROGRAM
CHANNEL PRESET
AMS
CLOCK SET
LANGUAGE
MODE
NOT AVAILABLE NOW
.
Press the number 5 and 6 buttons during step 3 to
perform Fine tuning.
Automatic Channel Changing
In step 3, the channel can be set as follows using the SHIFT
button.
Press the SHIFT, button to exchange the channels.
2. Press the button to select the POS (01-99) to
be changed. Then, press the SHIFT button.
To skip the stored position
When the stored program is not required, press the
RESET button.
To change the stored channel
To select the desired CHANNEL, press the
button.
3. Press the MENU button TWICE to return to the normal
TV screen.
channel positions 01 and 03
are interchanged.
Press the SHIFT button to set one channel number into
two or more positions.
channel 001 is memorized
in both position 01 and 03.
Selecting AUX Position
Input from the AUDIO/VIDEO socket on the rear
AU:
panel.
E-8
Page 11

BASIC OPERATION
Playback a Video Cassette
LOADING
Insert a cassette tape with its labeled side up
as shown In the cassette compartment. The
cassette will be automatically drawn inside the
compartment.
STOP
EJECTING
REWINDING
*
PLAYBACK
SLOW
PICTURE CONT
Slow Playback
Press this button to start Slow Playback at 1/6, 1/2, 1/25
speed during PLAYBACK. Each press of the SLOW button
in this mode changes the playback speed in 3 steps.
Picture Control
Press these buttons to obtain the desired picture enhancement. This function is also available in the Slow Playback
and Still Frame modes.
Frame Advance
Each time the PLAY button is pressed while in the still mode,
the picture advances one frame.
FAST FORWARDING
REVERSE SEARCH
FORWARD SEARCH
STILL
FRAME ADVANCE
* During FF/REW Hold or to change to SEARCH
** During SEARCH, press or to change to FF/REW
! NOTES
.
During SLOW PLAYBACK, use the buttons to
move the noise bars up or down.
.
During STILL FRAME, use the buttons to eliminate the shake of the picture screen.
.
The audio output is muted except during normal
PLAYBACK.
.
The colour of the picture may be lost during picture search
in the LP mode.
.
If the VCR is left in the Still/Slow playback mode for more
than 5 minutes, it will automatically return to the playback
mode to prevent damage to the tape.
.
A tape recorded in the LP mode can be played back, but
special playback functions such as still and slow playback
are not guaranteed.
*
* *
* *
E-9
Page 12

Digital Tracking Control
Auto Tracking
When playback starts or the playback speed is changed
during playback, the VCR enters the Auto tracking mode.
At this time, the indication "DT" blinks on the multi-display
for a few seconds.
Manual tracking
If noise still appears (picture and sound) :
Press the button during PLAYBACK until the best
picture is obtained.
Press the PLAY button for 2 SECONDS to return to the
Auto tracking mode.
! NOTE
The noise on the screen may not be completely removed
depending on the tape used, especially when the tape has
been recorded on another VCR.
Auto Operation Functions
Full Auto Playback (With VCR power
OFF)
1. Insert a video cassette without the safety tab.
(See page 2)
2. The VCR is turned on and Playback of the tape starts.
3. The tape is rewound to the beginning when it reaches
the end.
4. The tape is ejected and the VCR is turned off.
Auto Playback (With VCR power ON)
1. Insert a video cassette without the safety tab.
(See page 2)
2. Playback of the tape starts.
1 Minute Skip
With this feature, you can skip over one minute’s worth of
commercials recorded on a tape.
.
Press the SKIP button during PLAYBACK.
The VCR will search forward 60 seconds, then resume
playback.
Press the PLAY button to resume playback.
Press the STOP/EJECT button to stop.
Zero Return
1. Press the RESET button during RECORDING or PLAYBACK to set the counter to 0:00:00 at a scene you wish
to watch again.
2. Press the SKIP button in the STOP mode.
The VCR will go into FF or REW mode until the counter
setting is 0:00:00
3. The tape is rewound to the beginning when it reaches
the end. The VCR is not turned off.
! NOTE
The Auto Playback or Full Auto Playback mode is released
if one of the tape related buttons (FF, REW, PAUSE, STOP/
EJECT, PLAY or OPERATE) is pressed.
Auto Turn on
When a cassette tape with a safety tab is inserted with the
VCR turned off, the VCR will be automatically turned on.
Auto Rewind
When a tape reaches its end, (except during FF, OTR, Index search / scan, and programmable timer recording), it
will automatically be rewound to its beginning and the unit
will switch to the stop mode.
Auto Power off (Select by MODE
screen, page 7)
If no action is executed for 10 minutes in the STOP mode
or for 10 minutes in the EJECT mode, the unit is automatically turned off to save electricity.
Auto Repeat
During PLAYBACK, press the No. 1 key on the remote control, then Playback of the tape will be repeated from beginning to end, and the repeat mark will be displayed on
OSD. To release from Auto Repeat mode, press the No. 1
key again.
E-10
Page 13

Index Search Function
You can easily locate the desired programme using the
Index signal registered on the tape.
Registering INDEX Signals
Automatically
.
When the recording is started.
.
When a timer programme recording starts.
Manually
Press the INDEX button at a desired point during
recording.
Reverse direction
Current programme
! NOTES
.
An index signal is not registered when the VCR is in the
recording pause mode and recording restarts.
.
The INDEX search function can only work correctly if the
index signals are spaced at least 3 minutes apart In the
SP mode and 5 minutes apart in the LP mode.
(2 speed model only)
Forward direction
Index Scan
This function plays back the tape for about 5 seconds at
each index signal.
1. Press the INDEX button during the playback or stop
mode.
INDEX --
2. Press the REW button or press the FF button to search
in the reverse or forward direction.
INDEX SCAN
3. Press the PLAY button when the desired programme
is found. Normal playbackstarts.
Index Search
This function fast-fonvards or rewinds the tape to the point
at which the selected index signal is registered, and starts
playback from there.
1. Press the INDEX button while in the playback or stop
mode.
INDEX --
2. Press the button corresponding to the direction where your desired programme is located. Each
time you press, the number decreases or increases
respectively.
INDEX 2
Example:
If the button is pressed TWICE . . .
3. Press the REW button or press the FF button to search
in the reverse or forward direction. When the point is
found, playback will start automatically.
! NOTES
.
You can set up index numbers up to 99
.
The Index search is cancelled when the PLAY or
STOP button is pressed.
+
-
E-11
Page 14

RECORDING
Recording TV Programmes
1. Insert a video cassette with the safety tab.
2. Select the desired TV programme (position number)
by pressing the button or number button.
3. Press the SP/LP button to select the tape speed.
(2 speed model only)
Tape Type Setting
In order to accurately calculate the remaining tape time,
make sure the setting corresponds with the type of tape
being used.
1. Call the MENU screen.
Press the button to select the MODE screen.
Cursor
2. Press the button to select the tape length to
be used.
4. Press the REC/OTR button simultaneously, to start recording.
5. To stop recording, press the STOP button.
* You can mark INDEX for VISS using the INDEX button
during recording.
Tape Time Remaining
It is possible to view the remaining tape time.
(Make sure to insert a tape.)
Press the CLK/CNTR button to change the display
Each time you press the CLK/CNTR button, the display
changes as follows:
Clock
Tape Counter
Tape time remaining
OTR time
(When OTR is executed)
Each time you press the DATA button, the tape
length indicator changes as follows:
E180 : For E195 tapes or shorter
E240 : For E210 or E240 tape
E260 : For E260 tape
E300 : For E300 tape
3. Press MENU button twice to exit.
! NOTE
When the setting does not correspond with the type of tape
being used, the remaining tape time and auto speed adjustment does not operate correctly
! NOTES
.
The displayed remaining time is only an approximation.
.
The counter display automatically reverts to the clock display when the unit is turned off or a cassette tape is
ejected.
.
The tape counter does not operate during unrecorded
sections of the tape.
E-12
Page 15

One-touch Timer Recording (OTR)
While recording you can set the time.
At the recording end time you set, the recording stops and the VCR is turned off automatically.
EXAMPLE
Current time ...11:08
1 . Press the REC/OTR button during RECORDING.
The next hour or half hour
Each time the button is pressed, the end time changes as follows:
After a few seconds
Normal recording
! NOTES
.
To watch another TV program while recording. Press the
TV/VCR button to clear the VCR indication, then tune
the TV to the channel you want to watch.
.
In the Pause mode during normal recording, it is possible to change the channel and/or tape speed.
.
Select long-play (LP) recording, if desired. This doubles
the recording time. (2 speed model only)
.
If the VCR is left in the PAUSE state for more than 10
minutes, it will automatically return to the stop mode to
prevent damage to the tape.
2. Press the STOP/EJECT button to stop OTR.
.
LP Mode (2 speed model only)
.
The recorded pictures on the tape may be distorted near
portions where the PAUSE button is used. This is not a
defect in the unit.
.
When a recorded tape is played back, noise bars may
appear where there was a pause in recording of the tape,
or it was stopped, during recording. This is normal and is
not a malfunction.
.
The PAUSE button and SP/LP button cannot be used
when OTR is being executed.
.
(
OTR/TIMER set indicator) and (REC indicator)
will flash during OTR is being executed.
E-13
Page 16

Recording from Another Source
With this VCR, you can make recordings from an external
source, e.g. copying onto this VCR from a second VCR.
Copying Procedure
1. Connect another VCR or external equipment to this
VCR.
2. Press the 0/AUX button TWICE, then press the
button to select the AU position.
3. Play the tape on VCR A for playback and press the
REC/OTR button on VCR B.
Method 1
If the SCART socket is used
E-14
Page 17

PROGRAMMABLE TIMER RECORDING
Programmable timer recording allows you to record up to 6
different programmes within a period of 1 month.
This function is convenient when you are away from home
or when you are busy.
PREPARATION
.
Make sure the current time is correct.
.
Insert a cassette with the safety tab.
EXAMPLE
Current time...
August 20, 1999, 10:20AM
To program . . .
August 23, 1999, 19:30-20:25 CH32 stored in
memory at Position 07 on DATA SET LINE 2.
Programme Procedure
1. Press the MENU button and select the "TIME PRO-
GRAM".
2. Select the DATA SET LINE.
4. Set the recording START/STOP time.
5. Select the CHANNEL POSITION.
6. Select the RECORDING SPEED (2 speed model only).
7. Press the TIMER button to set the TIMER STANDBY.
To release the programming, press the TIMER button
again.The TIMER STANDBY indicator disappears.
3. Select the frequency of recording (e.g. once).
Sat the EXECUTION DATE.
Selecting the Frequency of Recording
The date changes as follows if it is 8/20 Friday today:
8/20
[ONCE]:
You can record TV programs on the specified days for the
following 31 days. The maximum limit of timer recording is
1 month or 31 days.
[MO-FR]:
You can record TV programs on the same channel at the
same time Monday through Friday.
[EV-SU]...[EV-SA]:
You can record TV programs on the same channel on the
specified day and time every week.
8/21
(The current
day)
9/18 9/19
(The same day
after one month)
EV SU
EV SA
MO-FR
If timer standby is not correctly set, the TIMER
STANDBY indicator will flash.
Basic key functions
Press the button until it reaches the desired
setting. When setting is done, press the SHIFT button to enter the data.
E-15
Page 18

Auto Speed Adjust
Clearing the Data
If you are not sure if the tape is long enough for timer
programme recording at the SP tape speed, set the recording tape speed to "A" (Auto) in step 6.
Recording starts at the SP tape speed and the VCR automatically selects the tape speed to record the programme
to the end. If the tape length is not long enough, the tape
speed automatically changes from SP to LP
! NOTES
.
It is necessary to select the tape length beforehand on
theMODE screen. (See page 13)
.
When the LP tape speed is selected and the tape length
is not sufficient to record the programme to the end, the
programme cannot be completely recorded.
.
When PDC/VPS is executing, Auto Speed Adjustment
does not work.
Confirming the Data
.
While in the Standby mode
Press the MENU button to display the PROGRAM screen.
Press again to resume.
.
During EXECUTION
Press the MENU button to display the PROGRAM screen.
The programme being executed (DATA SET LINE) will
blink. Press again to resume.
1. Press the TIMER button to release the timer standby
mode.
2. Press the OPERATE button to turn on the POWER.
3. Press the MENU button then press the SHIFT) button
to display the TIMER PROGRAM screen.
4. Press the CH V/ button to select the DATA SET LINE
to be cleared.
5. Press the SHIFT, then press RESET button to clear all
DATA.
V
Notes on Timer Settings
Programme priority
When two or more recording schedules overlap:
.
20:00
Program 1
.
When the start times for two or more recording schedules are the same:
20:00
Program 1
Program 2
21:00
Program 2
21:00
22:00 23:00
Overlapped portion (not recorded)
Entire programme
if VPS is set.
22:00 23:00
Overlapped portion
(not recorded)
! NOTES
.
If a power failure occurs or the power cord is unplugged,
the programmed data will be erased. (However, the programmed data will last for 30 minutes).
Reset the date and clock and re-programme the timer for
recording.
.
When a tape reaches its end (including OTR), the unit will
power off.
.
Select a recording speed using in CH V/ step 6.
When you select external input, Al is displayed for AU1
and A2 is displayed for AU2 on the timer program screen.
It is impossible to perform timer recording through AU3.
(Hi-Fi model only)
.
If you want to quit programmable timer recording during
execution, press the TIMER button.
V
E-16
Page 19

NTSC/MESCAM-RECORDED TAPE PLAYBACK
Settings for NTSC Playback
When you play back an NTSC or MESECAM-recorded tape on this VCR, set the AUTO, PAL or MESECAM mode on the
MODE screen according to your TV.
NTSC tape : Tapes on which NTSC M system broadcasts, mainly broadcast in the U.S. and Japan are recorded, and tapes
recorded in the NTSC video system which are commercially available on the market.
Multi System TV (NTSC 4.43 compatible)
1. Press the MENU button to display the MENU screen.
2. Press the SELECT button and SHIFT button to select "MODE".
3. Set "NTSC PLAY" to "NO" by pressing the DATA button.
4. Press the MENU button twice to exit.
! NOTE
With this VCR, an NTSC tape recorded at the LP tape speed can be played back. But there are some points to be observed.
- The quality of the playback picture and sound are not clear.
- Variable speed playback (picture search, still, slow playback, etc.) can’t be performed properly.
- Digital auto tracking may not be performed properly.
PAL System TV
1. Press the MENU button to display the MENU screen.
2. Press the SELECT button and SHIFT button to select "MODE".
3. Set "NTSC PLAY" to "YES" by pressing DATA button.
4. Press the MENU button twice to exit.
Notes for Using a PAL TV for NTSC Playback
.
Use a TV compatible with the PAL video signals of PAL 60 (525 lines).
When a TV that is not compatible with the PAL video signals of PAL 60, is used (when a TV that is compatible only with the
PAL video signals of PAL 50 (625 lines), is used), NTSC playback pictures may roll up and down. This is not a malfunction
of the VCR or the TV. If your TV is equipped with a V-HOLD control, it may be possible to stop the rolling of pictures by
adjusting this control.
About PAL 50 and PAL 60 video signals:
PAL 50 : is a normal signal and its PAL video signal is 50 fields (625 lines).
PAL 60 : a special signal and its PAL video signal is 60 fields (525 lines).
Some TV’s operate properly only with PAL 50 signals and some TV’s operate properly with both PAL 50 and 60 signals.
Therefore, if your TV is switchable between PAL 50 (625 lines) 60 (525 lines), you can view an NTSC recorded tape in
the PAL colour system with your own TV
.
Depending on the TV used, the picture may shrink vertically and black bars may appear both at the top and bottom of the
TV screen. This is not an indication of malfunction.
.
Variable speed playback (picture search, still, slow playback, etc.) may produce a skewed image and quite a bit of noise on
the picture.
.
If a tape pre-recorded at the SP tape speed mode is played back in the picture search mode, the picture may be reproduced
with no colour.
! NOTE
For viewing NTSC-recorded tapes, we recommend using an NTSC 4.43 TV.
E-17
Page 20

TROUBLESHOOTING GUIDE
Check the following points before calling service personnel. The problem may be one you can solve yourself.
SYMPTOM
No function and no play.
The VCR does not work even though
the power is turned on.
The colon between the hour
and minute digits blinks in the VCR
display.
The TV picture is not good.
TV broadcasts cannot be received
using the buttons on the VCR.
Channels on the are not received
when the VCR is on.
Recording cannot be performed.
A picture being recorded cannot be
seen on the TV.
The Playback picture is poor or
absent.
Time recording cannot be
performed.
The remote controller does not
operate.
Correct Indication does not appear
in the multi-display.
An Interference signal appears on the
TV screen when watching Pay-TV.
CAUSE
.
The power cord is not plugged in
.
There is no cassette in the VCR.
.
There was a short power failure.
The TV station is not tuned precisely.
.
.
The video channel is not set correctly.
.
The antenna cable is disconnected.
.
The TV signal is weak.
.
“AU” is displayed in the VCR display.
.
The VCR is not set in the VCR mode.
.
The VCR is not set in the TV mode.
.
The safety tab of the cassette is removed.
.
The VCR is not set in the VCR mode.
.
Tracking Is not adjusted appropriately.
.
Tuning of the TV is not good.
.
The video heads are dirty (beyond the head
cleaner’s capacity).
.
The VCR is not set in the VCR mode.
.
No cassette is loaded.
.
The safety tab of the cassette is removed.
.
The timer indicator ( ) is not displayed.
.
Clock setting has not been done.
.
The direction of the remote controller is
wrong.
.
The remote control is too far from the remote
sensor of the VCR.
.
An obstacle may be in the way of the operation.
.
The batteries are exhausted.
.
Something is wrong with the p-corn.
.
The mode is not properly set.
CORRECTION
.
Insert it firmly Into the main power outlet.
.
Load a cassette.
.
Set the clock.
.
Adjust it with the TV’s fine tuning control.
.
Set the video channel precisely.
.
Connect it again.
.
Adjust the antenna direction or use an antenna booster (not supplied).
.
Press the CH button so that the position
number appears.
.
Press the TV/VCR button to make the “VCR
indicator appear in the VCR display.
.
Press the TV/VCR button to make the “VCR
indicator disappear in the VCR display.
.
Use a cassette with a safety tab or cover the
tab hole with adhesive tape.
.
Press the TV/VCR button to make the “VCR”
indicator appear in the VCR display.
.
Adjust the tracking manually.
.
Fine tune the TV.
.
Consult your dealer for head cleaning.
.
Press the TV/VCR button to make the “VCR”
indicator appear in the VCR display.
.
Load a cassette.
.
Cover the tab hole or use another cassette
with a safety tab.
.
Press the TIMER button.
.
Set the clock.
.
Point the remote controller at the remote
sensor of the VCR.
.
Operate it within about 7 m from the VCR.
.
Remove the obstacle.
.
Replace all batteries.
.
Plug the power cord into the outlet again one
minute after it was disconnected.
.
Press the CLEAR (RESET) button on the
rear panel to clear the data stored in the
unit’s memory and input the data again.
.
After the CLEAR (RESET) button is pressed,
wait for about 2~3 minutes before connecting the power cord again.
.
Set the VCR in the VCR mode by pressing
TV/VCR button.
V
V/
E-18
Page 21

SPECIFICATIONS
GENERAL SECTION
Power Requirements
Power Consumption
Dimensions (W x H x D)
Weight
Operating Temperature
Operating Humidity
Video Recording System
Number of Video Heads
Channel Coverage
Tape Speed
Tape Format
Record/Playback Time
VIDEO SECTION
Television System
Modulation System
Horizontal Resolution
Input Level
Output Level
Signal-to-Noise Ratio
230V AC ~ 50 Hz
16 Watts
370 x 93 x 272 mm
Approx. 3.1 kg.
5°Ct o 40°C
35% to 80% R. H.
2 Rotary Heads, Helical Scanning System
2 Heads
PAL B/G
23.39 mm/sec. (SP)
11.69 mm/sec. (LP) (VCR-7490X)
VHS l/2-inch PAL Cassette Tape
Up to 5 Hours with E-300 tape
Up to 10 Hours with E-300 tape (in LP mode)
PAL: 625 Lines, 50 Fields, Colour Signal
NTSC: Colour, 525 lines
Luminance: FM Azimuth Recording
Colour Signal:
PAL: Converted subcarrier phase shift recording
Colour: 230 Lines, Nominal
1 Vp-p 75 unbalanced
1 Vp-p 75 unbalanced
More than 43dB
VHF : E2-E12
UHF : E21-E69
CATV : X-Z, Z+1, Z+2, S1-S41
AUDIO SECTION
Input Level
Output Level
Audio Track
Signal-to-Noise Ratio
Frequency Response
Design and specifications are subject to change without notice for performance improvement.
300m Vrms, 50 K Unbalanced
300m Vrms, 1 K Unbalanced
1 Track
More than 36dB
l00 Hz to 6KHz
E-19
Page 22

PALSONIC CORPORATION PTY LTD
1 JOYNTON AVENUE
WATERLOO NSW 2017 AUSTRALIA
TEL:(02)9313 7111
FAX:(02)9313 7555
www.palsonic.com.au
PALSONIC CUSTOMER SERVICE
TELEPHONE
AUSTRALIA: 1300 657 888
 Loading...