

Page 1
Operating
Instructions
PREV
PALSONIC CORPORATION PTY LTD
1 JOYNTON AVENUE
WATERLOO NSW 2017 AUSTRALIA
TEL: (02) 9313 7111
FAX: (02) 9313 7555
www.palsonic.com.au
PALSONIC CUSTOMER SERVICE
TELEPHONE
AUSTRALIA: 1300 657 888
DVDR111 DVD RECORDER
Page 2
Selecting Subtitles
Safety Precautions
The lightning flash with an arrowhead symbol within an equilateral triangle
is intended to alert the user to the presence of uninsulated "dangerous
voltage" within the product's enclosure that may be of sufficient magnitude
to constitute a risk of electric shock to persons.
The exclamation point within an equilateral triangle is intended to alert the
user to the presence of important operating and maintenance (servicing)
instructions in the literature accompanying the appliance.
WARNING:
C A U T I O N :
ATTENTION:
C A U T I O N :
CAUTION
RISK OF ELECTRIC SHOCK
DO NOT OPEN
RISQUE DE CHOC ELECTRIQUE NE
AVIS
CAUTION: TO REDUCE THE RISK OF ELECTRIC
SHOCK, DO NOT REMOVE COVER (OR BACK).
NO USER-SERVICEABLE PART INSIDE. REFER
SERVICING TO QUALIFIED SERVICE PERSONNEL
DO NOT EXPOSE THIS APPLIANCE TO RAIN OR MOISTURE, DUE TO THE HIGH RISK OF FIRE
OR ELECTRIC SHOCK, DO NOT OPEN THE CABINET DANGEROUS HIGH VOLTAGES ARE
PRESENT INSIDE THE ENCLOSURE. ONLY QUALIFIED SERVICE PERSONNEL SHOULD
ATTEMPT THIS.
TO PREVENT ELECTRIC SHOCK, MATCH WIDE BLADE OF PLUG TO WIDE SLOT, AND
FULLY INSERT.
POUR EVITER LES CHOCS ELECTRIQUE, INTRODUIRE LALAME LAPLUS LARGE DE LA
FICHE DANS LABORNE CORRESPONDANTE DE LAPRISE ET POUSSER JUSQU' AU FOUD.
This Digital Video Disc Player employs a Laser System. To prevent direct exposure to the laser beam, do not try to
open the enclosure.
Visible laser radiation emits when open and interlocks are defeated.
Use of controls or adjustments or performance of procedures other than those specified herein may result in hazardous
radiation exposure.
DO NOT STARE INTO BEAM.
To ensure proper use of this product, please read this owner's manual carefully and retain for future reference.
Should the unit require maintenance, contact an authorised service location, or contact us. Only qualified service personnel
should remove the cover.
PAS OUVRIR
WA R N I N G:
CLASS 1
LASER PRODUCT
Since it is very usual for DVD movies to be released at different times in different regions of the world, all players have
region codes and disks can have an optional region code. If you load a disk of a different region code to your player, you
will see the region code notice on the screen. The disk will not play, and should be unloaded.
Changes or modifications made to this equipment, not expressly approved by us or parties authorised by us will void all the
manufacture warranties.
THE REGION CODE FOR THE UNIT IS 4.
Note:
Playback of individual DVDs and CDs on Palsonic
DVD Player and Recorder:
DVD-R/RW in DVD video format and CD-R/RW in CD-DA or in MP3 format can be played. Due to quality differences of
the media as well as peculiarities of the recording it can occur, nevertheless, that individual DVDs or CDs cannot be read.
In such cases, it is not due to a malfunction of the playing equipment.
4
For Customer Use:
In spaces provided below, record the Model and Serial No. located on the rear panel of your DVD video player.
Model No. Serial No.
Retain this information for future reference.
1
Page 3
Safety Information
CAUTION: Use of controls or adjustments or performance of procedures other than those specified herein may result in hazardous radiation exposure.
Please carefully study this manual and always keep it available. There are, however, some installation and operation precautions which you
should be aware of.
1. Read Instructions - All the safety and operating instructions should be read before the product is operated.
2. Retain Instructions - The safety and operating instructions should be retained for future reference.
3. Heed Warnings - All warnings on the product and in the operating instructions should be adhered to.
4. Follow Instructions - All operating and use instructions should be followed.
5. Cleaning - Unplug this product from the wall outlet before cleaning. Do not use liquid cleaners or aerosol cleaners. Use a damp cloth for cleaning.
6. Attachments - Do not use attachments not recommended by the product manufacturer as they may cause hazards.
7. Water and Moisture - Do not use this product near water - for example, near a bath tub, wash bowl, kitchen sink, or laundry tub; in a wet
basement; or near a swimming pool; and the like.
8. Accessories - Do not place this product on an unstable cart, stand, tripod, bracket, or table. The product may fall, causing serious injury to a child or
adult, and serious damage to the product. Use only with a cart, stand, tripod, bracket, or table recommended by the manufacturer, or sold with the
product. Any mounting of the product should follow the manufacturer's instructions, and should use a mounting accessory recommended by the
manufacturer.
9. A product and cart combination should be moved with care. Quick stops, excessive force, and uneven surfaces may cause the product and cart
combination to overturn.
10. Ventilation - Slots and openings in the cabinet are provided for ventilation and to ensure reliable operation of the product and to protect it from
overheating, and these openings must not be blocked or covered. The openings should never be blocked by placing the product on a bed, sofa, rug, or
other similar surface. This product should not be placed in a built-in installation such as a bookcase or rack unless proper ventilation is provided or the
manufacturer's instructions have been adhered to.
11. Power Sources - This product should be operated only from the type of power source indicated on the marking label. If you are not sure of the
type of power supply to your home, consult your product dealer or local power company. For products intended to operate from battery power, or
other sources, refer to the operating instructions.
12. Grounding or Polarisation - This product may be equipped with a polarised alternatingcurrent line plug (a plug having one blade wider than the other). This plug will fit into the power
outlet only one way. This is a safety feature. If you are unable to insert the plug fully into the
outlet, try reversing the plug. If the plug should still fail to fit, contact your electrician to replace
your obsolete outlet. Do not defeat the safety purpose of the polarised plug.
Alternate Warnings - This product is equipped with a three-wire grounding-type plug, a plug
having a third (grounding) pin. This plug will only fit into a grounding-type power outlet. This
is a safety feature, If you are unable to insert the plug into the outlet, contact your electrician
to replace your obsolete outlet. Do not defeat the safety purpose of the grounding-type plug.
13. Power-Cord Protection - Power-supply cords should be routed so that they are not likely
to be walked on or pinched by items placed upon or against them, paying particular attention
to cords at plugs, convenience receptacles, and the point where they exit from the product.
14. Protective Attachment Plug - The product is equipped with an attachment plug having
overload protection. This is a safety feature. See Instruction Manual for replacement or
resetting of protective device. If replacement of the plug is required, be sure the service
NEC - NATIONAL ELECTRICAL CODE
S2898A
technician has used a replacement plug specified by the manufacturer that has the same overload protection as the original plug.
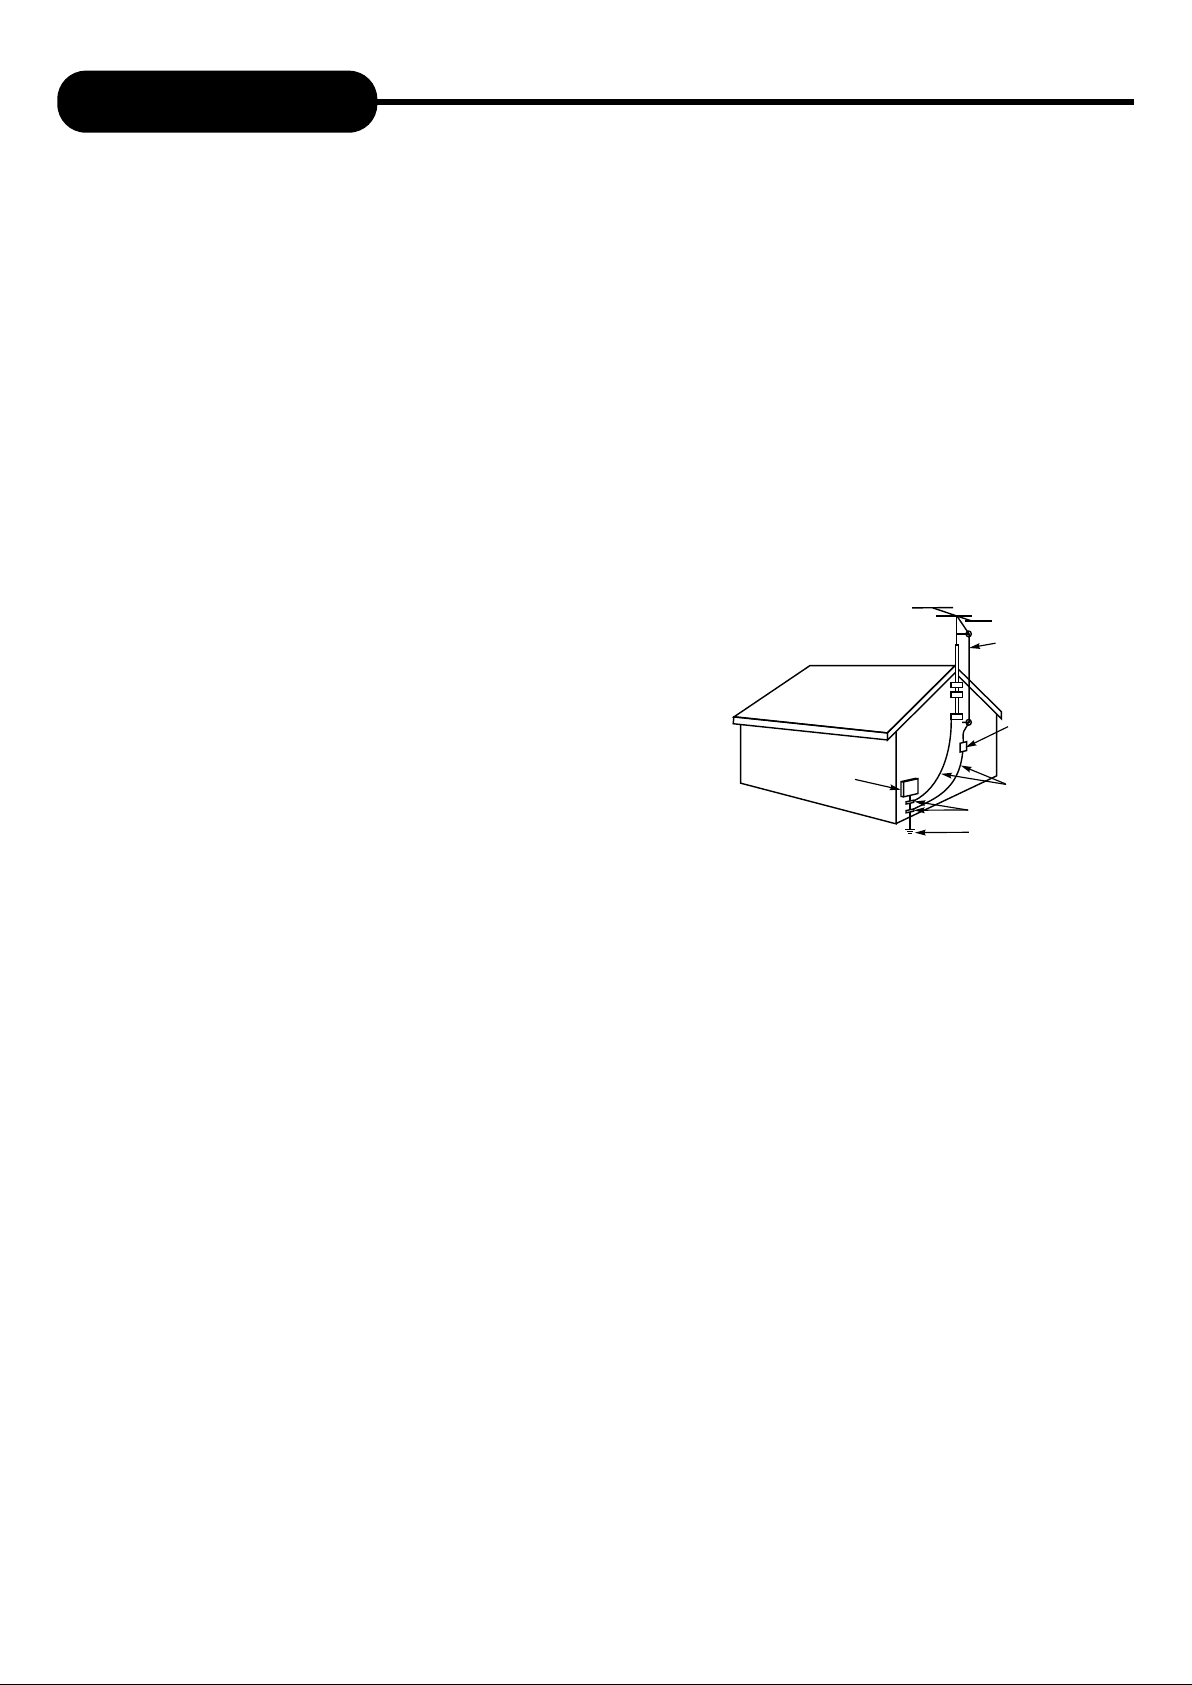
15. Outdoor Antenna Grounding - If an outside antenna or cable system is connected to the product, be sure the antenna or cable system is
grounded so as to provide some protection against voltage surges and built-up static charges. Article 810 of the National Electrical Code,
ANSI/NFPA 70, provides information with regard to proper grounding of the mast and supporting structure, grounding of the lead-in wire to an
antenna discharge unit, size or grounding conductors, location of antenna-discharge unit, connection to grounding electrodes, and requirements
for the grounding electrode.
16. Lightning - For added protection for this product during a lightning storm, or when it is left unattended and unused for long periods of time,
unplug it from the wall outlet and disconnect the antenna or cable system. This will prevent damage to the product due to lightning and powerline surges.
17. Power Lines - An outside antenna system should not be located in the vicinity of overhead power lines or other electric light or power circuits,
or where it can fall into such power lines or circuits. When installing an outside antenna system, extreme care should be taken to keep from
touching such power lines or circuits as contact with them might be fatal.
18. Overloading - Do not overload wall outlets, extension cords, or integral convenience receptacles as this can result in a risk of fire or electric shock.
19. Object and Liquid Entry - Never push objects of any kind into this product through openings as they may touch dangerous voltage points or
short-out parts that could result in a fire or electric shock. Never spill liquid of any kind on the product.
20. Servicing - Do not attempt to service this product yourself as opening or removing covers may expose you to dangerous voltage or other
hazards. Refer all servicing to qualified service personnel.
21. Damage Requiring Service - Unplug this product from the wall outlet and refer servicing to qualified service personnel under the following conditions:
a. When the power-supply cord or plug is damaged.
b. If liquid has been spilled, or objects have fallen into the product.
c. If the product has been exposed to rain or water
d. If the product does not operate normally by following the operating instructions. Adjust only those controls that are covered by the operating
instructions as an improper adjustment of other controls may result in damage and will often require extensive work by a qualified technician to
restore the product to its normal operation.
e. If the product has been dropped or damaged in any way, and
f. When the product exhibits a distinct change in performance - this indicates a need for service.
22. Replacement Parts - When replacement parts are required, be sure the service technician has used replacement parts specified by the
manufacturer or have the same characteristics as the original part. Unauthorised substitutions may result in fire, electric shock, or other hazards.
23. Safety Check - Upon completion of any service or repairs to this product, ask the service technician to perform safety checks to determine
that the product is in proper operating condition.
24. Wall or Ceiling Mounting - The product should be mounted to a wall or ceiling only as recommended by the manufacturer.
25. Heat - The product should be situated away from heat sources such as radiators, heat registers, stoves or other products (including amplifiers)
that produce heat.
FIGURE A
EXAMPLE OF ANTENNA GROUNDING
AS PER NATIONAL ELECTRICAL CODE
ELECTRIC
SERVICE
EQUIPMENT
ANTENNA
LEAD IN WIRE
ANTENNA
DISCHARGE UNIT
(NEC SECTION 810-21)
GROUNDING CONDUCTORS
(NEC SECTION 810-21)
GROUND CLAMPS
POWER SERVICE GROUNDING
ELECTRODE SYSTEM
(NEC ART 250, PART H)
2
Page 4

Introduction
Your recorder design combines the functionalities of a DVD player and
recorder. As a DVD player, you will be able to enjoy full length movies
with true cinema picture quality, and stereo or multichannel sound
(depending on the disc and your playback system). This player
includes KODAK picture CD and JPEG file readability, to view family
photos in slide show presentation. Playback standard CD's, and
personal MP3 & WMA files. It supports video connections such as
component, S-Video and progressive scan for greater picture clarity
DVD + ReWritable
What's more, as a DVD Video Recorder, it has some of the key features
that allow you to record programs conveniently such as:
A complete DVD+RW/DVD+R recorder.
Preset recording
Playback of pre-recorded or user-recorded DVDs and CDs
View, edit and play from a pre-recorded DVD+RW.
UNPACKING
When shipping the player, the original shipping carton and packing comes in handy. For maximum
protection, re-pack the unit as it was originally packed at the factory. It is normal for your changer tray to
partially open after you have unpacked the unit. This is a feature designed to allow easier access to disc
inside the tray during diagnostics.
First check and identify the contents of your player package, as listed below:
- DVD Recorder
- Remote control
- Audio Cable
- Video Cable
- Owner's manual
- Size AAA batteries (2)
If any item should be damaged or missing, please inform your supplier without delay.
Keep the packaging materials as you may need them to transport your player in the future.
WHERE TO PLACE YOUR DVD RECORDER
1. Place the unit on a firm, flat surface.
2. When you place this player near a radio or VCR the playback picture may become poor and/or
distorted. In this situation, move the DVD video player away from the other units.
3. Keep away from direct sunlight & domestic heating equipment.
4. If placed in a cabinet, please allow at least 2.5 cm (1 inch) of free space around the player for
proper ventilation.
I.LINK DVD
TO OBTAIN A CLEAR PICTURE
This player is a high-tech, precision device. If the optical pick-up lens and disc drive parts are dirty or worn
down, the picture quality will become poor. To obtain a clear picture, we recommend regular inspection and
maintenance (i.e. cleaning or parts replacement) every 1,000 hours of use depending on the operating
environment. For details, please contact your nearest dealer.
3
Page 5

Table of Contents
Safety Precautions .............................
Safety Information ..............................
Introduction.........................................
Table of Contents ..............................
Identification of Controls.....................
Connection .........................................
MP3, Progressive Scan......................
Playing Back a Disc ...........................
Playing a Normal Disc .......................
Playing a DVD+RW or DVD+R Disc...
General Features ...............................
Locating a Specific Title,
Chapter or Track.................................
1
2
3
4
5
7
12
13
13
14
16
18
KODAK Picture CD/JPEG/MP3 Playback ....
Using the On-screen Display.........................
Setting the Parental Lock...............................
Customising DVD Function Settings .............
Recording Options ........................................
Channel Search ............................................
Normal Recording .........................................
One-Touch Record .......................................
Time Record .................................................
Editing ...........................................................
Editing a Title of DVD+RW ...........................
Editing a Disc of DVD+RW or DVD+R ......
Specifications ................................................
Trouble Shooting Guide ................................
25
27
28
29
30
30
32
33
34
35
35
38
40
41
Playing Repeatedly.............................
Playing in Random Order...................
Selecting Camera Angles, Language
& Audio Settings ................................
Playing in a Favourite Order ..............
Selecting Subtitles .............................
20
21
22
23
24
Attachment ....................................................
42
4
Page 6
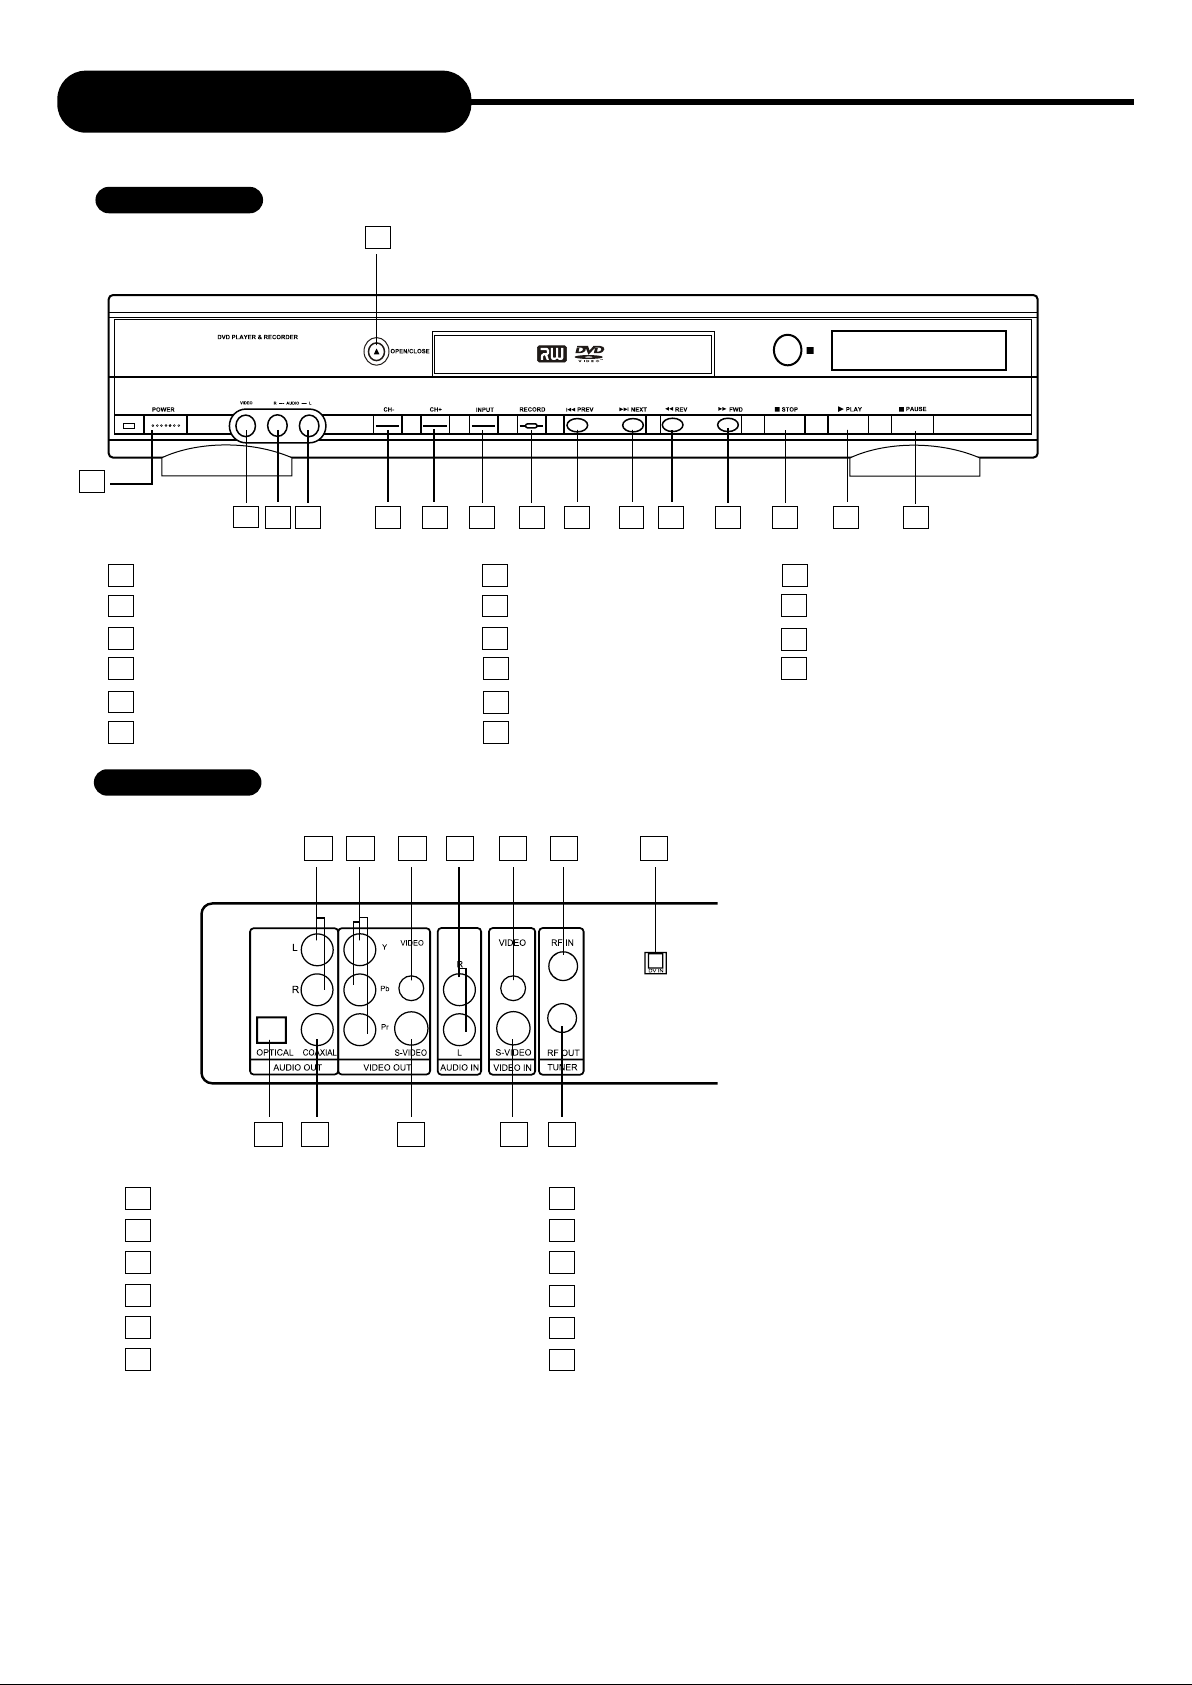
Identification of Controls
FRONT PANEL
16
1
2
3
4
POWER
1
COMPOSITE VIDEO INPUT (FRONT)
2
AUDIO INPUT (FRONT RIGHT)
3
4
AUDIO INPUT (FRONT LEFT)
CHANNEL -
5
6
CHANNEL +
REAR PANEL
1
10
11
12
5
2
3
7
6
7
8
9
10
11
12
4
5
9
8
INPUT
RECORD
PREVIOUS
NEXT
FAST REVERSE
FAST FORWARD
11
12
13
13
14
15
16
14
STOP
PLAY
PAUSE
OPEN/CLOSE
15
6
7
1
AUDIO OUTPUT
2
COMPONENT VIDEO OUTPUT
3
COMPOSITE VIDEO OUTPUT
AUDIO INPUT (REAR LEFT/RIGHT)
4
COMPOSITE VIDEO INPUT (REAR)
5
DIGITAL AUDIO-OPTICAL OUTPUT
6
8
10
9
7
DIGITAL AUDIO-COAXIAL OUTPUT
8
S-VIDEO OUTPUT
9
S-VIDEO INPUT (REAR)
RF SIGNAL OUTPUT
10
RF SIGNAL INPUT
11
I.LINK DV
12
5
Page 7
Identification of Controls
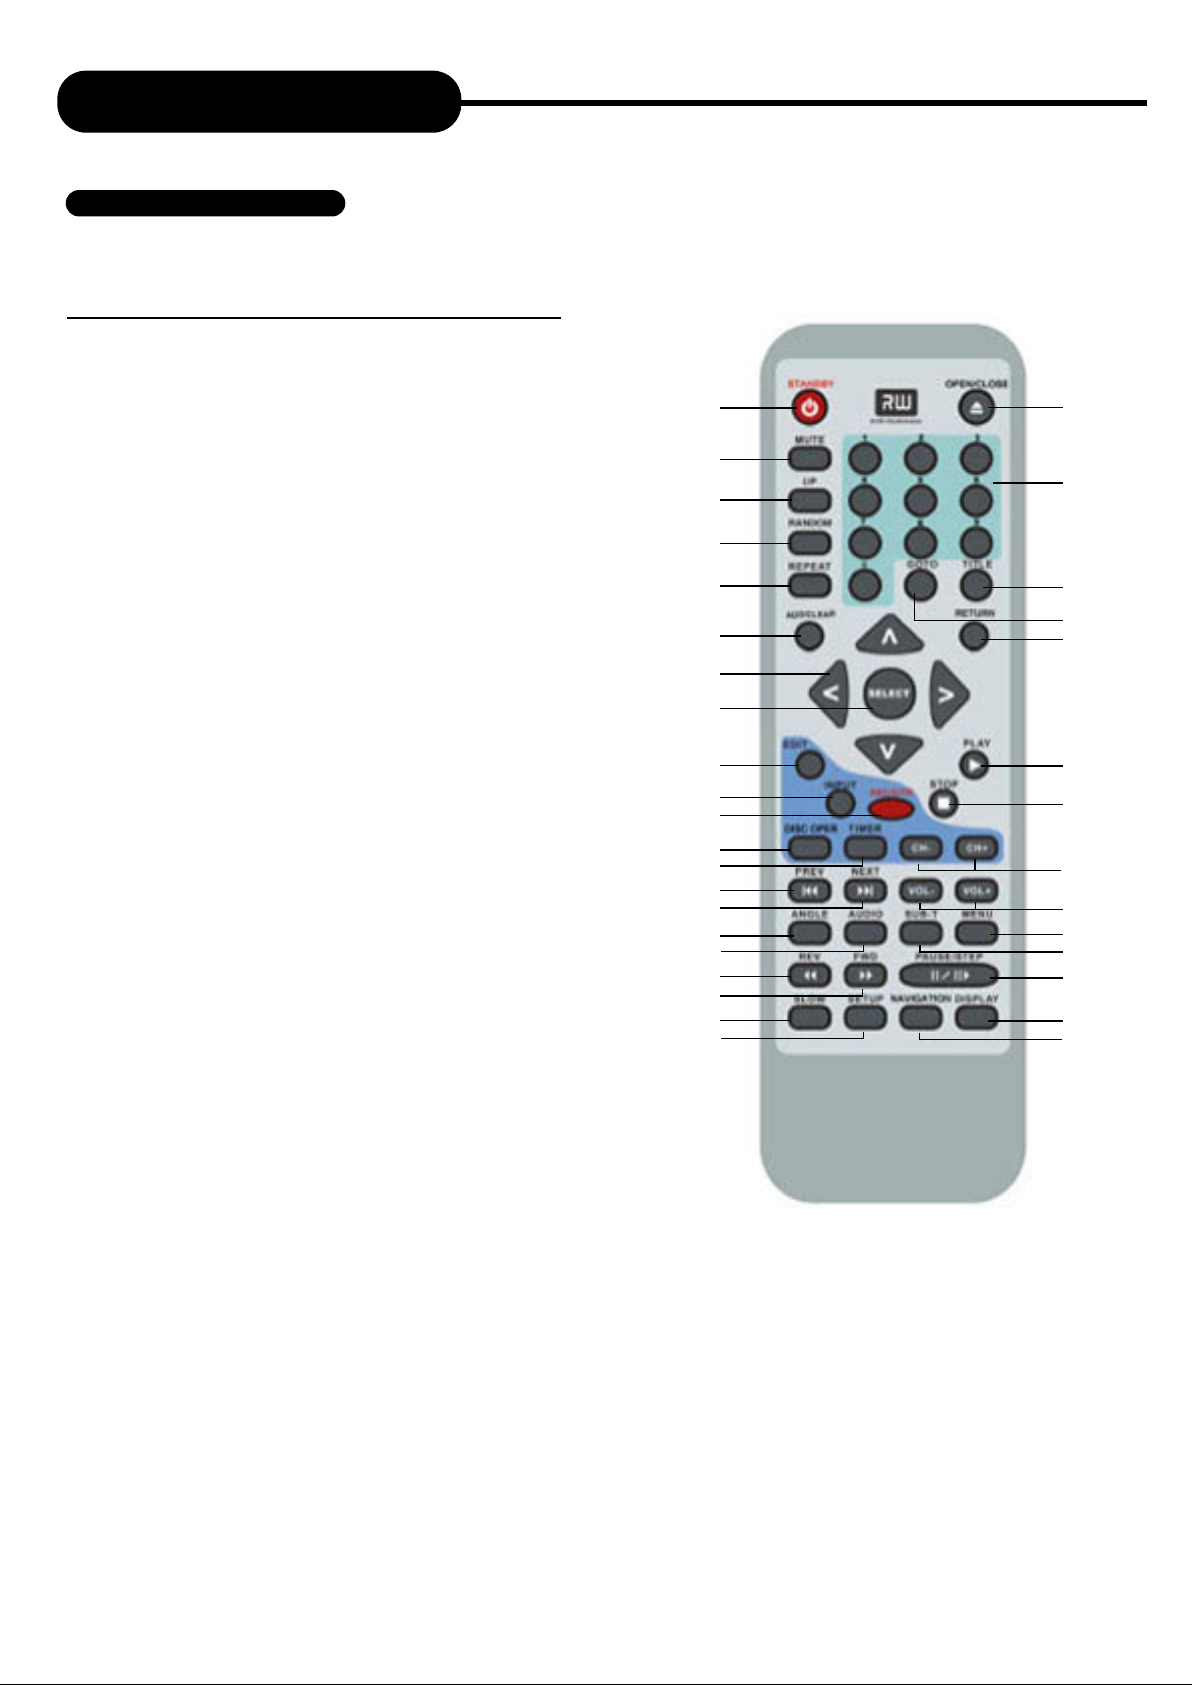
REMOTE CONTROL
THE INSTRUCTIONS BELOW DESCRIBE THE
FUNCTIONS OF THE REMOTE CONTROL.
1. STANDBY
2. MUTE
3. I/P
(INTERLACE / PROGRESSIVE)
4. RANDOM
5. REPEAT
6. ADD/CLEAR
7. DIRECTION
(UP / DOWN / LEFT / RIGHT)
8. SELECT
9. EDIT
10. INPUT
11 .REC/OTR
(RECORD / ONE-TOUCH RECORD)
1 2 .DISC OPERATION
13. TIMER
14. PREVIOUS
15. NEXT
16. ANGLE
19. FORWARD
20. SLOW
21. SETUP
22. OPEN / CLOSE
23. NUMBERS
24. TITLE
25. GOTO
26. RETURN
27. PLAY
28. STOP
29. CHANNEL -/+
30. VOLUME -/+
31. MENU
32. SUBTITLE
33. PAUSE / STEP
34. DISPLAY
35. NAVIGATION
10
11
12
13
14
15
16
17
18
19
20
21
1
2
3
4
5
6
7
8
9
22
23
24
25
26
27
28
29
30
31
32
33
34
35
17. AUDIO
18. REVERSE
6
Page 8
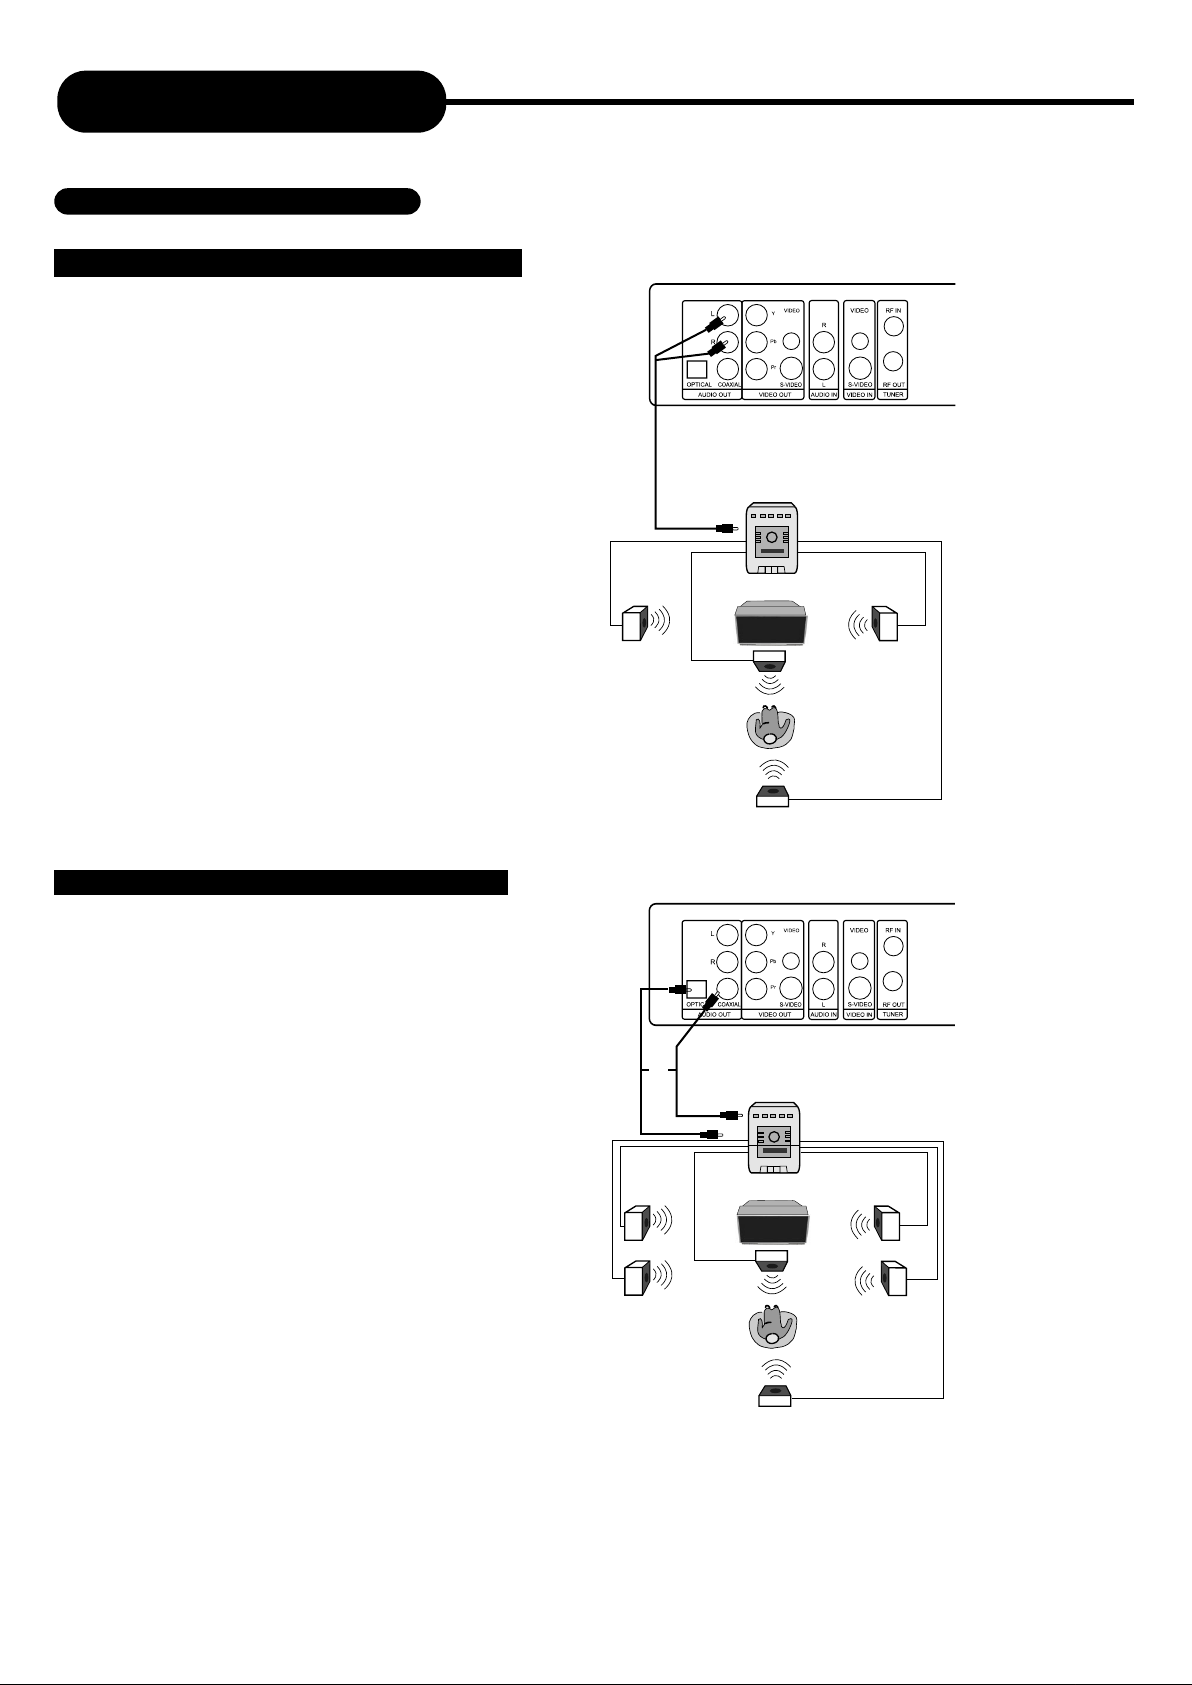
Connection
CONNECTION FOR AUDIO OUTPUT
Dolby Pro Logic Surround Sound (GOOD)
Enjoy Dolby Pro Logic Surround by connecting an
amplifier and speaker system (right and left front
speakers, a centre speaker, and one or two rear
speakers).
Audio cable
(Analog out)
Amplifier
Enjoying Digital Stereo Sound (BETTER)
Enjoy the dynamic sound of Digital Stereo by
connecting an amplifier equipped with a digital
audio input and speaker system.
or
Audio cable
Amplifier
7
Page 9
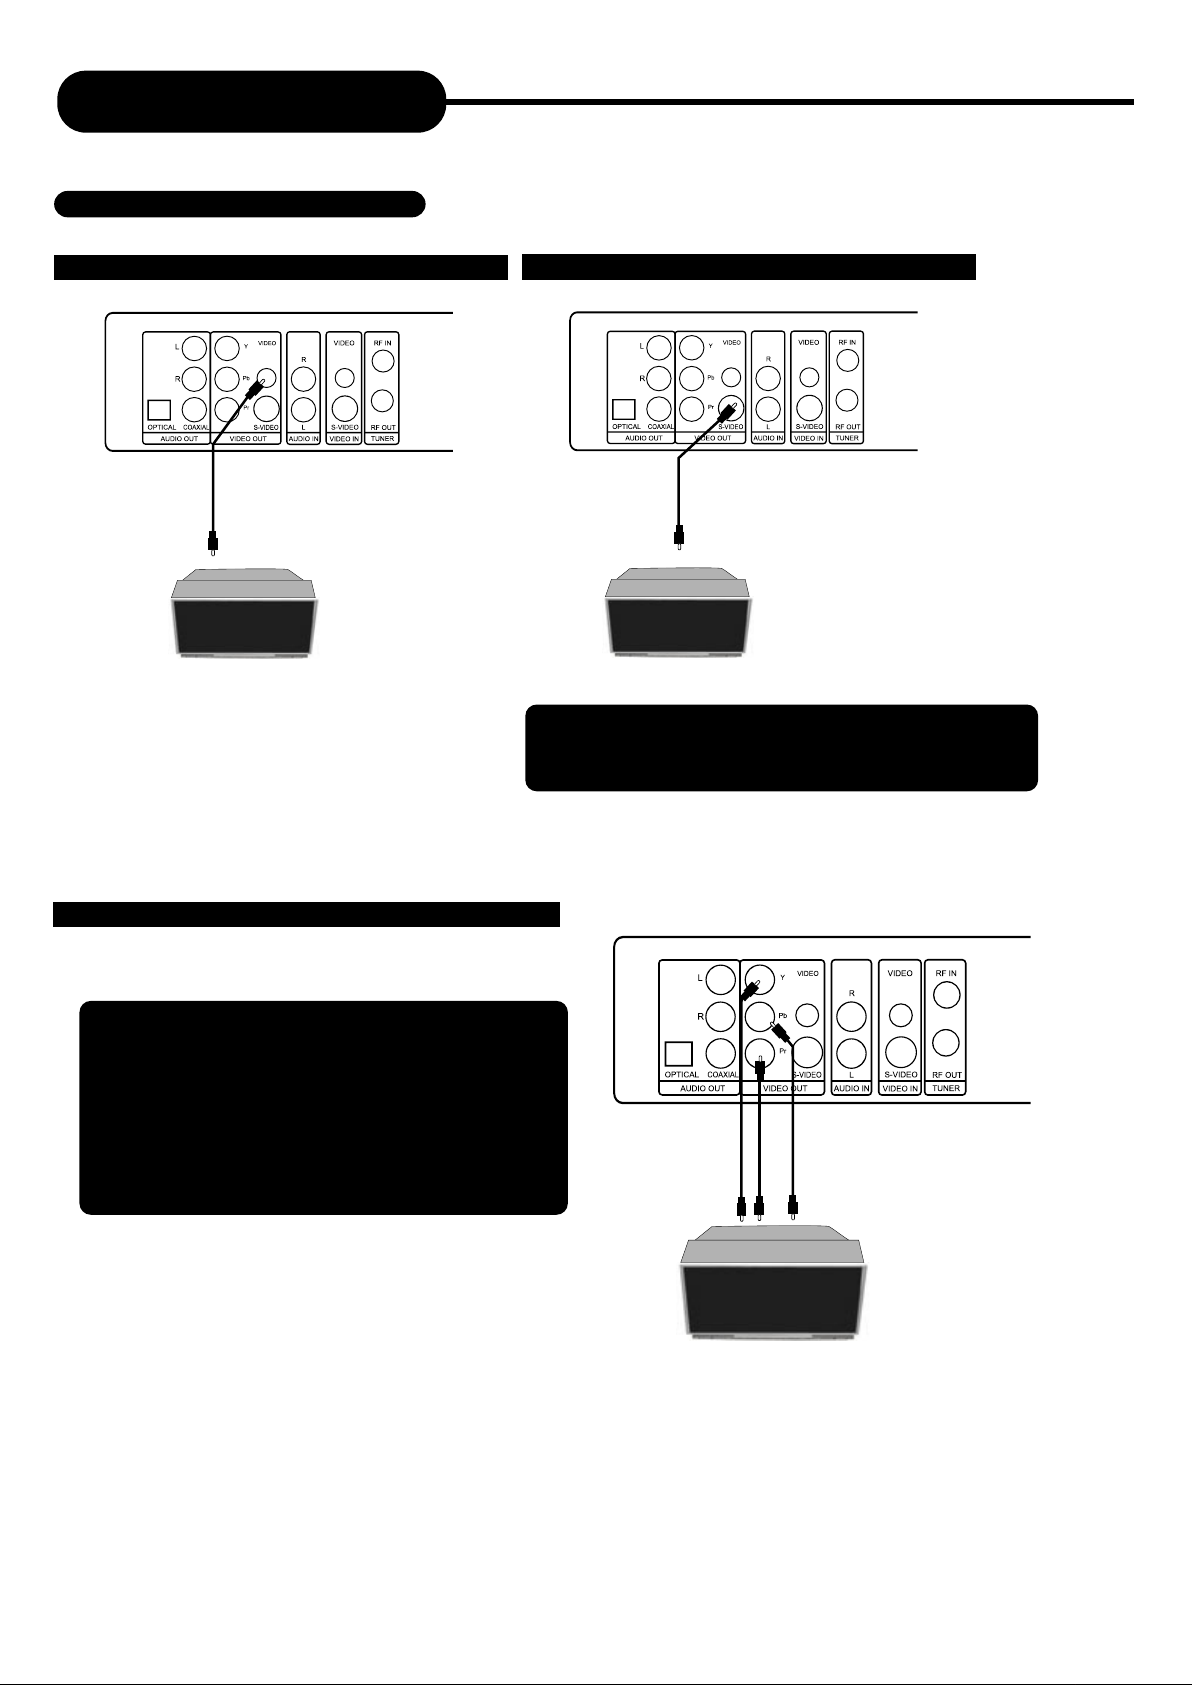
Connection
CONNECTION FOR VIDEO OUTPUT
GOOD
Video cable
BETTER
Video cable
Connect your recorder with the S-Video cable, if the TV
has an S-Video input. Do not connect the yellow video
cable if using the S-Video cable.
COMPONENT VIDEO OUTPUT (BEST)
The Component Video input allows you to enjoy the best
picture quality from a DVD video disc.
Connect your recorder with Y Video, Pr Video and
Pb Video, if TV has Progressive Scan or Component
Video Input.
During stop status, press I/P button on remote
control unit to switch between Progressive Scan or
Interlace Scan, or switch these two modes in
General Setup from the Setup Menu.
Pr VIDEO OUT
Pb VIDEO OUT
Y VIDEO OUT
8
Page 10
Connection
Connection
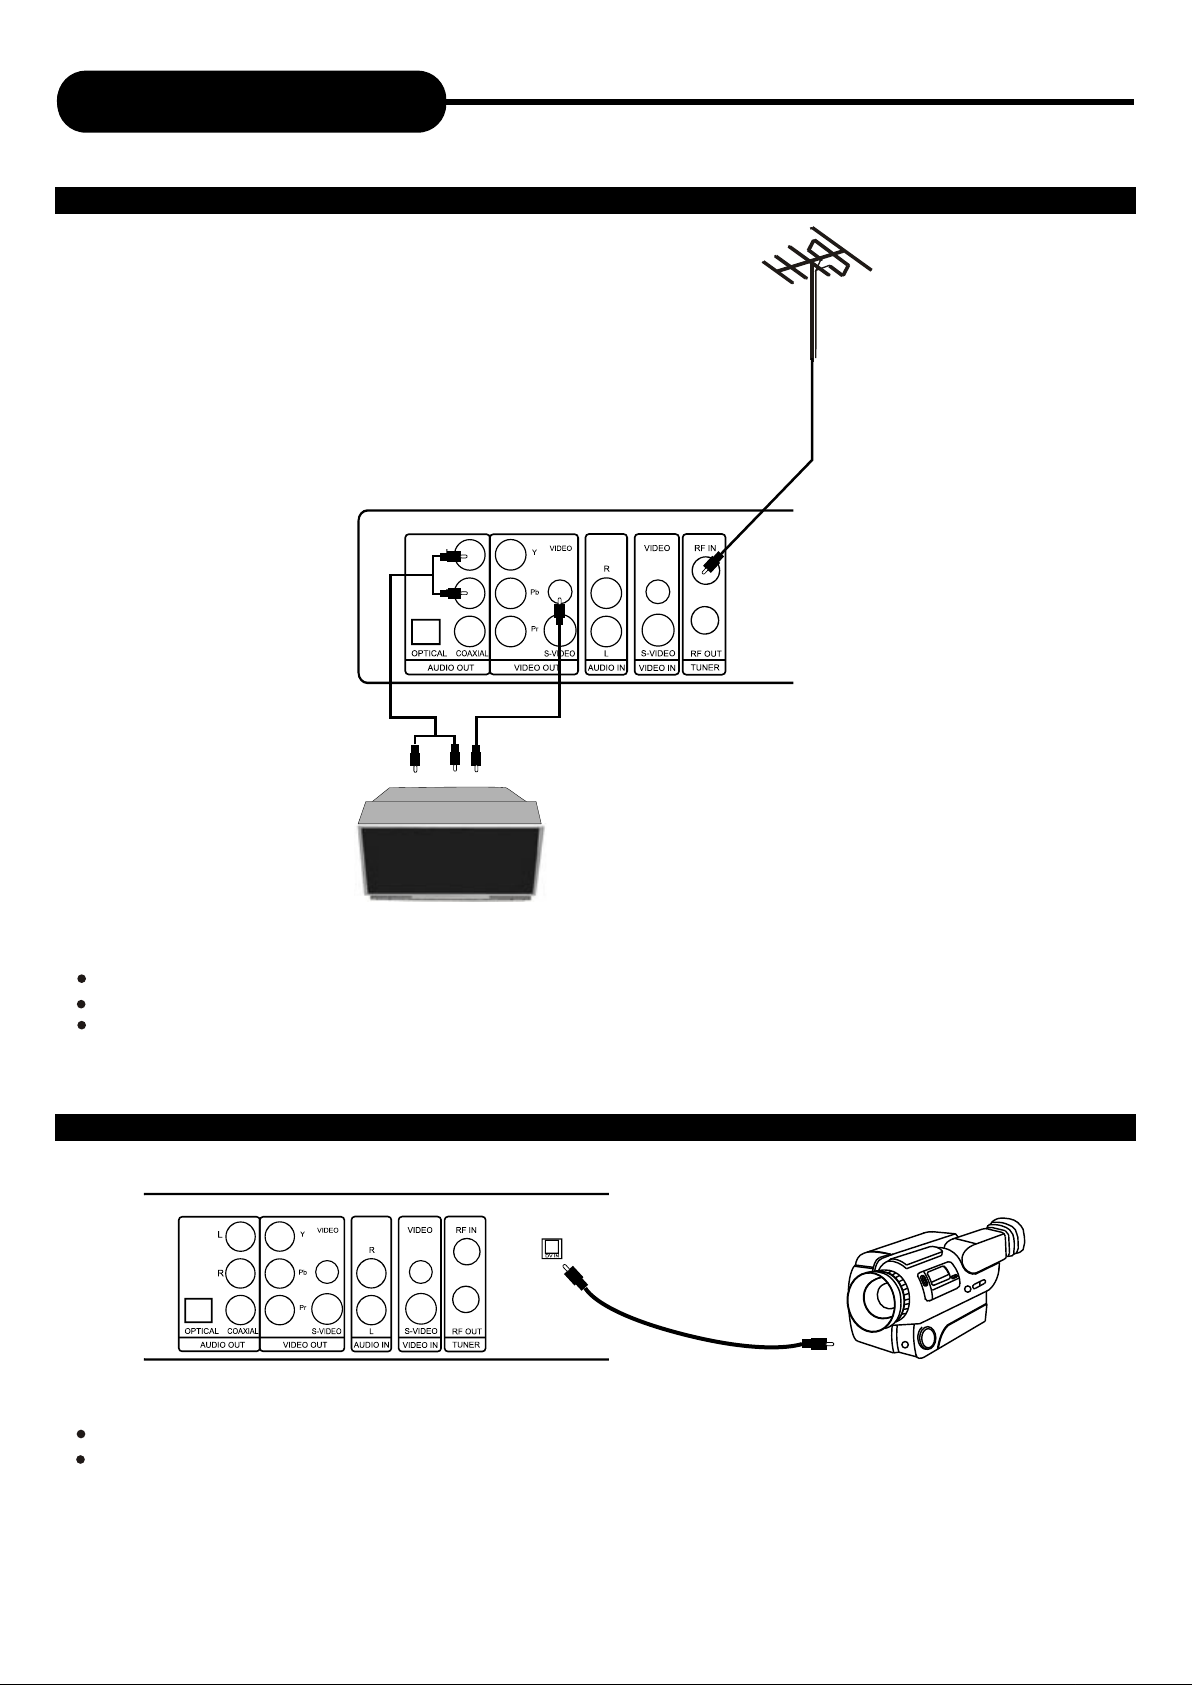
CONNECTION FOR TV TUNER
YOUR RECORDER
Signal Input
Signal Output
NOTE
Refer to the manual of the connected TV.
Turn off the power and unplug both units before setting up any connections.
RF out is signal pass-thru ONLY. Use A/V, S-Video, or Component outputs for playback. For TV without A/V inputs,
an RF Modulator Accessory RF-150 will be required.
CONNECTION WITH A DIGITAL VIDEO CAMCORDER
NOTE
Refer to the manual of the connected system.
Turn off the power and unplug both units before setting up any connections.
9
Page 11
Connection
Connection
THE RECORDER ALLOWS YOU TO ENJOY OR RECORD PROGRAMS WITH SIGNAL FROM AV SYSTEMS SUCH
AS VCR, DVD PLAYER, ETC.
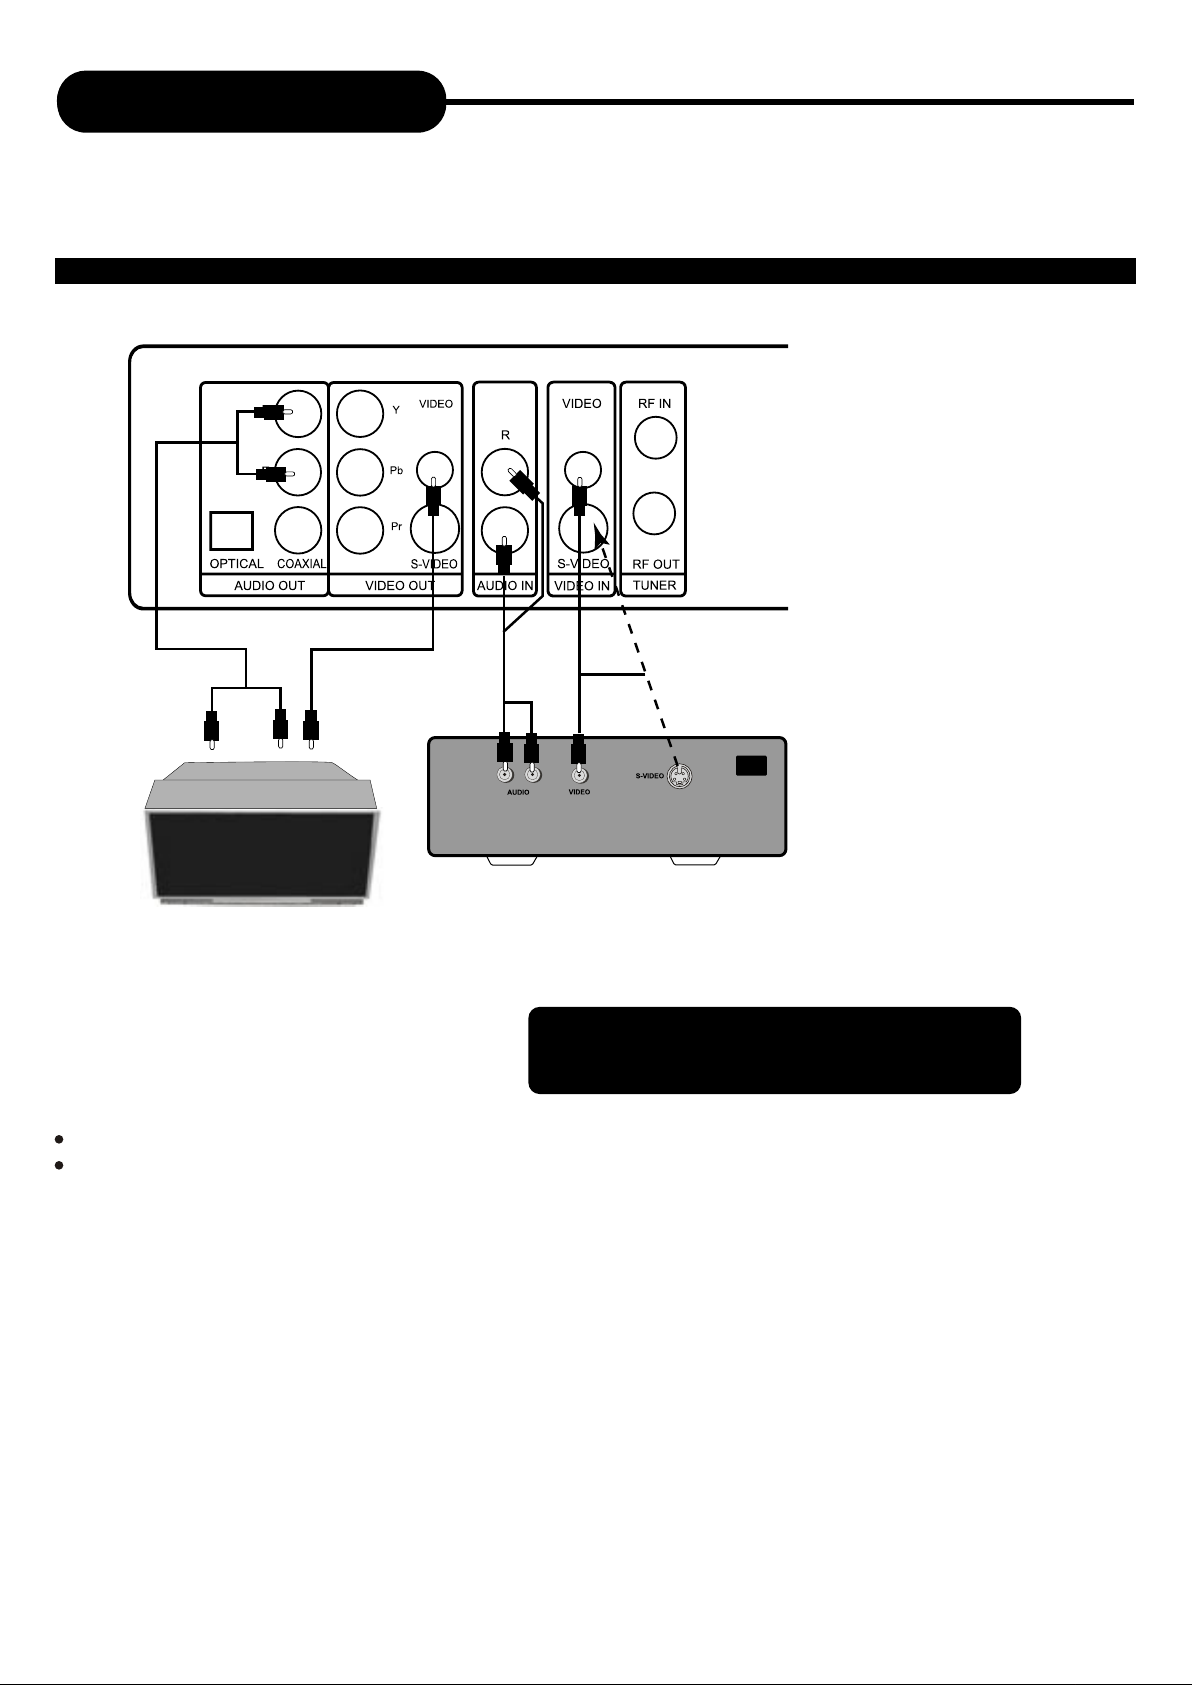
CONNECTION FOR AV SIGNAL (AV REAR INPUT)
YOUR RECORDER
Audio In
or
External Signal AV
TV Set
Connect your recorder with the S-Video cable, if the Signal
Source has an S-Video input. Do not connect the yellow
video cable if using the S-Video cable.
NOTE
Refer to the manual of the connected system.
Turn off the power and unplug both units before setting up any connections.
Video In
10
Page 12

Connection
POWER
NEXTPREV
RECORD
INPUT
CH+CH-
OPEN/CLOSE
VIDEO
R ---- AUDIO ---- L
DVD PLAYER & RECORDER
Connection
CONNECTION FOR AV SIGNAL (A/V FRONT INPUT)
RECORDER REAR
RECORDER FRONT
Audio Out
Video Out
EXTERNAL SIGNAL AV
S-VIDEO
Video In
Audio In
AUDIO
VIDEO
Connect your recorder with the S-Video cable, if the Signal
Source has an S-Video input. Do not connect the yellow
video cable if using the S-Video cable.
NOTE
Refer to the manual of the connected system.
Turn off the power and unplug both units before setting up any connections.
11
Page 13

MP3 & Progressive Scan
WHAT IS MP3?
MP3 refers to a new format of music files available for playback over the internet. The popularity of MP3 allows
people to download music from MP3 websites onto ones home computer.
WHAT IS PROGRESSIVE SCAN?
Progressive Scan creates a picture with double the scan lines of traditional component video pictures and
creates a sharper image. The advantages of progressive scan video output are reduced picture flickering and
motion artifacts as well as a sharper image on large screens.
This product incorporates copyright protection technology
that is protected by method claims of certain U.S. patents
and other intellectual property rights owned by Macrovision
Corporation and other rights owners. Use of this copyright
protection technology must be authorised by Macrovision
Corporation, and is intended for home and other limited
viewing uses only unless otherwise authorised by
Macrovision Corporation. Reverse engineering or
disassembly is prohibited.
It is forbidden by law to copy, broadcast, show, broadcast on
cable, play in public, and rent copyrighted material without
permission.
DVD video discs are copy protected, and any recordings
made from these discs will be distorted.
"DTS" and "DTS Digital Out" are trademarks of Digital
Theater Systems, Inc.
Manufactured under license from Dolby Laboratories.
"Dolby" and the double-D symbol are trademarks of Dolby
Laboratories. Confidential Unpublished works.
© 1992-1997 Dolby Laboratories, Inc. All rights reserved.
12
Page 14

Playing Back a Disc
PLAYING A NORMAL DISC
1. Power on your recorder.
2. Insert a DVD disc.
3. Press direction keys or the number buttons to select the title.
OPEN/CLOSE
Title 1
Title 3
Title 2
Title 4
4. Press the SELECT or PLAY button.
The DVD video player will start playback from the title selected.
5. To remove the disc, press the OPEN/CLOSE button.
SELECT
PLAY
13
Page 15

Playing Back a Disc
PLAYING A DVD+RW OR DVD+R DISC
Index Picture Screen
1.
2.
3.
4.
1. TITLE
01/01/00-12:14PM
SP 00:00:20
4. TITLE
01/01/00-12:14PM
HQ 00:00:20
1. TITLE
01/01/00-12:14PM
SP 00:00:20
2. TITLE
01/01/00-12:14PM
HQ 00:00:20
5. TITLE
01/01/00-12:14PM
SP 00:00:20
PREV
3. TITLE
01/01/00-12:14PM
SLP 00:00:20
6. TITLE
01/01/00-12:14PM
EP 00:00:20
NEXT
Description:
1. The name of the pre-recorded. The default is
TITLE.
2. The date and time of the record.
3. The quality.
4. Length of the record.
1. Power on your recorder.
2. Insert a DVD+RW or DVD+R disc.
The index pictures will appear on the screen as above.
14
Page 16

Playing Back a Disc
PLAYING A DVD+RW OR DVD+R DISC
3. Press the OPEN/CLOSE button
This will open the disc tray and allow for the placement of a playable disc
with the playback side down.
4. Use direction keys (UP/DOWN/RIGHT/LEFT) to highlight the item
you desired.
5. Press SELECT or PLAY to start playback of the title
you selected.
When PREV is highlighted, press SELECT, the previous index pictures will
display on the screen. When it reaches the first one, if press PREV again,
the Index Picture Screen can only be updated.
When NEXT is highlighted, press SELECT, the next index pictures will
display on the screen. When it reaches the last one, if press NEXT again,
the Index Picture Screen can only be updated.
SELECT
OPEN/CLOSE
UP/DOWN
/RIGHT/LEFT
PLAY
STOP
6. Stop playback
Press the STOP button once to stop the player; press the PLAY button to
resume playing.
To playback from the start, press the STOP button twice then press the
PLAY button.
Note:
After finishing playback of all titles contained on a DVD+RW or DVD+R
disc, it will return to the Index Picture Screen.
15
Page 17

Playing Back a Disc
GENERAL FEATURES
All playback operation can be realized by the navigation.
During playback, press NAVIGATION to access the control bar:
Control bar is a collection of icons. Those icons are presentations of commands or information that needed to finish
a function. The details of every functions see below:
Press RIGHT/LEFT to highlight one icon and press SELECT to enter it, press UP/DOWN to select a item,
press SELECT.
Press NAVIGATION again to cancel the control bar
Playback mode Set your preferable
playback mode such as PROGRAM,
RANDOM and various repeat mode.
Playback control Control playback by
various setting such as FAST
FORWARD, FAST REVERSE, PAUSE,
STOP,etc.
Title Select to choose an available title
by inputting numbers.
Chapter Select to choose an available
chapter by inputting numbers.
Angle Select your desired camera
angle, if available.
Audio Select your desired audio
setting, if available.
Subtitle Select to choose an available
subtitle by inputting numbers.
Timer Goto the point you want to start
from by inputting the time.
16
Page 18

Playing Back a Disc
GENERAL FEATURES
1. Fast forward playback
Press during normal playback.
The speed will cycle with each press as: FF2, FF4, FF16, FF32 or play.
Press PLAY to resume normal playback.
2. Fast reverse playback
Press during normal playback.
The speed will cycle with each press as: FR2, FR4, FR16, FR32 or play.
Press PLAY to resume normal playback.
3. Pause playback
Press PAUSE/STEP during normal playback to pause playback and
Press PLAY to resume normal playback.
4. Frame advance
Press PAUSE/STEP during normal playback.
One frame is advanced each time you press PAUSE/STEP.
Press PLAY to resume normal playback.
PLAY
ZOOM
REVERSE/
FORWARD
PAUSE/STEP
5. Slow
Press the SLOW button during playback
The playback speed becomes 1/2, 1/4, 1/8 of the normal speed or
normal play each time you press the SLOW button.
Note:
The above features vary depending on the disc type such as MP3, Audio CD, DVD+RW/DVD+R etc.
17
Page 19

Locating a Specific Title, Chapter or Track
DVD VIDEO DISCS ARE NORMALLY DIVIDED INTO TITLES AND SUB-DIVIDED INTO CHAPTERS.
SIMILARLY, CD'S (AUDIO, HDCD, and MP3) ARE DIVIDED INTO TRACKS. YOU CAN CONVENIENTLY
LOCATE ANY SPECIFIC TITLE, CHAPTER, OR TRACK WITH THIS DVD PLAYER.
Chapter 1 Chapter 2 Chapter 1 Chapter 2 Chapter 3
TITLE 1
DVD Video Disc
TITLE 2
Track 2
Track 3 Track 4 Track 5Track 1
Audio CD
LOCATING A TITLE USING THE TITLE MENU
You can locate a specific title using the title menu function, if a DVD video disc contains a title menu.
1. Press the TITLE button
Title 1
On the TV screen, the title menu will appear.
2. Press the button to select the title
you want.
Title 3
3. Press the SELECT button
This will cause the DVD video player to start playback from
chapter 1 of the title selected .
Example of a title menu.
NOTICE
There are some disc that does not respond to this function.
If different instructions appear on the TV screen, follow those instructions. The instructions above are describe
the basic procedure, but procedures may vary depending on the contents of the DVD video disc.
Title 2
Title 4
LOCATING A SPECIFIC CHAPTER OR TRACK
This player allows you to locate consecutive chapters or tracks.
Press the SKIP or button repeatedly to display the requested chapter or track
The player starts playback from the selected chapter or track.
How to locate proceeding chapters or tracks
When you press the SKIP button, the player starts playback from the beginning of the
preceding chapter or track.
How to locate succeeding chapters or tracks
When you press the SKIP button, the player starts playback from the beginning of the
succeeding chapter or track.
Notice: On some discs the titles may not display the sub-divided chapters.
NEXTPREV
18
Page 20

Locating a Specific Title, Chapter or Track
LOCATING A TITLE
If a DVD video disc contains title numbers, you can locate a specific title by directly selecting a title number.
1. Press GOTO during playback.
The control bar will display on the screen.
2. With the icon highlighted, input the number of a available title,
then press SELECT to confirm it.
e.g To select title 2
2
3. To select your desired chapter, press GOTO to highlight the icon ,
and input the number of a available chapter, then press SELECT.
4. If you want to start playback from some point, press GOTO to highlight the icon , and
input the time, then press SELECT.
Note:
The function is invalid on MP3 disc.
For CD disc, GOTO is used for track/time selection.
For DVD+RW/+R, it cannot function by time searching.
GOTO
SELECT
19
Page 21

Playing Repeatedly
THIS RECORDER ALLOWS YOU TO PLAYBACK A SPECIFIC TITLE, CHAPTER, TRACK, OR SEGMENT
REPEATEDLY. (TITLE REPEAT, CHAPTER/TRACK REPEAT, A-B REPEAT)
HOW TO REPEAT A TITLE, CHAPTER OR TRACK
1. Press the REPEAT button during playback.
The repeat mode changes, each time you press the REPEAT
button.
Repeats the same chapter.
Repeats the same title.
Repeat the whole disc.
Resumes normal playback.
REPEAT
NAVIGATION
HOW TO REPEAT A SPECIFIC SEGMENT
1. Press NAVIGATION to access the control bar.
2. Highlight by pressing RIGHT/LEFT, press SELECT.
3. Use UP/DOWN to select A-B and press SELECT at the beginning of the segment in which
you want to repeat playback (point A).
2. Press SELECT again at the end of the segment (point B)
The player will automatically return to point A and
start to repeat playback of the selected segment (A-B).
3. Highlight by pressing RIGHT/LEFT, press SELECT.
Use UP/DOWN to select NORMAL and press SELECT to resume normal playback.
Note:
There are two repeat modes for MP3/CD disc. On CD disc, they are track repeat and disc repeat,
and on MP3 disc, they are repeat song and repeat directory.
20
Page 22

Playing in Random Order
THIS RECORDER ALLOWS YOU TO PLAYBACK TITLES, CHAPTERS WITHIN A TITLE, OR
TRACKS IN RANDOM ORDER.
PLAYING TITLES IN RANDOM ORDER
1. During normal playback press the RANDOM button.
The player will start random playback now.
RANDOM
RANDOM
2. Press RANDOM again to resume normal playback.
Note:
The player will go to another chapter or track and start playback, if you press the SKIP button , during random playback.
When MP3/CD disc is played back, the display icon is different from each other.
21
Page 23

Selecting Camera Angles, Languages & Audio Settings
THIS RECORDER ALLOWS YOU TO SELECT FROM SEVERAL DIFFERENT ANGLES AND LANGUAGES.
ANGLE 1 ANGLE 2
Buenas tardes
Selecting the camera angle
Good afternoon Bonsoir
Selecting a language
HOW TO CHANGE THE CAMERA ANGLE
If the video on the DVD was recorded with multiple angles, you have the
option to change the camera angle of the scene you are watching.
Press the ANGLE button while playing back a scene recorded with
multiple angles.
ANGLE
AUDIO
You may only press the ANGLE button when the angle icon
is shown on the DVD display.
Each time you press the ANGLE button, the angle will change.
Note:
The angle function will not work on DVD video discs that does not contains recorded multiple angles.
During still playback, you are able to change the camera angle. When you resume to normal playback, the camera
angle changes to the new settings.
The angle icon indicator will illuminate while playing back a title that contains at least one scene recorded from multiple angles.
HOW TO SELECT A LANGUAGE & PLAYBACK AUDIO SETTING
This player allows you to select a preferred language and sound recording system from
those included on the DVD video disc.
1. Press the AUDIO button during playback
2. Press the AUDIO button repeatedly to cycle through the options
Note:
The player returns to the initial default settings when you turn on the player or replace a disc.
The player plays a default sound when unsupported format is selected.
On MP3/CD disc, AUDIO is used for the selection of LEFT, RIGHT and STEREO.
22
Page 24

Playing in a Favourite Order
THIS PLAYER ALLOWS YOU TO PROGRAM UP TO 99 ITEMS INTO MEMORY AND THEN PLAY
THEM BACK IN THAT ORDER (PROGRAM/PLAYBACK).
HOW TO SET TITLES, CHAPTERS, OR TRACKS IN A FAVOURITE ORDER
1. Press NAVIGATION to access the control bar.
2. Highlight by pressing RIGHT/LEFT, press SELECT.
3. Use UP/DOWN to select PROG and press SELECT, two volumes
will appear on the screen.
The left volume displays all titles available on the disc.
TITLE
TITLE 01
TITLE 02
The right volume allows you to edit titles in your favourite order.
4. In the left volume, use UP/DOWN to select one title, and press
ADD/CLEAR to add it to the right volume.
You can also select one chapter by pressing SELECT after highlighting
the title.
5. To clear one title you have added in the right volume, highlight
the one and then press ADD/CLEAR to clear it. Use RIGHT/LEFT to
move the cursor between the volumes.
FAVOURITE/PROGRAM
TITLE 01 CHAPTER 02
TITLE 01 CHAPTER 03
NAVIGATION
6. Press RETURN to return the control bar.
Select , use UP/DOWN to select NORMAL and press SELECT to
resume normal playback.
Note:
On the MP3/CD disc, there are some difference on OSD.
23
Page 25

Selecting Subtitles
THIS RECORDER ALLOWS YOU TO DISPLAY THE SUBTITLES FROM THOSE INCLUDED ON
THE DISC ON TO YOUR TV SCREEN.
Good afternoon Bonsoir
HOW TO DISPLAY SUBTITLES
Press the SUB-T button during playback to choose
one of the subtitle available on the disc, or turn the
subtitle off.
Buenas tardes
SUBTITLE
Note:
Due to the nature of some DVD's you may not be able to turn off the subtitles as they will appear on
screen automatically.
As you press the SUB-T button, the subtitles may not appear immediately during some scenes.
If the subtitles continue to show on your TV even after the DVD has been turned off, please check the closed
caption settings on your TV.
24
Page 26

KODAK Picture CD/JPEG/MP3 Playback
YOU CAN USE YOUR RECORDER TO VIEW PHOTOGRAPHS OR ENJOY SONGS STORED ON A CD-R
OR CD-RW DISC. THE PHOTOGRAPHS ON THE DISC NEED TO BE SAVED IN THE JPEG FILE
FORMAT. AND THE SONGS SHOULD BE SAVED IN MP3 FORMAT.
JPEG/KODAK Picture CD Playback
1. Press OPEN/CLOSE.
Place the CD on the disc tray, and press it again to close the
tray. A menu will soon appear on the screen.
For KODAK picture CD the slide show starts automatically
without the menu display.
FILES & DIRECTORY
\
2. Use direction keys LEFT <, RIGHT > to navigate among
the icons and volumes. When the left volume is highlighted,
use UP/DOWN to highlight one picture or a folder.
Press PLAY or SELECT to start the slideshow from which
MM0001.JPG
MM0002.JPG
MM0003.JPG
MM0004.JPG
MM0005.JPG
MM0006.JPG
MM0007.JPG
MM0008.JPG
picture you highlighted.
Press STOP or PAUSE/STEP on the remote to stop or pause
the slideshow.
You can also control the playback by the menu:
Highlight by press LEFT or RIGHT, press SELECT, then use UP or DOWN to set the three playback modes,
PLAY, PAUSE or STOP.
FAVOURITE/PROGRAM
3. To change a slideshow mode, you should first highlight , press SELECT, then use UP or DOWN to select
one. There are 17 modes available, such as "From top to down", "From down to top", "From left to right", "From
right to left", "Extend from centre V", "Extend from Centre H", etc.
4. Highlight , press SELECT, use UP or DOWN to select one command:
a. NORMAL: Play current list one by one.
b. S-RPT Repeatedly play current item.
c. D-RPT Repeatedly play all the items in current directory.
d. PROG: Play the favourite tracks list repeatedly.
Note: You should program in each track first: highlight your desired one in the left volume, press ADD/CLEAR to
add it to the right volume (FAVOURITE/PROGRAM), if you want to remove one in your favourite list, highlight it and
press ADD/CLEAR.
e. RANDOM: Play items in random mode.
5. To rotate a picture, press the direction buttons UP/DOWN/RIGHT/LEFT or highlight ,
press SELECT and then press UP/DOWN to select Rot 0, Rot 90, Rot 180 or Rot 270.
6. To Zoom in/out a picture, press or , the zoom ranges from 12% to 400%
By the menu, highlight , press SELECT, your can use UP or DOWN to select a zoom rating.
7. For Kodak Picture CD, press MENU/RETURN to access an index thumbnail. Then you can use direction
keys to navigate among them.
Note:
In the menu, the icon shows the played disc belongs to a VIDEO disc.
25
Page 27

KODAK Picture CD/JPEG/MP3 Playback
MP3 Playback
1. Press OPEN/CLOSE.
Place the CD on the disc tray, and press it again to close the
tray. A menu will soon appear on the screen.
2. Use direction keys LEFT < , RIGHT > to navigate among
the icons and volumes. When the left volume is highlighted,
use UP/DOWN to highlight one song or a folder.
Press PLAY or SELECT to start the playback from which song
file you highlighted.
FILES & DIRECTORY
\
A LITTLE BIT MORE
CARIBBEAN BLUE M
HEAL THE WORLD
IF YOU'D LOVE ME
KISS FROM ROSE
LARGER THAN LIFE
RIGHT HERE MP3
OTHER MP3
FAVOURITE/PROGRAM
Press STOP or PAUSE/STEP on the remote to stop or pause
the playback.
You can also control the playback by the menu:
Highlight by press LEFT or RIGHT, press SELECT, then use
UP or DOWN to set the three playback modes, PLAY, PAUSE or STOP.
3. To change an audio channel, press AUDIO on the remote, each time you press it, it cycles among LEFT,
RIGHT and STEREO.
You can also switch the channel by the menu:
Highlight by press LEFT or RIGHT, press SELECT, then use UP or DOWN to select it.
4. Highlight press SELECT, use UP or DOWN to select one command:
a. NORMAL: Play current list one by one.
b. S-RPT Repeatedly play current item.
c. D-RPT Repeatedly play all the items in current directory.
d. PROG: Play the favourite tracks list repeatedly.
Note: You should program in each track first: highlight your desired one in the left volume, press ADD/CLEAR to
add it to the right volume (FAVOURITE/PROGRAM), if you want to remove one in your favourite list, highlight it and
press ADD/CLEAR.
e. RANDOM: Play items in random mode.
Note:
In the menu, the icon shows the played disc belongs to a AUDIO disc.
And the numbers under the icon display the elapsed time/remain of the current song. To switch from them,
highlight the icon, use UP or DOWN to select the display time.
26
Page 28

Using the On-Screen Display
THIS PLAYER ALLOWS YOU TO VIEW STATUS AND DISC INFORMATION ON YOUR TV SCREEN.
CHECKING THE OPERATION STATUS
With this function, you can view on your TV the following information:
- Current title
- Current chapter
-Time elapsed
-Time remain
Press DISPLAY button during DVD playback.
CURRENT TITLE/TOTAL TITLE
CURRENT CHAPTER/TOTAL CHAPTER
TITLE ELAPSED
TITLE REMAIN
CHAPTER ELAPSED
CHAPTER REMAIN
DISPLAY
27
Page 29

Setting the Parental Lock
YOU CAN USE THE PARENTAL LOCK FUNCTION ONLY WITH DVD'S EQUIPPED WITH THE PARENTAL
LOCK FEATURE.
VIOLENT SCENE
DVD PLAYER & RECORDER
OPEN/CLOSE
VIDEO
R ---- AUDIO ---- L
POWER
RECORD
CH+CH-
NEXTPREV
INPUT
SETTING THE PARENTAL LOCK
DVD equipped with the parental lock function are rated according to
their content. The contents allowed by a parental lock level and the
way a DVD can be controlled may vary from disc to disc. For
example, if the disc allows it, you could edit out violent scenes
unsuitable for children and replace them with more suitable scenes,
or lock out playback of the disc all together.
PAUSE
PLAY
STOP
REV
FWD
SETUP
1. Press STOP button twice during playback.
2. Press SETUP during stop status.
3. Highlight the PLAY icon by pressing
RIGHT/LEFT.
The menu appears on the TV screen.
p
u
Set
Playback
TV aspect ratio
Rating level
Digital audio output
Pan Scan
OFF
RAW
4. Use UP/DOWN to select Rating Level, press
SELECT button.
5. Input your password by numbers, highlight
OK and press SELECT.
6. Press SELECT, the sub-menu of Set Rating
Level appears, use UP/DOWN to select one rating,
press SELECT to confirm it.
Set Rating Level
Set rating level
OFF
New password
New
OK
1 Kid Safe
2. G
3 PG
4 PG 13
5 PG-R
6 R
7 NC-17
8 Adult
Off
7. Highlight OK and press SELECT to save your
setting.
8. Press SETUP button to exit setup,
press PLAY button to start.
TO CHANGE YOUR PASSWORD
1. Follow step 1-6 to select "New".
2. Enter new password.
3. Re-enter to confirm your new password.
5. Highlight OK and press SELECT to save it.
6. Press SETUP button to exit.
The preset password is 3308
28
Page 30

Customising Function Settings
THIS PLAYER ALLOWS YOU TO CUSTOMISE THE PERFORMANCE TO YOUR PERSONAL
PREFERENCES.
SETUP MENU
GNRL
PLAY
REC LANGL
TUNER
CLOCK
DISPLAYING THE SETUP MENU SCREEN
The SETUP MENU screen asks you to select a setting category from General, Speaker, Audio and
Preferences. The selected category will provide you the setting details using the succeeding screen.
Main Page
GNRL
PLAY
REC
LANG
TUNER
CLOCK
1. Press SETUP during stop
status.
2. Press direction keys
(UP/DOWN/RIGHT/LEFT) to
select category (highlight),
then press SELECT.
General Setup
Screen saver
Progressive/Interlace
Video output
Tuner mode
Video output format
Restore factory settings
Playback Setup
TV aspect ratio
Rating level
Digital audio output
Closed captions
Record Setup
Auto chapter marker
Default source
Default quality
Language Setup
OSD language
Menu language
Subtle language
Audio language
Details see page 31
Off*
On
SLP
EP
SP*
HQ
RGB*
YUV
PAL*
NTSC
16:9
Pan Scan*
Letter box
F-A/V*
R-A/V
R-SV
DV
TUNER
English*
Spanish
French
German
English*
Chinese
...........
Original
On*
Off
Interlace*
Progressive
OK
Off
RAW*
LPCM
On*
Off
English*
Chinese
...........
Original
Off*
English
Chinese
...........
Original
PAL BG*
PAL DK
PAL I
SECAM L
SECAM DK
3. Press SETUP to exit the
setup menu.
* Factory defaults
29
Date Time Setup
Date (mm/dd/yy)
Time (hh:mm:ss)
AM/PM
01/01/00
01:15:01
AM
PM*
Page 31

Recording Options
CHANNEL SEARCH
To record TV programs, you should search TV
channels first.
1. Press SETUP to access the setup menu.
2. Highlight the icon GNRL, press SELECT to set your
Auto scan channels
appropriate tuner mode among PAL BG, PAL DK, PAL
I, SECAM L and SECAM DK, details refer to the
attached table, or consult your local TV dealer.
Modify channel information
Sort channel order
3. Press RIGHT/LEFT to highlight the icon TUNER and
press SELECT to setup it.
4. Use the UP/DOWN button to highlight SCAN and press SELECT.
It will search channels automatically.
The channel cannot be found will be skipped.
During auto-searching, press STOP to cancel searching.
CHANNEL EDIT
Channel NO. & Name
You can edit channel information by the second item
"Modify channel Information".
1. Highlight the "Modify Channel Information" to enter
Frequency
Video mode
Sound mode
Skip
Fine tuner
the sub-menu as the right figure.
To browse the the channels scanned:
Use CH+/CH- to switch to the channel or input the assigned
number of the channel directly.
TUNER
SCAN
EDIT
SORT
Channel Edit
CH/000/CH003
46.25 MHz
PAL
BG
No
OK
To rename the channel you have scanned:
Use the direction keys to select 'Channel NO. &name" then
press SELECT. A keyboard will appear on the screen. Input
the name as you desired by the direction keys and the
SELECT.
Press RETURN to go to the upper menu.
Channel Edit:
Channel: 000
Frequency: 46.0MHz
Finetune
To search channels by manual:
Use the direction keys to select 'Frequency", then press
LEFT/RIGHT to start the manual scan. You can search your
desired channel one by one.
Confirm
To stop the scan, press the STOP key.
To change the video/sound mode:
Highlight "Video mode" / Sound mode", press SELECT, there are several modes available:
Video mode: SECAM / PAL
Sound mode: L / BG / DK / I
Note: you should select your appropriate one suitable to your local TV signal.
Cancel
30
Page 32

Recording Options
To skip/unskip the current channel:
Highlight the "Skip", press SELECT to select Yes or No by the
UP/DOWN direction key, then press SELECT to enter it.
To fine tune the current channel:
1. If the picture of the channel scanned is poor, you can use the
direction buttons to highlight "Fine tune".
2. Use RIGHT/LEFT direction key to tune the picture to the best
performance.
Note:
Press RETURN to return to the upper menu.
SORT CHANNEL ORDER
You can sort the channels in your favourite order.
1. Highlight the "Sort channel order" to enter the submenu as the right figure.
To sort the channels:
a. Use the UP/DOWN to highlight each channel, press RIGHT
to select the channel you want to adjust the sequence.
b. On the right screen, it appears, use UP/DOWN to select the
position you want to insert it.
c. Press LEFT to insert it.
As the above steps, you can order the channels one by one.
Press RETURN to confirm your operation.
Channel Edit
Channel NO. & Name
Frequency
Video mode
Sound mode
Skip
Fine tuner
OK
Channel No. Name Skip Info.
Channel Sort
CH000
CH001
CH002
CH003
CH004
CH000
CH001
CH002
CH003
CH004
Unskipped
Unskipped
Unskipped
Unskipped
Unskipped
CH/000/CH003
46.25 MHz
PAL
BG
No
31
Page 33

Recording Options
NORMAL RECORDING
1. Make connections illustrated as page 9-11.
2. Insert a recordable DVD+RW or DVD+R into the recorder.
3. Press RECORD to access the Control Bar.
4. Press RIGHT/LEFT to highlight the icon , and press SELECT and UP/DOWN to select the
input source which you have connected as step 1.
F-A/V: Front Audio/Video Input (on the front panel)
R-A/V: Rear Audio/Video Input (on the rear panel)
R-SV: Rear S-Video Input (on the rear panel)
DV: I.link In (on the rear panel)
Each channel (you can select it by pressing CHANNEL+/- or input the assigned number of the
channel to select your desired one directly)
5. Press SELECT to confirm your selection.
6. Press RIGHT/LEFT to highlight the icon , and press SELECT and UP/DOWN to select the
record quality:
HQ Perfect quality, nearly 64 minutes in a blank disc.
SP Standard Play quality, nearly 130 minutes in a blank disc.
EP Extend Play, nearly 250 minutes in a blank disc.
SLP Standard Long Play, nearly 366 minutes in a blank disc.
After your selection, press SELECT to confirm it.
7. Press RECORD to start recording.
If you want to stop recording, press STOP.
If the DVD+RW or DVD+R is new, it will take about three minutes to stop.
Note:
It's up to 124 chapters can be recorded on a disc.
There are 99 chapters in a title at most.
32
Page 34

Recording Options
ONE-TOUCH RECORD
1. During normal recording, press RECORD, the recorder will auto stop in 30 minutes.
2. The record time will extend for another 30 minutes with each press.
The length of recording time is determined by disc capacity and record quality.
With your setting, if it will exceed the capacity of the disc, OTR will be cancelled, and switched to normal
record.
3. If you want to stop recording, press STOP.
HOW TO SWITCH TO PLAYBACK MODE
When the recording is suspended, you can press PLAY to switch to normal playback mode.
CLOCK SETUP
1. During stop status, press SETUP to access the Setup Menu.
2. Use RIGHT/LEFT to highlight the CLOCK icon as the
right figure.
3. Use UP/DOWN to highlight the Date and Timer
respectively.
4. With "Date (mm/dd/yy)" highlighted, press SELECT
and input the local date by numbers, press SELECT
again.
5. With "Time (hh:mm:ss)" highlighted, press SELECT
and input the local time by numbers, press SELECT again.
Note:
If you want to cancel input, press RETURN.
Date &Time Setup
01/01/00Date (mm/dd/yy)
02:03:25Time (hh:mm:ss)
33
Page 35

Recording Options
TIMER RECORD
1. First setup the clock of your system as "CLOCK SETUP" on page 30.
It is recommended to setup your local date and time.
2. Press TIMER, the record scheduler will pop up.
Record scheduler
SourceNO
1
2
3
4
5
6
R-AV
R-AV
R-SV
Quantity
EP
SP
HQ
Date
01/01/00
02/01/00
03/01/00
Start
12:14
12:14
12:14
AM/PM
PM
PM
PM
End
12:44
12:44
12:44
SELECT
TIMER
Note:
If you want to delete a schedule, highlight the one, press ADD/CLEAR.
3. Use UP/DOWN to select one schedule, and press SELECT to access Item Editor as below:
In each item you can also use direction keys to highlight
and press SELECT to choose your desired setting:
Signal input source, details see page 32, step 4.
Record quality, details see page 32, step 6.
Record frequency, once, daily or weekly.
mm/dd/yy
Start time for timer recording
AM/PM selection
End time for timer recording
Source
Quality
Once
Start
AM/PM
End
Item Editor
R-AV
EP
01/01/00
01:44
PM
02:14
OK Cancel
STOP
4. Select OK to save your setting.
5. In five minutes before it is ready to record the scheduled, it appears a Record Prompt dialog, affirm press
OK, abolish press CANCEL, and if without operation for a moment it will record the scheduled automatically.
Note:
In standby mode, your recorder can wake up in 2 minutes before recording.
During recording, you can press STOP to suspend the recording.
A DVD+RW/DVD+R can record for up to 366 minutes, up to 48 titles.
34
Page 36

Editing
EDITING A TITLE OF DVD+RW
1. Insert a recorded DVD+RW on the disc tray.
The Index Picture Screen pops up.
2. Use the direction keys to highlight the title which you want to edit.
When PREV is highlighted, press SELECT, the previous index pictures will display on the screen. When it reaches
the first one, if press PREV again, the Index Picture Screen can only be updated.
When NEXT is highlighted, press SELECT, the next index pictures will display on the screen. When it reaches the
last one, if press NEXT again, the Index Picture Screen can only be updated.
On the screen select PREV/NEXT to view the previous/next page of titles.
3. Press EDIT, the title edit bar appears on the screen while playing back.
Press RIGHT/LEFT to highlight one icon and enter it, press UP/DOWN to select a sub-item.
View current title / total title
View current chapter / total
chapter
Current operation status
Chapter editing Select to add one
chapter marker, or delete the
current / all chapter markers, details
see the next page.
4. Press EDIT to quit the menu.
Chapter hide or unhide Select to
hide the current chapter, details see
the next page.
Title face or Title name Select to
set the current image played back to
the face of the title or select to name
the current title, details see the next/page.
Timer Goto the point you want to
start from by inputting the time,
details see page 18,24.
35
Page 37

Editing
CHAPTER EDITING
From the control bar, select the fourth icon, press UP/DOWN repeatedly, it will cycle as following:
When is selected by pressing SELECT, a new chapter marker will be added to the current point.
When is selected by pressing SELECT, the marker of the current chapter will be deleted.
When is selected by pressing SELECT, all of the chapter markers in the current title will be
deleted.
Note:
From the second icon in the control bar, the above operation can be viewed.
If only one chapter is available in the current title, there is only to select.
CHAPTER HIDE OR UNHIDE
From the control bar, select the fifth icon, press SELECT.
When the icon displays C-hide, it shows the current chapter is visible, and you can select it to hide it by
pressing SELECT.
When the icon displays C-unhide, it shows the current chapter is invisible, and you can select it to unhide it
by pressing SELECT.
36
Page 38

Editing
TITLE ICON AND TITLE NAME
From the control bar, select the sixth icon, press UP/DOWN repeatedly, it will cycle as following:
When you want to set the current frame as the icon of the current title which miniature picture will appear in
the Index Picture Screen, press SELECT with T-ICON displayed.
You can also rename the current title by selecting , press SELECT with T-NAME displayed.
On the screen, there appears a keyboard:
Title name:
B
A C D E F G H I J K 1 2
L N O P Q R S T U V 3 4
M 5
W
X Y Z { } _ ? . 6 7 8
Space Caps
:
Delete Clear Exit OKBkSp
Press the direction keys (UP/DOWN/RIGHT/LEFT) to highlight the one which you want to input, and press
SELECT to confirm it.
The control bars of the last line in the keyboard is for edit command.
Select OK to save the name.
Note:
The maximum length of the title name is up to 9 characters.
0
9
37
Page 39

Selecting Subtitles
Editing
EDITING A DISC OF A DVD+RW
1. Insert a DVD+RW on the disc tray
2. Press DISC OPER to access the disc editing bar
Make compatible
This operation will make the disc compatible with a
normal DVD player
Disc compatilised 0%
0%
4. With each icon highlighted by pressing RIGHT/LEFT, the corresponding description of each operation will
display on the screen, such as Disc Finalisation, Delete title, Erase disc, Disc protection, etc.
5. Press SELECT to run the operation.
38
Page 40

Selecting Subtitles
Editing
EDITING A DISC OF A DVD+RW OR DVD+R
A
This icon is selected to view the disc information.
FINALISE DISC (DVD+R only)
Highlight the icon and press SELECT. It will take a few minutes to finalise the disc.
Note:
If a DVD+R has been finalised, you can not record or edit the DVD+R any more.
If you want to make your disc compatible with the other DVD player, you should go on
FINALISE operation.
T-DEL (DVD+RW only)
When this icon is selected, it will delete the last title.
ERASE (DVD+RW only)
Press SELECT to begin erasing the disc.
LOCK (DVD+RW only)
When the icon display LOCK, it shows you can lock your current disc. If you have locked
your disc, you can’t make any changes any more except play it back, but you can unlock it
by UNLOCK.
COMPATIBLE
When the icon display COMP, it shows you can make your current disc compatible.
If you want to make your disc compatible with the other DVD player, you should go on
COMPATIBLE operation.
39
Page 41

Specifications
DVD VIDEO PLAYER/OUTPUTS/SUPPLIED ACCESSORIES
PERSONAL VIDEO RECORDER
Power supply
Power consumption
Mass
External dimensions
Signal system
Laser
SUPPLIED ACCESSORIES
Audio cable (red and white)
Remote control
220-240V AC 50/60 Hz
30W
4.14 Kg
430 x 65 x 302 mm (W/H/D)
PAL/NTSC
Semiconductor laser, wavelength 650 nm
1 pair
1
Batteries (AAA)
Video cable (yellow)
Owner's Manual
S-video Cable
Design and specifications are subject to change without notice.
2
1
1
1
40
Page 42

Trouble shooting Guide
SYMPTOMS AND CORRECTION
Check the following guide for a possible correction to a problem
before contacting customer service.
Symptom
No power
No picture
No sound
Black & White
picture
The playback
picture has
occasional distortion
Brightness is
unstable or noises
are produced on
playback pictures
The DVD video
player does not start
playback
Correction
Connect the power plug into the wall outlet securely.
Verify the connection from the DVD video output to the TV video input. Then switch TV to
appropriate mode (video 1).
Connect the video cable into the jacks securely. Refer to your television owners manual.
Connect the audio cables into the jacks securely.
Verify the connection from the DVD audio output to the TV or receiver audio input. Then switch
to the appropriate source on the receiver. Refer to your audio amplifier owners manual.
Damaged S connector (bent pin).
A small amount of picture distortion may appear because of a poor quality video/sound transfer
to disc. This is especially true of some discs manufactured between 1997-1998.
Scratched disc.
Connect the DVD player directly through the TV and not through any other source. What you're
viewing is the effect of the copy protection circuitry required on all DVD players.
Place the disc with the graphics side up.
Place the disc on the disc tray correctly inside the guide.
Make sure the disc is free from scratches & fingerprints.
Press the SETUP button to turn off the menu screen.
Cancel the parental lock function or change the parental lock level. (The Preset password is
3308.)
Turn the power off then disconnect the power plug and reinsert it back into the wall. Retry again.
MP3 won't read disc
or it skips
The remote control
does not work
properly
The recorder cannot
record.
Some keys do not
work
The image is
distorted.
Re-burn disc as the software edition used may not be compatible with the player. Check web
site for instruction.
Use new editions of software such as Voyetra Audiostation 4, Adaptec's "Easy CD Creator",
NTI or Roxio's Toast Titanium.
Make sure MP3 file are not encoded with a variable bit rate such as provided by Real Networks
Replace the batteries with new ones.
The type of the disc is wrong, it's not a DVD+RW or DVD+R disc.
The disc is recorded full.
The disc (DVD+R, DVD+RW) is locked, it should be unlocked.
The DVD+R has been finalised.
The type of the disc is wrong, it's not a DVD+RW or DVD+R disc.
The unit is in record mode or it is recording.
The setup of Interlaced or Progressive is wrong.
Press the I/P button to switch from each other.
.
41
Page 43

Attachment
Supported Media (DVD+R)
Recommend
Max Write
Speed: 4x
Max Write
Speed: 2.4x
Not Recommend
Max Write
Speed: 2.4x
Maker
MITSUBISHI
YUDEN
YUDEN
Ricoh
Ricoh
SONY
Maxwell
TDK
MITSUBISHI
CMC
DAXION(ACER)
BeAll
Total (Recommend)
Maker
ProDISC
Ritek
Ricoh
HP
Total (Not
Recommend)
Media speed
4x
4x
2.4x
4x
4x
4x
4x
4x
2.4x
2.4x
2.4x
2.4x
12
Media speed
2.4x
2.4x
2.4x
2.4x
4
Manufacture ID
MCC
YUDEN000
YUDEN000
RICOHJPN
RIDOHJPN
SONY
MAXWELL
TDK
MCC
CMC Mag
DAXON
BEALL PRO
Manufacture ID Total
PRODISC
RITEK
RICOHJPN
RICOHJPN
Media
type ID
002
T00
T01
R00
R01
D01
001
001
001
R01
AZ0
001
R01
R01
R00
R00
Product
Rev. No
0
0
0
2
2
0
0
0
0
0
0
0
0,1
1
0
1
Notes
Sample Only
Ready Now
Ready Now
Ready Now
Notes
2 types
Ricoh ID
Supported Media (DVD+RW)
Recommend
Max Write
Speed: 2.4x
Not Recommend
Max Write
Speed: 2.4x
Total (Not Recommend)
Maker
MITSUBISHI
RICOH
TDK
Total
(Recommend)
Maker
RiTEK
CMC
CMC
OPTODISC
PRODISC
MCC
Ricoh
Media speed
2.4x
2.4x
2.4x
3
Media speed
2.4x
2.4x
2.4x
2.4x
2.4x
4x
4x
7
Manufacture ID
MCC
RICOHJPN
TDK
Manufacture ID
RiTECK
CMC"null" MAG
CMC "space" MAG
OPTODISC
PRODICS
MKM
RICOHJPN
Media
type ID
A01
W01
t01
Media
type ID
001
W01
W01
OP1
W01
W11
Total
1
1
1
Total
1
1
1
1
1
1
1
Notes
Notes
Sample only
Sample only
42
Page 44

Attachment
Country Tuner Mode
Argentina
Australia
Austria
Bahamas
Barbados
Belgium
Brasilia
Canada
China
Cuba
Czech Republic
Denmark
Dominican Republic
Egypt
Estland
Finland
France
Germany
Greece
Hong Kong
Hungary
India
Indonesia
Iran
Iraq
Ireland
Israel
Italy
Jamaica
Japan
North Korea
South Korea
Kuwait
Mexico
New Zealand
Norway
Poland
Portugal
Russia
Singapore
South Africa
Spain
Sweden
Switzerland
Taiwan
United Arab Emirates
Great Britain
USA
Yugoslavia
Zaire
PAL (CN)
PAL (BG)
PAL (BG)
NTSC (NA)
NTSC (NA)
PAL (BH)
PAL (BM)
NTSC (NA)
PAL (D)
NTSC (NA)
SECAM (DK)
PAL (BG)
NTSC (NA)
PAL (BG)
SECAM (DK)
PAL (BG)
SECAM (L)
PAL (BG)
SECAM (BG)
PAL (I)
SECAM (DK)
PAL (BG)
PAL (BG)
SECAM (BG)
SECAM (BG)
PAL (I)
PAL (BG)
PAL (BG)
NTSC (NA)
NTSC (J)
PAL (DK)
NTSC (NA)
PAL (BG)
NTSC (NA)
PAL (BG)
PAL (BG)
SECAM (DK)
PAL (BG)
SECAM (DK)
PAL (BG)
PAL (I)
PAL (BG)
PAL (BG)
PAL (BG)
NTSC (J)
PAL (BG)
PAL (I)
NTSC (NA)
PAL (BG)
SECAM (K1)
43
Page 45

PALSONIC CORPORATION PTY LTD
1 JOYNTON AVENUE
WATERLOO NSW 2017 AUSTRALIA
TEL: (02) 9313 7111
FAX: (02) 9313 7555
www.palsonic.com.au
PALSONIC CUSTOMER SERVICE
TELEPHONE
AUSTRALIA: 1300 657 888
 Loading...