

Page 1

DVD/CD/MP3 PLAYER
DVD2060DX
USER'S MANUAL
Please read this manual before connection and use.
PALSONIC
1 JOYNTON AVENUE
WATERLOO NSW 2017 AUSTRALIA
TEL: (02) 9313 7111
FAX: (02) 9313 7555
www.palsonic.com.au
PALSONIC CUSTOMER SERVICE
TELEPHONE
AUSTRALIA: 1300 657 888
Page 2

BEFORE USE
The lightning flash with arrow head symbol, within an
equilateral triangle,is intended to alert the user to the
presence of uninsulated [dangerous voltage] within the
product's enclosure that may be of sufficient magnitude
to constitute a risk of electric shock to persons.
The exclamation point within an equilateral triangle is
intended to alert the user to the presence of important
operating and maintenance (servicing) instructions in the
literature accompanying the appliance.
The symbol for CLASSII (Double Insulation).
WARNING:
CAUTION:
TO REDUCE THE RISK OF FIRE OR ELECTRIC SHOCK, DO NOT EXPOSE THIS
APPLIANCE TO RAIN OR MOISTURE, DANGEROUS HIGH VOLTAGES ARE
PRESENT INSIDE THE ENCLOSURE. DO NOT OPEN THE CABINET, REFER
SERVICING TO QUALIFIED PERSONNEL ONLY.
When replace the direct plug in power supply or a separable, cord-connected power
supply, the replacement must be exact duplicate, or one recommended by the
manufacture.
TO PREVENT ELECTRIC SHOCK, MATCH WIDE BLADE OF PLUG TO WIDE
SLOT, FULLY INSERT.
This product utilizes a laser.
Use of controls or adjustments or performance of procedures other than those
specified here in may result in hazardous radiation exposure.
Do not open the cover and do not repair yourself. Refer servicing to
qualified personnel.
DANGER Visible and invisible laser radiation when open and interlock
defeated. Avoid direct exposure to beam.
1
Page 3

BEFORE USE
CAUTION: PLEASE READ AND OBSERVE ALL WARNINGS AND INSTRUCTIONS GIVEN IN THIS MANUAL AND
THOSE MARKED ON THE UNIT. RETAIN THIS BOOKLET FOR FUTURE REFERENCE.
This set has been designed and manufactured to assure personal safety. Improper use can result in electric shock or fire
safeguards incorporated in this unit will protect you if you observe the following procedures for installation,
use and servicing. This unit is transistorised and does not contain any parts that can be repaired by the user.
DO NOT REMOVE THE CABINET COVER OR YOU MAY BE EXPOSED TO DANGEROUS VOLTAGE. REFER
SERVICING TO QUALIFIED SERVICE PERSONNEL ONLY.
1. Read This Manual
After unpacking this product. Please read
the manual,operating and other instructions
carefully.
2. Ventilation
Openings in the cabinet are provided for ventilation
and to ensure operation of the product. These openings
can protect it from overheating. These openings must not
be covered. The product should never be placed on a bed,
sofa,rug or other.
3. Heat
It should be situated away from heat sources radiators, heat
registers, stoves, or other products (including amplifiers)
that produce heat.
4. Water and Moisture
Do not use this product near water, for example, near a bowl,
kitchen sink, or laundry tub, in a wet basement or near a
swimming pool.
5. Cleaning
Unplug this product from the wall outlet before cleaning.
Do not use liquid cleaners or aerosol cleaners. Use a dry
cloth for cleaning.
6. Power-Cord Protection
Power cords should be routed so that they are not likely
to be walked on or pinched by items placed upon.
7. Lightning
For added protection fort his product during storm, or
unattended and unused for long periods unplug it from the
wall outlet. This will prevent product from lighting.
8. Object and Liquid Entry
Never push objects of any kind into this product or
liquid of any kind on the product. It may touch dangerous
voltage points and parts of that could result in a fire or
short circuit.
9. Attachments
Do not use attachments not recommended by the
manufacturer as they may cause hazards.
10. Accessories
Do not place this product on an unstable cart, stand, or table
The product may fall causing serious injury to a child or adult,
and serious damage. Only with a cart, stand, tripod, bracket, or
table recommended by the manufacturer, or sold with the product.
Any mounting of the product should follow the manufacturer's
instructions, and should use a mounting accessory recommended
by the manufacturer. A product and cart combination should be
moved with care. Quick stops excessive force and uneven
surfaces may cause the product and cart combination to
overturn.
11. Disc tray
Keep your fingers well clear of the disc tray as
it is closing. Neglecting to may cause serious
personal injury and damage to the product.
12. Burden
Do not place a heavy object on or step on the
product. The object may fall causing serious
personal injury and serious damage to the
product.
13. Damage Requiring Service
Unplug this product service from the wall outlet
and refer servicing to qualified service
personnel under the following conditions:
A) When the power-supply cord or plug is damaged.
B) If liquid has been spilled, or objects have fallen
into the product.
C) If the product has been exposed to rain or water.
D) If the product does not operate normally by
following the operating instructions. Adjust only those
controls that are covered by the operating instructions
as an improper adjustment of other control may
result in damage and will often require extensive work
by a qualified technician to restore the product to its
normal operation.
E) If the product has been dropped or damaged in
any way.
F) When the product exhibits a distinct change in
performance-this indicates a need for service.
14. Servicing
Do not attempt to service this product yourself as
opening or removing covers may expose you to
dangerous voltage or other hazards. Refer all
servicing to qualified service personnel.
15. Replacement Parts
When replacement parts are required, be sure the
service technician has used replacement parts
specified by the manufacturer or have the same
characteristics as the original part. Unauthorized
substitutions may result in fire, electric, shock,
or other hazards.
16. Safety Check
Upon completion of any service or repairs to this
product, ask the service technician to perform
safety Checks to determine that the product is in
proper operating condition.
2
Page 4
BEFORE USE
NOTES ON HANDLING
The top and rear panels of the unit may become warm
after a long period of use. This is not a malfunction.
When the unit is not use, be sure to remove the disc
and turn off the power.
If you do not use the unit for a long period, the unit
may not function properly in the future. Turn on and
use the unit occasionally.
Do not place foreign objects on the tray.
LOCATION
Do not locate the unit in places such as:
Near heating devices or in enclosed car.
High temperature (400C or higher) or high
humidity (90% or higher).
Dirty places.
Avoid direct exposure to sunshine
DISTURBANCE
When you place this unit near a TV, radio or VCR, the
playback picture may become poor and the sound may
be distorted. In this case, place the unit away from the
TV, radio or VCR.
ON HANDLING DISCS
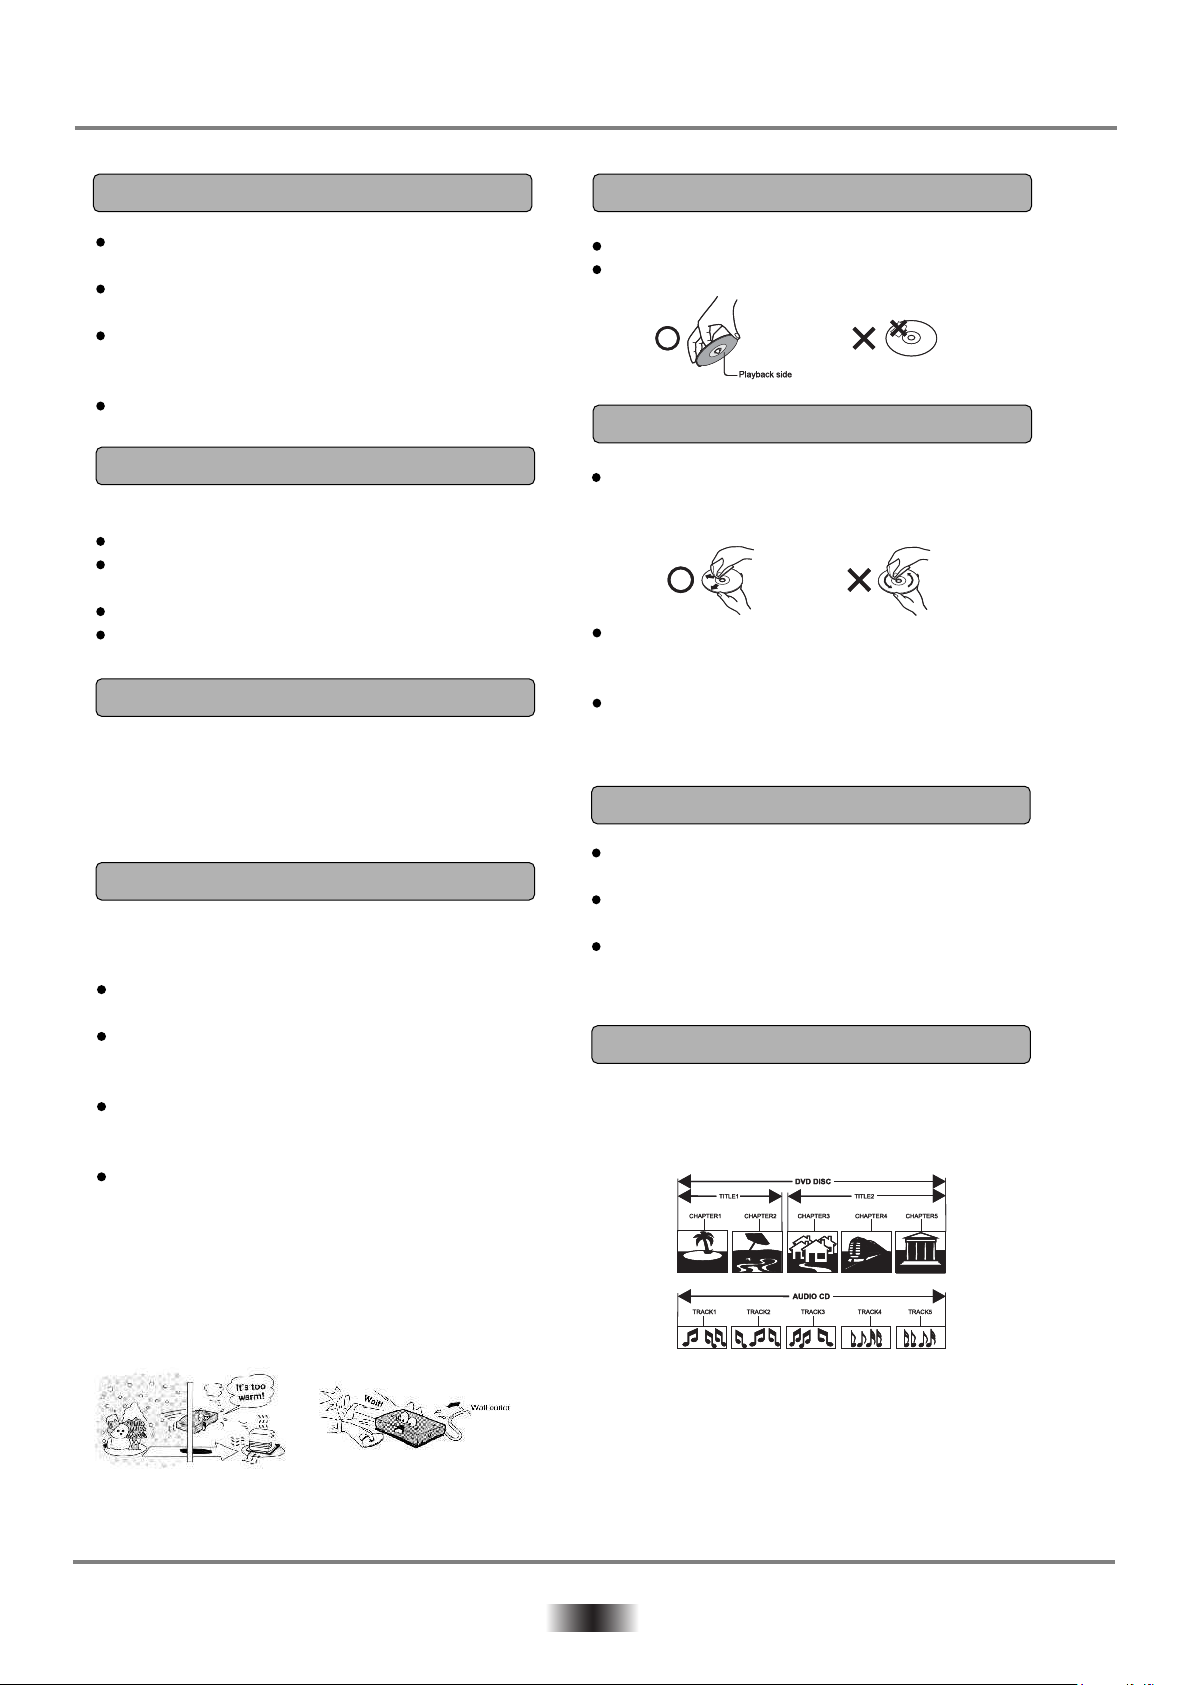
Do not touch the play back side of the disc.
Do not attach paper or tape to disc.
ON CLEANING DISCS
Fingerprints and dust on the disc cause picture and
sound deterioration. Wipe the disc from the centre
outwards With a soft cloth. Always keep the disc clean.
If you can not wipe off the dust with a soft cloth, wipe
the disc lightly with a slightly moistened soft cloth and
finish with a dry cloth.
Do not use any type of solvent such as thinner,
benzine, commercially available cleaners or
antistatic spray for vinyl LPs. It may damage the disc.
ON STORING DISCS
NOTES ON MOISTURE CONDENSATION
The pickup may be condensed with water under the
following situation.
When you bring the unit directly from a cold place
To a warm place.
When you use the unit in a room where you just
turned on the heater, or a place where the cold air
from the air conditioner directly hits the unit.
During the summer, when you use the unit in a hot
and humid place just after you move the unit from
an air conditioned room.
The room is vaporous or damp.
If condensation exists, the unit will not operate properly.
Remove the disc, connect the power cord of the unit to
the wall outlet, turn on the unit,and leave it for two or
three hours. After two or three hours, the unit will have
warmed up and evaporated any moisture. Keep the
unit connected to the wall outlet and moisture
condensation will seldom occur.
Do not store discs in a place subject to direct sunlight
or near heat source.
Do not store discs in place subject to moisture and
dust such as a bathroom or near a humidifier.
Store discs vertically in a case. Stacking or placing
object on discs outside or their case may cause
warping.
STRUCTURE OF DISC CONTENTS
Normally,DVD discs are divided in to titles, and the titles
are sub-divided into chapters. Audio CD are divided
into tracks.
Each title, chapter, or track is assigned a number, which
is called title number, chapter number or track number
respectively.
There may be discs that do not have these numbers.
3
Page 5

TABLE OF CONTENTS
TABLE OF CONTENTS
BEFORE USE
Safety Precautions -----------------------------------------
Important Safety Instructions ----------------------------
---------------------------------------------------------
Notice
DISC Protection
Special Function of DVD
Function Supported by DVD -----------------------------
Accessories --------------------------------------------------
--------------------------------------------
---------------------------------
BASIC PLAYBACK
Preparations -------------------------------------------------
Basic Playback ----------------------------------------------
Stop Playback -----------------------------------------------
Previous and Next
Fast forward and Fast reverse --------------------------
Pause/Step Playback
-----------------------------------------
-------------------------------------
REFERENCE
1
2
3
3
5
5
5
6
6
6
6
-
6
6
System Setup -----------------------------------------------
Trouble Shooting --------------------------------------------
Symptoms and Corrections -----------------------------
System and Outputs ---------------------------------------
17
21
22
23
ADVANCED PLAYBACK
Remote Control Operation ------------------------------- 7
SPECIAL FUNCTION PLAYBACK
AUDIO CD Playback --------------------------------------
JPEG Disc Playback --------------------------------------
MP3 Playback -----------------------------------------------
Kodak Picture CD Disc Playback ----------------------
16
16
16
16
4
Page 6

BEFORE USE
SETTING THE TV SCREEN
BEFORE USE
Multi-aspect
ratio suit to different TV screen size.
TV
screen
Film
format
Normal
4:3
Full view
4:3
16:9
FUNCTIONS SUPPORTED BY DVD PLAYER
There are many functions available on DVD discs and
the functions vary per player and per manufacturer.
Mailbox
16:9
Widescreen
Regional code and signal system
Dolby digital surround sound
8
32
Number of languages
Subtitle languages
ACCESSORIES
Audio/Video cable
Remote control
Owner's manual
16:9
RESTRICTEDR
9
CC
LB
Picture proportion modes
Parent lock
Multi -angle
Closed Caption
5
Page 7

BASIC PLAYBACK
Preparations
If you want to view a disc, turn on the TV and
select the video input, and connect to the DVD player.
Basic Playback
1. Press POWER switch on the front panel to turn on,
and the TV screen will display log.
The LED will display
NO DISC if the DVD player has no disc in the tray.
If a disc is already in the tray, it will begin to play
the disc.
2. Press OPEN / CLOSE to open the disc tray,
place a disc on the disc tray. There are two
different disc sizes. Place the disc in the
correct guide on the disc tray. If the disc is
off the guide, it may damage the disc and
cause the DVD player to malfunction.
Do not place a disc which is unplayable in
this DVD player.
3. Press OPEN/CLOSE to close the
disc tray, the playback will automatically
start. Some discs may not playback
automatically.
You can press ENTER/PLAY button
to start playback, and also you may
start playback with a menu,cursor button
on the remote controller, select menu
options and press ENTER/PLAY or
press figures to select a menu options.
Previous and Next
During playing, press PREV key can back to start
of this chapter. then each press this key will skip a
chapter still the start of the disc.
Each press of NEXT key during playing will skip
the current chapter and play the next one.
Fast Forward and Fast Reverse
1.
Press F.FWD to fast forward through the disc.
Each time the F.FWD button is pressed, the
fast forward motion speed changes.
2.
Press ENTER/PLAY to resume normal playback.
3.
Press F.REV to fast reverse through the disc.
Each time the F.REV button is pressed, the
fast reverse motion speed changes.
4.
Press ENTER/PLAY to resume normal playback.
Pause/Step Playback
1.
Press PAUSE/STEP first time to pause playback (still mode). The sound will be muted during
still mode.
2.
Press PAUSE/STEP continuous to single step
3.
forward to the next frame in the video.
Press ENTER/PLAY resume normal playback.
/
/
Standby Function
Stop Playback
1. Press the button to go to stop mode, the TV
screen will show the start logo, as some disc
the player can recall the location where stopped.
2. Press ENTER/PLAY to playback to resume
playback from the location where play back is
stopped or from the beginning of the disc.
3. Press STOP twice to stop completely.
Under status of Non-disc or Stop, the DVD player
will automatically enter into stand by status after
25 minutes. Now press STANDBY key on the
remote control to restart the DVD player.
NOTES:
1. “ ” may appear on the TV screen during operation.
A “ ” means that the operation is not permitted by
the unit or the disc.
2. This unit controlled by CPU, under setting mode,
there may be screen saver press any key to
activate the unit.
6
Page 8
Advanced Playback
Remote Control Operation
IMPORTANT NOTE:
ALL DESCRIBING FUNCTION IS FOR DVD DISCS. IF YOU PLAY OTHER FORMAT DISC, THE OPERATION
AND DISPLAY ON SCREEN WILL BE DIFFERENT.
POWER
OPEN/CLOSE
0-10+ Keys
During playback, press POWER to stop the player
and return to standby mode.
While the player is in standby, press POWER or any key
on the front panel to resume normal operation.
To open the disc tray, press OPEN/CLOSE.
To Close the disc tray, press OPEN/CLOSE again
These keys are used to input time, as well as
title, chapter and track numbers.
When a numeric item is displayed on the screen,
press 0-10+ keys to select the desired entry,
and press ENTER to confirm.
CLEAR
Press CLEAR to delete numbers you have selected.
Press once to delete on digit. Press and hold to
delete all digits.
7
Page 9

Advanced Playback
DISPLAY
During playback, press DISPLAY to display the current time counter position.
DVD
00:00:01 0:04:45
Press DISPLAY again to display additional information about the playing disc.
Elapsed time of the current track/chapter.
Disc type
CD
VCD
CDDA
Track 1/15
DVD
DVD 00:01:51 01:27:50
Title 1/1 Chapter 1/16 Angles 1/1
Audio 1/2 2ch Eng
Subtitle 1/1 Eng
00:00:01 0:04:45
Elapsed time of the current track.
Total tracks.
Current track.
8
Page 10

Advanced Playback
SEARCH
During playback, press SEARCH, and the [Tack Search] menu will display as follows:
CD
VCD
Track Search
Time
Track
-:--:--
---
DVD
Search
Time
Track/Chapter
-:--:--
--/--
Note:
1
Time searches for an exact time in
the movie.
In Title/Chapter mode, you cannot
2
select a value outside the range of the
total number of titles or chapters.
3
For some DVD discs, the Search
Function is unavailable.
Use the number keys to input the desired Time, Title or Chapter, then press ENTER to confirm.
Press SEARCH again, the [Disc Search] menu will be displayed as follows:
CD
Track Search
Time
Track
-:--:--
---
9
Page 11

Advanced Playback
During DVD or CD/VCD playback, press and hold to
to scan forward. The player will review the disc at 2, 4, 8 and 16 time
normal speed as
follows.
Press PLAY to resume normal playback.
During DVD or CD/VCD playback, press and hold to scan in reverse.
The player will review the disc at 2, 4, 8 and 20 time normal speed as
follows.
X2 X4 X8 X16 play
STOP
X2 X4 X8 X16 play
Press PLAY to resume normal playback.
Press STOP once during playback to stop and hold playback.
Press PLAY to resume playback from the point you pressed STOP
Press STOP twice to stop playback completely.
PAUSE
Press PAUSE during playback to pause playback.
10
Page 12

Advanced Playback
PLAY
DISC MENU
Press PLAY from stop mode to start playback
This function is not available if the elapsed time of current
track is less than 10 seconds.
Note: MP3 disc and some DVD discs do not have a 10 second review feature.
During DVD, press MENU to return to the program menu.
In the Setup Menu, press MENU to return to the main menu
or play mode.
Any time, press MENU to cancel the current OSD or some menus.
Note: This function is subject to the discs.
TITLE
A-B
During DVD playback, press TITLE key to display the DVD title
menu or play the first title.
Note: This function is subject to the discs.
During playback, press A-B to select A
Press it again to select B. The player will repeat the section from A
to B automatically.
Press A-B a third time to cancel A-B repeat and clear points A and B.
Note: 1. During CD/SVCD playback, points A and B must be within the same track.
2. This function is subject to the disc.
During DVD playback, points A and B can be selected from different chapters.
11
Page 13

Advanced Playback
Please use the [PROG] mode under the state stopping!
While [PROG] is on, press ENTER to display the [Program] submenu:
Input the track numbers in the order you would like them to
play. When finished, select [Play Program] and then press ENTER to
play the tracks in the new programmed order.
Select [Clear All] and press ENTER to clear all the numbers
you have input.
Input the title number and the chapter number in the desired
order. Then select [Play Program] and press ENTER to play the
chapters in the order you have set.
Select [Clear All] and press ENTER to clear all the numbers
you have input.
PROGRAM
PREV
NEXT
During playback is stopped, press PROGRAM button twice to
switch to progressive scan mode.
Press PROGRAM once to switch back to interlace scan mode.
Note: If you have connected the DVD player to your TV using the
component Video Output, you can use PROGRAM button to switch
to progressive scan for superior video quality.
Press PREV to skip to the previous chapter or track.
Press NEXT to skip to the next chapter or track.
12
Page 14

N/P
Advanced Playback
Press N/P when in STOP mode to select the mode
from NTSC/PAL/AUTO.
SLOW
STEP
REPEAT
Press SLOW repeatedly to SLOW DOWN motion playback at
variable speeds.
Press STEP during playback to pause playback.
Press STEP repeatedly to play frame.
Press PLAY to resume normal playback.
Select to press REPEAT to select Repeat Title, Repeat chapter,
Repeat off during DVD playback.
Press REPEAT to select Repeat Single, Repeat All and Repeat
off when PBC is off (VCD, CD, SVCD).
13
Page 15

Advanced Playback
RETURN
Press RETURN to the main menu when PBC is on.
VOL+ VOL-
PBC
MUTE
Press <VOL+> button to increase Volume.
Press <VOL-> button to reduce volume till no volume output.
During VCD playback.
Press PBC (playback control) to select PBC on and off.
Press MUTE to mute the Audio output.
Press MUTE again to resume normal audio output.
14
Page 16

ZOOM
Advanced Playback
During VCD/SVCD/DVD playback, press ZOOM to magnify the image
as follows:
Q1 Q2 Q3
Q Off
ANGLE
AUDIO
During DVD playback
Press ANGLE to view scenes from different camera angles.
Press ANGLE repeatedly to change from one camera angle to another.
Note: This function is disc specific.
During CD/VCD/SVCD playback
Press AUDIO to select a audio channel (STEREO, LEFT, RIGHT etc)
During DVD playback
Press AUDIO repeatedly to select from up to 8 audio languages/formats.
During SVCD playback
Press AUDIO repeatedly to select from up to 4 audio languages/formats.
Note: This function is disc specific.
SUBTITLE
During DVD playback
Press SUBTITLE repeatedly to select from up to 32
subtitle languages.
Note: This function is subject to the disc.
(languages will vary).
15
Page 17

SPECIAL FUNCTION PLAYBACK
AUDIO CD PLAYBACK
When playing Audio CD disc, a navigation menu will be displayed
automatically if the disc is loaded in succession.
In the menu, use UP or DOWN button in the cursors to select the
file, then press "ENTER/PLAY" to play this file, in this page, press
PREV or NEXT can go to the previous or next page.
Note: CD+G disc the same as Audio CD (when disc playing,
press STOP button can return to navigation menu).
MP3 PLAYBACK
When playing MP3 disc, a navigation menu will be displayed
automatically if the disc is loaded in succession.
In the menu, use UP or DOWN button in the cursors to choose
folder, then press "ENTER/PLAY" button to confirm. In the folder,
use UP or DOWN button in the cursors to select the file, then press
"ENTER/PLAY" to play this file. In this page, use LEFT button in
the cursors can return previous menu, press PREV or NEXT can go
to the previous or next page.
03 18 05 28
058/158
TRACK01
TRACK02
TRACK03
TRACK04
TRACK05
TRACK06
TRACK07
TRACK08
03 18 05 28
058/158
MP3 - - - - - - MP3 - - - - - - MP3 - - - - - - MP3 - - - - - - MP3 - - - - - - MP3 - - - - - - -
KODAK PICTURE CD DISC PLAYBACK
When playing Kodak Picture CD disc,a navigation menu will be displayed automatically if the disc is loaded
in succession. In the menu. Use UP or DOWN in the cursor to choose folder, then press "ENTER/PLAY" button
to confirm. In the folder, use UP or DOWN in the cursor to select a file, then press "ENTER/PLAY" to play
Each picture in the Kodak Picture CD will be displayed consecutively in a slide-show fashion and will be scaled
to tilt in the whole TV screen. If you want to return the menu, press MENU button.
If you desire to display an image indefinitely, press the PAUSE button. To view the next or previous picture,
press NEXT or PREVIOUS button. To resume the slide-show, press the "ENTER/PLAY" button.
IMPORTANT NOTE: Quality of pictures displayed on the screen is highly dependent on the viewing device.
JPEG DISC PLAYBACK
When playing JPEG disc, a navigation menu will be displayed automatically if the disc is loaded in succession.
In the menu, use UP or DOWN in the cursor to select a file, then press "ENTER/PLAY", the file will be play with
a slide-show, press PREV or NEXT to select the previous or the next picture. Press PAUSE to pause the
current picture for enjoying, when press ENTER/PLAY, it will return to normal playing.
16
Page 18

REFERENCE
When you press SETUP key on the remote control,
the setup menu will be displayed.
1. Within the setup menu, you can use UP, DOWN,
LEFT and RIGHT buttons on the remote control
to move the cursor, and then press the
ENTER/PLAY button to make your selection.
Press LEFT can return the previous menu.
2. To exit setup menu, you can press SETUP
menu.
1. GENERAL SETUP PAGE
Set up TV screen format, video type and all DVD
functions.
1.1 TV DISPLAY
General Audio Dolby
- - General Setup Page - -
Tv Display
Angle Mark
Osd Lang
Captions
Screen Saver
Ps
Off
Eng
Off
Off
Normal/Pa
Normal/Lb
Wide
Video
Preferences
1.2 ANGLE MARK
ANGLE MARK: Users can select a particular camera
angle when playing a DVD which offers multiple
angles.
General Audio Dolby
- - General Setup Page - -
Tv Display
Angle Mark
Osd Lang
Captions
Screen Saver
Angle Mark
Ps
Off
Eng
Off
Off
On
Off
Video
Preferences
1.3 OSD LANGUAGE
On Screen Display (OSD) Language: Users can
select the whole setup menu and on-screen display
language.
General Audio Dolby
Video
Preferences
Set TV Display Mode
The TV Display which select the different ratio of
display format and the screen of TV. There are
various types of display on screen for different
matches between Disc and TV (Please see page 20;
Multi-image ratio mode)
No matter which display format is selected, a
picture recorded in standard 4:3 format always
displays in the 4:3 aspect ratio.
The display format of DVD titles may vary; please
refer to the information that accompanies your
specific DVD title.
If the DVD title is recorded in 16:9 wide display
format while the TV is a standard 4:3 screen,
horizontal compression of the image will result.
Some DVD titles may be recorded in special
formats. In such cases, the DVD titles will always
appear on the screen in their original format,
regardless of which TV display format you select.
- - General Setup Page - -
Tv Display
Angle Mark
Osd Lang
Captions
Screen Saver
Set Osd Language
Ps
Off
Eng
Off
Off
English
French
German
Italian
Spanish
Portuguese
1.4 CAPTIONS
CAPTIONS: For hearing-impaired people. The picture
can be displayed with recorded explanatory captions.
Note: It is valid for disc that has captions.
General Audio Dolby
- - General Setup Page - -
Tv Display
Angle Mark
Osd Lang
Captions
Screen Saver
Angle Mark
Ps
Off
Eng
Off
Off
On
Off
Video
Preferences
17
Page 19

REFERENCE
1.5 SCREEN SAVER
General Audio Dolby
- - General Setup Page - -
Tv Display
Angle Mark
Osd Lang
Spdif Output
Captions
Screen Saver
Screen Saver
Ps
Off
Eng
Off
Off
Video
On
Off
Screen Saver: When the unit is in stop mode,a moving
picture will appear several minutes later if screen saver
is set on. Screen saver will protect the TV screen.
Preferences
2. SPEAKER SETUP PAGE
2.1 SPEAKER SETUP PAGE
DOWNMIX MODE: Sets front speakers to LT/RT,
STEREO.
General Audio Dolby
- - Speaker Setup Page - -
Dynamic Stereo
Video
Lt/Rt
Stereo
Preferences
2.2 SPDIF OUTPUT
SPDIF OUTPUT MODE: Sets the audio outputs.
Under the status of SPDIF/RAM, can not adjust
volume of DVD, CD, can adjust only under MP3
format.
General Audio Dolby
- - Digital Audio Setup Page - -
Spdif Output Spdif Off
Setup Spdif
Spdif/Raw
Spdif/Pcm
This DVD player includes three kinds of audio output:
1.
SPDIF OFF: An analog surround sound format is
output through the back-panel connections for 2-CH
audio out.
SPDIF/RAW or SPDIF/PCM: This surround sound
2.
format is output to a Dolby Digital decoder through
the optical and coaxial connectors on the backpanel of the product.
Video
Preferences
Set Downmix Mode
Down mix:
1 means LT/RT output
2 means STEREO output
In LT/RT or stereo mode,the centre speaker and
sub woofer on this page can not setup,only can
if 5.1 channel output.
Test tone: in 5.1 channel mode,setup this item
in the case of opening disc tray or stopping play.
18
Page 20

REFERENCE
3. DOLBY DIGITAL SETUP PAGE
3.1 DUAL MONO
DUAL MONO: If your amplifier/decoder has
Dolby Digital output,you may select stereo, left
mono,right mono, or mixed mono mode for your
amplifier decoder.
General Audio Dolby
- - Dolby Digital Setup - -
Dual Mono
Dynamic
Dual Mono (1+1) Setup
Video
Stereo
L-Mono
R-Mono
Mix-Mono
Preferences
3.1 DYNAMIC
DYNAMIC: This function is generally used when
playing high volume programs at night, in order
not to disturb the neighbour. This setting can dynamically lower the volume and still keep the original
tone quality, This is the range, measured in decibels(dB), between the loudest and the quietest
sound registers in a sound track.
General Audio Dolby
- - Dolby Digital Setup - -
Dual Mono
Dynamic
Set Drc OFF
Video
Preferences
FULL
3/4
1/2
1/4
OFF
4. VIDEO SETUP PAGE
4.3 TV MODE SETUP PAGE
TV MODE: Sets the scan mode of your TV.
If there are picture interferences or no picture
please press “V.MODE” to correct it.
General Audio Dolby
Video Setup Page
Component
Scan Mode
Sharpness
Brightness
Contrast
Set P-Scan On/Off
Yuv
Low
00
00
Video
P-Scan
Interlace
Preferences
4.3 SHARPNESS
SHARPNESS: Sets the sharpness level of video
output.
General Audio Dolby
Video Setup Page
Component
Scan Mode
Sharpness
Brightness
Contrast
Sharpness
Yuv
Low
00
00
Video
High
Medium
Low
Preferences
4.4 BRIGHTNESS
BRIGHTNESS: Sets the brightness level of video
output.
4.1 COMPONENT
COMPONENT: Sets the video output.
General Audio Dolby
Video Setup Page
Component
Scan Mode
Sharpness
Brightness
Contrast
Component
Yuv
Low
00
00
Video
CVAS
Yes
Preferences
General Audio Dolby
Video Setup Page
Component
Scan Mode
Sharpness
Brightness
Contrast
Brightness
Yuv
Low
00
00
Video
Press right button the TV will display below.
19
Preferences
Page 21

REFERENCE
General Audio Dolby
Video
Preferences
Brightness 0
Press LEFT/ RIGHT button to adjust, then press
ENTER/PLAY button to confirm and return upon
menu.
4.5 CONTRAST
CONTRAST: Sets the contrast level of Video output.
General Audio Dolby
Video Setup Page
Component
Scan Mode
Sharpness
Brightness
Contrast
Yuv
Low
00
00
Video
Preferences
5.1 TV TYPE
TV TYPE: This player supports different TV output,
including MULTI(Auto), NTSC, and PAL systems.
If your TV support only NTSC or PAL and had you
•
inadvertently selected the wrong TV type, the TV
screen will become flickering and black-and-white.
In this case, you should press the SETUP button
to set as following Note.
General Audio Dolby
- - Preference Page - -
Tv Type
Audio
Subtitle
Disc Menu
Parenta
Password
Default
Set Tv Standard
Pal
Eng
Eng
Eng
Video
Pal
Auto
Ntsc
Note: How to Set the TV Type?
You may switch the NTSC/PAL setting of the DVD
•
player to match the video signal of your TV.
The table below shows what kinds of disc are com-
•
patible with each setting (Auto, PAL and NTSC)
Preferences
Contrast
Press right button the TV will display below.
General Audio Dolby
Contrast 0
Video
Preferences
Press LEFT/RIGHT button to adjust, then press
ENTER/PLAY button to confirm and return upon
menu.
5 PREFERENCE SETUP PAGE
The preference setting is active only when no disc.
and the setting is effective on each time power on till
exchanging the saved setting.
Disc Output Format
Type
DVD
Format
NTSC
PAL
Selected TV System Mode
NTSC PAL
NTSC
PAL
PAL PAL
MULTI
NTSC
5.2 AUDIO
AUDIO: Sets the preferred audio language as the
default when playing DVD. (If DVD support these
languages)
General Audio Dolby
- - Preference Page - -
Tv Type
Audio
Subtitle
Disc Menu
Parenta
Password
Default
Preference Audio Language
Pal
Eng
Eng
Eng
Video
English
French
Spanish
Chinese
Japanese
Korean
German
Italian
Preferences
20
Page 22

REFERENCE
5.6 PASSWORD MODE5.3 SUBTITLE
SUBTITLE: Sets the preferred subtitle language as
the default when playing DVD. (if DVD support these
languages)
General Audio Dolby
- - Preference Page - -
Tv Type
Audio
Subtitle
Disc Menu
Parenta
Password
Default
Preference Subtitle Language
Pal
Eng
Eng
Eng
English
French
Spanish
Chinese
Japanese
Korean
German
Italian
Video
Preferences
5.4 DISC MENU
DISC MENU: Sets the preferred menu language as
the default when playing DVD. (if DVD support these
languages)
General Audio Dolby
- - Preference Page - -
Tv Type
Audio
Subtitle
Disc Menu
Parenta
Password
Default
Preference Menu Language
Pal
Eng
Eng
Eng
English
French
Spanish
Chinese
Japanese
Korean
German
Italian
Video
Preferences
PASSWORD CHANGE: You can change the pass-
word: please type 6 numerals as new password.
Note: Be sure to remember the new password.
General Audio Dolby
- - Preference Page - -
Tv Type
Audio
Subtitle
Disc Menu
Parenta
Password
Default
Change Password
General Audio Dolby
Pal
Eng
Eng
Eng
Old Password
New Password
Confirm Pwd
OK
Change
Video
Video
Preferences
Preferences
Note:
If you change this set, you must input password
(Initial password: 8888)
5.5 PARENTAL
PARENTAL: The parental control function works in
conjunction with the different censorship classes
assigned to DVDs. These classes help to control the
types of DVDs that the family watches, There are up
to 8 censorship classes for DVDs.
General Audio Dolby
- - Preference Page - -
Tv Type
Audio
Subtitle
Disc Menu
Parenta
Password
Default
Set Parental Control
Pal
Eng
Eng
Eng
1. Kid Saf
2. G
3. Pg
4. Pg 13
5. Pgr
6. R
7. NC 17
8. Audio
Video
Preferences
5.7 DEFAULT
DEFAULT: Resets to all the manufacturer's original
settings for this DVD player (except password). Press
ENTER/PLAY to perform the reset.
General Audio Dolby
- - Preference Page - -
Tv Type
Audio
Subtitle
Disc Menu
Parenta
Password
Default
Load Factory Settings
Pal
Eng
Eng
Eng
Reset
Video
Preferences
21
Page 23

REFERENCE
Please check the following guide for the possible cause and solution for a problem before contacting the
nearest service centre or dealer for repairs.
SYMPTOMS AND CORRECTIONS
SYMPTOMS
No power
No picture
No sound
Failed to Play
Failed to respond to
remote control
Picture Disturbance
CORRECTIONS
Check to make sure that the power connection is secure.
Make sure the connection between the player and the TV is secure.
Make sure that the TV is in good working condition.
Press "V.MODE" button continuously until it appear normal
picture.
Make sure the connection between the player and other devices
are secure.
Make sure that the TV and AMP are in good working condition
and setup properly.
Check that the disc is properly inserted.
Clean the disc.
Remove obstacles between remote control and unit.
Aim remote control at the sensor on the front panel
Check batteries and replace them if necessary.
Check the disc for dirt and scratches, Clean or replace disc.
Shut down the unit, wait ten seconds, and restart the unit.
Failed to work
with keys
Power surges or brown outs or other electrical phenomena.
Shut down the unit, wait ten seconds, and restart the unit.
22
Page 24

System and Outputs
REFERENCE
VF Signal
system
Frequence
response
Audio S/N ratio
Video/Picture MPEG1 V2.0; MPEG2
Audio
Audio output
(analog audio)
Audio output
(digital audio)
Video output
S-Video output
NTSC/PAL
CD: 20Hz-20KHz(EIAJ)
DVD: 20Hz-44KHz(96KHz) (Sample result)
20Hz-22KHz(48KHz)(Sample result)
>90 dB
MPEG LAYER2 standard
Electric level output: 1.0 ~ 2.0V Resistance:10KS
Electric level output: 0.5Vp--p Resistance: 75S
Electric level output: (1.0±0.2) Vp--p Resistance: 75S Unbalanced negative
Electric level output: Brightness (Y) 1.0Vp--p Resistance: 75S
Chrominance (C): 0,286Vp--p, Resistance:75S
Component video
(Y, CB, CR)
Electric level output: 0.7Vp--p resistance: 75S
Note: We reserve the right to modify the design without advice!
23
Page 25

PALSONIC
1 JOYNTON AVENUE
WATERLOO NSW 2017 AUSTRALIA
TEL: (02) 9313 7111
FAX: (02) 9313 7555
www.palsonic.com.au
PALSONIC CUSTOMER SERVICE
TELEPHONE
AUSTRALIA: 1300 657 888
 Loading...