

Page 1

DVD2021
USER'S MANUAL
Please read this manual before connection and use.
PALSONIC CORPORATION PTY LTD
1 JOYNTON AVENUE
WATERLOO NSW 2017 AUSTRALIA
TEL: (02) 9313 7111
FAX: (02) 9313 7555
www.palsonic.com.au
PALSONIC CUSTOMER SERVICE
TELEPHONE
AUSTRALIA: 1300 657 888
Page 2

Table of Contents
FCC and Safety Information ............................
Important Safety Instructions .........................
Player Overview ...............................................
Front View .................................................................
Rear View ..................................................................
Remote Control .........................................................
Inserting Remote Control Batteries ...........................
Connections .....................................................
Basic TV Connections ...............................................
Enhanced Video Connections ...................................
Enhanced Audio Connections....................................
DVD Playback ...........................................................
Before You Begin ......................................................
Basic DVD Playback ..................................................
Stop ...........................................................................
Pause ........................................................................
Forward/Reverse Scan ..............................................
Skip Next/Previous ....................................................
Repeat .......................................................................
Display .......................................................................
Audio .........................................................................
Subtitles .....................................................................
Angle Mute ................................................................
Mute ..........................................................................
Title ............................................................................
Disc Menu ..................................................................
A-B Repeat ................................................................
Other Disc Playback ........................................
Playing Audio CDs .....................................................
Playing Kodak Picture CDs .......................................
Playing JPEG Picture CDs ........................................
Playing MP3 CDs ......................................................
Playing CDs with MP3 and JPEG files ......................
3
4
5
5
5
6
7
8
8
8
9
10
10
10
10
10
10
10
11
11
11
11
11
11
11
11
12
12
13
13
14
14
Language Setup ...............................................
On Screen Display (OSD) Language.........................
Disc Menu Language ................................................
Audio Language ........................................................
Subtitle Language .....................................................
Screen Setup ....................................................
TV Type .....................................................................
TV System .................................................................
Video Output .............................................................
Brightness .................................................................
Contrast .....................................................................
Audio Setup .....................................................
Digital Audio Output ..................................................
Custom Setup ..................................................
Parental Control ........................................................
Change Password .....................................................
Angle Mark ................................................................
Restore Defaults .......................................................
Troubleshooting ..............................................
Disc Handling & Maintenance ........................
Included Accessories
The following items are included with your DVD
player:
Remote Control
•
AAA Batteries (2)
•
Audio/Video Cable
•
User's Guide
•
Limited warranty
•
15
15
15
15
15
16
16
16
17
17
17
18
18
19
19
19
20
20
21
22
2
Page 3
Safety Precautions
CAUTION:
WARNING:
CAUTION
RISK OF ELECTRICAL SHOCK
DO NOT OPEN
THE LIGHTNING FLASH WITH ARROWHEAD SYMBOL WITHIN AN EQUILATERAL TRIANGLE IS INTENT TO
ALERT THE USER TO THE PRESENCE OF
UNINSULATED "DANGEROUS VOLTAGE"
WITHIN THE UNIT'S CABINET THAT MAY
BE OF SUFFICIENT MAGNITUDE TO
CONSTITUTE A RISK OF ELECTRIC
SHOCK TO PERSONS.
THE EXCLAMATION POINT WITHIN AN
EQUILATERAL TRIANGLE IS INTENDED
TO ALERT THE USER TO THE PRESENCE OF IMPORTANT OPERATING
AND MAINTENANCE (SERVICING)
INSTRUCTIONS IN THE MANUAL
ACCOMPANYING THE UNIT.
THE UNIT EMPLOYS A LASER SYSTEM. TO
ENSURE THE PROPER USE OF THE UNIT, READ
THIS MANUAL CAREFULLY AND KEEP IT FOR
FUTURE REFERENCE.
IF THE UNIT REQUIRES SERVICING, CONTACT
THE SELLER OR OUR SERVICE CENTRE - SEE
"TROUBLE SHOOTING".
TO PREVENT DIRECT EXPOSURE TO THE LASER
RADIATION, DO NOT OPEN THE CABINET. VISIBLE LASER MAY RADIATE WHEN THE CABINET
OPENED OR THE INTERLOCKS ARE DEFEATED.
DO NOT STARE INTO THE LASER BEAMS.
CAUTION:
THE DVD VIDEO PLAYER IS A CLASS 1 LASER
PRODUCT. USE OF CONTROLS OR ADJUSTMENTS OR PERFORMANCE OF PROCEDURES
OTHER THAN THOSE SPECIFIED HEREIN MAY
RESULT IN HAZARDOUS RADIATION EXPOSURE.
AS THE LASER BEAM USED IN THIS DVD VIDEO
PLAYER IS HARMFUL TO THE EYES, DO NOT
ATTEMPT TO DISASSEMBLE THE CABINET.
REFER SERVICING TO QUALIFIED PERSONNEL
ONLY.
TO PREVENT FIRE OR ELECTRIC SHOCKS, DO NOT
EXPOSE THE UNIT TO RAIN OR MOISTURE. NEVER
ATTEMPT TO OPEN THE CABINET, DANGEROUS
HIGH VOLTAGES ARE PRESENT IN THE UNIT. REFER
SERVICING TO QUALIFIED SERVICE PERSONNEL.
CAUTION:
TO PREVENT ELECTRIC SHOCKS, MATCH WIDEBLADE PLUG WITH WIDE SLOT, FULLY INSERT.
THE APPARATUS SHALL NOT BE EXPOSED TO
DRIPPING OR SPLASHING AND THAT NO OBJECTS
FILLED WITH LIQUIDS SUCH AS VASES SHALL BE
PLACED ON THE APPARATUS.
WARNING:
FCC REGULATIONS STATE THAT ANY CHANGE
OR MODIFICATION TO THE EQUIPMENT, NOT
EXPRESSLY APPROVED BY MAKER OR ITS
AUTHORISED PARTIES, COULD VOID USERS
AUTHORITY TO OPERATE THIS EQUIPMENT.
3
Page 4
Important Safety Instructions
1
Read Instructions - All the safety and operating
instructions should be read before the product is operated.
2
Retain Instructions - The safety and operating
instructions should be retained for future reference.
3
Heed Warnings - All warnings on the unit and in the
operating instructions should be adhered to.
4
Follow Instructions - All operating and use
instructions should be followed.
5
Cleaning - Unplug this product from the wall outlet
before cleaning. Do not use liquid cleaners or aerosol
cleaners. Use a damp cloth for cleaning.
6
Attachments - Do not use attachments not
recommended by the product manufacturer as they may
cause hazards.
7
Water & Moisture - Do not use this product
near water for example, near a bathtub, wash bowl, kitchen
sink or laundry tub; in a wet basement, or near a
swimming pool; and the like.
8
Accessories - Do not place this product on an unstable
cart, stand, tripod, bracket, or table. The product may fall,
causing serious injury to a child
or adult and serious damage to
the product. Use only with a cart,
stand , tripod, bracket, or table
recommended by the manufacturer
or sold with the product. Any
mounting of the product should
follow the manufacturer's
instructions, and should use a
PORTABLE CART WARNING
(Symbol provided by RETAC)
mounting accessory recommended
by the manufacturer.
9
9. A product and cart combination should be moved with
care. Quick stops, excessive force, and uneven surface
may cause the product and cart combination to overturn.
10
Ventilation - Slots and openings in the case are
provided for ventilation to ensure reliable operation
of the product and to protect it from overheating. These
openings must not be blocked or covered. The openings
should never be blocked by placing the product on a
bed, sofa, rug, or other similar surface. This product
should not be placed in a built-in installation such as
bookcase or rack unless proper ventilation is provided or
the manufacturer's instructions have been adhered to.
11
Power Sources - This product should be operated only
from the type of power source indicated on the marking
label. If you are not sure of the type of power supplied
to your home, consult your product dealer or local
power company. For products intended to operate from
battery power, or other sources, refer to the operating
instructions.
12
Grounding or Polarisation - This product may be
equipped with a polarised alternating - current line plug
(a plug having one blade wider than the other). This
plug will fit into the power outlet only one way. This is a safety
feature. If you are unable to insert the plug fully into the
outlet, try reversing the plug. If the plug still fails
to fit, contact your electrician to replace your obsolete
outlet. Do not defeat the safety purpose of the polarised
plug.
13
Alternate Waring - The product is equipped with a
three wire grounding type plug, a plug having a third
(grounding) pin. This plug will only fit into the outlet,
contact your electrician to replace your obsolete outlet.
Do not defeat the safety purpose of the grounding-type
plug.
14
Power-Cord Protection - Power supply cords should
be routed so that they are not likely to be walked on or
pinched by items placed upon or against them, paying
particular attention to cords at plugs, convenience
receptacles, and the point where they exit from the unit.
15
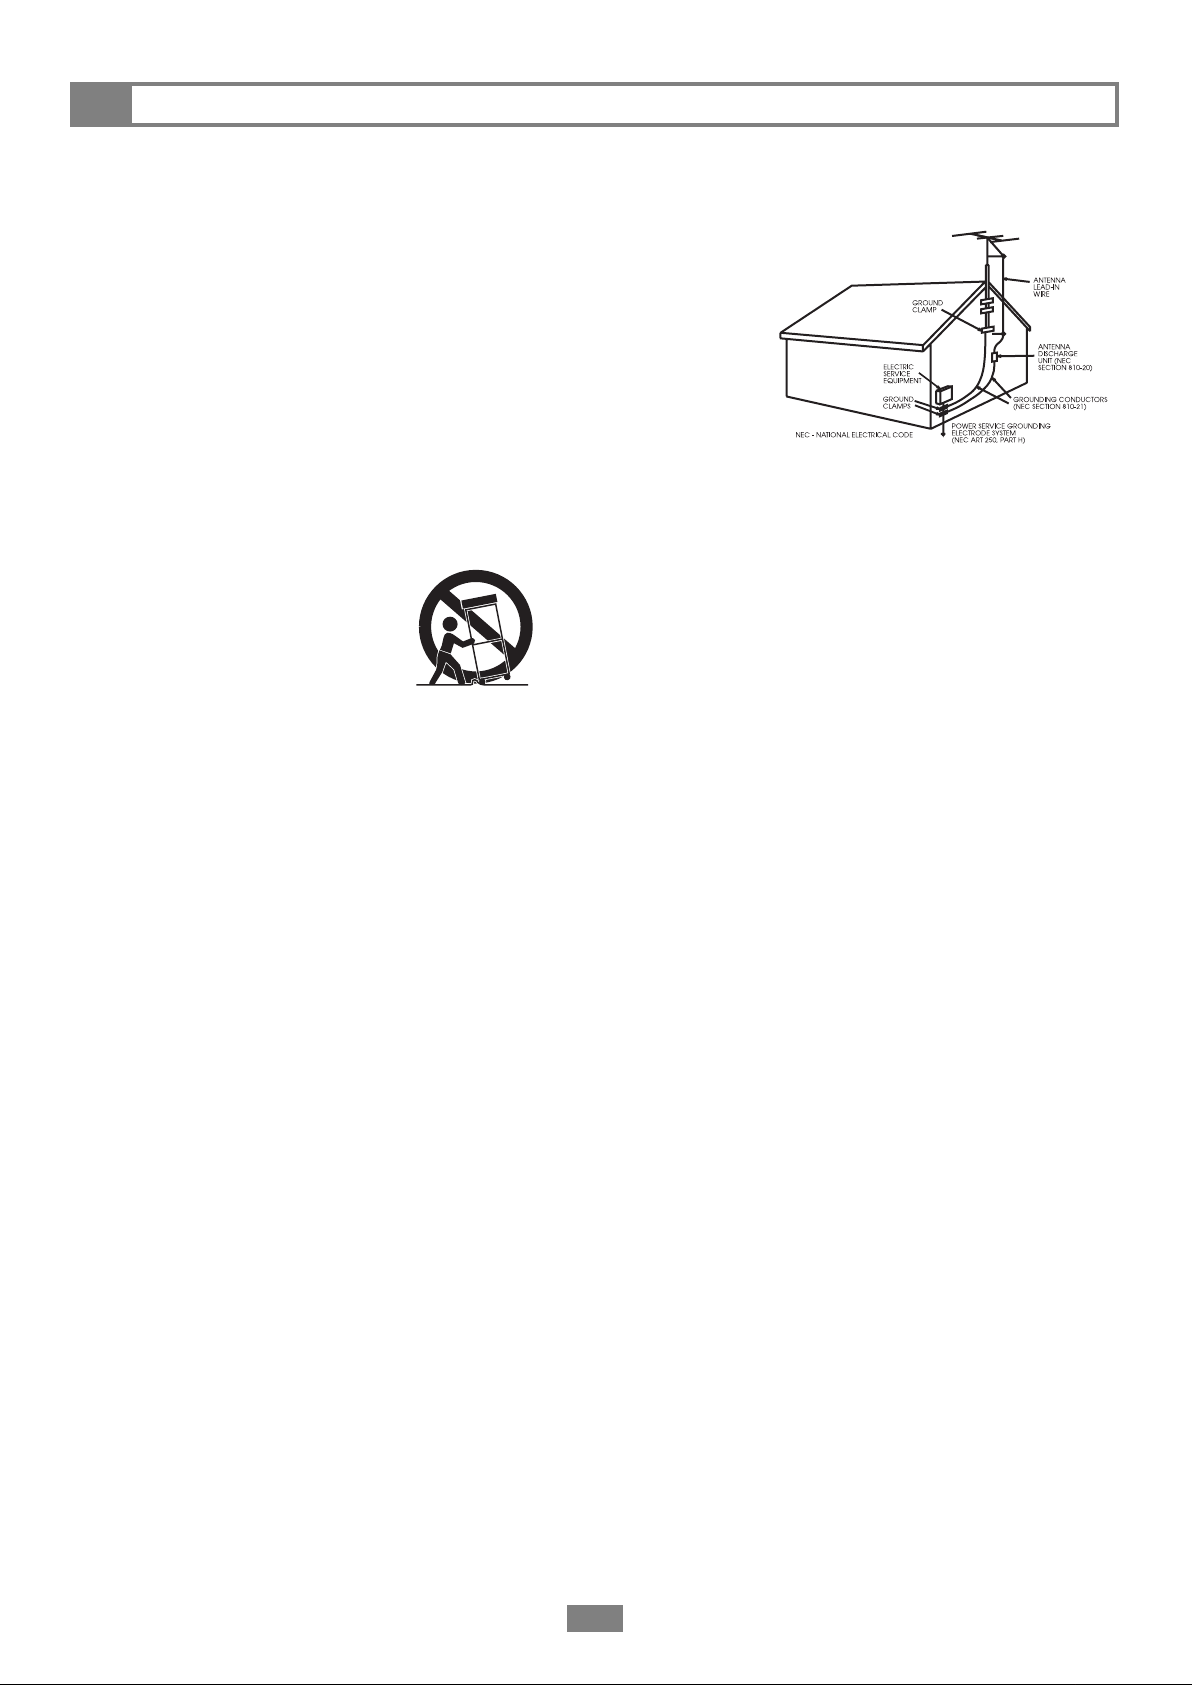
Outdoor Antenna Grounding - If an outside antenna
or cable system is connected to the product, be sure the
antenna or cable system is grounded so as to provide
some protection against voltage surges and built-up
static charges. Article 810 of the National Electrical
Code, ANSI/NFPA70, provides information with regard
to proper grounding of the mast and supporting structure,
grounding of the lead-in
wire to an antenna
discharge
unit, size of
grounding
conductors,
location of
antenna
discharge unit,
connection
to grounding
electrodes, and
requirements
for the grounding electrode.
Lightning - For added protection for this product during
16
a lightning storm, or when it is left unattended and
unused for long periods of time, unplug it from the wall
outlet and disconnect the antenna or cable system. This
will prevent damage to the product due to lightning and
power lines surges.
Power Lines An outside antenna system should not be
17
located in the vicinity of over head power lines or other
electric light or power circuits, or where it can fall in to
such power lines or circuits. When installing an outside
antenna system, extreme care should be taken to keep
from touching such power lines or circuits as contact with
them might be fatal.
Overloading - Do not overload wall outlets, extension
18
cords, or integral convenience receptacles, as this can
result in a risk of fire or electric shock.
Object and Liquid Entry - Never push objects of any
19
kind into this product through openings as they may
touch dangerous voltage points or short-out parts that
could result in a fire or electric shock. Never spill liquid of
any kind on the product.
Servicing - Do not attempt to service this product
20
yourself as opening or removing covers may expose
you to dangerous voltage or other hazards. Refer all
servicing to qualified service personnel.
Damage Requiring Service - Unplug this product from
21
the wall outlet and refer servicing to qualified service
personnel under the following conditions:
A) When the power-supply cord or plug is damaged,
B) If liquid has been spilled, or objects have fallen into
the product,
C) If the product has been exposed to rain or water.
D) If the product does not operate normally by following
the operating instructions. Adjust only those controls
that are covered by the operating instructions as an
improper adjustment of other controls may result
in damage and will often require extensive work by
a qualified technician to restore the product to its
normal operation,
E) If the product has been dropped or damaged in
anyway.
F) When the product exhibits a distinct change in
performance this indicates a need for service.
Replacement Parts - When replacement parts are
22
required, be sure the service technician has used
replacement parts specified by the manufacturer or
have the same characteristics as the original part.
Unauthorised substitutions may result in fire, electric
shock, or other hazards.
Safety Check - Upon completion of any service or
23
repairs to this product, ask the service technician to
perform safety checks to determine that the product is in
proper operating condition.
Heat - The product should be situated away from heat
24
sources such as radiators, heat registers, stoves, or
other products (including amplifiers) that produce heat.
Wall or Ceiling Mounting -The product should be
25
mounted to a wall or ceiling only as recommended by
the manufacturer.
4
Page 5
Player Overview
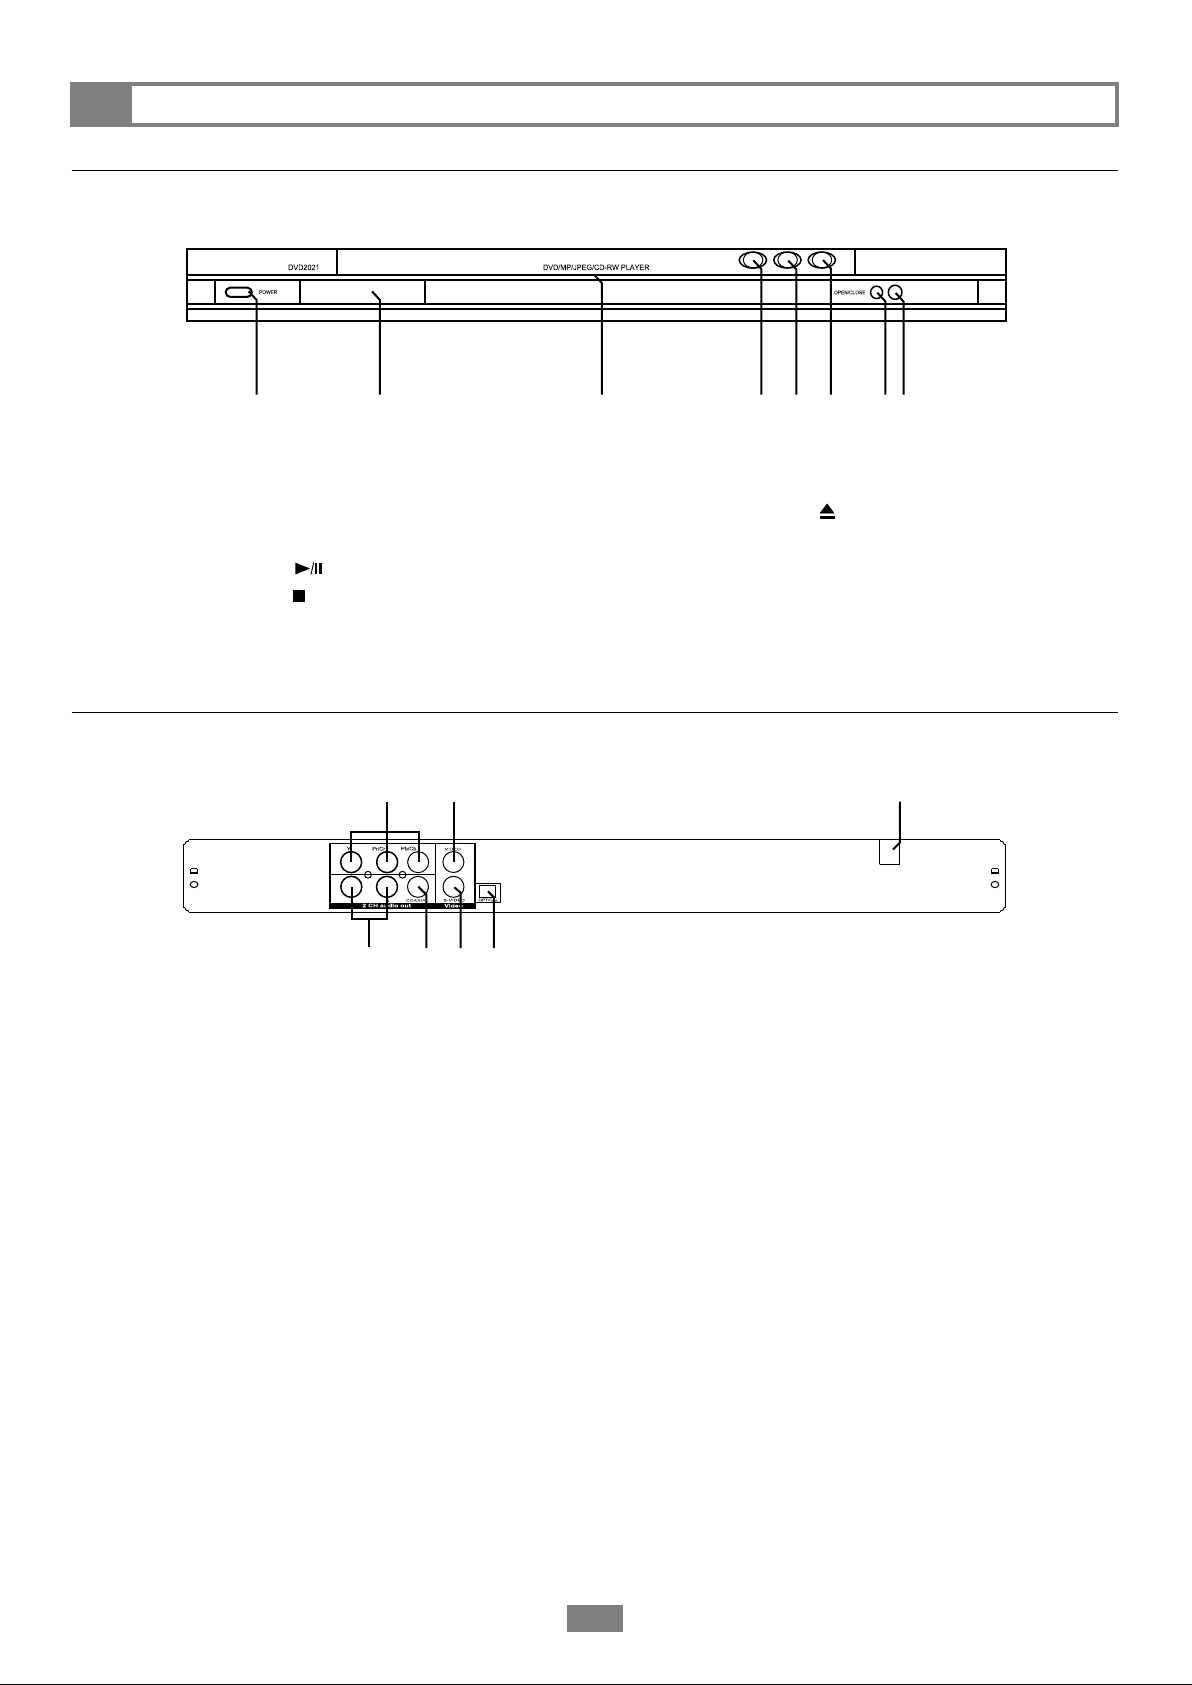
Front View
Rear View
1 2 3
1. POWER - Turns the player on and off.
2. VFD - display.
3. Disc Tray - insert disc here.
4. PLAY - Starts/pauses playback.
5. STOP - Stops playback.
1 2 5
3
4
7
6
5
4
6 7 8
6. L/R - Audio channel
7. OPEN/CLOSE - Opens and closes
the disc tray.
8. IR Sensor - Receives input from the
remote control.
1. Component Video/Progressive
Scan Video Output - Connects to a
TV equipped with Component Video or
Progressive Scan Video inputs.
2. Video Output - Connects out to a TV
or display device with a Video input.
3. AUDIO Output - Connects to the
audio inputs of a stereo TV or analog
amplifier.
4. Coaxial Digital AUDIO Output Connects to the coaxial input of a
digital amplifier/receiver with a Dolby
Digital decoder.
5. Power Cord - Connects to a standard
power outlet.
6. S-Video Output - Connects to a TV
equipped with an S-Video input.
7. Optical Digital AUDIO Output
Connects to the optical input of a
digital amplifier/receiver with a Dolby
Digital decoder.
5
Page 6
Player Overview
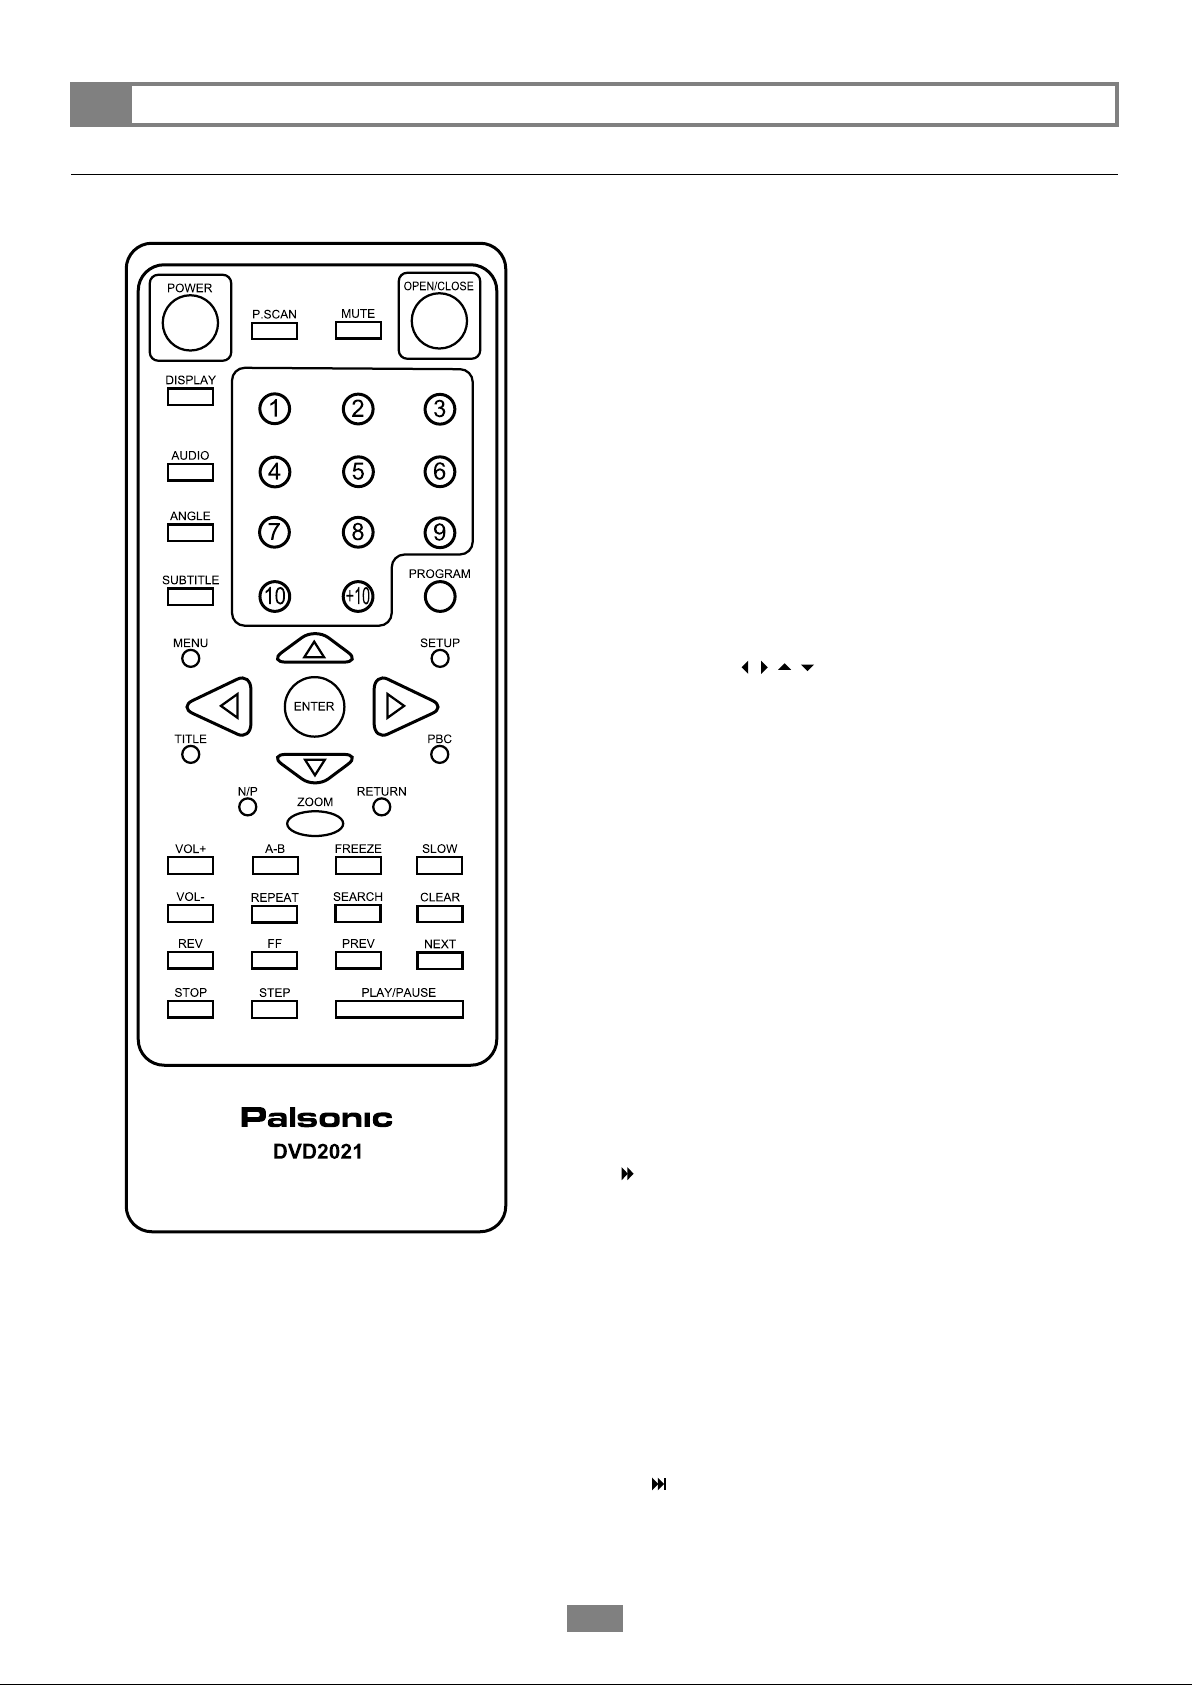
Remote Control
1-9
Use to key in numbers; e.g., chapter/track numbers in
Search mode.
0/10
Use to enter numbers 10 and above. For example, to
enter 102, press 0/10, then 2.
10+
Use to enter numbers by 10s (10, 20, 30, etc.).
A-B
Press to repeat an audio or video segment between
two points (A and B) during disc playback.
ANGLE
While a DVD is playing, press to view the same scene
from different angles (not available on all DVDs).
ARROW KEYS
Press to navigate in on-screen menus.
AUDIO
Press to select among available audio tracks/formats
during DVD playback.
CLEAR
Press to clear selections from Program Play.
DISC MENU
Press to access a DVD's disc menu (if applicable).
DISPLAY
Press to display the current disc time and status
information. While a DVD is playing, press to display
the Title/Chapter/Time menu.
ENTER
Press to confirm menu settings, passwords, etc.
FF
Press repeatedly to scan forward at faster than
normal speed. Each time you press the button, the
scan speed increases, until it cycles back to normal.
FREEZE
Freezes the current image on screen. Playback will
continue while this image is displayed.
MUTE
Press to toggle on/off to mute all audio output,
including amplified output and downmixed channels.
NEXT
While a disc is playing, press once to advance to the
next chapter or track.
6
Page 7
Player Overview
OPEN/CLOSE
Press to open and close the disc drawer.
PAUSE
Press to pause playback. Press again, or press
PLAY , to resume playback.
PBC
Toggles Playback Control on and off (used on "Video
CD").
PLAY
Press to start playback.
POWER
Press to switch between power on and standby
mode.
PREV
While a disc is playing, press once to return to the
previous chapter or track.
PROG.SCAN
While playback is stopped, press to switch between
Progressive Scan and Interlaced Scan (only
applicable when using the Component Video Out
connection to your TV).
STEP
Press once to pause playback. Press repeatedly to
step forward one frame at a time.
STOP
Press to stop and hold playback (press PLAY to
resume). Press STOP twice to reset playback to the
beginning of the disc.
SUBTITLE
While a DVD is playing, press to select among all
available subtitle languages.
TITLE
Press to display DVD title menus for discs with
multiple titles. If a disc has a single title, TITLE
functions like DISC MENU.
VOLUME +/-
Adjust the players audio output volume. This will not
change the settings on the TV or stereo.
ZOOM
Press to magnify part of the screen. The
buttons will move the zoom area to various parts of
the screen.
PROGRAM
Press to set up Program Play (custom playback
order).
REPEAT
While a disc is playing, press to select the Repeat
options (Title, Chapter, or Track).
RETURN
Press to return to the last menu viewed or to exit the
menu system.
REV
Press repeatedly to scan backward. Each time you
press the button, the scan speed increases, until it
cycles back to normal.
SEARCH
Press to jump to a specific time, title, chapter, or track
during disc playback.
SETUP
While the disc is stopped, press to display the Setup
menu for the DVD player.
Inserting Remote Control Batteries
1
Remove the battery cover from the back of
the remote control.
2
Insert the supplied batteries, paying
attention to the correct polarities (+ and -).
3
Replace the cover.
SLOW
Press repeatedly for slow motion playback at various
speeds.
7
Page 8

Connections
Basic TV Connections
You can connect the DVD player to a standard
television using the player's Audio and Video jacks.
Connect the supplied audio cable (red and white)
from the Audio jacks on the rear of the player to
the Audio Inputs on your television.
Connect the supplied video cable (yellow) from
the Video jack on the rear of the player to the
Video Input on your television.
Set your TV to its appropriate Video input to view
the player.
DVD Player
White Red Yellow
Enhanced Video Connections
For improved picture quality, you can connect
the DVD player to a TV equipped with S-Video,
Component Video, or Progressive Scan inputs. These
connections require special S-Video or Component
Video cables (not included). For audio, choose one of
the Enhanced Audio Connections shown on page 9.
S-Video Connections
Connect an S-Video cable (not included) from
the S-Video jack on the rear of the player to the
S-Video input on your television.
Set the Video Output to S-Video in the player's
Screen Setup Menu
Set your TV to its S-Video input to view the player.
Progressive Scan/Component Video
Connections
Connect a Component Video cable (not included)
from the Component jacks (Y, Pb/Cb, Pr/Cr) on
the rear of the player to the Progressive Scan or
Component Video inputs on your television.
Set the Video Output to Progressive Scan (PSCAN) or Component Video (S + Component) in
the player's Screen Setup menu.
You can also press the PROG.SCAN button as
a short cut to switch between Progressive Scan
and Interlace Scan modes.
Set your TV to its Progressive Scan or Component
Video input to view the player.
DVD Player
Component Video OR S-Video
8
Page 9

Connections
Enhanced Audio Connections
For enhanced audio quality, you can connect the DVD
player to a stereo system or digital amplifier/receiver.
Stereo Receiver Connections
Connect the supplied audio cable (red and white)
from the Audio R/L jacks on the rear of the player
to the left and right Audio Inputs on your stereo or
2-channel analog receiver.
DVD Player
Set your stereo to its appropriate input to hear the
player.
Digital Receiver Connections
Connect a digital optical cable (not included) from
the Optical jack on the rear of the player to the
optical digital audio input on your digital receiver.
OR
Connect a digital coaxial cable (not included) from
the Coaxial jack on the rear of the player to the
coaxial digital audio input on your digital receiver.
Set the Digital Out to SPDIF/PCM (Stereo) or
SPDIF/RAW (Digital) in the player's Audio Setup
menu, depending on the capabilities of your
receiver.
White Red
Stereo Receiver
DVD Player
Coaxial OR Optical
Set your receiver to its appropriate input to hear
the player.
Digital Decoding Receiver
9
Page 10

DVD Playback
Skip Next/PreviousBefore You Begin...
Turn on your TV and select the appropriate video
input.
If you connected the player to your audio system,
turn on your stereo or audio system and select the
appropriate audio input.
Basic DVD Playback
Press POWER on.
Press OPEN/CLOSE to open the disc tray.
Hold the edge of the disc and place it in the tray
with the label side up.
Press OPEN/CLOSE again to close the disc
tray.
The DVD player starts playback or opens the
DVD disc menu automatically.
Proceed with steps 5 and 6 if a menu is
available on the disc.
Press or use the number button(s) to
select the desired chapter/title.
To select a chapter/title, input the number; e.g.,
press "1" for chapter 1, "10" for chapter 10, etc.
Press PLAY
The player starts playback of the selected item.
Stop
You can skip to a specific chapter or track during
playback.
Skipping Ahead
Press NEXT during playback.
Skips a chapter each time you press the NEXT
button.
Skipping Back
Press PREV during playback.
If you press the PREV button midway through
a chapter, the DVD player returns to the beginning
of the chapter. The player then skips a chapter
each time you press the PREV button.
Repeat
Press REPEAT repeatedly during playback to select
from the following options:
Press once to repeat the current Chapter
Press twice to repeat the current Title
Press three times to repeat the current Disc
Press four times to turn repeat Off
To return to normal playback
Press REPEAT until "REPEAT Off appears.
Repeat playback works only with discs for which
the elapsed playing time appears on the player's
display during playback.
Repeat playback may not work correctly with
some DVDs.
Press STOP once to stop and hold playback at
the current position.
Press STOP twice to stop and reset the disc to
the beginning.
Pause
Press PAUSE once during playback.
The screen is paused.
To return to normal playback, press PLAY .
Forward/Reverse Scan
Press REW or FF during playback.
Normal playback is resumed when you press
PLAY .
The Forward Scan ( , x2, , x4 etc.) and
Reverse Scan ( , x2, , x4 and etc.) speed
changes each time you press the REW /FF
buttons.
When not in use...
When the DVD player is not in use, remove the disc
and press Power to turn off the player. Then close the
display panel.
The disc continues to rotate while the menu
is displayed even after the player has finished
playing a particular disc. When no further
selections are to be played, be sure to press the
STOP button to clear the menu screen.
If the disc is placed in the tray upside down (and
it is a single sided disc), the "NO DISC" message
will appear.
For your reference:
If " " appears when a button is pressed, it means
that the corresponding function is not available.
The function may not be present on the disc, or
the player may need to be in STOP to access the
function.
10
Page 11

Special DVD Features
MuteDisplay
Press DISPLAY during playback.
Press DISPLAY repeatedly to display the title
number, chapter number, and other information.
Stop Displaying Scene Information
Press DISPLAY repeatedly until the information
disappears.
Audio
You can change the audio sound track to any
language available on the disc.
Press AUDIO repeatedly until the preferred
language is selected.
If the language you want to hear is not selected
even after you have pressed the button several
times, it may indicate that language is not
available on the disc.
Subtitles
If a disc provides subtitles, you can choose to hide
or display them. This operation works only with discs
that provide subtitles.
Press SUBTITLE during playback.
After you press SUBTITLE once, the first
subtitle language on the disc will be displayed.
The rest of the subtitles recorded will display in
sequence as you press the button.
If no subtitles are recorded " " will display
instead of the language number.
To mute the volume on the DVD player.
Press MUTE during playback.
To resume normal sound, press MUTE
repeatedly until "MUTE OFF" appears on the
screen.
Title
Some DVDs have Title menus, which allow you to
choose among multiple titles (usually movies).
Press TITLE in stop mode
The Title menu appears, if available.
Press / / / to select the preferred item.
Press /Select.
Disc Menu
Most DVDs have disc menus, which include special
disc features, including audio languages, subtitle
languages and more.
Press DISC MENU.
The Disc menu appears, if available.
Press / / / or use the number button(s)
to select the preferred item, then press ENTER.
Menu details vary by disc.
A-B Repeat
Press SUBTITLE repeatedly until the preferred
language is selected.
Clear the subtitles by pressing this button
repeatedly until "SUBTITLE OFF" appears.
In some cases, the subtitle language may not
change immediately to the selected one.
If the preferred subtitle language is not played
even after you have pressed the button
several times, it may indicate that the language
is not available on the disc.
Angle
Some DVD discs contain scenes which were shot
simultaneously from multiple angles. Use the ANGLE
button to view these alternative scenes.
Press ANGLE during playback.
Press ANGLE repeatedly until the preferred
viewing angle is selected.
ANGLE will only function on discs where
different angles have been recorded.
A-B Repeat allows you to repeat any segment of a
DVD or CD. Mark the beginning point (A) and the
ending point (B) of the segment you want to review.
While playing a DVD or CD, at the place you want
the repeat to start, press the A-B button. "Repeat
A" will appear on screen.
Press A-B again at the end of the segment you
want to repeat. The segment will repeat in a
continuous loop.
Press A-B again to resume normal playback.
11
Page 12

Other Disc Playback
Playing Audio CDs
Before You Begin...
Turn on your TV and select the appropriate video
input.
Turn on your stereo or audio system and select
the appropriate audio input.
Basic Audio CD Playback
Press POWER on.
Press OPEN/CLOSE to open the disc tray.
Hold the edge of the disc and place it in the tray
with the label side up.
Close the disc tray.
Standard CDs start playing automatically.
If the CD has playback control, the CD disc
menu will appear.
Stopping Playback
Press STOP once to stop and hold playback at
the current position.
Press STOP twice to stop and reset the disc to
the beginning.
Forward/Reverse Scan
Press REW or FF during playback.
Normal playback is resumed when you press
PLAY .
The Forward Scan ( , x2, , x4 etc.) and
Reverse Scan ( , x2, , x4 etc.) speed changes
each time you press the REW /FF buttons.
Displaying Track Information
Press DISPLAY during playback.
Press DISPLAY repeatedly to display the elapsed
time, track number, and other information on the
screen.
Stop Displaying Track Information
Press DISPLAY repeatedly until the track
information disappears.
Program Mode
Program mode allows you to create a custom play list
The list will be remembered as long as the CD is in
the player. Removing the CD may erase the playlist.
Press PROGRAM.
Press to access the list of tracks.
Press / / / to highlight the first desired.
track, then press ENTER to add it to your play list.
Press to move to the next position on the play
list, and repeat steps 2 and 3.
Press PLAY to play the programmed tracks.
To delete a track from the programmed list
Press / / / to choose the track in the
playlist, then press CLEAR.
Skipping Ahead
Press NEXT during playback.
Skips a track each time you press the NEXT
button.
Skipping Back
Press PREV during playback.
If you press the PREV button midway through
a track, the DVD player returns to the beginning of
the track. The player then skips a track each time
you press the PREV button.
Pause
Press PAUSE once during playback.
Playback is paused.
To return to normal playback
Press PLAY .
12
Page 13

Other Disc Playback
Playing JPEG Picture CDsPlaying Kodak Picture CDs
You can play Kodak Picture CDs in your DVD player.
Basic Playback
Load a Kodak Picture CD.
After a few seconds the DVD player starts a
slide show of available images.
Press DISPLAY to view the current image number
and total number of images.
Use the number keys to jump to a specific image.
The DVD player will begin the slide show from
the selected image.
Press PAUSE to pause the slide show.
Press STOP to stop the slide show and
enter Thumbnail mode.
You can rotate images during a slide show,
by pressing the / / / keys when the
image appears on screen.
Playback Modes
There are two play modes for a Kodak Picture CD:
Thumbnail Mode
Rotate Mode
Thumbnail Mode
Thumbnail mode allows you to view thumbnails of up
to 20 images at a time.
Press STOP to stop the slide show.
Press PREV and NEXT to view the previous
or next page of thumbnail images.
Press / / / to choose the desired image.
You can play JPEG picture CDs in your DVD player.
Basic Playback
Load a JPEG Picture CD.
After a few seconds, the DVD player starts a
slide show of available images.
Press DISPLAY to view the current image number
and total number of images.
Use the number keys to jump to a specific image.
The DVD player will begin the slide show from
the selected image.
Press PAUSE to pause the slide show.
Press STOP to stop the slide show and
enter File Manager mode.
File Manager Mode
File Manager mode allows you to view your images in
a directory format.
Press / / / to choose the desired image,
then press ENTER to display the image.
Press PREV and NEXT to view the previous
or next group of images in the list.
Play Mode
Play mode allows you to view your images in a slide
show.
Press PREV and NEXT to view the previous
or next image.
Press / / / to rotate the images .
Press PAUSE to pause the slide show.
Press /Select to resume the slide show.
Press STOP to return to File Manager mode.
Press ENTER or PLAY to see the full size
image and start the slide show beginning with the
selected image.
Rotate Mode
You can rotate images or flip them horizontally and
vertically before starting a slideshow.
Press STOP to access thumbnail mode.
Press PREV and Next to view the desired
page of thumbnail images.
Press / / / to choose the desired image.
Press ENTER to view the full size image, then
press / / / to rotate the image, then
press STOP .
The images will remain rotated until you remove
the picture CD
Repeat steps 1-5 for every picture you want to
rotate, then select the first thumbnail and press
PLAY to start the slideshow.
13
Page 14

Other Disc Playback
Playing CDs with MP3 and JPEG FilesPlaying MP3 CDs
Press POWER on.
Press OPEN/CLOSE to open disc tray.
Hold the edge of the MP3 disc and place it in the
tray with the label side up.
Press OPEN/CLOSE to close the disc tray.
After a few moments, the first MP3 file in
the disc's root directory will start playing
automatically.
Browsing Directories
MP3 discs are often divided into directories (i.e.,
folders) which are subdivided into MP3 tracks. If your
disc contains directories:
Press STOP to stop playback.
Press / / / to choose the desired
directory, then press ENTER to open it.
Press / / / to choose the desired track,
then press ENTER or PLAY to start playback.
You can also enter a track number directly with
the number buttons, then press ENTER to start
playback.
The DVD player will play CDs with MP3 and JPEG
files. The operations are the same as with standard
MP3 and JPEG discs.
To stop playback
Press STOP .
To skip to the previous/next track.
Press PREV / during playback.
To pause playback
Press PAUSE .
To resume playback
Press PLAY .
14
Page 15

Language Setup
Audio LanguageOn Screen Display (OSD) Language
You can select among various languages for the
player's on-screen display (OSD).
Press SETUP in Stop mode.
Press to select "Language Setup", then
press .
Press to select "OSD", then press .
Press to select your preferred language.
Language Setup
OSD
Menu
Audio
Subtitle
English
French
German
Spanish
Press ENTER.
To exit the Setup menu
Press SETUP or select 'Exit Setup" on the Setup
Menu screen.
Disc Menu Language
You can select your preferred language for DVD
Disc menus. If your preferred language is recorded
on a DVD. the player will use it for playback. If the
language is not recorded on a DVD, the player will
use the DVDs default language.
Press SETUP in Stop mode.
You can select your preferred language for DVD
audio sound tracks.
Press SETUP in Stop mode.
Press to select 'Language Setup", then
press .
Press to select "Audio", then press .
Press to select your preferred language.
Select "Original" if you want the default
language to always be played first.
Language Setup
OSD
Menu
Audio
Subtitle
English
Chinese
Japanese
French
German
Press ENTER.
If the language selected is not recorded on the
disc, the DVD player will playback the disc's
default language.
Subtitle Language
You can select your preferred language for DVD
subtitles.
Press SETUP in Stop mode.
Press to select "Language Setup", then
press .
Press to select "Language Setup", then
press .
Press to select "Menu", then press .
Press to select your preferred language
Language Setup
OSD
Menu
Audio
Subtitle
English
Chinese
Japanese
French
German
Press ENTER.
To exit the Setup menu
Press SETUP or select 'Exit Setup" on the Setup
Menu screen.
Press to select "Subtitle", then press .
Press to select your preferred language.
Language Setup
OSD
Menu
Audio
Subtitle
English
Chinese
Japanese
French
German
Press ENTER.
If the selected language is not available on the
disc, the player will select the disc's default
language.
To exit the Setup menu
Press SETUP or select 'Exit Setup" on the Setup
Menu screen.
15
Page 16

Screen Setup
TV SystemTV Type
The TV Type feature allows you to set your preferred
aspect ratio for DVD movies. Choose from the
following:
4:3 PS (Pan & Scan) Crops widescreen movies
to fit a standard television.
4:3 LB (Letterbox) - Shows the full width of
widescreen movies on a standard television with
black bars above and below the picture.
16:9 - Select if you have a widescreen television.
Press SETUP.
Press to select "Screen Setup", then
press .
Press to select "TV Type", then press .
Press to select your preferred TV Type
setting.
Screen Setup
TV Type
Screen Saver
TV System
Video Output
Brightness
Contrast
4:3 PS
4:3 LB
16:9
Press ENTER.
When connecting the DVD player to a TV, you must
specify the broadcast system of your television.
Choose from the following:
NTSC -The colour TV broadcast standard for the
USA, Canada, Latin America and Taiwan.
PAL - The colour television broadcast standard for
Western Europe (except France, where SECAM
is the standard). Australia, China, Singapore and
Malaysia.
AUTO - Select if you have a multi-system TV that
supports both NTSC and PAL.
Press SETUP.
Press to select "Screen Setup", then
press .
Press to select "TV System", then
press .
Press to select the appropriate TV System
setting for your television.
Screen Setup
TV Type
Screen Saver
TV System
Video Output
Brightness
Contrast
NTSC
PAL
AUTO
To exit the Setup menu
Press SETUP or select "Exit Setup" on the Setup
Menu screen.
Press ENTER.
To exit the Setup menu
Press SETUP or select "Exit Setup" on the Setup
Menu screen.
16
Page 17

Screen Setup
BrightnessVideo Output
If you connected the DVD player to your TV using
the S-Video or Component Video output, you must
specify in the menu system which of these connection
types you are using.
Before you select YUV P-SCAN, make sure your
TV supports Progressive Scan and that the Y, Pb,
and Pr cables are properly connected.
If your screen turns black after adjusting this
setting, press the PROG.SCAN button on the
remote control to switch back to Interlace mode.
Press SETUP.
Press to select "Screen Setup", then
press .
Press to select "Video Output", then
press .
Press to select the appropriate Video
Output setting for your television.
Screen Setup
TV Type
Screen Saver
TV System
Video Output
Brightness
Contrast
S-Video
YUV
P-SCAN
You can change the light intensity of DVD playback to
"Normal", "Bright", or "Soft".
Press SETUP.
Press to select "Screen Setup", then
press .
Press to select "Brightness", then
press .
Press to select the desired Brightness
setting.
Screen Setup
TV Type
Screen Saver
TV System
Video Output
Brightness
Contrast
Normal
Bright
Soft
Press ENTER.
To exit the Setup menu
Press SETUP or select "Exit Setup" on the Setup
Menu screen.
S -Video - Choose when using a
standard Composite Video or S-Video
connection to your TV.
YUV - Choose when using a standard
Composite Video or Component Video
connection to your TV.
P-SCAN - Choose when using a
Progressive Scan connection to your TV.
Press ENTER.
If you selected YUV P-SCAN, you will be
prompted to confirm that your TV supports
Progressive Scan. Press ENTER to continue
or STOP to cancel.
To exit the Setup menu
Press SETUP or select 'Exit Setup" on the Setup
Menu screen.
Contrast
You can increase or decrease the difference between
light and dark tones during DVD playback.
Press SETUP.
Press to select "Screen Setup", then
press .
Press to select "Contrast", then press .
Press to select the desired Contrast setting
from -4 (least contrast, may lose detail in dark
scenes) to +4 (most contrast, may lose detail in
well-lit scenes).
Screen Setup
TV Type
Screen Saver
TV System
Video Output
Brightness
Contrast
-3
-2
-1
0
+1
+2
+3
Press ENTER.
To exit the Setup menu
Press SETUP or select "Exit Setup" on the Setup
Menu screen.
17
Page 18

Audio Setup
Digital Audio Output
The digital audio output jack (labelled "Coaxial") is
used to output the audio signal recorded on DVD
discs to an external amplifier/receiver. The player
provides three options for this audio signal:
SPDIF/PCM - Select if you are using a 2-channel
digital amplifier.
SPDIF/RAW - Select if you are using a 2-channel
digital or DTS capable amplifier.
Off - Select if you are not using the Coaxial audio
output.
Press SETUP in Stop mode.
Press to select your preferred Digital Out
setting.
Audio Setup
Digital Out SPDIF/PCM
SPDIF/RAW
Off
Press ENTER.
3
WARNING:
Do not set "Digital Out" to "SPDIF/RAW"
unless you are connecting the player to an
AV amplifier/receiver with Dolby Digital (AC-3)
decoding capability.
High volume sound may damage your hearing
as well as the speakers.
To exit the Setup menu
Press SETUP or select "Exit Setup" on the Setup
Menu screen.
18
Page 19

Custom Setup
Change PasswordParental Control
The Parental Control feature enables you to block
playback of movies based on their rating. For
example, if you set the rating level to PG-13, the
player will block playback of movies rated PG-13. R,
NC-17 and X unless the correct password is entered.
You can only use the Parental Control feature with
rated DVD discs.
Press SETUP in Stop mode.
You must remove any disc loaded in the player
to change the Parental Control setting.
Press to select "Custom Setup", then press
ENTER.
Press to select "Parental Ctrl", then
press .
Enter a 4-digit password, then press ENTER.
The factory preset password is "8888".
You must enter "8888" to set the rating for the
first time.
Press to select the desired rating and
press ENTER.
To change the Parental Control password:
Press SETUP in Stop mode.
Press to select "Custom Setup", then
press .
Press to select "password, then press
ENTER.
Use the number keys to enter your old password.
The factory preset password is "8888".
The numbers you enter will be shown as X on
the screen.
Enter your new password.
Re-enter your new password to verify it.
Custom Setup
Parental Ctrl
Password
Angle Mark
Old
Default
New
Verify
Custom Setup
Parental Ctrl
Password
Angle Mark
Default
1
2
3: PG
4: PG13
5
8: Adult
To exit the Setup menu
Press SETUP or select "Exit Setup" on the Setup
Menu screen.
To exit the Setup menu
Press SETUP or select "Exit Setup" on the Setup
Menu screen.
19
Page 20

Custom Setup
Restore DefaultsAngle Mark
Some DVDs feature scenes filmed at different angles,
which you can select by pressing the ANGLE button.
You can have the player alert you when multiple
angles are available by displaying an Angle Mark
( ) on screen.
Whether Angle Mark is set to On or Off, pressing
the ANGLE button will always allow selection of
multiple angles if they are available.
Press SETUP in Stop mode.
Press to select "Custom Setup", then
press .
Press to select "Angle Mark", then press
.
Custom Setup
Parental Ctrl
Password
Angle Mark
Default
On
Off
Select "Default" to restore the DVD player to its
factory default settings.
Press SETUP in Stop mode.
Press to select "Custom Setup", then
press .
Press to select "Default", then press .
•
"Reset" will be highlighted.
Custom Setup
Parental Ctrl
Password
Angle Mark
Default
Reset
Press ENTER.
The player's factory settings will be restored
The Parental Control rating and Password
settings will NOT be changed.
Press to select "On" or "Off', then press
ENTER.
To exit the Setup menu
Press SETUP or select "Exit Setup" on the Setup
Menu screen.
To exit the Setup menu
Press SETUP or select "Exit Setup" on the Setup
Menu screen.
20
Page 21

Troubleshooting
Before requesting service for the DVD player, check the chart below for a possible cause of the problem you
are experiencing. Some simple checks or a minor adjustment on your part may eliminate the problem and
quickly restore proper operation.
SYMPTOM
No Power.
REMEDY
Inset plug securely into power outlet.
Check if the POWER button is pressed.
Check power at AC outlet by testing another appliance.
Player does not start
playback when PLAY is
pressed.
Player starts playback but
stop immediately.
No Picture.
No Sound.
Distorted sound.
No audio from Digital
output.
Distorted picture.
Completely distorted picture
or no colour in picture.
Condensation has formed wait ~1-2 hours to allow player to dry out.
Player cannot play discs other than DVDs, Audio CDs, MP3 CDs and photo CDs.
Try another disc to check if the unplayable disc is defective.
Check region (local) code.
Disc may be dirty and may require cleaning.
Ensure that the disc is installed with label side up.
Ensure that equipment is connected properly.
Ensure that input setting for TV is set correctly.
Check if external equipment is on.
Select same channel and source on TV as on the player.
Ensure that equipment is connected properly.
If using a HiFi amplifier, try another audio source.
Check volume adjustment on the player and external equipment.
Check the MUTE on the player and the TV.
No sound will be heard during Pause, or when fast forward or reverse is used.
Ensure that the audio input setting for your TV and stereo system are correct.
Check digital connections.
Check Audio Setup menu to make sure the "SPDIF/RAW" or "SPDIF/PCM" is selected.
Check if the audio format of the selected audio language matched your receiver
capabilities.
Check disc for fingerprints and clean with soft cloth, wiping from the centre to edge.
Sometimes a small amount of picture distortion may appear. This is not a malfunction.
Disc format does not match TV format (PAL/NTSC). Check "TV System" setup.
Picture distorted during
forward or reverse scan.
No forward or reverse scan
playback.
No 4:3 (16:9) picture.
Remote control does not
function.
DVD player and remote
control keys not functioning.
Playback does not start
when Title is selected.
Audio sound track and/or
subtitle language not
selected.
No subtitles.
Alternative audio sound
track (or subtitle) languages
cannot be selected.
Picture will be somewhat distorted at times. This is normal.
Some discs may have sections which prohibit Forward/Reverse Scan.
Choose the correct "TV Type" setting in the Setup menu.
Make sure the battery is installed with correct polarities (+ and -).
Battery is depleted: replace with new one.
Point remote control at signal sensor.
Operate remote control within 20 feet of signal sensor.
Remove obstacles between remote control and signal sensor.
Power unit off and on. Alternatively, turn off unit, unplug power cable and plug it back in.
(Player may not be operating properly due to lightning, static electricity or some other
external factor.)
Parental Control function may be set. Confirm the "Parental Ctrl" setup.
If audio sound track and/or subtitle language are not available on the disc, the language
selected in Setup menu will not be seen/heard.
Subtitles are not available on all discs.
Subtitles are available but turned off. Press SUBTITLE to display the subtitles.
Only one language is available on the disc.
Angle cannot change.
Depends on angle availability. Even if a disc has a number of angles recorded, these
angles may be recorded for specific scenes only.
21
Page 22

Disc Handling & Maintenance
Handling Precautions
Hold the disc by the edges so the surface will not be
soiled with fingerprints.
Fingerprints dirt and scratches can
cause skipping and distortion.
Do not write on the label side with a
ball-point pen or other writing utensil.
Do not use record cleaning sprays,
benzene, thinner, static electricity
prevention liquids, or any other
solvent.
Be careful not to drop or bend the
disc.
Do not install more than one disc on
the disc tray.
Do not try to close the disc tray when
the disc is not installed properly.
Be sure to store the disc in its original
case when not in use.
If the surface is soiled
Wipe gently with a soft. damp (water
only) cloth.
When wiping discs, always move the
cloth from the centre hole toward the
outer edge (If you wipe the disc using
a circular motion, circular scratches are likely to occur,
which will cause noise).
If the disc is brought from a cold to a warm
environment, moisture may form on the disc
Wipe moisture off with a soft, dry, lint-free cloth before
using the disc.
Improper disc storage
You can damage discs if you store them in the following
places:
Areas exposed to direct sunlight
Humid or dusty areas
Areas directly exposed to a heat outlet or heating
appliance
Power cord protection
To avoid any malfunctions of the unit, and to protect against
electric shock, fire or personal injury, please observe the
following:
Hold the plug firmly when connecting or disconnecting
the AC power cord.
Keep the AC power cord away from heating appliances.
Never put any heavy object on the AC power cord.
Do not attempt to repair or reconstruct the AC power
cord in any way.
Placement
Avoid placing the unit in areas of:
direct sunlight or heating radiators, or closed automobiles
high temperature (over 950F) or high humidity (over
90%).
significant dust as the internal parts may be seriously
damaged.
Non-use periods
When the unit is not being used, turn it off. When left unused
for a long period of time, the unit should be unplugged from
the household AC outlet.
No fingers or other objects inside
Touching internal parts of this unit is dangerous, and
may cause serious damage to the unit. Do not attempt to
disassemble the unit.
Do not put any foreign object in the disc tray.
Keep away from water
Keep the unit away from flower vases, tubs, sinks, etc.
If liquids are spilled into the unit, serious damage could
occur.
Keep away from magnets
Never bring a magnet or magnetised object near the unit.
Stacking
Place the unit in a horizontal position, and do not place
anything heavy on it.
Disc which cannot be played with this player
CVD
CD-G
DVD with a Region Code other than that shown on the
DVD units's Region Code Label on the rear panel
Maintenance
Be sure to turn the unit off and disconnect the AC power
cord before maintaining the unit.
Wipe this unit with a dry soft cloth. If the surfaces are
extremely dirty, wipe clean with a cloth which has been
dipped in a week soap and water solution and wrung out
thoroughly and then wipe again with a dry cloth.
Never use alcohol, benzene, thinner, cleaning fluid or
other chemicals. And do not use compressed air to
remove dust.
Condensation
Moisture may form on the lens in the following conditions:
immediately after a heater has been turned on
in a steamy or very humid room
when the unit is suddenly moved from a cold
environment to a warm one
If moisture forms inside this unit, it may not operate
properly. In this case, turn on the power and wait
about one hour for the moisture to evaporate.
If there is noise interference on the TV while
a broadcast is being received
Depending on the reception condition of the TV, interference
may appear on the TV monitor while you watch a TV
broadcast and the unit is left on. This is not a malfunction
of the unit or the TV. To watch a TV broadcast, turn off
the unit.
22
Page 23

PALSONIC CORPORATION PTY LTD
1 JOYNTON AVENUE
WATERLOO NSW 2017 AUSTRALIA
TEL: (02) 9313 7111
FAX: (02) 9313 7555
www.palsonic.com.au
PALSONIC CUSTOMER SERVICE
TELEPHONE
AUSTRALIA: 1300 657 888
 Loading...