

Page 1

OWNER'S MANUAL
34CM CORDLESS REMOTE COLOUR TELEVISION
MODEL: 3490
PALSONIC CORPORATION PTY LTD
1 JOYNTON AVENUE
WATERLOO NSW 2017 AUSTRALIA
TEL: (02) 9313 7111
FAX: (02) 9313 7555
www.palsonic.com.au
PALSONIC CUSTOMER SERVICE
TELEPHONE
AUSTRALIA: 1300 657 888
Page 2

This equipment has been designed and manufactured to meet the highest international
standards, but, like any electrical apparatus which is operated at mains voltage, care must be
taken if you are to obtain the best results and safety is to be assured. This is particularly
important with audio and TV equipment.
DO
DO
DO
DO
DON'T
Remember that to obtain the best performance and lasting satisfaction from your
equipment : have it regularly maintained by a reliable service organisation: ensure that it is correctly
used by all the family.
read this handbook carefully and keep it handy for ready reference.
ensure that all electrical connections (including the mains plug, extension leads and
interconnections between pieces of equipment) are properly made and in accordance
with the manufacturer’s instructions. Check that the mains fuse rating is correct.
always call in your dealer if you are ever in doubt about the installation, operation or
safety of your equipment, he is the best person to advise you.
unplug the power cord if the appliance is left unused.
obstruct the necessary all round ventilation: moderate heat is generated when product
is operating - ensure installation is clear of curtains etc. Do not obstruct cooling
vents on rear of cabinet.
ABOVE ALL:-
Never let children push anything into holes or slots in the cabinet - this could result in an
electric shock.
Never guess or take chances with electrical equipment of any kind-it is better to be safe than
sorry.
WARNING:
To prevent fire or shock hazard do not expose this appliance to rain or moisture.
No user serviceable parts inside. Refer servicing to qualified service personnel. Never
remove covers unless qualified to do so; this unit contains dangerous voltages.
LOCATION:
LOCATE appliance in the room where direct light does not strike the screen.
ALLOW adequate space between the appliance and the wall to permit proper ventilation.
AVOID excessive warm and dusty location to prevent possible damage to the cabinet and
component failure.
NEVER install the appliance in a strong magnetic field.
CONNECT the appliance to AC 240V, 50Hz electricity supply.
1
Page 3
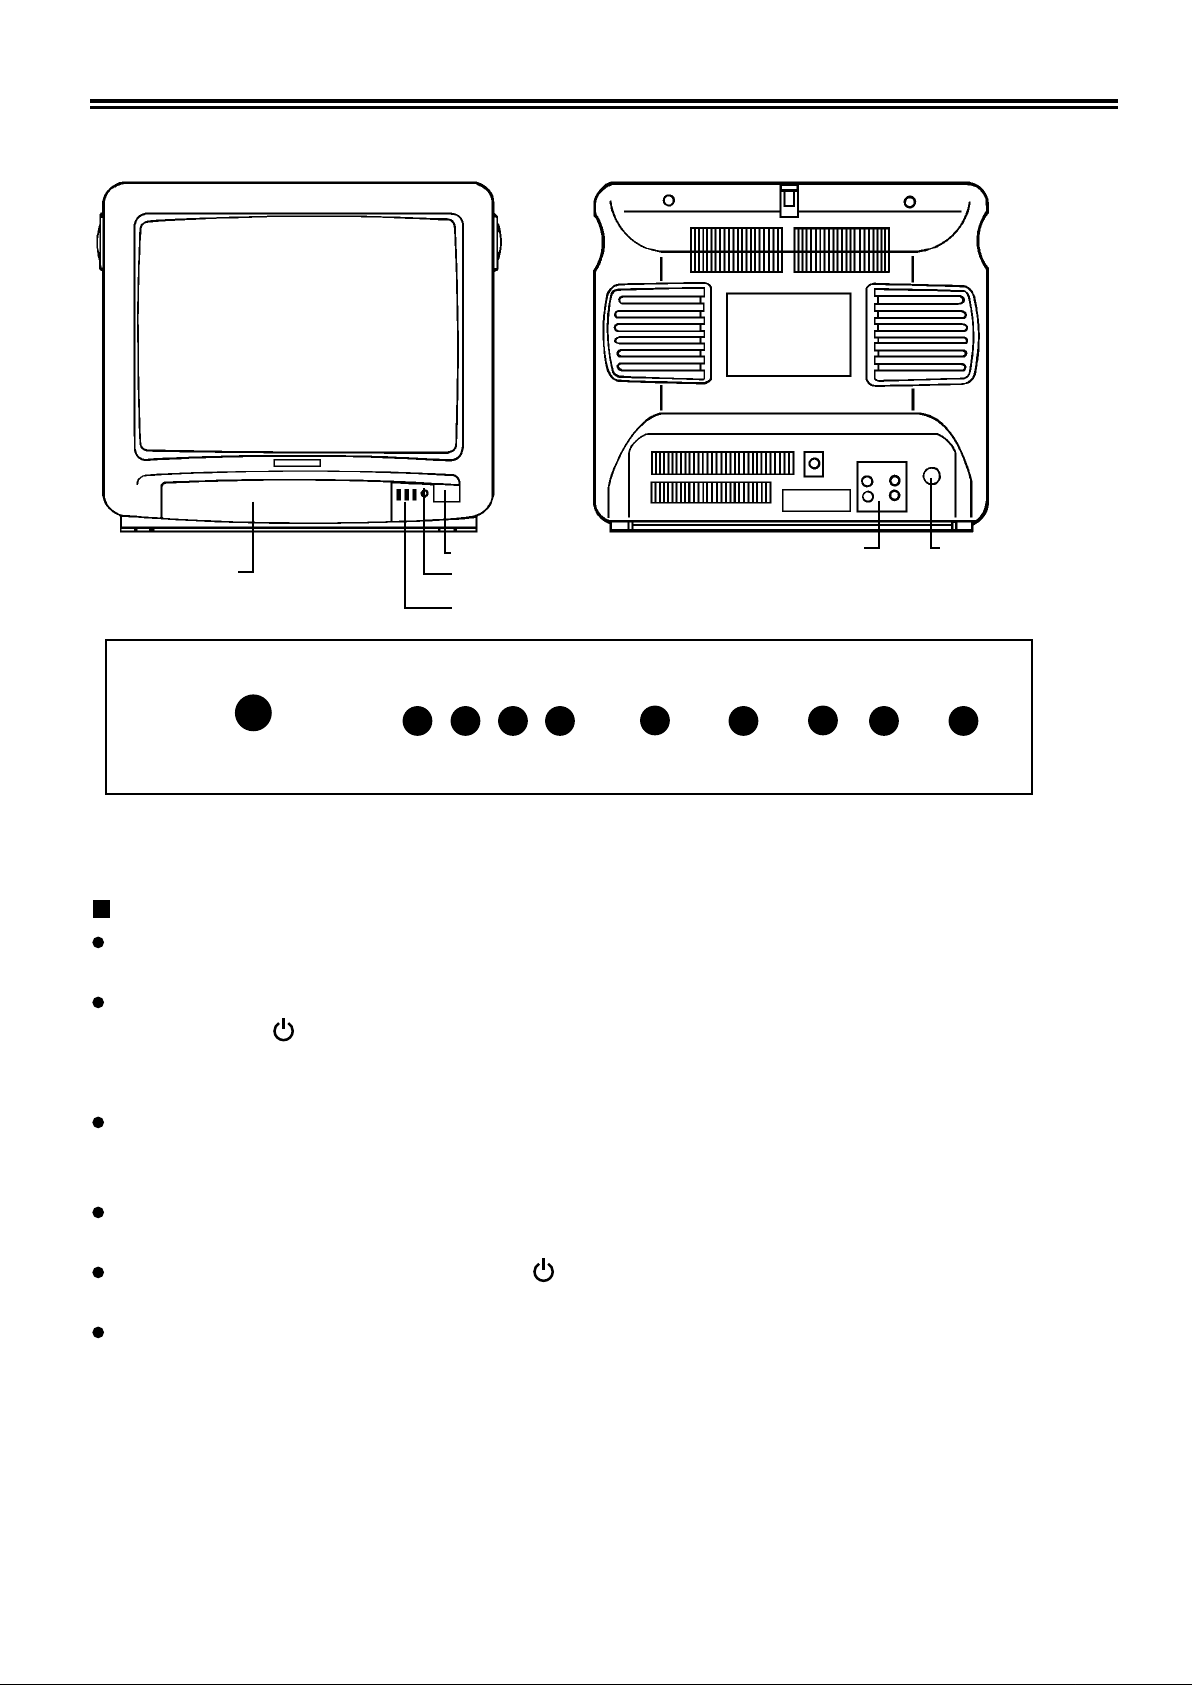
PRESET DOOR REMOTE SENSOR
POWER INDICATOR
AV IN/OUTPOWER SWITCH
ANTENNA INPUT
SHARPNESS LANG PIC SOUND STAND BY - VOL PR
INST
+
-
OPERATION INSTRUCTION
POWER SWITCH AND STANDBY BUTTON
Press POWER SWITCH, the TV set will be in STANDBY mode, and the indicator is
red.
In STANDBY mode, press any one of the following buttons could turn on the TV:
a. STANDBY ( ) on local or remote keyboard; b. DIGITAL 0~9.
Then the indicator is orange and the channel number is displayed in the upper right corner
of the screen for 10 seconds.
Sound mute of 1-2 seconds is executed after power on, and TV will tune to the last selected
program and the last memorised setting for contrast, brightness, saturation, volume,
etc.
If there has been no TV signal at the current program position for five minutes, the TV set
will go into STANDBY mode automatically; and the indicator is red.
In operation mode, press the STANDBY ( ) on local & remote keyboard, the TV will go
into STANDBY mode; the indicator is red.
If you do not want to watch TV, press POWER SWITCH again to turn off the TV set's
power completely.
+
2
Page 4

TELEVISION FUNCTIONAL DESCRIPTION
MENU DRIVEN SELECTION
RED KEY
This key activates the SOUND menu as shown below:For the stereo chassis:
OSD
BALANCE
VOLUME
TREBLE
BASS
44
23
33
50
* * The colour of the analog bar depend on the item selected
For the mono chassis, the menu is as shown: -
OSD
VOLUME 44
1.
When this menu is first activated, no bar display will be shown.
#2.
If RED key is pressed, the bar display changes to red colour to indicate the current level
setting for valance. The same principle applies to YELLOW for Treble and BLUE for
Bass.
3.
When GREEN key is pressed, the bar display appears in green to indicate the current
level setting for Volume. Activation of plus or minus (PR -/+ or VOL -/+ on local
& remote keyboard) key will change the volume level.
#4.
If during operation of balance, treble or bass, the VOL -/+ key is pressed, the volume
level will be reflected in the two digit display corresponding to volume.
NOTE:
1.
To exit menu, press " /--" key. At local keyboard, press STANDBY key to exit
menu.
2.
The instruction with "#" symbol is only for TV model with stereo chassis.
Red
Green
Yellow
Blue
* *
Green
Green
GREEN KEY
This key activates the picture menu as shown below: -
OSD
BALANCE
VOLUME
#
TREBLE
BASS
44
23
33
32
3
Red
Green
Yellow
Blue
Page 5
NOTE:
The instruction with "#" symbol is only applicable when AV IN signal is NTSC system or the
TV set is selected NTSC system.
1.
When this menu is first activated, no bar display will be shown.
2.
When RED key is pressed, the bar display appears in red to indicate the current level
setting for Brightness. Activation of plus or minus (PR -/+ on local & remote key board)
key will change the level for Brightness.
3.
If GREEN key is pressed, the bar display changes to green colour to indicate the current
level setting for Colour. The same principle applies to yellow for Contrast and BLUE for
*
Tint.
To exit menu, press " /--" key. At local keyboard, press STANDBY key to exit
menu.
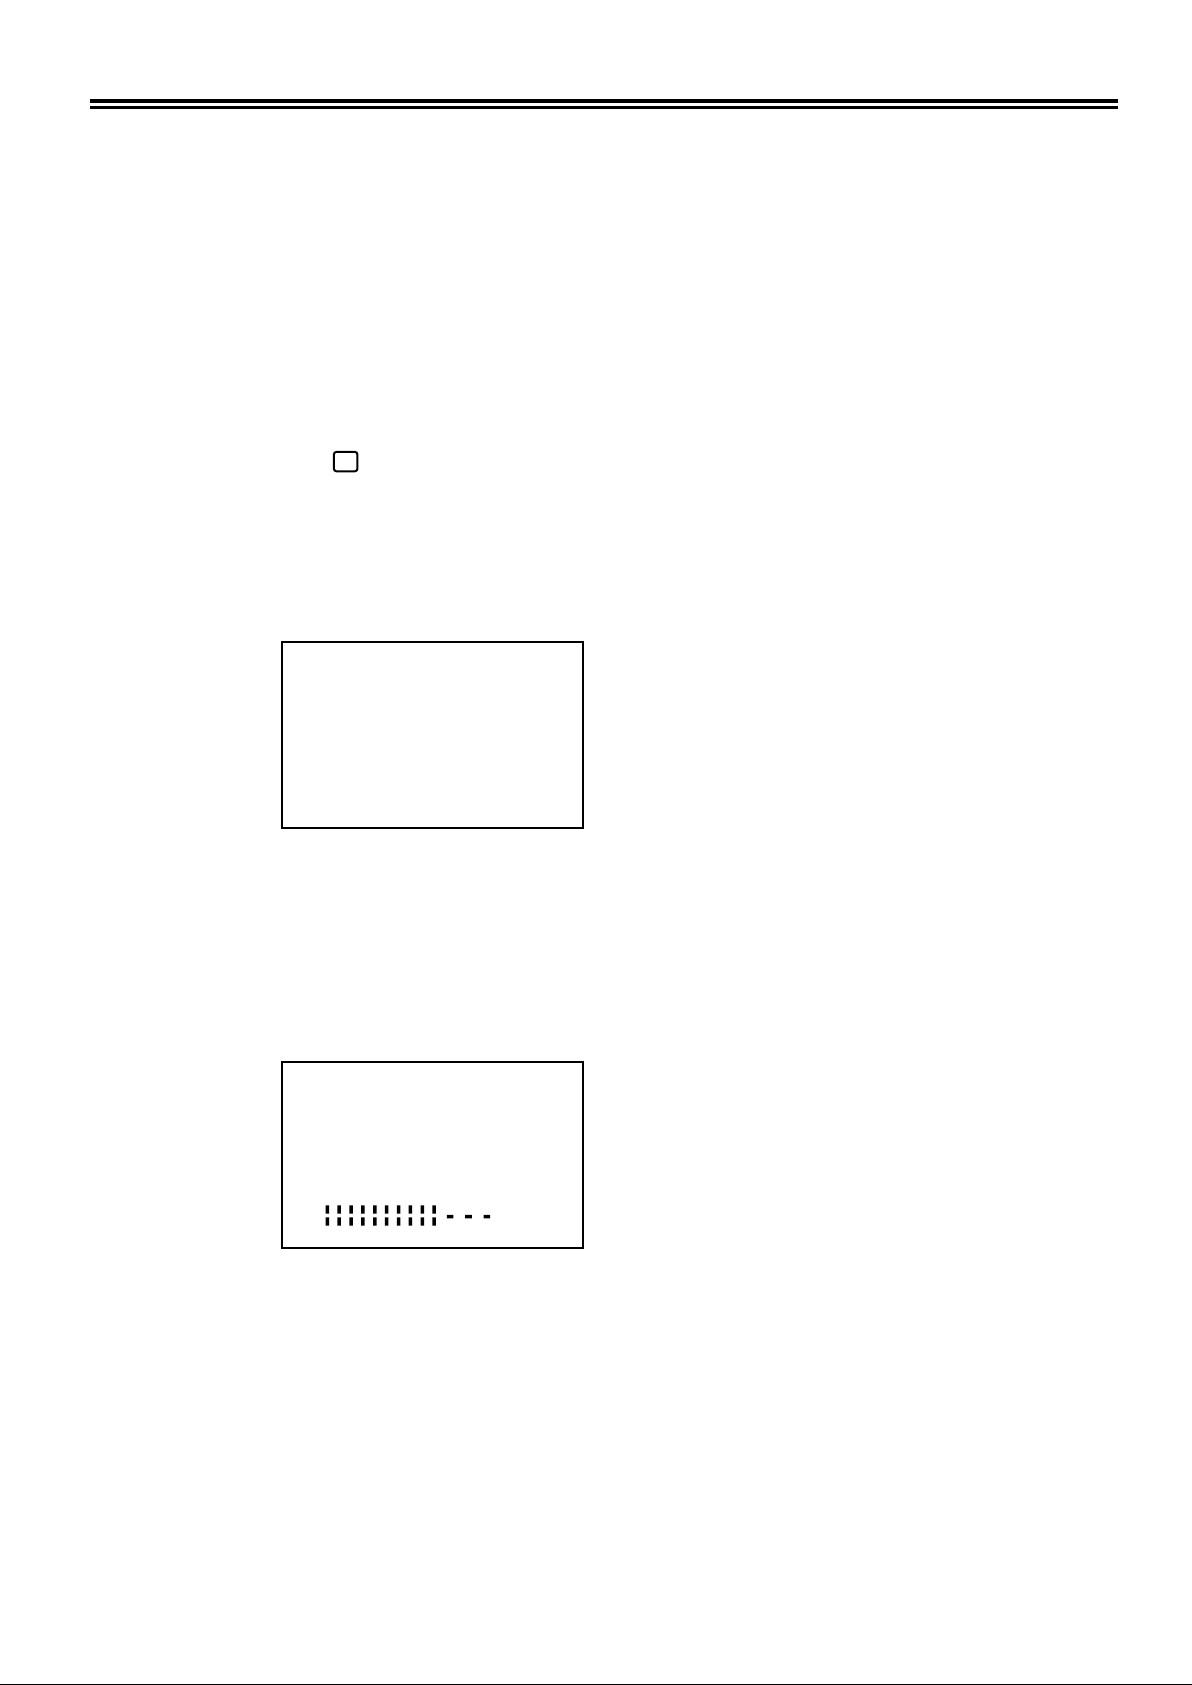
YELLOW KEY
This key activates the installation menu as shown below: -
OSD
SEARCH
STORE
FINE-TUNE
AUTOPROGRAM
UH
01
Red
Green
Yellow
Blue
When this menu is first activated, no bar display will be shown.
* In AV mode, the menu can not be activated.
AUTO-SEARCH
1. When RED key is pressed, the bar display appears in red colour to indicate that SEARCH
is in operation and '>>' (red colour) appears as shown below: -
OSD
SEARCH
STORE
FINE-TUNE
AUTOPROGRAM
2.
It will search to the next available station and stop to allow user to key in the program .
VL
>>
Red
Green '>>' in Red
Yellow
Blue
Red bar
number to store by indicating '--' (red colour ).
3.
The program number to be stored can be entered by direct number entry or PR -/+.
4.
After two digit program number has been entered, the user can then press the GREEN key
to store the signal to the desired program number. The program number which was in red
will turn to green to indicate that STORE operation is completed.
5.
During auto-search, only power on/off key is recognised, the rest of the keys are ignored.
When tuning voltage reaches the end of one band, the system changes band and start to
tune again after a delay of 400 ms.
4
Page 6

6. The auto-search speed at no signal condition of each band is shown below:
VL : 8 Sec
VH : 16 Sec
UHF : 32 Sec
HB : 32 Sec
7. If no station signal is detected after sweeping through all the bands, auto-search will stop at
the start of the next band.
FINE TUNE
1.2.When YELLOW (Fine-Tune) key is pressed, the tuning bar will not be displayed. The
current program number which was in green will be changed to yellow.
Activation of plus or minus (PR -/+ on local & remote keyboard) key will tune forward
or backward based on current band selected as shown in red. When '+' key is
pressed, '+ +' symbol will appear at yellow line, and it will disappear immediately after
' + ' key is released. For ' - 'key, '- -' symbol will appear instead of '+ +'.
OSD
SEARCH
STORE
FINE-TUNE
AUTOPROGRAM
UH
01
- -
Red
Green
Yellow
Blue
3. Once fine tuning is completed, the user can then pressed the GREEN key to store new tuning
values into current program number. The program number which was in yellow will
become green to indicate that STORE operation is completed.
AUTO-PROGRAM
1.
If BLUE (Auto-program) key is pressed, the program number will change to blue colour and
blue tuning bar will appear to indicate that Auto-program is in operation.
2.
It will automatically search through all the bands for any available stations in
transmission, and store them consecutively into program number 01 onwards.
3.
Progression of operation will be indicated by the moving of bar display, changing of band
and program number. Auto-program will be aborted if blue key is pressed a second time.
4.
The search speed for auto-programs the same as auto-search.
*
To exit menu, press " /- - " key. At local keyboard, press STAND BY key to exit
menu.
BLUE KEY
This key activates the language menu as shown: -
OSD
ENGLISH
DEUTSCH
FRANCAIS
ESPONAL
Red, '>' in Red
Green
Yellow
Blue
5
Page 7

Press Red button to activate English menu. OSD is in English.
1.
Press Green, Yellow or Blue to activate German, French or Spanish Menu respectively
2.
When the TV is turned on at the very first time, the Menu language selection is English. If
3.
the user change the language selection, the new language selection will be stored in
memory even if you turn off the TV set.
To exit Menu, press " /- - "key. At local keyboard, press STAND BY key to exit
*
Menu.
NOTE:
In Menu mode, at local keyboard press STAND BY first to exit menu. Press STAND BY
1.
again to enter STAND BY mode.
In Menu mode, no button except STAND BY and VOL-/+ can be operated.
2.
POSITION SELECTION
There are two methods to choose the channel number you wanted by single digital method
or two digit method.
1.
Single digit method
USING PROGRAM POSITION NUMBER BUTTONS
In single-digit mode, you can only select any one of 0-9 Program Position directly by
pressing the NUMBER BUTTON accordingly.
USING PROGRAM POSITION SELECTOR
Press PR (-/+) on local & remote keyboard, the position number will be increased or
decreased as shown in the following fig, and displayed in the upper right corner of the
screen.
+
PR
-
POSITION NUMBER INCREASE
0 1 2 58 59
0 1 2 58 59
- PR +
POSITION NUMBER DECREASE
2.*Two digit method
Press " /- -" so that the symbol "- - "is displayed on the screen.
In this mode, you can choose any one of two digit program position by pressing the
NUMBER BUTTONS accordingly. For example: If you wish to receive channel 28,
press "2" button, then press "8" button.
In this mode, you also can use PR( -/+)to change the position number.
STATUS
Press STATUS (2) key to display current status (including program number, sleep timer,
1.
mute, child lock, etc.)
The status display will time-out after 5 seconds. If status key is pressed again before 5 sec
2.
time out, then a real time clock is displayed on TV background whenever there is valid
Teletext transmission on current programme channel.
In addition, if Teletext transmission is FLOF and packet 8/30 is transmitted, a program
3.
ID strings of 20 characters will also be displayed at the bottom of screen. After 5 seconds,
the display will disappear.
6
Page 8

VOLUME CONTROL
1.2.The Volume -/+ keys is used to make the required change to the volume level. It can be
activated both in TV/menu and Teletext mode. However, in menu mode no bar display
will appear in picture, Installation and Language menu.
These keys can also be activated in TELETEXT mode, but there will be no OSD display.
OSD
VOLUME 44
Green
Green
MUTE
1.
First press MUTE ( ) switches the sound off and a second press returns the sound to the
previous level.
2.
Sound mute will also be cancelled by:
a. VOL -/+; b. PPR (3); c. /MTOG (5).
3.
Whenever mute function is on, the OSD will also stay on. MUTE key can be activated in
TELETEXT mode, but there will be no OSD display.
PERSONAL PREFERENCE STORE & RETRIEVE
1.
The PPS key (18) will store the current volume, brightness, saturation, contrast and tint
to eeprom. The OSD display is in WHITE.
2.
The PPR key (3) will retrieve the user stored preferred volume, brightness, saturation
contrast, and tint from eeprom into current setting. The OSD display is in MAGENTA.
The time-out for the OSD is 5 seconds.
OSD
PP
Magenta for "Retrieve"
White for "store"
NORMALISATION
Pressing /MTOG key (5) will return the analogue level settings to factory programmed
settings. The time-out for the OSD is 5 seconds.
OSD
Green
7
Page 9

CHILD LOCK
1.2.The purpose of this key (6) is to prevent the child from watching the TV when the parents
are not around by keeping the RC keypad.
When this key is pressed, a OSD symbol will be displayed permanently to inform the
user that it is in Child Lock mode. The user can then keep the remote control keypad in a
safe place and switches off the TV.
OSD
Green
3.
Whenever the TV is power up by the local keyboard, the Child Lock OSD will be displayed
on a blank screen and will automatically switch to standby after 5 minutes. Thus, without
the remote control keypad, the child will not be able to watch the TV.
4.
When the TV is power up by any one button of the remote control keypad, the Child Lock
OSD is still displayed with the TV operating as normal.
5.
In Child Lock mode, the Child Lock OSD will always remain on screen. To reset the Child
Lock function, press the key again and the OSD will disappear to indicate that Child Lock
mode is off.
SLEEP TIMER
1.
When / key (10) is first press, OFF will be shown. Subsequent press will
increase in steps of 15 minutes from 15 to 120 minutes. Once 120 minutes is reached,
the next step is OFF.
2.
Once the desired sleep time is set, the OSD will disappear after 5 sec. To display the
balance time after a time lapse, the same key can be pressed again.
3.
When this key is pressed once while the sleep timer is ON, it will display the balance time
left. Subsequent press will set the sleep timer to the next higher step values.
8
Page 10

TELETEXT FUNCTION DESCRIPTIONS
The thing to remember about Teletext is that it is slow. It is the nature of the system itself,
where a large amount of information is sent using a small fraction of the TV signal. If you get
yourself into trouble, read the following instruction carefully. It may have your answer.
Teletext is controlled through the remote control unit (Refer to P12 for BUTTON LIST).
DISPLAY The remote control unit has four buttons to control what will be shown on the
screen. Select a TV channel which can receive Teletext program.
Button (17) puts the Teletext information on the screen.
Button (20) /- - returns the TV display.
Button (13) mixes the two signals on the top of the other.
Button (14) switches to Audio/Video for VCRs and other equipment.
PAGE Use button (17) to enter Teletext mode.
Use PR -/+ Keys
1.
Increase/decrease current Teletext page number by 1 and request for the page.
a.
Page number will be displayed on top left corner of the text screen in white.
b.
Page up/down operation is confined to the current magazine only, and wrap-around will
c.
occur at the limits, i.e: If current number is 199 and page up key is pressed, page 100
will be requested.
In list mode, new page number will also be displayed on the status row, where list pages
d.
are displayed.
Use Number Keys (0 to 9)
2.
These keys are used to enter Teletext page numbers directly. Three digits are required for
a.
each page request with no subcode.
6 sec time out period is set for each digit entry. If subsequent digit is not entered within 6
sec, previous page number will be displayed on screen.
b.
If more than 3 digits are entered subsequently, new entry sequence will resume but previous
3 entries will be stored, e. g. numbers 1, 2, 3, 4 have been entered continuously, page
c.
123 will be requested while a new entry of '4 - -' will resume.
During digit entry, if any key other than number key is pressed, the entry sequence will be
aborted, and respective function will be executed, with the exception of the followings:
d.
Double Height (11) function will be carried out but digit entry sequence will be
maintained.
*
Mix (13) function will be carried out, but digit entry sequence will be maintained.
*
PR -/+ key - no action.
*
Most recent list of 4 pages will be stored into EEPROM, ignoring current incomplete page
*
entry.
9
Page 11

Four Colour Memory. (OPTIONAL)
The set is fitted with a four-page memory to speed up operation and make it more convenient
to use. If you are interested in stock Market Reports or TAB betting, then the four
most used pages would be set on these four colour coded buttons and be instantly available.
There are two ways to use the buttons:
use /MTOG to toggle between LIST mode and FLOF mode.
List mode: The character L appears bottom left of the screen and the coloured buttons may
1.
then be pressed to show the corresponding page number.
STRLIST BUTTON (12):
Only work in LIST mode. Press STRLST (12) to store current LIST of 4 preferred page
a.
numbers shown on status row into eeprom.
The key must be pressed for at least 1 sec for this storing function to take place.
b.
After the LIST has been stored successfully , the colour of the LIST pages displayed on
c.
status row will appear black on white background for 1 sec.
If the page number or the order of the current LIST has not been changed by user, pressing
d.
this key will give no action. i. e. storing action is only performed if the LIST has been
e.
altered by user.
This process has to be repeated for each TV channel sending Teletext.
FLOF (Fasttext) mode:
2.
In this case, the information stored is set by the TV station. (usually in Main index).
The memory of the four colour-coded buttons is continually updated. Pressing any one of
these buttons makes the information on that page instantly available (once the system has
first scan through).
MIX
Use Key (13) to display interlaced picture and text together.
1.
Toggle between TEXT and MIX mode.
2.
MIX mode will be cleared by
3.
a. MIX key (13); b. SUBCODE: / key (10); c. CANCEL X key (8).
4.
For MIX mode operating in LIST, page header and status row will be boxed for 6 sec when
5.
any of the following Keys is pressed:
6.
a. INDEX / key (6); b. PR -/+; c. DIGITAL 0~9 (4); d. SUBCODE /
key (10); e. HOLD key (7); f. 4 colour keys (21); g. BROWSE / key
(14).
For MIX mode operating in FLOF, only the page header will be boxed.
When MIX key is pressed to change from TEXT to MIX, text character size will be set to
normal, and CONCEAL mode will be resumed.
i
CONCEAL/REVEAL
Use REVEAL ? key (9) to display hidden characters previously hidden by space
1.
characters.
Toggle between CONCEAL and REVEAL mode.
2.
CONCEAL mode will always be resumed when any of the Teletext key is pressed except
3.
double height key (11).
10
Page 12

DOUBLE HEIGHT
1.
Use " " key (11) to expand character size and display half text screen.
2.
It toggles between top screen, bottom screen and normal screen.
INDEX Key
Press / key (6) to recall the stored list of page numbers if the TV station is sending it.
Otherwise, page 100 will be requested.
i
HOLD
1.2.Press HOLD key (7) stop page acquisition on current page to prevent text update.
HOLD will be displayed on top left corner of the screen in green colour.
HOLD status will be released by the following keys:
a. PR -/+; b. DIGITAL 0~9; c. MTOG /MTOG key; (5); d. SUBCODE /
key (10); e. INDEX / key (6); f. BROWSE / key (14).
i
CANCEL
1.
Press CANCEL X key (8) to cancel text and display picture while maintaining Teletext
mode.
2.
In this mode, the system behaves as in Teletext mode, except that the TV picture is
displayed on screen instead of Teletext data. When a Teletext command comes in, only the
header and status row will be boxed on screen for 6 sec.
3.
Any number keys, 4 COLOUR keys, BROWSE, PR -/+ , HOLD, SUBCODE,
INDEX keys pressed will cause the header and row 24 to be boxed for six seconds. There
after, if a new page request had just been made and is valid, then the page number will be
boxed at the upper left corner. If it is not valid yet, then no box will be displayed after the
six seconds timed out. The box (page number) will only come on when the page is
valid.
BROWSE
Press BROWSE / key (14) to capture and display as quickly as possible the next
available page being transmitted.
Sub pages
Some pages (such as share prices) have sub-pages. They are accessed by either waiting
(15 to 30 seconds), or by using the SUBCODE / key (10) and entering the required
sub-page number 6 sec time out for each digit entry. Sub pages entry will be reset when
any other Teletext function key is pressed. During sub pages entry, HOLD key (7) is
disabled. The page is released by pressing the key ( / ) again.
11
Page 13

REMOTE CONTROL UNIT
The remote control unit allows almost everything to be adjusted from the armchair.
/
1. STANDBY ( )
2. STATUS
3.
PPR
4.
DIGITAL KEYBOARD (0~9)
5. NORMAL/MTOG ( /MTOG)
6.
CHLLD LOCK/INDEX ( / )
7. HOLD ( )
8.
CANCEL (
9. REVEAL ( ? )
1
0. SLEEP/SUBCODE ( / )
X )
i
11. SIZE ( )
12. STORE LIST (STRLST)
13. MIX ( )
14. AV/BROWSE ( / )
15. MUTE ( )
16. VOLUME -/+
17. TELETEXT ( )
18. PPS19. PR -/+
20. TV/-- ( /--)
21. RED/GRE/YEL/BLU
12
Page 14

INSTALLING BATTERIES
1.
Remove the battery cover of Remote
Control Unit.
2.
Insert two AAA 1. 5V batteries making
sure the polarity (+ or -) of the batteries
matches the polarity marks inside
the unit.
3.
Close the battery cover.
NOTE:
When the Remote Control Unit is not used
*
for a long time or the batteries are worn
out, take out the batteries to prevent
electrolyte leakage.
Take care not to drop, dampen,
*
disassemble the Remote Control Unit.
Operatable remote control range is limited
*
as shown.
BUTTON LIST
Some button behave differently in TV and Teletext. The following list is grouped according to
TV or Teletext. If the description of a button is missing in one list, it will be found in the
other.
TV FUNCTIONS
1.
STANDBY ( )
This turns the set off. The red STANDBY light comes on to show that the set is in
STANDBY. If the set is left unattended for long periods it should be switched off with the
POWER SWITCH.
2.
STATUS
First press the button to display current program number, colour system and the sleep
timer setting etc. Second press the button to display current Teletext information if there is
Teletext transmitted.
3.
PPR
Press this button to select the Personal Preference preset value of Volume, Brightness,
Colour and Contrast.
4.
DIGITAL KEYBOARD (0~9)
In single-digit mode, press these buttons to select any of 0~9 channels.
In double-digit mode, press these buttons to select any of 00~59 channels.
5.
NORMAL ( / MTOG)
Set all analog at appropriate values.
13
Page 15

6.
CHILD LOCK ( / )
i
Use to prevent the child from watching the TV when the parents are not around by keeping
the Remote Control keypad (Refer to P8 CHILD LOCK).
10.
SLEEP ( / )
This button is for those fall asleep watching TV. The set switches off after a preset time
(Refer to P8 SLEEP TIMER).
14.
AV ( / )
The set is equipped with Audio/Video sockets or 21 pin scart. Press this button to take
input from the Audio/Video socket or 21-pin scart. Press the button again to return to
TV.
15.
MUTE ( )
Press the button to cut off the sound temporarily without affecting the picture. Press the
button again to resume normal.
16.
VOLUME -/+
Press the VOL + button to increase the volume level and the VOL - button to decrease
it.
18.
PPS
Store the current Volume, Brightness, Saturation, Contrast and Tint to eeprom.
19.
PR -/+
a. Press these buttons to change program numbers up and down once at a time.
b. In menu mode, use the button to change the value of Picture analog.
20.
TV/-- ( /--)
a. Use the button to exit menu mode.
b. Press the button to change from single-digit to double digit mode.
21.
RED/GRE/YEL/BLU
In TV mode, these four coloured button is served as menu buttons. Their functions are
the same with those on local keyboard. (Refer to P3 MENU DRIVEN SELECTION)
RED: Sound adjustment
GRE: Picture adjustment
YEL: Searching, memory and fine-tuning
BLU: Language selection
TELETEXT FUNCTIONS
DIGITAL KEYBOARD (0~9)
4.
Use these buttons to select a Teletext page number. To select page 51 8, press "5" then
5.
"1" then "8".
MODE TOGGLE ( / MTOG)
6.
Toggle between FLOF (FASTTEXT) and LIST mode.
INDEX ( / )
Press this button to recall the stored list of page numbers if the TV station is sending it
7.
i
Otherwise, it display the Teletext information of page 100.
HOLD (sub-pages) ( )
When a Teletext page has sub-pages the screen will change automatically to display the
next sub-page when it comes around. The button freezes the page on screen to prevent
this.
To release the page press again.
Sub-page may be identified by a number such as 2/3 on the page itself. The 2/3 means
that the page on screen is sub-page 2 of a 3 page set.
14
Page 16

.
8.
CANCEL( X )
This button is used to return to TV while Teletext is searching for a page. The search
continues in the background, and when the page is found it puts the page number on the
upper left of the TV picture. To view the page, pree button (17) to see Teletext, or
button (13) to mix.
9.
REVEAL (?)
This button reveals hidden words such as quiz pages with hidden answers. The revealed
words disappear automatically in a few seconds. The REVEAL button only works if the
TV station supports quiz pages.
10.
SLEEP/SUBCODE ( / )
Select the Teletext alarm page or Teletext subpage. Press the button, the "S * * * *"
will be displayed on the screen. Now enter the sub page number at which this page should
be displayed, using buttons 0-9 on the Remote Control Unit. To cancel this feature
press the button again for being initial status as "S * * * *".
11.
SIZE ( )
Press the button to expand the top half of the display.
Press again to expand the bottom half of the display.
Press once more to resume normal size.
12.
STORE LIST (STRLST)
Use the button to store your 4 preferred page numbers (Refer to P10 Four Colour
Memory >.
13.
MIX ( )
when the set is at Teletext mode, press the button to superimpose Teletext picture into TV
display.
14.
BROWSE ( / )
With the set in Teletext made, press this button to select a Teletext page at random.
Whether this function works or not depends on the Teletext system (For example:
Austext seems to ignore it).
17.
TELETEXT ( )
Press the button to change other modes to TELETEXT mode.
19.
PR +/Press the button to select the Teletext page number upwardly and downwardly.
20.
TV ( /--)
Press the button to change Teletext mode to TV mode.
21.
RED/GRE/YEL/CYN BUTTONS
These four colour-coded buttons control a memory that allows instant access to selected
page numbers. The page numbers are chosen using the STRLST (12) button (Refer to
P 10 Four Colour Memory).
15
Page 17

TROUBLE SHOOTING GUIDE
Many apparent malfunctions may be caused by slight misadjustment of regular controls or
some other equally similar simple causes. If any problem arises in the operation of your set, first
check through this list of symptoms and correction. Should the problem be unsettled, unplug the
set and contact your dealer.
Symptoms
No picture,
no sound.
Poor sound,
picture OK.
Poor picture,
sound OK.
Snowy picture
Lines in picture
Distorted picture
Weak picture.
Multiple images
(Ghost)
Check these things
Be sure power cord is plugged in.
May be station trouble.
Check antenna connections.
Maybe in AV mode.
May be station trouble.
May be local interference from
another appliance.
Check antenna connections.
May be station trouble.
Check antenna connections.
Check antenna for broken wires.
May be local interference from
another appliance.
.
May be station trouble.
.
Check antenna connections.
.
May be local interference.
Try these adjustment
Press POWER BUTTON
Try another channel.
Press AV button once.
Try another channel.
Reorient antenna.
Adjust VOLUME control.
Try another channel.
Reorient antenna.
Adjust BRIGHTNESS
control.
Adjust CONTRAST control.
Try another channel.
Reorient antenna.
Poor colour or
no colour
Remote control
does not work.
No picture,
Sound OK.
TV cabinet creaks
May be station trouble.
Check antenna connections.
Check antenna for broken wires.
May be local interference from
another appliance.
Be sure power cord is plugged in
Check battery in Remote Control
Hand Unit.
Station may be in trouble.
Even if the picture or sound is normal, changes in the room
temperature\ sometimes makes the TV cabinet expand or contract,
making a noise. This does not indicate a malfunction.
Try another channel.
Reorient antenna.
Adjust COLOUR control.
Change batteries.
Try another channel.
Switch off for several
minutes the switch on.
16
Page 18

SPECIFICATIONS:
Colour System
Receiver Channel
Teletext
Power supply
CRT
Power Consumption
Dimension (mm)
Weight
Remote Control Unit
Power Supply
* Design and specifications are subject to change without notice.
: PAL, B/G
: VHFL E2-E4; VHFH E5-E12; UHF E21-E69
: WST FLOF TELETEXT
: AC 240V, 50Hz
: 34 cm Diagonal/90 Deflection Angle
: 70W
: 366 (W) x 333 (H) x 373 (D)
: 12 kg
: DC 3V (2 x AAA)
17
 Loading...