

Page 1

OWNER'S MANUAL
34CM CORDLESS REMOTE COLOUR TELEVISION
MODEL: 3410
Type Tested
Electrical
Safety
AS/NZS 3250 Lic 4163
Standards Australia
APP No: N15957
PALSONIC CORPORATION PTY LTD
1 JOYNTON AVENUE
WATERLOO NSW 2017 AUSTRALIA
TEL:(02)9313 7111
FAX:(02)9313 7555
www.palsonic.com.au
PALSONIC CUSTOMER SERVICE
TELEPHONE
AUSTRALIA:1300 657 888
Page 2

Congratulations on your purchase of this Palsonic colour television receiver.
We recommend that you thoroughly read this manual before use to fully enjoy the
many functions and excellent effects of this receiver.
Retain is manual in an easily accessible location for future reference.
Contents
Main features .............................................................................................................
Notes for operation ....................................................................................................
Cautions for safety.....................................................................................................................................
Installation and appearance .....................................................................................
Antenna connection ..................................................................................................................................
Battery installation ....................................................................................................................................
Appearance .................................................................................................................................................
The remote controller ...............................................................................................................................
Operation ...................................................................................................................
Turning the power on/off ..........................................................................................................................
Menu operation .........................................................................................................................................
Picture menu ..............................................................................................................................................
Preset menu ...............................................................................................................................................
Function menu ..........................................................................................................................................
Channel selection ......................................................................................................................................
Picture and volume adjustment .................................................................................................................
Picture mode selection ..............................................................................................................................
Other functions ............................................................................................................................................
External equipment connections ..............................................................................
Trouble shooting ........................................................................................................
Specifications .............................................................................................................
2
3
3
4
4
4
5
6
7
7
7
8
8
10
11
12
13
13
16
18
19
1
Page 3

Main features
.
Hyperband.
.
Auto/manual search.
.
Voltage synthesised system
.
100 preset channels.
.
TV system: PAL-B/G, NTSC-4.43/3.58 (AV).
.
Full function remote control & English on screen menu display
.
No-signal blue background display and AUTO-POWER-OFF function.
.
Four picture mode settings.
.
Sound mute function.
.
Sleep timer.
.
AV IN/OUT S-VHS operation function.
2
Page 4

NOTES FOR OPERATION
* Do not let the TV set be in standby condition for a long period of time. When it is not in use,
please turn off the power supply and remove the power plug. When it is to be left for a
prolonged period of time, it is recommended to disconnect the connection to the outdoor
aerial, to avoid thunder strike.
* Please follow cautions for safety in the TV set instructions, and all warnings and descriptions denoted
on the TV set.
Cautions For Safety
Note: This TV set can be operated on an AC power of 240V, 50Hz. You should not use power
supply of the other type.
When an unusual situation
occurs, turn off the power
switch at once and remove the
plug from the wall outlet.
Contact a qualified service
department in your local area.
Do not expose the TV set to
rain or excessive moisture, to
prevent tire disaster or
electric shock. Avoid using
the set in very warm or damp
places. Never use it in a
bathroom.
There exists High Voltage in
this TV set. Do not remove
the cover to avoid danger.
When the TV set is to be left
unattended, please turn off the
power switch and remove the
plug from the wall outlet.
In order to wipe dust off the
picture tube or off the cabinet,
you should remove the power
plug from the wall outlet first.
You can wipe lightly with a
piece of dry, clean, soft cloth.
The TV set should be placed
on an adequate place without
exposing it to direct sunlight
and other sources of heat to
prevent the deformation of the
cabinet or damage to
components.
Do not cover the ventilating
holes in the cabinet. Keep a
space of more than 5 cm from
the walls to the TV set, to
guarantee the good ventilation.
When the power cord or the
plug is damaged, please
contact a qualified service
department to get service.
3
Page 5
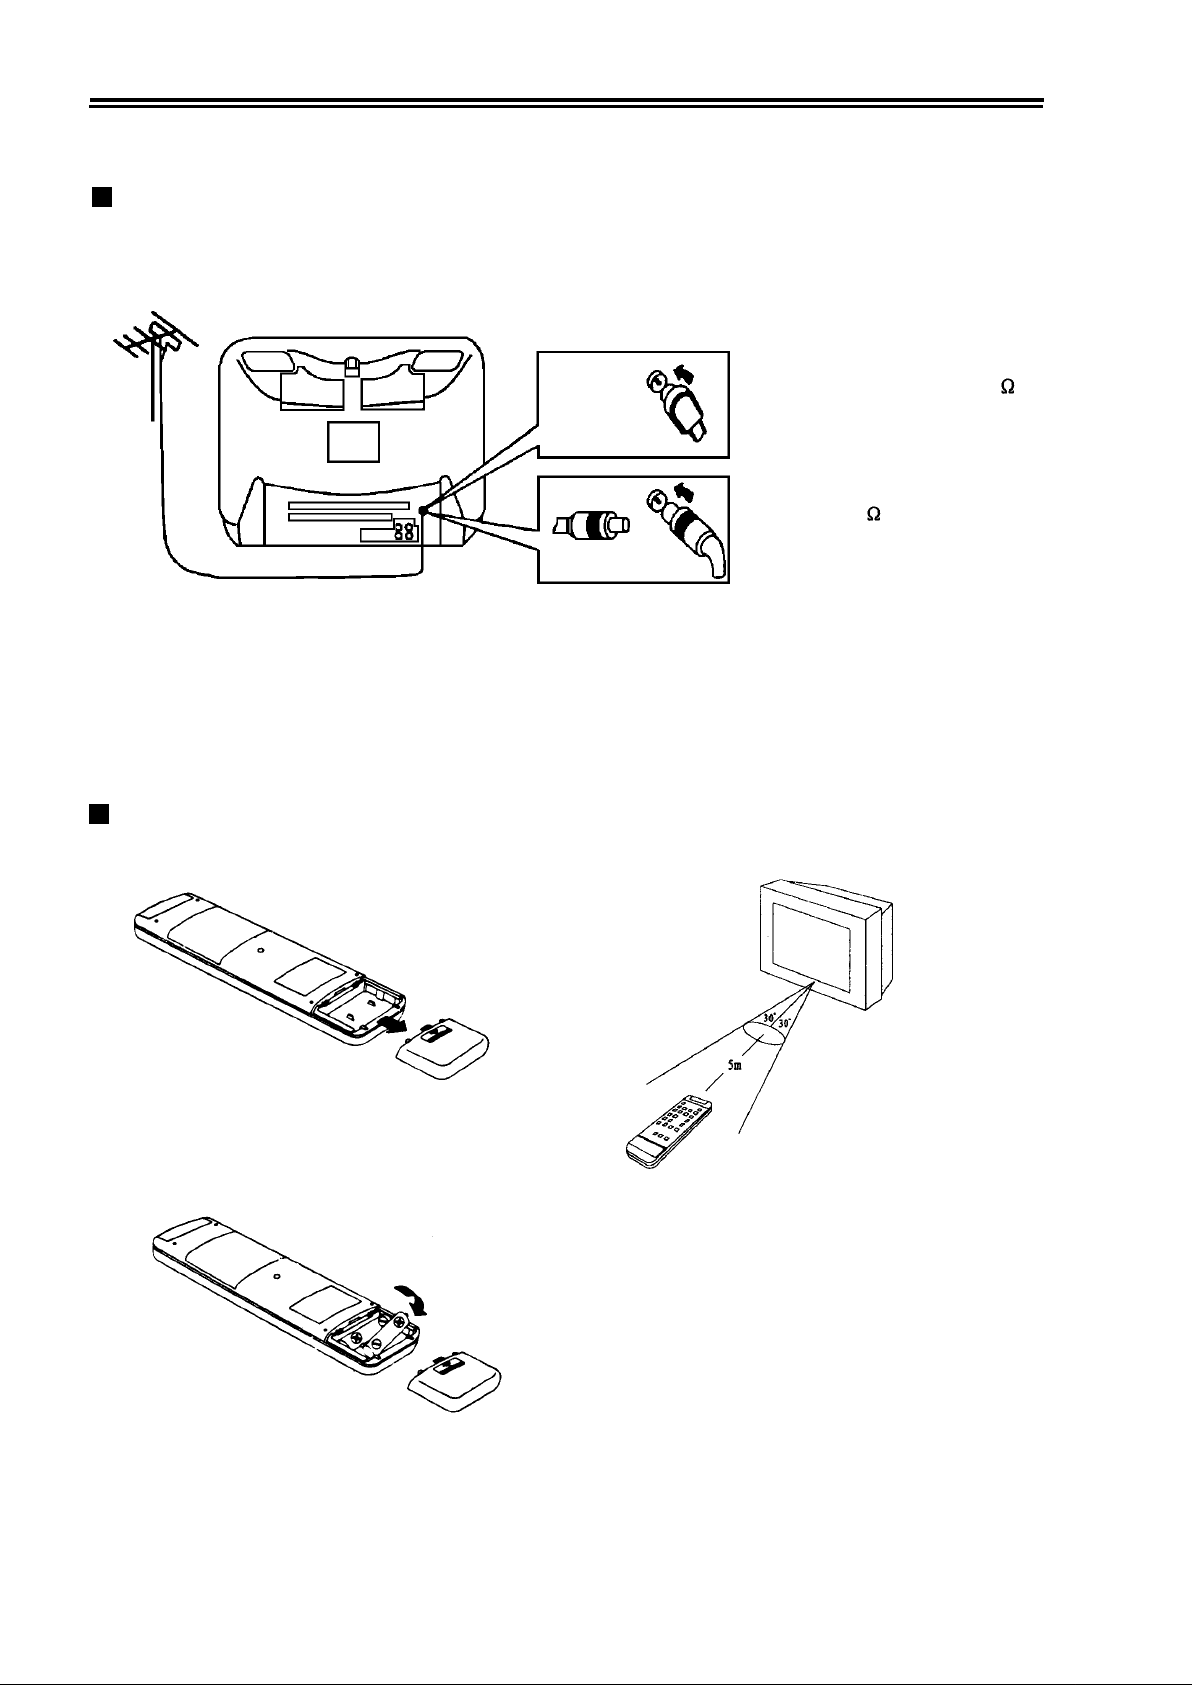
Installation and appearance
Antenna connection
To ensure a bright-coloured and clear picture, you should use an outdoor aerial or CATV
cable. If the signals are strong enough, you may use an indoor aerial.
Note: In case of using the
Twin-lead aerial feeder (300 )
for UHF/VHF aerial, use a 300-75
ohm adaptor (not supplied)
When using the coaxial cable (not
supplied) (75 ) for UHF/VHF
aerial, connect the plug into the
75 ohm aerial socket directly.
Note:
When you connect the outdoor aerial cable to the aerial terminal on the TV set, please turn off
the power switch on the TV while connecting the antenna lead.
In thunder and lightning, weather, please disconnect the connection to the outdoor aerial to avoid
thunder/lightning strike.
Battery Installation:
1) Remove the back battery cover.
2) Insert two size AAA batteries according to
the polarity indication inside the remote
controller.
Effective range of the remote control
operation
1. When the remote controller is not used for
an extended period of time or the batteries
are worn out, please remove the batteries in
time to avoid battery leakage.
2. Avoid moisture and mechanical shock to the
remote controller.
4
Page 6
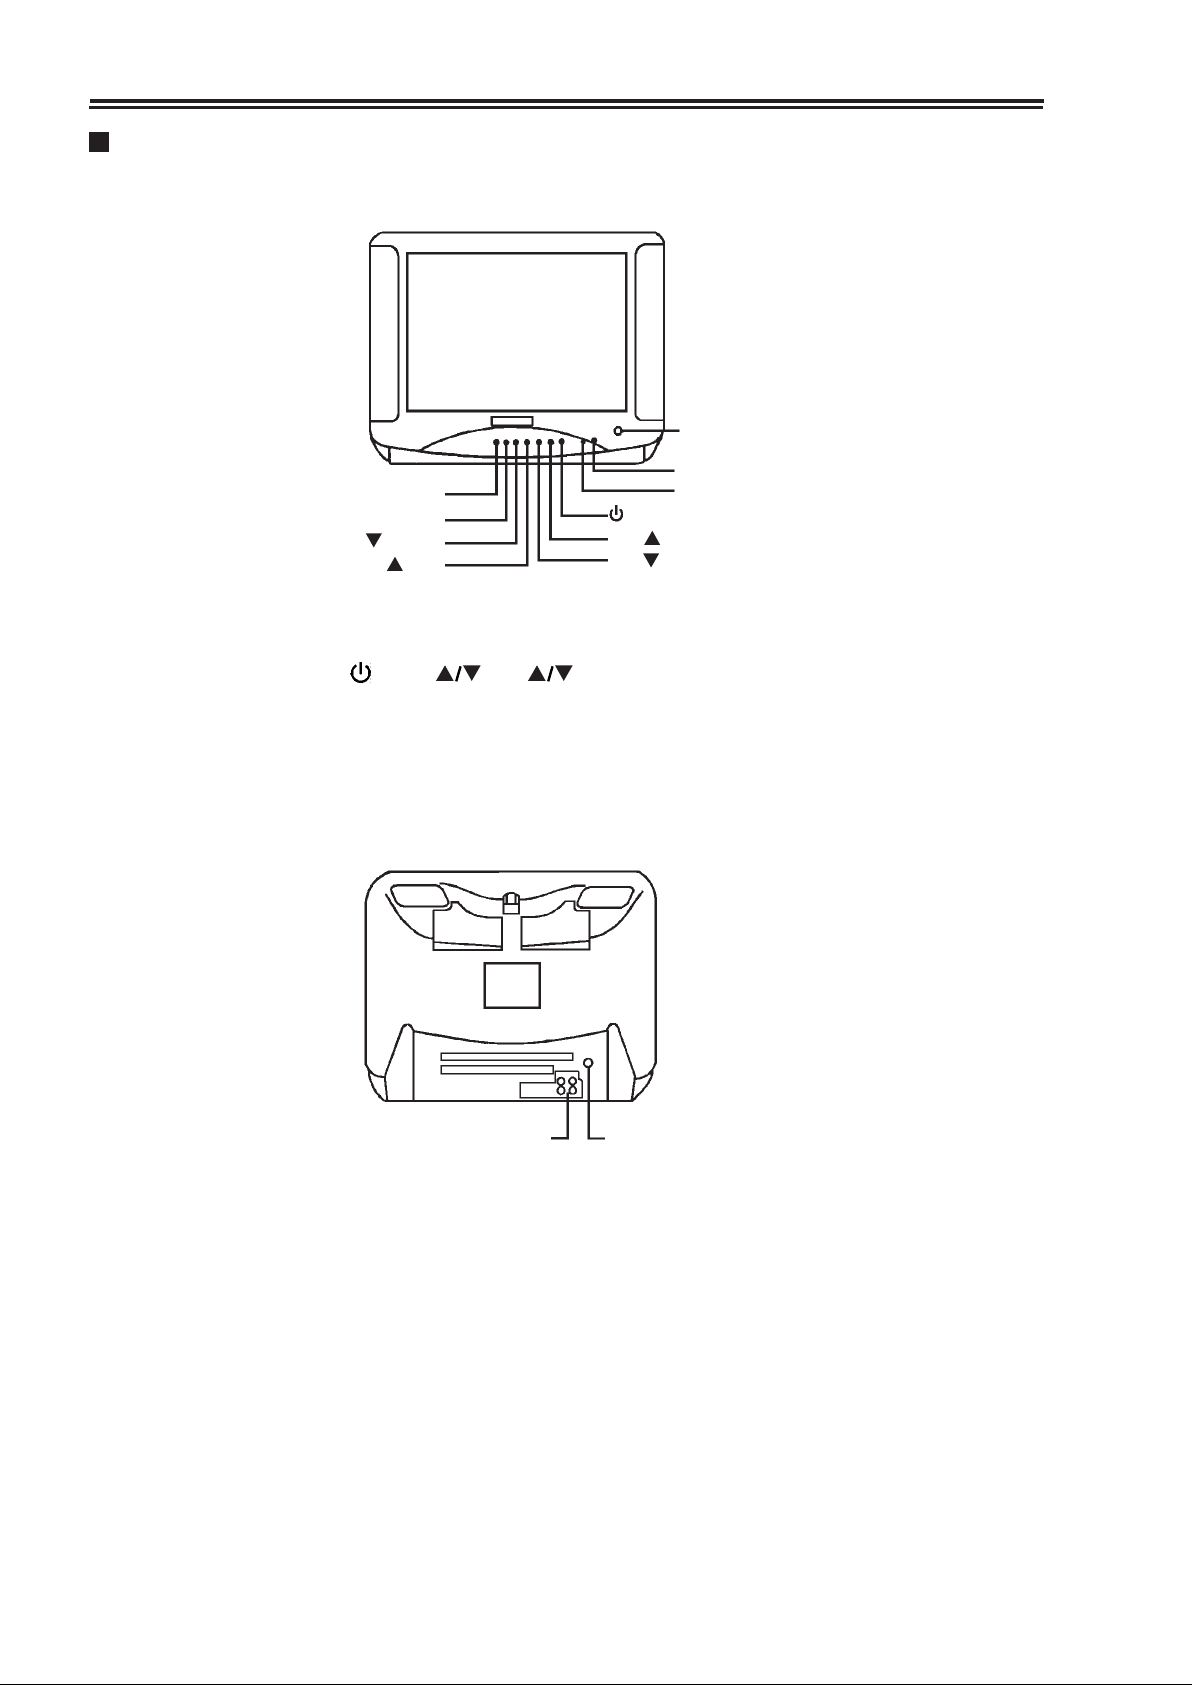
Appearance
Front view
POWER SWITCH
REMOTE SENSOR
MENU
TV/AV
VOL (down)
VOL (up)
CH (up)
CH (down)
Note: Functions of MENU, , VOL , CH and TV/AV are also provided to the
remote controller.
INDICATOR
Back view
AV IN/OUT
ANTENNA INPUT
5
Page 7
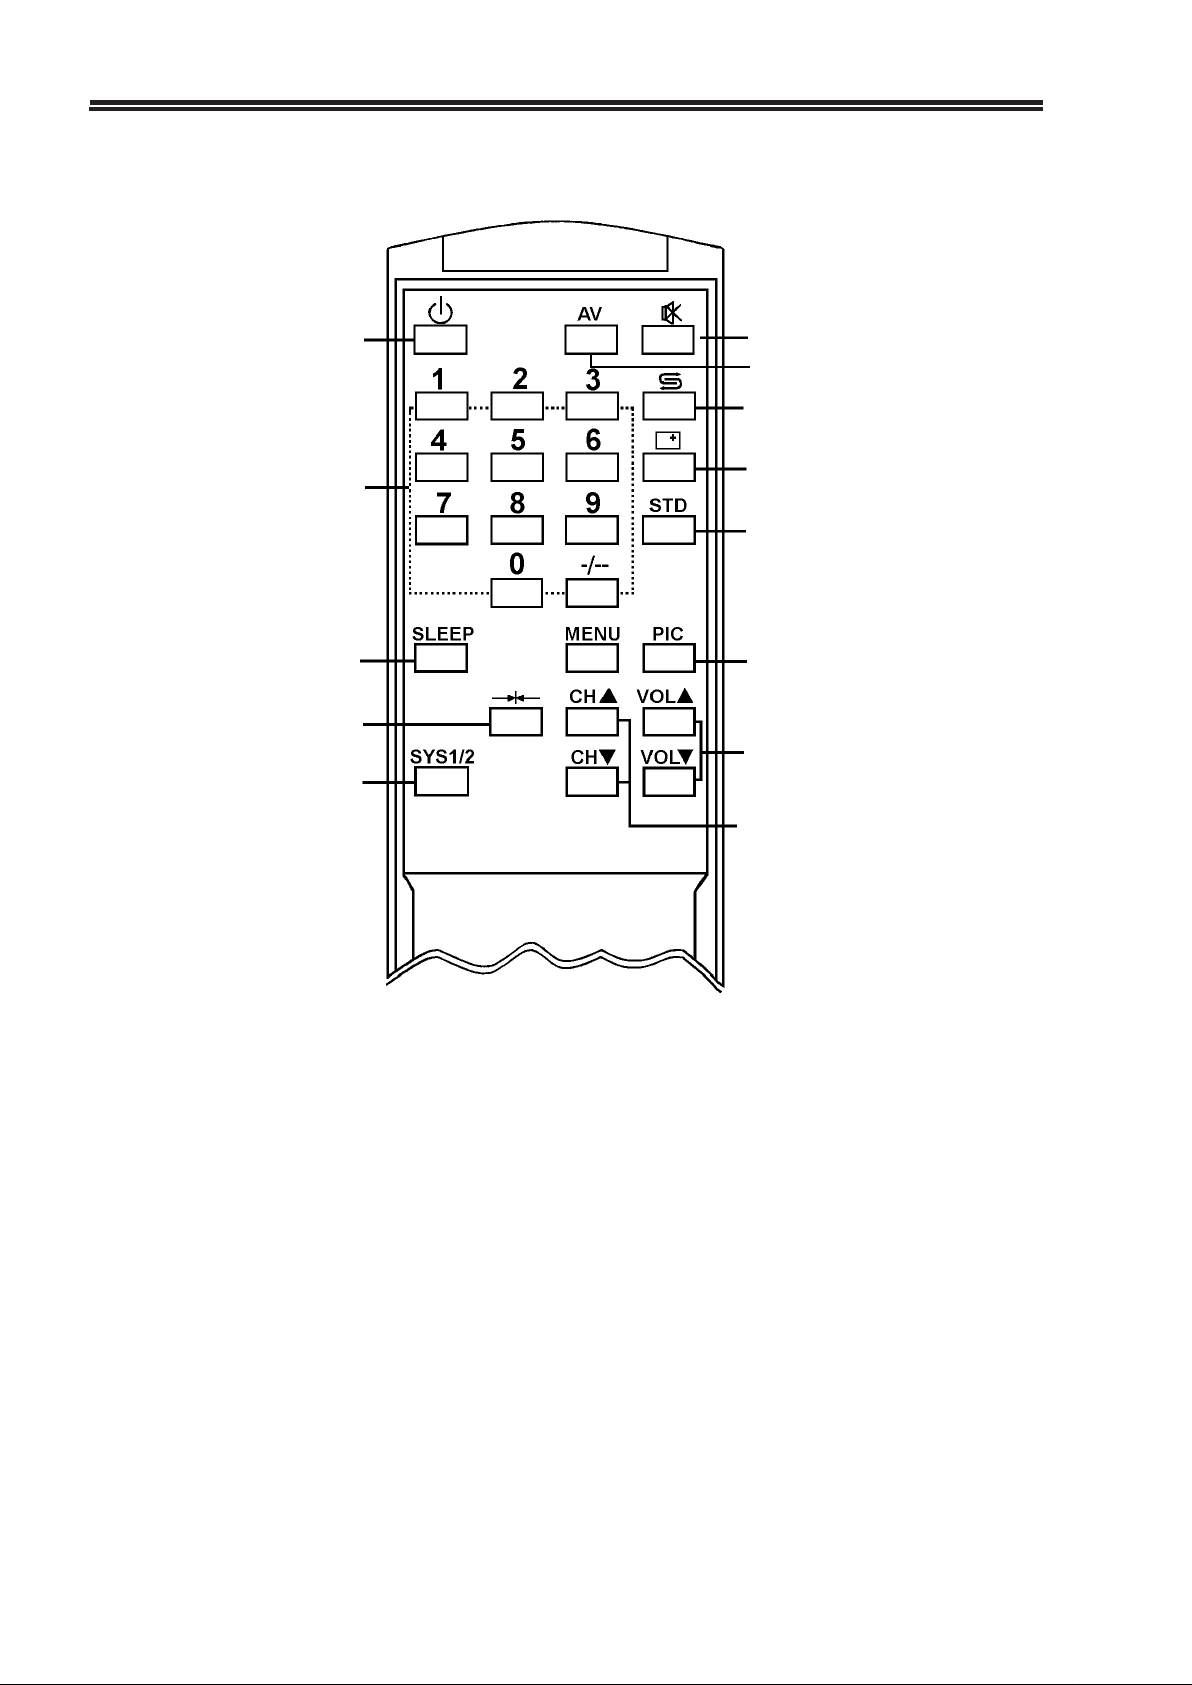
The remote controller
Standby
Channel direct select
Sleep timer
Picture mode selection
*Sound system select
Sound mute
TV/AV select
Previous channel
On screen recall
Colour system select
Picture control
Volume control
Channel select
* NOTE: this TV model's RF sound system is BG only. Therefore the SYS1/2 button on the remote
controller is ineffective in sound system selection. Similarly in the Preset and Function
menus the SYS item (sound system selection item) is ineffective.
6
Page 8

Operation
Turning the power on/off
1. Connect the power, push the main power switch, the red indicator is on, the set is in standby
mode.
2. Push the button on the remote controller to turn on the set when the set is in standby, this
time, the green indicator is on, on the upper right corner of the screen will display channel
number, colour and sound system. Or you can push the CH button to turn on the set
when in standby.
3. You can push the button to switch the set to standby mode when in operation mode, this
time the green indicator is off, the red indicator is on.
4. Push the main power switch to turn off the set completely and confirm that all indicators go
out.
Note: If there are no input signals for the TV when the set is in TV receiving mode, a blue
background will appear on the screen. After 5 minutes if there are still no signals to the TV,
it will enter into standby mode automatically.
Press the main
power switch
In stanby mode
Press
Press again
In operation mode
After 4
seconds
In operation mode
Menu operation
You can select adjustment items by making use of the menu. Press the MENU button to display
the main menu:
MENU
PICTURE
PRESET
FUNCTION
Press the CH button to select items upward or downward (the selected item is highlighted in
red, while others in green). The item sequence is:
PICTURE PRESET FUNCTION
7
Page 9

Press the VOL button to enter into the sub-menu. To exit the menu press the MENU
button.
Note: the menu displayed on the screen will disappear automatically in 10 seconds if not in
operation.
1. PICTURE menu
Making use of the PICTURE menu can adjust the picture effect according to your personal
preference and it will be stored as picture memory mode automatically.
Press the CH button to select the item (the selected item is highlighted in red). Press the
VOL button to adjust it. The range is 0-63.
Press the MENU button to exit to the main menu.
Below are the characteristics of the picture adjustment item.
OSD
0
Pressing
Item
(BRIGHTNESS) Darker
(COLOUR)
(CONTRAST)
(TINT)
(SHARPNESS)
Note:
* TINT is effective only in NTSC system.
Green bar moving
VOL
Lighter Stronger
Weaker Stronger
Purplish Greenish
Weaker Stronger
VOL
Brighter
63
8
Page 10

2. PRESET menu
PROG 28 SYS 1
SKIP OFF AUTO
AFT ON SEARCH
BAND U MANUAL
Making use of the PRESET menu can fulfil the function of auto-search, search. manual
search , channel and band selection. AFT and skip on/off.
Press CH button to select the item. (the selected item is highlighted in red). Press the
MENU button to exit to the main menu.
1) PROG (program)
Select the current program number while "PROG" is highlighted. Press VOL button to
increase or decrease the program number progressively.
PROG
0
1
2
99
2) SKIP-ON/OFF
Press CH button to highlight SKIP ON/OFF. Press VOL button to toggle between
SKIP ON and OFF. When "SKIP ON" is set, the current channel program will be skipped.
Making use of this function can skip some unwanted channel, say 5, 11, next when you press
CH button to select channel, 5, 11 channel will be skipped.
0
1
4 6
10 12
* Press the channel direct select button can select the skipped channel.
3) AFT ON/OFF
Making use of the AFT function can automatically fine tune the channel.
Select and highlight AFT, pressing VOL button it toggles between ON and OFF. When in
AFT ON, it can automatically fine tune the channel. In normal circumstances, please set
AFT ON.
When in the process of manual search, AFT is set "OFF" automatically.
4) Band Selection
Press the CH button to highlight BAND. Press the VOL button to select band. The
change sequence is
VL VH U
9
Page 11

5) SYS (sound system)
This item is used to select sound system. Since this TV model’s RF sound system is B/G only, this
item gets into ineffectiveness in sound system selection.
6) Auto - search (AUTO)
Press CH button to highlight AUTO. Press VOL button the set will automatically
search and store the active TV signals in your local area from lower band to higher band in the
sequence of VL VH U with the green bar moving rightward. When a station is located, the set
will store the signals with a channel number from 0. When all the signals are searched and stored,
the TV returns to 0 channel automatically, auto-search is finished.
* After auto-search, all programs colour system is set to AUTO and in AFT-ON mode.
* During the process of auto-search, if , MENU or CH button is pressed, the searching is
interrupted. Press VOL button the searching begins again.
7) SEARCH
Making use of SEARCH function will store a TV program at a referred channel position.
Select a channel number, when SEARCH is highlighted, press VOL button, the set begins to
search for signals upward or downward from current channel. When a station is located, the
searching stops and the program is stored into the referred channel position.
Repeat the above step and store another program signals into another position. If two channels are
same, the previous will be deleted.
When the searching is finished, to store the program signals you should press the MENU button
to exit the menu and the program signals are stored automatically.
* When the tuning changing reaches the highest (lowest), the searching turns to next band’s lowest
(highest) and continues searching. If the signals are not the signals you desire, you can press the
VOL button again until the desired signals are searched.
8) Manual search (MANUAL)
When some program’s picture or sound is not good, you can make use of this function to fine tune
the tuning voltage.
Press VOL button to highlight MANUAL. Press VOL successively, the set begins
searching upward or downward. When the picture has obtained the optimum effect, release the
button.
To store the effect you should press the MENU button to exit the menu and the effect is stored
automatically.
10
Page 12

3. FUNCTION menu
STD AUTO
SYS 1
BLUE ON
Making use of the FUNCTION menu can select BLUE ON/OFF and current channel’s colour and
sound system.
Press CH button to select item (the selected item is highlighted). Press MENU button to exit
to the main menu.
1) STD (colour system) selection.
In this TV model the colour system is automatically identified. In normal circumstances, please
set colour system to AUTO.
2) SYS (sound system) selection.
In this TV model this item is ineffective. (Refer to the NOTE on page 6)
3) BLUE ON/OFF selection.
Select and highlight BLUE ON/OFF. Press VOL button to select ON or OFF. When
"BLUE ON" is selected, blue background will appear on the screen automatically when no input
signals, and the sound is mute. After 5 minutes the set will cut off automatically.
Channel selection
1. Using direct select buttons
1) Single digital method ( 0~9 ).
You can select any one of 0~9 channel position directly by pressing the number button
accordingly.
AUTO
Press "0"
SYS 1
Press " 5 "
2) Two digital method (10~99).
Press "-/--" button until the symbol "--" is displayed on the screen. In this mode you can choose
any one of two digit channel by pressing the number buttons accordingly. For example, if you
wish to receive channel 25, press "2" button, then press "5" button.
AUTO
SYS 1
11
Page 13

25
AUTO
SYS 1
Press "-/--"
- -
Press " 2 "
2 -
Press " 5 "
Two digit mode
2. Using CH button
Press CH button, the channel number will be increased or decreased progressively.
3. Making use of button
Press button to swap the currently viewed channel with the previous channel.
AUTO
SYS 1
1
Press
20
AUTO
SYS 1
Picture and volume adjustment
1. Picture adjustment
Press PIC button repeatedly, on-screen display will change in the sequence below
PAL
NTSC
BRIGHTNESS CONTRAST
BRIGHTNESS CONTRAST COLOUR TINT SHARPNESS
Press VOL button to adjust the level. For example, to adjust brightness:
COLOUR SHARPNESS
Press " "
Press " "
BRIGHTNESS 63
lllllllllll
BRIGHTNESS 0
Press "PIC" After 4 seconds
BRIGHTNESS 30
llll.......
l..........
(Note: this button’s function is as same as the function of the PICTURE menu of the main menu,
refer to PICTURE MENU on page 8.)
12
Page 14

2. Volume adjustment
You can press the VOL button to adjust the volume, and the green bar will move rightward
or leftward, the volume output range is 0-63.
VOLUME 15
llllll......
Press VOL
VOLUME 30
llllll......
Press VOL
You can press the button to mute the sound. Press the button again or VOL button.
The sound is restored to normal.
SOUND MUTE MODE NORMAL SOUND MODE
Press Press
Press VOL
VOLUME 15
llllll......
Picture mode selection
You can select the picture quality instantly among three presets modes and one user-set mode.
Press the button to select the desired picture quality. DYNAMIC, STANDARD, MILD and
MEMORY (user-set) can be selected cyclically.
MEMORY DYNAMIC STANDARD
Output
Mode
Item
Brightness Colour Contrast Tint Sharpness
MILD
DYNAMIC 31 31 47 31 31
STANDARD 31 31 31 31 31
MILD 31 31 21 31 31
MEMORY
The picture quality you set
13
Page 15

Other functions
1. Retain on-screen display
Press the button and the upper right corner will display the current channel number and TV
system. After 4 seconds the display on the screen will disappear.
Press
In VIDEO mode, it will only display VIDEO l (or VIDEO 2) and the colour system.
2. TV colour system selection
Press the STD button and each time the colour system displayed on the screen will change in the
sequence of
If the system is not set correctly, the picture will have no colour or the colour will be abnormal. Press
the STD button to select the right colour system to obtain normal colour (Refer to the following
table).
+
2
+
AUTO
SYS 1
After 4
seconds
AUTO PAL N358 N443
COLOUR SYSTEM
PAL (RF/VIDEO)
Colour Sub-Carrier
4.43MHz
Vertical Frequency
50Hz
AUTO
NTSC 3.58 (VIDEO)
PAL (RF/VIDEO)
3.58MHz
4.43MHz
60Hz
50Hz
PAL
N358
N443
PAL 60 (VIDEO)
NTSC 3.58 (VIDEO)
NTSC 4.43 (VIDEO)
4.43MHz
3.58MHz
4.43MHz
60Hz
60Hz
60Hz
3. SLEEP timer
Using the SLEEP button allows you to have the appliance automatically turned off after a preset
time (the time range will be as long as 120 minutes) , and set the appliance to standby mode. At
every press of the button the setting time will be decreased by 30 minutes.
When the remaining time is 5 minutes left, it will be displayed once every 2 minutes for
4 seconds
:
Press SLEEP
SLEEP OFF SLEEP 120
Press SLEEP Press SLEEP
SLEEP 30
14
Page 16

When the SLEEP timer is functioning, if you press SLEEP button again, the TV will display the
remaining time. If the power is switched off, the SLEEP timer will be cancelled. You must set it
again if wanted.
4. TV/AV selection
Press the TV/AV button on the set or AV button on the remote controller to select TV or AV
mode.
When the TV is working at RF receiving mode, press AV button the set will be switched to
AV1, the screen displays AV1 and colour system; Press the button again and the set will be
switched to AV2, the screen displays AV2 and colour system. Press the button once more, the set
will be switched to TV mode and the screen displays current TV channel.
12
PAL
Press AV
Press AV
AV
PAL
After 4
seconds
Note:
1) When receiving broadcasting TV program (the TV signals are input through aerial terminal),
press the AV button to switch the set to TV mode.
2) When receiving programs played back by Video DISC, VCR, Satellite receiver, VCD (the
signals are input through AV terminals), please set the receiver to AV mode.
15
Page 17

External equipment connection
This set is incorporated with Audio & Video input and output sockets which allow direct
connection to external equipment (such as VCR, Video DISC, VCD, Satellite Receiver etc.) for
playing back and recording the programs.
1. VIDEO PLAYBACK
The figure below shows how to connect the TV set to the video equipment.
NOTE: The VIDEO equipment may be VCR, Video DISC, VCD or Satellite Receiver.
Press the "TV/AV" button on the set or "AV" button on the remote controller to select AV mode,
"AV" and corresponding colour system will be displayed on the screen. The picture displayed on
the screen is the program played back by the video equipment
2. RECORDING FROM THE TV SET
The figure below shows how to connect the TV set to the VCR.
Press AV button on the remote control unit to set TV mode, and choose the
desired channel. At this time, the program recorded is displayed on the screen.
Note: the following mis-operation should be avoided during recording.
* Press STANDBY button or set to VIDEO mode.
* Change the current channel accidentally.
16
Page 18

3. DUBBING
The picture below shows how to connect TWO VCRs to the TV for dubbing one from the other.
Press AV button on the remote control unit to select AV mode before dubbing, "AV" will be
displayed on the screen. The TV set will act as a monitor to help you edit while dubbing.
NOTE: The set MUST remain in Video mode and MUST NOT be switched off during the session.
17
Page 19

TROUBLE SHOOTING
If any problem arises in the operation of your set, first check through this list of symptoms and
correction. Should the problem be unsettled, unplug the set and contact your dealer.
Symptoms
.
No picture,
no sound.
.
Poor sound,
picture OK.
.
Poor picture,
sound OK.
Snowy picture
Lines in picture
Distorted picture
Weak picture.
.
Multiple images
(Ghost)
Check these things
.
Be sure power cord is plugged in.
.
May be station trouble.
.
Check antenna connections.
.
Maybe in AV mode.
.
May be station trouble.
.
May be local interference from
another appliance.
.
Check antenna connections.
.
May be station trouble.
.
Check antenna connections.
.
Check antenna for broken wires.
.
May be local interference from
another appliance.
.
May be station trouble.
.
Check antenna connections.
.
May be local interference.
Try these adjustment
.
Press POWER BUTTON
.
Try another channel.
.
Press AV button once.
.
Try another channel.
.
Reorient antenna.
.
Adjust VOLUME control.
Try another channel.
.
Reorient antenna.
.
Adjust BRIGHTNESS
.
control.
Adjust CONTRAST control.
.
.
Try another channel.
.
Reorient antenna.
.
Poor colour or
no colour
.
Remote control
does not work.
.
No picture,
Sound OK.
.
May be station trouble.
.
Check antenna connections.
.
Check antenna for broken wires.
.
May be local interference from
another appliance.
.
Be sure power cord is plugged in
.
Check battery in Remote Control
Hand Unit.
.
Station may be in trouble.
.
Try another channel.
.
Reorient antenna.
.
Adjust COLOUR control.
.
Change batteries.
.
Try another channel.
.
Adjust CONTRAST control.
18
Page 20

SPECIFICATIONS
Power Supply
Receiver Channel
Cable Channel
TV System
Dimension (mm)
Weight
CRT
Power Consumption
Antenna Impedance
Remote Control Unit
Power Supply
Accessories
Note : Design and specifications are subject to change without notice.
: AC 240V, 50Hz
: VHFL 0~5, 5A; VHFH 6~11; UHF E21-E69
: S1-S41 (Hyperband)
: PAL-B/G, NTSC 3.58 /4.43
: 430 (W) x 339 (H) x 370 (D)
: 12 kg
: 34cm
: 60W
: 75 ohm
: DC 3V (2 x UM-3)
: one remote controller
19
Page 21

PALSONIC CORPORATION PTY LTD
1 JOYNTON AVENUE
WATERLOO NSW 2017 AUSTRALIA
TEL:(02)9313 7111
FAX:(02)9313 7555
www.palsonic.com.au
PALSONIC CUSTOMER SERVICE
TELEPHONE
AUSTRALIA: 1300 657 888
604-37H03-09
 Loading...