

Page 1
®
SUNTUF
Corrugated Polycarbonate Sheet with Anti-Condensation
Plus
Greenhouse Installation Guide
61326 - 03.2014
Page 2

Page 3
Greenhouse Installation Guide
Content
Introduction 2
Main Benefits 2
Profile Dimensions 2
Distance Between Purlins 3
Handling and Storage 3
Cutting 3
Drilling 4
Chemical Resistance - Compatible Adhesives & Sealants 4
Sealing 4
Use of Shading Compounds 5
Positioning the Sheets 5
Overlap 5
Arching Radius 6
Roof and Wall Fastener Location 6
Screws, Washers and Gaskets 6
Sheet to Sheet Stitching Fasteners 7
Additional Accessories 7
Standard Accessories for SUNTUF® Plus 8
1
Page 4
Greenhouse Installation Guide
Introduction
SUNTUF Plus has special benefits that allow it to give plants the best nurturing conditions. SUNTUF Plus sets the standard for efficient
greenhouse roofing with more than 25 million square meters currently installed, offering guaranteed elimination of condensation dripping
and optimal PAR light transmission needed for plant growth.
SUNTUF Plus with the unique condensation control allows up to 30% light transmission increase at peak condensation periods,
as seen in the table below. The sheet also reduces disease resulting from condensation dripping. SUNTUF Plus is offered with
anti-condensation treatment on both sides for retractable greenhouse roofs.
Main Benefits
Up to 90% light transmission
Eliminates condensation drip
Retains its performance for many years
Virtually unbreakable
Blocks out UV and far IR radiation
Available with 20% and 100% light diffusion
Allows energy savings of up to 50%
Flexible and easy to install
Optional UV protection on both sides
Wide service temperature range
Available in 1260 mm and 1870 mm widths
In cold climates: Reduces snow buildup in comparison with twin-wall
a10 year limited warranty
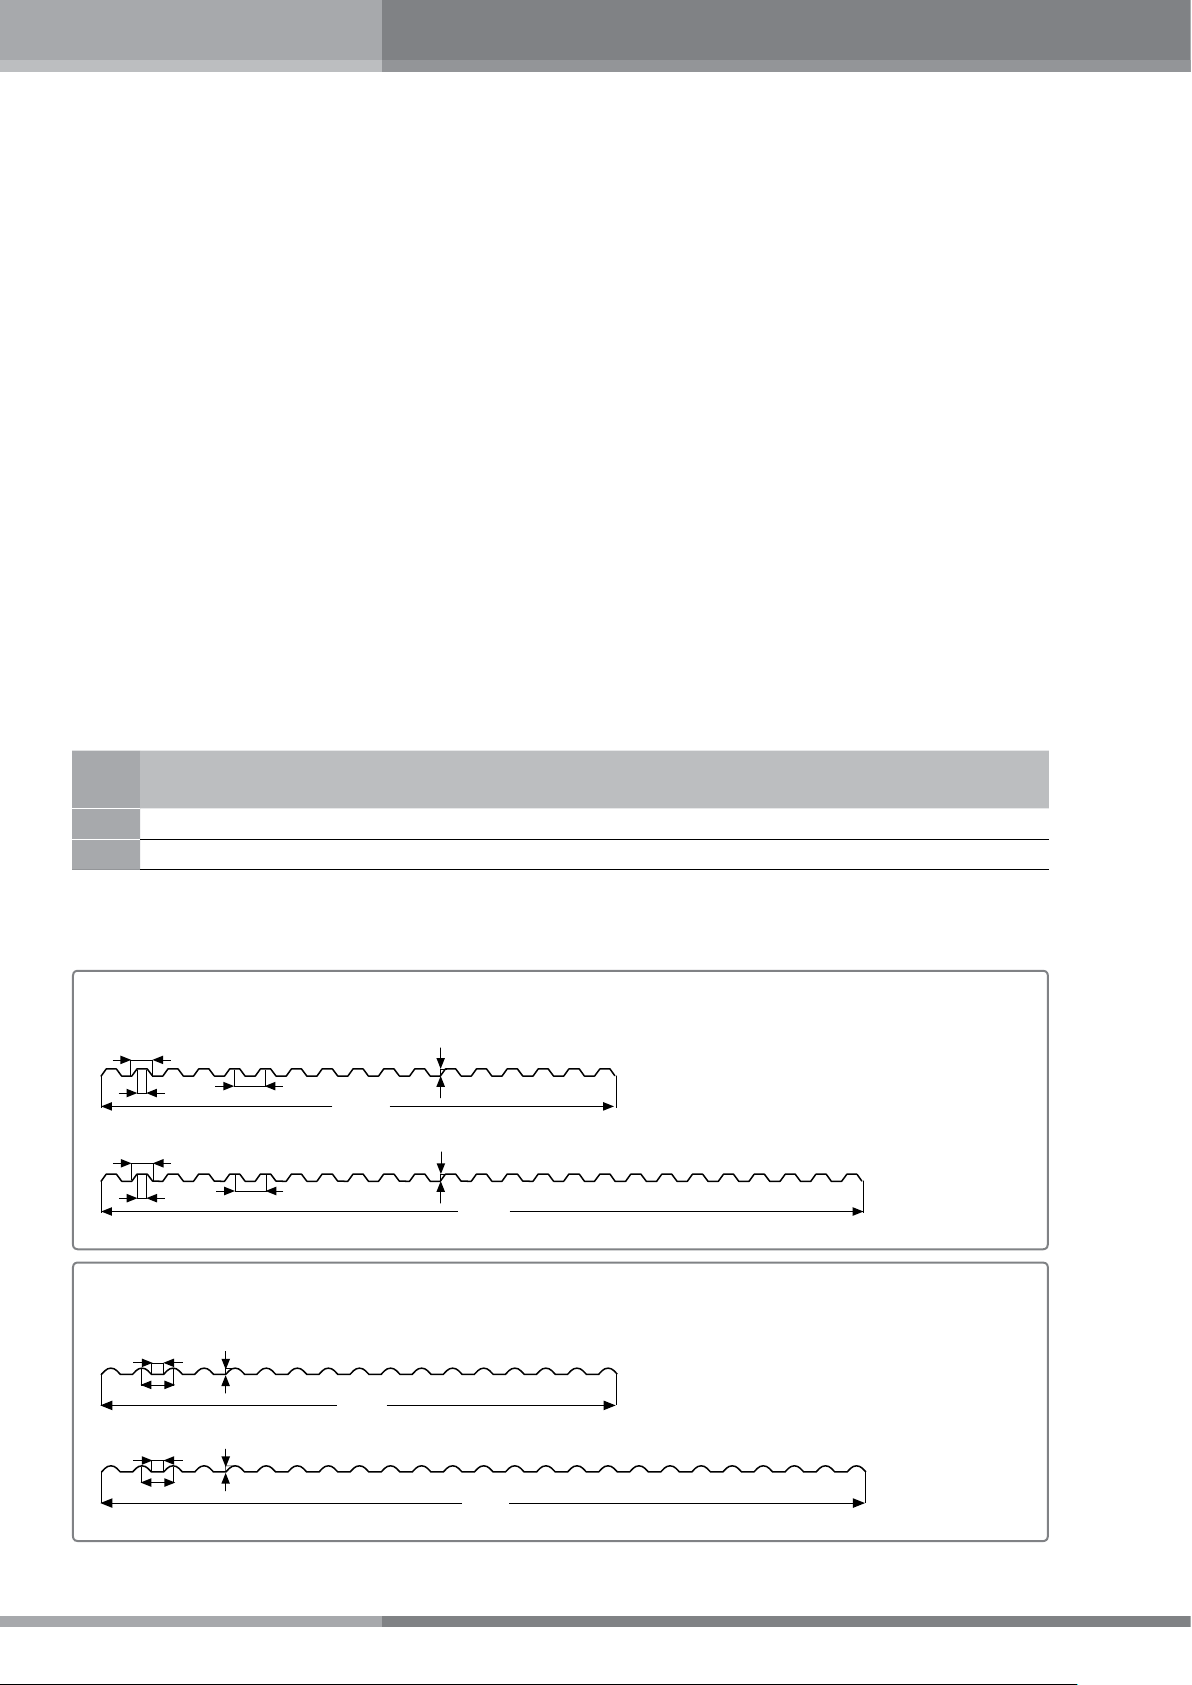
Profile Dimensions
Width
(mm)
1260 1210 76 17 1* 3.5
1870 1820 76 25 1* 2.5
* Two corrugations length overlap is recommended for slopes below 15%, or in case of extreme weather conditions (excessive
rain and/or wind.)
Greca 76/18 Profile
Effective Width
(mm)
26
26
76
76
Corrugations Pitch Distance
(mm)
1651
1260
1651
1870
Number of Corrugations Wave Overlap Percent Overlap
Omega 76/15 Profile
30
76
30
76
2
15
15
1260
1870
Page 5

Distance Between Purlins
Greenhouse Installation Guide
Profile Sheet Thickness
(mm)
Greca/Trapeze 76/18 0.8 1.20
Omega 76/15 0.8 1.15
1. The dimensions depicted above do not supersede the requirements of local construction codes. The distances depicted
above were calculated based on the structural properties with the following factors being taken into consideration: sheet
deflection, potential wind load, potential snow load, hail and application load according to usual construction practice.
2. When designing a new roof, it is strongly recommended that the slope be above 10% (5.7°). (Consult your local Palram
representative when recovering an existing greenhouse whose slope is shallower than this value).
3. The recommended maximum panel length is 7.0 m. The recommended maximum distance between the edge and first
purlin is 900 mm or the value dictated by the design engineer. (See drawing on page 4, Figure 8b).
Wall purlins distance can be increased by 10% of roof recommendation.
Theoretical Weight
(Kg/m)
Load
(Kg/m)
90 1200
150 1000
Distance Between
Roof Purlins
(mm)
Distance Between
Wall Purlins
(mm)
1200120 1100
Calculate the number of sheets as follows:
1. Divide the length of the roof (the length of the gutter) by the effective width of the sheet.
2. Calculate the required length of the sheet (to be no greater than 7.0m) according to purlin to purlin distance, plus the
required extension beyond first and last purlin and overlap distance, if exists.
Handling and Storage
1. Palram corrugated sheets must be transported and stored horizontally on a flat, sturdy pallet whose dimensions are equal to
or larger than the sheets themselves. The sheets should be secured and fastened to the pallet. It is possible to store sheets
of smaller dimensions on top of larger sheets of the same type. (Never store sheets of larger dimensions on top of smaller
sheets!) SUNTUF Plus must be stored in a cool and shaded location.
2. Important: Never cover the pallet with, or place on the pallet, materials
that are good conductors of heat (e.g. Metal, pipes, clear or dark objects).
3. In cases where it is necessary to store the pallet outdoors, cover it with a
white opaque polyethylene sheet, card board, or any other material that
does not absorb or conduct heat. The total pallet must be covered.
Cutting
It is possible to cut SUNTUF Plus corrugated sheets using a circular saw with small teeth, rotating at a high speed, taking care
to advance the saw slowly. It is also possible to use a portable electric saw (Jig Saw) or sheet metal shears. In any case, it is
important to support the sheet in the vicinity of the cut and clean away the dust and debris generated by cutting.
3
Page 6

Greenhouse Installation Guide
Drilling
1. Drilling should be carried out with a drill bit intended for metal. The hole
diameter must be 4 mm larger than the diameter of the screw to be used.
It is important to support the sheet in the vicinity where the sheet is being
drilled. The dust generated by drilling must be cleared away before the
insertion of the screw.
2. Special attention should be given to drill all the required holes perpendicular
to the face of the material.
90°
Chemical Resistance - Compatible Sealants and Adhesives
1. SUNTUF Plus sheets are resistant to a variety of chemicals and exhibit limited resistance to a second group of chemicals.
A third group of chemicals will attack and cause damage to the sheet. The degree of damage will depend on the severity
of attack and time of exposure.
2. Choose only sealants and adhesives which are compatible with SUNTUF Plus (see paragraph G).
3. Beware of installing the sheets on wet paint, or other incompatible materials, which may damage the polycarbonate
sheets.
4. Use of sealants or adhesives not included in the recommended list must receive the Manufacturer’s explicit
approval. This can be obtained through your distributor. Use of materials not on the list, or which have not received
the Manufacturer’s explicit approval, may harm the sheet and will void all warranties and any responsibility of the
manufacturer for the performance of SUNTUF Plus.
5. Your local distributor can provide additional information and forward materials for evaluation of their comparability with
SUNTUF Plus.
Sealing
1. Compatible silicone sealants recommended for use with
Palram polycarbonate sheets:
Manufacturer Sealant
Soudal MS Clear
Bison Polymax
For information on alternatives, please consult your Palram
distributor.
2. Shaped foamed Polyethylene closure strip should be
used to prevent the entry of water, wind, insects or other
small animals between installed sheets. A seal between
the sheet and the edge purlin of the roof can be created
using a sealing strip in the form of the profile. It is held in
place by the same screw used to fasten the sheet to the
purlin. The sealing strip should be manufactured from
cross-linked polyethylene foam (XPE).
Silicone Sealant
Shaped foamed
polyethylene top and
bottom sealing strips.
Butyl rubber strip
4
Page 7

Greenhouse Installation Guide
90°
Lay Sheets against Wind Direction
Direction of Wind and Rain
100 mm
M
Length Overlap
120-200 mm
Lay Sheets against Wind Direction
Direction of Wind and Rain
120-200 mm
3. Butyl rubber sealing strip should be used where the pitch is less than 15%
or in case where penetration of wind or fumes must be prevented. The
strip should be placed between the sheets at the width end lap, along
and exteriorly to the screw line.
Warning: Do not use materials which are not recommended by Palram.
Specifically, polyurethane foam should not be used as insulating foam with
SUNTUF Plus. Contact with this material will render the sheets fragile. When
in doubt, consult your Palram distributor.
Butyl rubber strip
Use of Shading Compounds
1. It is possible to apply shading compounds on SUNTUF Plus sheets.
2. Use only recognized commercial brands, confirmed to be compatible with polycarbonate. Do not apply dubious mixtures
that may contain incompatible components, which will attack and damage the sheets.
3. In case of doubt, consult your SUNTUF Plus distributor, who can advise you on the proper use of shading compounds.
4. You can ask for recommendations on compatible formulations that were tested and confirmed for use by Palram Industries.
Note that all the recommended formulations are water-soluble and will eventually be washed away by rains.
5. Shading compounds should be easily removed using a strong water jet in conjunction with vigorous brushing with a soft
bristle brush, or wiping with soft cotton rags.
Positioning the Sheets
1. Only one side of a SUNTUF Plus sheet is UV protected*. This side must always
face out toward the sun. The UV protected side is indicated by a sticker or
polyethylene strip along the length of the sheet. The sticker or polyethylene
strip must be removed immediately after the sheet is installed.
2. The sheets should be laid down on the roof or set upon the wall against
the primary direction of wind and rain.
3. Do not step on the panels between purlins.
4. Stepping ladders and other devices required for safe work should be used.
5. Never leave panels unattended until all the required screws have been
tightened.
6. Due to the sheets’ low weight, SUNTUF Plus can be rolled for the purpose
of lifting them to the roof. The sheets must be rolled perpendicular to the
length of the corrugations, with the upper UV protected side facing outwards
and the lower side with the anti-condensation treatment facing inward.
* Except for SUNTUF Plus UV2 which is manufactured with co-extruded UV protection on both
sided when a special order has been placed.
Overlap
1. Width overlap (sheet edge):
Minimum overlap: 120 mm
Minimum distance of 60 mm of
each sheet’s edge from center line
of supporting purlins (line of screws).
Maximum overlap: 200 mm
2. Length overlap: One corrugation**
3. Roof Edge: Sheets at the roof’s edge
should extend beyond over the edge
support by not more than 100 mm.
Width Overlap
inimum Slope 10%
Direction of Wind and Rain
Lay Sheets against Wind Direction
Edge Purlin to
Purlin Distance
Internal Purlin to
Purlin Distance
** Two corrugations length overlap is recommended for slopes below 15%, or in case of extreme
weather conditions (excessive rain and/or wind.)
5
Page 8

Greenhouse Installation Guide
Lay Sheets against Wind Direction
Direction of Wind and Rain
Minimum Slope 10%
Width Overlap
120-200 mm
19 mm washer
19 mm washer
Greca Profile
Omega Profile
25 mm washer
Lay Sheets against Wind Direction
Direction of Wind and Rain
19 mm washer
19 mm washer
Greca Profile
Direction of Wind and Rain
Gr-76 1870
Gr-76 1870
Gr-76 1870
Arching Radius
When covering curved structures, it is possible to set the sheets on an arched framework
so that they will arch within the range of elasticity of the sheets without inducing stress.
The minimum radius of the arch created is 3.00 m for Omega and 4.00 m for Greca.
Roof and Wall Fastener Location
1. A fastening screw should be inserted into at least every third corrugation valley at each internal purlin.
2. Along the edge purlin, the screws are to be inserted into alternate corrugation valleys.
3. Along the length overlap, the screws are to be inserted into the overlapping corrugation crest on top of each purlin.
4. A hole must be pre-drilled into each screw location. The diameter of the hole must be 4 mm larger than that of the screw.
5. The screws should be tightened with an electric screwdriver with an adjustable clutch, taking care not to over-tighten.
Excessive tightening may harm the sheet and cause premature failure.
6. Sheet-to-sheet stitching fasteners are recommended along the length of overlapping corrugations between the purlins,
at least 2 units at every span (See “Sheet-to-sheet stitching fasteners”, Page 7).
Positions for fastening roof or wall screws at internal purlin.
Positions for fastening roof or wall screws at edge purlin.
19 mm washer
25 mm washer
Omega Profile
Screws, Washers and Gaskets
1. General Recommendations: For optimal long-term maintenance
free service, Palram strongly recommends the use of heavyduty corrosion resistant screws, and special metal washers with
profiled 4 mm (at least) thick EPDM rubber gaskets*, 19 mm
(crest) or 25 mm (valley) diameter (in Greca profile both crest
and valley with 19 mm), to fasten the sheets to the supporting
structure and seal the fastener’s hole (Figure 1).
2. Use of self-tapping screws with pre-drilled holes or self-drilling
screws is recommended. For wooden purlins, a special woodscrew should be used (Figure 2).
3. The screw placed into corrugation crest should be 6.3 x 38 mm
(/ x 1 / in.) or a #12 or 14 gage screw. Screws placed in a
corrugation valley should be 6.3 x 25 mm (1/4 x 1 in.). Each
screw should be fitted with a conical corrosion resistant metal
washer at least 1 mm (0.04 in.) thick and a special EPDM gasket.
The screw should be tightened moderately without deforming
the washer and rubber gasket or distorting the corrugation.
4. Special attention should be given to the insertion of the screws
perpendicular to the material face. Oblique insertion could
damage the sheet and/or result in leaks (Figure 2).
* Palram offers to supply, upon demand, the recommended fastener combinations
mentioned above, along with the SUNTUF Plus sheets.
19 mm washer
Greca Profile
19 mm washer
25mm washer/gasket19mm washer/gasket
Figure 1
Self-tapping screw Self-drilling screw Wood screw
Figure 2
INCORRECT -
Non-perpendicular drilling
and insertion.
CORRECT INCORRECT -
Excess over tightening
Figure 3
6
Page 9

Sheet-to-Sheet Stitching Fasteners
Trave di sostegno Supporto a Omega
SUNTUF® Plus
Side-lap profiles Stitching Fasteners
Greenhouse Installation Guide
Top and bottom pre-drilled metal side-lap profiles are
recommended for improved tightening of lapping sheets,
between purlins, with /" x 1” self-tapping screws every 400
mm and /" x 2” self-drilling screws above each purlin.
Additional Accessories
1. Omega Purlins: Palram recommends building
the greenhouse utilizing special Omega
shaped purlins to prevent condensation
drips from the purlins. Care must be taken
to collect the condensation water at the
edge of the purlins.
Fastening Metal Profile: it is possible
to install a special sheet metal angle
profile for tightening the roof sheets
along the purlins. The profile will be
30 x 40mm, 2mm thick.
Fastening distance – no more than 1200 mm.
Stitching Fasteners: It is possible to use /" x /” selftapping screws every 400 mm at the side-lap crest top for
stitching the lapping sheets.
Sheet-to-sheet fastening screw between overlapping
corrugations (detail), for Greca profile.
Sheet-to-sheet fastening screw between overlapping
corrugations (detail), for Omega profile.
SUNTUF® Plus
Special care must be taken to fasten the angel
profile on top of the Side-lap/mid crests,
without over tightening, to avoid distorting
the corrugations.
2. Corner / Side Ridge Closure: Two adjoining galvanized
sheet-metal covering profiles (flashings) are used for
closing the cladding sheets where the roof meets the
gable wall, or a vertical closure between two walls corner.
a) the internal 100x100x1.5 mm profile is used to attach
both edges of the cladding sheets to the structure.
b) the external 150x150x0.6 mm flashing profile will fasten
to the internal profile through the cladding sheets and
will close the gap between them, at the corner.
copertura angolare
metallica superiore
150 X 150 X 0.6mm
copertura angolare
metallica inferiore
100 X 100 X 1.5 mm
7
Page 10

Standard SUNTUF® Plus Accessories
SUNTUF® Plus SUNTUF® Plus
Sigillatura corrugata
SUNTUF® Plus SUNTUF® Plus
SUNTUF® Plus
Profilo Omega
Trave di sostegno Supporto a Omega
SUNTUF® Plus
All items below can be purchased from Palram Industries and its distributors.
Universal Ridge Cap - Greca Profile
(Omega Profile Universal Ridge Cap is also available)
Dimensions: 1270 x 150 x 150 mm
1270 x 270 x 270 mm
Number of Corrugations: 17
Net Length: 1210 mm
Greenhouse Installation Guide
SUNTUF® Plus SUNTUF® Plus
Flat Ridge Cap 150°
Dimensions:
2500 x 210 x 210 mm
Net Length: 2400 mm
Corrugated Sealing Strip
SUNTUF® Plus
Flat Side Ridge - 90°
Dimensions:
2500 x 160 x 160 mm
Net Length: 2400 mm
SUNTUF® Plus
Universal Ridge Cap
8
Page 11

All marketing materials and any content therewith provided by palram® are provided solely for the purpose of supporting and enhancing the marketing of Palram® products.
These materials are protected by Palram’s intellectual property rights and may not be used for any other purpose or in connection with the sale of products of any other manufacturer.
These materials may not be transferred to or used by any third party without prior permission of Palram.
PALRAM H.Q.
Tel: +972.4.8459.900
Fax: +972.4.8444.980
palram@palram.com
www.palram.com
In as much as Palram Industries has no control over the use to which others may put the material, it does not guarantee that the same
results as those described herein will be obtained. Each user of the material should make his own tests to determine the material’s
suitability for his own particular use. Statements concerning possible or suggested uses of the materials described herein are not to
be construed as constituting a license under any Palram Industries patent covering such use or as recommendations for use of such
materials in the infringement of any patent. Palram Industries or its distributors cannot be held responsible for any losses incurred through
incorrect installation of the material. In accordance with our company policy of continual product development you are advised to
check with your local Palram Industries supplier to ensure that you have obtained the most up to date information.
©1997 Palram Industries Ltd. | SUNTUF is a registered trademark of Palram Industries Ltd.
PALRAM EUROPE LTD.
Tel: +44.1302.380776
Fax: +44.1302.380788
sales.europe@palram.com
www.palram.com
PALRAM AMERICAS
Tel: 610.285.9918
Fax: 610.285.9928
palramamericas@palram.com
www.palramamericas.com
 Loading...