

Page 1
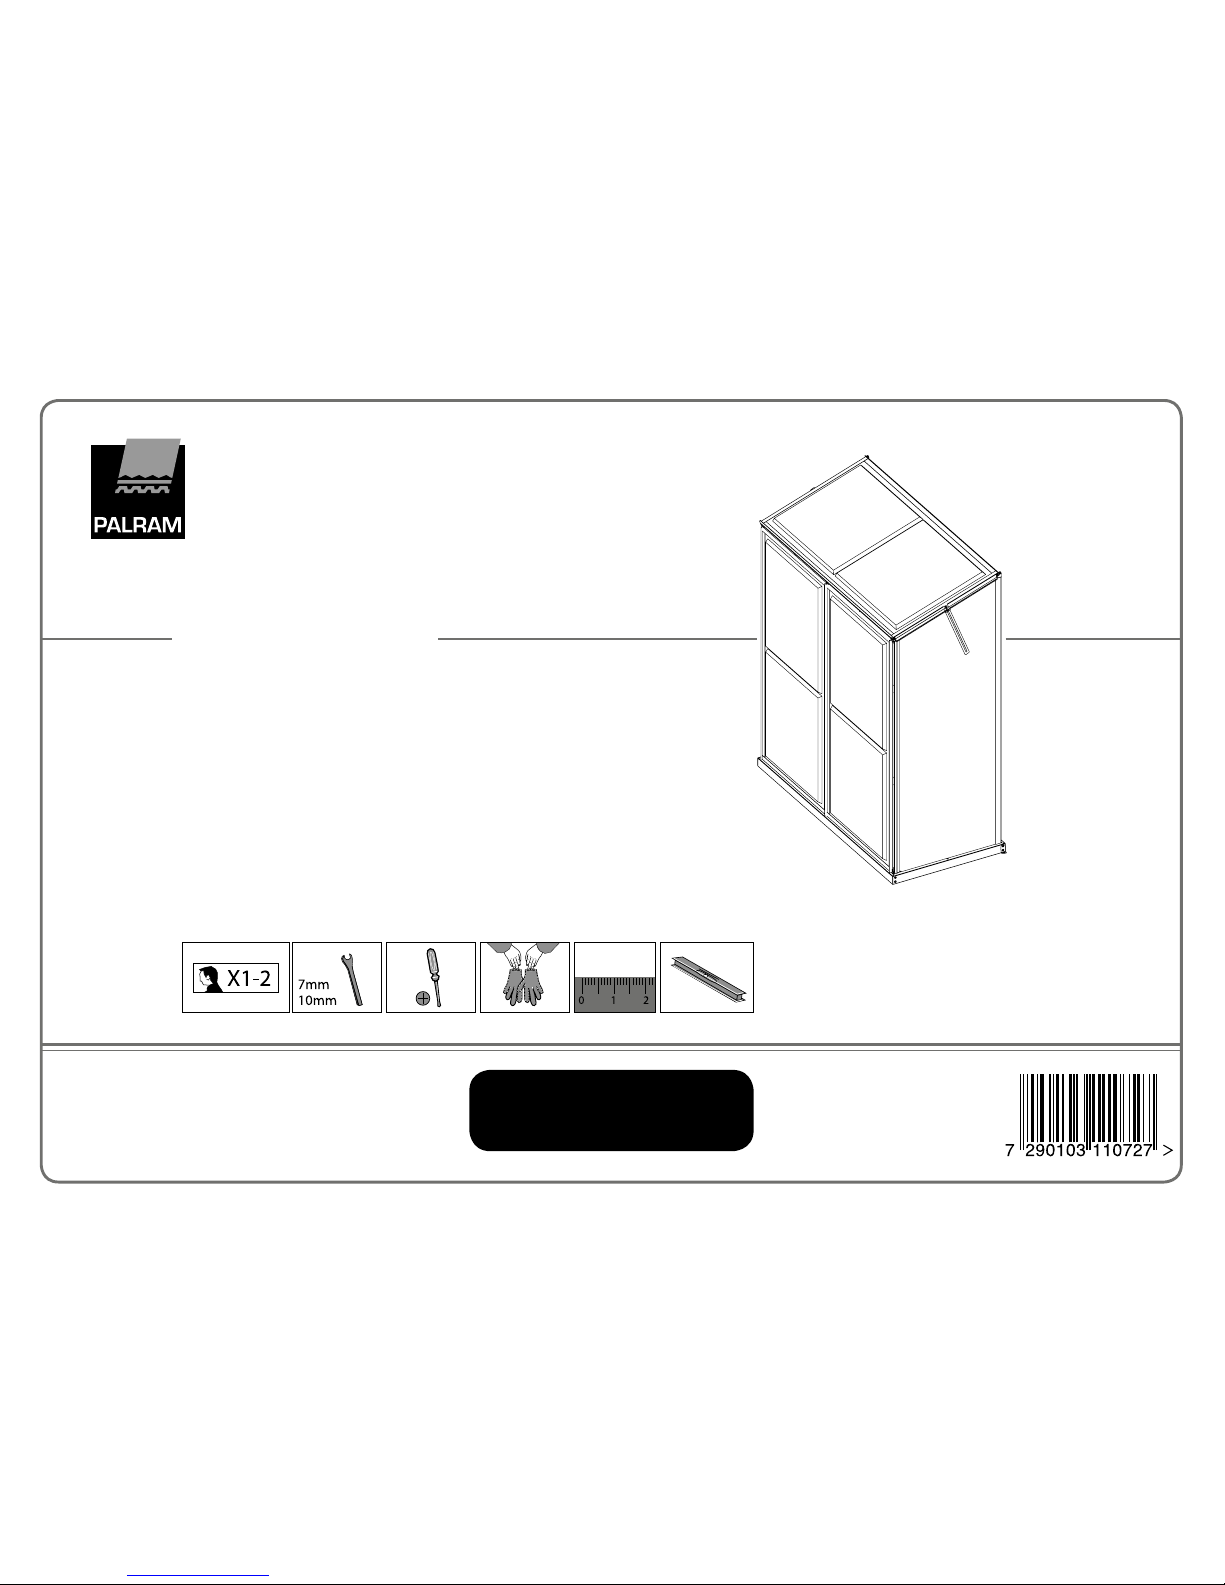
Grow Station
Assembly instructions
116x56x138 cm / 45¾”x22”x54½”
www.palramapplications.com
Customer help and support line:
01302-380775
English_71950
Page 2
a Customer Service
For assistance with assembly, replacement parts or any other additional information
please log onto our website or call our customer service line (number is on the title page).
www.palramapplications.com
a Safety advice
•
It is of utmost importance to assemble all of the parts according to the directions.
Do not skip any step.
•
We strongly recommend using work gloves during assembly.
•
Always wear shoes and safety goggles when working with extruded aluminium.
•
If using a step ladder or power tools ensure that you follow the manufacturer›s safety advice.
•
Do not touch overhead power cables with the aluminium profiles.
•
Do not attempt to assemble the product in windy or wet conditions.
•
Dispose of all plastic bags safely keep them out of reach of small children.
•
Keep children away from the assembly area.
•
Do not lean against or push the product during construction.
•
Do not position your product in an area exposed to excessive wind.
•
Do not attempt to assemble this product if you are tired, have taken drugs or alcohol or if you
are prone to dizzy spell.
•
Hot items such as recently used grills, blowtorches etc. must not be stored in the product.
•
This product is designed to use as growhouse only.
a Care & Maintenance
When your product needs to be cleaned, use a mild detergent solution and rinse with cold clean
water. DO NOT use acetone, abrasive cleaners or other special detergents to clean the clear panels.
a Tools & Equipment
•
Tape measure
•
Work gloves
•
Phillips head screwdr iver
•
Drill bit
•
Large hammer
•
T001 - Special tool for Screws 411 and nuts 412
IMPORTANT
Please read these instructions carefully before you start to assemble this product.
Keep these instructions in a safe place for future reference.
a Before Assembly
This is a multi-part assembly best achieved by two people.
Allow at least half a day for assembly process.
Selecting a site - the product must be assembled, positioned and fixed
on a flat level surface.
Choose a sunny position away from overhanging trees.
Take out all components parts of the packages. Sort the parts and
check against the contents parts list.
During assembly parts should be laid out close at hand. Keep all small
parts (screws etc.) in a bowl so they do not get lost.
a Notice
Step 7 – To level the shelves make sure the distances between floor and shelf are
equal on 4 corners. Shelves height can be adjusted to your needs.
Make sure screws are strongly tightened.
Steps 21-22 – The magnetic door catcher (1079) should be connected so it can
hold the nut on the door.
Step 25 – Make small holes on the back panel before it is screwed to shelves.
Step 26 – If door is not closing properly, bolt and nuts can be used to level the
product
a After assembly
This product’s ground fixing is based on storage weight. When shelves are empty
or light weight loaded it should be kept from winds. There for we are strongly
recommending fixing the product directly to a solid foundation.
EN
Page 3
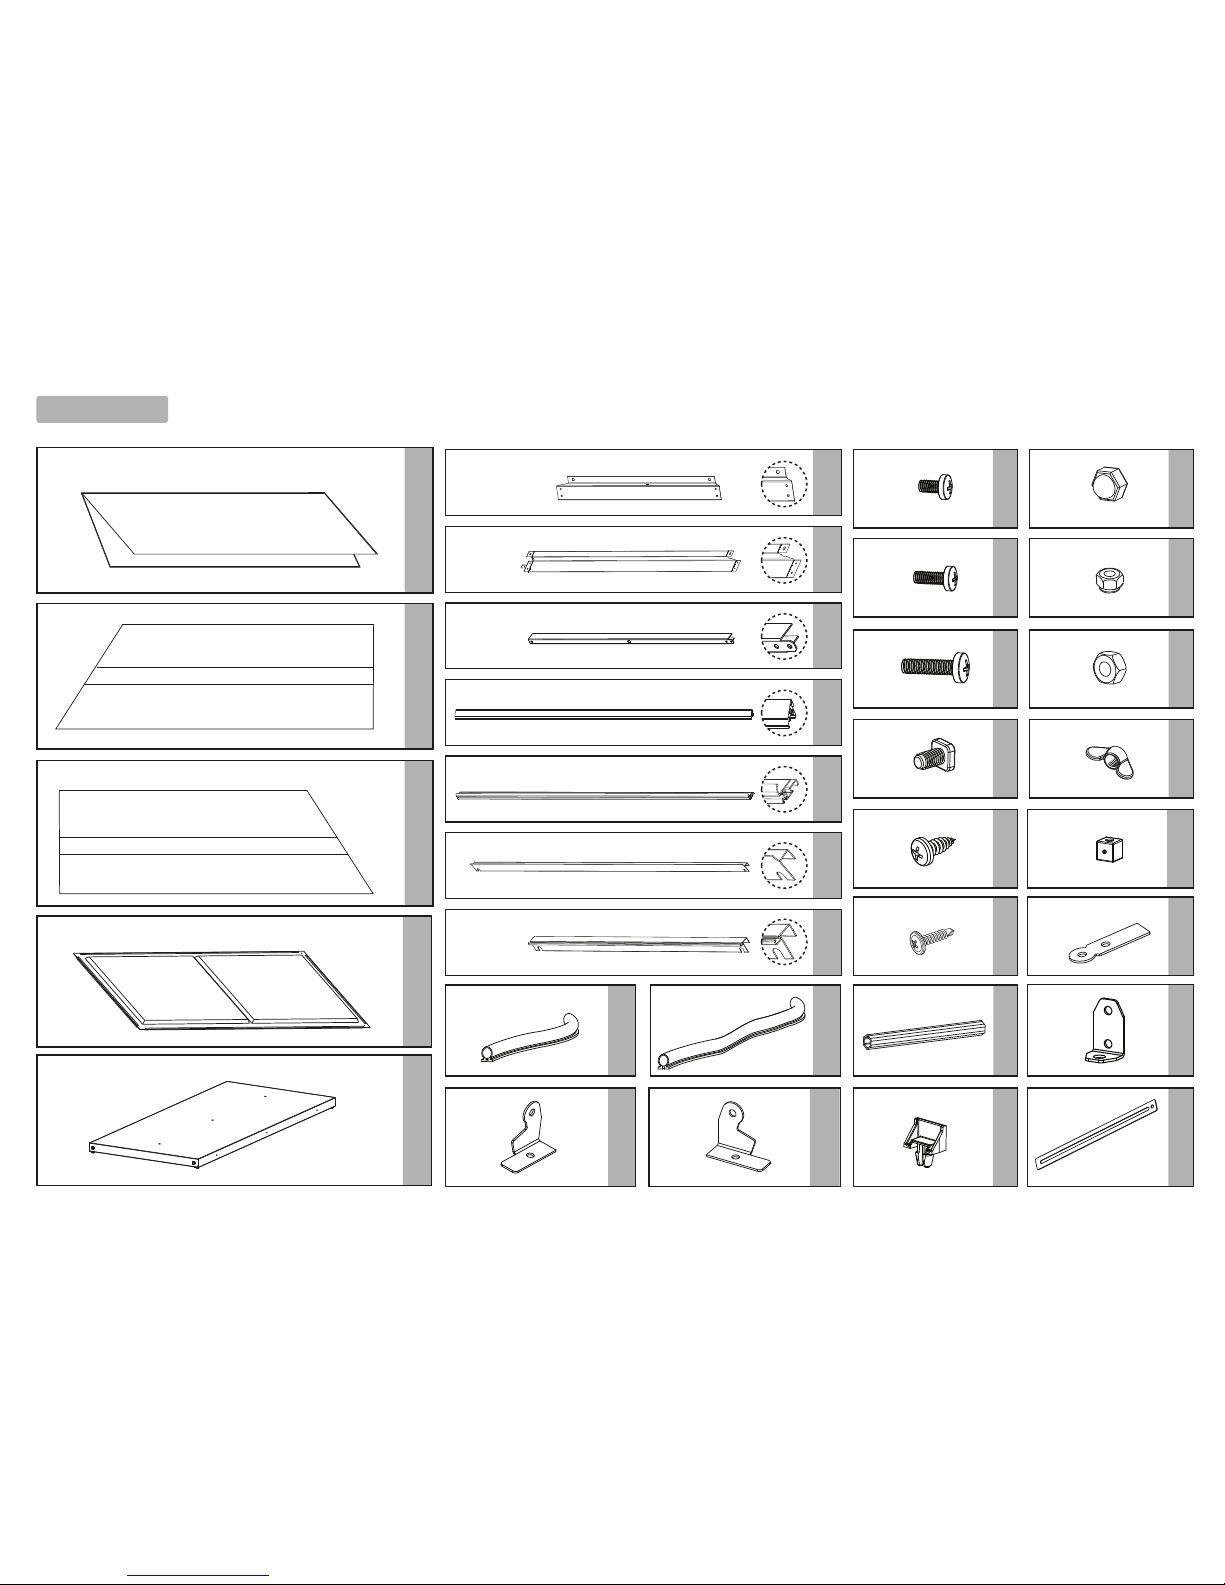
Item Qty. Item Qty.
P7007 1
M1050
2
P1068 3
M1061 2
M1049 2
M1056 6
A1058 2
A1057 8
A1060 1
A1059 2
This side out This side out This side out This side
This side out This side out This side out This side
P7008 1
P7006
1
Conte n ts
Item Qty.
M1053 1 M1052 1
Item Qty.
M4
M4
M6
M6
P3017 2 P7129 2
428 8
(+2)
M6
413 2
(+1)
M4
423 8
(+3)
M6
412 34
(+4)
1079 4
M1051 4
M1054 2
421 4
(+1)
411 34
(+4)
447 12
(+1)
4044 2
(+1)
4008 24
T001 1
M1055 2
P328 4
(+3)
4016 2
Page 4
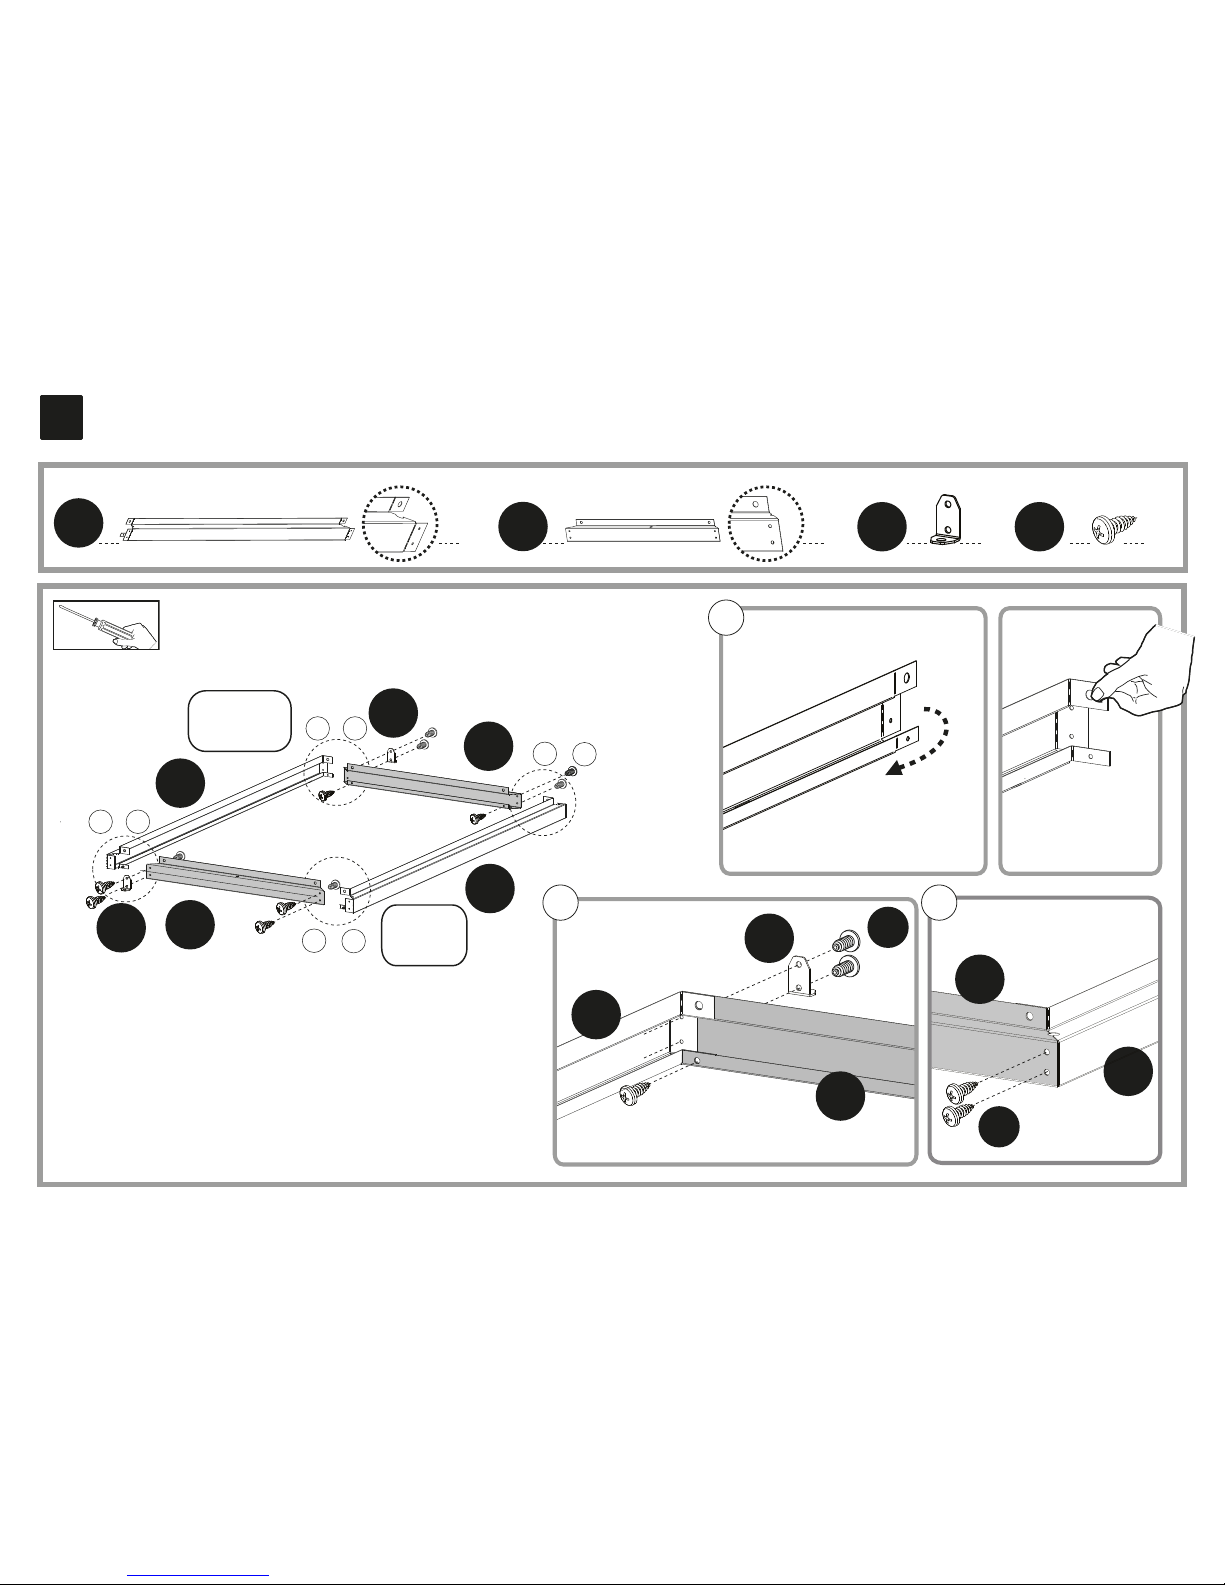
1
x2 x2
M1049 M1061
M1061
M1061
M1049
M1049
M1049
M1049
a
b
+
a
b
+
- Back
- Retour
- Rückseite
EN
FR
DE
EN
FR
DE
- Front
- Avant
- Front
c
a
+
c
a
+
x12
x2
447M1055
M1055
M1055
447
M1055
447
M1061
M1061
a
b c
Page 5
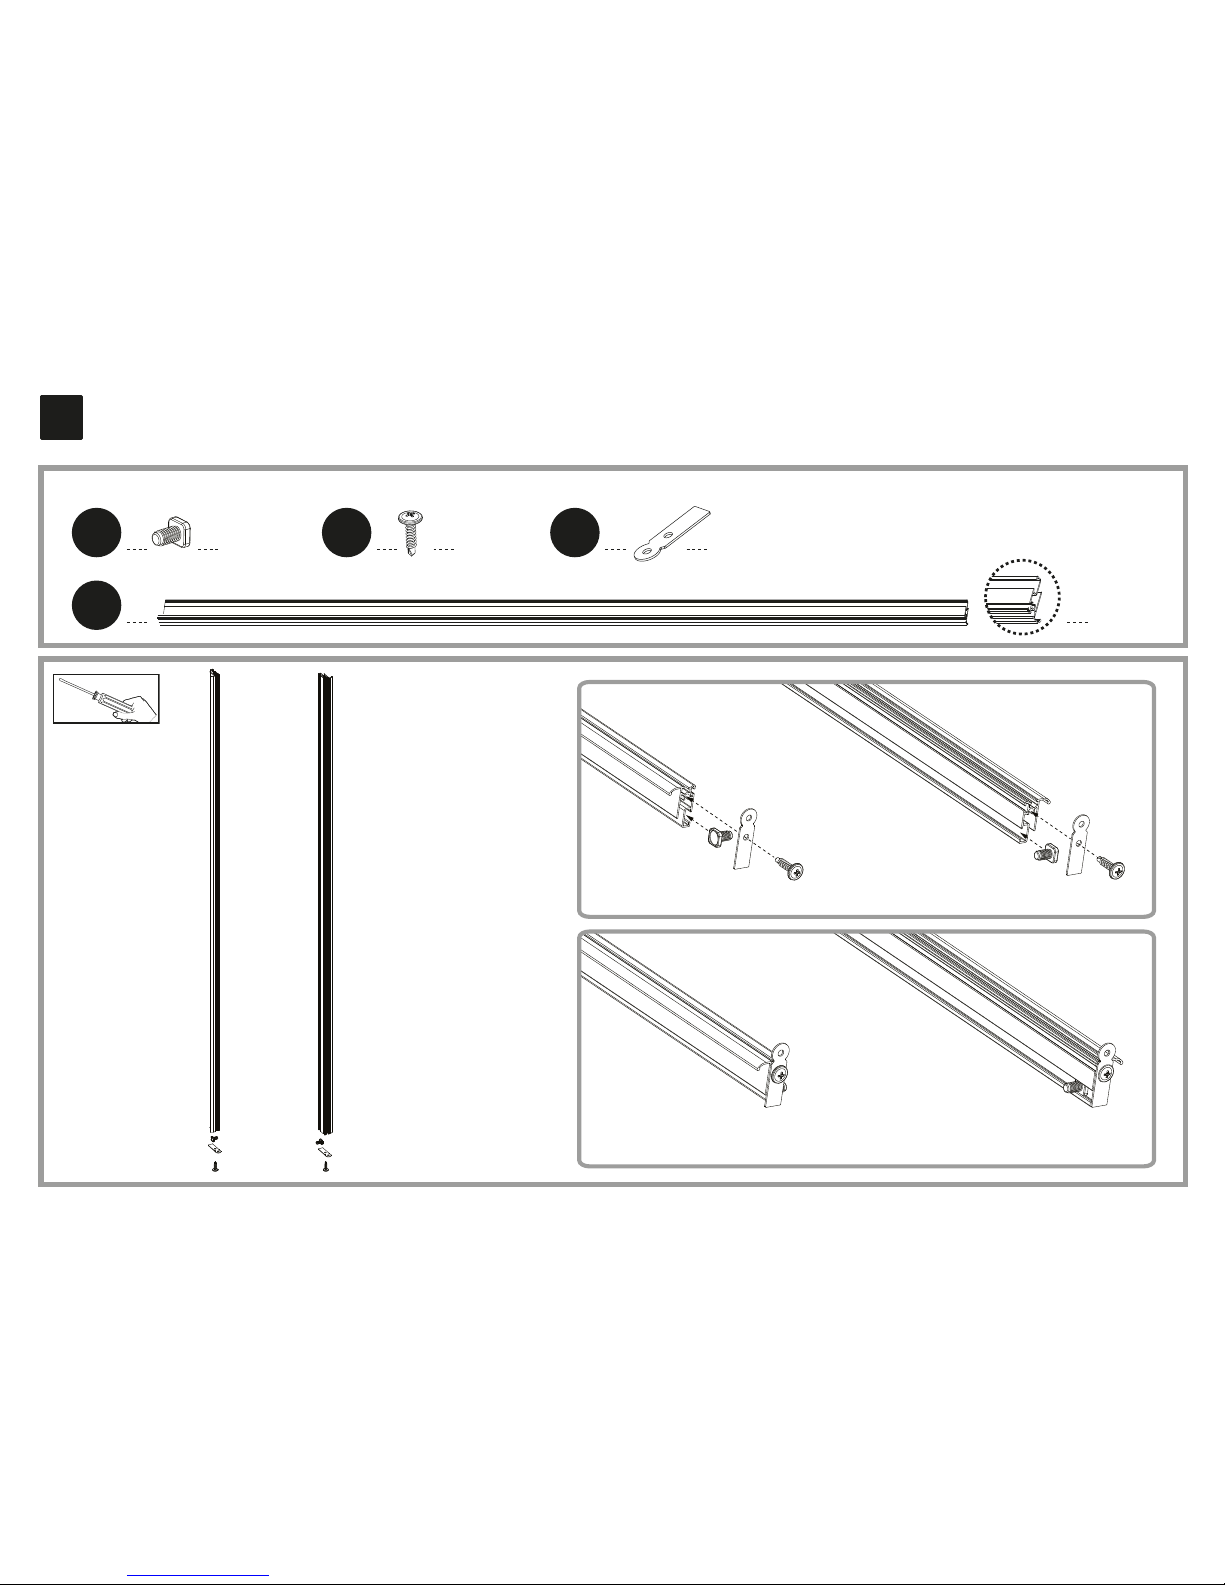
2
x2
411
x2
4008
x2
M1051
x2
A1057
Page 6
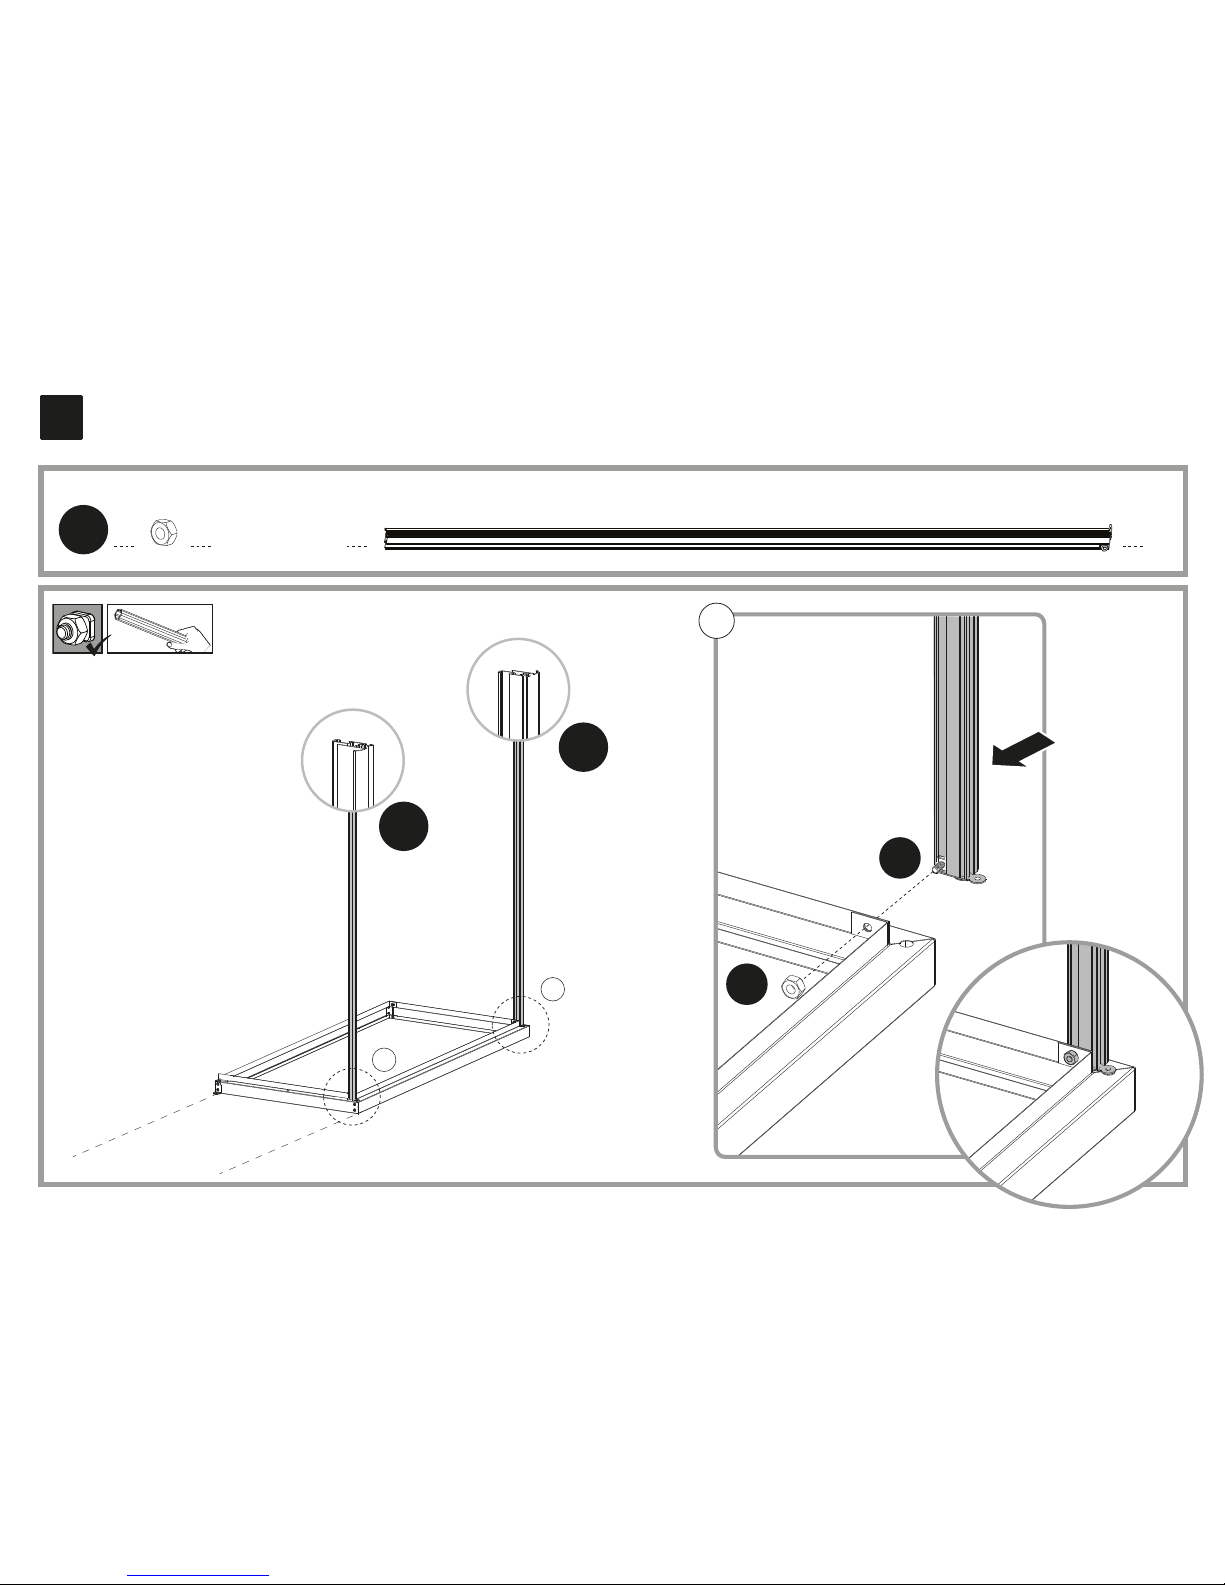
3
a
a
x2
x2
412
A1057
A1057
412
411
a
EN
FR
DE
- Back
- Retour
- Rückseite
EN
FR
DE
- Front
- Avant
- Front
Page 7
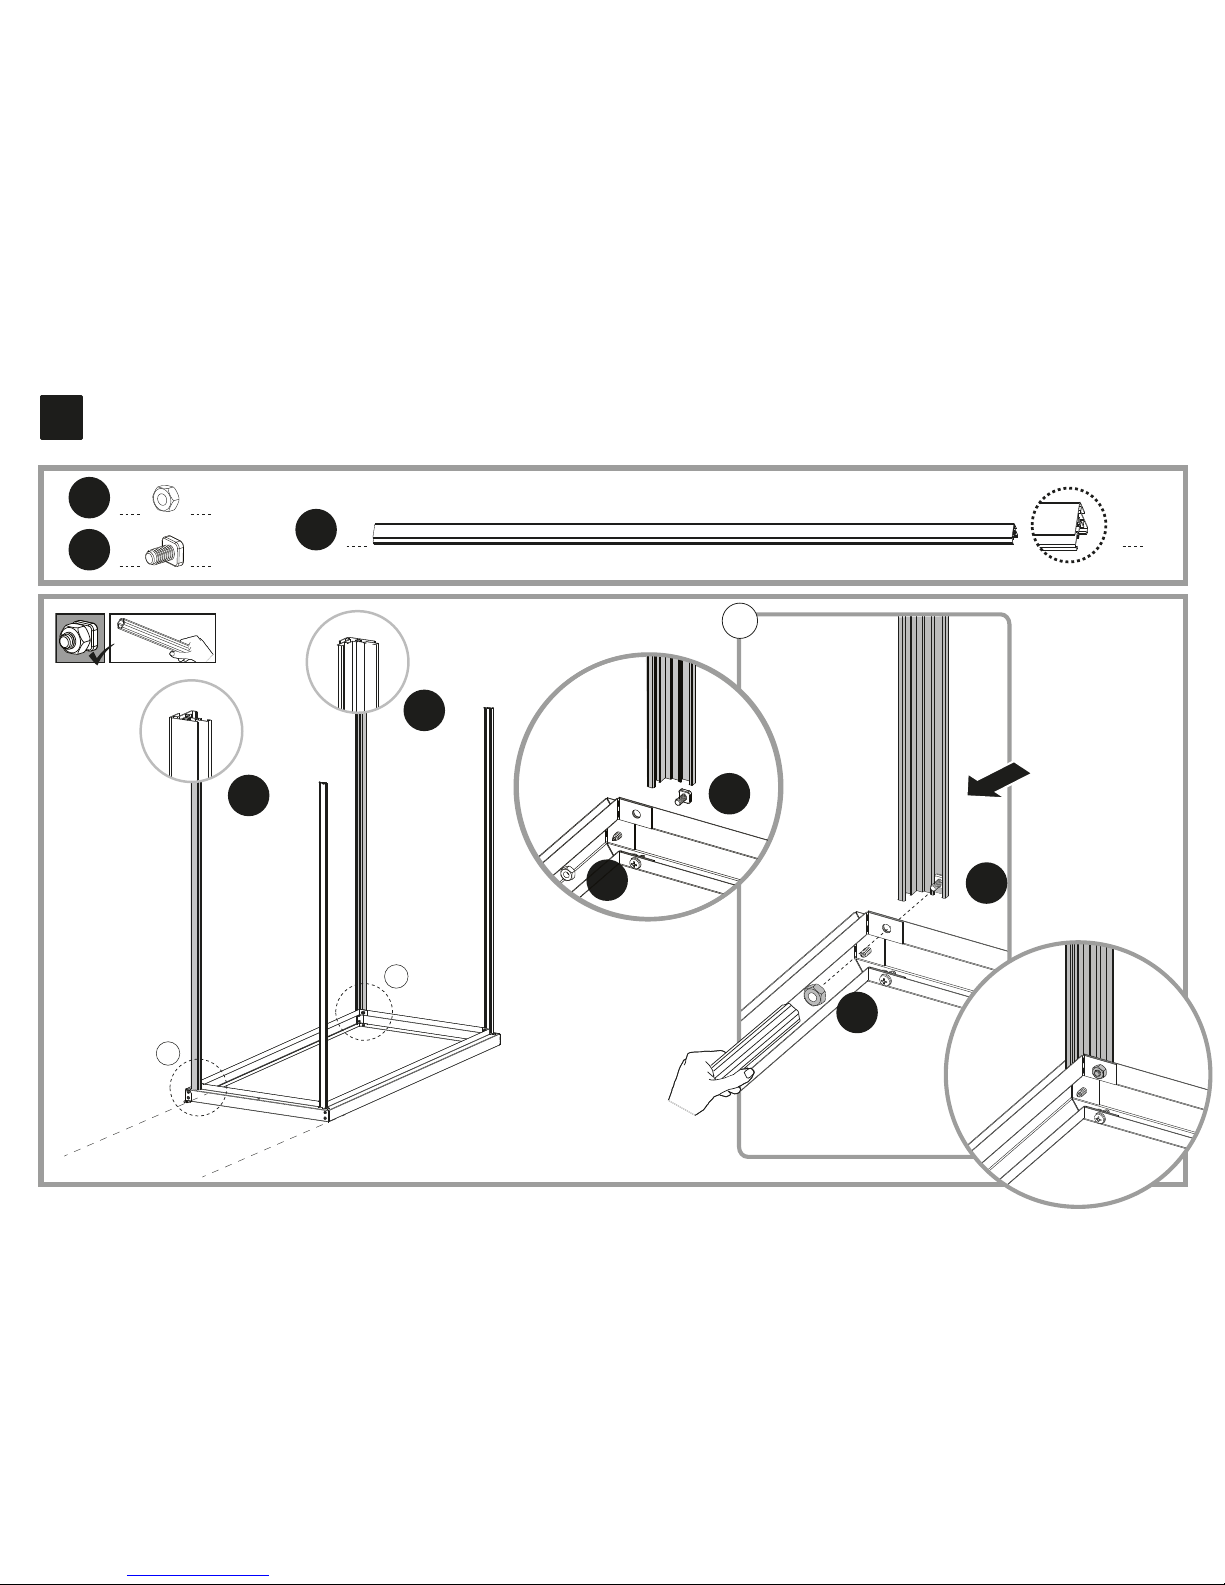
4
a
a
x2
412
x2
1058
x2
411
1058
1058
411
412
412
411
a
EN
FR
DE
- Back
- Retour
- Rückseite
EN
FR
DE
- Front
- Avant
- Front
Page 8
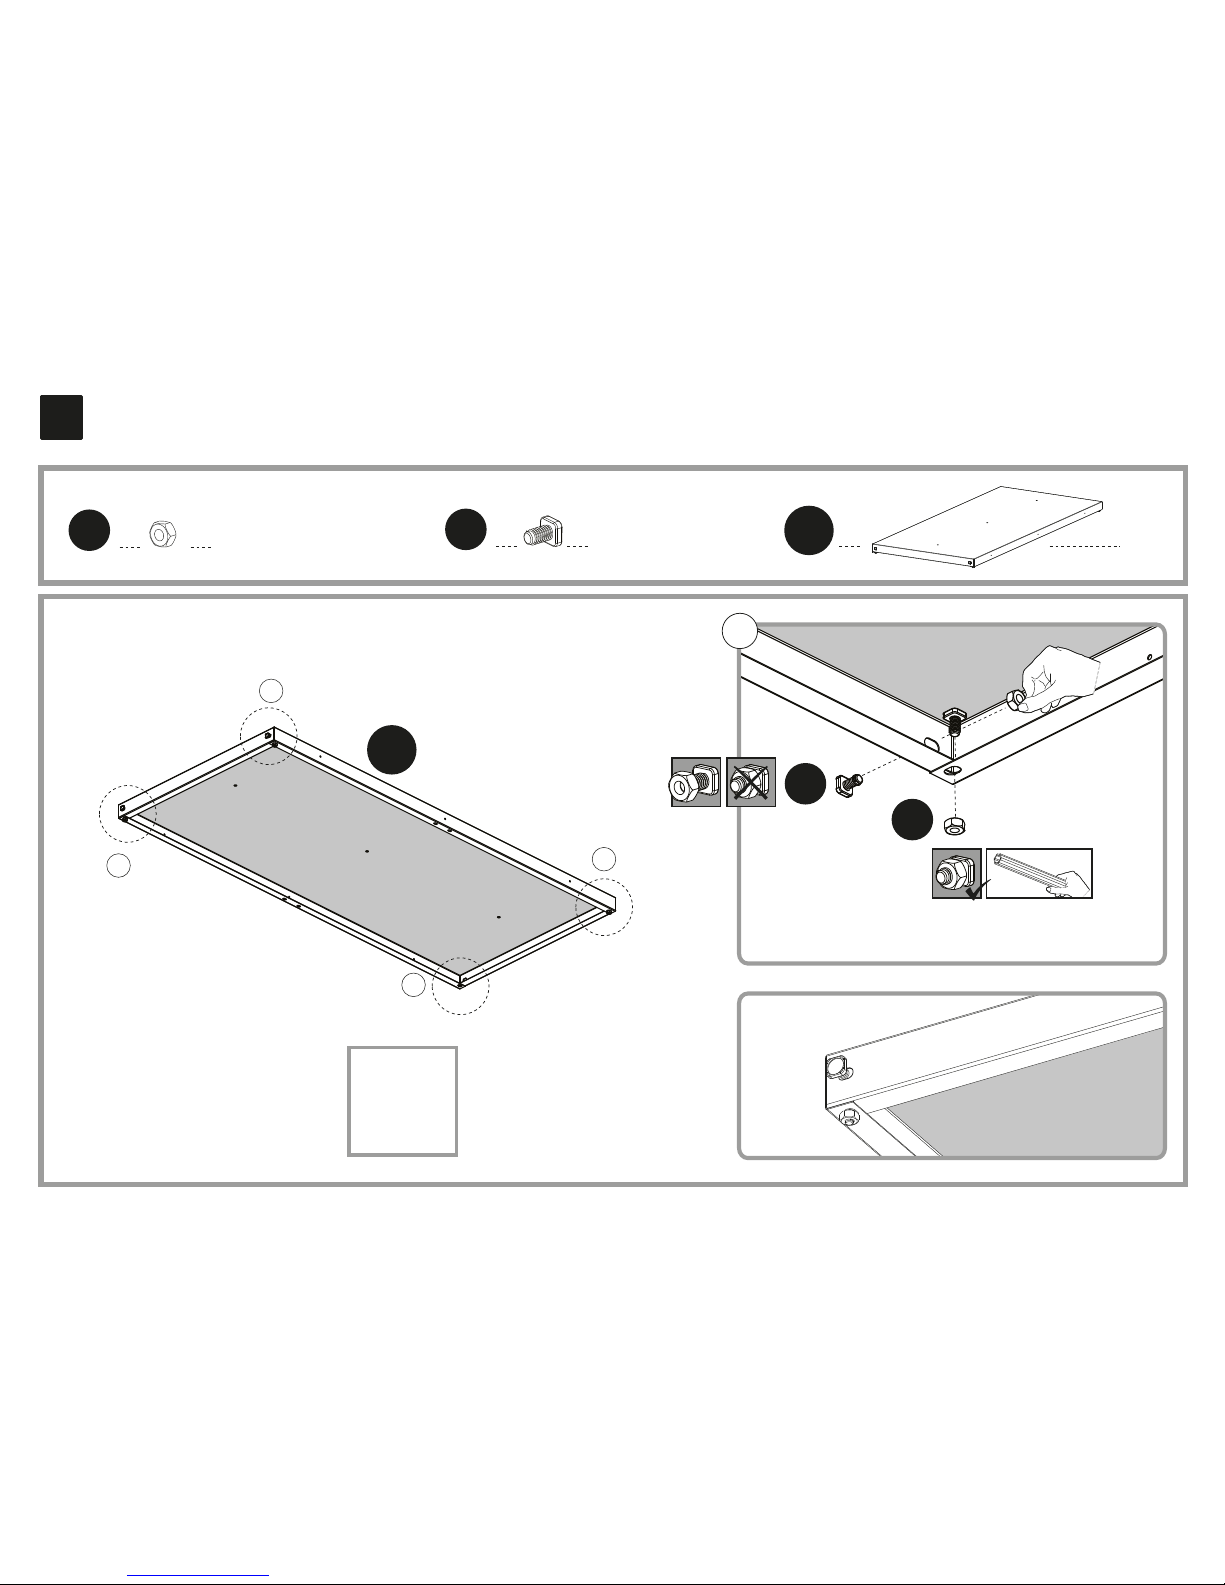
5
a
a
a
a
x16
412 xxx
x2
412
a
x16
411
x2
M1050
M1050
411
Page 9
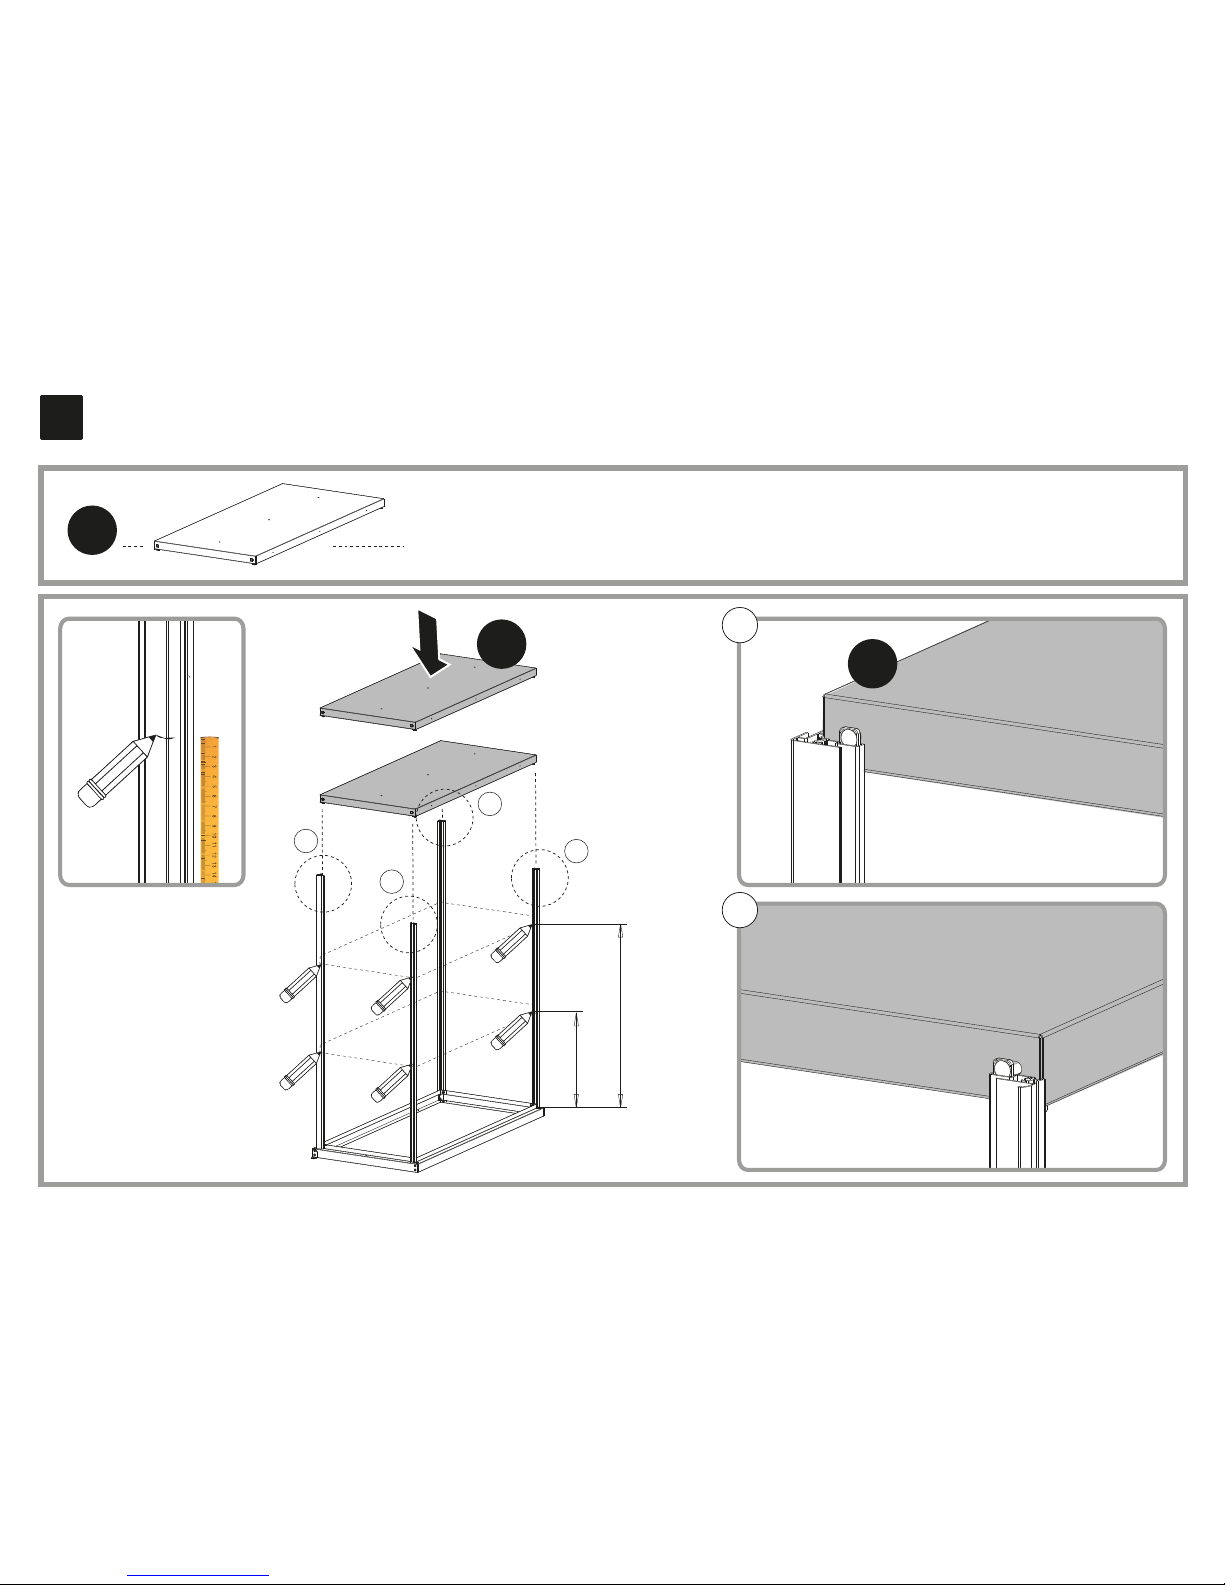
6
M1050
x2
a
b
b
a
a
b
M1050
M1050
93 cm
36
5/8”
48 cm
18
7/8”
Page 10
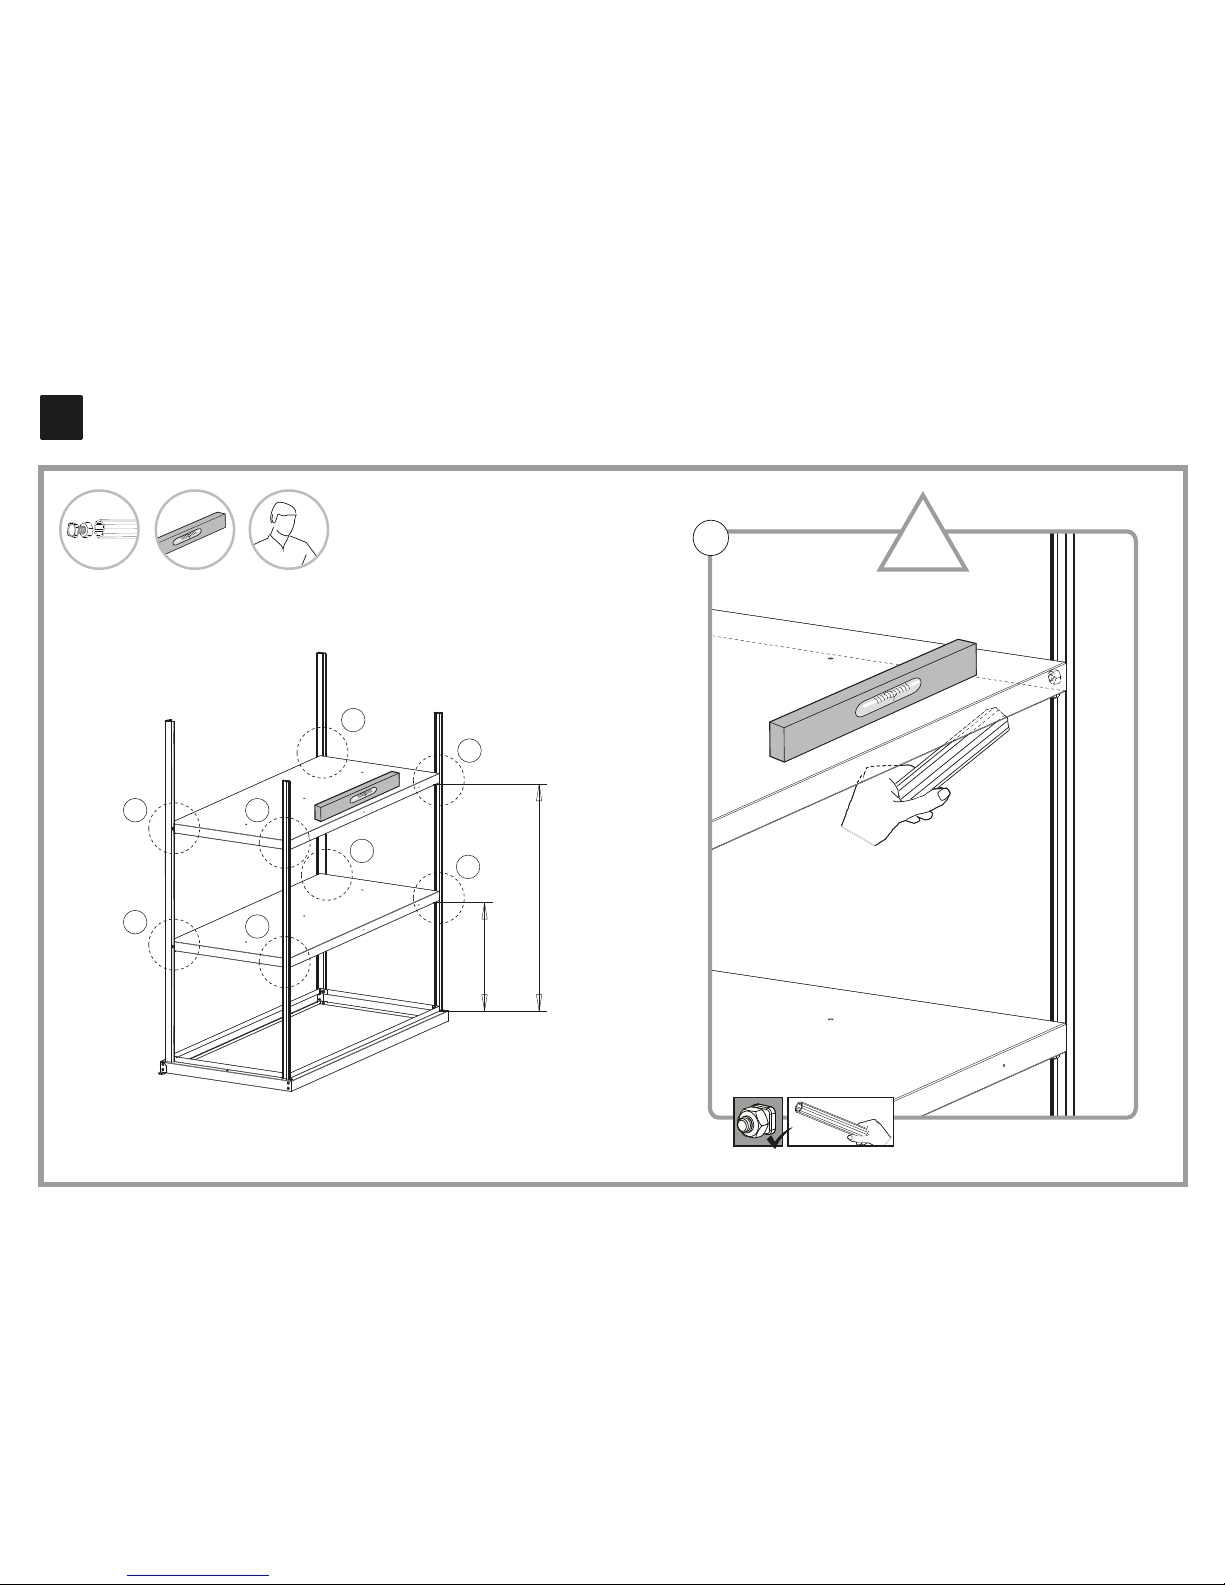
7
a
a
a
a
a
a
a
a
a
!
X2
93 cm
36
5/8”
48 cm
18
7/8”
Page 11
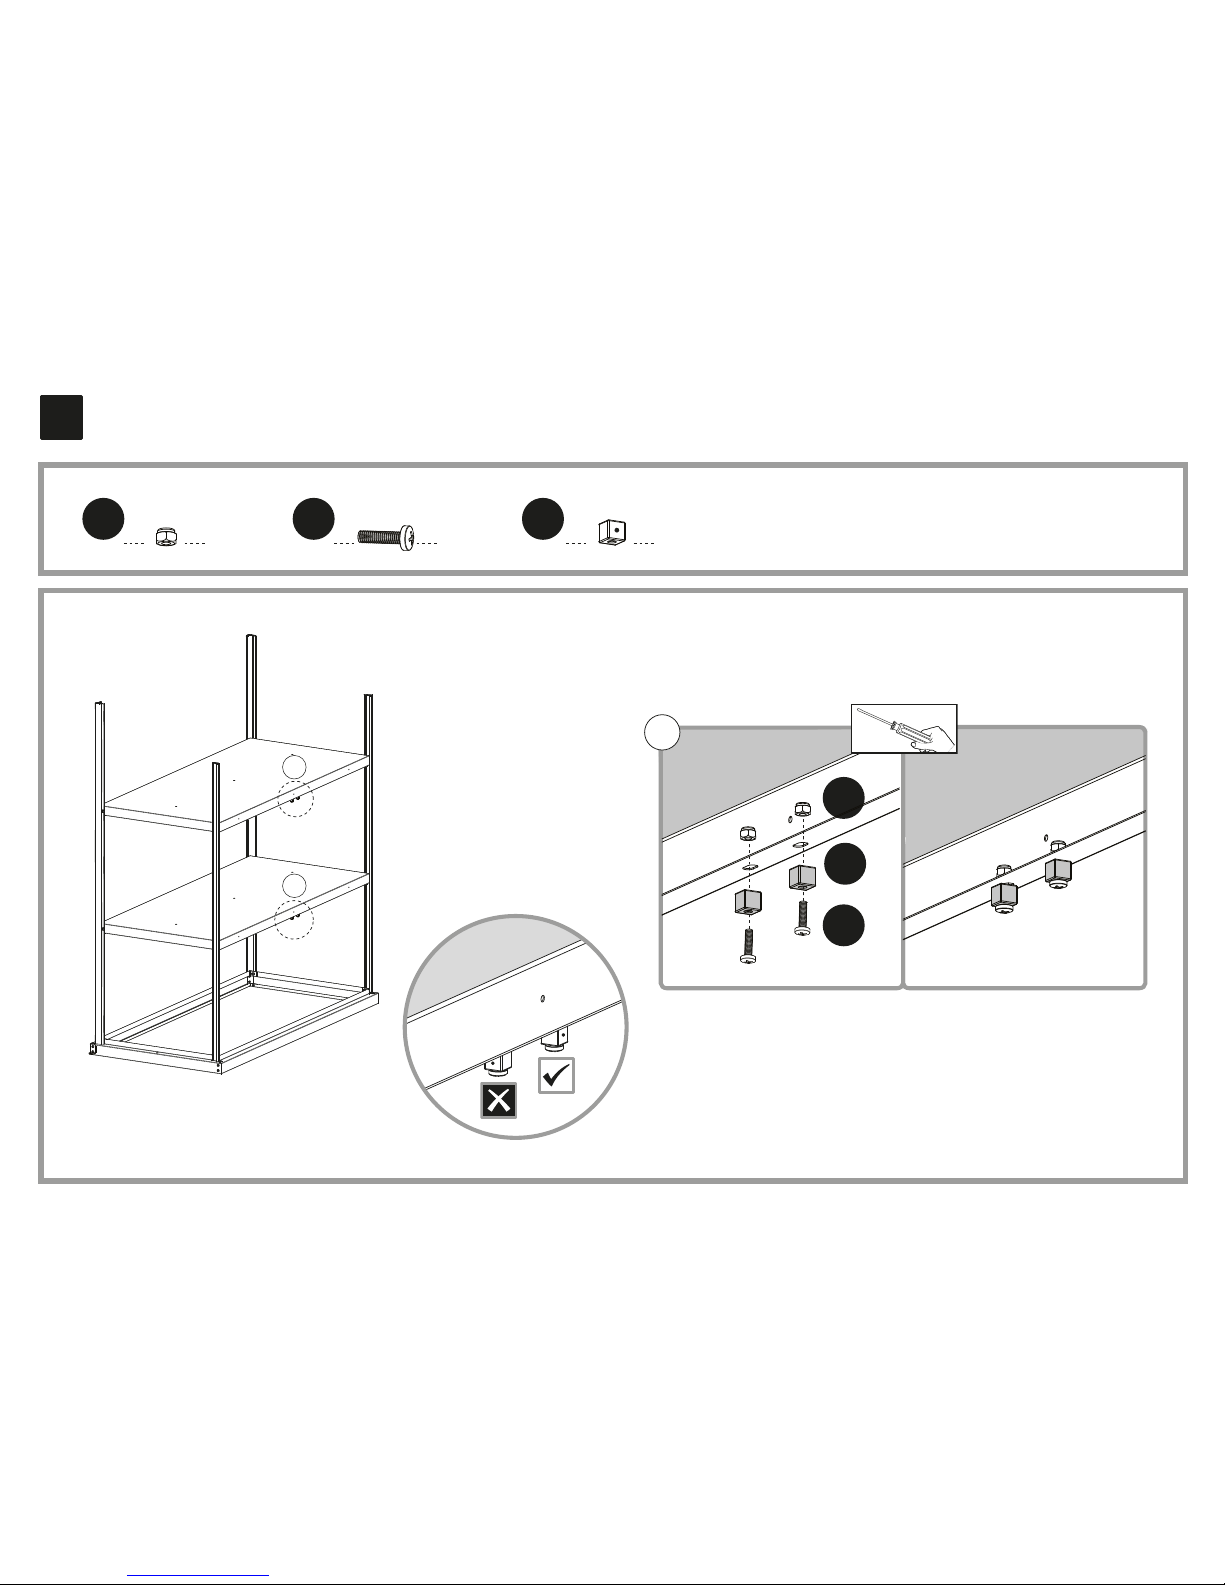
8
x4 x4x4
423 421 1079
1079
421
423
a
a
a
Page 12
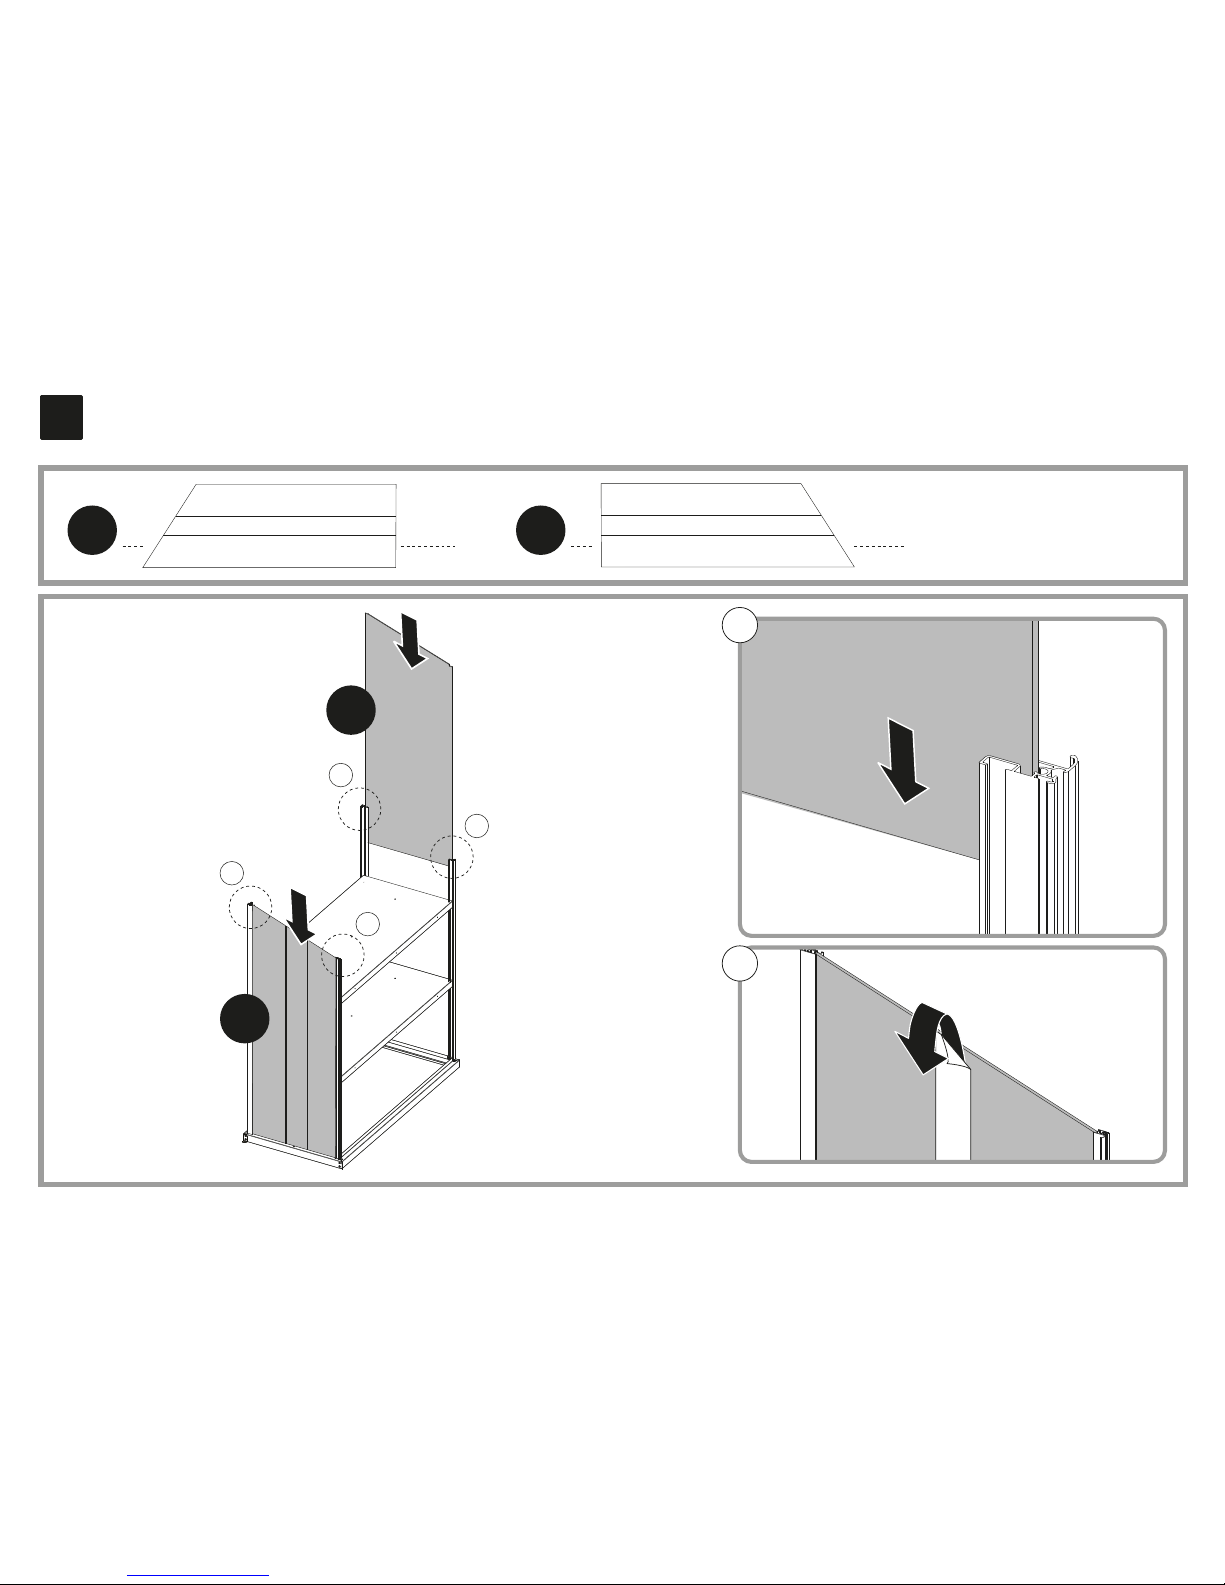
9
P7008
x1
P7006
x1
x2
a
a
a
a
a
P7008
P7006
b
This side out This side out
This side out This side out
This side out This side out
Page 13
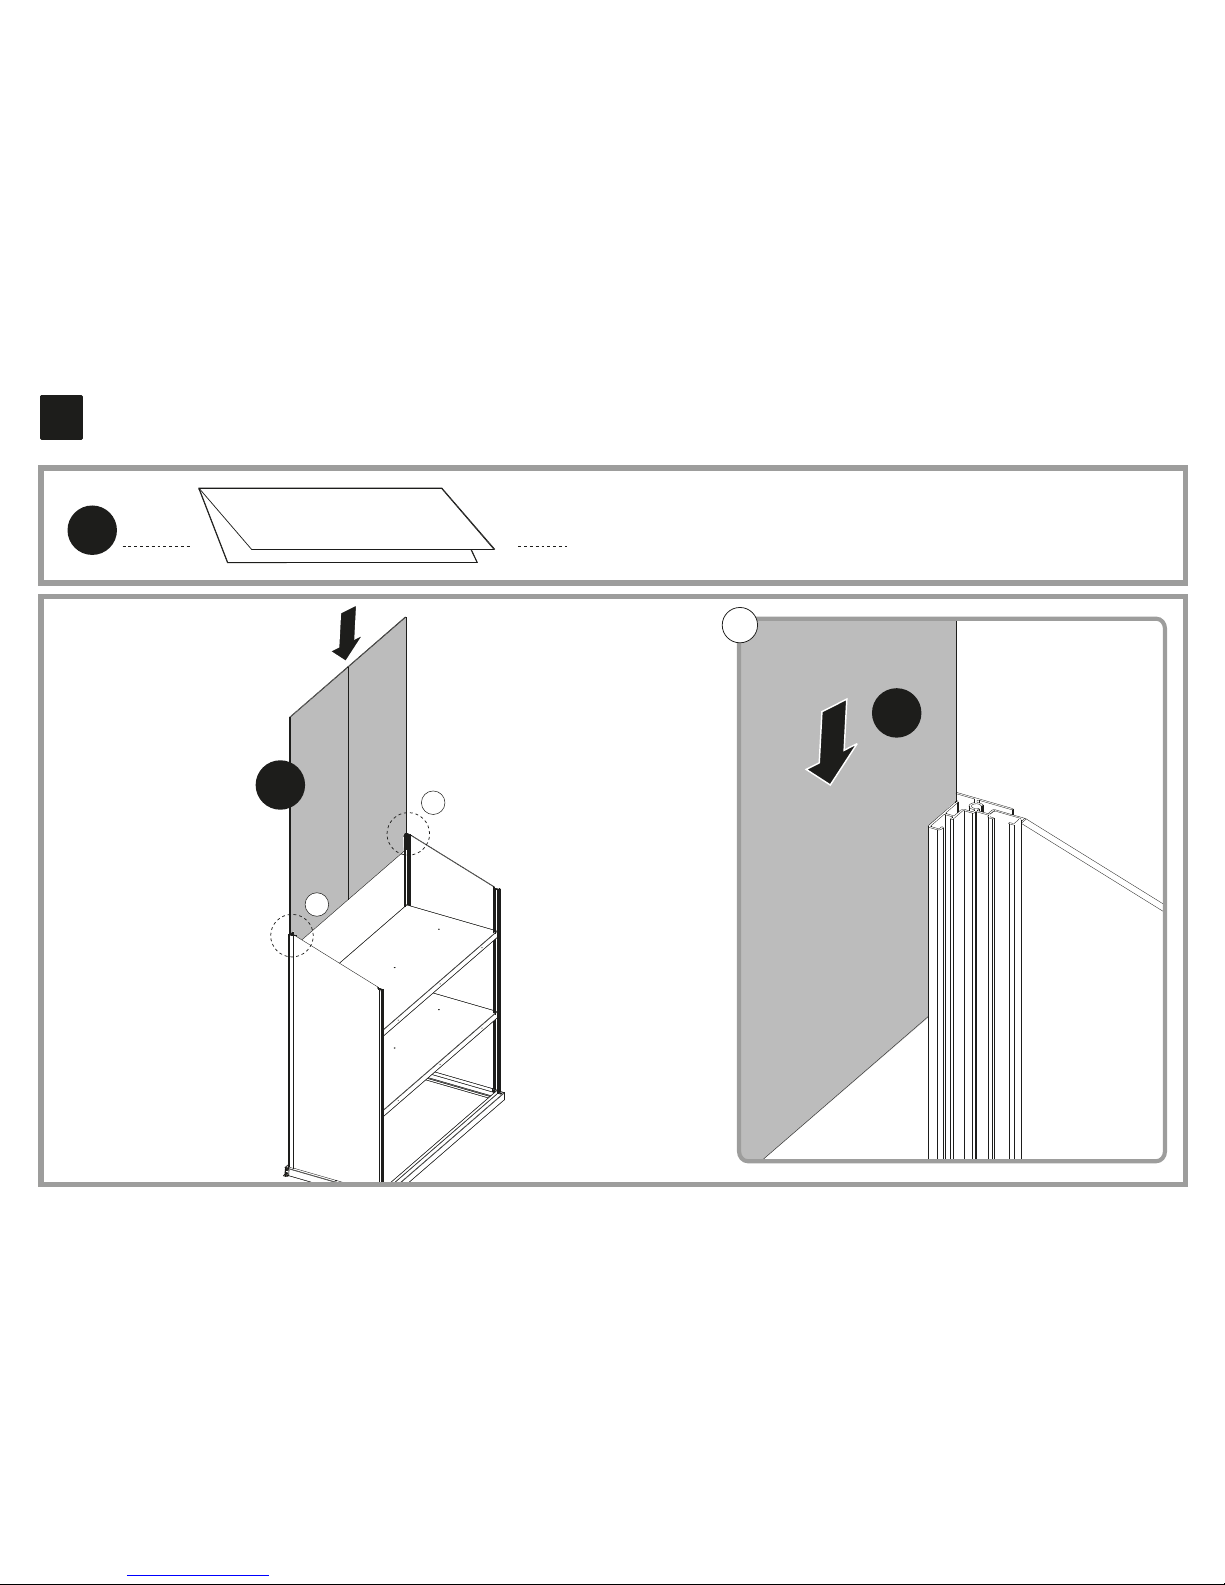
10
P7007
x1
a
a
a
P7007
P7007
Page 14
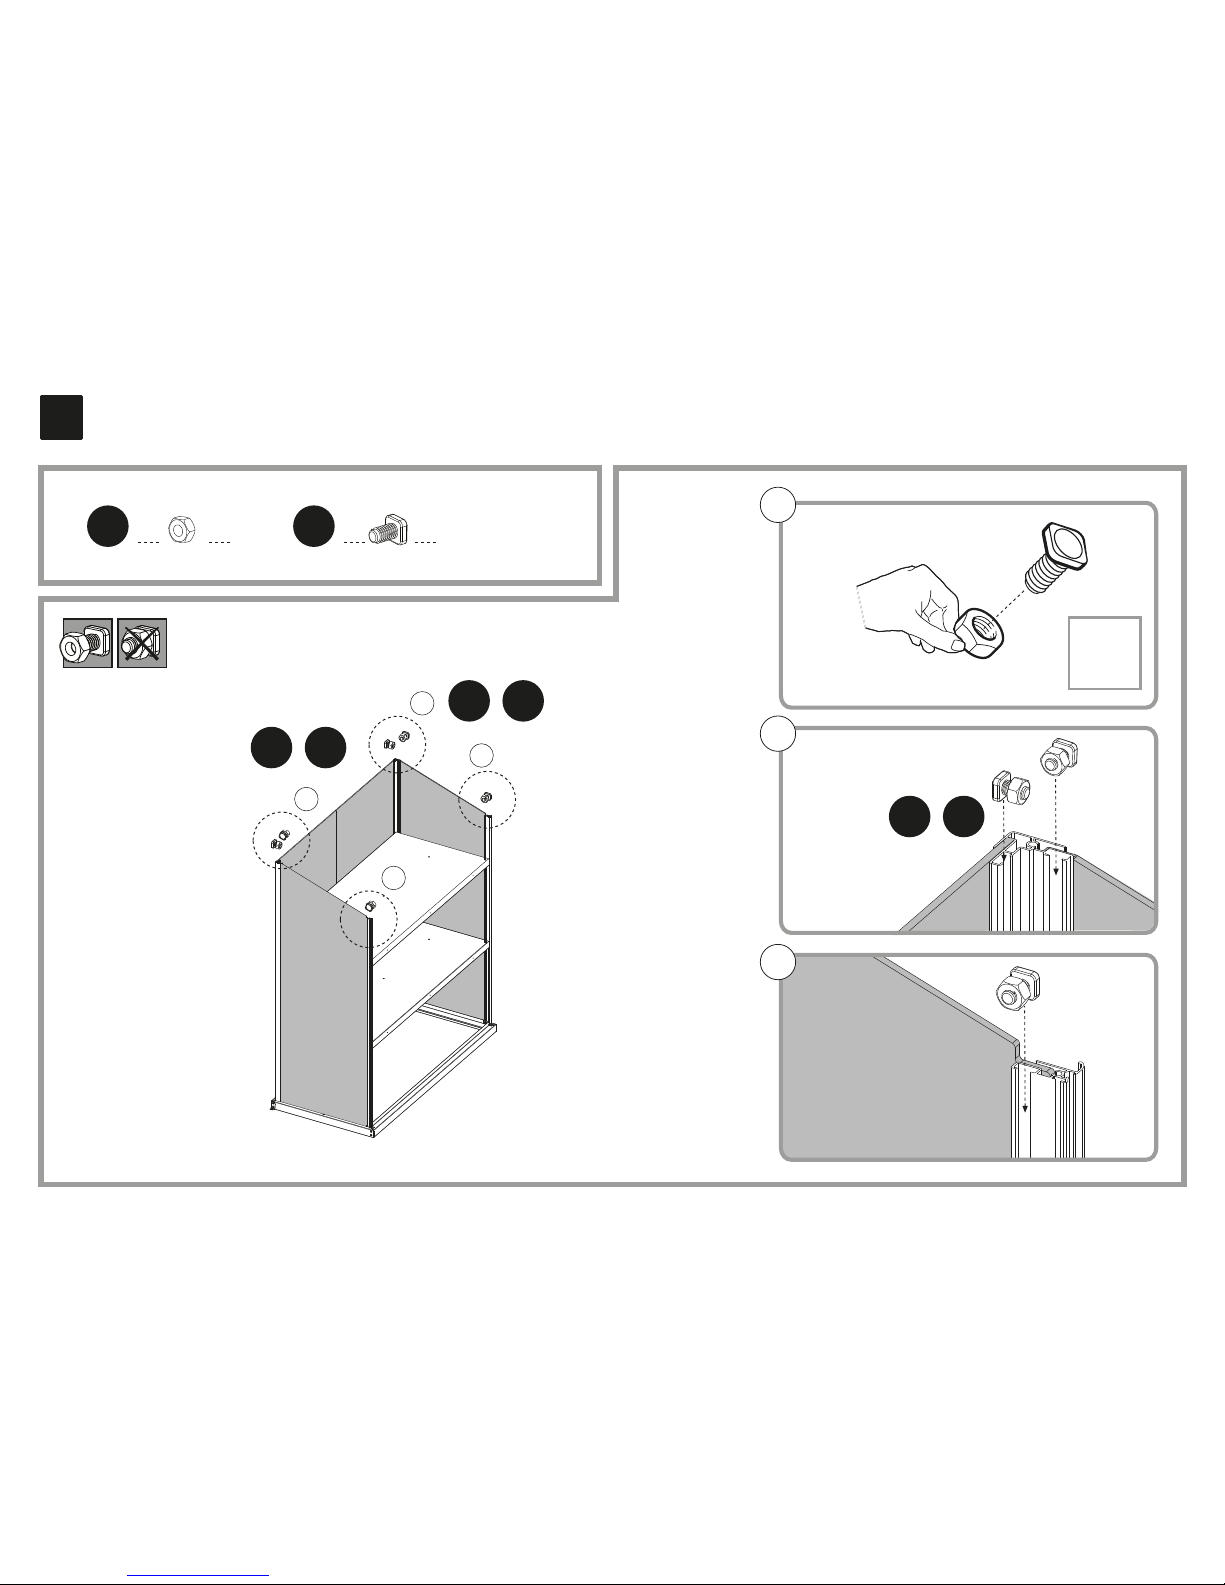
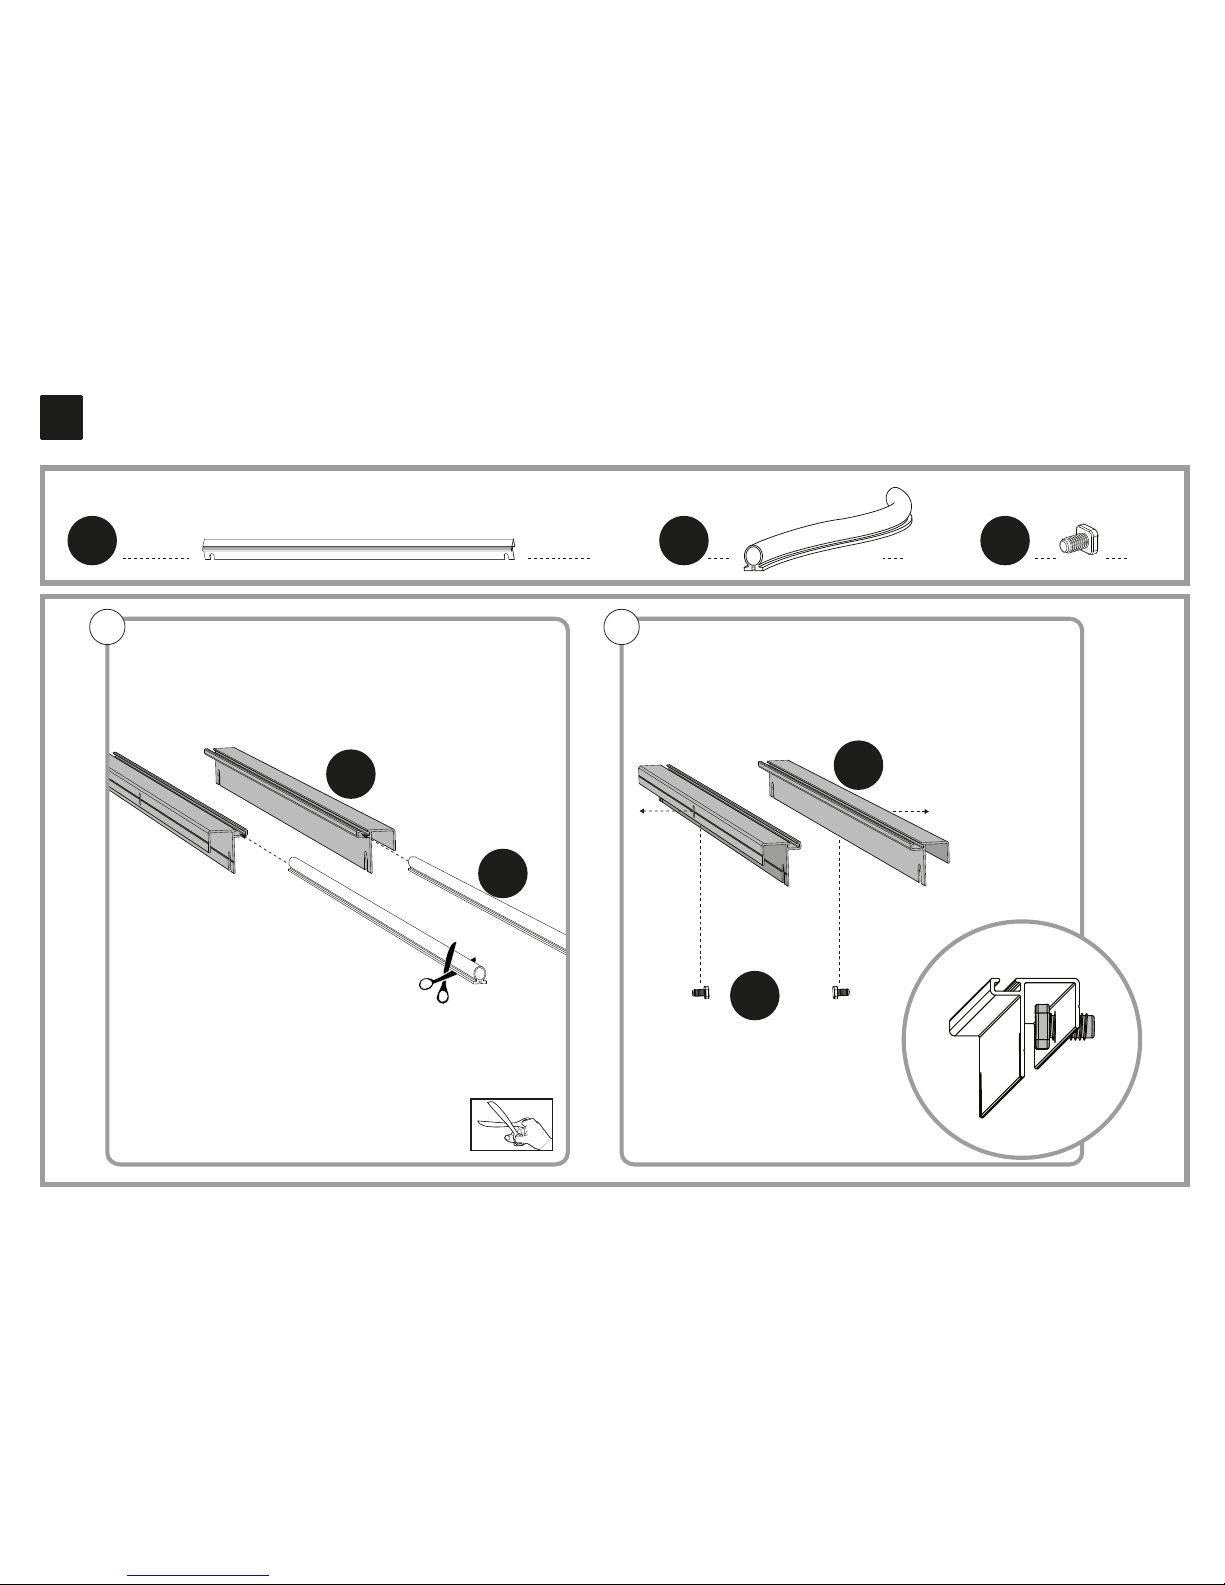
11
x6
412
x6
411
x6
412 411
412 411
412 411
b
c
c
b
a
b
c
Page 15
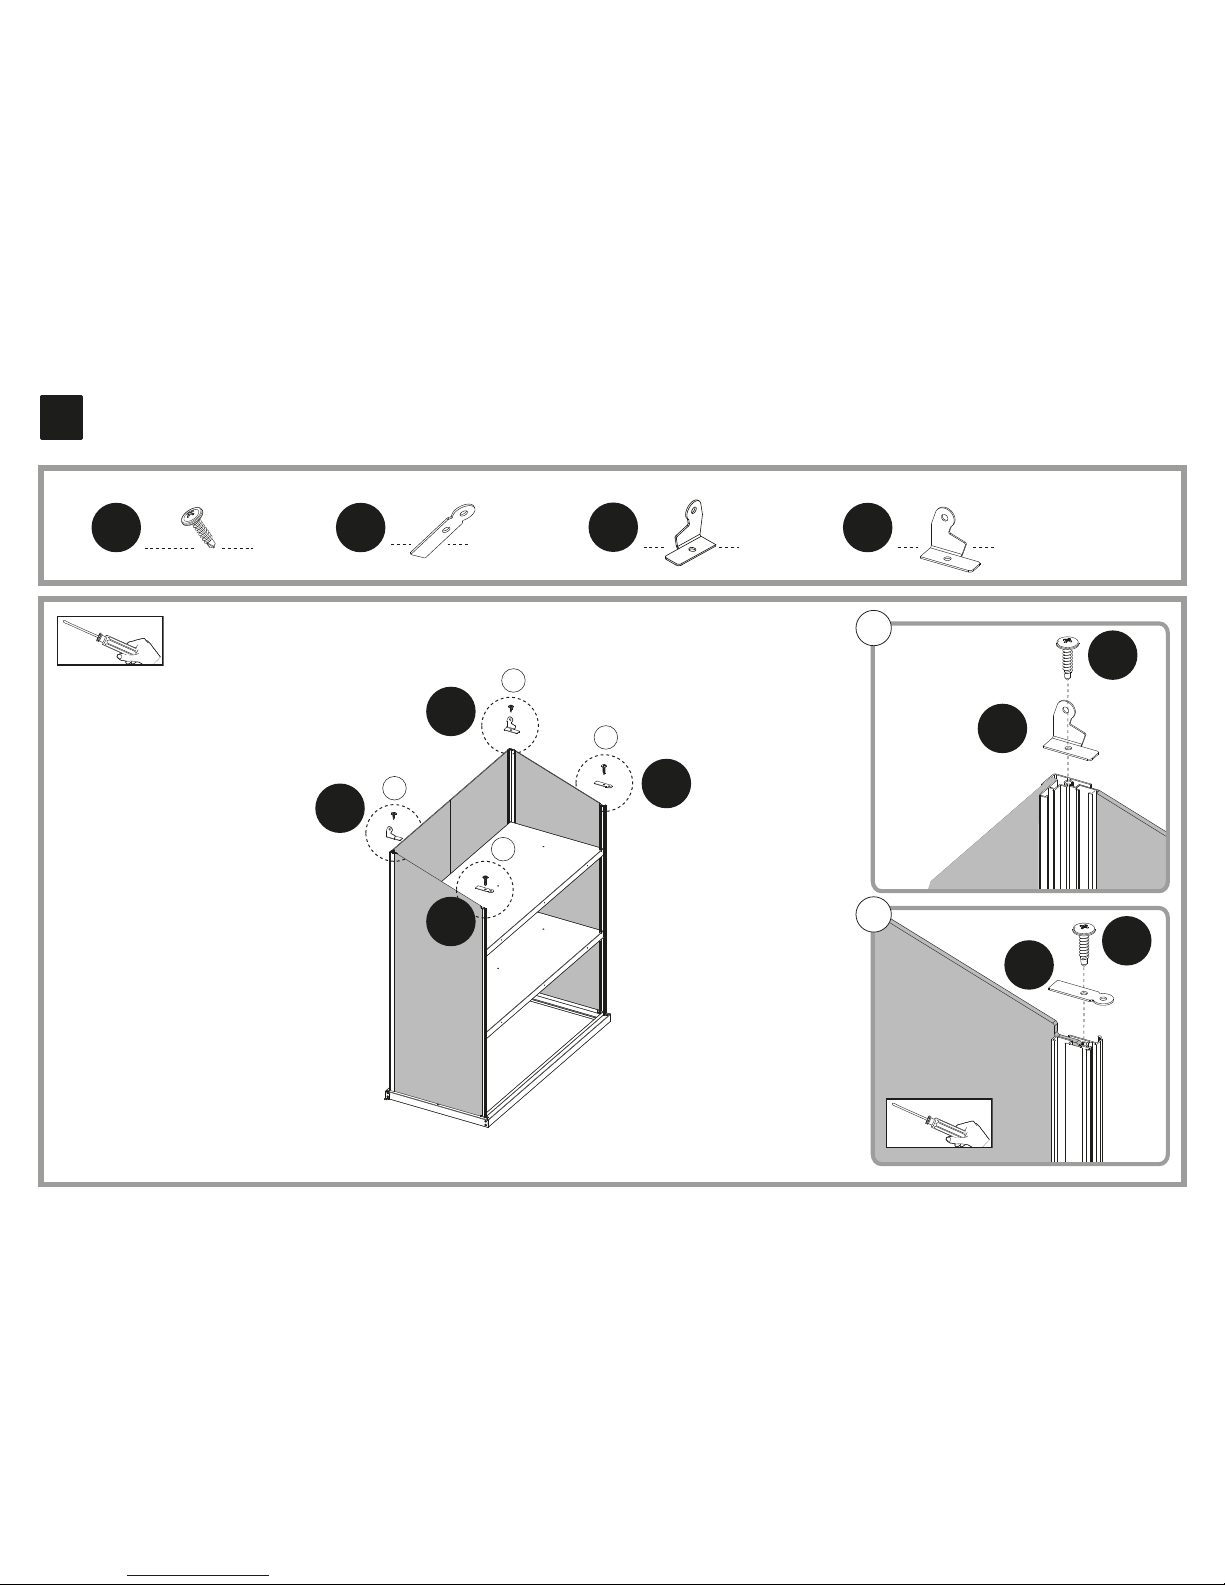
12
x4
4008
x2
M1051
x1
M1052
x1
M1053
M1052
M1051
M1051
M1052
M1053
4008
4008
M1051
a
a
b
b
a
b
Page 16
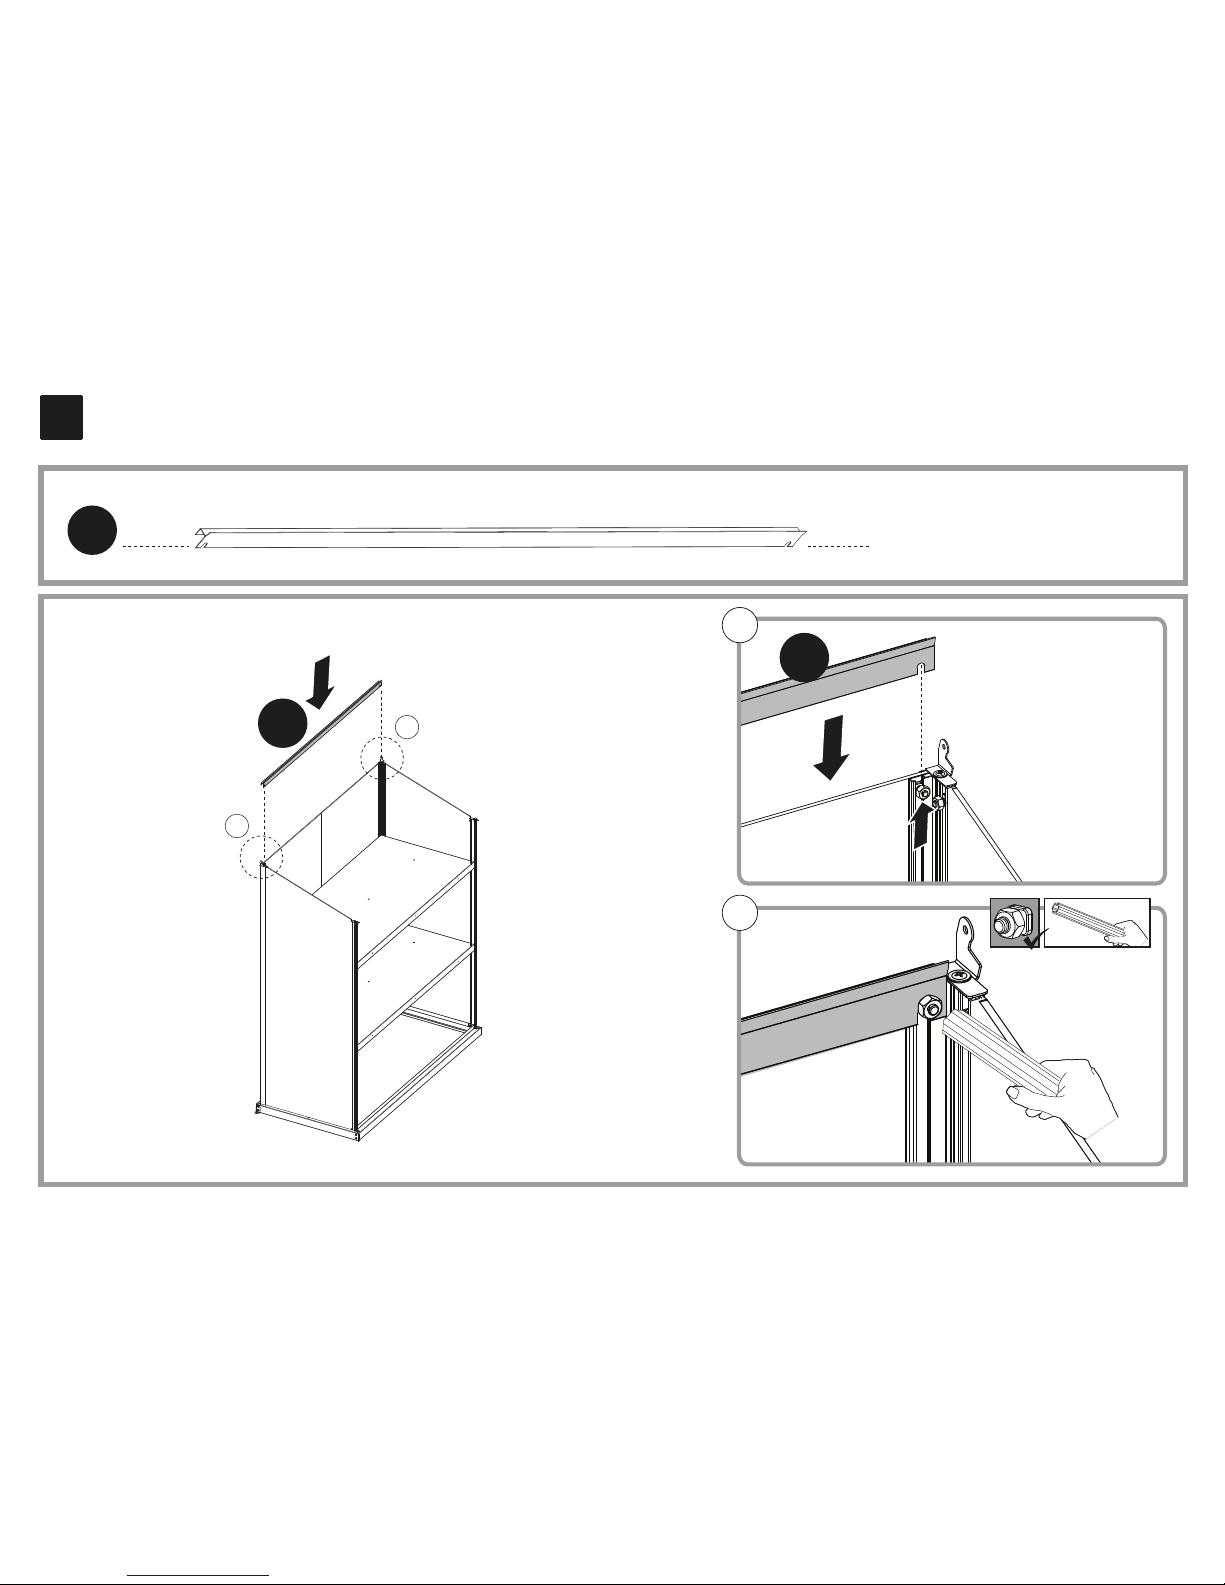
13
A1060
x1
A1060
A1060
a
a
a
b
Page 17
x2
411
14
x2
P3017
A1059
x2
A1059
x2
x2
411
P3017
A1059
x2
x2
a b
Page 18
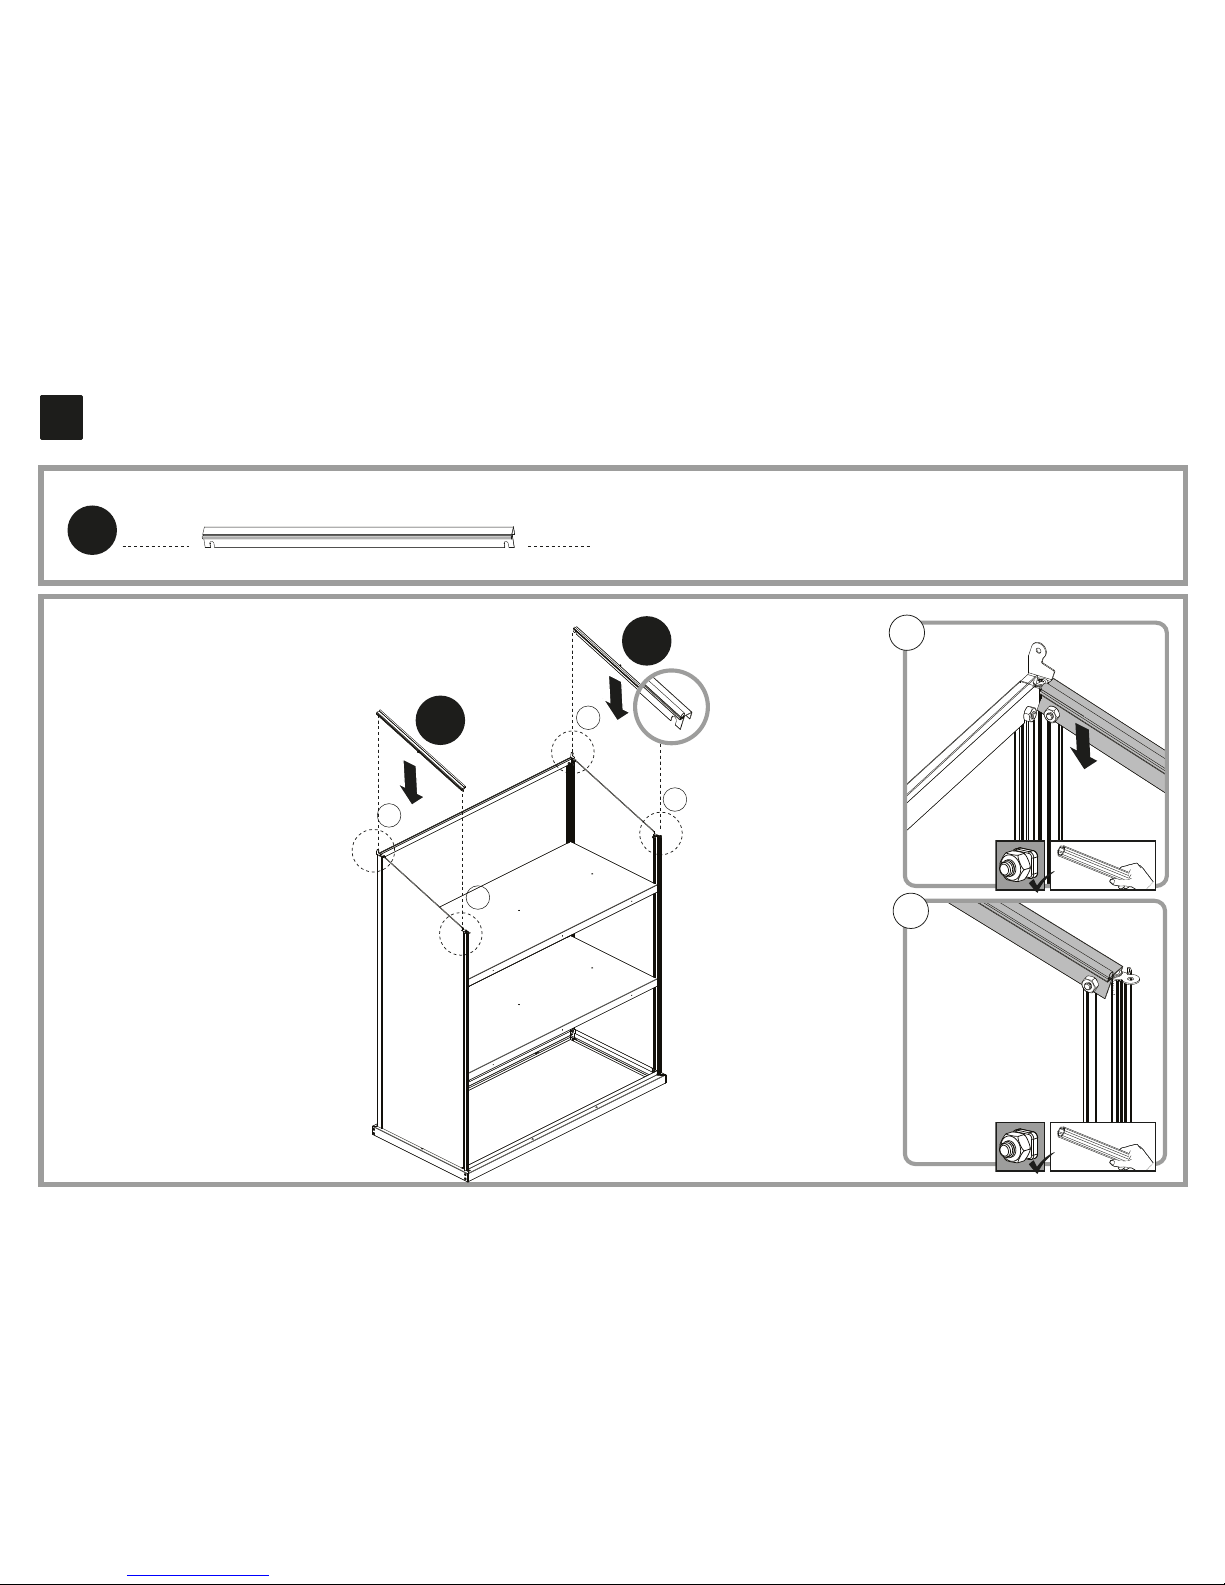
15
A1059
x2
A1059
A1059
b
a
b
a
b
a
Page 19
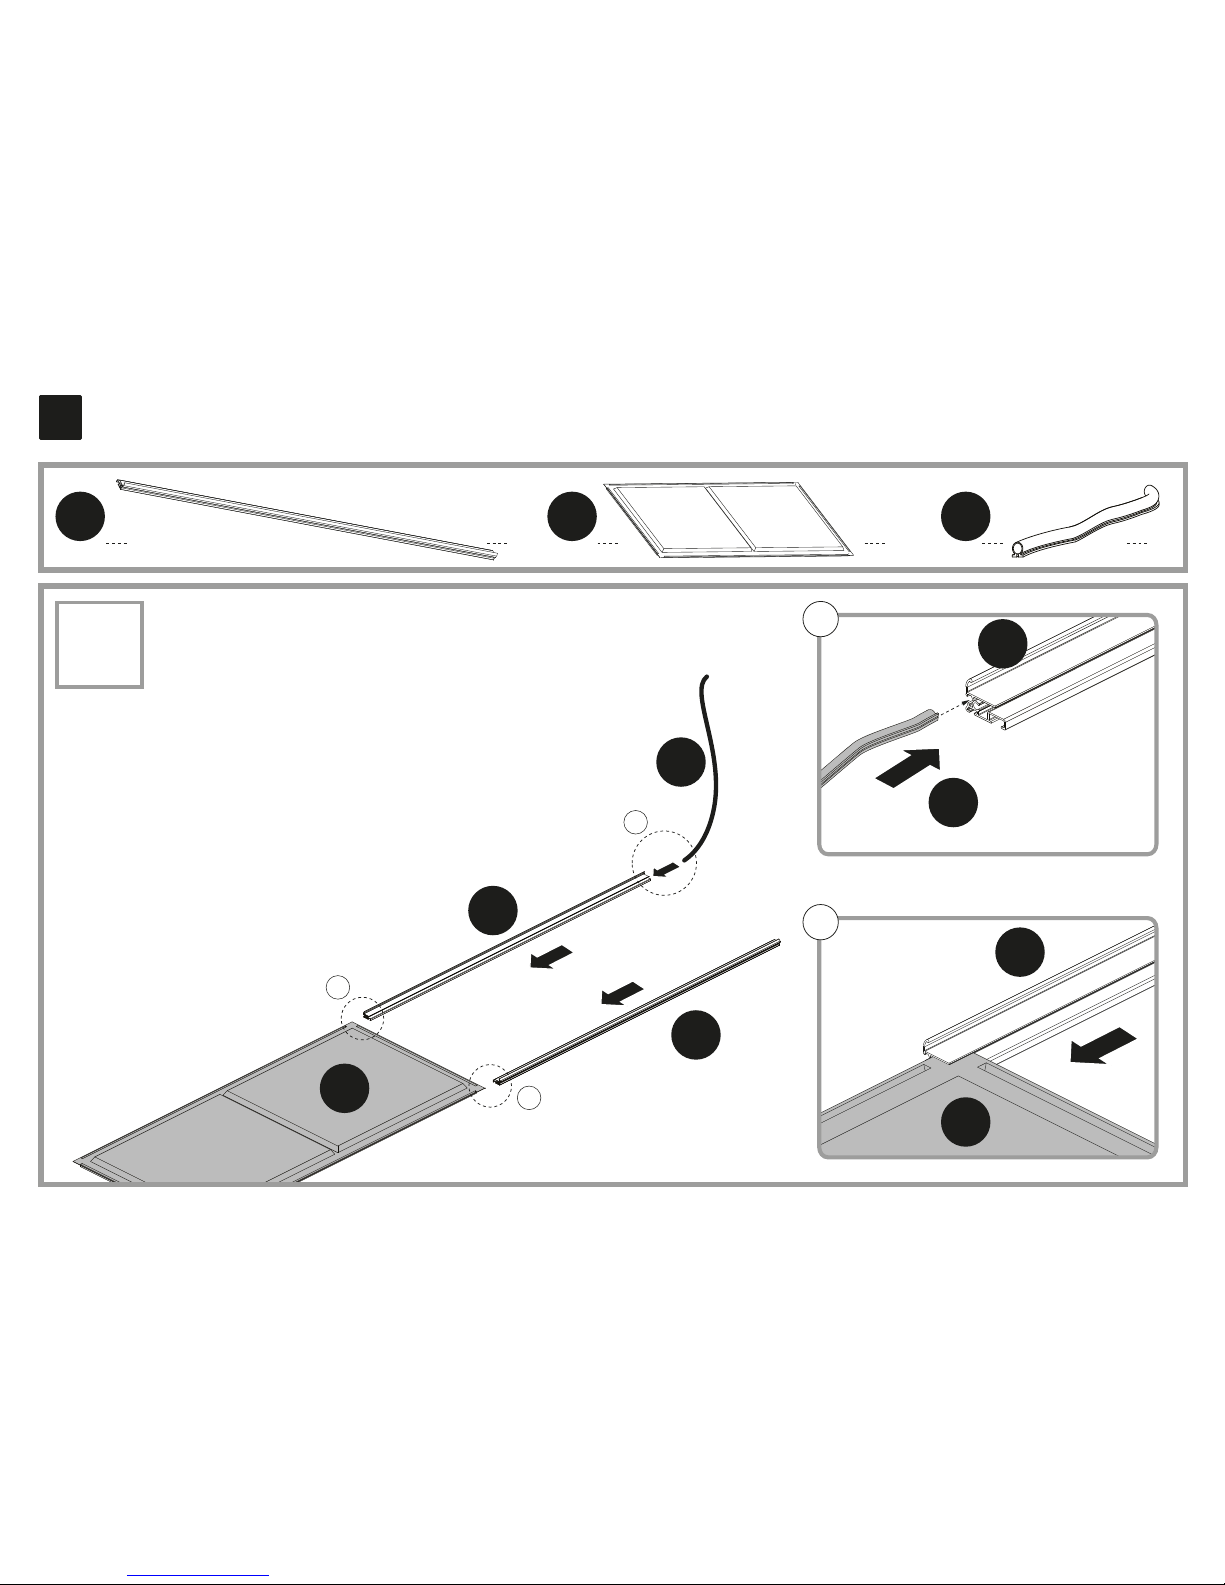
16
x4 x2 x2
1057
P1068 P7129
P7129
1057
a
1057
P1068
b
x2
1057
7129
P1068
1057
b
b
a
Page 20
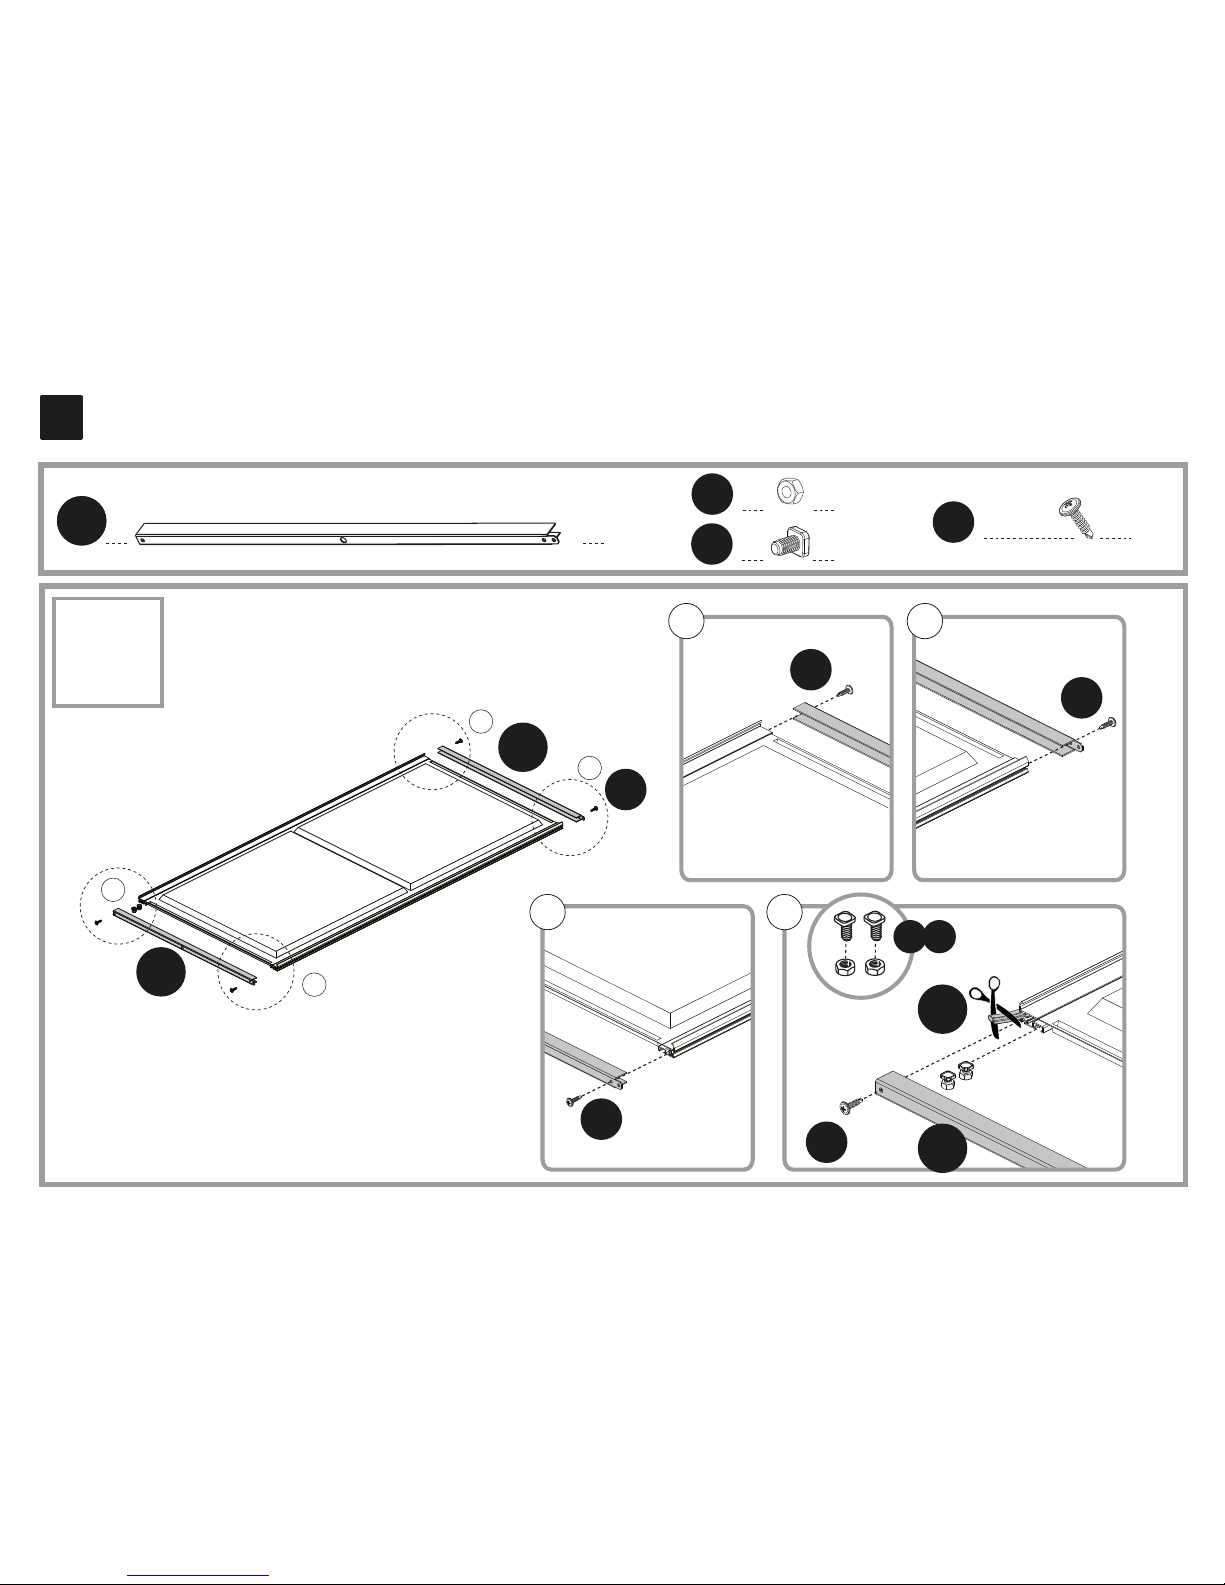
P7129
17
x4
M1056M1056
M1056
M1056
x4
412
x8
4008
4008
x4
411
x2
c
d
4008
4008
412411
a b
4008
4008
a
d
c
b
M1056
Page 21
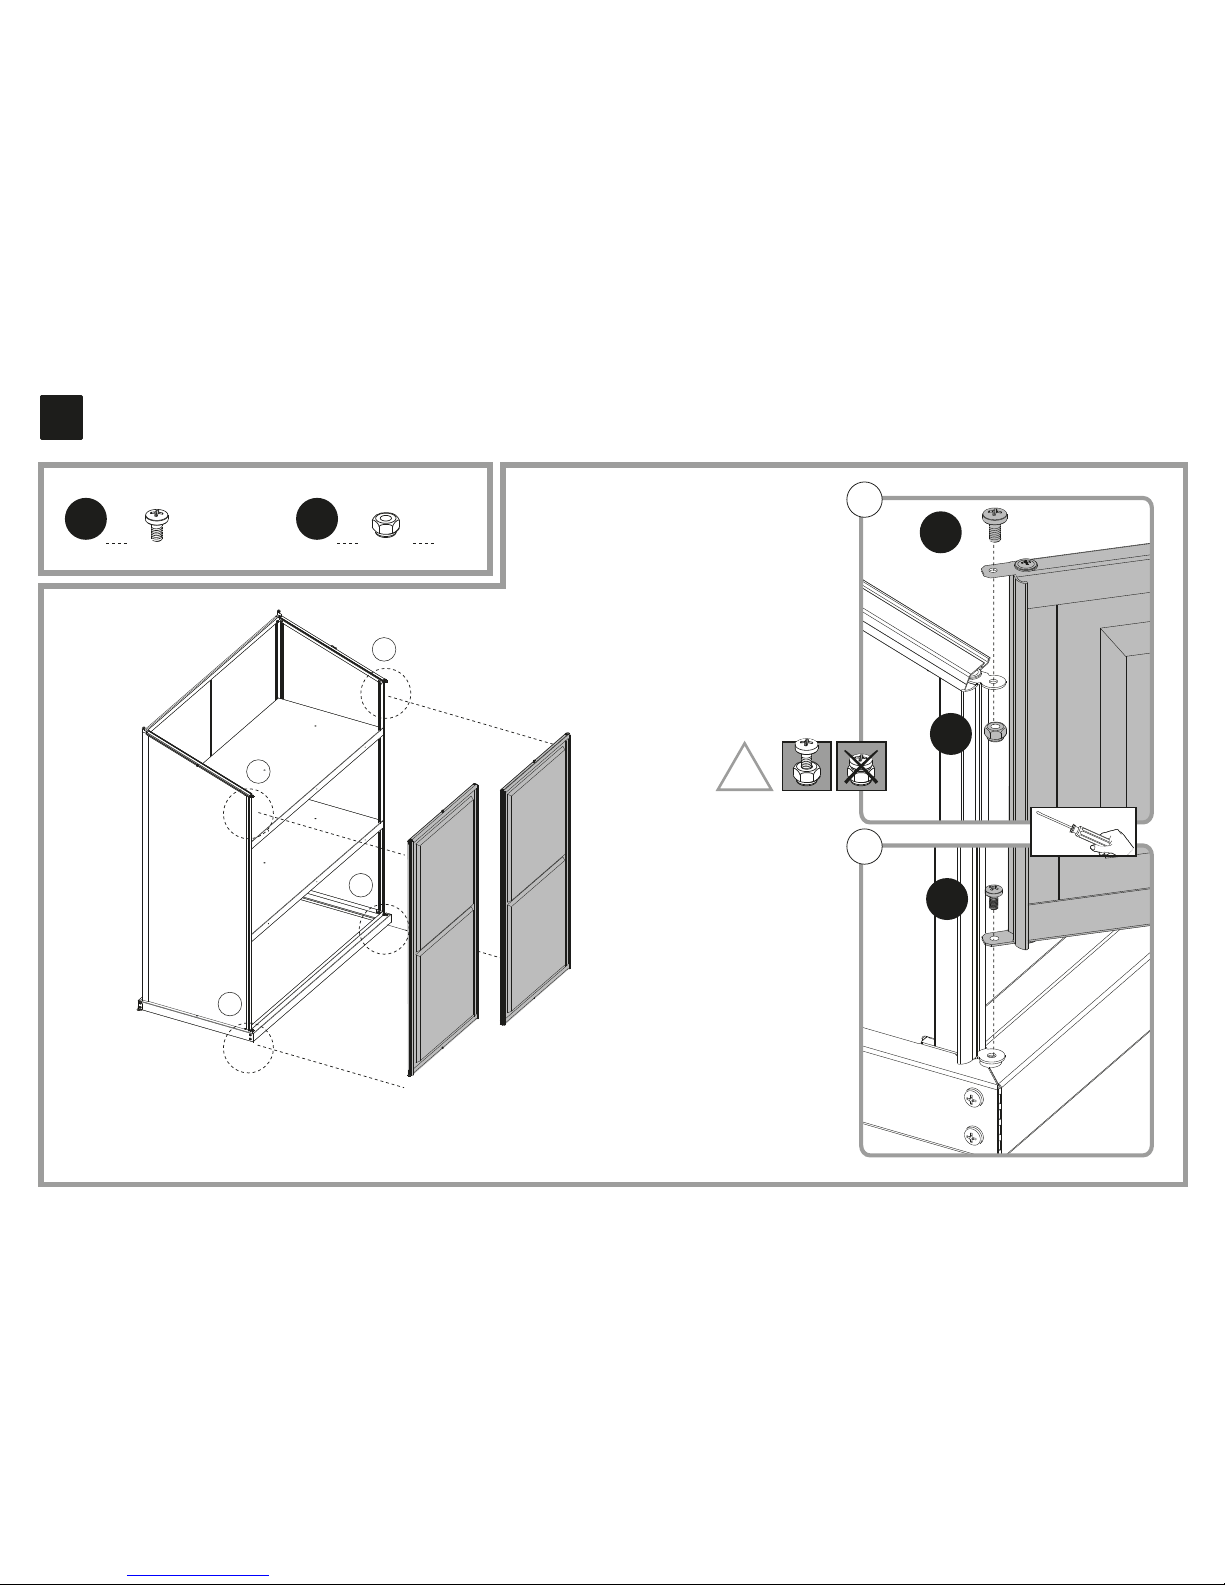
18
x4
x2
428 423
428
b
a
a
b
b
a
423
M4
428
!
Page 22
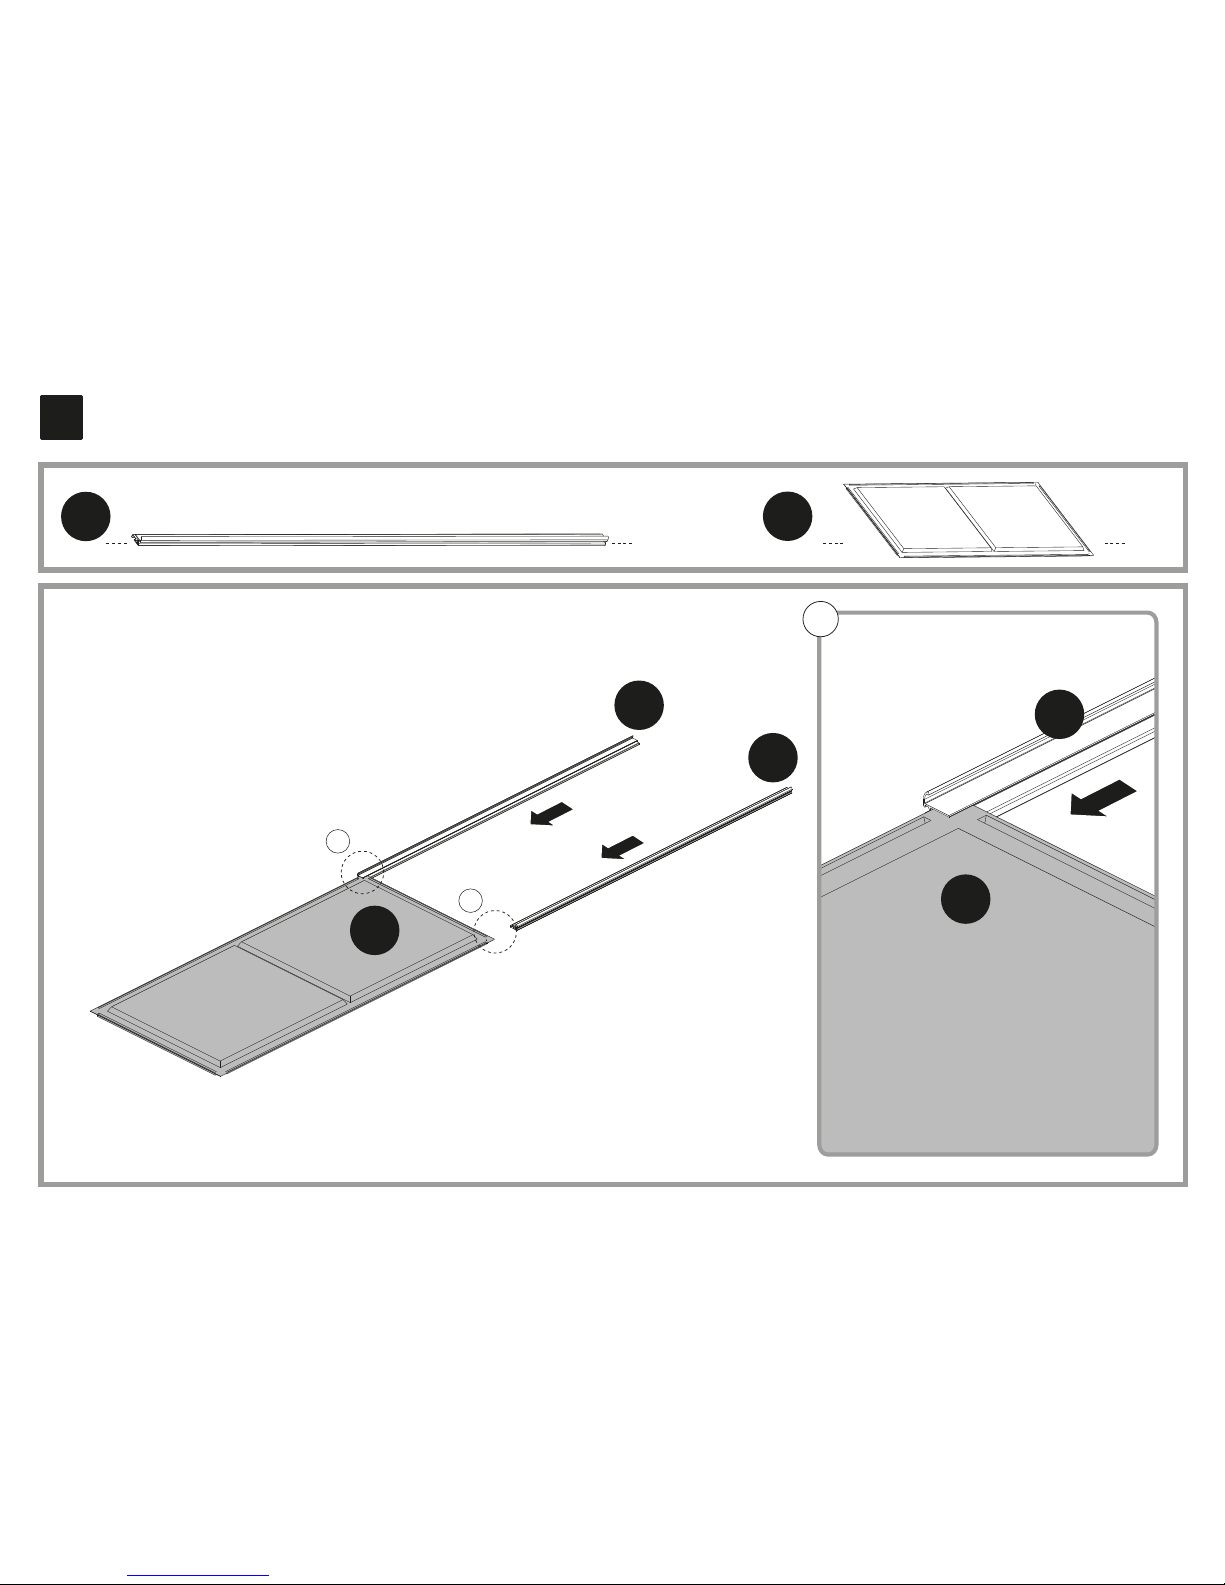
19
x2 x1
1057
P1068
1057
P1068
1057
1057
P1068
a
a
a
Page 23
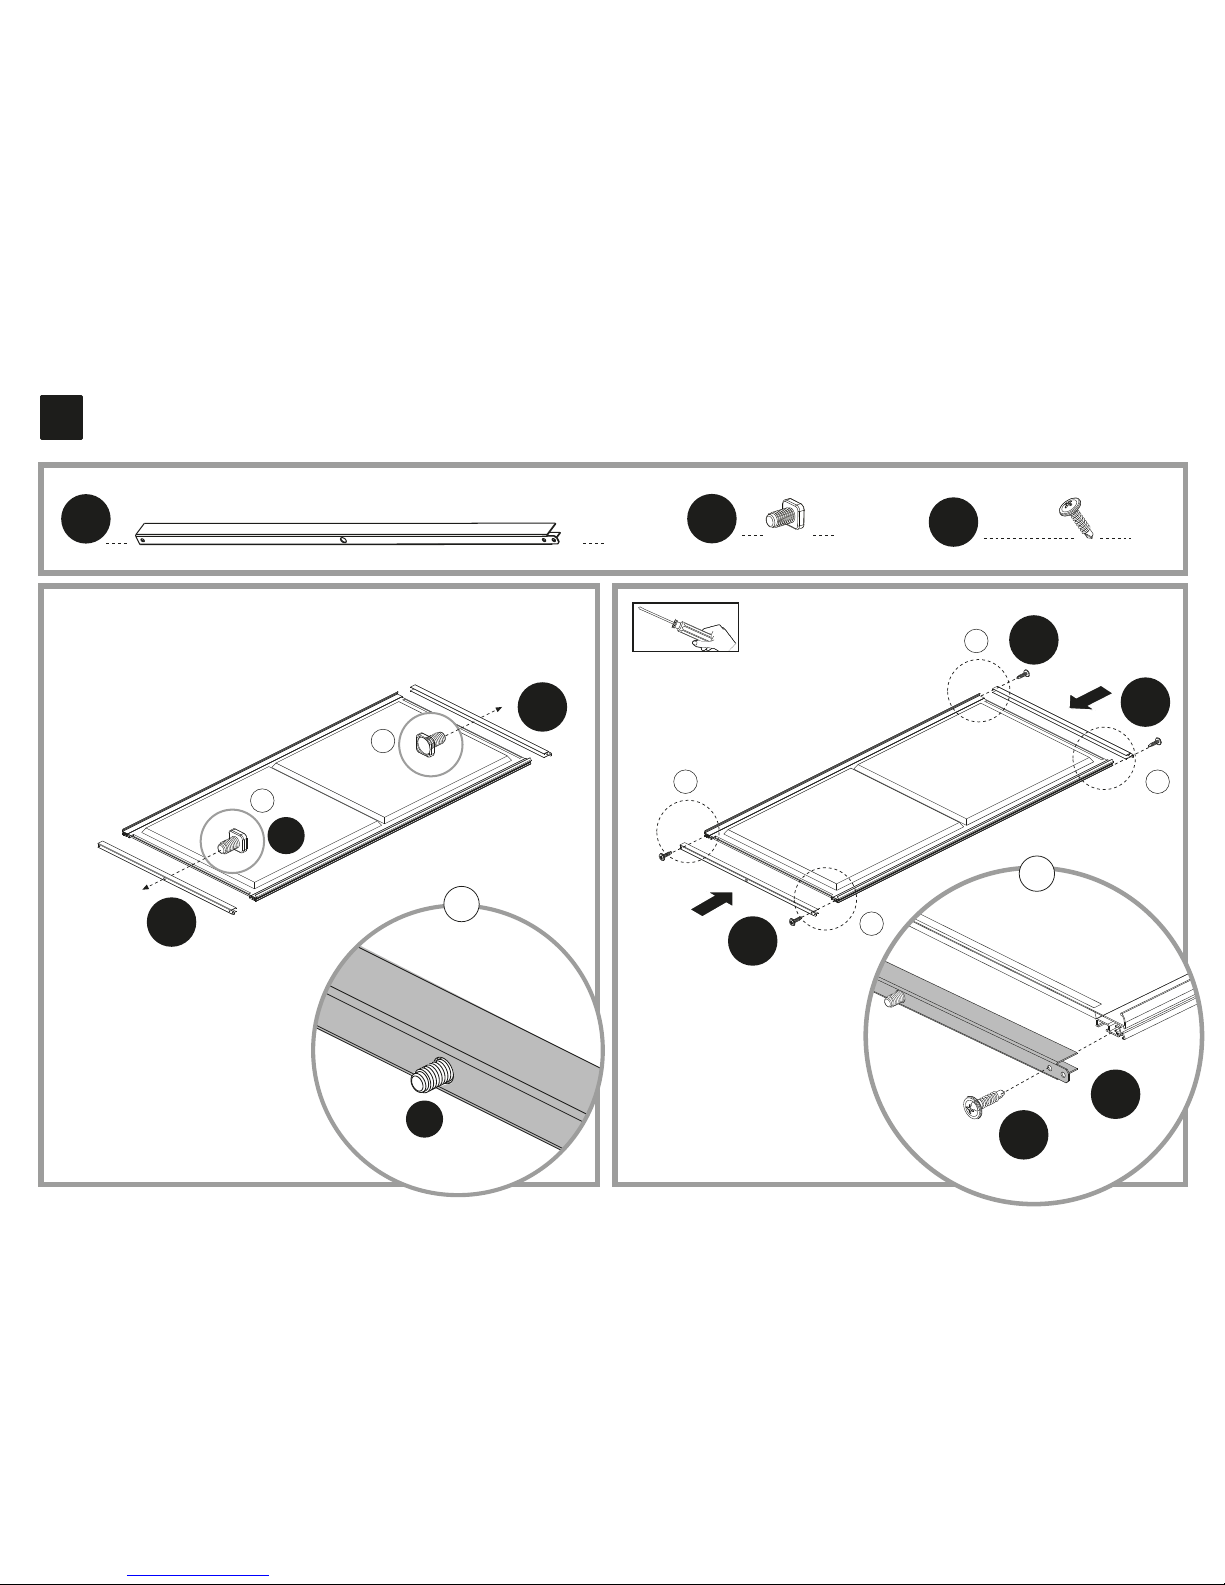
20
x2
M1056
M1056
M1056
M1056
M1056
M1056
b
b
b
b
x4
4008
4008
4008
x2
411
411
411
a
a
a
b
Page 24
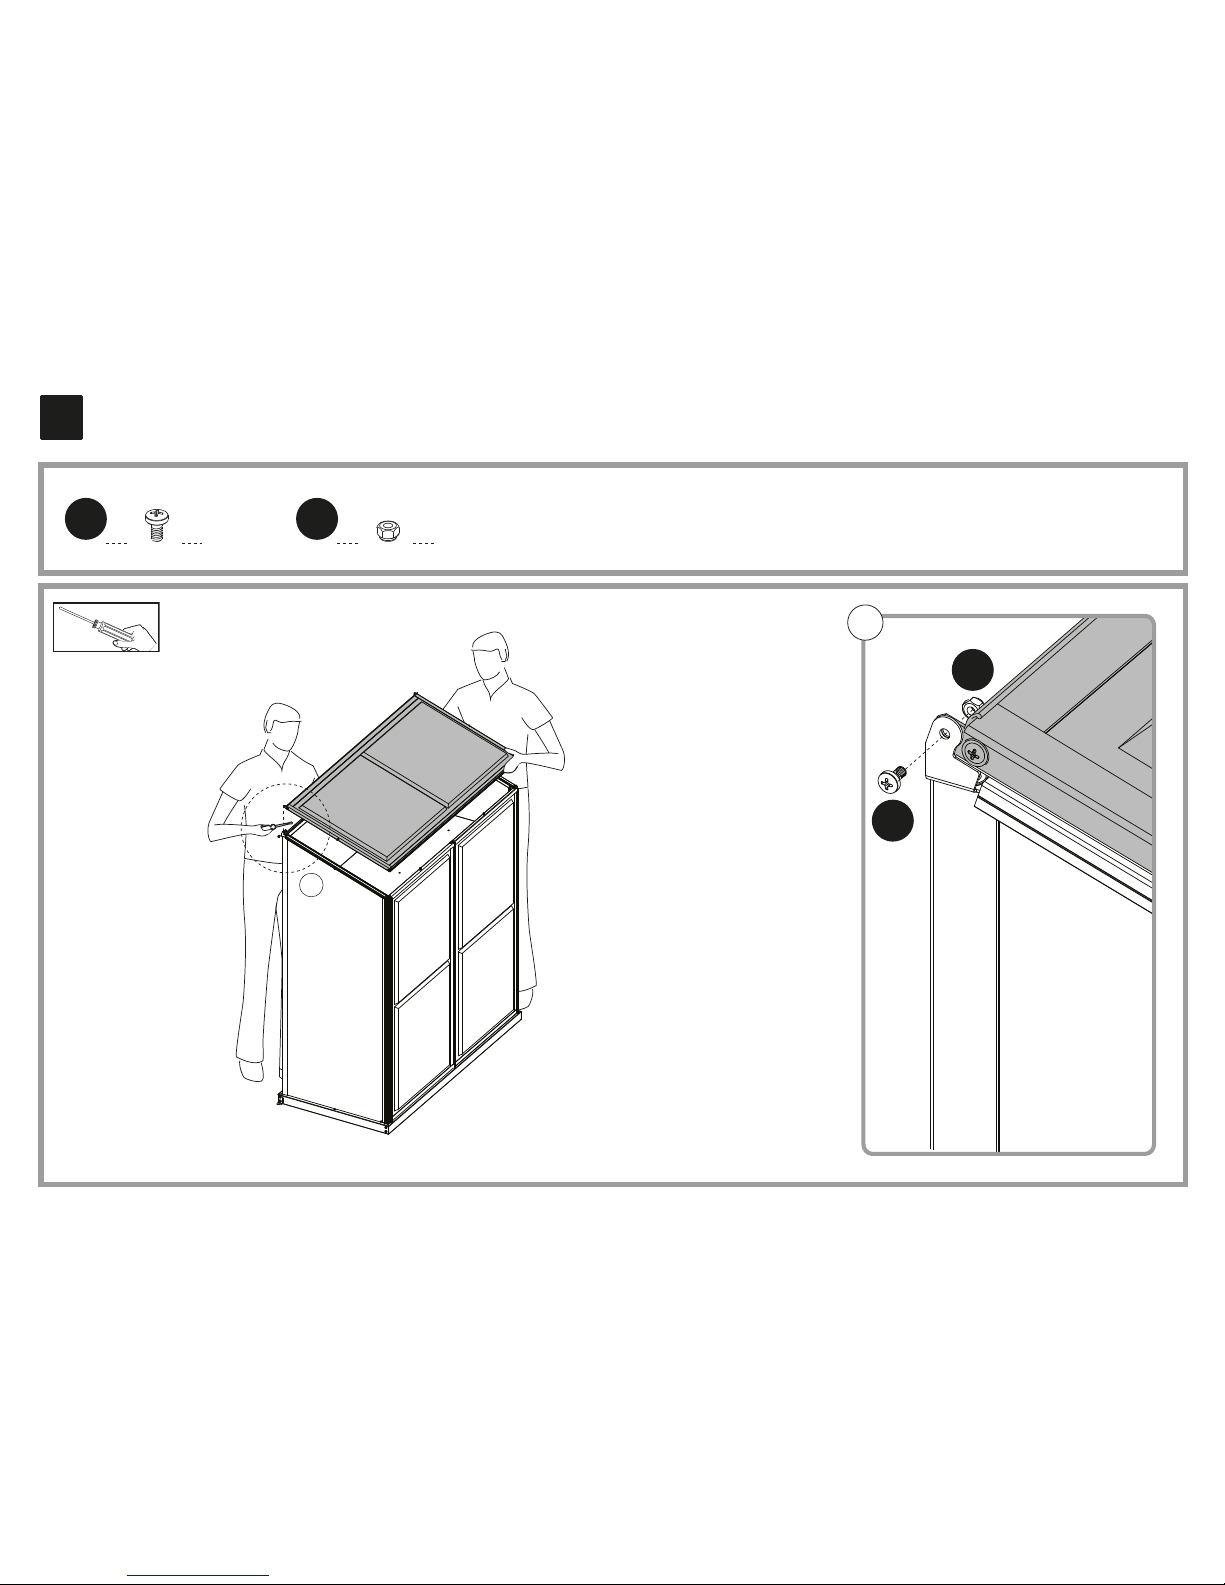
21
x2 x2
428 423
428
423
a
a
Page 25
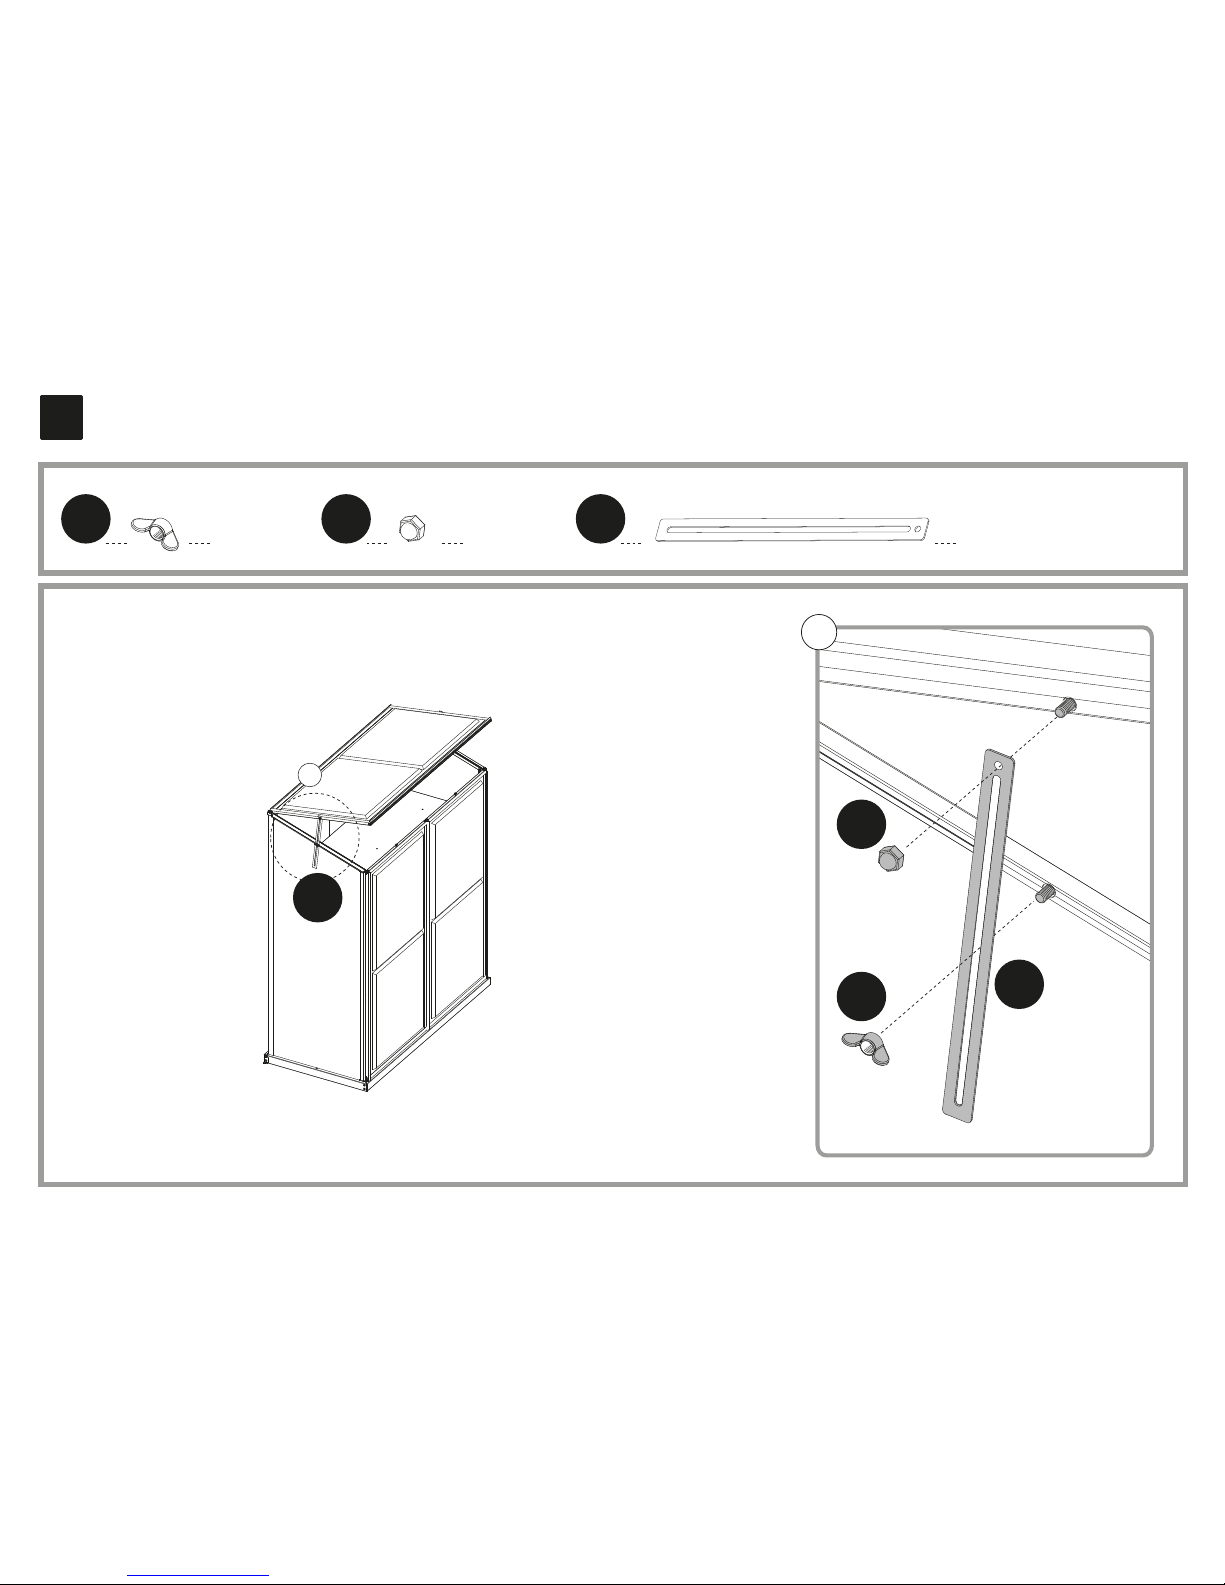
22
x2 x2 x2
4044 413 M1054
4044
413
M1054
M1054
a
a
Page 26
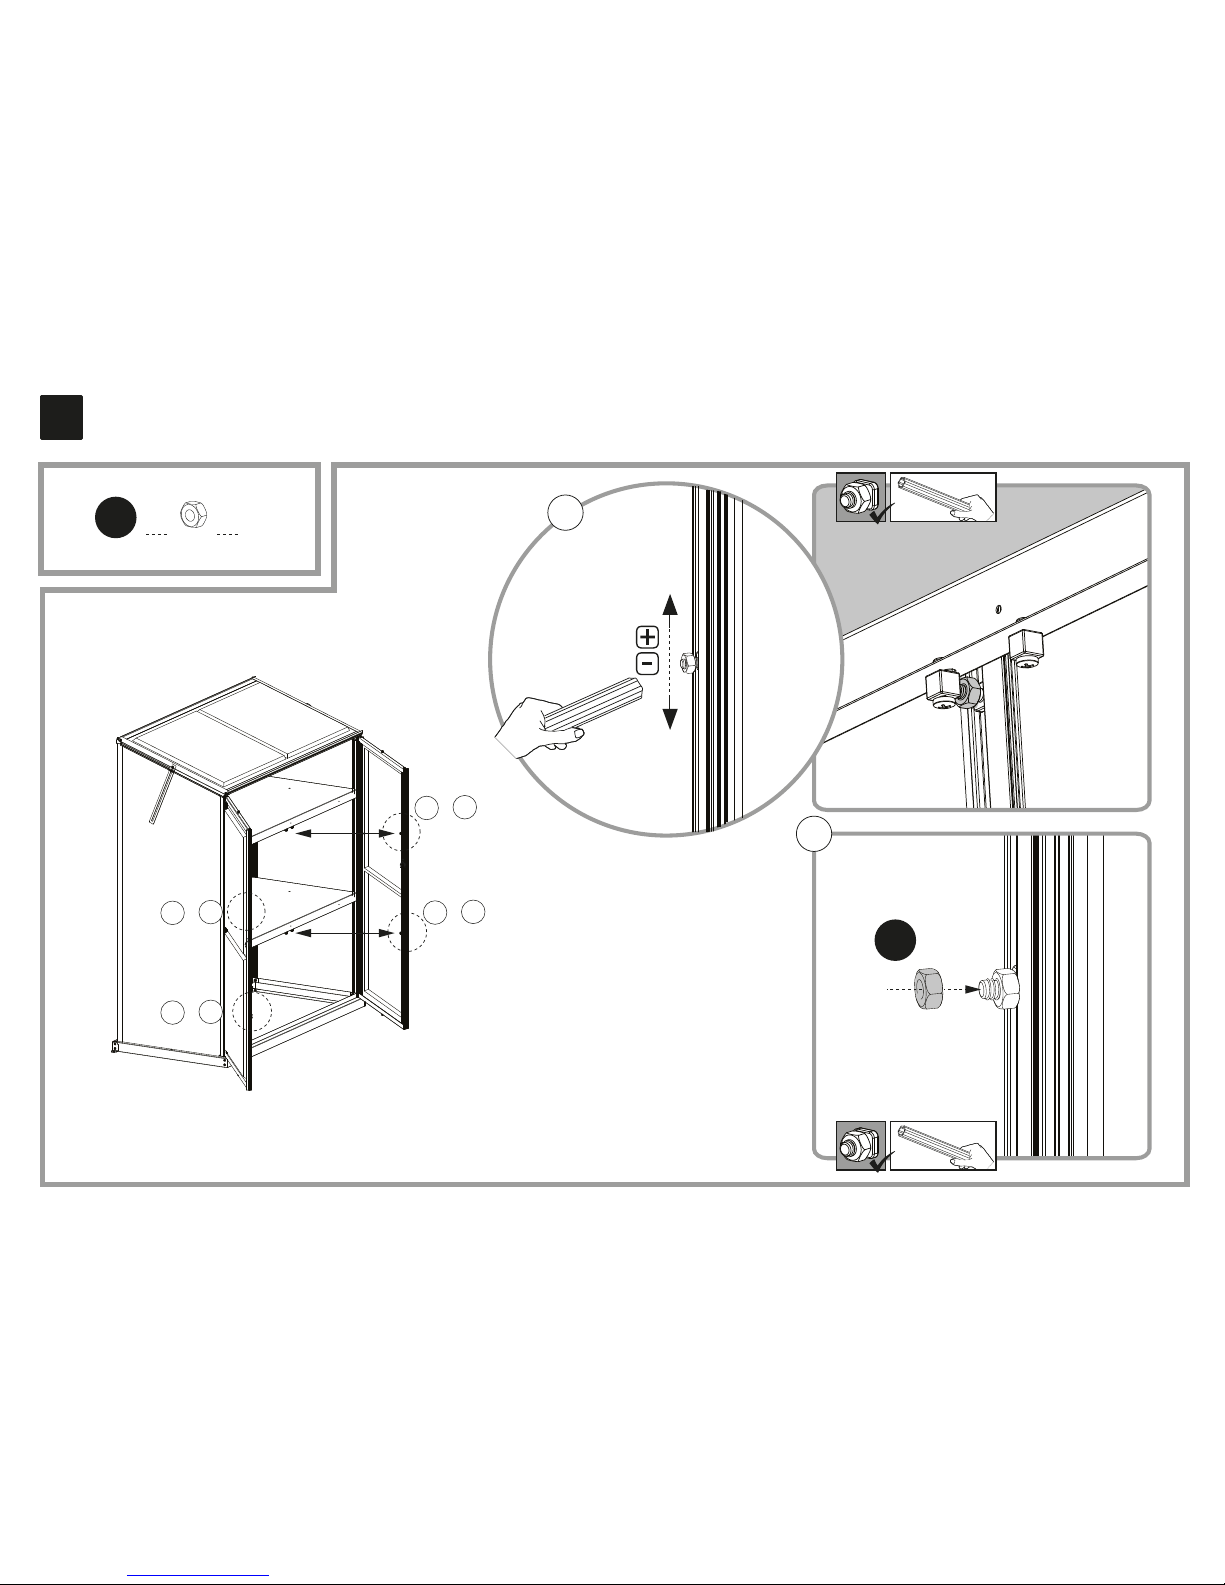
23
a
b
a
b
+
a
b
+
a
b
+
a
b
+
x1
412
412
Page 27
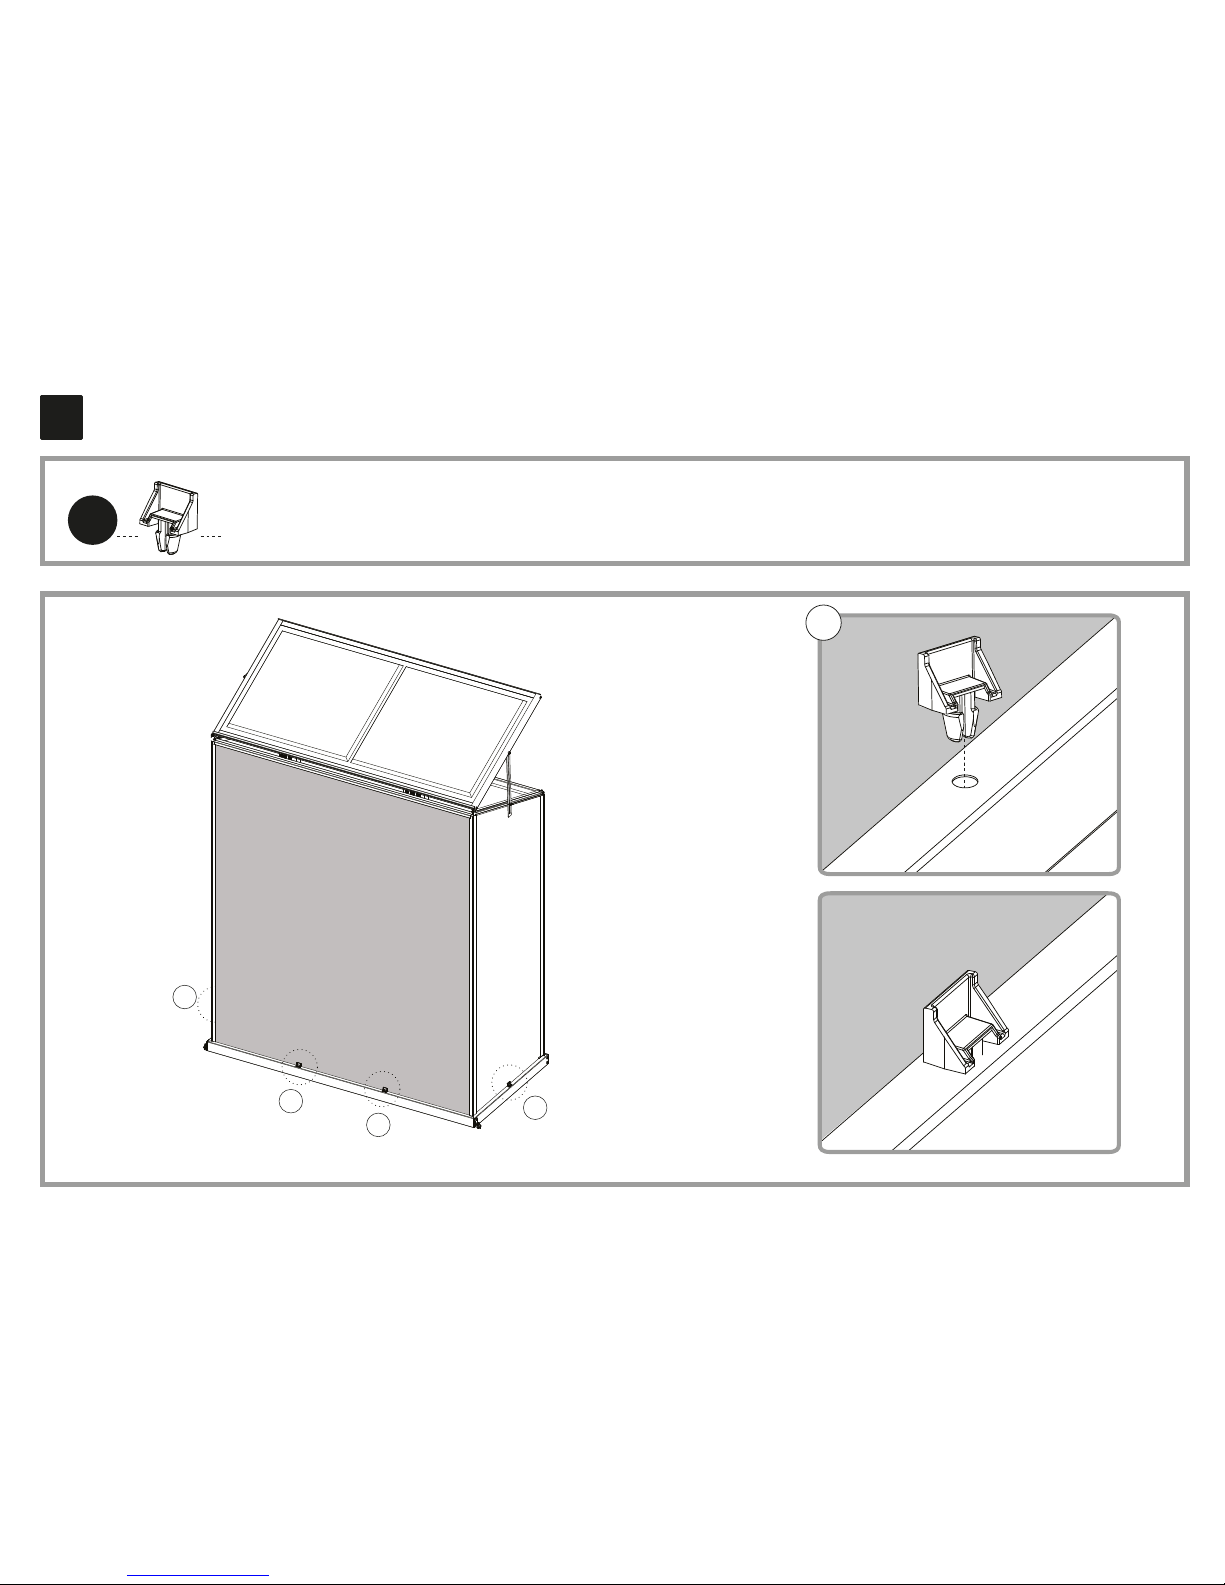
24
a
a
a
a
x4
P328
a
Page 28
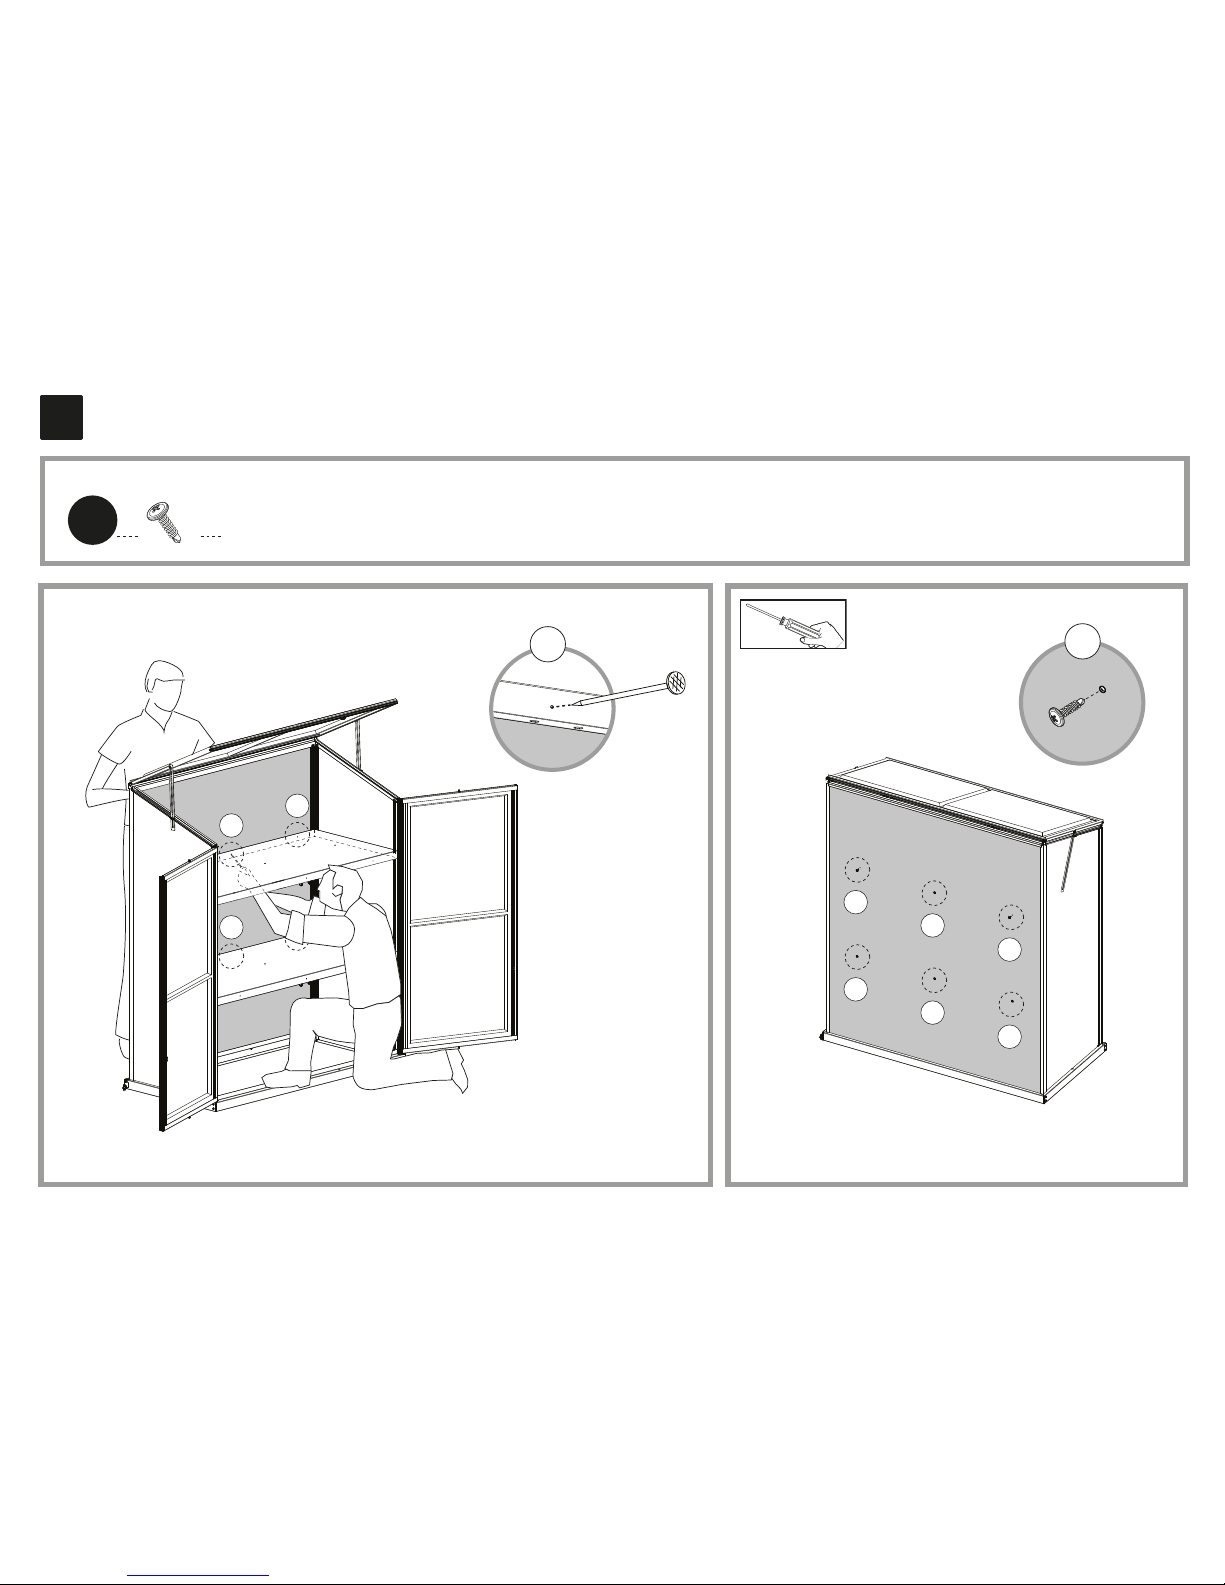
25
x6
4008
b
b
b
b
b
b
a
a
a
a b
Page 29
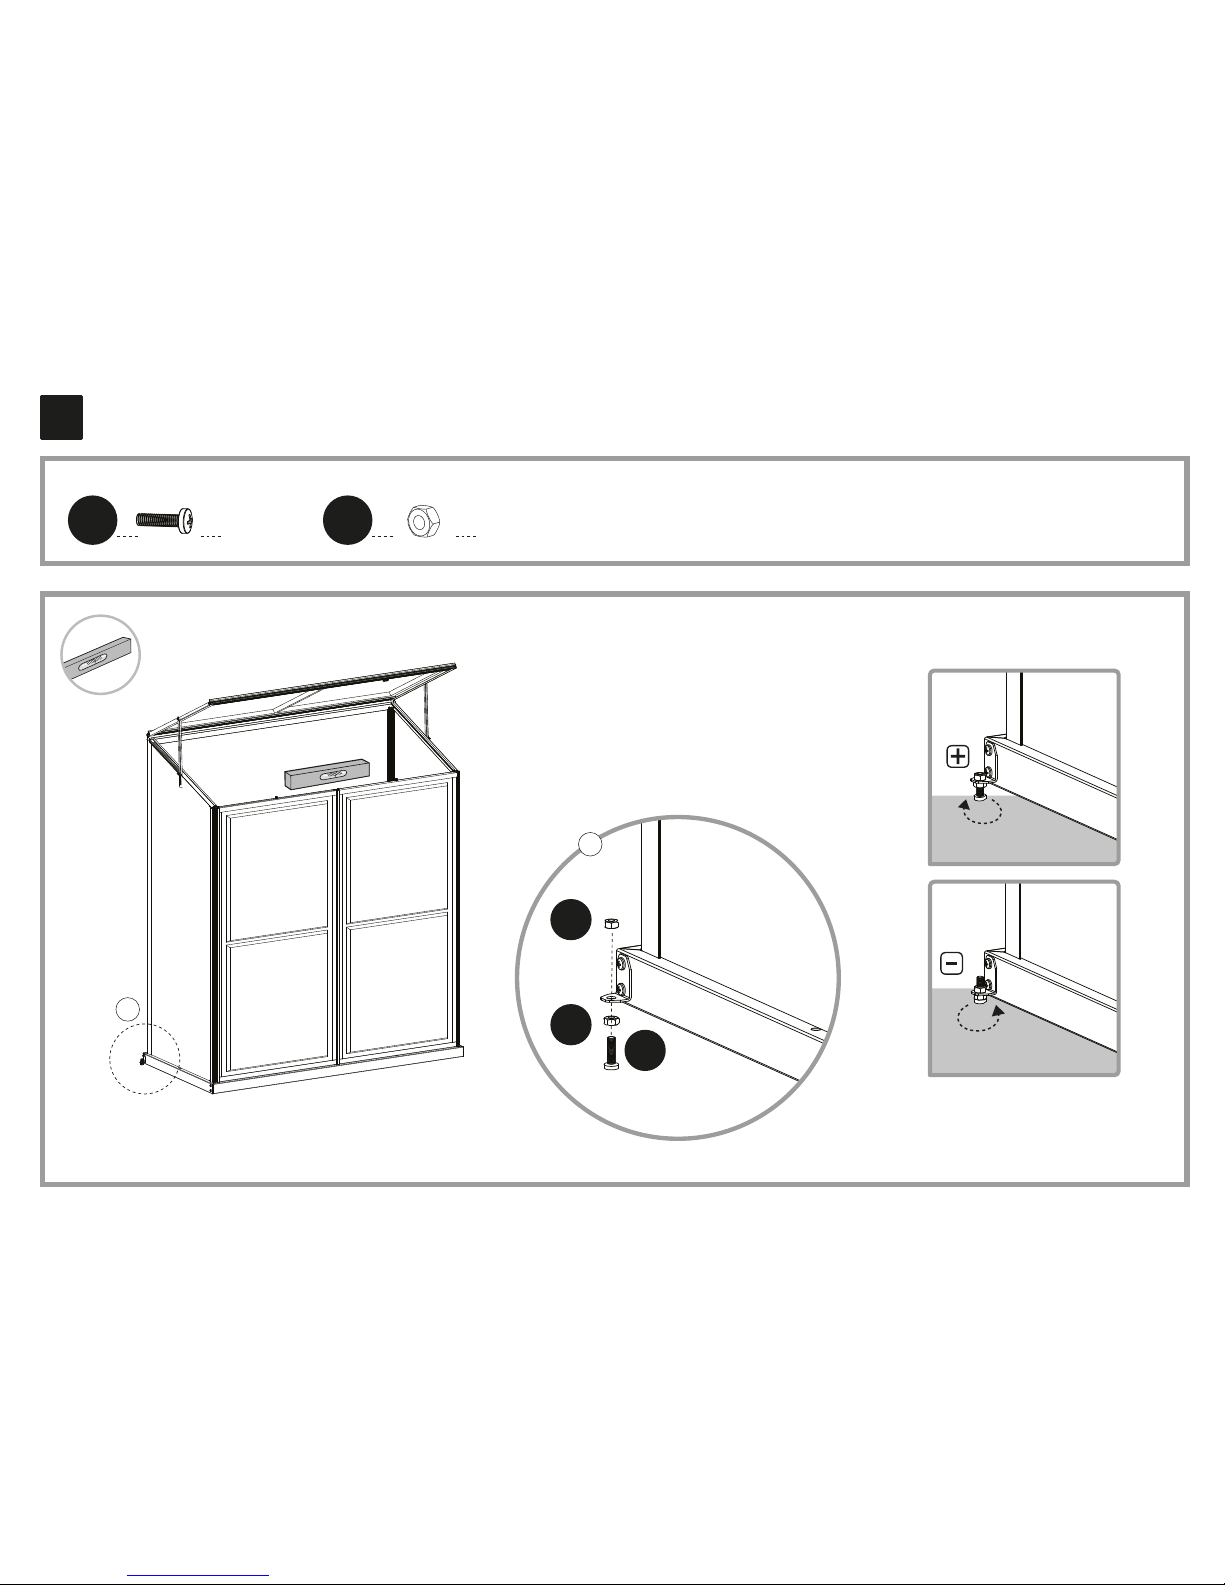
26
a
x2
4016
x4
412
a
4016
412
412
Version2_Nov2011
 Loading...