

Page 1
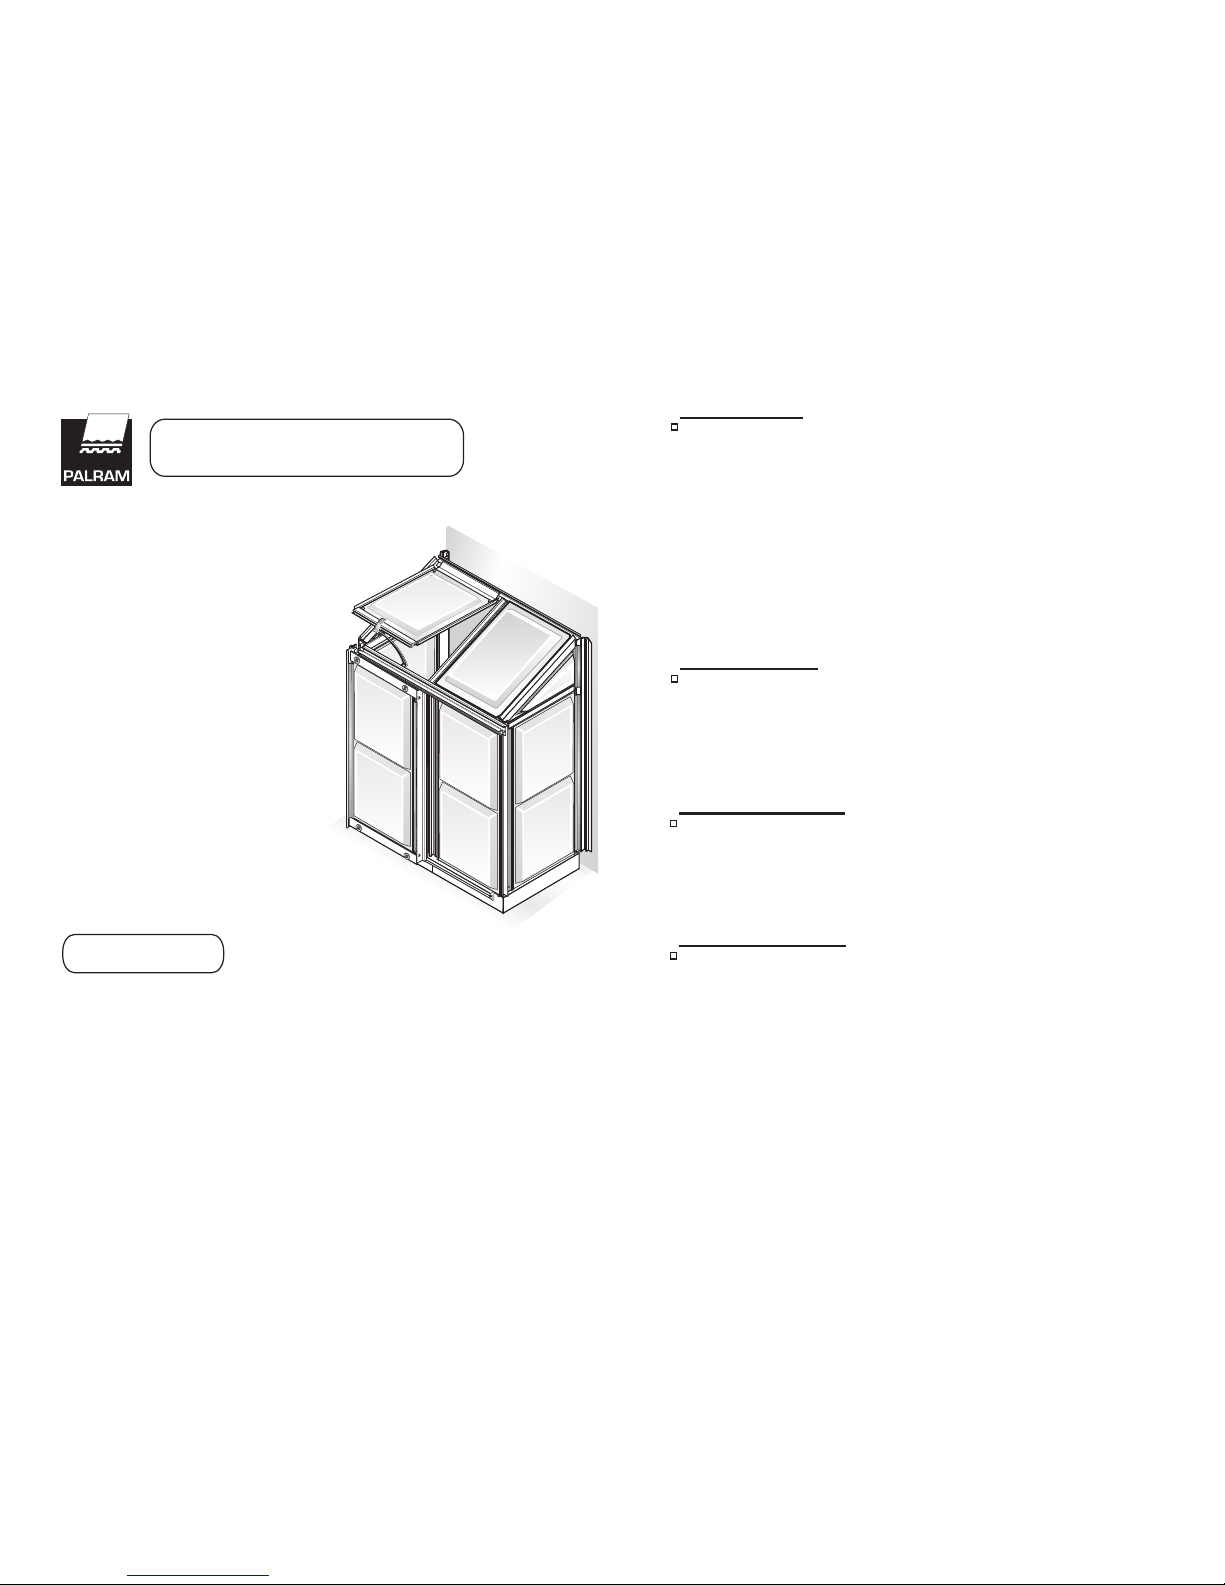
Overall Dimensions including base (Approx)
We strongly recommend the use of work gloves during assembly . Do not attempt
to assemble the greenhouse in windy or wet conditions.
Do not touch overhead power cables with the aluminum profiles. Always wear shoes
and safety goggles when working with extruded aluminum. Dispose of all plastic
bags safely - keep them out of reach of small children. The greenhouse must be
positioned and fixed on a flat level surface. Do not lean against or push the greenhouse
during construction. Keep children away from the assembly area. Do not position
your greenhouse in an area exposed to excessive wind.
Do not attempt to assemble this greenhouse if you are tired, have taken drugs or
alcohol or if you are prone to dizzy spells. If using a step ladder or power tools ensure
that you follow the manufacturers safety advice. Hot items such as recently used grills,
blowtorches etc. must not be stored in the greenhouse. Ensure there are no hidden
pipes or cables in the ground before inserting the pegs.
This is a multi-part assembly. Allow at least 180 minutes for assembly process.
Selecting a site - choose a sunny level position away from overhanging trees. If you
are fixing your greenhouse directly to a solid concrete foundation use the pre drilled
holes in the metal base supplied. The component parts should be checked and laid
out close at hand. Keep all small parts (screws etc.) in a bowl so they do not get lost.
Keep roof clear of snow and leaves.
When your greenhouse needs to be cleaned, use a mild detergent solution and rinse
with cold clean water. DO NOT use acetone, abrasive cleaners or other special
detergents to clean the clear panels.
Replacement parts - contact Customers service helpline at:
For additional information please visit our web site: www.palram.com
Tape measure
Work gloves
Crosshead screwdriver
Bradaw
Drill
2mm metal drill bit
Scissors
Step ladder
Spirit level
If help is required seek professional advice whithin store.
LEAN-TO
Greenhouse
ASSEMBLY INSTRUCTIONS
129L x 71W x 165H CM
Keep these instructions in a safe place for future reference.
You must read these instructions carefully before you start to assemble
this greenhouse. Please carry out the steps in the order set out in these
instructions.
Do not tighten the screws of the Greenhouse until completing on the
assembly of the panels.
IMPORTANT
SAFETY ADVICE
GENERAL ADVICE
CARE & MAINTENACE
TOOLS & EQUIPMENT
Version #3
Page 2
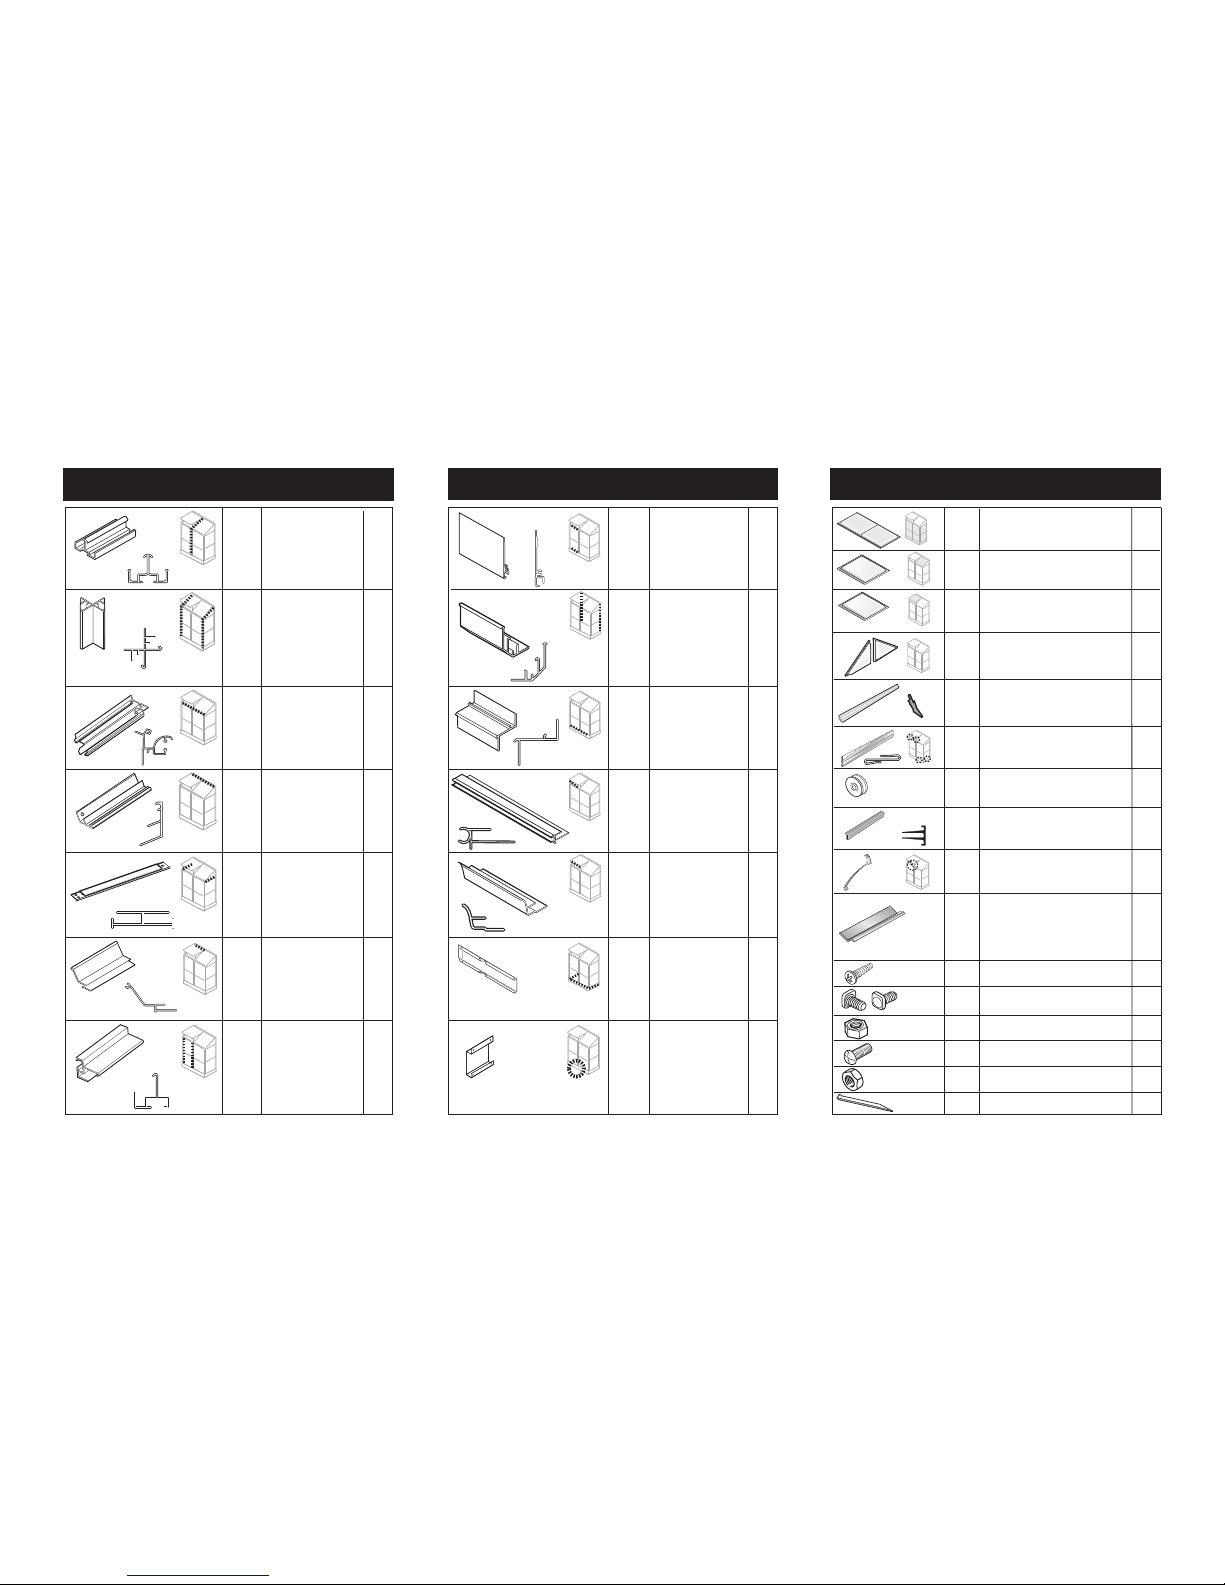
Contents
Item
Qty.
mm/inc.
Item
Qty.
mm/inc.
Item
Qty.
A701 1190mm/46.85”
A702 670mm/26.38”
1
1
A711 1200mm/47.24”
A712 200mm/47324”
A715 680mm/26.77”
A716 680mm”26.77”
1
1
1
1
A731 1233mm/48.54”
1
A741 1233mm/48.54”
1
A791 615mm/24.21”
2
A721 1472mm/57.92”
A722 1472mm/57.92”
1
1
A761 1233mm/48.54”
1
A782 585mm/23.03”
2
A752 585mm/23.03”
1
A771 1180mm/46.46”
2
A751 585mm/23.03” 1
A754 610mm24.02”
2
M745 RIGTH
M746 LEFT
M747
1
2
4
2
2
2
M8x16mm/0.63”
2
.
1
1
1
1
3
1
P501
P502
P520
P519
1
P521
P522
1
1
1
3
4
2
30
30
8
4
2
M6x10mm/0.39”
M6x10mm/0.39”
M4x16mm/0.63”
M4
1220x610mm/48.03x24”
1220x610mm/44.69x24”
680x612mm/26.77x24.09”
650x610mm/25.59x24”
275X610 mm/19.83x24”
275x610 mm/19.83x24”
P316
100mm/3.94”
P317
50mm/2”
P304
20mm/0.79”
P303
1180mm/46.46”
A307
447
411
412
421
422
M307
1465 mm/57.68”
1190 mm/46.87”
1110mm/43.70”
660mm/26”
640mm/25.2”
P330
P331
P332
P333
P334
mm/inc.
Page 3
745
746
A
B
447
747
C
412
412
A761
1
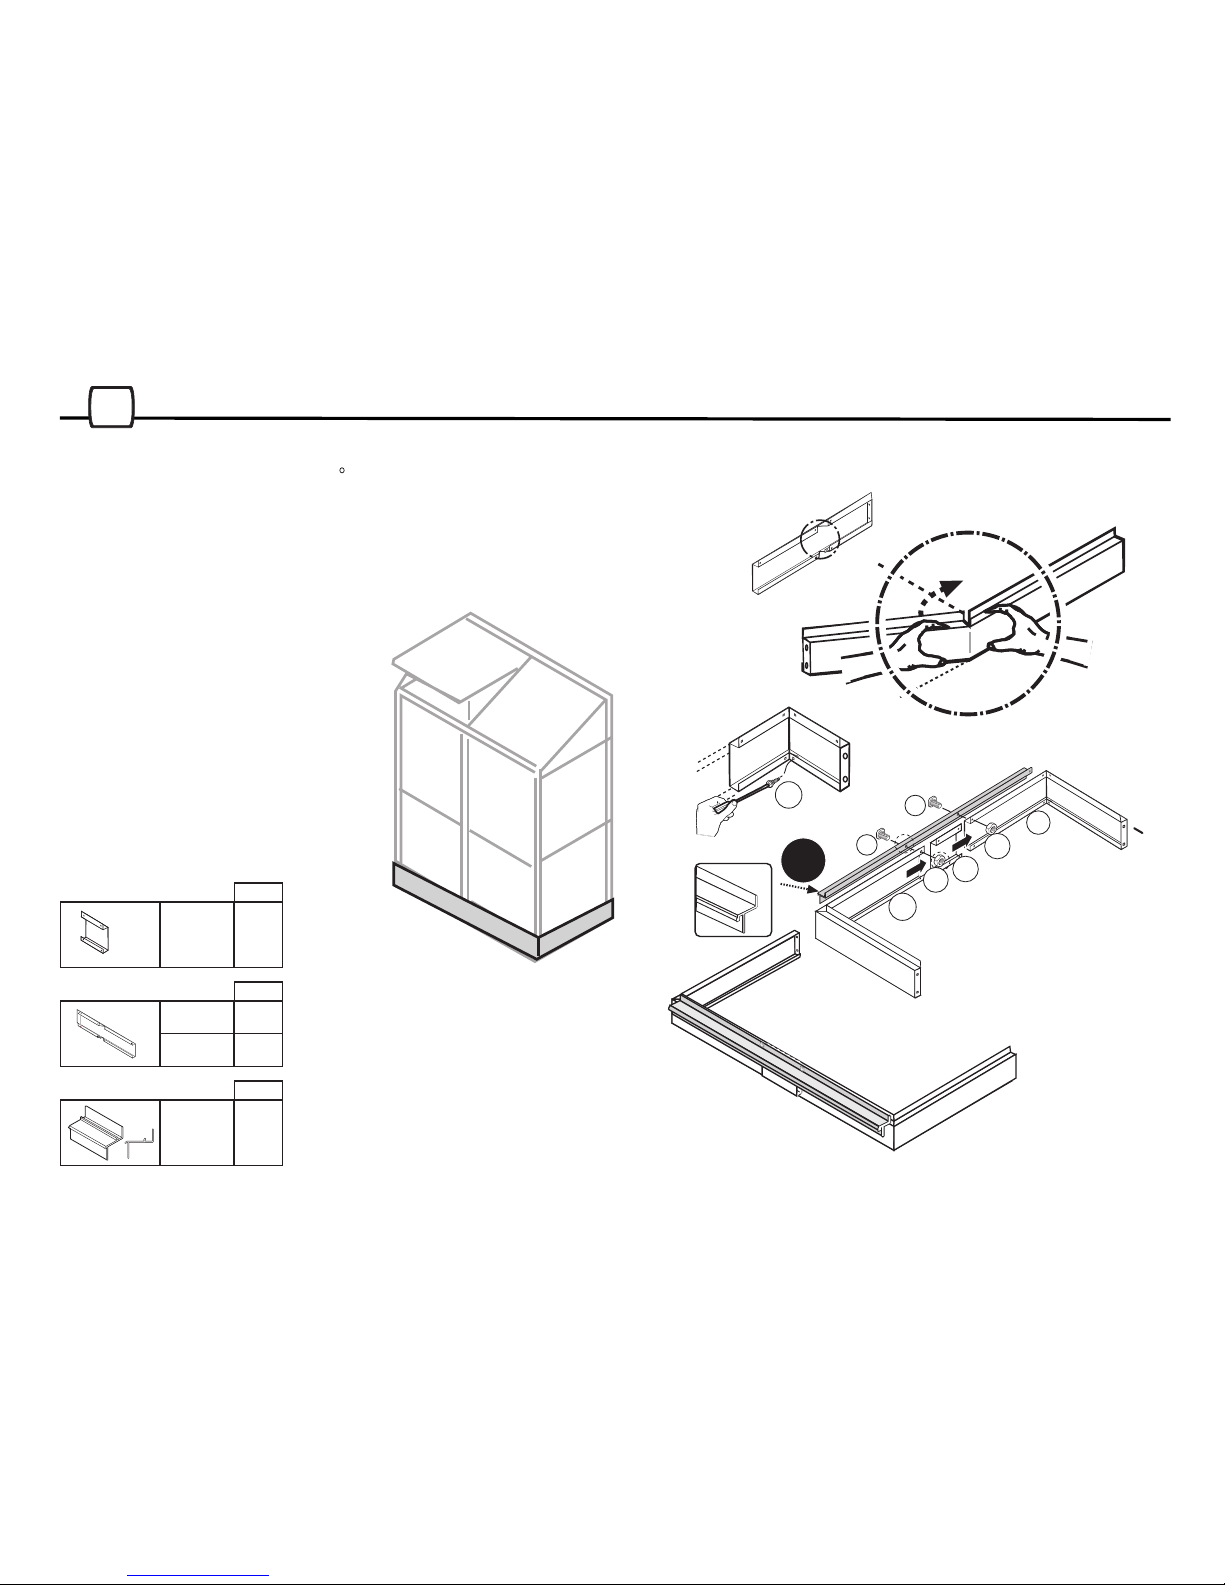
Assembly of base profiles:
Be sure to bend the profiles into 90 , and to tighten firmly with screws
447.
QTY
1
#A761
QTY
QTY
1
#M747
1
#M745
1
#M746
Page 4
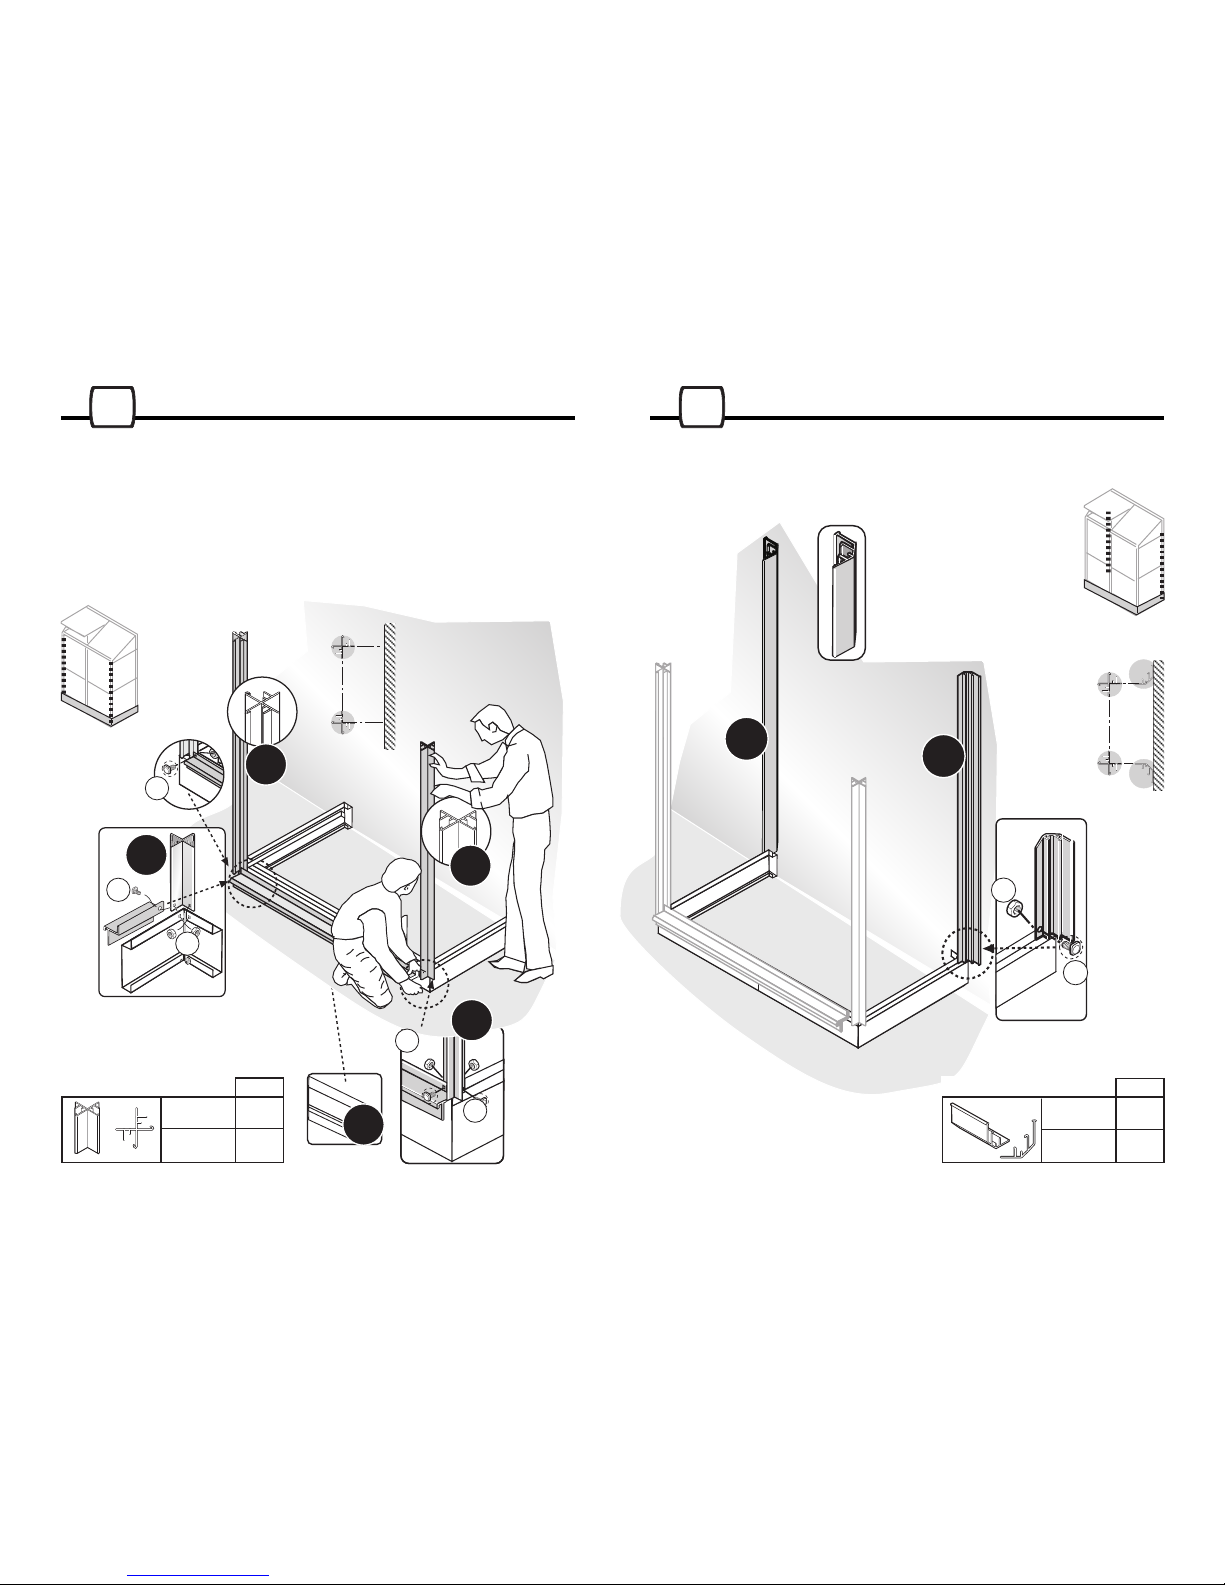
Assembly of the corners profiles A711 & A712:
Pay attention to set the profiles accordind to the detraction shown
on the profiles A711 during the assembly of profile A761.
NOTE: All nuts 412 should be on the inside of the stretcher,insert
the screws 411 from the outside inwards.
DO NOT FASTERN THE SCREWS AND NUTS until you complete
your greenhouse assembly.
Connect profiles A721,A722 to the base.
A711
A712
A712
A711
411
412
411
412
411
A761
411
412
A722
A721
32
QTY
1
#A711
1
#A712
QTY
1
#A721
1
#A722
Page 5
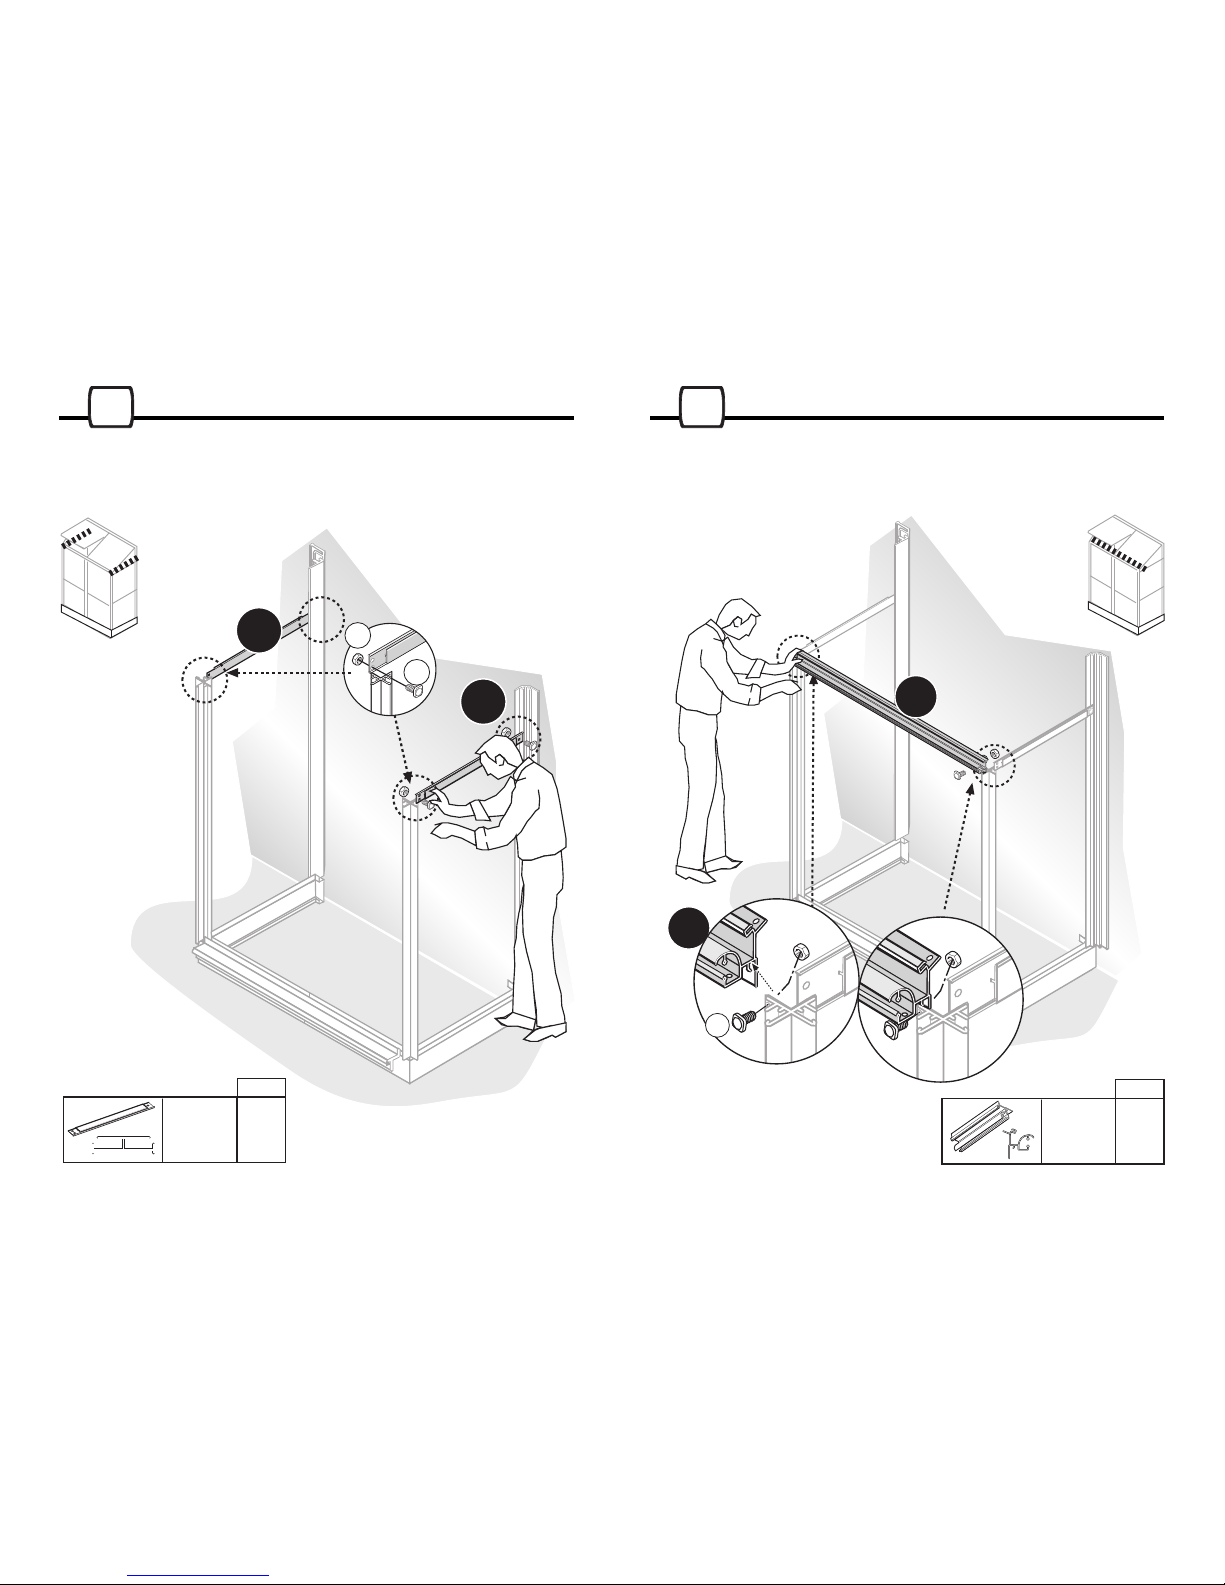
Assembly of profile A754:
Be sure to use the lower hall of existing two.
Assembly of the gutter A731 (The profile also includes the door
track):
Be sure to locate the gutter as shown in the illustration.
A253
A754
411
412
A754
54
QTY
2
#A754
QTY
1
#A731
A731
412
A731
411
Page 6
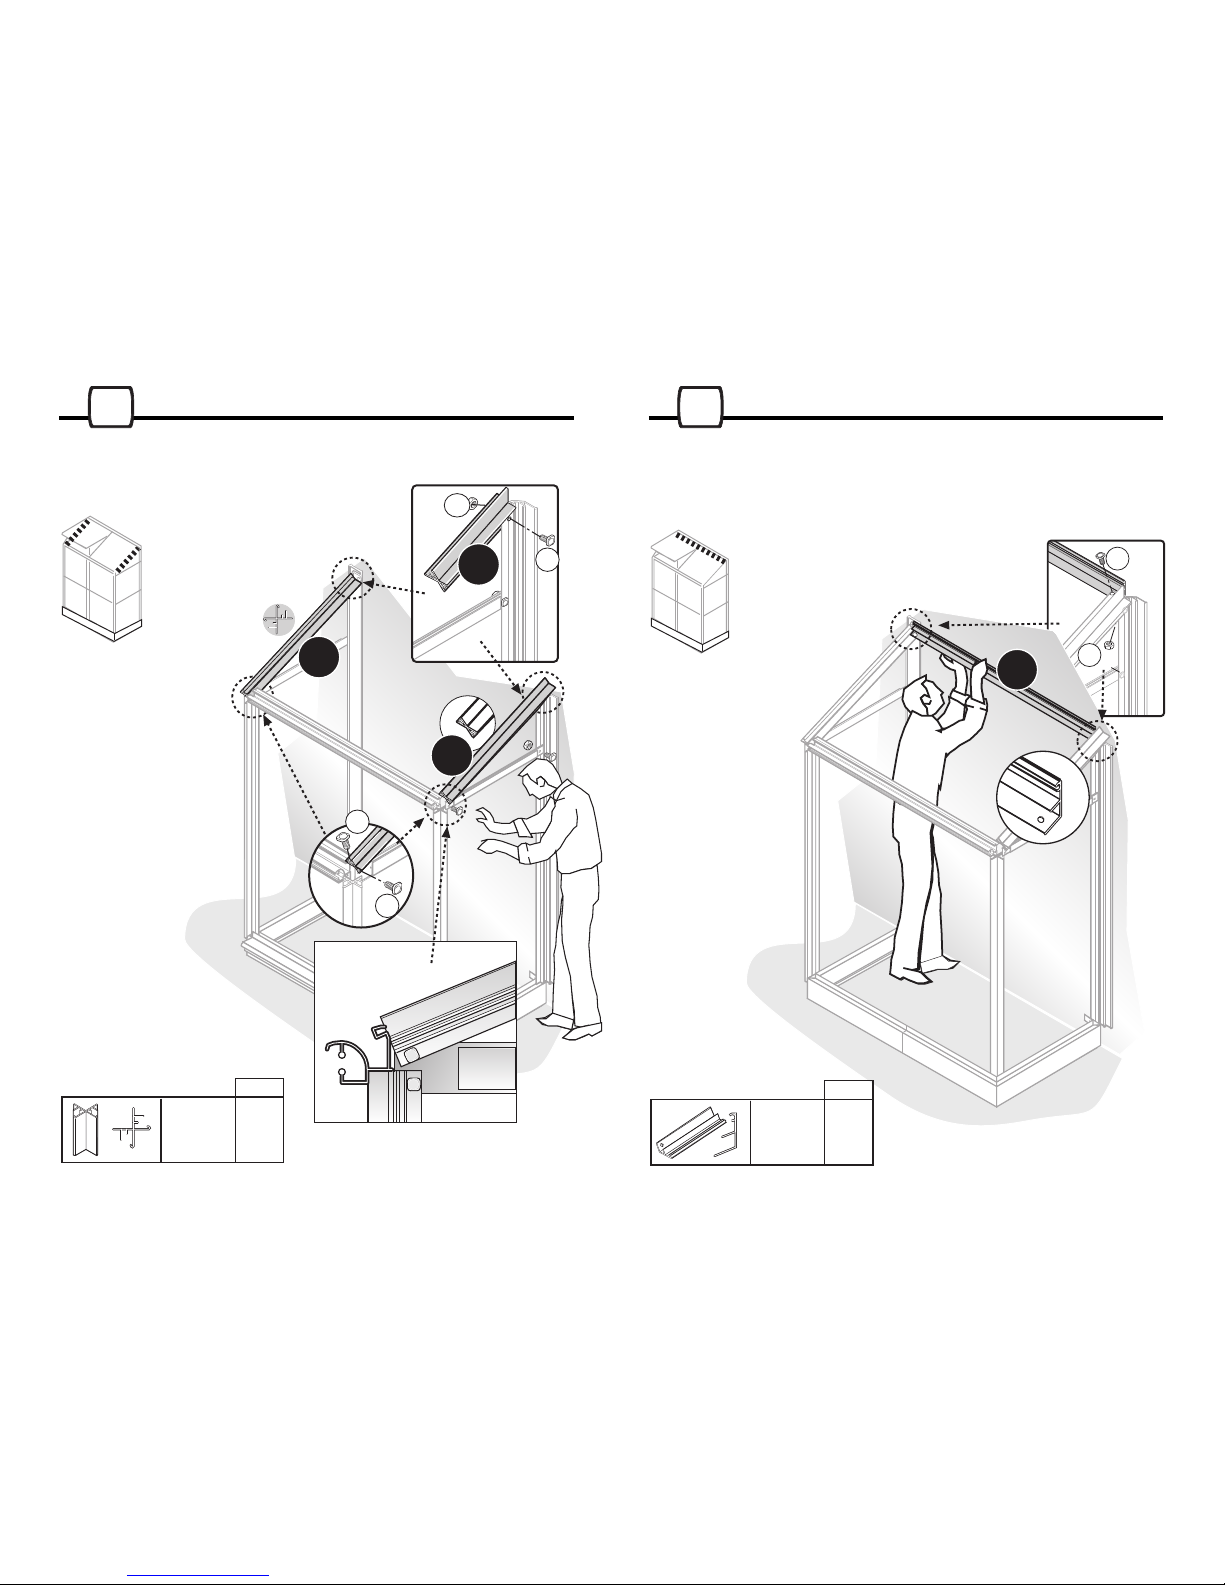
Assembly of profile A715 and A716:
Connect the profiles as shown in the illustration.
Assembly of the A741 profiles:
Connect the profile on both ends to profiles: A715 and A716, and
mark the connecting points (to the wall), using the pre-drilled halls
in the profile.
A716
A715
A715
411
412
411
411
76
QTY
1
#A715
1
#A716
A741
411
412
QTY
1
#A741
Page 7
412
A702
411
411
A702
10
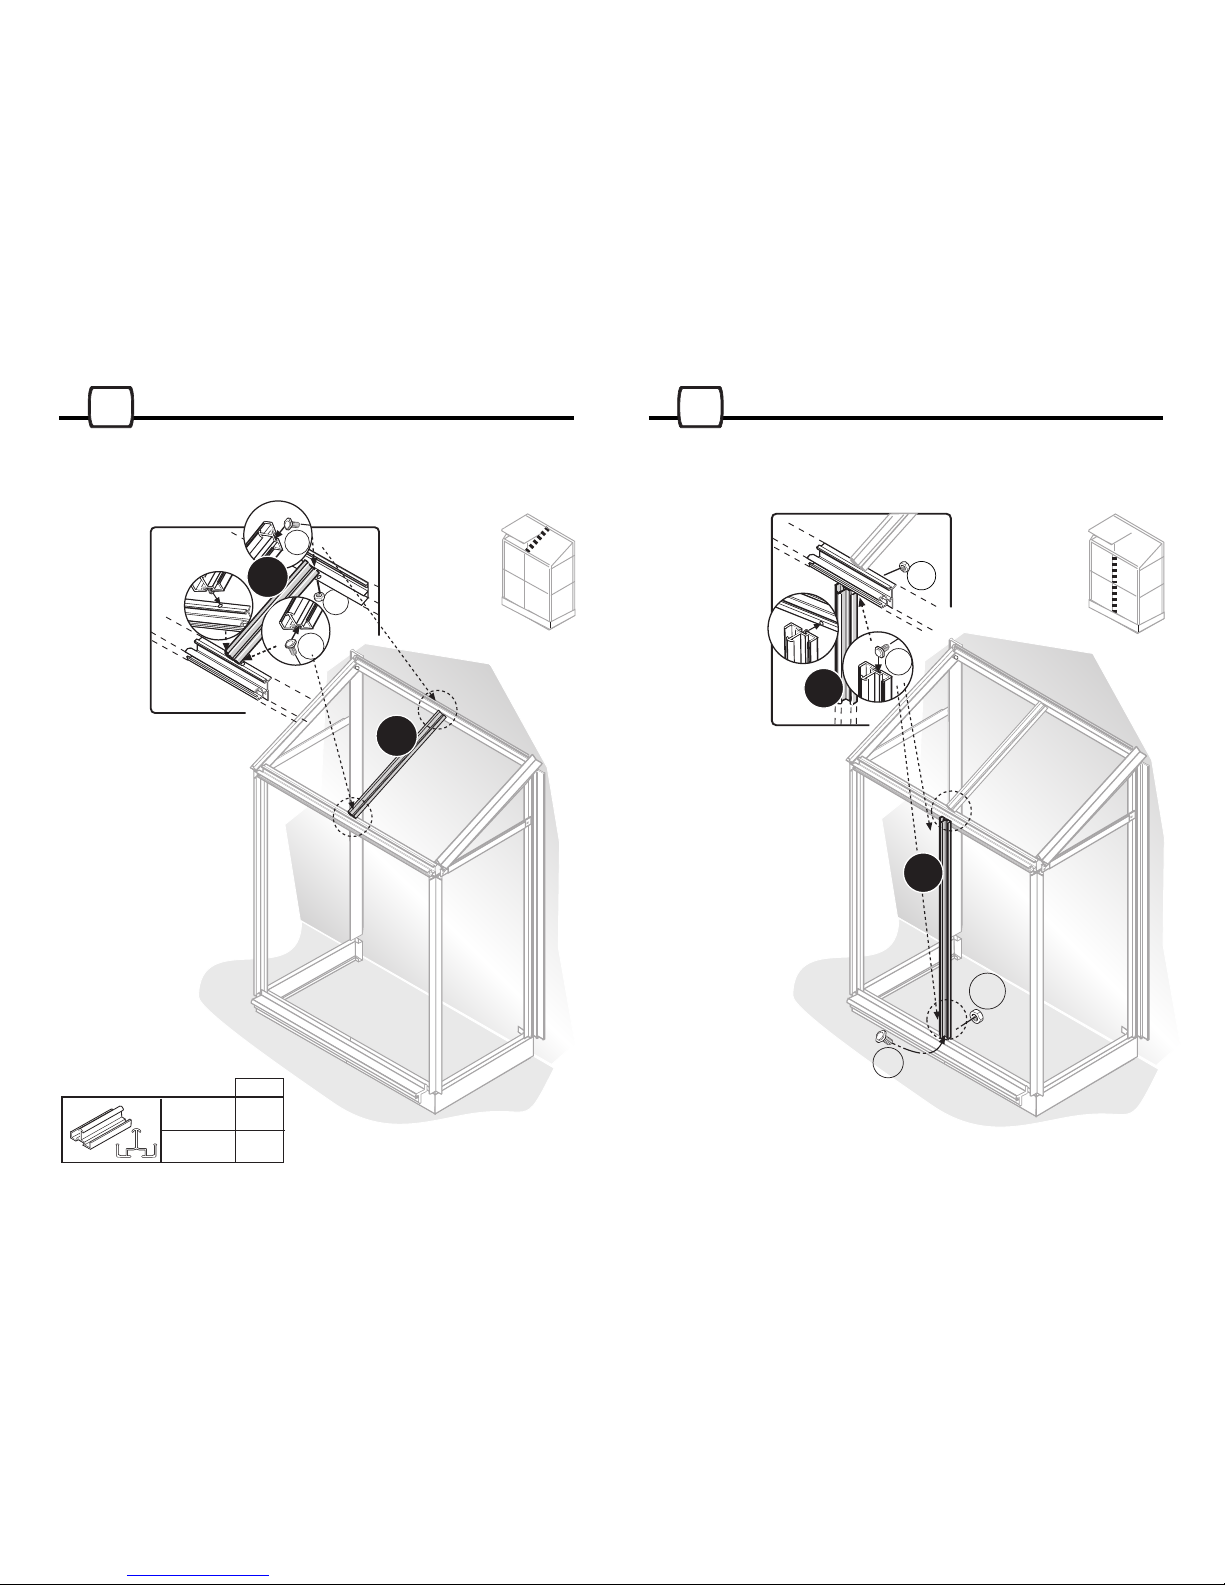
Assembly of profile A702 on the roof:
Connect the proile to profiles A741 on one side , and A731 on the
second side.
Assembly of profile A701 on the front wall:
Connect the profile to the profile A731 on one sideand to profile
A761 on the second side.
A701
412
411
A701
412
411
98
QTY
1
#A701
1
#A702
Page 8
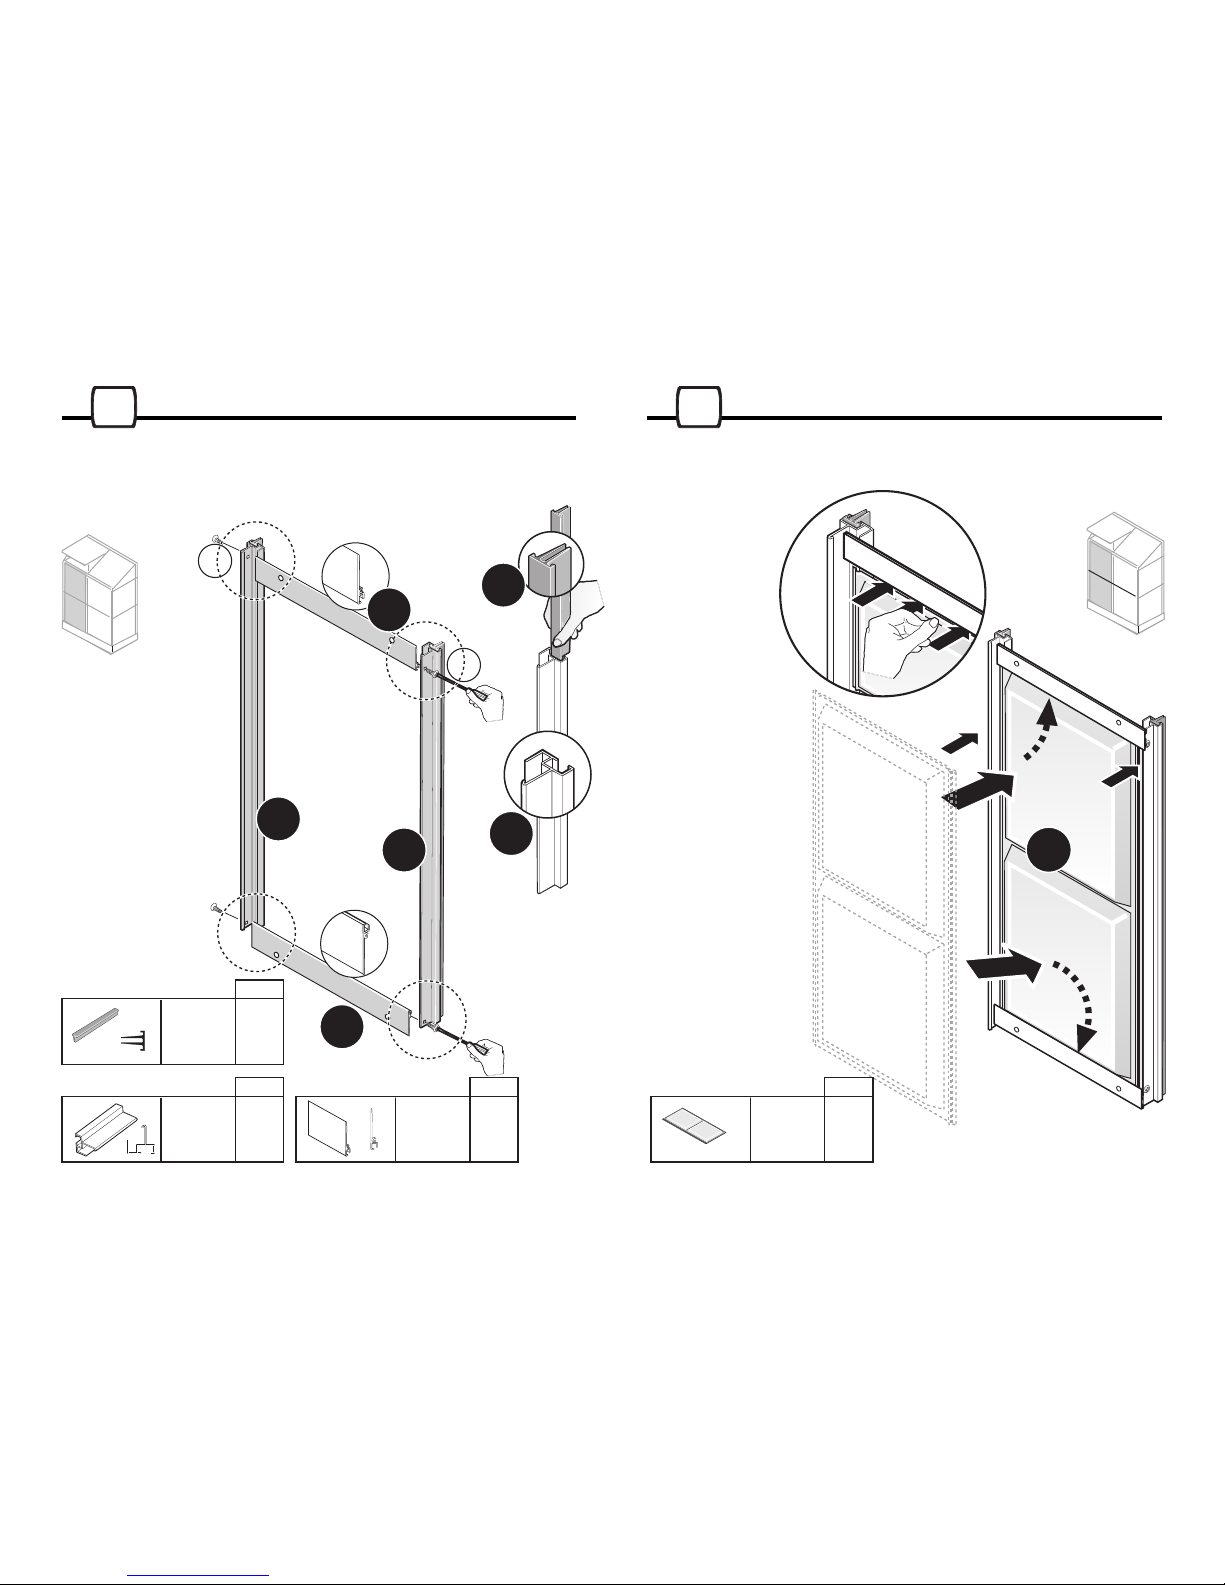
Door sub-assembly:
Insert rubber seal R303 into profiles A771. It is advisable to use small
amount of tender appropriate lubrication material. Connect profiles
A771 with profiles A791 using screws 421.
411
Door sub- assembly (continued):
Lay panel P502. Be sure to insert both ends into the channel in
profiles A791.
P502
1110
QTY QTY
1
#P502
QTY
2
#A771
2
#A791
QTY
R303
A791
421
421
A771
A771
A771
2
#R303
A791
Page 9
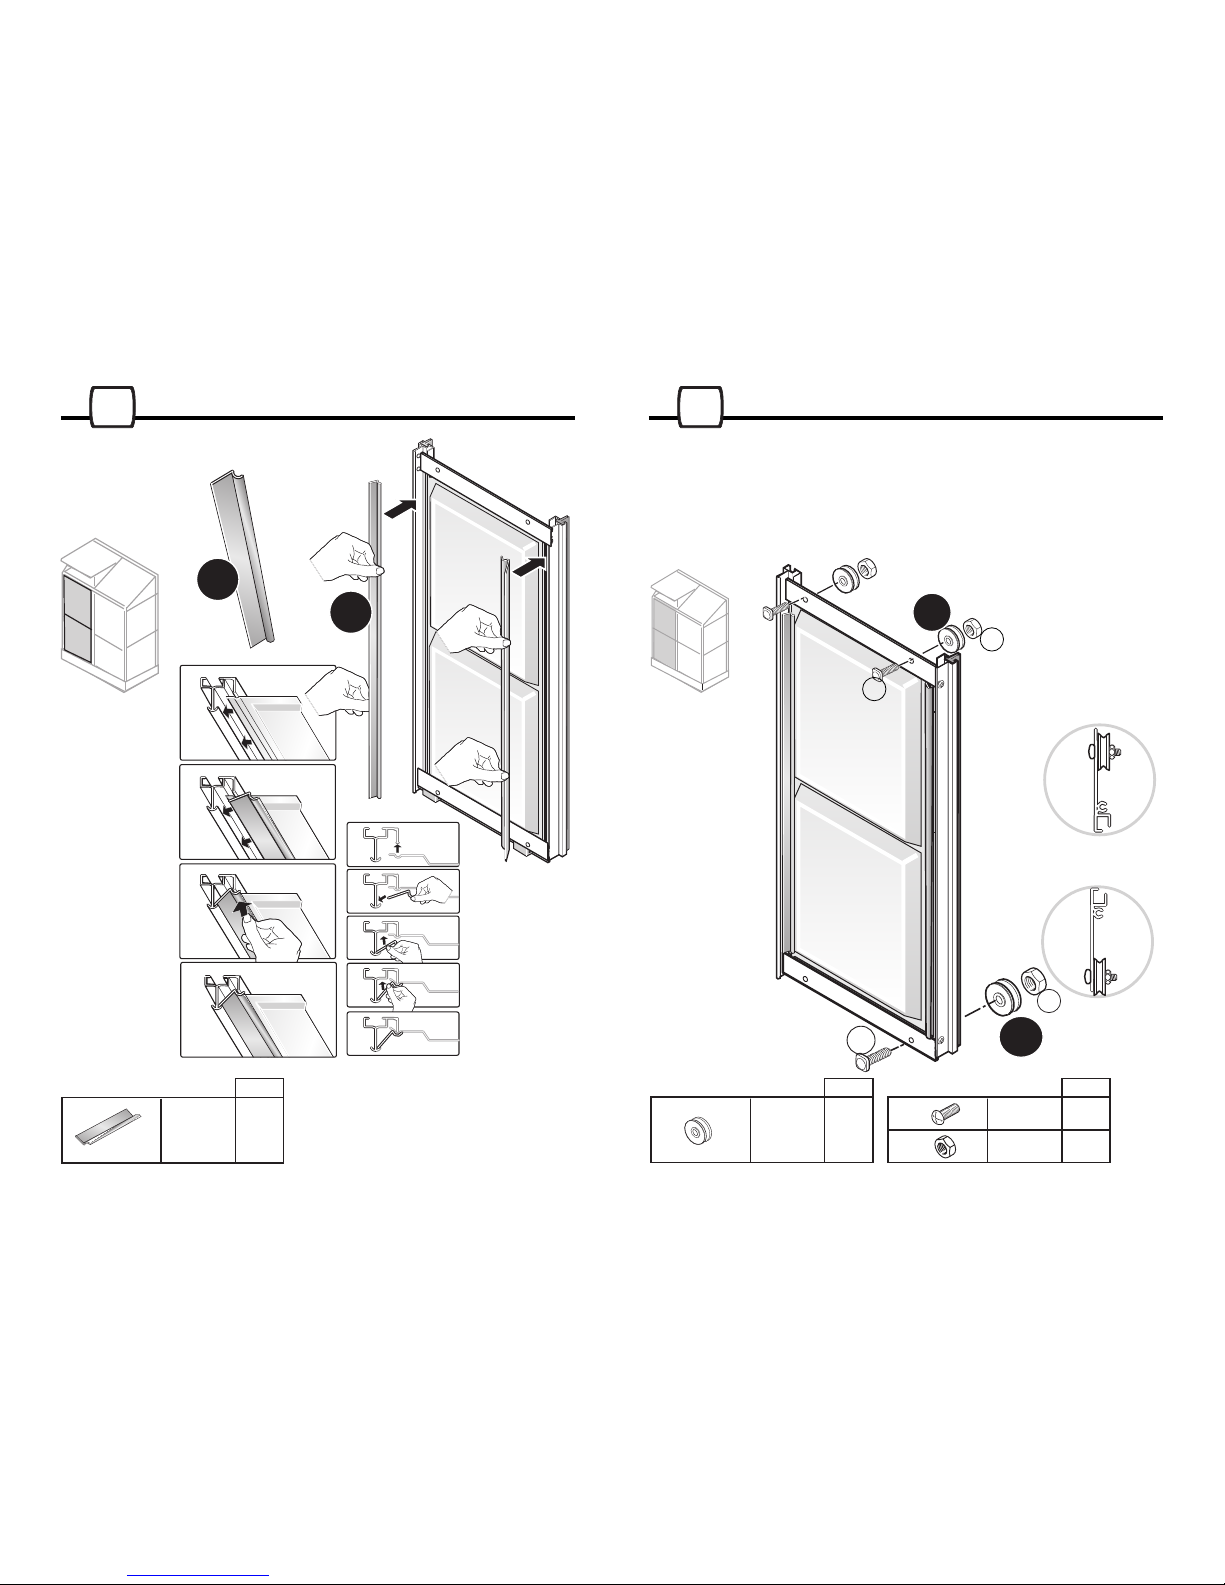
Connect plastic strips P332 on both sides of panel P502.
NOTE: It is imperative to thread in the plastic strips.Onto the aluminum
profiles in it’s assigned position. See illustrations A to D.
Door sub-assembly (Continued):
Connect all four plastic rollers P304 using screws 421 and nuts 422.
A
B
C
C
D
A
B
C
D
P332
P332
Assembly follows illustration.
421
422
P304
421
P304
422
1312
QTY
2
#P332
QTY QTY
4
#P304
4
#421
4
#422
Page 10
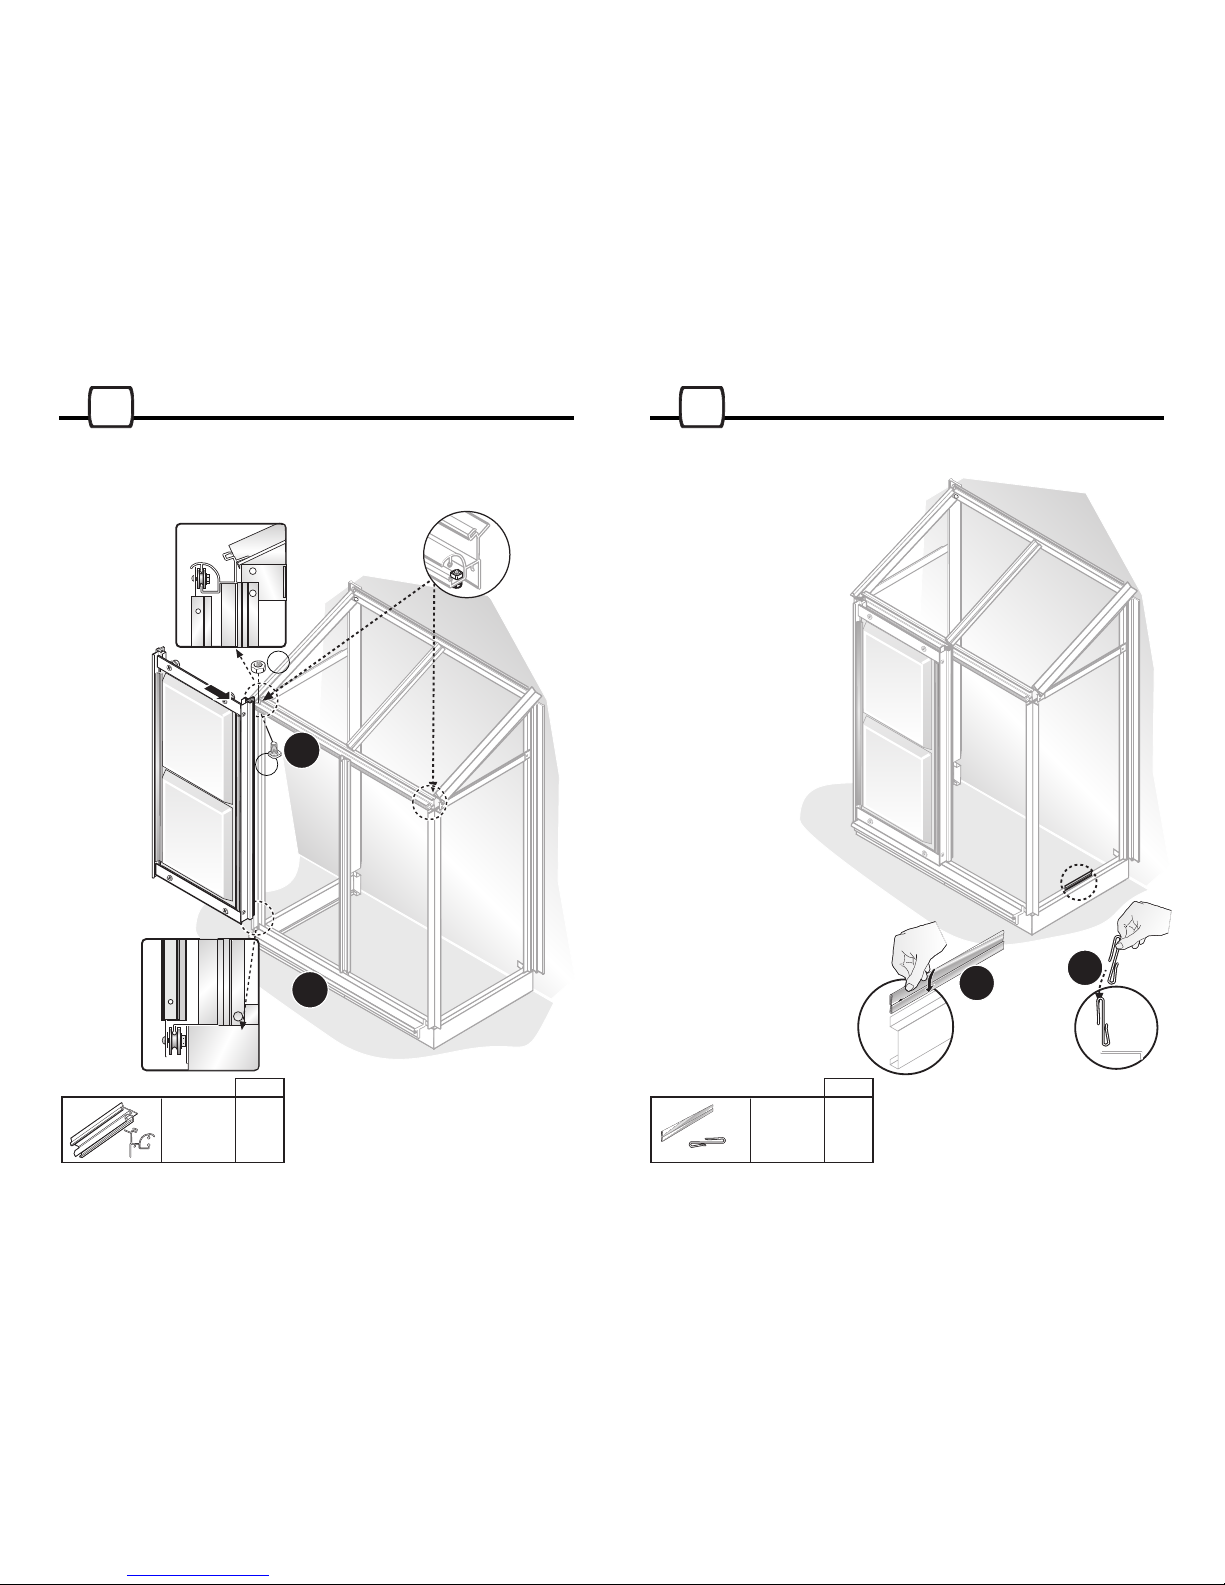
A731
412
411
A761
Assembly of the door to wall panels:
Slid the door unto the track on frofile A731 (gutter), and on
the same time on proffile A761. Insert two screws, 411& nuts
412 on both ends of profile A731.
Assembly noise reduction profile P317 to wall panels.
P317
P317
1514
QTY
3
#P317
QTY
1
#A731
Page 11
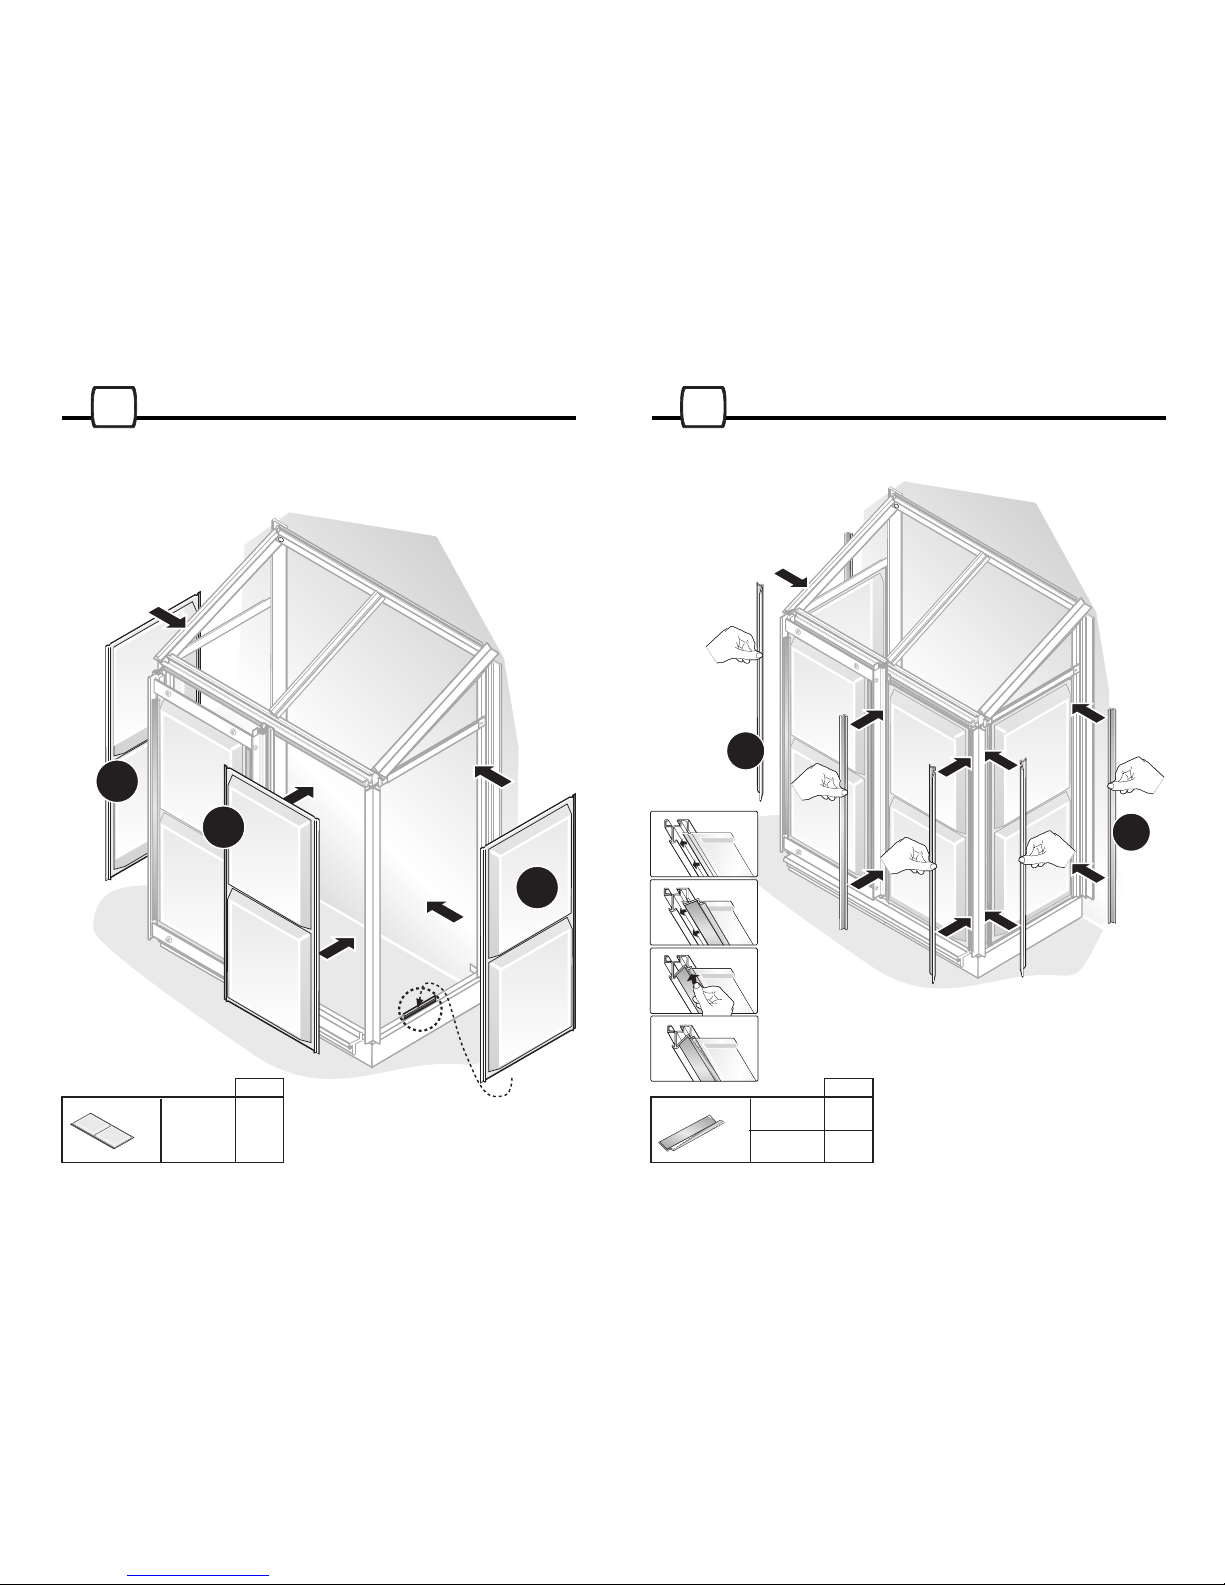
Connect plastic strips P331and P330. See illustations A to D.Lay panel P501.
Be sure to insert upper and into the channel in profile A731 and
frofiles A754.
P501
P501
P501
P331
P330
1716
QTY QTY
3
#P501
2
#P330
4
#P331
A
B
C
D
Page 12
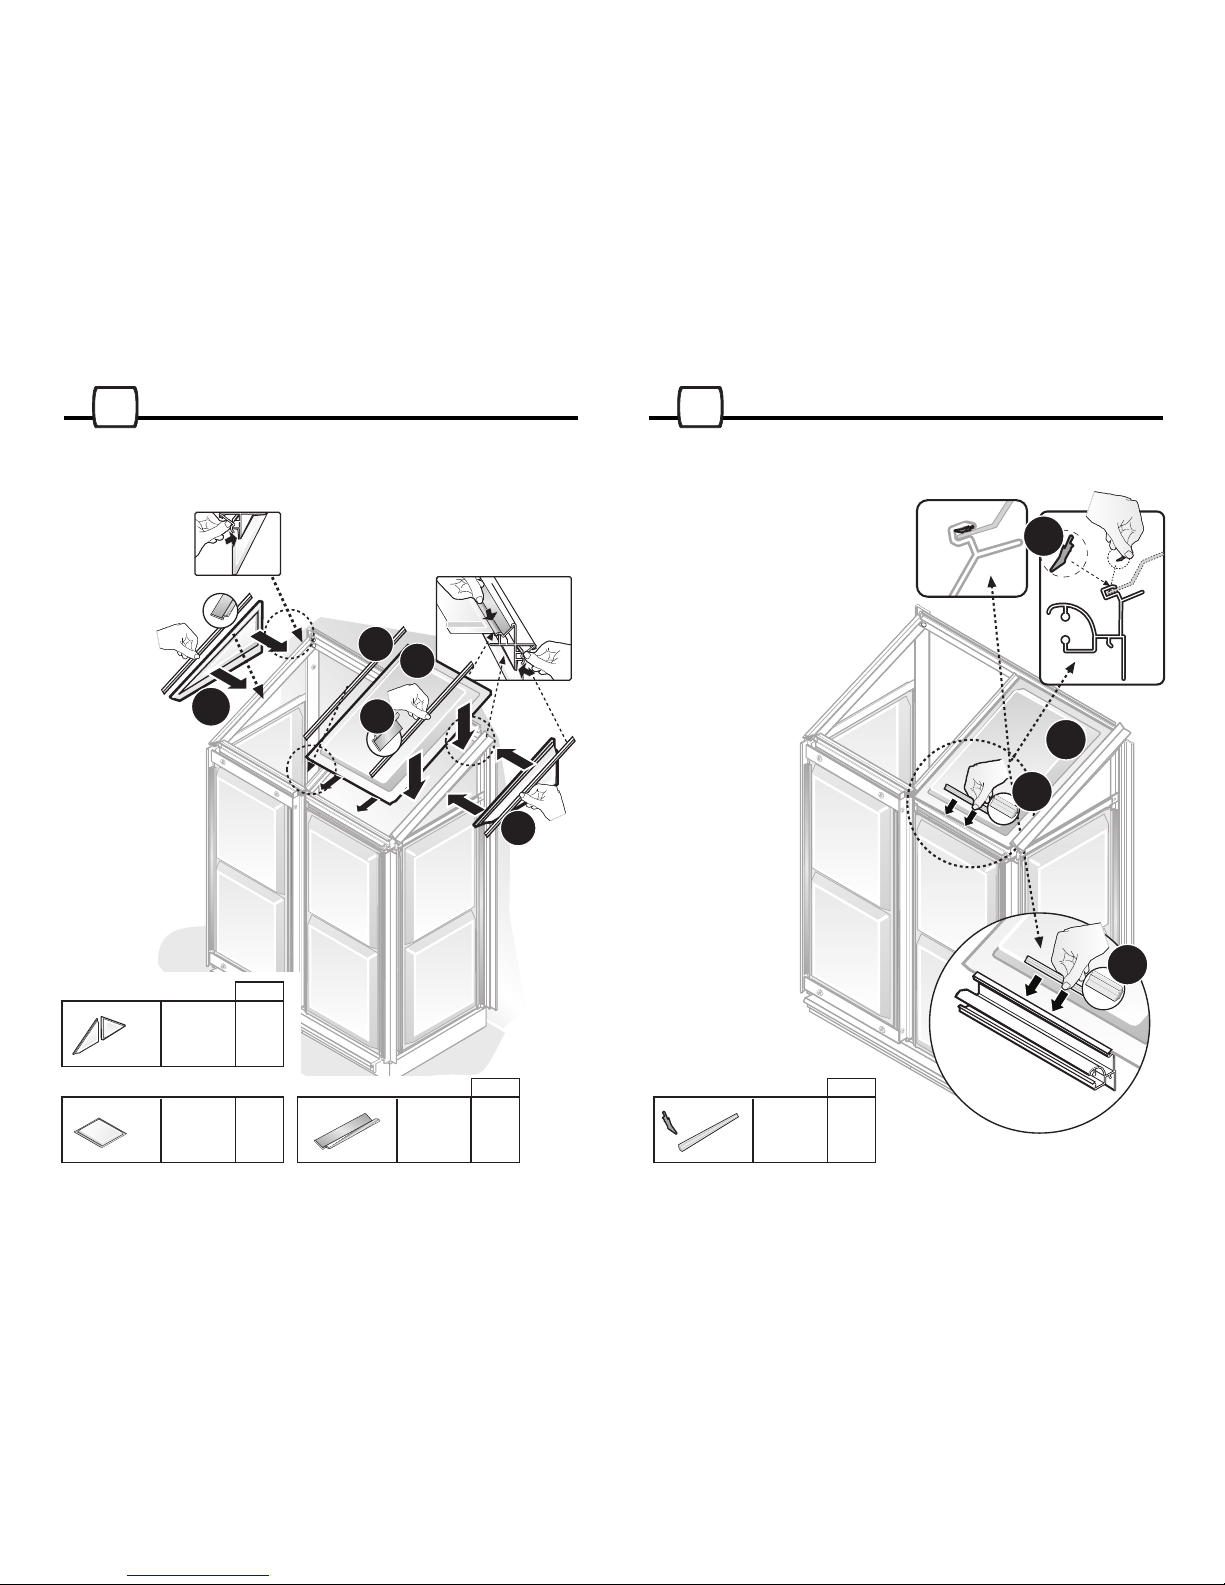
18
Apply roof panel P520 and triangle panels P521&P522. Connect
plastic strips P334.
See illustrations A to D at step #17.
P333
P521
P522
P520
P334
P334
1918
Assembly follows illustration.
QTY QTY
P316
P316
P316
P520
1
#P316
1
#P520
2
#P333
2
#P334
QTY
1
#P521
1
#P522
QTY
Page 13
QTY
412
412
A782
A782
A751
411
411
411
411
A752
A307
P519
P302
412
422
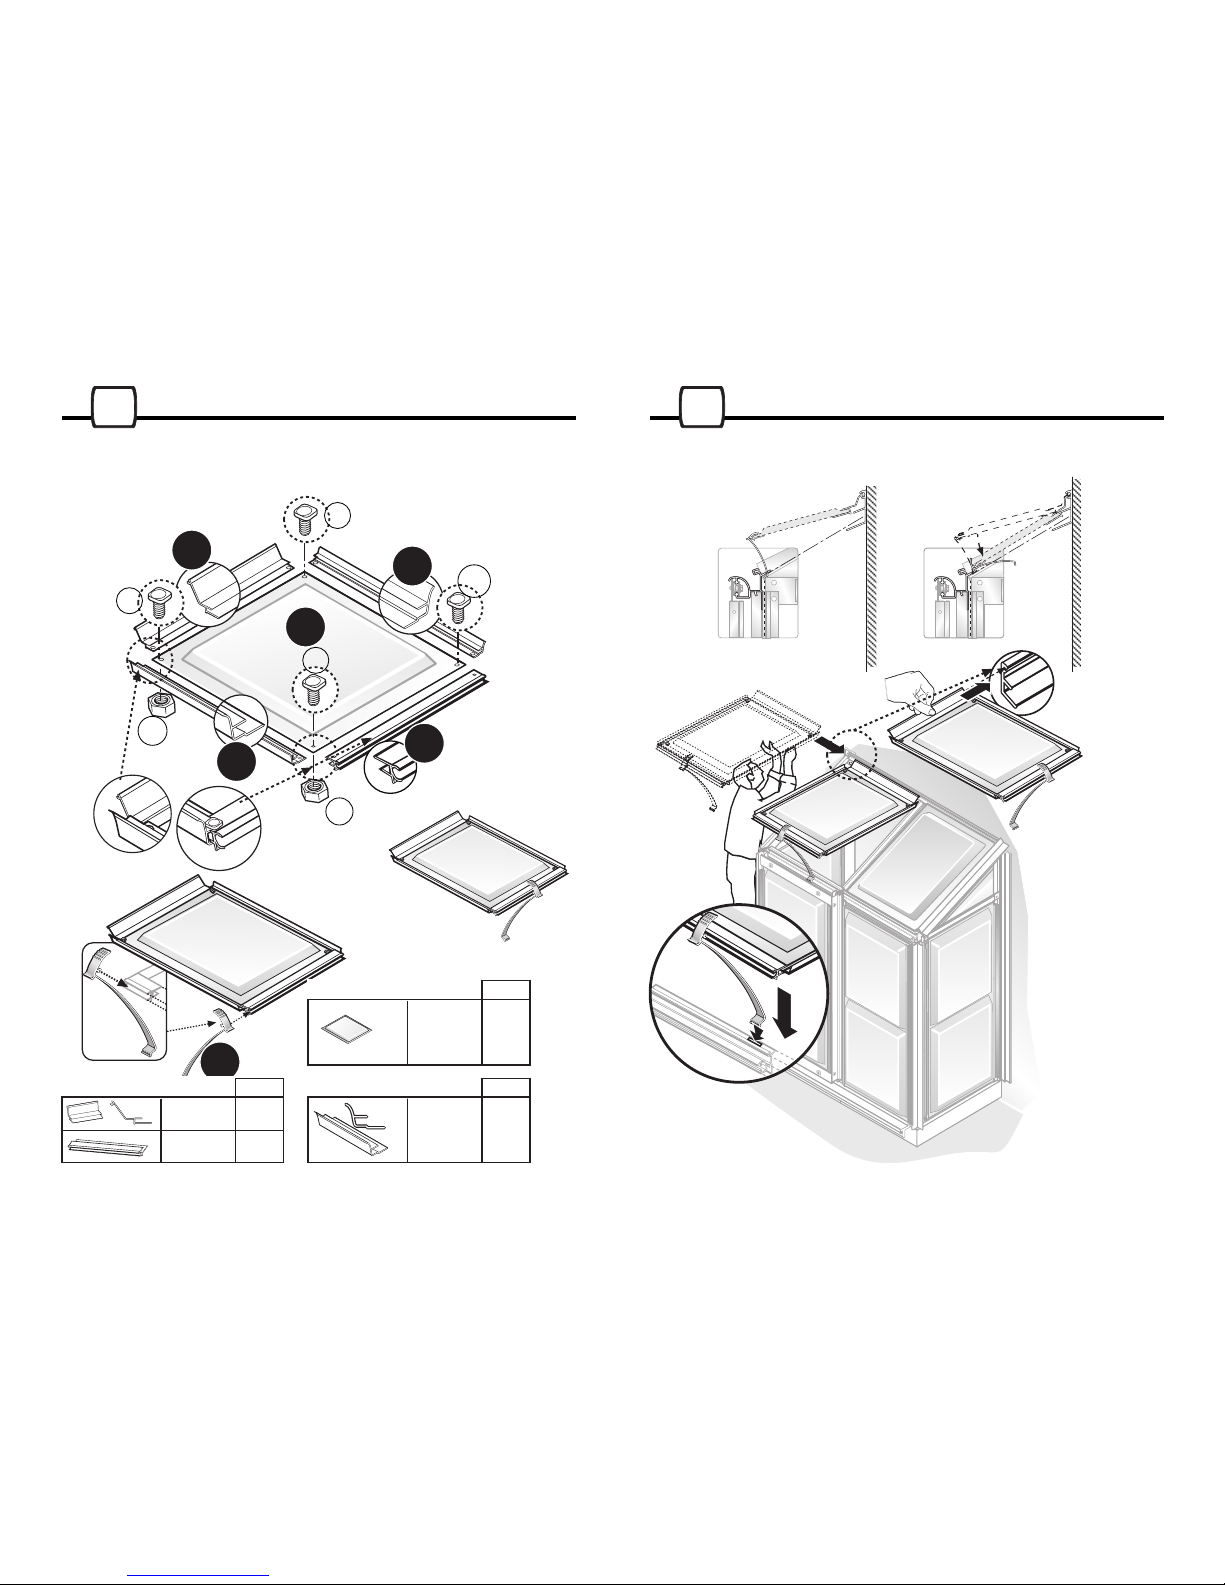
Vent sub-assembly: Apply profiles A782,A751,A752 and assemble
according to the illustration using screws and nuts 411, 412.
Assembly follows illustration.
2120
QTY
1
#A751
1
#A752
2
#A782
QTY
1
#P519
Page 14
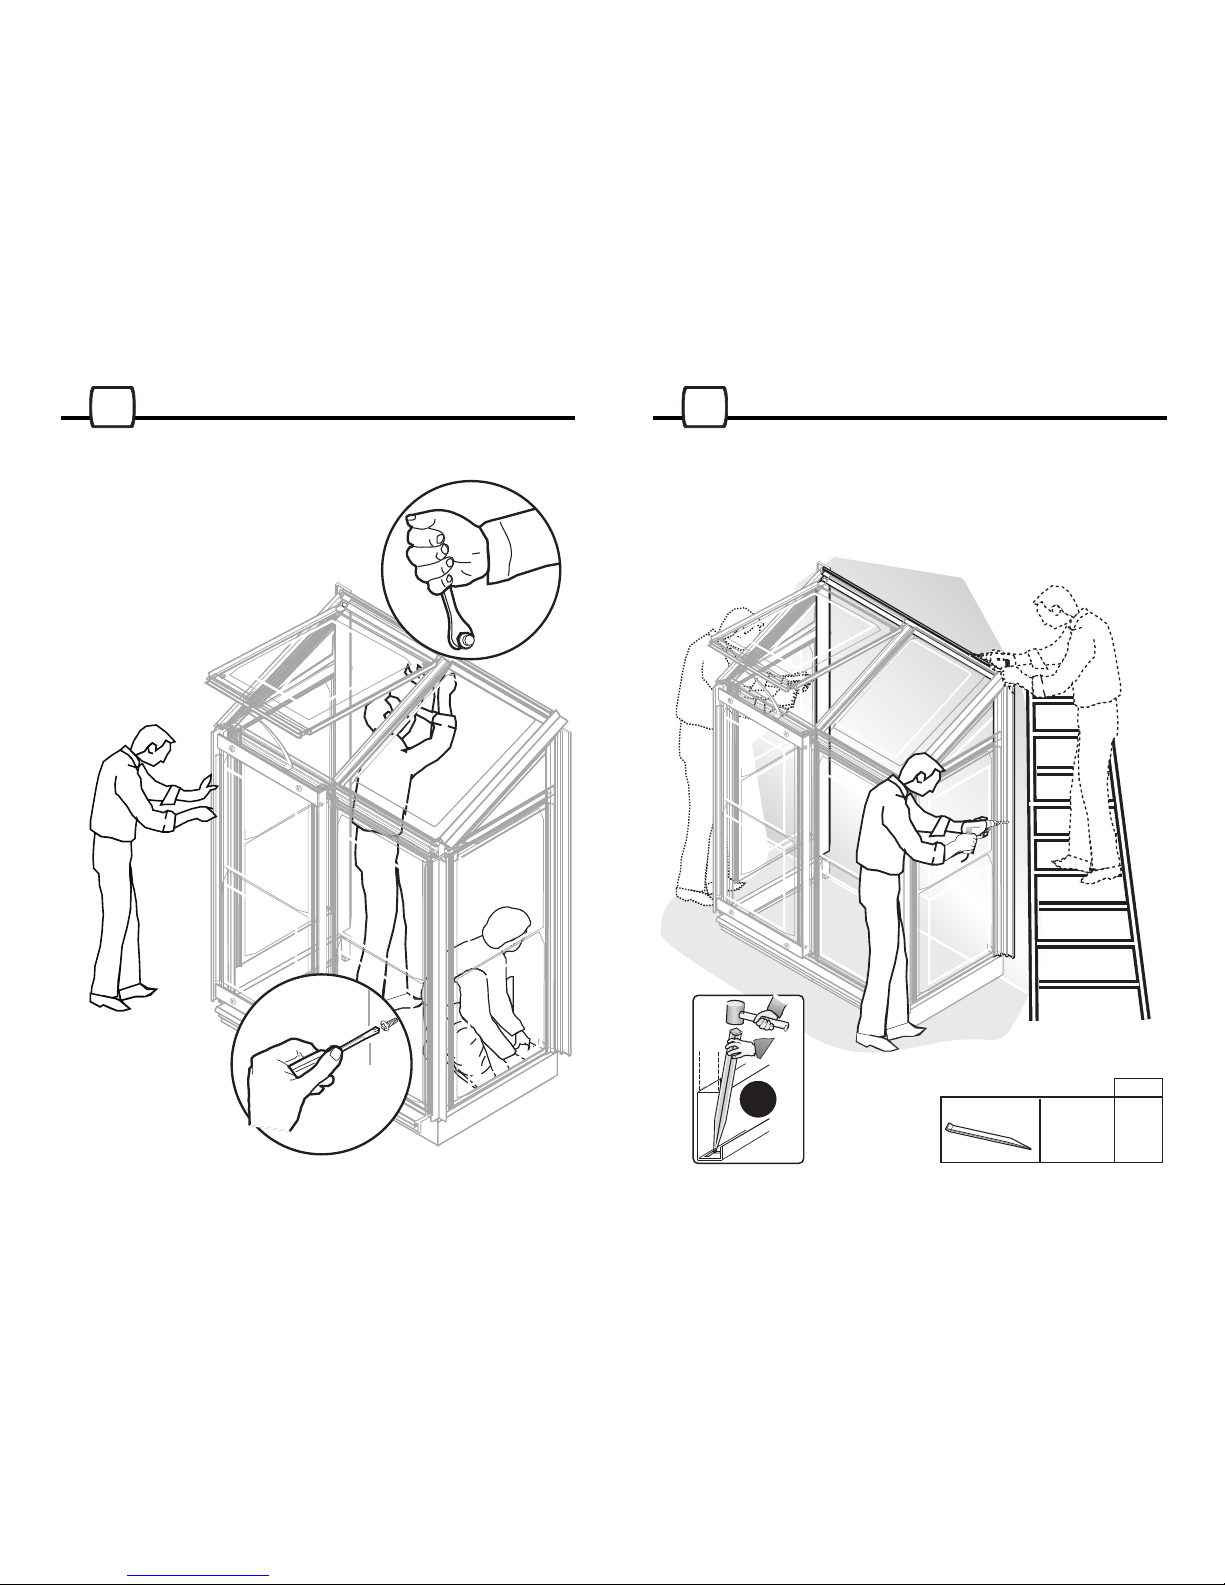
Fasten all screws and nuts of your Lean-To greenhouse.
M307
2322
QTY
2
#M307
 Loading...