

Palomar RFX150 Installation Manual

RFX150 Installation guide
The RFX150 is a replacement final RF amplification stage and low pass filter module for
use with 10 meter amateur transceivers. The RFX150 is standard equipment on certain models of
amateur transceivers, and it may also be used for repairs and upgrades on most 10 meter amateur
transceivers.
The RFX150 requires a RF input power level between 40 and 45 watts PEP for maximum
performance. RF input level less than 40 watts PEP will work, but overall power out levels will
be less.
1. Determine that the transceiver receives and transmits properly on all modes and all
frequencies before proceeding. Repair any problems prior to installing the RFX150.
Remove the transceiver covers.
2.
Unsolder and remove the antenna connector from the back of the transceiver.
3.
On transceivers with an aluminum heat sink, remove the original heat sink.
4.
a. This is usually accomplished by removing the two screws that are located between the
fins of the heat sink.
b. Some transceiver heat sinks are mounted with the same screws that hold the driver and
final transistors in place, inside the transceiver. On this style transceiver you will need to
remove the screws from the inside of the transceiver that are holding the transistors. After
removing the heat sink, use the three supplied nuts to secure the transistors back into
place. THIS IS REQUIRED. If the screws are not properly reinstalled the transistors will
overheat and fail.
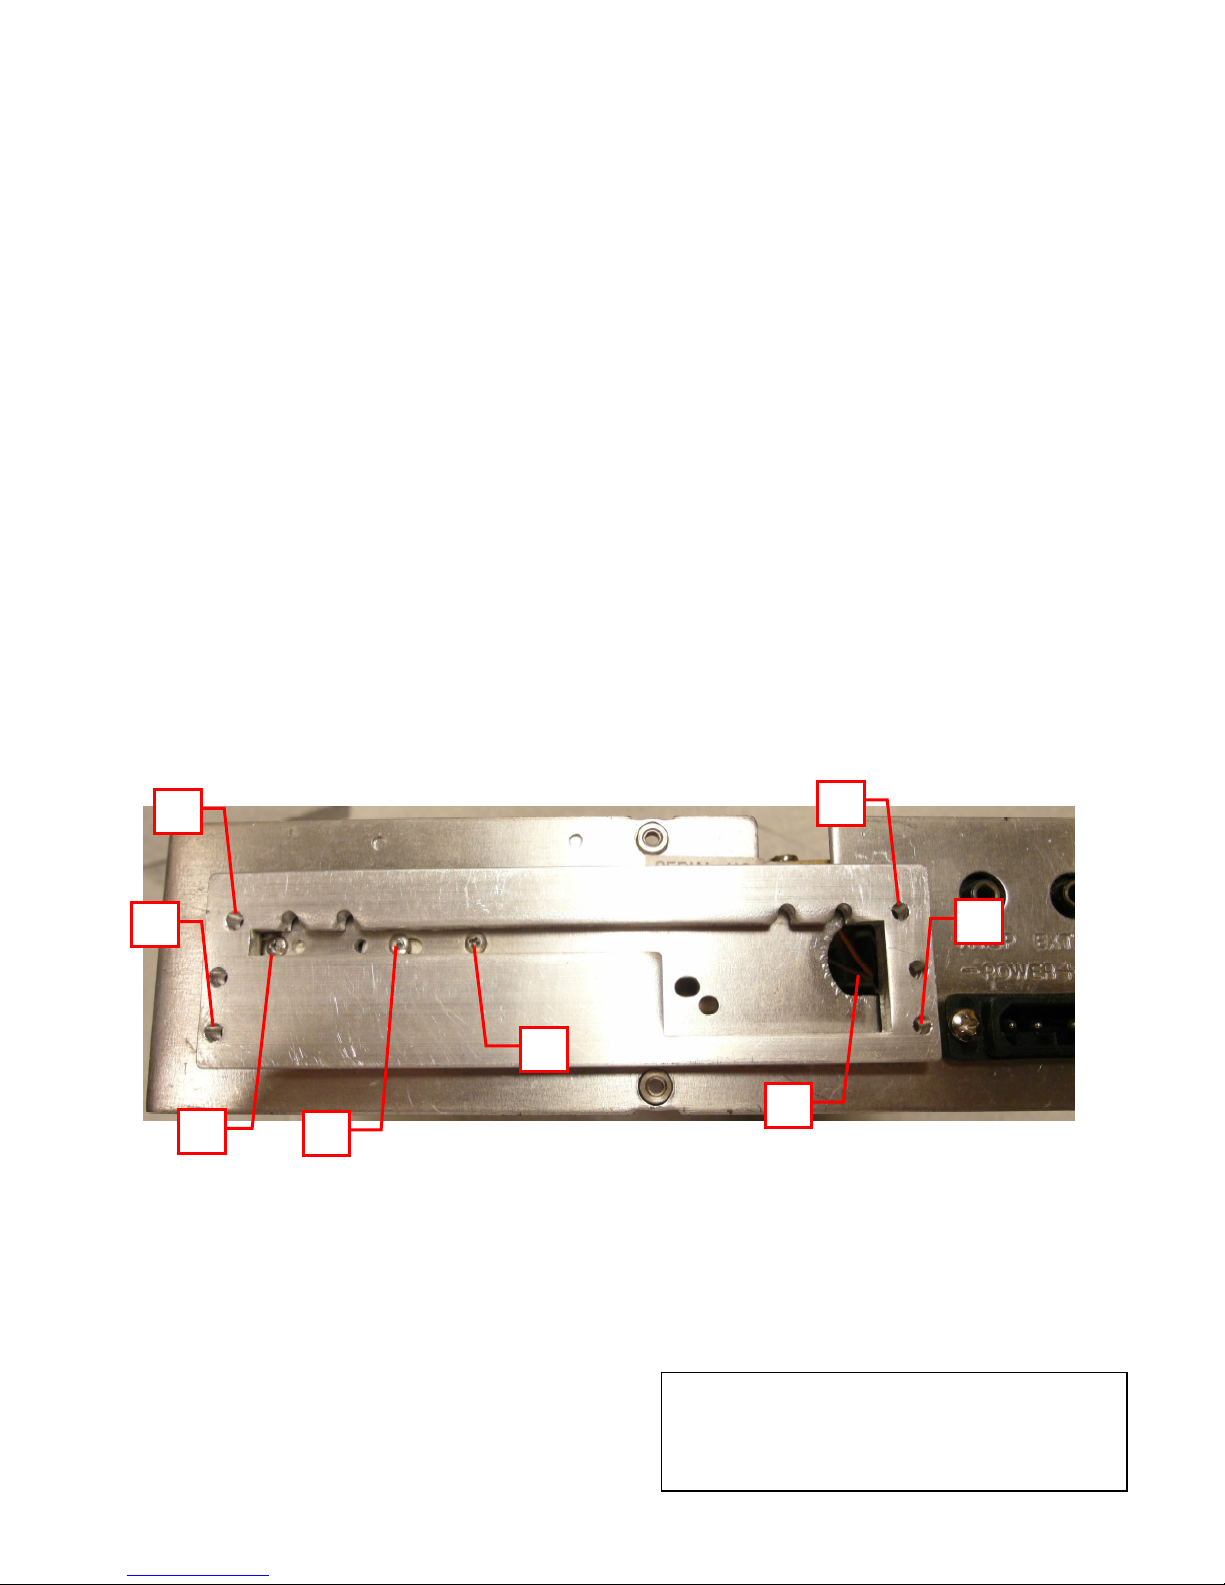
Position the RFX150 spacer on the back of the transceiver as shown in Figure 1. Note that
5.
the spacer is positioned so that the hole where the antenna connector was removed is partially
covered by the spacer, but allows enough room to route the wires from the RFX150 into
transceiver. In Figure 1, note how the spacer clears the screws that are mounting the
transistors inside the transceiver (if applicable) and that the spacer is flat against the back of
the chassis. This is critical to insure proper heat dissipation of the transceiver’s internal
transistors since the spacer is designed to act as a heat sink.
Decide which four holes will be used to hold the RFX150 and spacer in place on the radio by
6.
verifying any clearance issues that you see. It is suggested to use the outer most four corner
holes that are in the spacer and heat sink. Mark the four holes using the spacer as a template.
Remove the spacer and drill the four holes on the rear chassis. WARNING: Make sure not to
leave any drill shavings in the transceiver.
Apply a generous amount of heat sink compound (thermal grease) on the back of the
7.
transceiver chassis where the spacer will touch to insure good heat transfer. Position the
spacer in place.
Route the blue wire and the coax cable through the antenna connector hole.
8.
Locate the four threaded mounting rods and cap nuts. Screw the four cap nuts onto one end
9.
of each of the four threaded mounting rods. It is highly recommended to use thread lock so
that the cap nuts do not come loose.
Mount the RFX150 and spacer to the back of the transceiver by passing the assembled
10.
threaded mounting rods through the chosen mounting holes in the RFX150, spacer and into
the transceiver. Use the provided nylock nuts to tighten down the RFX150 assembly to the
A. Preferred holes for mounting RFX150
A A A A B C C
C
Palomar Electronics Customer Support
transceiver. Make sure to not overtighten the nylock nuts.
Inside the transceiver, locate the wire that was soldered to the antenna connector that was
11.
removed in step 3. Unsolder this wire from the transceiver’s circuit board and in its place
solder the center conductor of the coax from the RFX150. Solder the shield of the coax to the
transceiver’s CHASSIS Ground.
Locate the transceivers +8 volt transmit voltage. Solder the Blue wire to this +8 volt transmit
12.
voltage source. Optional: If you add a SPST switch in series with the Blue wire you can turn
the RFX150 on and off.
Once you have verified that all connections and mounting are done properly apply power to
13.
the transceiver and test the unit for proper operation.
Referencing your transceiver’s service manual or technical documentation reset the carrier
14.
level on AM/FM. With the transceiver’s output power set to maximum, adjust the carrier
level so that it does not exceed 40 watts. Exceeding 40 watts of carrier for a prolonged period
of time can damage the transceiver and installed RFX150.
Figure 1
B. Antenna connector hole positioned for best wire routing
C. Screws holding the transceiver’s finals and driver
info@palomarelectronics.com
253-509-7243
 Loading...