

Page 1

PALM
USER GUIDE
Page 2

Enjoy These Features
Numbershare
Allow your Palm to share a phone number with another device with Verizon. Your calls and messages will be synced between the two
devices.
To learn more, see “NumberShare” on page ___.
Life Mode
Life Mode allows you to minimize distractions by silencing most apps and notifications. With Life Mode on, everything will be silenced
other than calls and messages. You can also configure which apps are not muted.
Face Recognition
Use Face Recognition security to unlock your device.
To learn more, see “Face Recognition” on page ___.
Gesture Pad Search
Access any command on the Palm with a swipe of the finger on the Gesture pad. This feature is accessible from the lock screen. Swipe
your finger up from the bottom of the screen to use this feature.
To learn more, see “Gesture Pad Search” on page ___.
Customizable Action Menus
Each app has a Quick Menu to quickly and easily access features of the app before even opening the app. Touch and hold an app shortcut
to access its Quick Menu.
To learn more, see “Quick Menus” on page ___.
Water and Dust Resistance
Palm has a rating of IP68 using the Ingress Protection rating system. Brief exposure to sweat or a little bit of water will not damage the
device.
To learn more, see “Water and Dust Resistance” on page __.
Page 3
Out of the Box
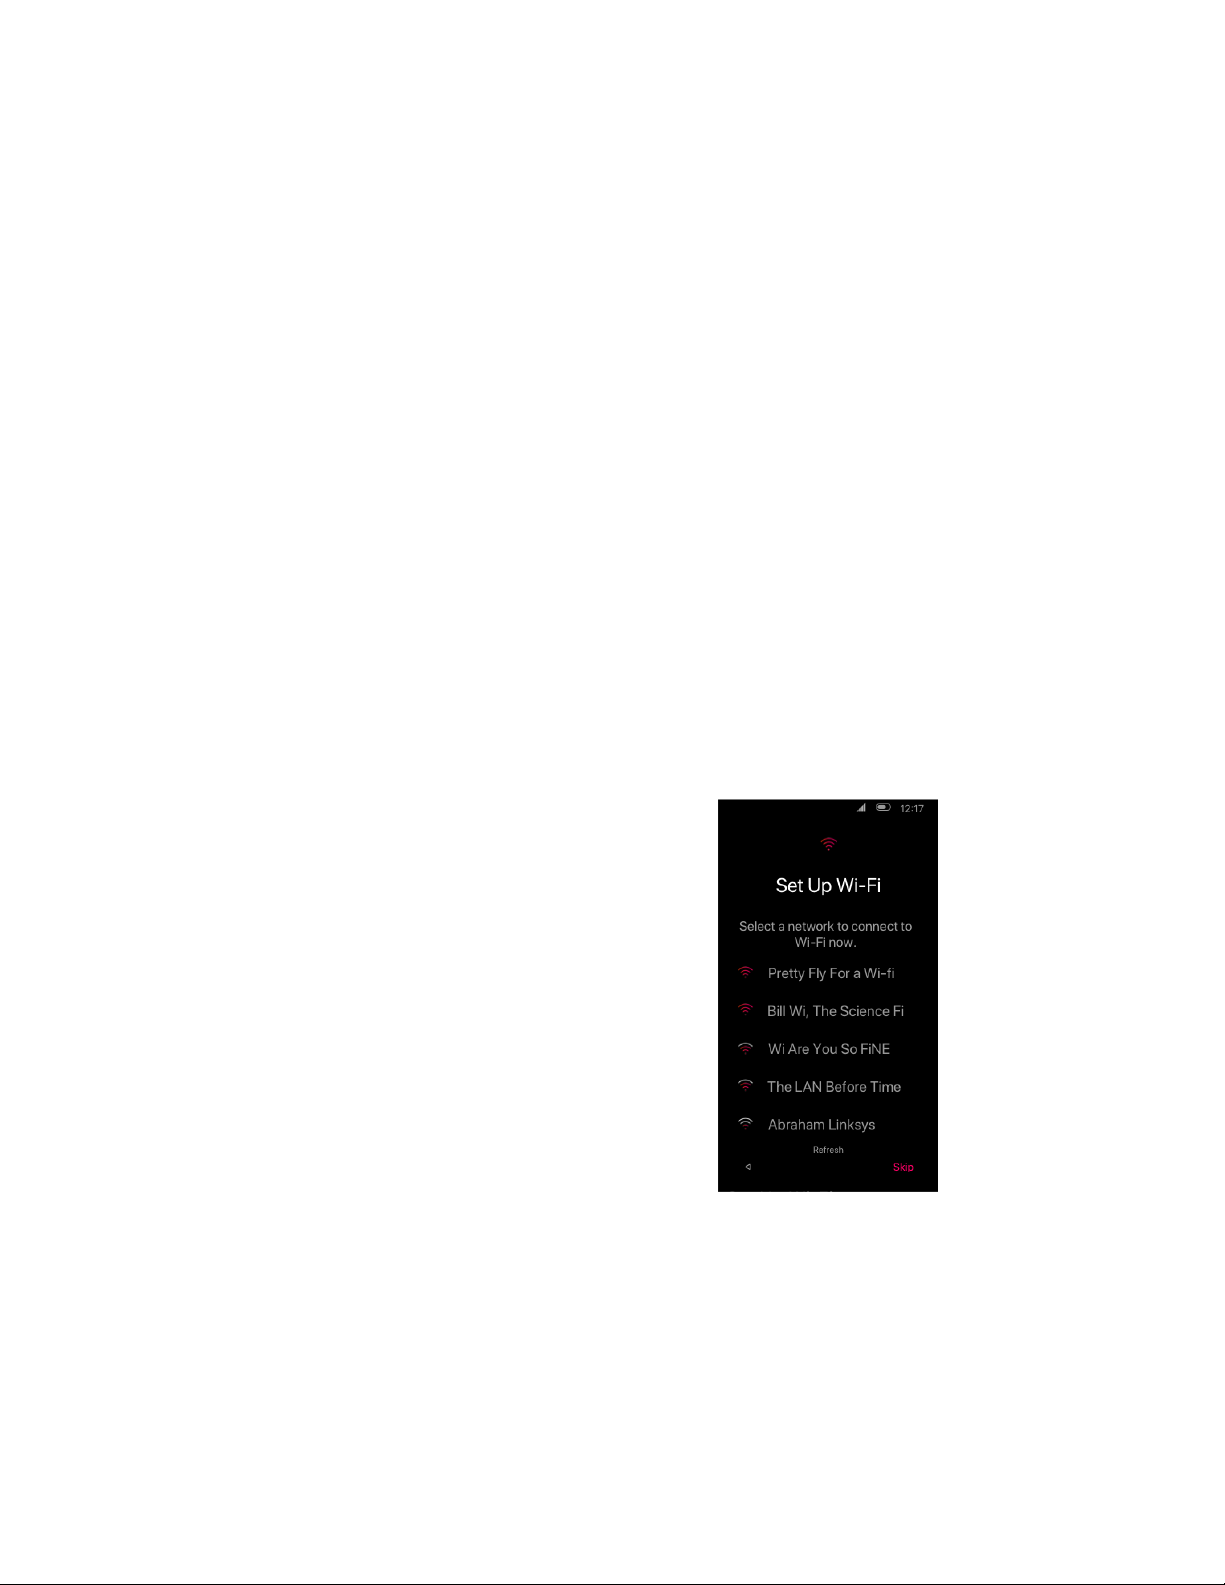
Connect to Wi-Fi
Follow the on-screen directions to find and connect to your desired
Wi-Fi network. Or tap Skip.
A walkthrough for setting up your Palm for the first time
Charge the Battery
Your Palm comes with a USB Type-C battery charger. To charge the battery:
1. Connect the charging head to the USB cable.
2. Plug the charging head into a standard wall outlet.
3. Insert the USB Type-C cable into the charging port on the bottom of your Palm.
You are able to use the device while it is charging. Once it is fully charged, disconnect your Palm from the charger.
Turn Your Palm On or Off
Turn it on by pressing and holding the Power button until the screen turns on.
Turn it off by pressing and holding the Power button and tapping Power off.
Setup Wizard
When turning your Palm on for the first time, the Setup Wizard guides you through the initial setup. Choose a language, connect to a WiFinetwork, set up your accounts, transfer data from another device, and more.
Sync Your Palm
Copy data from another device or from the cloud. If you want to start your device without any previous data, ignore this section.
Sync data from the cloud
1. Tap Copy your data from the Sync Your Palm screen.
2. On the next screen, tap A backup from the cloud.
3. You will be brought to a Google sign in screen. Input your Google credentials and accept the terms of service and privacy policy
by tapping “I Agree”.
4. After the device retrieves your account information, you will be prompted to choose which device backup you wish to use. Tap
the desired backup then choose what content you would like to transfer. You can choose to sync everything from that backup or
pick specific apps, sms messages, call history, or device settings to sync.
Page 4

Sync data from an Android
1. On your other Android device, go to your Google settings app.
2. Tap Set up nearby device.
3. Touch P1V (289) on the list and follow the instructions on the screen.
Sync data from an iPhone
Visit android.com/switch for instruction on copying data from an iPhone.
Setting up as new
After setting up Wi-Fi, you will be prompted to choose your date and time settings. Choose your time zone and enter your current date and
time.
On the next screen enter your name for personalization.
Set up Google Assistant
Follow the on-screen instructions for setting up Google Assistant. You will be asked to speak into the microphone to set up your voice with
Google Assistant. Or tap Skip.
Page 5

Select your Security
Face Recognition
Palm uses the front facing camera to scan your face and unlock your
device. From the Protect Your Palm screen, choose Face
Recognition.To set up Face Recognition, you will first need to set up
a secondary unlock method in either the pattern or the PIN. Once the
pattern or PIN is set up, a screen with a circle in the middle will come
up and you will be asked to place your face within the circle, 12-24
inches from the device. Hold your position until the device has a
chance to scan and register your face to the software.
You can now choose to turn on Face Recognition or skip.
Pattern
From the Protect Your Palm screen, select Pattern. A screen with 9
dots will appear. Using your finger in one motion, draw over the dots
a pattern you would like to use to unlock your device. Tap Next. You
will be asked to confirm the pattern on the next screen. Tap Confirm.
On the following screen you can choose to use the pattern every time
you unlock your device or not.
PIN
From the “Protect Your Palm” screen, select PIN. Enter your
desired PIN. Tap Next. Confirm PIN on the next screen and tap
Confirm. On the following screen you can choose to use the
pattern every time you unlock your device or not.
There are 3 types of security to prevent others from accessing your Palm without your permission. Face recognition, a pattern unlock or a
PIN are used to protect your Palm. Select one of these or tap skip.
Navigation
Page 6

The Palm has a navigation bar on-screen buttons for back, home, and task switcher. You have the option to pin these buttons to the bottom
of the screen, or hide them to maximize the space on the screen. On the Navigation screen, select either “Pin keys to screen” or “Auto-hide
keys.” Tap next.
Life Mode
Life Mode allows you to minimize distractions by silencing most apps and notifications. With Life Mode on, everything will be silenced
other than calls and messages. You can also configure which apps are not muted. Turn this on or tap skip.
NumberShare Setup
If you are using your Palm as a second cellular device, NumberShare allows you to have the same phone number for both devices. If your
other device is an Android, tap Android Setup. If you have an iPhone, tap iPhone Setup. Or tap Skip.
Android User Setup
Enter your phone number and tap Send SMS to receive a confirmation code through SMS. Enter the code you receive on the next screen.
Once you have done this, your Palm is setup with NumberShare. Tap continue.
iPhone User Setup
In order for your messages to be in sync between your Palm and iPhone, you must have iMessage set to SMS only. After you select
“iPhone Setup,” go to your iPhone settings > Messages >iMessage “off.” Then turn off FaceTime by going to your iPhone
settings >FaceTime>FaceTime “off”. You next must download the Verizon Message+ app on your iPhone and complete the setup.
On your Palm, tap continue and input your phone number on the next screen and tap Send SMS. You will receive a confirmation number
through SMS. To complete the activation of NumberShare, input the confirmation code.
Security and Privacy
Verizon will protect your Palm from viruses, malware, and other threats for free. Read through the Terms and Conditions and tap Accept or
Skip if you would like to opt out of the service.
Verizon Account and Cloud
If you would like to manage your Verizon account, tap My Verizon. If you would like to manage your Verizon Cloud, tap Verizon Cloud.
On the next screen, select what content to backup onto Verizon Cloud and tap Next. Choose whether to backup over Wi-Fi network or
cellular network.
You’re all set up!
Page 7

Lock and Unlock Your Palm
Lock your device:Press the Power button.
Unlock your device:Press the Power button and then swipe your finger across the screen.
See “Screen Lock” on page ___ to set up a secure screen lock.
Add a Google Account
Use your Google account to access all of the Android system features.
1. Scroll to the bottom of the Home screen and tap Settings.
2. Tap Users & Accounts > Add account > Google.
3. Input your credentials to sign in to your account.
Add an Email Account
For email addresses that work with the Gmail app:
1. Scroll to the bottom of the Home screen and tap Settings.
2. Tap Users & Accounts > Add account > Exchange.
3. Input your credentials to sign into your email account.
For any email accounts that do not work with the Gmail app, go to the Google Play store and download another email client.
Page 8
Familiarize Yourself With Your Palm
Navigation
Your device has a touch button below the screen to quickly navigate around the
device. To navigate:
Single-tap: Go back
Double-tap: Go home
Long-press: Open task-switcher
Alternatively, you have the option to have a static navigation bar at the bottom of
your screen with buttons to go home, go back, or launch the task switcher.
To edit navigation settings:
1. On the home screen tap Settings > Display
2. At the bottom tap Advanced> Navigation Bar
Fleksy Keyboard
Text, symbols, emojis, and more can be entered
using the Fleksy keyboard.
Palm utilizes common Android features as well as some unique features. Find out how to use
these features and navigate your Palm.
Command Options
Use these command options shared by all apps to fully utilize your device‟s features.
Menu: Tap to pull up a menu of available options for the app.
More options: Tap to view more menu options for an app.
Share: Tap to share an item in another app.
Edit: Tap to edit the item(s) on the screen.
Delete: Tap to delete items you select on the screen.
On/Off: Tap to turn a setting on or off.
Touch Button
The Palm has a touch button on the bottom of the device for quick navigation. Single-tap: Go back
Double-tap: Go home
Long-press: Open task-switcher
Page 9
To display the Fleksy keyboard, tap a text field.
Tap 123 to insert numbers and symbols.
Keyboard Features
The following options are available to you on the Fleksy keyboard:
Predictive Text: Predictive text displays word options at the top of
the keyboard when you start typing.
Emoji: Insert an emoticon.
Voice input: Use Fleksy voice input. To access, tap 123 then
Voice Input to the left of the space bar.
Other Fleksy Features
Stickers: Add illustrated stickers.
GIFs: Add animated GIFs.
Memes: Quickly search and share memes
YouTube: Search and share video links
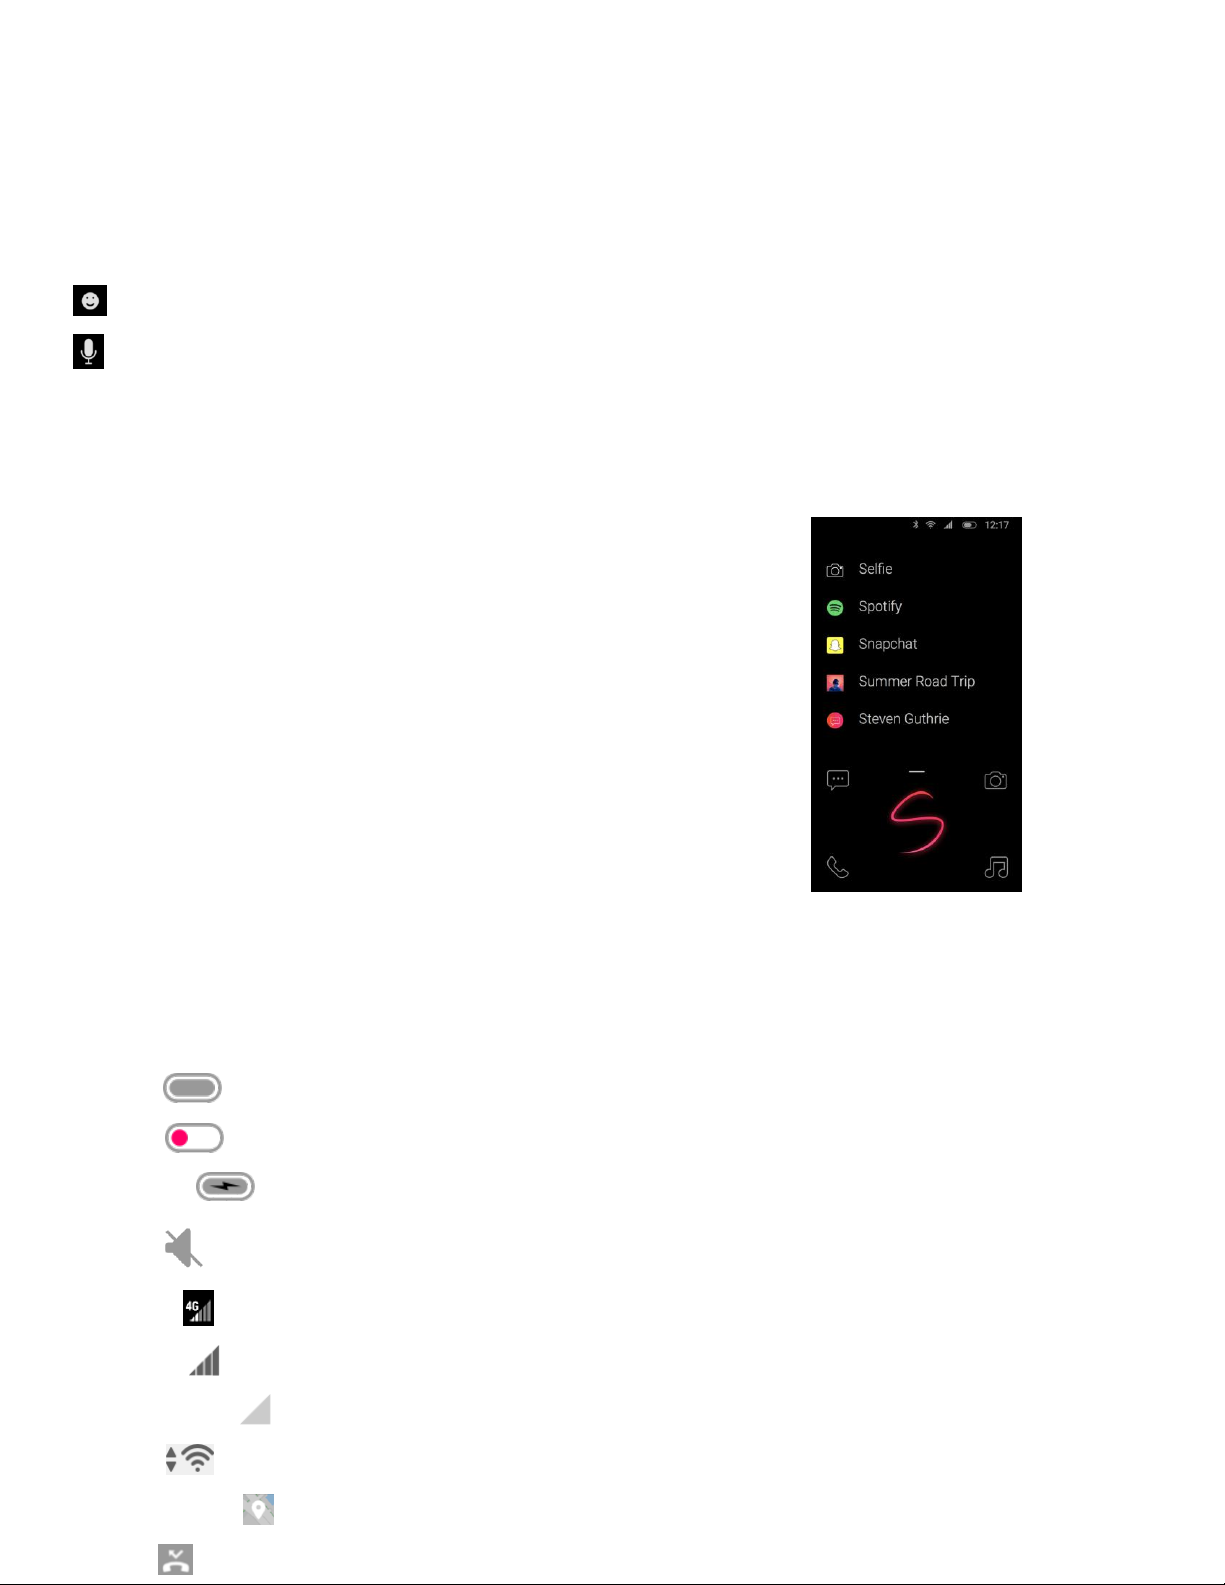
Gesture Pad Search
Access any quick action on the Palm with a swipe of the finger on the Gesture pad. This
feature is accessible from the lock screen. To display the Gesture Pad, swipe your finger up
from the bottom of the lock screen.
How to use:
Draw a letter with your finger in the Gesture Pad. A list of apps, quick actions, and specific
settings whose first letter is the letter you drew will be displayed. Choose an item to perform
the desired action.
Example: If you draw an “S” on the Gesture Pad to quickly find Settings, SMS Sarah, Selfie
mode for camera, and other actions are displayed.
Status Bar
The Status bar persists at the top of your screen to provides device information.
Status Icons:
Battery full
Battery low
Battery charging
Mute mode
4G LTEactive
Signal strength
Network not available
Wi-Fi active
Location service active
Missed call
Page 10

Notification Panel
The Notification Panel is accessible from any screen. To access:
1. Drag the Status bar down to display the Notification panel.
2. Swipe down the list to see notification details.
Tap a notification to open it.
Drag a notification left or right to clear it.
To clear all notifications, tap Clear under the notifications.
3. Swipe the Notification Panel up or tap the Touch to return to your previous screen.
Quick Settings
Quick Settings allows you access to certain device functions quicker than using the Settings menu. To access:
1. Display the Notification panel by dragging the Status Bar down.
2. Drag the screen down a second time to view Quick Settings.
Tap a setting to toggle it on/off.
Tap and hold a setting to go to view more related settings in the main settings menu.
3. Drag the screen upward to close Quick settings.
Lock Screen
Secure Your Palm with A Screen Lock
Lock Screen Features
Camera- Open the camera from the lock screen.
Messaging- Open messaging from the lock screen.
Gesture Pad- Swipe up from the bottom of the screen to access Gesture Pad.
Lock Screen Message- Include a message to display on the lock screen. You can change it in the settings menu.
Make an Emergency Call from the Lock Screen
You can make an emergency call even if the device is locked, allowing anyone to use your device to call for help in an emergency. To
access emergency calling from the lock screen:
1. Swipe the screen up to display the Emergency call feature.
2. Tap Emergency Call to open a dial pad.
3. Dial the emergency number (911 in North America) and tap Call .
Personalize Your Palm
Folders
Organize your app shortcuts into folders on your Home screen and app drawer.
For more information, see “App Folders” on page ___
Wallpapers
Choose a personal picture or a preloaded picture to set as your lock screen background. To access wallpaper settings:
1. Scroll to the bottom of the Home screen and tap Settings.
2. Tap Display > Wallpaper.
3. Choose from your photos or preloaded wallpapers.
4. Tap Set lockscreen wallpaper.
Page 11

Widgets
You can add widgets, which are app extensions that run on the Widget Panel. To access your widgets, swipe the Home screen left.
To add a widget to your Palm:
1. On the Home screen, scroll to the bottom and tap Manage.
2. Swipe the screen left and turn widgets on.
3. Tap Add widget.
4. Drag a widget to an open spot on the widget panel, and release it.
5. Tap the touch button to stop managing.
To remove a widget:
1. On the Home screen, scroll to the bottom and tap Manage.
2. Swipe the screen left to reveal the Widget Panel.
3. Touch and hold a widget to activate.
4. Drag to the “X” to delete.
5. Tap the touch button to stop managing.
Page 12

Apps
Access apps and learn how to change the way apps are displayed on the Home
screen, and organize them into folders. Familiarize yourself with apps that
come preloaded on your Palm.
Each app shortcut has its own customizable action menu. To access an action menu:
1. Find an app on the Home screen or scroll down to the app drawer.
2. Long-press the app shortcut to bring up its quick menu.
3. Tap a Quick Action to take in the app.
4. The app will launch with the desired action started.
Customize an Action Menu
You can add or remove actions from a quick menu.
Add an Action:
1. Find an app on the Home screen or scroll down to the app drawer.
2. Long-press the app shortcut to bring up its quick menu.
3. Tap Manage ( ) > Add.
4. Tap a quick action from the list to add to the quick menu.
5. Tap the touch button to return to the quick menu.
Remove an Action:
1. Find an app on the Home screen or scroll down to the app drawer.
2. Long-press the app shortcut to bring up its quick menu.
3. Tap Manage ( ).
4. Swipe a quick action to the left and tap Delete.
5. Tap the touch button to return to the quick menu.
Page 13

Handle Apps
All app shortcuts are displayed either on the Home screen, or below the Home screen in the app drawer.
Access and organize your app shortcuts.
Access Apps
Apps are accessible on the Home screen or app drawer.
1. Find an app on the Home screen, or swipe up to view the app drawer.
2. Tap an app shortcut to launch the app.
To return to the Home screen, double-tap the touch button.
Sort Apps
Change the position of app shortcuts on your Home screen and app drawer.
1. On the Home screen, scroll to the bottom and tap Manage.
2. Press and hold an app to activate, then drag to rearrange app shortcut location. You can drag them from the App drawer
to the Home screen and vice versa.
3. When finished, tap back or „Exit‟ to escape Manage mode.
App Folders
Use folders to organize app shortcuts on the Home screen or in the App drawer.
To create a folder:
1. On the Home screen, scroll to the bottom and tap Manage.
2. Drag an app shortcut on top of another app shortcut and hold until it is activated.
3. Drop the app shortcut to create an app folder.
4. Tap the touch button to close the folder.
Name the folder: Tap Unnamed and enter the name of the folder.
Add app shortcuts to a folder:
1. On the Home screen, scroll to the bottom and tap Manage.
2. Drag the app shortcuts you want into the folder.
3. Tap Exit on the Home screen to stop managing.
Remove app shortcuts from a folder:
1. On the Home screen, scroll to the bottom and tap Manage.
2. Tap the folder you want to remove app shortcuts from.
3. Drag an app shortcut upward until the Home screen displays, and then drop it in the desired location.
4. Tap Exit on the Home screen to stop managing.
Remove a Folder
1. On the Home screen, scroll to the bottom and tap Manage.
2. Tap a folder.
3. Drag app shortcuts out of the folder until the folder is removed.
Tap Exit on the Home screen to stop managing.
Page 14
Capture Photos
Capture photos with your Palm.
1. On the Home screen, Tap Camera .
2. Look at the screen to aim the camera. The following options are available to you:
Focus: Tap the screen.
Video mode: Swipe the screen left to switch to Video mode.
Switch camera: Tap Switch to switch between front and rear cameras.
Flash: Tap Flash ( )on the top of the screen to turn flash On/Off.
HDR: Tap HDR on the top of the screen to turn HDR On/Off.
Filters: Tap Filter ( ) on the top of the screen to choose a filter.
Square photos: Tap Square on the top of the screen to use a 1:1 aspect ratio.
Settings: Tap Mode ( ) on the top of the screen, and then tap Settings to change Camera settings.
3. Tap Capture ( )to take a photo. Press and hold Capture to take rapid photos.
Record Videos
Capture videos with your Palm.
1. On the Home screen, Tap Camera .
2. Swipe the screen left or tap Mode ( ) and select Video.
3. Tap Record ( ) to start recording a video.
To pause recording, tap Pause ( ).
To continue recording, tap Resume ( ).
4. Tap Stop ( ) when you are done recording.
Shooting Modes
Choose from several shooting modes the Camera app provides.
1. On the Home screen, Tap Camera .
2. Tap Mode ( )to see these available shooting modes.
Rear camera
Photo: Take a photo
Video: Take a video
Manual: Manually set the ISO sensitivity, exposure value, white balance, brightness, and focus.
Pano: Create a wide panoramic image.
Instant collage: Create a quick collage of photos. Snap a couple photos and this mode will put them together in one
image for you.
Light trace: Capture light, Capture movement, and Draw light allow you to take artistic photos of moving light, water,
and people.
Front camera
Photo: Take a selfie shot and apply effects, such as filters and an airbrushed effect.
Video: Take a video and apply filters from your front-facing camera.
Page 15
Instant collage: Take a couple photos from your front-facing camera and instantly put them together for a collage.
Camera Settings
Configure your Palm‟s Camera app settings.
1. On the Home screen, Tap Camera .
2. Tap Mode ( ) > Settings. The following options are available:
Size: Set the resolution for your photos. More memory is required for higher resolution photos.
Video quality: Set your video quality up to 1080p. More memory is required for videos of higher quality.
Video stabilization (EIS): Keep the focus steady when the camera is moving.
Grid: Turn a 3x3 grid On/Off to line up a subject on the photo.
Media storage: This displays where your photos and videos are stored.
Save location information: Save the location information of where you took the photo.
Shutter sound: Turn the shutter sound On/Off for when a photo is captured.
Reset settings: Restore Camera settings to factory default.
Access Photos
All photos, videos, and screenshots taken or downloaded onto your Palm are stored in Google Photos. To access Photos:
1. On the Home screen, scroll down to access apps.
2. Tap Google Photos ( ).
Screenshots
Capture an image of your screen. A Screenshots album in the Google Photos app will automatically be created after capturing your first
screenshot. To take a screenshot:
1. From any screen, drag your finger down from the Status bar to display the Notification panel, then drag the screen down again to
display Quick Settings.
2. Tap Screenshot.
To view the image, drag the Status bar down and tap the screenshot notification. You can share or delete the screenshot from the
Notification panel as well.
To access saved screenshots:
1. On the Home screen, Tap Google Photos ( ).
2. Tap Menu on the top left corner of the screen.
3. Tap Device Folders > Screenshots.
Page 16

Clock
The Clock app offers clocks, alarms, a timer, and a stopwatch. To manage these features:
1. Tap Clock on the Home screen or app drawer.
2. Tap a tab to use one of the following features:
Alarm
Set alarms, and set when and how they will go off. To set an alarm:
1. Tap Clock on the Home screen or app drawer.
2. Tap Add alarm (+).
3. Select the time for the alarm and tap OK.
4. Go to the newly created alarm and tap these options to configure:
Repeat: Choose which days of the week to repeat the alarm.
Alarm sound Choose a sound to play for the alarm.
Vibrate: Choose to allow vibration during the alarm.
Label: Enter a name for the alarm.
Dismiss or Snooze an Alarm
When the alarm goes off at its set time, several options will be displayed on the screen.
1. To stop the alarm:ap „Dismiss‟ on the alarm notification.
2. To postpone the alarm, tap „Snooze‟ on the alarm notification.
Enabling and Disabling an Alarm
To turn an alarm On/Off:
1. Tap Clock on the Home screen or app drawer.
2. Tap Alarm.
3. Tap the switch next to an alarm to turn it On/Off.
Delete an Alarm
To delete an alarm:
1. Tap Clock on the Home screen or app drawer.
2. Tap Alarm, and then tap the alarm you wish to delete.
3. Tap Delete.
Clock
The clock tab displays the current time in your specific time zone. You also have the option of displaying the time for cities around the
world.
1. Tap Clock on the Home screen or app drawer.
2. Tap Clock.
3. To add the time from another city in the world, tap the globe icon at the bottom.
4. Select a city and tap Back.
Timer
To use the timer:
1. Tap Clock on the Home screen or app drawer.
Page 17

2. Tap Timer.
3. Use the keypad to set the length of the timer.
4. Tap Start to begin the timer.
Tap Pause to pause the Timer. Tap Play to resume the timer.
Tap Delete to stop and reset the Timer.
Stopwatch
Use the stopwatch to time events down to a hundredth of a second. To access the stopwatch:
1. Tap Clock on the Home screen or app drawer.
2. Tap Stopwatch.
3. Tap Start to begin timing.
Tap Lap to measure lap times.
4. Tap Pause to end timing.
Tap Play to continue timing after stopping the stopwatch.
Tap Reset to reset the Stopwatch.
Tap Share to share your time on another app.
Page 18
Contacts
Manage your device and account contacts. You have the ability to sync your contacts with your Google Account. To learn more, see “Add
Account” on page ___
Add a Contact
To add a new contact:
1. Tap Contacts on the Home screen or app drawer.
2. Tap Add (+), and then tap the following fields to enter information:
Tap the Contact photo at the top to assign a picture.
Enter basic contact information such as name, phone number, and email. We suggest that when you add phone numbers to your contact list,
you add the area code + the 7 digit number.
Tap More fields to enter more detailed contact information.
3. Tap Save ( ) in the upper right corner to save.
Edit a Contact
Edit contacts by adding, removing, or changing information stored in a contact. To edit a contact:
1. Tap Contacts on the Home screen or app drawer.
2. Tap a contact.
3. Tap Edit ( ) on the top of the screen.
4. Tap any field to change contact information.
5. Tap Save ( ) on the top right corner to save.
Link or Unlink Contacts
Link multiple contacts into one contact if you have more than one entry for the same contact. To link a contact:
1. Tap Contacts on the Home screen or app drawer.
2. Tap a contact.
3. Tap More Options , and then tap Link.
4. Tap which other contact you want to link to this contact.
To unlink contacts:
1. Tap Contacts on the Home screen or app drawer.
2. Tap a linked contact.
3. Tap More Options > View linked contacts.
4. Tap Unlink and confirm.
Favorites
Mark contacts as Favorites to access them easier in Contacts and other apps. Favorites are displayed at the top of the contact list. To add a
Favorite:
1. Tap Contacts on the Home screen or app drawer.
2. Tap a contact.
3. Tap Favorite ( ) to make contact a favorite.
To remove the contact from Favorites, open the contact and tap Favorite ( ) again.
Share a Contact
Page 19

Share a contact through various apps. To share a contact:
1. Tap Contacts on the Home screen or app drawer.
2. Tap a contact you want to share.
3. Tap More Options ( ), and then tap Share.
4. Choose which app to share the contact through.
Delete a Contact
To delete contacts:
1. Tap Contacts on the Home screen or app drawer.
2. Tap Delete .
3. Select which contacts you want to delete, and then tap Ok on the bottom of the screen.
Contacts Settings
Adjust settings for using the Contacts app. To manage Contact settings:
1. Tap Contacts on the Home screen or app drawer.
2. Tap Menu on the upper left corner of the app.
3. Tap Settings to view and adjust settings for the Contacts app.
Make a Call from Contacts
You can make a call through the Contacts app. To call a contact:
1. Tap Contacts on the Home screen or app drawer.
2. Tap a contact, then tap their phone number to call.
Send a Text from Contacts
You can also send a text message through the Contacts app. To text a contact:
1. Tap Contacts on the Home screen or app drawer.
2. Tap a contact, then tap Message to send a text to them.
Downloads
Manage your downloaded photos, videos, audio files, and other files from the Downloads app.
1. On the Home screen, swipe up or down to access Apps.
2. Tap Downloads .
To view and manage downloads of specific file types, tap Menu . Tap which type of file you would like to view and manage.
To search downloads, tap Search .
Page 20

Messaging
Messaging allows you to send, receive, and manage your text messages.
Create and Send Messages
Send messages of various types to your friends. To create and send a text message:
1. Tap Messaging on the Home screen or app drawer.
2. Tap New message (+).
Tap the To: field to enter a contact name or a mobile phone number.
Tap the Send message field and enter your message.
Tap Attach (+ ) to attach an item, such as a picture, video, or audio recording.
Tap Emoji to insert emojis into your message.
Delete a Conversation
Delete an entire conversation with another person on your Palm.
1. Tap Messaging on the Home screen or app drawer.
2. Long press a conversation you want to delete, tap Delete , and confirm.
Delete a Message
Delete individual messages in a conversation.
1. Tap Messaging on the Home screen or app drawer.
2. Tap the conversation from which you want to delete a message.
3. Long press a message you want to delete, tap Delete , and confirm.
Archive Conversations
1. Tap Messaging on the Home screen or app drawer.
2. Long press a conversation you want to archive and tap Archive.
Turn Off Notifications for a Conversation
1. Tap Messaging on the Home screen or app drawer.
2. Long press a conversation you want to mute and tap Mute.
Read a Message
A New Message ( ) indicator will be displayed in the status bar, as well as a notification in the Notification Panel when you receive a
new message. To open a new message:
Swipe the Status Bar downward and tap the new message notification.
or
Tap Messaging on the Home screen or app drawer, and then tap the conversation with a new message.
Reply to a Message
Page 21

To reply to a message:
1. Tap Messaging on the Home screen or app drawer.
2. Tap a conversation to view messages.
3. Tap the Send message field to type a message.
4. Tap Send .
Page 22

Phone
Call Someone
Make a call using the Phone app.
1. Tap Phone on the Home screen.
2. You can make a call in the following ways:
Dial Pad : Tap to dial a number to call.
Favorites: Tap the Favorites tab, and then tap a favorite to call.
Recents: Tap the Recents tab, and then tap a recent number to call.
Contacts: Tap the Contacts tab, and then tap a contact to call. You can search for a contact using the search bar or scroll through your
contact list to find a contact.
Answer a Call
A caller‟s phone number and name (if they are a saved contact) are displayed on the screen when you are receiving a call.
To answer a call, tap Answer on the incoming call screen.
End a Call
To end a call, tap End on the call screen.
Decline a Call
As the device is ringing, you can decline the call by tapping Decline on the incoming call screen.
Decline with a Message
To decline a call with a text message response, tap Decline and then Send Message on the bottom of the screen.
In-Call Actions
There are a number of options once you are on a call, including adjusting call volume, switching to speakerphone, conference calling, and
more.
Call Volume
Swipe the Status Bar down to reveal the Notification Panel, and then swipe the screen down again to reveal Quick Settings. Drag the
Volume slider to adjust the volume of the call.
Speaker, Bluetooth, or Phone
Use your device‟s speaker or a Bluetooth headset to listen to calls.
To toggle between Speaker, Bluetooth, and Phone, tap Speaker or Bluetooth .
Multitasking
Page 23

During a call, double tap the touch button to access the Home screen, where you can open another app.
Return:Access the Notification panel by dragging the Status Bar down, and then tap the call notification.
End Call: If you are off the active call screen, end the call by swiping the Status Bar down and tapping End ( ) on the Notification Panel.
Conference Calls
You can make multiple calls at once and conference them together if your network plan allows. To create a conference call:
1. Call someone through the Phone app.
2. On the active call screen, tap Add call to make a second call.
3. Enter the new number and tap Call . Once the call is answered:
Tap the On hold number to switch between the two calls.
Tap Merge to create a Conference call.
Tap Manage Conference call to add more people to the conference call.
Wi-Fi Calling
Call someone over a Wi-Fi network. Wi-Fi Calling is provided by your wireless network provider. To turn Wi-Fi Calling On/Off:
1. Make sure you are connected to a Wi-Fi network.
2. Tap Phone on the Home screen.
3. Tap More Options > Settings > Calls > Wi-Fi calling.
4. Tap the switch to turn Wi-Fi calling On/Off.
You will now make and receive calls over Wi-Fi if your signal strength is weak or if you have no coverage from your wireless provider.
Recent Calls
Recent Calls displays your recent calls made, received, and missed. To access:
1. Tap Phone on the Home screen.
2. Tap the Recents tab to display calls.
Call History: A longer list of calls can be found by tapping Phone > More Options > Call History.
Save a Contact from a Recent Call
Use recent call information to create a contact or update your Contacts list.
1. Tap Phone on the Home screen.
2. Tap the Recents tab.
3. Tap the call that contains the information that you want to save to your Contacts list.
4. Tap Details.
5. Tap Create contact.
If you want to replace the number for an existing contact, tap Update existing.
Clear Call History
1. Tap Phone on the Home screen.
2. Tap More Options > Call History.
3. Tap More Options > Clear Call History, and confirm.
Blocked Numbers
Page 24

Blocked numbers will not be able to call or message you. To block a number:
1. Tap Phone on the Home screen.
2. Tap the Recents tab.
3. Long press the caller you want to block.
4. Tap Block number, and confirm.
To manage your Blocked numbers:
On the Home screen, tap Phone > More options > Settings > Call blocking.
Speed Dial
To assign a contact or number to speed dial:
1. Tap Phone on the Home screen.
2. Tap More options > Settings > Speed dial settings. Here you will find the assigned speed dial numbers.
3. Tap an unassigned number.
4. Type in a number, or tap Contacts to assign a contact to the number.
To delete: Tap an assigned number and tap Delete.
Call Someone Using Speed Dial
1. Tap Phone on the Home screen.
2. Tap Dial Pad if it is not displayed.
3. Long press the Speed dial number to call.
Phone Settings
Manage settings for the Phone app.
1. Tap Phone on the Home screen.
2. Tap More options > Settings.
3. Tap a setting to adjust.
Make an Emergency Call
You are able to call the emergency number in your area, even if you haven‟t activated your Palm. To make an emergency call:
1. Tap Phone on the Home screen.
2. Dial the emergency number (911 in North America) and tap Call .
Page 25

Google Apps
Your Palm comes with these apps from Google. Sign into your Google account to fully utilize these apps. Visit google.com to learn more.
Chrome
You can browse the Internet with Chrome. All of your bookmarks, passwords, and history are carried over from your Google account. To
access Chrome:
1. On the Home screen, swipe up or down to access Apps.
2. Tap Chrome.
To learn more, go to support.google.com/chrome.
Drive
You have access to your Google Drive account through your Palm. To manage Drive files:
1. On the Home screen, swipe up or down to access Apps.
2. Tap Drive.
To learn more, go to support.google.com/drive.
Duo
Use Google‟s video calling service. To access Duo:
1. On the Home screen, swipe up or down to access Apps.
2. Tap Duo.
To learn more, go to support.google.com/duo.
Gmail
Use Gmail to send and receive email. To access Gmail:
1. On the Home screen, swipe up or down to access Apps.
2. Tap Gmail.
To learn more, go to support.google.com/mail.
Google
Search the Internet with the Google app. Google personalizes your experience by displaying content you may be interested in, on the
Google feed. To access Google:
1. On the Home screen, swipe up or down to access Apps.
2. Tap Google.
3. Enable your feed the first time you open the app by following the prompts.
Maps
Use Google Maps to search directions to local businesses or input an address. Make sure location services are turned On. See “Location”
on page ___ to learn more.
To access Maps:
1. On the Home screen, swipe up or down to access Apps.
Page 26

2. Tap Maps.
To learn more, go to support.google.com/maps.
Photos
Use Google Photos to store your photos and videos on your Google account.
1. On the Home screen, swipe up or down to access Apps.
2. Tap Photos.
To learn more, go to support.google.com/photos.
Play Music
Use Google‟s music service to store, stream, and download music.
1. On the Home screen, swipe up or down to access Apps.
2. Tap Play Music.
To learn more, go to support.google.com/music.
Play Store
Use Google Play Store to download apps, games, music, magazines, and more.
1. On the Home screen, swipe up or down to access Apps.
2. Tap Play Store.
To learn more, go to support.google.com/play.
Page 27

Verizon Apps
Your Palm comes with these apps preloaded. For more information go to verizonwireless.com.
Verizon Cloud
Store and backup your data on Cloud.
1. On the Home screen, swipe up to access the app drawer.
2. Tap the Verizon Cloud Icon.
My Verizon
Manage your Verizon account with My Verizon.
1. On the Home screen, swipe up to access the app drawer.
2. Tap the My Verizon icon.
Caller Name ID
You can identify unknown callers by subscribing to Caller Name ID.
1. On the Home screen, swipe up to access the app drawer.
2. Tap the Caller Name ID icon.
Page 28

Settings
Manage your Palm‟s connections and settings.
Page 29

Network & Internet
Configure your Wi-Fi and network connections.
Wi-Fi
Connect to a Wi-Fi Network
1. Scroll to the bottom of the Home screen and tap Settings.
2. Tap Network & Internet > Wi-Fi.
3. Tap the switch to turn Wi-Fi on. Your device will scan for Wi-Fi networks in range.
4. Tap a network to connect to it. If it is a secured network, enter the network password.
Add a Network
Connect to a hidden network
1. Scroll to the bottom of the Home screen and tap Settings.
2. Tap Network & Internet > Wi-Fi, and then tap the switch to turn Wi-Fi on.
3. Tap Add network below the list of networks.
4. Enter the Wi-Fi network‟s information:
Network name: Enter the SSID.
Security: Choose a security option.
Password: Enter the network‟s password.
Advanced options: Enter Proxy and IP settings.
5. Tap Save.
Wi-Fi Preferences
Access advanced Wi-Fi settings, such as open network notifications, Wi-Fi Direct, and more.
1. Scroll to the bottom of the Home screen and tap Settings.
2. Tap Network & Internet > Wi-Fi, and then tap the switch to turn Wi-Fi on.
3. Scroll down and tap Wi-Fi preferences > Advanced.
Open network notification: Notify when a high-quality public network is available.
Switch to mobile data automatically: Connect automatically to a mobile network connection when the Wi-Fi connection is unstable. When
the Wi-Fi signal is strong, it will switch back to Wi-Fi connection.
Show Wi-Fi pop-up: When opening apps, indicate when Wi-Fi is available.
Install certificates: Install authentication certificates.
Network rating provider: Choose your network rating provider.
Wi-Fi Direct:
WPS Push Button: Connect to a Wi-Fi network by pressing the WPS button on a router.
WPS PIN entry: Connect to a Wi-Fi network by entering your WPS PIN.
Your MAC and IP addresses are displayed at the bottom.
Mobile Network
Configure your Palm‟s mobile network and data connections.
Page 30

1. Scroll to the bottom of the Home screen and tap Settings.
2. Tap Network & Internet > Mobile Network. The following settings are listed:
Mobile data: Tap to turn access to data On/Off.
Roaming: Tap to turn access to data when roaming On/Off.
Data usage: Your current monthly data usage is listed here.
Advanced: Tap Advanced to access more mobile network settings.
Preferred network type: Choose your preferred mobile network type. LTE is recommended.
Automatically select network: Your Palm can automatically select a network to connect to. Tap to turn On/Off.
Network
Access Point Names
Data Usage
Manage your data usage settings.
1. Scroll to the bottom of the Home screen and tap Settings.
2. Tap Network &Internet > Data usage. Your mobile data usage is displayed at the top.
Data Saver
Turn Data Saver on, and give certain apps unrestricted access to background data.
1. Scroll to the bottom of the Home screen and tap Settings.
2. Tap Network & Internet > Data usage > Data saver.
3. Tap the switch to turn Data saver On/Off.
To allow unrestricted data for selected apps, tap Unrestricted data, and tap the switch next to each app.
Mobile data
Configure mobile data settings. To turn your mobile data On/Off:
1. Scroll to the bottom of the Home screen and tap Settings.
2. Tap Network & Internet > Data usage.
3. Tap the Mobile data switch to turn On/Off.
Mobile data usage
To view mobile data usage by app:
1. Scroll to the bottom of the Home screen and tap Settings.
2. Tap Network & Internet > Data usage.
3. Tap Mobile data usage.
Billing cycle, Data Warnings, and Data Limits
Set the billing cycle reset day as well as data warnings and limits.
1. Scroll to the bottom of the Home screen and tap Settings.
2. Tap Network & Internet > Data usage > Billing cycle.
3. Tap the following to adjust:
Billing cycle: Set the billing cycle reset day.
Set data warning: Turn data warning On/Off. You will receive a warning when a set amount of mobile data is used.
Data warning: Set a data usage amount for the data warning.
Set data limit: Turn data limit On/Off. Your mobile data will be turned off when this limit is reached.
Data limit: Set a data usage amount for the data limit.
Page 31

Wi-Fi data usage
View your Wi-Fi data usage by app.
1. Scroll to the bottom of the Home screen and tap Settings.
2. Tap Network & Internet > Data usage.
3. Tap Wi-Fi data usage.
Network Restrictions
Restrict apps running in the background from using data on selected Wi-Fi networks.
1. Scroll to the bottom of the Home screen and tap Settings.
2. Tap Network & Internet > Data usage > Network restrictions.
3. Tap each network to set its restrictive status.
Tethering
Use USB or Bluetooth tethering to provide Internet to other devices.
1. Scroll to the bottom of the Home screen and tap Settings.
2. Tap Network & Internet > Tethering.
3. Tap an option:
Bluetooth tethering: Share your Internet connection with another device through Bluetooth.
USB tethering: Share your Internet connection with another device through a USB cable. To use this, connect a device to your Palm with a
USB cable and tap USB tethering.
VPN
Add and manage your VPNs.
Add a VPN
1. Scroll to the bottom of the Home screen and tap Settings.
2. Tap Network & Internet > VPN.
3. Tap (+) on the upper right corner of the screen.
4. Enter your VPN information in the fields listed, and then tap Save.
Connect to a VPN
Connect and disconnect a VPN after setup.
1. Scroll to the bottom of the Home screen and tap Settings.
2. Tap Network & Internet > VPN.
3. Tap a VPN and tap Connect.
Disconnect: Tap the VPN, and then tap Disconnect.
Manage a VPN
Edit or delete VPN connections.
1. Scroll to the bottom of the Home screen and tap Settings.
2. Tap Network & Internet > VPN.
3. Tap Settings ( ) next to a VPN.
4. Tap the following to manage your VPN settings:
Always-on VPN: Stay connected to VPN at all times.
Block connections without VPN: Establish an Internet connection only after the VPN is connected.
Forget VPN: Remove the VPN from your device.
Page 32

Airplane Mode and Airplane Plus
Airplane Mode
Airplane mode turns off all network connections, including mobile data, Wi-Fi, and Bluetooth. To turn Airplane mode On/Off:
1. Scroll to the bottom of the Home screen and tap Settings.
2. Tap Network & Internet > Airplane mode.
3. Tap the Airplane mode switch to turn Airplane mode On/Off.
Airplane Plus
Airplane Plus automatically turns airplane mode on and off. When the display is off, Airplane mode is turned on. When you wake the
device, Airplane mode is turned off. This optimizes battery life, but still connects your device when in use. If you are already streaming
music or using GPS, it will not be interrupted while in Airplane Plus. To turn Airplane Plus On/Off:
1. Scroll to the bottom of the Home screen and tap Settings.
2. Tap Network & Internet > Airplane mode.
3. Tap the Airplane Plus switch to turn Airplane Plus On/Off.
You can also toggle between Airplane Mode On/Off/Airplane Plus from Quick Settings.
1. From any screen, swipe the Status Bar down, then swipe the screen down a second time to access Quick Settings.
2. Tap Airplane Mode to toggle between Airplane Mode On/Off/Airplane Plus.
Page 33

Connected Devices
Manage your connections to other devices through bluetooth, USB cables, and Wi-Fi.
Bluetooth
Connect your Palm to other devices using Bluetooth to exchange information.
Turn Bluetooth On/Off
1. Scroll to the bottom of the Home screen and tap Settings.
2. Tap Connected devices > Bluetooth.
3. Tap the switch to turn On/Off.
Pair a new device
1. Scroll to the bottom of the Home screen and tap Settings.
2. Tap Connected devices > Bluetooth.
3. Make sure Bluetooth is switched on.
4. Tap Pair new device. A list of available devices to connect to will be displayed. Make sure the device you want to connect to has
its Bluetooth on.
5. Tap a device and follow the pairing instructions.
Paired Device Settings
Manage settings for a connection with a device.
Rename a Device
1. Scroll to the bottom of the Home screen and tap Settings.
2. Tap Connected devices > Bluetooth.
3. Tap Settings ( ) next to the paired device.
4. Enter a new name in the Name field.
The following options may or may not be available to you, depending on the paired device‟s features. Tap the checkbox next to each one of
these to enable/disable.
Contact sharing: Use paired device for contact sharing.
Phone calls: Use paired device during phone calls.
Media audio: Use paired device when listening to media audio.
HD audio: AAC: Use paired device when listening to HD audio files (AAC).
5. Tap OK.
Forget a Bluetooth Device
Your Palm can forget its connection with another device.
1. Scroll to the bottom of the Home screen and tap Settings.
2. Tap Connected devices > Bluetooth, and then tap the switch to turn on Bluetooth.
3. Tap Settings next to the paired device, and then tap FORGET to remove the paired device.
Device Name
Edit the name of your Palm to change how it is displayed when pairing with other devices.
1. Scroll to the bottom of the Home screen and tap Settings.
2. Tap Connected devices > Bluetooth.
3. Tap Device name.
4. Enter the new name and tap RENAME.
Page 34

Received files
View the files you have received from other devices using Bluetooth.
1. Scroll to the bottom of the Home screen and tap Settings.
2. Tap Connected devices > Bluetooth.
3. Tap Received files.
Share with Bluetooth
Share files with another device using Bluetooth.
1. From an app, select the file you want to share.
2. Tap Share , or More Options > Share.
3. Tap Bluetooth and select a device to share with.
Receive with Bluetooth
You will receive a request
1. Tap Accept.
2. To open the file, drag down the Notification panel and tap File received.
Printing
You can use your Palm to print. Your device comes with a default printing service. You can also
download another printing service through Google Play.
Connect to a printer
1. Scroll to the bottom of the Home screen and tap Settings.
2. Tap Connected Devices > Printing.
3. Tap a printing service and then tap the switch to make sure the service is on. Your device will scan for available printers on your
Wi-Fi network.
4. Tap a printer to connect.
Print from your Palm
Printing varies from one app to another, but generally, to print:
1. On the Home screen, swipe up or down to access apps.
2. Select the app that contains the content you would like to print.
3. Select the content you would like to print (documents, photos, etc.).
4. Tap More Options > Print.
5. Select a printer and printing preferences, and then tap Print.
USB
Connect your Palm to other devices to transfer data using a USB cable. Once connected you can manage
your USB connection. To access these settings:
1. Scroll to the bottom of the Home screen and tap Settings.
2. Tap Connected Devices > USB.
3. Choose what you want to do with the connection. The following options are available:
Page 35

Charge this device: Use the connection solely for charging your Palm.
Supply power: Use the connection to charge the other device.
MTP mode: Use the connection to transfer media files between your Palm and a computer.
Transfer photos (PTP): Use the connection transfer photos and videos between your Palm and a computer.
Drivers CD-ROM:
Page 36

Apps & Notifications
Manage your apps and notification settings.
App Settings
Manage settings for individual apps.
1. Scroll to the bottom of the Home screen and tap Settings.
2. Tap Apps & Notifications > See all apps.
3. Tap an app to view and change its settings. The following options may be displayed:
Uninstall: Remove the app from your device. (Preloaded apps cannot be uninstalled, but disabled.)
Disable: Disable a preloaded app.
Force stop: Force stop to restart a malfunctioning app.
App notifications: Choose your notification preferences for the app.
Permissions: Manage which device features the app has access to.
Storage: View app data storage, and clear app data and cache stored on the device.
Data usage: View mobile data usage and adjust app data usage settings.
Battery: View and manage the app‟s battery usage.
Open by default: Set how the app will launch from links and other defaults.
Display over other apps: Allow the app to display on top of other apps you are using.
App details: View more details about the app in the Google Play Store.
Notifications
View and manage notification settings, such as which apps can send notifications, notification dots, and notification sounds.
App Notifications
Manage notification settings for individual apps.
1. Scroll to the bottom of the Home screen and tap Settings.
2. Tap Apps & Notifications > Notifications > App notifications.
3. Tap an app to configure its notification settings.
Notification Dots
You have the option of displaying a small dot over an app shortcut for which there is an unread notification. To enable/disable:
1. Scroll to the bottom of the Home screen and tap Settings.
2. Tap Apps & notifications > Notifications.
Page 37

3. Tap Allow notification dots to turn this feature On/Off.
Notification Sounds
Choose a default notification sound for all apps sending notifications. To set the notification sound:
1. Scroll to the bottom of the Home screen and tap Settings.
2. Tap Apps & notifications > Notifications > Default notification sound.
3. Select a sound and tap OK.
App permissions
Manage each app‟s access to device features, such as Location, Camera, Microphone, and more. To access App permissions:
1. Scroll to the bottom of the Home screen and tap Settings.
2. Tap Apps & notifications > App permissions.
3. Tap a feature to enable/disable individual apps from using the feature.
Default apps
View the apps that come pre-installed on your Palm. To view and manage these apps:
1. Scroll to the bottom of the Home screen and tap Settings.
2. Tap Apps & notifications > Advanced > Default apps.
3. Tap an app to view and manage its settings.
Emergency alerts
Choose which emergency alerts you want to receive. To access Emergency alerts:
1. Scroll to the bottom of the Home screen and tap Settings.
2. Tap Apps & notifications > Advanced > Emergency alerts.
3. Tap each alert you want to enable/disable.
To change the alert tone:
1. Scroll to the bottom of the Home screen and tap Settings.
2. Tap Apps & notifications > Advanced > Emergency alerts.
3. Tap Alert tone and select a tone.
In this menu you also have the option to turn on vibration in addition to the alert sound.
Note: The master volume settings (vibrate or silent) override the Emergency tone setting.
Face Recognition
Use face recognition as an alternative to entering a password to unlock your Palm. Learn to manage your Face Recognition settings. You
must first set a PIN or Pattern to use Face Recognition. To learn how to setup a PIN or Pattern, see “Screen Lock” on page ___.
Page 38

Add a Face
To add your face to Face Recognition:
1. Scroll to the bottom of the Home screen and tap Settings.
2. Tap Face Recognition and enter your PIN or pattern.
3. Tap Add face data and follow the prompts to register your face.
Remove a Face
To remove your face from Face Recognition:
1. Scroll to the bottom of the Home screen and tap Settings.
2. Tap Face Recognition and enter your PIN or pattern.
3. Tap Remove face data and follow the prompts to remove your face.
Face Recognition Settings
Manage how you use Face Recognition.
1. On the Home screen, scroll down and tap Settings.
2. Tap Face Recognition and enter your PIN or pattern.
Face unlock: Turn Face Recognition On/Off.
Face unlock when screen turns on: Use Face Recognition to unlock your Palm when the screen turns on.
Page 39

Life Mode
Life mode helps you minimize distraction by muting notifications from most apps. You will still be able
to receive calls and text messages.
To turn Life Mode On/Off:
1. Scroll to the bottom of the Home screen and tap Settings.
2. Tap Life Mode.
3. Tap the switch to turn On/Off.
Exceptions: You can select certain apps to send notifications even when Life Mode is On. Tap an app in the list to allow notifications from
that app.
Page 40

Battery
View your battery power usage and manage battery settings.
Power Maintenance Tips
● Turn on Life Mode +. This allows your device to use minimal battery when you are not using it.
● Adjust the brightness of the screen to conserve power.
Power Saving Mode
Power saving mode reduces screen brightness, adjusts sleep time, turns off connections to networks, Bluetooth, and GPS. It also limits
vibrations and background data, and turns off automatic data sync. To turn Power Saving Mode On/Off:
1. Scroll to the bottom of the Home screen and tap Settings.
2. Tap Battery> Power saving mode.
3. Tap the switch to turn On/Off.
Turn on automatically: Tap to set Power saving mode to be turned on automatically at 5% or 15% battery.
Battery Settings
Monitor battery power usage on your Palm.
To access Battery settings:
1. Scroll to the bottom of the Home screen and tap Settings.
2. Tap Battery.
Battery percentage: Your device‟s battery percentage is displayed.
Estimated Battery Life: View your device‟s estimated battery life
Power saving mode: Tap to turn Power saving mode on. This will reduce the device‟s performance by reducing screen brightness and
limiting connections to mobile data, Bluetooth, GPS, etc.
Background apps: Select apps to be disabled from the background when not in use.
Optimized apps: View apps that have been optimized for maximum battery life.
Never optimize: View apps that should never be optimized for battery life.
Advanced settings: Tap to view Advanced battery usage settings.
Ambient display: Choose whether to wake screen when you receive notifications or not. Tap Ambient display > New notifications to
enable/disable.
Page 41

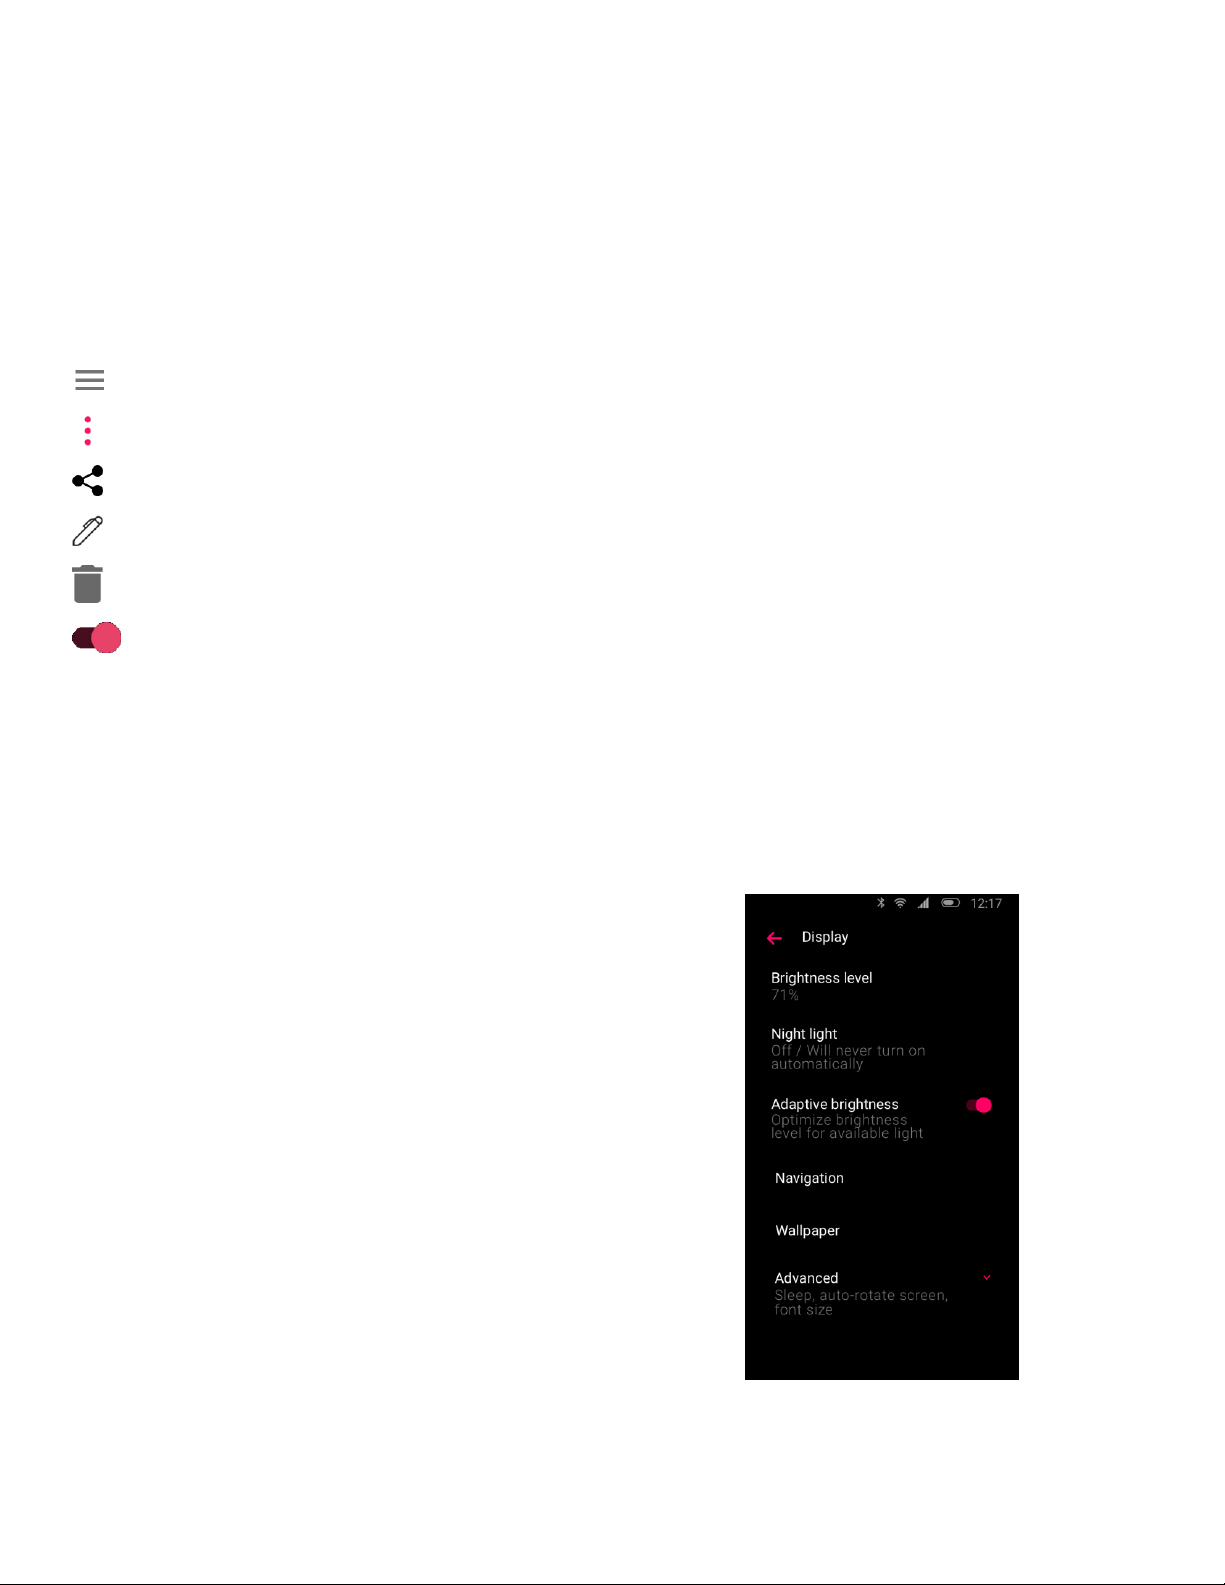
Display
Manage your display settings, such as brightness, font size, Navigation Bar, and more.
Brightness level
Set the display‟s brightness level for easier reading or battery saving.
1. Scroll to the bottom of the Home screen and tap Settings.
2. Tap Display > Brightness level.
3. Manually set the brightness, or tap Auto.
Night Light
Night light tints your screen amber to make it easier to look at in the dark and may help you fall asleep more easily. To turn Night Light on:
1. Scroll to the bottom of the Home screen and tap Settings.
2. Tap Display > Night Light > Status.
3. Drag the Intensity slider to adjust the intensity of Night Light.
To set a schedule for Night Light to come on automatically:
1. Scroll to the bottom of the Home screen and tap Settings.
2. Tap Display > Night Light.
3. Tap Schedule and choose a custom time, or choose for Night Light to turn on from sunset to sunrise.
Adaptive brightness
Optimize brightness level for available light.
1. Scroll to the bottom of the Home screen and tap Settings.
2. Tap Display.
3. Tap Adaptive brightness to turn the feature On/Off.
Wallpaper
Set a wallpaper for your lock screen.
1. Scroll to the bottom of the Home screen and tap Settings.
2. Tap Display > Wallpaper.
3. Choose from your photos or preloaded wallpapers.
4. Tap a picture and tap Set lockscreen wallpaper.
Advanced Display Settings
Adjust display settings for screen timeout, font size, display size and more. To access these settings:
1. Scroll to the bottom of the Home screen and tap Settings.
2. Tap Display > Advanced.
3. Tap the following items to adjust their settings.
Sleep: Turn the screen off after a set amount of time.
Font size: Tap Font size and then drag the slider to set the text size.
Display size: Tap Display size and then drag the slider to set the size of objects on the screen.
Page 42

Screen saver: Tap Screen saver >Current screen saver to choose what to display as your screensaver. Tap When to start to adjust when the
screen saver is displayed.
Ambient display: You can set your Palm to wake the screen when you receive notifications. Tap Ambient display > New notifications to
turn this feature On/Off.
Navigation Bar: You have the option of using virtual navigation keys pinned to the bottom of the screen. Tap Navigation Bar to turn
On/Off.
Page 43

Sound
Manage your sound settings including volumes, vibrations, ringtones, and more.
Volume
Adjust the volume level for media, alarms, and ringtones.
1. Scroll to the bottom of the Home screen and tap Settings.
2. Tap Sound.
3. Use the sliders for media, alarm, and ring to adjust their volumes.
Volumes can also be accessed in Quick Settings. To learn more, see “Quick Settings” on page ___
Call Vibrations
You can set your Palm to vibrate while it is ringing.
1. Scroll to the bottom of the Home screen and tap Settings.
2. Tap Sound.
3. Tap Also vibrate for calls to turn vibrations On/Off while ringing.
Do Not Disturb preferences
Set preferences and priorities for notifications and rules for when Do Not Disturb is activated.
1. Scroll to the bottom of the Home screen and tap Settings.
2. Tap Sound > Do Not Disturb preferences to configure the following:
Priority only allows: Set priorities for which events will allow for notifications and disturbances. Allow disturbances from Reminders,
Events, Alarms, Messages, Calls, and Repeat callers.
Block visual disturbances: Block visual notifications with Do Not Disturb. Select to block notifications when screen is On or Off.
Automatic rules
Set rules for when Do Not Disturb is turned On. Configure days, times, and events to set up a schedule for Do Not Disturb. Tap a rule to
edit its preferences.
Tap Add more to add a new event or time rule for Do Not Disturb.
Ringtone
To set your ringtone:
1. Scroll to the bottom of the Home screen and tap Settings.
2. Tap Sound > Phone ringtone.
3. Tap a ringtone to select and hear a preview.
4. Tap OK.
To add a custom ringtone:
1. Scroll to the bottom of the Home screen and tap Settings.
2. Tap Sound > Phone ringtone.
3. Scroll to the bottom and tap Add ringtone.
4. Select a file to use as your ringtone.
Notification Sound
Choose a sound for app notifications.
1. Scroll to the bottom of the Home screen and tap Settings.
2. Tap Sound > Advanced > Default notification sound.
3. Tap a sound to select and hear a preview.
Page 44

4. Tap OK.
To add a custom notification sound:
1. Scroll to the bottom of the Home screen and tap Settings.
2. Tap Sound > Advanced > Default notification sound.
3. Scroll to the bottom and tap Add ringtone.
4. Select a file to use as your notification sound.
Alarm Sound
Set the sound played during an alarm.
1. Scroll to the bottom of the Home screen and tap Settings.
2. Tap Sound > Advanced > Default alarm sound.
3. Tap a sound to select and hear a preview.
4. Tap OK.
To add a custom alarm sound:
1. Scroll to the bottom of the Home screen and tap Settings.
2. Tap Sound > Advanced > Default alarm sound.
3. Scroll to the bottom and tap Add ringtone.
4. Select a file to use as your alarm sound.
Other Sounds and Vibrations
Manage other system sounds and vibrations such as touch sounds, screen locking sounds, and more.
1. Scroll to the bottom of the Home screen and tap Settings.
2. Tap Sound > Advanced, and scroll to the bottom.
3. Tap to enable/disable each option:
Dial pad tones: Dial pad plays tones when it is tapped.
Screen locking sounds: Hear a sound when you lock/unlock the screen.
Charging sounds: Hear a sound when a charger is plugged in.
Touch sounds: Hear sounds when you make selections on the screen.
Vibrate on tap: Palm vibrates when keys are tapped.
Power on & off ringtone: Hear a ringtone play while your device turns on and off.
Page 45

Storage
View your Palm‟s storage and how much storage different parts of the device take up.
Free Up Space
Free up storage room on your Palm by removing unwanted or unnecessary files.
1. Scroll to the bottom of the Home screen and tap Settings.
2. Tap Storage > Free Up Space.
3. Choose files to remove from your device.
Storage Manager
To help free up storage space, Storage Manager removes backed up photos and videos from your device. To turn this On/Off:
1. Scroll to the bottom of the Home screen and tap Settings.
2. Tap Storage > Storage manager.
3. Tap the switch to turn On/Off.
Tap Remove photos & videos and select from 30, 60, or 90 days to remove photos and videos.
Storage By Content
View your Palm‟s current storage by media, apps, files, and more.
1. Scroll to the bottom of the Home screen and tap Settings.
2. Tap Storage and scroll down to view the content of your device‟s storage.
3. Tap an option to view more information.
Page 46

Security & Location
Manage your lock screen, security, and location settings.
Google Play Protect
Google scans your apps for harmful behavior.
1. Scroll to the bottom of the Home screen and tap Settings.
2. Tap Security & Location > Google Play Protect.
Find My Device
Locate your Palm in the event of loss or theft.
1. Scroll to the bottom of the Home screen and tap Settings.
2. Tap Security & Location > Find My Device. If you are not logged in to a Google Account, tap Find My Device won‟t work and
follow the prompts to sign in.
3. The following options are available:
Find My Device: Use Find My Device or download the app from Google Play.
Web: Use Find My Device in a browser.
Google: Search “find my device” on Google.
Security Update
See when your security software was last updated, and manually check for updates.
1. Scroll to the bottom of the Home screen and tap Settings.
2. Tap Security & Location > Security update. The date of your last security update is displayed.
3. Tap Check for update.
Screen Lock
Secure your Palm by selecting one of the following screen locks: Swipe, Pattern, PIN, or None. To set a secure screen lock:
1. Scroll to the bottom of the Home screen and tap Settings.
2. Tap Security & Location > Screen lock.
3. Tap a screen lock type and follow the prompts to set it up.
Screen Lock Settings
Configure your Palm‟s screen lock settings. To access Screen lock settings:
1. Scroll to the bottom of the Home screen and tap Settings.
2. Tap Security & Location > Screen lock settings ( ). The following settings can be adjusted:
Make pattern visible: Tap the switch to make your pattern unlock visible when you swipe your finger.
Automatically lock: Choose how much time to allow until the device locks itself after the screen sleeps.
Power button instantly locks: Tap the switch to set the power button to instantly lock the device. If you are using Smart Lock, this does
not apply.
Lock screen message: Place a message on your lock screen.
Page 47

Smart Lock
Set your Palm to automatically unlock when it is in a certain location or in the presence of certain devices. You must have a secure screen
lock to access Smart Lock.
1. Scroll to the bottom of the Home screen and tap Settings.
2. Tap Security & Location > Smart Lock.
3. Input your pattern or PIN. The following features are available to you through Smart Lock:
On-body detection: Keep your device unlocked while it‟s on you. Tap On-body detection, and then tap the switch to enable/disable.
Trusted places: Keep your device unlocked when it‟s in a trusted location. Tap Trusted places > Add trusted place.
Trusted devices: Keep your device unlocked when a trusted device is nearby. When your device is connected to a trusted device via
Bluetooth, your device will stay unlocked. Tap Trusted devices > Add Trusted Device, and then choose a device to trust.
Voice Match: Your device will unlock when it recognizes your voice. Tap Voice Match to enable/disable this feature.
Location
Activate location services, manage app permissions, view location history, and manage other location settings. To turn location services
On/Off:
1. Scroll to the bottom of the Home screen and tap Settings.
2. Tap Security & Location > Location.
3. Tap the switch to turn Location services On/Off.
Location Mode
To select a location mode:
1. Scroll to the bottom of the Home screen and tap Settings.
2. Tap Security & Location > Location > Mode.
3. Select one of the following modes:
High accuracy: Determines location using GPS, Wi-Fi, Bluetooth, and mobile networks.
Battery saving: Determines location using Wi-Fi, Bluetooth, and mobile networks. Does not use GPS.
Device only: Determines location using GPS and device sensors.
App-level permissions
Choose which apps have access to location services.
1. Scroll to the bottom of the Home screen and tap Settings.
2. Tap Security & Location > Location > App-level-permissions.
3. Tap the switch next to each app for which you want to enable/disable location services.
Scanning
Your device uses Wi-Fi and Bluetooth scanning to better determine location. Your device uses Wi-Fi scanning to automatically search for
Wi-Fi networks at any time. It can also use Bluetooth scanning to detect nearby Bluetooth devices at any time. To enable these features:
1. Scroll to the bottom of the Home screen and tap Settings.
2. Tap Security & Location > Location > Scanning.
3. Tap Wi-Fi scanning to turn On/Off.
4. Tap Bluetooth scanning to turn On/Off.
Page 48

Location Services
Allow Google apps to access your location to improve your search results based on your location history.
1. Scroll to the bottom of the Home screen and tap Settings.
2. Tap Security & Location > Location.
3. Under Location services you will find the following:
Google Location History: Manage your location timeline through Google Location History.
Google Location Sharing: Manage who you are sharing your location with through Google Location Sharing.
Recent Location Requests
View which apps have most recently requested your location.
1. Scroll to the bottom of the Home screen and tap Settings.
2. Tap Security & Location > Location.
3. Tap the switch to turn on Location services.
4. Scroll to the bottom to view Recent location requests.
Show Passwords
Briefly show password text as you enter a password. To turn this feature On/Off:
1. Scroll to the bottom of the Home screen and tap Settings.
2. Tap Security & Location > Show passwords.
Other Security & Location Settings
Manage other Security & Location settings such as admin apps, device encryption, and more. To access:
1. Scroll to the bottom of the Home screen and tap Settings.
2. Tap Security & Location and scroll down to view the following:
Device Admin Apps: Configure your device‟s admin apps and their permissions.
Encryption & Credentials: Manage your device‟s security certificates. View encryption settings or disable/remove security certificates.
Trust agents: View and enable/disable your device‟s trusted agents.
Screen Pinning: Use screen pinning to keep the current screen in view until you unpin. Tap the switch to turn On/Off.
Apps With Usage Access: Manage the apps that have access to your usage history.
Page 49

Users & Accounts
Users
Allow multiple users on the same device, with custom settings for each user. To manage users:
1. Scroll to the bottom of the Home screen and tap Settings.
2. Tap Users & Accounts > Users.
Here the admin is displayed as well as a Guest option and Add user option. Tap You or Guest to switch between users.
To add a new user:
1. Scroll to the bottom of the Home screen and tap Settings.
2. Tap Users & Accounts > Users.
3. Tap Add user and follow the prompts to set up a new user.
To delete a user:
1. Scroll to the bottom of the Home screen and tap Settings.
2. Tap Users & Accounts > Users.
3. Tap the settings gear to the right of the user and tap Remove user > Delete.
Accounts
Set up and manage your Google, Verizon, email or other social networking accounts. To access account information and settings:
1. Scroll to the bottom of the Home screen and tap Settings.
2. Tap Users & Accounts.
3. Tap your account to view its settings.
Add Account
You can add Google, Verizon, and other social networking accounts. To add an account:
1. Scroll to the bottom of the Home screen and tap Settings.
2. Tap Users & Accounts > Add account.
3. Tap an account type.
4. Set up the account by entering your sign-in information.
Remove an Account
To remove an account from your Palm:
1. Scroll to the bottom of the Home screen and tap Settings.
2. Tap Users & Accounts.
3. Tap an account and then tap Remove Account.
Emergency Information
Add medical information and emergency contacts to help first responders in the case of an emergency. This information can be accessed on
the lock screen without having to unlock your Palm. To set up emergency information:
1. Scroll to the bottom of the Home screen and tap Settings.
2. Tap Users & Accounts > Emergency information.
3. Tap Edit information to edit medical information.
4. Tap Add contact to add an emergency contact.
Page 50

Automatically Sync Data
Allow apps to automatically refresh data. To turn this feature On/Off:
1. Scroll to the bottom of the Home screen and tap Settings.
2. Tap Users & Accounts.
3. Tap Automatically sync data to turn On/Off.
Add Users From Lock Screen
1. Scroll to the bottom of the Home screen and tap Settings.
2. Tap Users & Accounts.
3. Tap Add users from lock screen to turn On/Off.
Page 51

Accessibility
Those with physical disabilities have access to Accessibility services to make the device easier to use.
Note: By using certain Accessibility features, you are allowing the device to:
Observe your actions: Receive notifications when you’re interacting with an app.
Retrieve window content: Inspect the content of a window you’re interacting with.
Turn on Explore by Touch: Tapped items will be spoken aloud and the screen can be explored using gestures.
Observe text you type: Includes personal data such as credit card numbers and passwords.
Control display magnification: Control the display’s zoom level and positioning.
My Verizon Guided Navigation
When Verizon Assistive Touch is active, your Palm provides access to read the elements present on the screen. To turn this feature On/Off:
1. Scroll to the bottom of the Home screen and tap Settings.
2. Tap Accessibility > My Verizon Guided Navigation.
3. Tap the switch and follow the prompts to turn On/Off.
Select to Speak
Select to Speak allows users to tap certain items on the screen to hear them read aloud. To turn on Select to Speak:
1. Scroll to the bottom of the Home screen and tap Settings.
2. Tap Accessibility > Select to Speak.
3. Tap the switch and follow the prompts to turn On/Off.
TalkBack
TalkBack helps blind or low-vision users by providing spoken feedback. Your Palm will describe what you touch, select, and activate. To
turn on TalkBack:
1. Scroll to the bottom of the Home screen and tap Settings.
2. Tap Accessibility >TalkBack.
3. Tap the switch and follow the prompts to turn On/Off.
Text-to-Speech Output
Manage settings for your text-to-speech output. To access:
1. Scroll to the bottom of the Home screen and tap Settings.
2. Tap Accessibility > Text-to-speech output. The following settings are available:
Preferred engine: Your device uses the Google Text-to-speech engine. Tap Settings ( ) for more options.
Language: Choose a language for text-to-speech. The default is the system language.
Speech rate: Drag the slider to set how fast the text is spoken.
Pitch: Drag the slider to set the pitch of the voice.
Play: Tap to play a preview of how text-to-speech would sound.
Page 52

Reset: Reset the speech rate and pitch to default settings.
Display Options
To make the screen easier to read, there are a number of settings you can adjust. To access Display settings:
1. Scroll to the bottom of the Home screen and tap Settings.
2. Tap Accessibility, and scroll down to Display to see these options:
Font size: Tap to adjust the size of the text on the screen.
Display size: Tap to adjust the size of objects on the screen.
Magnification: Tap to use gestures such as triple-tapping, pinching, and dragging two fingers across the screen to zoom and scroll the
screen.
Color Correction: For those that are color blind, tap to set the colors on the screen.
Color Inversion: Tap to switch the text and background color between black and white.
Large mouse pointer: Tap to use a large pointer when using a mouse.
Interaction Controls
1. Scroll to the bottom of the Home screen and tap Settings.
2. Tap Accessibility and scroll down to Interaction controls to access these options:
Switch Access: Use switches to select items, scroll, enter text, and more. Tap Switch Access and then tap the switch to turn this feature
On/Off. Tap settings to view more Switch Access settings.
Click After Pointer Stops Moving: Tap to turn this feature On/Off. Drag the slider to set the delay time.
Power Button Ends Call: Tap the switch to turn this feature On/Off.
Auto-Rotate Screen: Tap the switch to turn Auto-Rotation On/Off.
Touch & Hold Delay: Set the recognition time for pressing and holding an item on the screen. Tap to choose a delay.
Mono Audio
Choose between stereo and mono audio types. To turn mono audio On/Off:
1. Scroll to the bottom of the Home screen and tap Settings.
2. Tap Accessibility, and then scroll down to Mono audio.
3. Tap the switch to turn On/Off.
Captions
Turn on Captions to use subtitles on your Palm. To turn Captions On/Off:
1. Scroll to the bottom of the Home screen and tap Settings.
2. Tap Accessibility > Captions.
3. Tap the switch to turn On/Off.
4. Tap the following to adjust caption settings:
Language: Choose your caption language.
Page 53

Text Size: Adjust the size of the text.
Caption Style: Adjust font color and background color for the text.
High Contrast Text
Modify the text to have high contrast against the background. To turn High Contrast Text On/Off:
1. Scroll to the bottom of the Home screen and tap Settings.
2. Tap Accessibility, and scroll down to High Contrast Text.
3. Tap the switch to turn On/Off.
TTY Mode
Those who are deaf or who have speech disabilities can use a teletypewriter (TTY) mode to communicate through the device.
1. Tap Phone on the Home screen.
2. Tap More options > Settings.
3. Tap Accessibility > TTY mode.
4. Choose between TTY OFF, TTY FULL, TTY HCO, or TTY VCO.
Page 54

Google
Manage your Palm‟s Google settings. Access settings for account security, storage, data backup, privacy,
location services, Google apps and more.
To access Google settings:
1. Scroll to the bottom of the Home screen and tap Settings.
2. Tap Settings > Google.
Page 55

System
Manage system settings such as language, date and time, software updates, and more.
Languages and Input
Manage the language of your Palm as well as text input settings.
Languages
Add languages to your language preference list. Your Palm will use the next language on your preference list if an app does not support the
default language. To manage language settings:
1. Scroll to the bottom of the Home screen and tap Settings.
2. Tap System > Languages & input > Languages.
3. To add a language, tap Add language, and then select an available language.
4. Rearrange your language preference order by touching and holding a language and dragging it.
To remove a language, tap More Options ( ) > Remove. Select the language to remove and tap Remove ( ).
Virtual Keyboard
Palm‟s default keyboard is Fleksy. You can choose between Fleksyor other keyboards downloaded from the Google Play Store to use on
your device. To manage keyboards:
1. Scroll to the bottom of the Home screen and tap Settings.
2. Tap System > Languages & Input > Virtual keyboard > Manage keyboards.
3. Tap each keyboard to enable or disable.
Google Voice Typing
Google Voice Typing allows you to enter text into fields using your voice. To access Google Voice Typing settings:
1. Scroll to the bottom of the Home screen and tap Settings.
2. Tap System > Languages & Input > Virtual keyboard.
3. Tap Google voice typing to configure settings such as languages, voice recognition, speech output, and more.
Physical Keyboard
You have the option of connecting a physical keyboard to your Palm. To configure settings for when a keyboard is connected:
1. Scroll to the bottom of the Home screen and tap Settings.
2. Tap System > Languages & Input.
3. Tap Physical keyboard. The following options are available:
Show virtual keyboard: Keep the virtual keyboard on screen while the physical keyboard is active.
Keyboard shortcuts helper: Display available keyboard shortcuts.
Input Assistance
Use these accessibility features to help with inputting text on your device.
1. Scroll to the bottom of the Home screen and tap Settings.
2. Tap System > Languages & Input > Advanced.
3. Tap the following to access more settings:
Spell Checker: Tap Spell Checker and then tap the switch to turn it On/Off. Choose a spell checker.
Page 56

Autofill Service: Quickly enter saved usernames, passwords, addresses, credit card information, and more. Palm uses Google Autofill by
default. Tap to choose a service to enable. Adjust Autofill settings by tapping ( ).
Personal dictionary: Tap to add words to your personal dictionary that you want your device to recognize.
Pointer speed
To adjust the pointer speed of a connected mouse:
1. Scroll to the bottom of the Home screen and tap Settings.
2. Tap System > Languages & Input > Advanced > Pointer speed.
3. Drag the slider to the desired speed and tap OK.
Quick Launch
You can use your power button to do different things. To manage:
1. Scroll to the bottom of the Home screen and tap Settings.
2. Tap System > Quick Launch.
3. Tap one of the following to enable:
Google Assistant: Press the power button twice to start Google Assistant.
Open Camera: Press the power button twice to open Camera.
Volume setting: Press the power button twice to transfer the volume bar control.
Date and Time
Your Palm is set to automatically receive date and time information from your network. If you are outside of network coverage, you can
manually set the date and time.
1. Scroll to the bottom of the Home screen and tap Settings.
2. Tap System > Date and time. Configure the following:
Automatic Date and Time: Tap the switch to enable/disable automatic retrieval of date and time information from your network. If this
feature is disabled, you have the following options:
- Set date: Tap to select the current date.
- Set time: Tap to select the current time.
Automatic Time Zone: Tap the switch to enable/disable automatic retrieval of time zone information from your network. If this feature is
disabled, you have the following option:
- Select time zone: Tap to select a time zone.
Use 24-hour format: Tap to display the time in 24-hour format.
Backup
You can choose to backupyour Palm to your Google Drive account. To access backup settings:
1. Scroll to the bottom of the Home screen and tap Settings.
2. Tap System > Backup.
Page 57

System Updates
Check for Android system updates and view update history on your Palm. To access:
1. Scroll to the bottom of the Home screen and tap Settings.
2. Tap System > System Updates. The following is displayed:
Check for system updates: Tap to check for software updates.
Show system update history: Tap to see previous software updates
The System Update Status is displayed on the bottom.
Reset Options
There are a few options for resetting aspects of your Palm, including network, app preferences, and factory reset.
Reset Wi-Fi, Mobile & Bluetooth
To reset Wi-Fi, Mobile data, and Bluetooth settings:
1. Scroll to the bottom of the Home screen and tap Settings.
2. Tap System > Reset options > Reset Wi-Fi, mobile & Bluetooth.
3. Tap Reset Settings and confirm.
Reset App Preferences
You can reset app preferences, including notifications, permissions, and more. To reset app preferences:
1. Scroll to the bottom of the Home screen and tap Settings.
2. Tap System > Reset options > Reset app preferences.
3. Tap Reset Apps.
Erase All Data (Factory Reset)
You have the option of erasing all data to restore your Palm to factory defaults. By doing this, you are deleting all added data from the
device, including Google account settings, system settings, downloaded apps, media (photos, videos, and music) and other files stored on
your Palm.
To reset your Palm:
1. Make sure you have backed up any files you want to keep.
2. Scroll to the bottom of the Home screen and tap Settings.
3. Tap System > Reset options > Erase all data (factory reset).
4. Tap Reset Phone and follow the prompts.
5. Your device will restart. Follow the setup wizard to set up your Palm as new.
About Phone
Find information about your Palm, including device status, legal information, hardware model, serial number, software version, and more
in the About Phone menu. To access:
1. Scroll to the bottom of the Home screen and tap Settings.
2. Tap System >About phone.
3. Tap an item to view more information about your Palm.
Legal Information
Warranty info
Page 58

Regulatory & Safety
Limitations
No device can be used or sold in Cuba, Iran, Syria, Sudan, or North Korea.
Radio waves
THIS MOBILE PHONE MEETS THE GOVERNMENT‟S REQUIREMENTS FOR EXPOSURE TO RADIO WAVES.
Your mobile phone is a radio transmitter and receiver. It is designed and manufactured not to exceed the emission limits for exposure to
radio-frequency (RF) energy. These limits are part of comprehensive guidelines and establish permitted levels of RF energy for the general
population. The guidelines are based on standards that were developed by independent scientific organizations through periodic and
thorough evaluation of scientific studies. These guidelines include a substantial safety margin designed to ensure the safety of all persons,
regardless of age and health.
The exposure standard for mobile phones employs a unit of measurement known as the Specific Absorption Rate, or SAR. The SAR limit
set by public authorities such as the Federal Communications Commission of the US Government (FCC), or by Industry Canada, is 1.6
W/kg averaged over 1 gram of body tissue. Tests for SAR are conducted using standard operating positions with the mobile phone
transmitting at its highest certified power level in all tested frequency bands.
This device is complied with SAR for general population /uncontrolled exposure limits in ANSI/IEEE C95.1-1992 and had been tested in
accordance with the measurement methods and procedures specified in IEEE1528.
The FCC has granted an Equipment Authorization for this model phone with all reported SAR levels evaluated as in compliance with the
FCC RF exposure guidelines. SAR information on this model phone is on file with the FCC and can be found under the Display Grant
section of www.fcc.gov/oet/ea/fccid after searching on FCC ID: 2AOETPVG100.
Although the SAR is determined at the highest certified power level, the actual SAR level of the mobile phone while operating can be well
below the maximum value. This is because the mobile phone is designed to operate at multiple power levels so as to use only the power
required to reach the network. In general, the closer you are to a wireless base station antenna, the lower the power output of the mobile
phone. Before a mobile phone model is available for sale to the public, compliance with national regulations and standards must be shown.
Maximum SAR for this model and conditions under which it was recorded.
Head SAR 1.26 W/kg
Body-worn SAR 1.02 W/kg
While there may be differences between the SAR levels of various phones and at various positions, they all meet the government
requirements.
SAR compliance for body-worn operation is based on a separation distance of 10 mm between the unit and the human body. Carry this
device at least 10 mm away from your body to ensure RF exposure level compliant or lower to the reported level. To support body-worn
operation, choose the belt clips or holsters, which do not contain metallic components, to maintain a separation of 15 mm between this
device and your body.
Page 59

RF exposure compliance with any body-worn accessory, which contains metal, was not tested and certified, and use such body-worn
accessory should be avoided.
Additional information on SAR can be found on the Cellular Telecommunications & Internet Association (CTIA) Web site:
http://www.ctia.org/
The World Health Organization (WHO) considers that present scientific information does not indicate the need for any special precautions
for use of mobile phones. If individuals are concerned, they might choose to limit their own or their children‟s RF exposure by limiting the
length of calls, or using “hands-free” devices to keep mobile phones away from the head and body. Additional WHO information about
electromagnetic fields and public health are available on the following website:
http://www.who.int/peh-emf.
Note: This equipment has been tested and found to comply with the limits for a Class B digital device, pursuant to part 15 of the FCC Rules.
These limits are designed to provide reasonable protection against harmful interference in a residential installation. This equipment
generates, uses and can radiate radio frequency energy and, if not installed and used in accordance with the instructions, may cause harmful
interference to radio communications. However, there is no guarantee that interference will not occur in a particular installation. If this
equipment does cause harmful interference to radio or television reception, which can be determined by turning the equipment off and on,
the user is encouraged to try to correct the interference by one or more of the following measures:
- Reorient or relocate the receiving antenna.
- Increase the separation between the equipment and receiver.
- Connect the equipment into an outlet on a circuit different from that to which the receiver is connected.
- Consult the dealer or an experienced radio/ TV technician for help.
Changes or modifications not expressly approved by the party responsible for compliance could void the user‟s authority to operate the
equipment.
For the receiver devices associated with the operation of a licensed radio service (e.g. FM broadcast), they bear the following statement:
This device complies with Part 15 of the FCC Rules and Industry Canada licence-exempt RSS standard(s). Operation is subject to the
condition that this device does not cause harmful interference.
For other devices, they bear the following statement:
This device complies with Part 15 of the FCC Rules and Industry Canada licence-exempt RSS standard(s). Operation is subject to the
following two conditions:
(1) this device may not cause harmful interference
(2) this device must accept any interference received, including interference that may cause undesired operation.
Your mobile phone is equipped with a built-in antenna. For optimal operation, you should avoid touching it or degrading it.
Please note by using the device some of your personal data may be shared with the main device. It is under your own responsibility to
protect your own personal data, not to share with it with any unauthorized devices or third party devices connected to yours. For products
with Wi-Fi features, only connect to trusted Wi-Fi networks. Also when using your product as a hotspot (where available), use network
security. These precautions will help prevent unauthorized access to your device. Your product can store personal information in various
locations including a SIM card, memory card, and built-in memory. Be sure to remove or clear all personal information before you recycle,
return, or give away your product. Choose your apps and updates carefully, and install from trusted sources only. Some apps can impact
your product‟s performance and/or have access to private information including account details, call data, location details and network
resources.
You can access, review and edit your personal information at any time by logging into your user account, visiting your user profile or by
contacting us directly. Should you require us to edit or delete your personal data, we may ask you to provide us with evidence of your
identity before we can act on your request.
Hearing Aid Compatibility
Your mobile phone is rated: «For Hearing Aid», to assist hearing device users in finding mobile phones that may be compatible with their
hearing devices.
Your device is HAC M4/T3 compatible.
This phone has been tested and rated for use with hearing aids for some of the wireless technologies that it uses. However, there may be
some newer wireless technologies used in this phone that have not been tested yet for use with hearing aids. It is important to try the
different features of this phone thoroughly and in different locations, using your hearing aid or cochlear implant, to determine if you hear
any interfering noise. Consult your service provider or the manufacturer of this phone for information on hearing aid compatibility. If you
have questions about return or exchange policies, consult your service.
Page 60

How the ratings work
M-Ratings: Wireless devices rated M3 or M4 meet FCC requirements and are likely to generate less interference to hearing devices than
wireless devices that are not labeled. M4 is the better or higher of the two ratings.
T-Ratings: Wireless devices rated T3 or T4 meet FCC requirements and are likely to be more usable with a hearing device‟s telecoil (“T
Switch” or “Telephone Switch”) than unrate wireless devices. T4 is the better or higher of the two ratings. (Note that not all hearing
devices have telecoils in them.)
Hearing devices may also be measured for immunity to this type of interference. Your hearing device manufacturer or hearing health
professional may help you find results for your hearing device. The more immune your hearing aid is, the less likely you are to experience
interference noise from wireless devices.
Electronic labeling (Elabel) path: Input *#352235# in the dial screen, you can find more information about labeling.
 Loading...