

Page 1

Palm
™
Web Pro Handbook
Page 2

Copyright
© 2002-2003 Palm, Inc. All rights reserved. Graffiti, HotSync, the Palm logo, Palm OS, and the Palm
Powered logo are registered trademarks of Palm, Inc. Palm, Tungsten, VersaMail, and Zire are trademarks
of Palm, Inc. Palm, Inc. uses the Bluetooth trademark under express license from the owner. All other
brands are trademarks or registered trademarks of their respective owners.
Disclaimer and Limitation of Liability
Palm, Inc. assumes no responsibility for any damage or loss resulting from the use of this guide.
Palm, Inc. assumes no responsibility for any loss or claims by third parties which may arise through the use
of this software. Palm, Inc. assumes no responsibility for any damage or loss caused by deletion of data as
a result of malfunction, dead battery, or repairs. Be sure to make backup copies of all important data on
other media to protect against data loss.
IMPORTANT Please read the End User Software License Agreement with this product before using the
accompanying software program(s). Using any part of the software indicates that you accept the terms of the
End User Software License Agreement.
PN: 407-6169A-US
Page 3

Contents
About This Book . . . . . . . . . . . . . . . . . . . . . . . . . . . . . . . . . . . . . . . . . . . . . . . . 1
Chapter 1: Introducing Palm™ Web Pro . . . . . . . . . . . . . . . . . . . . . . . . . . . . 3
Ease of use . . . . . . . . . . . . . . . . . . . . . . . . . . . . . . . . . . . . . . . . . . . . . . . . . . . . . . . . . 3
Efficiency . . . . . . . . . . . . . . . . . . . . . . . . . . . . . . . . . . . . . . . . . . . . . . . . . . . . . . . . . . 3
Security . . . . . . . . . . . . . . . . . . . . . . . . . . . . . . . . . . . . . . . . . . . . . . . . . . . . . . . . . . . . 3
What Web Pro looks like . . . . . . . . . . . . . . . . . . . . . . . . . . . . . . . . . . . . . . . . . . . . . 4
Getting help in Web Pro . . . . . . . . . . . . . . . . . . . . . . . . . . . . . . . . . . . . . . . . . . . . . . 5
Chapter 2: Palm™ Web Pro Requirements . . . . . . . . . . . . . . . . . . . . . . . . . . 7
Handheld system requirements . . . . . . . . . . . . . . . . . . . . . . . . . . . . . . . . . . . . . . . 7
Uninstalling Web Pro . . . . . . . . . . . . . . . . . . . . . . . . . . . . . . . . . . . . . . . . . . . . . . . . 8
Chapter 3: Browsing the Web on Your Handheld . . . . . . . . . . . . . . . . . . . . . 9
Opening Web Pro . . . . . . . . . . . . . . . . . . . . . . . . . . . . . . . . . . . . . . . . . . . . . . . . . . . 9
Disconnecting from and connecting to the Internet . . . . . . . . . . . . . . . . . . . . . . 10
Visiting a web page . . . . . . . . . . . . . . . . . . . . . . . . . . . . . . . . . . . . . . . . . . . . . . . . . 10
Viewing different parts of a web page . . . . . . . . . . . . . . . . . . . . . . . . . . . . . . . . . 11
Following a link . . . . . . . . . . . . . . . . . . . . . . . . . . . . . . . . . . . . . . . . . . . . . . . . . . . . 12
Returning to a web page you just visited . . . . . . . . . . . . . . . . . . . . . . . . . . . . . . 12
Returning to your home page . . . . . . . . . . . . . . . . . . . . . . . . . . . . . . . . . . . . . . . . 13
Downloading a file to your handheld . . . . . . . . . . . . . . . . . . . . . . . . . . . . . . . . . 13
Stopping the download process . . . . . . . . . . . . . . . . . . . . . . . . . . . . . . . . . . . . . . 14
Refreshing a page . . . . . . . . . . . . . . . . . . . . . . . . . . . . . . . . . . . . . . . . . . . . . . . . . . 14
Viewing information about a web page . . . . . . . . . . . . . . . . . . . . . . . . . . . . . . . . 14
Using passwords . . . . . . . . . . . . . . . . . . . . . . . . . . . . . . . . . . . . . . . . . . . . . . . . . . . 15
Disconnecting from and connecting to the Internet . . . . . . . . . . . . . . . . . . . . . . 15
Chapter 4: Copying and Pasting Text . . . . . . . . . . . . . . . . . . . . . . . . . . . . . . 17
Copying text . . . . . . . . . . . . . . . . . . . . . . . . . . . . . . . . . . . . . . . . . . . . . . . . . . . . . . . 17
Pasting text . . . . . . . . . . . . . . . . . . . . . . . . . . . . . . . . . . . . . . . . . . . . . . . . . . . . . . . . 18
iii
Page 4

Contents
Chapter 5: Communicating with Other Users . . . . . . . . . . . . . . . . . . . . . . . 19
Sending e-mail . . . . . . . . . . . . . . . . . . . . . . . . . . . . . . . . . . . . . . . . . . . . . . . . . . . . . 19
Beaming a URL . . . . . . . . . . . . . . . . . . . . . . . . . . . . . . . . . . . . . . . . . . . . . . . . . . . . 19
E-mailing a URL . . . . . . . . . . . . . . . . . . . . . . . . . . . . . . . . . . . . . . . . . . . . . . . . . . . 20
Chapter 6: Bookmarking Your Favorite Pages . . . . . . . . . . . . . . . . . . . . . . . 21
Adding a bookmark . . . . . . . . . . . . . . . . . . . . . . . . . . . . . . . . . . . . . . . . . . . . . . . . 21
Visiting a bookmarked page . . . . . . . . . . . . . . . . . . . . . . . . . . . . . . . . . . . . . . . . . 22
Editing information about a bookmark . . . . . . . . . . . . . . . . . . . . . . . . . . . . . . . . 22
Deleting a bookmark . . . . . . . . . . . . . . . . . . . . . . . . . . . . . . . . . . . . . . . . . . . . . . . . 23
Chapter 7: Offline Browsing . . . . . . . . . . . . . . . . . . . . . . . . . . . . . . . . . . . . . 25
Saving a page . . . . . . . . . . . . . . . . . . . . . . . . . . . . . . . . . . . . . . . . . . . . . . . . . . . . . . 25
Viewing and editing a saved page on the handheld . . . . . . . . . . . . . . . . . . 25
Viewing files on an expansion card . . . . . . . . . . . . . . . . . . . . . . . . . . . . . . . . . . . 27
Viewing a file from another application . . . . . . . . . . . . . . . . . . . . . . . . . . . . . . . 27
Chapter 8: Finding Web Pages You Recently Visited . . . . . . . . . . . . . . . . . 29
Returning to a page you visited . . . . . . . . . . . . . . . . . . . . . . . . . . . . . . . . . . . . . . 29
Viewing a cached page . . . . . . . . . . . . . . . . . . . . . . . . . . . . . . . . . . . . . . . . . . . . . . 30
Clearing the History list . . . . . . . . . . . . . . . . . . . . . . . . . . . . . . . . . . . . . . . . . . . . . 30
Chapter 9: Customizing Palm™ Web Pro . . . . . . . . . . . . . . . . . . . . . . . . . . . 31
Changing your start and home page . . . . . . . . . . . . . . . . . . . . . . . . . . . . . . . . . . 31
Changing page characteristics . . . . . . . . . . . . . . . . . . . . . . . . . . . . . . . . . . . . . . . . 32
Changing the default size of text . . . . . . . . . . . . . . . . . . . . . . . . . . . . . . . . . . . . . 32
Changing display views . . . . . . . . . . . . . . . . . . . . . . . . . . . . . . . . . . . . . . . . . . 32
Changing link colors . . . . . . . . . . . . . . . . . . . . . . . . . . . . . . . . . . . . . . . . . . . . . 33
Changing how images are downloaded . . . . . . . . . . . . . . . . . . . . . . . . . . . . . 33
Enabling or disabling autofill . . . . . . . . . . . . . . . . . . . . . . . . . . . . . . . . . . . . . . . . 34
Enabling, disabling or deleting cookies . . . . . . . . . . . . . . . . . . . . . . . . . . . . . . . . 35
Changing the size and content of the cache . . . . . . . . . . . . . . . . . . . . . . . . . . . . 35
Controlling how Web Pro accesses the Internet . . . . . . . . . . . . . . . . . . . . . . . . . 36
Changing network preferences . . . . . . . . . . . . . . . . . . . . . . . . . . . . . . . . . . . . . . . 37
Enabling or disabling JavaScript . . . . . . . . . . . . . . . . . . . . . . . . . . . . . . . . . . . . . . 38
Changing the proxy server . . . . . . . . . . . . . . . . . . . . . . . . . . . . . . . . . . . . . . . . . . 38
Index . . . . . . . . . . . . . . . . . . . . . . . . . . . . . . . . . . . . . . . . . . . . . . . . . . . . . . . . . 39
iv
Page 5

About This Book
Palm™ Web Pro is your Palm™ handheld’s gateway to the web. The Palm™ Web
Pro Handbook can help you learn to use Web Pro to visit web pages. Later, you can
use this handbook as a reference for less common tasks, such as changing your
home page.
The Palm™ Web Pro Handbook is based on the following assumptions:
■ You know how to use the basic functions of your handheld, such as the basic
applications and HotSync
■ You know how to enter text and select onscreen items using the available
controls on your handheld, such as a built-in keyboard, an Input Area, an icon
area, or a navigator button.
■ You have all the elements you need to connect to the Internet. For example, you
may need a data-enabled phone, an Internet service provider, and so on.
■ You know how to configure your handheld to connect to the Internet.
■ You are using Web Pro 3.0 (or 3.0.x). For information about which Palm
handhelds support Web Pro 3.0 (or 3.0.x), see “Handheld system requirements”
in Chapter 2.
®
technology.
For information about any aspect of your handheld, please consult the
documentation that came with your handheld, or go to
you are outside the United States, go to
www.palm.com/support/intl.
www.palm.com/support. If
1
Page 6

About This Book
2
Page 7

Ease of use
CHAPTER 1
Introducing Palm™ Web Pro
Palm™ Web Pro gives you access to the Internet on your Palm™ handheld.
Web Pro is easy to use because it works much like the web browsers you use on
your desktop computer. You can enter Uniform Resource Locators (URLs, also
called web addresses), create bookmarks to mark favorite pages, save pages for
offline viewing later, and even download files directly to your handheld. You can
also use Web Pro to view certain kinds of files, such as popular graphics file
formats, that are attached to e-mail messages or stored on your handheld or on an
expansion card.
More importantly, Web Pro is designed to be used on the small screen of your
handheld. It forces images to fit the handheld’s screen, it does not clutter your
screen with fancy icons, and it handles technical features (like caching and cookies)
with minimal input from you.
Efficiency
Security
Web Pro keeps a History List of pages you have visited and lets you set an option
to view old content if it is available. When you view a page from the History
List with this option set, Web Pro displays that page from memory rather than
downloading it again and it informs you that you are viewing a stored version of
the page. You’re given the choice of viewing a stored version or connecting to the
Internet to refresh the page. You can also choose to manually confirm every
connection you make to the Internet.
Web Pro uses advanced encryption technology from Certicom. Encryption makes
your data unreadable by anyone but the intended recipient.
This encryption technology is used to secure the transmission of sensitive
information, such as credit card numbers, e-mail messages, and passwords.
Data is protected both when sent from your handheld over the network and when
coming in from the Internet directly to your handheld. For more information about
Certicom’s encryption technology, visit the Certicom web site:
www.certicom.com.
3
Page 8
Chapter 1 Introducing Palm™ Web Pro
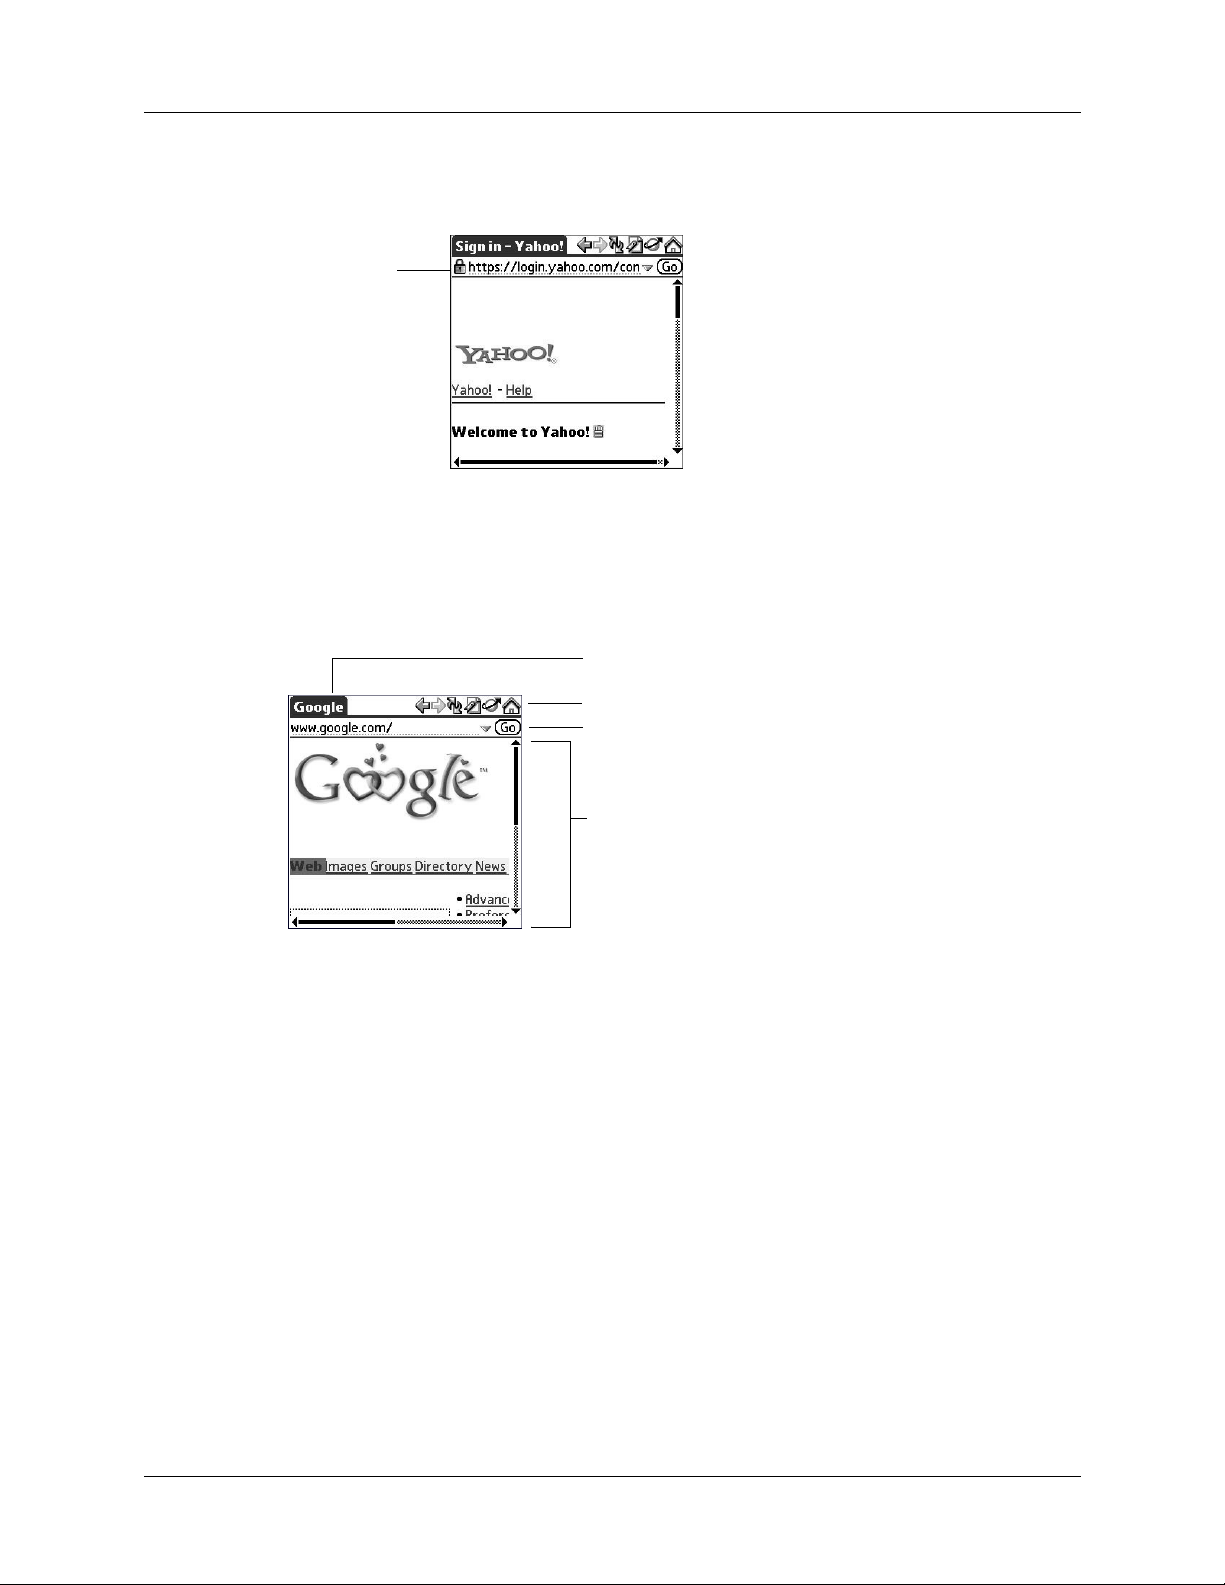
Title b
When you view a page that contains encrypted data, a padlock icon appears in the
upper-left corner of the page and indicates that your data is secure.
Secure icon
It’s not unusual to experience an additional delay of several seconds when a
transaction is being encrypted.
What Web Pro looks like
ar
Action icons
URL Entry field
Web content
The Web Pro screen has four parts:
■ The title bar displays the name of the current web page or shows the status of
actions, such as “Requesting...”, “Receiving...”, “Formatting...”, and so forth.
■ The action icons enable you to navigate in the browser, to refresh pages, and to
bookmark pages.
■ The URL Entry field enables you to quickly enter web page addresses.
■ The rest of the screen displays the content of the web page.
You can perform other actions by tapping items in menus. Like in other Palm OS
®
applications, when you select the title bar, it is replaced by the menu bar.
4
Page 9

Getting help in Web Pro
Help is available in the following locations:
■ Tap the Menu icon and select Web Pro help in the Options menu for
information about Web Pro.
■ Most dialog boxes in Web Pro have help about the options in the dialog box. To
see that information, tap the Tips icon .
Getting help in Web Pro
■ For help with drawing Graffiti
and then tap Graffiti 2 Help.
NOTE
support Graffiti 2 writing.
Graffiti 2 Help may not apply to your handheld; some handhelds do not
®
2 characters, tap the Menu icon , tap Edit,
5
Page 10

Chapter 1 Introducing Palm™ Web Pro
6
Page 11

CHAPTER 2
Some handhelds come with Web Pro 3.0 (or 3.0.x) already installed; you open it just
as you open any other application on your handheld. If you are upgrading from an
earlier version of Web Pro, review the following system requirements. Then, refer
to the documentation you received with your handheld for information about
installing additional applications.
Handheld system requirements
To use Web Pro 3.0 (or 3.0.x), your handheld must have the following:
■ Palm OS
■ 16 megabytes (MB) of total RAM with 2.5 MB of free RAM available
■ A way to connect to the Internet. For example, one of the following:
– A radio built into your handheld
– A wireless connection made through peripheral hardware attached to
®
software version 5.0 or later
your handheld
Palm
™
Web Pro Requirements
– A connection using a cell phone and appropriate software
– A modem for your handheld
NOTE Web Pro 3.0 (or 3.0.x) is not supported on the following Palm™ handhelds:
Palm™ m100 series handhelds, Palm™ m500 series handhelds, Palm™ i700 series
handhelds, Zire™ handhelds, and Tungsten™ W handhelds.
To find the Palm OS version number:
1. Go to the Palm applications Home screen.
2. Open the menus.
3. Tap Info from the App menu.
4. Tap Vers io n.
7
Page 12

Chapter 2 Palm™ Web Pro Requirements
To find the amount of RAM:
1. Go to the Palm applications Home screen.
2. Open the menus.
3. Tap Info from the App menu.
4. Tap Size.
In the line beginning “Free Space” are two numbers. The second number is
the total amount of RAM available on your handheld. The first number is the
amount of free RAM available. If the first number can be rounded up to 2.5 MB
or more, your handheld has enough RAM to support Web Pro.
Uninstalling Web Pro
Web Pro is easy to uninstall from your handheld.
NOTE
uninstall Web Pro because it is an integral part of the handheld software.
Some handhelds have Web Pro already installed on the handheld. You cannot
To uninstall Web Pro:
1. Go to the Palm applications Home screen.
2. Open the menus.
3. Tap Delete from the App menu.
4. Tap Web Pro.
5. Tap Delete.
A confirmation dialog box appears.
6. Tap Yes.
7. If a dialog box appears, asking you to reset your handheld, tap Reset.
IMPORTANT
browsing history.
Uninstalling Web Pro also removes your bookmarks, saved pages, and
8
Page 13

Like the web browser you use on your desktop computer, Palm™ Web Pro enables
you to browse the web in several ways:
■ Visit a web page by entering its URL.
■ Visit another web page by tapping a link.
■ Go back to the pages you have already visited by using the Back and
Forward icons.
■ View web pages stored offline on your handheld or on an expansion card.
Opening Web Pro
Web Pro works just like any other application on your handheld.
CHAPTER 3
Browsing the Web on Your Handheld
To open Web Pro:
1. Go to the Palm applications Home screen.
2. Select All in the Category pick list in the upper-right corner of the screen.
3. Tap the Web Pro icon .
Web Pro may take a moment to load the first page.
IMPORTANT If you are in another application, such as Palm™ VersaMail™, you can
tap on a URL and Web Pro automatically opens and connects to the Internet to display
the page. Depending on your preference, Web Pro also opens when you click on a
supported file type (.gif, .jpg, or .html) received as an attachment in VersaMail.
NOTE The rest of the instructions in this handbook assume that you’re already
running Web Pro and that you’ve successfully connected to the Internet.
9
Page 14
Chapter 3 Browsing the Web on Your Handheld
Disconnecting from and connecting to the Internet
If you are using GPRS service, you are only charged for the data sent. If you are
using a GSM service, you are charged for the time you are connected. While you’re
working with stored information in Web Pro, such as saved pages, stored versions
of pages, and so forth, you can disconnect from the Internet in order to reduce
usage charges. You can connect to the Internet again when you need access again.
To disconnect from the Internet:
1. Tap the Menu icon .
2. Tap Disconnect in the Page menu.
To connect to the Internet:
1. Tap the Menu icon .
2. Select Connect in the Page menu.
The Service Connection Progress dialog opens.
3. If the connection is not established, do one of the following:
– Tap Cancel to stop the connection process.
– Tap Change Network to select a different service to connect to.
Visiting a web page
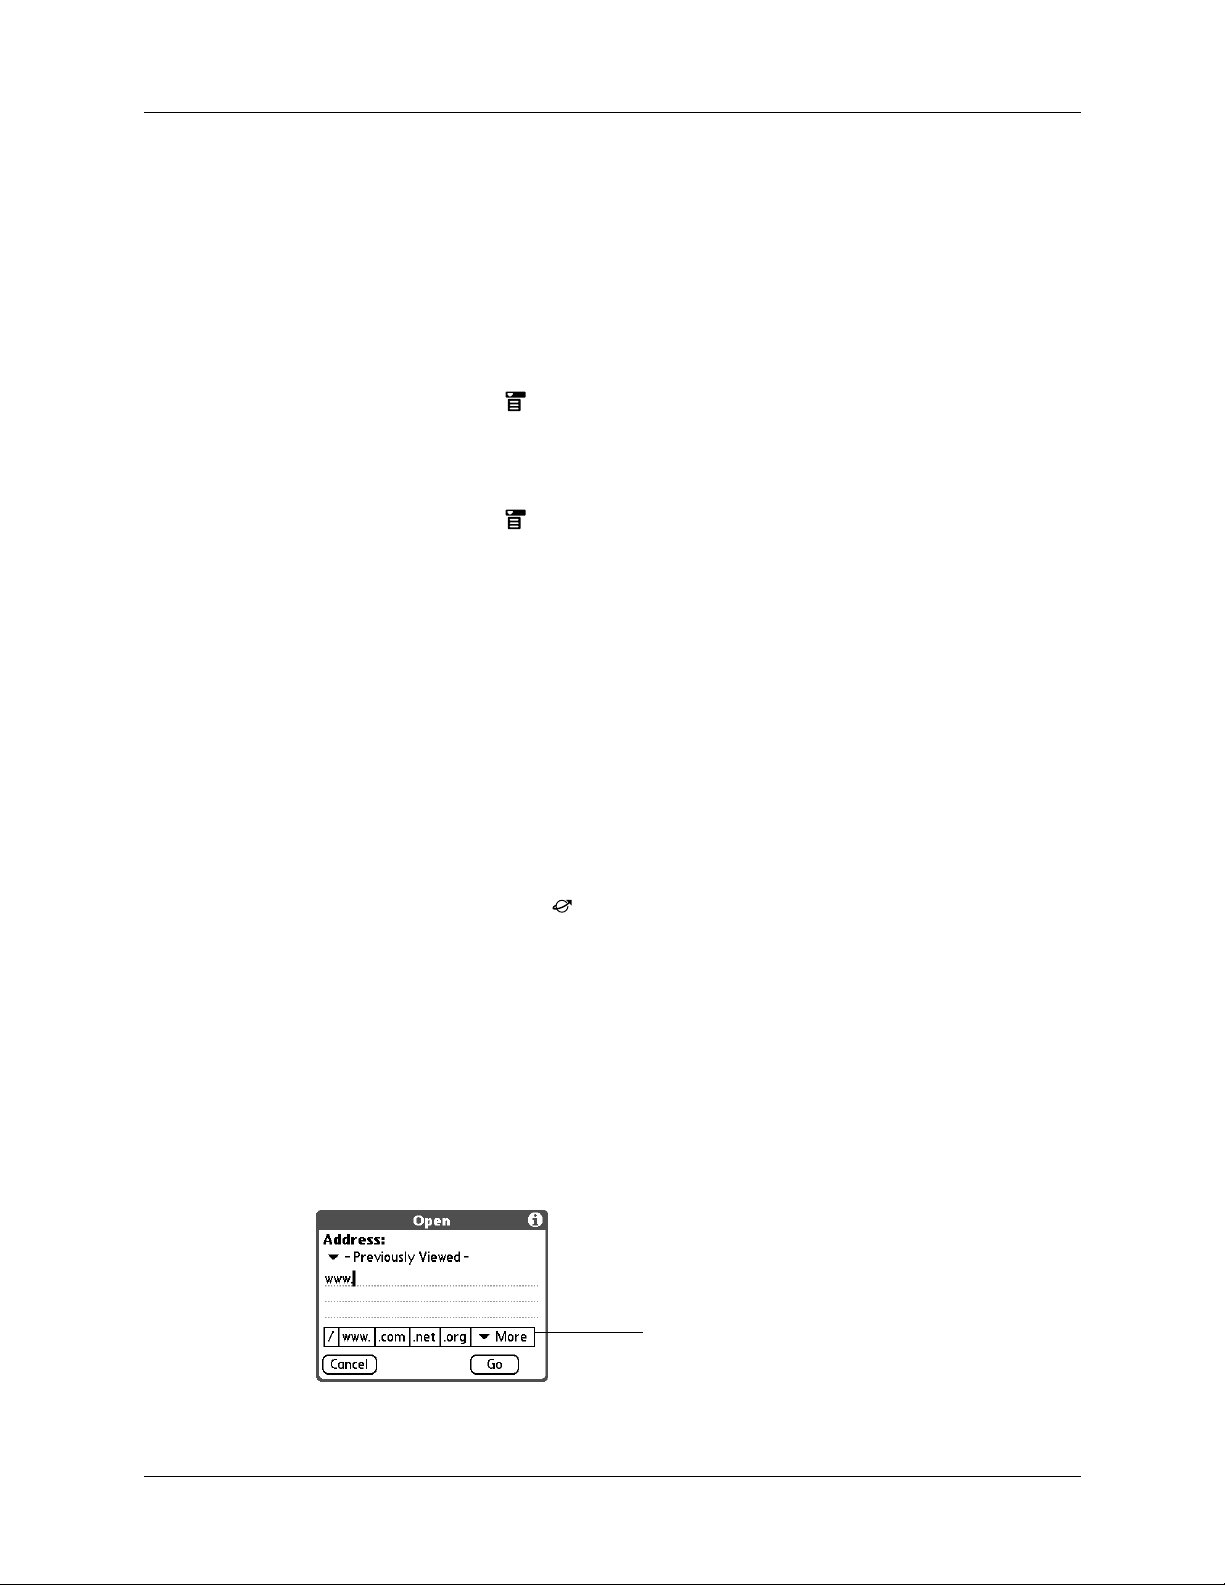
You can visit web pages by using the Open URL dialog box or the URL Entry field.
To visit a web page by using the Open URL dialog box:
1. Tap the Open URL icon .
2. Enter the URL of the web page you want to visit.
The field in the Open URL dialog box already contains the characters “www.”
If the web address you want to enter starts with another set of letters, just drag
over the “www.” and backspace to delete them.
Tap buttons to enter other characters commonly used in web addresses.
Tap the Previously Viewed pick list to select a URL from a list of web sites that
you recently visited. The URL is entered and, if necessary, you can modify the
URL.
10
(Optional) Tap buttons to
complete the web address
Page 15

Viewing different parts of a web page
Tell
3. Tap Go.
During the short delay while the new page is being downloaded, the title bar
displays information about the download process.
s you what Web Pro is doing
(receiving data, sending data)
Indicates how much data has been
downloaded so far (in kilobytes)
Activity icon shows you that
Web Pro is busy
To visit a web page by using the URL Entry field:
1. Tap the URL Entry field at the top of the screen.
Select the URL field and enter
the URL
2. Enter the URL in the field.
3. Tap Go, or press Enter if your handheld includes a navigator.
If autofill is enabled, you can enter just the first few letters of a URL that you’ve
TIP
entered before in the URL Entry field, and Web Pro completes the URL for you. For
more information on autofill, see “Enabling or disabling autofill” in Chapter 9.
Viewing different parts of a web page
If the web page is larger than your screen, you can tap and drag the stylus to move
the web page in any direction to view different parts of the web page.
NOTE
must tap and hold, then drag to select text when copying from a page.
Due to the ability to tap and drag pages to view other parts of a page, you
11
Page 16

Chapter 3 Browsing the Web on Your Handheld
Following a link
Many web pages contain links, which are text or pictures that, when clicked, take
you to another web page or to another part of the same page. Like many other web
browsers, Web Pro highlights these links by underlining them.
To follow a link:
■ Tap the link.
Links
NOTE
on a page. Once a link is highlighted, use the Up and Down buttons to go to the
previous or next link on the page. Once a link is highlighted, press Select to follow
the highlighted link.
You can use Navigator to quickly access links. Press Select to highlight a link
Returning to a web page you just visited
To go back to the last web page you visited:
■ Tap the Back icon .
To go back to an earlier page:
■ Tap the Back icon until you return to the page you want.
The list of visited pages (which is limited by your handheld’s memory) is called
the cache. See “Viewing a cached page” in Chapter 8 for more information on the
cache.
To go forward through the cached pages:
■ Tap the Forward icon .
12
Page 17

Returning to your home page
No matter where you navigate on the Internet, you can always return to your home
page quickly and easily.
To return to your home page:
■ Tap the Home Page icon in the Web Pro action bar .
If you want a different web page to be your home page, see “Changing your start
and home page” in Chapter 9.
Downloading a file to your handheld
Web Pro can download any type of file for which your handheld provides native
support, which means that your handheld contains an application that enables you
to open and view the file in its original format. (Some handheld applications allow
you to view files only after you perform a HotSync
file is converted from its original format to different format. Web Pro does not
download files that are supported only in this way.) For example, if your handheld
contains an application that lets you open PDF documents without format
conversion required on the desktop computer, you will be able to download PDF
files with Web Pro.
Returning to your home page
®
operation, during which the
Popular file types that Web Pro can download (when native support is present on
your handheld) include applications (.prc) and databases (.pdb) for Palm OS
software, as well as documents (.doc, .txt, and .pdf), images (.jpg and .gif), and
music files.
Downloading a file is much like visiting a web page.
NOTE
supported on your handheld.
You can download a file to an SD card even if the file type does not have native
To download a file by following a link from a web page:
1. Tap the link.
The Download dialog box appears, asking you to confirm the file you want to
download.
If you want to download to an expansion card, select the Download to card
check box.
2. If the file is the one you want, tap Save.
A message appears showing you the progress of the download. When the file
download is complete, a message appears.
3. Tap OK .
13
Page 18

Chapter 3 Browsing the Web on Your Handheld
Stopping the download process
If you decide that the download process is taking too long, you can stop it.
To stop a web page from downloading:
■ Tap the Stop icon in the Web Pro action bar.
To stop a file from downloading:
■ Tap Cancel in the Download dialog box.
You can make changes to improve the download speed, such as not downloading
images that appear on web pages. See “Changing page characteristics” in
Chapter 9.
Refreshing a page
Some web pages, such as news sites, change frequently. If you visit a page and
spend several minutes reading an article, the web site may change during that
time. To make sure you have the latest content, refresh the page.
To refresh a page:
■ Tap the Refresh icon .
You can also view old content instead of accessing the Internet. See Chapter 7.
Viewing information about a web page
Because of the limited space on the handheld screen, sometimes the current web
address (URL) is not fully viewable. To find the full URL, name, and size of the
current web page, open the Web Page Info dialog box.
To view information about the current web page:
1. Open the menus.
2. Tap Page Info from the Page menu.
14
3. Tap OK .
Page 19

Using passwords
Some web sites require that you use a password to gain access to information.
Passwords in Web Pro work in a slightly different way from those in typical
desktop browsers.
To enter a password:
1. Open the web page where you must enter the password. The password field
contains the word “Unassigned.”
Using passwords
2. Enter your sign-in name in the appropriate field.
3. Enter your password in the appropriate field and tap OK.
The password field now contains asterisks indicating the password has been
entered.
4. Tap the sign-in button (Enter, Go, and so forth) on the web page to gain access
to the password-protected information.
Disconnecting from and connecting to the Internet
While you’re working with stored information in Web Pro, such as saved pages,
stored versions of pages, and so forth, you can disconnect from the Internet to reduce
usage charges. You can connect to the Internet again when you need access again.
To disconnect from the Internet:
1. Open the menus.
2. Tap Disconnect from the Page menu.
To connect to the Internet:
■ Do one of the following:
– Open the menus, and then tap Connect from the Page menu.
– If Web Pro is open: Enter a URL, and then tap Go.
Web Pro automatically initiates an Internet connection.
15
Page 20

Chapter 3 Browsing the Web on Your Handheld
16
Page 21

Copying text
CHAPTER 4
Copying and Pasting Text
You’ll often find text on web pages, in web page fields, and in dialog boxes that
you’d like to copy and use elsewhere in Palm™ Web Pro or in another application.
When editing, note the following:
■ None of the Edit options copy or cut images, only text.
■ Due to the ability to tap and drag pages to view other parts of a page, you must
tap and hold, then drag to select text. For more information on tap and drag to
view other parts of a page, see “Viewing different parts of a web page” in
Chapter 3.
Cut
Copy
Select All
Removes the selected text from a field on a web page or in a
dialog box and stores it temporarily in the memory of your
handheld. If you select text on a web page rather than in a field,
Cut functions just like Copy.
Copies selected text from a field or web page and stores it
temporarily in the memory of your handheld.
If the cursor is in a URL, input, or text field, selects all the text
in the field. If the cursor is not in a field, selects all the text on
the web page.
To copy or cut text:
1. Open the application.
2. Select the text you want to copy or cut.
3. Open the menus.
4. Select Cut or Copy from the Edit menu.
To undo the last Cut, Copy, or Select All action:
■ Select Undo from the Edit menu.
17
Page 22

Chapter 4 Copying and Pasting Text
Pasting text
Once you’ve copied text, you can paste that text into a web page field, dialog box,
or another application.
To paste text into a web page field or dialog box:
1. Place the cursor where you want the text pasted.
2. Open the menus.
3. Select Paste from the Edit menu.
To paste text into another application:
1. Open the application.
2. Place the cursor where you want the text pasted.
3. Use the Paste option in the application. For example, in Address Book, select
Paste from the Edit menu.
To undo a Paste action:
■ Do one of the following:
– In Web Pro, open the menus and select Undo from the Edit menu.
– In other applications, choose the undo option, if available. For example, in
Address Book, open the menus and select Undo from the Edit menu.
18
Page 23

You can use Palm™ Web Pro to communicate with other users in several ways:
■ Use a mailto link on a web page to compose and send e-mail.
■ Beam a URL to another Web Pro user.
■ E-mail a URL to another user.
Sending e-mail
Some web pages include “mailto” links. You can use these links to send e-mail to
others if the default e-mail application on your handheld is the VersaMail™
application or another application that supports this functionality.
To send e-mail:
1. Tap a mailto link on a web page.
CHAPTER 5
Communicating with Other Users
The e-mail application opens and a new e-mail message is created. The message
is already addressed to the mailto address, and the subject line may be filled out
for you, as well.
2. Compose your e-mail message in the e-mail application.
3. Tap Outbox to save the e-mail in your e-mail application’s outbox.
Use your e-mail application, such as VersaMail, to send the e-mail message.
Beaming a URL
You can share your favorite web pages with other Web Pro users by beaming URLs
to their handhelds.
To beam a web page’s URL:
1. Navigate to the web page.
2. Open menus and select Send from the Page menu.
A dialog box opens.
19
Page 24

Chapter 5 Communicating with Other Users
3. Point the IR port of your handheld directly at the IR port of the receiving device.
4. Tap Beam URL.
The recipient can choose to accept the beamed URL or not. If the recipient
chooses not to accept the URL, the beaming process ends.
Messages display showing the beaming progress. When the message closes, the
beaming process is complete.
E-mailing a URL
You can also e-mail the URLs of your favorite web pages to other users.
To e-mail a web page’s URL:
1. Navigate to the web page.
2. Open the menus and select Send from the Page menu.
A dialog box opens.
3. Tap Mail URL.
The e-mail application opens.
4. Compose your mail message in the e-mail application.
5. Tap Send to send the e-mail message now, Outbox to send the e-mail message
later, or Cancel.
You are returned to Web Pro and to the web page you were viewing.
20
Page 25

When you read a printed book, you place a bookmark at the page where you
stopped reading so that you can remember where you stopped. In the same way,
you can bookmark a web page for later reference. A bookmark in Palm™ Web Pro
doesn’t store the actual page; instead, it stores a reference to the page’s URL.
Adding a bookmark
If you would like to visit the current page again, add a bookmark to the Bookmark
list.
To add a bookmark for the current page:
1. Open the menus, and then tap Add Bookmark from the Page menu.
2. (Optional) Change the bookmark name, URL, or category.
CHAPTER 6
Bookmarking Your Favorite Pages
3. Tap Sa ve.
Tap here to change the bookmark name
Tap here to choose a category
Tap here to change the URL
21
Page 26

Chapter 6 Bookmarking Your Favorite Pages
Visiting a bookmarked page
Use your list of bookmarks to visit a particular page again.
NOTE
home page” in Chapter 9.
You can set Bookmarks as your start page. See “Changing your start and
To visit a bookmarked page:
1. Do one of the following:
– Tap the Bookmark icon .
– Open the menus, and then tap View Bookmarks from the Page menu.
2. Do one of the following:
– Tap the name of the bookmarked page you want to visit, and then tap Go.
– If your handheld includes a navigator, press Up and Down to scroll through
the list of bookmarks, and then press Select to visit the bookmarked page
you’ve chosen.
Editing information about a bookmark
You can edit the name and URL of a bookmark and change its category.
To edit information about a bookmark:
1. Do one of the following:
– Tap the Bookmark icon , and then tap Bookmarks.
– Open the menus, and then tap View Bookmarks from the Page menu.
2. Do one of the following to select the bookmark you want to edit:
– Tap the name of the bookmark you want to edit.
– If your handheld includes a navigator, press Up and Down to scroll through
the list of bookmarks to the bookmark you want to edit.
3. Tap Edit.
4. Tap De ta il s.
22
Page 27

5. Edit the bookmark:
– Tap the Name field, and then enter a new name.
– Tap the URL box to change the address.
– Tap the Category pick list to change the category or to create a new category.
6. Tap Sa ve.
7. Tap Do ne .
Deleting a bookmark
You can delete bookmarks that you no longer want.
To delete a bookmark:
1. Press Select on the navigator.
2. Press Up and Down on the navigator to scroll through the list of bookmarks to
the bookmark you want to delete.
3. Tap Edit.
Deleting a bookmark
4. Tap Delete.
A confirmation dialog box appears.
5. Tap OK .
6. Tap Do ne.
23
Page 28

Chapter 6 Bookmarking Your Favorite Pages
24
Page 29

If you want to save a page (such as a travel itinerary or Internet order receipt)
indefinitely, you can create a saved page. A saved page is a copy of the page. The
copy is stored on the handheld until you delete it.
NOTE Because saved pages are stored on your handheld, the number of pages you
can save depends on the amount of available memory on your handheld.
Saving a page
You can save a web page to your handheld.
To save a web page to your handheld:
1. Open the web page you want to save.
2. Open the menus.
CHAPTER 7
Offline Browsing
3. Tap Save Page from the Page menu.
4. (Optional) Change the page name or category.
5. Tap Sa ve.
Viewing and editing a saved page on the handheld
When you open a saved page, remember that you’re seeing a copy of the actual
page.
To open a saved page:
1. Open the menus.
2. Select View Saved Pages from the Page menu.
25
Page 30

Chapter 7 Offline Browsing
3. Tap the name of the saved page you want to open.
4. Tap Go.
To edit information about a saved page:
1. Open the menus.
2. Select View Saved Pages from the Page menu.
3. Tap the name of the saved page you want to edit.
Shows when you saved the page.
If you saved it today, it shows the
time. If you saved it before today,
it shows the date.
4. Tap Edit.
5. Edit the information about the saved page:
– Tap the Name field, and then enter a new name.
– Tap the Category pick list to change the category or to create a new category.
6. Tap Sa ve.
A confirmation dialog box appears.
7. Tap Yes.
8. Tap Do ne.
To delete a saved page:
1. Open the menus.
2. Select View Saved Pages from the Page menu.
3. Tap the name of the saved page you want to delete.
4. Tap Edit.
5. Tap Delete.
A confirmation dialog box appears.
26
6. Tap OK .
7. Tap Do ne.
Page 31

Viewing files on an expansion card
You can view saved files on an expansion card without an active Internet
connection. The following files types can be opened from an expansion card: .html,
.htm, .gif, and .jpg.
Viewing files on an expansion card
NOTE
into your handheld.
The Open from Card option appears only when an expansion card is inserted
To view a file on an expansion card:
1. Open the menus.
2. Select Open from Card from the Page menu.
3. Open the folder that contains the file.
4. Select the file.
5. Tap Open.
Viewing a file from another application
Web Pro also functions as a viewer, enabling you to quickly view certain files while
working in other applications. For example, if you read an e-mail message that has
an image file attached, tap the image file. If no other application on your handheld
is identified to open the image file by default, Web Pro opens so that you can view
the image.
27
Page 32

Chapter 7 Offline Browsing
28
Page 33

Finding Web Pages You Recently Visited
Using the Back and Forward icons to browse through the pages you recently have
visited, one page at a time, can be tedious. Instead, you can use the History list to
view a list of the pages you have visited and go directly to any page in that list. The
History list contains a record of the last 50 pages you have visited and is saved even
when you exit Palm™ Web Pro.
The History list also indicates pages that have been cached, or stored on your
handheld, which means you can view them again without connecting to the
Internet.
Returning to a page you visited
To return to a page you visited:
1. Open the menus.
CHAPTER 8
2. Select History from the Options menu.
3. Tap the name of the web page you want to visit.
4. Tap Go .
29
Page 34

Chapter 8 Finding Web Pages You Recently Visited
Viewing a cached page
■ Tap a page that appears in the History list next to the cached icon.
A dialog box appears, reminding you that you are about to view old content.
■ Do one of the following:
– Tap Yes to view the stored version.
– Tap No, Get Latest to initiate an Internet connection and retrieve up-to-date
content.
Clearing the History list
If you’ve recently visited web pages you have no intention of visiting again, you
can clear the History list.
IMPORTANT
history. Pages you’ve recently visited are still available in the cache, and you can visit
those pages by using the Back and Forward icons in the Web Pro action bar. If you
want to save the location or content of a web page indefinitely, create a bookmark or
a saved page for that page before clearing the History list. For more information on
the cache, see “Changing the size and content of the cache” in Chapter 9. For more
information on the Back and Forward icons, see “Returning to a web page you just
visited” in Chapter 3.
Clearing the History list removes the record of your recent browsing
To clear the History list:
1. Open the menus.
2. Select History from the Options menu.
3. Tap Clear.
A confirmation dialog box appears.
4. Tap OK .
NOTE
and saved pages are not deleted.
5. Tap Do ne.
This action clears only the contents of the History list. Your bookmarks
30
Page 35

CHAPTER 9
You can change Palm™ Web Pro to improve the speed, ease of use, and security of
your browsing experience.
Changing your start and home page
You can select the start page you want Web Pro to open to when you first open Web
Pro. You can also choose a home page to any web address.
NOTE Your service provider has the option to disable this choice. If the choice is
disabled, your changes have no effect.
To change your start page:
1. Open the menus.
2. Select Preferences from the Options menu.
3. Tap De fau lt .
Customizing Palm
™
Web Pro
4. Tap Start With pick list and select page.
5. Tap OK .
To change your home page:
1. Open the menus.
2. Select Preferences from the Options menu.
3. Tap De fau lt .
4. Tap the Home Page box.
Ta p he re
31
Page 36

Chapter 9 Customizing Palm™ Web Pro
5. Enter the URL.
To make the page currently displayed in Web Pro your home page, tap Current
URL.
To select one of the last five home pages you’ve used as your home page, tap the
URL pick list and select a URL.
6. Tap OK .
Changing page characteristics
You can change the color of links on pages. In some cases, you can also change the
way images appear on pages.
Changing the default size of text
If the default size of the text is too small, you can increase the size.
To change the default size of text:
1. Open the menus.
2. Select Font from the Options menu.
3. Choose font size and check the sample text.
4. When you’re satisfied with your choice, tap OK.
Changing display views
You can optimize your viewing of a web page on your handheld.
Normal View functionality is only available when the proxy server is turned off.
Usually the default setting has the proxy server turned on and pages are displayed
in Handheld view. When you select Normal View, you have a choice to turn off the
proxy server and display pages in Normal View, or remain in Handheld View. By
keeping the proxy server turned on, web pages generally load much faster and
your data charges are reduced. For more information on using a proxy server, see
“Changing the proxy server” later in this chapter.
To change display views:
1. Open the menus.
2. Select Options, and then tap one of the following options:
Normal View
Displays the web page as it would appear in a desktop
computer web browser.
32
Handheld View
Fullscreen View
Displays a modified version of the web page so that it is
optimized for handheld viewing.
The web page fills the whole screen. To exit Fullscreen mode,
tap the circle icon in the upper-right corner.
Page 37

Changing link colors
You can change the colors that are used to display visited and unvisited links on
the web pages you view.
Changing the default size of text
NOTE
Changing link colors affects only sites that use default link colors.
To change link colors:
1. Open the menus.
2. Select Display Options from the Options menu.
3. Change the display colors for visited and/or unvisited links. The default
display color for unvisited links is blue; for visited links it is purple.
4. Tap OK .
Changing how images are downloaded
Images in web pages can be very large. If you are accessing the Internet by using a
proxy server, you may be able to set options to make web pages download faster
by reducing image quality or removing images altogether, or you may choose to
have images downloaded so that they appear at their highest quality.
IMPORTANT
deselect an option to view images. When you choose to view images, they will be
displayed at their best quality.
If you are not using a proxy server, you will only be able to select or
33
Page 38

Chapter 9 Customizing Palm™ Web Pro
To change how images are downloaded and displayed:
1. Open the menus.
2. Select Display Options from the Options menu.
3. Select one of the following items from the Images pick list:
No Images
All web pages are downloaded without images. If images are
already in cache, they will be displayed.
Low Quality
Images are compressed and have a very low resolution.
This makes downloading faster but results in reduced
image quality.
Normal Quality
Image quality is average. This is the best compromise
between speed and image quality.
High Quality
Best Quality
Image quality is better than average. This is the default setting.
Images are downloaded at their highest quality. This may
result in longer download times.
4. Tap OK .
Enabling or disabling autofill
Filling out an order form or application on the web usually requires entering several
pieces of information: your name, address, phone number, and so on. By default,
Web Pro stores the information you entered in these fields. The next time you use
that order form and type the first few letters in a field, Web Pro remembers the last
item you entered in that field that started with those letters, and fills in the field.
34
The autofill feature also applies to URLs. If autofill is enabled, when you enter the
first few letters of a URL you’ve entered before in the URL Entry field, Web Pro
completes the URL for you.
To enable or disable autofill:
1. Open the menus.
2. Select Preferences from the Options menu.
3. Tap General.
4. In the Autofill Text check box, do one of the following:
– To turn off autofill, tap to remove the checkmark.
– To turn on autofill, tap to select it.
5. Tap OK .
Page 39

Enabling, disabling or deleting cookies
Some web sites store information in a small text file, called a cookie. Cookies usually
contain information about you and your preferences for that web site. A site can
use this information to customize the pages you see the next time you visit.
Allowing a web site to create a cookie does not give the site access to the rest of
your handheld. A cookie stores only the information you provide while visiting
the web site.
By default, Web Pro saves the cookies it receives. You can tell it not to accept
cookies. You can also periodically delete cookies from your handheld.
To enable or disable cookies:
1. Open the menus.
2. Select Preferences from the Options menu.
3. Tap Advanced.
4. In the Accept cookies check box, do one of the following:
– To not store cookies, tap to remove the checkmark.
Enabling, disabling or deleting cookies
– To accept cookies, tap to select it.
5. Tap OK .
To delete cookies:
1. In the Advanced Preferences screen, tap the Delete Cookies box.
2. Tap OK in the Delete Cookies confirmation dialog box.
Changing the size and content of the cache
The cache in Web Pro consists of web pages that are stored so you can view them
again without accessing the Internet. By default, this cache is saved, thereby saving
the content you’ve viewed even when you exit Web Pro.
You can change the size of the cache to increase the number of web pages stored,
you can choose to clear the cache immediately, or you can choose to clear the cache
each time you exit Web Pro so that it starts fresh at the beginning of each session.
To change the size and content of the cache:
1. Open the menus.
2. Select Preferences from the Options menu.
35
Page 40

Chapter 9 Customizing Palm™ Web Pro
3. Tap Advanced.
4. Use one or more of the following options:
Clear Cache
Clear cache on exit
Tap to clear the cache immediately.
Select the check box to clear the cache each time you exit
Web Pro. Deselect the check box to keep the cache from
session to session.
Max. cache size
Tap to change the maximum cache size used to store web
pages. The default size of the cache is 1,024KB and the
maximum size is 9,999KB.
NOTE
Choose a cache size that lets you store at least a few pages but still leaves room
on your handheld for other data and applications. A value of at least 500KB is
recommended.
5. Tap OK .
Remember that your handheld has a limited amount of memory.
Controlling how Web Pro accesses the Internet
Because some wireless Internet service providers (ISPs) charge by the amount of
data you download, Web Pro is careful to limit how often it accesses the Internet.
If you have a faster or more permanent connection to the Internet (such as a
wireless Ethernet attachment), the default settings should work for you.
36
If you have a slower or more expensive Internet connection, you can enable three
settings that can help reduce your access costs.
To change connection settings:
1. Open the menus.
2. Select Preferences from the Options menu.
3. Tap General.
Page 41

Changing network preferences
4. Tap the check box next to the following options to enable or disable that option:
Offer old content if
available
Ask before
connecting
Disconnect on Exit
By default, these options are disabled (that is, there are no checks in the check
boxes).
5. Tap OK .
Changing network preferences
Web Pro includes many options you can use to change the way in which you access
the network.
To change network preferences:
1. Open the menus.
Use of old content is only available from the History list.
Old pages from cache are displayed instead of new
versions being retrieved from the Internet, even if the old
pages are outdated. A dialog box is displayed informing
you when the page you are viewing is old.
You’re notified each time before you access the Internet.
Your handheld disconnects from the Internet when you
exit Web Pro.
2. Select Network from the Options menu.
3. Change one or more of the following settings:
Always connect using
Check if you always want to use the same ISP to connect
to the Internet.
Service
4. Tap Do ne .
Select the ISP you want to use to connect to the Internet.
37
Page 42

Chapter 9 Customizing Palm™ Web Pro
Enabling or disabling JavaScript
Web Pro supports JavaScript code on web pages. JavaScript is often used on web
pages for interactive content.
If Web Pro is configured for a Palm-hosted proxy server, JavaScript is enabled by
default and can’t be turned off.
If Web Pro is configured for a non-Palm proxy server or to operate without a proxy
server, JavaScript is enabled by default, but you can disable JavaScript using the
procedure below.
NOTE
rollovers and form validation.
Some JavaScript implementations are not supported, such as mouse
To enable or disable JavaScript:
1. Open the menus.
2. Select Preferences from the Options menu.
3. Tap Advanced.
4. In the Enable JavaScript check box, do one of the following:
– To disable JavaScript, tap to remove the checkmark.
– To enable JavaScript, tap to select it.
5. Tap OK .
Changing the proxy server
Using a proxy server reduces your data charges by downloading web pages faster.
Your handheld comes with the proxy server turned on. You can turn the proxy
server off, or configure some other proxy server.
NOTE
turned off. For more information on using the different display views, see “Changing
display views” earlier in this chapter.
Normal view of the web pages is only available when the proxy server is
38
To turn on or off the proxy server or to configure another proxy server:
1. Open the menus.
2. Select Preferences from the Options menu.
3. Tap Advanced.
4. In the Use proxy server check box, do one of the following:
– To not use a proxy server, tap to remove the checkmark.
– To use a proxy server, tap to select it.
If you want to use a proxy server other than the default Palm hosted proxy
server, enter the appropriate server address and port number.
5. Tap OK .
Page 43

Index
A
Action icons 4
Adding a bookmark 21
Autofill, enabling or disabling 34
B
Beaming URLs 19
Bookmarks
adding 21
deleting 23
editing 22
effect of Web Pro removal on 8
visiting pages 22
Browsing files on a card 27
Browsing the web 9–14
C
Cache
changing the size and content of 35
clearing 35
definition 35
saved pages 35
saving 35
Category
for bookmarks 21, 22
for saved pages 26
Cell phone connection to Internet 7
Certicom. See Encryption security
Changing
bookmark information 22
cache size 35
home page 31
image download preferences 32
saved page information 26
text size 32
Clearing
cache 36
History list 30
Compression, of images 34
Connecting to the Internet 10
Connection
cell phone 7
Internet 7, 15
modem 7
modifying preferences 36
requirements 7
Content
latest 14
old 14
Controlling Internet access 36
Cookies
definition 35
enabling or disabling 35
Copy 17
Customizing Web Pro 31–38
Cut 17
D
Databases, downloading 13
Default screen 4
Default setting
for autofill 34
for connection preferences 36
for cookies 35
for unvisited link color 33
for visited link color 33
of text size 32
Deleting
bookmarks 23
Palm Web Pro 8
saved pages 26
Disabling
autofill 34
cookies 34
JavaScript 38
Disconnecting from the Internet 15
Downloading
files, all types 13
stopping 14
39
Page 44

Index
E
Editing
bookmarks 22
saved pages 26
E-mail
e-mailing URLs 20
launching from Palm Web Pro 19
security 3
Emptying the History list 30
Enabling
autofill 34
cookies 34
JavaScript 38
Encryption security 3
Expansion card 27
F
Favorites. See Bookmarks
File types that can be downloaded 13
Finding
Palm OS version 7
visited pages 29
Font size. See Text size
Open URL 10
Refresh 14
Stop 14
Web 9
Images
behavior in Web Pro 3
changing download preferences 33
compression 34
copying 17
Internet access 7, 36
ISP, changing 37
J
JavaScript, enabling and disabling 38
Jumping to another web page 12
L
Launching Web Pro 9
Link
colors, changing 33
definition 12
downloading files 13
unvisited links 33
visited links 33
G
Graphics pick list 34
Graphics. See Images
H
Handheld system requirements 7
History list
clearing 30
definition 29
effect of Palm Web Pro removal 8
limit 29
Home page
changing 31
returning to 13
Hyperlink. See Link
I
Icon
Back 12
Bookmark 22
Forward 12
Home Page 13
M
Mailto links 19
Maximum cache size 36
Memory, limitations on History list 12
Menu bar 4
Modem connection to Internet 7
Modifying
cache size 35
connection preferences 36
home page 31
image download preferences 32
text size 32
N
Network preferences 37
O
Old content 3, 14
Old web page content, viewing if
available 37
40
Page 45

Index
Opening
bookmarked pages 22
Web Pro 9
Overview of Palm Web Pro 3–5
P
Pages. See Web pages
Palm OS, finding version used on
handheld 7
Passwords, entering in Web Pro 15
Paste 18
Pictures. See Images
R
Reducing costs 36
Refreshing a page 14
Removing
bookmarks 23
Palm Web Pro 8
saved pages 26
Renaming
bookmarks 22
saved pages 26
Returning
to a page in the History list 29, 30
to a web page 12
to your home page 13
Running Web Pro 9
T
Text size 32
Title bar 4, 11
U
Undo
Copy 17
Cut 17
Paste 18
Select All 17
Uniform Resource Locator. See URL
Uninstalling Palm Web Pro 8
URL
beaming 19
changing home page 31
definition 3
e-mailing 20
entering in Palm Web Pro 10
Entry field 4, 11
truncated 14
V
VersaMail application 19
Viewing
a web page 10
page information 14
Visiting
bookmarked pages 22
web pages 10
S
Saved pages
definition 25
deleting 26
effect of Web Pro removal 8
opening 25
renaming 26
timestamp 26
Security 3
Select All 17
Sending 19
Service, changing 37
Speed, of image downloading 34
Starting Web Pro 9
Stopping a download 14
System requirements 7
W
Web address. See URL
Web page
displaying old content 37
list of visited 29
refreshing 14
returning to 12
saving 25
viewing information about 14
Wireless connections 7, 36
41
Page 46

Index
42
 Loading...