


Palmer FAB 5 User Manual [en, de, fr, es]
FAB5
5W All-Tube Guitar Combo
USER´S MANUAL
BEDIENUNGSANLEITUNG
MANUEL D`UTILISATION
MANUAL DE USUARIO

DEFINE
YOUR
TONE
2

INTRODUCTION
Thank you for choosing the Palmer FAB5.
Your new amp is an all-tube amplifier with a Class-A design that is especially prized by countless guitarists because of its direct response and
harmonious distortion and is frequently used to record guitar tracks in
the studio. Because of their seemingly low output, single-ended amplifiers are usually pigeon-holed in the practice amp category. In conjunction with the powerful, built-in 10" Eminence Ragin Cajun speaker or an
external speaker cabinet, however, the FAB5's 5 watts reach volume levels
that are thoroughly band- and stage-compatible. Here, it is above all
at high volume levels that the power stage distortion and natural compression preferred by tone aficionados come into their own. These can be
controlled conveniently by means of picking dynamics and with the guitar
volume control. The boost control lets you continually boost the volume
and distortion yet again. This function can be activated via an additional footswitch for various rhythm and solo settings.
In keeping with the practice amp application, one special feature of FAB5
is a built-in power attenuator capable of reducing the volume to a level
acceptable in living rooms and bedrooms. This allows you to use the overdrive of the amp even at drastically reduced levels without alarming your
neighbours or the police.
The FAB5 is built using high-quality components and specially selected
tubes that ensure maximum tone quality and reliable operation. The preamp
uses a 12AX7 (ECC83) tube and the output stage a 6V6; the rectifier is
an EZ81. If you should ever notice signs of wear such as high frequency
loss, reduced output, hum or microphonics, have the tubes replaced only
by a qualified technician.
We hope you have a lot of fun with your Palmer FAB5!
EN FRDE ES
3

SAFETY INFORMATION
1. Please read these instructions carefully.
2. Keep all information and instructions in a safe place.
3. Follow the instructions.
4. Observe all safety warnings. Never remove safety warnings or other
information from the equipment.
5. Use the equipment only in the intended manner and for the intended
purpose.
6. Use only sufficiently stable and compatible stands and/or mounts (for
fixed installations). Make certain that wall mounts are properly
installed and secured. Make certain that the equipment is installed
securely and cannot fall down.
7. During installation, observe the applicable safety regulations for
your country.
8. Never install and operate the equipment near radiators, heat registers, ovens or other sources of heat. Make certain that the equipment
is always installed so that is cooled sufficiently and cannot overheat.
9. Never place sources of ignition, e.g., burning candles, on the equipment.
10. Ventilation slits must not be blocked.
11. Do not use this equipment in the immediate vicinity of water (does
not apply to special outdoor equipment - in this case, observe the
special instructions noted below. Do not expose this equipment to
flammable materials, fluids or gases.
12. Make certain that dripping or splashed water cannot enter the equipment. Do not place containers filled with liquids, such as vases or
drinking vessels, on the equipment.
13. Make certain that objects cannot fall into the device.
14. Use this equipment only with the accessories recommended and intended
by the manufacturer.
15. Do not open or modify this equipment.
16. After connecting the equipment, check all cables in order to prevent
damage or accidents, e.g., due to tripping hazards.
17. During transport, make certain that the equipment cannot fall down
and possibly cause property damage and personal injuries.
18. If your equipment is no longer functioning properly, if fluids or
objects have gotten inside the equipment or if it has been damaged in
another way, switch it off immediately and unplug it from the mains
outlet (if it is a powered device). This equipment may only be repaired by authorized, qualified personnel.
19. Clean the equipment using a dry cloth.
20. Comply with all applicable disposal laws in your country. During disposal of packaging, please separate plastic and paper/cardboard.
21. Plastic bags must be kept out of reach of children.
FOR EQUIPMENT THAT CONNECTS TO THE POWER MAINS:
EN FRDE ES
22. CAUTION: If the power cord of the device is equipped with an earthing contact, then it must be connected to an outlet with a protective
4

ground. Never deactivate the protective ground of a power cord.
23. If the equipment has been exposed to strong fluctuations in temperature (for example, after transport), do not switch it on immediately.
Moisture and condensation could damage the equipment. Do not switch
on the equipment until it has reached room temperature.
24. Before connecting the equipment to the power outlet, first verify
that the mains voltage and frequency match the values specified on
the equipment. If the equipment has a voltage selection switch, connect the equipment to the power outlet only if the equipment values
and the mains power values match. If the included power cord or power
adapter does not fit in your wall outlet, contact your electrician.
25. Do not step on the power cord. Make certain that the power cable does
not become kinked, especially at the mains outlet and/or power adapter and the equipment connector.
26. When connecting the equipment, make certain that the
power adapter is always freely acces
equipment from the power supply if the equipment is not in use or if
you want to clean the equipment. Always unplug the power cord and
power adapter from the power outlet at the plug or adapter and not
by pulling on the cord. Never touch the power cord and power adapter
with wet hands.
27. Whenever possible, avoid switching the equipment on and off in quick
succession because otherwise this can shorten the useful life of the
equipment.
28. IMPORTANT INFORMATION: Replace fuses only with fuses of the same type
and rating. If a fuse blows repeatedly, please contact an authorised
service centre.
29. To disconnect the equipment from the power mains com
power cord or power adapter from the power outlet.
30. If your device is equipped with a Volex power con
Volex equipment connector must be unlocked before it can be removed.
However, this also means that the equipment can slide and fall down
if the power cable is pulled, which can lead to personal injuries
and/or other damage. For this reason, always be careful when laying
cables.
31. Unplug the power cord and power adapter from the power outlet if
there is a risk of a lightning strike or
before extended periods of disuse.
sible. Always disconnect the
power cord or
pletely, unplug the
nector, the mating
CAUTION
RISK OF ELECTRIC SHOCK
CAUTION:
Never remove the cover, because otherwise there may be a risk of electric
shock. There are no user serviceable parts inside. Have repairs carried
out only by qualified service personnel.
The lightning flash with arrowhead symbol within an equilateral
triangle is intended to alert the user to
sulated „dangerous voltage“ with
may be of sufficient magnitude to constitute a risk of electrical
shock.
DO NOT OPEN
the presence of unin-
in the product‘s enclosure that
5
EN FRDE ES

The exclamation mark within an equilateral triangle is intended to
alert the user to the presence of
important operating and maintenance instructions.
CAUTION – HIGH VOLUME LEVELS WITH AUDIO PRODUCTS!
This equipment is intended for professional use. Therefore,
of this equipment is subject to the respec
prevention rules and regula
ed to notify you formally about the existence of potential health risks.
Hearing damage due to high volume and prolonged exposure: When in use,
this product is capable of producing high sound-pressure levels (SPL)
that can lead to irreversible hearing damage in performers, employees,
and audience
members. For this reason, avoid prolonged exposure to vol
90 dB.
CAUTION! IMPORTANT INFORMATION ABOUT LIGHTING
PRODUCTS
1. Do not look into the beam from a distance of less than 40 cm.
2. Do not stare into the beam for extended periods at short-to-medium
distances.
3. Do not view the beam directly with optical instruments such as magnifiers.
4. Under some circumstances, stroboscopic effects may
seizures in sensitive individu
fer from epilepsy should always avoid places where strobe lights are
used.
tions. As a manufacturer, Adam Hall is obligat-
tively
als! For this reason, persons who suf-
applicable national accident
commercial use
umes in excess of
trigger epileptic
EN FRDE ES
6

CONTENTS
1) BEFORE SWITCHING THE AMP ON FOR THE FIRST TIME
2) SINGLE-ENDED OR PUSH-PULL
3) WHAT DOES A RECTIFIER DO?
4) CONNECTIONS AND CONTROLS
5) TUBE REPLACEMENT, MAINTENANCE, AND CARE
6) TROUBLESHOOTING
7) SPECIFICATIONS
8) MANUFACTURER'S DECLARATIONS
EN FRDE ES
7

1) BEFORE SWITCHING THE AMP ON FOR THE FIRST TIME
— Make certain that the voltage selected next to the rear panel pow-
er connector of the FAB5 (mains voltage selector) matches the mains
voltage in your country.
— Make certain that the amp is positioned safely and secured.
— Ensure sufficient air circulation through the cooling slits of the
FAB5.
PLEASE MAKE CERTAIN THAT YOU READ ALL OF THE SAFETY INSTRUCTIONS CONTAINED IN THIS MANUAL BEFORE YOU BEGIN USING YOUR FAB5!
2) SINGLE-ENDED OR PUSH-PULL
Like tube and diode rectifiers, both "single-ended and "push-pull" amplifiers have a fixed place among guitarists because of their varying
tone characteristics. Both terms actually refer only to the output stage.
Single-ended amplifiers produce a complex, warm tone with distinctive
harmonics, while push-pull amplifiers stand out because of high efficiency, direct response, and high dynamics.
Single-ended circuits usually use only one power tube (or multiple tubes
connected in parallel for higher output). They always run at full power
regardless of whether or not an input signal is present - in other words,
the power tube is always "on". This mode of operation is also called
"Class A".
The push-pull circuit requires a pair of power tubes (or multiple pairs
connected in parallel for higher output). The input signal of a push-pull
amplifier is split into a signal with the same phase as the original and
a signal with the phase reversed by 180°. The two opposing signals now
drive the power tubes alternately, i.e., while one tube amplifies the
in-phase signal ("on"), the tube driven by the phase-reversed signal is
"off". The difference between the two sides is picked up as the output
signal. For this reason, push-pull amplifiers are also referred to as
differential amplifiers. They are usually operated in "Class AB".
The constant alternation produces distortion in the transition area
("on", "off"). Many guitarists love this aggressive, scratchy transition
distortion.
Unlike the single-ended circuit ("always on"), the output transformer of
a push-pull amplifier is not constantly under load. This means that it is
less saturated and attains higher sound fidelity. Push-pull circuits are
also more efficient, since the rest periods of the power tubes ("off")
permit higher output levels when they are "on". However, odd overtones
generated in the output stage are cancelled out by the push-pull function, while they are clearly predominant in single-ended amplifiers.
In the end, the choice is a matter of taste. In the studio, professional
guitarists like to use small single-ended amplifiers, while more powerful
push-pull amplifiers are preferred on stage.
EN FRDE ES
8

3) WHAT DOES A RECTIFIER DO?
The Palmer FAB5 has a EZ81 rectifier tube.
Rectifiers convert the alternating current from the mains connection into
direct current, which is required by the amplifier circuitry.
Early "classic" tube amplifiers used rectifier tubes that produce an
elastic feeling when playing. The advent of transistor technology resulted in the increasing use of silicon diodes as rectifiers, which produce
a direct, "crisp" response. They are cheaper, more efficient, and easier to integrate in amplifier circuits than tube rectifiers are. Today,
one finds both tube and diode rectifiers in guitar amplifiers and has a
choice; many models even use diode rectifiers that emulate the response
and tone of a tube rectifier.
As a rule, diode rectifiers react more quickly to the high voltage requirements of heavily played notes and chords. The significantly longer
rise time of a tube rectifier at first produces a voltage drop when the
strings(s) are plucked, which is often referred to as "sag" in English.
When the signal decays, the direct voltage increases again. This results
in essentially the same effect as that of a compressor/sustainer. Many
guitarists prefer tube rectifiers because of their quasi "breathing"
response and the possibility of controlling the tone by means of the attack.
The maximum voltage and the rise time, i.e., the duration until the maximum voltage is generated, vary depending on the rectifier tube and type.
A different tube type or a diode plug-in that plugs into the tube socket
can change the playing feel, sound, and performance of an amplifier.
ALWAYS CONSULT A QUALIFIED TECHNICIAN BEFORE ANY CHANGE - A DIFFERENT
TUBE TYPE OR DIODE RECTIFIER COULD DAMAGE YOUR AMPLIFIER!
EN FRDE ES
9
4) CONNECTIONS AND CONTROLS
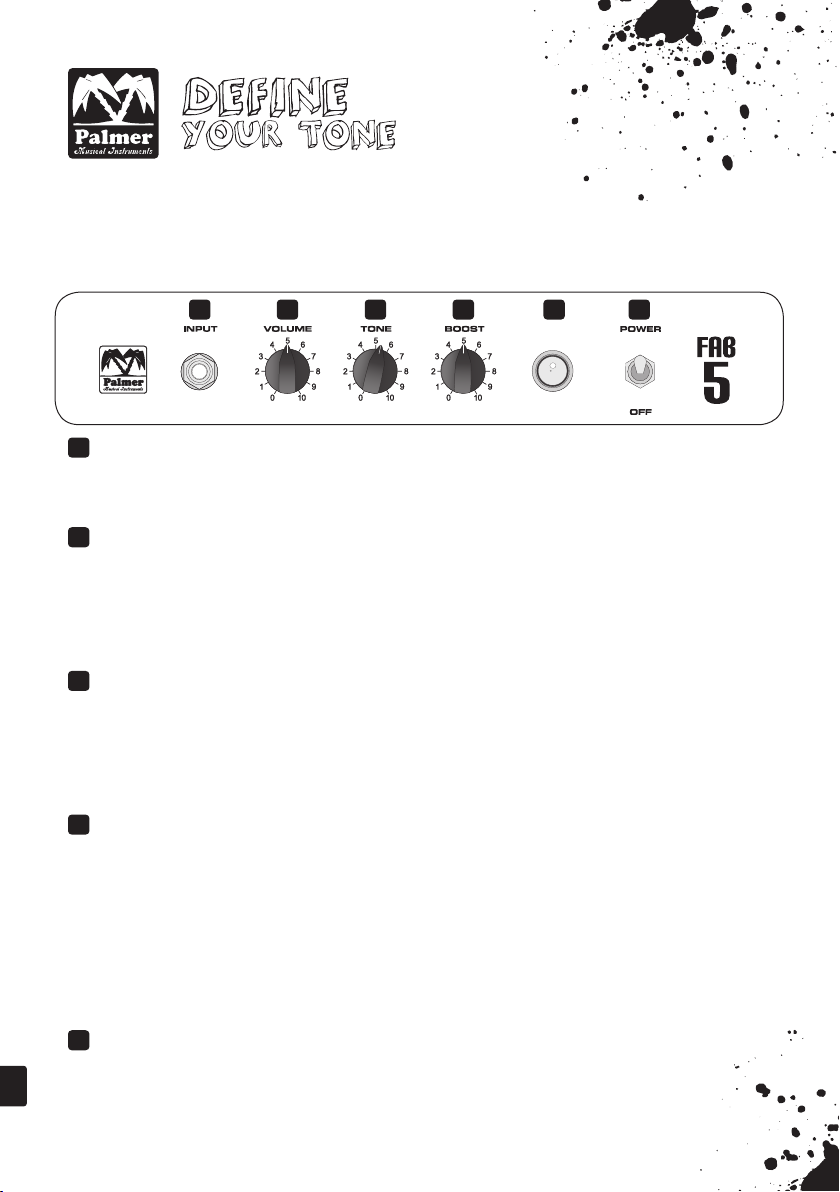
CONTROL PANEL (TOP)
1 2 3 4 5 6
1
INPUT
Connect your guitar to this socket. Use a high-quality instrument cable
for this.
2
VOLUME
This control sets the volume of the FAB5. With single-coil pickups, light
distortion sets in at around the 12-o'clock position, with humbuckers a
little sooner; then the overdrive increases continuously. At very high
settings and with a strong attack, the amp produces the typical, harmonious Class-A crunch with light compression.
3
TONE
This control sets the tone reproduction of the FAB5. At 0, the treble is
reduced, but the sound always remains defined and never becomes excessively muffled or flabby. In the middle position the treble is largely
neutral, and turning the knob further to the right adds edge and presence.
4
BOOST
This control is always activated unless a footswitch (see 11) is connected and increases the volume and overdrive as it is turned to the the
right. In conjunction with the VOLUME control (1), it makes it possible
to adjust the level of distortion and volume of the FAB5 sensitively over
a wide range from clean to crunch to medium gain overdrive.
With a standard footswitch connected to the BOOST socket (11) on the rear
of the amplifier, the boost function can be activated or deactivated.
This makes it possible to set individual volume and distortion levels for
rhythm and solo playing and retrieve them with the footswitch.
5
POWER LAMP
This indicator shows that the FAB5 is turned on and connected to a suitable power supply.
EN FRDE ES
10
6
Power /OFF
The mains switch of the FAB5. It turns the amplifier on (POWER) and off
(OFF).
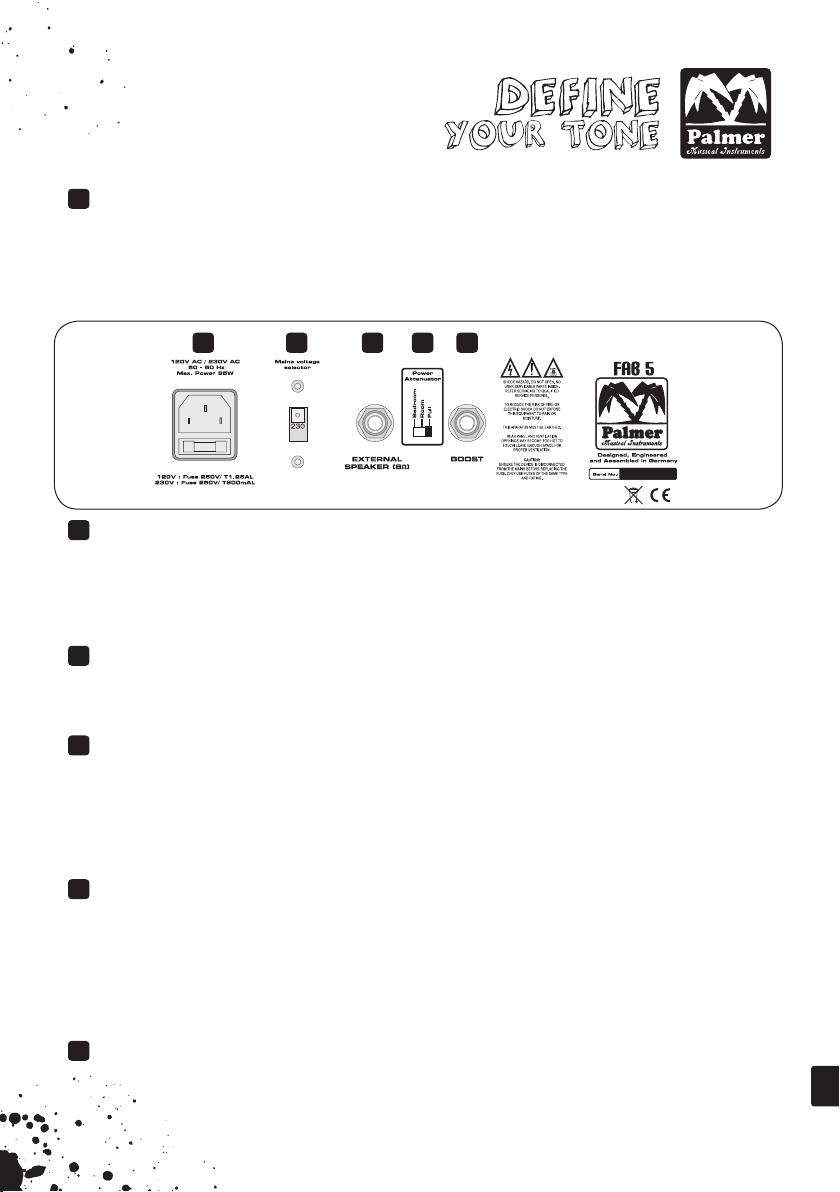
CONNECTOR PANEL (REAR)
7 8 9 10 11
7
IEC POWER SOCKET WITH FUSE HOLDER
Connect the included Euro power cord for powering the FAB5 here. The fuse
holder is built into the IEC socket. Always replace burnt out mains fuses
with the correct 250V type as specified under the socket (T800mAL for
230V mains current, T1.25AL for 120V).
8
MAINS VOLTAGE SELECTOR
Make certain that the voltage selection switch is set to the available
mains voltage.
9
EXTERNAL SPEAKER (8 Ω)
You can use this socket to connect external speaker cabinets; the total
impedance of the connected speakers must be 8 ohms. Depending on the design and configuration of the cabinet, this enables you to attain higher
volume levels, more punch, and various colourations of tone. The built-in
10" Eminence Ragin Cajun speaker is then automatically deactivated.
10
POWER ATTENUATOR
As a special feature, the FAB5 has a power attenuator with three switchable levels that reduce the amplifier with its full output (“Full” position – full 5 Watts)to living room (“Room” position – approx 2 Watts) or
bedroom (“Bedroom” position – approx 0.005 Watts)levels. This lets you
enjoy the harmonious output stage distortion of the FAB5 even late at
night without complaints from your neighbours.
11
BOOST
You can use this socket to connect a standard footswitch that lets you
activate or deactivate the BOOST function (see 4).
11
EN FRDE ES

5) TUBE REPLACEMENT, MAINTENANCE, AND CARE
After “burn-in” (initial operation under load) the tubes used in the FAB5
undergo a sophisticated selection process in which their electrical specifications and mechanical characteristics (microphonics) are tested. Additionally, their tone behaviour is tested in an acoustical test in the
finished equipment.
WHEN DOES IT MAKE SENSE TO REPLACE TUBES?
The tubes used in the FAB5 stand out because of exemplary workmanship and
long service life. If a problem should nevertheless occur, before replacing
the tubes, you should first please ask yourself the following questions:
Was the fault or failure caused by the tube itself or perhaps by a peripheral device, e.g., a defective speaker cable as the cause for defective
power tubes? (If the defect is not remedied, the problem could reoccur after the tube replacement.)
Was the mains voltage constant during operation? With all-tube amplifiers,
a breakdown can be caused by a mains voltage surge. Surges occur, e.g.,
with generators or faulty high-voltage circuits.
Is it possible that merely a circuit breaker/fuse has been tripped without
there being a real defect? “Old” circuit breakers/fuses, tube de-ionization, or arcing due to voltage peaks could be the cause. Then it would make
little sense to replace the tubes. After being used for a certain amount of
time, tubes evidence signs of fatigue (increased microphonics, susceptibility to hum, loss of treble, reduced output, etc.). Signs like this necessitate replacement, because they not only lead to decreased sound quality,
but also indicate that the affected tubes are about to fail.
Note: replacing tubes for experimentation purposes is a bad idea. The resulting costs in the event of improper actions can be surprisingly high.
WHAT IS IMPORTANT TO KEEP IN MIND WHEN REPLACING TUBES?
Tube replacements should be left to qualified professionals. Before removing the rear panel, the mains plug of the FAB5 must be unplugged and the
equipment must be allowed to discharge for a minimum period of 2 minutes.
Loosen the rear panel screws and pull them out together with the electronics chassis. Take care of the speaker connection when doing so. Now the
tubes can be removed carefully from their sockets. No bias adjustment is
required when replacing power tubes.
IMPORTANT: THERE MUST BE A TUBE IN EVERY TUBE SOCKET!
HOW CAN TUBE SERVICE LIFE BE EXTENDED?
Never operate the FAB5 without a load (speaker)! Thus a high-quality, kinkproof speaker cable is absolutely necessary if you want to connect an external speaker.
Avoid vibration, especially when the equipment is on. Before transport,
turn the amp off and let the tubes cool down.
EN FRDE ES
12

A correctly set bias current and heating symmetry (“hum balance”) extend
service life. In case of increased tube wear, these settings should be
checked.
HERE ARE A FEW MORE BASIC RULES YOU CAN FOLLOW TO EXTEND THE SERVICE LIFE
OF YOUR AMP SIGNIFICANTLY:
— Condensation may form inside the equipment if it is suddenly moved from a
cold place to a warm one. This is especially important where tube equipment is concerned. Do not turn the equipment on until it has reached room
temperature.
— Always ensure that any peripheral devices and equipment are technically
flawless!
— Where the FAB5 is concerned, open ventilation slits for unimpeded air
circulation are vitally important.
— Extreme heat and penetration by dust and especially moisture should al-
ways be avoided.
— Always comply precisely with the specifications of additional devices.
Never operate the FAB5 when it is connected to speaker cabinets with an
impedance (ohm rating) that is too low. Never operate the device unless
it is connected to a speaker or an appropriate load. Never connect equipment with a level that is too high (e.g., power amps) to the amp.
— Always check the local mains voltage before connecting the device. In
case of doubt, contact the stage technician, maintenance supervisor, or
the like.
— Do not make “do-it-yourself” repairs in the event of trouble! Even re-
placement of internal fuses is best left to an experienced technician.
6) TROUBLESHOOTING
THE FAB5 WILL NOT TURN ON:
•There is no mains voltage present: verify that the power cord is connect-
ed correctly!
•The mains fuse is defective: replace the mains fuse with a fuse of the
same type with the same rating. If the defect occurs again, you should
contact a PALMER dealer.
•The local mains voltage does not match the operating voltage of the am-
plifier.
THE FAB5 IS CONNECTED CORRECTLY, BUT NO SOUND IS AUDIBLE:
•The guitar VOLUME control is turned all the way down.
•The volume on the amp is turned all the way down!
•The anode fuse has blown. You should contact a PALMER dealer.
THE AMP MAKES “RINGING” NOISES WHEN PLAYING AND TENDS TO FEED BACK
•One or more tubes are microphonic. Have the tubes tested by a technician
and, if necessary, replaced with new tubes of the same type with the same
characteristic.
13
EN FRDE ES

7) SPECIFICATIONS
Product type: guitar amplifier
Type: combo
Technology: tube
Class: A
Output power: 5 W
Number of inputs: 1
Input connections: 6.3 mm jack
Input impedance: 1 M ohm
Number of outputs: 1
Output connections: 6.3 mm jack
Output impedance: 8 ohms
Speaker type: Eminence Ragin Cajun
Speaker diameter: 10" / 254 mm
Number of channels: 1
Indicators: Power
Controls:
FX loop: no
Tubes (preamp): 12AX7
Tubes (power stage): 6V6
Rectifier: tube EZ81
Power supply: 230/115 VAC
Power consumption 70 W
Cabinet material: sheet steel, plywood
Dimensions (W x D x H): 360 x 230 x 345 mm
Weight: 10 kg
Adam Hall GmbH, all rights reserved. The technical data and the func-
tional product characteristics can be subject to modifications.
Volume, tone, mains voltage selector
attenuator, boost
EN FRDE ES
14

8)
MANUFACTURER´S WARRANTY
This warranty covers the Adam Hall, LD Systems, Defender, Palmer, and
Cameo brands.
It applies to all products distributed by Adam Hall.
This warranty declaration does not affect the statutory warranty claims
against the manufacturer, but expands them with additional warranty
claims vis-a-vis Adam Hall.
Adam Hall warrants that the Adam Hall product that you have purchased
from Adam Hall or from an Adam Hall authorized reseller is free from defects in materials or workmanship under normal use for a period of 2 or
5 years (please inquire on a product-by-product basis) from the date of
purchase.
The warranty period begins on the date on which the product was purchased, proof of which must be produced (through presentation of the invoice or the delivery note with the date of purchase) in the event of a
warranty claim. Should products of the brands named above be in need of
repair within the limited warranty period, you are entitled to warranty
service according to the terms and conditions stated here.
During the Limited Warranty Period, Adam Hall will repair or replace
the defective component parts or the product. In the event of repair or
replacement during the Limited Warranty Period, the replaced original
parts and/or products become property of Adam Hall.
In the unlikely event that the product which you purchased has a recurring failure, Adam Hall has the right, at its discretion, to replace the
defective product with another product, provided that the new product
is at least equivalent to the product being replaced with regard to the
technical specifications.
Adam Hall does not warrant that the operation of this product will be
uninterrupted or error-free. Adam Hall is not responsible for damage
that occurs as a result of your failure to follow the instructions included with the Adam Hall branded product. The manufacturer‘s warranty does not cover – expendable parts (e. g., rechargeable batteries) products from which the serial number has been removed or with a serial
number that has been damaged as a result of an accident - damage due to
improper use, user error or other external reasons
•damage to devices operated outside the usage parameters stated in the
documentation included with the product
•damage due to the use of replacement parts not manufactured, sold or
recommended by Adam Hall,
•damage due to modification or servicing by anyone other than Adam Hall.
These terms and conditions constitute the complete and exclusive warranty agreement between you and Adam Hall regarding the Adam Hall branded
product you have purchased.
15
EN FRDE ES

LIMITATION OF LIABILITY
If your Adam Hall branded hardware product fails to work as warranted
above, your sole and exclusive remedy shall be repair or replacement.
Adam Halls’ maximum liability under this limited warranty is expressly
limited to the lesser of the price you have paid for the product or the
cost of repair or replacement of any components that malfunction under
conditions of normal use.
Adam Hall is not liable for any damages caused by the product or the
failure of the product, including any lost profits or savings or special,
incidental, or consequential damages. Adam Hall is not liable for any
claim made by a third party or made by you for a third party.
This limitation of liability applies whether damages are sought, or
claims are made, under this Limited Warranty or as a tort claim (including negligence and strict product liability), a contract claim, or any
other claim, and cannot be rescinded or changed by anyone. This limitation of liability will be effective even if you have advised Adam Hall or
an authorized representative of Adam Hall of the possibility of any such
damages, but not, however, in the event of claims for damages in connection with personal injuries.
This manufacturer‘s warranty grants you specific rights; depending on
jurisdiction (nation or state), you may be be entitled to additional
claims. You are advised to consult applicable state or national laws for
a full determination of your rights.
REQUESTING WARRANTY SERVICE
To request warranty service for the product, contact Adam Hall or the
Adam Hall authorized reseller from which you purchased the product.
EC DECLARATION OF CONFORMITY
The equipment marketed by Adam Hall complies (where applicable) with the
essential requirements and other relevant specifications of Directives
1999/5/EC (R&TTE), 2004/108/EC (EMC) und 2006/95/EC (LVD). Additional information can be found at www.adamhall.com.
PROPER DISPOSAL OF THIS PRODUCT
(WASTE ELECTRICAL AND ELECTRONIC EQUIPMENT)
(Valid in the European Union and other European countries with waste separation)
This symbol on the product, or the documents accompanying the product,
indicates that this appliance may not be treated as household waste. This
EN FRDE ES
is to avoid environmental damage or personal injury due to uncontrolled
16

waste disposal. Please dispose of this product separately from other
waste and have it recycled to promote sustainable economic activity.
Household users should contact either the retailer where they purchased
this product, or their local government office, for details on where and
how they can recycle this item in an environmentally friendly manner.
Business users should contact their supplier and check the terms and conditions of the purchase contract. This product should not be mixed with
other commercial wastes for disposal
ENVIRONMENTAL PROTECTION AND ENERGY CONSERVATION
Energy conservation is an active contribution to environmental protection. Please turn off all unneeded electrical devices. To prevent unneeded devices from consuming power in standby mode, disconnect the mains
plug.
17
EN FRDE ES

DEFINE
YOUR
TONE

EINLEITUNG
Vielen Dank, dass Sie sich für den Palmer FAB5 entschieden haben.
Ihr neuer Amp ist ein Vollröhrenverstärker im Class A-Design, das von
zahllosen Gitarristen wegen seiner direkten Ansprache und harmonischen
Verzerrung besonders geschätzt wird und häufig zum Einspielen von Gitarrenspuren im Studio zum Einsatz kommt. Wegen ihrer scheinbar geringen
Leistung werden Eintaktverstärker meist in die Kategorie der Übungsamps
eingeordnet, doch die 5 Watt des FAB5 sind in Verbindung mit dem druckvollen bordeigenen 10” Ragin Cajun von Eminence oder einer externen
Lautsprecherbox durchaus zu band- und bühnentauglichen Lautstärken fähig.
Hier kommen bei höheren Pegeln vor allem die von Ton-Kennern bevorzugte
Endstufenzerrung und natürliche Kompression zum Zug, die sich bequem über
die Anschlagsdynamik und das Volume-Poti der Gitarre steuern lassen. Mit
dem Boost-Regler können Sie Lautstärke und Verzerrung nochmals kontinuierlich anheben; diese Funktion kann über einen zusätzlichen Fußschalter
für unterschiedliche Rhythmus- und Solo-Einstellungen abgerufen werden.
Damit das Üben nicht zu kurz kommt, besitzt der FAB5 als Besonderheit
einen integrierten Power Attenuator, der auf Wohn- und Schlafzimmerpegel
schaltbar ist. So können Sie die Übersteuerung des Amps auch bei deutlich
reduzierten Pegeln nutzen, ohne die Nachbarn oder den Lärmschutz auf den
Plan zu rufen.
Ihr FAB5 ist mit hochwertigen Bauteilen und speziell selektierten Röhren
bestückt, die für höchste Klangqualität und zuverlässigen Betrieb sorgen. In der Vorstufe arbeitet eine Röhre vom Typ 12AX7 (ECC83), in der
Endstufe eine 6V6, als Gleichrichter dient eine EZ81. Sollten Sie einmal
Verschleißerscheinungen wie Höhenverlust, verminderte Leistung, Brummen oder Mikrofonie bemerken, lassen Sie den Röhrentausch nur von einem
qualifizierten Techniker vornehmen.
Wir wünschen Ihnen viel Spass mit Ihrem Palmer FAB5!
19
EN FRDE ES

SICHERHEITSHINWEISE
1. Lesen Sie diese Anleitung bitte sorgfältig durch.
2. Bewahren Sie alle Informationen und Anleitungen an einem sicheren Ort
auf.
3. Befolgen Sie die Anweisungen.
4. Beachten Sie alle Warnhinweise. Entfernen Sie keine Sicherheitshinweise oder andere Informationen vom Gerät.
5. Verwenden Sie das Gerät nur in der vorgesehenen Art und Weise.
6. Verwenden Sie ausschließlich stabile und passende Stative bzw. Befestigungen (bei Festinstallationen). Stellen Sie sicher, dass Wandhalterungen ordnungsgemäß installiert und gesichert sind. Stellen Sie
sicher, dass das Gerät sicher installiert ist und nicht herunterfallen kann.
7. Beachten Sie bei der Installation die für Ihr Land geltenden Sicherheitsvorschriften.
8. Installieren und betreiben Sie das Gerät nicht in der Nähe von Heizkörpern, Wärmespeichern, Öfen oder sonstigen Wärmequellen. Sorgen Sie
dafür, dass das Gerät immer so installiert ist, dass es ausreichend
gekühlt wird und nicht überhitzen kann.
9. Platzieren Sie keine Zündquellen wie z.B. brennende Kerzen auf dem
Gerät.
10. Lüftungsschlitze dürfen nicht blockiert werden.
11. Betreiben Sie das Gerät nicht in unmittelbarer Nähe von Wasser (gilt
nicht für spezielle Outdoor Geräte - beachten Sie in diesem Fall
bitte die im Folgenden vermerkten Sonderhinweise). Bringen Sie das
Gerät nicht mit brennbaren Materialien, Flüssigkeiten oder Gasen in
Berührung.
12. Sorgen Sie dafür, dass kein Tropf- oder Spritzwasser in das Gerät
eindringen kann. Stellen Sie keine mit Flüssigkeit gefüllten Behältnisse wie Vasen oder Trinkgefäße auf das Gerät.
13. Sorgen Sie dafür, dass keine Gegenstände in das Gerät fallen können.
14. Betreiben Sie das Gerät nur mit dem vom Hersteller empfohlenen und
vorgesehenen Zubehör.
15. Öffnen Sie das Gerät nicht und verändern Sie es nicht.
16. Überprüfen Sie nach dem Anschluss des Geräts alle Kabelwege, um
Schäden oder Unfälle, z. B. durch Stolperfallen zu vermeiden.
17. Achten Sie beim Transport darauf, dass das Gerät nicht herunterfallen
und dabei möglicherweise Sach- und Personenschäden verursachen kann.
18. Wenn Ihr Gerät nicht mehr ordnungsgemäß funktioniert, Flüssigkeiten
oder Gegenstände in das Geräteinnere gelangt sind, oder das Gerät
anderweitig beschädigt wurde, schalten Sie es sofort aus und trennen es von der Netzsteckdose (sofern es sich um ein aktives Gerät
handelt). Dieses Gerät darf nur von autorisiertem Fachpersonal repariert werden.
19. Verwenden Sie zur Reinigung des Geräts ein trockenes Tuch.
20. Beachten Sie alle in Ihrem Land geltenden Entsorgungsgesetze. Trennen Sie bei der Entsorgung der Verpackung bitte Kunststoff und Papier
EN FRDE ES
bzw. Kartonagen voneinander.
21. Kunststoffbeutel müssen außer Reichweite von Kindern aufbewahrt
werden
20

BEI GERÄTEN MIT NETZANSCHLUSS:
22. ACHTUNG: Wenn das Netzkabel des Geräts mit einem Schutzkontakt ausgestattet ist, muss es an einer Steckdose mit Schutzleiter angeschlossen
werden. Deaktivieren Sie niemals den Schutzleiter eines Netzkabels.
23. Schalten Sie das Gerät nicht sofort ein, wenn es starken Temperaturschwankungen ausgesetzt war (beispielsweise nach dem Transport).
Feuchtigkeit und Kondensat könnten das Gerät beschädigen. Schalten
Sie das Gerät erst ein, wenn es Zimmertemperatur erreicht hat.
24. Bevor Sie das Gerät an die Steckdose anschließen, prüfen Sie zuerst,
ob die Spannung und die Frequenz des Stromnetzes mit den auf dem
Gerät angegebenen Werten übereinstimmen. Verfügt das Gerät über einen
Spannungswahlschalter, schließen Sie das Gerät nur an die Steckdose
an, wenn die Gerätewerte mit den Werten des Stromnetzes übereinstimmen. Wenn das mitgelieferte Netzkabel bzw. der mitgelieferte Netzadapter nicht in Ihre Netzsteckdose passt, wenden Sie sich an Ihren
Elektriker.
25. Treten Sie nicht auf das Netzkabel. Sorgen Sie dafür, dass spannungsführende Kabel speziell an der Netzbuchse bzw. am Netzadapter und der
Gerätebuchse nicht geknickt werden.
26. Achten Sie bei der Verkabelung des Geräts immer darauf, dass das
Netzkabel bzw. der Netzadapter stets frei zugänglich ist. Trennen Sie
das Gerät stets von der Stromzuführung, wenn das Gerät nicht benutzt
wird, oder Sie das Gerät reinigen möchten. Ziehen Sie Netzkabel und
Netzadapter immer am Stecker bzw. am Adapter und nicht am Kabel aus
der Steckdo¬se. Berühren Sie Netzkabel und Netzadapter niemals mit
nassen Händen.
27. Schalten Sie das Gerät möglichst nicht schnell hintereinander ein und
aus, da sonst die Lebensdauer des Geräts beeinträchtigt werden könnte.
28. WICHTIGER HINWEIS: Ersetzen Sie Sicherungen ausschließlich durch Sicherungen des gleichen Typs und Wertes. Sollte eine Sicherung wiederholt auslösen, wenden Sie sich bitte an ein autorisiertes Servicezentrum.
29. Um das Gerät vollständig vom Stromnetz zu trennen, entfernen Sie das
Netzkabel bzw. den Netzadapter aus der Steckdose.
30. Wenn Ihr Gerät mit einem Volex-Netzanschluss bestückt ist, muss der
passende Volex-Gerätestecker entsperrt werden, bevor er entfernt
werden kann. Das bedeutet aber auch, dass das Gerät durch ein Ziehen
am Netzkabel verrutschen und herunterfallen kann, wodurch Personen
verletzt werden und/oder andere Schäden auftreten können. Verlegen
Sie Ihre Kabel daher immer sorgfältig.
31. Entfernen Sie Netzkabel und Netzadapter aus der Steckdose bei Gefahr
eines Blitzschlags oder wenn Sie das Gerät länger nicht verwenden.
ACHTUNG:
Entfernen Sie niemals die Abdeckung, da sonst das Risiko eines elektrischen Schlages bestehen kann. Im Inneren des Geräts befinden sich keine Teile, die vom Bediener repariert oder gewartet werden können.
Lassen Sie Reparaturen ausschließlich von qualifiziertem Service-Personal
durchführen.
21
EN FRDE ES