

Page 1

Handbook
for the
Palm V™ Organizer
Page 2

Copyright
Copyright © 1998 3Com C orpora ti on or its subsid iarie s. All rights rese rved . 3Com, the
3Com logo, Palm Computing, Graffiti, and HotSync are registered trademarks, and
PalmPilot , Palm III, Palm V, Palm OS, Palm, the Palm Com puting platform logo , the
PalmPilot logo , Palm V logo, and th e HotSync logo are trademarks of Palm Computing
Inc., 3Com Cor poration or its subsidiaries. Other prod uct and brand names may be
trademarks or registered trademarks of their respective owners.
Disclaimer and Limitation of Liability
3Com Corporation and its subsidiaries assume no responsibility for any damage or loss
resulting from the use of this handbook.
3Com Corpo ration and i ts sub si diar ies assu me n o re spon sibilit y for any loss or claims
by third part ies whic h ma y arise through th e use of t his softw are. 3Co m Corpor ation
and its subsidiaries assume no responsibility for any damage or loss caused by deletion
of data as a result of malfunction, dead battery or repairs. Be sure to make backup copies
of all important data on othe r medi a to prote ct agains t dat a loss.
Important: Please read the 3Com End User Software License Agreement contained in
this handbook before using the acc ompany ing softw are prog ram(s). Usin g an y part of
the software indicates that you accept the terms of the 3Com End User Software License
Agreement.
3.5" Softw are Diskettes A vailable
Palm™ Desktop software is supplied on a CD-ROM disc. If you do not have access to a
CD-ROM drive for your computer, you may download the Palm Desktop software software from http://www.palm.com. Alternatively, you can order 3.5" diskettes by completing and mailing the diskette order card supplied in the Palm V™ organizer product
package, or ca ll to order the disk ettes. See th e Worldw ide Custom er Supp ort card for
the appropriate phone number.
P/N: 405-03 45-0 1A
A/N: 423-0223-01
Page ii Handbook for th e Palm V™ Or ga nizer
Page 3

Contents
About This Book
Chapter 1: Introduction to Your Palm V™ Organizer
Getting to know your Palm V organizer............................................3
What is a Palm V organizer? ........................................................... 3
System requirements ........................................................................ 4
Information for upgraders............................................................... 4
Palm V components.......................................................................... 5
Recharging the battery ................................................................... 10
Palm Desktop organizer software ................................................ 11
Using your organizer with another PIM ..................................... 13
Tapp in g and typin g ... .. .......... ......... ... .......... ......... ... ......... .......... ... .....1 4
Tap with the stylus to get things done .........................................14
Elements of the organizer interface.............................................. 15
Opening applications ..................................................................... 16
Using menus .................................................................................... 17
Three ways to enter data................................................................ 19
Customizing your organizer..............................................................23
Chapter 2: Entering Data in Your Pa lm V™ Organize r
Using Graffiti writing to enter data ..................................................25
Writing Graffiti characters............................................................. 25
Graffiti tips....................................................................................... 27
The Graffiti alphabet....................................................................... 28
Writing capital letters ..................................................................... 29
Writing numbers ............................................................................. 29
Graffiti numbers .............................................................................. 30
Writing punctuation marks ........................................................... 30
Additional Graffiti punctuation.................................................... 31
Writing symbols and extended characters .................................. 31
Writing accented characters .......................................................... 32
Accent strokes.................................................................................. 32
Additional non-English characters............................................... 32
Navigation strokes.......................................................................... 33
Graffiti ShortCuts............................................................................ 33
Using the onscreen keyboard ............................................................35
Using your computer keyboard ........................................................35
Impo rt in g da ta......... ... ......... .......... .. .......... .......... .. .......... .......... .. ........ 3 6
......................................................................................... 1
Chapter 3: Managing Your Applications
Selecting applications .........................................................................39
Contents Page iii
Page 4

Switching between applications .......................................................39
Using the Applications Launcher.....................................................39
Categorizing applications.............................................................. 39
Changing the Applications Launcher display............................ 40
Choosing preferences.........................................................................41
Installing and removing applications..............................................42
Installing add-on app licat ions .......... ................. ................. .......... 42
Installing games.............................................................................. 44
Removing applications .................................................................. 45
Removing Palm Desktop software............................................... 45
Security.................................................................................................46
Assig ning a pass word..... .. .......... ... ......... .......... .. .......... .......... .. ..... 46
Changing or deleting a password................................................ 47
Locking your organizer ................................................................. 47
Recovering from a forgotten password....................................... 48
Chapter 4: Survey of Basic Applications
Overview of basic applications......................................................... 50
Date Book......................................................................................... 50
Addr ess Book .. .. ... .......... ......... ... ......... .......... ... ......... .......... .. .......... 51
To Do List .........................................................................................52
Memo Pa d........ .. .......... .......... .. .......... .......... .. .......... .. .......... .......... .. 53
Calcu l at o r....... ......... ... ......... .......... ... ......... .......... .. .......... .......... .. ..... 53
Expense ............ .. .......... .......... .. .......... .......... .. .......... .......... .. .......... .. 54
Comm o n ta s ks.. .. .......... ......... ... .......... ......... ... ......... ... .......... ......... ... ...55
Creat i ng re co r d s ... .......... .. .......... .. .......... .......... .. .......... ......... ... ....... 55
Editi ng re c or d s.......... .. .......... .......... .. .......... ......... ... .......... ......... ... .. 55
Deleting records.............................................................................. 57
Purging records............................................................................... 58
Exchanging and updating data: HotSync operations ............... 58
Categorizing records...................................................................... 61
Finding records............................................................................... 65
Sorting lists of records.................................................................... 69
Making records private.................................................................. 70
Attaching notes............................................................................... 72
Choosing fonts ................................................................................ 73
Application-specific tasks..................................................................74
Date Book......................................................................................... 74
Addr ess Book .. .. ... .......... ......... ... ......... .......... ... ......... .......... .. .......... 87
To Do List......................................................................................... 92
Memo Pa d........ .. .......... .......... .. .......... .......... .. .......... .. .......... .......... .. 97
Calcu l at o r....... ......... ... ......... .......... ... ......... .......... .. .......... .......... .. ... 100
Expense ............ .. .......... .......... .. .......... .......... .. .......... .......... .. .......... 102
Page iv Handbook for th e Palm V™ Or ga nizer
Page 5

Chapter 5: Comm uni cat ing Using Your Organizer
Managing desktop E-Mail away from your desk.........................113
Setting up Mail on the desktop ................................................... 114
Synchronizing Mail with your E-Mail application .................. 116
Opening the Mail application on your organizer..................... 116
Viewing e-mail items.................................................................... 116
Creating e-mail items.................................................................... 117
Looking up an address .................................................................120
Adding details to e-mail items .................................................... 121
Stori ng e -ma i l to b e s en t la te r..... ... .. ... ......... ... .......... ......... ... ....... 124
Editi ng un s e nt e - ma il . ... .. ... ......... ... .......... .. .......... .. .......... .. .......... 12 4
Draf t e-m a i l ........... .......... .. .......... .. .......... ... ......... ... ......... ... .......... .. 125
Filing e-mail ................................................................................... 126
Delet in g e - m ail ... .. ... .. .......... ......... ... .......... .. .......... .. .......... .. .......... 12 7
Removing e-mail from the Deleted folder................................. 127
Purging deleted e-mail................................................................. 128
Message List options .................................................................... 128
HotSync options ............................................................................ 130
Creating special filters .................................................................. 131
Truncating e-mail items ............................................................... 135
Mail menus..................................................................................... 136
Beaming information ........................................................................137
Chapter 6: Advanced HotSync® Operations
Selecting HotSync setup options.....................................................139
Customizing HotSync application settings ...................................142
Conducting a HotSync operation via modem...............................144
Preparing your computer ............................................................ 144
Preparing your organizer............................................................. 145
Selecting the conduits for a modem HotSync operation..... .... 146
Performing a HotSync operation via a modem ........................ 147
Conducting a HotSync operation via a network ..........................148
Connecting to your company’s dial-in server........................... 148
Using File Link...................................................................................150
Creating a user profile ......................................................................150
Chapter 7: Setting Preferences for Your Organizer
Viewing preferences .........................................................................153
Buttons preferences...........................................................................154
Pen preferences.............................................................................. 154
HotSync buttons preferences....................................................... 156
Digitizer preferences.........................................................................156
Contents Page v
Page 6

Formats preferences ......................................................................... 156
Coun t ry def a u lt...... ... ......... ... .......... ......... ... ......... .......... ... ......... ... 156
Time, date, week start, and numbers formats.......................... 157
General preferences.......................................................................... 158
Auto-off delay ............................................................................... 158
Cradle settings............................................................................... 158
System, alarm, and game sounds............................................... 159
Beam R e ce i v e . .. .......... ......... ... .......... ......... ... ......... .......... ... ......... ... 1 59
Modem preferences.......................................................................... 160
Network preferences and TCP/IP software .................................161
Selecting a service......................................................................... 161
Entering a user name ................................................................... 162
Entering a password .................................................................... 163
Addi ng te le p hone settings ............ ......... ... ......... .......... ... ......... ... 164
Connecting to your service.......................................................... 167
Creating additional service templates....................................... 167
Adding detailed information to a service template................. 168
Creat i ng a lo g in sc ri pt... ......... ... ......... ... .......... ......... ... ......... ........ 171
Deleting a service template ......................................................... 172
Network preferences menu commands .................................... 173
TCP/IP troubleshooting .............................................................. 173
Owner preferences............................................................................ 175
Shor tCuts pre f ere n c e s ........ .......... .. .......... .......... .. .......... ......... ... ......176
Creat i ng a S ho rtCut .. .. .......... .. .......... .. .......... .......... .. .......... .......... 176
Editing a ShortCut........................................................................ 177
Deleting a ShortCut...................................................................... 177
Appendix A: Maintaining Your Organizer
Caring for your organizer................................................................179
Batt ery co n s ideratio ns...... .. .. .......... .......... .. .......... .......... .. .......... ......180
Rese tt in g y o u r o rg a ni z e r ... .......... .. .......... .......... .. .......... .. .......... ......181
Performing a soft reset................................................................. 181
Performing a hard reset ............................................................... 182
Appendix B: Frequently Asked Questions
Software installation problems.......................................................183
Operating problems..........................................................................184
Tapp in g a n d wr i t in g problem s............ ... .......... ......... ... ......... ......... 185
Appl ication p ro b le m s....... .. .......... ......... ... .......... ......... ... ......... ......... 186
HotSy nc probl e m s ....... ......... ... .......... ......... ... ......... .......... ... ......... ....187
Beaming problems ............................................................................ 191
Recharging problems .......................................................................191
Pass wo r d p ro b l e m s .......... ......... ... ......... .......... ... ......... ... ......... ......... 192
Tech ni c al suppor t ..... ... ......... .......... ... ......... .......... .. .......... .......... .. ....193
Page vi Handbook for th e Palm V™ Or ga nizer
Page 7

Appendix C: Creating a Custom Expense Report
About mapping tables ......................................................................195
Customizing existing sample templates ........................................196
Determining the layout of the Expense Report.............................197
Label s ................... .. .......... .......... .. .......... ......... ... .......... ......... ... ....... 19 7
Sectio n s ........ .......... ... ......... .......... .. .......... .......... .. .......... .......... .. ..... 198
Analyzing your custom Expense Report .......................................199
Programming the mapping table....................................................200
Using applications other than Microsoft Excel.............................204
Expense file details............................................................................205
Appendix D: Non-ASCII Characters for Login Scripts
Use of ^ char ... ... .......... .. .......... ......... ... .......... ......... ... ......... .......... ... ...207
Carriage return and line feed ..........................................................207
Literal characters ...............................................................................208
Warranty and Other Product Inf o rmation
Limited warranty...............................................................................209
3Com end user software license agreement..................................212
FCC Sta t e me nt ............ ......... ... ......... .......... ... ......... .......... .. .......... ......215
Canadian RFI Statement...................................................................215
Index
........................................................................................................ 217
Contents Page vii
Page 8

Page viii Handbook for th e Palm V™ Or ga nizer
Page 9

About This Book
Welcome to the Palm V™ connected organizer. This handbook
describes all you need to know about how to use your Palm V
organizer and the applications that come with it. It walks you through
viewing and entering data, using your Palm V organizer with your
computer, and personal izing the or ganizer with your own
preferences.
This book is designed to help you get up and running quickly on your
organizer. The beginning chapter explains the following:
■ All the parts of your organizer
■ The Palm V interface
■ Entering data
■ Setting up security and other preferences
After you become familiar with the basic functionality, you can use
the rest of th is ha ndbook as a refer en ce for les s common tasks and for
maintaining your Palm V organiz er, and also as a source of
information if you have problems operating it.
About This Book Page 1
Page 10

Page 2 About T his Book
Page 11

Chapter 1
Introduction to Your
Palm V
This chapter explains the physical buttons and controls on your
Palm V™ connected organizer, how to use your Palm V organizer for
the first time, and how to use HotSync
your Palm V organizer and Palm™ Desktop organizer software.
Getting to know your Palm V organizer
What is a Palm V organizer?
With your Palm V organizer you will no longer have trouble getting
to meetin gs and appointme nts on time, or rememberi ng the names
and personal details of the people you connect with. It will be easy for
you to re member all the it ems on y our to do list. The Palm V organizer
can help you im prove y our t rack r ecord i n al l these areas, both at w ork
and at home.
You can enter all your schedule details in Date Book so you can view
them by the day, week, or month; you can even set an alarm to remind
you of important meetings. Keep all your contact names, addresses,
phone numbers, and other de tails in Addres s Book, so you can fi nd
them as soon as you nee d the m. Add your tasks to To Do List,
prioritize them so you don’t ove rl ook them, and assign them a due
date.
™
Organizer
®
technology to sy nchronize
To make sure you d on’t lose any of this important i nformation, you
can synchronize your data with Palm Desktop software on your
computer so you always have a backup copy. You can set different
levels of security for your Palm V organizer so unauthorized eyes
cannot view your data.
When you are out of the office, track your expenses for your expense
reports; then transfer the data to your computer to print it out. You can
write, edit, and view your e-mail, and then sychronize your e-mail
with your desktop E-Mail application when yo u return to your office.
Chapter 1 Page 3
Page 12

System requirements
To install and operate Palm Desktop software, your computer system
must meet the following requirements:
Minimum requirements
■ Windows 98, Windows 95, or Windows NT 4.0
■ IBM-compatible 486 computer or higher
■ 8 MB RAM (memory) minimum, 16 MB recommended
■ 20 MB available hard disk space
■ VGA monitor or better (the Palm V Quick Tour requires a 256
color video display)
■ CD-ROM drive (y ou can also download the Palm Desktop
software f rom http://www.palm.com, or order 3.5" disk e ttes
from 3Com)
■ Mouse
■ One available serial port
Option al equipment
■ Palm V™ Modem
■ Windows-compatible printer
Information for upgraders
If you already own a PalmPilot™ organizer or Palm III™ organizer,
3Com recommends that you install the version of Palm Desktop
software that comes with your new Palm V organizer. All your data
will be preserved .
You can perform HotSync operations in exactly the same way, so you
can quickly synchronize your data wi th your new organizer . Just
remember to synchroni ze your old organizer with Pa lm Desktop
software before you synchronize with your new organizer, so you
have all your latest information.
Page 4 Introduction to Your Palm V™ Organizer
Page 13
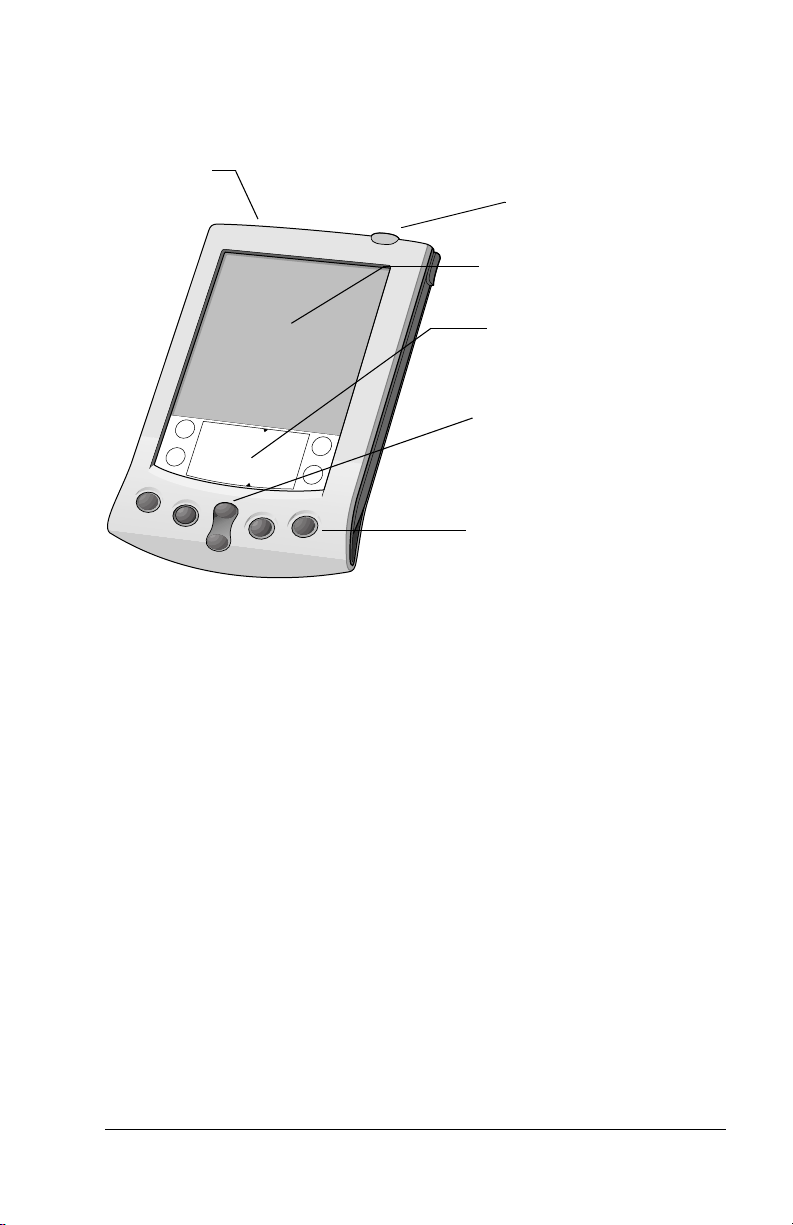
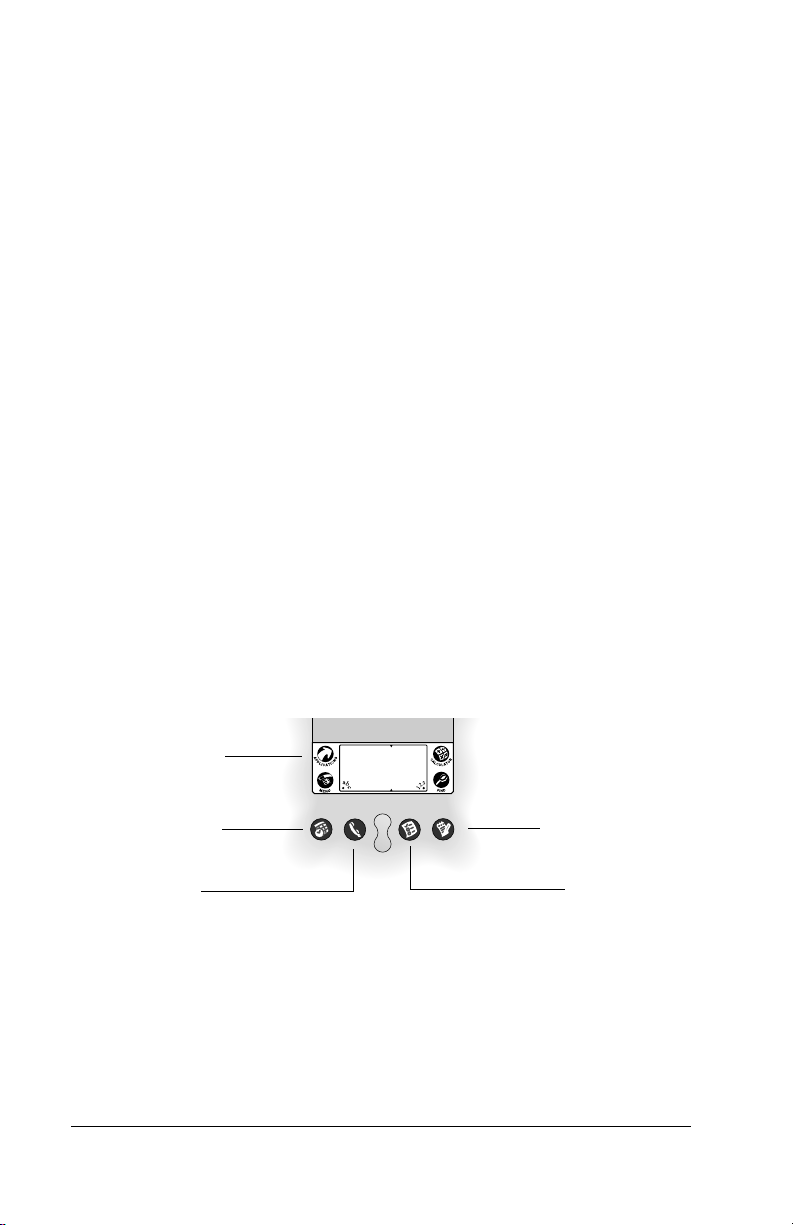
Palm V components
C
Locating front panel controls
ontrast
control button
Power button
Screen
Graffiti writing area
Scroll button
Applic a tion buttons
PalmV
organizer
screen
Graffiti
writing
area
Application
buttons
Displays the applications and information stored in
your Palm V organizer. It is touch-sensitive and
responds to the stylus or your finger.
®
The area where you write letters and numbers using
®
the Graffiti
alphabet. See Chapter 2 to learn how to
write Graffiti characters.
Activate the individual Pal m V organizer
applications that correspond to the icons on the
buttons: Date Book, Address Book, To Do List, and
Memo Pad. See “Buttons preferences” in Chapter 7
for details on re assigning the se b uttons to activate
any application on your Palm V organize r.
Tip: If your Palm V organizer is turned off,
pressi ng an y application bu tton activates the
Palm V organizer and opens the
corresponding application.
Chapter 1 Page 5
Page 14

Scroll
button
Displays text and other information that extends
beyond the area of the Palm V organizer screen.
Pressing the lower hal f of the scroll button scrolls
down to view informatio n belo w the viewing area,
and pressing the upper half of the button scroll s up to
view the information above the viewing area.
Contrast
control
button
Turns on the onscreen contrast control so you can
adjust the screen for the clearest screen display as
required by the lighting condit ions or temperature of
the environment where you use your organizer. See
“Usi n g th e onscreen co nt ra st contro l” lat e r in thi s
chapter for more information.
Power
button
Turns your Palm V organizer on or off and controls
the backlight feature. If your Palm V organize r is
turned off, pressing the power button turns the unit
on and ret u rns you to the last sc re e n y o u vi e w ed .
If your Palm V organizer is turned on, pressing the
power button turns the unit off. Holding the power
button do wn for about two seconds turns the
backlight on or off.
Using the onscreen contrast control
Even with the backlight on, you may need to make further
adjustments by changing the amount of contrast on the screen.
To adjust the contrast:
1. Pres s the Co n t ra s t co n t ro l b u tt o n .
2. To change the contrast in small increments, tap to the lef t or right
of the slider .
To change the contrast in larger increments, drag the slider to
the left or ri ght.
Tip: You can also pres s the scroll button to move the slider
incrementally.
3. Tap Done.
Page 6 Introduction to Your Palm V™ Organizer
Page 15

Using the backlight
If you have difficulty seeing the information on your Palm V
organizer, you can use the backlight to illuminate your screen.
To activate the backlight:
■ Press the power button and hold it down for about two seconds.
Release the button when the b acklight turns on.
To turn off the backlight:
■ Press and hold the po we r button for about two seconds. The
backlight also turns off automatically (after a per iod of inactivity)
with the Auto-off feature.
In add i tion, you ca n assign th e f u ll - s cre e n pen stro k e to ac ti v a te th e
backlight. See “General preferences” in Chapter 7 for more
information.
Chapter 1 Page 7
Page 16

Locating back panel components
Side
channel
for stylus
or cover
IR port
Reset
button
Serial
connector
Side channels
Hold the stylus or front cover, which slide in
and out of either side channel and click into
place. To use the stylus, remove it from the
side channel and hol d it as you would a pen or
pencil.
IR port
Uses infrared technology to trans mi t data to
and receiv e data from oth er Palm Computi ng
connected organizers. See “Beaming
informatio n” in Chap ter 5 for mor e
informatio n.
Reset button
Under normal use, you should n ot have to use
the reset button. See Appendix A for
informa t ion about whe n and how to use the
reset button.
Page 8 Introduction to Your Palm V™ Organizer
®
Page 17
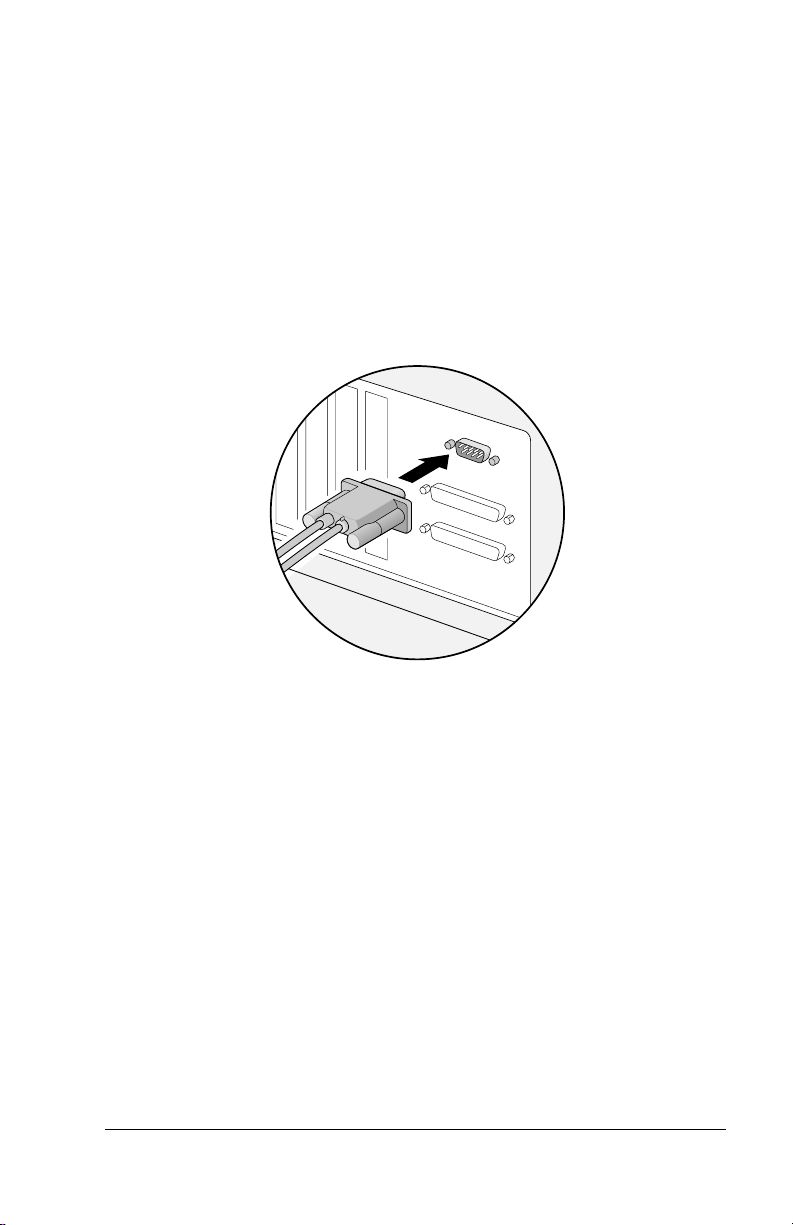
Serial connector
Conn e ct s y o u r or g a ni z e r to th e cr a dl e , w h ic h
in turn connects to the back of your computer
and th ro u g h the AC ad ap t e r to the wall
current. This allo ws you to recharge y o u r
Palm V organizer as well as update the
information between your organi zer and
computer using HotSync technology.
Note: The cradle must be plugged into the
serial (COM) port at the back of your
computer.
Your Palm V organizer requires a dedica ted
port. It can not share a port with an in te rnal
modem or oth er device. If you are unsure
abou t the exac t location o f the seria l p ort on
your compute r, re f er to the use r’ s ma n ual
supplied with the computer.
Chapter 1 Page 9
Page 18
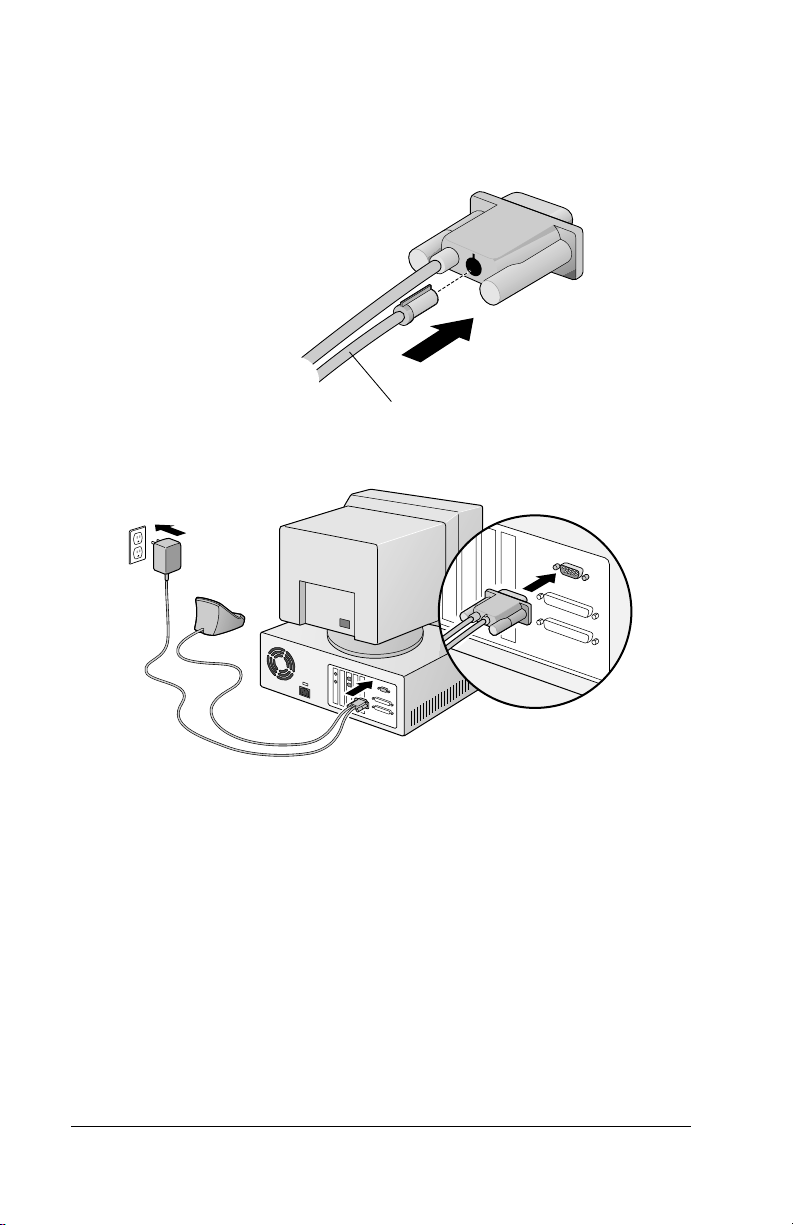
An additional connection is made f rom the
back of the cr adl e’s serial (COM) port
connector to the AC adapter which plug s into
any AC current outlet.
AC adapter
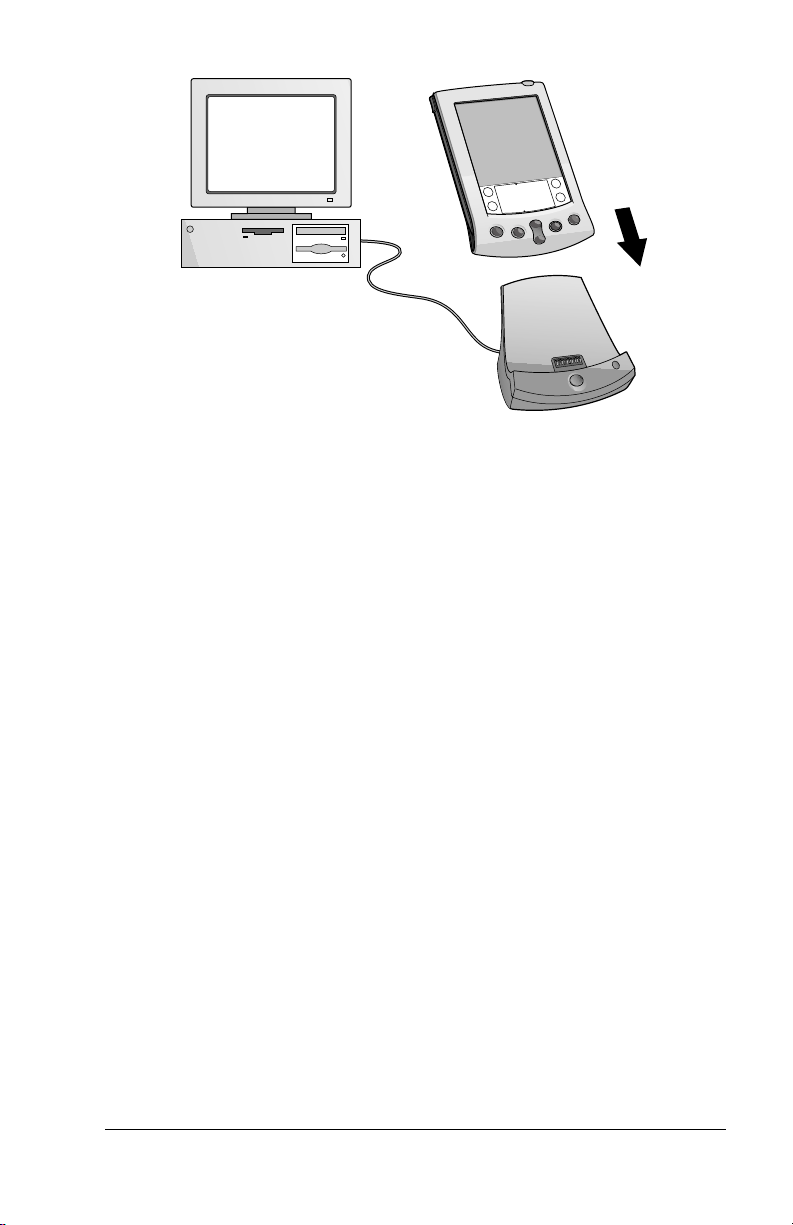
Recharging the battery
The Palm V organizer contains a Lithium-ion battery that is recharged
each time you place the organizer in the cradle. You never need to
replace the battery. Just pl ace your Palm V organizer in the cra dle for
three hours for an initial charge before you use your organizer. Then
place it in the cradle for a few minutes each day to rech arge the battery
to full capacity.
If the battery gets low, your Palm V organizer displays a warning
message. If this occurs, perform a HotSync operation and then
recharge th e battery as soon as possible. If your Palm V organ izer
shuts down, you still h ave about a week to rech arge the b attery be fore
you lose the data on your organizer.
Page 10 Introduction to Your Palm V™ Organizer
Page 19

Viewing data while in the cradle
You can set a preference so that you can continue to view data while
your organizer is in the cradle and while the battery is being
recharged. See “General preferences” in Chapter 7 for more
informatio n.
Palm Desktop organizer software
Palm Desktop soft ware extends man y of the functi ons of your Palm V
organize r to your computer and serves to back up al l your data.
Viewing and editing your data using Palm Des ktop softwa re is
optional. However, when yo u use it with your P a lm V organ izer and
the built-in HotSync technology, you can full y synchronize the
information on your Palm V orga nize r with the information on your
computer.
It is a good idea to back up your data in case somethi ng happens to the
data on your Palm V organizer. Changes you make on your Palm V
organizer or Palm Desktop software appear in both places after you
synchronize.
With Palm Desktop software, you can do the following:
■ Work with your Palm V organizer applications on your computer.
Palm Desktop software dupl icates the Da te Book, Address Book,
To Do List, and Memo Pa d appl icat ion s on y our or ga niz er, so yo u
can view, ente r, and modify any data stored on your organizer.
■ Back up the data stored on your organizer wi th HotSync
technology and synchronize the data on your Palm Desktop
software. Synchronization is a one-step procedure that ensures
your data is always safe and up-to-date. See “Exchanging and
updating data: HotSync operations” in Chapter 4 for more
information.
■ Import and exp ort d at a, so you ca n easi ly tran sfer da ta f rom o th er
desktop applications into any of your main applications. See
“Importing data” in Chapter 2 for more information.
■ Print your Date Book, Address Book, To Do List, and Memo Pad
information on any printer.
Chapter 1 Page 11
Page 20

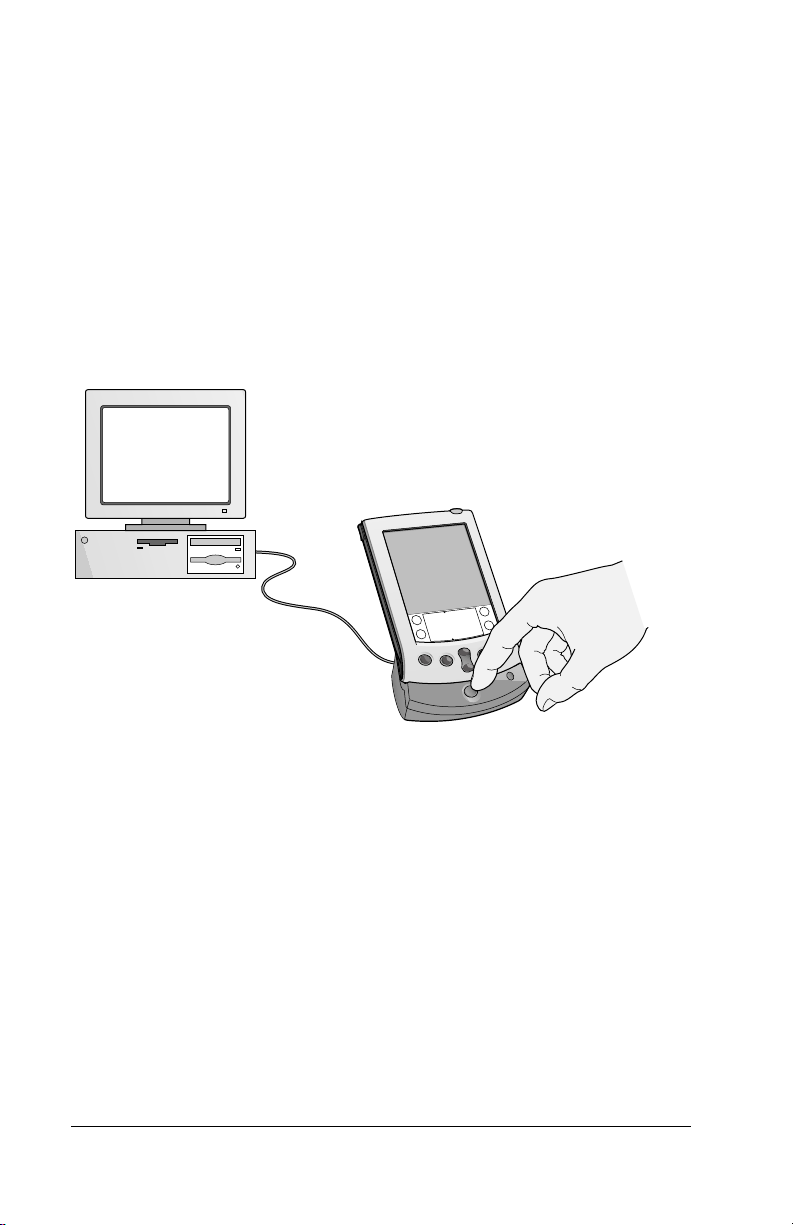
Installing Palm Desktop software
The following instructions guide you through installing Palm
Desktop software. After installation, re f e r to the online Hel p in Palm
Desktop soft ware for in f o rm a ti o n a bout how to u se the so f t wa re.
To ensure a safe and uninterrupted installation of Palm Desktop
software, pleas e do the foll owing before installing:
■ Turn off your computer and connect the cradle to it.
■ If you are installing from diskettes (rather than the CD-ROM
included in th e b ox), make sure the original Palm Desktop
software diskettes are write-protected, and then make backup
copies of them. When you finish, use the copies to install the
software, and store the origin al diskettes in a safe pl ace. Refer to
your computer’s manual or op e rating system documentati on if
you need information ab out locking o r copying dis ket tes.
■ Do not simply copy the Palm Desktop software f iles to your
computer’s hard disk. You must use the installer to plac e the fi les
in the ir p roper lo ca tions and to deco mpres s th e fi le s .
To install Palm Desktop software:
1. Exit any open prog rams, includ ing thos e that run auto matic ally at
startup such as Microsoft Office, and disable any virus-scanning
software.
2. Inse rt the Palm Desktop software CD-R OM into the computer’s
CD-ROM drive (or inse rt the disket te labeled Setup in to the
diskette drive).
3. Click the Install button to begin the installation p rocedure.
4. Follow the onscreen ins truct ions to comp lete th e instal lation.
During installation you will be asked to insert your organizer into
the cradle.
Page 12 Introduction to Your Palm V™ Organizer
Page 21
Using your organizer with another PIM
If you prefer to use a personal information manager (PIM) other t han
Palm Desktop software or Micr osoft Outlook, all you need is the
connection software, called a conduit, that lets you synchr onize the
data between your organizer and your PIM. For information on
conduit software, go to this web site : http://www.palm.com.
The install a tion progr a m can detect that you have Microsoft Outlook
on your computer. If it finds Outlook, the program lets you choose
between installing Palm Desktop software or installing the conduit for
Outlook so that you can use that application as your PIM.
Chapter 1 Page 13
Page 22

Tapping and typing
Tap with the stylus to get things done
Like using a mouse to click elements on a computer screen, using the
stylus to tap el em ents o n yo ur o rgani zer scree n i s th e bas ic a cti on that
gets things don e on your organizer .
The first time you start you r P a lm V organizer, setup instructions
appear on the screen. These instructions include a calibration screen,
or digitize r. Cal ibra ti on align s the i nter nal ci rcui t ry of you r orga nizer
with its touc h-sensi tive sc reen so that when you ta p an element on the
screen, the organizer can detect exactly which task you want to
perform.
Important: Always u se the point of the stylus for tapping or making
strokes on the organizer screen. Never use an actual pen,
pencil, or other sharp object to write on the organizer
screen.
With your organ izer turn ed on, you ca n tap the organ izer scr een to do
many operatio n s , such as the follow i ng:
■ Open applications
■ Choose menu commands
■ Initiate a global Find oper ati on
■ Select options in dialog boxes
■ Open the onscreen keyboards
Just as you can drag the mouse to select text or move objects on your
computer, yo u can also drag the styl us to sel ec t text. You can al so use
the stylus to drag the slider of any scroll bar.
Page 14 Introduction to Your Palm V™ Organizer
Page 23
Elements of the organizer interface
Icons
Menu
bar
Check
box
Command
buttons
Pick list
Scroll
bar
Previous/next
arrows
Menu bar
A set of commands that are specific to the applicat ion.
Not all applications have a menu bar.
Command
buttons
Tap a button to perform a command. Command
buttons appear in dialog boxes and at the bottom of
application screens.
Icons
Tap the icons to open application s, menus,
Calculator, and to find text anywhere in your data.
abc
With the curs or in an input field, tap the dot to
activate th e a l p habeti c k e y b o ar d .
123
With the curs or in an input field, tap the dot to
activ ate the nu meric k ey b oa rd.
Chapter 1 Page 15
Page 24
Check box
When a check mark appears in a check box, the
corresponding option is active. If a check box is
empty, tapping it inserts a check mark. If a check box
is checked, tapping it removes the check mark.
Pick list
Tap the arrow to d isplay a list o f choic es, and then tap
an item in the list to select it.
Scroll bar
Drag the slider, or tap the top or bott om arrow, to
scroll the d is p l a y one l in e a t a time. To sc roll to the
previous page, tap the scroll bar just abo ve the slider.
To scroll to the n ext page, ta p th e scroll bar just belo w
the sli de r.
You can also scroll to the previous and next pages by
pressing the upper and lower portions of the scroll
button on the front panel of the organizer.
Next/
previous
arrows
Tap the up and down arrows to display the previous
and next page of information; tap the left and right
arrows to display the previous and next record.
Openin g applic ations
You can use the Applications Launcher to open any application
installed on your organizer. You can also open the four main
applicati ons — Date Bo ok, Address Book, To Do List, an d Memo Pad
— with the application butt ons on the front panel of your organ izer.
Applications
Launcher
Date
Book
Address
Book
Memo
Pad
To Do
List
Tip: When you press an application button on the front panel, you
have instant access to t he selec ted appli cation. You don’t ev en
need to turn on your organizer first.
In addition to providing a way for you to open applications, the
Applications Launcher displays the current time, battery level, and
application catego ry.
Page 16 Introduction to Your Palm V™ Organizer
Page 25
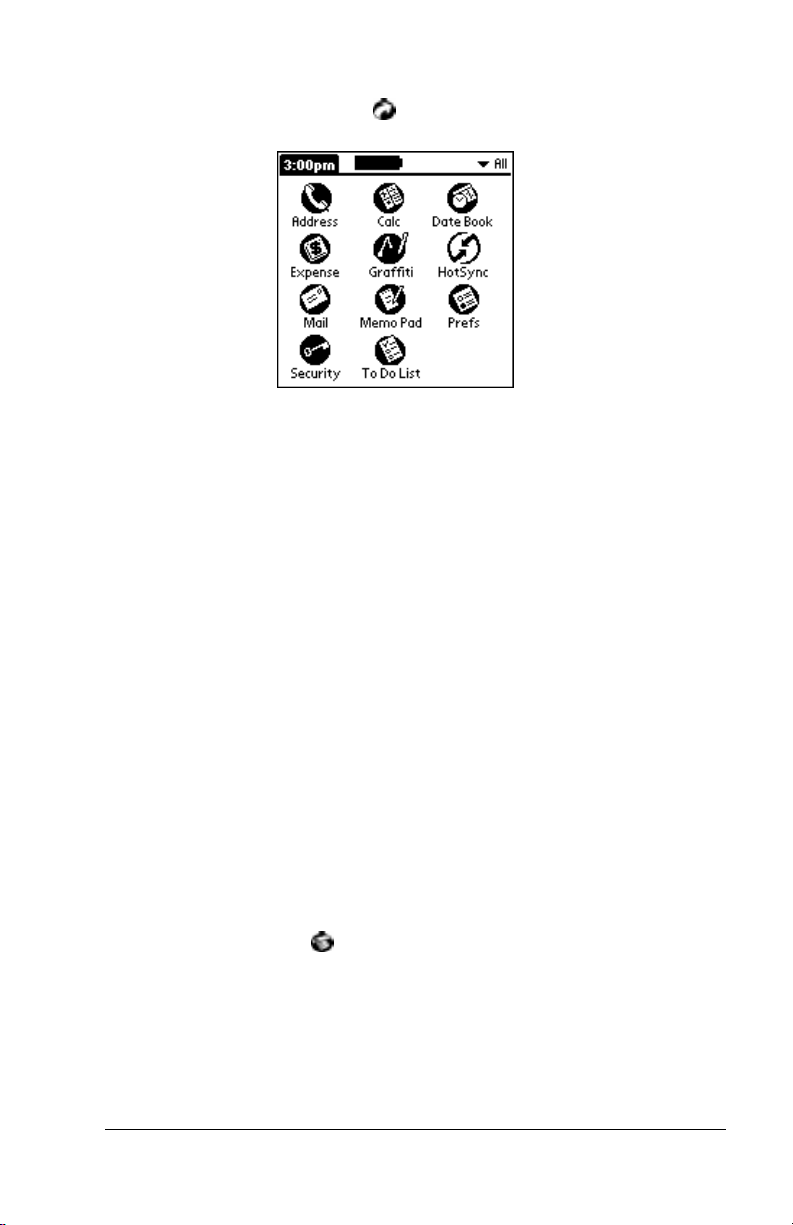
To open an application:
1. Tap the Applications icon .
2. Tap the icon of the application that you want to open. If you have
many application s installed on your Palm V org aniz er, tap the
scroll bar to see all of your applications.
Tip: To find an application quickly, you can write the Graffiti
character for the first letter of its name. The Ap plicat io ns
Launcher scrolls to the fi rst application with a name that
begins with that letter. You can als o assign appl ication i cons to
different categories. See “Categorizing applications” in
Chapter 3.
Using menus
Menus on your organizer are easy to use. Once you have mastered
them in one application, you can use them the same way in all other
applications.
The menus of each application are illustrated in the se ction on that
application in Chapter 4. The Edit menu is described in “Editing
records” in Chapter 4.
To open the menu bar:
1. Open an application (such as Memo Pad).
2. Tap the Menu icon .
Chapter 1 Page 17
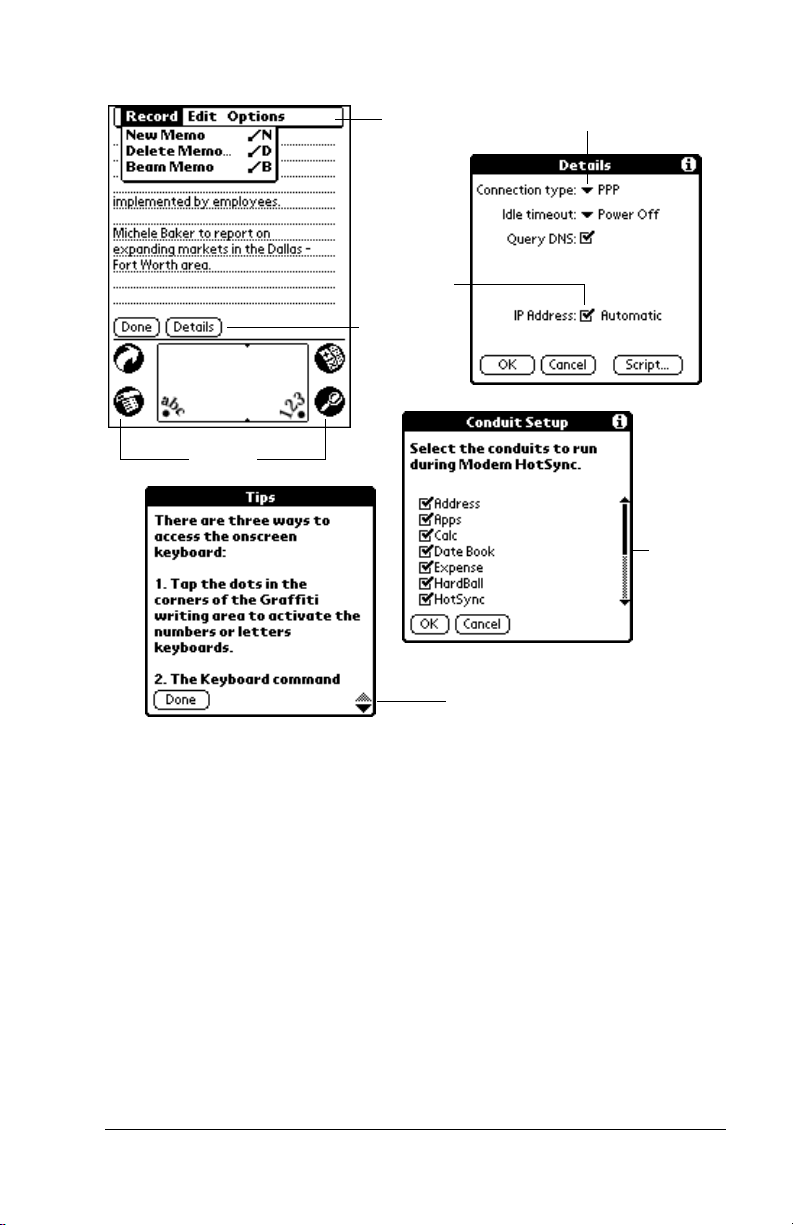
Page 26
Tap the Menu icon
In this example, three menus are available: Record, Edit, and Options.
The Record menu i s sel ected an d cont ains the comma nds N ew Memo,
Delete Memo, and Beam Memo.
Choosing a menu
After you open the menu bar for an application, tap the menu that
contains the command you want to use.
The menus and menu commands that are available depend on the
application that is currently open. Also, the menus and menu
commands vary dependin g on which part of the application you’re
currently using. For example, in Memo Pad, the menus are different
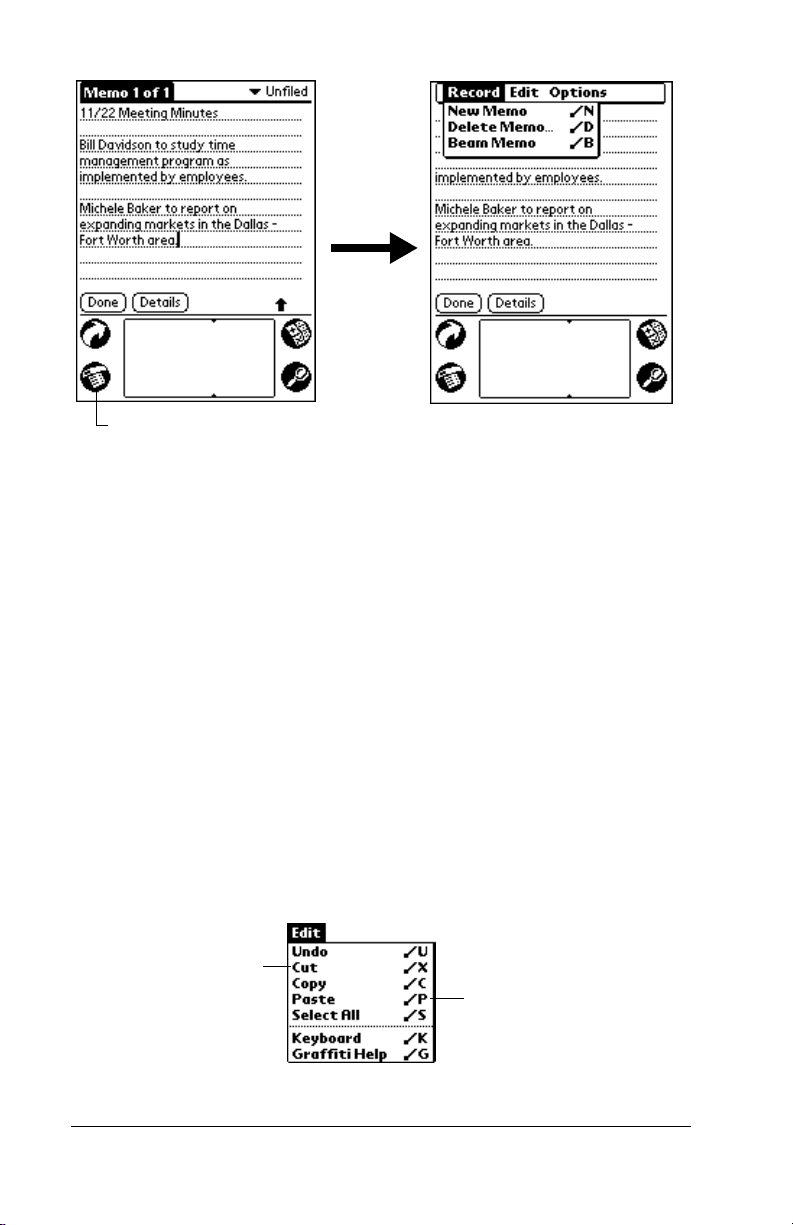
for the Memo List screen and the Memo screen.
Graffiti menu commands
Most menu commands have an equivalent Graffiti Command stroke,
which is simi lar to the k eyboar d shor tcu ts used t o exe cut e comman ds
on computers. The command letters appear to the right of the
command n a mes.
Menu commands
Command letters
To use the Gra f fiti menu commands, the me nu b a r must be closed.
Page 18 Introduction to Your Palm V™ Organizer
Page 27
Draw the Command stroke anywhere in the Graffiti area, and
immediately write the corresponding command letter in the Graffiti
letter area. When you draw the Command stroke, the word
“Command” appears just above the Graffiti writing area to indicate
that you are in Command mode.
Command
For example, to choose Select All in the Edit menu, draw the
Command stroke, followed by the letter “s.”
Note: Command mode is active for approximately two seconds, so
you must wri te the co mmand let ter imme diatel y to choo se the
menu command.
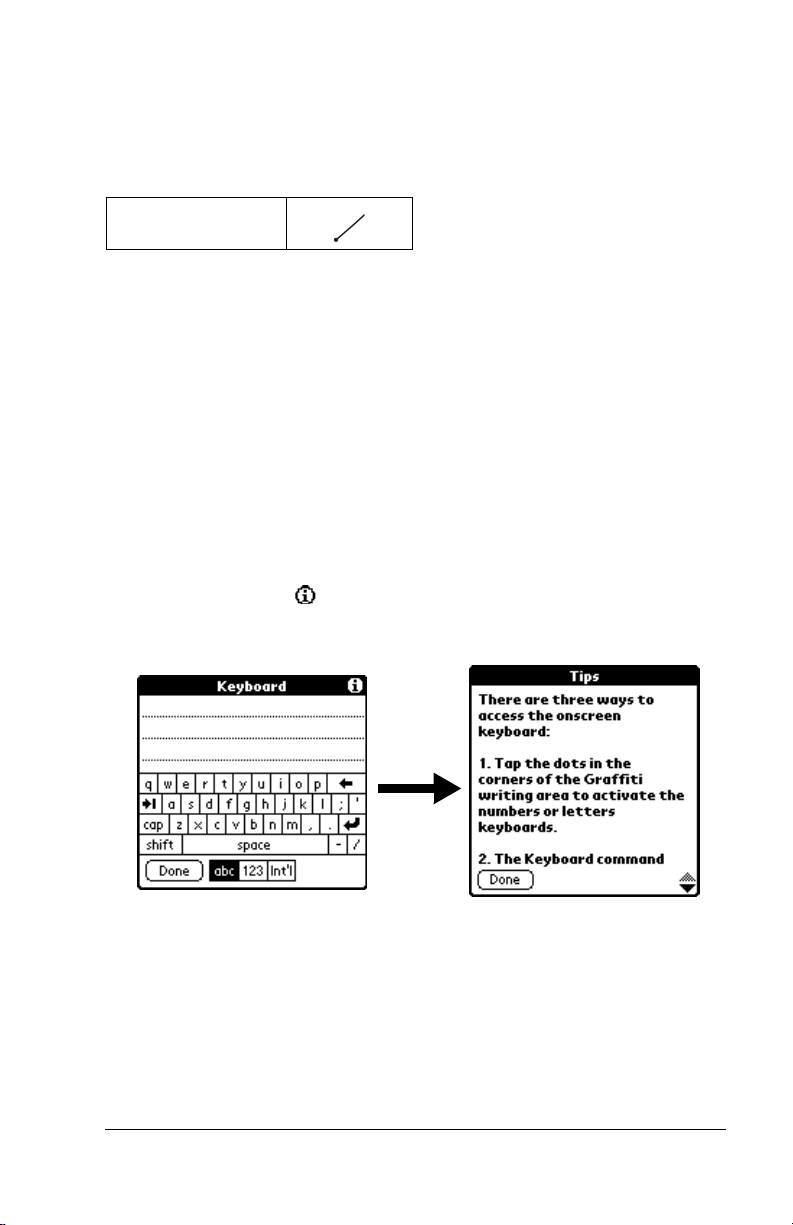
Displaying online tips
Many of the dialog boxes that appear on your organizer contain an
online Tips icon in the upper-right corner. Online tips anticipate
questions you have in a dialog box, provide shortcu ts for using the
dialog box, or give you other useful information.
To display an online tip:
1. Tap the Tips icon .
2. After you review the tip, tap Done.
Three ways to enter data
There are three ways to enter data into your Palm V organizer:
■ Using the on screen keyboard
■ Using Graffiti writing
■ Entering or importing data in Palm Desktop software and then
synchronizing with your organizer
Chapter 1 Page 19
Page 28

Onscreen keyboar d
When you create or edit a record in an applicat io n such as Address
Book, you can open the onscreen alphabetic and numeric keyboards
to enter data.
Tap here for
alphabetic keyboard
Tap here for numeric
keyboard
After a keyboard is open, you can tap to open any of the other
keyboards, including the international keyboard. See “Using the
onscreen keyboard” in Chap ter 2 for mo re information.
Note: You cannot enter Graffiti characters while using the onscreen
keyboard.
Alpha
Tab
Caps lo ck
Caps shift
Tap here to display
alphabetic keyboard
Numeric
Backspace
Carria g e return
International
Tap here to disp lay
numeric keyboard
Tap here to di s p lay
international keyboard
Graffiti writing
Your Palm V organizer includes Gra f f iti writing software as the
primary system for entering text and numbe rs. With Graffiti writing,
you w r ite simp l e str okes wi th the stylus and the y a r e in st a n t l y
recognized as letters or numbers.
Page 20 Introduction to Your Palm V™ Organizer
Page 29

Write le tters h ere Write numbers here
Division marks
Your Palm V organizer also includes Giraffe, a game you can use to
practice Graffiti writing. See “Installing and removing applications”
in Chapter 3 for installation instructions. The Memo Pad application
is ideal for practicing Graffit i writi ng. Th is secti on expl ains ho w to
open Memo Pad and use it to practice Graffiti writing.
To open Memo Pad:
1. Press the Memo Pad application button .
2. Tap New.
Note: A blinking cursor a ppears on the f irst lin e of t he new memo to
indicate where new text will appear.
New
memo
cursor
Tap
New
Write in Graffiti area
See “Using Graffiti writi n g to ent e r data” in Chapter 2 for more
information.
Chapter 1 Page 21
Page 30
Using Palm Desktop software
If you have n ew records you want to add to your Palm V organizer
and prefer to use the computer keyboard rather than the onscreen
keyboard, enter the data in the Palm Desktop software or the PIM you
have in st a l le d to use with y o u r or g a n iz e r.
If you already have data in a database on your computer, you can
import it into the Palm Desktop software.
After the infor mation is in Palm Desktop soft ware, perform a HotSyn c
operation to synchronize your organizer with your computer. See
“Exchanging and updati ng data: HotSync operations ” in Chapter 4 for
more in f o rm a tio n .
Importing data
If you have da ta stored i n computer ap plicati ons such as spread sheets
and database s, or if you want to import d a ta f rom another organizer,
you can transfer the records to your Palm V organizer without having
to key the m i n manually. See “Importing data” in Chapter 2 for more
information.
Page 22 Introduction to Your Palm V™ Organizer
Page 31

Customizing your organizer
You can customize your organizer to suit your way of working. You
can enter your personal informati on such as y our name and address;
change the time and date, and view them in different format s when
you tr avel; tu rn of f sounds; and con figure y o u r or g a n izer to wo rk
with a modem or network. See Chapter 7 for more infor mation on
customizing your organize r.
To open the Preferences screens:
1. Tap the Applications icon .
2. Tap the Preferences icon .
3. Tap the category pick list in the upper-right corner of the screen.
4. Tap the Preferences category you want to view.
The following procedures for setting the time and date give you an
example of how to customize your organizer.
You make change s to the time and date in General pref e rences.
To set the current time:
1. Tap the Set Time box.
Tap here
2. Tap the up or down ar rows to change the hour.
3. Tap each number of t he minute, and then t ap t he arrows t o chan ge
them.
4. Tap AM or PM.
Note: Your organizer can also display time based on a 24-hour
clock. See “Formats preferences” in Chapter 7 for more
informatio n.
5. Tap OK.
Chapter 1 Page 23
Page 32

To set the current date:
1. Tap the Set Da te b ox.
2. Tap the arrows to select the current year.
Tap arrows to select year
Tap to select month
Tap to select date
3. Tap a month.
4. Tap the current date.
Page 24 Introduction to Your Palm V™ Organizer
Page 33

Chapter 2
Enteri n g D a ta in Your
Palm V
This chapter explain s how to enter data into y our Pal m V™ organiz er,
either b y writi ng wit h the stylus in th e Graf fiti
onscreen keyboard, using the computer keyboard, or importing data
from another application.
Using Graffiti writing to enter data
Chapter 1 introduced Graffiti writing and briefly described how to use
it to enter text in your applications. In this section, you learn the
procedures for creating letters and some Graffiti tips and tricks.
Writing Graffiti characters
Most people find they can enter text quickly and accurately with only
minutes of practice. Graffiti writing includes any character yo u can
type on a stand ard keyboar d. The Gra ffiti stroke s closel y resemb le the
uppercase letters of the regular alphabet, which makes Graffiti writing
easy to learn .
™
Organizer
®
writing area, using the
There are four basic concepts for success with Graffiti writing:
■ If you draw the character shape exactl y as shown i n the ta bles later
in this chap te r (like the sh ap es shown in the following diagram),
you achieve 100% accuracy.
■ The heavy dot on each shape shows where to begin the stroke.
Certain characters ha ve similar shapes, but different begin ni ng
and end points . Always begin the stroke at the heavy dot (you
should not cr eate th e heavy dot; i t is only th ere to show you where
to beg in the stroke) .
Chapter 2 Page 25
Page 34

■ Most characters require onl y a single stroke. Whe n you lift the
stylus from the Graffiti writing area, your organi ze r recognizes
and displays the text character immediately. To accomplish single
strokes , some Graffiti strokes are p ortions of the re gular alp habet
equivalen ts.
■ The Graffiti writing area is divided into two parts: one for writing
the letters of the alphabet and one for writing numbers. The small
marks at the top and bottom of the Graff iti writin g ar e a indicate
the two areas .
Write le tters h ere Write numbers here
Division marks
To write Graffiti letters:
1. Tap the screen where you want your text to go.
2. Use the tables on the following pages to find the stroke shape for
the letter you want to creat e. For example, the stroke s hown below
creates the le tter “n.”
Note: There are two different stroke shapes available for some
letters. For these lett ers, choose th e one that’s easiest for
you.
Lift stylus
here
Start stroke
at heavy dot
As you’ll see l ater, you use th e same shape to create both the
uppercase and lowercase version of a letter.
3. Positi o n the st ylu s i n th e lef t-han d si de of the Gra ffi ti wr iti ng ar ea.
4. Start your st roke at the heavy dot and draw the stroke shape as it
appears in the tables.
Page 26 Entering Data in Your Palm V™ Organizer
Page 35

5. Lift the stylus from the screen at the end of the stroke shape.
That’s all th e re is to it! When you lift the stylus from the screen, your
organizer recognizes your stroke immediately and prints the letter at
the insertion point on the screen.
As soon as you lift the stylus from the sc reen, you can begin the stroke
for the next character you want to write.
Important: You must begin the character strokes in the Graffiti
writing ar e a . If you do not make Gr af fiti strokes in the
Graffiti writing area, your organizer does not recognize
them as text characters.
Graf fiti ti ps
When using Graffiti writing, keep these tips in mind:
■ Accuracy improves when you write large characters. You should
draw strokes that nearly fill the Graffiti writing area.
■ To dele t e c ha racter s, si m p l y se t the insert i o n p oint to the ri g ht of
the charac te r you want to delete an d make the backspace stroke
(a line from right to left) in the Graffiti writing area.
■ Write at natural speed. Writing too slowly can generate
recognition errors.
■ Do not write on a slant. Vertical strokes should be parallel to the
sides of the Graffiti wri ting area.
■ Press firmly.
Chapter 2 Page 27
Page 36

The Graffiti alphabet
Letter Strokes Letter Strokes
AN
B
O
CP
D
Q
ER
F
G
S
T
HU
IV
JW
KX
LY
M
Z
Space Back Space
Carriage
Period
tap twice
Return
Page 28 Entering Data in Your Palm V™ Organizer
Page 37

Writing capital letters
You make capit a l letters with the same stroke shapes as the basi c
alphabet characters. T o make capital letters, you must first “shift” to
caps — just as you press the Sh ift key on a keyboard — and then write
the character strokes.
Note: Graffiti writing includes a feature that automatically
capitalizes the first letter when you create a new record (by
tapping New or a blank line).
To draw the first letter of a word as a capital letter:
■ Use the Caps Shift stroke:
Caps
Shift
Tip: When Caps Shift is active, an “up arrow” symbol appears in
the lower - right corn e r of the organizer screen. If you
accidentally activate Caps Shift, backspace will cancel it.
To enter only capital letters (Caps Lock):
■ Use the Caps Lock stroke:
Caps
Lock
Tip: When Caps Lock is active, an underlined “up arrow” symbol
appears in the lower-right corner of the organizer screen. To
return to lowerca s e, make the Cap s Shift st roke.
Writing numbers
Writing numbers with Gra ffiti writi ng is similar to writing letters of
the alphabet, except that you make the character strokes on the righthand side (nu mbers side) of the Graffiti wr iting area.
Chapter 2 Page 29
Page 38

Graffiti numbers
Number Strokes Number Strokes
0
5
1
27
38
4
6
9
Writin g punctuatio n marks
Graffiti wr i ting c an cre ate an y punc tuat ion sym bol th at you can ente r
from a standard ke yboar d. All p unctuat ion marks b egin with a sin gle
tap on the Graffiti writing area. When you make this tap, you activate
Punctuation Shift and a dot appears to show it is active. The next
stroke you make with the stylus creates a punctuation mark.
Punctuati on shi ft
Symbol Stroke Symbol Stroke
Period
.
Dash
—
Comma
,
Apostrophe
'
Question
?
Exclamation
!
Page 30 Entering Data in Your Palm V™ Organizer
Left Paren
(
Right Paren
)
Slash
/
Dollar
$
Page 39

Additional Graffiti punctuation
@ # % ^ & * < > – + = |
\ { } [ ] ~ ` ; : " tab
Note: When Punctuation Shift is active, you can make a symbol
stroke anywhere in the Graff iti writing area (the letters or
numbers side).
Writing symbols and extended characters
All symbols and exte nded characte rs begin with th e stroke in the
Graffiti writing area of yo u r organizer:
Symbol
Shift
When the Symbol Shift is active, a slanted shift symbol appears in the
lower-r ight corner of th e screen. The next str oke that you make crea tes
the symbol or extended char acter.
,
•
+
±
:
X
,
==c
ƒ
,
,
,
,
Y
∅
.
?
!
Chapter 2 Page 31
Page 40

Writing accented characters
To create accented characters, draw the stroke normally used to creat e
the letter, followed by an accent stroke. Graffiti writing then adds the
accent to the l e tter.
For example, the following diagram shows the strokes required to
draw an accented “e.”
= e
Accent strokes
a a a a a a
Using these accent strokes, you can write the following accented
letters:
à á â ã ä å è é ê ‘ “ ’ ” • ò — ô õ ö ù ú û ü – ÿ
Additional non-English characters
You can write the following characters in the lowercase alphabet
mode without any special punctuation or shifting:
c
a
e
Note: You must wr it e these no n-En gli sh ch ar acter s i n t he lef t si de of
the Graffiti writing area.
Page 32 Entering Data in Your Palm V™ Organizer
Page 41

Navigation strokes
In addition to character symbols, Graffiti writing includes special
stro k es that you ca n u se to navig a t e wi t h in te xt or fields in you r
applications.
Command Stroke
Move cursor right
Move cursor left
Previous field
(Address Book only)
Next Fiel d
(Address Book only)
Open Address Record
(Address Book only)
Graffiti ShortCuts
Graffiti ShortCuts make e ntering commonly used words or phrases
quick and easy. ShortCuts are similar to the Glossary or Autotext
features of some word processors.
Graffiti writing comes with several predefined ShortCuts, and you can
also create your ow n. Each Sh ortCut c an re present u p to 45 c haracters.
For example, you might create a ShortCut for your name, or for the
header of a memo. See “ShortCuts preferences” in Chapter 7 to learn
about creating your own ShortCuts.
To use a ShortC ut, draw t he Short Cut stroke follo wed by the Sh ortCut
character s. Wh en yo u draw th e Shor tCu t st roke , t he Sho rtCut s ymb ol
appears at the insertion point to show th at you ar e i n ShortC ut mo de.
ShortCut
Chapter 2 Page 33
Page 42

Your organizer includes the following predefined Graffiti ShortCuts:
Entry ShortCut
Date st a mp ds
Time stamp ts
Date / time stamp dts
Meeting me
Breakfast br
Lunch lu
Dinner di
Page 34 Entering Data in Your Palm V™ Organizer
Page 43

Using the onscreen keyboard
You can open the onscreen keyboard anytime you need to enter text
or numbers on your organizer. Not e that you cannot enter Graffiti
characters while using the onscreen keyboard.
To use the onscreen keyboard:
1. Open any application (such as Memo Pad).
2. Tap any record, or tap New.
3. Tap “abc” to open the alphabetic keyboard, or tap “123” to open
the numeric keyboard.
Tap here for alpha
keyboard
4. Tap the ch aracters to en te r text and numbers.
Note: The onscreen keyboard also includes a dialog box for
international characters. You can switch among the three
dialogs at any time to enter the exact text you need.
5. After you finish, tap D one to close the onsc reen keyboard an d
place the text in the record.
Tap here for numeric
keyboard
Using your compu ter keyboard
If you have a lot of data to enter, or prefer to use th e computer
keyboard, you can use Palm™ Desktop software or any supported
PIM to enter information and then perform a HotSync
synchronize it with your organizer. All the main applications on your
organizer are also avail able in Palm Desktop software and in most
PIMs, so you don’t need to learn different applications.
Refer to Palm Desktop online Help for more information on entering
data on your com puter.
®
operation to
Chapter 2 Page 35
Page 44

Importi ng da ta
If you have da ta stored i n computer ap plicati ons such as spread sheets
and database s, or if you want to import d a ta f rom another organizer,
you can transfer the data to your Palm V organizer without having to
key it in manually. Save the data in one of the file formats listed below,
import it into Palm Desktop software, and then perform a HotSync
operation to transfer the data to your organizer.
Palm Desktop software can import data in the following file formats:
■ Comma delimited (.csv, .txt)
■ Tab delimited (.tab, .tsv, .txt)
■ CSV (Lotus Organizer 2.x/97 Mapping)
■ Date Book archive (.dba)
■ Address Book archive (.aba)
■ To Do List archiv e (.tda)
■ Memo P a d ar chive (.mp a)
Archive formats can only be used with Pal m D esktop software. Use
the archive file formats to share information with other organizer
users or to create a copy of your important Palm Desktop information.
To import data:
1. Open Palm Desktop software.
2. Click the application you want to import data into.
3. If you are importing records that contain a field with category
names, do the following :
Select All in the Category b ox.
Be sure that the same categories that appear i n the imported file
also exist in the applicat ion. If the ca tegori es do not exist, create
them now; otherwise, the records are imported into the Unfiled
catego ry.
4. From the File menu, choose Import.
5. Select the file you want to import.
6. Click Open.
7. To import data into the correct Palm Desktop fields, drag fields in
the left-hand column so that they are opposite the corresponding
imported field on the right.
Page 36 Entering Data in Your Palm V™ Organizer
Page 45

8. If you do not w ant to i mport a fi eld , dese lec t the che ck box f or th at
field.
9. Click OK.
The imported dat a is highlight ed in the ap plicat io n.
10.To add the imported data to your organizer, perform a HotSync
operation.
See Palm Desktop online Help for more information on importing and
exporting data.
Chapter 2 Page 37
Page 46

Page 38 Entering Data in Your Palm V™ Organizer
Page 47

Chapter 3
Managing Your Applications
This chapter explains how to switch between applications on your
Palm V™ organizer , how to change applic ation settings so they are
personalized to your work methods, and how to categorize
applications so you view them in related groups.
Selecting applications
Your Palm V organizer is equipped with a variety of applications. All
the applications installed on your organizer appear in the
Applications Launcher. See “Opening applications” in Chapter 1 for
details.
Switching between applications
When working in any application, tap the Applications icon or
press an application button on the fron t panel of your organizer to
switch to another applic ation. Your org a nizer automatically saves
your work in the current application and displays it when you return
to that application.
Using the Applications Launcher
To open the Applications Launcher, tap the Applications icon .
Categorizing applications
The category feature enables you to manage the number of application
icons that appear onscreen in the Applications Launcher. You can
assign an application to a category and then display a single cat egory
or all your applications.
Chapter 3 Page 39
Page 48

To categorize an application:
1. Tap the Applications icon .
2. Tap the Menu icon .
3. Tap App, and then tap Category.
4. Tap the pick list next to eac h application to select a category .
Tip: To create a new category, tap Edit Categories from the
pick list. Tap New, enter the category name, and then tap
OK to add the cat e g o ry . Tap OK.
5. Tap Done.
To display applications by category:
1. Tap the Applications icon .
2. Do one of the following :
Tap the Applications icon repeatedly to cycle through all your
categories.
Tap the pick list in the upper-right corner of the screen and se-
lect the category you want to display.
Changing the Applications Launcher display
By default, the Applications L auncher dis plays each applicat ion as an
icon. As an alternative, you can choose to show a list of application s.
You can also choose to view the sa me category of applications e a ch
time you open the Applications Launcher.
Page 40 Managing Your Applications
Page 49

To change the Applications Launcher display:
1. Tap the Applications icon .
2. Tap the Menu icon .
3. Tap Options, and then tap Preferences.
4. Tap the View By pick list and select List.
5. Tap OK.
To open the Applications Launcher to the last opened category:
1. Tap the Applications icon .
2. Tap the Menu icon .
3. Tap Options, and then tap Preferences.
4. Tap the Reme mber Last Categ ory check box to select it.
5. Tap OK.
Choosing preferences
You can set opti ons that affect an entire application in the
application’s Preferences dialog box.
To change preferences for an application:
1. Open an application.
2. Tap the Menu icon .
3. Tap Options, and then tap Preferences.
Note: Not all applications have a Preferences command.
4. Mak e change s to the set t i n gs.
5. Tap OK.
Chapter 3 Page 41
Page 50

Installing and removi ng applications
This section explains how to install and remove applications on your
Palm V organizer and how to remove Palm™ Desktop software from
your computer.
Installing add-on applications
Your Palm V organizer comes with the Date Book, Address Book, To
Do List, Memo Pad, Ex pe nse , Calcu lato r, and Mail applicat io ns
installed and ready to use.
You can also install addi tional appli cations on your o rganizer, such as
games and other software. The Install Tool makes it easy to install
software on your Pa l m V organi z e r du ring a H ot Sync
There are a variety of third-party applications available for your
Palm V organizer. To learn more about these applications, go to the
web site: http://www.palm.c om.
Note: Any game or application that you install on your organizer
resides in RAM mem ory; you can del e te them at any time.
To install add-on software on your organizer:
1. On your computer, copy or download the application you want to
install into the add-on folde r in your Palm Desk top direc tor y on
your computer.
®
operation.
Note: If the software you download is compressed, you need to
decompress i t into this folder. If you prefer to place the
application into another folder, you need to navigate to
that folder before you complete step 5.
2. Double-click the Palm Desktop icon on your desktop.
Page 42 Managing Your Applications
Page 51

3. Click In stall.
Tip: You can also access the Install Tool di alog by selecting
Install Too l from t he Palm Des ktop p rogr am group o r by
double-clicking any file w ith a PRC file extension.
Chapter 3 Page 43
Page 52

4. In the User drop-down l ist, select the name that corresponds to
your Palm V organizer.
5. Click Add.
6. Select the applic atio n(s) th at you want to inst all on your or ganizer .
7. Click Open.
Note: Review the list of applications you selected in the Install
Tool dialog box. If you do not want to install an
application, select it, and then click Remove. (This does
not remove the application from your computer; it simply
removes it from the list of applications to install.)
8. Perform a HotSync operation to install the application(s) you
selected in step 6. See “Exchanging and updating data: HotSync
operations ” in Chapt er 4 for details.
Installing games
The CD-ROM al so in cludes seve ral game s that you ca n inst all wi th the
Palm Install Too l:
■ Giraffe
■ HardBall
■ MineHunt
■ Puzzle
■ SubHunt
Note: Giraff e is a fun, easy way for y ou to p ractice Graffiti
After you install and start a game, the instructi ons appear in the Game
menu. Depending on the game, the Game menu may also contain
commands to show high scores, to start a new game, or to set
preferences for the game.
Page 44 Managing Your Applications
®
writing.
Page 53

Removing applications
In the event that you run out of memory or decide that you no longer
need an application you installed, you can remove applications from
your organizer. You can remove only add-on applications, patches,
and extensions that you install; you cannot remove the applications
that reside in the ROM portion of your organizer.
To remove an add-on application:
1. Tap the Applications icon .
2. Tap the Menu icon .
3. Tap App, and then tap Delete.
4. Tap the applicat ion that you want to remove.
5. Tap Delete.
6. Tap Yes.
7. Tap Done.
Removing Palm Desktop software
If you no longe r want to use Pa lm Desktop software, you can remove
it from your computer.
To remove Palm Desktop software:
1. From the Windows Start menu, choose Settings, and then Control
Panel.
2. Doub le-click the Ad d/Remove Prog rams icon.
3. On the Install/Uninstall tab, selec t Palm Desktop sof tware.
4. Click Add/Remove.
Note: You need to in stall the Hot Sync Manage r from the installa tion
CD if you want to synchronize dat a with another PIM.
Chapter 3 Page 45
Page 54

Security
Your organizer comes with a Securi ty application so that
unauthorize d users cannot view the entries you wish to protect.
In Security, you can do the following:
■ Turn of f and l o ck yo u r organiz e r s o th a t it d o e s not opera te u ntil
you enter the correct password.
■ Hide records that you mark as private. You can hide private
records with or wi t hout a p ass word. Withou t a passw ord, pr i vate
records are hidden until you set the Security application to show
them. With a password, you must enter the password to view the
private entries. See “Making records private” in Chapter 4 for
information on making records private.
Assigning a password
You can assign a password to protec t your pri vate records and to lock
your orga nizer.
To assign a password:
1. Tap the Applications icon .
2. Tap the Security icon.
3. Tap the P assword box.
4. Enter a password.
Tap here
5. Tap OK.
6. Enter the same password a second time, and tap OK.
Page 46 Managing Your Applications
Page 55

Changing or deleting a password
Once you define a password for your organizer, you can change or
delete it at any ti me. You must e nter the cur rent pas swor d before you
can chang e or delete it .
To change or delete your password:
1. Tap the Password box.
2. Enter the current password.
Tap here
3. Tap OK.
4. Do on e o f th e fo l lowing:
To change the password, enter the new password, and tap OK.
To dele te th e p a ssword , ta p De l e t e .
Locking your organizer
You ca n als o l o ck y o u r organiz e r s o th a t you n e e d to enter you r
password to operate it.
Important: If you l o ck y o u r or g a ni z e r, yo u must ente r the exact
password to re-activate your organizer. If you forget the
password, you need to use the re se t b utton to res um e
using your organizer. Using the reset button deletes all
the reco rds in your or g a ni z er; however, you can res t or e
all synchronized data at the next HotSync operation. See
“Resetting your organizer” in Appendix A for
informati on about how to use the reset button.
Chapter 3 Page 47
Page 56

To lock your organizer with a password:
1. Perform a HotSync operation to synchronize the data between
your organizer and your computer. See “Ex changing and updating
data: HotSync operations” in Chapter 4 for information on
synchronizing your data.
2. Assign a pass word.
3. Tap Turn O ff & Lo ck De v i ce.
Tap Of f and
Lock
4. Tap Off & Lock.
5. To start your organ i zer, enter the password.
Recovering from a forgotten password
If you forget your password, you can delete th e password fro m yo ur
organizer. Deleting a forgotten password also deletes all entries and
files marked as Private.
Important: If you synchr onize with yo u r computer before deleting a
forgotten passw or d, you r or ganize r r est ores your pri vate
entr i es the next ti m e y ou p e rf o rm a HotS yn c o p e ra tion,
but it does not restore the password.
To delete a forgotten password:
1. Tap For gotten Passwor d.
2. Tap Yes.
Page 48 Managing Your Applications
Page 57

Chapter 4
Survey of Basic Applications
These are the basic applications of your organizer:
■ Date Book
■ Addres s Boo k
■ To Do List
■ Memo Pad
■ Calculator
■ Expense
This chapter is divided into three sections:
■ “Overview of basic applications” briefly describes each
application and explains how to open it.
■ “Common tasks” g ives instructions on how to do tasks that you
can do in most or all of the basic applications. It’s easy to transfer
what you learn in one application to the others because the
structure and behavior of all the applications are quite similar.
■ “Application-specific tasks” is organized by application and gives
instructions on how to do tasks that are specific to each
application.
Chapter 4 Page 49
Page 58

Overview of basic applic ations
Date Book
Date Book lets you quickly and easily schedule appointments
or any kind of activity associated with a time and date.
In Date Book, you can do the following:
■ Enter a description of your appointment and assign it to a specific
time and date.
■ Display a chart of your appointments for an entire week. The
Week View makes it easy to spot available times and any potential
scheduli ng overlaps or con f licts.
■ Display a monthly calendar to quickly spot days where you have
morning, lunch, or afternoon appointments.
■ Set an alarm to sound prior to the scheduled activity.
■ Create reminders for events that are based on a particular date,
rather than time of day. Birthdays and anniversaries are easy to
track with you r connected organizer.
■ Attach notes to individ u al events for a description or cl arification
of the entry in your Date Book.
To open Date Book:
■ Press the Date Book application button on the front panel o f your
organizer. Date Book opens to today’s schedule.
Date Bo ok button
Note: Press the Date Book application button repeatedly to cycle
through the Day, Week, and Month views.
Page 50 Survey of Ba s ic Applic a tions
Page 59

Address Book
Address Book enab les you to keep names, addresses, ph one
numbers, and ot her informati on about your person a l or
business co ntacts.
In Address Book, you can do the following:
■ Quickly lo ok up or enter names, addresses, phone numbers , and
other information.
■ Enter up to five phone numbers (home, work, fax, car, etc.) or
e-mail addresses for each name.
■ Define which phone number appears in t h e A ddress L i st for each
Address Book entry.
■ Attach a note to each Address Bo ok entr y, i n which you can ent er
additional information about the entry.
■ Assign Address Book entries to categories so that you can
organize and view them in logical groups.
To open Address Book:
■ Press the Addr e ss Book application button on the front panel of
your organizer. Address Book opens to display the list of all your
records.
Addr e s s Book bu tton
Note: Press the Address Book application button repeatedly to cycle
through th e categori e s in which you have recor ds.
Chapter 4 Page 51
Page 60

To Do List
To Do List is a convenient place to create reminders and
prioriti ze the things that you have to do.
In To Do List, you can do the following:
■ Make a quick and convenient list of things to do.
■ Assign a priori ty level to each ta sk .
■ Assign a due date for any or all of your To Do List items.
■ Assign To Do List items to ca tegor ies so that you can orga nize and
view them in logical groups.
■ Sort your To Do List items either by due date, priority level, or
category.
■ Attach notes to individual To Do Li st items for a description or
clarification of the task.
To open To Do List:
■ Press the T o Do List appl ication button on th e f ront panel of your
organize r. To Do List opens to di splay the category of items you
last viewed.
To Do List button
Note: Press the To Do List application button repeatedly to cycle
through the categories in which you have items.
Page 52 Survey of Ba s ic Applic a tions
Page 61

Memo Pad
Memo Pad provides a plac e to take notes that ar e not associat ed
with records in Date Book, Address Book, or To D o Li st.
In Memo Pad, you can do the following:
■ Take notes or write any kind of message on your conne cted
organize r.
■ Drag and drop memos into popular computer applications like
Microsoft Word when you synch ronize usi ng P a lm™ Desktop
software and HotSync
■ Assign memos to categories so that you can organize and view
them in logical groups.
■ Write down phone numbers and other types of information. Later,
you can copy and paste this information to othe r applicat io ns.
To open Memo Pad:
■ Press the Me mo Pad ap plic atio n but ton on the fr ont p anel of you r
organizer. Memo Pad opens to display the last Memo Pad screen
that you viewed.
®
technology.
Memo P a d button
Note: Press the Memo Pad application button repeatedly to cycle
through th e categori e s in which you have memos.
Calculator
Calculator enables you to perform addition , subtraction,
multiplicatio n, and div is ion.
In Calculator, you can do the following:
■ Perform basic calculations.
■ Store and retrieve values.
Chapter 4 Page 53
Page 62

■ Display the last series of calculati ons, whic h is useful for
confirming a series of “chain ” calculations.
To open Calculator:
■ Tap the Calculator icon next to the Graffiti
®
writing area.
Expense
Expense lets you keep track of your expenses and then transfer
the information to a spreadsheet on your computer.
In Expense, you can do the following:
■ Record dates, types of expenses, amount spent, payment method,
and other details associated with any money that you spend.
■ Assign expens e items to categori e s so that you can organize and
view them in logical groups.
■ Keep track of vendors (companies) and peo ple involved with each
particular expense.
■ Log miles traveled for a particular date or expense category.
■ Sort your expenses by date or expense type.
■ Transfer your ex p e nse information to a Microsoft Excel
spreadshee t ( ve rsion 5.0 or later) on your computer. (Microsof t
Excel is not included in the Palm V™ organizer package.)
To open Expens e:
1. Tap the Applications icon .
2. Tap the Expense icon .
Page 54 Survey of Ba s ic Applic a tions
Page 63

Common tasks
The tasks d escribe d in th is se ction us e the t erm “rec ords” to refer to an
individual item in any of the basic applications: a single Date B ook
event, Address Book entry, To Do List item, Memo Pad memo, or
Expense item.
Creating records
You can use the following procedure to create a new record in Date
Book, A ddress Book, To Do List, Memo Pad, and Expense.
To create a record:
1. Select the application in which you want to create a record.
2. Tap New.
3. In Dat e Book onl y: Selec t start an d end times for yo ur appointm ent
and tap OK.
4. Enter text for the record.
5. (Optional) Tap Details to select attributes for the record.
6. In Address Book a nd Memo Pad only: Tap Do ne .
There’s no need to save the rec ord because your organizer sa ves it
automatical ly.
Editing records
After you create a record, you can change, delete, or enter new text at
any time. Two screen features tell you when your organizer is in
editing mode:
■ A blinking cursor
■ One or more edit lines
Blinking cur sor
Edit line
Chapter 4 Page 55
Page 64

Entering text
For information on how to enter text using Graffiti writing, the
onscreen keyboard, or the keyboard attached to your computer, see
Chapter 2.
Edit menu
The Edit menu is available with any screen where you enter or edit
text. In general, commands available in the Edit menu apply to text
that you select in an application.
To select text in an application:
1. Tap the be ginning of the tex t that you want to sel e ct.
2. Drag the stylus over the text to highlight it (in black).
Note: You can drag acro ss the te xt to sel ect addi tion al wor ds, or
drag down to select a group of lines.
The following commands may appear in an Edit menu:
Undo
Cut
Copy
Paste
Select All
Reverses the action of the la st ed it command. For
example, if you used Cut to remove text, Undo
restores the text you removed. Undo also
reverse s de letions don e by using back sp ace.
Removes the selected text and stores it
temporarily in the memory of your organizer.
You can paste t he text y ou cut int o anoth er area
of the current application or into a different
application.
Copies the selected text and stores it
temporarily in the memory of your organizer.
You can paste the text that you copy into
another ar e a of the current application or into a
different application.
Inserts th e te xt that you cut or cop ied at the
selected point in a record. The text you paste
replaces any selected text. If you did not
previously cut or copy text, Paste does nothing.
Selects all of the text in th e cu rrent re co rd or
screen. This e nabl es you to cu t or co py a ll of t he
text and paste it elsewhere.
Page 56 Survey of Ba s ic Applic a tions
Page 65

Keyboard
Opens the onscreen keyboard. When you finish
with the onscreen keyboard, tap Done.
Graffiti Help
Opens screens that show all the Graffiti
chara ct e r st ro k e s . Us e thi s com mand an yt i m e
you forget a stroke for a character.
Dele ting records
To delete a record in any of the basic applications:
1. Select the record you want to delete.
2. Tap the Menu icon .
3. Tap Record, and then tap the Delete command:
Date Book: Delete Event
Address Book: Delete Address
To Do List: Delete Item
Memo Pad: Delete Memo
Expense: Dele te Item
A confirmation dialog box appears. If you want to save a copy of
the deleted item to an archive file in Palm Desktop software, be
sure that the ch eck box is check ed. If you don’ t want to save a copy,
tap the check box to remove the check.
4. Tap OK.
If you choose to save a copy of the se lected item , your organiz e r
transfer s it to the archi ve f ile on your desktop the next ti me you
perform a HotSync operation.
Other ways to delete records
You ca n als o de l e t e re co rds in the f ol l ow i ng ways:
■ In the Details dialog box of the application, tap Delete, and then
tap OK.
■ Delet e th e te x t of th e re c ord.
Note: In Date Book, if you delete the text of a repeating event,
you delete all instances of that event.
Chapter 4 Page 57
Page 66

Purging records
Over time, as you use Date Book, To Do List, and Expense, you’ll
accumulate records in these applications that have outlived t heir
usefulness. For example, events that occurred months ago remain in
the Date Book, an d To Do List items that you marked as completed
remain in the list, as do Expense items.
All these ou tdated records take up memory on y our organizer, so it’s
a good i dea to r emov e t he m by usi ng Purg e. If you thi nk D ate Book or
To Do Li st re cor ds mig ht p rov e u sefu l l a ter , yo u ca n purg e t he m fr om
your organizer and save them in an archive file.
Purging is also available in Mail. See Chapter 5 for more information.
Purging is not availa ble in Addr e ss Book or Me mo Pa d, so delet e
outdated records from these applications.
To purge records:
1. Open the application.
2. Tap the Menu icon .
3. Tap Record, and then tap Purge.
A confirmation dialog box appears.
Date Book: Tap the pick list and select how old a record must be
to be purged. Purge deletes r epeating events if the last of the series ends before the date that you purge records.
Date Book, To Do List: If you want to save a copy of the purged
records to an archive file on your desktop, be sure that the check
box is checked. If you don’t want to save a copy, tap the check
box to re m o ve th e ch e c k box.
4. Tap OK.
If you chose to save a copy of the purged records, your organizer
transfers them to an archive file on your desktop the next time you
perform a HotSync operation.
Note: Purging does not happen automatically. You must tap the
command to make it happen.
Exchanging and updating data: HotSync operations
The HotSync process automatic ally sy nchronize s — that i s, exch anges
and updates — data be twe e n your organiz e r and Palm Desktop
software. Changes you make on your organizer or Palm Desktop
Page 58 Survey of Ba s ic Applic a tions
Page 67

software appear in both places after a HotSync operation. HotSync
technolo gy synchroniz e s only the neede d portions of fi les, thus
reducing synchron izatio n time.
You can sync hro nize your da ta by conne cti ng you r org aniz er d ire ctl y
to your computer with the cradle or indirectly with a Palm V ™
Modem or network. See Chapter 6 for information about performing
HotSync operations via a modem or network.
Performing a HotSync operation for the first time
The first time you synchronize your data, you need to enter user
information on both the organizer and Palm Desktop software. After
you enter this information and synchronize, the HotSync Manager
recognizes your organizer and doesn’t ask for this information again.
If you are a System Administrator preparing several connected
organizers for a group of users, you may want to create a user profile.
See “Creating a user profile” in Chapter 6 before performing the
following steps.
Important: You must perform your first Ho tSy nc operation wi th a
local , direct co nnection, rathe r than using a modem.
To perform a HotSync operation for the first time:
1. Click the HotSync Manager icon
in the Wi ndows syst em tray.
Tip: The Windows system tray is usual ly in the lower-right
corner on your comp uter displa y. The lo cation may vary
depending on the location of the taskbar and the version
of Windows you are using.
2. From the HotSync Manager menu, choose Local.
3. Turn on the organizer and slide it into the cradle.
Chapter 4 Page 59
Page 68

Tip:
The bottom edge of the organizer should align smooth ly
with the cradle when it is inserted properly.
4. Press the HotSync butt on on the cradle to open the New User
dialog box.
5. Enter a user name for your organizer and click OK.
The HotSync Progress dialog box appears and synchroni zation
begins.
Important:
Every organizer should have a unique name. To prevent
loss of a user’s records, neve r try to synchr onize more
than one organizer to the same user name.
Page 60 Survey of Ba s ic Applic a tions
Page 69

6. Wait for a message on you r compute r indicat ing that th e process is
complete .
After the HotS y nc proce ss is co mplete, you can re move you r
organizer fr om the cradle.
To conduct a local HotSync operation:
1. Insert th e or g a ni z e r in th e cradle.
2. If th e HotSync Manager is n ot ru nning, start it: On the Windows
desktop, click Start, and then choose Pro grams. Naviga te to the
Palm Desktop software program group and choo se HotSync
Manager.
3. Pres s the HotSync button on the cra dle to start the HotSyn c
process.
4. Wait for a message on you r compute r indicat ing that th e process is
complete .
Categorizing records
Categorize records in the Ad dress Book, To Do List, Memo Pad, and
Expense applications so that they are grouped logically and are easy
to review. ( You can also categor ize applications. See “Using the
Applicatio ns Laun cher ” in Chapt er 3 for more info rm ation. )
When you create a record, your organizer automatically places it in
the category that is currently displayed. If the category is All, your
organizer assigns it to the Unfiled category. You can leave an entry as
Unfiled or assign it to a category at any time.
You can define up to 15 ca tegorie s for each application.
Default categories
Your organizer com e s w i th two def ault categories: Busin e s s and
Personal . In addition, the Address Book contains the QuickList
Chapter 4 Page 61
Page 70

category, whi ch you ca n use a s a qui ck r efe renc e of na mes, addr esse s,
and phone numbers (such as emergency numbers, doctor, lawyer,
etc.).
Expense contains two default categories, New York and Paris, to show
how you might sor t your expenses according to different bu siness
trips.
You can rename or delete thes e def a u lt categor ies.
Note: The illustrations in this section come from Address Book, but
you can use these procedures in all the applications in which
categorizing is available. Categorizing is not available in Date
Book.
To move a record into a category:
1. Selec t the record y o u wa nt to categorize.
2. In Address Book only: Tap Edit.
3. Tap Details.
4. Tap the Category pick list to display t he list of avai lable categor ies.
5. Selec t the categ o ry f or th e record.
6. Tap OK.
Page 62 Survey of Ba s ic Applic a tions
Page 71

To display a category of records:
1. Tap the category pick list in the upper-right corner of the List
screen.
Tap here
2. Select the category you want to view.
The List scr e e n now displays only the records assigned to that
category.
Tip: Pressing an appli cation butto n on the front panel of the
organizer tog g les through all the categories of that
application.
To define a new category:
1. Tap the category pick list in the upper-right corner of the screen.
Tap here
2. Tap Edit Categories.
3. Tap New.
Chapter 4 Page 63
Page 72

4. Enter the name of the new category, and then tap OK.
5. Tap OK.
You can assign any of your records to the new category.
To rename a category:
1. Tap the category pick list in the upper-right corner of the screen.
2. Tap Edit Categories.
3. Sele ct th e ca teg ory t hat yo u wa nt to r en ame, and t hen ta p Ren ame.
Page 64 Survey of Ba s ic Applic a tions
Page 73

4. Enter the new name for the category, and then tap OK.
5. Tap OK.
Tip: You can group the records in two or more categories into one
category by giving the categories the same name. For exa mple,
if you change the name of the Per sonal category to Business,
all records formerly in the Personal category appear in the
Busi n e ss ca te gory.
Finding records
Your organizer offers several ways to find informatio n quick ly:
■ All applications: Find locates any text that you specify, always
startin g wi th the current application.
■ Date Bo ok, T o Do Li st, Memo Pa d: Phon e L ookup disp lays th e Ad dress
List screen and lets you add the information that appears in this
list to a re c ord.
■ Address Book: The Look Up line lets you enter the firs t letters of a
name to scroll immediately to that name.
■ Expense: Looku p di sp lays the names in your Address Book that
have data in the Company field. You can add these names to a list
of attendees associate d wi th an Expense recor d.
Looking up Address Book records
When working with Address Book, the scrol l button on the front pane l
of the organizer makes it easy to naviga te among your address e ntries.
■ In the Addres s L ist s cre en, t he scr oll butt on moves u p or down an
entire s creen of records. If you hold down the scrol l button, y ou
acceler a te the scrolli ng and display eve ry third scree n.
■ In the Address View screen, the scroll button moves to the
previous or next address record.
You can also use the A ddr ess Li st Look Up f eatur e to quickl y sc roll to
any of your Address Book entries.
To look up an Address Book record:
1. Disp la y the Addr e ss L ist screen .
Chapter 4 Page 65
Page 74

2. Ente r th e fi rs t l etter of th e na me you wan t to fin d .
Look Up line
The list scrolls to the first entry tha t begins with that letter. If
you write another letter, the list scrolls to the first entry that
starts wi th t hose two letters. For example, writing a n “s” scrolls
to “Sands,” and writing “sm” scrolls fu rther to “Smi th.” If you
sort the list by company name, the Look Up feature scrolls to
the fi rs t le tter of the compan y na me .
3. Tap the re cord to view its contents.
Using Find
You can use Find to locate any text that you specify, in any
application.
To use Find:
1. Tap the Find icon .
Tip: If you select text in an applicat ion before you tap Find, the
selected text automatically appears in the Find dialog box.
2. Enter the text that you want to find.
Find is not case-sensitive. For example, searching for th e name
“davidson” also finds “Davi dson.”
Find locat e s any words that begin with the text you enter. For
example, searching for “plane” finds “pl an e t,” but not “airplane.”
3. Tap OK.
Find se a r ch e s for the text in a ll re co rds and all no t e s.
Page 66 Survey of Ba s ic Applic a tions
Page 75

As your organi zer se arch es f or th e te xt, y ou can tap S top at any
time. You may want to do this if the entry you want appears before your orga nizer finishes the search. To continue the search
after you tap Stop, tap Find More.
4. Tap the text that you want to re view.
Using Phone Lookup
Phone Lookup displays the Address List screen and lets you add the
information that appears in this list to a record.
To use Phone Lookup:
1. Display the record in which you want to insert a phone number.
The record can be in Date Book, To Do List, or Memo Pad.
2. Tap the Menu icon .
3. Tap Opt ions, and then tap Ph one Lookup.
4. Begin to spell the last name of the nam e you wan t to find.
The li st scrolls to th e f irs t re cord in th e li s t th a t sta rts wit h th e
first le tte r y ou en ter . Co nti nue to s pel l the name yo u’r e look in g
for, or when you see the name, tap it.
Chapter 4 Page 67
Page 76

5. Tap Add.
The name you selected, along with the other information associated
with it, is p a sted into the re cord you selected in ste p 1 .
Phone Lookup tips
Write the Gr affiti Command stroke “/L” to act ivate the Phon e Lookup
feature. You can also activate it in the following circumstances:
■ While enteri ng text: For example, to insert the full name and phone
number for someone with the last name “Williams,” write the
Graffiti charac ters for “Wi” and then the Phone Lookup
Command stroke “/L.”
Assuming you have only one Address Book record that begins
with “Wi,” your organizer inserts the full name “Williams” (and
its associated information). If you have more than one name that
begins with “Wi,” the Phone Lookup screen appears and
highlig hts the first record that b e gins with “Wi .”
■ For selected text: Drag to highlight the text, and then write the Phone
Lookup Command stroke “/L.” Your organizer replaces the
selected text and adds the name and its associated information.
Looking up names to add to expense records
In Expense, Looku p di splays the names in your Address Book th at
have data in the Com p any field. You can add these names to a list of
attendees as sociated with an Exp e nse record.
To add names to an Expense record:
1. Tap the Expense record you want to add name s to.
2. Tap Details.
Page 68 Survey of Ba s ic Applic a tions
Page 77

3. Tap Who.
Tap here
4. Tap Looku p .
The Attendees Lookup screen displays all the names in your
Address Book that have data in the Company field.
5. Select the name you want to add, and then tap Add.
The name appears in the Attendees screen.
6. Repeat steps 4 and 5 to add more names.
7. Tap Done.
8. Tap OK.
Sorting lists of records
You can sort lists of records in various ways, depending on the
application. Sorting is available in applications that have List screens:
Address Book, To Do List, Memo Pad, and Expense.
Note: You can also assign records to categories. See “Categorizing
records” ear l ie r in this chap t e r.
To sort records in To Do List and Expense:
1. Open the application to display the List screen.
2. Tap Show.
3. Tap the Sort by pick list and select an option.
4. Tap OK.
To sort records in Address Book an d Memo Pad:
1. Open the application to display the List screen.
2. Tap the Menu icon .
Chapter 4 Page 69
Page 78

3. Tap Options, and then tap Preferences.
Address Book:
Memo Pad:
4. Do one of the following :
Address Book: Tap the setting you want.
Memo Pad: Tap the Sort by pick list and select Alphabetic or
Manual.
5. Tap OK.
To sort the Memo List manually, tap and drag a memo to a new
location in the list.
Note: To make the list of your memos appear in Palm Desktop
software as you manually sorted it on your organizer, open
Memo Pad in Palm Desktop software and click List by. Then
select Ord e r on handheld.
Making records private
In all basic applications except Expense, you can make individual
records private. Private records remain visible and accessible,
however, until you select the Secur ity setting to hide a ll privat e
records. See “Sec urity” in Chapter 3 for mo re informa t ion.
Hiding private records
You can hi de re co r d s tha t yo u ma rk a s private. If you de f in e a
password for your organizer, you must enter it to display private
records.
Page 70 Survey of Ba s ic Applic a tions
Page 79

To hide private records:
1. Tap the Applications icon .
2. Tap Security.
3. Tap Hide.
Tap Hide
4. Tap Hide to confirm th at y ou want to hide private records.
To display private records:
1. Tap the Applications icon .
2. Tap Security.
3. Tap Show.
If you do not have a password, hidden records become visible.
If you have a password, the Show Private Records dialog box
appears. Go to step 4.
Tap Show
4. Enter your password, and then tap Show.
Chapter 4 Page 71
Page 80

To make a record private:
1. Disp lay the entry that you want to mak e p ri vate.
2. Tap Details.
3. Tap the Private check box to select it.
4. Tap OK.
Attaching notes
In all basic appl ications exc e p t Memo Pad, you can attach a note to a
record. A no te can be up to several th ousand characters long. For
example, for an appointment in Date Book, you can attach a note with
dire c tions to the location.
To attach a note to a record:
1. Display the entry to which you want to add a note.
2. In Address Book only: Tap Edit.
3. Tap Details.
4. Tap Note.
5. Enter yo u r no te .
6. Tap Done.
A small note icon appears at the right sid e of any item that has a note.
Note icon
To review or edit a note:
1. Tap the Note icon .
To delete a note:
1. Tap the Note icon .
2. Tap Delete.
3. Tap Yes.
Page 72 Survey of Ba s ic Applic a tions
Page 81

Choosing fonts
In all basic applications except Expense, you can change the font style
to make text easier to read. Yo u can choose a diffe re nt font styl e for
each application.
Small font
Bold font
To change the font style:
1. Open an application.
2. Tap the Menu icon .
3. Tap Opt ions, and then tap Fon t.
4. Tap the font style you want to use.
Tap here for small f ont
5. Tap OK.
Large font
Tap here for bold font
Tap here for large font
Chapter 4 Page 73
Page 82

Application-specific tasks
Date Book
When you open Date Book, the screen shows the current date and a
list of times for a normal business day.
Scheduling an event
A record in Date Book is called an “event.” An event can be any kind
of activity that you asso ciate with a day. You can enter a new event on
any of the available time lines.
When you schedule an event, its description appears on the time line,
and its duration is automatically set to one hour. You can easily
change the start time and duration for any event.
Note: It’s possible to schedule events that overlap, but Date Book
makes it easy to find such conflicts. See “Spotting event
conflicts” later in this chapter.
You can also sch e dule events in yo ur Date Book that occ u r on a
particular date but have no specific start or end times, such as
birthdays, holidays, and anniversaries. These are referred to as
“untimed events.” Untimed events appear at the top of the list of
times, ma rked with a di amond . Yo u can h ave m ore than one u ntime d
event on a particular date.
You can also schedule a repeating event, such as a weekly meeting,
and continuous events, such as a three-day conference or a vacation.
To schedule an event for the current day:
1. Tap the time line that corresponds to the beginning of the event.
Tap a time
line
Time bar
shows
duration
Enter event
Page 74 Survey of Ba s ic Applic a tions
Page 83

2. Enter a description of the event. You can enter up to 255 characters.
3. If the event is one hour long, skip to s tep 7. If the event is l onger or
shorter t han an hou r, t ap t he ti me o f t he eve nt to open th e Se t Time
dialog box.
Tap the
time of an
event
Tip: You can also open th e Se t Ti me dialog (to sele ct a start
time) by making sure no event is selected, and then
writing a number on the number side of the Graffiti
writing area.
4. Tap the ti me column s on the right si de of the Set Time dialog to set
the Start Time.
Start Time
highlighted
Tap to scroll to
earlier hours
Tap to change
hours
Tap to change
minutes
Tap to scroll to
later hours
5. Tap the End Time box, and then tap the time columns to set the
End Time.
6. Tap OK.
7. Tap a blank area of the screen to deselect the event. A vertical line
appears next to the time, indicating the duration of the event.
Chapter 4 Page 75
Page 84

To schedule an event for another day:
1. Sele c t the date you wa n t fo r the even t b y doi ng one of th e
following:
■ Tap the day of the week that you want in the date bar at the top of
the screen. If necessary, tap the Previous week or Next week scroll
arrows to move to another week.
Previous
week
Next
week
Tap to select a day of
the current week
Tip: You can also use the scroll butto n on the front panel of
your organizer to move for ward or backward one day at
a time.
■ Tap Go To at the b o ttom of the sc re e n to open the Go to D a te
dialog box. Select a d ate by tapping a year, mo nt h , and day in the
calendar.
Previous year Next year
Tap to select a
month
Tap to select a
day
Tap to select
current date
Tip: In the Go to Date dialog box, you can also use the scroll
button on the fron t panel of the organ izer to move
forward or backward one month at a time.
2. After you locate the date, follow the steps for scheduling an event
for th e cu rrent day.
Page 76 Survey of Ba s ic Applic a tions
Page 85

To schedule an untimed event:
1. Select the date that you want for the event as described in “To
schedule an event for another day.”
2. Tap New.
3. Tap OK, so that no sta rt or end time s ar e defi ne d for t he new e ven t.
Tip: You can also create a new untimed event by ma king sure
no event is selecte d and th en writing l etters in the Gr affiti
writing area.
4. Enter a description of the even t.
New
untimed
event
No time
selected
5. Tap a blank area on the screen to deselect the untimed event.
Note: If you create an event and decide later that there is no
particular start or end time, you can easily change it to an
untimed eve nt. Tap th e ti me of the even t i n th e Date Book
screen, tap No Time, and then tap OK.
Chapter 4 Page 77
Page 86

Rescheduling an event
You ca n ea s i ly ma ke ch a nges to you r schedule wi t h y o u r or g a ni z e r.
To reschedule an event:
1. Tap the event you want to reschedule.
2. Tap Details.
3. To change the time, tap the Time box and select a new time.
4. To change the date, tap the Date box and select a new date.
5. Tap OK.
Setting an alarm for an event
The Alarm setting enables you to set an audible alarm for events in
your Date Book. You can set an alar m to sound minutes , hours, or
days before an event. The default Alarm setting is 5 minutes before the
time of the event, but you can change th is to any number of minutes,
hours, or day s.
When you set an alarm, this icon appears to the far right of the
event with the alarm. When the alarm tone sounds, a reminder
message also appears onscreen.
To set an alarm for an event:
1. Tap the even t to which you want to assig n an alarm.
2. Tap Details.
3. Tap the Alarm check box to select it.
The default setting, 5 Minutes, appears.
4. Tap the pick list to select Minutes, Hour s, or Days.
5. Select the 5 and enter any number from 0 to 99 (inclusi ve) as the
number of time u nits.
Enter number of
time units here
Tap here to
select unit of time
6. Tap OK.
Page 78 Survey of Ba s ic Applic a tions
Page 87

Alarm for unti med events: Y ou can set a sil ent al arm for an untimed event.
In this case, the alarm triggers at the specified period of minutes,
hours, or da ys befo re mi dni ght (be gin ni ng) of the day of the unt imed
event. No audible alarm sounds for an untimed event; instead, the
reminder message appears onscreen.
For example, you set an alarm for an untimed event that occurs on
February 4t h. If the alarm is set for 5 minute s, the reminder message
appears at 11:55 PM on the night of February 3rd. The reminder
remai ns onsc ree n u nt i l yo u tu r n on y o u r or g a n iz e r a n d ta p OK to
dismiss it.
Scheduling repe atin g or continuou s even ts
The Repeat function lets you schedule events that recur at regular
intervals or extend over a period of consecutive days.
A birthday is a good example of an event that repeats annually.
Another example is a weekly guitar lesson that falls on the same day
of the week and the same time of day.
A business trip or a vacation is an example of a continuous event.
To schedule a repeating or continuous event:
1. Tap the event.
Typically, a continuous event is an untimed event.
2. Tap Details.
3. Tap the Repeat box to open the Change Repeat dialog box.
Tap the
Repeat
box
4. Tap Day, Week, Month, or Year to set how often event repeats.
For a continuous event, tap Day.
Chapter 4 Page 79
Page 88

5. Enter a number that corresponds to how often you want the event
to repeat on the Every line.
For example, if you select Month and enter the number 2, the
event repeats every other month.
6. To specify an end date for the repeating or continuous event, tap
the End on pick list and tap Choose Date. Use the date picker to
select an en d date.
7. Tap OK.
After you schedule a repeating or continuous event, this icon
appears to the far right of the event.
Considerati ons fo r repeat ing o r contin uous even ts : Keep the following points
in mind.
■ If you change the start date of a repeating event, your organizer
calculates the number of days you moved the event. Your
organizer th en auto maticall y changes the end date to maintai n the
duration of the repeating event.
■ If you change the repeat interval (e.g., daily to weekly) of a
repeating event, past occurrences (prior to the day on which you
change the setting) are not changed, and your organizer cre ates a
new repeating event.
■ If you change the date of an occurrence of a repeating event (e.g.,
from January 14th to January 15th) and apply the change to all
occurrences, the new date becomes the start date of the repeating
even t. Your orga n i z e r a dj u s ts th e end date to ma i n t a i n th e
duration of the e vent.
■ If you change other repeat settings (e.g., t i me, al arm, pr i vat e) of a
repeating event and apply the change to all occurrences, your
organizer creates a new e ve nt. The sta rt date of this n ew event is
the day on wh ich th e s ett ing is ch anged . P ast occu rre nc es (pri or t o
the day of the chan ge) are not changed.
■ If you apply a change to a single occurrence of a repeating event
(e.g., time), that occurrence no longer shows the Repeat icon .
Changing the Date Book view
In addition to di sp laying the time list for a specific day, you can also
display a whole w eek or mon th. You can als o disp lay the c urre nt time .
To cycle through Day, Week, and Month views:
■ Press the Date Book application button repeatedly to display the
next view.
Page 80 Survey of Ba s ic Applic a tions
Page 89

To display the current time:
■ Tap the da te in the date ba r to dis play th e curr ent time. After a few
seconds, the date reappears.
Tap the date Curr e nt time displays
Working in Week View: Week View shows the calendar o f your e vents for
an entire week. This view lets you quickly review your appointments
and available time slots. In addition, the graphical display helps you
spot overlaps and conflicts in your sche dul e.
To display the Week View:
1. Tap the Week View button.
Week View
2. Tap the navigation controls to move forward or backward a week
at a time, or to di sp lay details of an event.
Note: The Week View also shows untimed events and events
that are before and after the range of times shown.
Previous
week
Chapter 4 Page 81
Next
week
Tap for that day
Bar indicates earlier event
Dot indicates untimed event
Bar indicates later event
Page 90

3. Tap an even t to show a descripti on of the event.
Event details
Tap to show even t de ta ils
Tips for using Week View: Keep the following points in mind.
■ To reschedule an event, t ap an d drag the event to a different time
or day.
■ Tap a blank t ime on any day to mov e to th at day and have th e time
selected for a new event.
■ Tap any day or date that appears at the top of the Week View to
move directly to that day wi thout selecti ng an event.
■ The Week View shows the time span defined by the Start Time
and End Time in the Date Book Preferences settings. If you have
an event before or after this time span, a bar appears at the top
or bottom of t hat day's column. Use the onscreen scrol l arrows
to scroll to the event.
Spotting event conf licts
With the ability to define specific start and end times for any event, it’s
possible to sch e dule events that overlap (an event that starts before a
previous event finishes).
An event conflict (time overlap) appears in the Week View as
overlapping bars. The Day View displays overlapping brackets to the
left of the con f licting times.
Page 82 Survey of Ba s ic Applic a tions
Page 91

Event
conflicts
Working in Mon th Vie w
The Month View screen shows which days have events scheduled.
Dots and lines in the Month View indicate events, repeating events,
and untimed events.
Previous/next month
Dashed line indicates continuous event
Dots on right side indicate events
Dots below date indicate untimed events
Month View button
You can control the dots and li nes that a ppear in t he Month View. S ee
“Options menu ” later in this chapter.
Tips for using Month View : Keep the following points in mind.
■ Tap a day in the Month View to dis pla y that day in the Day View.
■ Tap the scroll arrows in the upper-right corner to move forward or
backward a month.
■ Tap Go to to open the date selector and select a dif ferent month .
■ Use the scro l l but ton on the fr on t pane l of yo ur org aniz er t o mov e
between months. Press the upper half of the button to display the
previous month, the lower half to display the next month.
Chapter 4 Page 83
Page 92

Date Book menus, preferences, and display options
Date Book menus are shown here for y our reference, and Date Book
features that are not explained elsewhere in this book are described
here.
See “Using menus” in Chapter 1 for information about choosing menu
commands .
Record menu
Options menu
Page 84 Survey of Ba s ic Applic a tions
Page 93

Display Options
Allows you to change Date Book’s appearance
and which events display.
■ Show Time Bars. Ac tivates the ti me bars t hat
appear in the Day View. The time bars show
the duration of an event and illustrate event
conflicts.
■ Compress Day View. Controls how times
appear in the Day View. When Compress
Day View is off, all time slots display. When
it is on, start and end times display for each
event, but blank ti me slots t oward t he bottom
of the screen disappear to minimize scrolling.
■ Month View settings. These check boxes
apply to the Mont h View of the Date Book.
You can acti vat e any or all of the se sett ings t o
show that you have T imed, Unti med, or Dai ly
Repeating events in the Month View only.
Chapter 4 Page 85
Page 94

Preference s
■ Start/End Time. Define the start and end t imes
for Date Book screens. If the time sl ots you
select do n ot fit on one screen, you can tap the
scrol l arrows to s croll up an d down.
■ Alarm Preset. Auto ma tical ly set s an al arm fo r
each new event. The silent alarm for untimed
even ts is de f in e d by minu te s , d a ys, or hours
before midn ight of the date of the event.
■ Alarm Sound. Sets the tone of the alarm.
■ Remind Me. Defines how many times the
alarm sounds. The choices are Once, Twice, 3
Times, 5 Times, and 10 Times.
■ Play Every. Defines how often the alarm
soun ds . Th e choices a re M in u t e ,
5 minutes, 10 minutes, and 30 minutes.
About Date
Shows version information for Date Book.
Book
Page 86 Survey of Ba s ic Applic a tions
Page 95

Address Book
Address Book is the app licat io n in whi ch you sto re nam e and addr ess
information about people or businesses.
Creating an Address Book entry
A record in Address Book is called an “ e ntry.” You ca n c re ate entries
on your organize r, or you can use Pal m Des ktop software to create
entries on your computer and then download the entries to your
organize r with your next HotSync operation.
Palm Desktop software also has data import capabilities that enable
you to load database files into Address Book on your organizer.
See “Importing data” in Chap te r 2 and Palm Desktop online Help for
more information.
To create a new Address Book entry:
1. Pres s the Address Book applicatio n button on the front of your
organizer to display the Address List.
2. Tap New.
Cursor
at Last
name
Tap New
3. Ent e r the last name of th e p e rson you want to add to your
Addres s Bo ok .
Note: The organizer automatically ca p italizes the fi rst letter of
each field (except numeric and e-mail fields). You do not
have to use the Graffiti capital stroke to capitalize the firs t
letter of th e name.
Chapter 4 Page 87
Page 96

4. Use the Next Field Graffiti stroke to move to the First Name field.
Next Field
Tip: You can also move to any field by tapping it directly.
5. Enter the person' s f irst name in the Fi rst Name field .
6. Enter the other infor mation that you want to in clude in this entry.
7. Tap the scroll arrows to move to the next page of info rmation.
8. After you finish entering information, tap Done.
Tap Do ne
Tip: To crea t e an entry tha t alway s ap pears a t th e to p of th e
Address List, begin the Last name or Company field with a
symbol, as in *I f Found Ca ll*. This entry can contain conta ct
information in case you lose your organizer.
Selecting types of phone numbers
You can select the types of phone numbers or e-mail addresses that
you associate wi th an Address Book entry. Any changes you mak e
apply only to the current entry.
To select other types of phone numbers in an entry:
1. Tap the entry that you want to change.
2. Tap Edit.
Page 88 Survey of Ba s ic Applic a tions
Page 97

3. Tap the pick list next to the label you want to change.
Tap
triangle
4. Select a new label.
Changing Address Entry details
The Address Entry Details dialog box provides a variety of options
that you can associate with an entry.
To open the Address Entry Details dialog box:
1. Tap the entry whose deta il s you want to change.
2. Tap Edit.
3. Tap Details.
4. Select any of the following settings:
Show in List
Select which type of phone or other information
appears in the Address List screen. Your options
are Work, Home, Fax, Other, and E-mail.
Category
Private
Assign the en try to a category .
Hide this entry when Security is turned on.
Address Book menus
Address Book menus are shown here for your reference, and Address
Book features that are not explained elsewhere in this book are
described here.
Chapter 4 Page 89
Page 98

See “Using menus” in Chapter 1 for information about choosing menu
commands .
The Record and Options menus differ depending on whether you’re
displaying the Address List screen or the Address View screen.
Record menus
Address List
Address View
Options menus
Address List
Preferences
Address View
■ Remember last category. Determines how
Address Book appears when you return to it
from another application. If you select this
check box, Address Book shows the last
category you selected. If you clear it, Address
Book display s the All categ ory.
Page 90 Survey of Ba s ic Applic a tions
Page 99

Rename Custom
Fie lds
These custom fields appear at the end of the
Address E dit scre en. Re name them to iden tify t he
kind of information you enter in them. The names
you give the custom fields appear in all entries.
About Address
Book
Shows version info rma tion for Add ress Bo ok.
Chapter 4 Page 91
Page 100

To Do List
A To Do List item is a reminder of some task that you have to
complete. A record in To Do List is called an “item.”
To create a To Do List item:
1. Press the To Do List application button on the front of your
organizer to display the To Do List.
2. Tap New.
New To
Do item
Tap New
3. Enter the text of the To Do List item. The text can be longer than
one line.
4. Tap anywh e re onscreen to dese lect the To Do List ite m.
Tip: If no To Do List item is currently selected, writing in the
Graffiti writing area automatically creates a new item.
Setting priority
The priority sett ing for items le ts you arran ge the tas ks in y our To Do
List according to their importance or u rg ency. The default setting for
the To Do List is to arrange items by priority and due date, with
priority 1 items at the top. If you have a number of items in your list,
changing an item’s priority setting may move its position in the list.
Note: When you create a new To Do List item, its priority i s
automatical ly set to le vel 1, the highest ( most impo rtant) l evel.
If you select another item first, however, the item you create
appears beneath the selected item and is given the same
priority as the selected item.
Page 92 Survey of Ba s ic Applic a tions
 Loading...