

Page 1

Handbook for
DRAFT Palm, Inc. Confidential
Palm™ Tungsten™ C
Handhelds
Page 2

Copyright
DRAFT Palm, Inc. Confidential
© 2002 Palm, Inc. All rights reserved. The Palm logo, HotSync, MultiMail, PalmModem, and Palm OS are
registered trademarks, and the HotSync logo, Palm, Palm Powered, Tungsten, and VersaMail are
trademarks of Palm, Inc. Palm, Inc. uses the Bluetooth trademark under express license fr om Bluetooth SIG,
Inc., U.S.A. All other brands are trademarks or registered trademarks of their respective owners.
Disclaimer and Limitation of Liability
Palm, Inc. assumes no responsibility for any damag e or loss resulting from the use of this handbook.
Palm assumes no responsibility for any loss or claims by third parties which may arise through the use of
this software. Palm, Inc. assumes no responsibility for any damage or loss caused by deletion of data as a
result of malfunction, dead battery, or repairs. Be sure to make backup copies of all important data on other
media to protect against data loss.
IMPORTANT Please read the End User Software License Agreement with this product before using the
accompanying software program(s). Using any part of the software indicates that you accept the terms of the
End User Software License Agreement.
Software Download Available
Palm™ Desktop software is supplied on a CD-ROM disc. If you do not have access to a CD-ROM drive for
your computer, you can download the Palm Desktop software from www.palm.com/support/.
PN: 407-4891A-US
Page 3

Contents
DRAFT Palm, Inc. Confidential
About This Book . . . . . . . . . . . . . . . . . . . . . . . . . . . . . . . . . . . . . . . . . . . . . . . . 1
Chapter 1: Welcome . . . . . . . . . . . . . . . . . . . . . . . . . . . . . . . . . . . . . . . . . . . . . 3
System requirements . . . . . . . . . . . . . . . . . . . . . . . . . . . . . . . . . . . . . . . . . . . . . . . . 3
Minimum requirements: Windows computers . . . . . . . . . . . . . . . . . . . . . . . . 4
Minimum requirements: Mac computers . . . . . . . . . . . . . . . . . . . . . . . . . . . . . 4
Finding information . . . . . . . . . . . . . . . . . . . . . . . . . . . . . . . . . . . . . . . . . . . . . . . . . 5
Chapter 2: Exploring Your Handheld . . . . . . . . . . . . . . . . . . . . . . . . . . . . . . . 7
Locating handheld components . . . . . . . . . . . . . . . . . . . . . . . . . . . . . . . . . . . . . . . 7
Locating front panel controls . . . . . . . . . . . . . . . . . . . . . . . . . . . . . . . . . . . . . . . 8
Locating back panel components . . . . . . . . . . . . . . . . . . . . . . . . . . . . . . . . . . 10
Adding an expansion card . . . . . . . . . . . . . . . . . . . . . . . . . . . . . . . . . . . . . . . . . . . 11
Adjusting the screen brightness level . . . . . . . . . . . . . . . . . . . . . . . . . . . . . . . . . . 12
Chapter 3: Navigating and Entering Data . . . . . . . . . . . . . . . . . . . . . . . . . . 13
Tapping . . . . . . . . . . . . . . . . . . . . . . . . . . . . . . . . . . . . . . . . . . . . . . . . . . . . . . . . . . . 13
Using the navigator . . . . . . . . . . . . . . . . . . . . . . . . . . . . . . . . . . . . . . . . . . . . . . . . . 14
Using the keyboard . . . . . . . . . . . . . . . . . . . . . . . . . . . . . . . . . . . . . . . . . . . . . . . . . 15
Typing capital letters . . . . . . . . . . . . . . . . . . . . . . . . . . . . . . . . . . . . . . . . . . . . . 16
Accessing international and special characters . . . . . . . . . . . . . . . . . . . . . . . 16
Using the Function key . . . . . . . . . . . . . . . . . . . . . . . . . . . . . . . . . . . . . . . . . . . 18
Using ShortCuts . . . . . . . . . . . . . . . . . . . . . . . . . . . . . . . . . . . . . . . . . . . . . . . . . 19
Using elements of the handheld interface . . . . . . . . . . . . . . . . . . . . . . . . . . . . . . 19
Using Graffiti writing to enter data . . . . . . . . . . . . . . . . . . . . . . . . . . . . . . . . . . . 21
Graffiti tips . . . . . . . . . . . . . . . . . . . . . . . . . . . . . . . . . . . . . . . . . . . . . . . . . . . . . 23
Graffiti alphabet . . . . . . . . . . . . . . . . . . . . . . . . . . . . . . . . . . . . . . . . . . . . . . . . . 24
Capital letters . . . . . . . . . . . . . . . . . . . . . . . . . . . . . . . . . . . . . . . . . . . . . . . . . . . 25
Graffiti numbers . . . . . . . . . . . . . . . . . . . . . . . . . . . . . . . . . . . . . . . . . . . . . . . . . 25
Punctuation marks . . . . . . . . . . . . . . . . . . . . . . . . . . . . . . . . . . . . . . . . . . . . . . . 26
Symbol characters . . . . . . . . . . . . . . . . . . . . . . . . . . . . . . . . . . . . . . . . . . . . . . . 27
Accented characters . . . . . . . . . . . . . . . . . . . . . . . . . . . . . . . . . . . . . . . . . . . . . . 27
Additional non-English characters . . . . . . . . . . . . . . . . . . . . . . . . . . . . . . . . . 28
Navigation strokes . . . . . . . . . . . . . . . . . . . . . . . . . . . . . . . . . . . . . . . . . . . . . . . 28
iii
Page 4

Contents
DRAFT Palm, Inc. Confidential
Graffiti ShortCuts . . . . . . . . . . . . . . . . . . . . . . . . . . . . . . . . . . . . . . . . . . . . . . . . 28
Beaming data . . . . . . . . . . . . . . . . . . . . . . . . . . . . . . . . . . . . . . . . . . . . . . . . . . . . . . 29
Using your computer keyboard . . . . . . . . . . . . . . . . . . . . . . . . . . . . . . . . . . . . . . 32
Importing data . . . . . . . . . . . . . . . . . . . . . . . . . . . . . . . . . . . . . . . . . . . . . . . . . . . . . 32
Importing data from a Windows computer . . . . . . . . . . . . . . . . . . . . . . . . . . 32
Importing data from a Mac computer . . . . . . . . . . . . . . . . . . . . . . . . . . . . . . 34
Chapter 4: Working with Applications . . . . . . . . . . . . . . . . . . . . . . . . . . . . . 37
Opening applications . . . . . . . . . . . . . . . . . . . . . . . . . . . . . . . . . . . . . . . . . . . . . . . 37
Other ways to open applications . . . . . . . . . . . . . . . . . . . . . . . . . . . . . . . . . . . 38
Opening expansion card applications . . . . . . . . . . . . . . . . . . . . . . . . . . . . . . . 38
Switching between applications . . . . . . . . . . . . . . . . . . . . . . . . . . . . . . . . . . . . . . 38
Categorizing applications . . . . . . . . . . . . . . . . . . . . . . . . . . . . . . . . . . . . . . . . . . . 39
Changing the Applications Launcher display . . . . . . . . . . . . . . . . . . . . . . . . . . 40
Copying applications to or from an expansion card . . . . . . . . . . . . . . . . . . . . . 41
Selecting copy settings . . . . . . . . . . . . . . . . . . . . . . . . . . . . . . . . . . . . . . . . . . . . . . 42
Using menus . . . . . . . . . . . . . . . . . . . . . . . . . . . . . . . . . . . . . . . . . . . . . . . . . . . . . . 43
Using menu commands and the command toolbar . . . . . . . . . . . . . . . . . . . . . . 45
Using menu commands . . . . . . . . . . . . . . . . . . . . . . . . . . . . . . . . . . . . . . . . . . 45
Using the command toolbar . . . . . . . . . . . . . . . . . . . . . . . . . . . . . . . . . . . . . . . 45
Choosing application preferences . . . . . . . . . . . . . . . . . . . . . . . . . . . . . . . . . . . . . 46
Enabling and disabling Palm On-screen Writing . . . . . . . . . . . . . . . . . . . . . . . . 46
Performing common tasks . . . . . . . . . . . . . . . . . . . . . . . . . . . . . . . . . . . . . . . . . . . 47
Creating records . . . . . . . . . . . . . . . . . . . . . . . . . . . . . . . . . . . . . . . . . . . . . . . . . 47
Editing records . . . . . . . . . . . . . . . . . . . . . . . . . . . . . . . . . . . . . . . . . . . . . . . . . . 47
Deleting records . . . . . . . . . . . . . . . . . . . . . . . . . . . . . . . . . . . . . . . . . . . . . . . . . 49
Purging records . . . . . . . . . . . . . . . . . . . . . . . . . . . . . . . . . . . . . . . . . . . . . . . . . 50
Categorizing records . . . . . . . . . . . . . . . . . . . . . . . . . . . . . . . . . . . . . . . . . . . . . 50
Finding information . . . . . . . . . . . . . . . . . . . . . . . . . . . . . . . . . . . . . . . . . . . . . . 54
Sorting lists of records . . . . . . . . . . . . . . . . . . . . . . . . . . . . . . . . . . . . . . . . . . . . 58
Attaching notes . . . . . . . . . . . . . . . . . . . . . . . . . . . . . . . . . . . . . . . . . . . . . . . . . . 60
Choosing fonts . . . . . . . . . . . . . . . . . . . . . . . . . . . . . . . . . . . . . . . . . . . . . . . . . . 61
Receiving alerts . . . . . . . . . . . . . . . . . . . . . . . . . . . . . . . . . . . . . . . . . . . . . . . . . . 62
Hiding or masking private records . . . . . . . . . . . . . . . . . . . . . . . . . . . . . . . . . 63
Installing and removing applications . . . . . . . . . . . . . . . . . . . . . . . . . . . . . . . . . . 63
Installing files and add-on applications . . . . . . . . . . . . . . . . . . . . . . . . . . . . . 63
Installing applications and files on a Windows computer . . . . . . . . . . . . . 64
Palm Quick Install Tips . . . . . . . . . . . . . . . . . . . . . . . . . . . . . . . . . . . . . . . . . . . 67
Installing applications and files on a Mac computer . . . . . . . . . . . . . . . . . . 67
iv
Page 5

Contents
DRAFT Palm, Inc. Confidential
Removing applications . . . . . . . . . . . . . . . . . . . . . . . . . . . . . . . . . . . . . . . . . . . 69
Removing Palm Desktop software . . . . . . . . . . . . . . . . . . . . . . . . . . . . . . . . . 70
Chapter 5: Using Address Book . . . . . . . . . . . . . . . . . . . . . . . . . . . . . . . . . . 73
Creating an Address Book entry . . . . . . . . . . . . . . . . . . . . . . . . . . . . . . . . . . . . . . 74
Selecting types of phone numbers . . . . . . . . . . . . . . . . . . . . . . . . . . . . . . . . . . . . 75
Changing Address Entry details . . . . . . . . . . . . . . . . . . . . . . . . . . . . . . . . . . . . . . 76
Address Book menus . . . . . . . . . . . . . . . . . . . . . . . . . . . . . . . . . . . . . . . . . . . . . . . 77
Record menus . . . . . . . . . . . . . . . . . . . . . . . . . . . . . . . . . . . . . . . . . . . . . . . . . . . 77
Options menus . . . . . . . . . . . . . . . . . . . . . . . . . . . . . . . . . . . . . . . . . . . . . . . . . . 78
Chapter 6: Using Calculator . . . . . . . . . . . . . . . . . . . . . . . . . . . . . . . . . . . . . . 79
Performing calculations . . . . . . . . . . . . . . . . . . . . . . . . . . . . . . . . . . . . . . . . . . . . . 79
Viewing recent calculations . . . . . . . . . . . . . . . . . . . . . . . . . . . . . . . . . . . . . . . . . . 80
Using Calculator menus . . . . . . . . . . . . . . . . . . . . . . . . . . . . . . . . . . . . . . . . . . . . . 81
Chapter 7: Using Card Info . . . . . . . . . . . . . . . . . . . . . . . . . . . . . . . . . . . . . . 83
Reviewing Card Information . . . . . . . . . . . . . . . . . . . . . . . . . . . . . . . . . . . . . . . . . 83
Renaming a card . . . . . . . . . . . . . . . . . . . . . . . . . . . . . . . . . . . . . . . . . . . . . . . . . . . 84
Formatting a card . . . . . . . . . . . . . . . . . . . . . . . . . . . . . . . . . . . . . . . . . . . . . . . . . . 84
Managing an expansion card . . . . . . . . . . . . . . . . . . . . . . . . . . . . . . . . . . . . . . . . . 85
Using the Card Info menu . . . . . . . . . . . . . . . . . . . . . . . . . . . . . . . . . . . . . . . . . . . 85
Chapter 8: Using Date Book . . . . . . . . . . . . . . . . . . . . . . . . . . . . . . . . . . . . . 87
Scheduling an event . . . . . . . . . . . . . . . . . . . . . . . . . . . . . . . . . . . . . . . . . . . . . . . . 88
Selecting an event . . . . . . . . . . . . . . . . . . . . . . . . . . . . . . . . . . . . . . . . . . . . . . . . . . 91
Rescheduling an event . . . . . . . . . . . . . . . . . . . . . . . . . . . . . . . . . . . . . . . . . . . . . . 91
Setting an alarm for an event . . . . . . . . . . . . . . . . . . . . . . . . . . . . . . . . . . . . . . . . . 92
Scheduling repeating or continuous events . . . . . . . . . . . . . . . . . . . . . . . . . . . . 93
Changing repeating or continuous events . . . . . . . . . . . . . . . . . . . . . . . . . . . 95
Considerations for repeating or continuous events . . . . . . . . . . . . . . . . . . . 95
Changing the Date Book view . . . . . . . . . . . . . . . . . . . . . . . . . . . . . . . . . . . . . . . . 96
Working in Week view . . . . . . . . . . . . . . . . . . . . . . . . . . . . . . . . . . . . . . . . . . . 96
Working in Month view . . . . . . . . . . . . . . . . . . . . . . . . . . . . . . . . . . . . . . . . . . 97
Working in Agenda view . . . . . . . . . . . . . . . . . . . . . . . . . . . . . . . . . . . . . . . . . 98
Spotting event conflicts . . . . . . . . . . . . . . . . . . . . . . . . . . . . . . . . . . . . . . . . . . . . . 99
Date Book menus, preferences, and display options . . . . . . . . . . . . . . . . . . . . . 99
Record menu . . . . . . . . . . . . . . . . . . . . . . . . . . . . . . . . . . . . . . . . . . . . . . . . . . . 100
Options menu . . . . . . . . . . . . . . . . . . . . . . . . . . . . . . . . . . . . . . . . . . . . . . . . . . 100
v
Page 6

Contents
DRAFT Palm, Inc. Confidential
Chapter 9: Using Expense . . . . . . . . . . . . . . . . . . . . . . . . . . . . . . . . . . . . . . 103
Adding expense items . . . . . . . . . . . . . . . . . . . . . . . . . . . . . . . . . . . . . . . . . . . . . 104
Changing the date of an Expense item . . . . . . . . . . . . . . . . . . . . . . . . . . . . . 105
Entering receipt details . . . . . . . . . . . . . . . . . . . . . . . . . . . . . . . . . . . . . . . . . . 105
Customizing the Currency pick list . . . . . . . . . . . . . . . . . . . . . . . . . . . . . . . . . . 106
Changing the default currency . . . . . . . . . . . . . . . . . . . . . . . . . . . . . . . . . . . 107
Defining a custom currency symbol . . . . . . . . . . . . . . . . . . . . . . . . . . . . . . . 107
Setting Show Options . . . . . . . . . . . . . . . . . . . . . . . . . . . . . . . . . . . . . . . . . . . . . . 108
Working with Expense data on your computer . . . . . . . . . . . . . . . . . . . . . . . . 109
Displaying the euro on your computer . . . . . . . . . . . . . . . . . . . . . . . . . . . . 109
Printing the euro . . . . . . . . . . . . . . . . . . . . . . . . . . . . . . . . . . . . . . . . . . . . . . . 109
Using Expense menus . . . . . . . . . . . . . . . . . . . . . . . . . . . . . . . . . . . . . . . . . . . . . . 109
Record menu . . . . . . . . . . . . . . . . . . . . . . . . . . . . . . . . . . . . . . . . . . . . . . . . . . . 110
Options menu . . . . . . . . . . . . . . . . . . . . . . . . . . . . . . . . . . . . . . . . . . . . . . . . . . 110
Chapter 10: Using Memo Pad . . . . . . . . . . . . . . . . . . . . . . . . . . . . . . . . . . . 111
Creating memos . . . . . . . . . . . . . . . . . . . . . . . . . . . . . . . . . . . . . . . . . . . . . . . . . . . 111
Reviewing memos . . . . . . . . . . . . . . . . . . . . . . . . . . . . . . . . . . . . . . . . . . . . . . . . . 112
Using Memo Pad menus . . . . . . . . . . . . . . . . . . . . . . . . . . . . . . . . . . . . . . . . . . . 113
Record menus . . . . . . . . . . . . . . . . . . . . . . . . . . . . . . . . . . . . . . . . . . . . . . . . . . 113
Options menus . . . . . . . . . . . . . . . . . . . . . . . . . . . . . . . . . . . . . . . . . . . . . . . . . 113
Chapter 11: Using Note Pad . . . . . . . . . . . . . . . . . . . . . . . . . . . . . . . . . . . . 115
Creating a note . . . . . . . . . . . . . . . . . . . . . . . . . . . . . . . . . . . . . . . . . . . . . . . . . . . . 116
Reviewing notes . . . . . . . . . . . . . . . . . . . . . . . . . . . . . . . . . . . . . . . . . . . . . . . . . . 116
Changing Note Pad color settings . . . . . . . . . . . . . . . . . . . . . . . . . . . . . . . . . . . 117
Setting an alarm for a note . . . . . . . . . . . . . . . . . . . . . . . . . . . . . . . . . . . . . . . . . . 118
Using Note Pad menus . . . . . . . . . . . . . . . . . . . . . . . . . . . . . . . . . . . . . . . . . . . . . 119
Record menu . . . . . . . . . . . . . . . . . . . . . . . . . . . . . . . . . . . . . . . . . . . . . . . . . . . 119
Options menus . . . . . . . . . . . . . . . . . . . . . . . . . . . . . . . . . . . . . . . . . . . . . . . . . 120
TM
Chapter 12: Using Palm
Photos . . . . . . . . . . . . . . . . . . . . . . . . . . . . . . . 121
Viewing photos . . . . . . . . . . . . . . . . . . . . . . . . . . . . . . . . . . . . . . . . . . . . . . . . . . . 121
Viewing photos in Thumbnail view . . . . . . . . . . . . . . . . . . . . . . . . . . . . . . . 122
Viewing photos in List view . . . . . . . . . . . . . . . . . . . . . . . . . . . . . . . . . . . . . . 123
Viewing a slide show . . . . . . . . . . . . . . . . . . . . . . . . . . . . . . . . . . . . . . . . . . . . 123
Rotating photos . . . . . . . . . . . . . . . . . . . . . . . . . . . . . . . . . . . . . . . . . . . . . . . . 124
Viewing photo information . . . . . . . . . . . . . . . . . . . . . . . . . . . . . . . . . . . . . . 125
Organizing photos . . . . . . . . . . . . . . . . . . . . . . . . . . . . . . . . . . . . . . . . . . . . . . . . . 126
Sorting photos in List view . . . . . . . . . . . . . . . . . . . . . . . . . . . . . . . . . . . . . . . 126
vi
Page 7

Contents
DRAFT Palm, Inc. Confidential
Creating an album . . . . . . . . . . . . . . . . . . . . . . . . . . . . . . . . . . . . . . . . . . . . . . 126
Filing photos in albums . . . . . . . . . . . . . . . . . . . . . . . . . . . . . . . . . . . . . . . . . . 127
Copying and Moving photos . . . . . . . . . . . . . . . . . . . . . . . . . . . . . . . . . . . . . 128
Renaming or deleting an album . . . . . . . . . . . . . . . . . . . . . . . . . . . . . . . . . . . 128
Beaming photos . . . . . . . . . . . . . . . . . . . . . . . . . . . . . . . . . . . . . . . . . . . . . . . . . . . 130
Sending photos . . . . . . . . . . . . . . . . . . . . . . . . . . . . . . . . . . . . . . . . . . . . . . . . . . . 130
Deleting photos . . . . . . . . . . . . . . . . . . . . . . . . . . . . . . . . . . . . . . . . . . . . . . . . . . . 132
Working with photos on your computer . . . . . . . . . . . . . . . . . . . . . . . . . . . . . . 133
Using Palm Photos menus . . . . . . . . . . . . . . . . . . . . . . . . . . . . . . . . . . . . . . . . . . 133
Photo menu . . . . . . . . . . . . . . . . . . . . . . . . . . . . . . . . . . . . . . . . . . . . . . . . . . . . 133
Options menus . . . . . . . . . . . . . . . . . . . . . . . . . . . . . . . . . . . . . . . . . . . . . . . . . 133
Chapter 13: Using To Do List . . . . . . . . . . . . . . . . . . . . . . . . . . . . . . . . . . . . 135
Creating list items . . . . . . . . . . . . . . . . . . . . . . . . . . . . . . . . . . . . . . . . . . . . . . . . . 136
Setting priority . . . . . . . . . . . . . . . . . . . . . . . . . . . . . . . . . . . . . . . . . . . . . . . . . . . . 136
Checking off a To Do List item . . . . . . . . . . . . . . . . . . . . . . . . . . . . . . . . . . . . . . 137
Changing To Do List item details . . . . . . . . . . . . . . . . . . . . . . . . . . . . . . . . . . . . 138
Setting a due date . . . . . . . . . . . . . . . . . . . . . . . . . . . . . . . . . . . . . . . . . . . . . . . . . 138
Setting To Do Preferences . . . . . . . . . . . . . . . . . . . . . . . . . . . . . . . . . . . . . . . . . . 139
Using To Do List menus . . . . . . . . . . . . . . . . . . . . . . . . . . . . . . . . . . . . . . . . . . . . 140
Record menu . . . . . . . . . . . . . . . . . . . . . . . . . . . . . . . . . . . . . . . . . . . . . . . . . . . 140
Options menu . . . . . . . . . . . . . . . . . . . . . . . . . . . . . . . . . . . . . . . . . . . . . . . . . . 140
Chapter 14: Using Palm™ VersaMail™ Personal E-mail Software . . . . . 141
What’s new . . . . . . . . . . . . . . . . . . . . . . . . . . . . . . . . . . . . . . . . . . . . . . . . . . . . . . . 141
Getting started with the VersaMail application . . . . . . . . . . . . . . . . . . . . . . . . 141
Synchronizing an existing username . . . . . . . . . . . . . . . . . . . . . . . . . . . . . . 142
Upgrading a MultiMail/VersaMail database . . . . . . . . . . . . . . . . . . . . . . . 142
Setting up and managing e-mail accounts . . . . . . . . . . . . . . . . . . . . . . . . . . . . . 142
Account and connection types . . . . . . . . . . . . . . . . . . . . . . . . . . . . . . . . . . . . 143
Setting up a network e-mail account . . . . . . . . . . . . . . . . . . . . . . . . . . . . . . . 143
Creating a network e-mail account . . . . . . . . . . . . . . . . . . . . . . . . . . . . . . . . 146
Creating a synchronize-only account . . . . . . . . . . . . . . . . . . . . . . . . . . . . . . 152
Setting VersaMail connection preferences . . . . . . . . . . . . . . . . . . . . . . . . . . 158
Editing e-mail accounts . . . . . . . . . . . . . . . . . . . . . . . . . . . . . . . . . . . . . . . . . . 159
Deleting an e-mail account . . . . . . . . . . . . . . . . . . . . . . . . . . . . . . . . . . . . . . . 165
Selecting a different service for a given e-mail account . . . . . . . . . . . . . . . 166
Getting, sending, and managing e-mail . . . . . . . . . . . . . . . . . . . . . . . . . . . . . . . 168
Getting and reading e-mail . . . . . . . . . . . . . . . . . . . . . . . . . . . . . . . . . . . . . . . 168
vii
Page 8

Contents
DRAFT Palm, Inc. Confidential
Creating and editing mail folders . . . . . . . . . . . . . . . . . . . . . . . . . . . . . . . . . 188
Creating and sending new e-mail . . . . . . . . . . . . . . . . . . . . . . . . . . . . . . . . . 190
Working with URLs . . . . . . . . . . . . . . . . . . . . . . . . . . . . . . . . . . . . . . . . . . . . . 202
Working with attachments . . . . . . . . . . . . . . . . . . . . . . . . . . . . . . . . . . . . . . . 202
Deleting messages . . . . . . . . . . . . . . . . . . . . . . . . . . . . . . . . . . . . . . . . . . . . . . 212
Emptying the trash . . . . . . . . . . . . . . . . . . . . . . . . . . . . . . . . . . . . . . . . . . . . . . 215
Marking messages as read or unread . . . . . . . . . . . . . . . . . . . . . . . . . . . . . . 217
Setting preferences for getting and deleting e-mail . . . . . . . . . . . . . . . . . . 218
Adding or updating an Address Book entry directly from a message . . 220
Synchronizing e-mail between the handheld and the desktop . . . . . . . . . . . 221
Configuring an account in HotSync Manager . . . . . . . . . . . . . . . . . . . . . . . 221
Setting synchronization options and account settings . . . . . . . . . . . . . . . . 222
Converting attached files . . . . . . . . . . . . . . . . . . . . . . . . . . . . . . . . . . . . . . . . 232
Synchronizing an account . . . . . . . . . . . . . . . . . . . . . . . . . . . . . . . . . . . . . . . . 234
Using SSL with the conduit . . . . . . . . . . . . . . . . . . . . . . . . . . . . . . . . . . . . . . 235
Going beyond the basics . . . . . . . . . . . . . . . . . . . . . . . . . . . . . . . . . . . . . . . . . . . 236
Managing mail filters . . . . . . . . . . . . . . . . . . . . . . . . . . . . . . . . . . . . . . . . . . . . 236
Managing mail settings . . . . . . . . . . . . . . . . . . . . . . . . . . . . . . . . . . . . . . . . . . 240
Adding APOP to an account . . . . . . . . . . . . . . . . . . . . . . . . . . . . . . . . . . . . . 248
Adding ESMTP to an account . . . . . . . . . . . . . . . . . . . . . . . . . . . . . . . . . . . . 249
Cutting and copying text from an e-mail message for use in other applica-
tions . . . . . . . . . . . . . . . . . . . . . . . . . . . . . . . . . . . . . . . . . . . . . . . . . . . . . . . . . . 251
Using the command bar . . . . . . . . . . . . . . . . . . . . . . . . . . . . . . . . . . . . . . . . . 251
E-mail header details . . . . . . . . . . . . . . . . . . . . . . . . . . . . . . . . . . . . . . . . . . . . 253
Backing up mail databases . . . . . . . . . . . . . . . . . . . . . . . . . . . . . . . . . . . . . . . 254
Wireless IMAP folder synchronization . . . . . . . . . . . . . . . . . . . . . . . . . . . . . 255
Accessing corporate e-mail . . . . . . . . . . . . . . . . . . . . . . . . . . . . . . . . . . . . . . . 256
Using Secure Sockets Layer (SSL) . . . . . . . . . . . . . . . . . . . . . . . . . . . . . . . . . 257
Viewing the wireless coverage indicator . . . . . . . . . . . . . . . . . . . . . . . . . . . 257
Troubleshooting account access problems . . . . . . . . . . . . . . . . . . . . . . . . . . 257
Five-way navigation in the VersaMail application . . . . . . . . . . . . . . . . . . . 258
Keyboard shortcuts in the VersaMail application . . . . . . . . . . . . . . . . . . . . 260
viii
Chapter 15: Using Palm™ Web Browser . . . . . . . . . . . . . . . . . . . . . . . . . . 263
Using Palm Web Browser’s features . . . . . . . . . . . . . . . . . . . . . . . . . . . . . . . . . 263
Palm Web Browser is easy to use . . . . . . . . . . . . . . . . . . . . . . . . . . . . . . . . . 263
Palm Web Browser is fast . . . . . . . . . . . . . . . . . . . . . . . . . . . . . . . . . . . . . . . . 263
Palm Web Browser is secure . . . . . . . . . . . . . . . . . . . . . . . . . . . . . . . . . . . . . 264
What Palm Web Browser looks like . . . . . . . . . . . . . . . . . . . . . . . . . . . . . . . 264
Page 9

Contents
DRAFT Palm, Inc. Confidential
Getting help in Palm Web Browser . . . . . . . . . . . . . . . . . . . . . . . . . . . . . . . . 265
Opening Palm Web Browser . . . . . . . . . . . . . . . . . . . . . . . . . . . . . . . . . . . . . . . . 266
Browsing the Web on your handheld . . . . . . . . . . . . . . . . . . . . . . . . . . . . . . . . 266
Visiting a web page . . . . . . . . . . . . . . . . . . . . . . . . . . . . . . . . . . . . . . . . . . . . . 266
Following a link . . . . . . . . . . . . . . . . . . . . . . . . . . . . . . . . . . . . . . . . . . . . . . . . 267
Returning to a web page you just visited . . . . . . . . . . . . . . . . . . . . . . . . . . . 267
Returning to your home page . . . . . . . . . . . . . . . . . . . . . . . . . . . . . . . . . . . . 268
Downloading a file to your handheld . . . . . . . . . . . . . . . . . . . . . . . . . . . . . . . . 268
Stopping the download process . . . . . . . . . . . . . . . . . . . . . . . . . . . . . . . . . . . 269
Refreshing a page . . . . . . . . . . . . . . . . . . . . . . . . . . . . . . . . . . . . . . . . . . . . . . . . . 269
Viewing information about a web page . . . . . . . . . . . . . . . . . . . . . . . . . . . . . . . 270
Bookmarking Your Favorite Pages . . . . . . . . . . . . . . . . . . . . . . . . . . . . . . . . . . . 270
Adding a bookmark . . . . . . . . . . . . . . . . . . . . . . . . . . . . . . . . . . . . . . . . . . . . . 270
Visiting a bookmarked page . . . . . . . . . . . . . . . . . . . . . . . . . . . . . . . . . . . . . . 271
Editing information about a bookmark . . . . . . . . . . . . . . . . . . . . . . . . . . . . 271
Deleting a bookmark . . . . . . . . . . . . . . . . . . . . . . . . . . . . . . . . . . . . . . . . . . . . 272
Saving Pages . . . . . . . . . . . . . . . . . . . . . . . . . . . . . . . . . . . . . . . . . . . . . . . . . . . . . . 272
Saving a page . . . . . . . . . . . . . . . . . . . . . . . . . . . . . . . . . . . . . . . . . . . . . . . . . . 272
Opening a saved page . . . . . . . . . . . . . . . . . . . . . . . . . . . . . . . . . . . . . . . . . . . 274
Editing information about a saved page . . . . . . . . . . . . . . . . . . . . . . . . . . . 274
Copying text from a page to another application . . . . . . . . . . . . . . . . . . . . 275
Deleting a saved page . . . . . . . . . . . . . . . . . . . . . . . . . . . . . . . . . . . . . . . . . . . 275
Finding Web Pages You Recently Visited . . . . . . . . . . . . . . . . . . . . . . . . . . . . . 275
Returning to a page you visited . . . . . . . . . . . . . . . . . . . . . . . . . . . . . . . . . . . 276
Clearing the History list . . . . . . . . . . . . . . . . . . . . . . . . . . . . . . . . . . . . . . . . . 276
Customizing Palm Web Browser . . . . . . . . . . . . . . . . . . . . . . . . . . . . . . . . . . . . 277
Changing the default size of text . . . . . . . . . . . . . . . . . . . . . . . . . . . . . . . . . . 277
Changing your home page . . . . . . . . . . . . . . . . . . . . . . . . . . . . . . . . . . . . . . . 277
Changing how images are downloaded . . . . . . . . . . . . . . . . . . . . . . . . . . . . 278
Enabling or disabling autofill . . . . . . . . . . . . . . . . . . . . . . . . . . . . . . . . . . . . . 278
Enabling or disabling cookies . . . . . . . . . . . . . . . . . . . . . . . . . . . . . . . . . . . . 279
Changing the size of the History list . . . . . . . . . . . . . . . . . . . . . . . . . . . . . . . 279
Controlling how Palm Web Browser accesses the Internet . . . . . . . . . . . . 281
Viewing web content with plug-ins . . . . . . . . . . . . . . . . . . . . . . . . . . . . . . . 281
Finding the Palm Web Browser version number . . . . . . . . . . . . . . . . . . . . . . . 282
Palm Web Browser menus . . . . . . . . . . . . . . . . . . . . . . . . . . . . . . . . . . . . . . . . . . 283
Page menu . . . . . . . . . . . . . . . . . . . . . . . . . . . . . . . . . . . . . . . . . . . . . . . . . . . . . 283
Options menu . . . . . . . . . . . . . . . . . . . . . . . . . . . . . . . . . . . . . . . . . . . . . . . . . . 283
ix
Page 10

Contents
DRAFT Palm, Inc. Confidential
Chapter 16: Using World Clock . . . . . . . . . . . . . . . . . . . . . . . . . . . . . . . . . . 285
Setting the primary location . . . . . . . . . . . . . . . . . . . . . . . . . . . . . . . . . . . . . . . . 285
Choosing a different primary location . . . . . . . . . . . . . . . . . . . . . . . . . . . . . 287
Setting the secondary locations . . . . . . . . . . . . . . . . . . . . . . . . . . . . . . . . . . . . . . 288
Adding a location . . . . . . . . . . . . . . . . . . . . . . . . . . . . . . . . . . . . . . . . . . . . . . . . . 288
Modifying a Location . . . . . . . . . . . . . . . . . . . . . . . . . . . . . . . . . . . . . . . . . . . . . . 290
Removing a location . . . . . . . . . . . . . . . . . . . . . . . . . . . . . . . . . . . . . . . . . . . . . . . 290
Setting an alarm . . . . . . . . . . . . . . . . . . . . . . . . . . . . . . . . . . . . . . . . . . . . . . . . . . . 290
Using World Clock menus . . . . . . . . . . . . . . . . . . . . . . . . . . . . . . . . . . . . . . . . . . 291
®
Chapter 17: Performing HotSync
Operations . . . . . . . . . . . . . . . . . . . . . 293
Selecting HotSync setup options . . . . . . . . . . . . . . . . . . . . . . . . . . . . . . . . . . . . . 293
Customizing HotSync application settings . . . . . . . . . . . . . . . . . . . . . . . . . . . . 295
Conducting network HotSync operations . . . . . . . . . . . . . . . . . . . . . . . . . . . . . 297
Connecting to your computer through a wireless local area network (LAN)
298
Performing a wireless network HotSync operation . . . . . . . . . . . . . . . . . . 299
Performing cradle/cable HotSync operations . . . . . . . . . . . . . . . . . . . . . . . . . 301
Performing a cradle/cable HotSync operation: Windows computer . . . 301
Performing a direct HotSync operation: Mac computer . . . . . . . . . . . . . . 303
Conducting IR HotSync operations . . . . . . . . . . . . . . . . . . . . . . . . . . . . . . . . . . 306
Preparing your computer for infrared communication . . . . . . . . . . . . . . . 306
Performing an IR HotSync operation . . . . . . . . . . . . . . . . . . . . . . . . . . . . . . 308
Returning to cradle/cable HotSync operations . . . . . . . . . . . . . . . . . . . . . . 308
Using File Link . . . . . . . . . . . . . . . . . . . . . . . . . . . . . . . . . . . . . . . . . . . . . . . . . . . . 309
Creating a user profile . . . . . . . . . . . . . . . . . . . . . . . . . . . . . . . . . . . . . . . . . . . . . 309
Performing the first HotSync operation with a user profile . . . . . . . . . . . 312
Chapter 18: Setting Preferences for Your Handheld . . . . . . . . . . . . . . . . . 315
Viewing Preferences . . . . . . . . . . . . . . . . . . . . . . . . . . . . . . . . . . . . . . . . . . . . . . . 316
Buttons preferences . . . . . . . . . . . . . . . . . . . . . . . . . . . . . . . . . . . . . . . . . . . . . . . . 317
Connection preferences . . . . . . . . . . . . . . . . . . . . . . . . . . . . . . . . . . . . . . . . . . . . 317
IR to PC connection . . . . . . . . . . . . . . . . . . . . . . . . . . . . . . . . . . . . . . . . . . . . . 318
Date and Time preferences . . . . . . . . . . . . . . . . . . . . . . . . . . . . . . . . . . . . . . . . . 319
Digitizer preferences . . . . . . . . . . . . . . . . . . . . . . . . . . . . . . . . . . . . . . . . . . . . . . . 320
Formats preferences . . . . . . . . . . . . . . . . . . . . . . . . . . . . . . . . . . . . . . . . . . . . . . . 320
Country default . . . . . . . . . . . . . . . . . . . . . . . . . . . . . . . . . . . . . . . . . . . . . . . . 320
Time, date, week start, and numbers formats . . . . . . . . . . . . . . . . . . . . . . . 321
Sounds and Alerts preferences . . . . . . . . . . . . . . . . . . . . . . . . . . . . . . . . . . . . . . 321
System, alarm, and game sounds . . . . . . . . . . . . . . . . . . . . . . . . . . . . . . . . . 322
x
Page 11

Contents
DRAFT Palm, Inc. Confidential
Alarm Vibrate and indicator light settings . . . . . . . . . . . . . . . . . . . . . . . . . . 322
Keyboard Preferences . . . . . . . . . . . . . . . . . . . . . . . . . . . . . . . . . . . . . . . . . . . . . . 322
Remapping keys . . . . . . . . . . . . . . . . . . . . . . . . . . . . . . . . . . . . . . . . . . . . . . . . 323
Network preferences . . . . . . . . . . . . . . . . . . . . . . . . . . . . . . . . . . . . . . . . . . . . . . . 325
Modem Accessory and TCP/IP software . . . . . . . . . . . . . . . . . . . . . . . . . . . 325
Selecting a service . . . . . . . . . . . . . . . . . . . . . . . . . . . . . . . . . . . . . . . . . . . . . . 325
Entering a password . . . . . . . . . . . . . . . . . . . . . . . . . . . . . . . . . . . . . . . . . . . . 326
Selecting a connection . . . . . . . . . . . . . . . . . . . . . . . . . . . . . . . . . . . . . . . . . . . 327
Adding telephone settings . . . . . . . . . . . . . . . . . . . . . . . . . . . . . . . . . . . . . . . 327
Entering a prefix . . . . . . . . . . . . . . . . . . . . . . . . . . . . . . . . . . . . . . . . . . . . . . . . 328
Disabling call waiting . . . . . . . . . . . . . . . . . . . . . . . . . . . . . . . . . . . . . . . . . . . 328
Using a calling card . . . . . . . . . . . . . . . . . . . . . . . . . . . . . . . . . . . . . . . . . . . . . 329
Connecting to your service . . . . . . . . . . . . . . . . . . . . . . . . . . . . . . . . . . . . . . . 330
Creating additional service templates . . . . . . . . . . . . . . . . . . . . . . . . . . . . . 330
Adding detailed information to a service template . . . . . . . . . . . . . . . . . . 330
Idle timeout . . . . . . . . . . . . . . . . . . . . . . . . . . . . . . . . . . . . . . . . . . . . . . . . . . . . 331
Selecting Next Service . . . . . . . . . . . . . . . . . . . . . . . . . . . . . . . . . . . . . . . . . . . 331
Defining primary and secondary DNS . . . . . . . . . . . . . . . . . . . . . . . . . . . . . 332
IP address . . . . . . . . . . . . . . . . . . . . . . . . . . . . . . . . . . . . . . . . . . . . . . . . . . . . . 332
Login scripts . . . . . . . . . . . . . . . . . . . . . . . . . . . . . . . . . . . . . . . . . . . . . . . . . . . 333
Creating a login script on your handheld . . . . . . . . . . . . . . . . . . . . . . . . . . 334
Plug-in applications . . . . . . . . . . . . . . . . . . . . . . . . . . . . . . . . . . . . . . . . . . . . . 335
Deleting a service template . . . . . . . . . . . . . . . . . . . . . . . . . . . . . . . . . . . . . . . 336
Network preferences menu commands . . . . . . . . . . . . . . . . . . . . . . . . . . . . 336
On-Screen Writing preferences . . . . . . . . . . . . . . . . . . . . . . . . . . . . . . . . . . . . . . 336
Enabling Palm On-screen Writing . . . . . . . . . . . . . . . . . . . . . . . . . . . . . . . . . 337
Displaying penstrokes . . . . . . . . . . . . . . . . . . . . . . . . . . . . . . . . . . . . . . . . . . . 337
Owner preferences . . . . . . . . . . . . . . . . . . . . . . . . . . . . . . . . . . . . . . . . . . . . . . . . 338
Power preferences . . . . . . . . . . . . . . . . . . . . . . . . . . . . . . . . . . . . . . . . . . . . . . . . . 339
Auto-off delay . . . . . . . . . . . . . . . . . . . . . . . . . . . . . . . . . . . . . . . . . . . . . . . . . . 339
Cradle settings . . . . . . . . . . . . . . . . . . . . . . . . . . . . . . . . . . . . . . . . . . . . . . . . . 339
Beam Receive . . . . . . . . . . . . . . . . . . . . . . . . . . . . . . . . . . . . . . . . . . . . . . . . . . 339
Security preferences . . . . . . . . . . . . . . . . . . . . . . . . . . . . . . . . . . . . . . . . . . . . . . . 340
Assigning a password . . . . . . . . . . . . . . . . . . . . . . . . . . . . . . . . . . . . . . . . . . . 340
Locking your handheld . . . . . . . . . . . . . . . . . . . . . . . . . . . . . . . . . . . . . . . . . . 341
Recovering from a forgotten password . . . . . . . . . . . . . . . . . . . . . . . . . . . . 344
Making records private . . . . . . . . . . . . . . . . . . . . . . . . . . . . . . . . . . . . . . . . . . 345
Setting security options . . . . . . . . . . . . . . . . . . . . . . . . . . . . . . . . . . . . . . . . . . 352
ShortCuts preferences . . . . . . . . . . . . . . . . . . . . . . . . . . . . . . . . . . . . . . . . . . . . . . 355
xi
Page 12

Contents
DRAFT Palm, Inc. Confidential
VPN preferences . . . . . . . . . . . . . . . . . . . . . . . . . . . . . . . . . . . . . . . . . . . . . . . . . . 356
Connecting to your VPN account . . . . . . . . . . . . . . . . . . . . . . . . . . . . . . . . . 357
Wi-Fi preferences . . . . . . . . . . . . . . . . . . . . . . . . . . . . . . . . . . . . . . . . . . . . . . . . . . 359
Turning the 802.11b radio on and off . . . . . . . . . . . . . . . . . . . . . . . . . . . . . . 359
Finding Wi-Fi connection information . . . . . . . . . . . . . . . . . . . . . . . . . . . . . 360
Conserving battery power . . . . . . . . . . . . . . . . . . . . . . . . . . . . . . . . . . . . . . . 360
Adding and editing a Wi-Fi connection . . . . . . . . . . . . . . . . . . . . . . . . . . . . 360
Appendix A: Maintaining Your Handheld . . . . . . . . . . . . . . . . . . . . . . . . . 367
Caring for your handheld . . . . . . . . . . . . . . . . . . . . . . . . . . . . . . . . . . . . . . . . . . 367
Battery considerations . . . . . . . . . . . . . . . . . . . . . . . . . . . . . . . . . . . . . . . . . . . . . 368
Resetting your handheld . . . . . . . . . . . . . . . . . . . . . . . . . . . . . . . . . . . . . . . . . . . 368
Performing a soft reset . . . . . . . . . . . . . . . . . . . . . . . . . . . . . . . . . . . . . . . . . . 368
Performing a hard reset . . . . . . . . . . . . . . . . . . . . . . . . . . . . . . . . . . . . . . . . . . 369
Appendix B: Frequently Asked Questions . . . . . . . . . . . . . . . . . . . . . . . . . 373
Software installation problems . . . . . . . . . . . . . . . . . . . . . . . . . . . . . . . . . . . . . . 374
Operating problems . . . . . . . . . . . . . . . . . . . . . . . . . . . . . . . . . . . . . . . . . . . . . . . 375
Tapping and writing problems . . . . . . . . . . . . . . . . . . . . . . . . . . . . . . . . . . . . . . 376
Application problems . . . . . . . . . . . . . . . . . . . . . . . . . . . . . . . . . . . . . . . . . . . . . . 377
HotSync problems . . . . . . . . . . . . . . . . . . . . . . . . . . . . . . . . . . . . . . . . . . . . . . . . . 378
Beaming problems . . . . . . . . . . . . . . . . . . . . . . . . . . . . . . . . . . . . . . . . . . . . . . . . . 383
Recharging problems . . . . . . . . . . . . . . . . . . . . . . . . . . . . . . . . . . . . . . . . . . . . . . 384
Security and VPN problems . . . . . . . . . . . . . . . . . . . . . . . . . . . . . . . . . . . . . . . . 384
Wi-Fi problems . . . . . . . . . . . . . . . . . . . . . . . . . . . . . . . . . . . . . . . . . . . . . . . . . . . 385
Technical support . . . . . . . . . . . . . . . . . . . . . . . . . . . . . . . . . . . . . . . . . . . . . . . . . 385
xii
Product Regulatory and Safety Information . . . . . . . . . . . . . . . . . . . . . . . . 387
Index . . . . . . . . . . . . . . . . . . . . . . . . . . . . . . . . . . . . . . . . . . . . . . . . . . . . . . . . 393
Page 13

About This Book
DRAFT Palm, Inc. Confidential
This handbook is designed to help you get up and running quickly on your
Tungsten C handheld. It describes all you need to know about how to use your
handheld and the applications that come with it. It describes:
■ Enabling wireless features
■ Locating all the parts of your handheld
■ Viewing and entering data
■ Working with expansion cards
■ Using your handheld with your computer
■ Personalizing your handheld with your own preference settings
After you become familiar with the basic functionality of your handheld, you can
use the rest of this handbook as a reference for performing less comm on tasks, for
maintaining your handheld, and for solving problems that might arise as you
operate your handheld.
1
Page 14

About This Book
DRAFT Palm, Inc. Confidential
2
Page 15

CHAPTER 1
DRAFT Palm, Inc. Confidential
Welcome
Y our new Palm™ Tungsten™ C handheld is wir elessly enabled so that you can use
it to transmit and receive information over the airwaves. Use your handheld to do
the following:
■ Connect to your corporate or personal local area network (LAN) wirelessly with
a built-in 802.1 1b radio enabling you to read, compose , and send e-mail on-thego.
■ Browse or search the Internet through your wireless LAN.
■ Stay organized and on time by keeping your appointments, contact
informat ion, and to-do items in one pla ce.
■ Wireless ly connect in coffee shops and airports that have LAN service. A service
subscription agreement is required to access these services.
Before you can use all these features, you must set up your handheld and install
software on your desktop computer.
Y our handheld comes with an easy- to-follow installation guide, Palm™ Montana™
Read This First, that steps you through the process of successfully setting up your
handheld. The guide contains important information that must be followed for
initial setup of the features available on your handheld.
IMPORTANT If you are upgrading from another Pa lm OS
www.palm.com/support/ for important upgrade instructions before beginning your
Tungsten C handheld installation.
System requirements
Before you install and operate Palm™ Desktop software, your computer system
must meet the following minimum requirements.
®
handheld, see
3
Page 16

Chapter 1 Welcome
DRAFT Palm, Inc. Confidential
Minimum req uirement s: Windows comp uters
The minimum requirements for Windows computers are as follows:
■ IBM-compatible Pentium-class computer
■ One of the following operating systems:
– Windows NT 4.0 Workstation with SP6 or later (requires a serial
cradle/cable, sold separately, and administrator rights to install Palm
Desktop software)
–Windows 98
–Windows ME
– Windows 2000 Pro (requires administrator rights to install Palm Desktop
software)
– Windows XP Home or Pro (requires administrator rights to install Palm
Desktop software)
■ Internet Explorer 4.01 with SP2 or later
■ Netscape Navigator
■ 50 megabytes (MB) available hard disk space
■ VGA monitor or better (16 Bit or High Color, and 800 x 600 resolution
recommended)
■ CD-ROM or DVD-ROM drive (you can also downloa d P alm Des ktop sof tware
from
www.palm.com/support/)
■ Mouse
■ One available USB port or serial port (serial cradle/cable sold separately)
Minimum requirements: Mac computers
The minimum requirements for Mac computers are as follows:
■ Mac computer or compatible with a PowerPC processor
■ Mac OS
– Mac OS 9, version 9.1 or later
– Mac OS X, version 10.1.2 or later
■ 25MB available hard disk space
■ 12MB available RAM
■ Monitor that supports screen resolution of 800 x 600 or better
■ CD-ROM or DVD-ROM drive (you can also downloa d P alm Des ktop sof tware
from
www.palm.com/support/)
■ Mouse
4
Page 17

■ One available USB port or serial port (serial cradle/cable sold separately and
DRAFT Palm, Inc. Confidential
compatible with Mac OS 9 only)
Finding information
For installation information, see the Palm™ Montana™ Read This First that came
with your T ungsten C handheld. For comprehensive information about using your
handheld, continue reading this electronic handbook.
For support information, upgrade information, articles, and answers to questions,
see
www.palm.com/support/.
For more information about using Palm Desktop software, see the following:
■ The handheld tutorial, Quick Tour. To access this tutorial, tap the Quick Tour
icon from th e Applications main screen.
■ The electronic Palm Desktop software for the Macintosh User’s Guide. T o access this
guide, open the Palm folder and then open th e Documentation f older.
Double-click the file Palm Desktop.pdf.
■ The online help for Palm Desktop software. To access the online help, open
Palm Desktop software and select the Help menu.
Finding information
5
Page 18

Chapter 1 Welcome
DRAFT Palm, Inc. Confidential
6
Page 19

CHAPTER 2
DRAFT Palm, Inc. Confidential
Exploring Your Handheld
YourPalm™ Tungsten™ C handheld uses a wireless local area network (LAN) to
help you stay in touch with important information while you are away from your
desk. You can stay organized, on time, and up-to-date with daily tasks. Use your
new handheld to do the following:
■ Compose and securely send and receive business or personal e-mail through
your wireless LAN.
NOTE Some companies re strict access to inte rnal e-mail accounts w hen using
a handheld. Check your company or network administrator for their policy on
use of handhelds.
■ Receive alerts when a new e-mail arrives or a reminder occurs. Rely on any or
all of the three alert modes: the indicator light, vibrator, or alarm sound.
■ Set preferences for how you receive alarms: hea ring a sound, seeing a bl inking
indicator light, or feeling your handheld vibrate. Choose any combination.
■ Browse or search the Internet.
■ Enter your schedule in Date Book.
■ Keep all your contact names, addresses, and phone numbers in Address Book.
■ Prioritize and assign your tasks a due date in To Do List.
■ Set alarms from World Clock and Date Book to keep yourself on schedule and
remind yourself of appointments, redial reminders, and notes.
■ Synchronize your data with Palm™ Desktop software on your Windows or Mac
computer so you can work with your personal information on your computer
and maintain a copy of your information.
■ Insert SD, MultiMediaCard, or SDIO expansion cards to add more software or
memory, or to back up your data.
■ Beam information to another device that has an infrared (IR) port.
Locating handheld components
Take a few moments to locate the front and back panel components of your
handheld.
7
Page 20

Chapter 2 Exploring Your Handheld
DRAFT Palm, Inc. Confidential
Locating front panel controls
Green indicator light
Screen
Date
Book
Address
Book
Application
buttons
Navigator
Select button
Stylus
IR port
Keyboard area
Power button/
Brightness control
Wireless
E-mail
Application buttons
IR port
Uses infrared technology to transmit data to and r eceive data
from other Palm OS
®
handhelds, and to perform HotSync®
operations. See “Using elements of the handheld interface”
in Chapter 3 and see “Conducting IR HotSync operations” in
Chapter 17 for more information.
Keypad
The area where you type letters and numbers, and access
special function keys. See Chapter 3 to learn how to type
characters.
Power button
Turns your handheld on or off. If your handheld is turned
off, pressing the power button turns the handheld on and
returns you to the last screen you viewed.
If your handheld is turned on, pressing the power button
turns the unit off.
8
Page 21

Locating handheld components
DRAFT Palm, Inc. Confidential
Application button s
Navigator
Select button
Screen
Green indicator light
Activate the individual handheld applications that
correspond to the icons on the buttons: Date Book, Address
Book, E-mail, and Wireless. See “Buttons preferences” in
Chapter 18 for details on reassigning these buttons to open
any application on your handheld.
The five-way navigation button enables you to move up,
down, right, and left in pick lists and menus. You can scroll
down to view information below the viewing area, and sc roll
up to view the information above the viewing area. The
navigator also has some special functions that are described
in this ha ndbook.
The navigator center Select button enables you to select
items. The Select button also has some special f unctions that
are described in this handbook.
Displays the applications and information stored in your
handheld. It is touch-sensitive and responds to the stylus.
A blinking green light indicates:
■ an e-mail message has arrived.
■ an alarm or event notification has occurred.
Stylus
A dialog box appears, describing the r eason for notif ication.
Acknowledging the notification turns off the indi cator light.
The light also indicates that the handheld is properly placed
in the cra dle.
Slides in and out of the slot in the side channel of the
handheld. T o use the stylus, remove it from the slot and hold
it as you would a pen or pencil. Unscrew the top of the stylus
to access the reset tool.
9
Page 22
Chapter 2 Exploring Your Handheld
DRAFT Palm, Inc. Confidential
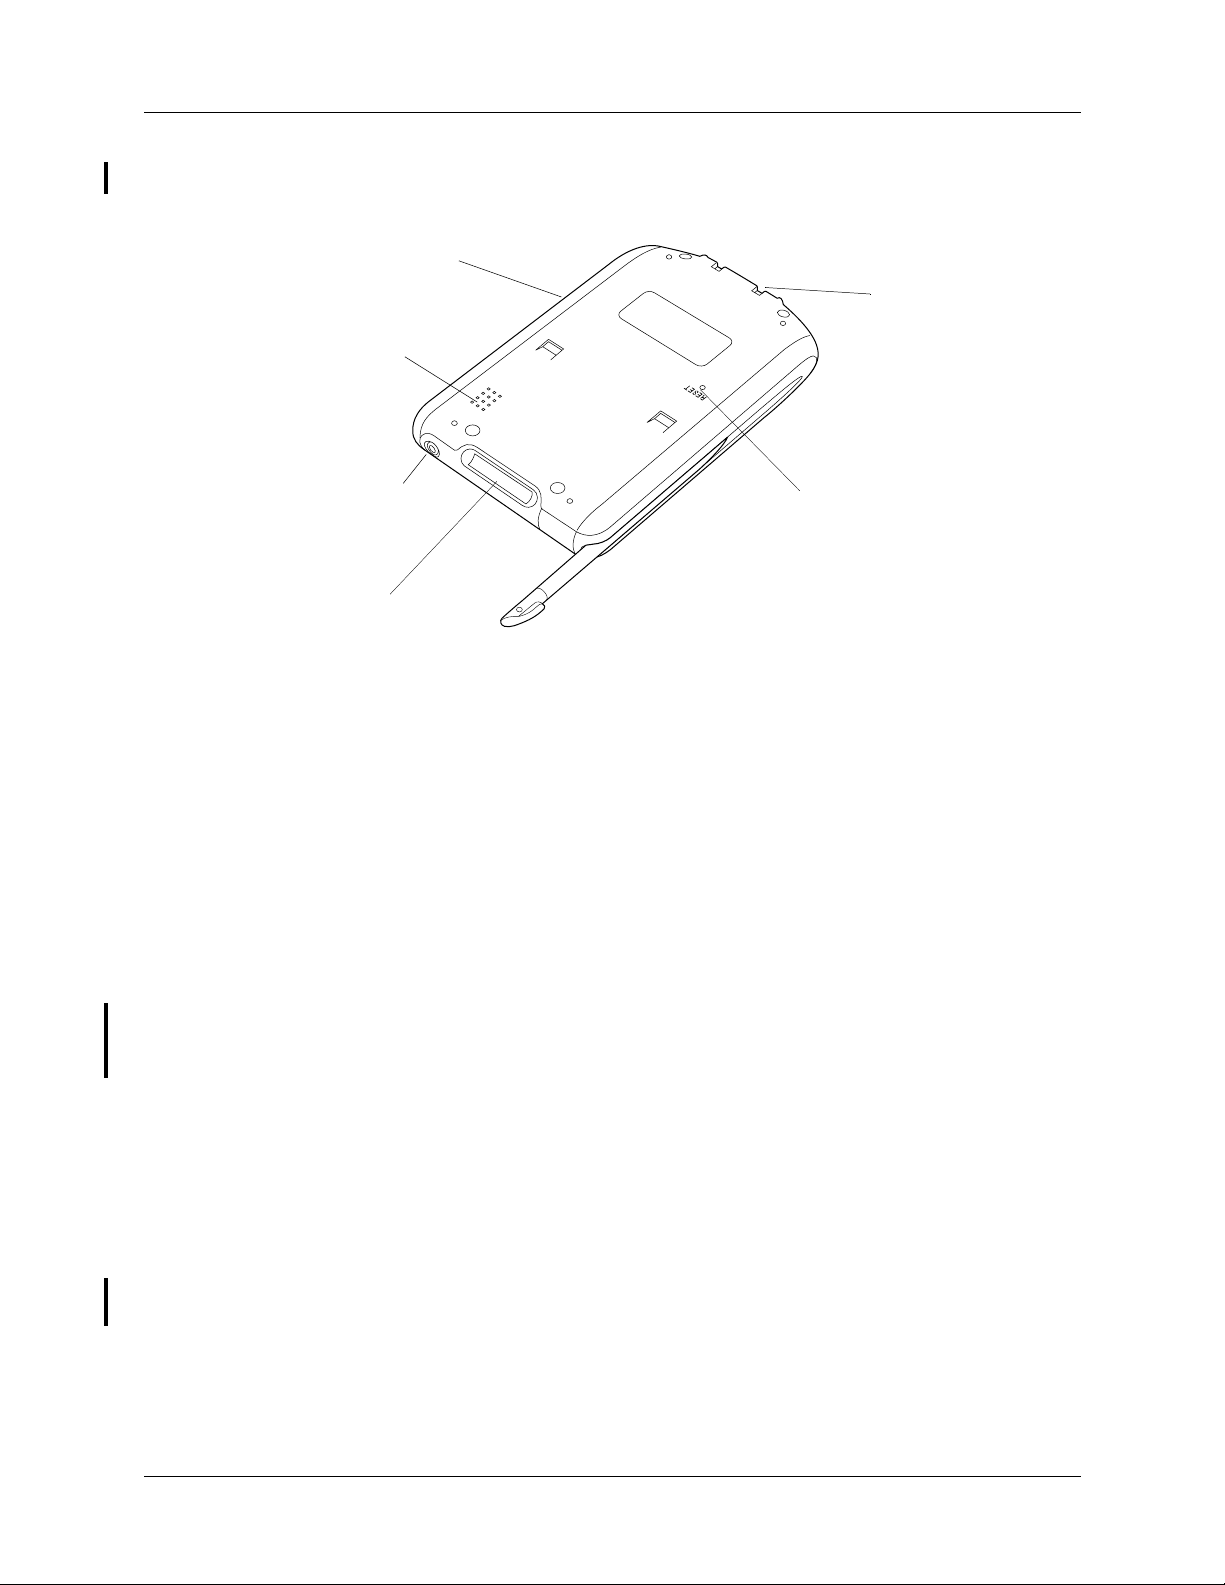
Locating back panel components
Side
channel for
cover
Speaker
Universal
connector
Headset jack
Expansion
card slot
Universal connector
Reset button
Expansion card slot
Reset
button
Connects your handheld to the cradle, which in turn
connects to the back of your computer and through the AC
adapter to the wall current. This allows you to rechar ge your
handheld as well as update the information between your
handheld and computer using HotSync technology.
The universal connector also connects peripheral hardware
devices to your handheld.
Under normal use, you should not have to use the reset
button. See “Resetting your handheld” in Appendix A for
information about when and how to use the reset button.
Accepts SD, MultiMediaCard, and SDIO expansion cards,
enabling you to add more memory, applications, or other
functionality. You can also back up data to an expansion
card.
10
Headset jack
Speaker
Side channel
NOTE Expansion cards are purchased separately.
Connects a hands-free headset to your handheld, enabling
you to recor d and lis ten to voic e m emos, and listen to audio
files from the Internet.
For improved system sounds and the playing of audio f il es,
such as voice recording (.wav) or multimedia.
The left side channel holds the front cover, which slides in
and out.
Page 23

Adding an expansion ca rd
DRAFT Palm, Inc. Confidential
A tiny expansion card (sold separately) increases the variety of tasks you can do
and the amount of space you have for s toring software a nd data on your handheld.
To insert a card:
1. Insert the card in the direction shown by the icon.
2. Push the card in with your thumb. You feel the card lock and hear the system
sound.
Label on card
faced down
Adding an expansion card
Push
Notched
corner
To remove a card:
1. Push lightly against the card with your thumb.
2. When the card is released, you hear the system sound.
Push
For complete information about working with expansion cards, see Chapter 7.
11
Page 24

Chapter 2 Exploring Your Handheld
DRAFT Palm, Inc. Confidential
Adjusting the screen brightness level
The screen brightness makes it easy for you to see the information on your
handheld. The screen brightness level can be adjusted to for ease of viewing and to
extend battery life. You can adjust the brightness level using the Adjust Brightness
dialog box.
To adjust the screen brightness level:
1. Press Function + Brightness .
2. Tap to the left or right of the slider to adju st the brightness in small i ncrem ents,
or drag the slider to change the brightness in large increments.
12
Page 25

CHAPTER 3
DRAFT Palm, Inc. Confidential
Navigating and Entering Data
This chapter explains how to enter data into your handheld, navigate around the
interface, and use menu commands. There are several ways to enter data, to
navigate, and to use menu commands:
■ Tapping
■ Using the five-way navigator
■ Using the handheld keyboard
Tapping
■ Using Graffiti
■ Beaming data from another device that has an infrared port
■ Entering or importing data in Palm™ Desktop software and then synchronizing
TM
writing
with your handheld
Like using a mouse to click elements on a computer scr een, using the styl us to tap
elements on your handheld screen is the basic action that gets things done on your
handheld.
The first time you start your handheld, setup instructions appear on the screen.
These instructions include a calibration screen. Calibration aligns the internal
circuitry of your handheld with its touch-sensitive screen so that when you tap an
element on the screen, the handheld can detect exactly which task you want to
perform.
IMPORTANT Always use the point of t he styl us f or tapp ing or ma king s trokes on the
handheld screen. Never use an actual pen, pencil, or other sharp object to write on
the handheld screen.
With your handheld turned on, you can tap the handheld screen to do many
operations, such as the following:
■ Open applications
■ Choose menu commands
■ Select options in dialog boxes
13
Page 26
Chapter 3 Navigating and Entering Data
DRAFT Palm, Inc. Confidential
Just as you can drag the mouse to select text or move objects on your computer , you
can also drag the stylus to select text. You can also use the stylus to drag the slider
of any scroll bar.
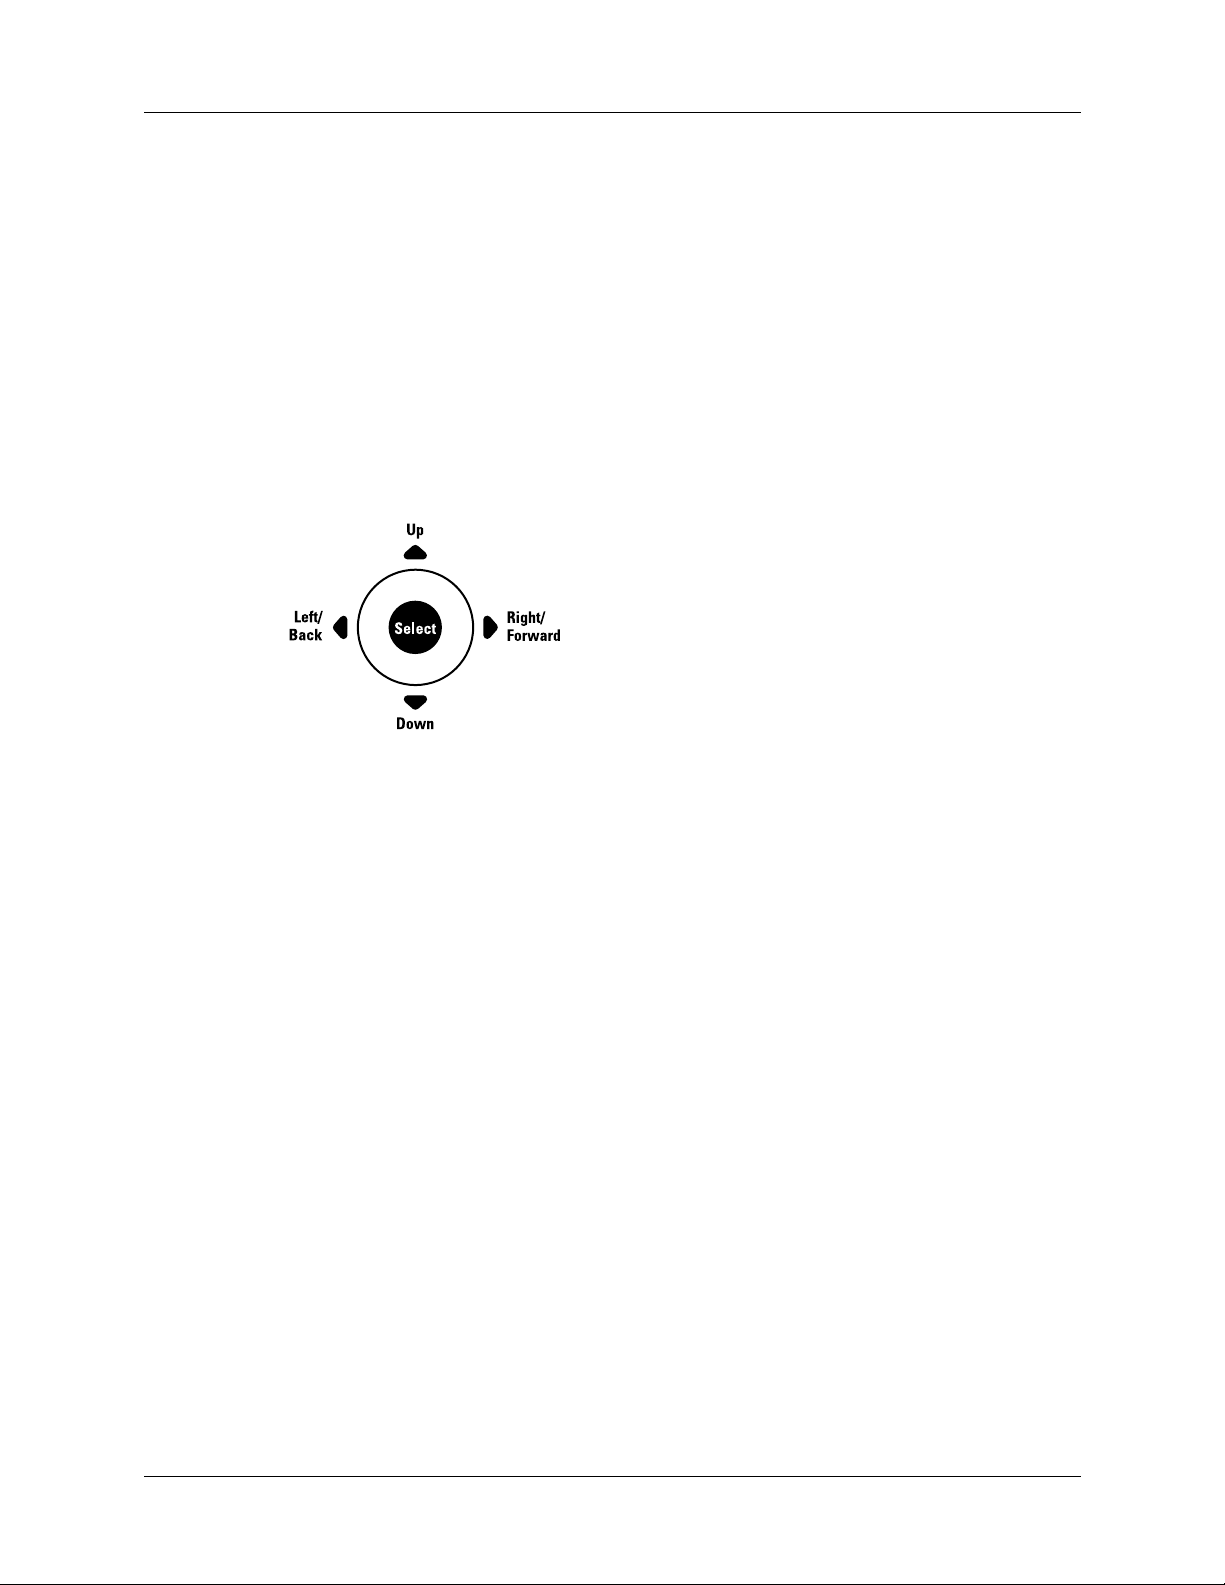
Using the navigator
When you work with most applications, the navigator on the front panel of your
handheld makes it easy for you to navigate among and select your entries. You can
use the navigator to perform tasks without the stylus using one hand.
See Chapter 4 and Chapter 5 for additional information about using the navigator
with Address Book, and Chapter 8 for additional information on using the
navigator with Date Book.
To navigate in list screens, do any of the following:
■ Press Up or Down on the navigator to scroll an entire screen of records.
■ Press and hold Up or Down on the navigator to accelerate the scrolling.
■ Press Select on the navigator to insert the selection highlight. When the selection
highlight is present, you can do the following:
– Press Up or Down on the navigator to scroll to the previous or next records.
– Press Select again to view the selected record.
– Press Left on the navigator to remove the selection highlight.
To navigate in record screens:
1. Press Up or Down on the navigator to scroll within the current record.
2. Press Right or Left on the navigator to scroll to the pr evious or next record. (This
feature is not available in Address Book.)
3. Press Select on the navigator to return to the list screen.
14
Page 27

To navigate in dialog boxes:
DRAFT Palm, Inc. Confidential
■ While a pick list is open, press Up or Down on the navigator to highlight an
item, and then press Select on the navigator to select the item.
■ Press Select on the navigator to close a dialog. If there’s only one button,
pressing Select activates that bu tton. If there’s multipl e buttons, Select activates
affirming buttons such as OK, Yes, or Done.
IMPORTANT Read dialog boxes carefully. Sometimes, selecting OK or Yes results in
deleting data.
Using the keyboard
You can quickly and accurately enter text or numbers on your handheld using the
keyboard. The keyboard also has special function keys that enable you to access
features. Another feature is AutoCorrect, which automatically corrects some
common misspellings when entering data from the keyboard.
Using the keyboard
Below the keyboard are application buttons and the 5-way naviga tor that enables
you to navigate menus and pick lists quickly without using the stylus. These
features are described in Chapter 2.
Letter and
number keys
Tab/Brightness
key
Function
key
CAPS/Find key
Letter and number keys: Enables you to enter letters and numbers. You
Space/Symbol key
Delete key
Return/Enter key
Home/ShortCut
key
Command/Menu
key
can change the key response from the Keyboard preferences screen.
See “Keyboard Preferences” in Chapter 18.
Y ou can a lso access international characters using the navigator c ontrol.
See “Accessing international and special characters” later in this
chapter.
Tab/Brightness key: Adds a tab or opens the Brightness dialog box. For
more information on the Brightness dialog box, see “Adjusting the
screen brightness level” in Chapter 2.
15
Page 28

Chapter 3 Navigating and Entering Data
DRAFT Palm, Inc. Confidential
Function key: Pr ess to access the secondary character set. See “Using the
Function key” later in this chapter.
CAPS/Find key: Capitalizes letters or opens the Find dialog box. For
more information on capitalizing letters, see the next section “Typing
capital l etters”. For information on the Find dialog box, see “Finding
information” in Chapter 4.
Space/Symbol key: Adds a space to the text or opens the onscreen
keyboards. For more information about the onscreen keyboards, see
“Accessing the onscreen keyboards” later in this chapter.
Command/Menu key: Opens the Command toolbar or Menu. The
Command bar has many functions, such as showing the signal str ength
for the 802.11b radio. For information about the Command mode,
see “Using menu commands and the command toolbar” in Chapter 4.
For more information about Menus, see “Using menus” in Chapter 4.
Home/ShortCut key: Opens the Application Launcher or enables you to
enter a text ShortCut. For more information on ShortCuts, see “Using
ShortCuts” later in this chapter.
Return/Enter key: Adds a manual return to the next line or enters the
data.
Delete/Backspace key: Deletes the previous character.
Typing capital letters
The keyboard enables you to capitalize letters in two ways:
■ Use the CAPS key . Press the CAPS key twice to initiate CAPS lock.
■ Press and hold the key. This feature works only when the Keyboard pr eference
Repeat Function is set to Capital. See “Keyboard Preferences” in Chapter 18 for
more information.
Accessing international and special characters
You can access international and sp ecial characters directly from the keyboard or
from onscreen keyboards. These character sets enable you to communicate
accurately through your memos or wireless messages.
Accessing from the keyboard
Y ou can access international characters from t he keyboard by pr essing and holding
a key, and then pressing Up and Down on the navigator. The character on the
screen scrolls thr ough a sequence of related i nternational characters. You can scroll
though the sequence either forward or backward depending on whether you are
pressing Up or Down on the navigator.
16
Page 29

Using the keyboard
DRAFT Palm, Inc. Confidential
NOTE This feature does not work w ith every key or wi th the F unction key secondary
character set.
To access international character s from the keyboard:
1. Press and hold a key.
2. Press Up or Down on the navigator.
3. Accessing the onscreen keyboards
Y ou can open the onscr een keyboards anytime you need to enter speci al characters
or numbers on your handheld.
To use the onscreen keyboard:
1. Open any application (such as Memo Pad).
2. Tap any record, or tap New.
3. Press Function + Symbol .
When a keyboard is open, you can tap to open any of the other keyboards.
Tab
Caps lock
Caps shift
Numeric
Tap here to display
numeric keyboard
Alpha
Tap here to display
alphabetic keyboard
Tap here to display
international keyboard
Symbol
Backspace
Carriage return
International
Tap here to display
symbol keyboard
After you finish, tap Done to close the onscreen keyboard and place the text in
the record.
17
Page 30
Chapter 3 Navigating and Entering Data
DRAFT Palm, Inc. Confidential
Using the Function key
The Function key enables you to access the secondary character or feature set
from each of the keys. The secondary charact er and feature se t is labeled in b lue in
the upper right on each available key.
Function key
When you press Function , a dot appears in the l ower-right corner , i ndicat ing
that the next key pressed will use the secondary character or feature set. If you
press the Function twice, the dot changes to a “1” and the function feature
remains locked. Pressing Function again unlocks it.
Function active icon Function lock icon
Using special features
In addition to characters, the Function key accesses special features on some of the
keys. The following keys have special features:
Brightness key: Opens the Brightness dialog box. See “Adjusting the
screen brightness level” in Chapter 2 for more information.
Find key: Opens the Find dialog box. See “Using Find” in Chapter 4 for
more information.
Menu key: Opens the menu for the current screen. For more i nformation,
see “Using menus” in Chapter 4 and see “Using menu commands and
the command toolbar” in Chapter 4.
18
Page 31

Using Shor tCuts
DRAFT Palm, Inc. Confidential
ShortCuts make entering commonly used words or phrases quick and easy.
ShortCuts are similar to the Glossary or Autotext features of some word
processors.
The handheld comes with several predefined ShortCuts, and you can also create
your own. Each ShortCut can represent up to 45 characters. For example, you
might create a ShortCut for your name or for the header of a memo. See “ShortCuts
preferences” in Chapter 18 to learn about creating your own ShortCuts.
To use a ShortCut:
1. Press Function + ShortCut .
When you press the ShortCut key, the ShortCut symbol appears at the insertion
point to show that you are in ShortCut mode.
2. Type the ShortCut characters.
Using elements of the handheld interface
Using elements of the handheld interface
Menu bar and menu
commands
Menu bar
Menu
command
Check
box
Command
button
Previous/next
arrows
Pick list
Scroll
bar
A set of commands that ar e specific to the application. Not all
applications have a menu bar.
To access the menu bar, do one of the following:
■ Tap the Menu bar.
■ Press Function + Menu .
To access the menu commands, do one of the following:
■ Tap the menu command on the menu.
■ Use Right, Left, Up, or Down on the navigator.
■ Press Command Stroke + the letter. For more
information see “Using menu commands and the
command toolbar” in Chapter 4.
19
Page 32

Chapter 3 Navigating and Entering Data
DRAFT Palm, Inc. Confidential
Check box
Command buttons
Next/previous arrows
When a checkmark appears in a check box, the
corresponding option is active.
To insert or remove a check mark:
■ If a check box is empty, tapping it inserts a checkmark.
■ If a check box is selected, tappi ng it remove s the
checkmark.
These appear in dialog boxes and at the bottom of
application screens.
To select a command button, do one of the following:
■ Tap a button to perform a command.
■ Press Select on the navigator to select buttons suc h as OK,
Yes, or Done.
■ Press Function + Enter to select the OK, Done, or
Yes buttons.
■ Press Function + Backspace , to select Cancel or
No buttons.
The left and right arrows display the previous and next
record; the up and down arrows display the previous and
next page of information.
Pick list
To use the arrows, do one of the following:
■ Tap the arrows.
■ Use Right, Left, Up, or Down on the navigator.
A list of choices that you can select from.
To use the pick list:
■ Tap the arrow to display a list of choices.
■ Tap an item in the list.
■ Use Up or Down on the navigator to scroll through the list
and select an item.
20
Page 33

Using Graffiti writing to enter data
DRAFT Palm, Inc. Confidential
Scroll bar
A bar that enables you to scroll up and down a page.
To use the scroll bars:
■ Drag the slider, or tap the top or bottom arrow, to scroll
the display one line at a time.
■ To scroll to the previous page, tap t he scroll bar j ust above
the slider . To scroll to the next page, tap the scroll bar just
below the slider.
■ You can also scroll to the previous and next pages by
pressing Up and Down on the navigator.
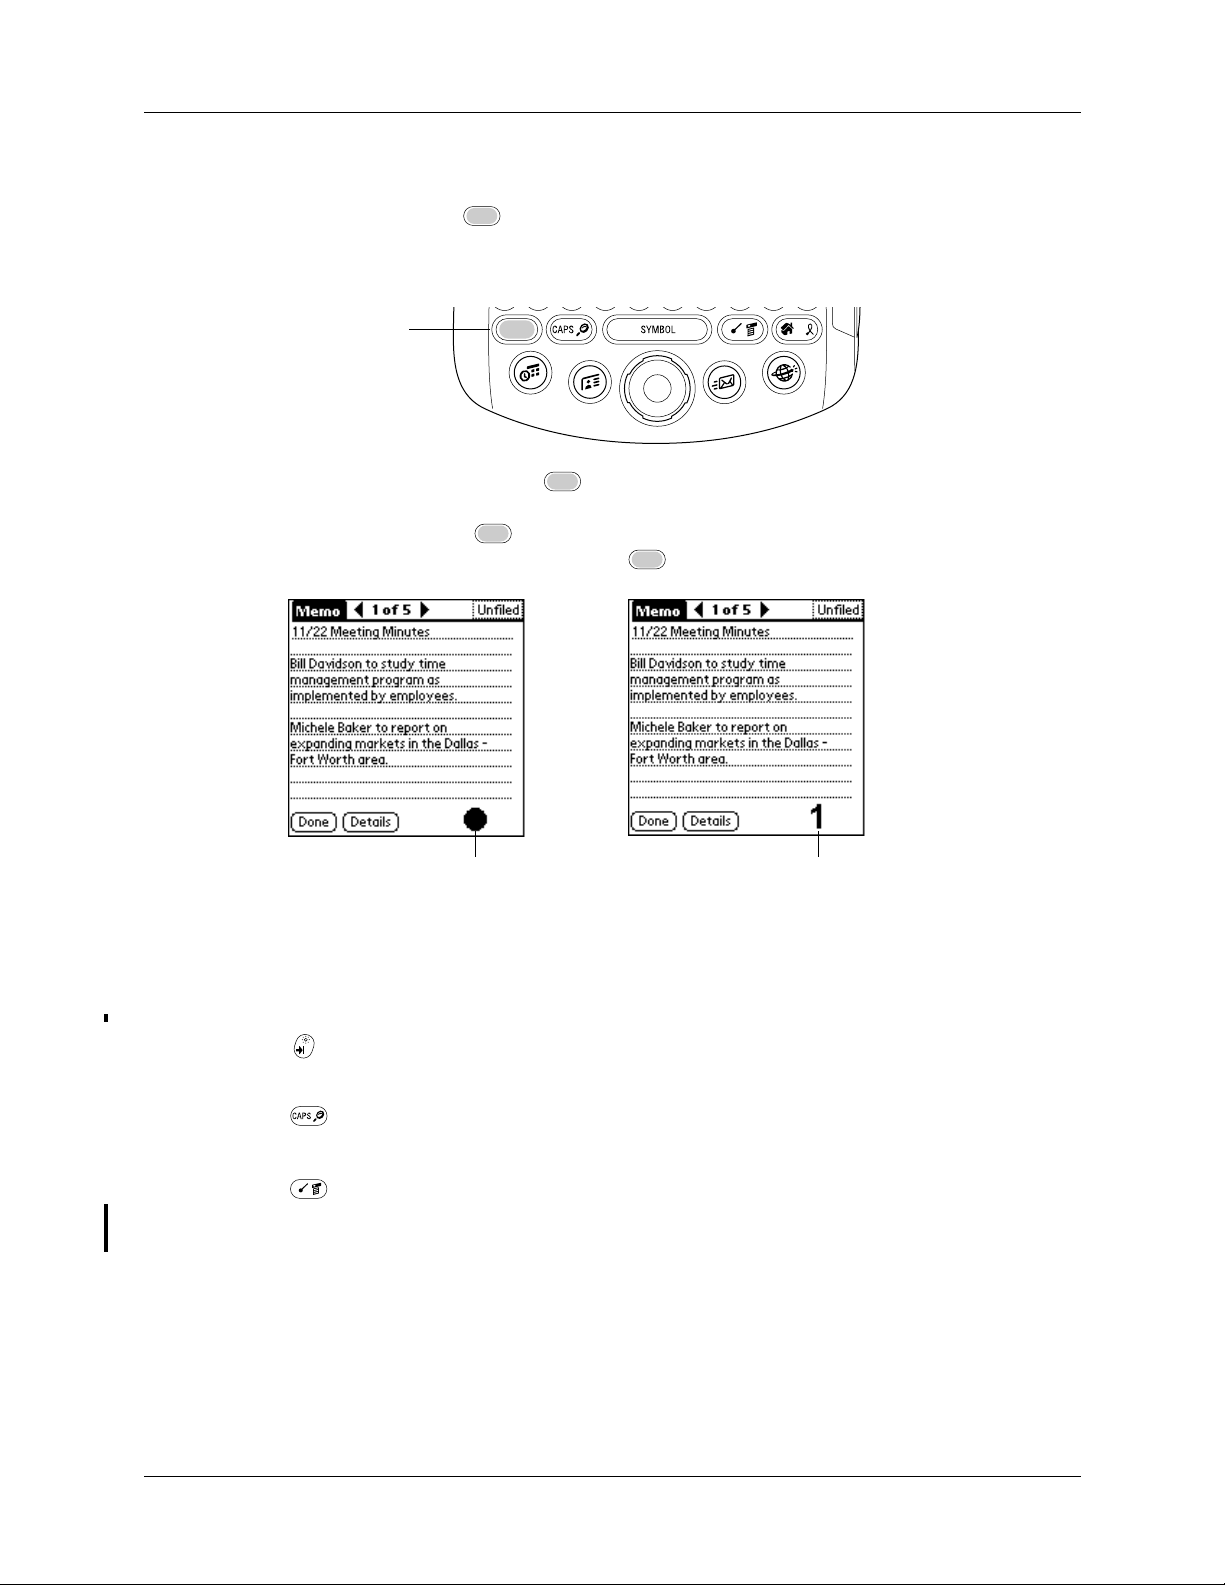
Displaying online tips
Many of the dialog boxes that appear on your handheld contain an online Tips icon
in the upper-right corner . Online tips anticipate questions you have in a dialog box,
provide shortcuts for using the dialog box, or give you oth er useful information.
To display an online tip:
1. Tap the Tips icon .
2. After you review the tip, tap Done.
Using Graffiti writing to enter data
IMPORTANT Palm™ On-screen Writing must be enabled before you can use Graffiti
writing. See “On-Screen Writing preferences” in Chapter 18 for more information.
In this section you learn the procedures for cr eating letters, numbers, punctuation,
and symbols, as well as some Graffiti tips and tricks.
Most people find they can enter text quickly and accurately with only minutes of
practice. Graffiti writing includes any character you can type on a standard
keyboard. The Graffiti characters closely resemble the uppercase letters of the
regular alphabet, which makes Graffiti writing easy to learn.
21
Page 34

Chapter 3 Navigating and Entering Data
Wri
DRAFT Palm, Inc. Confidential
There are four basic concepts for success with Graffiti writing:
■ If you draw the character shape exactly as shown in the tables later in this
chapter (like the shapes shown in the following diagram), you can achieve close
to 100 percent accuracy.
■ The heavy dot on each shape shows where to begin the stroke. Certain
characters have similar shapes but diff er ent begi nning and end points. Always
begin the stroke at the heavy dot. (Y ou should not creat e the heavy dot; it is there
only to s how you where to be gin the st roke.)
■ Most characters require only a single stroke. When you lift the stylus from the
screen, your handheld recognizes and displays the text character immediately.
Some single Graffiti strokes are portions of the regular alphabet equivalents.
■ The screen is divided into two parts: the left side for writing the letters of the
alphabet and the right side for writing numbers.
te letters on
the left side
Write numbers
on the right side
To write Graffiti cha racters:
1. Tap and hold the place where you want your text to appear.
You must see a blinking cursor before you write the text.
22
2. Use the tables on the following pages to find the stroke shape for the letter you
want to create. For example, the stroke shown below creates the letter n.
Page 35

Using Graffiti writing to enter data
Lif
DRAFT Palm, Inc. Confidential
Two stroke shapes are available for some letters. Choose the one that’s easiest
for you.
t stylus
here
Start stroke
at heavy dot
As you’ll see later in this chapter, you use the same shape to create both the
uppercase and lowercase version of a letter.
3. Position the stylus in the left side of the screen.
4. Start your stroke at the heavy dot, and draw the stroke shape as it appears in the
tables.
5. Lift the stylus from the screen at the end of the stroke shape.
When you lift the stylus from the screen, your handheld recognizes your stroke
immediately and prints the letter at the insertion point on the screen.
Graffiti tips
As soon as you lift the stylus from the scr een, you can begin the str oke for the next
character you want to write.
NOTE You must begin the c haract er strokes on the left side of the screen. Otherwise
your handheld does not recognize them as text characters.
To delete Graffiti character s:
■ Set the insertion point to the right of the character you want to del ete and make
the backspace stroke (a line from right to left).
When using Graffiti writing, keep these tips in mind:
■ Accuracy improves when you write large characters. Draw strokes that nearly
fill the side of the screen.
■ Write at natural speed. Writing too slowly can generate rec ognition errors.
■ Do not write on a slant. Ve rtical strokes should be parallel to the sides of the
screen.
■ Press firmly.
23
Page 36

Chapter 3 Navigating and Entering Data
DRAFT Palm, Inc. Confidential
Graffiti alphabet
The Graffiti alphabet consists of the following letters:
Letter Strokes Letter Strokes
AN
B
O
or
CP
or
or
D
Q
or
ER
or
F
S
or
G
or
T
HU
IV
or
24
JW
KX
or
LY
or
M
Z
or
Space Backspace
Carriage
Period
Tap twice
return
Page 37

Capital letters
DRAFT Palm, Inc. Confidential
Using Graffiti writing to enter data
You make capital letters with the same stroke shapes as the basic alphabet
characters. You must first “shift” to caps—just as you press the Shift key on a
keyboard—and then write the character strokes.
Graffiti writing includes a feature that automatically capitalizes the first letter
when you create a new sentence or a new record (by tapping New or a blank line).
To draw the first lett er of a wo rd as a capital letter :
■ Enter the Caps Shift stroke:
Caps
Shift
TIP When Caps Shift is a ctive, an up arrow symbol appears in the lower-right
corner of the handheld screen. If you accidentally activate Caps Shift,
backspace will cancel it.
Caps Shift
To enter only capital letters (Caps Lock):
■ Enter the Caps Lock stroke:
Caps
Lock
TIP When Caps Lock is active, an underlined up arr ow symbol appea rs in the
lower-right corner of the handheld screen. To return to lowercase, make the
Caps Shift stroke.
Graffiti numbers
Writing numbers with Graffiti writing is similar to writing letters of the alphabet,
except that you make the character strokes on the right side (numbers side) of the
Graffiti writing area.
Caps Lock
Number Strokes Number Strokes
0
or
5
or
25
Page 38

Chapter 3 Navigating and Entering Data
DRAFT Palm, Inc. Confidential
Punctuation marks
Graffiti writing can create any punctuation symbol that you can enter from a
standard keyboar d. When Enable Writing is enabled, the punctuation shift area at
the bottom of the screen is highlighted by a color. A single tap within the
punctuation shift area activates Punctuation mode and the next stroke you make
with the stylus creates a punctuation mark.
1
27
38
6
or
4
9
Punctuation shift area
TIP Double-tapping within the punctuation shift area creates a period.
When Punctuation Shift is active, you can make a symbol stroke anywhere in the
Graffiti writing area (the letters or numbers side).
Symbol Stroke Symbol Stroke
Period
.
Comma
,
Apostrophe
'
Question
?
Exclamation
!
Dash
—
Left P aren
(
Right Pare n
)
Slash
/
Dollar
$
26
Page 39

Using Graffiti writing to enter data
DRAFT Palm, Inc. Confidential
You can also use the following additional Graffiti punctuation marks.
@ # % ^ & * < > + = |
Symbol char acters
All symbol characters begin with the symbol shift stroke in the Graffiti writing area
of your handheld.
When the Symbol Shift is active, a slanted shif t symbol appears in the lower-right
corner of the screen. The next str oke that you make creates the symb ol or extended
character.
—
\ { } [ ] ~ ` ; : " tab
Symbol
Shift
Symbol Shift
•
+
Accented characters
To create accented characters, draw the stroke that is normally used to create the
letter, followed by an accent stroke. Graffiti writing then adds the accent to the
letter.
For example, the following diagram shows the strokes required to draw an
accented e.
—
= e
,
,
==c
:
X
!
ƒ
,°,
,
,
Y
∅
?
27
Page 40

Chapter 3 Navigating and Entering Data
DRAFT Palm, Inc. Confidential
You can use the following accent strokes in combination with Graffiti letters:
a a a a a a
Using these accent strokes, you can write the following accented letters:
абвгдеийклмноптуфхцщъыьяэс
Additional non-English characters
Y ou can writ e the following characters without any s pecial punctuation or shifting:
c
a
e
You must write these non-English characters in the left side of the Graf f iti wri ting
area.
Navigation s trokes
In addition to character symbols, Graffiti writing includes special str okes that you
can use to navigate within text or fields in your applications.
Command
Move cursor right
Move cursor lef t
Previous field
(Address Book only)
Next Field
(Address Book only)
Open Address Record
(Address Book only)
Graffiti ShortCuts
Stroke
28
Graffiti ShortCuts make entering commonly used words or phrases quick and
easy. ShortCuts are similar to the Glossary or Autotext features of some word
processors.
Page 41

Beaming data
DRAFT Palm, Inc. Confidential
Graffiti writing comes with several pr edefined ShortCuts, and you can also cr eate
your own. Each ShortCut can represent up to 45 characters. For example, you
might create a ShortCut for your name or for the header of a memo. See “ShortCuts
preferences” in Chapter 18 to learn about creating your own ShortCuts.
To use a ShortCut, draw the ShortCut stroke foll owed by t he ShortCut charact ers.
The ShortCut symbol appears at the insertion point to show that you are in
ShortCut mode.
ShortCut
Your handheld includes the predefined Graffiti ShortCuts shown in the following
table.
Entry Shortcut
Date Stamp ds
Time stamp ts
Date / time stamp ds
Meeting me
Breakfast br
Lunch lu
Dinner di
Beaming data
Your handheld is equipped with an infrared (IR) port that is located at the top of
the handheld, behind the small dark shield. The IR port supports the IrCOMM
implementation of the standards for infrared communication established by the
Infrared Data Association (IrDA). This means that not only can you beam data to
another Palm OS
can also beam data to a mobile phone and to any other device that supports the
IrCOMM implementation of the IrDA standards and that c an read the type of da ta
you’re beaming.
You can beam the following information between devices with an IR port:
■ The record currently displayed in Date Book, Address Book, To Do List, Note
■ All records of the category currently displayed in Address Book, To Do List,
®
handheld that’s close by and equipped with an IR port, but you
Pad, Palm Photos, or Memo Pad
Note Pad, Palm Photos, or Memo Pad
29
Page 42

Chapter 3 Navigating and Entering Data
DRAFT Palm, Inc. Confidential
■ A special Address Book record that you designate as your business card,
containing information you want to exchange with business contacts
■ An ap plication installed in RAM me mory
■ An application installed on an expansion card that is seated in the card slot
TIP You can a ls o pe rf o r m Ho t Syn c
®
operations using the IR port.
See “Conducting IR HotSync operations” in Chapter 17 for details.
To select a busine ss card:
1. Create an Address Book record that contains the information you want on your
business card.
2. Press Function + Menu .
3. Select “Select Business Card” on the Record menu.
4. Tap Yes.
To beam a record, busin ess card, or cat egory of reco rds:
1. Locate the record, business card, or category you want to beam.
2. Press Function + Menu .
3. Select one of the following from the Record menu:
– The Beam command for an individual record
– In Address Book only: Beam Business Card
–Beam Category
4. When the Beam Status dialog box appears, point the IR port directly at the IR
port of the receiving handheld.
For best results, handhelds should be between 10 centimeters (approximately
4 inches) and 1 meter (approximately 39 inches) apart, and the path between the
two handhelds must be clear of obstacles. The beaming distance to other Palm
OS handhelds may be different.
5. Wait for the Beam Status dialog box to indicate that the transfer is complete
before you continue working on your handheld.
TIP You can also press and hold the Address Book application button to instantly
beam your business card to another device with an IR port
.
30
Page 43

Beaming data
DRAFT Palm, Inc. Confidential
To beam an application:
1. Press the Home .
2. Press Function + Menu .
3. Tap App, and then select Beam.
4. Select either Handheld or Card from the Beam From pick list.
5. Tap the application you want to transfer.
Some applications are copy-protected and cannot be beamed. These are listed
with a lock icon next to them.
6. Tap Beam.
7. When the Beam Status dialog box appears, point the IR port directly at the IR
port of the receiving handheld.
8. Wait for the Beam Status dialog box to indicate that the transfer is complete
before you continue working on your handheld.
To receive beamed information:
1. Turn on your handheld.
2. Point the IR port directly at the IR port of the transmitting handheld to open the
Beam dialog box.
3. Select a category fo r the incoming inform ation, create a new category, or leave
the inform ation unfiled.
4. Tap Yes.
31
Page 44

Chapter 3 Navigating and Entering Data
DRAFT Palm, Inc. Confidential
Using your computer keyboard
If you have a lot of data to enter, or prefer to use the computer keyboard, you can
use Palm Desktop software or any supported personal inf ormation manager (PIM)
to enter information. Y ou can then perform a HotSync operation to synchronize the
information on your computer with the information on your handhel d . Ma ny of
the applications that came with your handheld are also avail able in Palm Desktop
software and in most PIMs, so you don’t need to learn different applications. For
more information on entering data on your computer, refer to the online Help in
Palm Desktop software, the Quick Tour in Palm Desktop software (for Windows
users), and the Palm™ Desktop software Sof tware for the Macintosh User’s Guide
on the Palm Desktop software CD-ROM.
Importing data
If you have data stored in computer applications such as spreadsheets and
databases, or if you want to import data from another handheld, you can transfer
the data to your handheld without having to enter it manually. Save the data in one
of the file formats in the following list, import it into Palm Desktop software, and
then perform a HotSync operation to transfer the data to your handheld.
Importing data from a Windows computer
Palm Desktop software can import data in the following file formats:
■ Comma delimited (.csv, .txt): Address Book and Memo Pad only
■ Tab delimited (.tab, .tsv, .txt): Address Book and Memo Pad only
■ CSV (Lotus Organizer 2.x/97 Mapping): Address Book only
■ vCal (.vcs): Date Book only
■ vCard (.vcf): Address Book only
■ Date Book archive (.dba)
■ Address Book archive (.aba)
■ To Do List archive (.tda)
■ Memo Pad archive (.mpa)
Archive formats can be used only with Palm Desktop softwar e. Use the ar chive file
formats to share information with other people who use a Palm OS handheld or to
create a copy of your important Palm Desktop information.
To import data from a Windows computer:
1. Open Palm Desktop software.
32
2. Click th e application into which you want to import data.
Page 45

Importing data
DRAFT Palm, Inc. Confidential
3. If you are importing records that contain a field with category names, do the
following:
Select All in the Category box.
Be sure that the same categories that appear in the imported file also exist in the
application. If the categories do not exist, create them now; otherwise, the
records are imported into the Unfiled category.
4. From the File menu, choose Import.
5. Select the file you want to import.
6. Click Open.
If you are importing a vCal or vCard file, skip to step 10. You do not have to
specify which fields correspond to the imported data.
7. To import data into the correct Palm Desktop fields, drag fields in the left
column so that they are opposite the corresponding imported fields on the right.
8. If you do not want to import a field, deselect the check box for that field.
9. Click OK.
The imported data is highlighted in the application.
10. To add the imported data to your handheld, perform a HotSync operation.
See Palm Desktop online Help for more information on importing and exporting
data.
Using File Link
The File Link feature enables you to import Address Book and Memo Pad
information to your handheld from a separate external file on your Windows
computer, such as a company phone list. You can configure the File Link feature to
check for changes to the external file when you perform a HotSync operation.
HotSync Manager stores the data in a separa te category in Palm Desktop softwar e
and on your handheld.
With File Link, you can import data stored in any of the following formats:
■ Comma-separated (*.csv)
■ Memo Pad archive (*.mpa)
■ Address Book archive (*.aba)
■ Text (*.txt)
For information on how to set up a file link, see the Palm Desktop online Help.
33
Page 46

Chapter 3 Navigating and Entering Data
DRAFT Palm, Inc. Confidential
Importing data from a Mac computer
Palm Desktop software can import data from any of the following applications
when you export the data in the appropriate file format:
■ Address Book Plus (text file)
■ Claris Organizer (Palm Desktop software can open these files directly).
■ ClarisWorks (Save under new name as ASCII text file).
■ DateBook Pro (text file)
■ DayMaker (text file)
■ Dynodex (t ext file)
■ FileMaker Pro (tab separated text file)
■ Meeting Maker (text file)
■ Newton running OS 1.0 with Newton Connection Kit:
Names, Date Book Calendar, and Notepad (text file)
■ Now Contact (text file)
■ Now Up-to-Date (text file)
■ QuickDex (text file)
■ TouchBase Pro (text file)
Palm Desktop software can also import data in the following file formats:
■ Tab delimited (.tab, .tsv, .txt)
■ vCal (.vcs): Data Book only
■ vCard (.vcf): Address Book only
To import data from a Mac compute r:
1. Open Palm Desktop software.
2. From the File menu, choose Import.
3. Select the file you want to import.
4. Click Import.
5. If you want to change the order of the fields you’re importing, point to a field,
wait for the cursor to change to a double arr ow, and then drag the field to a new
location.
6. If you do not want to import a field, click the arrow between the field names.
34
7. From the Fields pop-up menu, choose the appropriate field.
8. From the Delimiters pop-up menu, choose the appropriate delimiter.
Page 47

Importing data
DRAFT Palm, Inc. Confidential
9. Click OK.
10. To add the imported data to your handheld, perform a HotSync operation.
See Palm Desktop online Help for more information on importing and exporting
data.
35
Page 48

Chapter 3 Navigating and Entering Data
DRAFT Palm, Inc. Confidential
36
Page 49

This chapter explains how to open and switch between applications on your
DRAFT Palm, Inc. Confidential
handheld, how to change application settings so they are personalized to your
work methods, and how to categorize applications so you view them in related
groups.
Opening applications
You can use the Applications Launcher to open any application installed on your
handheld or on an expansion card. You can also open Date Book, Address Book,
VersaMail
handheld.
TM
CHAPTER 4
Working with Applications
, and Palm™ Web Browser with the application buttons on your
Home key opens
Application Launcher
Date Book
Address Book
In addition to providing a way for you to open applications, the Applications
Launcher displays the current time, battery level, and application category.
Wireless
E-mail
To open an application on your handheld:
1. Press Home .
Need
screenshot
37
Page 50

Chapter 4 Working with Applications
DRAFT Palm, Inc. Confidential
2. Tap the icon of the application that you want to open. If you have many
applications installed on your handheld, tap the scroll bar to see all your
applications.
Other ways to open applications
You can also open applications on your handheld in either of the following ways:
■ Press and hold Select on the navigator to open the Applications Launcher. Pr ess
Select on the navigator to insert the highlight. Press Up, Down, Right, and Left
on the navigator to highlight the icon of the application you want to open. Press
Select on the navigator to open the application.
■ In the Applications Launcher , type the first lette r of the applicati on’s name. The
Applications Launcher scrolls to the first application with a name that begins
with that letter and highlights the icon. You can open the icon by pressing the
Enter key.
Opening expansion card applications
When an expansion card is properly seated in the expansion card slot, your
handheld responds based on the contents of the card and the application that is
active when you insert the card. In some cases, the application on the card opens
automatically upon insertion, or if you insert a card containing data from the
current application, the application displays the data on the card. In other cases,
the Applications Launcher switches to the card, and displays its contents, and the
pick list in the upper-right corner of the screen displays the name of the card.
To open an application on an expansion card:
■ Select the ico n of the application that you want to op en.
Switching between applications
When working with any application, press Home or press an application
button on your handheld to switch to another application. Your handheld
automatically saves your work in the curr ent application and d isplays it when you
return to that application.
Need
screenshot
38
Page 51

Categorizing applications
DRAFT Palm, Inc. Confidential
When you use an expansion card, your handheld creates and displays a new
category that matches the name of the expansion card. You can easily switch
between applications installed on your handheld and on the expansion card.
To switch to an expansion card:
1. Tap the pick list in the upper-right corner.
TIP When the highlight in the Applications Launcher is not active, you can also
press and hold Select on the navigat or to open the category pick list.
2. Select the category item that matches the name of the expansion card.
Need
screenshot
Categorizing applications
The category feature enables you to manage the number of application icons that
appear onscreen in the Applications Launcher. You can assign an application to a
category and then display a single category or all your applications.
By default, your handheld includes system-defined categories, such as All and
Unfiled, and user-defined categories, such as Games, Main, and System.
You cannot modify the system-defined categories, but you c an rename and delete
the user-defined categories. In addition, you can create your own user-defined
categories. You can have a maximum of 15 user-defined categories.
When you have an expansion card properly seated in the expansion card slot, the
last item in the category pick list becomes the name of the expansion card. You
cannot otherwise categorize applications that reside on an expansion card.
To categorize an application:
1. Press Home .
2. Press Command Stroke + Y.
Alternately, press Function + Menu , and then select Category on the
App menu.
39
Page 52

Chapter 4 Working with Applications
DRAFT Palm, Inc. Confidential
3. Tap the pick list next to each application to select a category.
TIP To create a new category, select Edit Categories from the pick list. Tap
New, enter the cate gory name, and the n press Function +
OK to add the category.
4. Press Function + Enter , or tap Done.
To display applications by category :
1. Press Home .
Need
screenshot
Enter , or tap
2. Do one of the following:
– Press Home repeatedly to cycle through all your categories.
– Tap the pick list in the upper-right corner of the screen, and select the
category you want to display.
– When the highlight in the Applications Launcher is not active, press and
hold Select on the navigator to open the category list, press Up or Down on
the navigator to highlight a category, and then press Select on the navigator
to display that category.
Changing the Applications La uncher display
By default, the Applications Launcher displays each application as an icon. As an
alternative, you can choose to show a list of applications. You can also choose to
view the same category of applications each time you open the Applications
Launcher.
To change the Applicat ions Launcher disp lay:
1. Press Home .
2. Press Command Stroke + R.
40
Alternately, press Function + Menu , select Options, and then select
Preferences.
3. Tap the View By pick list and select List.
Page 53

Copying applications to or from an expansion card
DRAFT Palm, Inc. Confidential
4. Press Function + Enter , or tap OK.
Need
screenshot
To open the Applic ations L auncher to the last opened c ategory:
1. Press Home .
2. Press Command Stroke + R.
Alternately, press Function + Menu , select Options, and then select
Preferences.
3. Tap the Remember Last Category check box to select it.
4. Press Function + Enter , or tap OK.
Copying applications to or from an expansion card
You can copy applications from your handheld to an expansion card, or from an
expansion card to your handheld.
To copy an application to an expansion card:
1. Press Home .
2. Press Command Stroke + C.
Alternately, press Function + Menu , select Copy on the App menu.
3. Select Handheld from the Copy From pick list.
4. Select the card name from the Copy To pick list.
The Copy To pick list appears only if there are multiple cards available.
5. Tap an application to copy.
6. Tap Copy.
41
Page 54

Chapter 4 Working with Applications
DRAFT Palm, Inc. Confidential
7. Press Function + Enter , or tap Done.
You can install applications to a card that is seated in the expansion card slot
during a HotSync
later in this chapter for details.
NOTE If you view your applications on the card using a Card Reader on your
Windows or Mac computer , the actual file names may dif fer from those display ed in
the Applications Launcher.
To copy an application from an expansion card:
1. Press Home .
2. Press Command Stroke + C.
Alternately, press Function + Menu , select Copy on the App menu.
®
operation; see “Installing files and add-on applications”
3. Select the card name from the Copy From pick list.
4. Select Handheld from the Copy To pick list.
5. Tap an application to copy.
6. Tap Copy.
7. Press Function + Enter , or tap Done.
You can also beam applications from expansion cards to your handheld.
See “Using elements of the handheld interface” in Chapter 3 for details.
Selecting copy settings
When using the copy feature, you can set the following:
■ How applications are sorted and listed
■ Whether to copy only the application or both the application and its data files
To select copy settings:
1. Press Home .
2. Press Command Stroke + C.
42
Alternately, press Function + Menu , select Copy on the App menu.
Page 55

Using menus
DRAFT Palm, Inc. Confidential
3. Tap Settings.
4. Select Name or Size from the Sort By pick list.
5. Tap the Copy Application Only check box to select it, if you want to copy only
the application files. Leave it deselect ed if you want to copy both the application
file and its associated data files.
6. Press Function + Enter , or tap OK.
NOTE The Sort By setting is in effect each time you use the copy feature. Each time
you want to copy an application only, you must select the Copy Applications Only
check box.
Using menus
Menus on your handheld are easy to use. Once you have mastered them in one
application, you can use them the same way in all other applications.
The menus of each application are illustrated in the chapter that discusses that
application.
To open the menu bar:
1. Open an application (such as Memo Pad).
2. Do one of the following:
– Press Function + Menu .
43
Page 56

Chapter 4 Working with Applications
T
DRAFT Palm, Inc. Confidential
– Tap the inverted title area at the top of the screen.
ap the title area
Press
Function
Press
Menu
In this example, three men us ar e av ailable : Recor d, Edi t, and Option s. The Recor d
menu is selected and contain s the commands New Memo, Delete Memo, and Beam
Memo.
Choosing a men u
The menus and menu commands that ar e available depend on the application that
is currently open. Also, the menus and menu commands va ry depending on which
part of the application you’re currently using. For example, in Memo Pad the
menus are different for the Memo list screen and the Memo record screen.
To select a menu command with the s tylus:
1. Tap the menu bar for an application.
2. Tap the menu that contains the command you want to use.
3. Tap the command you want to use.
TIP After you open the menu bar, you can also press Right and L eft on the navig ator
to select a menu, press Down on the navigat or to select the command you want to
use, and then press Select on the navigator to run the command.
44
Menu commands
Most menu commands have an equivalent Command stroke, which is similar to
the keyboard shortcuts used to execute c ommands on computers. For information
on using menu commands “ Using menu commands and the command toolbar” in
the next section.
Page 57

Using menu commands and the command toolbar
DRAFT Palm, Inc. Confidential
Using menu commands and the command toolbar
By using the menu commands you can access many functions directly from the
keyboard without tapping. You can also view the 802.1 1b radio signal strength and
access the Wi-Fi preferences screen.
Using menu c ommands
Most menu commands have an equivalent Command stroke, which is similar to
the keyboard shortcuts used to execute commands on computers. The command
letters appear to the right of the command names. For example, to choose Select All
in the Edit menu, press Command stroke , and type the letter s.
Menu commandsMenu commands
Command letters
Using the co mmand to olbar
The command toolbar displays the W i-Fi icon and the 802.1 1b radio signal stre ngth
indicator. The command toolbar also displays context-sensitive menu commands
for the current screen. For example, if text is selected the menu icons displayed
may be Undo, Cut, Copy, and Paste. Tap an icon to select the command.
To use menu commands:
1. Press Command stroke .
The Command toolbar opens at the bottom of the screen. The Command toolbar
indicates that you are in Command mode.
Need
screenshot
CutUndo Copy Paste Beam Delete
2. Tap an icon or type the command letter immediately to choose the menu
command.
Command mode is active only for a short time.
45
Page 58

Chapter 4 Working with Applications
DRAFT Palm, Inc. Confidential
To access Wi-Fi status:
1. Press Command stroke .
2. Tap the Wi-Fi icon .
From the Wi-Fi Status dialog box, you can view the network connection and
signal strength. You can also tap to access Wi-Fi and VPN prefer ences. See “Wi-
Fi preferences” in Chapter 18 and see “VPN preferences” in Chapter 18 for
more information on preferences.
Choosing application preferences
Y ou can set options that affect an entire applica tion in the application’s Pr eferences
dialog box.
To change preferences fo r an application:
1. Open an application.
2. Press Command Stroke + R.
– Alternately, press Function + Menu , and then select Preferences on
the Options menu.
NOTE Not all applications have a Preferences command.
3. Make changes to the settings.
4. Press Function + Enter , or tap OK.
Enabling and disabling Palm On-screen Writing
The Edit menu also has an option Enable W ri ting and Disable Writing that enables
or disables Palm On-scr een Writing. Enabling Palm On-screen Writing allows you
to use the full screen to write Graffiti
characters and Palm On-scre en Writing, see “Using Graffiti writing to enter data”
in Chapter 3.
TM
characters. For a description of Graffiti
46
TIP On-screen writing can be turned on and off from the preferences screen. For
more information, see “On-Screen Writing preferences” in Chapter 18.
Page 59

To turn on or off Palm On-screen Writing wr iting:
DRAFT Palm, Inc. Confidential
■ From the Edit menu, tap Enable Writing or Disable Writing.
Performing common tasks
The tasks described in this section use the term records to refer to an individual item
in any of the applications: a single Date Book event, Addr ess Book entry , To Do List
item, Memo Pad memo, Note Pad note, or Expense item.
Creating rec ords
Performing common tasks
Tap here
Editing records
You can use the following procedur e to cr eate a new recor d in Date Book, Addre ss
Book, To Do List, Memo Pad, Note Pad, and Expense.
To create a rec ord:
1. Select the application in which you want to create a record.
2. Tap New.
3. In Date Book only: Select start and end times for your appointment, and press
Function + Enter
4. Enter text for the record.
5. (Optional) T ap Detail s to select attributes for the record. (In Note Pad the Details
command is located on the Options menu.)
6. In Address Book, Note Pad, and Memo Pad only: Press Function
+ Enter
, or tap Done.
There’s no need to save the record because your handheld saves it automatically.
After you create a record, you can change, delete, or enter new text at any time.
Two screen features tell you when your handheld is in editing mode:
, or tap OK.
■ A blinking cursor
47
Page 60

Chapter 4 Working with Applications
DRAFT Palm, Inc. Confidential
■ One or more dotted edit lines
Edit line
NOTE In Note Pad you can write anywhere on the screen. Therefore, you will
not see an edit line or blinking cursor unless the cursor is in the title line.
Entering text
For information on how to enter text using the keyboard on your handheld or the
keyboard attached to your computer, see Chapter 3. For information on entering
text in Note Pad, see Chapter 11.
Blinking cursor
Using the Edit menu
The Edit menu is available with any screen whe re you enter or edit text. In general,
commands available in the Edit m enu apply to text that you select in an application.
To select text in an application :
1. Tap the beginning of the text that you want to select.
2. Drag the stylus over the text to highlight it (in yellow).
NOTE You can also double-tap to se lect a word, or triple-tap to se lect a line of
text. Y ou can also drag across the text to select additiona l words, or drag down
to select a group of lines.
The following commands may appear in an Edit menu:
Undo
Cut
Reverses the action of the last ed it command. For example, if you
used Cut to remove text, Undo restor es the text you removed. Undo
also reverses deletions you made using the backspace.
Removes the selected text and stores it temporarily in the memory
of your handheld. You can paste the text you cut into another area
of the current application or into a different application.
48
Copy
Copies the selected text and stores it temporarily in the memory of
your handheld. You can paste the copied text into another area of
the current application or into a different application.
Page 61

Performing common tasks
DRAFT Palm, Inc. Confidential
Paste
Select All
Keyboard
Deleting records
To delete a record using the menu command:
1. Select the record you want to delete.
2. Press Command Stroke + D.
To delete a record using the Menu:
1. Select the record you want to delete.
2. Press Function + Menu .
3. Select Record, and then select one of the following Delete commands:
Inserts the cut or copied text at the selected point in a record. The
text you paste replaces any selected text. If you did not previously
cut or copy text, Paste does nothing.
Selects all the text in the current recor d or scr een. This enables you
to cut or copy all of the text and paste it elsewhere.
Opens the onscreen keyboard. After you finish with the onscreen
keyboard, press Function + Enter
, or tap Done.
Date Book: Delete Event
Address Book: Delete Address
To Do List: Delete Item
Note Pad: Delete Note
Memo Pad: Delete Memo
Expense: Delete Item
A confirmation dialog box appears. If you want to save a copy of the deleted
item to an archive file in Palm™ Desk top software, be sur e that the check box is
selected. If you don’t want to save a copy, tap the check box to deselect it.
4. Press Function + Enter , or tap OK.
If you choose to save a copy of the selected it em, your handhe ld transf ers it to the
archive file on your desktop the next time you perf orm a HotSync operation. (The
archive option is not available in Note Pad.)
Other ways to delete records
You can also delete records in the following ways:
■ Delete the text of the record.
■ In Date Book, Address Book, T o Do List, and Memo Pad, open the Details dial og
box for the record, tap Delete, and then press Function + Enter
, or
tap OK.
49
Page 62

Chapter 4 Working with Applications
DRAFT Palm, Inc. Confidential
NOTE When deleting a repeating event in Date Book, you can choose to delete
the current repeating event, current and future events, or all instances of that
event.
■ In Note Pad, open the note you want to delete, and then tap Delete.
Purging records
Over time, as you use Date Book, To Do List, and Expense, you’ll accumulate
records that have outlived their usefulness. For example, events that occurred
months ago remain in the Date Book, and To Do List items that you marked as
completed remain in the list, as do Expense items.
All these outdated records take up memory on your handheld, so it’s a good idea
to remove them by using Purge. If you think Date Book or To Do List records might
prove useful later, you can purge them from your handheld and save them in an
archive file on your computer.
Purging is not available in Address Book, Note Pad, or Memo Pad; you must delete
outdated records manually from these applications.
To purge records:
1. Open the application.
2. Press Command Stroke + E.
Alternately, press Function + Menu , and then select Purge on the
Record menu.
A confirmation dialog box appears.
Date Book: Tap the pick list and select how old a record must be to be purged.
Purge deletes repeating events if the last of the series ends before the date that
you purge records.
Date Book, To Do List: If you want to save a copy of the purged records to an
archive file on your desktop, be sure that the check box is select ed. If you don’t
want to save a copy, tap the check box to deselect it.
Expense: Select the category you want to pur ge. All data in the selected cat egory
will be purged and there is no archive option.
3. Press Function + Enter , or tap OK or Done.
If you chose to save a copy of the purged recor ds, your handheld transfers them to
an archive file on your desktop the next time you perform a HotSync operation.
NOTE Purging does not happen automatically. You must select the command to
make it happen.
Categorizing records
You can categorize records in the Addr ess Book, To Do List, Note Pad, Memo Pad,
and Expense applications so that they are grouped logically and ar e easy to review .
50
Page 63

Performing common tasks
DRAFT Palm, Inc. Confidential
When you create a record, your handheld automatically places it in the category
that is currently displayed. If the category is All, your handheld assigns it to the
Unfiled category. You ca n leave an entry as Unfiled or assi gn it to a category at any
time.
By default, your handheld includes system-defined categories, such as All and
Unfiled, and user-defined categories, such as Business and Personal.
You cannot modify the system-defined categories, but you c an rename and delete
the user-defined categories. In addition, you can create your own user-defined
categories. You can have a maximum of 15 user-defined categories in each
application.
When you have an expansion card properly seated in the expansion card slot, the
last item in the category pick list is the name of the expansion card. You cannot
otherwise categorize applications that reside on an expansion card.
Address Book contains the QuickList user-def ined category , in which you can store
the names, addresses, and phone numbers you mi ght need in emergencies ( doctor ,
fire department, lawyer, and so on).
Expense contains two user-defined categories, New York and Paris, to show how
you might sort your expenses according to different business trips.
The illustrations in this section come from Address Book, but you can use these
procedures in all the applications in which categories are available.
To move a record into a category:
1. Select the record you want to categorize.
2. In Address Book only: Tap Edit.
3. Tap Details.
51
Page 64

Chapter 4 Working with Applications
T
DRAFT Palm, Inc. Confidential
4. Tap the Category pick list to display the list of available categories.
5. Select the category for the record.
6. Press Function + Enter , or tap OK.
NOTE In Address Book, Note Pa d, and Memo Pad you can select the category
name in the upper-right corner of the screen to assign the item to a different
category.
To display a category of records:
1. Tap the category pick list in the upper-right corner of the list screen.
ap here
52
NOTE In the Date Book Agenda view, the pic k list is in the upper right of the To
Do list.
2. Select the category you want to view.
The list screen now displays only the records assigned to that category.
TIP Pressing an application button on your handheld scrolls through all the
categories of that application except for Unfile d. This feature is not available in
Date Book.
Page 65

Performing common tasks
T
DRAFT Palm, Inc. Confidential
To define a new category:
1. Tap the category pick list in the upper-right corner of the screen or list.
ap here
2. Select Edit Categories.
3. Tap New.
4. Enter the name of the new category , and then press Function + Enter , or
tap OK.
5. Press Function + Enter , or tap OK.
You can assign any of your records to the new category.
To rename a category:
1. Tap the category pick list in the upper-right corner of the screen or list.
2. Select Edit Categories.
53
Page 66

Chapter 4 Working with Applications
DRAFT Palm, Inc. Confidential
3. Select the category that you want to rename, and then tap Rename.
4. Enter the new name for the category, and then press Function + Enter ,
or tap OK.
5. Press Function + Enter , or tap OK.
TIP Y ou can group the re cords in two or more categor ies into one category by
giving the categories the same name. For example, if you change the name of
the Personal category to Business, all records formerly in the Personal
category appear in the Business category.
Finding information
Your handheld offers several ways to find information quickly:
■ All applications that reside on your handheld: Find locates any text that you
specify, always starting with the current application. However, Find does not
search through applications on expansion cards.
■ Date Book, To Do List, Memo Pad: Phone Lookup displays the Address list
screen and enables you to add to a record the information that appears in this
list.
■ Address Book: The Look Up line enables you to scroll immediately to a name
when you enter the first letters of that name.
■ Expense: Lookup displays the names in your Address Book that have data in the
Company field. You can add these names to a list of attendees associated with
an Expens e record.
54
Looking up Addr ess Book r ecords
In Address Book, you can use the Look Up line with the stylus or the navigator to
look up and quickly scroll to any of your Address Book entries.
Page 67

Performing common tasks
DRAFT Palm, Inc. Confidential
To look up an Address Book rec ord with the stylu s:
1. From the Address list screen, enter the first letter of the name you want to find.
Look Up line
The list scrolls to the first ent ry that begi ns with that lett er. If you write another
letter, the list scrolls to the first entry that starts with those two letters. For
example, writing an s scrolls to “Sands,” and writing sm scrolls further to
“Smith.” If you sort the list by company name, the Look Up feature scrolls to the
first letter of the company name.
2. Tap the record to view its contents.
To look up an Address Book rec ord with the navigato r:
1. From the Address List screen, press Right on the navigator to display the
navigator Quick Look Up line.
2. Press Up or Down on the navigator to select the first letter of the name you want
to find.
The list scrolls to the first entry that begins with that letter.
3. Press Right on the navigator to move to the next letter box.
Quick Look Up line
The Quick Look Up line displays only letters that are a possible match for that
position.
If only one match is possible for a particular position, the highlight jumps to the
next position.
55
Page 68

Chapter 4 Working with Applications
DRAFT Palm, Inc. Confidential
4. Press Up or Down on the navigator to select the next letter of the name you want
to find.
The list then scrolls to the first entry that starts with those two letters. For
example, selecting s scrolls to “Sands,” and selecting sm scrolls further to
“Smith.” If you sort the list by company name, the Quick Look Up feature
scrolls to the matches for the company name.
5. Repeat steps 3 and 4 until the entry you want appears in the list.
6. Press Select on the navigator to highlight the record you want.
7. Press Select on the navigator to view the contents of the selected record.
TIP If only one match is possible for the letters you selected, the contents of
the record displays automatically.
Using Find
You can use Find to locate any text that you specify, in any application that resides
on your handheld. Find does not search applications that reside on an expansion
card.
To use Find:
1. Press Function + Find .
TIP If you select text in an application before you tap Find, the selected text
automatically appears in the Find dialog box.
2. Enter the text that you want to find.
Find is not case-sensitive. For example, sear ching for the name “davidson” also
finds “Davidson.”
Find locates any words that begin with the text you enter. For example,
searching for “plane” finds “planet” but not “airplane.”
3. Press Function + Enter , or tap OK.
Find searches for the text in all records and all notes.
56
Page 69

Performing common tasks
DRAFT Palm, Inc. Confidential
As your handheld searches for the text, you can tap Stop at any time. You may
want to do this if the entry you want appears before your handheld finishes the
search. To continue the search after you tap Stop, tap Find More.
4. Tap the text that you want to review.
Using Phone Loo kup
Phone Lookup displays the Address list screen and enables you to add the
information that appears in this list to a record.
To use Phone Lookup:
1. Display the record in which you want to insert a phone number. The record can
be in Date Book, To Do List, Memo Pad, or any other application that takes
advantage of this feature.
2. Press Command Stroke + L.
Alternately, press Function + Menu and then select Phone Lookup on
the Options menu.
3. Begin to spell the last name of the name you want to find.
The list scrolls to the first record in the list that starts with the first letter you
enter . Continue to spell the name you’r e looking for, or when you see the name,
tap it.
4. Tap Add.
The name you selected, along with the other information associated with it, is
pasted into the record you selected in step 1.
Looking up nam es to add to Expense records
In Expense, Lookup displays the names in your Address Book t hat have data in the
Company field. You can add these names to a list of attendees associated with an
Expense record.
57
Page 70

Chapter 4 Working with Applications
DRAFT Palm, Inc. Confidential
To add names to a n Expense record:
1. Tap the Expense record to which you want to add names.
2. Tap Details.
3. Tap Who.
4. Tap Lookup.
The Attendees Lookup screen d isplays all the names i n your Address Book that
have data in the Company field.
5. Select the name you want to add, and then tap Add.
The name appears in the Attendees screen.
6. Repeat steps 4 and 5 to add more names.
7. Press Function + Enter , or tap Done.
8. Press Function + Enter , or tap OK.
Sorting lists of records
Y ou can s ort lists of r ecords in vario us ways, depending on the applic ation. Sorting
is available in applications that have list screens: Address Book, Note Pad, To Do
List, Memo Pad, and Expense.
NOTE You can also assign records to ca tegories. S ee “ Cat ego ri zin g rec ords ” earlier
in this chapter.
Tap here
58
Page 71

Performing common tasks
DRAFT Palm, Inc. Confidential
To sort records in Address Book, Note Pad, and Memo Pad:
1. Open the application to display the list screen.
2. Press Command Stroke + R.
Alternately, press Function + Menu , and then select Preferences on the
Options menu.
Address Book
Note Pad
Memo Pad
3. Do one of the following:
Address Book: Tap the setting you want.
Note Pad: Tap the Sort by pick list and select Alphabetic, Date, or Manual.
Memo Pad: Tap the Sort by pick list and select Alphabetic or Manual.
4. Press Function + Enter , or tap OK.
To sort the Note Pad and Memo list manually, tap and drag a note or memo to
a new location in the list.
T o make the list appear in Palm Desktop software as you manually sorted it on
your handheld, open the application in Palm Desktop software and click Sort
by. Then select Order on Handheld.
To sort records in To Do List and Expense:
1. Open the application to display the list screen.
2. Tap Show.
3. Tap the Sort by pick list and select an option.
4. Press Function + Enter , or tap OK.
59
Page 72

Chapter 4 Working with Applications
DRAFT Palm, Inc. Confidential
Attaching notes
In Address Book, Date Book, To Do List, and Expense, you can attach a note to a
record. A note can be up to several thousand characters long. For example, for an
appointment in Date Book, you can attach a note with directions to the location.
To attach a note to a record:
1. Display the entry to which you want to add a note.
To display an entry, tap it or press Up or Down on the navigator to highlight it,
and then press Select on the navigator.
2. In Address Book only: Tap Edit.
3. Tap Details.
4. Tap Note.
5. Enter your note.
6. Press Function + Enter , or tap Done.
A small note icon appears at the right side of any item that has a note.
Note icon
To review or edit a note:
■ Tap the Note icon .
TIP In Date Book, you can also select the event that contains the note, press Select
on the navigator to open the note, and then press Select on the navigator again to
close the note .
To delete a note:
1. Tap the Note icon .
2. Tap Delete.
3. Press Function + Enter , or tap Yes.
60
Page 73

Choosing font s
DRAFT Palm, Inc. Confidential
Performing common tasks
In many applications, you can change the font style to make text easier to read. You
can choose small, small bold, large, or large bold fonts in each application that
enables you to change font style.
Small font
Large font
Small bold font
Large bold font
To change the font style:
1. Open an application.
2. Press Command Stroke + F.
Alternately, press Function + Menu , and then select Font on the
Options menu.
3. Tap the font style you want to use.
Tap here for
small font
4. Press Function + Enter , or tap OK.
Tap here for small bold font
Tap here for large bold font
Tap here for large font
61
Page 74

Chapter 4 Working with Applications
DRAFT Palm, Inc. Confidential
Receiving alerts
You can receive alerts on your handheld and in Palm Desktop software.
Receiving alerts on your handhel d
When you use certain application settings, your handheld can alert you to any of
the following:
■ An appointment set in Date Book
■ A note created in Note Pad
■ An alarm set in World Clock
When an alert occurs, your handheld displays a reminder message. If you tap
Snooze in response to an alert message, your handheld reminds you of the item
again in five minutes. The Reminder screen displays alerts that await attention.
To respond to al erts, do one of the following:
■ Select an item’s check box to clear the item.
■ Tap an item (either the icon or the text description) to open the application
where the alarm was set. The application opens to the entry associated with the
alarm.
■ Press Function + Enter , or tap Done to close the reminder li st and return
to the current screen. An attention i ndicator blinks in the upper-left corner of the
screen; tap it to view the alert list again.
■ Tap Snooze to see the list again in five minutes.
If you tap Done or Snooze and view the reminder list later, the current time is
displayed in the Reminder bar and the original alert time is displayed with each
list item .
■ Tap Clear All to dismiss all alerts in the list.
Receiving alerts from Palm Desktop software
You can also set an option to receive Date Book event alerts from Palm Desktop
software. The feature is disabled by default, so you must enable it within Palm
Desktop software.
62
Page 75

To enable an event alert from Palm Desktop software:
DRAFT Palm, Inc. Confidential
1. Double-click the Palm Desktop icon.
2. From the Tools menu, select Options, and then select Alarms.
3. Set Alarm Configuration options, either Always Available or Available only
when the Palm Desktop is running.
4. (Optional) To hear an alert sound as well as receive an al ert mes sage, select the
check box Play audible notification with alarm dialog.
5. Click OK.
Hiding or masking private records
You can use the Security preferences to s et a password and se lect whether to mask
your private records or hide them completely. See “Security preferences” in
Chapter 18 for de tails.
Installing and removing application s
Installing and removing applica tion s
This section explains how to install and remove applications and other files on
your handheld or on an expansion card, and how to remove Palm Desktop
software from your computer.
Installing files and add-on applications
Your handheld comes with applications installed and ready to use, but you can
also install additional applications, such as games and other software, on your
handheld or on a card that is seated in the expansion card slot. Applications or
games that you install on your handheld reside in RAM memory, and you can
delete them at any time. Y ou can also install other files such as photos or MP3 audio
files. Both applications and files are easy to install during a HotSync operation.
There are a variety of third-party applications available for your handheld. To
learn more about these applications, go to the web site:
NOTE Palm works with developers of third-party add-on applications to ensure the
compatibility of these applications with your new Palm handheld. Some third-party
applications, however, may not have been upgraded to be compatible with your new
Palm handheld.
If you suspect that a third-party application is adversely affecting the operation of
your handheld, contact the developer of the application. In addition, Palm, Inc. has
information about some applications' compatibility with your handheld. To find this
information, do one of the following:
www.palm.com.
■ Go to www.palm.com/support/. Click the link for information about your
handheld, and then find the information on compatibility of third-party
applications.
63
Page 76

Chapter 4 Working with Applications
DRAFT Palm, Inc. Confidential
■ Read the readme file for your handheld. After you install Palm Desktop software
on your computer , open the Palm folder . The readme file is located in the Helpnote
folder.
Installing applications and files on a Windows computer
Palm Quick Install makes it easy to install applications and f iles during a HotSync
operation. Depending on the file type, Palm Quick Install determines whether to
install the files on your handheld or on an expansion card.
With Palm Quick Install you can install the following types of files:
■ Palm files types, including PRC, PDB, PQA, PNC, and SCP
■ ZIP files
■ Image files, including BMP, JPEG, TIFF, and GIF
■ Audio files, including MP3, WAV, AAC, and RMJ
■ Video files, including MP4, MPG, and AV I
You can use any of the following methods to install applications and files with
Palm Quick Install:
■ Drag and drop files onto the Palm Quick Install icon on the Windows desktop.
■ Drag and drop files onto the Palm Quick Install window.
■ Use the commands or buttons in the Palm Quick Install window.
The procedures that f ollow explain how to install appli cations and files using each
of these methods.
To drag and drop applications or files ont o the Palm Quick Install icon:
1. Copy or download the application(s) or file(s) you want to install onto your
computer.
2. From My Computer or Windows Explorer, select the file(s) or folder that you
want to install.
3. Drag and drop the file(s) or folder on to the Palm Quick Install icon on the
Windows desk top.
Palm Quick Install displays a status dialog box that shows whether the files will
be installed on your handheld or an expansion card.
64
4. Click OK.
If the selected files are compatible, the files are placed in the Handheld or
Expansion Card queue based on the file extension.
Page 77

Installing and removing applica tion s
DRAFT Palm, Inc. Confidential
If the files are incompatible, a message asks if you want to add the files to the
queue. Click Yes to add the files to the expansion card queue.
5. Perform a HotSync operation to install the files.
To drag and drop applications or files ont o the Palm Quick Install window:
1. Copy or download the application(s) or file(s) you want to install onto your
computer.
2. Double click the Palm Quick Install icon on the Windows desktop.
Handheld queue
Expansion card queue
3. From My Computer or Windows Explorer, select the file(s) or folder that you
want to install.
4. Drag and drop the file(s) or folder on to the handheld or expansion car d queue.
If you drag an incompatible file to the handheld queue, a status dialog box asks
if you want to install the file on the expansion car d. Click Yes to place the file in
the queue.
5. Perform a HotSync operation to install the files.
65
Page 78

Chapter 4 Working with Applications
DRAFT Palm, Inc. Confidential
To install add-on software on your handheld using a Windows c omputer:
1. Copy or download the application(s) or file(s) you want to install onto your
computer.
2. Double click the Palm Quick Install icon on the Windows desktop.
Add button
User
drop-down
list
3. In the User drop-down list, selec t the name that corresponds to your handheld.
4. Click Add.
TIP To install a folder, open the File menu and select Add Folder.
5. Select the application(s) or file(s) that you want to install.
6. Click OK.
If you selected any files that are incompatible with the handheld, a status dialog
box asks if you want to install the file on the expans ion card. Click Yes to place
the file in the queue.
7. If you need to change the destination of the application you are installi ng, drag
the files to move applications between the handheld and expansion card queue.
8. Perform a HotSync operation to install the selected application(s).
See “Performing cradle/cable HotSync operations” in Chapter 17 for details .
NOTE Files that remain in the list af ter you perform a HotSync opera tion were
not installed. This can happen if the file type was not recognized during the
HotSync operation. Expansion c ards may hold application s that use files othe r
than the Palm™ application files. For your handheld to recognize such a file,
you must first launch the associated application at least once.
66
Page 79

Palm Quick Install Tips
DRAFT Palm, Inc. Confidential
■ Audio and video files are automatically placed in the expansion card queue.
■ When you drag and drop a folder that has subfolders, Palm Quick Install only
looks at the files one folder below the selected folder.
■ To install files in a different location, start Palm Quick Install and dra g the f iles
to a different queue.
■ You can also access the Palm Quick Install window by c licking Install on the
Palm Desktop launch bar.
Installing applications and files on a Mac computer
The Install Tool makes it easy to install applications and files during a HotSync
operation. You can specify whether to install the files on your handheld or on an
expansion card.
You can use the Install Tool to install the following types of files:
■ Palm files types, including PRC, PDB, PQA, PNC, and SCP
Installing and removing applica tion s
■ Image files, including BMP, JPEG, TIFF, and GIF
■ Audio files, including MP3, Real Audio RA8, and Gecko
■ Video files
To install add-on software on your handheld using a Mac computer :
1. On your Mac computer, copy or download the application you want to install
into the Add-on folder in your Palm folder.
2. Double-click the HotSync Manager icon in the Palm folder.
3. From the HotSync menu, select Install Handheld Files.
67
Page 80

Chapter 4 Working with Applications
DRAFT Palm, Inc. Confidential
4. From the User pop-up menu, select the name that corresponds to your
handheld.
5. Click Add To List.
68
If the file you want to install is not listed in the dialog box, go to the folder to
which you copied the file. Most handheld application files have the extension
PRC, PDB, PQA, or SCP.
6. Select the application(s) you want to install.
7. Click Add File to add the selected application to the Install Handheld Files list.
TIP You can also drag files or folders of files to the list in the Inst all Handheld
Files dialog box. The files are copied to the Files To Install folder.
Page 81

Installing and removing applica tion s
DRAFT Palm, Inc. Confidential
8. If you need to change the dest ination of the applica tion you are insta lling, click
Change Destination in the Install Handheld Files window, and then use the
arrows to move applications between your handheld and an expansion card.
9. Click OK to close the Change Destination window.
10. Close the Install Handheld Files window.
11. Perform a HotSync operation to install the selected application(s) on your
handheld. See “Performing cradle/cable HotSync operations” in Chapter 17 for
details.
NOTE Files that remain in the list af ter you perform a HotSync opera tion were
not installed. This can happen if the file type was not recognized during the
HotSync operation. Expansion c ards may hold application s that use files othe r
than the Palm application f iles. F or your ha ndheld to reco gnize s uch a file, you
must first launch the associated application at least once.
Removing applications
If you run out of memory or decide that you no longer need an application you
installed, you can remove applications from your handheld or from an expansion
card. From your handheld, you can r emove only add-on applications, patches, and
extensions that you install; you cannot remove the applications that reside in the
ROM portion of your handheld.
To remove an add-on application:
1. Tap the Home icon .
2. Tap the Menu icon .
3. Select Delete on the App menu.
4. Tap the Delete From pick list and select either Handheld or Card. If you want
to delete applications from a card, the card must be seated in the expansion
card slot.
69
Page 82

Chapter 4 Working with Applications
DRAFT Palm, Inc. Confidential
5. Tap the application that you want to remove.
6. Tap Delete.
7. Tap Yes.
8. Tap Done.
Removing Palm Desktop software
If you no longer want to use Palm Desktop software, you can remove it from your
computer .
This process removes only the application files. The data in your Users folder
remains untouched.
NOTE You may need to modify the steps shown here to accommodate the version
of the operating system installed on your computer.
To remove Palm Desktop software from a Windows computer:
1. From the Windows Start menu, select Settings and then click Control Panel.
2. Double-click the Add/Remove Programs icon.
3. Click the Change or Remove Programs button.
4. Select Palm Desktop.
5. Click Change/Remove.
This process removes only the application files. The data in your Users folder
remains untouched.
6. Click Yes in the Confirm File Deletion box.
7. Click OK.
70
8. Click Close.
NOTE If you want to synchronize data with another personal information manager
(PIM) you need to install the HotS ync Ma nager from the Desktop S of tw are CD-R OM.
During the installation select the Custom option and then choose to install only
HotSync Manager.
Page 83

Installing and removing applica tion s
DRAFT Palm, Inc. Confidential
To remove Palm Desktop software from a Mac comput er:
1. Insert the Desktop Software CD-ROM in the CD-ROM drive on your computer .
2. Double-click the Desktop Software CD-ROM icon on your desktop.
3. Double-click the Palm Desktop Installer icon.
4. From the Easy Install screen, select Uninstall from the pop-up menu.
5. Select the software you want to remove.
6. Click Uninstall.
7. Select the folder that contains yo ur Palm Desktop software files.
8. Click Remove.
9. Restart your computer.
71
Page 84

Chapter 4 Working with Applications
DRAFT Palm, Inc. Confidential
72
Page 85

CHAPTER 5
DRAFT Palm, Inc. Confidential
Using Address Book
Address Book enables you to keep names, addresses, phone numbers, and
other information about your personal or business contacts. Use Address
Book to do the following:
■ Quickly look up or enter names, addresses, phone numbers, and other
information.
■ Enter up to five phone numbers (home, work, fax, mobile, and so on) or e-mail
addresses for each name.
■ Define which phone number appears in the Address list for each Address Book
entry.
■ Attach a note to each Address Book entry, in which you can enter additional
information about the entry.
■ Assign Address Book entries to categories so that you can organize and view
them in logical groups.
■ Create your own digital business card that you can beam using e-mail to other
devices with an infrared (IR) port.
NOTE You can encrypt your Address Book entries. For more information,
see “Encrypting your data” in Chapter 18.
To open Address Book:
■ Press the Address Book application button on the front panel of your
handheld. Address Book opens to display the list of all your records.
Address Book button
73
Page 86

Chapter 5 Using Address Book
DRAFT Palm, Inc. Confidential
TIP Press the Address Book application button repeatedly to cycle through the
categories in which you have records. You can also press and hold the Address Book
application button to instantly beam your business card t o another device with an
IR port. The receiving device must also have an application tha t can read the Address
Book data.
Creating an Address Book entry
A record in Address Book is called an entry. You can create entries on your
handheld, or you can use Palm™ Desktop software to create entries on your
computer and then transfer the entries to your handheld with your next HotSync
operation.
Palm Desktop software also has data import capabilities so that you can load
database files into Address Book on your handheld.
See “Importing data” in Chapter 3 and Palm Desktop online Help for more
information.
To create a new Ad dress Book entry:
1. Press the Address Book button on the front of your handheld to display the
Address list.
®
2. Tap New.
Cursor
at Last
name
Tap New
3. Enter the last name of the person you want to add to your Address Book.
The handheld automatically capitalizes the first letter of each field (except
numeric and e-mail fields). You do not have to use the CAPS key to capitalize
the first letter of the name.
4. Tap the First Name field.
TIP Pressing Tab moves the cursor to the next field.
74
5. Enter the first name of the person in the First Name field.
6. Enter the other information that you want to include in this entry.
Page 87

Selecting types of phone numbers
DRAFT Palm, Inc. Confidential
As you enter letters in the T itle, Company, City, and State fields, text appears for
the first logical match that exists in your Address Book. As you enter more
letters, a closer match appears. For example , you may alrea dy have Sacramento
and San Francisco in your Address Book. As you enter S, Sacramento appears,
and as you continue entering a and n San Francisco replaces Sacramento. As
soon as the word you want appears, tap the next field to accept the word.
7. T ap the scroll arr ows or press Up/Down on the navigator to move to the next
page of in formation.
8. After you finish entering information, Press Function + Enter , or tap
Done.
Tap Done
TIP To create an entry that always appears at the top of the Address list, begin the
Last name or Company field with a symbol, as in *If Found Call*. This entry can
contain contact information in case you lose your handheld.
Selecting types of phone numbers
You can select the types of phone numbers or e-mail addresses that you associate
with an Address Book entry. Any changes you make apply only to the current
entry.
To select other types of ph one numbers in an entry:
1. Tap the entry that you want to change.
2. Tap Edit.
75
Page 88

Chapter 5 Using Address Book
DRAFT Palm, Inc. Confidential
3. Tap the pick list next to the label you want to change.
Tap
triangle
4. Select a new label.
Changing Address Entry details
The Address Entry Details dialog box provides a variety of options that you can
associate with an entry.
To open the Addre ss Entry De tails dialog box:
1. Tap the entry whose details you want to change.
2. Tap Edit.
3. Tap Details.
4. Select any of the following settings:
Show in List
Category
Select which type of phone or other information appears in
the Address list screen. Your options are Work, Home, Fax,
Other, E-mail, Main, Pager, and Mobile. The identifying
letters W, H, F, O, M, or P appear next to the record in the
Address list, depending on which information is displayed.
If you select E-mail, no identifying letter is displayed.
Assign the entry to a category.
76
Private
Hide this entry when Security is turned on.
Page 89

Address Book menus
DRAFT Palm, Inc. Confidential
Address Book menus are shown here for your reference, and Address Book
features that are not explained elsewhere in this book are described here.
See “Using menus” in Chapter 4 for information about selecting menu commands.
The Record and Options menus may differ, depending on whether you’re
displaying the Address list screen or the Address view screen.
Record menus
Address list
Address Book menus
Address view
Duplicate
Address
Connect
Send Category
Send Address
Makes a copy of the current record and displays the copy in
Address Edit so you c an make changes to the copied r ecord. The
copy has the same category and attached notes as the original
record.
Opens the Quick Connect dialog box where you can select which
application to use to make the connection.
Opens a dialog box where you can select how to send all records
in the selected category to another device. The options a vailable
depend on the software installed on your handheld.
Opens a dialog box where you can select how to send the
selected entry to another device. The options available depend
on the software installed on your handheld.
77
Page 90

Chapter 5 Using Address Book
DRAFT Palm, Inc. Confidential
Options menus
Address list
Preferences
Address view
Rename Custom
Fields
About Address
Book
Remember last category:
Determines how Address Book
appears when you return to it fr om another application. I f
you select this check box, Address Book shows the last
category you selected. If you clear it, Address Book
displays the All category.
Fields that appear at the end of the Address Edit screen.
Rename them to identify the kind of information you enter
in them. The names you give the custom fields appear in
all entries.
Shows version info rmation for Address Book.
78
Page 91

CHAPTER 6
DRAFT Palm, Inc. Confidential
Using Calculator
Calculat or enables you to perform bas ic calculations. Use Calcul ator to do
the following:
■ Perform addition, subtraction, multiplication, division, and square root
operations.
■ Store and retrieve values.
■ Display the last series of calculations, which is useful for confirming a series of
“chain” calculations.
To open Calculator:
1. Press Home .
2. Tap the Calculato r icon .
Performing calculations
The Calculator includes several buttons to help you perform calculations.
Clears the entire calculation so that you can begin a fr esh calculation.
Clears the last number you entered. If you make a mistake while
entering a number in the middle of a calculation, you can use this
button to reenter the number without starting the calculation over.
79
Page 92

Chapter 6 Using Calculator
DRAFT Palm, Inc. Confidential
Toggles the current number between a negative and pos iti ve va lue.
If you want to enter a negative number, enter the number first and
then press the +/- button.
Places the current number in memory. Each new number you enter
with the M+ button is added to the total alr eady stored in memory. The
number that you add can be either a c alculated value or any number
you enter by pressing the number buttons. Pressing this button has
no effect on the current calculation (or series of calculations); it
merely places the value into memory until it is recalled.
Recalls the stored value fr om memory and in serts it into the cur rent
calculation.
Clears any value that is stored in the Calculator memory.
Calculates the square root of a number. Enter the number, and then
tap the square root button.
Viewing recent calculations
The Recent Calculations command enables you to review the last series of
calculations and is particularly useful for confirming a series of “chain”
calculations.
To display recent calculations:
1. Press Command Stroke + l.
Alternately, press Function + Menu , and then select Recent
Calculations on the Options menu.
2. After you finish reviewing the calculations, press Function + Enter , or
tap OK.
80
Page 93

Using Calculator menus
DRAFT Palm, Inc. Confidential
The Calculator menu shown here is for your referen ce, and the Calculat or feature
described here is not explained elsewhere in this book.
See “Using menus” in Chapter 4 for information about choosing menu commands.
Options menu
Using Calculator menus
About Calculator
Shows version info rmation for Calculator.
81
Page 94

Chapter 6 Using Calculator
DRAFT Palm, Inc. Confidential
82
Page 95

Card Info enables you to review general information about an expansion
DRAFT Palm, Inc. Confidential
card. Use Card Info to do the following:
■ Review card contents.
■ Rename a card.
■ Format a card.
Reviewing Card Information
You can view the card name, type, available storage space, and a summary of its
contents.
To review Card Information:
CHAPTER 7
Using Card Info
1. Press Home .
2. Tap the Card Info icon .
3. Review Card name, Type, and Size.
4. Review card contents summarized by directory.
Review card information
Review summarized
card contents
83
Page 96

Chapter 7 Using Card Info
DRAFT Palm, Inc. Confidential
Renaming a card
Renaming a card enables you to give an easy to recognize name to the card.
To re name a c ar d:
1. Press Home .
2. Tap the Card Info icon .
3. Press Command Stroke + R.
Alternately, press Function + Menu , and then select Rename Card on
the Card menu.
4. Enter the new name for the card.
5. Tap Rename.
Formatting a card
Formatting a card destroys all its data and prepares it to accept new applications
and data.
To format a card:
1. Press Home .
2. Tap the Card Info icon .
3. Press Command Stroke + F.
Alternately, press Function + Menu , and then select Format Card on
the Card menu.
4. Press Function + Enter , or tap OK.
84
Page 97

Managing an expansion card
DRAFT Palm, Inc. Confidential
■ When writing data to an expansion card, wait for your handheld to complete
the operation before removing the card from the slot. This prevents data
corruption or accidental damage to the expansion card.
■ You can install applications to an expansion card after performing an initial
HotSync
®
operation. See “Installing files and add-on applications” in Chapter 4
for information. For optimal performance, we recommend that you do not
install more than fifty applications to a single expansion card.
■ When your handheld’s battery level becomes very low, access to the expansion
card may be disabled to protect your data. If this occurs, recharge your
handheld as soon as possible.
Using the Card Info menu
The Card Info menu is shown here for your reference, and the Card Info features
that are not explained elsewhere in this book are described here.
See “Using menus” in Chapter 4 for information about choosing menu commands.
Managing an expansion card
Help
About Card Info
Provides help text.
Shows version information for Card Info.
85
Page 98

Chapter 7 Using Card Info
DRAFT Palm, Inc. Confidential
86
Page 99

CHAPTER 8
DRAFT Palm, Inc. Confidential
Using Date Book
Date Book enables you to quickly and easily schedule appointments or any
kind of activity associated with a time and date. Use Date Book to do the
following:
■ Enter a description of your appointment and assign it to a specific time and
date.
■ Display a chart of your appointments for an entir e week. The Week view makes
it easy to spot available times and potential scheduling overlaps or conflicts.
■ Display a monthly calendar to quickly spot days where you have morning,
lunch, or afternoon appointments.
■ Display an agenda showing appointments, untimed events, and your To Do
items for the day.
■ Set an alarm to notify you of the scheduled activity.
■ Create reminders for events that are based on a part icular date, rather than time
of day. Birthdays and anniversaries are easy to track with your handheld.
■ Attach notes to individual events for a description or clarification of the entry
in your Date Book.
NOTE You can encrypt your Date Book records. For more information,
see “Encrypting your data” in Chapter 18.
To open Date Book:
■ Press the Date Book application button on the front panel of your handheld.
Date Book opens to today’s schedule.
Date Book button
TIP Press the Date Book application button repeatedly to cycle through the
Day, Week, Month, and Agenda views.
87
Page 100

Chapter 8 Using Date Book
DRAFT Palm, Inc. Confidential
When you open Date Book, the screen shows the current date and a list of times for
a normal business day.
Scheduling an event
A record in Date Book is called an “event.” An event can be any kind of activity
that you associate with a day. You can enter a new event on any of the available
time lines.
When you schedule an event, its description appears on the time line, and its
duration is automatically set to one hour. You can easily change the start time and
duration for any event.
It’s possible to schedule events that overlap, but Date Book makes it easy to find
such conflicts. See “Spotting event conflicts” later in th is chapter.
Y ou can also schedule eve nts in your Date Book that occur on a particular date but
have no specific start or end times, such as birthdays, holidays, and anniversaries.
These are referred to as “untimed events.” Untimed events appear at the top of the
list of times, marked with a diamond. You can have more than one untimed event
on a particular date.
Y ou can also schedule a r epeating event, such as a weekly meeting, and continuous
events, such as a three-day conference or a vacation.
To schedule an event for the current day:
1. Tap the time line that corresponds to the beginning of the event.
Tap a
time line
Time bar
shows
duration
Enter event
2. Enter a description of the event. You can enter up to 255 characters.
88
 Loading...