


Palm TREO 680, 1049NA - Treo 680 Smartphone 64 MB User Manual

User Guide
Your Palm® Treo™ 680 Smartphone

Intellectual Property Notices
© 2006–2007 Palm, Inc. All rights reserved. Blazer, HotSync, Palm,
Palm OS, Treo, VersaMail, and the Palm and Treo logos are among the
trademarks or registered trademarks owned by or licensed to Palm,
Inc. This product contains ACCESS Co., Ltd.’s NetFront 3.0 Internet
browser software. © 1996-2005 ACCESS Co., Ltd. and ACCESS
Systems America, Inc. NetFront is the trademark or registered
trademark of ACCESS Co., Ltd. in Japan and in other countries except
the United States of America. NetFront is a registered trademark of
NetFront Communications, Inc. in the United States of America and
is used under a license. Documents To Go is a trademark or
registered trademark of DataViz, Inc. All other brand and product
names are or may be trademarks of, and are used to identify products
or services of, their respective owners.
This product is protected by one or more of the following United
States patents:
7,007,239; 6,976,226; 6,975,304; 6,965,375; 6,961,567; 6,961,029;
6,957,397; 6,952,571; 6,950,988; 6,947,975; 6,947,017; 6,943,667;
6,940,490; 6,924,752; 6,907,233; 6,906,701; 6,906,741; 6,901,276;
6,850,780; 6,845,408; 6,842,628; 6,842,335; 6,831,662; 6,819,552;
6,804,699; 6,795,710; 6,788,285; 6,781,824; 6,781,575; 6,766,490;
6,745,047; 6,744,451; 6,738,852; 6,732,105; 6,724,720; 6,721,892;
6,712,638; 6,708,280; 6,697,639; 6,687,839; 6,685,328; 6,665,803;
6,618,044; 6,590,588; 6,539,476; 6,532,148; 6,523,124; 6,519,141;
6,516,202; 6,490,155; 6,480,146; 6,457,134; 6,456,247; 6,442,637;
6,441,824; 6,437,543; 6,429,625; 6,425,087; 6,389,572; 6,388,877;
6,381,650; 6,363,082; 6,344,848; 6,317,085; 6,241,537; 6,222,857;
6,185,423; 6,147,314; 6,115,248; 6,064,342; D421,251; D429,252;
D466,128; D478,091. Patent pending.
This product also is licensed under United States patent 6,058,304.
A portion of this software includes software modules developed by
the Independent JPEG group.
This product includes technology owned by Microsoft and cannot be
used or distributed without a license from Microsoft.
The TREO trademark is used by Palm in Sweden and Denmark with
the express consent of McNeil AB and its affiliated companies. The
products marketed and/or sold by Palm under the TREO trademark
are in no way affiliated with McNeil or its business.
Swedish: Varumärket Treo används av Palm i Sverige och D anmark
med uttryckligt tillstånd från McNeil AB och dess dotterbolag. De
produkter som marknadsförs och/eller säljs av Palm under varumärket
Treo ska på inget sätt alls kopplas samman med McNeil eller dess
verksamhet.
Danish: Treo-varemærket anvendes af Palm i Danmark og Svirge
med udtrykkelig tilladelse fra McNeil AB og McNeils associerede
selskaber. De produkter, der markedsføres og/eller sælges af Palm
under Treo-varemærket, er på ingen måde tilknyttet McNeil eller
McNeils virksomhed.
Disclaimer and limitation of liability
Palm, Inc. and its suppliers assume no responsibility for any damage
or loss resulting from the use of this guide. Palm, Inc. and its
suppliers assume no responsibility for any loss or claims by third
parties that may arise through the use of this software. Palm, Inc. and
its suppliers assume no responsibility for any damage or loss caused
by deletion of data as a result of malfunction, dead battery, or repairs.
Be sure to make backup copies of all important data on other media
to protect against data loss.
Palm Take Back and Recycling Program
This symbol indicates that Palm products should be
recycled and not be disposed of in unsorted municipal
waste. Palm products should be sent to a facility that
properly recycles electrical and electronic equipment.
For information on environmental programs visit:
palm.com/environment
.
As part of Palm’ s corporate commitment to be a good steward of the
environment, we strive to use environmentally friendly materials,
reduce waste, and develop the highest standards in electronics
recycling. Our recycling program keeps Palm handheld devices,
smartphones, and mobile companions out of landfills through
evaluation and disposition for reuse and recycling.
Palm customers may participate in the recycling program free of
charge. Visit palm.com/recycle
for additional details and information
about how you can help reduce electronic waste.
v. 2.0

Contents
Welcome . . . . . . . . . . . . . . . . . . . . . . . . . . . . . . . . . . . . . . . . . . . . . . . . . . . . . . . . . . . 7
What’s in the box? . . . . . . . . . . . . . . . . . . . . . . . . . . . . . . . . . . . . . . . . . . . . . . . . . .8
What do I need to get started? . . . . . . . . . . . . . . . . . . . . . . . . . . . . . . . . . . . . . . . . 9
Chapter 1: Setting up . . . . . . . . . . . . . . . . . . . . . . . . . . . . . . . . . . . . . . . . . . . . . . . . . . 11
Smartphone overview . . . . . . . . . . . . . . . . . . . . . . . . . . . . . . . . . . . . . . . . . . . . . . . 13
Inserting the SIM card and battery . . . . . . . . . . . . . . . . . . . . . . . . . . . . . . . . . . . . . . 15
Charging the battery . . . . . . . . . . . . . . . . . . . . . . . . . . . . . . . . . . . . . . . . . . . . . . . . . 17
Maximizing battery life . . . . . . . . . . . . . . . . . . . . . . . . . . . . . . . . . . . . . . . . . . . . . . . 19
Making your first call . . . . . . . . . . . . . . . . . . . . . . . . . . . . . . . . . . . . . . . . . . . . . . . . 21
Setting up your computer for synchronization . . . . . . . . . . . . . . . . . . . . . . . . . . . . .22
Synchronizing information—the basics . . . . . . . . . . . . . . . . . . . . . . . . . . . . . . . . . . 29
Chapter 2: Moving around on your Palm
Moving around the screen . . . . . . . . . . . . . . . . . . . . . . . . . . . . . . . . . . . . . . . . . . . .33
Using the keyboard . . . . . . . . . . . . . . . . . . . . . . . . . . . . . . . . . . . . . . . . . . . . . . . . . 37
Opening applications . . . . . . . . . . . . . . . . . . . . . . . . . . . . . . . . . . . . . . . . . . . . . . . .41
Chapter 3: Your phone . . . . . . . . . . . . . . . . . . . . . . . . . . . . . . . . . . . . . . . . . . . . . . . . . 45
Turning your smartphone on and off . . . . . . . . . . . . . . . . . . . . . . . . . . . . . . . . . . . . 47
Making calls . . . . . . . . . . . . . . . . . . . . . . . . . . . . . . . . . . . . . . . . . . . . . . . . . . . . . . . 49
Receiving calls . . . . . . . . . . . . . . . . . . . . . . . . . . . . . . . . . . . . . . . . . . . . . . . . . . . . . 53
Using voicemail . . . . . . . . . . . . . . . . . . . . . . . . . . . . . . . . . . . . . . . . . . . . . . . . . . . . 54
What can I do when I’m on a call? . . . . . . . . . . . . . . . . . . . . . . . . . . . . . . . . . . . . . . 56
How many minutes have I used? . . . . . . . . . . . . . . . . . . . . . . . . . . . . . . . . . . . . . . . 62
Entering names and phone numbers . . . . . . . . . . . . . . . . . . . . . . . . . . . . . . . . . . . . 63
Defining favorite buttons . . . . . . . . . . . . . . . . . . . . . . . . . . . . . . . . . . . . . . . . . . . . . 67
®
Treo™680 smartphone . . . . . . . . . . . . . . . 31
CONTENTS
iii

Using a hands-free device . . . . . . . . . . . . . . . . . . . . . . . . . . . . . . . . . . . . . . . . . . . . 70
Customizing phone settings . . . . . . . . . . . . . . . . . . . . . . . . . . . . . . . . . . . . . . . . . . . 76
What are all those icons? . . . . . . . . . . . . . . . . . . . . . . . . . . . . . . . . . . . . . . . . . . . . . 82
Chapter 4: Your email and other messages . . . . . . . . . . . . . . . . . . . . . . . . . . . . . . . . 85
Which email application should I use? . . . . . . . . . . . . . . . . . . . . . . . . . . . . . . . . . . . 87
The VersaMail
®
application . . . . . . . . . . . . . . . . . . . . . . . . . . . . . . . . . . . . . . . . . . . 87
Messaging . . . . . . . . . . . . . . . . . . . . . . . . . . . . . . . . . . . . . . . . . . . . . . . . . . . . . . . . 101
Chapter 5: Your connections to the web and wireless devices . . . . . . . . . . . . . . . . . 113
Web browser . . . . . . . . . . . . . . . . . . . . . . . . . . . . . . . . . . . . . . . . . . . . . . . . . . . . . . 115
Connecting your computer to the Internet through your smartphone . . . . . . . . . . . 124
Connections with Bluetooth
®
devices . . . . . . . . . . . . . . . . . . . . . . . . . . . . . . . . . . . 127
Chapter 6: Your photos, videos, and music . . . . . . . . . . . . . . . . . . . . . . . . . . . . . . . . . 131
Camera . . . . . . . . . . . . . . . . . . . . . . . . . . . . . . . . . . . . . . . . . . . . . . . . . . . . . . . . . . . 133
Pictures & Videos . . . . . . . . . . . . . . . . . . . . . . . . . . . . . . . . . . . . . . . . . . . . . . . . . . . 137
Pocket Tunes . . . . . . . . . . . . . . . . . . . . . . . . . . . . . . . . . . . . . . . . . . . . . . . . . . . . . . 142
Chapter 7: Your personal information organizer . . . . . . . . . . . . . . . . . . . . . . . . . . . . . 149
Calendar . . . . . . . . . . . . . . . . . . . . . . . . . . . . . . . . . . . . . . . . . . . . . . . . . . . . . . . . . . 151
World Clock . . . . . . . . . . . . . . . . . . . . . . . . . . . . . . . . . . . . . . . . . . . . . . . . . . . . . . . 158
Tasks . . . . . . . . . . . . . . . . . . . . . . . . . . . . . . . . . . . . . . . . . . . . . . . . . . . . . . . . . . . . 160
Chapter 8: Your memos and documents . . . . . . . . . . . . . . . . . . . . . . . . . . . . . . . . . . 165
Documents To Go Professional . . . . . . . . . . . . . . . . . . . . . . . . . . . . . . . . . . . . . . . . 167
Memos . . . . . . . . . . . . . . . . . . . . . . . . . . . . . . . . . . . . . . . . . . . . . . . . . . . . . . . . . . . 168
Voice Memo . . . . . . . . . . . . . . . . . . . . . . . . . . . . . . . . . . . . . . . . . . . . . . . . . . . . . . . 169
Chapter 9: Your application and info management tools . . . . . . . . . . . . . . . . . . . . . . . 171
Using Find . . . . . . . . . . . . . . . . . . . . . . . . . . . . . . . . . . . . . . . . . . . . . . . . . . . . . . . . 173
Viewing and using the alerts . . . . . . . . . . . . . . . . . . . . . . . . . . . . . . . . . . . . . . . . . . 173
CONTENTS
iv

Calculator . . . . . . . . . . . . . . . . . . . . . . . . . . . . . . . . . . . . . . . . . . . . . . . . . . . . . . . . . 174
Installing applications . . . . . . . . . . . . . . . . . . . . . . . . . . . . . . . . . . . . . . . . . . . . . . . . 176
Removing applications . . . . . . . . . . . . . . . . . . . . . . . . . . . . . . . . . . . . . . . . . . . . . . .178
Viewing application info . . . . . . . . . . . . . . . . . . . . . . . . . . . . . . . . . . . . . . . . . . . . . .179
Sending information with Bluetooth
®
wireless technology . . . . . . . . . . . . . . . . . . . 180
Beaming information . . . . . . . . . . . . . . . . . . . . . . . . . . . . . . . . . . . . . . . . . . . . . . . . 182
Synchronizing information—advanced . . . . . . . . . . . . . . . . . . . . . . . . . . . . . . . . . . .185
Using expansion cards . . . . . . . . . . . . . . . . . . . . . . . . . . . . . . . . . . . . . . . . . . . . . . .191
Chapter 10: Your personal settings . . . . . . . . . . . . . . . . . . . . . . . . . . . . . . . . . . . . . . . 197
System sound settings . . . . . . . . . . . . . . . . . . . . . . . . . . . . . . . . . . . . . . . . . . . . . . . 199
Display and appearance settings . . . . . . . . . . . . . . . . . . . . . . . . . . . . . . . . . . . . . . . 200
Applications settings . . . . . . . . . . . . . . . . . . . . . . . . . . . . . . . . . . . . . . . . . . . . . . . . 203
Locking your smartphone and info . . . . . . . . . . . . . . . . . . . . . . . . . . . . . . . . . . . . . . 205
System settings . . . . . . . . . . . . . . . . . . . . . . . . . . . . . . . . . . . . . . . . . . . . . . . . . . . .212
Connecting to a VPN . . . . . . . . . . . . . . . . . . . . . . . . . . . . . . . . . . . . . . . . . . . . . . . . 214
Chapter 11: Common questions . . . . . . . . . . . . . . . . . . . . . . . . . . . . . . . . . . . . . . . . . 217
Upgrading . . . . . . . . . . . . . . . . . . . . . . . . . . . . . . . . . . . . . . . . . . . . . . . . . . . . . . . . . 219
Desktop software installation . . . . . . . . . . . . . . . . . . . . . . . . . . . . . . . . . . . . . . . . . . 221
Resetting your smartphone . . . . . . . . . . . . . . . . . . . . . . . . . . . . . . . . . . . . . . . . . . . 221
Replacing the battery . . . . . . . . . . . . . . . . . . . . . . . . . . . . . . . . . . . . . . . . . . . . . . . .223
Screen . . . . . . . . . . . . . . . . . . . . . . . . . . . . . . . . . . . . . . . . . . . . . . . . . . . . . . . . . . . 225
Synchronization . . . . . . . . . . . . . . . . . . . . . . . . . . . . . . . . . . . . . . . . . . . . . . . . . . . . 226
Phone . . . . . . . . . . . . . . . . . . . . . . . . . . . . . . . . . . . . . . . . . . . . . . . . . . . . . . . . . . . . 233
Hands-free devices . . . . . . . . . . . . . . . . . . . . . . . . . . . . . . . . . . . . . . . . . . . . . . . . . . 235
Email . . . . . . . . . . . . . . . . . . . . . . . . . . . . . . . . . . . . . . . . . . . . . . . . . . . . . . . . . . . . . 237
Messaging . . . . . . . . . . . . . . . . . . . . . . . . . . . . . . . . . . . . . . . . . . . . . . . . . . . . . . . .237
Web . . . . . . . . . . . . . . . . . . . . . . . . . . . . . . . . . . . . . . . . . . . . . . . . . . . . . . . . . . . . . 238
Camera . . . . . . . . . . . . . . . . . . . . . . . . . . . . . . . . . . . . . . . . . . . . . . . . . . . . . . . . . . . 242
CONTENTS
v

Making room on your smartphone . . . . . . . . . . . . . . . . . . . . . . . . . . . . . . . . . . . . . . 242
Third-party applications . . . . . . . . . . . . . . . . . . . . . . . . . . . . . . . . . . . . . . . . . . . . . . 243
Error messages . . . . . . . . . . . . . . . . . . . . . . . . . . . . . . . . . . . . . . . . . . . . . . . . . . . . 245
Where to learn more . . . . . . . . . . . . . . . . . . . . . . . . . . . . . . . . . . . . . . . . . . . . . . . . . . 247
Terms . . . . . . . . . . . . . . . . . . . . . . . . . . . . . . . . . . . . . . . . . . . . . . . . . . . . . . . . . . . . . . 249
Important safety and legal information . . . . . . . . . . . . . . . . . . . . . . . . . . . . . . . . . . . . 253
Specifications . . . . . . . . . . . . . . . . . . . . . . . . . . . . . . . . . . . . . . . . . . . . . . . . . . . . . . . . 261
Index . . . . . . . . . . . . . . . . . . . . . . . . . . . . . . . . . . . . . . . . . . . . . . . . . . . . . . . . . . . . . . 265
CONTENTS
vi

Welcome
• A VGA (640x480) digital camera for
snapping photos and capturing short
videos
Congratulations on the purchase of your
®
Palm
Tre o™680 smartphone! In one
compact and indispensable device, you
now have all of the following:
• Contacts application that stores the
names, phone numbers, and even
pictures of friends, family, business
contacts—everyone you stay in touch
with
• Email application for receiving and
sending email (business and personal)
• Palm OS
®
by ACCESS personal info
applications for storing your
appointments, to-do lists, memos, and
more
• Expansion card slot that accepts cards
(MultiMediaCard/SD/SDIO; sold
separately) for storing music files,
videos, dictionaries, games, and lots of
other applications
• Text and multimedia messaging
• MP3 player
• Applications for reading, creating, and
editing Microsoft Office files and
viewing PDF files
• Desktop synchronization software for
entering names, addresses, and more
on your computer, and then transferring
them to your smartphone with one
press of a button
NOTE Phone and text messaging services
require a service contract with your
wireless service provider. Web, email, and
multimedia messaging services require a
service contract and data services, such as
GPRS or EDGE, from your wireless service
provider. Data speeds vary based on
network availability and capacity.
WELCOME
7

What’s in the box?
Documentation and software
• Read This First setup booklet
You should have received all the following
items in the smartphone box:
Hardware
• Treo 680 smartphone
• SIM card from your wireless service
provider (not included with all models)
KEY TERM
card The smartcard that you insert into your
smartphone and that identifies you to the
mobile network. It contains your mobile
account information, such as your phone
number and the services to which you
subscribe. Phone book entries and SMS
messages can also be stored on the SIM card.
• Rechargeable battery
• AC charger with international adapter(s)
SIM (Subscriber Identity Module)
(if required in your region)
• Quick Reference Guide
• Palm Software Installation CD, which
includes the following:
• Palm
• Bonus software for your smartphone
• Your Palm Treo 680 Smartphone User
®
Desktop software
Guide (this guide)
• Palm warranty
• USB sync cable
• Headset
WELCOME
8

What do I need to
get started?
card must be inserted into your
smartphone. Without a SIM card, you
can only make emergency calls, such as
112 or 911.
This guide helps you set up your
smartphone and quickly learn to use it. To
get started, you need all the items that
came in the smartphone box (see What’s in
the box? ), plus the following:
• A SIM card. If you do not already have a
SIM card and your smartphone box did
not contain a SIM card, you need to
contact your wireless service provider
to get one. Be sure to sign up for a
mobile account with data services. To
use your smartphone on your wireless
service provider’s network, the SIM
• You must be in a location where you are
within coverage of your wireless service
provider’s network.
• An electrical outlet
• The computer with which you want to
synchronize your personal information
NOTE To use email, web browsing, and
multimedia messaging, your wireless
service provider plan must include data
services. Please contact your wireless
service provider for details about your data
service options.
WELCOME
9

10
WELCOME

CHAPTER
Setting up
Congratulations on the purchase of your new Palm®Tre o™680
smartphone. You’re about to discover the many things about
your smartphone that will help you better manage your life and
have fun, too.
As you become more familiar with your smartphone, you’ll
want to personalize the settings and add applications to make it
uniquely yours. But first, take these few easy steps to set up
your smartphone and get it running.
1
Benefits
• Know where your smartphone
controls are located
• Start using your smartphone right
away
• Establish a link between your
smartphone and your computer

In this chapter
Smartphone overview . . . . . . . . . . . . . . . . . . . . . . . . . . . . . . . . . . . 13
Inserting the SIM card and battery. . . . . . . . . . . . . . . . . . . . . . . . . . 15
Charging the battery. . . . . . . . . . . . . . . . . . . . . . . . . . . . . . . . . . . . . 17
Maximizing battery life. . . . . . . . . . . . . . . . . . . . . . . . . . . . . . . . . . . 19
Making your first call . . . . . . . . . . . . . . . . . . . . . . . . . . . . . . . . . . . . 21
Setting up your computer for synchronization . . . . . . . . . . . . . . . . . 22
Synchronizing information—the basics . . . . . . . . . . . . . . . . . . . . . . 29
SETTING UP
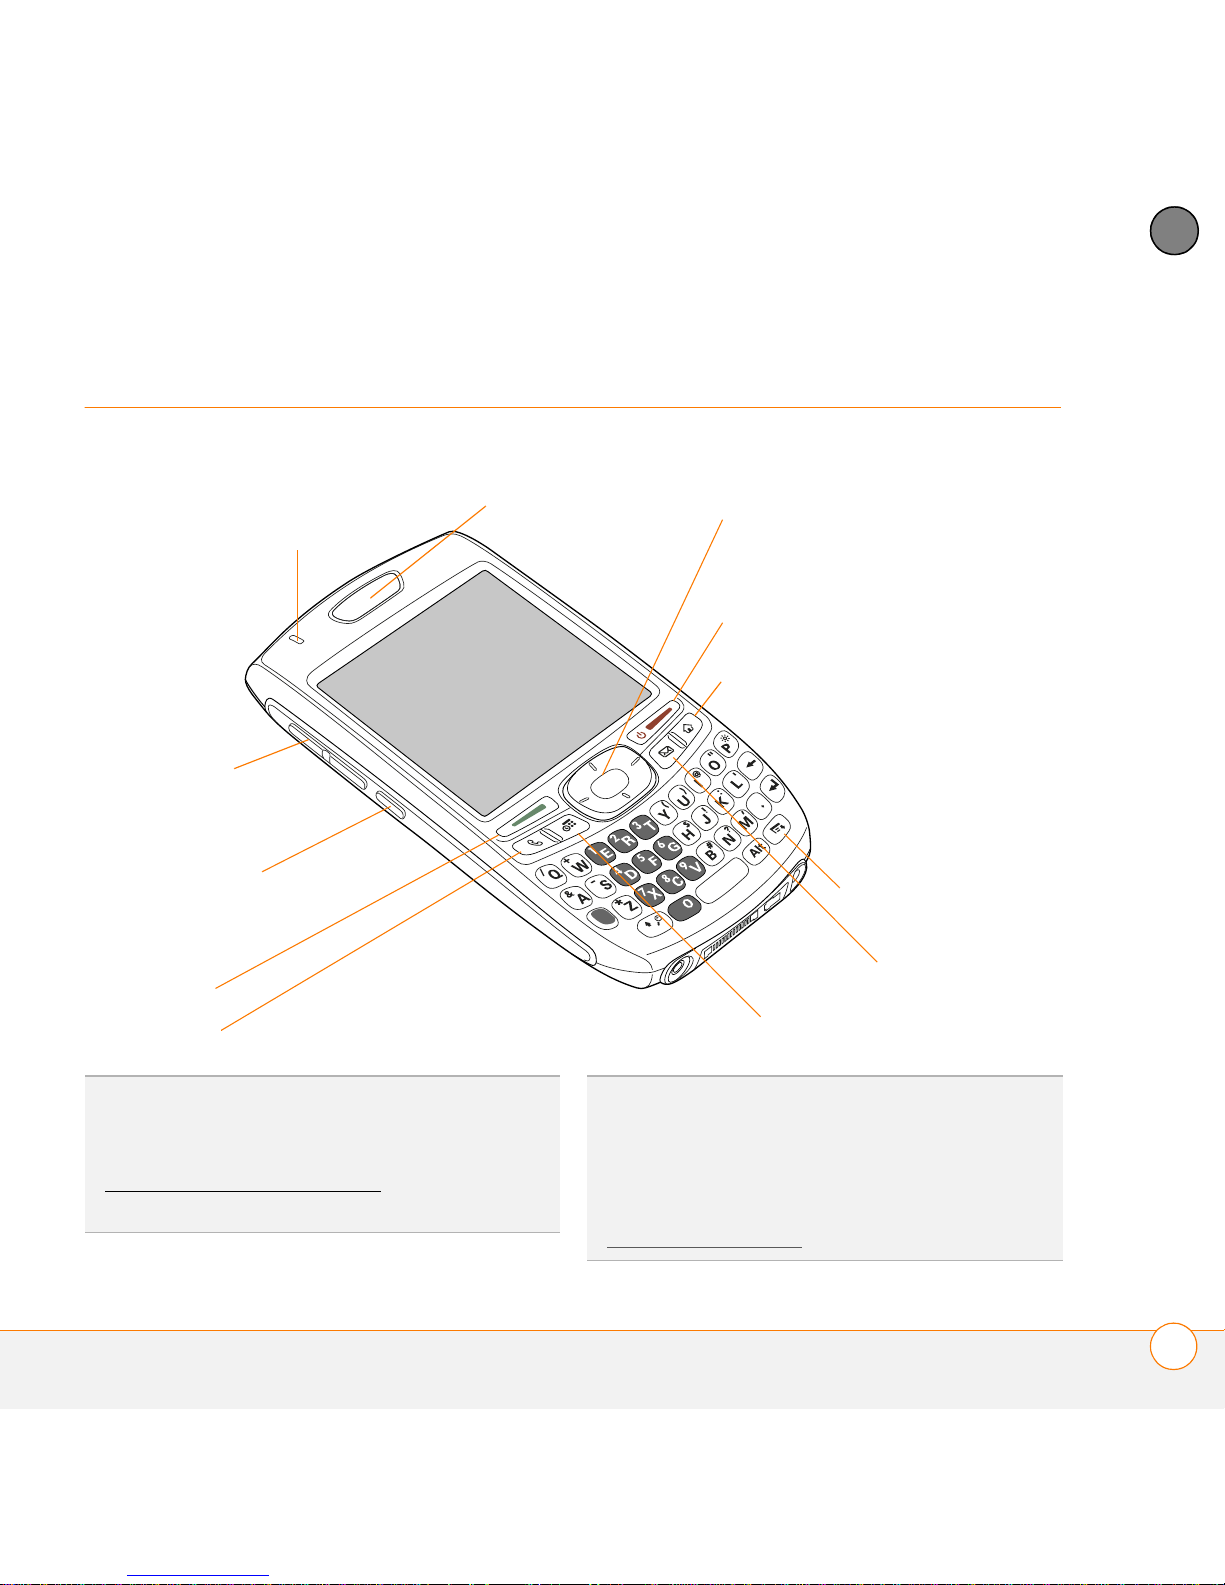
Indicator light (phone
and charge indicator)
Calendar
5-way navigator and
Center button
Earpiece
Menu
Send
Phone
Side button
Volume
Power/End
Messaging
Applications
1
Smartphone overview
Front view
CHAPTER
TIP
Protect your screen. Be careful to store
your smartphone away from items that might
scratch or crush the screen. Visit
www.palm.com/
cases and other useful accessories.
treo680gsm to find carrying
DID YOU KNOW
screen is on, you can press and hold the Side
button to open the Voice Memo application.
You can also change your button settings and
select an application of your choice; see
Reassigning buttons
?
When your smartphone
for details.
SMARTPHONE OVERVIEW
13
1
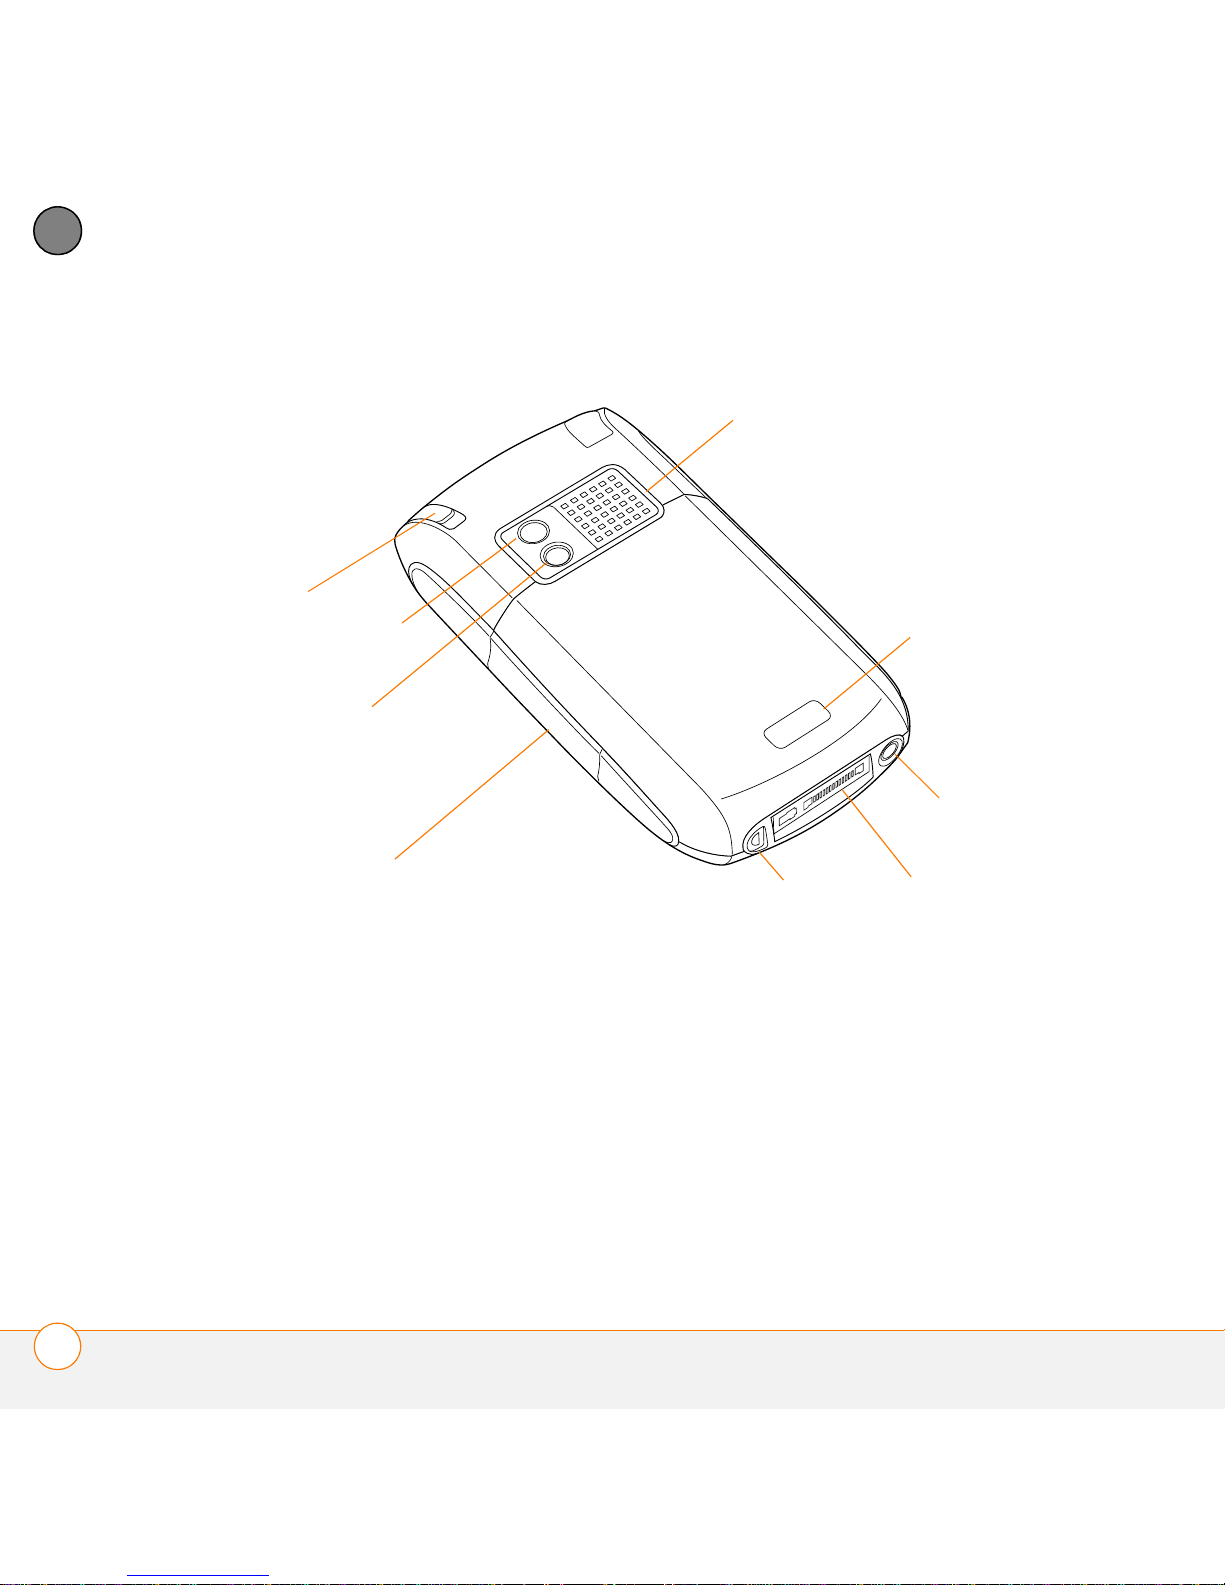
Camera lens
Battery door
release
Speaker
Self-portrait mirror
Multi-connector
Headset jack
Microphone
Expansion slot door
Stylus
SETTING UP
CHAPTER
Back view
IMPORTANT The smartphone speaker
includes a large magnet, so be sure to
keep your smartphone away from credit
cards or other items that could be
demagnetized.
14
SMARTPHONE OVERVIEW
SETTING UP
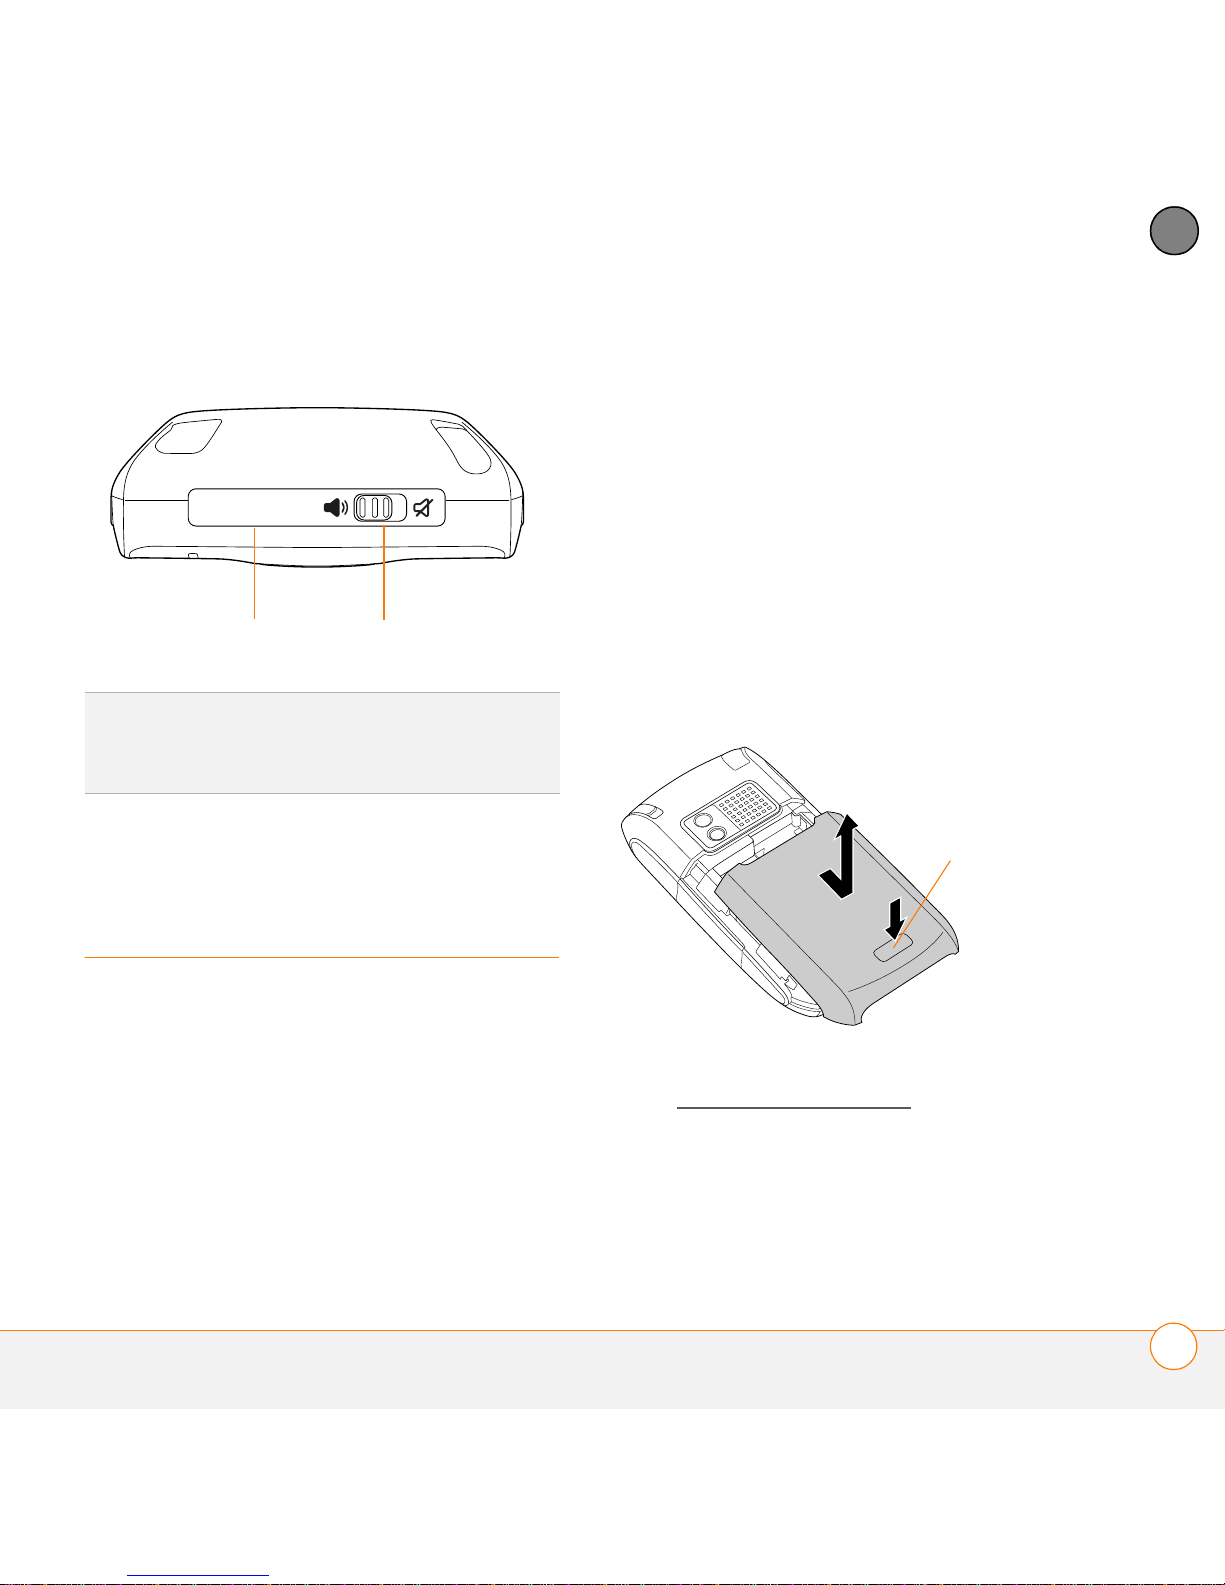
Ringer switchInfrared (IR) port
Battery door
release
1
Top view
DID YOU KNOW
sounds at once. You don’t need to hunt for Off
buttons all over the device.
?
The Ringer switch silences all
Inserting the SIM
card and battery
NOTE Your SIM card may already be
installed in your smartphone. Follow steps
1–3 to check. If a SIM card did not come
with your smartphone, you may already
have one; otherwise, your wireless service
provider will give you one when you
subscribe.
1 Use one hand to press the Battery
door release and use your other hand
to slide the battery door downward to
remove it from your smartphone.
CHAPTER
Your SIM card contains account
information such as your phone number
and voicemail access number. To use the
phone, email, or web features, the SIM
card must be inserted in your smartphone.
2 If the battery is installed, remove it.
(See Replacing the battery
for details.)
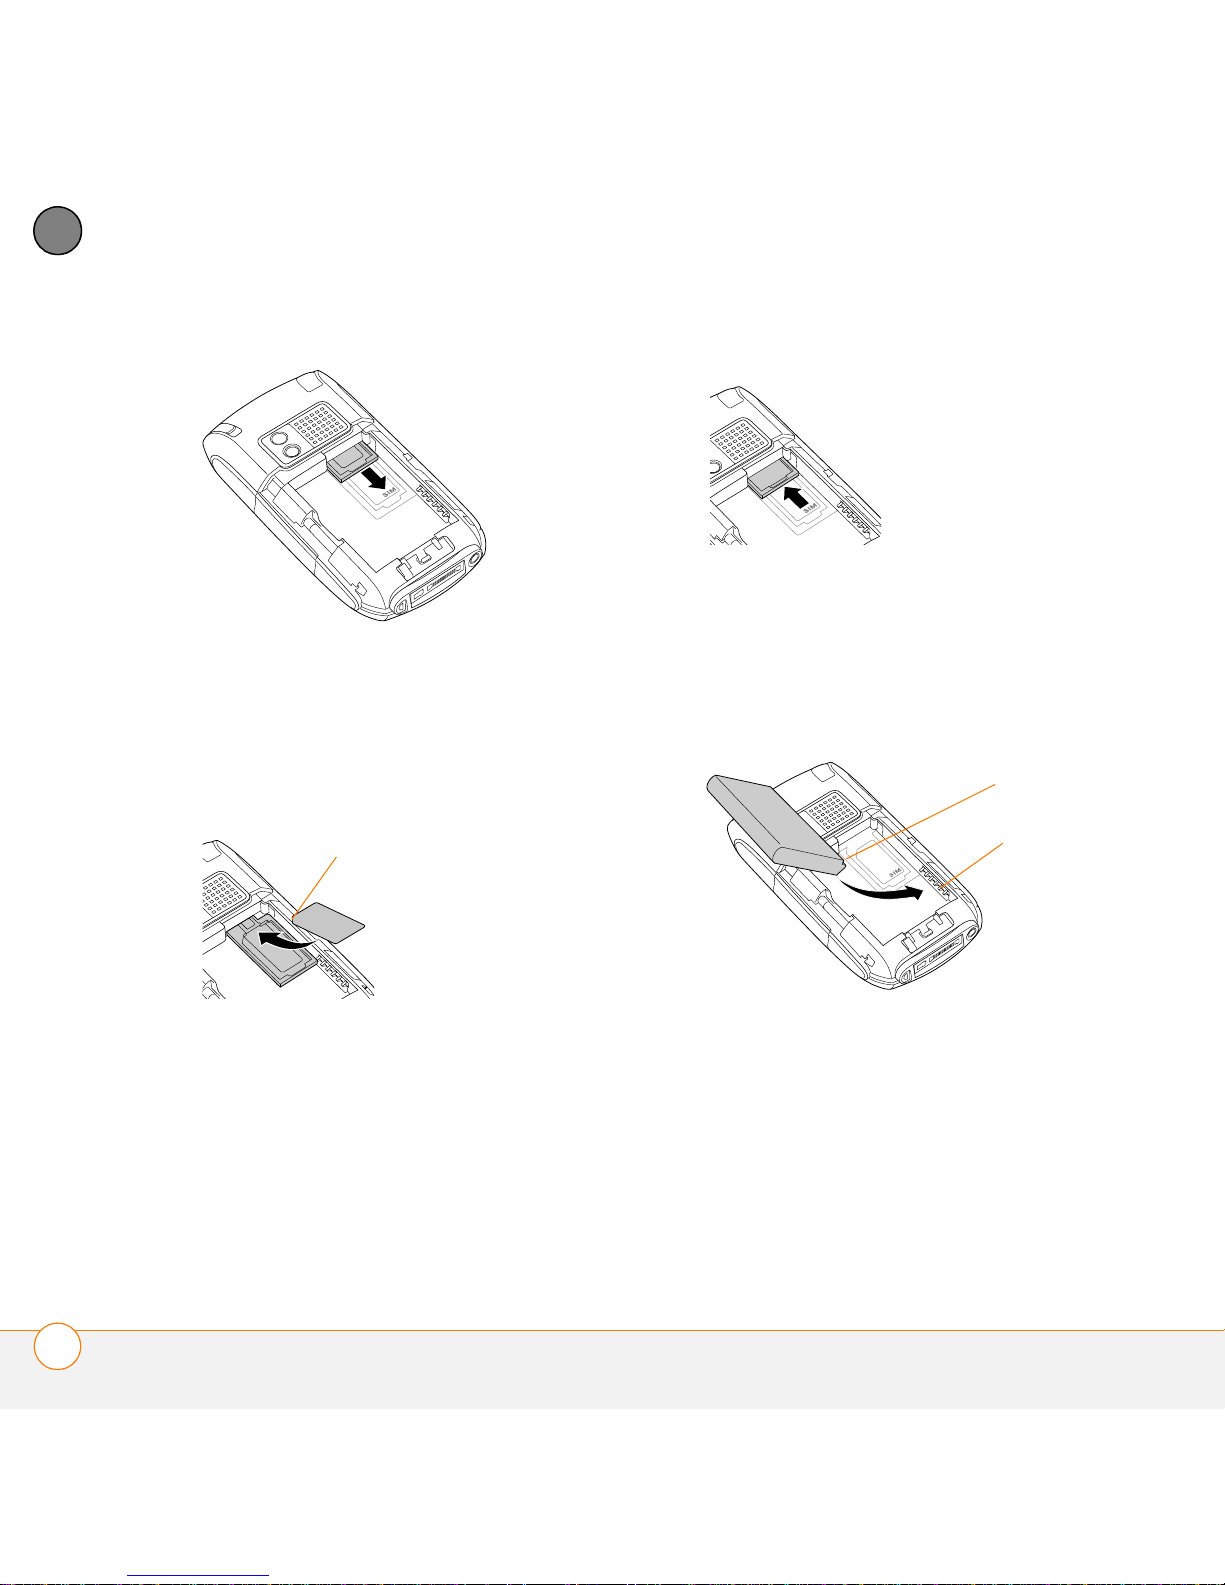
3 Slide the SIM tray out of the slot inside
the smartphone. If the SIM card is
already installed, skip to step 6.
INSERTING THE SIM CARD AND BATTERY
15
1
Notch
Battery
contacts
Smartphone
contacts
SETTING UP
CHAPTER
6 Align the metal contacts on the battery
with the contacts inside the battery
4 Align the notch on the SIM card with
the notch in the SIM tray. Insert the
notched end of the SIM card into the
compartment, insert the battery into the
compartment at a 45-degree angle, and
then press it into place.
SIM tray, and then press the other end
of the card until it falls into place.
5 Slide the SIM tray back into the slot
inside the smartphone.
16
INSERTING THE SIM CARD AND BATTERY
IMPORTANT Use the battery that came
with your smartphone. Do not use a
battery from another smartphone model in
your smartphone. Similarly, do not use the
smartphone battery in another smartphone
model. Using a battery that is designed for
another smartphone model can damage

SETTING UP
1
your smartphone. For info on replacement
batteries, see Replacing the battery
.
7 Slide the battery door onto the back of
the smartphone until it clicks into place.
8 Your smartphone screen wakes up and
begins the setup process. When the
language selection screen appears,
select the language you want to use,
and then follow the onscreen
instructions to set up your smartphone.
TIP
If your smartphone does not turn on, you
need to connect it to the AC charger. If it still
does not turn on after being connected to the
AC charger for five minutes, then do a soft
reset. See Performing a soft reset
IMPORTANT Always use the same
.
language for your smartphone, your
computer operating system, and your
desktop software. Otherwise, you may
lose information or have difficulty with
synchronization. Support is not provided for
mismatched language setups.
TIP
The power-saving feature turns off the
smartphone screen after a period of inactivity.
To wake up the screen, press and release
Power/End, and then press Center on the
5-way to turn off Keyguard.
Charging the battery
The battery comes with a sufficient charge
to complete the setup process and activate
your phone. After activation, we
recommend charging your smartphone for
three hours (or until the indicator light is
solid green) to give it a full charge. See
Maximizing battery life
maximizing the life of your smartphone
battery.
TIP
To avoid draining the battery, charge your
smartphone every day, especially if you use
your phone often.
DID YOU KNOW
fully drained, your info is still stored safely on
your smartphone until you recharge the
battery or connect your smartphone to a
power source.
?
If your battery ever becomes
for tips on
CHAPTER
CHARGING THE BATTERY
17
1
Indicator light
SETTING UP
CHAPTER
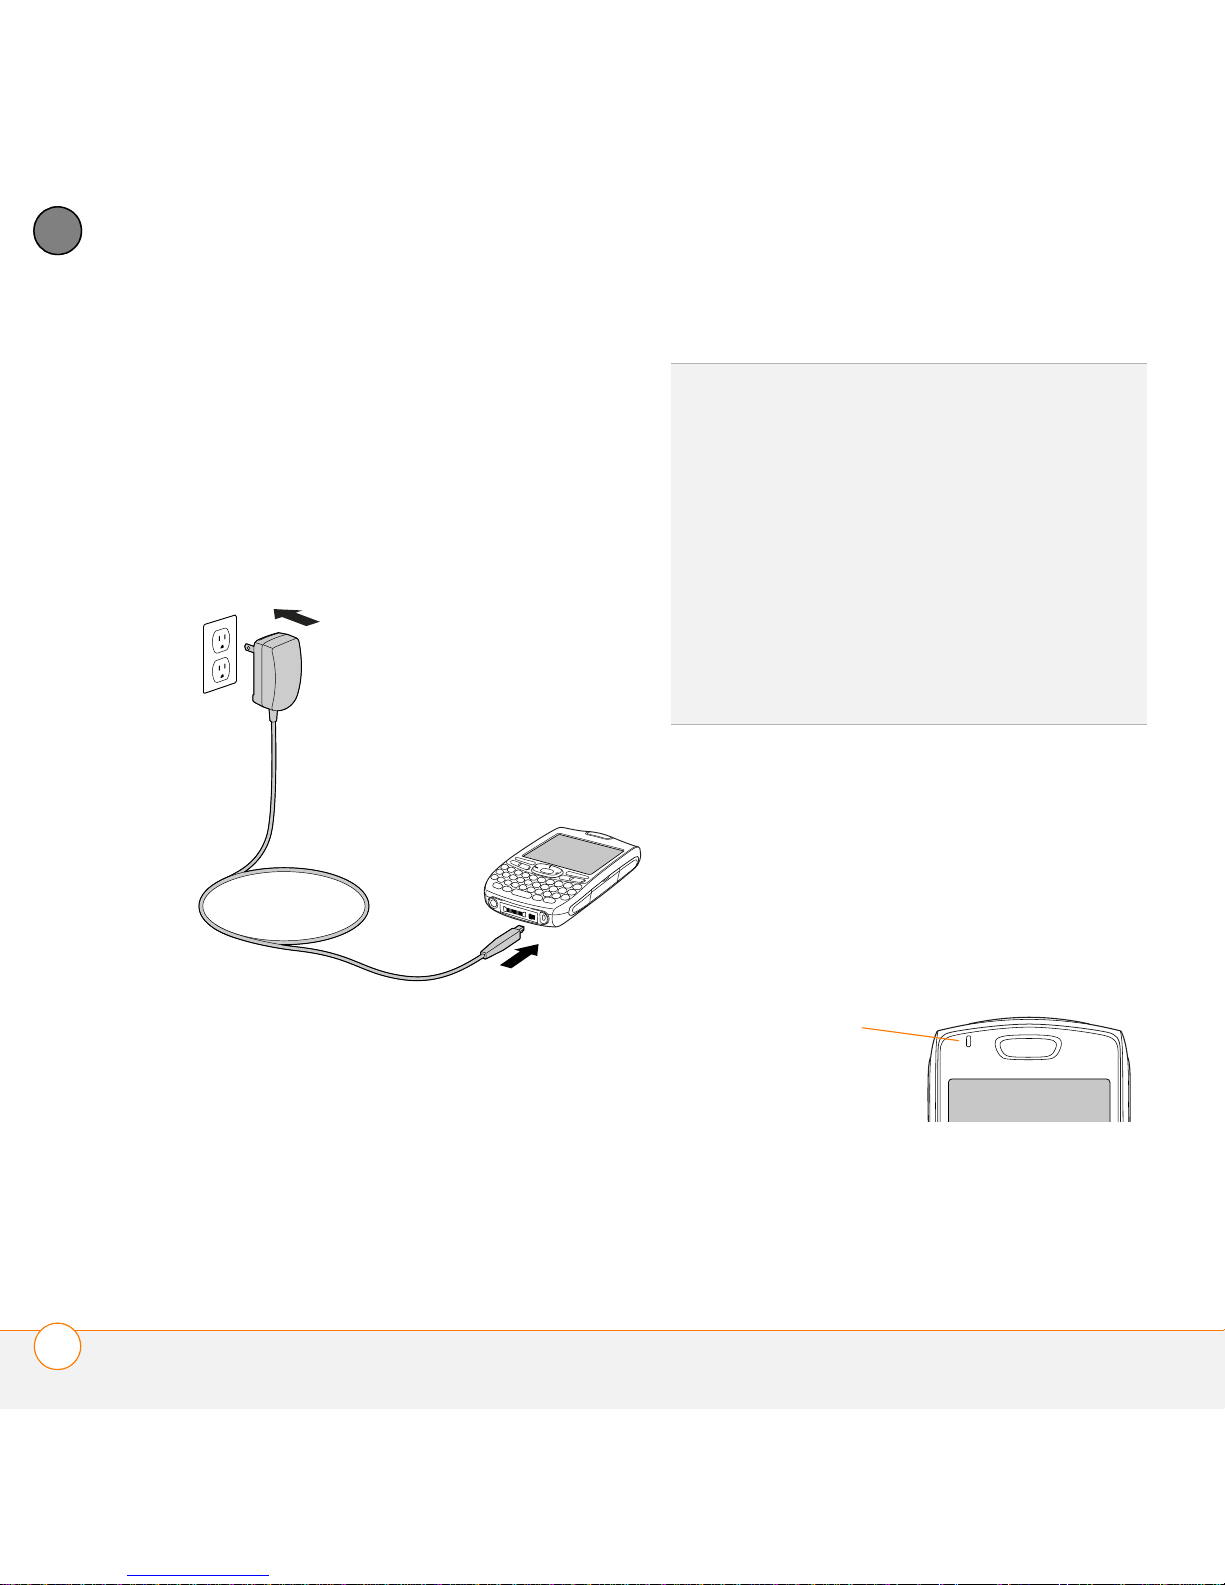
1 If necessary, connect the international
adapter to the AC charger plug.
2 Plug the AC charger into a wall outlet.
3 Connect the charger cable to the
bottom of your smartphone. Make sure
the arrow on the connector is facing up,
toward the screen.
DID YOU KNOW
smartphone without the AC charger by
connecting it to your computer with the sync
cable. However, it takes longer to charge the
battery without the AC charger, and if your
laptop isn’t plugged into a power source, it can
drain the laptop’s battery. For the quickest
charge time, use the AC charger.
TIP
When trickle charging your smartphone
with the sync cable, the indicator light may
not turn on. To make sure the battery is
charging, check the onscreen battery indicator.
?
You can also trickle charge your
4 To confirm that your smartphone is
charging, check the indicator light on
your smartphone.
• Solid red indicates that your
smartphone is charging.
• Solid green indicates that your
smartphone is fully charged.
18
CHARGING THE BATTERY
SETTING UP
Battery icon
1
TIP
If the battery is fully drained, it may take a
few moments for the indicator light to turn on
when you begin charging.
TIP
If the indicator light does not turn on when
you connect your smartphone to the AC
charger, double-check the cable connection
and the electrical outlet to which it is
connected.
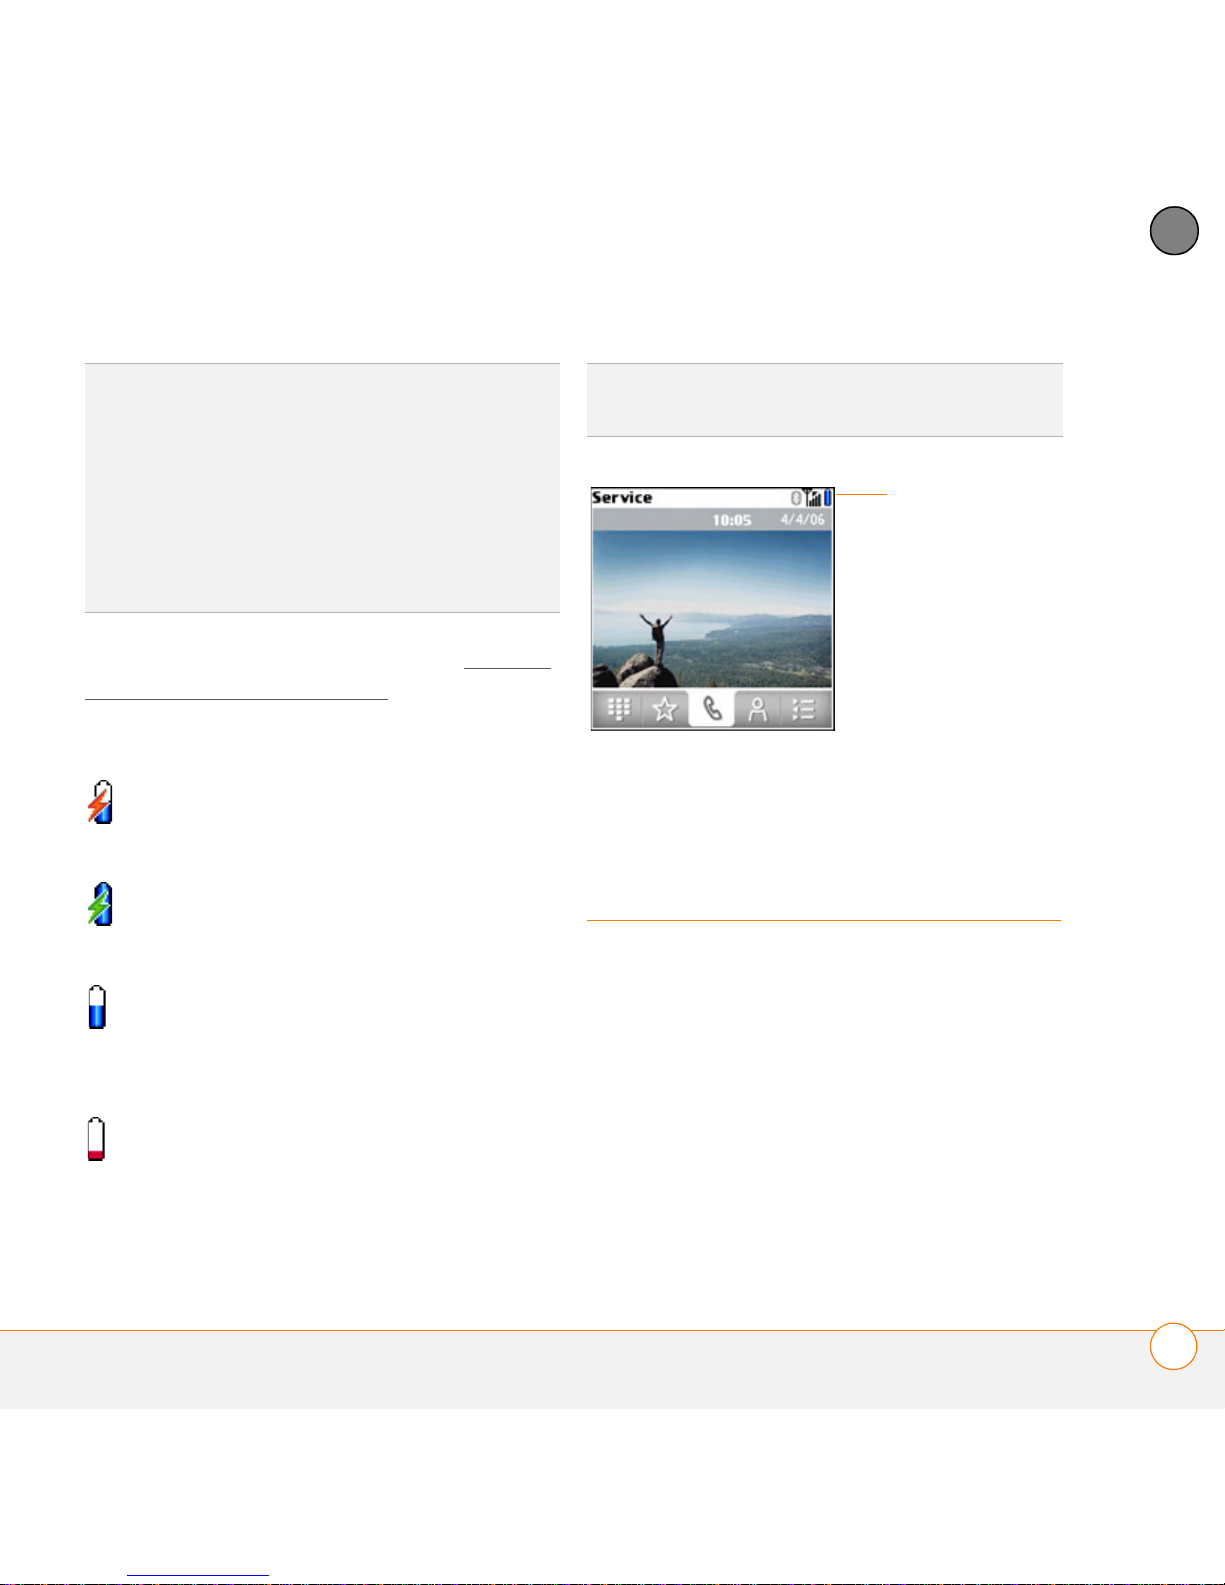
When your smartphone is on (see Turning
your smartphone on and off), the onscreen
battery icon displays the charging status:
A red lightning bolt indicates that
the battery is connected to a wall
outlet and is charging.
A green lightning bolt indicates that
the battery is connected to a wall
outlet and is fully charged.
A partial battery without a lightning
bolt indicates that the battery is not
connected to a wall outlet and it
has some power.
An almost empty battery that is red
at the bottom indicates that you
need to charge the battery
immediately.
TIP
To see exactly how much power is left in
your battery, tap the onscreen battery icon.
Maximizing battery
life
Battery life depends on how you use your
smartphone. You can maximize the life of
your battery by following a few easy
guidelines:
IMPORTANT Use the battery that came
with your smartphone. Do not use a
battery from another smartphone in your
smartphone. Similarly, do not use the
smartphone battery in another
CHAPTER
MAXIMIZING BATTERY LIFE
19

1
SETTING UP
CHAPTER
smartphone. Using a battery that is
designed for another smartphone can
damage your smartphone. For info on
replacement batteries, see Replacing the
battery.
battery icon and charge when
necessary.
• If you don’t plan to use the wireless
features on your smartphone for a
while, turn off your phone (see Turning
your phone on and off) and let all calls
TIP
You can buy an extra battery as a spare for
long airplane trips or periods of heavy use. To
purchase batteries that are compatible with
your smartphone, go to www.palm.com/
treo680gsm.
be picked up by voicemail.
• As with any mobile phone, if you are in
an area with no wireless coverage, your
smartphone searches for a signal, which
consumes power. If you cannot move to
an area of better coverage, temporarily
• Charge your smartphone whenever you
can. Charge it overnight. The battery
has a much longer useful life when it is
topped off frequently, rather than
charging it after it is fully drained.
• The wireless features (phone, email,
messaging, and web) and media
features (camera, media players,
eBooks, and games) of your
smartphone consume more power than
its organizer features. Speakerphone
usage also consumes more power than
turn off your phone. While your phone is
off, you can continue to use the
nonwireless features of your
smartphone.
• Turn down the screen brightness (see
Adjusting the brightness
• Decrease the settings in Power
).
Preferences and turn off Beam Receive
(see Optimizing power settings
• Turn off the Bluetooth
®
feature if you’re
).
not using it. See Connecting to a
Bluetooth hands-free device.
using the earpiece. If you use the
wireless, speakerphone, and media
features often, keep an eye on the
20
MAXIMIZING BATTERY LIFE

SETTING UP
Center
1
Making your first call
1 Press Phone .
2 If prompted, press Center to turn
off Keyguard (see Locking your
keyboard (Keyguard) for more info).
TIP
If Check SIM Card appears in the title bar,
see Inserting the SIM card and battery
TIP
If No Service appears in the title bar,
you’re outside a wireless coverage area. If you
believe you are in a wireless coverage area
and this problem persists, contact your
wireless service provider for assistance.
.
5 Press Send to dial the number.
6 If prompted, press Center to select
Ye s and turn on your phone.
TIP
If you are inside a coverage area and
cannot complete a call, contact your wireless
service provider for assistance.
7 After you finish the call, press Power/
End to end the call.
Adjusting call volume
CHAPTER
3 Press Left to select the Dial Pad
tab.
4 Tap the onscreen Dial Pad to enter the
number you want to call.
While a call is in progress, press the
Vol ume button on the side of your
smartphone to adjust the call volume.
• To increase the volume, press the upper
half of the Vol um e button.
MAKING YOUR FIRST CALL
21
1
Volume
Side button
Look here for
your phone
number
SETTING UP
CHAPTER
• To decrease the volume, press the
lower half of the Volu me button.
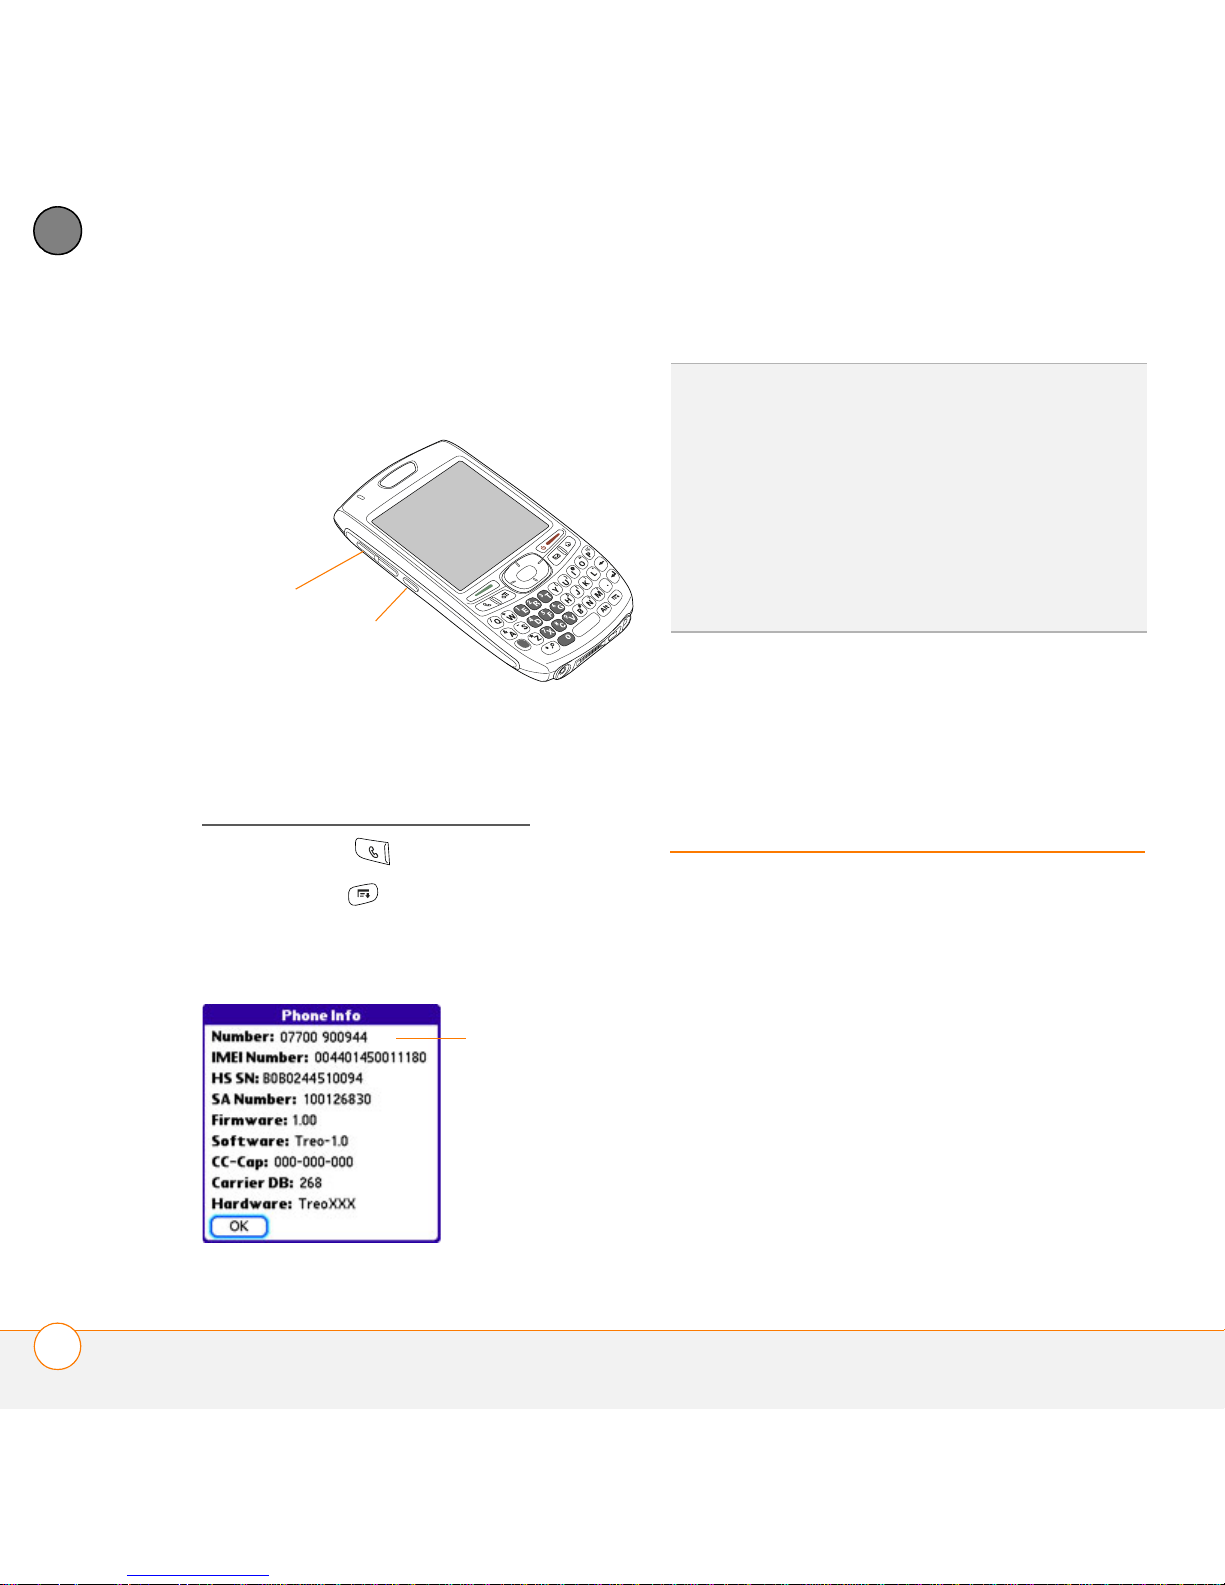
TIP
If your phone number doesn’t appear in
Phone Info, make sure your SIM card is
properly inserted in your smartphone. If your
phone number still does not appear in Phone
Info, your wireless service provider may not
support this feature. Look for your phone
number on the plastic holder to which the SIM
card was attached. If you still need assistance,
please contact your wireless service provider.
Setting up your
What’s my phone number?
1 Make sure your phone is on (see
Turning your phone on and off
).
2 Press Phone .
3 Press Menu .
4 Select Options, and then select Phone
Info.
computer for
synchronization
Why set up a connection between your
smartphone and your computer? So you
can synchronize. Why synchronize? Here
are two good reasons:
22
SETTING UP YOUR COMPUTER FOR SYNCHRONIZATION
• It’s easier to enter names, phone
numbers, and addresses using the big
keyboard on your computer than the
keyboard on your smartphone. Whether
you enter or change information on your
computer (using Palm
®
Desktop
software or Microsoft Outlook for

SETTING UP
1
Windows, which is sold separately) or
on your smartphone, you automatically
update the info in both places when you
synchronize. So there’s no need to enter
the info twice.
• You have a backup copy of all your info.
Should anything happen to your
smartphone, your info still exists on
your computer.
We strongly recommend that you
synchronize your smartphone with your
computer frequently to keep your
information up-to-date (and backed up) in
both locations.
Before you can synchronize, you need to
install the desktop synchronization
software and connect the sync cable to
your computer.
System requirements
Your computer should meet the following
minimum system profiles for Windows or
Mac computers:
• Windows 2000 or XP (or later)
• 32MB of available memory (RAM)
• CD drive
• Available USB port
• Mac OS X version 10.2 or later
• 128MB of total memory (RAM)
• 190MB of free hard disk space
• CD drive
• Available USB port
®
Upgrading from another Palm OS
by
ACCESS device
NOTE If you are setting up your first Palm
®
OS
by ACCESS device, skip ahead to
Installing the desktop synchronization
software.
You can transfer all compatible applications
and information from your previous Palm
OS device—whether it’s a handheld or a
smartphone— to your new smartphone, so
long as the space taken up by all the info
you want to transfer is 64MB or less. This
includes your calendar events, contacts,
memos, and tasks, as well as your
application settings and any compatible
third-party applications and files.
CHAPTER
• 170MB of free hard disk space
SETTING UP YOUR COMPUTER FOR SYNCHRONIZATION
23
1
SETTING UP
CHAPTER
When you install the desktop software
from the Palm Software Installation CD,
some third-party applications may be
quarantined because they are not
compatible with the Palm OS software
version 5.4.9 on your smartphone.
Quarantined files are not installed on your
smartphone, nor are they deleted; these
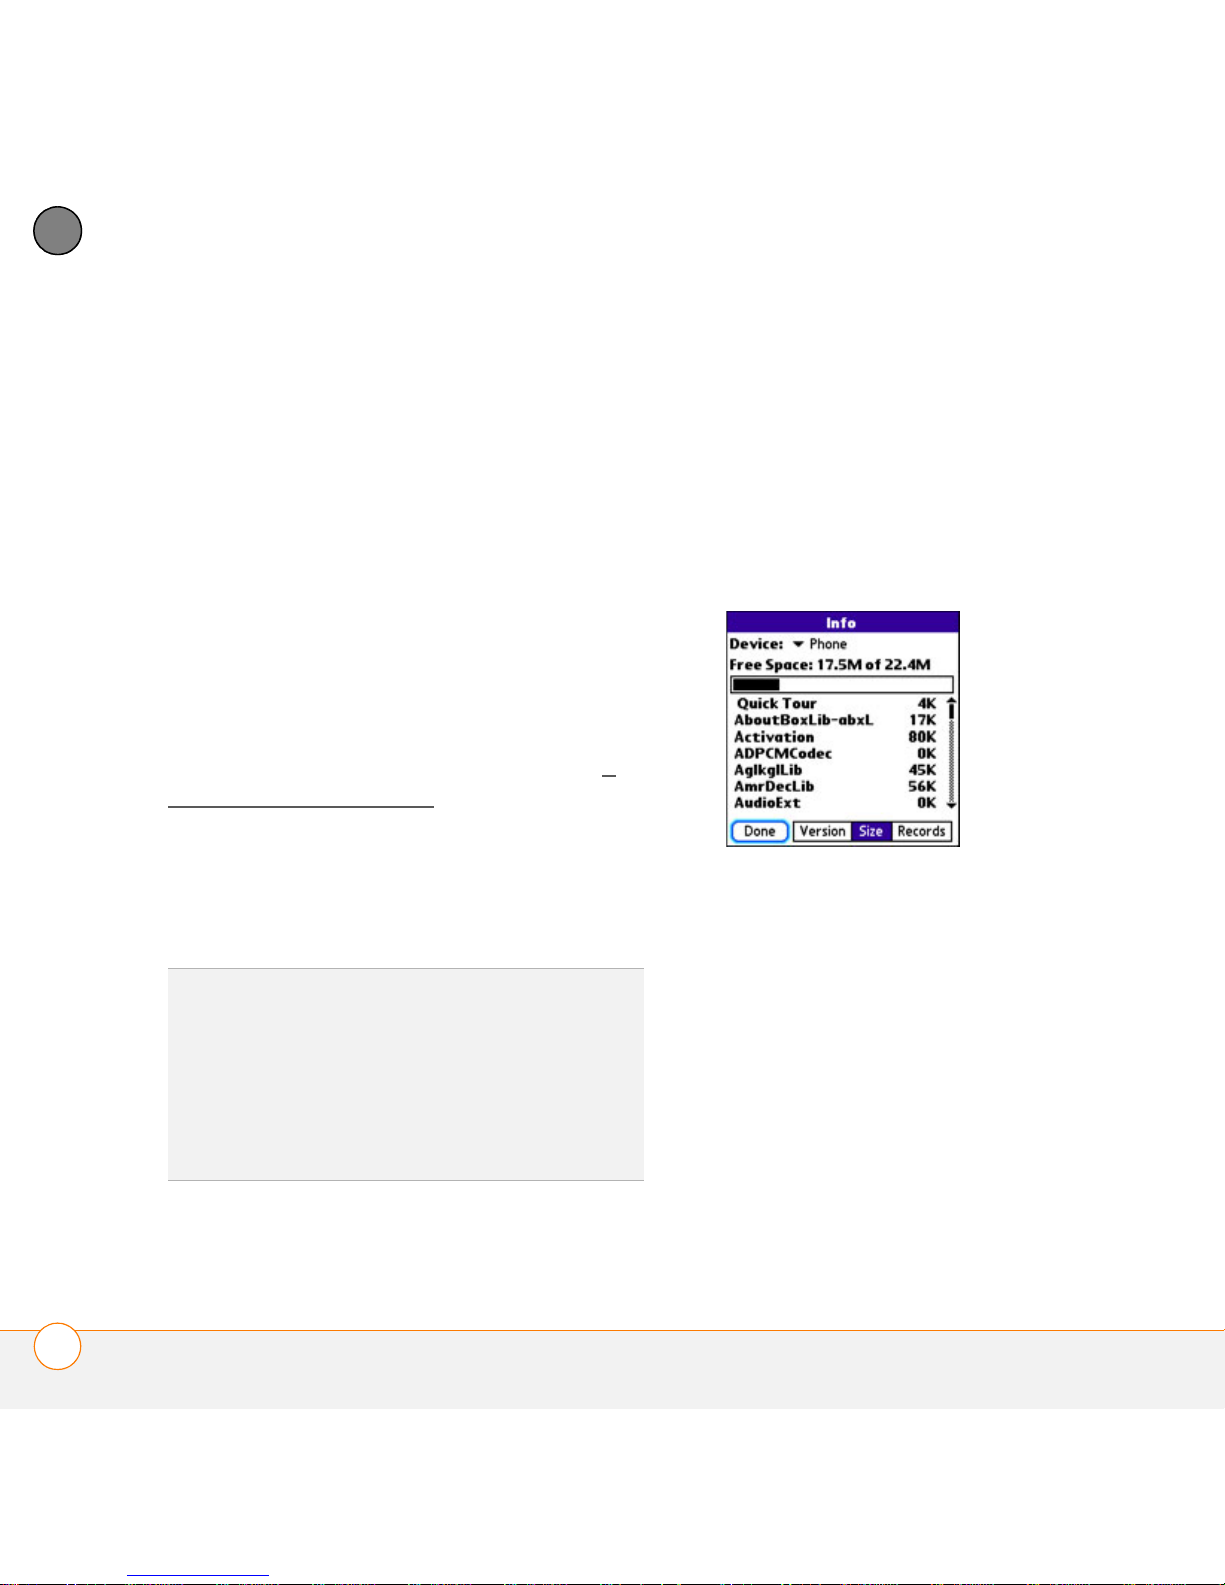
1 Calculate how much space your apps
and info occupy on your previous Palm
OS device:
• In Applications View, open the menus.
• Select Info on the App menu.
• At the bottom of the screen, select
Size.
files are placed in a new folder on your
computer: C:\Program Files\Palm\<device
name>\PalmOS5 Incompatible Apps.
(Can’t find a Palm folder in Program Files?
Then look for a folder labeled palmOne or
Handspring instead. For more info, see I
can’t find my user folder.)
IMPORTANT Do not synchronize your
smartphone with any previous versions of
Palm Desktop software.
• Look at the numbers on the Free
Space line and subtract the number
on the left from the number on the
TIP
We do not recommend using third-party
utilities that back up your old device’s
information onto an expansion card and then
transfer the info to your smartphone. Such
methods transfer all applications to your
smartphone, including ones that are not
designed to work with Palm OS version 5.4.9.
right to calculate the space used. For
example, on the device shown here,
22.4 – 17.5 = 4.9. This means that
4.9MB of space is occupied on this
device.
2 If the space occupied on your previous
device is 64MB or less, then go to step
3. If the space occupied is greater than
64MB, then do any of the following to
24
SETTING UP YOUR COMPUTER FOR SYNCHRONIZATION

SETTING UP
1
reduce the storage space you’re using
before you go to the next step:
• Delete any third-party applications
that you no longer use.
• Move large files, such as eBooks and
images, to an expansion card.
• Move third-party applications to an
expansion card.
• Purge old info in applications such as
Calendar (Date Book), Tasks (To Do),
and email. Refer to the
documentation that came with your
previous device for instructions on
these items.
3 Synchronize your previous device with
your previous desktop software to back
up your information one last time.
4 Install the desktop synchronization
software from your new Palm Software
Installation CD (see Installing the
desktop synchronization software).
5 During the installation process, sync
your smartphone with your new
desktop software as instructed. When
prompted, do the following:
• Connect your smartphone to your
computer (see Connecting your
smartphone to your computer).
• Indicate whether you want to sync
only the info in your PIM apps
(Calendar, Contacts, Memos, and
Tasks) or all info and apps (excluding
apps known to be incompatible).
• Select a device name for your
smartphone; be sure to select the
same name that you used for your old
device. (This is the name that appears
in the User list in Palm
®
Desktop
software.)
6
MAC ONLY If you have pictures on
your previous device, copy them from
your previous device to an expansion
card or beam them to your smartphone.
7 If you plan to continue using your
previous device, perform a hard reset
on your previous device to remove its
associated device name. (See the
documentation that came with your
previous device for instructions on
performing a hard reset.) Each device
you synchronize with your computer
must have a unique name. The next
time you synchronize your previous
CHAPTER
SETTING UP YOUR COMPUTER FOR SYNCHRONIZATION
25

1
SETTING UP
CHAPTER
device with your computer, be sure to
assign it a new name.
If any third-party applications are
quarantined during the installation, do not
manually install them. Contact the
BEFORE YOU BEGIN If you are installing
on a computer at work, make sure your
computer is configured to let you install
new software. Contact your company’s
IT department for help.
third-party developer for software updates
and info about compatibility with your
smartphone.
TIP
If you have trouble upgrading or finding
quarantined files, see Upgrading
.
Installing the desktop synchronization
software
TIP
If you want to sync info with applications
other than Palm Desktop or Microsoft
Outlook, you need to purchase additional
third-party sync software. This sync software
is sometimes called a conduit.
1 Close any applications that are currently
running on your computer, including
those that are minimized. Your
IMPORTANT Even if you already own a
Palm OS device and have installed a
previous version of the desktop software,
computer needs to have all its
resources available to install the
software.
you must install the software from the
Palm Software Installation CD that came
with your smartphone.
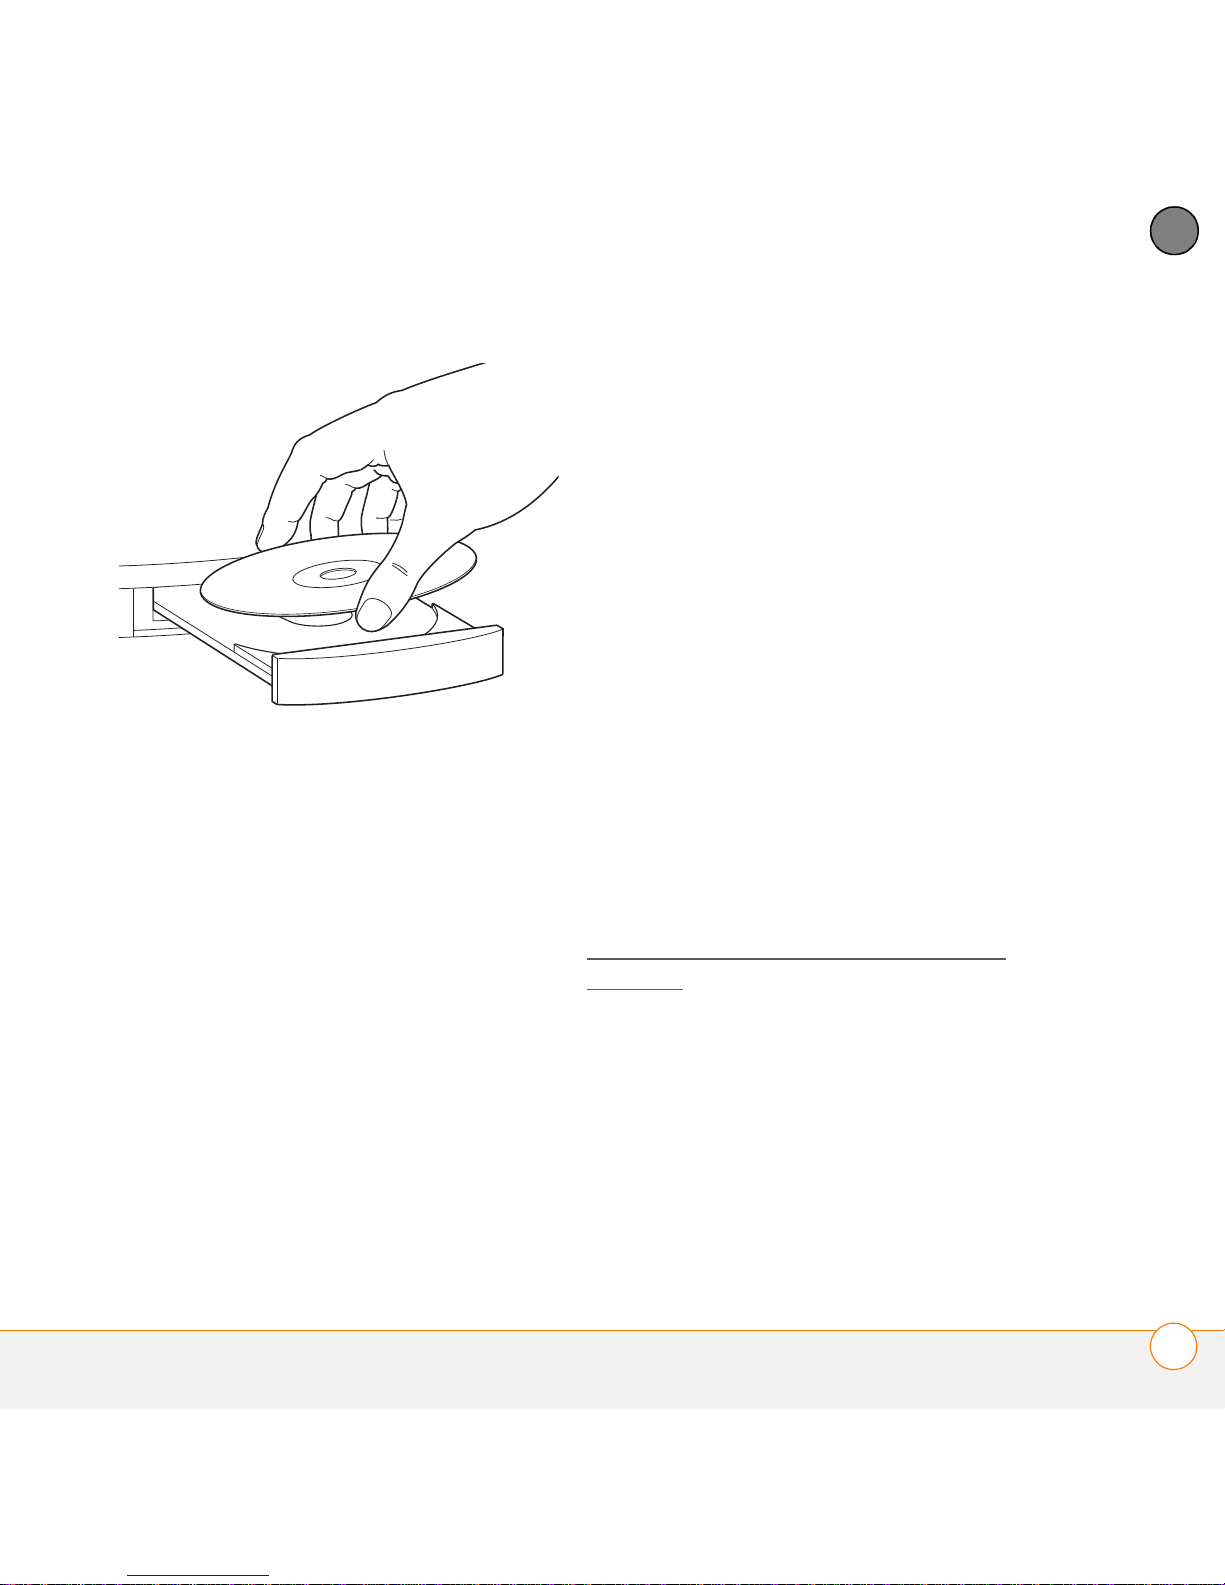
2 Insert the Palm Software Installation CD
into the CD drive on your computer.
NOTE Windows Vista users: Before
inserting the Palm installation CD, please
visit www.palm.com/windowsvista
you’ll find installation instructions and
information about using your smartphone
and desktop software with Windows Vista.
26
SETTING UP YOUR COMPUTER FOR SYNCHRONIZATION
, where
SETTING UP
1
3 If you are installing on a Mac,
double-click the CD icon on the desktop,
and then double-click the Palm
Software.pkg icon.
4 When the installation wizard opens,
follow the onscreen instructions. Please
note these important points about the
installation process:
• When the language selection screen
appears, select the same language
you selected on your smartphone.
• WINDOWS ONLY You can choose
which desktop software you want to
use for synchronization:
Palm Desktop software or Microsoft
Outlook.
NOTE Whether you select to synchronize
with Microsoft Outlook or Palm Desktop
software, Palm Desktop software is still
installed on your computer. If you use
Outlook as your desktop email application,
select Outlook as your desktop
synchronization software. Remember that
when you enter information on your
computer, enter it in the software you
selected in this step.
• The install process prompts you to
connect your smartphone to your
computer. Go to the next section.
0
Connecting your smartphone to your
computer
After you install the desktop software (see
Installing the desktop synchronization
software), you’re ready to connect your
smartphone to your computer.
BEFORE YOU BEGIN To set up your
computer, you need the sync cable that
came with your smartphone.
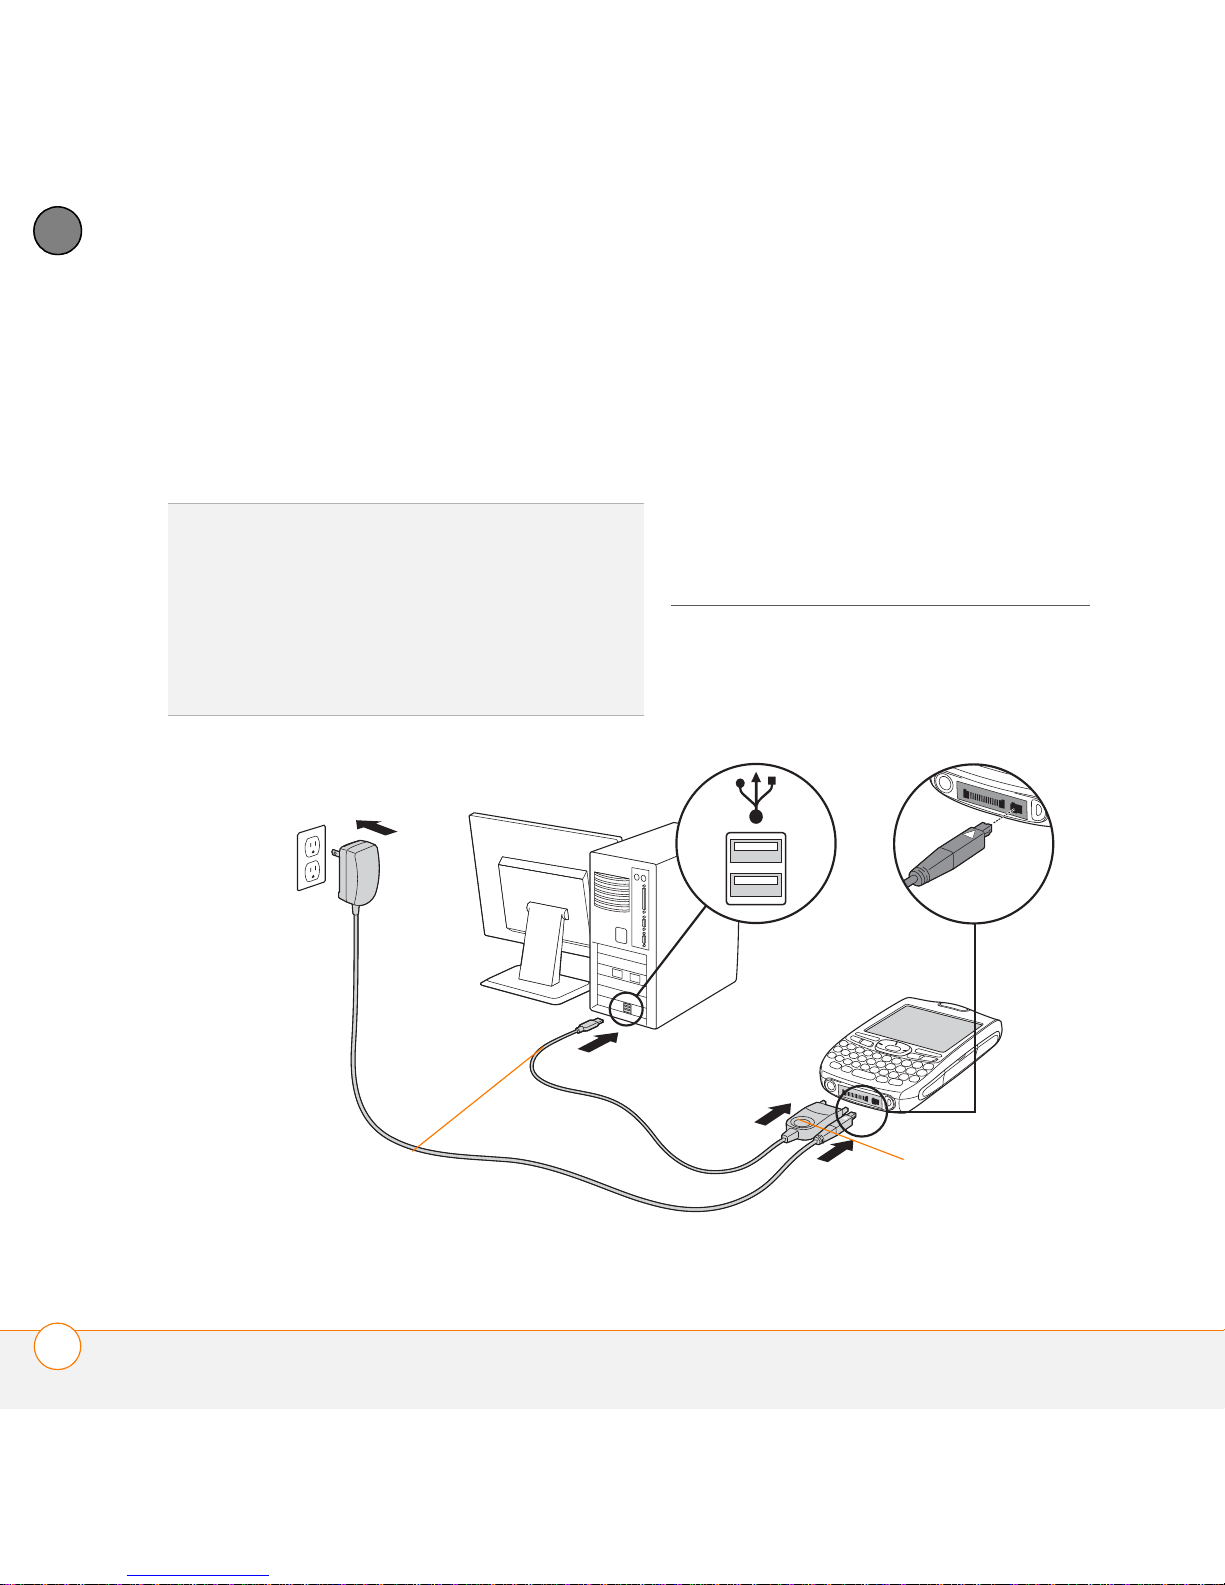
1 If necessary, connect the international
adapter to the AC charger plug.
CHAPTER
SETTING UP YOUR COMPUTER FOR SYNCHRONIZATION
27
1
Sync cable
Sync button
SETTING UP
CHAPTER
2 Plug the AC charger into a wall outlet.
3 Plug the USB sync cable into an
available USB port or a powered USB
hub connected to your computer.
4 With the sync button facing up, connect
the sync cable to the bottom of your
smartphone. Do not press the sync
button until you are instructed to do so.
5 Connect the charger cable to the
TIP
For best performance, plug your sync
cable directly into a USB port on your
computer. If your computer has USB ports on
both the front and back, we suggest using the
back port; the front port is often a low-power
port. If you use a USB hub, make sure the hub
has its own power supply.
bottom of your smartphone.
You are now ready to synchronize; go to
Synchronizing information—the basics
.
28
SETTING UP YOUR COMPUTER FOR SYNCHRONIZATION
SETTING UP
1
Synchronizing
information—the
basics
Synchronizing means that info you enter or
change in one place (your smartphone or
your computer) is automatically entered or
changed in the other; so there’s no need to
enter the info twice. We strongly
recommend that you sync your
smartphone with your computer or
corporate server frequently to keep your
0
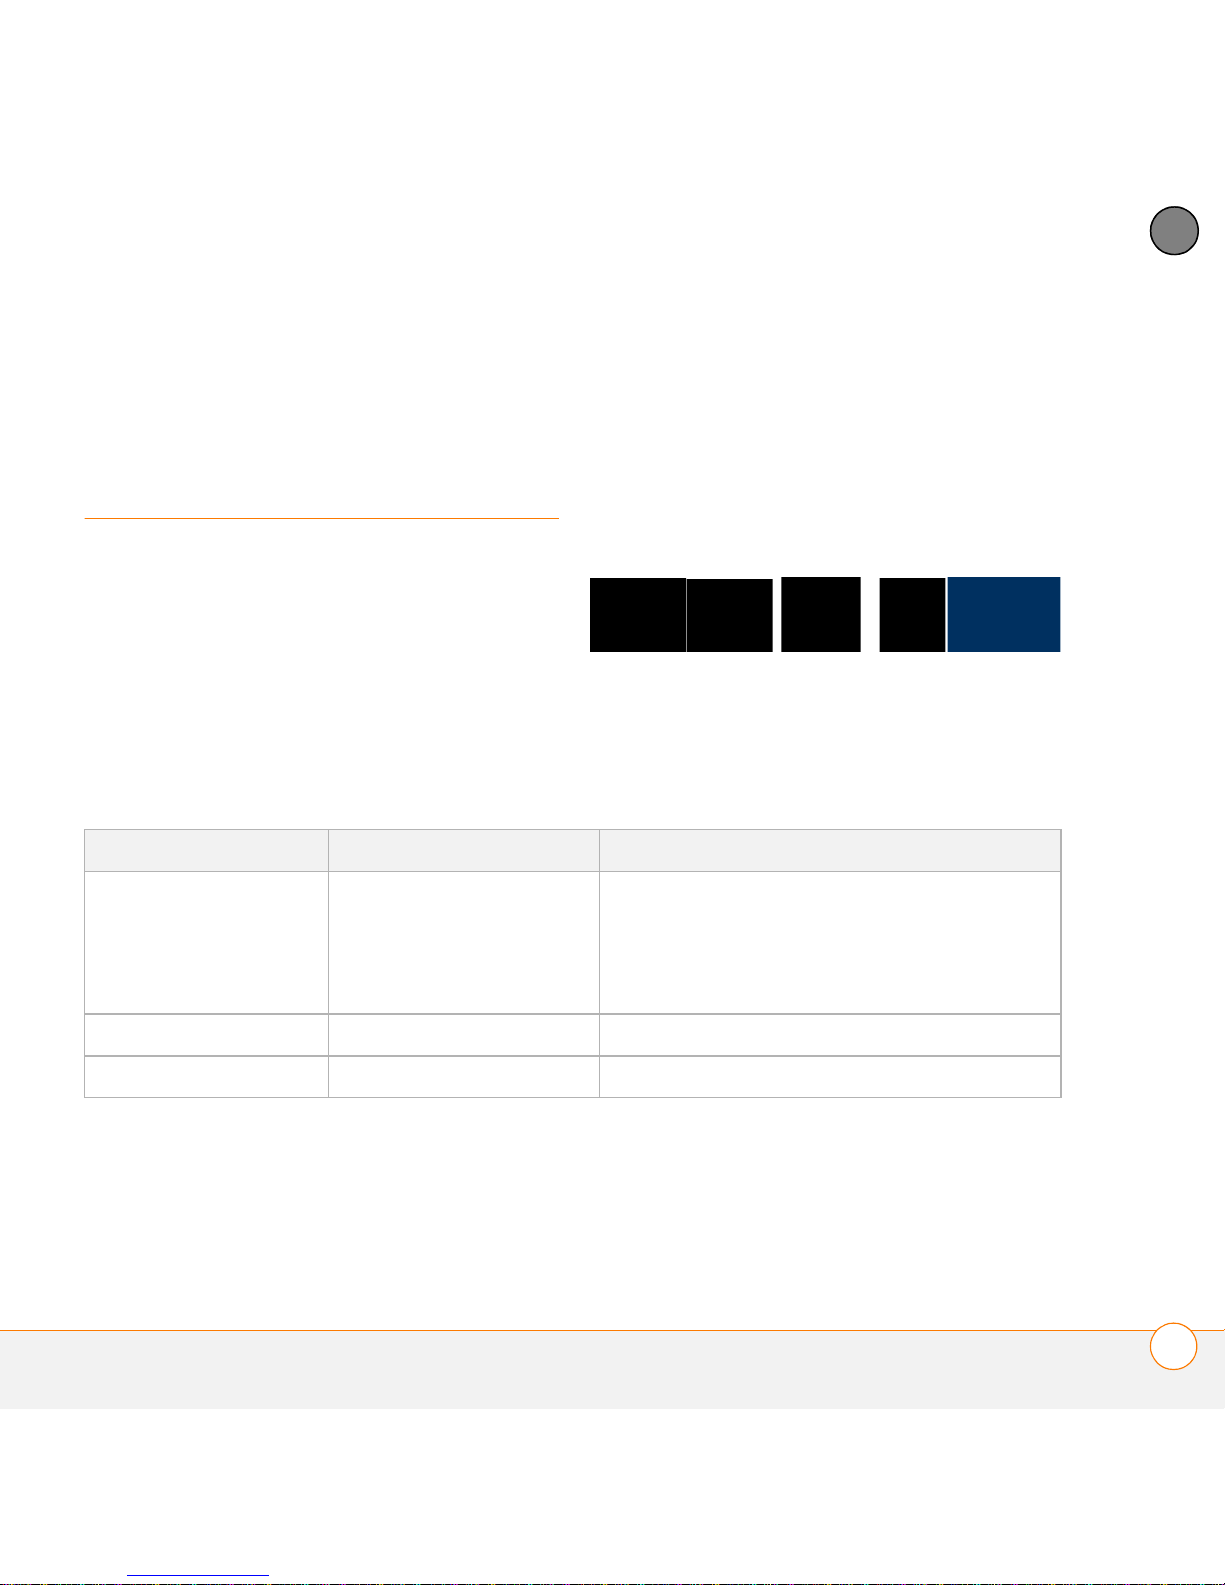
Computer type Desktop software What syncs and where
Windows Microsoft Outlook
info up-to-date (and backed up) in
both locations.
The info from all the following applications
is updated by default each time you sync
your smartphone with your desktop
software:
How each application syncs depends on
your computer type and the desktop
software you are using, as follows:
• Calendar, Contacts, Memos, and
Tasks sync with Outlook
CHAPTER
• Pictures & Videos syncs with
Palm Desktop
Windows Palm Desktop All apps sync with Palm Desktop
Mac Palm Desktop All apps sync with Palm Desktop
SYNCHRONIZING INFORMATION—THE BASICS
29
1
Sync button
SETTING UP
CHAPTER
TIP
For more sync options, including which
apps sync, see Synchronizing information—
advanced.
Messages on both your computer and
your smartphone indicate that
synchronization is in progress.
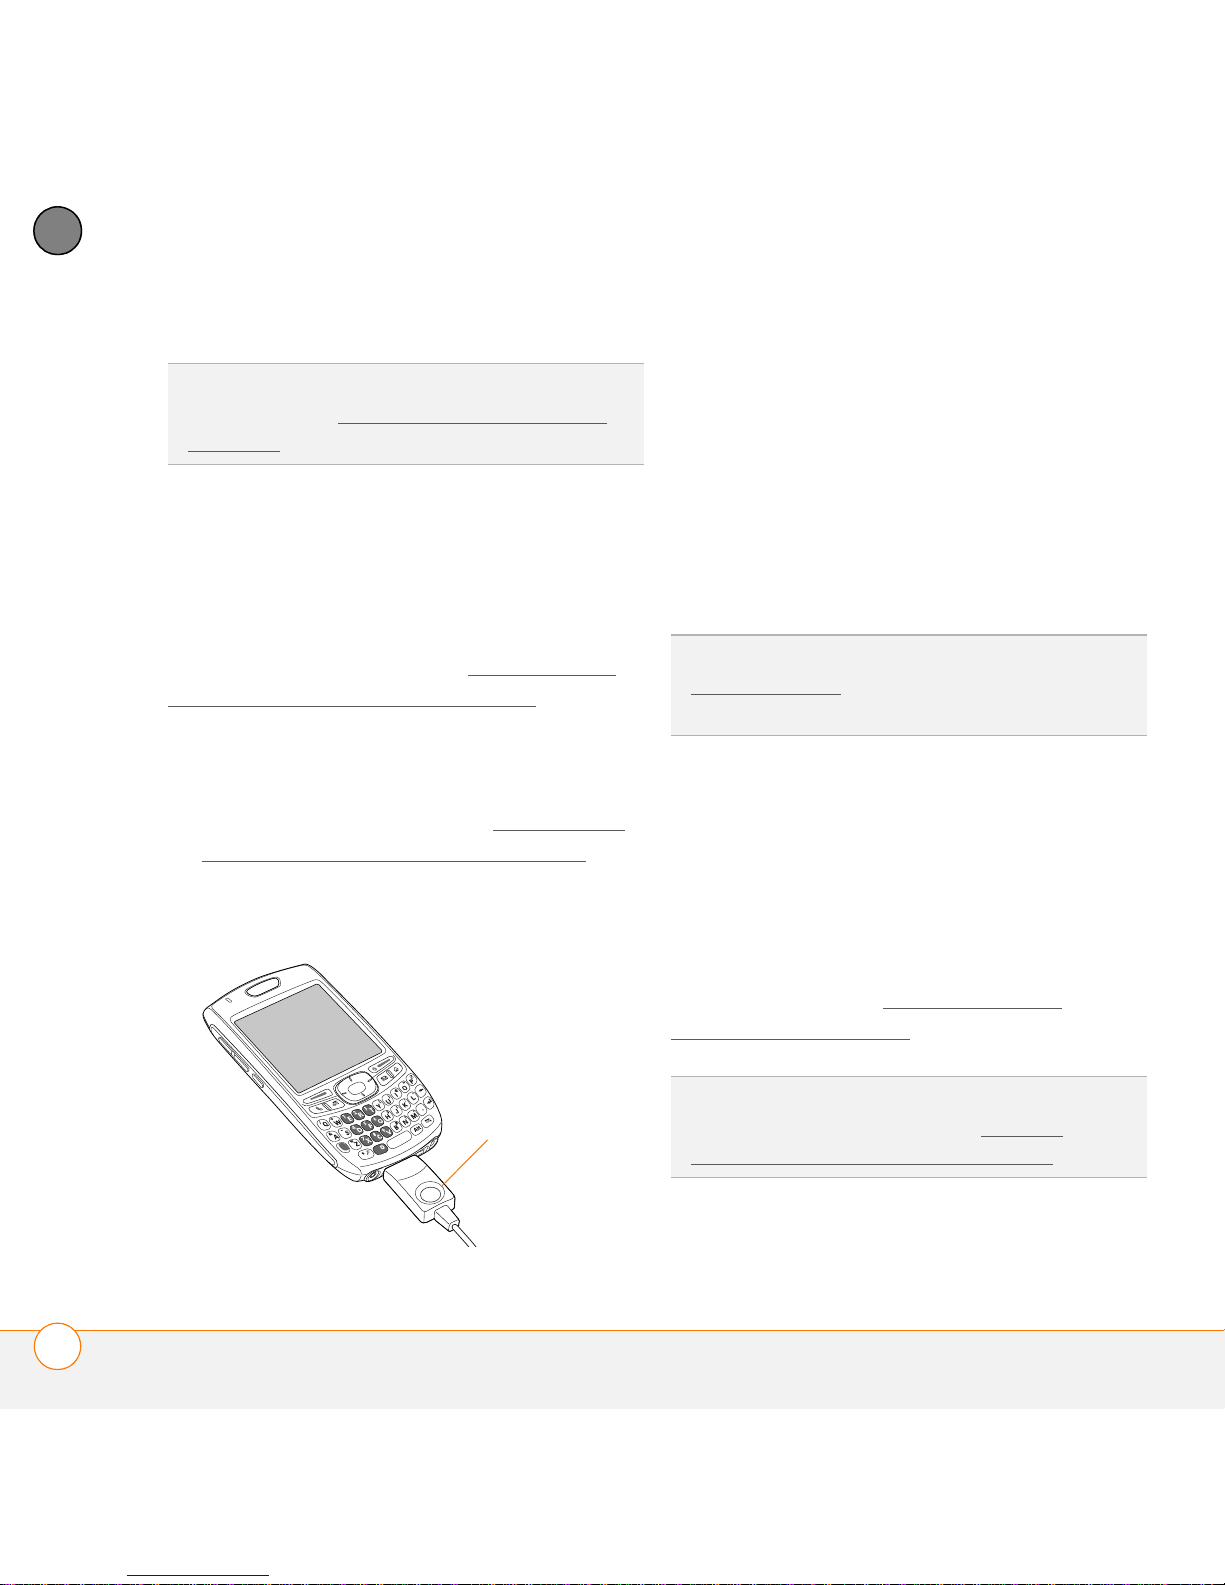
3 Wait until you see the message on your
BEFORE YOU BEGIN To sync your info,
you must install Palm Desktop software
from the Palm Software Installation CD
that came with your smartphone—even if
smartphone that the HotSync operation
is complete; then disconnect the sync
cable. Do not disconnect the sync cable
until you see this message.
you sync with Outlook or another
TIP
third-party application. See Installing the
desktop synchronization software for
instructions.
1 Connect your smartphone to your
computer, as described in Connecting
your smartphone to your computer.
2 Press the sync button on the sync
cable.
Problems synchronizing? See
Synchronization
suggestions.
for troubleshooting
If you’re finishing your initial setup, you
now have the option to install bonus
software from the Palm Software
Installation CD. If you choose to install
some of the bonus software, you need to
sync again to install the software on your
smartphone. You can also install bonus
software later; see Installing bonus
software from the CD.
30
SYNCHRONIZING INFORMATION—THE BASICS
TIP
For info on locating your pictures and
videos on your computer, see Viewing
pictures and videos on your computer.