

Page 1
Puffin Swift
Assembly
and
User Information
ScanSport, Inc. / Pakboats
234 May St
Post Office Box 700
Enfield, New Hampshire 03748 USA
Phone: (888) 863-9500 (toll free)
From outside the US: +1 (603) 632-9500
Fax: (603) 632-5611
Email: [email protected]
www.pakboats.com
Page 2
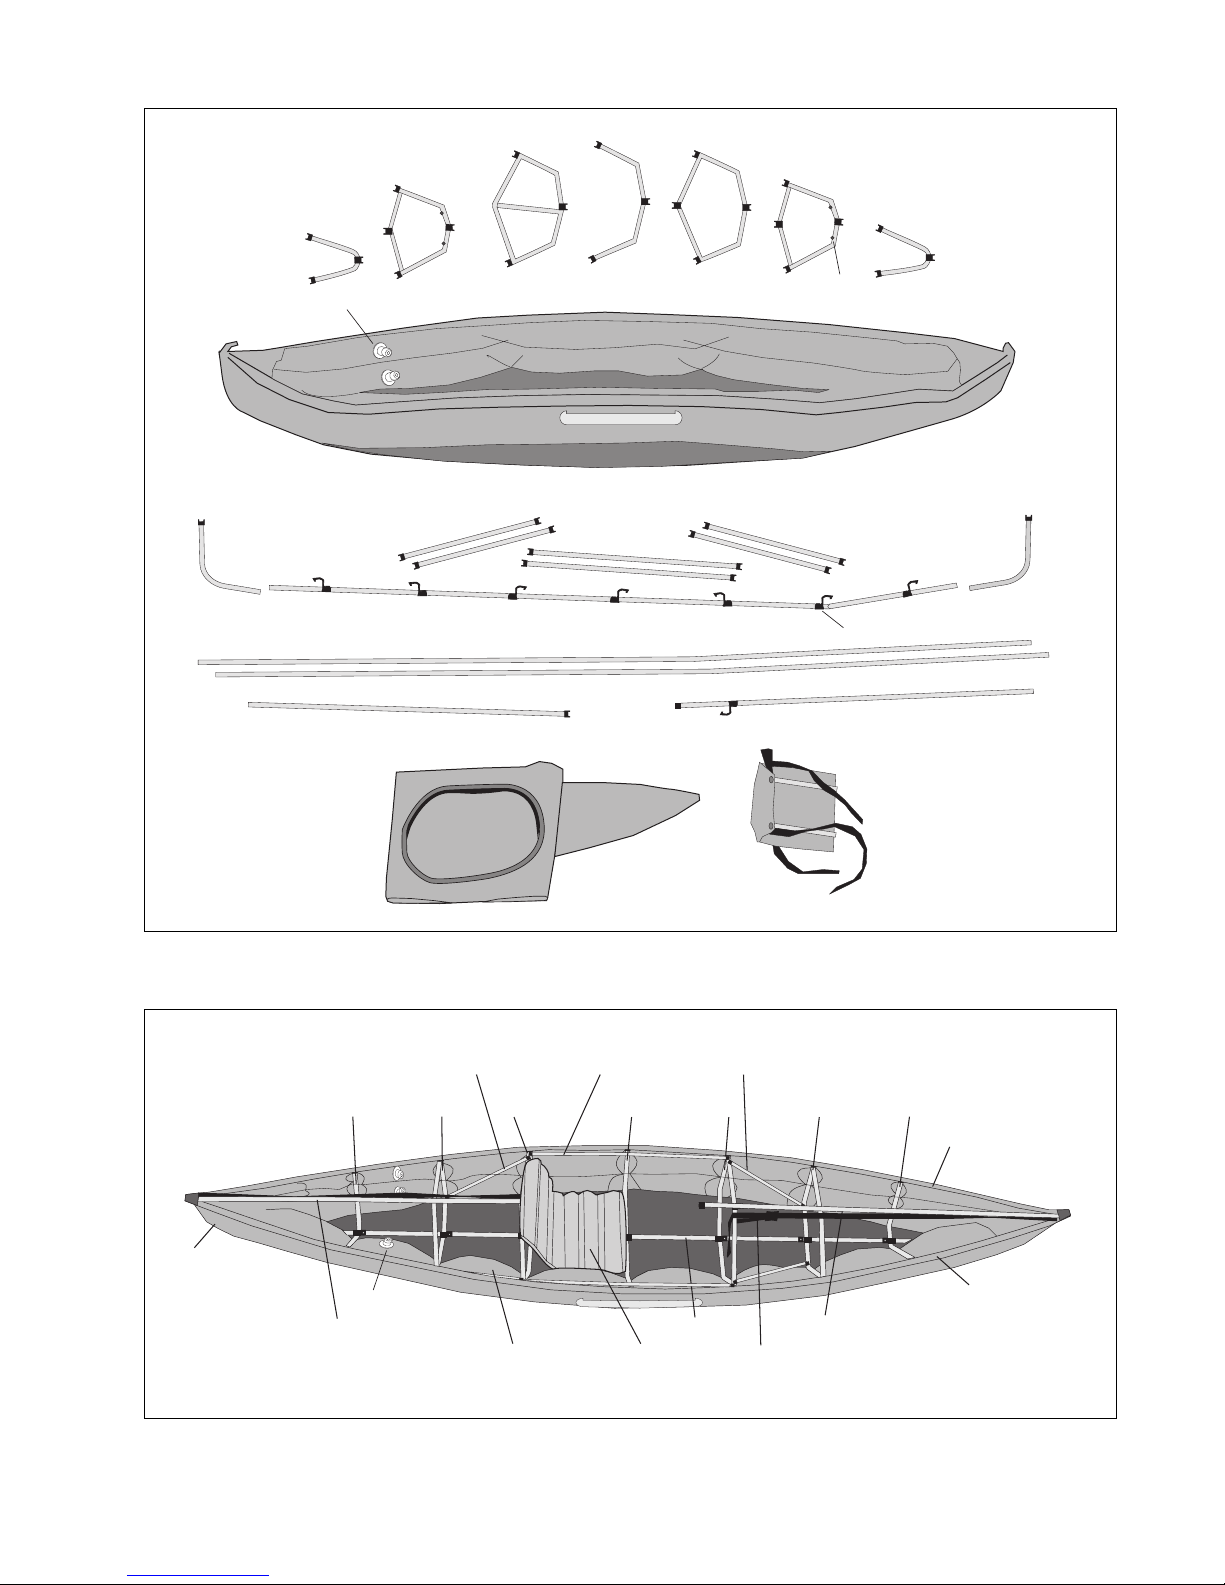
Cross Ribs
(C)
(B1) (B2)
(A)
(C)
Stem
Gunwales
(D)
Air Valve
Stern Deck Support
(F)
Keel
w/clip at end
Support Rods
(E)
(D)
A-stop
(F)
Latch Clip
Forward Deck Support
Seat
Boat Skin
Stem
w/latch clip
Cross Ribs:
Stem
(inside boat skin)
Stern Deck Support
Support Rods:
Air Valve
Inflated Air Tube
Figure 2, Assembled (deck removed)
Deck
Figure 1, Parts
(E) (F)(F)
(A)(B1) (B2)(C) (C)(D) (D)
Keel
Seat
Forward Deck Support
Strap
Gunwale
(
in channel)
Gunwale
(
in channel)
– 2 –
Page 3

Assembling the Puffin Swift
NOTE! We recommend that you study this manual carefully before you start the assembly
procedure! When assembling the Puffin Swift, please refer to Figure 1 and Figure 2
of this manual.
1. Roll out the boat skin and assemble all the
rods.
2. Insert both gunwales as far as they will go.
Close the black flaps to cover the ends.
3. Assemble keel and stems.
4. Position keel and stems inside the boat skin.
5. Clip tube stubs at end of boat skin onto the
plastic fittings on top of the stems.
Cross Rib
Elastic
Band
Figure 3, Latch Clip
Keel
Latch
Clip
➜ The sections of the long rods are
internally connected by elastic cords to
ensure correct assembly.
➜ The two longest rods are gunwales. They
are to be inserted in channels along the
edges of the boat skin. The channel
openings are under black flaps at one end of
the skin.
➜ The curved pieces with plastic fittings are
stems. The narrow end of the stems fit into
the keel.
➜ The keel will now be at an angle.
➜ The cross ribs are connected to the keel
by means of latch clips. Each cross rib has a
plastic clip at the center. Position this clip on
the keel as shown in Figure 3 and press in
the direction of the arrow until the latch clip
locks. Mount the elastic band to secure the
locking.
➜ The ends of the cross ribs clip to the
gunwales at openings in the gunwale
channels.
6. Mount cross rib (C) at the angle point of the
keel.
7. Mount cross ribs (A), (B1) and (B2).
8. Mount the three remaining crossribs, (C)
and (D).
– 3 –
➜ To install rib C the keel angle is moved to
the center of the kayak.
➜ As the cross ribs are installed the keel
will gradually straighten.
NOTE: The hull is symmetrical. It does not
matter at which end cross ribs (B1) and (B2)
are installed.
➜ The rear part of the kayak will be where
rib (B1) is installed.
➜
Make sure the keel is straight and the stems
are centered in the ends of the boat skin.
NOTE: Cross ribs lock to the gunwales when
the “wing” on the connecting clip is aligned
with the gunwales.
Page 4
9. Inflate upper air tubes just enough to give a
little pressure. Inflate lower air tubes
alternately until they feel hard (about as much
as you can easily do with the pump provided).
Continue inflating upper air tubes alternately
until full pressure is obtained.
➜ Make sure the keel is straight during the
iinflation. If it bowes to one side, add more
pressure to the air tubes on that side. The
hull is straight when the keel is between the
two white lines.
10. Mount the forward deck support.
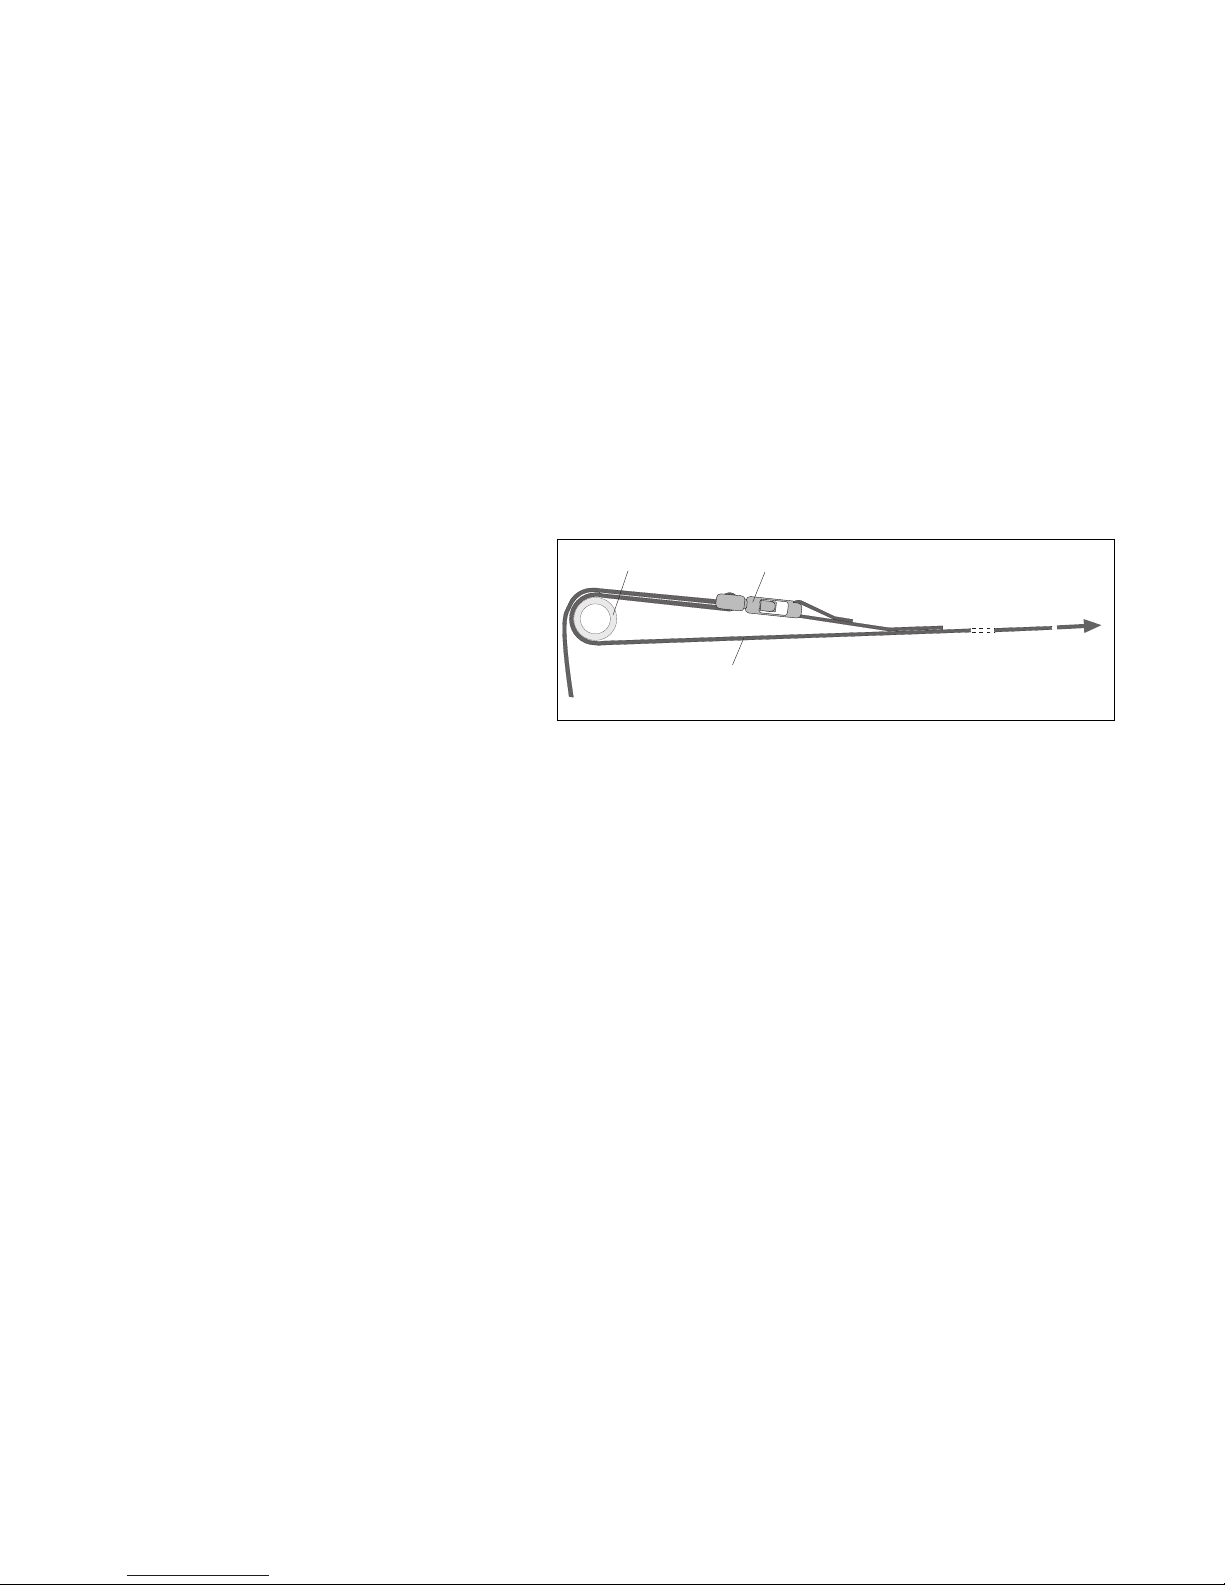
11. Locate the strap attached to the front end of
the boat skin and secure cross rib (B2) as
shown in Figure 4.
Cross Rib (B1 or B2)
12. Mount the stern deck support.
➜ The straight rod with a latch clip close to
one end, is the forward deck support. The
latch clip will attach to a corresponding clip at
the top of cross rib (B2). The clip at the other
end of the rod should be attached to the
stem near the top.
Buckle
Attached to
end of boat skin
Strap
Tighten well!
Figure 4, Securing Cross Ribs (B1) and (B2)
➜ The straight rod with a clip at each end, is
the stern deck support. One clip will attach to
the top of cross rib (B1). The other end of the
rod should be attached to the stem.
13. Locate the strap attached to the rear end of
the boat skin and secure cross rib (B1) as
shown in Figure 4.
14. Inflate the seat.
15. Mount the seat.
– 4 –
➜ The seat should not be completely full of
air.
➜ The seat is placed with the aluminum
frame to the back against cross rib (B1).
Front seat-straps: Around cross rib (A)
and back to snap.
Back seat-straps: Run longest end under
cross rib (B1) and keel, and buckle to
short end.
The seat is equipped with additional
straps on each side for back adjustment.
Page 5

16. Mount support rods (E)
➜ The two longer rods with a clip at each
end, are support rods (E).
The support rods (E) are attached, on each
side, between the cross braces of cross ribs
(B1) and (B2). Mount the rods as near to the
gunwales as possible.
17. Mount support rods (F).
18. Hook “short” end of deck over the stern
(boat’s rear end) and pull other end of
deck towards the boat’s front end.
Support the boat with your foot while
stretching the deck to fit over the bow.
➜ The four shorter rods with a clip at each
end, are support rods (F).
The support rods (F) are attached, on each
side, sloping between the cross braces of
cross ribs (B1/B2) and the lower part of cross
rib (C).
NOTE:
At the (C) end, attach the support rib (F) on
the outer side of the stop.
At the (B1/B2) end, the support rib (F) is
attached next to the end of rod (E).
➜ Both ends of the deck must be in place
before the hook and loop fastener along the
edge of the deck is attached to the hull.
The Puffin Swift is now complete.
– 5 –
Page 6

Note!
• Reduced pressure in the air tubes is common if you assemble the boat on a warm,
sunny day and go paddling in cold water. Under these conditions you should add some
extra pressure during assembly.
Disassembling the Puffin Swift
Disassembling is essentially the assembly process in reverse, but there are a few
important details:
➜ Undo all the hook and loop fasteners before you try to get the ends of the deck off.
➜ Open the air tube valves .
➜ To remove the gunwales:
• Open the black flaps to expose the gunwale ends.
• Grip the exposed end of the gunwale and lift it above the gunwale channel.
• Make sure the gunwale does not have fabric tightly around it.
• Torque the gunwale so it forms an arc and pull it out. It should slide out easily.
• If the gunwales do not slide out easily
• Move to the other end of the boat
• Grip the side fabric on one side just below the gunwale, about a foot (30 cm)
from the end.
• Push with the other hand against the end of the gunwale.
• Straighten the boat skin, move your hands, and repeat the process on both
sides of the boat until the gunwales can easily be pulled out.
➜ Roll up the boat skin from the end opposite the valves.
– 6 –
Page 7

Safety
• Always wear a personal flotation device.
• Know your abilities and do not exceed them.
• Be aware of changing weather conditions.
General Information
Storage Your Puffin Swift is equally happy stored assembled or packed in the bag.
Salt Water Following exposure to salt water, rinse the Puffin Swift in fresh water if you can.
This will help preserve the Puffin Swift’s appearance.
Repairs HULL - If you need to repair a puncture or abrasion of the hull, use a patch of the
same material and the repair kit adhesive. Cut a patch to cover an area about 3/4"
past the damaged area of the hull. Round the corners of the patch. Cover the patch
and the area the patch will cover with a thin coat of adhesive. Wait until the adhesive feels dry to the touch and immediately apply patch. Press down well. The
adhesive will cure for twenty-four hours, but the Puffin Swift can go in the water
immediately after a patch is applied.
AIR TUBES - A puncture of an air tube can be repaired the same way as the hull.
Small punctures may be repaired without a patch. Coat the puncture repeatedly
with the repair kit adhesive, letting the adhesive dry between each coat.
NOTE: There must be no pressure in the tube or seat when being repaired.
– 7 –
Page 8

ScanSport, Inc. / Pakboats
234 May St
Post Office Box 700
Enfield, New Hampshire 03748 USA
Phone: (888) 863-9500 (toll free)
From outside the US: +1 (603) 632-9500
Fax: (603) 632-5611
Email: [email protected]
www.pakboats.com
 Loading...