

Page 1
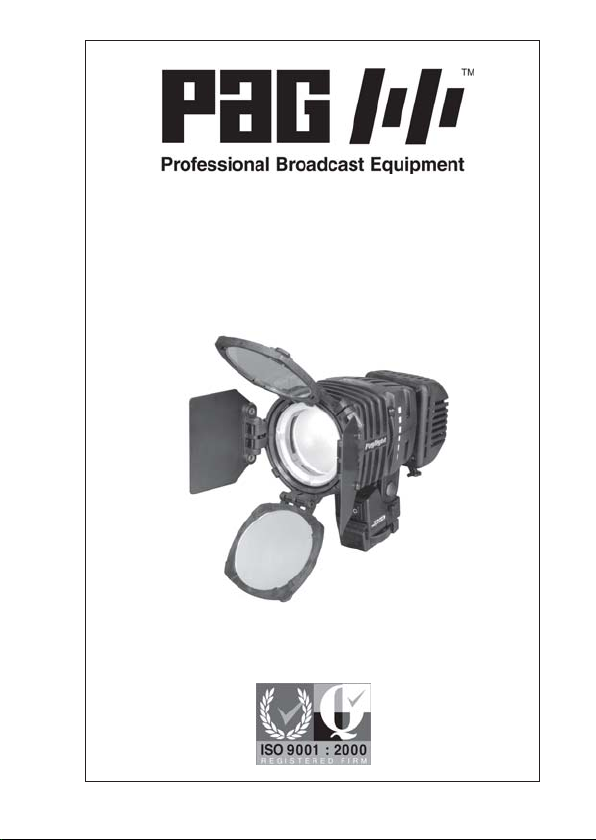
Paglight
Professional Camera Light
Instruction Manual
Page 2
Page 3
Paglight
Professional Camera Light
Instruction Manual
CONTENTS
SECTION PAGE
1 SAFETY 2
2 SPECIFICATION 4
3 OPERATION AND MAINTENANCE 6
4 PAGLIGHT SYSTEM 12
5 WARRANTY 17
Page 4

SECTION 1
SAFETY
PLEASE READ THESE INSTRUCTIONS CAREFULLY BEFORE USE.
This leaflet contains important safety information.
1.1 Low voltage DC input only. Do not connect to incorrect
supplies (see Specifications).
1.2 Avoid the possibility of water ingress. This could cause the
lamp to rupture forcibly.
1.3 The Paglight is not intended for any use other than video
lighting purposes.
1.4 Do not disassemble the Paglight or any of the lamp holder
units. There are no user-serviceable parts. Incorrect
reassembly may result in a safety hazard.
1.5 Do not operate if the fixed safety glass is cracked or broken.
1.6 Do not leave the Paglight switched on while unattended.
Do not obstruct the cooling vents or operate near combustible materials. Allow the Paglight to cool before storage.
1.7 Always turn-off the Paglight before removing or replacing any
of the plug-in lamp holder units.
1.8 The PowerArc generates high voltages when striking. Do not
insert a damaged or misaligned lamp into the Paglight.
1.9 For optimum performance never handle the lamp’s quartz
envelope directly. Should you inadvertently handle the quartz
2
Page 5

envelope you must clean it carefully with methylated spirit
or industrial alcohol, using a lint free cloth.
1.10 The LED Dimmer Unit is designed for use only in conjunction
with the 12V Broadcast Paglight. NEVER attempt to run the
unit away from its enclosure.
IMPORTANT: Never stare directly into the emitters when
lit.
For optimum performance never leave the soft acrylic domed
lens, situated at the end of the silver aluminium heat sink,
unprotected and exposed to dust. If the domed lens becomes
dusty, you must clean it carefully with a moistened finger.
Use of a cloth will merely add more dust particles.
1.11 After removing the lamp holder units from the Paglight
always place them in a PAG heat-resistant lamp protector, to
avoid contact and damage to the unit.
3
Page 6

SECTION 2
SPECIFICATION
2.1 HALOGEN LAMPS:
Low voltage halogen capsules, long life (2000 hours at 12V).
Voltage: Nominal 12V.
Watts: 20W (M76)
35W (M75)
50W (M32)
75W (M73)
100W (M28)
Colour Temperature: 3200°K at 12V (5600°K with dichroic
filter).
Filament: Axial filament with centre 30mm from end of pins.
Base: Type GY6.35.
2.2 POWERMAX/VARILUX LAMP HOLDER:
Input Voltage: Maximum 20V DC.
Output Voltage: Regulated 12V DC.
Maximum consumption: 100W nominal.
2.3 PAG POWERARC (LAMP):
Low wattage, single-ended short-arc metal-halide lamp.
Wattage: 24W.
Colour Temperature: 5600°K.
Lumens: 1850.
Warm-up Time: 20 seconds to 90% of full output. 30
seconds to normal colour temperature.
PAG POWERARC (BALLAST):
Input Voltage: 10V-16V DC. 32W.
Output Voltage: Striking 3000V, running 60V.
4
Page 7

2.4 LED DIMMER UNIT:
Input Voltage Range: 10V to 20V DC.
Power Consumption: 11W.
Output: 850 lux at 2m (spot), 175 lux at 2m (flood).
Spot and Flood Angles: Flood 62°, Spot 22.6°.
Colour Temperature: The colour temperature of the LED
output is a perfect blend with daylight.
2.5 PAGLIGHT BASE CONNECTIONS:
PP90: Centre pin negative.
XLR-4: Pin 1 negative, Pin 4 positive, Pins 2 & 3 (no
connection).
2.6 GENERAL:
Voltage: Nominal 12V to 14.8V battery supply.
Maximum Power Rating: 100W lamp with 13.2V battery.
5
Page 8

SECTION 3
OPERATION AND MAINTENANCE
3.1 HALOGEN LAMP HOLDERS:
There are three halogen lamp holder units Standard, Softstart
and PowerMax Control/VariLux. They utilise 12V halogen
lamps, available in 5 wattages: 20W, 35W, 50W, 75W and
100W. Halogen lamp holders can be exchanged instantly
without the need to handle the bulb.
The Softstart lamp holder is designed for use with suitable
Lithium-Ion batteries, capable of powering both a mediumconsumption broadcast camera and a light of up to 35W
(check with the battery manufacturer). Lithium-Ion batteries
incoporate electronic over-current protection that may be
triggered by the high current pulse that occurs when a
tungsten-filament light is turned on from cold. The Softstart
lamp holder overcomes this effect. This unit will not be
required when using the regulated light socket on a Sony
digital camera, or if the camera is fitted with PAG System
RTI, and the Softstart feature is enabled.
Halogen lamps, typically specified for 12V operation, are
over-run when they are used with 13.2V or 14.4V camera
batteries, and consume far more power than they are
designed to. The specified wattage of a 12V halogen lamp is
correct only at 12V, and rises proportionally with the supply
voltage. A fully charged 13.2V Nickel-Cadmium battery can
present over 16V at the terminals, and a 12V '100W' lamp
connected to such a battery can actually consume over 135W
of power. The result is reduced camera run time, shortened
lamp filament life, and incorrect colour temperature. It is
6
Page 9

also possible for the camera low-voltage cutout to be
triggered as a result of the voltage depression caused by the
unnecessarily heavy load on the battery. For these situations
we recommend the use of the PowerMax Control/VariLux
lamp holder, which incorporates a voltage control circuit. The
PowerMax unit efficiently regulates the running voltage of
the Paglight while conserving the unused battery power,
thereby extending available run-time by as much as 25%. In
addition to this, colour temperature remains constant and
lamp filament life is dramatically improved.
The VariLux feature of PowerMax is a dimming facility that
enables you to control the light output, which unlike other
systems, further conserves battery power. The manual control
features a detent position which corresponds to the midpoint in the brightness range. NOTE: The PowerMax is not
suitable for use with the 30W regulated light outputs of
Sony SX cameras.
3.2 POWERARC UNIT
The PowerArc unit enables the Paglight to be instantly
converted from tungsten halogen to a daylight balanced
metal-halide arc light. The ballast and lamp combined
consume approximately 55W in total, whilst having an
output equivalent to nearly 100W of halogen light. The
output can be converted to match halogen using PowerArc
Conversion Filter Model 9973.
3.3 LED DIMMER UNIT
The LED Dimmer unit provides a daylight balanced output,
equivalent to 50W of halogen light, but with a low power
consumption of 11W. The intensity of the light can be
adjusted by using the dimmer control situated on the rear of
the unit. Additionally, the spot and flood facility of the
Paglight lamp head can be used. The output can be
7
Page 10

converted to match halogen using LED Conversion Filter
Model 9998.
3.4 PLUGGING A LAMP HOLDER UNIT INTO THE PAGLIGHT:
IMPORTANT: First turn-off the Paglight.
To avoid the risk of damage when inserting any lamp holder
into the lamp body, ensure that the lamp is correctly aligned
through both reflectors. Gently engage the unit into the
body of the Paglight. When it is fully home the securing
latch will lock. To ensure compliance with the EMC Directive
89/336/EU a suppressor is supplied with the PowerArc unit.
This should be clipped around the supply cable as close to
the unit as possible.
3.5 REMOVING A LAMP HOLDER UNIT FROM THE PAGLIGHT:
IMPORTANT: First turn-off the Paglight.
Pressing the release button, gently withdraw the lamp holder
from the rear of the Paglight keeping it straight until the
quartz envelope is clear of the lamp body. Remember that
the lamp may be very hot. In the interests of safety, the unit
should be placed in a PAG Lamp Protector immediately
following withdrawal from the Paglight. This will also protect
the lamp during storage and transportation.
3.6 CHANGING HALOGEN LAMPS:
Allow the old lamp to cool before removing it from the lamp
holder. The halogen lamp is a push fit into the lamp holder.
Gently push the lamp into the lamp holder taking great care
not to twist or bend the pins. Do not handle the glass
envelope directly. If it is touched inadvertently, clean it with
a lint-free cloth moistened with methylated spirit. Finger
marks cause hot spots in the lamp, leading to reduced life
and possible rupture of the glass.
8
Page 11

3.7 CHANGING POWERARC LAMPS:
IMPORTANT: See the instructions supplied with the arc lamp
or PowerArc Unit before fitting. Remove the quartz arc lamp
from the packaging without touching the quartz envelope
itself. The arc lamp is a push fit into the lamp holder.
Carefully holding the arc lamp by its base flange and without
touching the quartz envelope, align the indexing slot of the
flange with that of the PowerArc lamp holder. Gently push
the arc lamp into the lamp holder taking great care not to
twist or bend the pins.
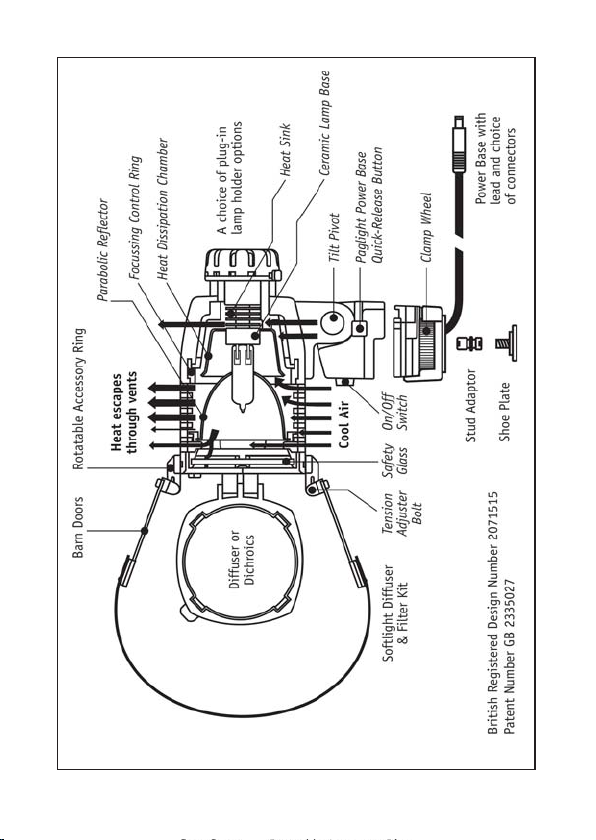
3.8 THE LAMP HEAD:
The lamp head incorporates a tilting facility with a friction
locking mechanism. From the horizontal, the lamp head can
be adjusted upwards by 85°and downwards by 15°. The
friction lock includes an adjustment lever which can be
positioned in any orientation.
Focusing is provided by a lever on each side of the lamp
body, and is continuously variable from narrow to wide
angle, thereby increasing or decreasing light intensity.
A toughened, heatproof safety glass is provided at the front
of the light. This provides protection from flying glass in the
unlikely event of a quartz lamp envelope forcibly rupturing.
Never operate the light if this glass is broken or missing.
The lamp head is designed around a clever heat dissipation
system, which allows external parts of the light to operate at
a far lower temperature than other models currently on the
market. However, halogen lamps operate at very high
temperatures (the quartz envelope can reach 900°C), and
considerable heat can still be projected from the front of the
light, especially when using high wattage lamps. Do not
operate the light with the barn doors fully closed.
9
Page 12

Do not operate the light in the vicinity of highly combustible materials, especially explosive heavy vapours. Never leave
the light turned on while unattended. Do not obstruct the
airflow through the cooling vents.
3.9 THE PAGLIGHT HOT-SHOE POWER BASE:
The Paglight Power Base incorporates a swivelling facility
with a captive locking mechanism. Use the 1/4" Whit. stud
or Camera Shoe Plate to fit the Power Base directly to the
camera. Always tighten the locking wheel firmly; this will
secure the base while retaining the swivelling facility.
Paglight Power Bases are available with the following
connectors and lead lengths:
PP90: for connection to the power output socket of the
PAGlok Connector (available in 150mm, 500mm and 1.5m
lead lengths).
XLR-4: for connection to an XLR-4 output (lead length 1.5m).
D-Tap: a 2-pin connector for a Sony camera light output
(lead length 150mm) or Anton-Bauer battery mount light
output (lead length 500mm).
The Paglight can be quickly detached from its low-profile
hot-shoe Power Base, allowing the camera to be stowed in
its flight case without the need to remove the base and
wiring. The light is removed from the base by depressing the
release catch and sliding the lamp head rearwards.
3.10 FILTERS AND BARN DOORS:
An accessory ring fits onto the front of the Paglight, and
accepts a range of snap-in filters and barn doors (parallel
and tapered). The accessories include colour temperature
10
Page 13

conversion filters and a frosted diffuser. The ring will
accommodate any four accessories, available either as a
complete kit, or individually. Accessories are a snap-fit onto
the ring, and may be assembled in any permutation. To
adjust the position of the accessory ring, slacken the screw,
rotate the ring to the desired position, and re-tighten the
screw. To remove the ring, unscrew the screw completely, and
expand the ring over the front rim of the light. The barn
doors and filters feature screws to adjust the tension of the
hinges.
3.11 SERVICE:
If a fault develops, do not disassemble the Paglight or its
ancillaries. The electronics assemblies do not require periodic
maintenance, and contain no user-serviceable parts.
Unqualified personnel should not attempt further investigation. Any such interference will invalidate the guarantee,
may give rise to a fire hazard or the risk of electric shock,
and could cause more damage than the original fault.
In order to maintain the PAG quality standard for which this
product was originally selected, seek advice from your
nearest PAG Dealer or direct from PAG Ltd. London by
telephoning +44 (0)20 8543 3131, or by emailing
service@paguk.com
11
Page 14

SECTION 4
PAGLIGHT SYSTEM
PAGLIGHT SYSTEM:
Components of the Paglight system may be purchased separately.
See Page 15 for an illustration of the Paglight System.
Lamp Holders:
9950 Standard Halogen (includes lamp protector).
9938 Softstart Halogen (includes lamp protector).
9958 PowerMax Control/VariLux Halogen (includes lamp protector).
9955 PowerArc HMI (includes lamp protector).
9997D LED Dimmer (includes lamp protector).
9968 Lamp Protector.
Lamps:
9930 Halogen Lamp: 12V 20W.
9931 Halogen Lamp: 12V 35W.
9912 Halogen Lamp: 12V 50W.
9932 Halogen Lamp: 12V 75W.
9911 Halogen Lamp: 12V 100W.
9967 Arc Lamp.
Filters and Barn Doors:
9959 Halogen Rotatable Accessory Kit.
Comprises rotatable accessory holder, 1 pair of parallel
barn doors, 1 dichroic filter (converts halogen to
daylight) and 1 diffuser.
9959D LED Rotatable Accessory Kit.
Comprises rotatable accessory holder, 1 pair of parallel
barn doors, 1 LED conversion filter and 1 diffuser.
9953 Rotatable Accessory Holder (ring only).
9951 Dichroic Filter. Converts nominal colour temperature
12
Page 15

from halogen (3200°K) to daylight (5600°K).
9973 PowerArc Conversion Filter. Converts PowerArc colour
temperature from daylight (5600°K) to halogen
(3200°K).
9998 LED Conversion Filter. Converts LED unit colour
temperature to match halogen (3200°K).
9952 Diffuser.
9954 Parallel Barn Doors (pair).
9963 Tapered Barn Doors (pair).
9983 Softlight Diffuser & Filter Set.
Comprises: 2 filter holders, 2 Softlight diffusers, 2 full
CT blue filters, 2 half CT blue filters & 2 full CT orange
filters.
9979 Replacement Softlight diffusers x 6.
9984 Replacement Filter holders x 2.
9980 Replacement Full CT blue filters x 6.
9982 Replacement Half CT blue filters x 6.
9981 Replacement Half CT orange filters x 6.
Power Bases:
9957 Hot-Shoe Power Base, PP90 with 500mm lead.
9943 Hot-Shoe Power Base, PP90 with 1.5m lead.
9986 Hot-Shoe Power Base, PP90 with 150mm lead.
9960 Hot-Shoe Power Base, XLR-4 with 1.5m lead.
9961 Hot-Shoe Power Base, D-Tap with 500mm lead.
9962 Hot-Shoe Power Base, D-Tap with 150mm lead.
9987 Power Base Locking Adaptor.
Mounting Options:
9971 Male to Male Stud Adaptor 1/4" Whit.
9972 Camera Shoe Plate 1/4” Whit.
9906 Handle 1/4" Whit. stud to bush. Length 127mm.
9807 Camera Clamp: 1/4" Whit. bush.
9990 Extender Arm: 1/4" Whit.
9985 Spigot Adaptor: 1/2" dia. to 1/4" Whit.
13
Page 16

14
Page 17

Mounting Adaptors:
These handy spigots and spigot adaptors enable the Paglight to be
mounted to any camera, tripod, lighting rig or gaff grip.
9974 Thread Adaptor: 3/8" Whit. to 1/4" Whit.
9975 Spigot Pin: 1/2" dia. to 1/4" Whit.
9976 Spigot Pin: 5/8" dia. to 1/4" Whit.
9977 Multi-Configuration Spigot Adaptor: In-line or 90°,
5/8" to 5/8" to 1/2" dia. & 1/4" Whit.
9978 Mounting Adaptor Kit: Comprises: 9971, 9974, 9975,
9976 & 9977.
9977
9974 9975
9976
15
Page 18

PAGLIGHT LED & POWERARC FIELD KITS:
Models 9825L and 9825
A
F
B
*
A Paglight
B Choice of Power Base
C Standard lamp holder
(choice of lamp)
D Standard lamp holder
and protector
(choice of lamp)
E LED Dimmer unit or
PowerArc unit, lamp and
protector
F Accessory Kit
Comprising: accessory holder,
1 pair of parallel barn doors,
1 dichroic filter and 1 diffuser
C
DE
*
G
L
K
I
G Tapered barn doors
H LED or PowerArc Conversion
Filter
I Handle
J Camera Clamp
K Camera Shoe Plate
L Stud Adaptor
M Fitted Flight Case
* Storage space for additional
items
H
J
M
16
Page 19

SECTION 6
WARRANTY
Notwithstanding any provision of any agreement the following
warranty is exclusive: PAG Limited warrants each Paglight (with the
exception of glass parts) it manufactures to be free of defects in
material and workmanship under use and service for TWO YEARS
from the date of purchase. This warranty extends only to the
original purchaser. This warranty shall not apply to fuses or any
product or parts which have been subject to misuse, neglect,
accident or abnormal conditions of operation.
In the event of failure of a product covered by this warranty, PAG
Ltd. will repair and calibrate equipment returned to an authorised
service facility within the period of the warranty, provided the
warrantor’s examination discloses to its satisfaction the product was
defective. The warrantor may, at its option, replace the product in
lieu of repair. With regard to any equipment returned within this
period, said repairs or replacements will be made without charge.
If the failure has been caused by misuse, neglect, accident or
abnormal conditions of operation, repairs will be billed at a
nominal cost. In such a case, an estimate will be submitted before
work is started, if requested.
The foregoing warranty is in lieu of all other warranties, express or
implied, including but not limited to any implied warranty or
merchantability, fitness or adequacy for any particular purpose or
use. PAG Limited shall not be liable for any special, incidental, or
consequential damages, whether in contract, tort, or otherwise.
17
Page 20

U4976 ISS G / JULY 2010
PAG Ltd.
565 Kingston Road
Raynes Park
London SW20 8SA
T +44 (0) 20 8543 3131
F +44 (0) 20 8540 4116
E sales@paguk.com
www.paguk.com
 Loading...