

Page 1
Commercial Backpack
Vacuum Cleaners
Product & Training Manual
Support: +61 8 9479 1444
www.pacvac.com
Original
Instructions
CAUTION Read the instruction
manual before using the machine.
Retain for future reference.
Page 2

Page 3
Page 2
Page 2
Page 3
Page 3
Page 4
Page 5
Page 6
Page 7
Page 8
Page 8
Page 9
Page 10
Page 11
Page 12
Page 13
Page 14
Page 15
Page 16
Page 17
Page 18
Page 19
Page 20
Page 21
This manual applies to the Superpro 700 Series:
Superpro 700, Duo 700, Micron 700, Trans 700 and Wispa 700.
General Safety Instructions
Product Specic Safety Instructions
Symbol Denitions
Patents
Wear Right
Operate Right
Work Right
Safety and Maintenance Checks
Troubleshooting
Service Requirements
Warranty
Superpro 700 Parts Prole
Superpro 700 Specications
Superpro duo 700 Parts Prole
Superpro duo 700 Specications
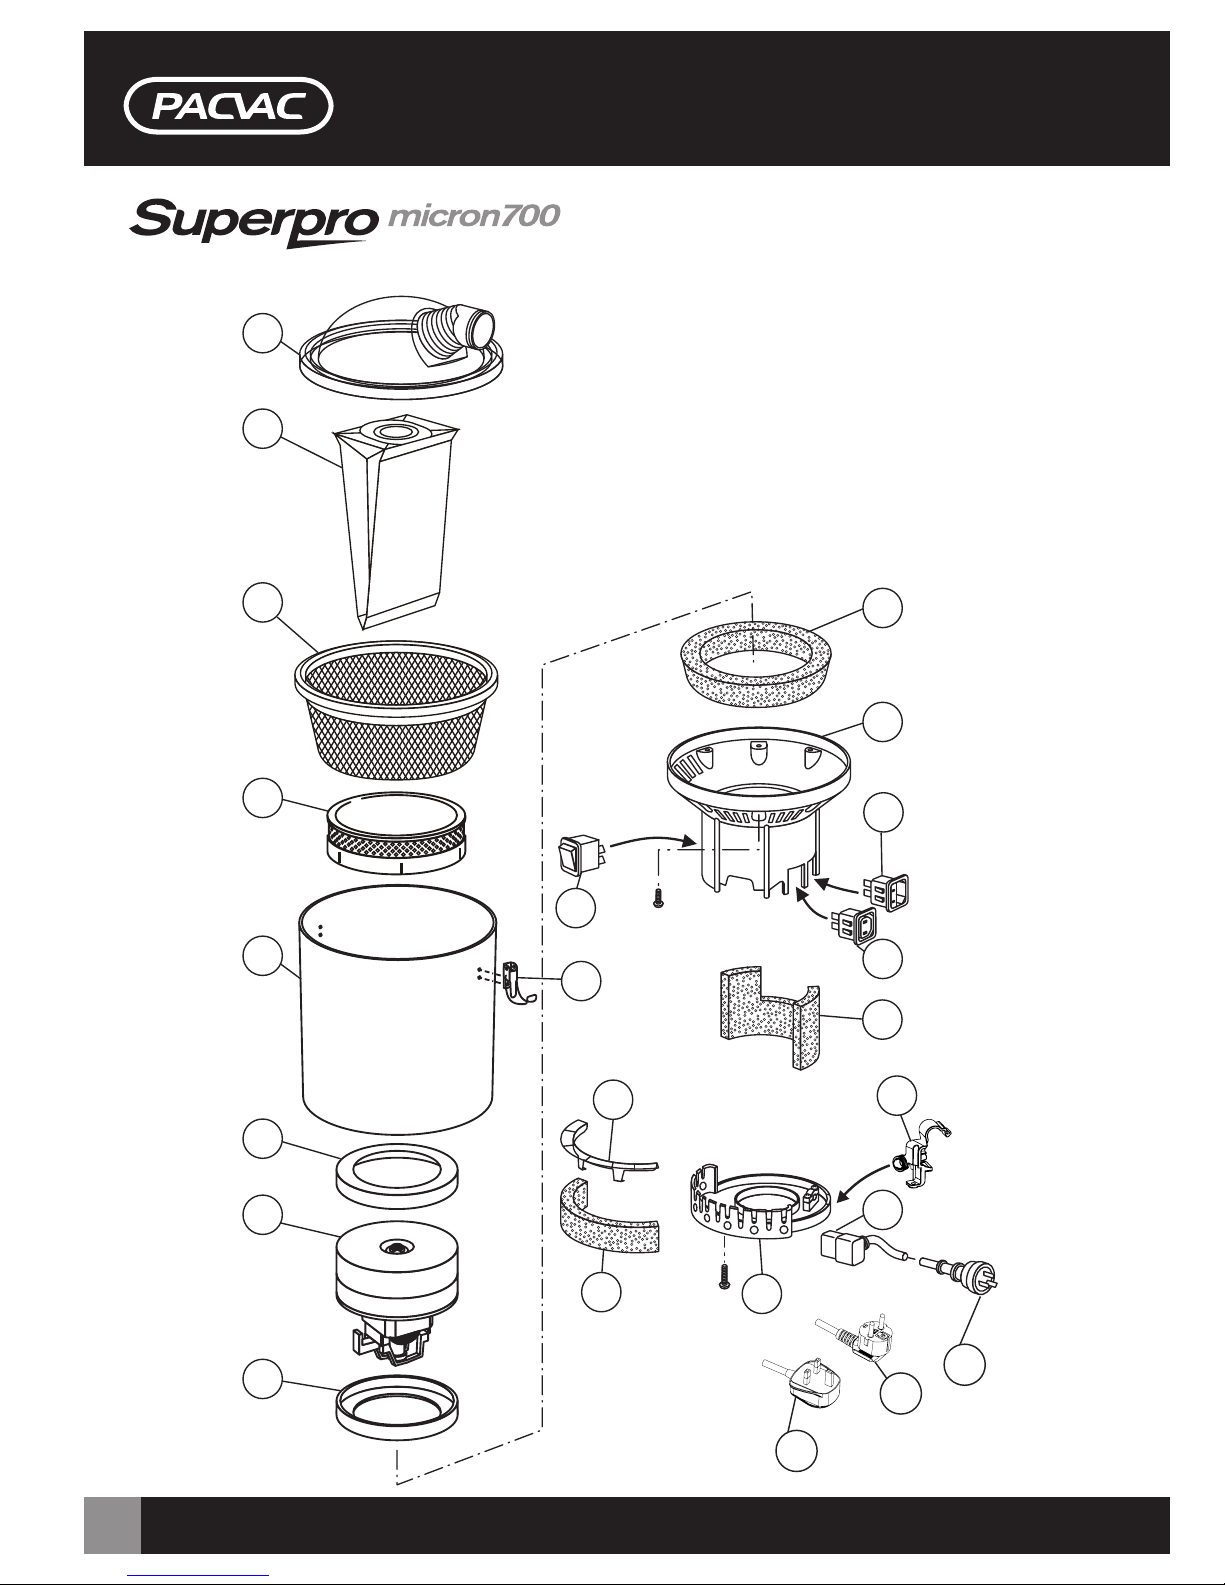
Superpro micron 700 Parts Prole
Superpro micron 700 Specications
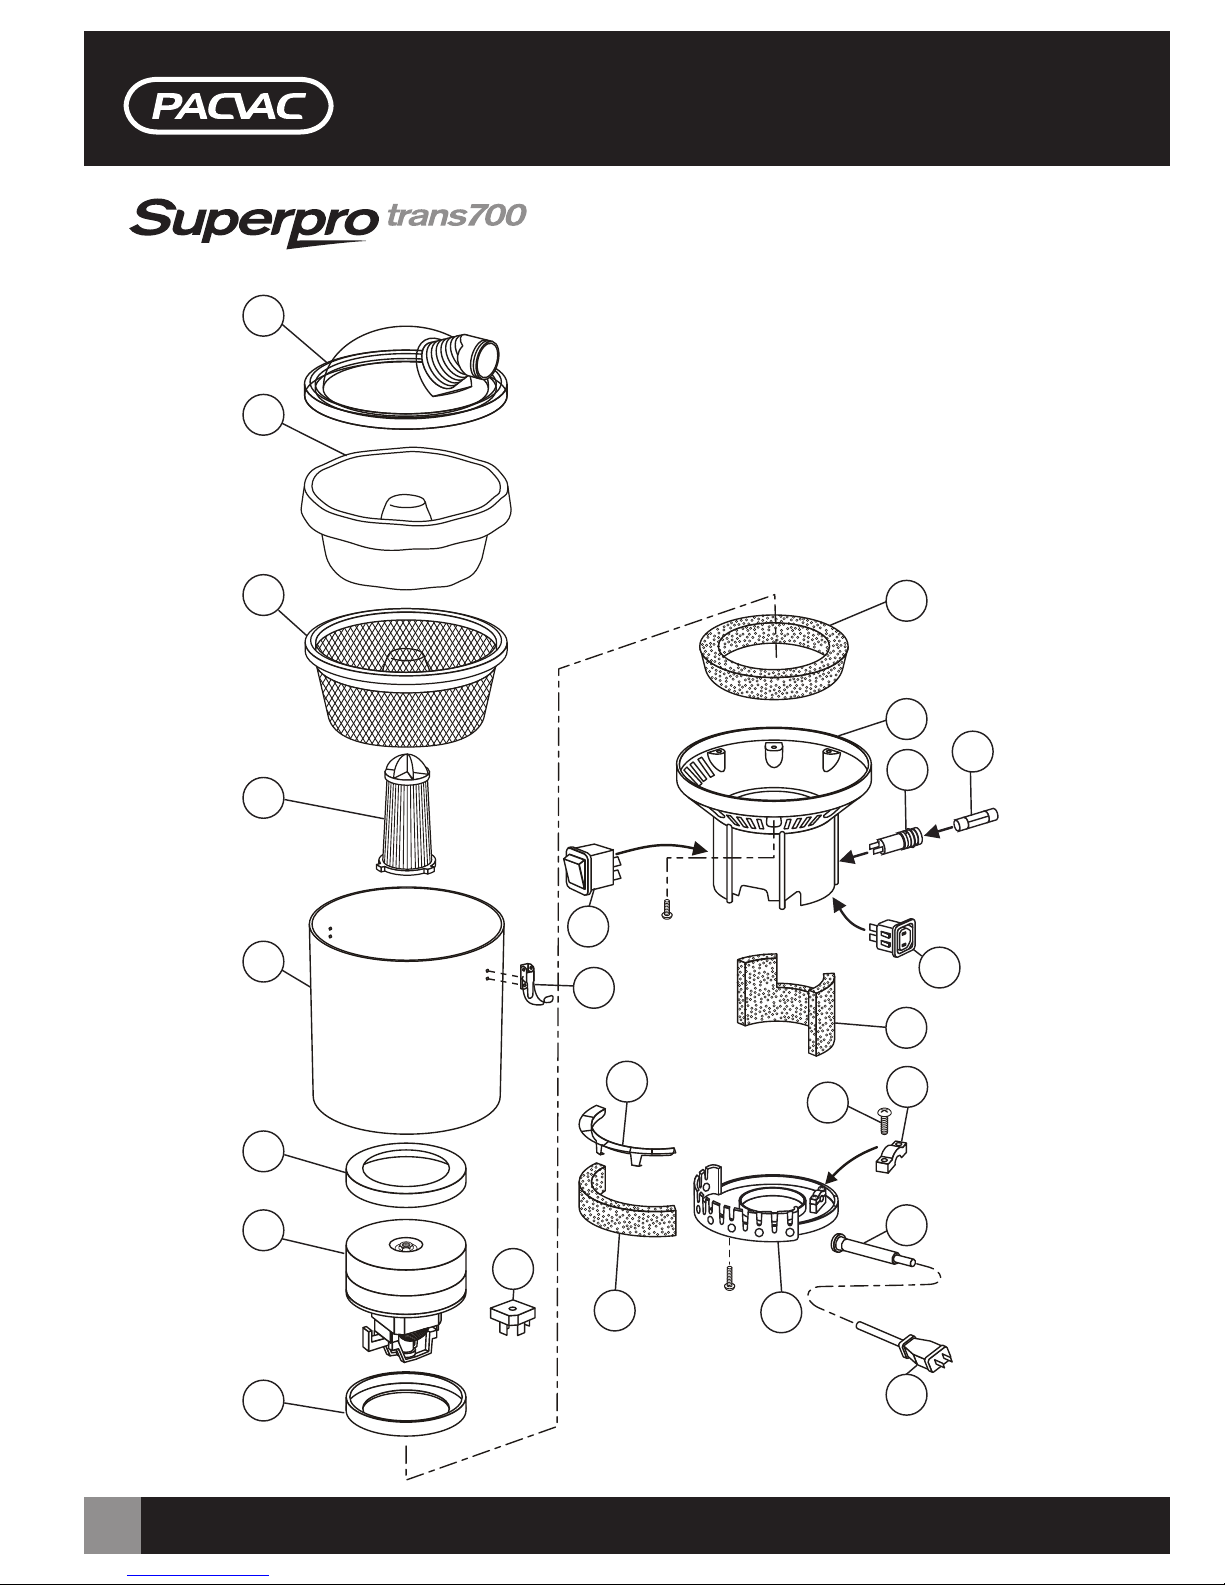
Superpro trans 700 Parts Prole
Superpro trans 700 Specications
Superpro wispa 700 Parts Prole
Superpro wispa 700 Specications
Superpro 700 Series Harness and Accessories Parts Prole
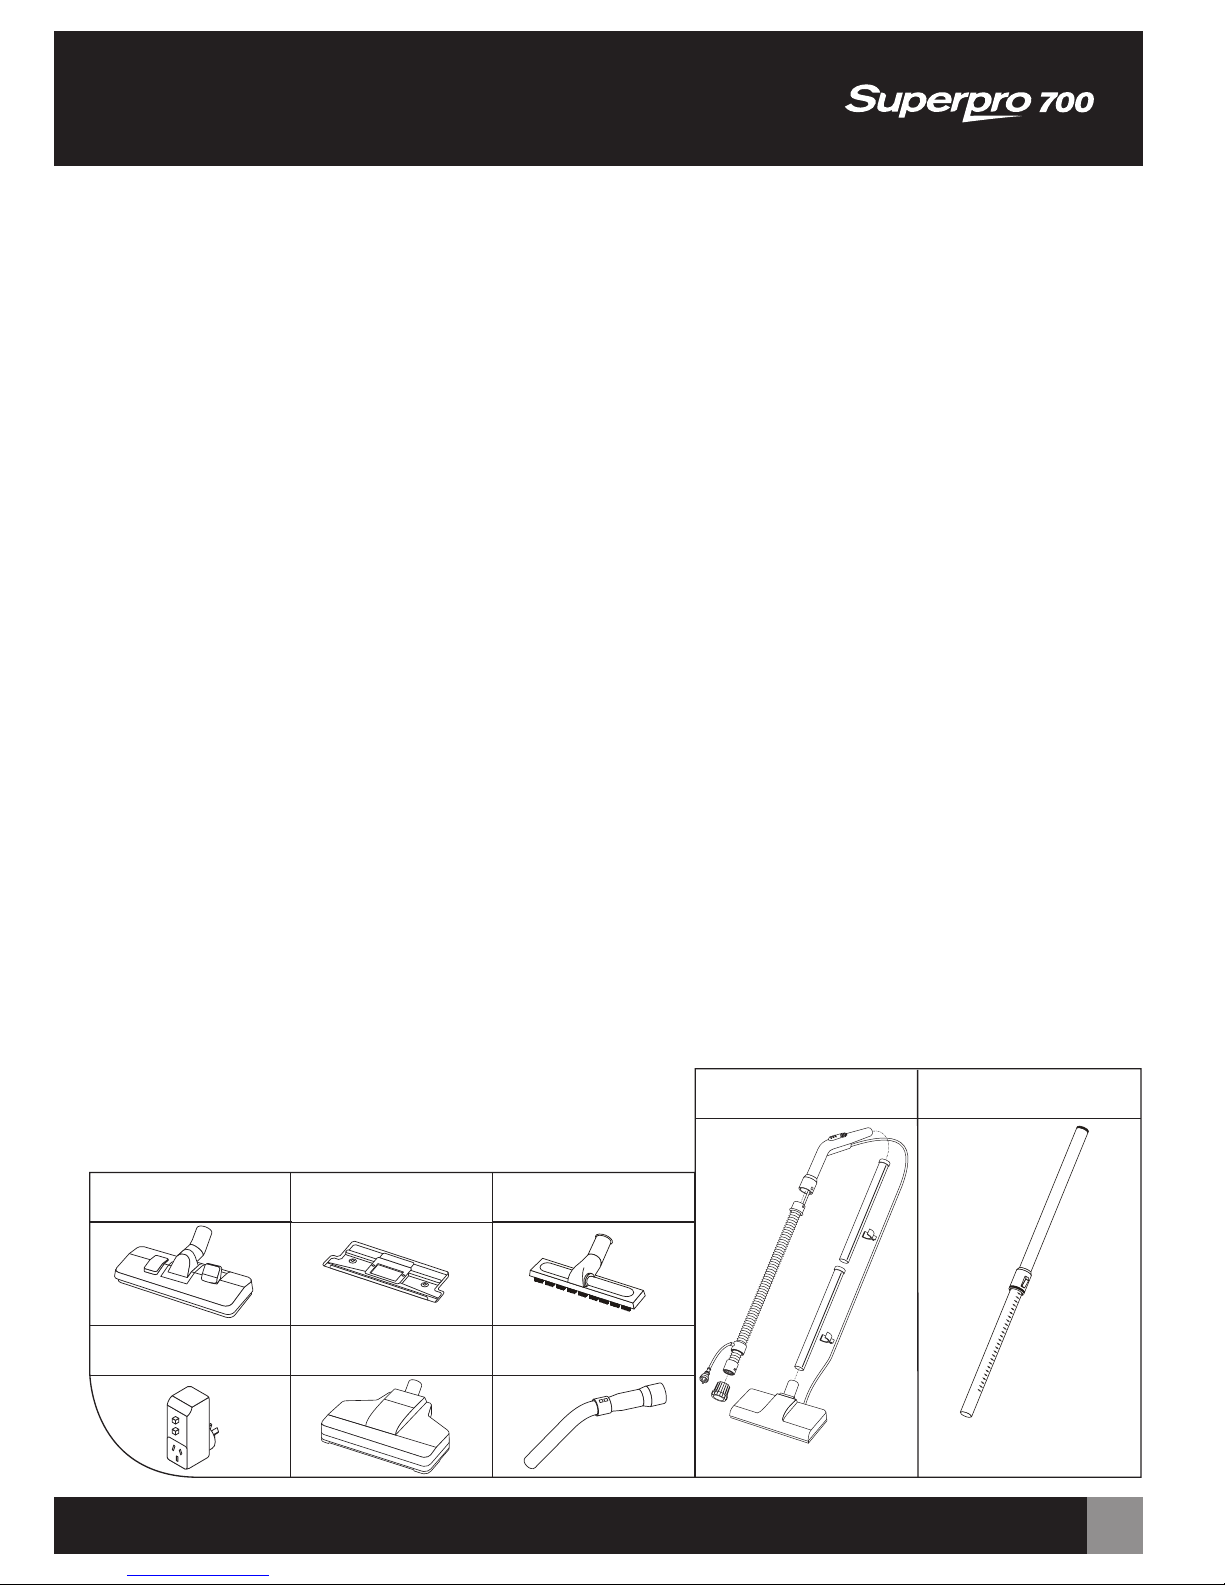
Optional Extras
Contents
1
Page 4

2
General Safety Instructions
1. This manual shall be considered an integral part
of the machine and should be carefully looked after
for subsequent reference.
2. WARNING Read this instruction manual before
using this machine and always follow the Safety
and Maintenance instructions.
3. WARNING Operators shall be adequately instructed
on the use of this machine.
4. WARNING This machine is not suitable for picking
up hazardous dust (Contact Pacvac for specic
equipment for this use).
5. WARNING Do not allow the power cord to come
into contact with rotating brushes of oor tools.
6. WARNING Do not use this machine in wet conditions.
7. CAUTION This machine is for indoor use only.
8. CAUTION This machine shall be stored indoors only.
9. Remove the machine from packaging and ensure
it and all its accessories and attachments are present
and in perfect condition. Contact the place of purchase
immediately in the event of any discrepancies.
10. The electrical specications of this machine are noted
on the data plate which is located near the power
switch. Ensure the specications correspond to those
of the mains power supply in your area. If the machine
is without a data plate, contact the place of purchase
immediately.
11. This machine is intended for commercial use, for
example in hotels, schools, hospitals, factories, shops
or ofces.
12. Do not restrict the vacuum cleaner’s airow. Maintain
the vacuum cleaner regularly so that all lters and
openings are free of dust, lint, hair build-up or anything
else which may affect airow. Refer to the maintenance
instructions in the Product & Training Manual.
13. If the machine has been dropped, damaged, left
outdoors or has been exposed to liquids, return it
to your local Authorised Pacvac Service and Warranty
Agent for a safety check.
14. Do not use the machine to pick up ammable
or combustible liquids, such as petrol etc. and
do not use in areas where they may be present.
15. Do not vacuum anything that is burning or smoking
such as cigarettes or hot ashes.
16. Do not vacuum up hard or sharp objects such as
glass, nails, screws etc.
17. Keep hair, loose clothing, ngers and all parts of the
body away from moving parts and openings.
18. Keep the machine and power cord away from heated
surfaces.
19. Do not unplug the machine while it is turned on.
Turn the machine off, turn the power off at the
power outlet then unplug by grasping the plug and
pulling gently to unplug.
20. Do not handle the machine, power cord or plug
with wet hands.
21. Unplug from power point when not in use, before
servicing or before changing lters and attachments.
22. Do not pull or carry the machine by the power cord.
23. Do not close doors on the power cord and do not
pull the cord around sharp edges or corners.
24. Regularly check the power cord for damage, such as
cuts, abrasions, exposed wiring or aging. If the power
cord or plug is damaged, the complete power cord
must be replaced by your local Authorised Pacvac
Service and Warranty Agent in order to avoid an
electric shock. The power cord should only be replaced
with a Pacvac Genuine Spare Part with the same
specications.
25. Store in an appropriate place after use to prevent
tripping accidents.
26. This appliance is not intended for use by persons
(including children) with reduced physical, sensory
or mental capabilities, or lack of experience and
knowledge, unless they have been given supervision
or instruction concerning use of the machine by a
person responsible for their safety. Children should
be supervised to ensure that they do not play with
this machine.
27. Use only the manufacturer’s recommended
attachments and/or replacement parts.
Product Specic Safety Instructions
1. WARNING This machine is intended for the
vacuuming of dry dust and/or small debris off dry
carpeted or hard oor surfaces in indoor areas only.
2. WARNING Do not use the machine without the dust
bag and lters in place.
3. WARNING Do not place the Superpro duo 700 model
on the ground while the machine is turned on. This can
result in irreparable damage to the motor.
4. WARNING Do not plug the Superpro trans 700 into
a power supply other than 110-120V, 400Hz. An
alternate power supply can cause irreparable damage
to the motor and other electrical components.
5. The following models have a “A”-weighted emission
sound pressure level (measured at 1.5 meters) of:
Superpro 700 - 67 ± 3dB(A)
Superpro duo 700 - 74 ± 3dB(A)
Superpro wispa 700 - 66 ± 3dB(A) normal mode/
62 ± 3dB(A) wispa mode
Superpro micron 700 - 65 ± 3dB(A)
Superpro trans 700 - 63 ± 3dB(A).
Page 5
3
6. WARNING Only use the socket outlet on the machine
for purposes specied within these instructions.
7. This appliance may be tted with a power socket
outlet (excludes wispa 700 model). A power socket
outlet is designed for use with applicably approved
electric powerhead attachments. Powerhead
attachments use rotating brushes to agitate carpet
bres in order to dislodge dust and/or debris.
Maximum wattage for such attachment shall not exceed
200 watts.
8. Floor Tool and Attachment Use
Part No. FLT001 - Floor Tool
is intended for vacuuming of dry dust and debris
off oor surfaces.
Part No. ACC001 - Dusting Brush
is intended for vacuuming of dry dust from blinds
and other delicate surfaces.
Part No. ACC002 - Crevice Tool
is intended for vacuuming of dry dust and debris
from crevices.
Part No. ACC003 - Upholstery Tool
is intended for vacuuming of dry dust from
upholstered surfaces.
Symbol Denitions
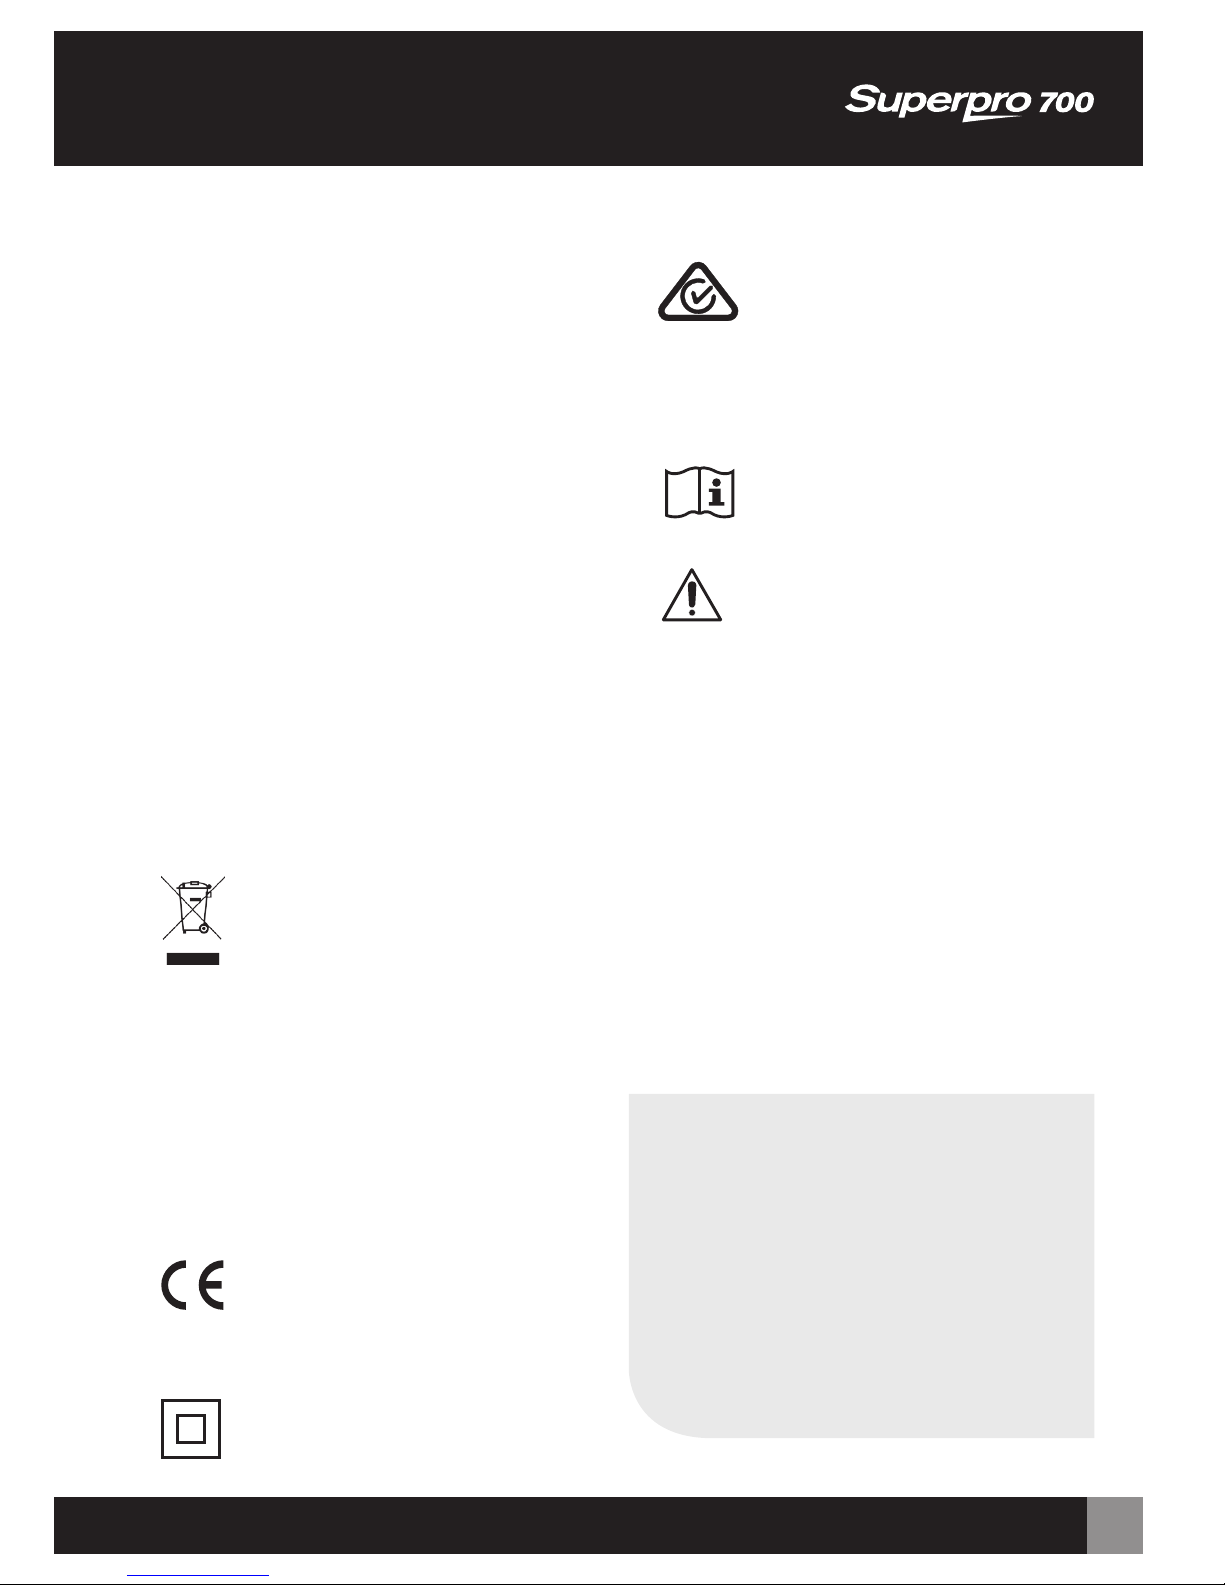
1.
Meaning of crossed–out wheeled dustbin:
Do not dispose of electrical appliances as unsorted
municipal waste, use separate collection facilities.
Contact your local government for information
regarding the collection systems available.
If electrical appliances are disposed of in landlls
or dumps, hazardous substances can leak into the
groundwater and get into the food chain, damaging
your health and wellbeing.
Europe Only - When replacing old appliances
with new ones, the retailer is legally obligated
to take back your old appliance for disposals
at least free of charge.
2.
The CE Mark certies that a product has met
EU consumer safety, health or environmental
requirements.
3.
Class II, Double Insulated Appliance.
4.
The Regulatory Compliance Mark (RCM) indicates a
device’s compliance with all applicable ACMA
regulatory arrangements.
5.
Operator’s Manual; Operating Instructions
6.
Attention!
7. Transportation and Storage
This appliance and attachments should be packed
in double wall corrugated cardboard boxes with
dimensions of approximately 33cm x 33cm x 54.5cm.
Stack levels of boxes shall not exceed four units in
a vertical position.
RETAIN THESE SAFETY INSTRUCTIONS FOR
FURTHER USE.
Patents
The following patents apply:
AU Registered Design 326911
EP Registered Design 001617051-0001
Motor Thermostat
IMPORTANT: The motor is equipped with
a thermostat. If for any reason, the vacuum
cleaner should over-heat, the thermostat will
automatically turn the unit off. Should this
occur, turn off the switch and unplug the
vacuum cleaner from the electrical outlet and
conduct safety and maintenance checks.
Allow the cleaner to cool for approximately
30 minutes. To re-start, plug into a power
point and switch back on.
Support: +61 8 9479 1444 www.pacvac.com
Page 6
4
Wear Right
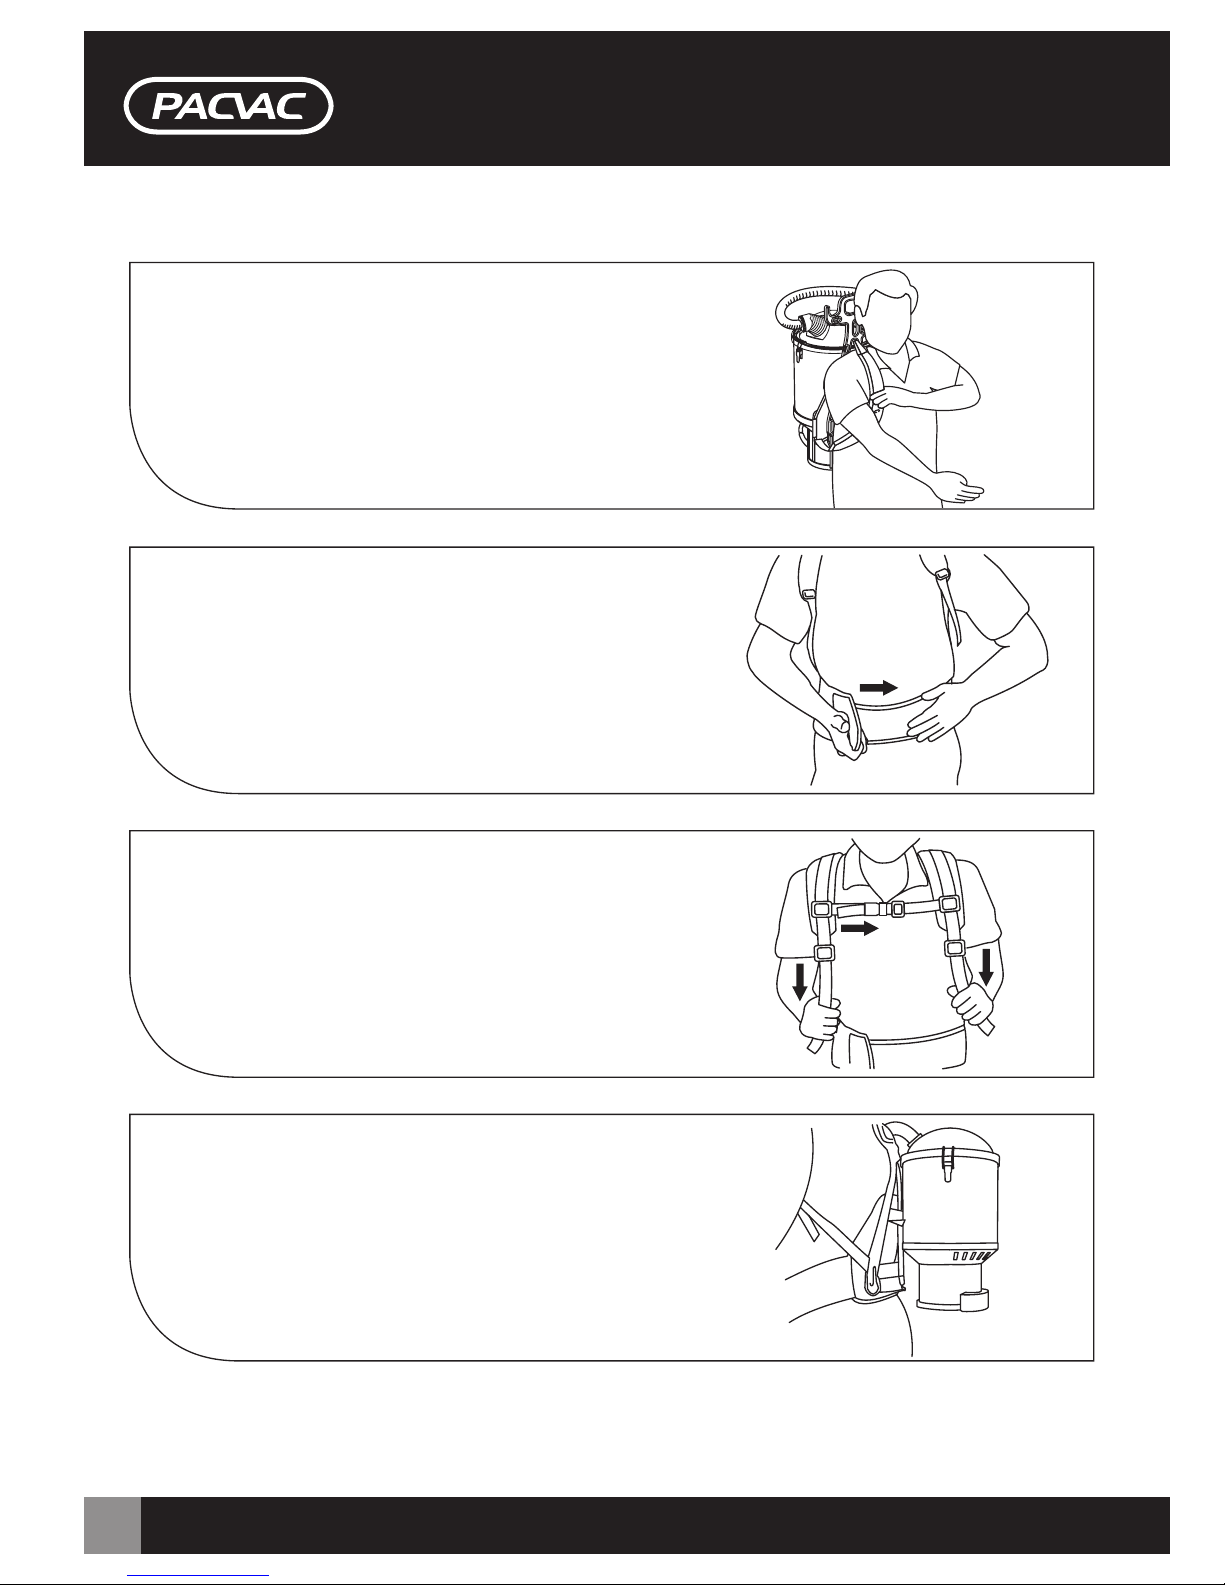
Step 1:
• Rotate the dome lid to suit left or right handed vacuuming.
• Loosen the shoulder straps.
• Adjust the length at top of shoulder strap (if required).
• Lift the backpack by one shoulder strap.
• Then slide your free arm into the other strap.
Step 2:
• Tighten the hipband so the machine rests
comfortably on your hips.
Step 3:
• Pull down on shoulder straps for a comfortable t.
• Adjust position and connect chest strap to secure
backpack.
Step 4:
• Make sure the harness is resting on your hips.
IMPORTANT TIP:
If the backpack feels heavy or uncomfortable, it is
likely you are not wearing it correctly. Contact Pacvac
for further advice.
Page 7
5
Support: +61 8 9479 1444 www.pacvac.com
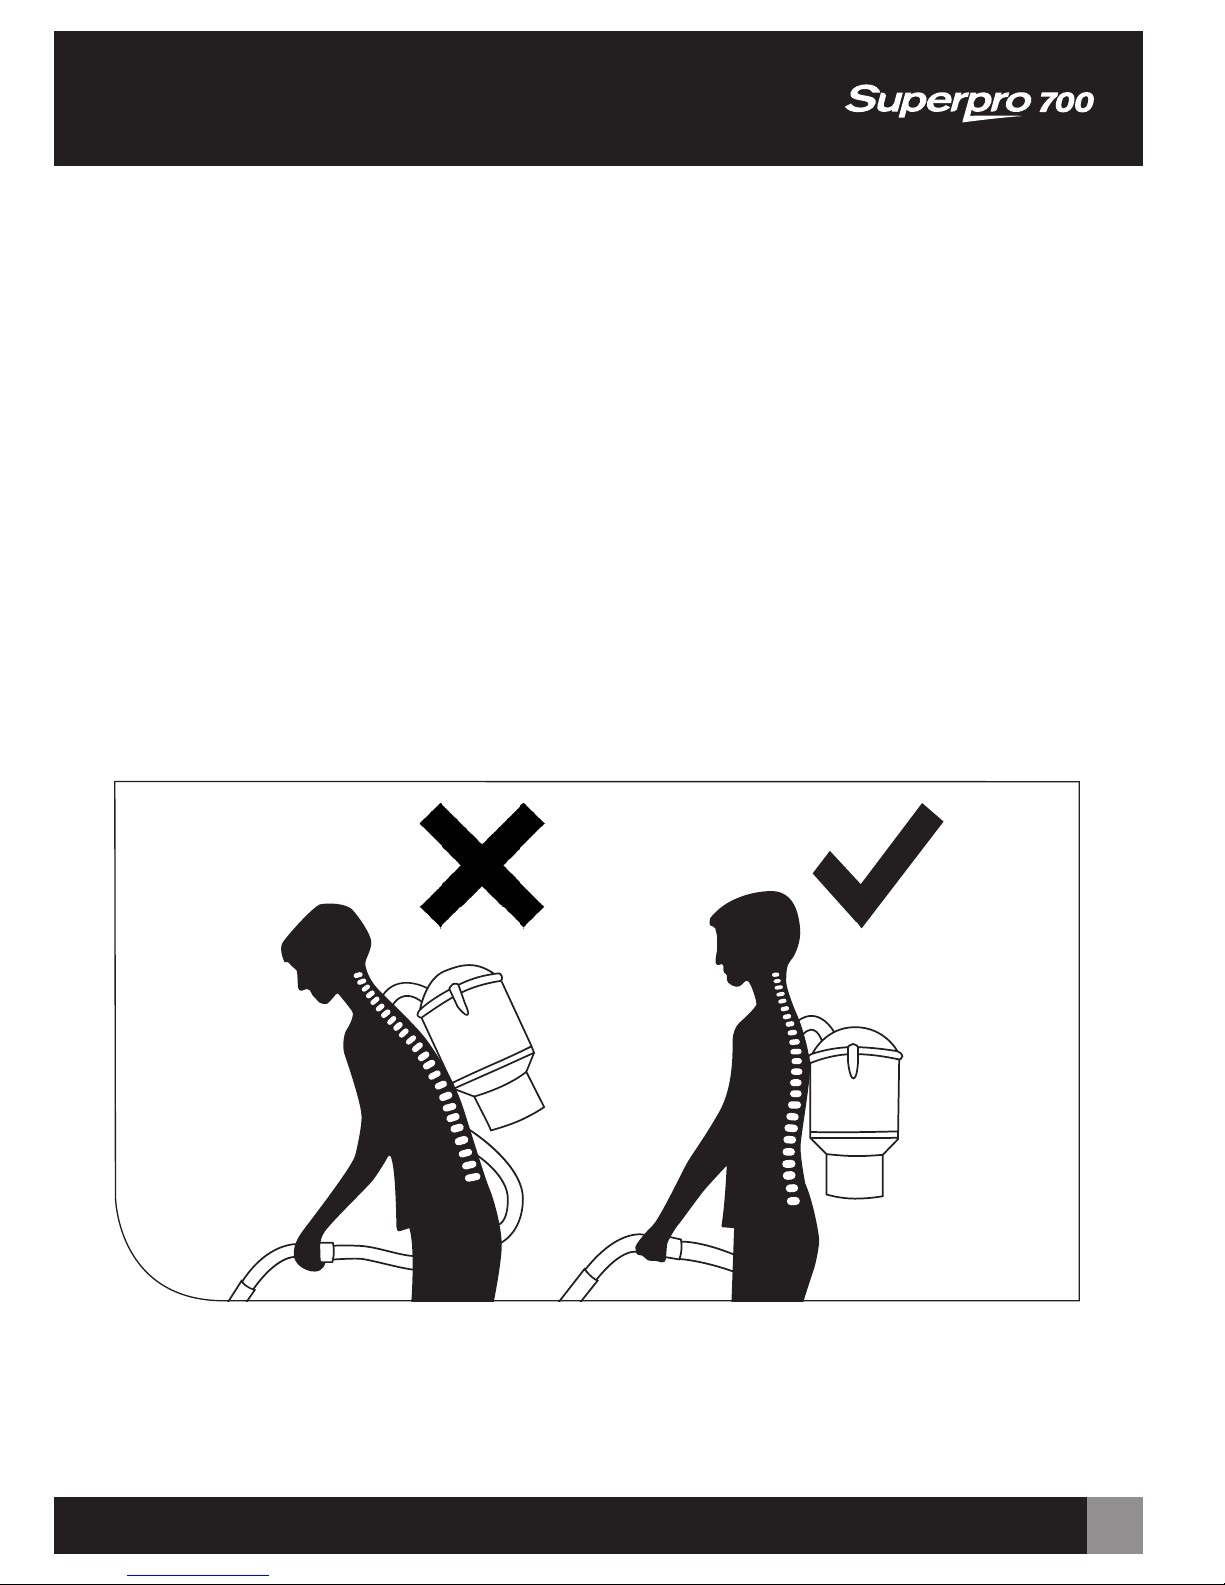
Operate Right
How to vacuum easier and faster with no back strain.
1. Stand upright, with the hand piece section parallel to the oor.
2. Hold the hand piece with one hand at a comfortable arm’s length.
3. Move forward and away from the power point.
4. Use easy underarm swinging motion when detail cleaning and short dabs when spot cleaning, always
standing upright.
5. Once the end of the power cord has been reached and work completed, return to the power point along
the cord line and disconnect the power cord from the power point.
6. If work is not completed move to the next area, connect power cord to the nearest power point and
repeat steps 1 through 6.
7. Remove backpack by sliding the one of the straps off the shoulder, while raising the other arm/shoulder
to hold strap in place. Slowly lower the shoulder and lower the back pack to the oor, do not drop.
8. If work is completed disconnect power cord from power point then wind from the backpack towards
the end of the power cord to reduce likelihood of cable twists. In the process check for nicks, cuts,
fractures, and knots.
Page 8
6
Work Right
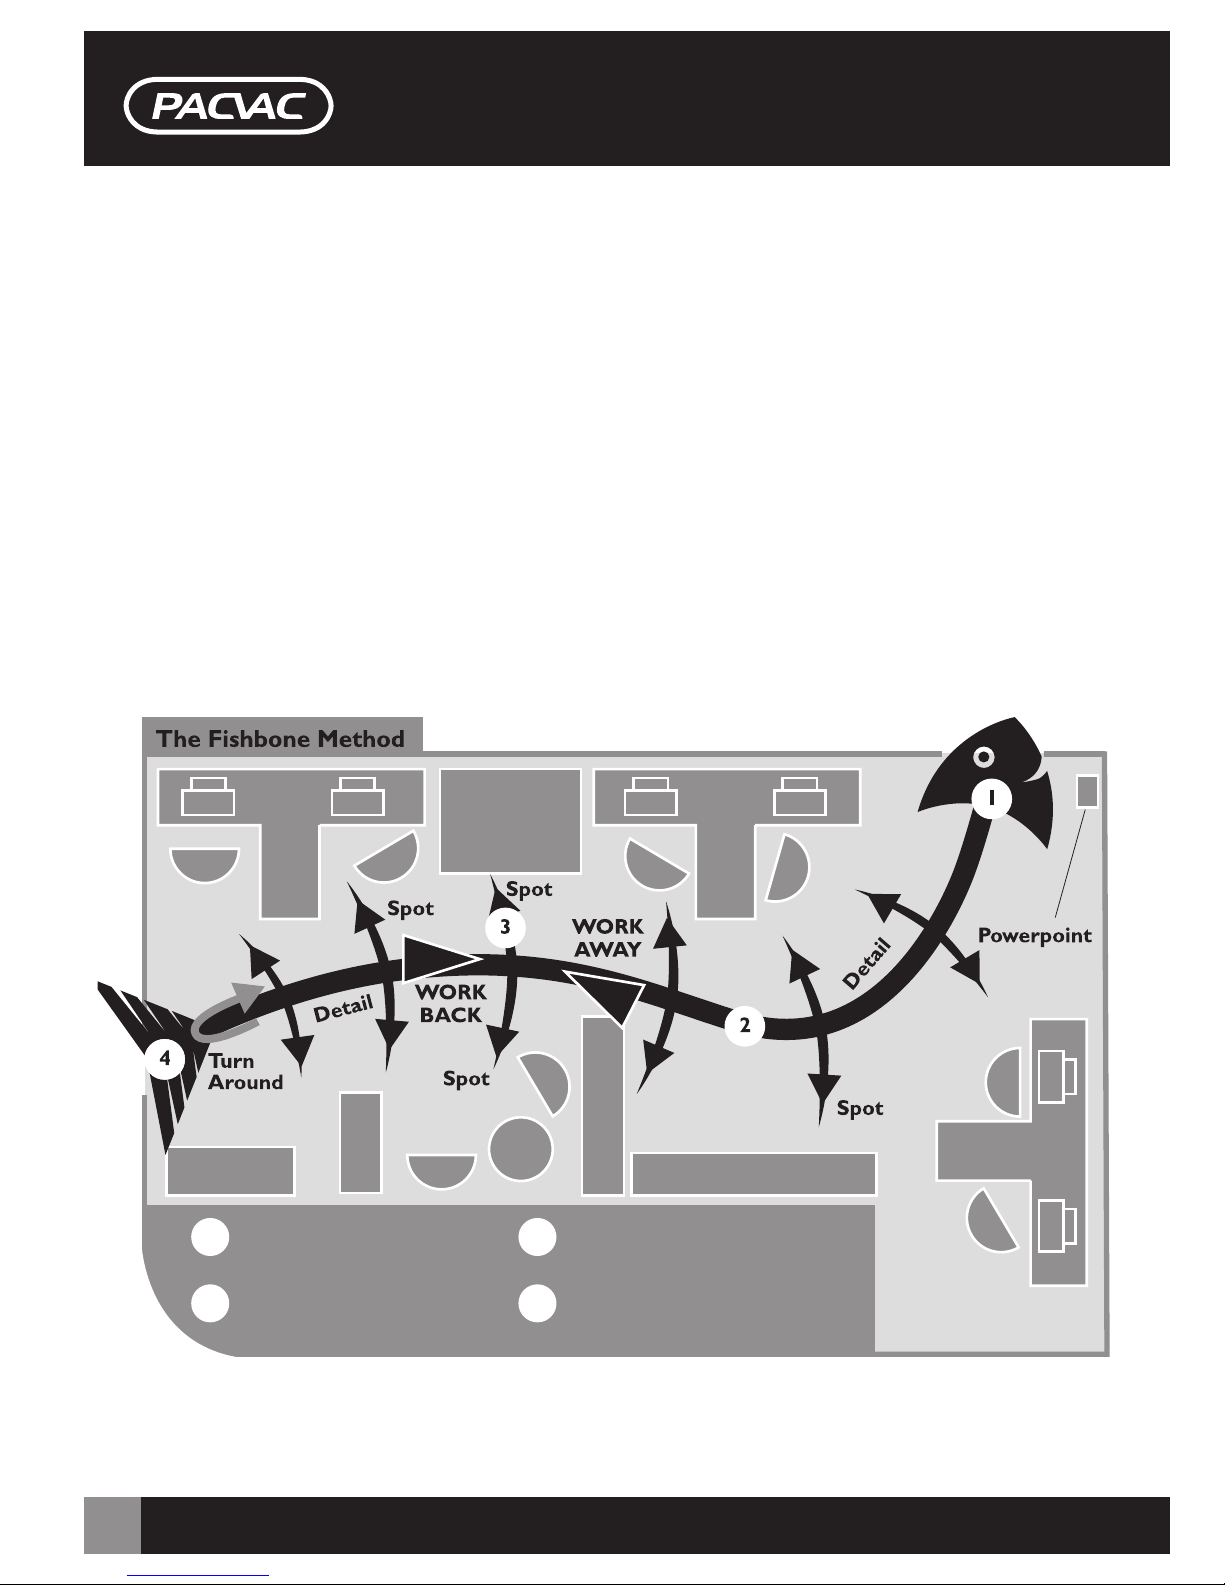
LOOK AT THE LAYOUT (refer to the Fishbone Method below)
• Find the most easily located power point. This is your starting location at the sh’s head.
Your turnaround is the ‘tail’.
• Check the room layout (position of desks, tables, chairs, ttings etc.)
• Check the condition of the oor - how dirty it is on a scale of 1 to 10.
PLAN THE PROCESS
• See in your mind the shbone method over the entire area or room to be cleaned.
• Decide which areas are to be detail cleaned (the spine), or spot cleaned (the ribs).
CLEAN SMARTER
• Work away from the power point.
• Work one side of the shbone towards tail. Then back the other side towards head.
• Work to the plan - long strokes for the detail clean area and short dabs for the spot cleans.
3
4
1
2
Fish Head Start
Spine Heavy Trafc Areas -
Detail Clean
Ribs Light Trafc - Spot Clean
Tail Turn Around
Page 9
7
Support: +61 8 9479 1444 www.pacvac.com
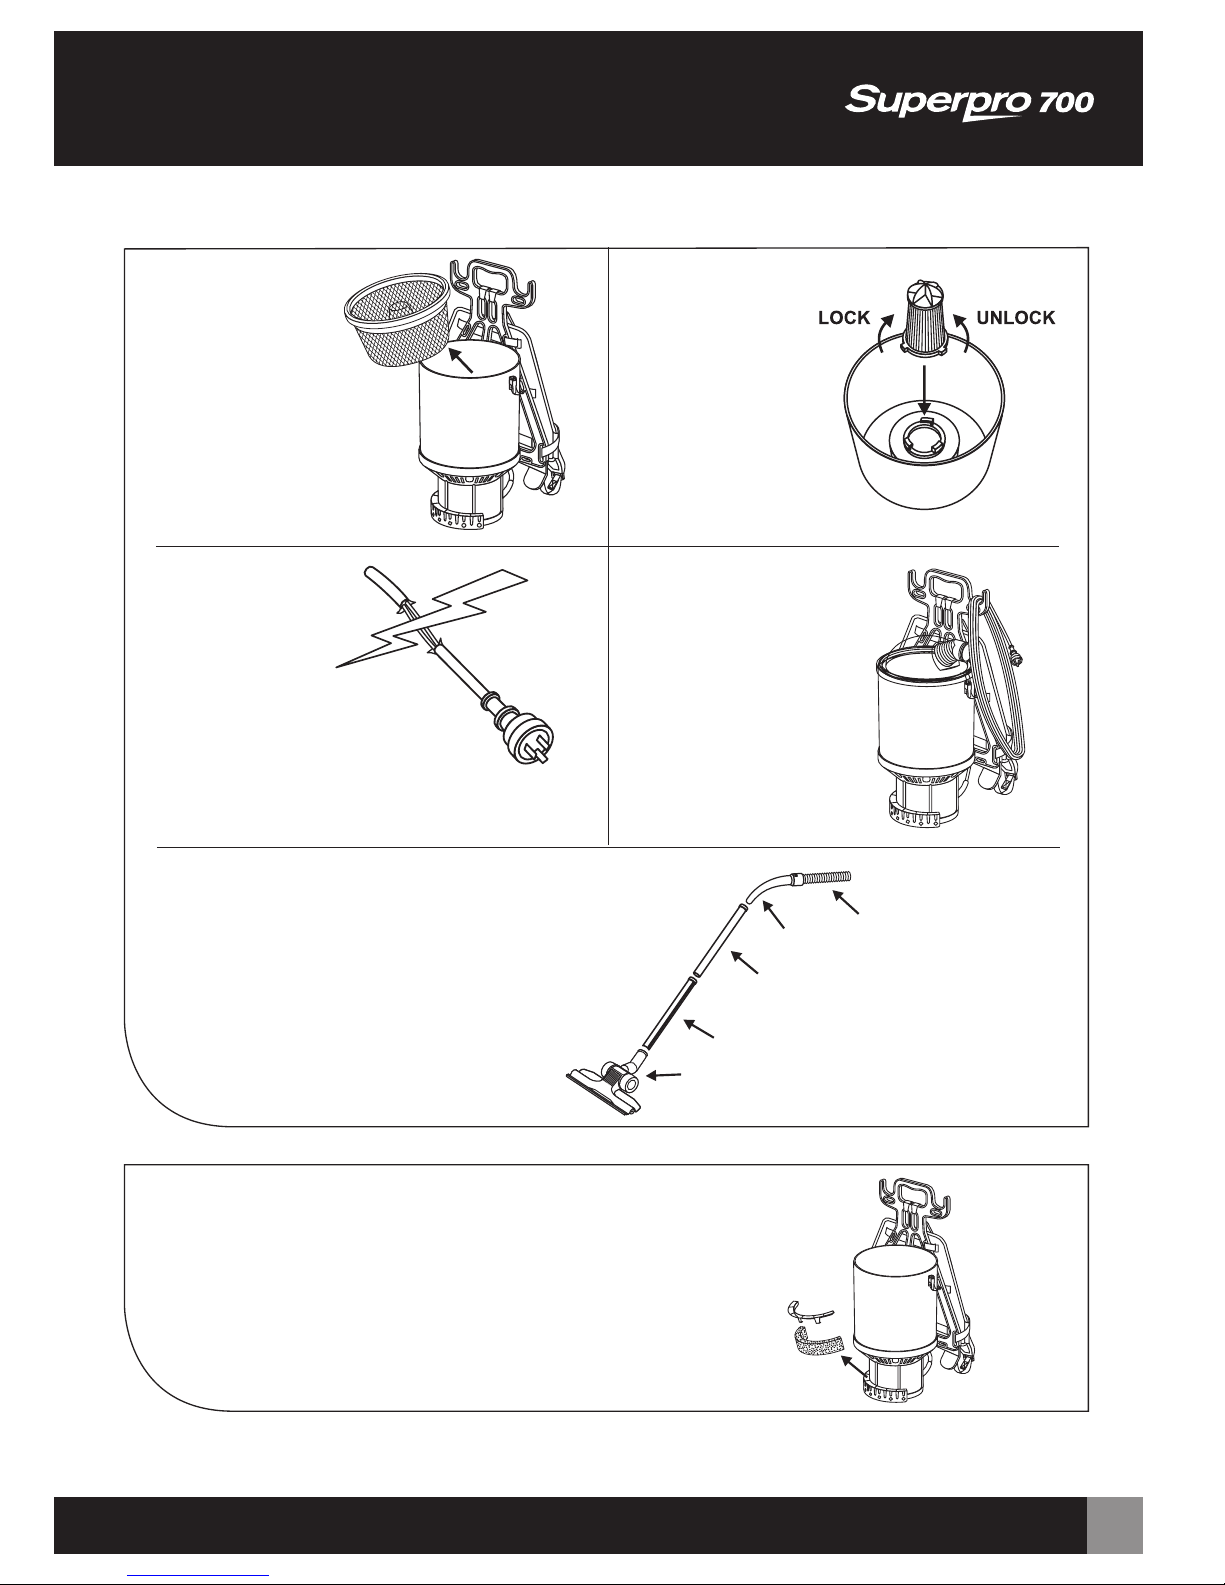
Safety and Maintenance Checks
Remove and clean external motor lter.
WEEKLY
DAILY
1. Remove, empty
and clean
dust bag.
2. Remove the
lter and tap
gently to clean.
3. Check all
power cords,
for cuts, abrasions
and exposed wiring.
4. Wind up power cord
from machine end.
Store power cord
as shown.
5. Check the oor tool, wand,
hand piece and hose
for any obstructions.
NOTE: Any other servicing should be performed by an authorised technician.
Page 10
8
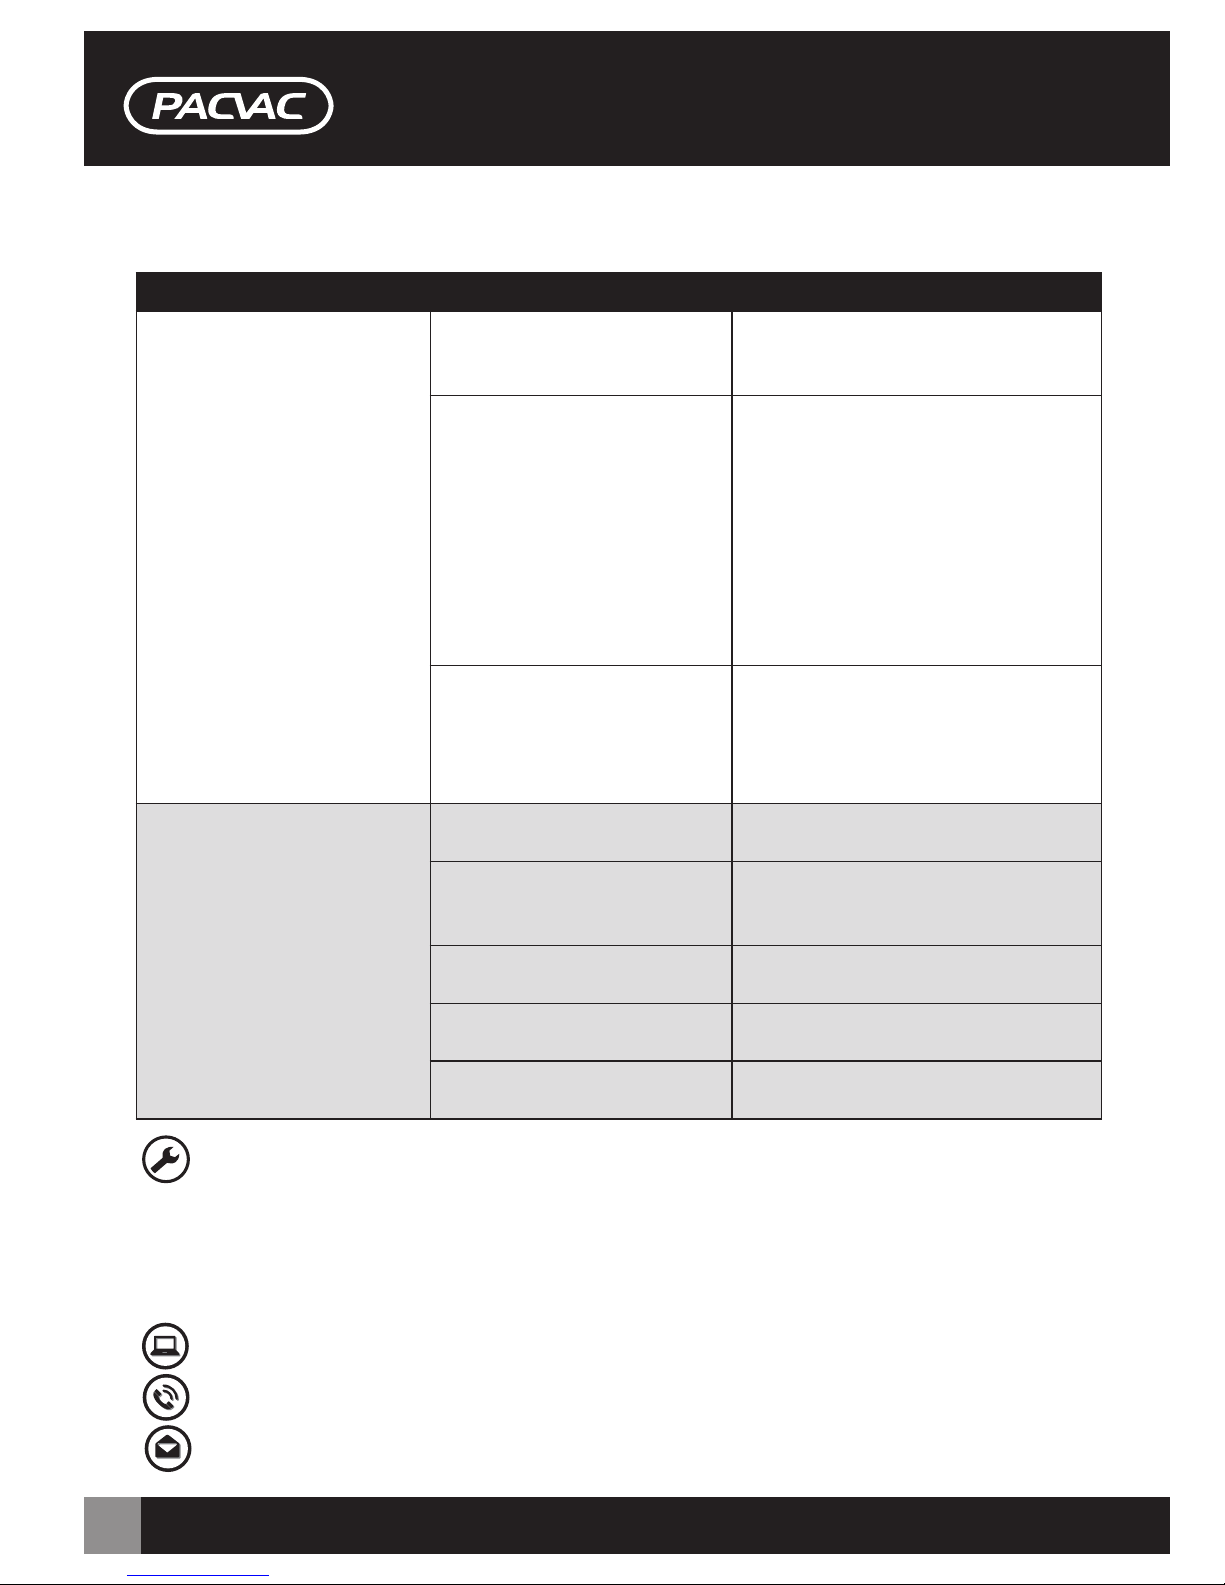
Caution: Always unplug the back pack before attempting to solve a problem or when servicing.
Troubleshooting
PROBLEM: CAUSE: SOLUTION:
Backpack not working Power cord not rmly plugged
into power point, short lead,
or machine.
Check all plugs and sockets are rmly
plugged in.
Backpack shuts off due to high
motor temperature.
Turn main switch off and unplug
the backpack. Conduct safety and
maintenance checks found in the
Product and Training Manual or as
per labelling on the machine. After 30
minutes (60 minutes for wispa) the
backpack should be ready for use.
If not contact the number below
for your nearest Authorised Pacvac
Service and Warranty Agent.
Circuit breaker or RCD has
tripped.
Check the machine is in good working
order. If OK, reset circuit breaker or
RCD. If circuit breaker or RCD trips
again contact your nearest Authorised
Pacvac Service and Warranty Agent.
Backpack has no/poor
suction
Hypercone dust bag full. Remove, empty and clean Hypercone
dust bag.
Hypercone dust bag not
installed correctly.
Remove and empty Hypercone dust
bag making sure the rubber edging is
correctly tted around the canister.
Hose not installed correctly. Reconnect hose and ensure correctly
sealed.
Blockages. Remove hose, wand and oor tools;
remove any blockages.
Filters blocked. Clean Hypercone HEPA lter and
external motor lter.
Service Requirements
Our products are designed and built to be functional and durable. For information on use and maintenance
please read the Product & Training Manual thoroughly.
Should you require servicing contact your nearest Authorised Pacvac Service and Warranty Agent.
www.pacvac.com
+61 8 9479 1444
Page 11

9
Support: +61 8 9479 1444 www.pacvac.com
Warranty
Your Pacvac Pty Ltd (Pacvac) product has been manufactured to meet our highest quality standards.
We urge you to take good care of your product and be sure to follow instructions carefully. This will provide
you with the best possible performance and lifespan of the product.
The inclusion of the following paragraph is a requirement by Australian Law. It explains that consumers
have rights by law regardless of any warranties provided or not by a manufacturer or supplier.
“Our goods come with guarantees that cannot be excluded under the Australian Consumer Law. You
are entitled to a replacement or refund for a major failure and for compensation for any other reasonably
foreseeable loss or damage. You are also entitled to have the goods repaired or replaced if the goods fail
to be of acceptable quality and the failure does not amount to a major failure.”
In addition to guarantees under Australian Consumer Law, Pacvac warrants all machines and their
components against faulty material and/or workmanship for a period of two years from the date
of purchase by the consumer. The following explains conditions and what to do in the event of a claim:
• Pacvac will replace parts determined as faulty however this does not cover reasonable wear through
normal use of any consumable parts, such as but not limited to, bags, lters, hoses, power cords,
carbon brushes and oor tools etc.
• Warranty does not cover any machine or component that has been altered, abused, neglected,
modied, used with non-genuine Pacvac components or has not been used and maintained
as indicated in the Product and Training Manual.
• Warranty repairs can only be carried out by an Authorised Pacvac Distributor or Service and Warranty
Agent. Visit our website or call Pacvac for your nearest location.
• All reasonable expenses associated with returning goods for a warranty claim are the consumer’s
responsibility.
• Claims must be made within two years of the date of purchase and proof of purchase must be
supplied with the claim.
• To make a claim under warranty, take the product with proof of purchase to the place of purchase.
In the event the place of purchase does not satisfactorily rectify the matter, please contact Pacvac.
Page 12
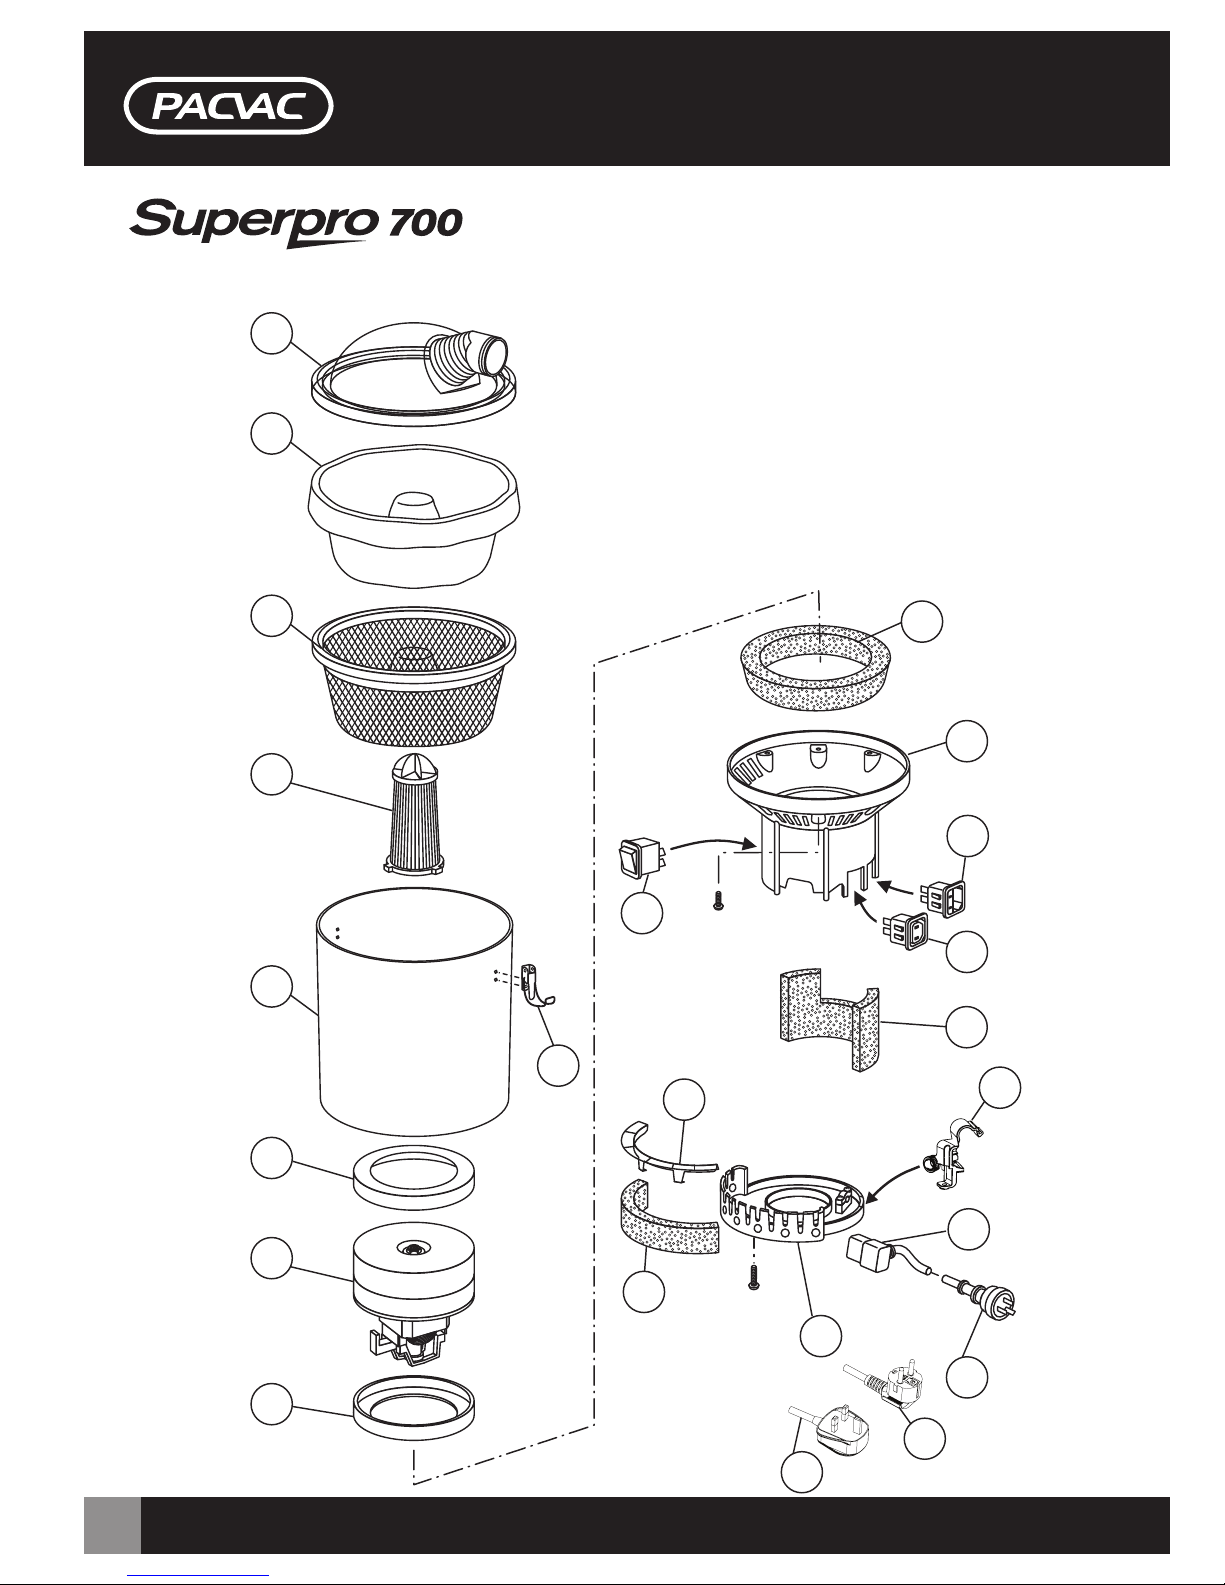
10
1
2
3
4
5
6
7
8
9
10
11
12
13
15
16
17
21
20
19
18
14
Parts Prole
Model Number: 01PR700VB
21a
21b
Page 13
Quote these part numbers when ordering spare parts
No. Part Name Part No.
1. Lid - Plastic - Clear - 270mm LID001
2. Dust Bag - Disposable - Paper - Cone - Pkt 5 DUB001
3. Dust Bag - Reusable - SMS - Cone - Pkt 1 DUB003
4. Filter - Pre-Motor - Cartridge - HEPA FIL001
5. Canister - Pro 700 CAN001
6. Gasket - Motor - Rubber - 150mm GAS007
7. Motor - Two Stage - Flow Through - 240V - 1000W MOT001
8. Gasket - Motor - Rubber - 150mm GAS007
9. Latch - Aluminium - Silver - 65mm LAT001
10. Insulation - Noise - Foam - 180mm INS008
11. Intermediate Housing - Insert - Power Outlet - IEC C17 - Power Inlet IEC C14 - Blue INH008
12. Power Inlet - IEC C14 - Panel Mount PWI002
13. Power Outlet - IEC C17 - Panel Mount PWO001
14. Switch - On-Off - Non-Illuminated - Black SWI001
15. Insulation - Motor - Foam - 420mm INS009
16. Holder - Short Lead - Plastic - Black HOL004
17. Short Lead - IEC C13 Vertical Right Angle - 420mm - 3C - Plug Type I SHL001
18. Cage - Motor Filter - Plastic - Black CAG001
19. Filter - Exhaust - Flat - Foam FIL004
20. Bottom Cap - Plastic - Black - 175mm BOT001
21. Extension Lead - 18m - 3C - Plug Type I EXL001
21a. Power Cord - IEC C13 Vertical Right Angle - 18m - 3C - Plug Type G PWC007
21b. Power Cord - IEC C13 Vertical Right Angle - 18m - 3C - Plug Type E/F PWC006
11
Specications
Volts / Frequency: 220-240V~50Hz
Motor: 240V 1000W Two Stage Flow Through
Noise Level: 67dB(A) ± 3dB(A) (at 1.5m)
Filtration: 4 stage, HEPA Rated HyperconeTM Filter
Volumetric Airow (per second): 38 litres
Capacity: 5 litres
Weight: 5.2kg (excluding power cord assembly and hose)
Vibration Level: <2.5m/s²
Technical specications, part numbers and parts proles are subject to change without notice.
Support: +61 8 9479 1444 www.pacvac.com
Page 14
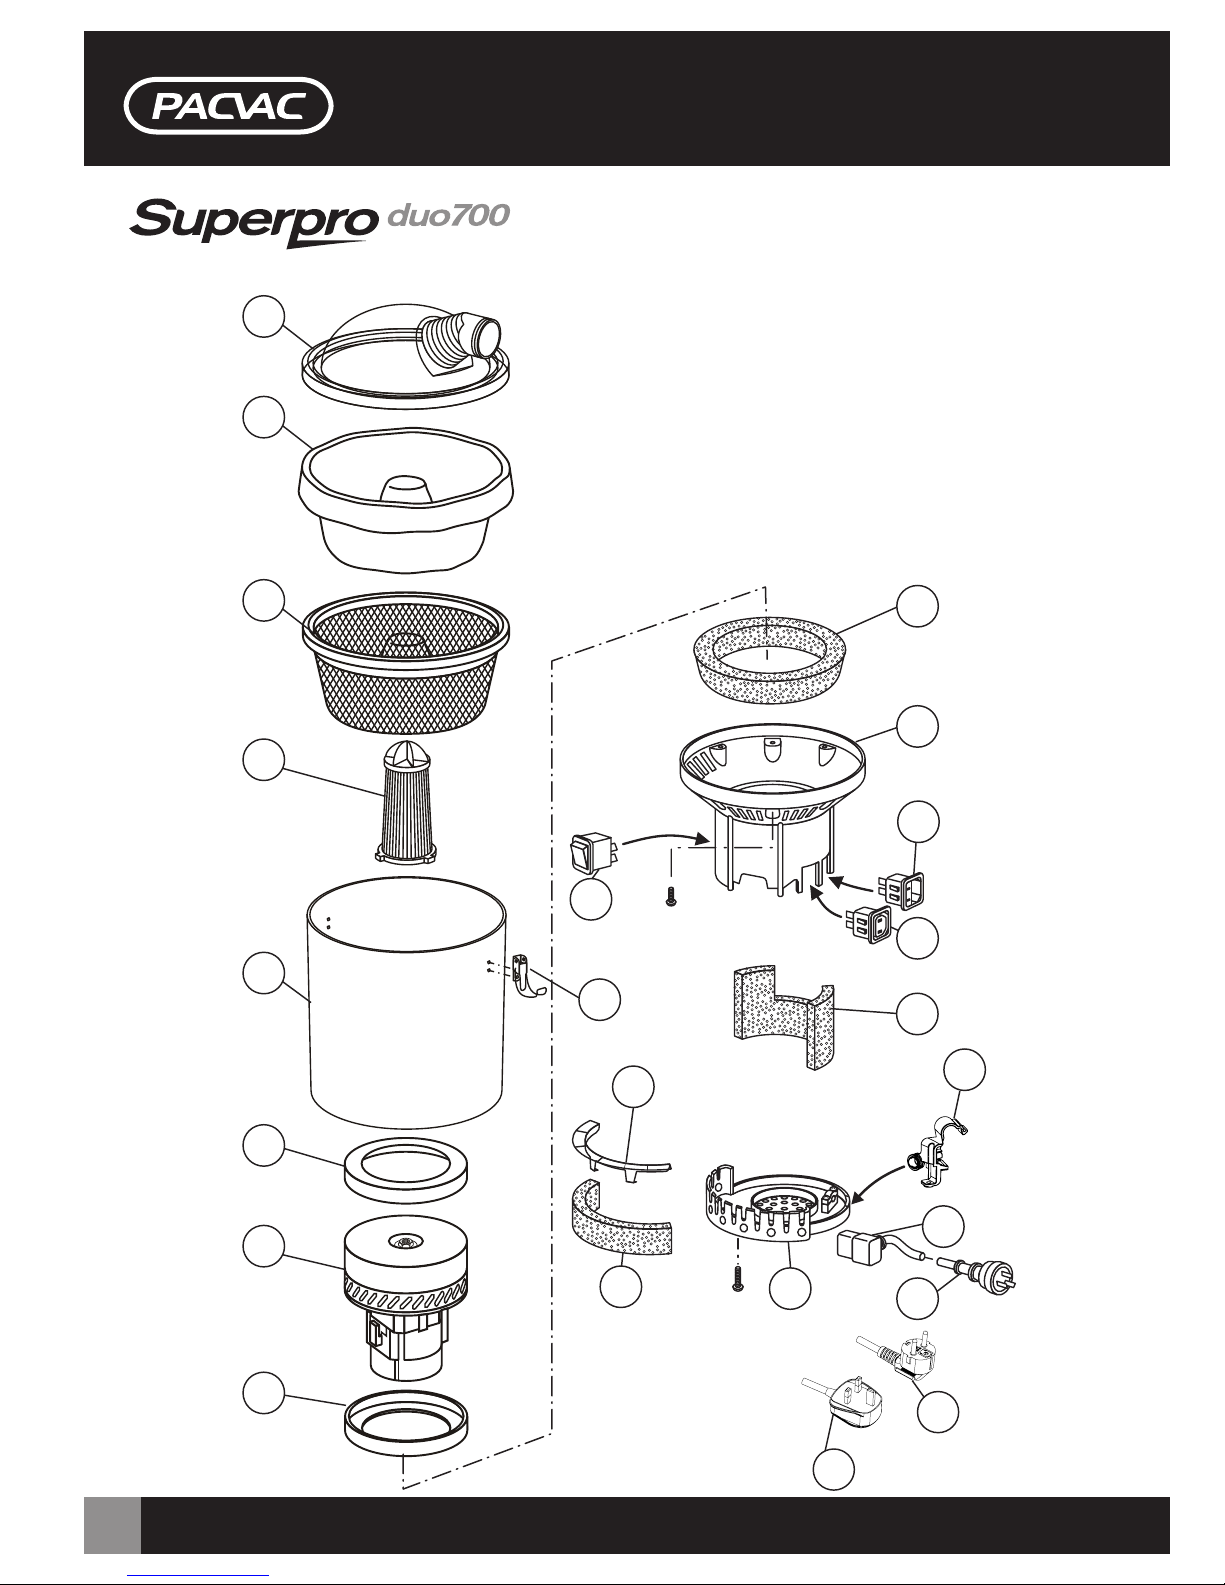
12
1
2
3
4
5
6
7
8
9
10
11
12
13
15
16
17
21
20
19
18
14
Parts Prole
Model Number: 01DU700VB
21a
21b
Page 15
Quote these part numbers when ordering spare parts
No. Part Name Part No.
1. Lid - Plastic - Clear - 270mm LID001
2. Dust Bag - Disposable - Paper - Cone - Pkt 5 DUB001
3. Dust Bag - Reusable - SMS - Cone - Pkt 1 DUB003
4. Filter - Pre-Motor - Cartridge - HEPA FIL001
5. Canister - Duo 700 CAN004
6. Gasket - Motor - Rubber - 150mm GAS007
7. Motor - Two Stage - By Pass - 250V - 1000W MOT003
8. Gasket - Motor - Rubber - 150mm GAS007
9. Latch - Aluminium - Silver - 65mm LAT001
10. Insulation - Noise - Foam - 180mm INS008
11. Intermediate Housing - Insert - Power Outlet - IEC C17 - Power Inlet IEC C14 - Blue INH008
12. Power Inlet - IEC C14 - Panel Mount PWI002
13. Power Outlet - IEC C17 - Panel Mount PWO001
14. Switch - On-Off - Non-Illuminated - Black SWI001
15. Insulation - Motor - Foam - 420mm INS009
16. Holder - Short Lead - Plastic - Black HOL004
17. Short Lead - IEC C13 Vertical Right Angle - 420mm - 3C - Plug Type I SHL001
18. Cage - Motor Filter - Plastic - Black CAG001
19. Filter - Exhaust - Flat - Foam FIL004
20. Bottom Cap - Plastic - Black - By-Pass - 175mm BOT002
21. Extension Lead - 18m - 3C - Plug Type I EXL001
21a. Power Cord - IEC C13 Vertical Right Angle - 18m - 3C - Plug Type G PWC007
21b. Power Cord - IEC C13 Vertical Right Angle - 18m - 3C - Plug Type E/F PWC006
13
Specications
Volts / Frequency: 220-240V~50Hz
Motor: 250V 1000W Two Stage By-pass
Noise Level: 74dB(A) ± 3dB(A) (at 1.5m)
Filtration: 4 stage, HEPA Rated HyperconeTM Filter
Volumetric Airow (per second): 38 litres
Capacity: 5 litres
Weight: 5.3kg (excluding power cord assembly and hose)
Vibration Level: <2.5m/s²
Technical specications, part numbers and parts proles are subject to change without notice.
Support: +61 8 9479 1444 www.pacvac.com
Page 16
14
21
1
2
3
4
5
6
7
8
9
10
11
12
13
15
16
17
20
19
18
14
Parts Prole
Model Number: 01MI700VB
21a
21b
Page 17
Quote these part numbers when ordering spare parts
No. Part Name Part No.
1. Lid - Plastic - Clear - 270mm LID001
2. Dust Bag - Disposable - Paper - Sealed - Pkt 5 DUB004
3. Dust Bag - Reusable - SMS - Bucket - Pkt 1 DUB007
4. Filter - Pre-Motor - Cartridge - HEPA FIL003
5. Canister - Micron 700 CAN005
6. Gasket - Motor - Rubber - 150mm GAS007
7. Motor - Two Stage - Flow Through - 240V - 1000W MOT001
8. Gasket - Motor - Rubber - 150mm GAS007
9. Latch - Aluminium - Silver - 65mm LAT001
10. Insulation - Noise - Foam - 180mm INS008
11. Intermediate Housing - Insert - Power Outlet - IEC C17 - Power Inlet IEC C14 - Blue INH008
12. Power Inlet - IEC C14 - Panel Mount PWI002
13. Power Outlet - IEC C17 - Panel Mount PWO001
14. Switch - On-Off - Non-Illuminated - Black SWI001
15. Insulation - Motor - Foam - 420mm INS009
16. Holder - Short Lead - Plastic - Black HOL004
17. Short Lead - IEC C13 Vertical Right Angle - 420mm - 3C - Plug Type I SHL001
18. Cage - Motor Filter - Plastic - Black CAG001
19. Filter - Exhaust - Flat - Foam FIL004
20. Bottom Cap - Plastic - Black - 175mm BOT001
21. Extension Lead - 18m - 3C - Plug Type I EXL001
21a. Power Cord - IEC C13 Vertical Right Angle - 18m - 3C - Plug Type G PWC007
21b. Power Cord - IEC C13 Vertical Right Angle - 18m - 3C - Plug Type E/F PWC006
15
Specications
Volts / Frequency: 220-240V~50Hz
Motor: 240V 1000W Two Stage Flow Through
Noise Level: 65dB(A) ± 3dB(A) (at 1.5m)
Filtration: 4 stage, HEPA Rated High Grade Filter
Volumetric Airow (per second): 39 litres
Capacity: 5 litres
Weight: 5.3kg (excluding power cord assembly and hose)
Vibration Level: <2.5m/s²
Technical specications, part numbers and parts proles are subject to change without notice.
Support: +61 8 9479 1444 www.pacvac.com
Page 18
16
1
2
3
4
5
6
7
8
9
11
12
22
14
16
18
21
20
19
15
13
10
17
24
Parts Prole
Model Number: 01TR700VB
23
Page 19
Quote these part numbers when ordering spare parts
No. Part Name Part No.
1. Lid - Plastic - Clear - 270mm LID001
2. Dust Bag - Disposable - Paper - Cone - Pkt 5 DUB001
3. Dust Bag - Reusable - SMS - Cone - Pkt 1 DUB003
4. Filter - Pre-Motor - Cartridge - HEPA FIL001
5. Canister - Trans 700 CAN006
6. Gasket - Motor - Rubber - 150mm GAS007
7. Motor - Two Stage - Flow Through - 120V - 950W MOT004
8. Seal - Motor - Rubber - 145mm SEA002
9. Latch - Aluminium - Silver - 65mm LAT001
10. Electrical - Bridge Rectier - 35A ELE005
11. Insulation - Noise - Foam - 180mm INS008
12. Intermediate Housing - Insert - Power Outlet - IEC C17 - Blue INH007
13. Switch - On-Off - Non-Illuminated - Black SWI001
14. Insulation - Motor - Foam - 420mm INS009
15. Cage - Motor Filter - Plastic - Black CAG001
16. Screw - Aluminium - 1mm x 9mm SCR007
17. Clamp - Cable - Plastic - White - 34mm CLA001
18. Grommet - Cable - Rubber - Black - 48mm GRO001
19. Filter - Exhaust - Flat - Foam FIL004
20. Bottom Cap - Plastic - Black - 175mm BOT001
21. Power Cord - Hard Wired - 18m - 2C - Plug Type A PWC008
22. Holder - Fuse - Plastic - Black - 42mm HOL009
23. Electrical - Fuse - Time Lag - 10A ELE006
24. Power Outlet - IEC C17 - Panel Mount PWO001
17
Specications
Volts / Frequency: 120V~400Hz
Motor: 120V 850W Two Stage Flow Through
Noise Level: 63dB(A) ± 3dB(A) (at 1.5m)
Filtration: 4 stage, HEPA Rated HyperconeTM Filter
Volumetric Airow (per second): 29 litres
Capacity: 5 litres
Weight: 5.1kg (excluding power cord assembly and hose)
Vibration Level: <2.5m/s²
Technical specications, part numbers and parts proles are subject to change without notice.
Support: +61 8 9479 1444 www.pacvac.com
Page 20
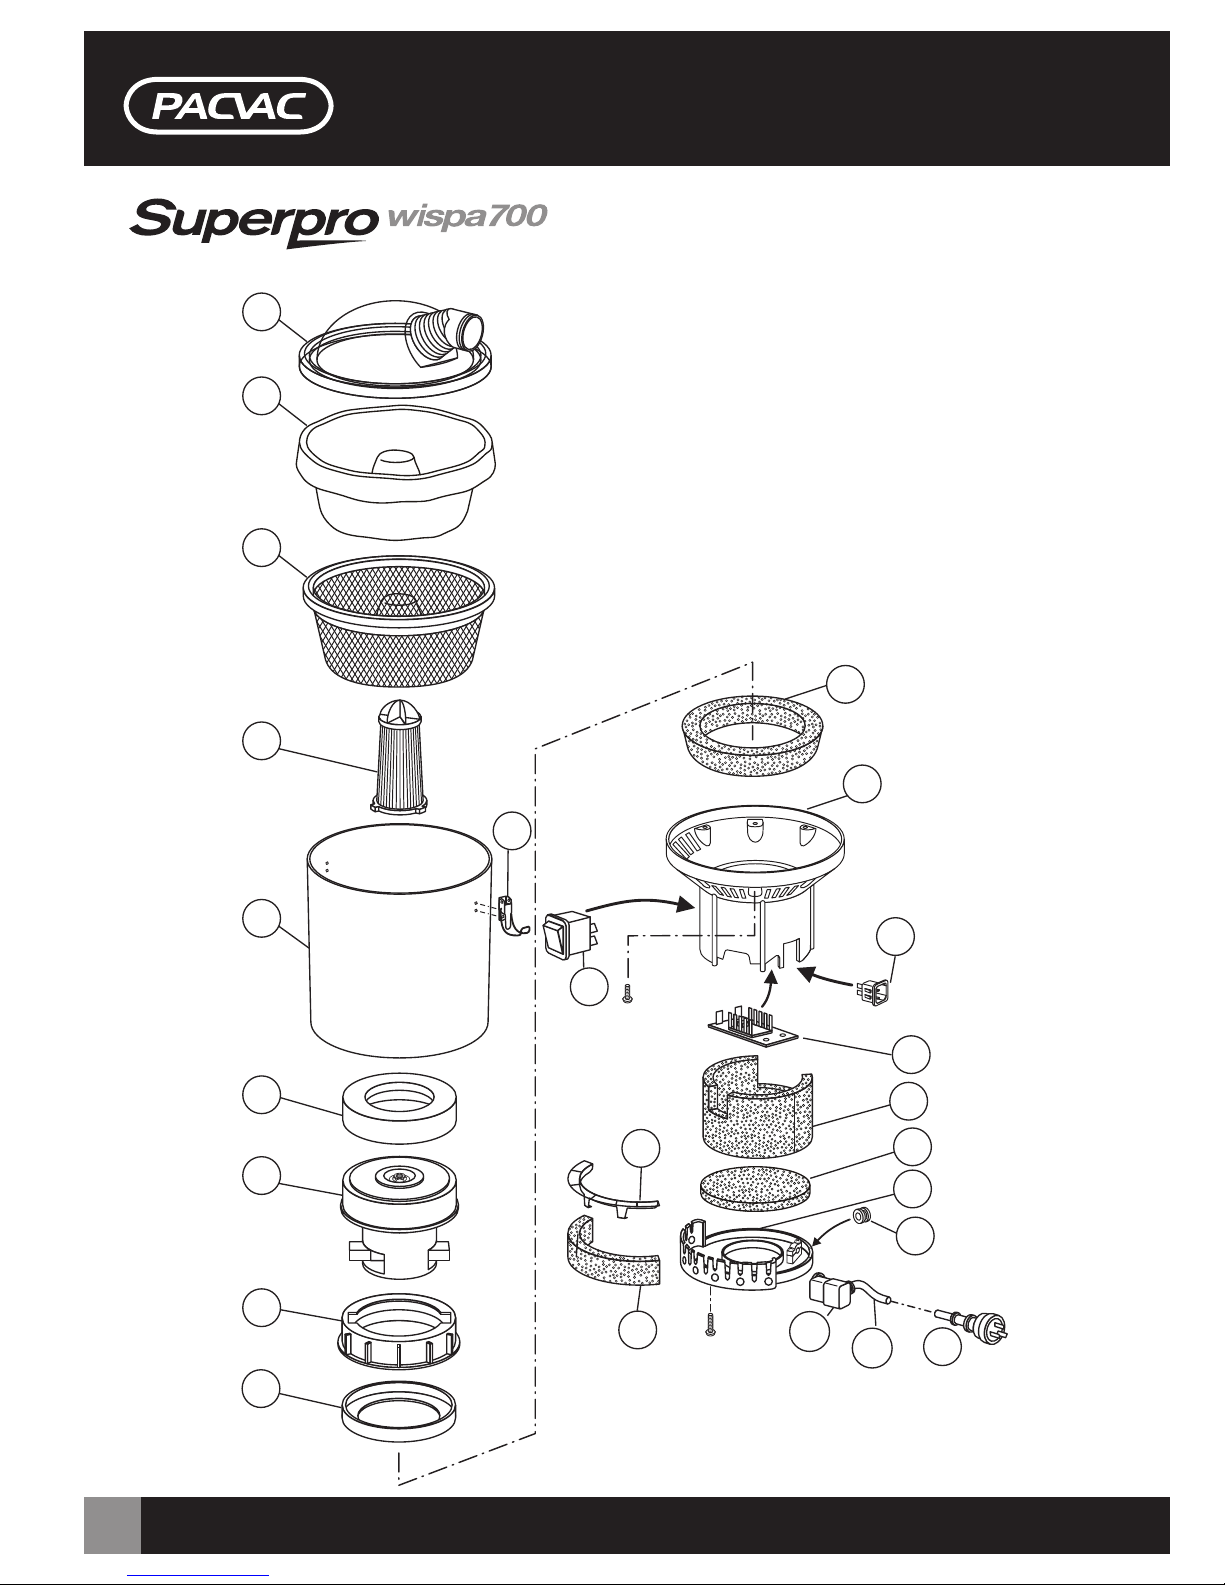
18
Parts Prole
1
2
3
4
5
6
7
8
9
10
11
12
13
15
16
20a
19
18
17
14
21
22
23
20b
Model Number: 01WI700VB
Page 21
19
Specications
Volts / Frequency: 220-240V~50Hz
Motor: 240V 1300W Single Stage Flow Through
Noise Level: Normal mode 66dB(A) ± 3dB(A) (at 1.5m) / Wispa mode 62dB(A) ± 3dB(A) (at 1.5m)
Filtration: 4 stage, HEPA Rated HyperconeTM Filter
Volumetric Airow (per second): 37 litres; wispa mode 31 litres
Capacity: 5 litres
Weight: 4.7kg (excluding power cord assembly and hose)
Vibration Level: <2.5m/s²
Quote these part numbers when ordering spare parts
No. Part Name Part No.
1. Lid - Plastic - Clear - 270mm LID001
2. Dust Bag - Disposable - Paper - Cone - Pkt 5 DUB001
3. Dust Bag - Reusable - SMS - Cone - Pkt 1 DUB003
4. Filter - Pre-Motor - Cartridge - HEPA FIL001
5. Canister - Wispa 700 CAN007
6. Gasket - Motor - Foam - 145mm GAS010
7. Motor - Single Stage - Flow Through - 240V - 1300W MOT005
8. Spacer - Motor - Plastic - 145mm SPA002
9. Gasket - Motor - Rubber - 150mm GAS007
10. Latch - Aluminium - Silver - 65mm LAT001
11. Insulation - Noise - Foam - 180mm INS004
12. Intermediate Housing - Insert - Power Inlet - IEC C16 - Blue INH006
13. Power Inlet - IEC C16 - Panel Mount PWI001
14. Switch - Hi-Low - Non-Illuminated - Black SWI002
15. PCB - Two Speed - AC PCB002
16. Insulation - Noise - Foam - 430mm INS005
17. Insulation - Motor - Foam - 165mm INS006
18. Cage - Motor Filter - Plastic - Black CAG001
19. Insulation - Noise - Foam - 200mm INS007
20. Power Plug - Female - IEC C15 Horizontal Right Angle - Hot Conditioned Plastic - Black PWP005
20b. Short Lead - Hard Wired - 420mm - 3C - Plug Type I SHL006
21. Extension Lead - 18m - 3C - Plug Type I EXL001
22. Bottom Cap - Plastic - Black - 175mm BOT001
23. Cap - Blank - Plastic - Blue - 17mm CAP006
Technical specications, part numbers and parts proles are subject to change without notice.
Support: +61 8 9479 1444 www.pacvac.com
Page 22
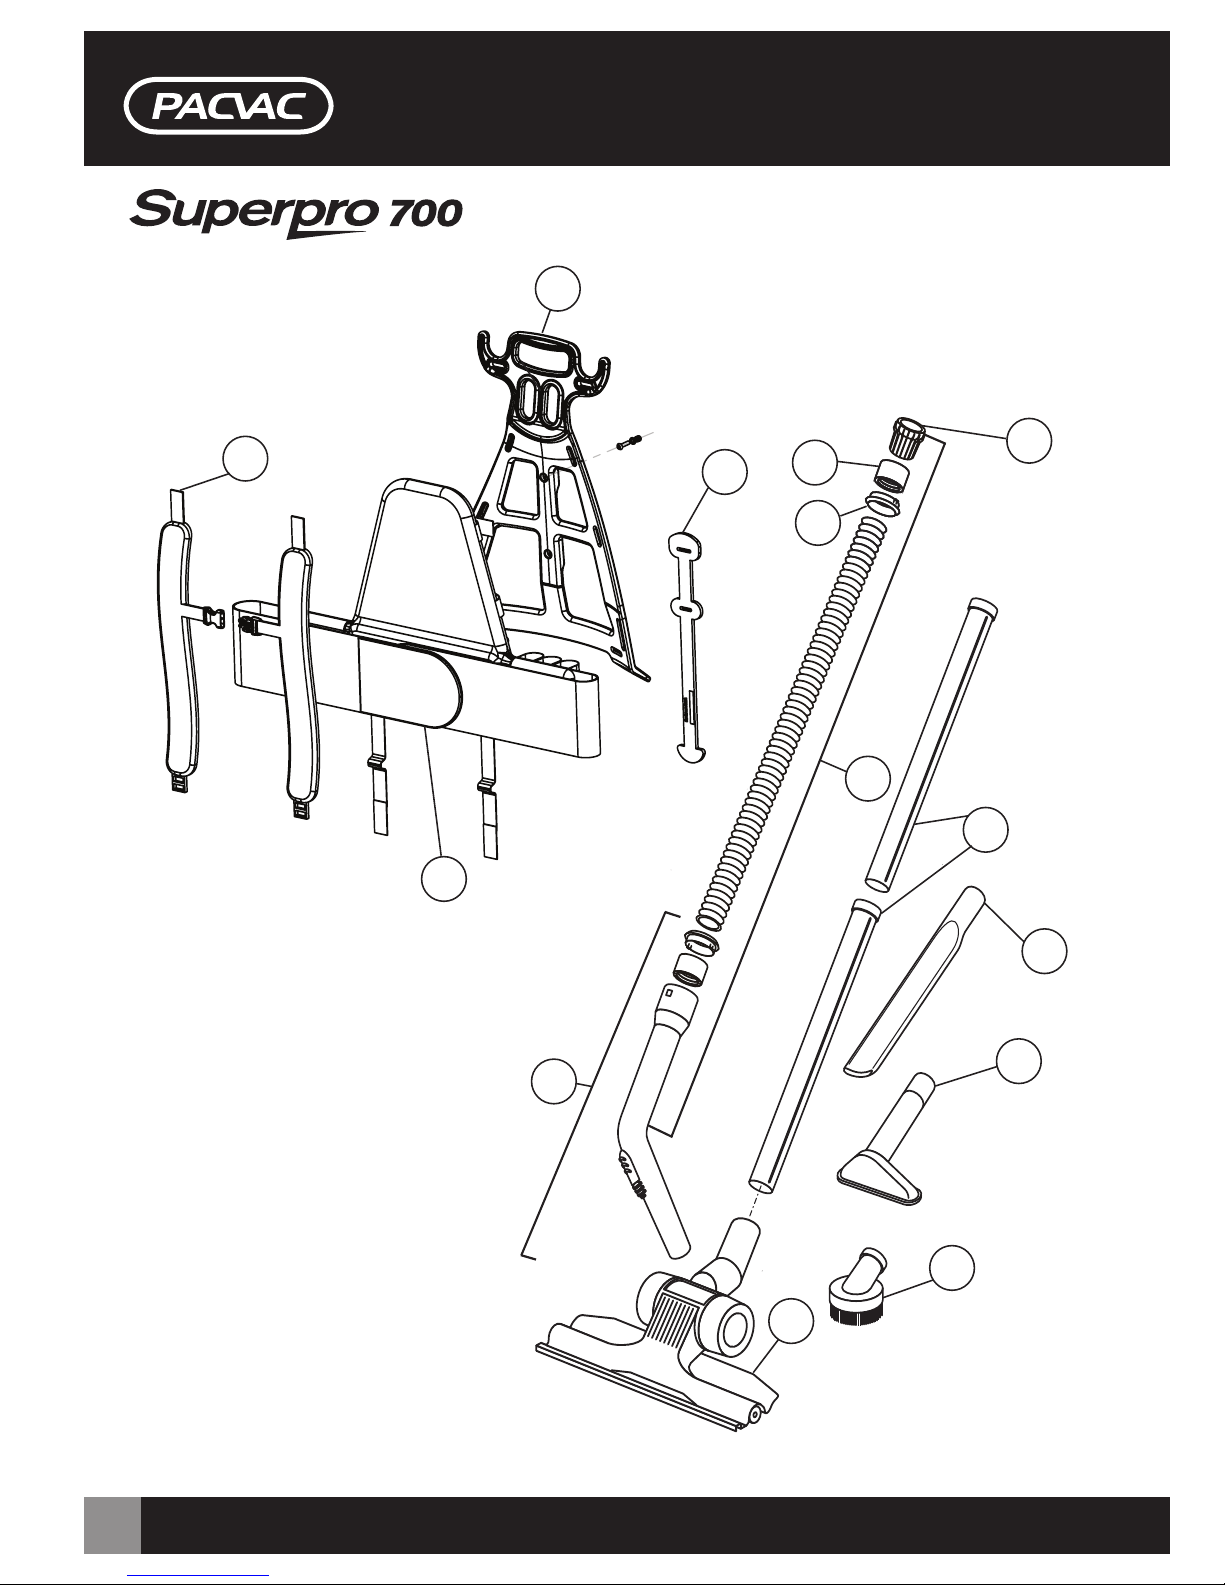
20
Series Harness and Accessories Parts Prole
1
2
3
4
5
6
7
8
9
10
5b
5c
5a
5d
Page 23
21
Quote these part numbers when ordering spare parts
No. Part Name Part No.
1. Frame - Backpack - Plastic - Black - 530mm FRA001
2. Strap - Shoulder - Padded - Black - Pkt 2 STP003
3. Cord Restraint - Rubber COR001
4. Harness - Padded Back - Elastic Velcro Hip Band HAR001
5. Hose Assembly - 32mm - 1.2m - Screw Fit HOA001
5a. Connector - Hose - Plastic - Black - 32mm CON001
5b. Cuff - Hose - Plastic - Black - 32mm CUF002
5c. Clip - Hose - Plastic - Black - 32mm CLI004
5d. Hand Piece - 32mm - Plastic HAP001
6. Wand - Two Piece - Chrome - 32mm WND002
7. Accessory - Crevice Tool - 32mm ACC002
8. Floor Tool - All Purpose - 32mm - 285mm FLT001
9. Accessory - Dusting Brush - 32mm ACC001
10. Accessory - Upholstery Tool - 32mm ACC003
Optional Extras
11. Floor Tool - Combination - 32mm - 270mm FLT003
12. Floor Tool Fitting - Plate - 270mm FLF001
13. Floor Tool - Hard Surface - 32mm - 300mm FLT005
14. RCD - Piggy Back - Plug Type I RCD003
15. Floor Tool - Turbo Head - 32mm - 280mm FLT007
16. Hand Piece - 32mm - Chrome HAP003
17. Floor Tool - Power Head - 32-38mm - 305mm FLT014
18. Wand - Telescopic - Chrome - 32mm WND001
Technical specications, part numbers and parts proles are subject to change without notice.
Support: +61 8 9479 1444 www.pacvac.com
11 12 13
1514
18
16
Optional Extras
17
Page 24
Service & Help
For service and help contact Pacvac on +61 8 9479 1444 or email [email protected]
Alternatively visit our website at www.pacvac.com for a list of your nearest Authorised
Distributors and Service and Warranty Agents.
Revised: September 2017
700SPS - M - 170928
PACVAC PTY LTD
ABN: 60 709 396 593
7 Mackay Street, Kewdale WA 6105
AUSTRALIA
 Loading...