

Page 1
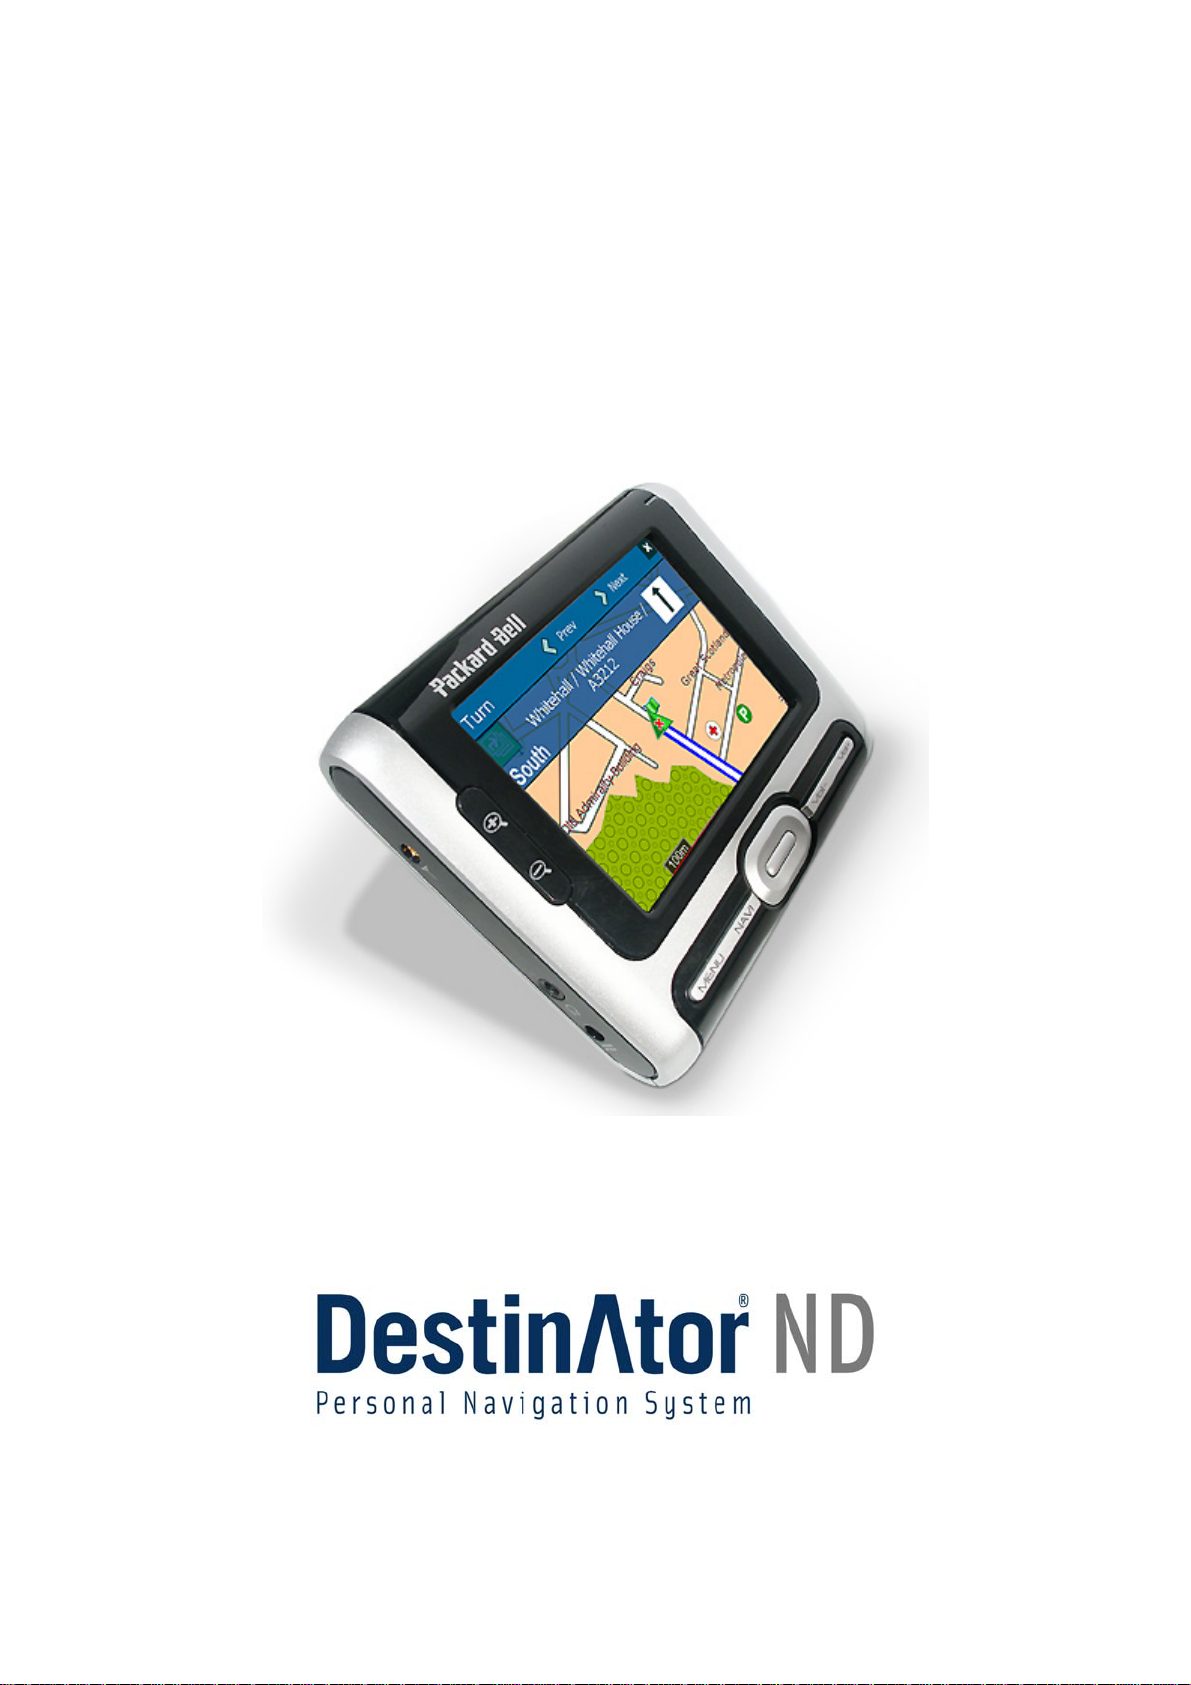
PACKARD BELL GPS 400
USER'S GUIDE
Page 2

Notices & Disclaimers
Copyright Notice
Packard Bell GPS 400 User's Guide. Copyright © 2006 Packard Bell B.V. All Rights Reserved. No
part of this manual may be reproduced or transmitted, in any form or by any means, whether
electronic, chemical, manual or otherwise, including but not limited to photocopying, recording, or
information storage and retrieval systems, for any purpose without prior written permission of Packard
Bell B.V.
Disclaimer
See page 54
Trademark
Packard Bell is a registered trademark of Packard Bell B.V. Destinator ND is a trademark of Destinator
Technologies Inc. (DTI). All other company or product names are trademarks, registered trademarks
or service marks of their respective owners.
Caution
Do not leave the device in your car. Exposure to sunlight may cause damage.
Do not incinerate or disassemble; the unit may explode or release toxic materials. Do not short circuit
as this may cause burns.
Product Disposal
Battery notice
DO NOT REPLACE THE BATTERY BY YOURSELF. RISK OF EXPLOSION IF BATTERY IS
REPLACED BY INCORRECT MODEL. DISPOSE OF USED BATTERIES ACCORDING TO
INSTRUCTIONS.
Ultimate disposal of the batteries should be handled according to all national laws and regulations. Do
not place used batteries in your regular waste: the incineration, landfilling or mixing of batteries with
the municipal solid waste stream is prohibited by law in most countries. Contact your local waste
management officials for other information regarding the environmentally sound collection, recycling,
and disposal of the batteries.
.
The Waste Electrical and Electronic Equipment (WEEE) Directive requires that used
electrical and electronic products must be disposed of separately from normal
household waste in order to promote reuse, recycling, other forms of recovery and to
reduce the quantity of waste to be eliminated with a view to reducing landfill. This
concerns your computer and all its accessories, such as a keyboard, mouse, remote
control, speakers, etc. When you dispose of such products, please follow the guidance
of your municipal authority and/or ask your retailer when purchasing a new product.
Note:
Some smaller (sub-) municipalities may not contain street data. In such cases, please choose the
larger (super-) municipality displayed in parentheses to search for these streets. Alternatively, you can
change the search order to Street>City or ZIP/Postal Code>Street to find street data for the smaller
municipality.
2
Page 3

Table of Contents
Chapter 1 - Introducing the Packard Bell GPS 400............................................................5
1.1 Contents of the box ........................................................................................................... 5
1.2 Features ............................................................................................................................ 5
1.3 Controls............................................................................................................................. 5
Chapter 2 - Getting Started..................................................................................................7
2.1 Powering ON/OFF.............................................................................................................7
2.2 Connecting to your computer ............................................................................................ 7
2.3 Disconnecting from your Computer................................................................................... 8
2.4 Charging the Battery.......................................................................................................... 8
Chapter 3 - Troubleshooting & Upgrading the GPS 400...................................................9
3.1 Resetting the device.......................................................................................................... 9
3.2 Technical Support.............................................................................................................. 9
Chapter 4 - Installing the Packard Bell GPS 400 in your car..........................................10
Setting up the device............................................................................................................. 10
Chapter 5 - Destinator ND for the Packard Bell GPS 400................................................13
5.1 Introduction...................................................................................................................... 13
5.2 Destinator ND Features................................................................................................... 13
5.3 Tutorial............................................................................................................................. 14
Chapter 6 - Getting to know your GPS 400 ......................................................................14
6.1 What’s on the map?......................................................................................................... 14
6.2 GPS not found................................................................................................................. 15
6.3 Map views........................................................................................................................ 16
6.4 Point on the map ............................................................................................................. 17
6.5 Menus.............................................................................................................................. 17
Destination menu ............................................................................................... 17
Option menu....................................................................................................... 18
Settings menu.....................................................................................................19
6.6 Screens buttons............................................................................................................... 20
6.7 Cycling through screens.................................................................................................. 20
Chapter 7 - Searching for a location.................................................................................21
7.1 Enter address.................................................................................................................. 21
Address Modes .................................................................................................. 21
Address Actions ................................................................................................. 22
Go to your destination........................................................................................ 23
7.2 Recent Locations............................................................................................................. 24
7.3 My Favorites.................................................................................................................... 24
Favorite Groups.................................................................................................. 25
Favorite Alerts ....................................................................................................26
Add Favorite Locations....................................................................................... 27
7.4 Points of Interest (POI)....................................................................................................27
Subcategories.....................................................................................................28
Search near a location .......................................................................................28
Actions................................................................................................................29
7.5 Route Overview or Cancel Route.................................................................................... 30
7.6 Turn-by-turn list ............................................................................................................... 30
7.7 Select Map....................................................................................................................... 31
Chapter 8 - Planning a trip.................................................................................................32
8.1 Multistop planner............................................................................................................. 32
Defining Route Groups.......................................................................................32
3
Page 4

Setting Stops along the Route............................................................................ 33
Stop Actions .......................................................................................................33
8.2 Avoid roads...................................................................................................................... 34
Avoid Road Groups............................................................................................ 34
Avoid Road Locations ........................................................................................35
8.3 Route playback................................................................................................................ 35
8.4 Pedestrian mode .............................................................................................................36
8.5 Map browsing.................................................................................................................. 36
Chapter 9 - Settings............................................................................................................37
9.1 Map.................................................................................................................................. 37
9.2 Quick navigation.............................................................................................................. 37
9.3 GPS Settings................................................................................................................... 38
9.4 Prompts........................................................................................................................... 39
Voice Prompts.................................................................................................... 39
Visual Prompts ...................................................................................................39
9.5 Units of measure ............................................................................................................. 39
9.6 Look & Feel ..................................................................................................................... 40
9.7 Tutorial............................................................................................................................. 40
9.8 Help................................................................................................................................. 40
Chapter 10 - Installation Requirements............................................................................41
10.1 Computer Requirements ............................................................................................... 41
10.2 Installing the console.....................................................................................................41
10.3 Console Toolbar............................................................................................................41
Chapter 11 - Maps...............................................................................................................42
11.1 Map Screen Interface.................................................................................................... 42
11.2 Installing a Map ............................................................................................................. 42
11.3 Map Cutter Screen Interface ......................................................................................... 42
11.4 Focus the Map............................................................................................................... 43
Focus the Map by Route.................................................................................... 44
11.5 Cut Map......................................................................................................................... 45
11.6 Load Map....................................................................................................................... 45
11.7 Remove Map .................................................................................................................45
Chapter 12 - Importing a Favorite......................................................................................46
12.1 Favorites Importing File Structure ................................................................................. 46
12.2 Importing a .CSV file......................................................................................................46
Chapter 13 - MP3 Player.....................................................................................................47
13.1 Overview........................................................................................................................ 47
13.2 Creating a Play list......................................................................................................... 47
13.3 Basic Operation............................................................................................................. 48
Chapter 14 - Photo Viewer .................................................................................................49
14.1 Overview........................................................................................................................ 49
14.2 Basic Operation............................................................................................................. 49
Chapter 15 - Packard Bell GPS Settings...........................................................................50
15.1 Volume Settings ............................................................................................................50
15.2 Power Settings .............................................................................................................. 51
15.3 Backlight Settings.......................................................................................................... 51
15.4 Date-Time Settings........................................................................................................ 51
15.5 Language Settings......................................................................................................... 52
15.6 System Information........................................................................................................ 52
Specifications......................................................................................................................53
4
Page 5
Chapter 1 - Introducing the Packard Bell
GPS 400
1.1 Contents of the box
• 12V cigarette lighter adapter + DC power lead
• AC adapter
• Socket adapter (Europe or UK)
• Car holder kit
• USB cable
• MMC card (with country map)
• Protective pouch
• Companion CD/DV
• Quick Start Guide
1.2 Features
• Plug and play GPS device
• 3.5' TFT-LCD colour tou
• SD/MMC card reader
• 256/512 MB MMC card provide
• MP3 player and Photo viewer
• High-quality loudspeaker
• GPS Module: SiRF Star
• Processor: 266MHz
• Memory: 64MB (internal memory) + 256/512 MB MM
• Battery: Integrated recharg
• Upgradeable firmware
• Supports Windows 2000/XP
D (documentation & software)
ch screen
d, with country map
III
C card
eable Li-Ion 2, 100 mAh
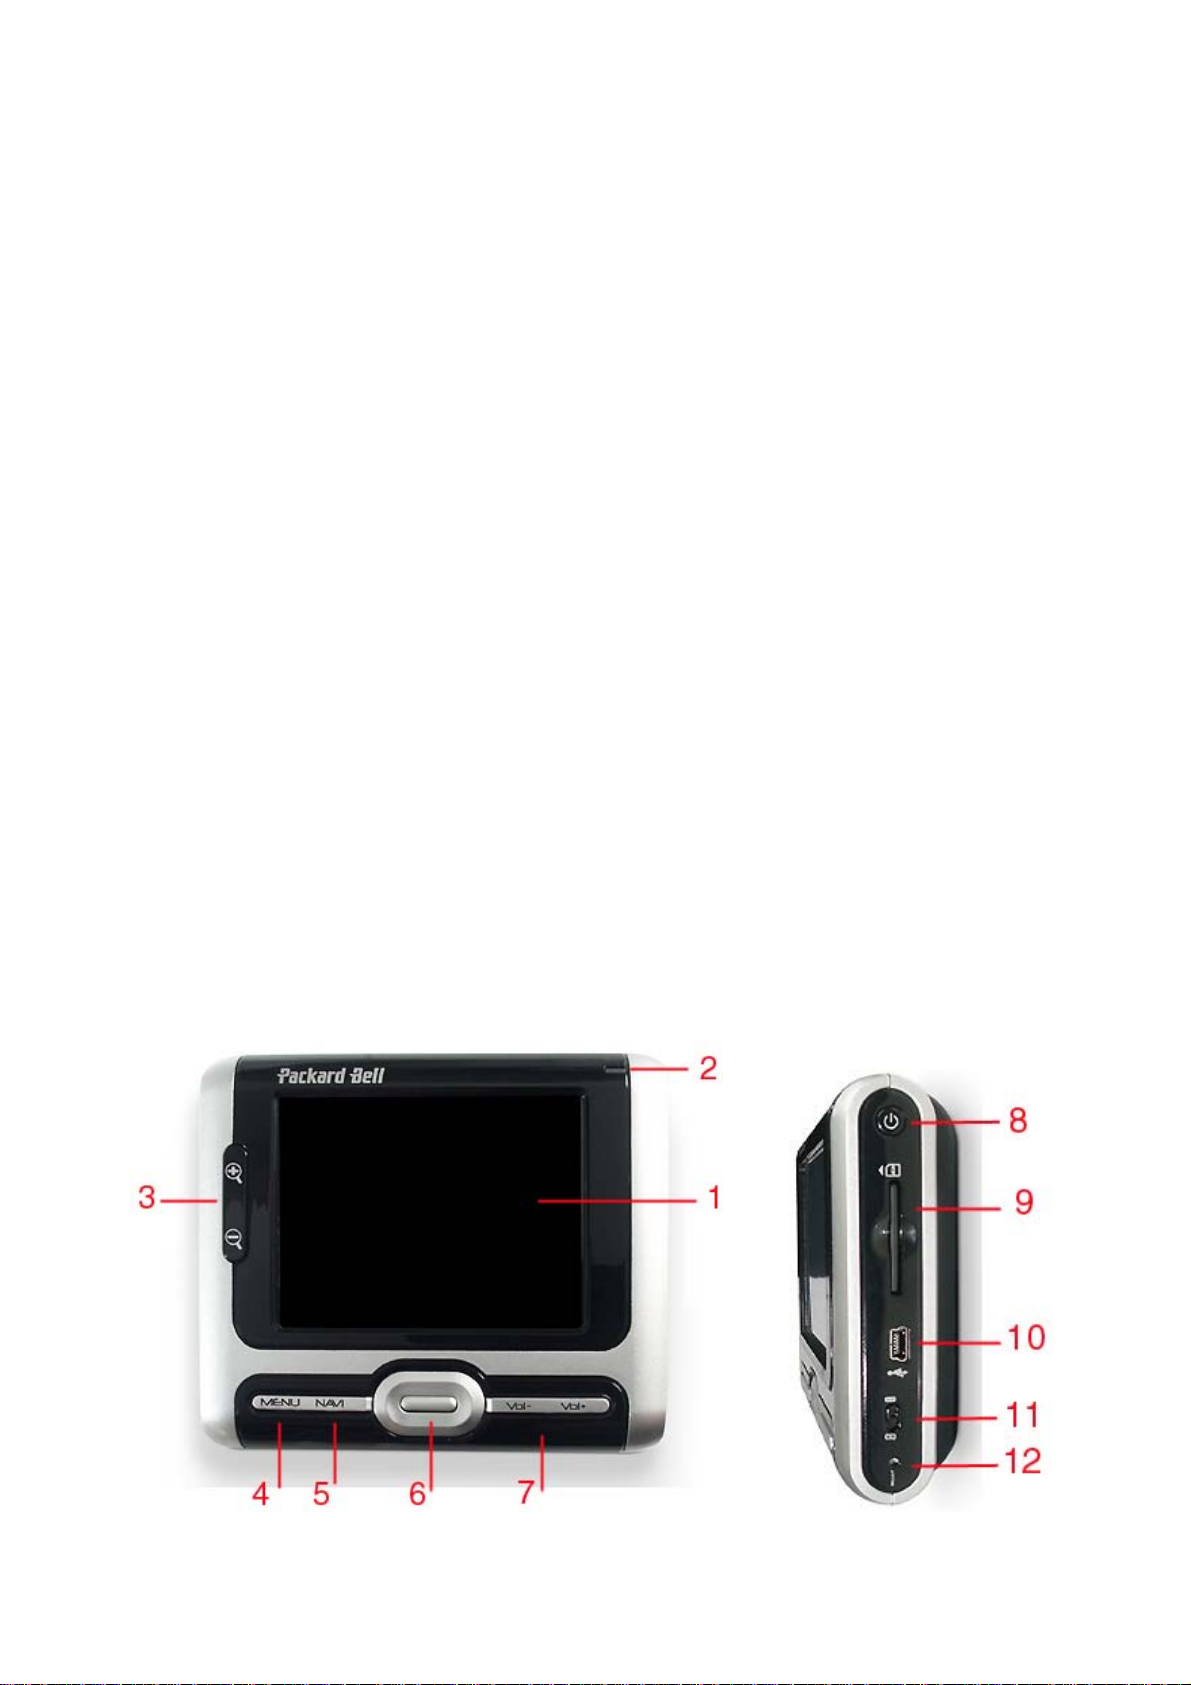
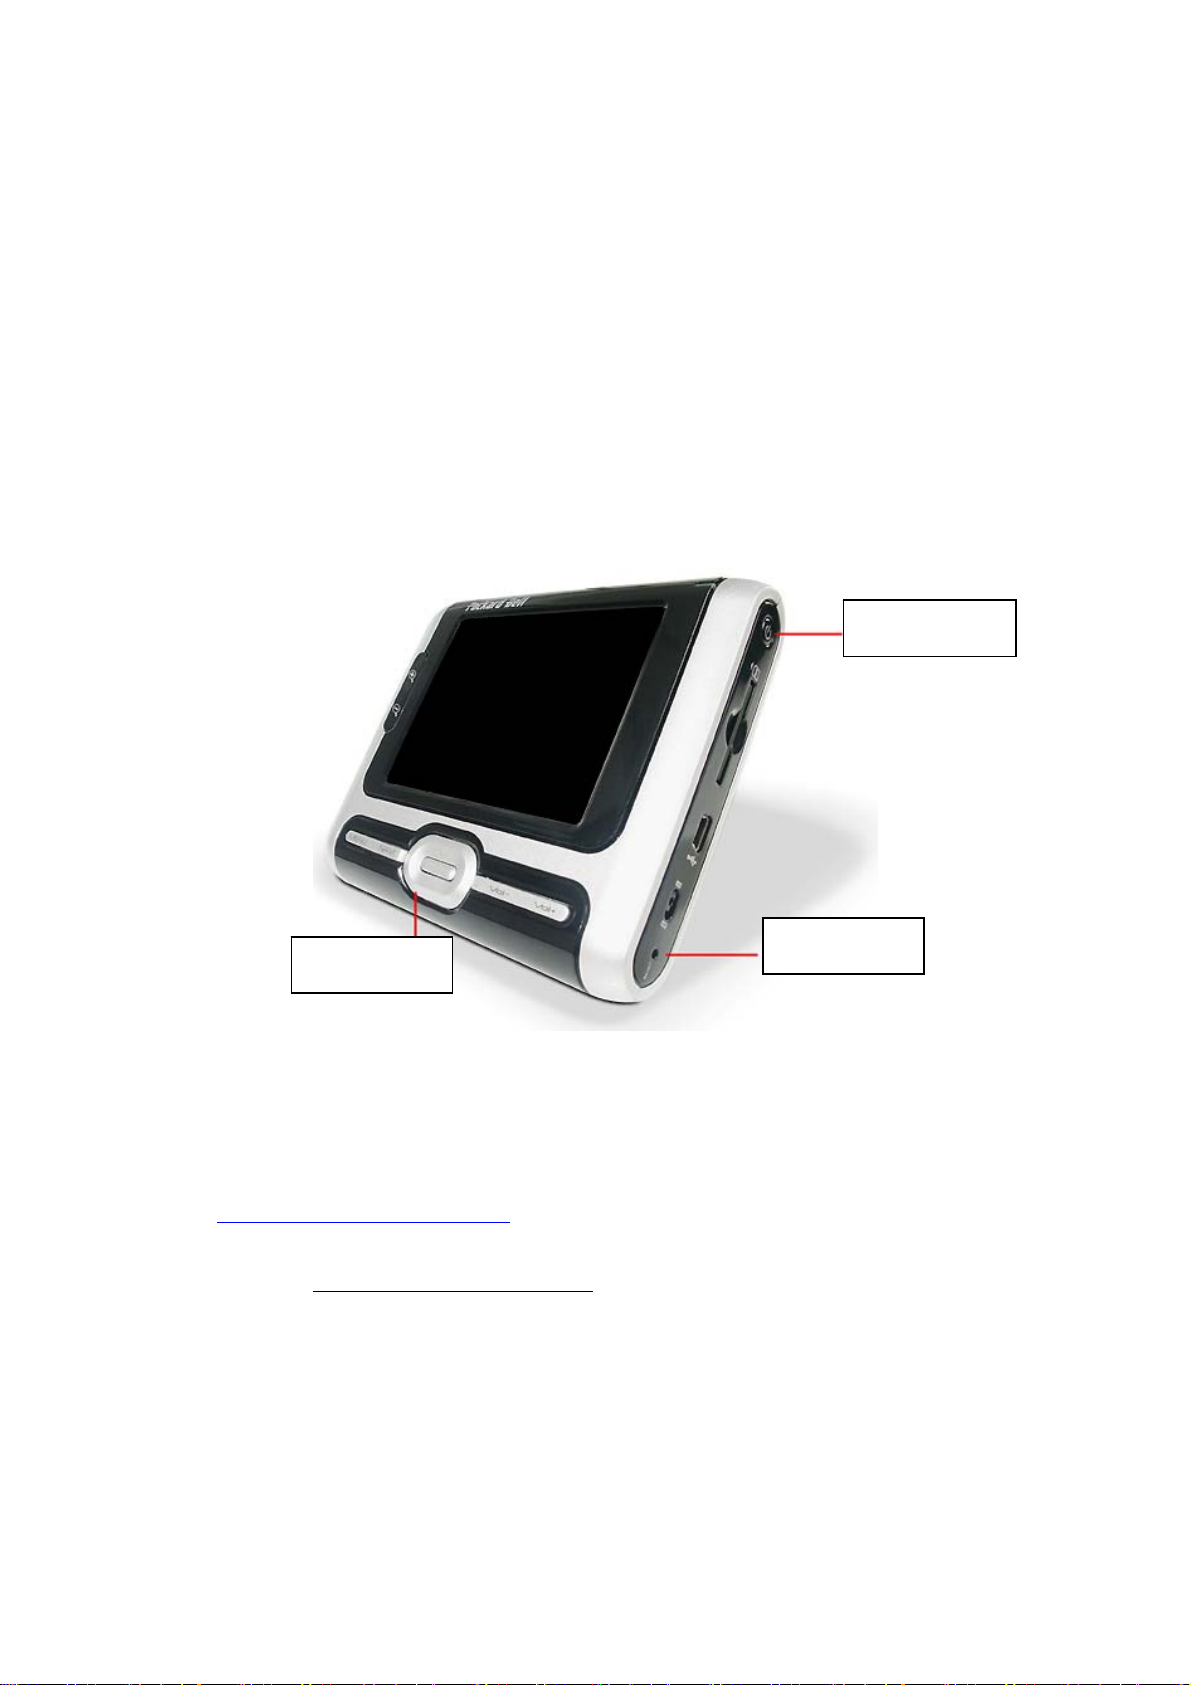
1.3 Controls
5
Page 6

1 Touch screen
2 Battery charging LED
3 Zoom in/out
4 Menu button
5 Navigation button
6 5-way scroll button
7 Volume up/down
8 Standby button
9 SD/MMC card slot
10 USB connector
11 Power Switch
(full reset)
12 Reset button
13 External GPS antenna
connector (MMCX)
14 Earphone Jack
15 Power connector
16 Speaker
17 Car holder slots
Read status and information on the screen. Tap the screen to enter
information and navigate through the applications.
Indicates the status of battery.
Press to adjust the current view.
Press to go back to the main screen.
Press this button to launch the navigation application directly.
Press to go up/down/left/right/ or select enter.
Press to adjust the volume.
Press briefly to power on or off the device. Press and hold to turn the
backlight on or off.
Insert an SD or MMC card to read maps, music, photos.
Use the supplied USB cable to connect to your computer.
Use this switch to cut all power to the device. Note that this also resets
the device’s memory. You will have to perform the first start process again
(calibrate screen, settings, acquire GPS connection, etc.).
Restart your device in case it stops responding or becomes unstable.
If your car has a heat reflective/thermal windscreen, you may need to use
an external antenna to get better GPS reception.
Connect earphones.
Connect to the supplied AC adapter.
Listen to route guidance instructions.
Use to position your device in the car holder kit.
To make the most of your Packard Bell GPS 400, download extra maps, get the latest firmware and
purchase accessories, make sure you visit the Packard Bell Website regularly on
www.packardbell.com !
6
Page 7
Chapter 2 - Getting Started
2.1 Powering ON/OFF
Simply press the standby button to power on or off the Packard Bell GPS 400.
2.2 Connecting to your computer
You will need to connect to your computer to get the latest maps, points of interest or software updates
(Internet connection required).
1. Connect the small end of the supplied USB cable to your GPS 400 and the other to one of your
computer's USB ports.
2. Insert the Companion CD/DVD into your computer.
3. Click on the Driver button to install Auto Scan for driver.
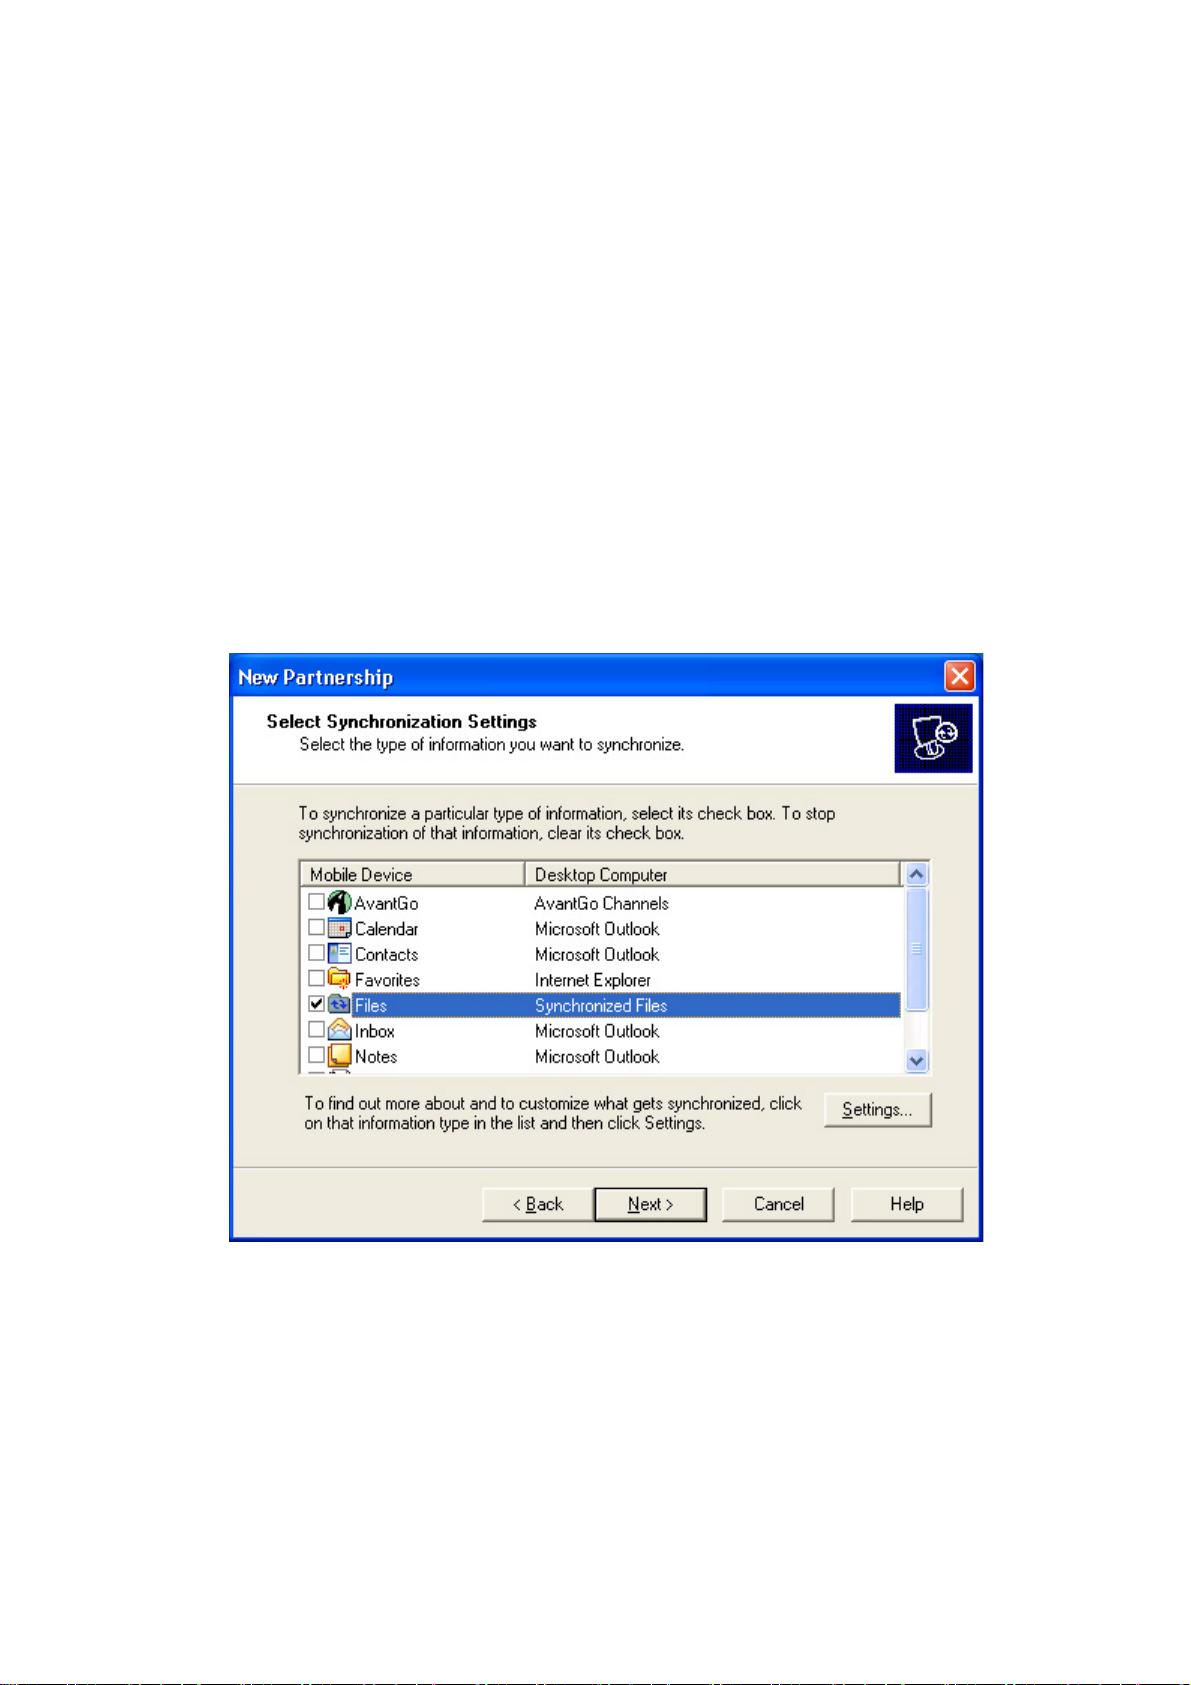
4. Click on the Microsoft ActiveSync button to install Microsoft ActiveSync 4.1.
5. Follow the onscreen instructions and select "Files" in the Synchronisation Settings window.
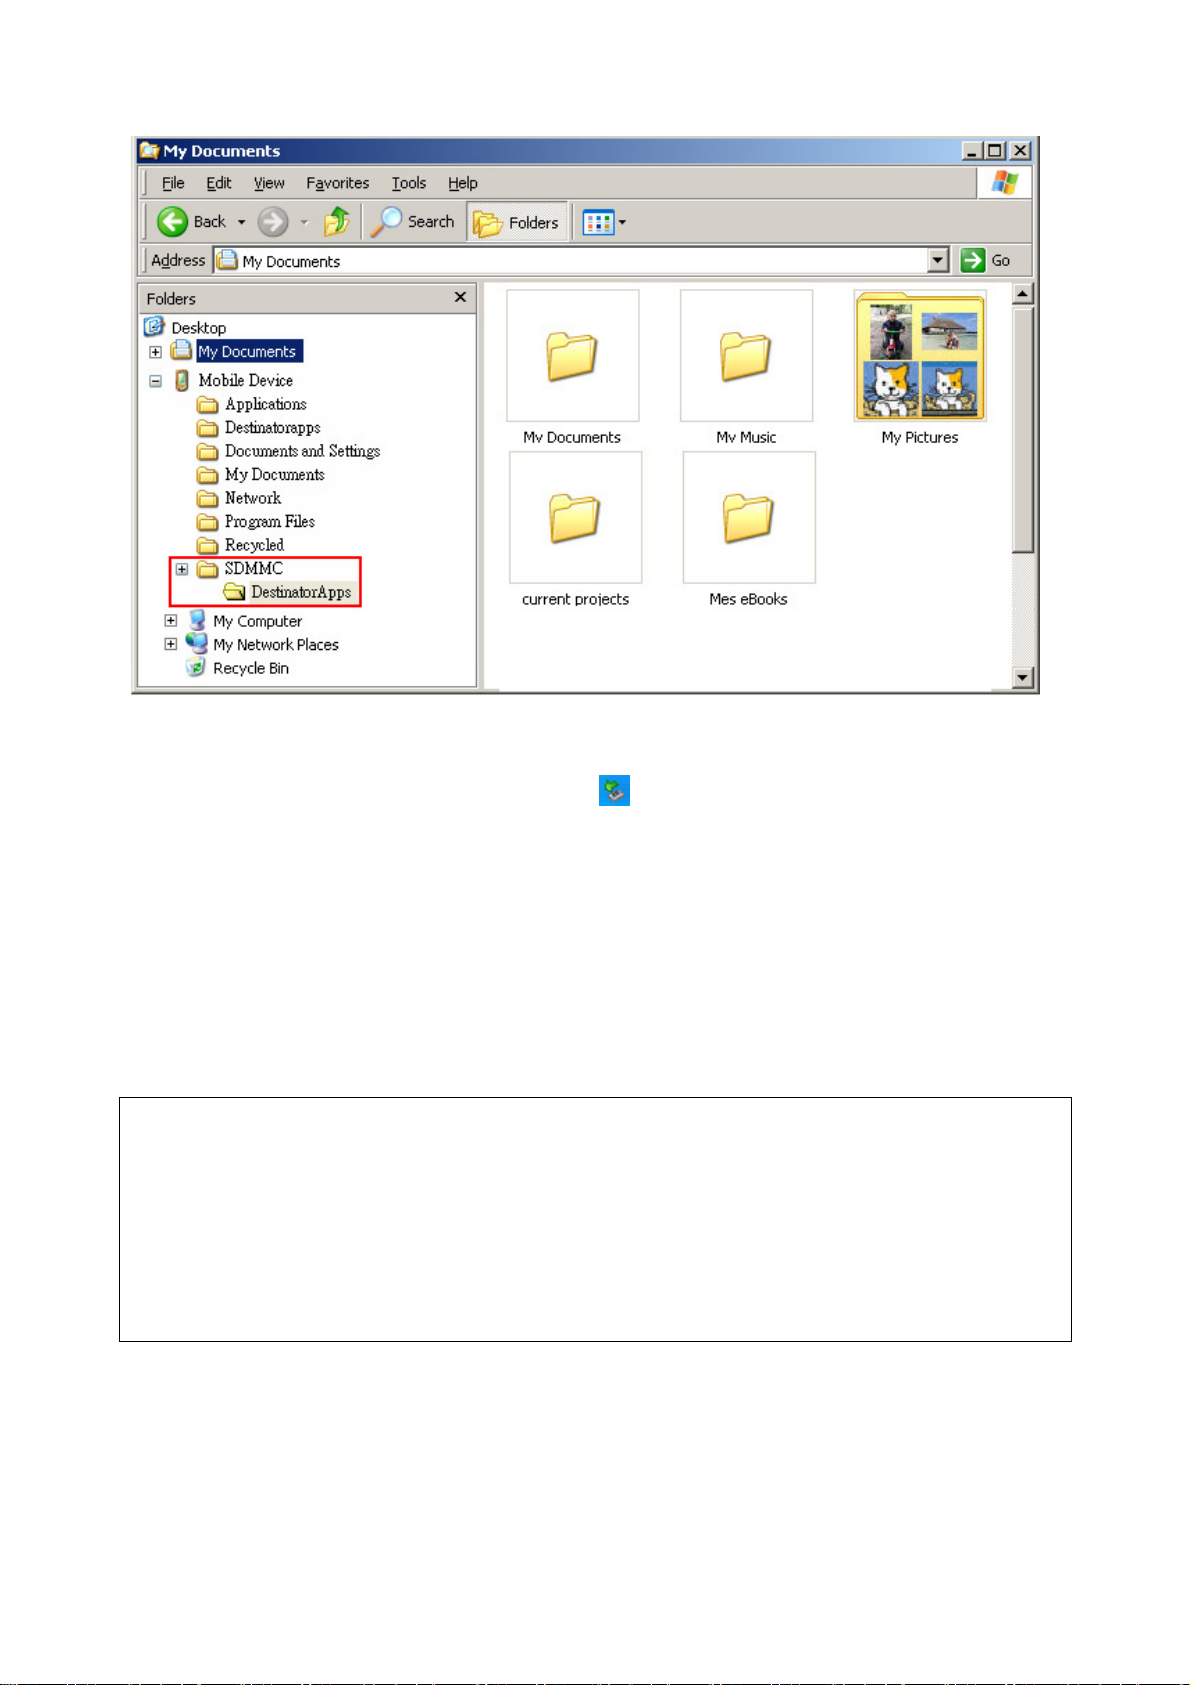
6. You can now transfer files to and from the MMC card in the GPS 400 using Windows Explorer.
7
Page 8
2.3 Disconnecting from your Computer
1. Click on the Safely Remove Hardware icon in the Notification area (next to the clock).
2. Click on Safely remove USB Mass Storage Device.
3. Wait until a Safe to Remove Hardware message is displayed.
4. Remove the device.
2.4 Charging the Battery
The charging LED indicates the status of battery:
Red blinking: battery has less than 10% (with beep sound)
Static amber: charging
Static green: fully charged
The charging indicator (the last two) works only when AC power is present.
You are recommended to fully charge the battery each time the device is completely discharged. This will
ensure maximum performance. Avoid frequent full discharges, because this puts additional strain on the
battery. Several partial discharges with frequent recharges are better for lithium-ion than one deep one.
When the battery is too low, be sure to charge it in time. Otherwise, the device may automatically
turn off and cannot be turned on. If your device becomes fully discharged and cannot be started,
follow the procedure below.
1. Connect the device to the AC adapter for at least three minutes before tuning it on.
2. After this short period, the battery should be sufficiently charged to allow the device to operate
z
z
normally when connected to the AC adapter or computer.
Charging with the AC adapter:
Connect the AC adapter to the power connector. The device will automatically charge.
Full charge in power-off mode requires about 4 hours.
Charging with the cigarette lighter adapter:
You can plug in the cigarette lighter adapter to charge the GPS 400 in your car.
8
Page 9
Chapter 3 - Troubleshooting & Upgrading
the GPS 400
3.1 Resetting the device
Reset Button:
Should the GPS 400 freeze or become unstable, insert a straightened paper clip into the Reset switch
located on the right side of the device. The device will then restart.
Cold Boot:
Insert a straightened paper clip into the reset switch and press the standby button simultaneously. This
procedure will restore the factory default settings of the device. Switching the device off and then on with
the power switch will also result in a cold boot.
Standby button
Down button
Reset button
3.2 Technical Support
For answers to common questions and quick assistance see the Destinator FAQ for Registered Users
online at: http://www.destinatoreurope.com
If you have other questions about Destinator ND, please contact your supplier or Destinator Technical
Support via email at
support@destinatoreurope.com.
, click Community, login and choose FAQ.
9
Page 10

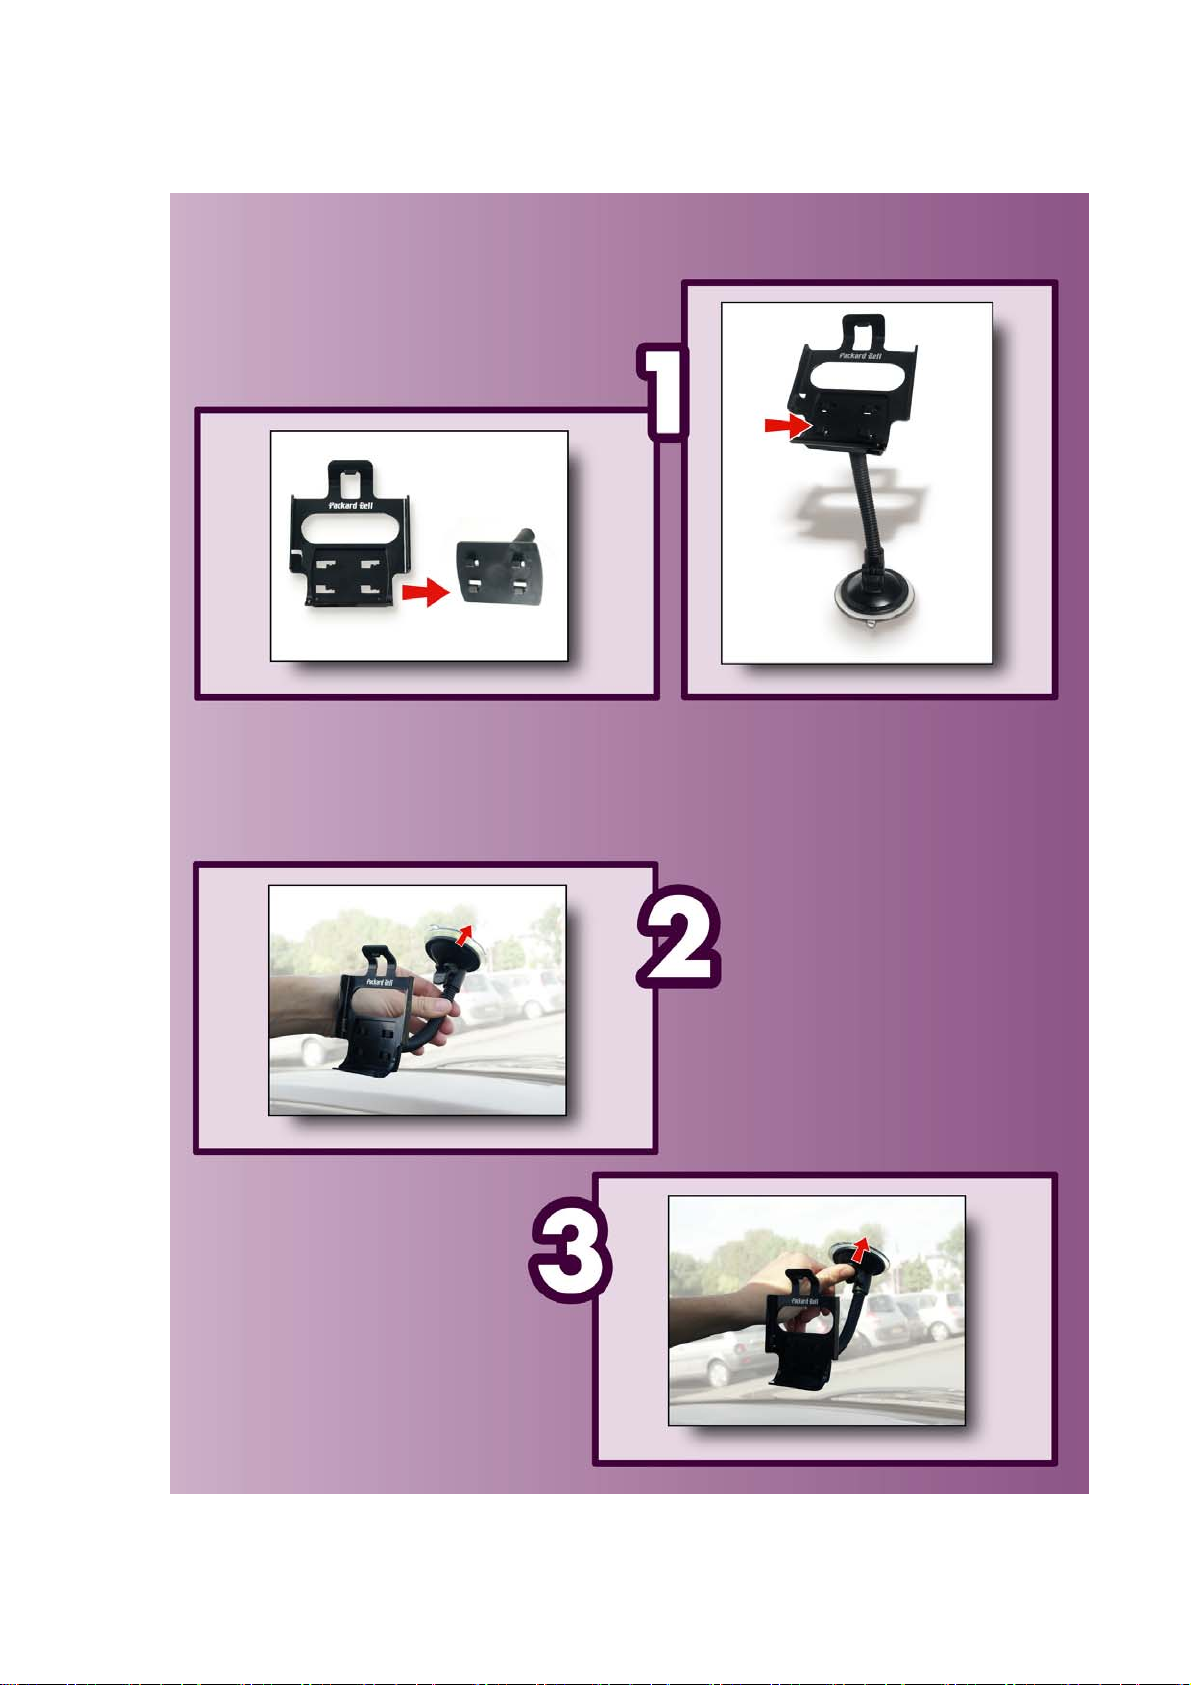
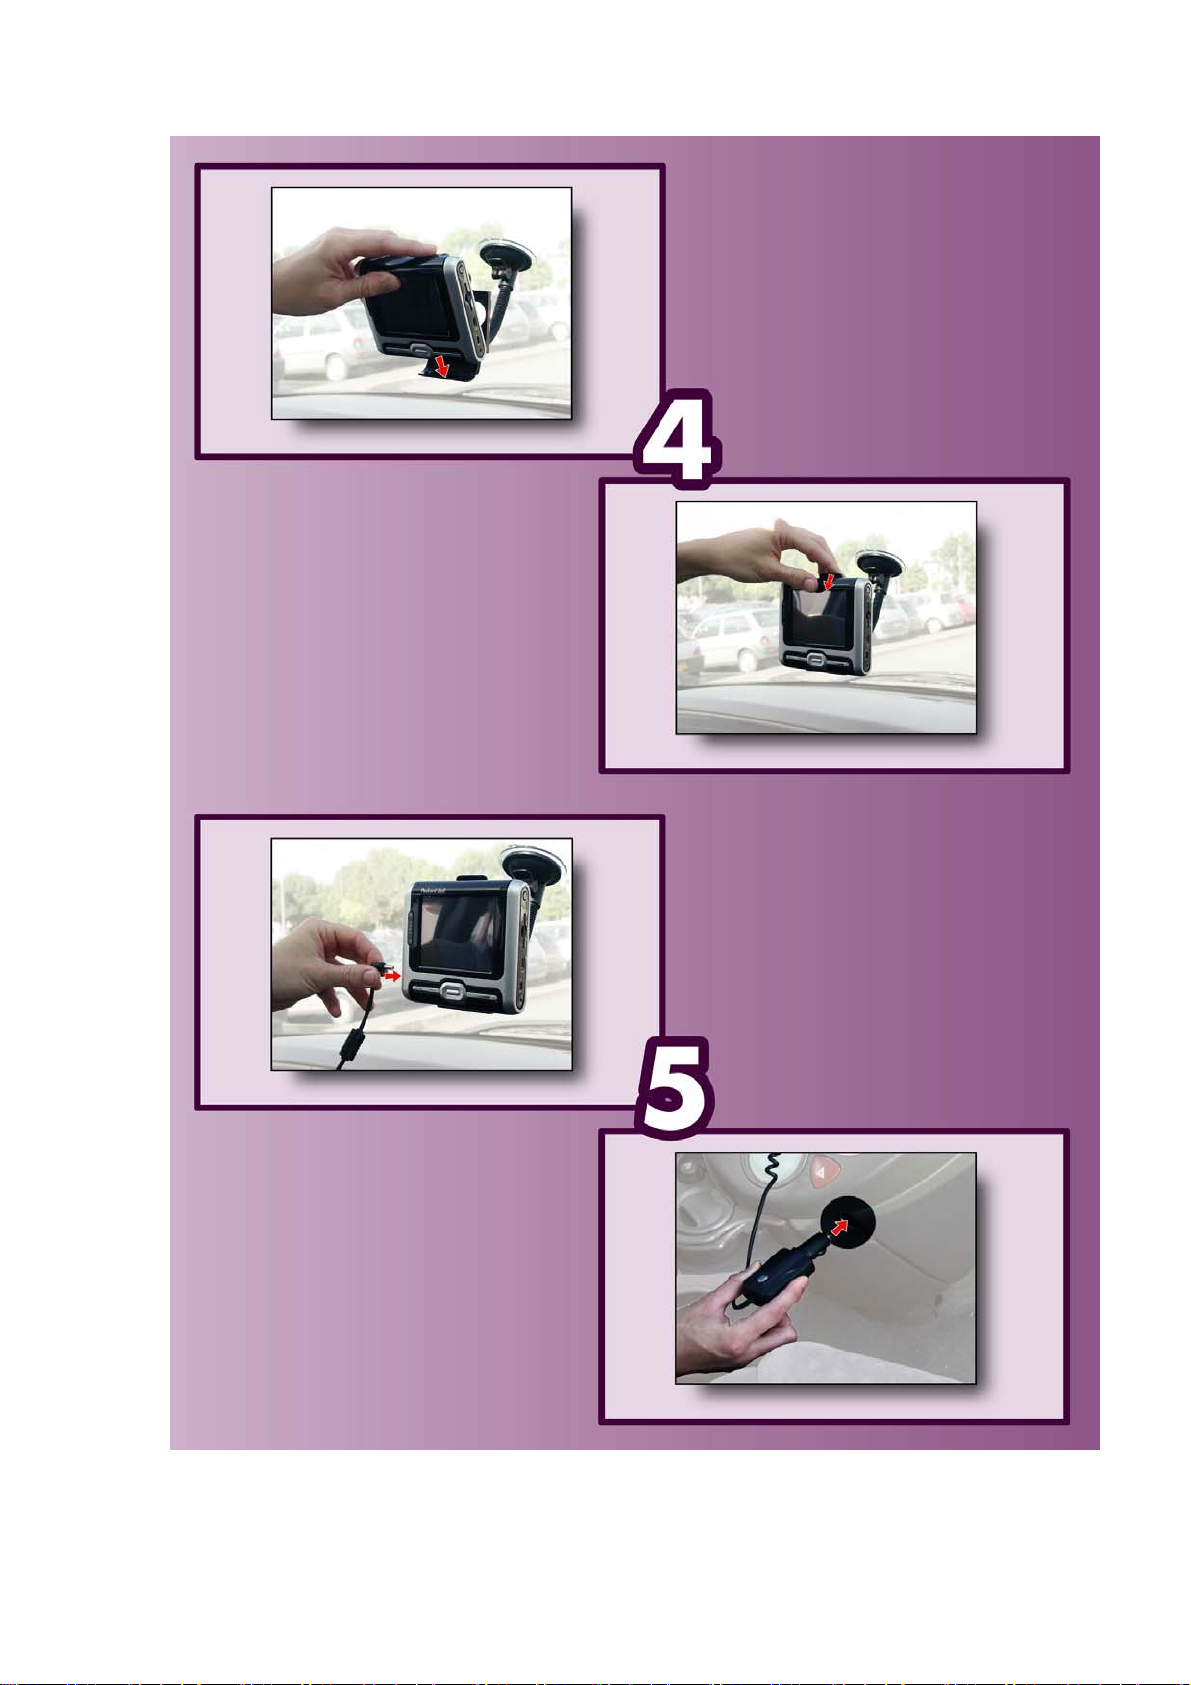
Chapter 4 - Installing the Packard Bell
GPS 400 in your car
Setting up the device
Please refer to the pictures on the following page and instructions below to set up your device correctly.
1. To assemble your car holder kit first attach the cradle to the suction-mount gooseneck. Ensure
that the 'CLOSE' arrow points in the direction you attach the cradle.
2. Place the car holder kit in a suitable location on your windscreen and release the clip at the base
of the gooseneck.
3. Push the clip back into place to fix the suction-mount gooseneck firmly to the windscreen.
4. Attach the GPS 400 to the car holder kit: position the bottom of the GPS 400 first, then tilt the
top of the GPS 400 back into position. Pull the top clip until it clicks into place. Twist the
gooseneck to adjust the position of the GPS 400 so that you can see the screen comfortably.
5. If you wish to charge the GPS 400 while in your car, connect the DC power lead to the AC
connector on the GPS 400 and plug the other end of the cable into the cigarette lighter.
The Packard Bell GPS 400 is now ready for use! Please read the instructions regarding Destinator ND to
know how to use your GPS.
CAUTION: Do not leave the device in your car. Exposure to sunlight may cause damage.
10
Page 11
11
Page 12
12
Page 13
Chapter 5 - Destinator ND for the Packard
Bell GPS 400
5.1 Introduction
Destinator ND is a full-featured mobile satellite navigation system. It utilizes GPS (Global Positioning
System) satellites to pinpoint your location using the latest mapping data technology to get you to your
destination in the most efficient and timely manner, and it assists you in planning your route by providing
Turn by Turn, Voice and Visual instructions.
In addition to Destinator ND, the Packard Bell GPS 400 has an MP3 function that can download and play
your favourite songs, as well as a Photo View function that can display your photos.
The MP3 Player lets you download your favourite songs from an SD or CF card and crea te a play list. Th e
Photo Viewer function lets you download and view y our digit al phot os on th e Packard Bell GPS 400 devi ce.
Figure 1 - Main Menu
5.2 Destinator ND Features
Destinator provides the following features for easy navigation:
• Lets you differentiate between car and pedestrian navigation
• Able to install and use your navigation device in minutes
• Full screen 2D/3D day and night maps with precise voice guidance
• Able to quickly create a route for any distance
• Cross border navigation without switching maps
• Intuitive menus and touch-screen buttons for easy input
• Instant address retrieval from recent loc
• Planning routes that include stopovers
ations, favourite destinations, or POIs
13
Page 14
• Avoid toll roads, congested roads, or roads through dangerous areas
p
V
• Provides traffic messages alerts (Optional)
• A wide selection of maps from all over the world
• A choice of over 10 languages
• Attractive map and screen format
• Can be used in a vehicle or by a pedestrian, during your daily commute or on vacation
5.3 Tutorial
From the Settings menu, you can tap the Tutorial button to open the
Destinator Guide Tour program. The Guided Tour is an excellent way of
becoming familiar with the different navigation features available.
Chapter 6 - Getting to know your GPS 400
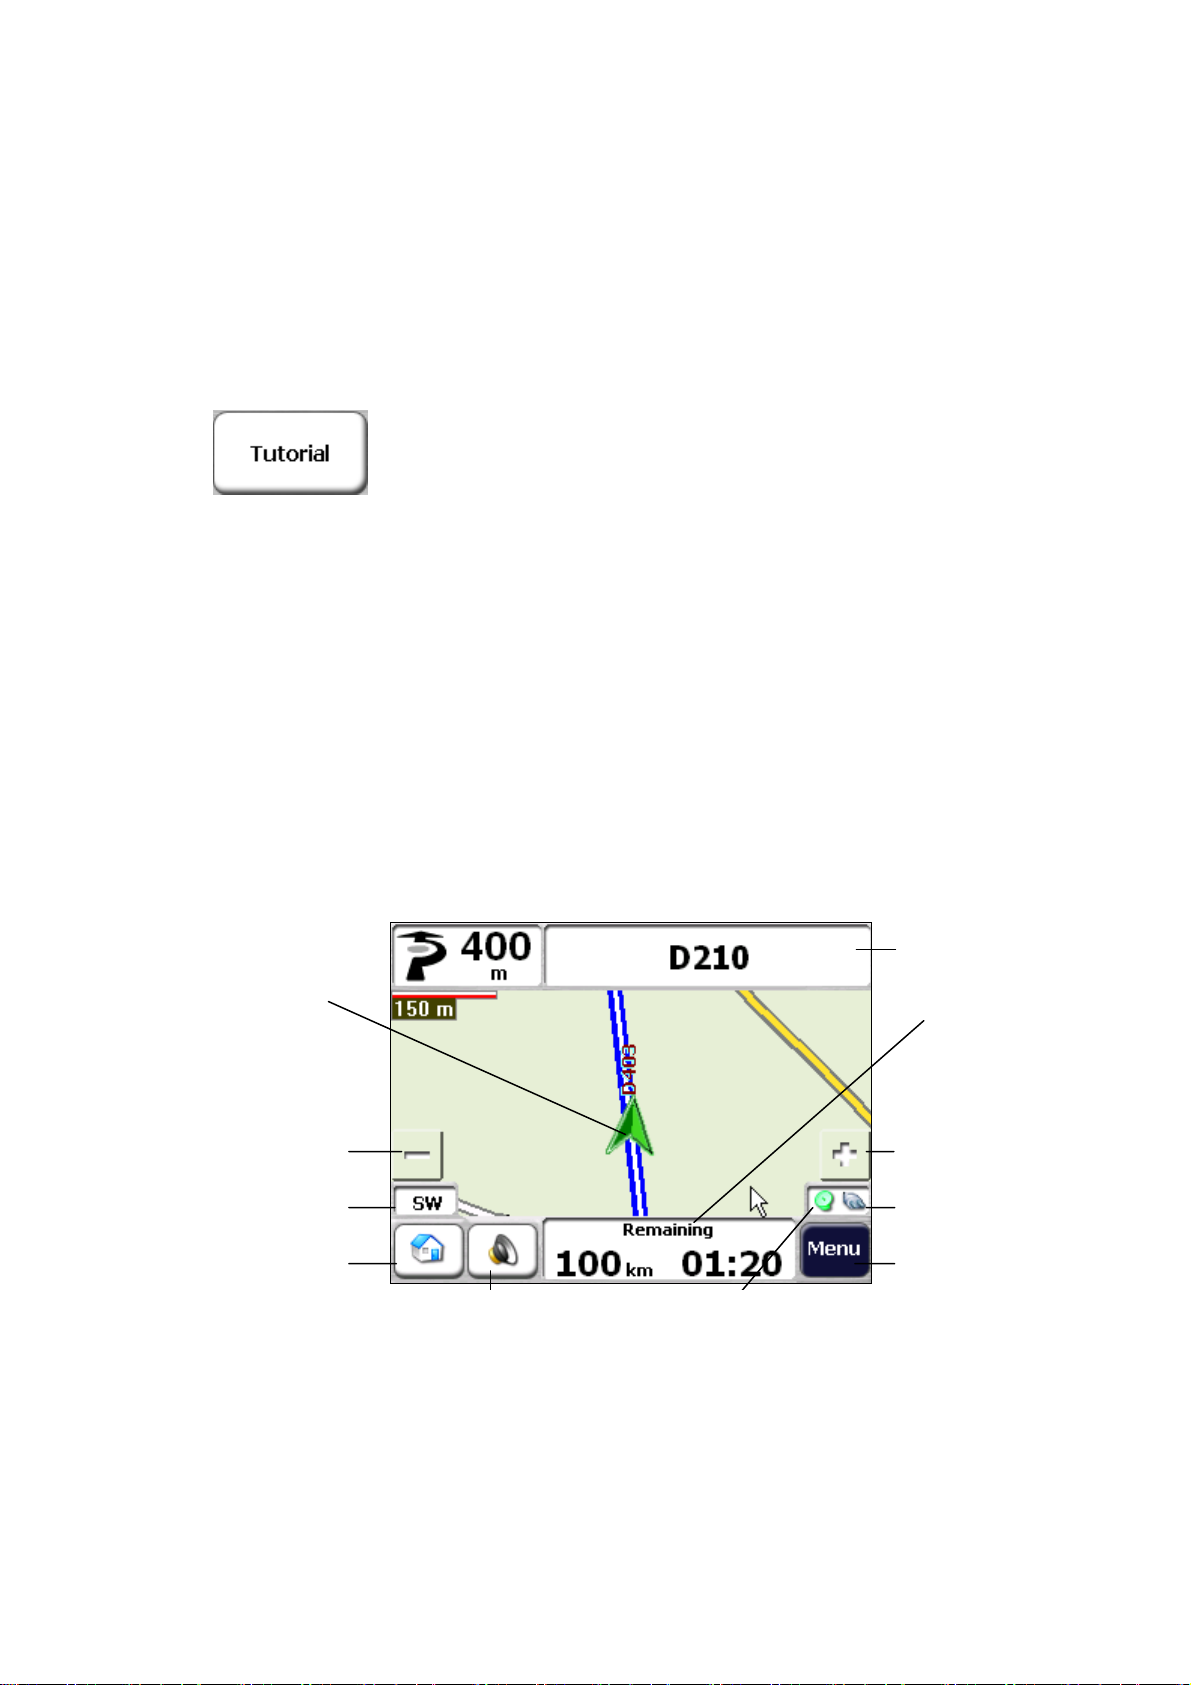
6.1 What’s on the map?
When you first turn on your , the screen appears. GPS 400 Main Map
You can use the icons displayed on this screen to plan and view your route.
Current Location
Zoom In
Com
ass
Quick Nav
olume
Figure 2 - Map Screen
GPS Status
GPS-Generated
Information
Power Indicator
Menu Button
14
Page 15

Your current location in Vehicle Mode.
Your current location in Pedestrian Mode.
Your last known location when GPS signal is unreliable.
The generated route.
The Compass displays the travel direction.
The red GPS receiver
signal.
The green GPS receiver
and that you are ready to navigate.
These icons display your power source, electricity
yellow, or red depending on whether the battery is recharged or weak.
The GPS bar is a toggle button that displays the remaining travel distance and travel time,
estimated time of arrival, and speed and altitude, and street name and address number.
When you have calculated a route, the Directions bar displays information about your next turn.
Click this bar for a complete list of turn-by-turn directions.
Your selected destination.
means that the navigation device has not yet located a reliable GPS
means that the navigation device has located a reliable GPS signal
or battery . The battery appears as green,
6.2 GPS not found
When you first start your navigation device, you will hear the message “Signal too low”. This
message means that your navigation device hasn’t yet located a reliable GPS signal. Check that
your device is connected and has a clear view of the sky.
Please check that:
• The GPS antenna is extended or flipped up.
• The device has a clear view of the sky for uninterrupted GPS reception. Destinator cannot
calculate the route if there is no GPS reception (for example, in a tunnel).
• The navigation device is charged or connected to the cigarette lighter.
15
Page 16
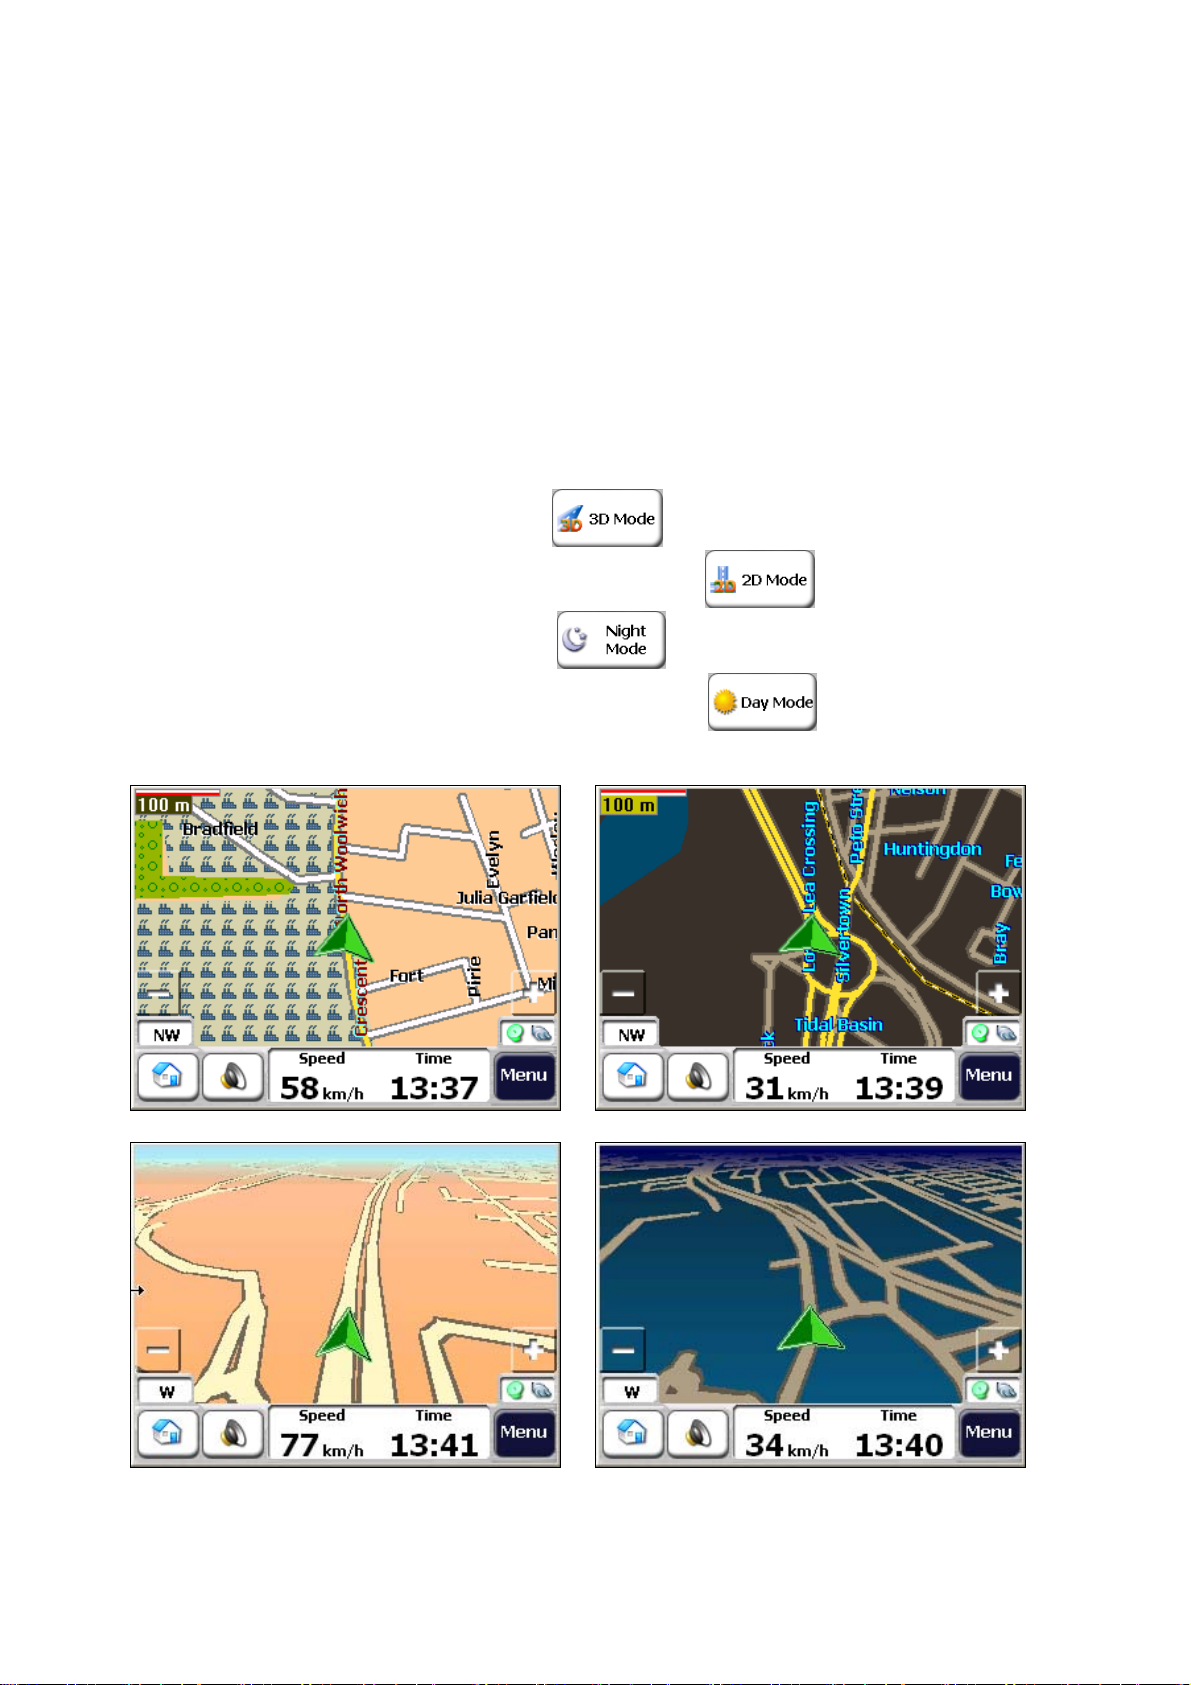
6.3 Map views
You can determine whether you want to see a two-dimensional or three-dimensional map in
daylight or nighttime conditions.
The 2D Day Mode View is optimized for a daytime viewing. 2D views let you manually pan or
zoom. For an example, refer to Figure 3 - 2D Day Mode Map View.
The 2D Night Mode View is optimized for night driving or adverse weather conditions. For an
example, refer to Figure 4 - 2D Night Mode Map View.
The 3D Mode Day View or Night View provide you with a three-dimensional map for day or
night driving. For an example, refer to Figure 5 - 3D Day Mode Map View and Figure 6 - 3D
Night Mode Map View.
From the Options menu, click the 3D Mode
map. If the map already appears in three-dimensions, 2D Mode
toggle button. You can click the Night Mode
conditions. If the map already appears in night mode, Day Mode
toggle button.
Figure 3 - 2D Day Mode Map View
Figure 4 - 2D Night Mode Map View
button to view a three-dimensional
button to display the map in night
is displayed on the
is displayed on the
Figure 5 - 3D Day Mode Map View
Figure 6 - 3D Night Mode Map View
16
Page 17

6.4 Point on the map
You can navigate to any point by tapping its location directly on the Map screen. This feature is
especially handy when you want to navigate to a specific point on the map, but you don’t have
the street address. When you tap on the map, the context menu appears.
Navigate – This button lets you calculate a route
from the map point.
Favorites – This button lets you save a point on the
map as a favorite destination. This is helpful if you
see a location that you want to return you later.
Set as Origin – This button lets you designate the
selected point as the starting point and not the
designation. This is helpful when you want to
calculate a route from a point other than your
current location.
Figure 7 - Point on the Map Option
6.5 Menus
You can press the Menu button from the Main Map screen to display the three main
Destinator menus, as shown below.
Figure 8 - Destinator Menus
The More
You can click the Map
button to close the Destinator ND Navigation System.
button lets you cycle through the Destinator ND menus.
button to return to the Main Map screen or the Quit
Destination menu
This menu provides the following options:
17
Page 18

The Enter Address button lets you navigate to an address.
The Recent Locations button lets you navigate to a previously visited destination.
The My Favorites button lets you navigate to a favorite location.
The Points of Interest button lets you navigate to thousands of interesting places,
such as beaches, parks, hotels, museums, and restaurants.
The Route Overview button lets you display your complete route on the Map
screen. This button is disabled when no route exists.
The Cancel Route button stops the current navigation.
The Turn-by-Turn button lets you display the complete, step-by-step directions to
your destination.
The Select Map button lets you choose among different maps on your memory
card.
Option menu
This menu provides the following options:
The Avoid Roads button lets you avoid a road type, such as toll roads or
selected streets.
The Multi-Stop Planner button lets you designate several stops on a route.
The Route Playback button lets you record your route and play it back later.
The Walking Mode/Driving Mode button lets you toggle between traveling as
a pedestrian or in a vehicle. When in Walking Mode, the navigation region is
limited to ten kilometers and Voice prompts are not available.
18
Page 19

The 2D/3D Mode toggle button lets you display the map view in 2dimensional or 3-dimensional views for either day or night driving.
The Day/Night Mode toggle button lets you display the map view for either
day or night driving.
The Map Browsing button lets you browse the map unconnected to the
current location. In this mode, the GPS system is not used. Your current
position is not detected and Destinator ND does not keep track of your
driving progress.
Settings menu
This menu provides the following options:
The Map Settings button lets you specify map orientation, font, and zoom
features.
The Quick Nav Settings button lets you specify an address or place to which
you can navigate with a single tap on the Quick Nav button.
The GPS button lets you configure the GPS settings.
The Prompts button lets you specify the types of voice or visual prompts that
you want to use.
The System button lets you specify the system measurement units and
provides About information.
The Look & Feel button lets you select a skin, which determines the look and
feel of the Destinator Navigation System.
The Tutorial button opens the Destinator Guide Tour program.
The Help button opens the Destinator ND help file.
19
Page 20

6.6 Screens buttons
The following buttons appear on many of the navigation Destinator screens.
When you tap the Next button for a selected address, group, or place, Destinator
automatically opens the next screen in the sequence. After you have specified your
destination, tap the Next button to display a map screen showing your selected
location. This map lets you determine a route type and provides a GO button,
which instructs Destinator to calculate the route from your current location to your
selected destination.
When you tap the Back button, Destinator returns you to the previous screen.
When you tap the GO button, Destinator calculates the route to your selected
destination.
The Actions button provides a list of command options available for the selected
address or place.
The Hide/Display Keyboard toggle button lets you show or remove the keyboard.
The Save, OK, or Done buttons confirm your value preferences and returns you to
the menu or map.
6.7 Cycling through screens
Every navigation function in the system, such as Address, POI, or My Favorites consists of a sequence
of screens. You can cycle through the screen sequences by either:
• Selecting an item from the list and tapping it.
• Selecting an item form the list and tapping the Next button.
The sequence ends with the Show on Map screen, where the destination is displayed and the GO
button is available for you to calculate a route.
You must first select an item from the list to cycle through the screen sequence, and for the Actions,
Next and Back buttons to be enabled.
20
Page 21

Chapter 7 - Searching for a location
7.1 Enter address
When you click the Address button, the Address screen appears, as shown below.
1.
2. 3.
Figure 9 - Display the Address Screen
You can use the keyboard to enter the first characters of the address name. The characters appear in
the Address field. Destinator automatically searches the Address list for the first occurrence of the
entered characters. After you have selected a city, Destinator displays the next address field, such as
street and address number.
You can also tap the Next button to move through the sequence of address screens.
The following command keys are available to enhance your search process:
If the automatic search feature does not find your specified name, use the Find button
to conduct a sub-search, particularly useful when the address name consists of two or
more words.
The Scroll buttons let you move up or down the list of address items, such as city or
street names.
The Hide/Display Keyboard toggle button lets you extend or shorten the address list
by hiding or displaying the keyboard.
The Select key lets you display lowercase and numeric characters.
The Erase key lets you delete the last character in an address field.
You can change your address search method by tapping the Mode button to select from a
variety of address formats.
4.
Note: If the entered characters are not found at the beginning of the name in the Address list, the Smart
Search System automatically searches for the entered characters throughout the entire list, for example,
in the middle or the end of the name.
Destinator lets you search for city and street names without having to enter accent marks (umlauts),
which are used in many European languages.
Address Modes
You can define the information used to locate an address by tapping the Mode button.
Destinator provides a variety of address formats, as described below.
21
Page 22

City-Street
Street-City
Cross-Street
Zip Code
In other maps
This sequence displays the following address screens: City, Street, and
Address Number.
You can also navigate to city or street only. When you have selected a city, the
first entry of the Street Name list is City Center. When you have selected a
street, the first entry in the Address Number list is Street Midpoint.
City-Street is the default format.
This sequence displays the following address screens: Street, City and
Address Number.
Lets you enter a street name without having to first designate a city. Useful when
you're looking for an address in a metropolitan area where there are many cities
and towns.
This sequence displays the following address screens: City, Street 1, Street 2.
Lets you locate an intersection by entering the names of two intersecting streets.
This sequence displays the following address screens: Zip Code, Street and
Address Number.
This mode lets you locate a street address by entering the zip code, without
entering a city name. Useful when you have no city information or if the city has
multiple zip codes.
You can select another map of a country that you can travel to by vehicle.
This feature is available only when you have the following maps installed:
• Another map of countries on the same continent as the selected map
• The map of the major roads for the continent that connects one map to another (for
example, the major roads of Europe)
For example, if you are in Paris and you want to travel to Munich, select the map
of Germany and designate Munich City Center as your destination. Destinator
automatically displays the map of France when traveling on local roads of that
country, a map of Major Roads of Europe when traveling on a European
highway, and the map of Germany when traveling on local roads of that country.
Address Actions
When you have specified an address, tap the Actions button to select from the following
commands:
Set as Origin
Show on Map
Lets you designate the selected address as the route origin. Use this
command when calculating a route from a point other than your current
location. The navigation device displays the selected location as a
starting point only for a few seconds before returning you to your current
location.
Note: You are still receiving the GPS signal.
Lets you see the selected address on the map.
22
Page 23

Add to My Favorites
Allows you to add an address to your list of favorite locations, as shown
in the figure below.
Figure 10 - Add Address to My Favorites
Information
Displays the location’s address information.
Go to your destination
After you have specified the address, tap the Next button. Destinator shows your destination on
the Map screen before calculating a route. Check that the destination address is correct at the
top of the screen. If you want to change the destination, tap the Back button and change your
address entries.
1.
2.
3
.
Figure 11 - Calculate your Destination
If the destination is correct, you can instruct Destinator how to calculate your route by tapping
either the Faster or Shorter button, as described below.
This option selects the route that takes less time. Faster is the default value.
This option selects the route that is the shorter distance. The shorter route may not
always be the quickest, as you are able to travel faster on some roads than on others.
Note: Route generation does not take into account any detours, stops, or delays along the route.
When you are ready, tap the GO button to create a route to your selected destination.
23
Page 24

7.2 Recent Locations
The Recent Locations screen lets you select an existing destination from a list of destinations
that you have previously traveled to. Destinator automatically stores the last 64 destinations in
memory. As each new route is added to the top of the list, the older destinations at the bottom
are erased.
To navigate to a recently-traveled destination, tap the Recent Locations button. From the
Recent Locations screen, select a location and tap the Show or Next button. A map appears
showing the specified location. Tap the GO button to calculate the route.
1.
2.
3. 4. 5.
Figure 12 - Traveling to a Recent Location
From this screen, you can tap the Actions button to select from the following commands.
Set as Origin
Add to My Favorites
Delete Item
Clear List
Information
Lets you designate the selected address as the route origin. You would
use this command when calculating a route from a point other than your
current location Note: You are still receiving the GPS signal.
Lets you add an address to your list of favorite locations.
Lets you delete a recent location.
Lets you clear all locations in the Recent Locations screen.
Displays the location’s address information.
7.3 My Favorites
A Favorite is a destination that you have stored for easy retrieval.
To access a favorite destination, open the Destinations menu and tap the My Favorites button.
The My Favorites screen displays your favorites groups. When you tap on a selected group,
Destinator automatically displays its stored locations. Tap the selected location to show your
destination on a map. Tap GO to calculate your route.
24
Page 25

1.
2.
4.
5.
3.
6.
Figure 13 - Travel to a Favorite Location
The My Favorites folder is the default folder where all favorites are stored if not assigned to a group.
The Show Map screen also lets you set your route type, Faster or Shorter.
Favorite Groups
You can tap the Actions button from the My Favorites screen to add, edit, or delete groups, as
described below.
Add Group
Edit Group
Delete Group
When you tap this button, the Favorites Group screen appears. Enter the group
name and select an icon to identify the group, as shown below.
Figure 14 - Create Favorites Group
The icon identifies all destinations located in that group, as displayed on the map.
When you tap this button, the Favorites Group screen appears with the name
and selected image of the highlighted group. You can change the name and icon.
When you tap this button, the selected group and its associated entries are
removed. The My Favorites group cannot be deleted.
25
Page 26

Favorite Alerts
Alerts let you know that you are within a certain distance of a favorite location.
You can tap the Alerts button to set the distances for the 1st and 2nd Alerts. When you travel
closer than the designated distance, the alert will sound, as shown below.
1.
2.
Examples:
• You have a group called “Shopping” that includes all of your favorite stores. An alert appears on the
screen when you are closer than the designated distance to the stores in your group, providing an
opportunity to consider whether you would like to stop and shop.
• You have a group called “Projects” that include addresses of your bank, grocery store, garage,
hardware store, doctor’s office, post office, and so on. When the alert is set, Destinator reminds you
about these places when you come within close proximity to them.
• You are going on a trip and friends have recommended certain restaurants that are on your route.
You can create a group called “Restaurants” and enter the restaurant addresses. As you take your
trip, an alert will go off when you come within range of these restaurants.
Figure 15 - Setting Your Favorite Alerts
Notes:
• Favorite Alert settings affect all Favorites Groups.
• The 2
nd
Alert must be set to go off at closer distance than the 1st Alert.
• Alerts can be set for a group but not for individual locations. Of course, you can always create a
group that has just one location.
You can disable the alerts for all groups by selecting the 1st Alert setting to Off.
You can disable the alerts for a particular group by selecting the group and tapping the Hide
Symbol on Map button. Disabled alerts are identified by a red diagonal line through the symbol.
Activate that disabled alert by selecting the group and tapping the Show Symbol on Map button.
Figure 16 - Disabled Favorite Alerts
26
Page 27

Add Favorite Locations
Tap MY FAVORITES or any selected group that you have created to display its locations. You
can save a location to your favorites groups from the Address, Recent Locations, or POI
screens.
From this screen, you can tap the Actions button to display the following commands.
Set as Origin
Show Map
Edit Favorite Location
Delete Favorite Location
Information
Allows you to designate the selected location as the route origin.
You would use this command when calculating a route from a point
other than your current location.
Note: You are still receiving the GPS signal.
Allows you to see the map with the selected favorite destination for
you to review before creating a route.
Allows you to change the name, comment, or group location for the
selected location.
Tap the button to remove the selected location.
This button displays additional address information, such as
address details, phone number, and other comments about your
favorite location that you have entered.
7.4 Points of Interest (POI)
The POI list is a collection of hundreds of interesting or useful places organized by easy-to-find
categories. For example, you can use Destinator to guide you to a mall, hotel, restaurant, or gas
station.
From the Destinations menu, tap the Points of Interest button. The POI screen appears. You
can find a category by tapping the Hide/Display Keyboard
POI Category field. The Smart Search System automatically displays the POI categories that
match the characters entered.
If you didn’t find the category through the initial search you can also use the Find
button to do a sub-search, particularly useful when the category name consists of two or more
words. You can always browse the POI Category list by using the Browse buttons.
When selecting a category, Destinator automatically displays the category entries and the
distance each entry is from your current position. Select your entry and tap or click the Next
button to display your selected destination on the map and then tap GO to calculate your route.
From the Show on Map screen, you can designate a route type, Faster or Shorter.
button and entering text in the
27
Page 28

1.
2.
3.
4.
5.
6.
Figure 17 - Points of Interest
Note: From the Item Entries Actions screen, click the Sort by ABC button to display the category
entries in alphabetical order.
Subcategories
Many categories have subcategories to provide for an even greater list of choices. For example,
“Gasoline Station” may have many subcategories each representing a particular brand name. The same
is also true for “Hotels”. “Restaurants” have subcategories that represent different types of food, such as
American, Italian, and French, as shown below.
Figure 18 - POI Subcategories
Search near a location
You can tap the Near button to determine the location area, where you want to search for a
specific place, such as a gas station, hotel, or restaurant.
The available options are listed below.
28
Page 29

Current Location
Destination
Other Address
Search Radius
Lets you search near your current location. This is the default value.
Lets you search near a specified destination. For example, you know
your general destination, but not very much about interesting locations
in the area. You can use Destinator to locate the tourist attractions
most appealing to yourself, family, or friends. Note that this button is
enabled only when a destination is entered.
Lets you search near another address. For example, you have set a
destination, but on the way you want to stop at another location. You
can use this feature to search near that location for restaurants,
lodging, historical sites, or anything you want.
Enter the location distance to search for a designated place. For
example, if you enter 5 km, Destinator only searches within a five
kilometer radius.
When you select a large search radius, you risk the chance of finding
too many locations, which makes it harder to find the place that you are
searching for. It is best to start with a small search radius size, and then
make it larger if necessary.
Note: if you don’t specify a search radius, Destinator searches the whole map.
Show or Hide Symbol on
Map
Lets you customize your POI list by showing or hiding the POI category
symbols that you don’t want. When you hide a category a red mark
appears. This mark only means that the category symbol does not
appear on your map. The category locations are still available to you.
You can always show a hidden category symbol by selecting the
category and tapping the Show Symbol on Map button.
Actions
When you have selected a POI location, tap the Actions button to display the commands listed
below.
Set as Origin
Show on Map
Add to My Favorites
Sort By ABC or
Distance
Lets you designate the selected location as the route origin. You would use
this command when calculating a route from a point other than your current
location. Note: You are still receiving the GPS signal.
Lets you show the map with the displayed destination for you to review
before creating a route.
Lets you add a POI entry to your list of favorite locations.
Lets you sort the entries of the selected category alphabetically or by
distance from your current location.
Note: Destinator initially displays the entries by distance.
Information
Displays the telephone number and address information, and all other
information the system has regarding the selected POI entry.
29
Page 30

7.5 Route Overview or Cancel Route
The Route Overview button lets you display an overview of your complete route on
the Map screen, the total driving distance to your destination, the estimated travel time, and the
complete destination address.
Figure 2 - Show Route
The Cancel Route
feature is active only after a destination has been set.
button stops the current navigation and clears the route. This
7.6 Turn-by-turn list
After you have entered a destination and calculated a route, the Directions bar appears at the
bottom of the Map screen, displaying the following information:
• The next turn direction
• The distance to the next turn
• The street name of the next turn
When you tap the Directions bar or click the Turn-by-Turn
displays a complete set of turn-by-turn directions from your current point to your selected
destination.
Use the Scroll buttons to move up or down the directions list.
1.
2.
button, Destinator
Figure 3 - Display Turn-by-Turn
30
Page 31

The following options are available:
The Route Summary button displays your entire route on the Map screen, plus the
travel distance and the Estimated Travel Time Remaining (ETR).
The Show Turn button displays the next turn on the Map screen, including the street
name, the distance to it, and the turn direction.
The Avoid button lets you avoid the selected turn in the directions list. Destinator
recalculates the route automatically. Note that when you exclude a turn, the
recalculated route may take longer.
7.7 Select Map
This feature lets you change the currently selected map to another map saved on your SD
memory card.
You can tap the Select Map button from the Options menu to display the maps saved on your
SD memory card. The Select Map screen displays map details and version numbers. The map
currently used appears at the top of the list.
1.
2.
The following Select Map commands are:
Select
Delete
Refresh
Allows you to designate a selected map as the current map.
Allows you to permanently remove a selected map.
Note: You cannot delete the current map.
Allows you to refresh the screen when a new memory card is inserted into the device.
Figure 4 - Select a Map
31
Page 32

Chapter 8 - Planning a trip
8.1 Multistop planner
The Multistop Planner lets you plan a route with up to twelve stops.
When you press the GO button, the route is calculated in stages, from the departure point to the
first stop. When you reach the first stop, the route recalculates to the second stop, and so on.
1.
2.
3.
4.
5.
6.
Figure 5 - Travel to Multiple Routes
The Show on Map screen provides you with the following route types: Faster and Shorter. You
can select Shorter to calculate a route with the shorter physical distance between your current
location and the selected designation. When you tap the GO button, Destinator automatically
calculates the faster route.
Defining Route Groups
A Route Group represents a group of stops.
From the Multistop Planner screen, select the Actions button and tap Add Group. From the
Add Group screen, enter the Group name and save. The Actions screen also lets you edit or
delete a selected group.
32
Page 33
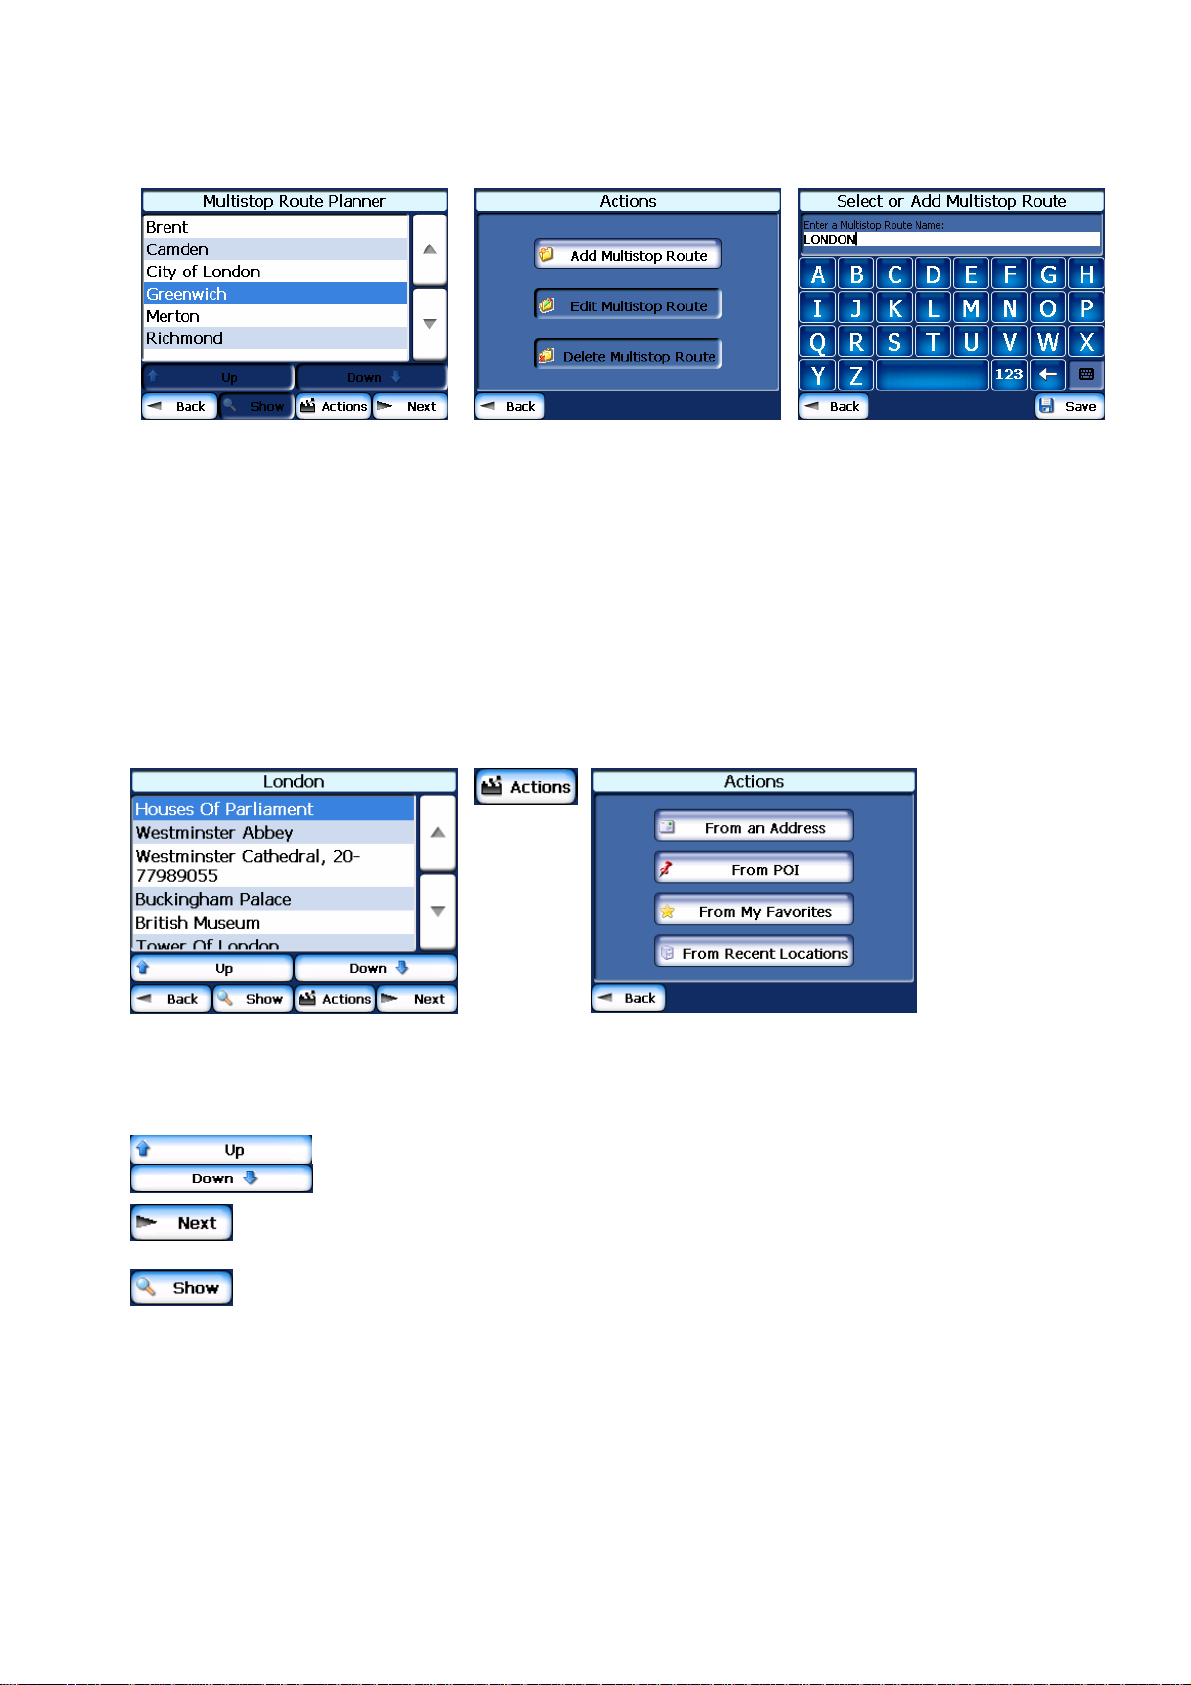
1.
2.
3.
Figure 6 - Defining the Route Group
Setting Stops along the Route
You can set up stops by selecting the Route Group and tapping the Next button. From the
Stops screen, tap the Actions button to add, rename, or delete a destination.
Add a stop by Address, POI, My Favorites, or Recent Locations. Select one of these options,
specify a location, and click the OK button. The Add Stop screen appears. You can change the
location name, enter a comment, or designate a different group. When you’re done, tap Save.
1.
2.
3.
Figure 7 - Specifying a Stop
When in the Stops screen, you can use the following commands:
You can use the Move Up or Move Down buttons to change the order of your
itinerary.
Shows the stop destination on the map and lets you select a route type, Faster
or Shorter. Tap GO to calculate the stop destination.
Select the Show button to view the selected stop destination on the map.
Stop Actions
You can tap the Actions button for the following command options:
Set as Origin
Lets you designate the selected address as the route origin. You would use this
command when calculating a route from a point other than your current location.
Note: You are still connected to the GPS signal.
33
Page 34

Add Stop
Rename Stop
Delete Stop
Optimize Route
Information
Lets you add a location by specifying an address from recent locations, favorite
locations, or pre-defined POIs, such as fuel, food, or lodging.
Lets you change the stop information, such as name, comments, or route group.
Lets you remove a selected stop.
Your trip itinerary is created by the sequence of stops entered. This may not be
the most efficient route. When you click Optimize Stops, Destinator changes
the order of stops to create the most efficient route.
This button displays the location’s address information.
8.2 Avoid roads
You can specify that certain roads be permanently excluded from your route calculations. Use
this feature when you want to avoid congested boulevards, toll roads, or unsafe streets.
From the Destinations menu, tap the Avoid Roads button. The Avoid Roads screen appears,
displaying the Toll Roads and Avoid Road groups.
1.
2.
3.
4.
Avoid Road Groups
From the Avoid Roads screen, tap the Actions button. The Actions screen lets you select from
the following commands:
Add Group
Edit Group
Delete Group
When selecting a group route, you can tap the Allow
include or exclude all roads located in the group.
Figure 8 – Creating Avoid Road Groups
Create a new a group of roads to avoid. For example, you can create a group
called “San Francisco Roads”, where you designate the roads in that area to
be avoided.
When you tap the Add Group button, the Avoid Roads Group screen
appears. Enter the group name and tap Save.
Select a group and tap this button to change the group name. When you tap
the Edit Group button, the Avoid Roads Group screen appears displaying
the group name. Change the group name and tap Save. The new name is
displayed on the Avoid Roads screen.
Select a group and tap this button to remove the group from the Avoid Roads
screen. The road entries in this group are also removed.
or Avoid button to
34
Page 35

Avoid Road Locations
When you tap Default or an Avoid Roads group, Destinator displays the group screen, which
lets you select roads to avoid. From this screen, you can use the Allow or Avoid buttons to
include or exclude a selected road when calculating a route.
1.
2.
3.
Note: You cannot specify a particular toll road.
You can tap the Actions button from this screen to select from the following commands:
Add Road
Edit Road
Delete Road
Figure 26 - Adding a Road to Avoid
Lets you select a road. An address screen appears for you to specify a city and
street. When you have completed updating your road information, tap Save.
Lets you rename the road and select a different group. When you have made
your changes, tap Save.
Select a road and tap this button to remove the road from your group.
Destinator no longer recognizes the removed entry as a road to avoid.
Show on Map
Information
Lets you show the map with the displayed destination for you to review before
creating a route.
This button displays the location’s address information.
8.3 Route playback
This feature lets you record your route as you’re traveling and then to play it back on the Map
screen. From the Options menu, tap the Route Playback button.
To record a route, tap the Record button in the Route Playback screen. Destinator ND shows
the Map screen and navigates you to your selected destination. To stop recording, return to the
Route Playback screen and tap the Stop button.
35
Page 36

Figure 9 - Recording a Route
To playback your recording, select the data file, and tap the Play button. Destinator ND shows
the Map screen to play the recorded route. To stop the playback, return to the Route Playback
screen and tap the Stop button.
You can tap the Actions button to display the following commands:
Delete Recording
Clear All Recordings
Playback Speed
This button lets you remove a selected recording.
This button removes all recordings.
Use the arrow keys to adjust the playback speed. The range is from
100% to 300%.
8.4 Pedestrian mode
The Pedestrian Mode button lets you toggle between traveling as a
pedestrian or in a vehicle. When in Pedestrian Mode, your navigation
region is limited to ten kilometers. When creating a pedestrian route,
Destinator avoids highways or other roads where pedestrians would not
travel. Voice prompts are not available in this mode.
Pedestrian Mode displays a shadow that shows the position of the sun.
This is helpful when you are trying to orient yourself to the Map screen
during the day. For example, you have calculated a route, but you don’t
know whether the route is to the right or left of your current position. If
you’re shadow is behind you, then the sun is in front of you. Move your
navigation device to the direction of the sun and follow the route. At
night, no shadow is displayed.
Note: The sun is always in the opposite direction from where your shadow appears.
8.5 Map browsing
This feature lets you browse the map without the GPS receiver returning
you to your current location. Tap the Browse the Map button to
disconnect from the GPS receiver.
36
Page 37

Chapter 9 - Settings
9.1 Map
You can click the Map Settings button from the Settings menu to customize your map display,
as shown in the figure below.
Figure 10 - Map Settings
The following map settings are:
Map Orientation
Use Automatic Zoom
Use Larger Print
Forward is up – This option orients the map so that your forward
direction is always at the top.
North is up – This option orients the map so that North is always at
the top.
When this option is selected, the zoom is speed dependent. The
map zooms out at higher speeds, displaying a larger map area, and
zooms in at slower speeds, displaying a smaller map area. If you
manually change the zoom, the Automatic Zoom returns to its
system level after several seconds of inactivity.
This option increases the size of street names to make the map
easier to read.
9.2 Quick navigation
You can define the Quick Nav. location by selecting either the To Predefined Address or To
Nearest POI Category in the Quick Nav. Settings screen. When the location is selected, you
can navigate to your address by tapping the Quick Nav.
screen.
For example, if you have selected "Gas Stations" as the Quick Nav. destination, when you click
the Quick Nav. from the Map screen, Destinator automatically creates a route to the closest
gas station.
37
button displayed on the Map
Page 38

Figure 29 - Setting the Quick Nav Location
9.3 GPS Settings
Destinator ND uses the GPS receiver to pinpoint your location. GPS signals are automatically
acquired and your vehicle's location and position are constantly updated unless you are working
in the Browse Map mode. The GPS may take a few minutes to find its initial location. For best
results, ensure that the GPS has a clear view of the sky.
Figure 30 - GPS Status
You can tap the GPS Status button from the Settings menu to display the following information:
• Longitude - The angular distance east or west on the earth's surface, as measur ed in degrees from
the meridian of a particular point to the prime meridian of Greenwich, England.
• Latitude - The angular distance, measured north of south from the equator, of a point on the earth's
surface.
• Speed - The rate of movement, as expressed by kilometers or miles per hour.
• Altitude - The height above sea level.
The green lines that appear on the satellite image represent the satellites that are sending GPS signals
to your receiver.
38
Page 39

9.4 Prompts
You can select the types of voice and visual notifications that you would like to use while
navigating. From the Settings menu, tap the Prompts button. The Prompts screen appears, as
shown in the figure below.
Figure 31 - Prompts Settings
Voice Prompts
Speed Warning
Route Recalculation
Unreliable GPS Signal
Drive Carefully
This prompt warns you when your car exceeds the speed limit. This
prompt is not active unless selected.
This prompt is activated when Destinator recalculates a new route. This
prompt is not active unless selected.
This prompt warns that the GPS signal is too low and unreliable for
navigation. This prompt is automatically active.
This is a friendly reminder at the start of each journey. This prompt is
automatically active.
Visual Prompts
Text
Symbols
None
Directional prompts are displayed in written form.
Directional prompts are displayed in diagram form, such as an arrow.
Directional prompts are not displayed.
9.5 Units of measure
From the Settings menu, click the Units of Measure button to specify the system’s units of
measurement.
39
Page 40

You can select:
System Units
About
9.6 Look & Feel
Figure 32 - Units of Measure
Imperial – Yards or miles
Metric – Meters or kilometers
This information box provides version and copyright information.
From the Settings menu, click the Look & Feel button to select from
other skins that have been installed.
9.7 Tutorial
From the Settings menu, you can tap the Tutorial button to open the
Destinator Guide Tour program. The Guided Tour is an excellent way
of becoming familiar with the different navigation features available.
9.8 Help
The Help button displays the Destinator ND Help file.
40
Page 41

Chapter 10 - Installation Requirements
Destinator ND is already installed on your proprietary device, but to add or change maps, you
are required to install the Destinator ND Console on to your PC.
10.1 Computer Requirements
To install and use the Console, your PC must meet the following requirements:
- Microsoft Windows 98, ME, NT, 2000, or XP
- Microsoft ActiveSync
- A minimum of 300 MB free space for temporary files
- An Internet connection for online registration
10.2 Installing the console
To install the Destinator ND Console:
1. Insert the Destinator ND Disk into the PC's CD-ROM drive. The Destinator ND Console
Installation Wizard prompts you to select the language used for the installation process. When you
have selected a language, click OK.
2. Please read the Welcome message and click Next.
3. From the Select Directory screen, either accept the recommended default directory or browse to a
different directory to install the Destinator ND Console. Click Next.
4. From the Language screen, select the default language. Click Next.
5. The Installation Confirmation screen displays your installation choices. If you are ready to install,
click Next. The Installation Status box displays the progress of the installation process.
If you want to change the language selection or the directory location before installing, click Back,
make your changes, and return to the Installation Confirmation screen, and click Next.
6. When the installation is complete, click the Finish button to close the wizard.
10.3 Console Toolbar
The following options are available from the Console Toolbar:
The Install Software button lets you install the Navigation System
to your device.
The Install/Remove Map button lets you install or remove a map.
The Map Cutter button lets you customize an installed map.
The Import Favorites button lets you download a list of your
favorite locations from your PC to the selected My Favorites group
on your device.
The Quick Activation button lets you activate your Navigation
System through an automated process.
41
Page 42

Chapter 11 - Maps
When you receive your device, Destinator ND is installed on your SD memory card along with a
series of maps. This section provides information about installing additional maps from the
Destinator ND Console.
11.1 Map Screen Interface
On the Destinator ND Console, a collection of maps is displayed.
Standard Maps
Maps available for installation from your CD.
My Maps
Installed Maps
Maps that you have customized from a standard map. For example, creating a map of
London from the standard map of the United Kingdom and Ireland.
Current maps on your SD memory card.
11.2 Installing a Map
You can install a map by selecting it from the Standard Maps pane in the Destinator Console
and clicking the Install/Remove Maps button. The Target Device dialog box appears. Select
Storage Card. The amount of memory available for the SD memory card appears on the Target
Device Memory Balance pane. The installed map appears in the Installed Maps pane.
1.
3.
4.
5.
2.
Figure 11 - Installing a Map
11.3 Map Cutter Screen Interface
Due to memory limitations of your SD memory card, you may want to customize a standard map
by selecting the area you need. For example, if you are visiting a number of European cities on
business, you may not want to install entire maps of those countries.
You can crop a standard map from the Destinator Map Cutter screen. Select a standard map
and click the Cut Map
below.
button. The Map Cutter screen appears, as shown in the figure
42
Page 43

Figure 34 - Using the Map Cutter
The following tools are provided to help you easily move, view, and designate an area on the
map:
You can use the Pan tool to move the map up, down, left, or right.
You can use the Zoom tool to increase or decrease the map detail. You can also use the
scroll bar to zoom in or out.
You can use the Crop tool to designate an area on the map that you want to cut. When
you have selected your focus by using the focus tools, as described below, click the
Crop tool to designate an area on the standard map.
You can use the Cut tool to create a customized map from your desi gnated area.
11.4 Focus the Map
The following tools are provided to help you center your map, so you can designate the area that
you want to cut. For example, perhaps you want the Center of London to be the center of your
map. If you are creating a very local map, perhaps you want to make the office or the hotel the
center.
You can click the Address tool to set the origin of the map to a City, Street Address, or
Intersection. The Address dialog box provides the Show and Set buttons to view and
set the map focus.
You can click the POI tool to set the origin of the map to a point of interest. The POI
dialog box displays all categories in the left pane. When you click a category, the items
associated with the category appear in the right pane. You can click the Show POI and
Set POI buttons to view and set the map focus.
43
Page 44

You can click the Select tool to set the origin of the map by a predefined sub-region. A
list of sub-regions is displayed in a pane to the right of the map. When you click a subregion, that area is highlighted.
Focus the Map by Route
Destinator ND supports route cutting, which allows you to create a map composed of points on
a route. To create the route, you must specify two or more points. After the route has been
created, you can cut a map from your route specifications.
Click the Route tool. The Route pane appears. Use the Address and POI tools to set route
points. Click the Create Route button. Your route is highlighted in blue. Click the Cut Map tool.
1.
2.
Figure 12 - Create Map by Route
The following commands are described below:
Click this button to center the map on the selected point.
Corridor
Click this button to delete the selected point.
Click this button to delete all selected points.
Click these buttons to move a selected point up or down.
You can select the amount of surrounding area that is included along the route's path, as
measured in kilometers or miles.
3.
6.
4.
5.
Route
You can select either the quickest route, as determined by speed limit, or the shortest physical
route.
44
Page 45

11.5 Cut Map
When you have designated your map area, click the Cut Map tool. The Cut Map dialog
box appears, as shown in the figure below.
Figure 36 - Cutting a Map
You must enter a map name and description. If you have entered a name that already exists,
Destinator ND prompts you to enter a different name.
You can click the Estimate button to display the map size. This is an important feature when
memory space is limited.
11.6 Load Map
On the Destinator Console, you can refresh your maps by clicking Tools>Refresh New Map
Data. Select the map that you wish to load by clicking on the map image or select it from the list.
A checkmark represents a selected map.
From the Target Device pane, click the Change button to specify where to install the map. You
can choose Removable Disk. After you have selected your target device and have confirmed
that there's sufficient memory, click the Install/Remove Maps button. Your selected maps are
installed and appear in the Installed Maps pane.
11.7 Remove Map
In the Target Device pane, click the Change button and select the location from where to
remove the map. You can choose Storage Card. This updates the Installed Map pane.
The Installed Map pane displays a list of all the loaded maps available. Select the check box by
the map you want to remove. Click the Install/Remove Maps button to remove the selected
map.
45
Page 46

Chapter 12 - Importing a Favorite
You can download a list of favorite locations from your PC to your device.
The list must be contained in .csv files. As part of the download procedure, you convert the .csv
files to .dat format for storage on your device by using the Destinator Conversion utility.
12.1 Favorites Importing File Structure
The Favorites Importing file structure must be in .csv (Comma-Separated Values) format.
The file contains the following fields:
1. Name of favorite
2. Comment
3. Longitude
4. Latitude
5. ZIP Code
6. City
7. Street
8. House number
The Longitude and Latitude are numerical values. All the others are string values. If a string
value contains a comma, the field must have quotation marks.
The .csv file contains the values in a table as a series of ASCII text lines, organized so that each
column value is separated by a comma from the next column's value and each row starts a new
line.
12.2 Importing a .CSV file
To import a .csv file:
On the Destinator Console, click on a Standard Map. This will enable the Installing Map and
Favorites Importer features.
1. Click the Favorites Importer button. The Converter dialog is displayed.
2. Select the .csv file, specify a category name, and click the Convert button. The Report Area
displays a message stating that the content of the file has been converted and that the file is
ready for download.
3. Download the file to your device by clicking the Download button.
46
Page 47

Chapter 13 - MP3 Player
13.1 Overview
The Packard Bell GPS 400 scans its memory card for MP3 audio recordings. You can create play lists
from the audio files. Songs on a play list will be played sequentially.
Note: You must exit Destinator ND before you can use the MP3 Player.
13.2 Creating a Play list
Step 1:
Select the Music Player
Figure 13. If this is the first time you are using the MP3 player, the screen shown in Figure 13 will be
blank.
Then tap the “playlist”
Step 2:
When you open the play list, the system will look for MP3 files on its SD or CF memory card and create a
playlist. If the playlist consists of more than one screen, tap the up arrow
the down arrow
for the next page.
from the Main Menu to open the MP3 Player Main Screen, as shown in
icon to display the Play List.
Figure 13 - MP3 Player Main Screen
for the previous page or
Figure 14 – Play List
47
Page 48

Step 3:
Tap to add more songs to the Player Main Screen shown in Figure 13. Any song that is currently
included in the Player Main Screen will be displayed in red in the Play List.
Tap to select all music in the Play List.
Tap to delete the selected song from the Main Player Screen. Tap to delete all songs
from the Main Player.
Tap the exit button to go back to the MP3 player control.
13.3 Basic Operation
Figure 15 - Current MP3 Selection
Play the Created Play List
The Packard Bell GPS 400 has standard playback features:
Tap
Tap
Tap
to start playing the songs that are displayed in the Player Main Screen.
to stop the playback.
to rewind quickly to the beginning of the current song. Tap to fast forward to the
next song.
Change the Playback Mode of the Play List
Tapping the icon plays sequentially every song in the Player Main Screen once and then stops
playing.
Tapping the icon plays the songs in the Player Main Screen in random order.
Tapping the
icon plays the current song repetitively. To cancel repeat mode, tap
again.
48
Page 49

Chapter 14 - Photo Viewer
14.1 Overview
The Packard Bell GPS 400 scans its memory card for images. Any pictures found will be displayed as
thumbnails.
Note: You have to exit Destinator ND before you can use the Photo Viewer.
14.2 Basic Operation
Select the Photo Viewer from the Main Menu. The thumbnail screen is displayed.
Figure 16 - Thumbnail Display
You can use the icons displayed on the screen to do the following:
• The arrow displays the next page.
• The
arrow displays the previous page.
• The
• The
photo to enlarge it.
button closes Photo Viewer.
button enlarges the current photo. Alternatively, you can click the current thumbnail
The enlarged image is displayed, as shown in Figure 17. You can click on the up and down arrows to
display an enlarged image of the next or previous photo.
Figure 17 - Enlarged Image
49
Page 50

Chapter 15 - Packard Bell GPS Settings
Starts the Destinator
ND application
Opens the device’s
System Settings screen
Starts Photo
Viewer
Figure 37 - The Main Menu
You can change the system settings by tapping the System button. The System screen shows
all of the system settings that you can change, as displayed below.
You can tap the Back button to return to a previous screen.
15.1 Volume Settings
Figure 38 - System Settings
This screen allows you to change the volume level for voice prompts and tap sounds.
Figure 39 - Volume Settings
50
Page 51

15.2 Power Settings
Figure 40 - Power Settings
This screen indicates the battery status of the device.
You can select the hot key checkboxes to determine whether you want the backlight for the device
keys.
15.3 Backlight Settings
This screen lets you determine the brightness of the screen.
You can save power by selecting how long the backlight will stay on before it dims when running the
device either on battery or on AC power.
15.4 Date-Time Settings
Figure 41 - Backlight Settings
This screen lets you select your time zone, and to set the date and time.
Figure 42 - Date-Time Settings
51
Page 52

15.5 Language Settings
Figure 43 - Language Settings
This screen allows you to select the language to be used for screen displays and voice prompts.
15.6 System Information
Figure 44 - System Information
This screen displays information about the device.
52
Page 53

Specifications
Hardware
Processor: Samsung S3C2410X02/A26 with internal clock speed 266MHz
On Board Memory
FLASH: 64MB for OS image and data storage
DRAM: 64MB
Display
LCD: 3.5” TFT-LCD
Backlight: six levels of intensity (0, 20, 40, 60, 80 and 100% of the maximum level)
Touch Panel: 300 DPI touch screen; Finger-tapping type
Audio
CODEC:16-bits stereo; 44.1KHz max sample rate.
Earphone Jack : 3.5 mm stereo earphone jack
Speaker
Battery
Battery Pack: 3.7 volt Lithium-Ion cell (non-removable), 2200 mAH.
Capacity Detection: six levels of battery capacity (0, 20, 40, 60, 80 and 100%).
I/O connectors
USB: USB (v1.1).Mini USB connector.
SD/MMC Slot: supports SD/MMC memory cards (up to 1G bytes)
DC IN Jack: for power source.
External GPS Antenna Connector (MMCX type)
Environment
Temperature
Operating Temperature: 0 to 40 C°
Storage temperature: -20 to 60 C°
Humidity 20-95% non-condensing
ESD: +/-8kv air discharge, +/-4kv direct discharge.
Vibration: 2.60 Grms, 5 ~ 500 Hz
Regulatory/Certification
Complies with CE standards.
GPS Receiver
Module
Chipset: SiRF Star III solution.
Performance
Interface
EMI/RFI:
In Emission - Radio R&TTE directive 99/5/EC 301-440
In Immunity: EN-55024
Safety: EN60950
Frequency: 1575.42 MHz
C/A code: 1.023 MHz chip rate.
Channel: 20 channels.
Sensitivity: -159 dBm.
Position Accuracy: 10 meters, 2D RMS
Altitude: max. altitude 18000 m.
Velocity: max. velocity 515 m/s.
Baud rate: 4800 ~ 57600 bps adjustable
Output Message: SiRF binary or NMEA-0183 GGA, GSA, GSV, RMC, VTG, GLL
53
Page 54

Disclaimers
All Packard Bell GPS products and accessories are to be used only as travel aids. THEY MUST NOT
BE USED FOR ANY PURPOSE REQUIRING PRECISE MEASUREMENT OF DIRECTION,
DISTANCE, LOCATION, OR TOPOGRAPHY. It is the user's responsibility to use the product
prudently.
IN NO EVENT WILL PACKARD BELL BE LIABLE TO ANY PARTY FOR ANY DIRECT, INDIRECT,
INCIDENTAL, SPECIAL OR OTHER CONSEQUENTIAL DAMAGES WHETHER RESULTING FROM
THE USE, MISUSE, OR INABILITY TO USE THE PACKARD BELL GPS PRODUCTS, OR FROM
DEFECTS IN THE PRODUCTS.
Any information supplied to PACKARD BELL by third parties such as, but not limited to, Navteq Corp.,
ALERTEGPS SARL or Destinator Europe GmbH (hereinafter "third party information") and contained
in the Packard Bell GPS product is provided to end-users on an "as is" basis, without warrantees of
any kind, implied, express or statutory. PACKARD BELL does not warrant the accuracy, adequacy or
completeness of any third party information contained in the GPS and expressly disclaims liability for
errors or omissions in this information and materials. In no event will PACKARD BELL be liable for any
damages, including without limitation, direct or indirect, special, incidental, punitive, or consequential
damages, losses or expenses arising in connection with such third party information or use thereof or
the inability to use by any party, or in connection with any failure or performance, error, omission,
interruption, defect, delay in operation or transmission, computer virus or line or system failure, even if
PACKARD BELL or its affiliates, are advised of the possibility of such damages, losses or expenses.
The access by any user to any hyperlinks to internet resources mentioned in the present
documentation are at the user's own risk and the content, accuracy, opinions expressed and other
links provided by these resources are not investigated, verified, monitored or endorsed by PACKARD
BELL.
Updates to software and hardware components are made regularly. Therefore some of the
instructions, specifications and pictures in this documentation may differ slightly from your particular
situation. All items described in this guide are for illustration purposes only and may not apply to your
particular situation. No legal rights or entitlements may be obtained from descriptions made in this
manual. Packard Bell B.V. reserves the right to revise or make changes or improvements to this
product or documentation at any time without obligation to notify any person of such revisions or
improvements.
IF THE FOREGOING LIMITATION IS HELD TO BE UNENFORCEABLE BY SOME JURISDICTIONS,
THE MAXIMUM LIABILITY OF PACKARD BELL TO THE-END USER SHALL NOT EXCEED THE
AMOUNT OF FEES PAID BY THE END-USER FOR THE PRODUCTS.
54
 Loading...