

Pacific energy SUPER 27, SPECTRUM, DESIGN-D, SPECTRUM CLASSIC Installation And Operating Instructions Manual
IMPORTANT:
THESE INSTRUCTIONS ARE TO
REMAIN WITH THE HOMEOWNER
SERIAL #
INSTALLATION
SAFETY NOTICE
If this stove is not properly installed, a
house re may result. For your safety,
follow the installation instructions. Contact
local building or fire officials about
restrictions and installation inspection
requirements in your area.
TESTED and LISTED to CAN/ULC S627
AND UL 1482
Meets the Environmental Protection
Agency's July 1990 Particulate Emission
Standards
AND OPERATING
INSTRUCTIONS
300913-24 SUPER-SD1 5055.201
MODEL - SUPER 27
SPECTRUM
SPECTRUM CLASSIC
DESIGN-D

Contents
Safety and Maintenance ...................................................................................... 3
Maintenance Checks ........................................................................................... 4
Creosote ............................................................................................................... 5
Assembly .............................................................................................................. 6
Mobile Home Installation .................................................................................... 7
Residential Installation .......................................................................................9
Floor Protector ................................................................................................... 10
Combustion Air .................................................................................................. 10
Operation ............................................................................................................ 11
Baffle Removal ................................................................................................... 12
Optional Blower ................................................................................................. 13
Appendix A ......................................................................................................... 14
Formation and Need for Removal ....................................................................................... 5
Chimney Fires ..................................................................................................................... 5
In Case of a Chimney Fire ..................................................................................................5
Avoiding a Chimney Fire ..................................................................................................... 5
Crate Removal .................................................................................................................... 6
Optional Ash Cleanout System -(Install rst) ...................................................................... 6
Pedestal Kit ......................................................................................................................... 6
Leg Kit ................................................................................................................................6
Clearances .........................................................................................................................7
Procedure:...........................................................................................................................7
Clearances .........................................................................................................................9
Chimney and Connector ..................................................................................................... 9
Double-Wall Connector ....................................................................................................... 9
Single-Wall Connector ........................................................................................................9
Procedure ...........................................................................................................................9
Over Firing ........................................................................................................................ 11
Wood Selection................................................................................................................. 11
How to Test Your Wood ..................................................................................................... 11
Lighting for the First Time ................................................................................................. 11
Lighting a Fire ................................................................................................................... 11
Normal Operation ............................................................................................................. 11
Restarting After Extended or Overnight Burns .................................................................. 12
More Wood, More Heat ..................................................................................................... 12
Proper Draft ......................................................................................................................12
Ash Removal ....................................................................................................................12
Disposal of Ashes ............................................................................................................. 12
Removal ............................................................................................................................ 12
Blower Operation .............................................................................................................. 13
Optional Outside Air Adaptor ............................................................................................ 13
Troubleshooting ................................................................................................................14
Replacement Parts - Super 27 ......................................................................................... 15
Replacement Parts - Spectrum and Spectrum Classic .................................................... 16
Understanding & Operating Your Paci c Energy Stove ..................................................... 17
Pedestal or Legs Installation Instructions .........................................................................18
Label ................................................................................................................................. 19
PLEASE SAVE THESE INSTRUCTIONS
NOTE: WE STRONGLY RECOMMEND THAT SMOKE DETECTORS BE INSTALLED.
If smoke detectors have been previously installed, you may notice that they are operating more frequently. This may
be due to curing of stove paint or fumes caused by accidentally leaving the re door open. Do not disconnect the
detectors. If necessary, relocate them to reduce their sensitivity.
SAFETY NOTICE: If this stove is not properly installed, a house re may result. For your safety, follow the
installation instructions. Contact local building or re officials about restrictions and installation inspection
requirements in you area.
Please read this entire manual before you install and use your new room heater. Failure to follow instructions may
result in property damage, bodily injury, or even death.
2 SUPER-SD1 300913-24

Safety and
Maintenance
1. Burn wood only, dry and well seasoned. The denser or
heavier the wood when dry, the greater its heat value.
This is why hardwoods are generally preferred. Green
or wet wood will cause a rapid buildup of creosote.
If you feel it is necessary to burn wet or unseasoned
wood, do so only with the air inlet set open enough
to maintain a good strong re and fairly high chimney
temperatures. Do not attempt to burn overnight using
green wood or wet wood. Wet wood can cause up
to 25% drop in heater output, as well as contributing
signi cantly to creosote buildup.
WARNING: Never use chemicals or any other
volatile liquid to start a re. Do not burn garbage,
or ammable uids such as gasoline, naptha, or
engine oil. We strongly recommend that smoke
detectors be installed.
2. Remove ashes frequently. Embers can roll out the
door and create a re hazard. Maintain a 1" minimum
ash base.
3. If glass becomes darkened through slow burning or
poor wood, it can readily be cleaned with replace
glass cleaner when stove is cold. Never scrape with
an object that might scratch the glass. The type and
amount of deposit on the glass is a good indication
of the ue pipe and chimney buildup. A light brown
dusty deposit that is easily wiped off usually indicates
good combustion and dry, well-seasoned wood and
therefore relatively clean pipes and chimney. On the
other hand, a black greasy deposit that is difficult to
remove is a result of wet and green wood and too
slow a burning rate. This heavy deposit is building
up at least as quickly in the chimney.
WARNING: ONLY USE MATERIALS SUPPLIED BY
MANUFACTURER WHEN DOING MAINTENANCE
OR REPLACEMENTS.
4. DOOR GASKETS - The gasket used by Paci c Energy
(7/8" medium density berglass rope) requires only
light pressure to seal. This will prolong seal life. It is
important that the door seal be maintained in good
condition. Periodically inspect seals and replace if
necessary. Follow instructions included in the DR31.
WDGKIT kit obtainable from your nearest Paci c
Energy dealer.
5. DOOR GLASS - Do not slam loading door or otherwise
impact glass. When closing door, make sure that no
logs protrude to impact the glass. If the glass gets
cracked or broken, it must be replaced before us-
ing the stove. Replacement glass can be obtained
from your dealer. Use 8-13/16" x 15-1/4" x 5 mm.
Ceramic glass only. Do not substitute with any
other type.
To remove broken glass, undo the four retaining screws
and remove clamps and frame, noting position for reassembly. Remove all particles of glass . Be careful as
they are very sharp. Install new glass complete with
gasket. Replace frame, clamps and screws.
CAUTION:
- do not overtighten, tighten screws very carefully
- do not clean glass when hot
- do not use abrasive cleaners on glass
6. The area where boost combustion air enters the
rebox must be kept clear of excessive ash buildup
which will block air ow. This area is at the front of
the rebox.
7. Do not store wood within heater installation clearances,
or within the space required for fuel loading and ash
removal. Keep the area around the heater clean and
free of loose combustibles, furniture, newspapers,
etc.
8. If gold door requires cleaning, use mild soap and
water only. Use of abrasive cleaners will void war-
ranty.
9. Establish a routine for the fuel, woodburning and ring technique. Check daily for creosote buildup until
experience shows how often you need to clean to be
safe.
10. Be aware that the hotter the re, the less creosote
is deposited. Weekly cleaning may be necessary in
mild weather, even though monthly cleaning is usually
enough in the coldest months when burning rates are
higher.
11. Instruct all members of your family on the safe
operation of the heater. Ensure they have enough
knowledge of the entire system if they are expected
to operate it. Stress the section on chimney res
and the importance of following the steps outlined
"In Case of Chimney Fire".
300913-24 SUPER-SD1 3

Maintenance Checks
Check the following parts for damage such as cracks, excessive corrosion, burned out sections
and excessive warping: (See website for descriptions and more detail)
Weekly:
- Firebrick - Visual, for cracking.
- Door Gasket - sagging, placement, damage.
Monthly
- Brick rail tabs and brick rails.
- Air riser tube in the back of the rebox.
- Back side of airwash chamber.
- Baffle locking pin.
- Boost tube cover.
When Cleaning the
Chimney System:
- Top baffle board/blanket.
- Baffle.
- Top heat shield and mounting bolt.
- Baffle Gasket.
- Brick Rails.
- Manifold.
Blower:
- The blower should be cleaned out a minimum every six months by using a vacumn on the grill
openings in the back and bottom of the blower casing to remove any dust and debris.
- Some warping of the baffle is normal(up to 1/4” or .65cm).
- Replace if the baffle has permanent warping greater than this or has cracking or breakage.
- Please contact your Dealer if you experience any of the damage listed above. Continuing to
operate your stove with broken parts may accelerate damage to other parts and may void your
warranty
4 SUPER-SD1 300913-24

Creosote
Formation and Need for Removal
When wood is burned slowly, it produces tar and other
organic vapours, which combine with expelled moisture
to form creosote. The creosote vapours condense in the
relatively cool chimney ue of a slow burning re. As a
result, creosote residue accumulates on the ue lining.
When ignited, this creosote makes an extremely hot re.
The chimney connector and chimney should be inspected
periodically (at least once every two months) during the
heating season to determine if a creosote buildup has
occurred. If creosote has accumulated (3 mm. or more), it
should be removed to reduce the risk of a chimney re.
1. Highest smoke densities occur when a large amount of
wood is added to a bed of hot coals and the air inlet is
closed. The heated wood generates smoke, but without
ample air, the smoke cannot burn. Smoke-free, clean
burning requires small fuel loads, two or three logs at
a time or 1/4 to 1/2 of fuel load and leaving the air inlet
relatively wide open, especially during the rst 10 to 30
minutes after each loading, when most of the smoke
generating reactions are occurring. After 30 minutes
or so, the air inlet can be turned down substantially
without excessive smoke generation. Wood coals
create very little creosote-producing smoke.
2. The cooler the surface over which the wood smoke is
passing, the more creosote will be condensed. Wet
or green wood contributes signi cantly to creosote
formation as the excess moisture that is boiled off
cools the re, making it difficult for the tars and gases
to ignite, thus creating dense smoke and poor combustion. This moisture-laden smoke cools the chimney,
compounding the problem by offering the smoke the
ideal place to condense.
In summary, a certain amount of creosote is inevitable
and must be lived with. Regular inspection and cleaning is the solution. The use of dry, seasoned wood
and ample combustion air will help to minimize the
buildup.
-Flames and sparks shooting out of the top of the
chimney
-A roaring sound
-Vibration of the chimney
In Case of a Chimney Fire
1. Prepare to evacuate to ensure everyone's safety. Have
a well understood plan of action for evacuation. Have
a place outside where everyone is to meet.
2. Close air inlet on stove.
3. Call local re department. Have a re extinguisher
handy. Contact your local municipal or provincial re
authority for further information on how to handle a
chimney re. It is most important that you have a
clearly understood plan on how to handle a chimney
r e .
4. After the chimney re is out, the chimney must be
cleaned and checked for stress and cracks before
starting another re. Also check combustibles around
the chimney and the roof.
- The services of a competent or certi ed installer, (certi ed
by the Wood Energy Technical Training program (WETT)
- in Canada, Hearth Education Foundation (HEARTH) - in
U.S.A.,) are strongly recommended.
Avoiding a Chimney Fire
There are two ways to avoid chimney res:
1. Do not let creosote build up to a point where a big
chimney re is possible.
2. Do not have res in the heater that may ignite chimney res. These are hot res, such as when burning
household trash, cardboard, Christmas tree limbs,
or even ordinary fuel wood; (e.g.. with a full load on
a hot bed of coals and with the air inlet excessively
open.)
Chimney Fires
The result of excessive creosote buildup is a chimney re.
Chimney res are dangerous. Chimney inside temperatures can exceed 2000° F. This causes much higher than
normal temperatures in the chimney and on its exterior
surfaces. Thus ignition of nearby or touching combustible material is more likely during a chimney re. Proper
clearances are critical during such a re.
Chimney res are easy to detect; they usually involve one
or more of the following:
300913-24 SUPER-SD1 5
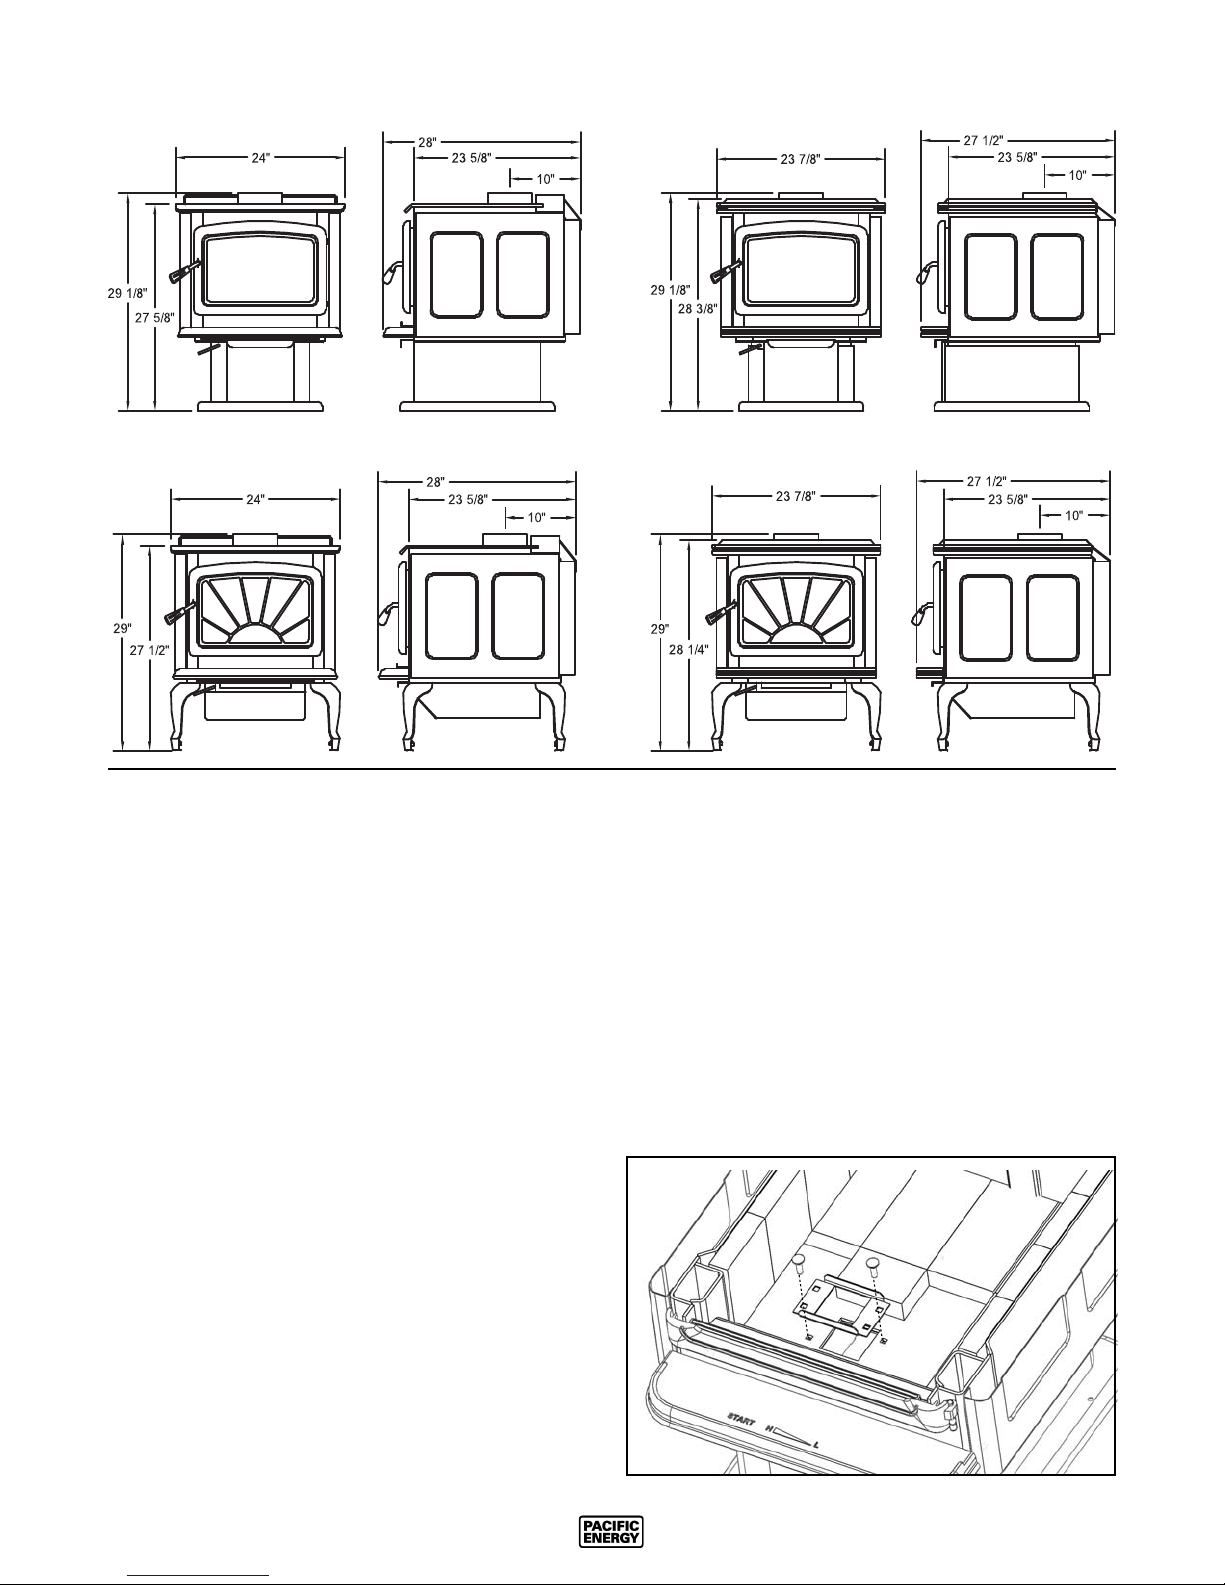
Super 27 - Pedestal Model Spectrum
Super 27 - Leg Model Spectrum Classic
Assembly
- Super 27 only -
Crate Removal
1) Carefully remove wood top and supports.
2) Remove plastic cover.
3) Using a 7/16" wrench, remove lag bolts that secure
stove body to bottom pallet.
4) Place stove body carefully on its back.
5) Using two 3/4" wrench, remove 1" x 1/2" bolts and
save for later use.
6) Remove pallet retaining brackets from stove bottom.
Optional Ash Cleanout System -(Install
rst)
1) With stove body laying on its back, remove the ash
system hole cover and gasket located under the stove.
Discard cover plate and gasket.
2) Inside the stove, remove the two bolts for the ash dump
from the rebox bottom and insert into the brick retainer
with the anges on the the brick retainer pointed away
from the threads on the bolts.
3) Replace bolts with brick retainer in the firebox
bottom.
4) Place new gasket provided over existing bolts.
5) Install ash dump system over gasket and secure with
two nuts previously removed.
2) Secure in place with 1" x 1/2" bolts previously removed.
3) Carefully place the unit in the upright position.
Leg Kit
1) With the unit on its back, align the ash drawer enclosure mounting holes (removable cover facing up) with
the holes on the stove.
2) Position the legs over top of the same holes on the
stove.
2) Secure in place with 1" x 1/2" bolts previously removed.
3) Carefully place the unit in the upright position.
Pedestal Kit
1) With the unit on its back and the removable cover
facing up, align the pedestal mounting holes with the
holes on the stove.\
6 SUPER-SD1 300913-24
22"
12"
18"
30"
25"
11"
11"
20"
16"
26"
14"
15"
5"
10"
16"
18"
28"
4"
4"
8"
28"
18"
16"
8"
22"
8"
Mobile Home
Installation
Warning: Under no circumstances is this heater to be
installed in a makeshift or "temporary" manner. It may be
red only after the following conditions have been met.
- DO NOT CONNECT THIS UNIT TO A CHIMNEY FLUE
SERVING ANOTHER APPLIANCE.
- DO NOT INSTALL IN A SLEEPING ROOM.
- Outside air supply must be used for Mobile Home installations see Figure #2, Page 8.
- The services of a competent or certi ed installer, (certi ed
by the Wood Energy Technical Training program (WETT)
- in Canada, Hearth Education Foundation (HEARTH) - in
U.S.A.,) are strongly recommended.
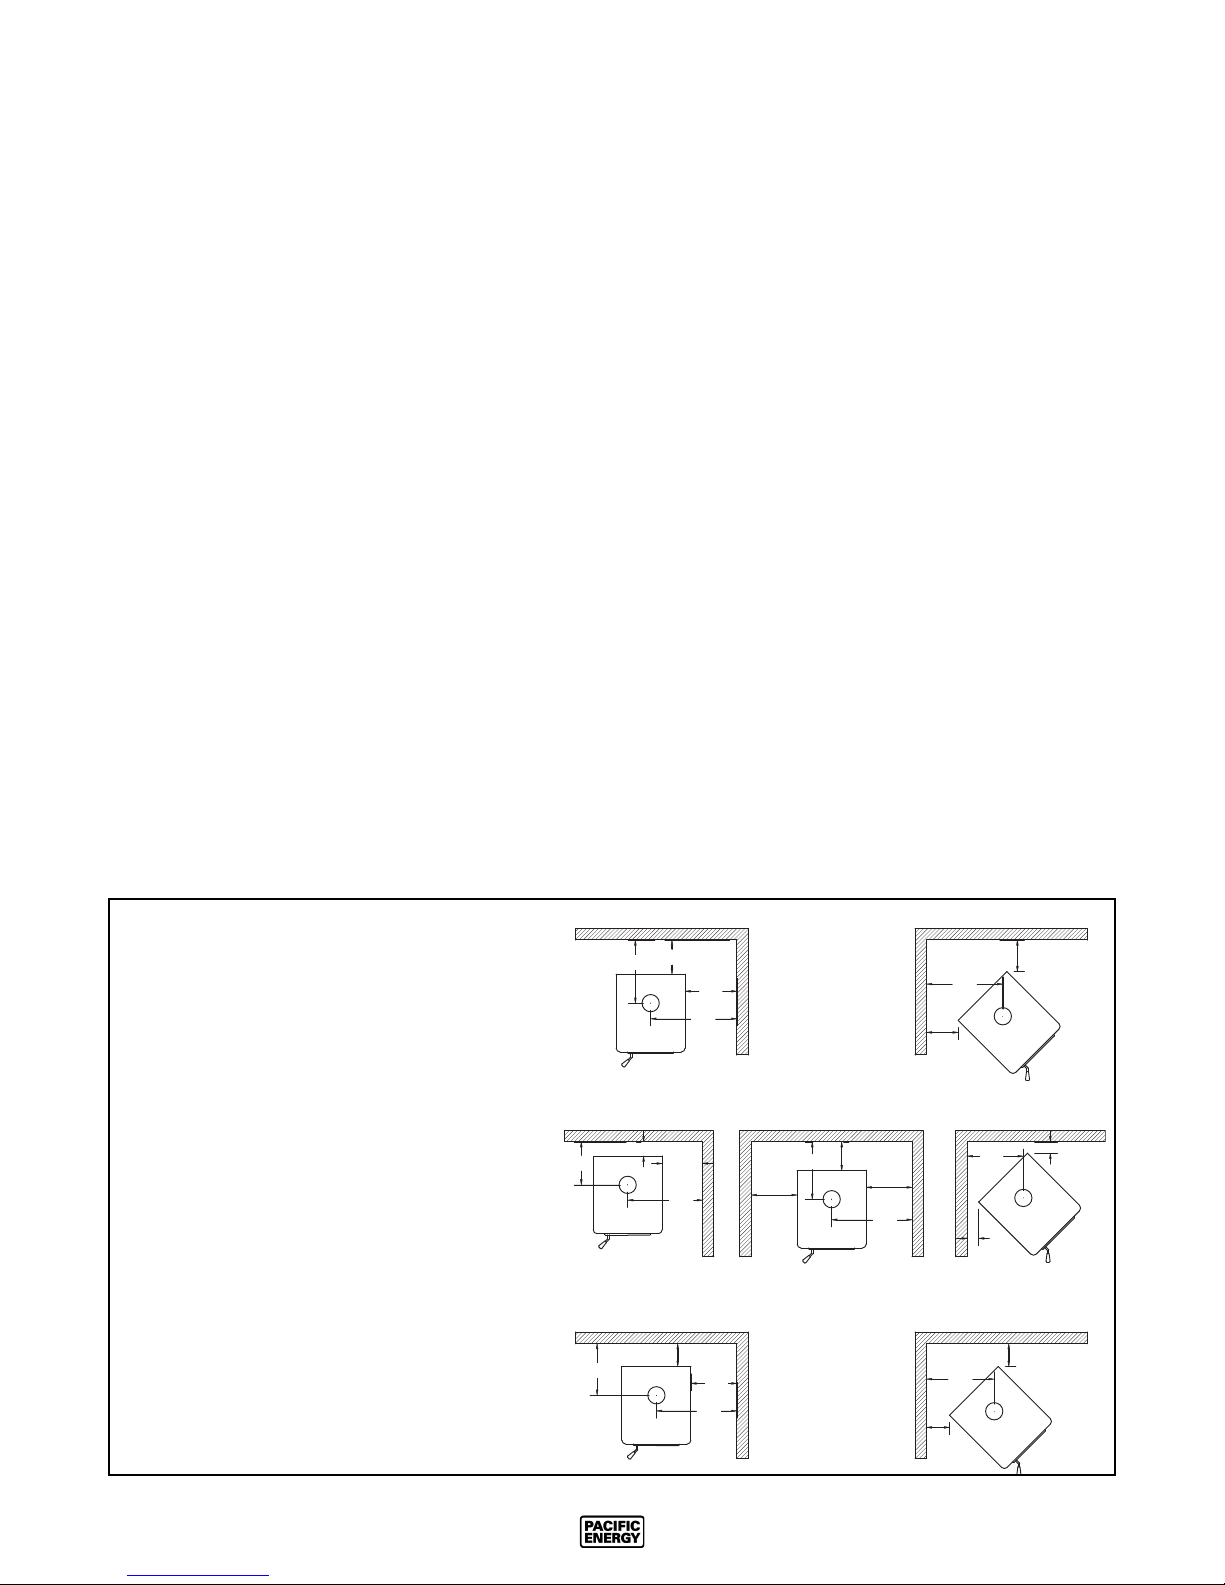
Clearances
This heater must be installed with listed double-wall connector and compatible chimney system listed on page 7.
Clearances to combustible surfaces and materials are
shown below in Figure #1 and Figure #1.
Clearances may be reduced with various heat insulating
materials. Consult local re codes and authorities for
approval.
NOTE: Longer chimney lengths and different pitch
ashings may be used. All other parts listed must be
installed (see Figure #2, Page 8). Install all components
to the connector or chimney manufacturer's installation
requirements. Consult your chimney supplier for instal-
lation advice.
Procedure:
CAUTION: THE STRUCTURAL INTEGRITY OF THE
MOBILE HOME FLOOR, WALL AND CEILING/ROOF
MUST BE MAINTAINED.
Note: See "Combustion Air" section on page 10.
1. Position stove and oor protection with hole for combustion air in accordance with the clearances as stated
on the label and in Figure #1.
2. Mark the position for the hole in the ceiling and roof
by using a string and plumb-bob.
3. Check that the intended location will not interfere with
oor joists, ceiling joists or rafters before proceeding
further.
4. Cut a hole in the ceiling and roof to suit the chimney
system and frame in the sides. The chimney support
is mounted to the framing.
5. Assemble chimney sections so the nished length
is resting on the support and protruding through the
roof. Avoid having joints between ceiling and roof.
Install radiation shield. Assemble ashing and storm
collar and be sure to maintain the vapour barrier at
this point. (Seal securely.) Attach rain cap and check
ashing for leaks.
6. Install connector as per manufacturer's instructions.
7. Attach stove to ooring using two 1/4" x 2" or longer
lag screws.
FIG. #1
Minimum
Clearance to
Combustibles
300913-24 SUPER-SD1 7
Single Wall Connector - Residential
Double Wall Connector - Residential
Alcove: Min. Height 7 1/2'
Max. Depth 4'
Double Wall Connector - Mobile Home
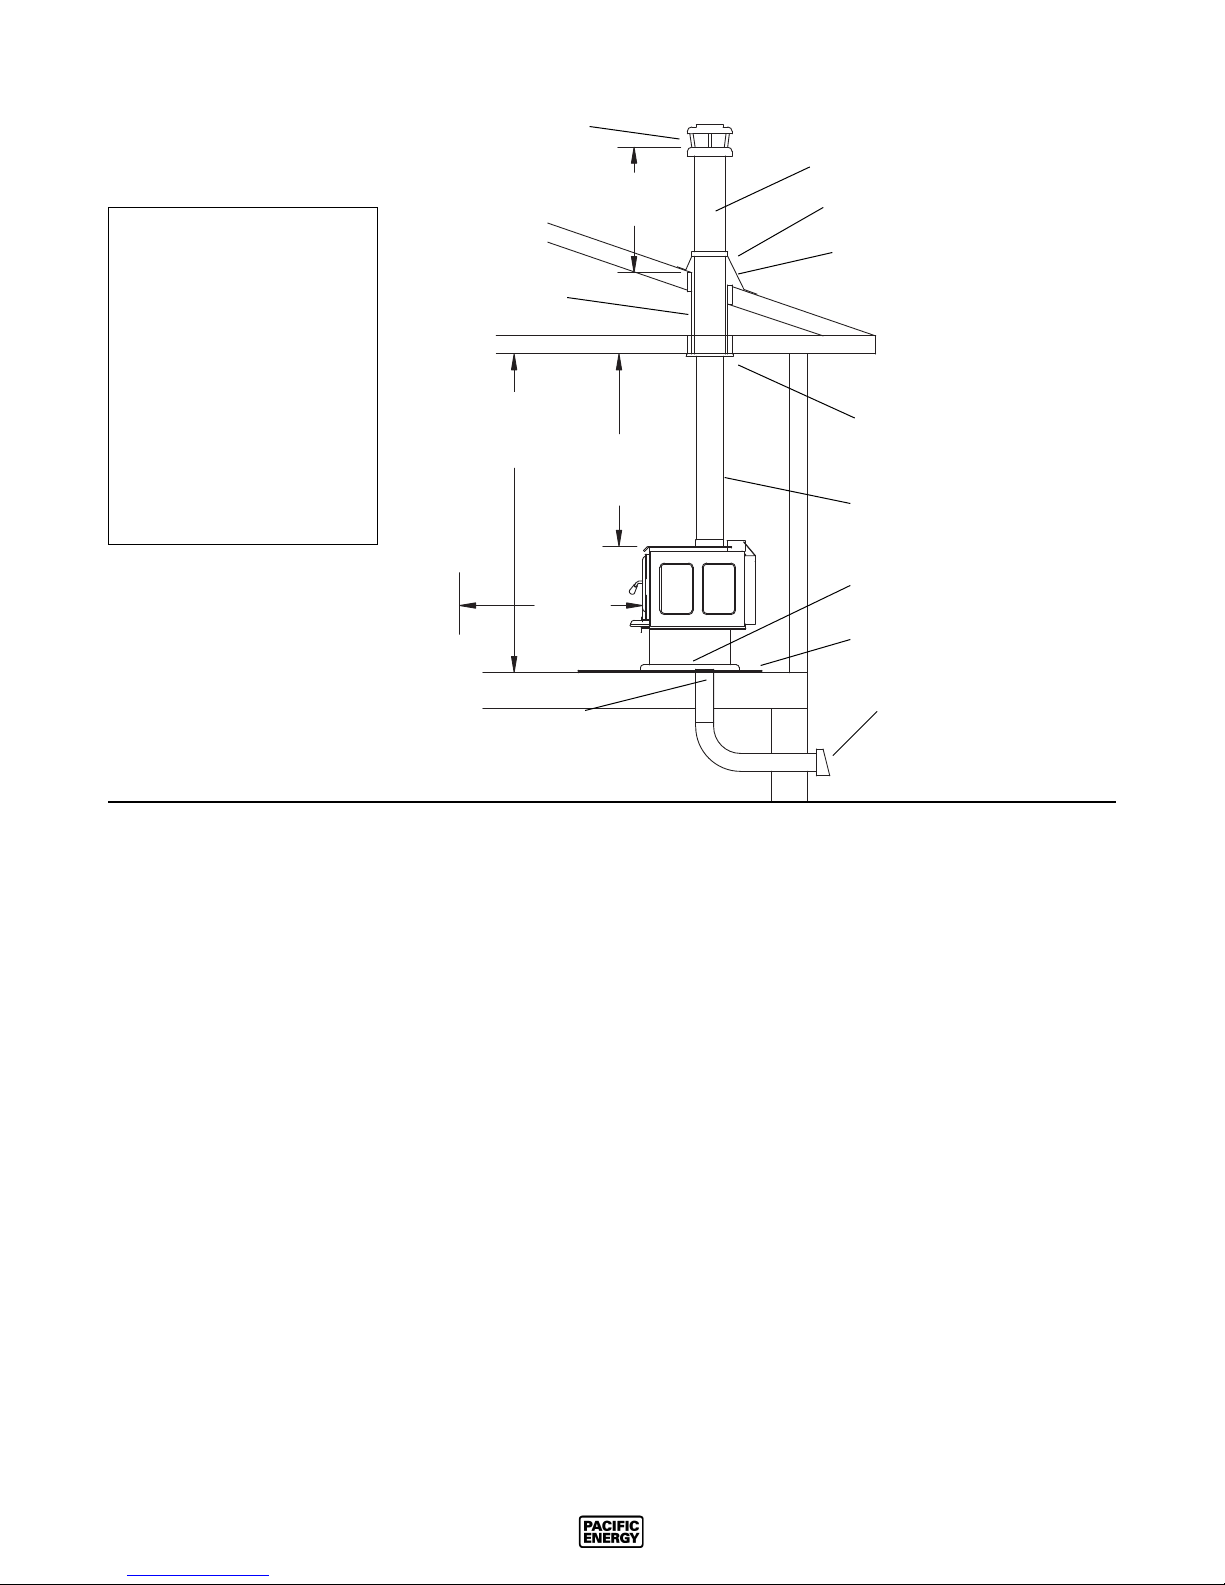
FIG. #2
Spark arrestor rain cap
Chimney
The chimney may incorporate an offset. To do
this safely, all sections
of listed connector, offset elbows and chimney section must be
screwed together by at
least three sheet metal
screws per joint. The
chimney must be suitably supported by the
chimney manufacturer's
* 4" diameter air inlet with rodent
screen
* If the crawl space is well ventilated
Radiation shield
Minimum 7' (2.1m.)
Ceiling Height
56" (1422 mm)
48"
(1219 mm)
3' (914 mm)
Minimum
Minimum
Storm collar
Roof ashing
Chimney Sup-
Chimney Con-
Attachment to oor for
mobile homes
Non-combustible
oor protector
Hooded vent or
90 elbow turned
8 SUPER-SD1 300913-24
 Loading...