

Pacific Drums & Percussion Z5 SERIES User Manual
Z5 SERIES
DRUM SET
ASSEMBLY AND SET-UP GUIDE
1-YEAR LIMITED WARRANTY
Congratulations on your purchase of this Pacific Drum Kit. The following directions
are a step-by-step guide to get you playing your new drums as quickly as possible.
The only tool you need is the drum key that is supplied with your kit.
Additional tips and information can be found at www.pacificdrums.com
PACIFIC DRUMS & PERCUSSION 1 YEAR LIMITED WARRANTY
This warranty protects the original retail purchaser only. If a covered product or component fails due to a manufacturing or material
defect, Pacific will repair or replace the product at no charge. To obtain warranty service, return the product to your authorized Pacific
Drums dealer along with your original proof of purchase. In the case that the dealer is unable to correct a warranty defect, the dealer
will then contact Pacific for further instructions and to obtain a Return Authorization (RA) number. No shipments will be accepted
without an RA number. Any and all shipping charges are the responsibility of the purchaser.
This warranty does not apply to 1) drums purchased from a source other than an authorized Pacific Drum dealer, 2) any owner other
than the original purchaser, 3) defects caused by neglect, moisture, extreme temperatures, handling, shipping or use under normal
playing conditions, 4) finishes, 5) alterations made after the product leaves the factory, 6) sticks and 7) drumheads. Pacific drums and
percussion shall not be liable for incidental, consequential or other damages that may arise as a result of or related to any defect or
failure of this product. This warranty gives you specific legal rights. You may also have other rights, which vary from state to state.
Component drum shells drum finishes drum hardware
Length of Coverage l year 1 year 1 year
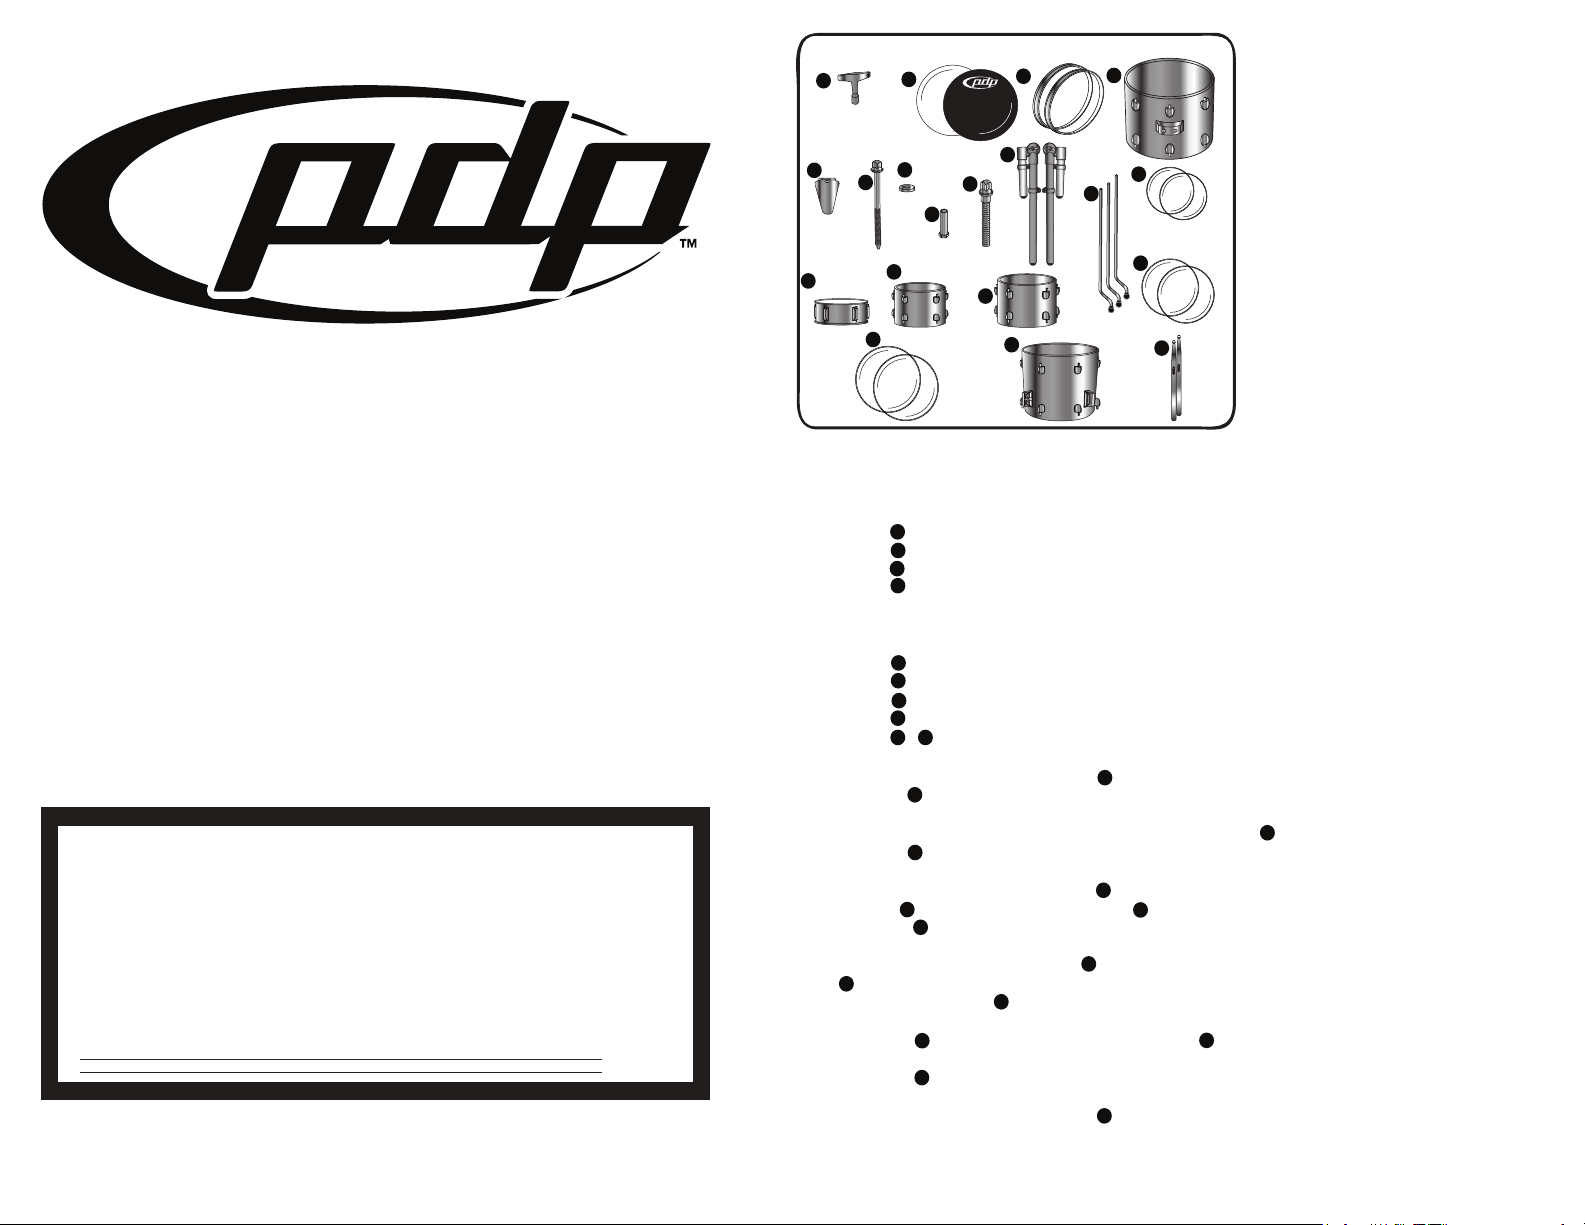
A Drum key (1)
B Bass Drum Heads (2)
(One Clear Batter & One Black Logo
Resonant)
C Bass Drum Hoops (2)
D 16X22" Bass Drum Shell (1)
E Claw Hooks (16)
F Bass Drum Tension Rods
(16 + 2 spares)
G Metal Washers (48 + 4 spares)
H Lug Receivers (6 spares)
I Smaller Tension Rods For Toms
(32 +2 spares)
J Bass Drum Mounted Tom Arms (2)
K Floor Tom Drum Legs (3 Legs)
L 10" Tom Tom Drum Clear Heads (2)
M 5X14" Snare Drum (1 - Assembled)
N 8X10" Tom Tom (1 - Unassembled)
O 9X12" Tom Tom (1 - Unassembled)
P 12" Tom Tom Drum Clear Heads (2)
Q 14" Floor Tom Drum Clear Heads (2)
R 12X14" Floor Tom Drum
(1 - Unassembled)
S PDP Drum Sticks (2)
Package Contents
A
B
C
D
E
G
H
I
J
K
M
N
O
P
F
Q
S
R
1. Before removing anything from the box, place the box in a location where you will be able to remove
the contents of the boxes easily and safely.
2. Remove the top packet that holds the Drum Heads.
This packet contains:
* Two Bass Drum Heads (One Clear Batter & One Black Logo Resonant)
* Two 14” Floor Tom Drum Heads (Two Clear Batter)
* Two 12” Tom Drum Heads (Two Clear Batter)
* Two 10” Tom Drum Heads (Two Clear Batter)
3. On the side of the box you will find a rectangular box with type that reads: “Attention: this box contains
parts necessary for the assembly of the drums. Please keep it together with the drums.”
This box contains:
* One pair of PDP drum sticks
* Bass Drum mounted tom arms (qty 2)
* Bass Drum claw hooks
* Tension rods for the claw hooks
* + Spare PDP true pitch lug receiver nuts and washers
4. Place this box next to the box holding the Drum Heads for the time being.
5. Remove the extra cardboard that holds the 12” unassembled Tom Drum box.
6. Remove the 12” unassembled Tom Drum sitting inside the shell of the Bass Drum and place the drum
on a smooth and sturdy surface to prevent damage to your drum.
7. On the side of the Bass Drum shell you will find the box holding the 14” Snare Drum.
8. Remove the 14” Snare Drum from the box and place the drum on a smooth and sturdy surface to
prevent damage to your drum.
9. Remove all the excess packing around the Bass Drum shell to ensure easy removal.
10. Inside the Bass Drum shell you will find the 10” unassembled Tom Drum.
11. Remove the 10” unassembled tom drum and place the drum on a smooth and sturdy surface to
prevent damage to your drum.
12. Remove the extra cardboard inside the unassembled Floor Tom Drum and the Styrofoam inside the
Bass Drum shell to ensure easy removal.
13. You can now remove the 14” unassembled Floor Tom Drum. Place the drum on a smooth and sturdy
surface to prevent damage to your drum.
14. Remove the Bass Drum Hoop located on the top of the Bass Drum Shell and place it next to the
box holding the Drum Heads.
15. Remove the Bass Drum Shell and place the drum on a smooth and sturdy surface to prevent damage
to your drum.
16. At the bottom of the box, remove the last Bass Drum Hoop and place it next the box holding the
Drum Heads.
L
B
Q
P
L
S
J
E
F
H
O
O
M
M
D
D
N
N
D
D
C
G
R
R
C
D
10" and 12" Tom Toms
1 2 3 4 5 6

SERIES
DRUMS
SERIES
DRUMS
SERIES
DRUMS
SERIES
DRUMS
Bass Drum Assembly
Bass Drum Assembly
10" and 12" Tom Toms
Step 1: Set the Bass Drum Shell on the side with the spurs (legs) towards
the top. Place the black “PDP” logo head over the shell. Center the logo
underneath the BDM (Bass Drum Mount Receiver) located on the top of
the bass drum.
Step 2: Place one of the bass drum hoops over the bass drum head.
Step 3: Slide 8 metal washers from the accessory box onto 8 longer
tension rods . Then slide the tension rod through 8 claw hooks .
Step 4: Position each claw hook over the bass drum hoop and thread
the tension rods into the lugs around the shell. Tighten by hand only.
(You will fully tighten and tune the drum later.)
Step 5: Turn the drum on its side (black head down) Place the clear batter
head over the shell .
Step 6: Repeat steps 2 through 4 for the batter head .
Step 7: By loosening the wing nut, angle the spurs (legs) so they face
slightly towards the front of the bass drum.
Step 8: Put the drum in its upright position.
Step 9: Loosen the spur legs with the drum key and lower the legs so
that the front of the bass drum is lifted about one inch off the ground.
Tighten the spurs.
Step 1: Insert the arms so that the wing screw on the arms face the
black logo head.
Step 2: As, you did with the bass drum place the 10" Tom Tom Drum
Head over the shell.
Step 3: Place one of the counter hoops over the Tom Drum Head.
Step 4: Slide 6 Metal Washers onto 6 Smaller Tension Rods.Then
slide the Smaller Tension Rod through each ear of the Tom Drum
counter hoop.
Step 5: Align the Smaller Tension Rods with the lugs and thread the
Tension Rods into the lugs around the shell. Tighten by hand only. (You
will fully tighten and tune the drum later.)
Step 6: Turn the drum over.
Step 7: Repeat steps 2 through 5 for the other side of the 10" Tom, and
for the 12
" Tom Tom Drum, using the 12" counter hoops and the
12" Drum Heads
.
Step 8: Using the drum key, loosen the memory locks on the Tom Arms
and slide them away from the end of the arms. Later, once you’ve mounted
and positioned the 10" + 12" Toms, you can use the memory locks to
hold the prefered position of the Toms above the Bass Drum.
Bass Drum Assembly
D
B
C
E
B
J
E
F
G
C
B
D
C C
B
D
BDM Receiver
Bass Drum Assembly
N
O
E
Spurs
G
F
B
A
F
D
C
B
J
G
L
I
I
L
E
C
F
I
N
O
P
NOTE: Don’t worry about the precise placement
of the drums at this point. You will arrange them
all later.
NOTE: For convenience, you may now want to tune
your bass drum before attaching the tom and pedal.
Please refer to page 4 for tuning guidelines.
N
O
J
Cymbal Stand
Bass Pedal
10" and 12" Tom Toms
(continued)
Step 1: Remove the plastic wrapping around the Hi-Hat footboard.
Step 2: Fold out the footboard radius rod assembly and insert the radius
rod into the two holes in the base casting so that the heel plate sits flush
with the floor.
Step 3: Loosen the wing screw on the leg assembly clamp.
Step 4: Pull the legs out and away from the center tube and place the base
section on the floor. Tighten the wing screw.
Step 5: Remove the clutch from the upper rod by loosening the wing
screw and sliding the clutch off the rod.
Step 6: Insert the threaded end of the upper rod into the receiver at the top
of the lower rod (inside the base section).
Step 7: Screw the two rod sections together by rotating the upper section
clockwise until tight.
Step 8: Insert the upper tube into the lower tube so that the cymbal seat's
angle adjustment knob sits towards the back of the stand (about 180 degrees
from the location of the footboard). Tighten the wing nut at the top of the
lower tube to secure the upper tube in place.
Hi-Hat Stand
14" Floor Tom Assembly
14" Floor Tom Assembly
R
K
K
All Drum Hardware Sold Seperately
Step 9: Loosen the wing screw on the bracket of the 10" Tom Tom, and
slide the right tom arm on the left (from a right-handed drummer’s
perspective behind the kit - reverse if you play left - handed). Tighten the
wing screw on the tom bracket.
Step 10: Loosen the wing screw on the bracket of the 12" Tom Tom.
Position the tom on the Bass Drum Mounted Tom Arms (reverse if you play
left-handed). Tighten the wing screw on the tom bracket.
14" Floor Tom Assembly
Step 1: The 14” tom is not assembled. Place the batter head on
the drum as you did with the small toms. Place the counterhoop
over the head and thread the Smaller Tension Rods in just like
the smaller tom. Make sure all the tension rods and washers are
correctly inserted in the lug receivers, and finger-tighten all
tension rods. Repeat the head, counterhoop and tension rod
installation for the bottom (resonant) head. You will fully tighten
and tune this drum later.
Step 2: Place the drum on the floor upside-down, with the three
receivers that are on the side of the shell toward the top. Loosen
the wing screws on the three receivers.
Step 3: Insert the end of one floor tom leg into the receiver, with
the foot up in the air. Allow approximately 4-5 inches of the rod
to come through the receiver. Rotate the leg so the foot is facing
away from the drum (when turned over, the feet will be facing out,
not tucked under the shell). Tighten the wing screw. Repeat
for the other two floor tom legs, and turn the drum over so it is
standing on the legs.
R
K
I
N
O
Lower Section Hi-Hat Set-Up
Radius Rod
Wing Screw
Hi-Hat Stand
Wing
Screw
 Loading...