

Page 1
USER’S MANUAL
Page 2

TABLE OF CONTENTS
1. Introduction............................................................................. 1
2. Ways to Use Your MemoryFrame™............................. 2
3. Warnings............................................................................... 4
4. Getting Started .................................................................... 6
4.1 Unpacking your MemoryFrame™....................................... 6
4.2 Registration & Your Product Serial Number........................ 6
4.3 Removing the Protective Plastic Film from the LCD ............ 7
4.4 Connecting MemoryFrame to the Power Supply .................. 8
4.5 Using the Foldout Stand ..................................................... 8
4.6 Power-on Initialization....................................................... 8
5. Control Buttons and Connectors................................... 10
6. Using MemoryFrame with a Personal Computer..... 13
6.1 Digital PixMaster™ PC Software Overview ...................... 13
6.2 Minimum PC System Requirements.................................. 14
6.3 Installing Digital PixMaster™ PC Software....................... 14
6.4 Installing MemoryFrame’s USB Drivers ........................... 16
6.5 Using Digital PixMaster™ to Create Slideshows.............. 18
6.6 Transferring Slideshows to/from MemoryFrame ................ 25
6.7 Help - Internet Updates .................................................... 27
6.8 Help - About MemoryFrame.............................................28
6.9 Help - About Digital PixMaster ........................................28
Copyright© 2002-2003 Pacific Digital, Corp Page i
Page 3

6.10 Exiting Digital PixMaster................................................. 28
7. Connecting a Camera to the MemoryFrame.............. 29
8. Connecting a USB Card-Reader to MemoryFrame. 32
9. MemoryFrame Menu System........................................ 35
9.1 Menu Navigation ............................................................. 35
9.2 Main Menu...................................................................... 36
10. Tips and Tricks.............................................................. 45
10.1 Optimizing images for display on MemoryFrame............... 45
10.2 Caring for the Screen: ......................................................46
10.3 Securing MemoryFrame in Office Environments ............... 47
10.4 How to change the decorative 5 x 7 frame ......................... 48
10.5 Showing PowerPoint™ Slides on MemoryFrame............... 49
10.6 Disabling Pop-up Reminder Messages...............................49
11. Purchasing New Decorative 5x7 Frames ............... 50
12. Troubleshooting / FAQ ............................................... 53
13. MemoryFrame Specifications................................... 56
14. Upgrading MemoryFrame Software/Firmware .... 57
15. MemoryFrame Limited Warranty ............................ 60
16. Contacting Technical Support................................... 62
Copyright© 2002-2003 Pacific Digital Corporation Page ii
Page 4

1. Introduction
Welcome to the future of personal digital imaging. The Pacific Digital
MemoryFrame
TM
combines the vibrant high-resolution quality of activematrix TFT (Thin Film Transistor) display technology with the
convenience and speed of the popular Universal Serial Bus (USB)
interface for a new way to display your photos instantly.
The Pacific Digital MemoryFrame is designed to download and display
pictures from Personal Computers, USB Mass Storage Digital Cameras,
or USB Mass Storage memory-card readers using the two USB ports
built into MemoryFrame.
TM
By using the DirectConnect
feature of the MemoryFrame you can
download digital photos directly and play them back in a slideshow-type
fashion in your home or office. The USB interface provides speed and
portability, allowing you to download immediately from your own or
your friend’s camera. It is ideal for both home and office users to
proudly display family, vacation, or business related images on the desk,
shelf, or wall. For those who use a PC, you can also create, name and
save hundreds of different slideshows for easy USB transfer to/from the
PC.
MemoryFrame
stores 50+ photos and allows you to select how long each
image is displayed and what style of transition is used between each
image!
MemoryFrame
is perfect as a gift for friends, business contacts, or
relatives. Imagine preloading the MemoryFrame with those “just perfect”
photos, and sending it as a personal gift. It would leave an impression
long after the gift is opened.
For that personal touch, a wide variety of wood and lacquered frames are
available to suit any décor. Frames can be changed in moments, and
locked directly onto the MemoryFrame to be displayed on a desk,
mantelpiece, or hanging on a wall.
So let MemoryFrame free your imagination to explore the many ways
you can express yourself, not only with the photos you take, but the way
you present them.
Copyright© 2002-2003 Pacific Digital, Corp Page 1
Page 5

2. Ways to Use Your MemoryFrame™
The MemoryFrame is a stand-alone device that is designed to transfer
and store images from either a PC or a camera/reader and then display
the images in a continuous slideshow. You can set a transition style and
display-time duration for each of the slides. After transferring photos, the
MemoryFrame does not need to remain connected to the USB cable in
order to display the photo slideshow. For example, after transferring
photos, the MemoryFrame can be moved to a different room for display.
Transfer Camera Images Directly to the MemoryFrame
No PC required. Take pictures with your digital camera,
DirectConnect
TM
your USB camera to MemoryFrame to select
which photos to transfer. Then disconnect your camera and simply
display them. With its easy-to-use on-screen menu system and
multi-function control buttons, users can view their digital camera
or memory card contents at a glance with easy to view thumbnails,
edit slideshows, select the time between image changes, add fun
transition and display effects, delete images from slideshows, and
much more. Manual image forward, pause, and reverse buttons and
adjustable contrast are also provided. If your camera does not
support USB Mass Storage (see Section 12 of this manual for more
information), you can use either a USB Mass Storage compatible
card-reader or a PC to transfer and display your pictures (see
below).
Connect a USB Memory-Card Reader to the MemoryFrame
No PC required. Take pictures with your digital camera, then
remove the memory card from the camera and insert it into a USB
Mass Storage compatible memory-card-reader. Next, connect the
USB card-reader to the camera USB port of the MemoryFrame to
transfer and display your pictures. If your card-reader does not
support USB Mass Storage (see Section 12 of this manual for more
information), you can use a PC to transfer and display your pictures
(see next page).
Transfer Images from a PC to the MemoryFrame
Many digital camera users will want to take advantage of their
personal computer’s power, memory and user interface to edit,
enhance, and archive their photos and other images. Using the
Digital PixMaster application supplied with the MemoryFrame
Copyright© 2002-2003 Pacific Digital Corporation Page 2
TM
,
Page 6

you can organize a personalized photo show and download it to the
MemoryFrame using USB.
PowerPoint™ Slides
PowerPoint slides can be saved as JPEG images or pasted into
photo-applications as JPEGs. After your slides have been converted
to JPEGs, simply drag & drop them into Digital PixMaster for quick
USB download to MemoryFrame. Integrating PowerPoint slides
into the photo slideshows is fun, and in business can make
MemoryFrame a valuable tool for many applications.
E-mail Images
When you receive a picture via e-mail, most programs allow you to
save the image file to your computer’s hard disk. If the image is
visible on your computer screen, simply copy & paste the picture
into Digital PixMaster for quick USB download to MemoryFrame.
If the image file is contained in an attachment to an e-mail, there is
usually a button or link that requires clicking. In AOL, this is the
“Download Now” button. Once the image file is saved to your hard
disk, use PixMaster™ to send it to your MemoryFrame
for viewing.
Internet Images
Images found on many websites can be transferred to
MemoryFrame. First, right-click the image, then either Copy (for
later Paste into Digital PixMaster), or Save-As (to save to your hard
disk for later drag & drop into Digital PixMaster) for quick USB
download to MemoryFrame.
Paintings & Drawings
Images that you or your children have created in programs such as
Microsoft Paint or other drawing software packages can be
transferred to MemoryFrame. Simply save the images to your hard
disk for later drag & drop into Digital PixMaster for quick USB
transfer to MemoryFrame.
Be Creative! Mix & Match Images
Memoryframe enables you to be creative in your presentation allowing
you to mix and match multiple image types into a single slideshow
(photos, PowerPoint, email images, paint images, and internet images).
Copyright© 2002-2003 Pacific Digital Corporation Page 3
Page 7
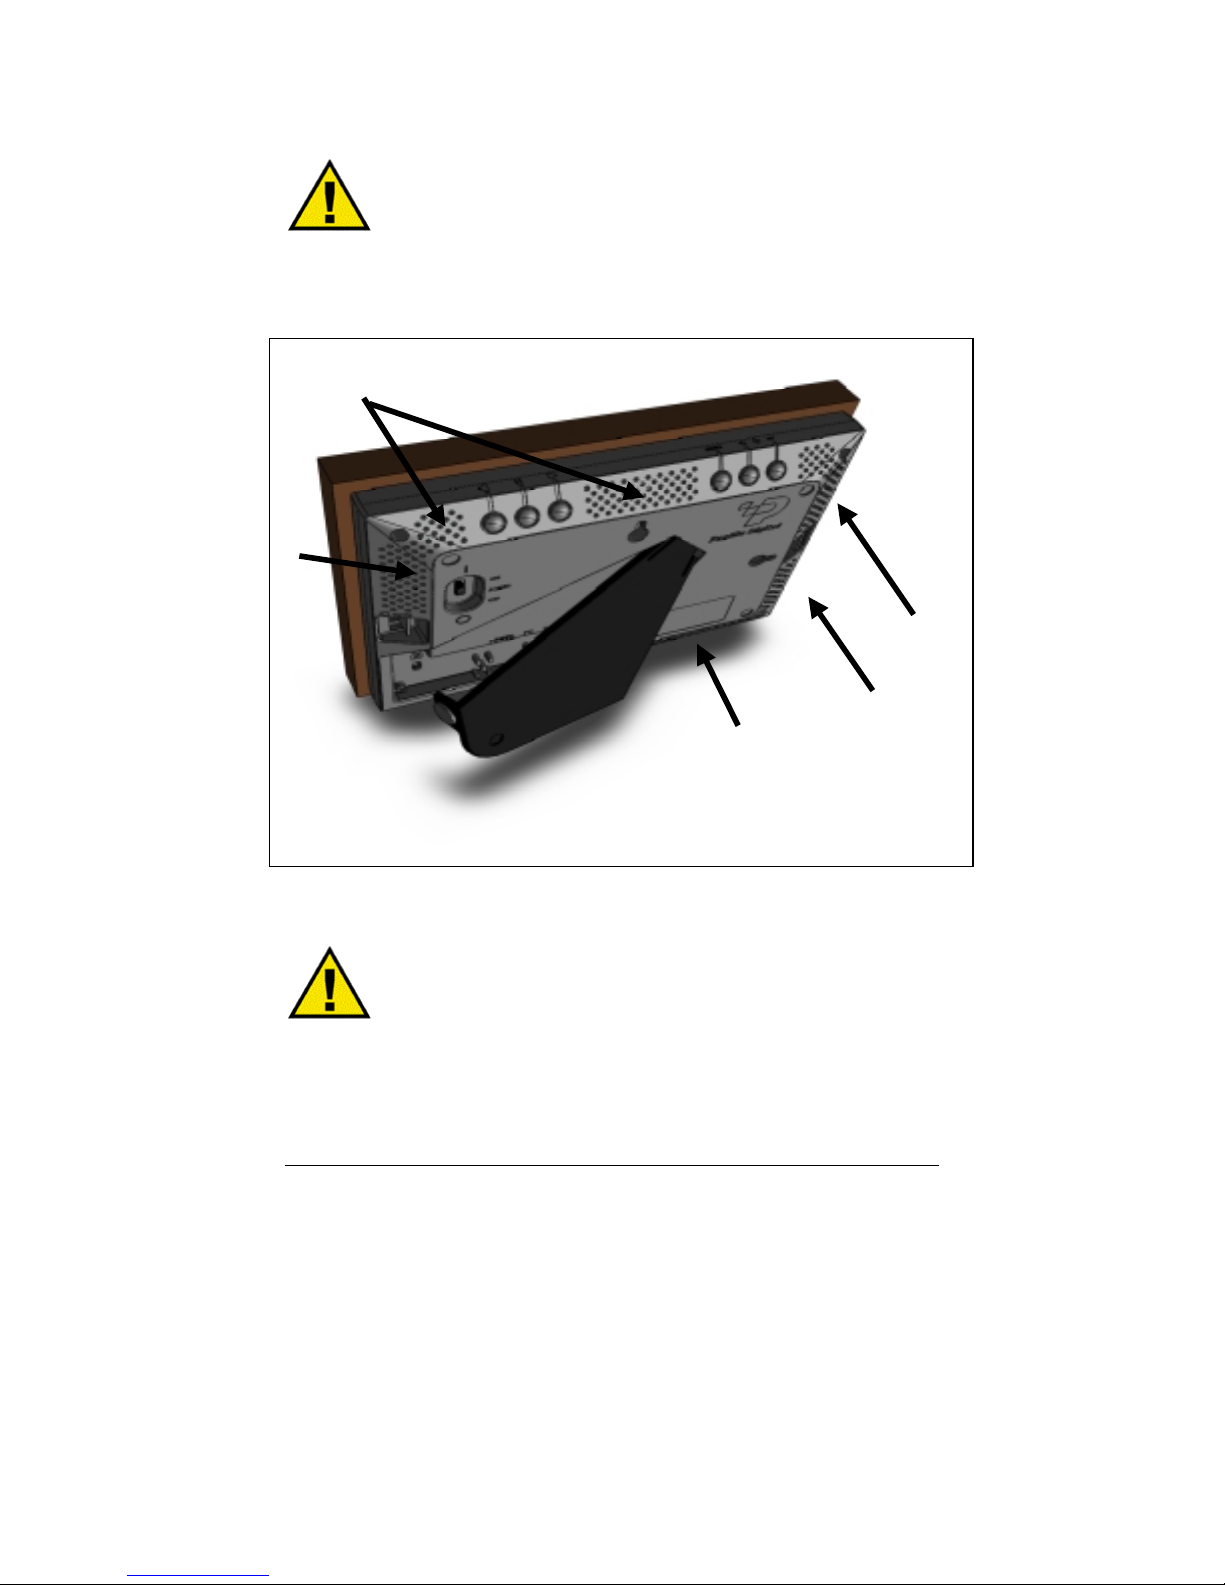
3. Warnings
Do not block the ventilation holes on the back, bottom, or
sides of the MemoryFrame
of ventilation holes.
Ventilation holes
at any time. See Figure-1 for locations
Ventilation holes
Figure 1 – Ventilation Holes
Do not open the plastic case of the MemoryFrame at any
time. There is risk of electric shock. There are no User serviceable parts
inside. Opening the plastic case voids the product warranty.
Copyright© 2002-2003 Pacific Digital Corporation Page 4
Page 8

The screen of the MemoryFrame is made of glass and must
be treated with care or may break. It is covered with plastic polarizing
material that can be scratched. Follow the screen care instructions in
Chapter 10 “Tips” to properly care for your MemoryFrame display.
Keep your MemoryFrame out of direct sunlight. DIRECT
SUNLIGHT MAY CAUSE DAMAGE.
MemoryFrame is sold in North America with a North
American 110V only external power-supply. If the North American
power-supply is plugged into locations outside of North America that
use 240 VAC 50 Hz (such as Europe), it will damage the unit and void
the warranty. Pacific Digital offers a separate international external
power supply for use outside of North America.
Copyright© 2002-2003 Pacific Digital Corporation Page 5
Page 9

4. Getting Started
The following sections provide step-by-step instructions on setting
up your MemoryFrame for the first time.
4.1 Unpacking your MemoryFrame™
In the retail box, the MemoryFrame unit is wrapped in a cardboard
shock-absorbent holder. Do NOT RIP the “shrink-wrap” portion
when removing the unit. Instead, remove the entire cardboard
shock-absorbent holder from the box, and unfold the cardboard so
that it lies flat. After unfolding the cardboard, you can gently slide
the MemoryFrame from out of the “shrink-wrap” material. Next
refold the cardboard shock-absorbent holder and place it back in the
retail box. Save the box so you can pack or store the unit in the
future.
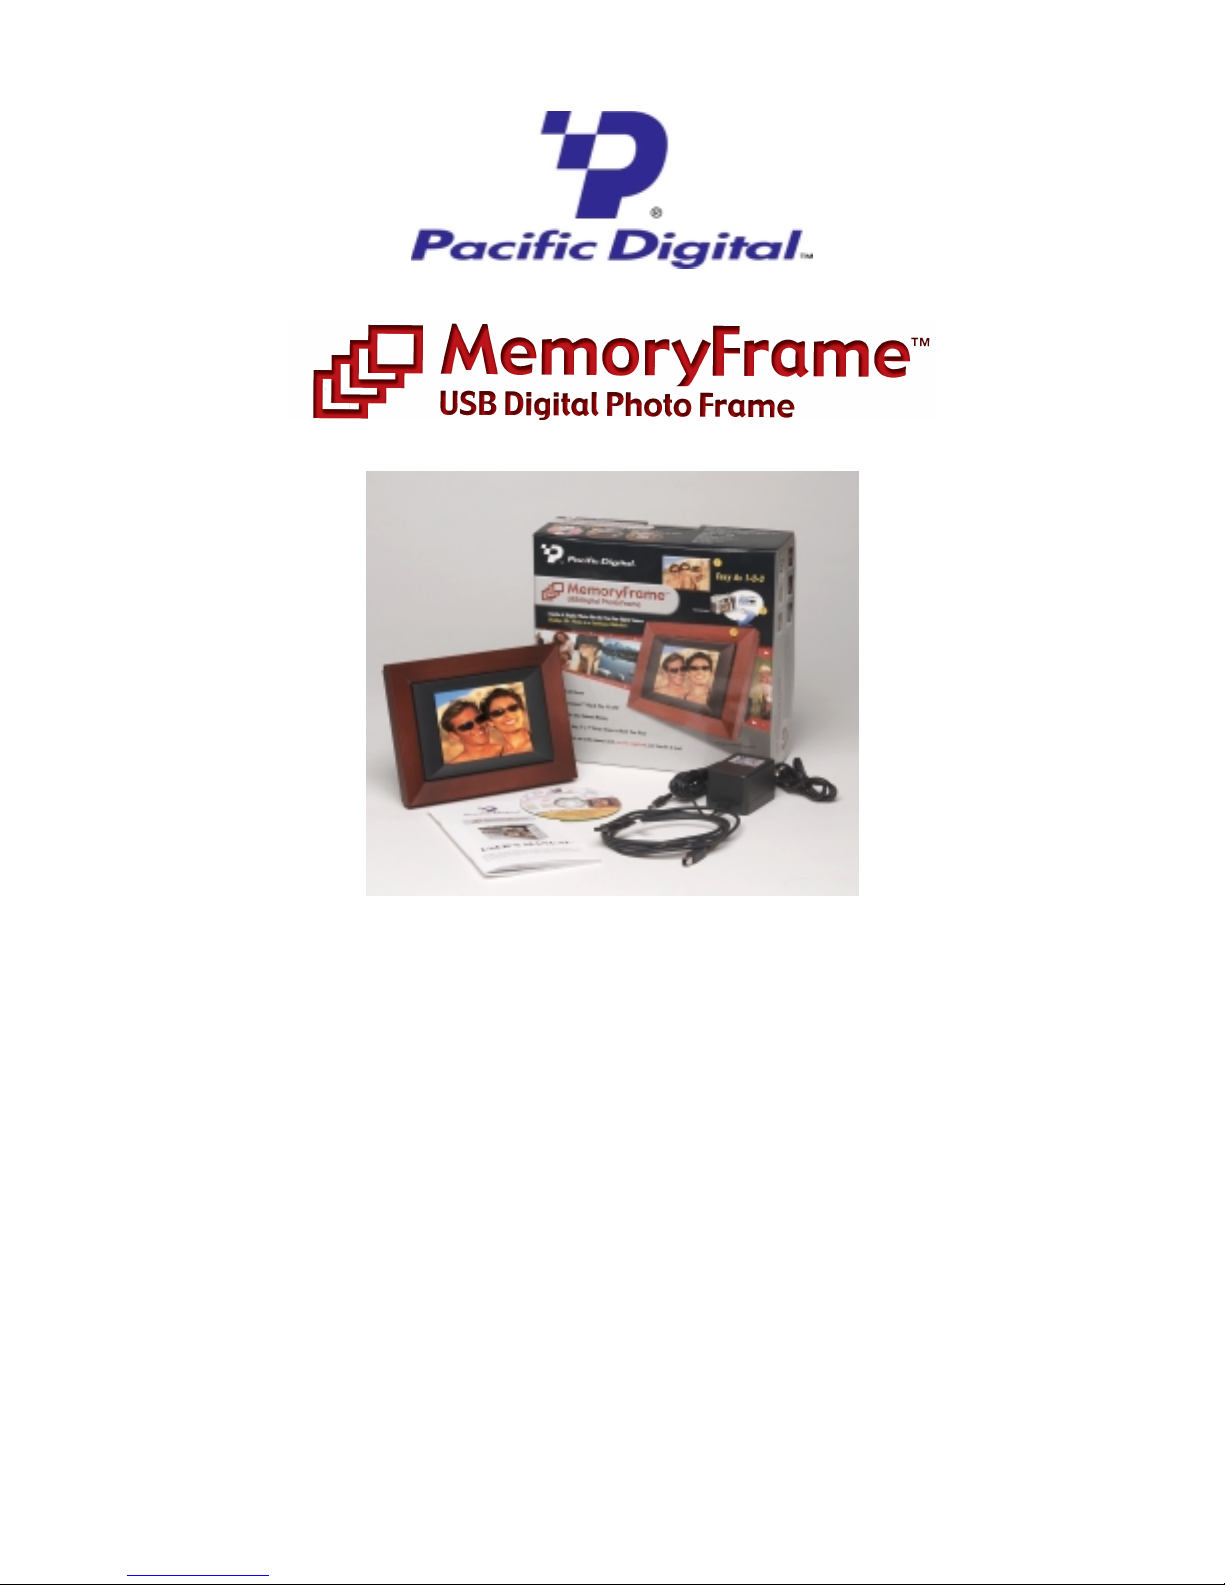
The MemoryFrame MF-570 retail pack includes:
• MemoryFrame™ Electronic USB Digital Picture Frame
• Wood 5x7 decorative frame (may be already attached to unit)
• External power supply with cable
• USB Cable (2 meters)
• Digital PixMaster™ PC compatible photo slideshow software
and USB Drivers on CD-ROM
• This Users Manual
• Mail-in registration/warranty card (inserted into manual)
If something is missing from the above list, contact customer service
at the following phone number
North America: 888-999-0732 or 949-252-1111
Europe: +353-61-702029
4.2 Registration & Your Product Serial Number
Please record the model and serial number from the bar coded label
located on the rear of the MemoryFrame to keep for reference. The
serial number is required for Technical Support and Product
Registration. See Figure 2 for location of model and serial number.
Copyright© 2002-2003 Pacific Digital Corporation Page 6
Page 10
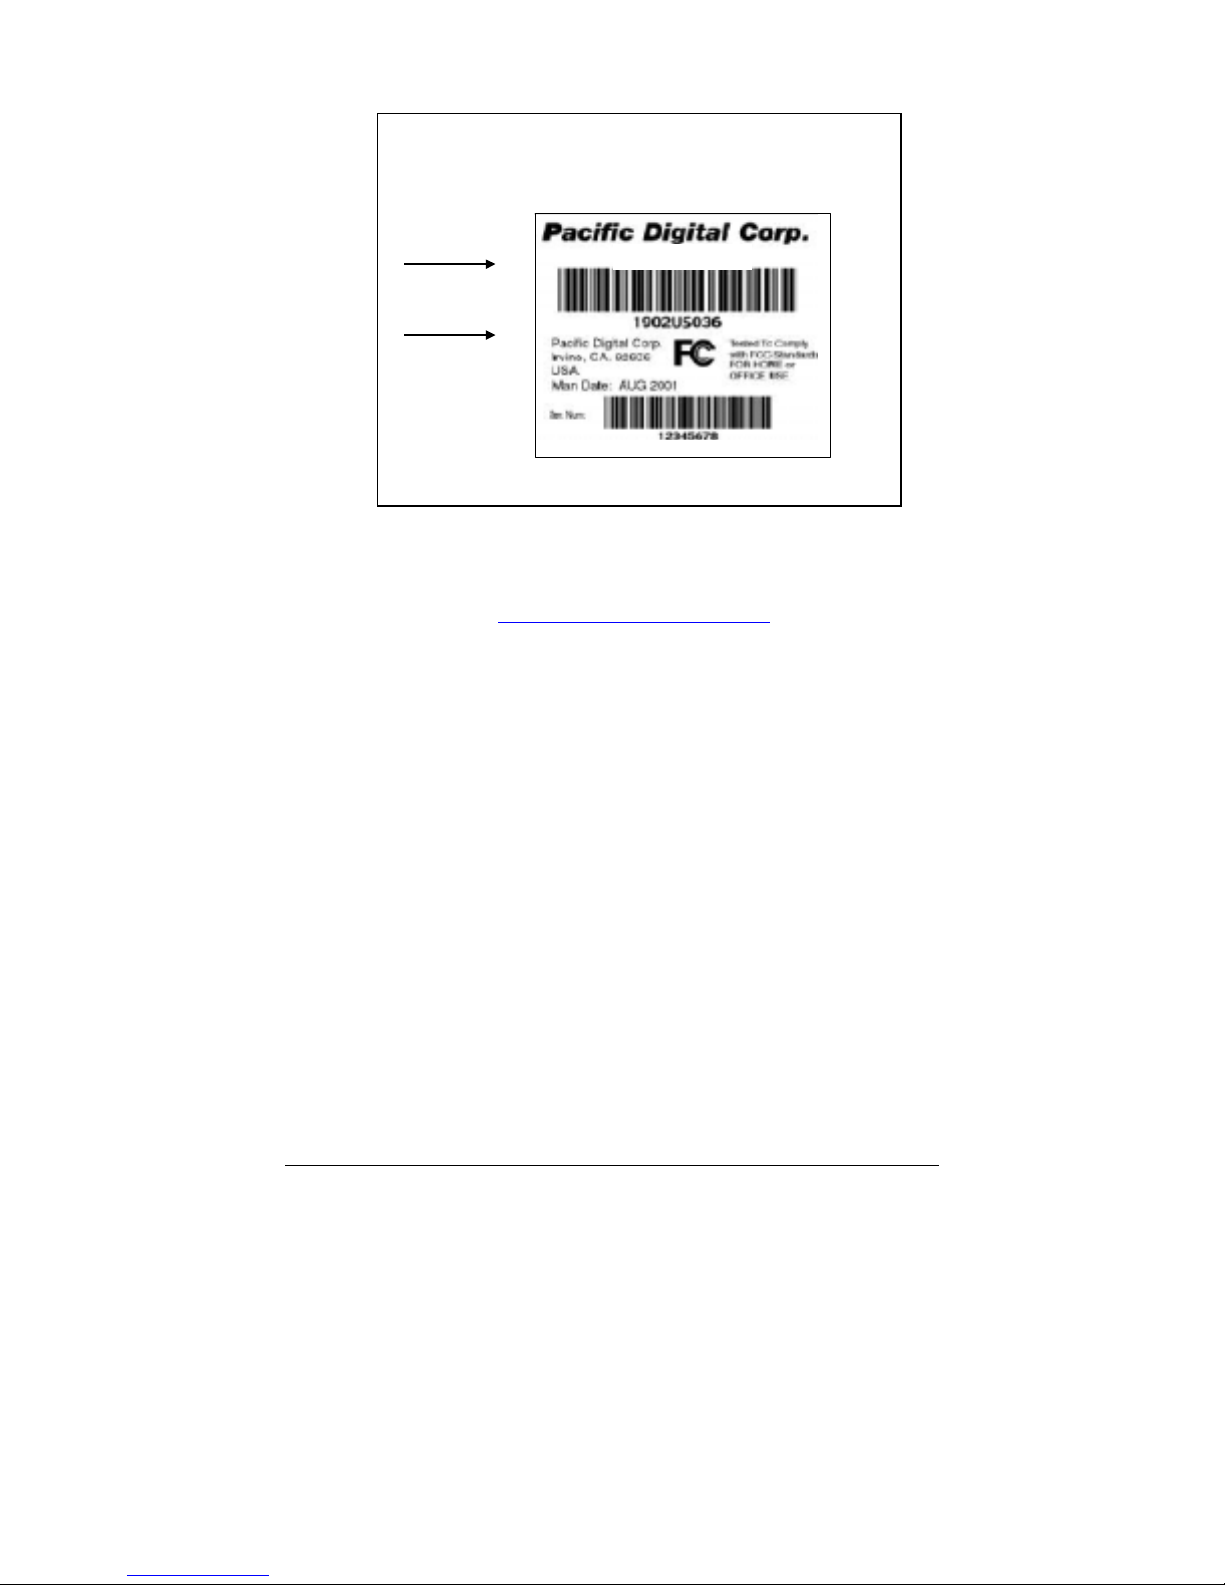
Model #
Model U-30140
Serial #
Figure 2 – Product Serial Number Label
In order to receive your one year of free technical support, you must
register online at: http://www.PacificDigital.com
fill-out and mail the included mail-in registration card.
4.3 Removing the Protective Plastic Film from the LCD
The MemoryFrame ships with a protective plastic film on its LCD
screen. The purpose of this protective plastic film is to prevent the
LCD screen from being scratched or damaged during manufacturing
and packaging. You can choose whether to remove the protective
plastic film or to keep it on. Please note, however, that the clarity of
the images will appear brighter and clearer after removing the
protective plastic film from the LCD screen. To remove the
protective plastic film, look closely at the four corners of the
MemoryFrame LCD screen. You will see that one of the four
corners is lifted slightly. Carefully lift that corner and peel the
protective plastic film away from the MemoryFrame. Use the
Contrast Up/Down buttons to achieve your desired level of contrast.
Note: You may choose to leave the protective plastic film on the
LCD screen to keep it protected.
or alternatively
Copyright© 2002-2003 Pacific Digital Corporation Page 7
Page 11

4.4 Connecting MemoryFrame to the Power Supply
MemoryFrame runs on AC power from an ordinary wall outlet. Use
only the supplied MemoryFrame external Power Supply. Other
power adapters will cause damage to MemoryFrame and void the
warranty.
Before connecting the power supply, make sure that the
MemoryFrame power switch is in the OFF position. Connect the
External Power Supply to the Power receptacle jack on the back of
MemoryFrame. Plug the External Power supply wall plug into an
electrical socket.
Warning! Plugging the North American plug into locations outside
of North America that use 240 VAC 50 Hz will damage unit and void
warranty. European models are available for 220V-240V countries.
Pacific Digital offers an international external power supply for use
outside of North America.
4.5 Using the Foldout Stand
The stand on the back of MemoryFrame is designed to properly
support the MemoryFrame in either portrait (vertical) or landscape
(horizontal) orientations. The stand is designed to support
MemoryFrame on flat surfaces only.
Fold out the Stand from the rear of the MemoryFrame. Choose the
orientation that you prefer, and set the MemoryFrame on a flat
surface.
4.6 Power-on Initialization
Move the MemoryFrame’s Power Switch to the “ON” position to
turn on the MemoryFrame.
Important Note: In the power-on sequence of the MemoryFrame, its
initialization screen will take a few moments to appear. The entire
power-on sequence may take several minutes and you will be unable
to use the push-button menu system until the initialization screen is
replaced by the first photo appearing on the screen.
Copyright© 2002-2003 Pacific Digital Corporation Page 8
Page 12

After going through a power-on initialization sequence, the
MemoryFrame will automatically enter the slideshow mode and
begin displaying the currently loaded show (a default show is
included with the unit from the factory).
Each image in the slideshow has an assigned transition effect, and
display-time duration. When the display-time of the current image
ends, the MemoryFrame transitions to the next picture.
The type of transition and the display-time duration is selected by
the user during slideshow creation. Slideshows can be created on a
PC using the Digital PixMaster™ application. If photos were
directly loaded into MemoryFrame from a USB camera or cardreader without a PC, then MemoryFrame allows you to change/set
the transition and duration after the photos have been transferred.
Settings may be changed using the control button menus defined in
the Menu section.
Copyright© 2002-2003 Pacific Digital Corporation Page 9
Page 13
5. Control Buttons and Connectors
This section briefly summarizes the main control buttons and connectors.
The buttons can have a variety of functions while in the Menu system.
More detailed control button usage in the Menu system is discussed in
the Menu System section (Chapter 9).
Figure 3 – Buttons & Connectors
Frame Lock The two frame locks hold a decorative 5x7
frame in place. There are two locations, one on
each side. The “Locked” position is toward the
outside of the unit. A noticeable “click” may be
heard when locked or unlocked.
Forward (►) During a slideshow, press the ► button to
transition to the next photo in the slideshow.
When viewing a user-interface menu (see Menu
button), use this button to highlight the next
menu option.
Pause/Select ( || ) Press the || button to pause or restart the slide
show. When the show is paused, the || button
resumes the slideshow. When viewing a userinterface menu (see Menu button), this button
Copyright© 2002-2003 Pacific Digital Corporation Page 10
Page 14

functions as the “Select” key to select a photo or
menu option.
Reverse (◄) During a slideshow, press the ◄ button to
transition to the previous photo in the slideshow.
When viewing a user-interface menu (see Menu
button), use this button to highlight the previous
menu option.
On/Off Switch The On/Off Switch is the main power control for
the MemoryFrame. Be sure that the power is Off
before plugging in or unplugging MemoryFrame
from the wall socket. This will help protect the
electronics from possible power surge damage.
Power Connector The Power Connector is the connection point for
the supplied power adapter, and is used to
provide main power to the MemoryFrame. The
input is 12 VAC developed through the supplied
AC power adapter.
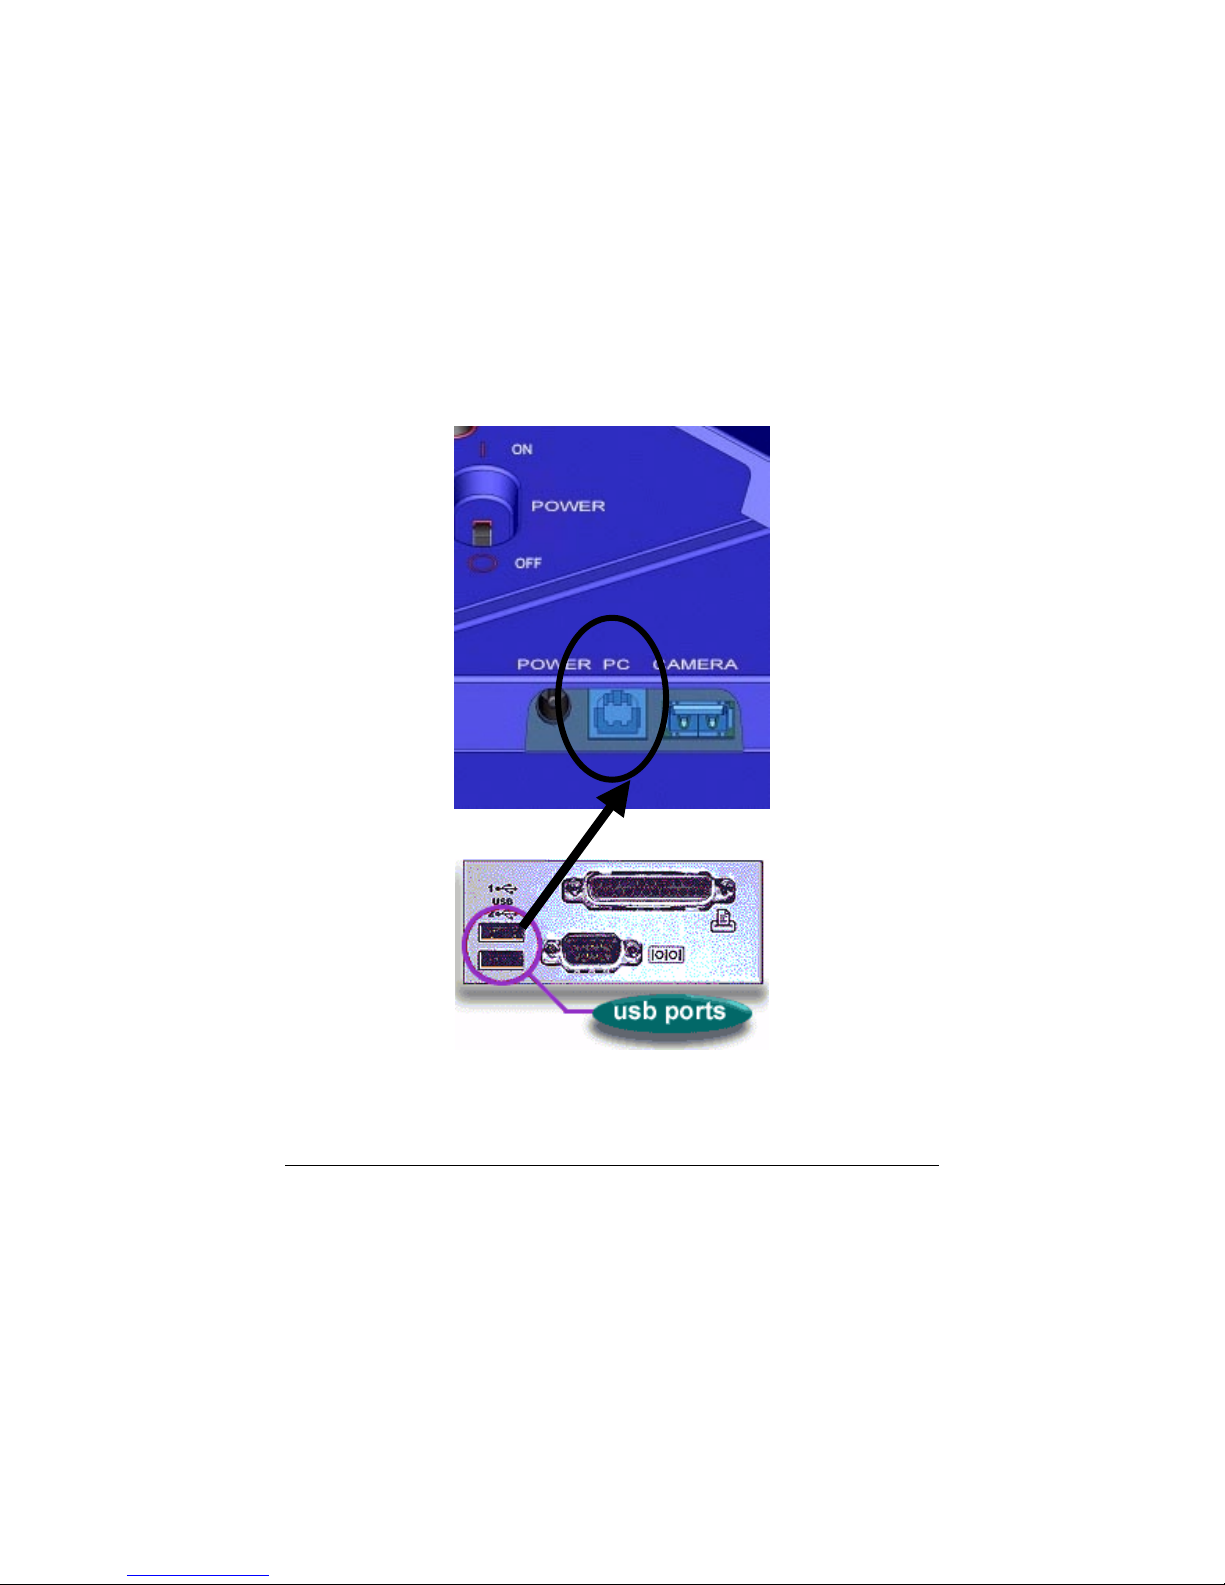
USB Connectors There are 2 USB connectors as shown in Figure
4 on the following page. The one marked
“Camera” is used to transfer images from a
camera or USB memory-card-reader. The one
marked “PC” is used to transfer shows to/from a
PC running the bundled Digital PixMaster
software.
Figure 4 – Power & USB Connectors
Copyright© 2002-2003 Pacific Digital Corporation Page 11
Page 15

Menu When using MemoryFrame without a PC, this
button is used to download directly from a
camera and to select and set the organization of
the MemoryFrame slide show.
Increase Contrast MemoryFrame is easy to adjust for different
ambient lighting conditions. With the slideshow
in operation, adjust the contrast to create the
optimum display setting. Use this button to
increase the contrast of the image currently in
the display. One button press will increase the
contrast by one step. If the user presses and
holds the button, after one second the contrast
will increase at a rate of one step each half-
second until maximum contrast is achieved.
Note: the Contrast buttons respond only when
MemoryFrame is displaying a slideshow, and do
not respond while in the Menu system.
Decrease Contrast Use this button to decrease the contrast of the
image currently in the display. One button press
will decrease the contrast by one step. If the
user presses and holds the button, after one
second the contrast will increase at a rate of one
step each half-second until minimum contrast is
achieved. Note: the Contrast buttons respond
only when MemoryFrame is displaying a
slideshow, and do not respond while in the
Menu system.
Wall Mount Slots There are two wall mount slot locations; one for
portrait and one for landscape orientation. The
slots will accept a standard #8 wood screw
(.164inch / 4.17mm diameter).
Screen Displays your pictures in vivid color. Your
MemoryFrame screen is made of glass and
should be treated with care. See Section 10.2 for
care and cleaning.
Kensington® Lock MemoryFrame has a receptacle that accepts a
locking system to add protection and security
when used in business environments. (See
Chapter 10.3).
Copyright© 2002-2003 Pacific Digital Corporation Page 12
Page 16

6. Using MemoryFrame with a Personal Computer
Although MemoryFrame does not require a PC, many digital camera
users will want to take advantage of their personal computer’s power,
memory, user interface, and photo editing software. The PC can be used
to edit, enhance, and archive photos and other images. Using a PC, you
can simply and easily download images to your MemoryFrame. You can
organize a personalized photo show and quickly transfer it to/from the
MemoryFrame using USB. In this usage scenario the PC is momentarily
connected directly to the MemoryFrame with the USB cable that was
provided in the box with the unit.
After transferring photos, the MemoryFrame does not need to remain
connected to the PC via the USB cable in order to display the photo
slideshow. For example, after transferring photos, the MemoryFrame
can be disconnected from the USB cable and moved to a different room
for display. Alternatively, if the display location for the MemoryFrame
is near the PC, you can leave the MemoryFrame connected to the PC as
may be the case in a home office or at work.
6.1 Digital PixMaster™ PC Software Overview
TM
A PC communicates with the MemoryFrame using Digital PixMaster
software. The Digital PixMaster software runs on your computer and is a
special application (also provided in the box on a CD) used to control
and configure MemoryFrame. Digital PixMaster uses a special USB
driver to communicate (also provided on the CD). PixMaster is an
innovative solution that is incredibly easy to use, while offering key
features, such as the ability preview slideshows, rotate photos, specify
transition effects, and create/name/save unique slideshows from your
vacations, sporting events, family functions, etc. The software presents a
graphical user interface that allows you to do the following:
• Easily create professional looking photo slideshows to be
displayed on the MemoryFrame. Choose the pictures, choose
the times & transitions and let Digital PixMaster do the rest. The
software easily allows you to create custom slideshows that
integrate photos from both your camera as well as images stored
anywhere on your PC. Simply drag & drop the desired photos
for a particular show into
software can import the following picture formats: JPEG, TIFF,
BMP, PNG, or GIF.
Digital PixMaster. Digital PixMaster
Copyright© 2002-2003 Pacific Digital Corporation Page 13
Page 17

• Retrieve an existing slideshow from the MemoryFrame and
store it on a PC with a name of your choosing for later use
(example: you can save a slideshow as HawaiiVacation.pd).
• Quickly transfer the slideshows that you created on your PC
using the Digital PixMaster application into the MemoryFrame
via USB for instant viewing enjoyment.
• Digital PixMaster also allows you to upgrade the software in
your MemoryFrame as new features and enhancements become
available (see Upgrading your MemoryFrame software in
Chapter 14).
6.2 Minimum PC System Requirements
Digital PixMaster™ has the following minimum system requirements:
• IBM compatible PC
• Pentium II 200MHz or higher with at least 64 MB of memory.
Pentium III 300MHz or higher recommended for optimum
performance
• Microsoft Windows® XP, Windows® 2000, Windows® 98SE,
or Windows® ME
• Mouse (to drag & drop photos)
• USB port (either USB 1.1 or USB 2.0)
• VGA compatible display (or higher)
• 10MB of hard-disk space for software installation, and 50MB for
storage of slideshows. Slideshows can be stored on any media
(examples: HDD, ZIP, CD-RW, DVD, etc.)
6.3 Installing Digital PixMaster™ PC Software
Place the software CD-ROM that came with MemoryFrame in your PC’s
CD-ROM drive. If your Windows®PC is configured to auto-run, the
Install-Shield wizard for Digital PixMaster should automatically start
within one minute.
Copyright© 2002-2003 Pacific Digital Corporation Page 14
Page 18

Figure 5 –Digital PixMaster Setup Program
Follow the on screen instructions to install Digital PixMaster to your
PC’s hard-drive.
If however, the InstallShield Wizard does not automatically start to
install after one minute, click your mouse on START, then RUN, then
browse to your CD drive and select SETUP.EXE from the CD drive to
run. Finally, follow the on-screen instructions to install the Digital
PixMaster software application to your PC’s hard-drive.
After the installation is completed, the Digital PixMaster icon will
automatically be located on your Windows Desktop.
Figure 6 – Digital PixMaster Icon
Digital PixMaster
To start Digital PixMaster double click on the icon.
Copyright© 2002-2003 Pacific Digital Corporation Page 15
Page 19
6.4 Installing MemoryFrame’s USB Drivers
MemoryFrame has custom USB drivers from Pacific Digital that are
shipped to you on the same software CD as Digital PixMaster. To load
them, boot your Windows PC, and after Windows has completely
loaded, simply connect your PC to your MemoryFrame with the USB
cable that was provided in the box with the unit.
Connect the larger “standard USB” connector to the USB port of the PC.
Connect the smaller “mini-USB” connector to the “PC” connector of the
MemoryFrame. Figure 7 shows the location of the “PC-toMemoryFrame” connector on the back of MemoryFrame.
MemoryFrame
PC
Figure 7 – Connecting a PC to MemoryFrame
Copyright© 2002-2003 Pacific Digital Corporation Page 16
Page 20
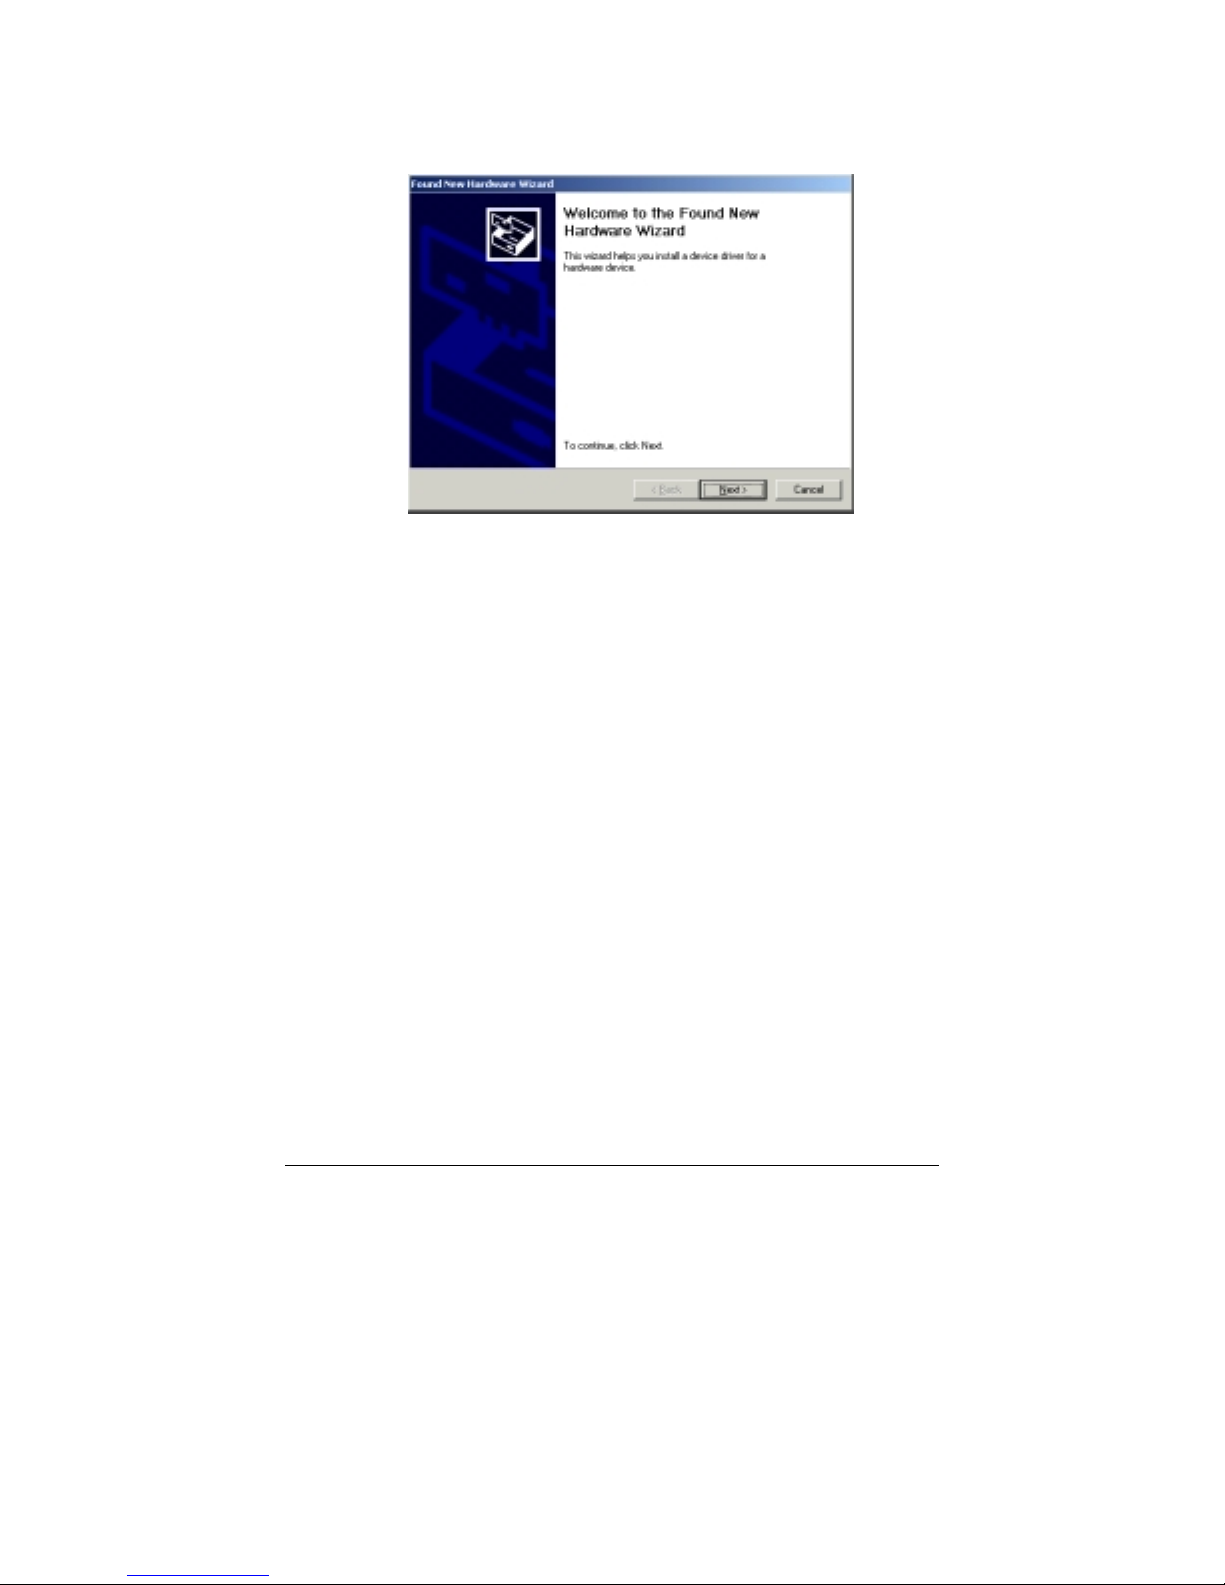
After connecting, the Windows® Hardware Wizard will detect the
MemoryFrame. When the Hardware Wizard begins, the following
screen should be displayed:
Figure 8 – Windows Hardware Found Wizard
Click Next to begin installation.
The next step is INSTALL HARDWARE DEVICE DRIVERS. To do
so, select the install method for the “Digital Picture Frame”. Select
“Search for suitable driver for my device” and click Next to continue
installation.
Next, in the LOCATE DRIVER FILES screen, select the device where
the MemoryFrame “Digital Picture Frame” USB driver can be found.
The MemoryFrame “Digital Picture Frame” USB driver resides on the
Digital PixMaster software CD. Insert the CD-ROM into the appropriate
device and select the CD-ROM drive checkbox. Then click on Next to
continue the installation.
After Windows® finds and installs the driver, the COMPLETING THE
NEW HARDWARE WIZARD screen will be displayed. Click on
Finish to complete the installation.
Copyright© 2002-2003 Pacific Digital Corporation Page 17
Page 21

Some older versions of Windows® require a system restart. If so, you
will see the following screen. If this screen is displayed, click on Yes to
restart the system.
Figure 9 – Windows Settings Change Message
If the above screen is not displayed, the system does not need to be
restarted.
Note: Once the MemoryFrame USB driver is installed the “Pacific
Digital MemoryFrame MF-570” USB device will be listed as an
“Imaging Device” in the imaging devices section of the Windows®
Device Manager.
6.5 Using Digital PixMaster™ to Create Slideshows
The PC does not need to be connected to the MemoryFrame to create
slideshows. You don’t need to connect the USB cable until you want to
transfer slideshows from the PC to your MemoryFrame, or when you
want to transfer a slideshow from MemoryFrame back to your PC.
The Digital PixMaster icon should be located on your Windows Desktop.
To start Digital PixMaster double click on its icon. By default, Digital
PixMaster will open an empty slideshow and also launch the Windows®
Explorer program to your MyPictures directory. In the figure below, the
Digital PixMaster program is open on the left, while MyPictures
directory is shown on the right.
Copyright© 2002-2003 Pacific Digital Corporation Page 18
Page 22

Figure 10 – Digital PixMaster Empty Show
Digital PixMaster lets you create a complete slideshow of up to 55
images for download to MemoryFrame.
In the Windows® Explorer program (which by default will point to your
MyPictures directory) locate the photo images (JPEG, TIFF, BMP, PNG,
or GIF) that you want to download onto your MemoryFrame frame.
Digital PixMaster supports “drag and drop,” so simply select one or more
photos (up to 55 maximum) from any location on your hard-drive and
“drag and drop” over to the Digital PixMaster application window.
Digital PixMaster also supports “paste from clipboard,” to allow simple
selection of one or more photos from the Internet, email, your hard-drive,
or any other storage device in your PC. Use the Windows “Copy”
function, then “Paste” the images into the Digital PixMaster application
window.
The original image files on your PC will be left unmodified, and a resized copy of the image will be added to the Digital PixMaster
file. The original high-resolution photo files will remain in the directory
where they were.
You can also select photos from any application, directory, CD, DVD,
etc. to import via “drag and drop” or “copy/paste” into your slideshow.
Simply find the images that you want to include in the slideshow.
slideshow
Copyright© 2002-2003 Pacific Digital Corporation Page 19
Page 23

Repeat this process until you have selected all of the images (up to 55)
that you wish to add to this particular slideshow. The figure below
shows an example of a Digital PixMaster slideshow after pictures have
been imported via “drag and drop” from other applications and
directories.
Figure 11 – Digital PixMaster slideshow
Shown below each photo is the slide number, the time duration the
photo will be displayed, and whether or not a transition effect has
been selected for that photo.
6.5.1 Application Commands and Pull-Down Menus
Across the top of the Digital PixMaster application are the pull-down
menus: File, Edit, View, MemoryFrame, and Help. All of the commands
(except those in the MemoryFrame pull-down) can be performed on the
PC without the need for a MemoryFrame to be connected. This allows
you to create slideshows on any PC. The Figure below shows the various
options under the File, Edit, and View pull-down menus.
Copyright© 2002-2003 Pacific Digital Corporation Page 20
Page 24

w
File Edit View
ew Ctrl-N Undo Delete Ctrl-Z
N
Open… Ctrl-O Cut Ctrl-X Status Bar
C
lose Ctrl-F4 Copy Ctrl-C Toolbar
S
ave Ctrl-S Paste Ctrl-V
Save A
P
Rec e nt F ile s I
Ex
R
Im
s… Delete D el
references… Select All Ctrl-A
nsert… Ctrl-I
it Alt-F4 Hide Image Ct rl-H
otat e 90° Ctrl-R
age Properties Ctrl-P
Preview S l idesho
Table 1 – Application Commands: File, Edit, View
6.5.2 Naming and Saving Slideshows
You can create, name, and save hundreds of different slideshows on
your PC (e.g. Graduation, Hawaii, Little League, Football, Soccer,
Wedding, Lakers, Church, etc.). Each can be quickly downloaded to
MemoryFrame over USB. To save a slideshow that you have
created, click on File then select “Save” or “Save As” to save the
slideshow to your hard drive under a name of your choosing. The
file extension for MemoryFrame slideshows created with Digital
Pixmaster is the “.pd” extension. Using the “Save As” function,
you can create variations of a slideshow that differ by one or more
photos.
Digital PixMaster can have only one slideshow open at one time. If
you choose to open a new blank slideshow while another is already
open, the program will close the first one (asking you if you want to
save first) before opening the new blank one. Additionally, you can
open existing slideshows that you had previously saved.
6.5.3 Removing an image from a slideshow
There are three ways to remove an image from a slideshow. The
first method is to Right-Click on the image that you wish to remove,
and select Delete or Cut. The other method is to first select the
image to be removed by using Left-Click. Then, click EDIT, and
Copyright© 2002-2003 Pacific Digital Corporation Page 21
Page 25

select either Delete or Cut to remove the Image from the slideshow.
Alternatively, you can press the delete key on your keyboard. Cut
will make the image available in the Windows Clipboard for
subsequent Paste.
6.5.4 Inserting an image into a slideshow
In addition to the Drag&Drop and Paste functions discussed earlier,
you can also Insert an image from a directory or storage device with
the “Insert Image from File” option available in the Edit menu. This
option will ask you to specify the location or Browse to find.
6.5.5 Rotating an image in a slideshow
Some of your pictures will have been taken with the camera in a
horizontal position, and others in a vertical position. The Rotate 90º
option is under the Edit menu (or Right-Click menu) and allows you
to set the proper orientation to display any particular photo. When
you select Rotate 90º, Digital PixMaster will rotate the currently
selected picture 90º to the right. Select the image you wish to rotate
and then rotate it as many times as necessary until you reach the
desired orientation.
6.5.6 Hiding an image in a slideshow
You may not want to delete an image from a slideshow, but still not
want to display it in that slideshow. Selecting Hide Image from the
Edit menu allows you to hide that particular slide. This setting can
also be reversed to unhide the slide in the show. This option can
also be selected from the Image Properties screen discussed below.
6.5.7 Copying images from one slideshow to another
Since Digital PixMaster can have only one slideshow open at one
time, you must open/start another session of Digital PixMaster (by
double clicking on its icon again or invoking from the Windows
Program list), in order to copy images from one slideshow to
another show. With two instances of Digital PixMaster running,
you can copy & paste images from one show to another.
6.5.8 Image Properties: Transition Effects and Timings
Digital PixMaster features a wide variety of transitions between
images. Selecting Image Properties from the Edit menu allows you
to assign transitions, fill colors, and set the slide display duration
Copyright© 2002-2003 Pacific Digital Corporation Page 22
Page 26

time for each individual slide (or apply to all slides). Figure 12
below shows the Image Properties screen.
Figure 12 – Image Properties
Fill Color: The program will fill any unused portion of the
screen with a background of your choosing from the list of
colors. This reduces the “black bar” effect seen when pictures do
not have the same 4:3 proportion as the MemoryFrame screen.
See section 10.1 for details.
Transitions: Seven (7) transitions are available. The transitions
in your MemoryFrame may differ from those listed below
depending on the version of software shipped with your
MemoryFrame. Check our website for software upgrades.
None: The next image simply appears replacing the
previous.
Wipe Down: The next image wipes down from the top of the
screen.
Wipe Right: The next image wipes from the left of the
screen towards the right side.
Box out: The next image appears from center in a small box
and expands towards the edges of the screen.
Copyright© 2002-2003 Pacific Digital Corporation Page 23
Page 27

Tile Fill Down: The old image is tiled over as the new image
wipes down from the top.
Tile Box out: The old image is tiled over as the next image
appears from center and expands towards edges to replace the
previous.
Diagonal Fill: The next image overwrites with diagonal
stripes to replace the previous.
Timings: The Image Properties in the Edit menu also allows
you to set the time that each slide will display.
Once you have selected the desired settings you can then Apply to the
individual slide selected, or you can Apply to All to make the settings
apply to all the images in the slideshow.
6.5.9 Preview Slideshow
Now that your slideshow is configured with your selected transitions and
fill-colors, you can preview how the slideshow will appear in either
landscape or portrait mode on the MemoryFrame before sending.
Selecting “Preview Slideshow” from the View menu will present the
slideshow in a window using your transition and timing selections. This
function is also available by clicking on “preview-slideshow” icon (
)
in the toolbar.
6.5.10 Portrait/Landscape Modes
MemoryFrame supports both portrait (vertical) or landscape (horizontal)
orientations. You can select whether your slideshow should be
configured in either Portrait or Landscape modes. When you send the
slideshow to MemoryFrame it will automatically program
MemoryFrame for the orientation you selected. This function is
available by clicking on “{Portrait/Landscape” icon (
) in the toolbar.
6.5.11 Preferences
The Preferences menu allows you to control two settings: 1) how often
the program will automatically check the Internet to see if updated
versions of MemoryFrame software are available for download (see
section 6.7), and 2) whether or not to always remind you “to put
MemoryFrame into slideshow mode” before communicating (send,
receive, update, etc.). To control these settings, click on File then select
Copyright© 2002-2003 Pacific Digital Corporation Page 24
Page 28

“Preferences.” After making changes, click on “Apply” then “OK” to
save the new preferences settings.
Updates to MemoryFrame software can be downloaded and installed
automatically. By default, Digital PixMaster will automatically search
the Pacific Digital website once a week for updates. The automatic
update schedule can be altered through the "File/Preferences" menu
option. This Internet Update method can save a considerable amount of
time compared to downloading the software updates manually.
6.6 Transferring Slideshows to/from MemoryFrame
The next Figure below shows the various options under the
MemoryFrame and Help pull-down menus. The three (3) commands in
the MemoryFrame pull-down menu involve communication with the
MemoryFrame and can only be performed when a MemoryFrame is
connected to the PC.
MemoryFrame Help
S
end Sli des how Con tents
R
etrieve Slides how Internet Updat es
U
pdate Firmware About MemoryFrame…
A
bout Digital P i xM as ter…
Figure 13 – Additional Application Commands
Copyright© 2002-2003 Pacific Digital Corporation Page 25
Page 29

Note: Exit any on-board-button menus and return to displaying the
current slideshow. This will place the MemoryFrame in the mode
that is required to communicate with the PC.
When the MemoryFrame is connected to a computer running Digital
PixMaster with its USB drivers, the MemoryFrame accepts and
processes communication from the computer. Digital PixMaster can
retrieve the current slideshow in MemoryFrame to the PC (retrieve) for
saving or editing, or it can replace the slideshow in the MemoryFrame
with a new one from the computer (send).
To transfer slideshows from the PC to your MemoryFrame or from
MemoryFrame back to your PC, you must first connect your PC to the
MemoryFrame with the USB cable that was provided in the box with the
unit.
Connect the larger “standard USB” connector to the USB port of the PC.
Connect the smaller “mini-USB” connector to the “PC” connector of the
MemoryFrame. See Figure 7.
Important! For the PC application (Digital PixMaster) to communicate
to your MemoryFrame, you first need to prepare your MemoryFrame for
communicating to a PC, as described in the section below.
Preparing MemoryFrame to Communicate to a PC
The MemoryFrame cannot be managed or communicate with a PC
while it is in the Menu system mode. In all cases, you must be in
photo slideshow Display mode for Digital PixMaster to
communicate. Exit any on-board button menus and return to
displaying the current slideshow. This will place the MemoryFrame
in the mode that is required to communicate with the PC.
Getting the current slideshow from the MemoryFrame
From the “MemoryFrame” pull-down menu of Digital PixMaster,
select Retrieve-Slideshow to get the current slideshow from the
MemoryFrame. This function is also available by clicking on
“retrieve-slideshow” icon (
) in the toolbar. When the
MemoryFrame receives the Retrieve-Slideshow command it
transfers the current slideshow photos (and associated delay times,
fill-colors, delays, etc.) from its memory to the PC. Once complete,
you can save or edit this show.
Sending slideshows to the MemoryFrame
Copyright© 2002-2003 Pacific Digital Corporation Page 26
Page 30

Important! Because MemoryFrame will overwrite an existing
slideshow if a new one is sent to it, you may want to first Retrieve the
existing show to your PC for saving on your PC hard drive before
sending a new one.
First open the show you want to send on the PC. From the
“MemoryFrame” pull-down menu of Digital PixMaster, select
Send-Slideshow. This function is also available by clicking on
“send-slideshow” icon (
) in the toolbar. This will send your PC
slideshow to the MemoryFrame. When the application sends the
Send-Slideshow command, the MemoryFrame will erase its current
slideshow, then read in the new show over the USB connection
from the PC and save it into its onboard memory.
After you click on Send, Digital PixMaster will display a progress
bar to indicate the transfer of the new images to MemoryFrame.
Important! When the progress bar is complete, it only signifies that the
file has been transferred, but not yet stored in memory. This is just the
beginning of the MemoryFrame’s actual process of updating its
Slideshow, so do not turn off the power
After the transfer is complete, the MemoryFrame will erase the
current slideshow portion of its memory and program in the new
slideshow image. You must wait up to one (1) minute for the frame
to complete the slideshow change.
Important! Do not unplug or cut power to the MemoryFrame or PC
during the send slideshow process!
Once the new slideshow has been loaded into the MemoryFrame’s
storage memory, the MemoryFrame will indicate it is done by
displaying the first new image of the slideshow. A power-cycle is
not required.
6.7 Help - Internet Updates
Updates for Digital PixMaster software, the USB Driver, and the
MemoryFrame’s firmware can be downloaded and installed
automatically. By default, Digital PixMaster will automatically search
the Pacific Digital website once a week for updates. The automatic
update schedule can be altered through the "File/Preferences" menu
option (see Preferences section 6.5.11). Checking for updates can be also
invoked at anytime by clicking on Help then select “Internet Updates.”
Copyright© 2002-2003 Pacific Digital Corporation Page 27
Page 31

Note: Your computer must be already be connected to (or dialed
into) the Internet for the program to be able to locate the update
website. If not, you will receive a message saying “Cannot locate the
update website”
If newer updates are available, the following screen will appear.
6.8 Help - About MemoryFrame
This allows you to see what version firmware your MemoryFrame is
currently running. The MemoryFrame must be attached to your
computer for this function to be available. If your MemoryFrame is not
attached, this function will be “grayed out” (not available for selection).
Simply click on Help then select “About MemoryFrame.”
6.9 Help - About Digital PixMaster
This allows you to see what version of Digital PixMaster software your
computer is currently running. Simply click on Help then select “About
Digital PixMaster.”
6.10 Exiting Digital PixMaster
Choosing Exit from the File menu will exit the Digital PixMaster
program. If you have an unsaved slideshow file currently open, the
program will ask you if you want to save it before exiting the program.
Clicking on the close window box (x) in the upper right corner will also
exit the Digital PixMaster program.
Copyright© 2002-2003 Pacific Digital Corporation Page 28
Page 32

7. Connecting a Camera to the MemoryFrame
For those who wish to bypass their PC, MemoryFrame can also be
connected directly to USB digital cameras that support the USB Mass
Storage Specification (see Chapter 12). In this mode, the Photos stored
in the camera must be in JPEG format (not TIF or other camera formats).
In this mode, independent of a PC, MemoryFrame is capable of
downloading JPEG formatted pictures, changing the resolution of the
pictures to match that of the MemoryFrame display, storing the pictures
in nonvolatile memory, and displaying the downloaded pictures with user
specified durations and transitions.
Important! To transfer slideshows from the Camera directly to your
MemoryFrame, you first need to prepare your MemoryFrame for
communicating, as described in the section below.
Preparing MemoryFrame to Communicate to Camera
The MemoryFrame is a single function device; this means that it cannot
be managed or communicate with a camera while it is displaying a slide
show. In all cases, you must stop the slideshow by pressing the Menu
Button. This will place the MemoryFrame in the Menu System mode
that is required to communicate with the Camera.
Important! Make sure that the camera’s memory-card is already
inserted into the camera before connecting the USB cable.
Next, connect the MemoryFrame directly to the USB digital camera
using the USB cable that was provided by the camera manufacturer (i.e.
the cable that came with your camera).
To use a camera, connect the “micro-USB” connector to the camera’s
USB port. Then connect the “Standard USB” connector to the “Camera”
connector of the MemoryFrame. See Figure 14.
Copyright© 2002-2003 Pacific Digital Corporation Page 29
Page 33

Figure 14 – Connecting a Camera
The MemoryFrame is capable of displaying the pictures found in the
camera and allows you to download pictures from the camera directly
into the MemoryFrame until the internal memory of the MemoryFrame is
full.
Important! The camera will need to be set into the appropriate mode to
transmit its pictures. Many cameras have two modes of operation:
proprietary and standard (driver-less) mode, and the camera has menu
items and/or buttons that set the USB mode. The standard (driver-less)
makes the camera look like a drive-letter to Windows Explorer without
the need for the camera manufacturer's custom driver. This standard
driverless mode (called “disk-drive” mode by some cameras) is required
to interface to MemoryFrame. See your camera’s user manual for details
of how to prepare your camera for driver-less USB transfers.
Copyright© 2002-2003 Pacific Digital Corporation Page 30
Page 34

After the camera is connected, use the MemoryFrame’s onboard Menu
System (described in Chapter 9 of this manual), and select the
“Download Pictures” option from the Main Menu.
Follow the onscreen instructions for transferring images to
MemoryFrame from the camera and for setting the display times and
transitions. More information on navigating the menu system is
described in the Camera Download section of Chapter 9, the
MemoryFrame Menu System chapter.
Copyright© 2002-2003 Pacific Digital Corporation Page 31
Page 35

8. Connecting a USB Card-Reader to MemoryFrame
If you have a Camera that is not compliant with the USB Mass Storage
specification, you can still bypass your PC by using MemoryFrame
directly with USB memory-card readers that support the USB Mass
Storage Specification (see Chapter 12).
Important! To transfer slideshows from the Memory Card Reader
directly to your MemoryFrame, you first need to prepare your
MemoryFrame for communicating, as described in the section below.
Preparing MemoryFrame to Communicate with Card-Readers
The MemoryFrame is a single function device; this means that it cannot
be managed or communicate with a card reader while it is displaying a
slide show. In all cases, you must stop the slideshow by pressing the
Menu Button. This will place the MemoryFrame in the Menu System
mode that is required to communicate with the USB memory-cardreader.
Important! Make sure that the memory-card is already inserted into
the card reader before connecting the USB cable to the
MemoryFrame.
Next, connect the MemoryFrame directly to the USB memory-card
reader using the USB cable that was provided by the card-reader
manufacturer (i.e. the cable that came with your reader).
To do this with a USB memory-card reader, connect the USB connector
of the card-reader’s USB cable to the “Camera” connector of the
MemoryFrame. See Figure 15.
Copyright© 2002-2003 Pacific Digital Corporation Page 32
Page 36

Figure 15 – Connecting a Card-Reader
The MemoryFrame is capable of displaying the JPEG pictures found in
the reader’s memory cards and allowing the user to download pictures
from the reader directly into the MemoryFrame until the internal memory
of the MemoryFrame is full.
Copyright© 2002-2003 Pacific Digital Corporation Page 33
Page 37

After the card reader is connected, use the MemoryFrame’s onboard
Menu System (described in Chapter 9 of this manual), and select the
“Download Pictures” option from the main menu.
Note: The on-board menu system options for “Download Pictures
from Camera” are also used for card readers.
Follow the onscreen instructions for transferring images to
MemoryFrame from the reader and for setting the display times and
transitions. More information on navigating the menu system is
described in the Camera Download section of Chapter 9, the
MemoryFrame Menu System chapter.
Copyright© 2002-2003 Pacific Digital Corporation Page 34
Page 38

9. MemoryFrame Menu System
When the user presses the Menu button, the MemoryFrame enters the
Management mode menu. This menu system, which is controlled by
pushing the buttons on the top of the MemoryFrame, allows you to use
the MemoryFrame without a PC to download and configure slideshows
by simply using the buttons on the top of the MemoryFrame unit. In this
mode, the user may download new slideshows, alter the current slide
show, or change MemoryFrame options as described in the following
sections.
9.1 Menu Navigation
When you enter the menu system, the MemoryFrame changes the usage
of three of the buttons: Forward (►), Pause/Select (
(◄).
|| ) and Reverse
Menu Control Buttons
Menu Button
Figure 16 – Menu Buttons
Copyright© 2002-2003 Pacific Digital Corporation Page 35
Page 39

While in the Menu system, these buttons are used to navigate through the
MemoryFrame management menus and to execute the various
management functions as follows:
Forward (►) While in the Menu system, pressing the Forward
(►) button will move the item selector either
down to next menu text line, or to the right to
next thumbnail, depending upon the current
menu context.
Pause/Select ( || ) While in the Menu system, the ( || ) button
functions as the “select” key to select a
thumbnail or to select and execute a text menu
option.
Reverse (◄) While in the Menu system, pressing the Reverse
(◄) button will move the item selector either up
to the prior menu text line, or to the left to the
prior thumbnail, depending upon the current
menu context.
The basis of operation is that the MemoryFrame will highlight the
currently selected item in one of two ways. If the item is a thumbnail,
the selected thumbnail will be designated by an outline. If the material is
text, the selected text option will be highlighted in a different color than
the rest of the menu. This highlight is called the selector. Once the
appropriate item has been highlighted, you can press Pause/Select ( || ) to
perform the selected function.
9.2 Main Menu
When you press the Menu button during a slideshow, the
MemoryFrame™ will stop displaying the slideshow and enter the menu
system into the “Main” Menu. Figure 17 is a sample of the Main Menu
screen.
Copyright© 2002-2003 Pacific Digital Corporation Page 36
Page 40

Main Menu
RReessuummeeSSlliiddeeSShhoow
w
Configure Pictures
Retrieve Pictures from Camera/Reader
Fill MemoryFrame from Camera/Reader
Delete All Pictures in Memory
Change Orientation to: Portrait
Figure 17 Main Menu
The first and last two items in the main menu execute the listed task,
while the 2
the described function. Each of the options in the main menu are
described below. Once in the Menu system, hitting the Menu button
again will return you to the slideshow.
9.2.1 Resume Picture Show
nd
– 4th items in the main menu each launch a sub-menu for
When you wish to exit the Menu system, you can either push the Menu
button again or alternatively use the appropriate button (Forward (►) or
Reverse (◄) ) to highlight the Resume Picture Show menu selection and
then press the Pause/Select ( || ) button. This will resume the slideshow
from the last picture that was displayed before entering the Menu system.
9.2.2 Delete All Pictures in Memory
Selecting this will cause all stored pictures in the MemoryFrame to be
permanently deleted. One may wish to do this if the goal is to
subsequently fill the entire Memoryframe from a camera or card-reader
(See section for “Fill MemoryFrame from Camera/Reader”).
9.2.3 Change Orientation to: Portrait or Landscape
The stand on the back of the MemoryFrame is designed to support the
MemoryFrame in either the portrait (vertical) or the landscape
Copyright© 2002-2003 Pacific Digital Corporation Page 37
Page 41

(horizontal) orientation. The default position is Landscape (horizontal).
After you stand the MemoryFrame into the desired position, you will
need to select the appropriate choice in the menu option to match the
orientation by pushing the Pause/Select ( || ) button after highlighting
this menu option. Upon selection, your MemoryFrame frame will
automatically rotate all its menus and stored slideshow pictures from
horizontal to vertical or vice-versa.
9.2.4 Picture Configuration Menu
This menu lets you set or change the same settings as the Digital
PixMaster PC Application allows you to set/change. This allows you to
use the MemoryFrame without a PC, or change settings originally set
with the PC application with the on-board button Menu system. This
method is not as fast as the PC. To enter the Picture Configuration submenu, highlight the Picture Configuration Menu entry by using the
Forward (►) or Reverse (◄) button and then press the Pause/Select ( || )
button.
Important! On any menu that has thumbnail images, the
thumbnails will take a few moments to appear, and you will be
unable to select a picture or move the highlight until ALL of the
thumbnails have appeared in their entirety.
Selecting this menu option will cause the menu being displayed to
change from the Main Menu to a sub-menu called the Picture
Configuration menu. For this menu, the focus is initially on thumbnails
of the stored pictures as depicted in the Figure 18.
CONFIGURATION MENU
PRESS REVERSE, FORWARD,
SELECT
Figure 18- Configure Pictures Menu
Copyright© 2002-2003 Pacific Digital Corporation Page 38
Page 42

In this menu, you are first presented with a thumbnail view of three (3)
of many pictures stored in the MemoryFrame. If you have marked any
of the pictures as hidden (with either the PC application or in this menu
system), the hidden pictures will be displayed in normal sequence with
the word “Hidden” appearing over or near the picture.
You can navigate through the pictures using the Forward (►) and
Reverse (◄) buttons. Since the MemoryFrame can hold 50+ pictures,
this display of three (3) thumbnails serves as a window into the
MemoryFrame’s picture memory. When you navigate past the third
picture on the screen, the program will render the next three (3)
thumbnails, and so on until the last picture is displayed. At this point the
Forward (►) navigation button will not let you advance past the last
picture. Conversely, when you use the Reverse (◄) button to navigate to
a picture prior to the currently displayed thumbnails, the prior three (3)
thumbnails will appear on the screen, and so on until the first picture is
displayed. When you have reached the beginning of your pictures, the
Reverse (◄) navigation button will not let you navigate back any further.
Changing a Picture’s Display Characteristics
When you press ‘Select’ to select a picture, the menu options for
that picture will appear and apply to that picture only. This submenu allows you to set the attributes of your slideshow without a
PC (the time the photos are displayed, the photo transition effects,
as well as the ability to hide and delete photos, etc).
First, find a picture where you want to change either the time
displayed, transition effect, hide, or delete it. Then, press the
Pause/Select ( || ) button. After the Pause/Select button is pressed,
the MemoryFrame will display the Picture Configuration menu
choices underneath the thumbnail display.
The picture configuration menu items presented for the
selected
photo are:
Return to Main Menu
Rotate 90º
Delete
Hide/Show
Set Transition Effect
Set Transition Delay
Set Background (fill) Color
Cancel
Copyright© 2002-2003 Pacific Digital Corporation Page 39
Page 43

Most of these settings apply only to the selected thumbnail, while
some allow you specify an option to “apply the setting to all
photos.” Each photograph in the slideshow can have different
effects, delays, etc.
Whenever these Picture Configuration menu options are displayed,
the Forward (►) and Reverse (◄) navigation buttons operate on the
menu items and not on the thumbnails. Each of these Picture
Configuration menu choices are described below.
9.2.4.1 Return to Main Menu
When you want to exit the Picture Configuration sub-menu, select
“Return to Main Menu.” This will bring you back to the Main Menu
from where you may resume the slideshow. Hitting the Menu button at
anytime will return you to the slideshow mode.
9.2.4.2 Rotate 90º
Your pictures may have been taken with the camera in either horizontal
or vertical position. The Rotate 90º option allows you to set the proper
orientation to display any particular image. When you select Rotate 90º,
the MemoryFrame will rotate the currently selected picture 90º to the
right. First select the thumbnail image you wish to rotate and then push
the Pause/Select button as necessary to rotate the image to the desired
orientation. This will save the change into memory and then return to
thumbnail navigation mode.
9.2.4.3 Delete Picture
The Delete Picture option allows you to delete a particular image from
your MemoryFrame’s storage. Highlight the thumbnail of the image to
be deleted then push the Pause/Select ( || ) button.
9.2.4.4 Hide/Show Image
The MemoryFrame allows pictures that are stored in memory to be
hidden (not shown) when the normal slideshow is presented. This allows
the user to alter the slideshow without deleting the photo from memory.
If you have marked any of the pictures as hidden (with either the PC
application or in this menu system), the thumbnails for these “hidden”
pictures will show the word “Hidden” over the picture. Upon selection
Copyright© 2002-2003 Pacific Digital Corporation Page 40
Page 44

of the “Hidden” feature, MemoryFrame will automatically record the
change and return to the thumbnail navigation mode.
9.2.4.5 Set Transition Effect
Your MemoryFrame features seven (7) choices for transition effects
between images These are the same as those selectable with the PC
application software, Digital PixMaster. When you choose a transition
effect, this menu selection will save the changes into memory and then
return you to thumbnail navigation mode. The transitions in your
MemoryFrame may differ from those listed below, depending on the
version of software shipped with your MemoryFrame.
No Effect: The next image simply appears replacing the previous.
Wipe Down: The next image wipes down from the top of the
screen.
Wipe Right: The next image wipes from the left of the screen
towards the right side.
Box out: The next image appears from center in small box and
expands towards edges.
Tile Fill Down: The old image is tiled over as the new image wipes
down from the top.
Tile Box out: The old image is tiled over as the next image appears
from center and expands towards edges to replace the previous.
Diagonal Fill: The next image overwrites with diagonal stripes to
replace the previous.
Once selected you are given the choice to apply this Effect to either
“Only This Picture” or alternatively to “All Pictures”
9.2.4.6 Set Transition Delay (the delay between slide changes)
You can select the amount of time the selected photo image will display:
from 10 seconds to several hours. Upon selection of a time
MemoryFrame will automatically, record the change and return to
thumbnail navigation mode.
Once selected you are given the choice to apply this Time to either
“Only This Picture” or alternatively to “All Pictures”
Copyright© 2002-2003 Pacific Digital Corporation Page 41
Page 45

9.2.4.7 Set Background (Fill) Color
Your MemoryFrame will fill any unused portion of the screen with a
background of your choice from the list of colors. This reduces the
“black bar” effect seen when pictures do not have the same 4:3
proportion as the MemoryFrame screen (see Section 10.1 for more
information).
Once selected you are given the choice to apply this Color to either
“Only This Picture” or alternatively to “All Pictures”
9.2.4.8 Cancel
If you select and execute Cancel, the MemoryFrame will return you to
the thumbnail navigation mode, leaving the current picture selected.
9.2.5 Download Pictures (from USB Camera or Reader)
Important! Before selecting this item, you must first perform all the
steps in either Chapter 7 “Camera Connection to MemoryFrame”
or Chapter 8 “Card-Reader Connection to MemoryFrame.
The initial menu view for Download Pictures (from Camera/Reader) is
very similar to the prior Picture Configuration sub-menu section). The
major difference is that all the thumbnail pictures displayed are from the
Camera or USB Memory-Card reader, and not from the MemoryFrame’s
picture storage memory.
To enter this menu, highlight “Download Pictures,” and press
Pause/Select for the MemoryFrame to enter it’s picture transfer
mode (from camera or reader).
Important! This function will display thumbnail images from the
camera or Reader, and the thumbnails will take a few moments to
appear, and you will be unable to select a picture or move the
highlight until the first 3 thumbnails have appeared in their entirety.
A progress meter bar will show you the progress of the image
transfer. The higher the mega-Pixel resolution of the images, the
longer this progress may take.
If no device is attached when select this function (or if the camera
or reader is not USB Mass Storage compatible), you will get a
message that says “Device Empty/Not Connected.” If your device
is attached try again.
Copyright© 2002-2003 Pacific Digital Corporation Page 42
Page 46

Download Menu
Cancel
SSaavveettooPPiiccttuurreeFFrraamme
e
Return to Main Menu
Figure 19- Download Pictures Menu
In this mode, the user is presented with a thumbnail view of three (3) of
the many pictures in the Camera or Reader. In this menu, the pictures
reside on the USB device and NOT in the MemoryFrame yet.
You can navigate through the pictures in the Camera/reader using the
Forward (►) and Reverse (◄) buttons. The display of three (3)
thumbnails serves as a window into the camera/reader’s picture memory.
When you navigate past the third thumbnail picture on the screen, the
program will display the next three (3) thumbnail images, and so on until
the last picture is displayed. At this point the Forward (►) navigation
button will not let you advance past the last picture. Conversely, when
you use the Reverse (◄) button to navigate to a picture prior to the
currently displayed thumbnails, the screen the program will display the
prior 3 thumbnail images, and so on until the first picture is displayed.
At this point the Reverse (◄) navigation button will not let you navigate
back any further.
Note: On any menu that has thumbnail images, the menus may take
a few moments to appear, and you cannot move the highlight until
the image has completely appeared.
Selecting Camera/Reader Pictures to Transfer
First find a picture you want to copy from the Camera (or Reader)
into the MemoryFrame’s picture storage memory. Press the
Copyright© 2002-2003 Pacific Digital Corporation Page 43
Page 47

Pause/Select ( || ) button. The MemoryFrame will display sub-menu
items underneath the thumbnail display. When these options are
displayed, the navigation keys operate on the menu items and not
the thumbnails.
Now that you have selected the picture you want to transfer, you
must now select either “Save to Picture Frame” or “Cancel” to
return to thumbnail navigation. Highlight either option and press
the Pause/Select ( || ) button.
9.2.6 Fill MemoryFrame from Camera (or Reader)
This choice simply transfers as many pictures from the
camera/reader as will fit into the MemoryFrame’s memory and
eliminates thumbnail viewing and button based selection. It allows
you to start the transfer and not have to be present to interact with
the process. It is faster than selecting specific thumbnails for
transfer.
Important! Before selecting this item, you must first perform all the
steps in either Chapter 7 “Camera Connection to MemoryFrame”
or Chapter 8 “Card-Reader Connection to MemoryFrame.
To enter this menu, highlight “Fill MemoryFrame from Camera,”
and press Pause/Select for the MemoryFrame to enter it’s picture
transfer mode (from camera or reader).
A progress meter bar will show you the progress of the image
transfer. The higher the mega-Pixel resolution of the images, the
longer this progress may take.
If no device is attached when select this function (or if the camera
or reader is not USB Mass Storage compatible), you will get a
message that says “No Camera or Pictures Found.” If your device
is attached and has pictures, try again.
Copyright© 2002-2003 Pacific Digital Corporation Page 44
Page 48

10. Tips and Tricks
This chapter discusses ways to enhance your use of MemoryFrameTM.
Areas covered include: image optimization, care of the LCD screen,
securing MemoryFrame in busy environments, and changing the
decorative frame.
10.1 Optimizing images for display on MemoryFrame
The physical screen resolution of the MemoryFrame is 320 x 240 pixels.
Images larger than this will not increase detail or resolution when
displayed on the MemoryFrame.
Although a PC is not required, many digital camera users will want to
take advantage of their personal computer’s power, memory, and user
interface to edit, enhance, and archive their photos and other images.
Using the Digital PixMaster
MemoryFrame, you can organize a personalized photo show and
download it to the MemoryFrame using USB. If you do use a PC to
transfer your photos to MemoryFrame, then you will want to take
pictures at full resolution and store them on your hard-drive. The Digital
PixMaster software will automatically resize photos appropriately when
you drag & drop a photo into the application. This will not affect the
size and resolution of the original photo on your hard-drive, therefore, if
you do desire to print that photo later, you will still have the original fullresolution photo on your hard-drive.
TM
application supplied with the
To have an image fill the MemoryFrame screen completely, ensure that it
has an aspect ratio (the ratio of width to height) of 4:3 (or 3:4 for
portrait-mode vertical photos). The smallest recommended size for
photos is 320 x 240 (4:3) [or 240 x 320 (3:4) for 'portrait' photos].
Sending photos larger than these sizes will not improve their display
quality on the MemoryFrame.
If you use the DirectConnect feature to connect your camera (or USB
card-reader) directly to the MemoryFrame, you will get the best results
(fastest performance and fullest screens) by shooting pictures at either
640 x 480 or 1024 x 768. This will also increase the number of pictures
that can be stored on your Camera’s Memory Card. When the
MemoryFrame is in “Portrait mode”, photos taken at this size will have a
3:4 aspect ratio when rotated 90° for portrait orientation and will fill the
screen.
Photos larger than 640 x 480 (landscape) or 480 x 640 (portrait) will take
Copyright© 2002-2003 Pacific Digital Corporation Page 45
Page 49

longer to transfer to the MemoryFrame from cameras. Modern, multimegapixel cameras allow taking photos with incredible detail suitable for
photographic prints. However, the screen resolution of the
MemoryFrame is lower than the resolution of a photographic printer,
meaning that most of a high-resolution photograph is not needed when
copied to the MemoryFrame. When shooting photos exclusively for use
in the MemoryFrame, you can take them as small as possible without
going smaller than 640 or 320 pixels wide or tall. Small photos transfer
quickly and as long as they are not smaller than 320 pixels wide or tall,
there will be no loss in image quality.
Lower resolution photos will also speed decompression of the pictures,
improving camera-connection download and performance. In this mode,
your MemoryFrame will automatically reduce the size of large image
files to fit on the screen. Images smaller than 320 x 240 pixels will not
be enlarged.
10.2 Caring for the Screen:
As is noted in Section 4.3, the MemoryFrame is shipped with a
protective plastic film on its LCD screen. Please see Section 4.3 for
instructions on removal of the protective plastic film.
The screen on MemoryFrame is made of glass and is extremely delicate.
It can be easily scratched. Treat the screen with care and avoid touching
it. If the screen does become dirty, turn off the power and use a soft,
absorbent cloth (not tissue paper) dampened with water. Do not use
Windex or other glass cleaners to clean it unless they are specifically
recommended as LCD cleaning solutions. Please wipe off any moisture
before turning the power back on. Listed below are some additional
precautions for the LCD screen:
• LCD screen display surface never likes dirt, stains, or oil mists.
Do not use furniture polish. Do not use window cleaners, acetic
acid, chlorine compounds, or other glass cleaners to clean it
unless they are specifically recommended as LCD cleaning
solutions, as they will damage the TFT LCD display screen.
• The LCD screen scratches easily, please handle it carefully.
• Avoid applying pressure to the surface of the LCD screen, as it
may cause display non-uniformity or other functional issues.
Copyright© 2002-2003 Pacific Digital Corporation Page 46
Page 50

• Do not twist or bend the module.
• Prevent the use of unsuitable external force to the LCD display
module.
• Be sure to operate the module within the specified
temperature range (32 – 85 degrees Fahrenheit, 0-30
degrees Celsius) and keep out of direct sunlight.
• Avoid keeping the slideshow in either pause mode or menu
management mode for long periods (multiple hours) to
avoid displaying the same image continuously, as it will
cause image sticking (burn-in of the image into LCD).
• Be sure to turn Off the power before connecting or
disconnecting MemoryFrame to the external AC Adapter.
• Sudden temperature changes may cause condensation. This
can cause the LCD screen polarizer to be damaged.
• High temperature and humidity may degrade performance.
Please do not expose the module to the direct sunlight.
• Static electricity can damage the module, please do not
touch the module without first discharging any static charge
you may have.
• Do not disassemble and reassemble the module. This will
void the warranty.
• Do not expose the unit to strong vibration or shock. It may
damage the unit and void the warranty.
• When storing the unit, store the unit in suitable environment in
its original packaging.
10.3 Securing MemoryFrame in Office Environments
With its ability to mix PowerPoint slides with photos, MemoryFrame is
perfect for use in business for reception counters and desks. To keep it
secure in these high-traffic areas, MemoryFrame has a receptacle that
accepts a Kensington® compatible locking system. Many different lock
brands can be used, and are typically called “notebook computer locks”.
Copyright© 2002-2003 Pacific Digital Corporation Page 47
Page 51

This adds protection and security when used in business environments.
See Figure 20.
Figure 20 – Security Lock
10.4 How to change the decorative 5 x 7 frame
Follow these instructions to remove and reinstall your MemoryFrame
Decorative frame.
To remove decorative frames from MemoryFrame
• Read the section of the manual “Caring for the Screen”
(Chapter 9) before removing the decorative frame. Try to
avoid touching the LCD screen during this process.
• MemoryFrame has two “frame lock” tabs on the rear of the
unit. These are used to lock a decorative 5x7 frame in place.
There are two locations, one on each side. The “Locked”
position is toward the outside of the unit.
• Pick up MemoryFrame with the LCD screen facing away
from you and fold in the Stand from the rear of the
MemoryFrame. Grasp the edges of the frame with thumbs
against the “frame lock” tabs on the rear of the unit.
• Apply strong thumb pressure inward towards the center of
the frame until the frame locks are in the unlocked position.
A noticeable “click” may be heard when unlocked.
• The wood 5x7 picture frame can now be pulled away from
the face of the MemoryFrame housing.
Copyright© 2002-2003 Pacific Digital Corporation Page 48
Page 52

To install decorative frames on the MemoryFrame
• Read the section of the manual “Caring for the Screen”
(Chapter 9) before removing the decorative frame. Try to
avoid touching the LCD screen during this process.
• After removing (as described above) the wood 5x7 picture
frame that came with MemoryFrame, place your new wood
5x7 frame onto the face of the MemoryFrame housing.
• Pick up MemoryFrame with the LCD screen facing away
from you and grasp the edges of the frame with thumbs
against the “frame lock” tabs on the rear of the unit.
• Apply strong thumb pressure outward towards the edges of
the frame until the frame locks are in the locked position. A
noticeable “click” may be heard when locked.
• Fold out the Stand from the rear of the MemoryFrame.
Choose the orientation that you prefer either portrait
(vertical) or landscape (horizontal) orientation, and set the
MemoryFrame on a flat surface.
10.5 Showing PowerPoint™ Slides on MemoryFrame
You can display a combination of photos and PowerPoint™ slides
to make presentations or to use MemoryFrame as a point-ofpurchase shelf-talker. PowerPoint allows you to save your slides as
JPEG images (using the save-as function) or to be pasted into other
applications as JPEG images. After your slides have been converted
to JPEGs, simply drag & drop them (or copy & paste) into Digital
PixMaster for quick USB download to MemoryFrame. Integrating
PowerPoint slides into the photo slideshows is fun, and in business
can make MemoryFrame a valuable tool for many applications.
10.6 Disabling Pop-up Reminder Messages
Every time you click on a function in Digital PixMaster which requires
communications with the MemoryFrame, a pop-up reminder message is
displayed to remind you that the MemoryFrame must be in slideshow
mode. This pop-up reminder can become bothersome for experienced
users, so you can choose to stop displaying the pop-up reminder by
clicking the appropriate “check box” on the pop-up screen. If desired,
the reminder pop-up messages can be re-enabled through the
"File/Preferences" menu option (see part two of section 6.5.11 for
details).
Copyright© 2002-2003 Pacific Digital Corporation Page 49
Page 53

11. Purchasing New Decorative 5x7 Frames
MemoryFrame’s stylish design and unique ability to use virtually any
off-the-shelf wood 5x7 picture frame allows you to choose a frame that
matches your décor, whether it be cherry wood, walnut, oak, teak, etc.
This unique feature allows MemoryFrame to make a handsome display
in any home or office, suiting any motif.
Additional frames are available from Pacific Digital. Please see our
website for details: www.pacificdigital.com
Figure 21 – Sample 5 x 7 Frames
In addition to frames from Pacific Digital’s website, you can also
purchase standard 5x7 frames from your local store. The rest of this
section gives details on how to select a frame that is compatible with
MemoryFrame.
MemoryFrame works with many off the shelf wood 5”x7” picture
frames. The Figure below shows some examples of the types of frames
that work with MemoryFrame.
Copyright© 2002-2003 Pacific Digital Corporation Page 50
Page 54

Figure 22 – Examples of wood frames
Size of Frames that Fit MemoryFrame
The frames can be of various dimensions, but they must fit 5” x 7”
pictures. The inner dimensions of frames that fit are approximately
11.9cm x 17 cm. The outer dimensions of the frames that work can vary
by as much as 2 cm in each direction. For example, as you can see in
the Figure 22, the rear-middle frame shown is slightly wider and taller
than the rest and this is fine.
Types of 5 x 7 Frames that Fit MemoryFrame
In general, most 5 x 7 frames come in three different basic types in terms
of how the photo and the stand mechanism are retained (secured) into the
frame. These three types are briefly described below. The first two
types are not usable by MemoryFrame, and only the third type described
will fit MemoryFrame:
1. Some 5x7 frames supply retention for the photo and the stand
mechanism by having metal clips attached to the wood itself which
either swivel or bend over the stand mechanism to provide retention.
Please note, that MemoryFrame cannot use this type of frame,
so purchase only type #3 below.
2. The second type of 5x7 frames have a slot in the bottom such
that the glass, picture, and stand-mechanism all slide up from the
bottom of the frame. Please note, MemoryFrame cannot use this
type of frame, so purchase only type #3 below.
Copyright© 2002-2003 Pacific Digital Corporation Page 51
Page 55

3. The third type of 5x7 frame has a “groove” cut into the inside
perimeter of the frame, which is used by the stand mechanism to
swivel a metal clip into the groove for retention. This is the type of
frame that will work with MemoryFrame. A rear-view of this type
of required frame and the groove in the frame is shown in Figure 23.
Typically, this type of frame is made of wood, but sometimes is
made of metal or other materials.
Figure 23 – Example of groove in rear of frame
Retention Groove – Minimum Length
In the example 5x7 picture frames shown in this manual, the retention
groove extends around the entire interior perimeter of the rear of the
frame. It is not required for the groove to extend this far, but is
acceptable if it does. At minimum, the groove must be at least 1 inch in
length and be centered on each of the two short sides of the frame,
Grooves are not required on the long sides of the frame, but are
acceptable if present.
Copyright© 2002-2003 Pacific Digital Corporation Page 52
Page 56

12. Troubleshooting / FAQ
Q: I have a USB camera connected, but MemoryFrame doesn’t
recognize my camera.
A: The camera will need to be set into the appropriate mode to transmit
its pictures. Many cameras have two modes of operation: proprietary
and standard (driver-less) mode, and the camera has menu items and/or
buttons that set the USB mode. The standard (driver-less) makes the
camera look like a drive-letter to Windows Explorer without the need for
the camera manufacturer's custom driver. This standard driverless mode
(called “disk-drive” mode by some cameras) is required to interface to
MemoryFrame. See your camera’s user manual for details of how to
prepare your camera for driver-less USB transfers.
Even though your camera is a USB model, your camera may not support
the USB Mass Storage specification. The DirectConnect
TM
feature of
MemoryFrame allows a user to directly attach a USB camera without the
need for a PC. For the DirectConnect feature of MemoryFrame to
operate seamlessly with your camera, the camera needs to support the
USB Mass Storage specification. This specification (co-authored by
Microsoft) is built into Windows®98SE, Windows ME, Windows 2000,
and Windows XP. If a camera supports this spec, then it does NOT need
its own custom driver from the camera manufacturer for Windows to
recognize and be able to use it as a “drive letter” in Windows Explorer.
This allows you to drag pictures from the camera onto your hard-drive.
If your camera is not recognized by MemoryFrame, then the camera
won’t work in DirectConnect mode, and instead, such a non-compliant
camera must use either a PC (running Digital PixMaster software) or a
USB memory-card-reader in order to get its photos into the
MemoryFrame. Check the Pacific Digital website for a partial list of
cameras which are known to be compliant to the Microsoft USB Mass
Storage specification. You may also want to contact Pacific Digital
customer support to see if there is a software upgrade available to
support your camera.
Q: I did not need to install a custom driver for Windows® XP to
recognize my USB camera, but MemoryFrame still doesn’t recognize my
camera.
A: Your camera may not support the USB Mass Storage specification,
and Microsoft may have included the custom driver for your camera
Copyright© 2002-2003 Pacific Digital Corporation Page 53
Page 57

model in the XP release. The DirectConnect specifies on the box that the
camera needs to support the USB Mass Storage specification. If your
camera is not recognized by MemoryFrame, then the camera won’t work
in DirectConnect mode, and instead, such a non-compliant camera must
use either a PC (running Digital PixMaster software) or a USB memorycard-reader in order to get its photos into the MemoryFrame. Check the
Pacific Digital website for a list of cameras which are compliant to the
Microsoft USB Mass Storage specification. You may also want to
contact Pacific Digital customer support at to see if there is a software
upgrade available to support your camera.
Q: With my camera connected, MemoryFrame doesn’t display any
pictures, even though I know there are pictures in the camera.
A: Your camera may be storing images in a non-standard format.
MemoryFrame frame only supports standard JPEG (.JPG) files. Consult
your camera’s documentation to learn if your camera can be configured
to store pictures in JPEG (.jpg) format. Alternatively, you can transfer
the photos first to your PC. The bundled Digital PixMaster software can
download the following picture formats to MemoryFrame: JPEG, TIFF,
BMP, PNG, or GIF.
Q: With my camera connected, picture display seems to be slow.
A: Your picture files may be very high-resolution. Large picture files
take longer to display. Many cameras allow you to choose between
different picture storage resolutions. To maximize MemoryFrame
responsiveness, take your pictures with the camera a lower resolution
setting.
Q: I have attached a USB card reader to MemoryFrame with my
camera’s memory-card inserted, but MemoryFrame does not recognize
the USB card-reader.
A: Even though your card-reader is a USB model, your card-reader may
not support the USB Mass Storage specification. The DirectConnect
TM
feature of MemoryFrame allows a user to directly attach a USB cardreader without the need for a PC. For this DirectConnect feature of
MemoryFrame, it is specified that the card-reader needs to support the
USB Mass Storage specification. This spec (co-authored by Microsoft) is
built into Windows 98SE, Windows ME, Windows 2000, and Windows
XP. If a card-reader supports this specification, then it does NOT need
its own custom driver from the card-reader manufacturer for Windows to
recognize and be able to utilize as a “drive letter” in Windows Explorer.
This specification allows you to drag pictures from the card-reader onto
Copyright© 2002-2003 Pacific Digital Corporation Page 54
Page 58

your hard-drive without requiring a custom Driver. If your card-reader is
not recognized by MemoryFrame, then the card-reader won’t work in
DirectConnect mode. Such a non-compliant card-reader must use a PC
(running Digital PixMaster software) in order to get its photos into the
MemoryFrame.
Q: I have attached a USB card reader to MemoryFrame with my
camera’s memory-card inserted. MemoryFrame sees the card-
reader but
does not see the pictures.
A: Your camera may not be storing pictures on the memory-cards in
standard MS-DOS compatible format, or your camera may be storing
images in a non-standard format. MemoryFrame only supports standard
JPEG (.JPG) files. Consult your camera’s documentation to learn if your
camera can be configured to store pictures JPEG (.jpg) format. You may
also want to contact Pacific Digital customer support at to see if there is a
software upgrade available to support your camera. Alternatively, you
can transfer the photos first to your PC. The bundled Digital PixMaster
software can download the following picture formats to MemoryFrame:
JPEG, BMP, TIFF, PNG, or GIF.
Q: My MemoryFrame has fingerprints on the LCD screen. How do I
clean it without scratching the screen?
A: The screen on MemoryFrame is made of glass and is extremely
delicate. It can be easily scratched. Treat the screen with care and avoid
touching it. If the screen does become dirty, use a soft, absorbent cloth
(not tissue paper) dampened with water. Do not use glass cleaners to
clean it unless they are specifically recommended as LCD cleaning
solutions.
Q: Where can I find additional known resolved issues and information to
help me solve a problem on my MemoryFrame?
A: A list of additional resolved issues and information is posted on the
Pacific Digital WEB site at www.PacificDigital.com
Copyright© 2002-2003 Pacific Digital Corporation Page 55
Page 59

13. MemoryFrame Specifications
Screen Type/Size: Bright 5.6” Active Matrix TFT LCD
Camera Interface: USB 1.1 Host interface
# of photos stored: up to 55 photos
Photo File Format: JPEG on Camera, and JPEG, TIFF, PNG, GIF, and BMP
Resolution: 320 x 240 physical resoluti on, 640 x 480 logi cal. La rger
pictures are automatically scaled to fit the screen
Onboard Memory: 16 MB RAM & 8MB Flash memory
PC Interface: USB 1.1 Target interface
AC Adapter: North America: 120 VAC, 60 Hz, 17w
Europe: 220-240 VAC, 50 Hz, 17w
Dimensions: 8.31 x 6.33 x 1.71 in
(211 x 161 x 43 mm) (w/h/d)
Weight/Mass: 28 oz. (800g)
Environment: 32 – 85
40-64% RH (non-condensing)
Accessories: USB cable, software CD-ROM, wood frame
on PC
0
F, 0-30 OC,
Copyright© 2002-2003 Pacific Digital Corporation Page 56
Page 60

14. Upgrading MemoryFrame Software/Firmware
Software Updates May Be Available
From time to time, Pacific Digital may make improvements to
MemoryFrame’s internal software (firmware) to add features or
enhancements. Check www.pacificdigital.com
How to Download MemoryFrame Software updates
for updates.
Go to www.pacificdigital.com
Follow the links to the MemoryFrame software update page.
Updates to the MemoryFrame firmware should be downloaded to
your PC’s hard-drive. Take note of the exact directory location on
your hard-drive to which you downloaded the update files.
How to Update MemoryFrame Firmware
When the MemoryFrame is connected to a computer running Digital
PixMaster with its USB drivers, the MemoryFrame accepts and
processes communication from the computer. Digital PixMaster
can update the MemoryFrame’s software image with the new one
you downloaded from the Pacific Digital website.
You must first connect your PC to the MemoryFrame with the USB
cable that was provided in the box with the unit.
Connect the larger “standard USB” connector to the USB port of the
PC. Connect the smaller “mini-USB” connector to the “PC”
connector of the MemoryFrame. See Figure 7.
Important! For the PC application (Digital PixMaster) to communicate
to your MemoryFrame, you first need to prepare your MemoryFrame for
communicating to a PC by putting into Slideshow display mode.
Digital PixMaster’s Update Firmware Command
Use the Digital PixMaster™ software to transfer the software
update to your MemoryFrame. The Digital PixMaster icon should
be located on your Windows Desktop. To start Digital PixMaster
double-click on the icon.
Copyright© 2002-2003 Pacific Digital Corporation Page 57
Page 61

Next, from the “MemoryFrame” pull-down menu of Digital
PixMaster, select “Update Firmware.” Follow the on-screen
instructions to point to the updated firmware file (with a “.bin” file
extension) that you just downloaded from the Pacific Digital
website to your hard-drive.
After you click on the OPEN box to select the .bin firmware update
file, Digital PixMaster will display a progress bar to indicate the
transfer of the file to MemoryFrame.
On the MemoryFrame’s LCD screen, the MemoryFrame will
display a sequence of messages to show the progress of the
firmware update. The first progress message is:
“FIRMWARE BEING DOWNLOADED, PLEASE WAIT”
Important! When the progress bar shown in Digital PixMaster is
complete, it only signifies that the file has been transferred, and it is just
the beginning of the MemoryFrame’s actual process of updating its
firmware.
If a transfer error occurs, the MemoryFrame will display the
following message:
“BAD FLASH DOWNLOAD, PLEASE RETRY”
If so, retry the update by select “Update Firmware” from the
“MemoryFrame” pull-down menu of Digital PixMaster.
When the MemoryFrame receives the updated firmware file, the
MemoryFrame will erase the current firmware portion of its
memory and program in the new firmware image. You must wait up
to three (3) minutes for the frame to complete the software upgrade.
Important! Do not unplug or cut power to the MemoryFrame or PC
during the upgrade process! A loss of power could erase both old
and new operating systems, leaving the MemoryFrame inoperable.
The MemoryFrame will display the following sequence of messages
to show the progress of the firmware update:
“FLASH BEING ERASED”
“FLASH BEING LOADED”
“READING FLASH”
“VERIFYING FLASH”
Copyright© 2002-2003 Pacific Digital Corporation Page 58
Page 62

If an error occurs in the above process (either erase,
loading, or verification), the MemoryFrame will display the
following message:
“REDO FLASH- DON’T POWER OFF ( error code number)”
Caution! Important! Do not unplug or cut power to the
MemoryFrame or PC. The above error message indicates that there
was an error (either erase, loading, or verification) during the
firmware update. The firmware update MUST BE retried, and the
PICTURE FRAME MUST NOT BE POWERED OFF BEFORE
THAT during the upgrade process! A loss of power could erase both
old and new operating systems, leaving the MemoryFrame
inoperable.
If no errors occur, then once the new firmware update file has been
loaded into the MemoryFrame’s storage memory, the
MemoryFrame will indicate it is done by displaying the following
message indicating when you can reset the MemoryFrame:
“PLEASE POWER THE MEMORYFRAME OFF/ON”
Only then can you turn the MemoryFrame OFF, then turn it back
ON. When the MemoryFrame goes into normal operation, the
upgrade has been completed. The new Firmware revision will be
displayed in the lower right hand corner of the MemoryFrame’s
power-up initialization screen.
Enjoy the new firmware!
Copyright© 2002-2003 Pacific Digital Corporation Page 59
Page 63

15. MemoryFrame Limited Warranty
Pacific Digital Corporation warrants this product to be free from
manufacturing defects for a period of 90 days from the date of invoice to
the end user (Customer). In the event that this product should fail during
this period, Pacific Digital Corporation reserves the right to either
replace or repair the product at its own discretion. If the product becomes
defective during the Warranty period, Pacific Digital will repair or
replace any defective component part at no charge to the original owner,
subject to the limitations and requirements listed.
THE FOLLOWING IS REQUIRED BY PACIFIC DIGITAL
CORPORATION when requesting warranty service:
Check your resellers return policy first. All purchased products must be
returned to original reseller within their return policy time period. If the
product is out of reseller’s return period, all returns to Pacific Digital
Corporation for warranty repair within the warranty period must be
authorized by Pacific Digital with a Return Material Authorization
(RMA) number. To obtain an RMA number, contact tech-support or send
an email to support@pacificdigital.com to obtain an RMA. The product
must be packed in the original shipping carton or in suitable packing
offering a similar degree of protection. To avoid scratches or other
damage to the product during shipping, separate items such as the cables,
power cords, etc. Each should be individually wrapped and placed in the
same package.
Limitations:
The limited warranty provided by Pacific Digital Corporation does not
cover:
• The cost of returning the product to Pacific Digital (i.e. this
is the user’s responsibility)
• Any product with serial numbers or identification altered or
removed
• Exterior cosmetic damage
• Damage, defect or failure caused by or resulting from:
improper installation or operation of the unit from incorrect
voltages or power supply; improper service by a nonauthorized service facility; abuse, neglect, accidents, misuse,
Copyright© 2002-2003 Pacific Digital Corporation Page 60
Page 64

fire, flood, or acts of God; unauthorized modification by end
user; installation removal or on site service.
• Damages resulting from loss of use, loss of data, loss of time
or inconvenience, cost of temporary replacement unit or
spares, property damage caused by this unit or its failure to
work, or any other incidental or consequential damages
• Damage caused by installation/operating software which
may or may not be supplied with the product is not covered
by this Limited Warranty. Separate End-User License
Agreement provisions and restrictions apply.
Customer’s acceptance of Pacific Digital’s RMA number reflects
acceptance to the terms and conditions of Pacific Digital's Warranty and
Return Policy, as set by Pacific Digital. All requests for RMA numbers
must include product serial numbers and proof of purchase. Customer
agrees to assume shipping charges on return shipments to Pacific Digital
and Pacific Digital agrees to assume shipping charges back to customer.
All returns are for repair or replacement at Pacific Digital's discretion.
There are no returns for credit or refunds. This warranty excludes defects
or damage due to misuse, abuse, or neglect.
The foregoing warranty is in lieu of all other warranties, express or
implied, including but not limited to implied warranties of
merchantability and fitness for a particular purpose. In no event shall
Pacific Digital Corporation be liable for special, indirect, incidental, or
consequential damages whether in contract, tort, or negligence.
CE Notice: It is acknowledged by Pacific Digital, Corp., that the
MemoryFrame, model MF-570, has shown susceptibility to electrostatic
discharges (ESD) at over 4KV at its top left corner. This ESD
susceptibility can cause the MemoryFrame to decrease its display
contrast level temporarily until its power is recycled; however, this
tendency is acceptable to Pacific Digital, Corp.
Copyright© 2002-2003 Pacific Digital Corporation Page 61
Page 65

16. Contacting Technical Support
North America:
Pacific Digital Corporation
2052 Alton Pkwy
Irvine, CA 92606
Phone: 888-999-0732 or 949-252-1111
Fax: 949-252-9397
Europe:
Pacific Digital Europe
Unit 1B Distribution Centre
Shannon Ind. Estate
Shannon Co. Clare, Ireland
Tel: +353-61-702029
Fax: +353-61-702001
WEB: www.PacificDigital.com
During installation, record the following information. This information
will be needed to contact technical support.
When calling the Technical Support Department, MAKE SURE TO
HAVE THE FOLLOWING INFORMATION READILY
AVAILABLE, BECAUSE IT IS NECESSARY IN ORDER TO
RECEIVE TECHNICAL SUPPORT.
RETAILER INFORMATION
Date of Purchase:_____________________Invoice #:_____________________
Product Purchased From:____________________________________________
Seller's Tech Support Phone #:________________________________________
PDC PRODUCT INFORMATION
PDC Part #: U-30-___________ PDC Serial #:_________________________
Name of Software:________________________________________________
Software Version:________________________________
and Information
Copyright© 2002-2003 Pacific Digital Corporation Page 62
Page 66

OTHER INFORMATION ABOUT YOUR DIGITAL CAMERA
Camera Image Type (JPEG, TIF, etc.):______________________________
Brand of Camera:_________________________________________________
Type of Memory:_____________________________________________
USB type:______________________________________________________
OTHER INFORMATION ABOUT THE PC YOU USE TO RUN THE
DIGITAL PIXMASTER SOFTWARE
Processor Speed:______________________________________________
Brand of Computer:____________________________________________
RAM Size:__________________________________________________
Operating System:______________________________________________
The Pacific Digital part num ber for this MemoryFrame MF-570
User’s Manual is: 1862-PF-03-7 (revised May-24-2003).
The Pacific Digital part num ber s for the MF-570 model of the
MemoryFrame product line are:
U-30140 USA 110V
U-30156 North/South Americas 110V
E-30167 United King dom 220v
E-30168 Europe 220V
E-30169 Pan-world 220V
Copyright 2002-2003 Pacific Digital, Corporat ion All r ights
reserved. Specifications and items shown subject to chang e
without notice. Pacific Digital
logo are registered tradem ar ks, and MemoryFrame
PixMaster
TM
are trademarks of Pacific Digital Corp. All ot her
TM
and the Pacific Digital stylized P
TM
and Digital
trademarks are the proper t y of their respective owners.
Pacific Digital Corporation
www.PacificDigital.com
Copyright© 2002-2003 Pacific Digital Corporation Page 63
 Loading...