

Page 1
appliances
Page 2

2
Congratulations!
Yourpurchase
of aPACIFICA
®/ PACIFIC®productatteststotheimportanceyouplace
uponthequalityandperformanceofthemajorappliances
outlined
inthisguide,
yourproductisdesignedtoprovide
service. Pleasetakea fewminutestolearnaboutitsproper
Thisguide
product’scare
willprovideyou
andoperation.
withtheinformation
you needto
Yourcompletesatisfactionisourultimategoal
If
you have anyquestionsorcommentsabou
whom youpurchasedit,orcontact
appreciateyourchoosin
for
yourothermajorappliance
g of
ourproduct,
ourConsumerSupportCentreat603-7805 7725. We
needs.
t thisproduct,pleas
and hope
that
you
Formoreinformation about the complete
growingselectionproducts.
T
o reduce
injury when using your
follows thesebasicprecautions.
the risk of fire,electricalshock,or
appliance, please
you use.
Withminimalcare,
you
withyearsof reliable
andefficient
become
familiar withyour
e contac
willagainselect
as
use and care
.
t thedealerfrom
ourproducts
and
.
Page 3

3
CONTENTS
b. Installation & use pg8
c. During
cooking
pg10
e.
To protect the appliance pg12
f. Appliance maintenance pg12
g. Other safety notes pg13
Specification
Installation diagram
Guide to gas hob
IMPORTANT SAFETY INSTRUCTIONS
a. Electrical safety
pg4
pg5
pg7
pg8
d. Children
BEFORE USING THE GAS HOB
OPERATION INSTRUCTIONS
a. To
b. To
COOKING GUIDES
turn
on the burner
turn
off the burner
MAINTENANCE
AND CLEANING
TROUBLESHOOTING
PROTECT THE ENVIRONMENT
pg11
pg14
pg15
pg15
pg15
pg16
pg18
pg19
Page 4

4
SPECIFICATION
Capacity
5.0kw x
2
Productdimensio
n
W860 x D470 xH150(mm)
ModelIGN
3
Ignitionpower
1.5 V.D.C (Dsizebattery)
Gastype
L.P.GDefault/ N.GOptional
Capacity
5.0kw x 2&2.5kw x
1
Productdimensio
n
W860 x D470 xH150(mm)
Model
Ignitionpower
1.5 V.D.C (Dsizebattery)
Gastype
L.P.GDefault/ N.GOptional
Capacity
5.0kw x 1
Productdimensio
n
W300 x D510 xH125(mm)
Model
Ignitionpower
Gastype
IGN2
1.5 V.D.C (Dsizebattery)
L.P.GDefault/ N.GOptional
PDIG1
Page 5
5
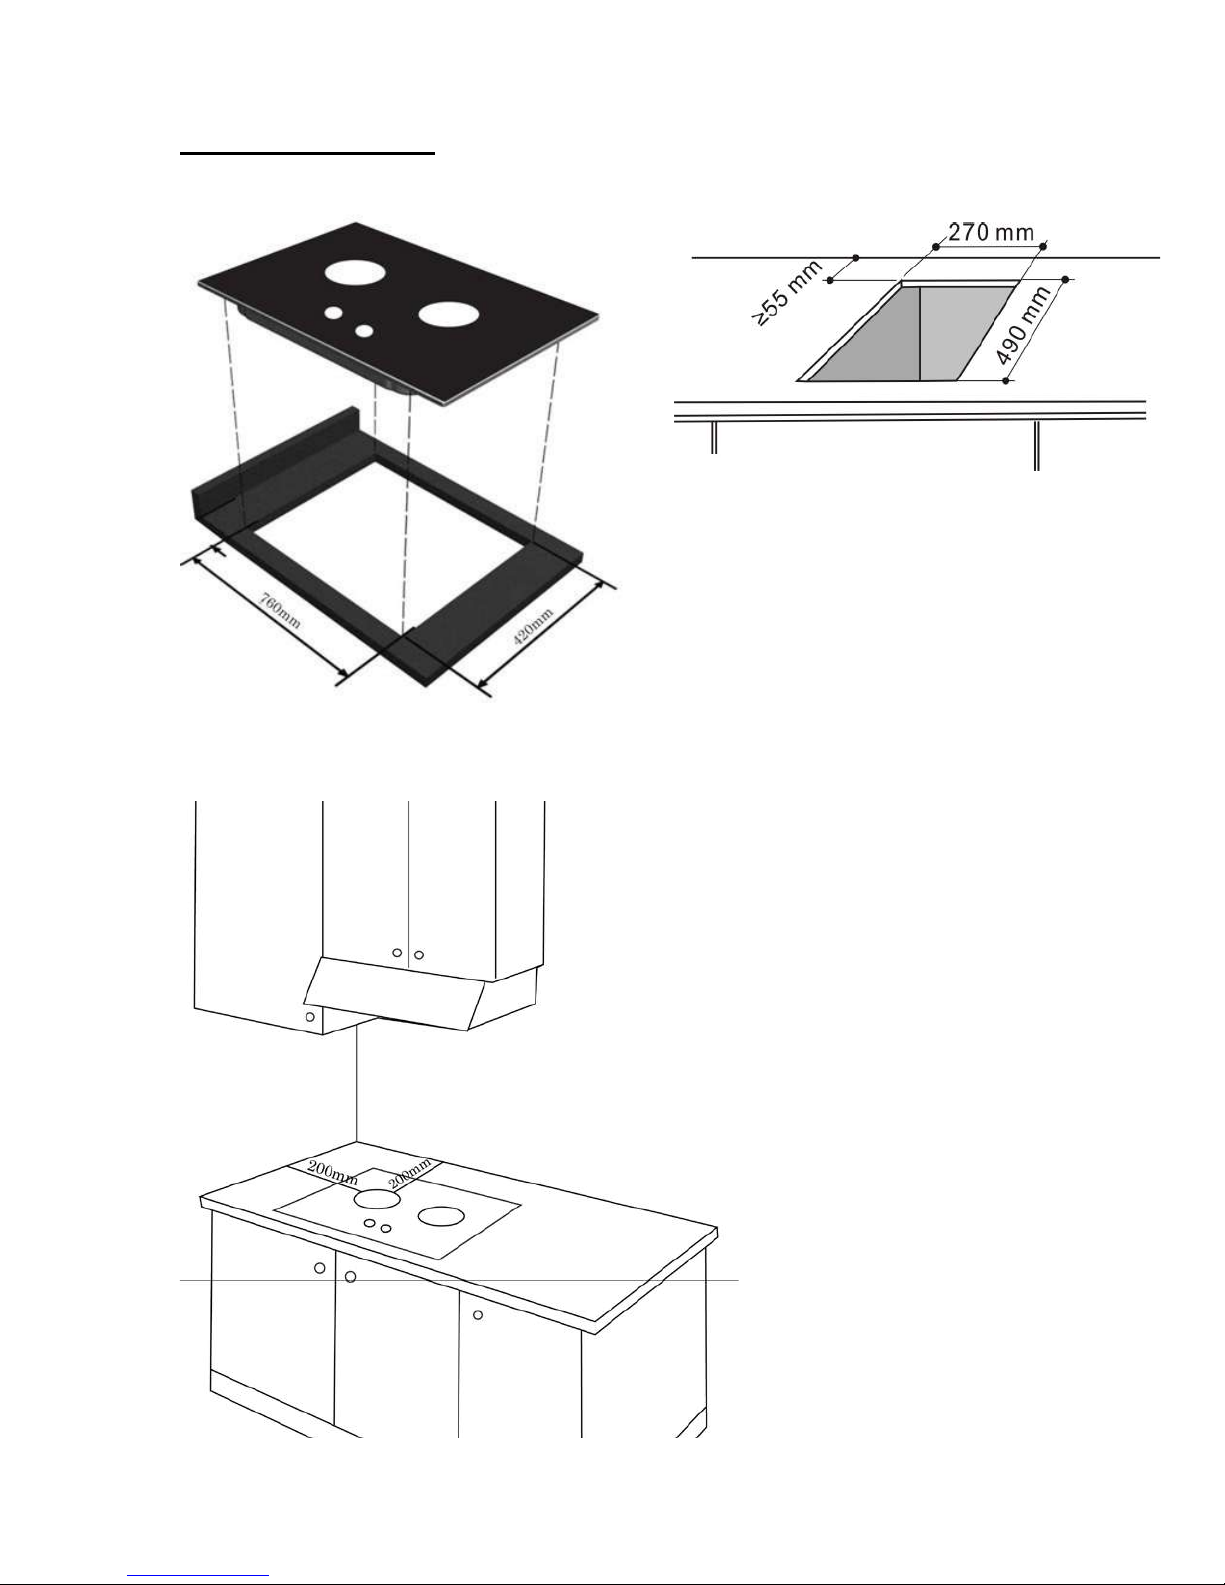
INSTALLATIONDIAGRA
F
igure
1 (IGN2 & IGN3)
M
Figure 3 (PIDG1)
Figure2 (IGN2 & IGN3)
Page 6

6
Installation guides & instructions
1. Make sure the
gas hob is insta
lling according to the recommended cut out size (Fig
1).
2. Make sure the installed gas hob’s burner
from the walls (Fig. 2).
has sufficient safe distance (at least 200mm)
3. Make sure there is a minimum distance of 760mm between the
the cooker hood or cabinet on top of the gas hob. The minimum distance may be change
depend on the type
of
cooker hood is selected.
4. The kitchen where the gas hob is installed has to
be well ventilated
gas hob’s top plate
all the times.
and
5. Do not install this gas hob between two tall cabinets
as this
may cause fire hazard.
6. The gas hob cannot be installed
freezer, built-in dishwasher
which
may damage the nearby appliances.
and etc. in order to avoid the heat emitted from the gas ho
7. The gas hob should never install beside
high temperature oil that sp
needed to install these 2 appliances together at the same
ills out
8.
If the user is usin
away
from the gas
g a LPG gas
tank in order to retain enough gas pressure.
9. The user
regulator
has to
and
make sure the
it is to access after installing both the
10.
For pipe connection,
the local authority for usage. Otherwise, it
subsequently.
it is necessary that the applied sealant on the pipe is approved by
11.
For pipe
Pacific authorized technician and the installer
nnected firmly with
co
soapy solution instead
and gas tube connection, the installation has to
no leakage.
of lighter or flame.
12. Do not seal the
for the user or technician to service and repair the
gas hob after
on top of or near other appliances like washer, dryer,
a deep fryer as the gas flame may light
from the deep fryer.
tank, please
gas
Leakage test is necessary here and only test
it
has build into a
do not install this gas hob more than 12 fee
tank
has a proper
may lead to gas leakage and fire ris
has to
A minimum distance of 400mm is
cooking counter top.
and good condition
gas hob and gas
make sure the connected parts ar
cooking counter top as
gas hob
in future.
tank.
be done by the Pacifica
it will
up th
gas tank
it with
be hard
b
e
t
k
&
e
Page 7
7
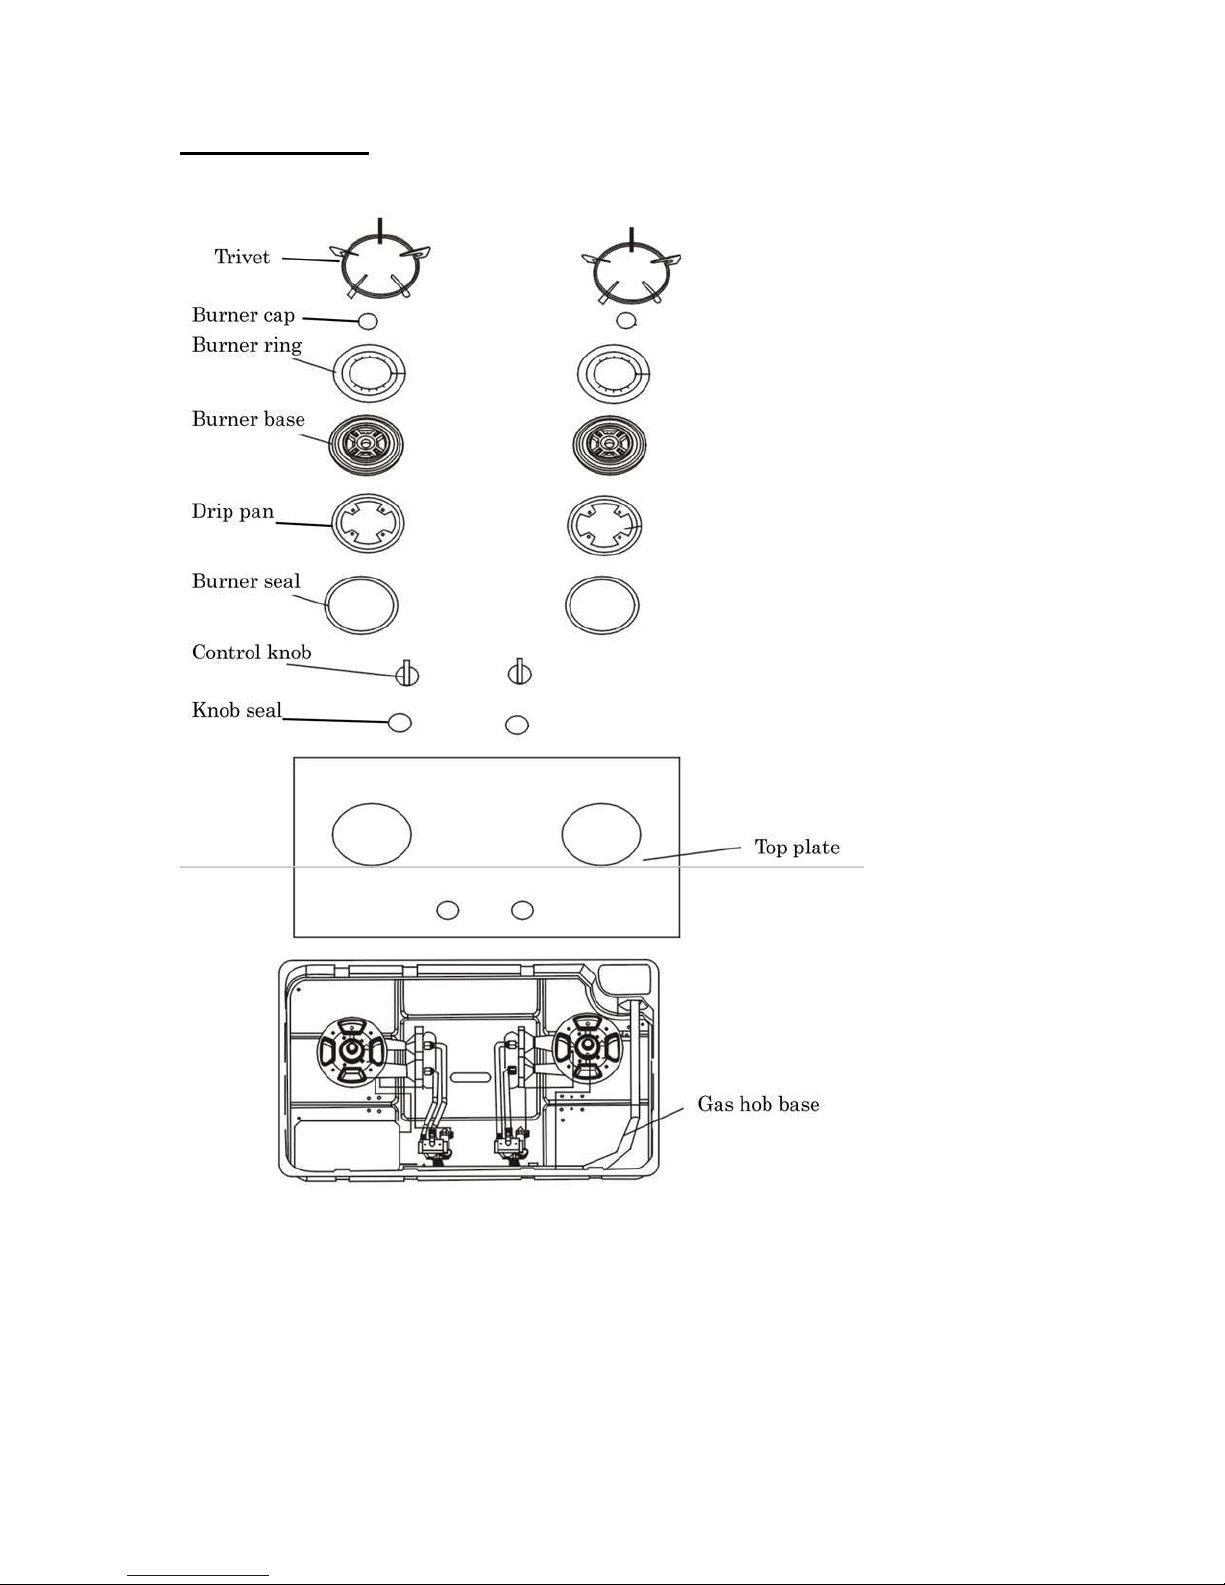
GUIDE T
O GAS HOB
Page 8

8
IMPORTANT SAFETY INSTRUCTIONS
WARNING:
user has to read
The
use of the gas hob
This appliance is intended for residential cooking only therefore please uses this
for its intended purpose only. This appliance conforms to the local uniform safety codes
regulations. The manufacturer
and
caused by improper
perating instructions
o
user for their safety concern.
Electrical Safet
1. Before the installation
battery’s size suits the battery compartment
or the authorised dealers if there is
Before installation and service, the installer
2.
compartment.
maintenance or repair work.
3. Make sure the battery is
Then, make sure the battery is fitted properly a
manufacturer cannot
insertion
4. Never use an extension cord to connect this appliance to electricity as the extensio
cords do not guarantee the required safety of the appliance.
5. Do not operate this appliance
damaged
for examination
6.
If the gas hob is not going to be
the battery compartment and only insert
hazardous risk.
Installation & use
1. Inspect the
damaged
2. This appliance should
access
3. This appliance is not designed for maritime
or aircraft.
Pacific Technical Department for further advice
4. This appliance is
commercial purposes.
all the stated instructions
in order to prevent unn
will not take the responsible for the
use of this appliance.
in
a safe place for future reference
y
of this appliance, the user has to
any doubt.
Ensure
of battery.
in
any manner. Return this appliance to the nearest authorized service fac
and repair.
gas hob for shippin
unit
and contact the Pacifica
it safely. This is to avoid unn
It is only possible with certain conditions; please consult the Pacifica an
that the battery
in
good condition before insert it into the battery compartment.
be held responsible for
with
a damaged cord or plug, or
in
used for long time, please remove the battery from
it
g damage before installation. Do not install or operate
and Pacific dealer
be installed at
made and intended for household
a safe height
ecessary injury
in this manual before the installation
ecessary injury
The user
of the gas hob. Consult a qualified electricia
has to remove the battery
will not return
ccording to the stated position. The
damage or injury
back when
and for easier
use or mobile installations
and specific requirements.
and damages on the appliance
damages or injur
of this appliance has to
and pass them
make sure that the adopte
to
the appliance
caused by an improper
if the appliance
it is in
and appropriate place for users to
use only
use again. This is to preven
if there is
any damage found.
access.
and should not
on to
from the batter
in
and
gas ho
keep thes
any future
during
has bee
ility
any vehicles
be used fo
.
b
y
e
d
n
y
n
n
t
a
d
r
Page 9

9
5. This appliance must only be used after
counter top or placing it firmly
nsure that all parts are accurately shielded.
e
and appropriately
it
has been properly installed into the cooking
on top of the counter. This is
needed to
6. Only
the manufacturer will not bear
use this
gas hob for its intended purpose. Any other use is at the owner’s risk and
any responsibility for this.
7. Do not allow metal objects such as meat probe, aluminium foil, cooking pans, racks
etc. come
burner itself.
in contact with the burner to avoid damages on either the metal object or th
8. Do not slide
gas hob as this
any pan, pot, rack or
may damage the surface.
any other
hard object on the external surface of th
9. Do not leave
prevent unn
cookware or cooking utensil
ecessary damage.
on the gas hob even
it is not
in
use as to
10. Do not use gas hob as a heater for the room or the kitchen.
11. Do not use this
gas hob as a barbequing, roastin
g and grilling tool.
12. This appliance can only
dehumidifier
and etc.
13. The gas hob
therefore the kitchen or area where this appliance is installed
will produce heat and moisture durin
14. Do not use this appliance
be used for
in a potentially explosive environment.
cooking only
and not to
g
cooking
has to
use as a dryer, kiln
within kitchen or are
be well ventilated.
15. Do not carry the
gas hob by holdin
g up the stands
and gas inlet.
16. Make sure the cooking counter top and the surrounded walls for this
installed can resist the high temperature of
120oC.
17. Do not allow flammable objects come into contact
with the gas hob.
gas hob to
18. The installation, repair and maintenance work should
and Pacific authorized technician or service professional. The installation, repair
maintenance work
oid the given warranty.
v
done by the unauthorised individuals could
19. The user must not install
and use this
gas hob outdoors.
be carried out
be dangerous and
by the Pacific
20.
For proper ignition and performance, make sure the igniters are always clean
and dry.
21. Make sure the parts
before using.
22. Do not use
make the fire spread out and damage the counter top or
the
gas hob.
cookware
and components on top of the gas burner are fitted properl
that is
much larger than the trivets of the gas hob as this may
any other things that are aroun
and
be
and
it ma
e
e
,
a
a
y
y
d
Page 10

10
23. Do not use
burn
and damage the
cause
injury
cookware
and
burn to the user during use as well.
that is
cookware when
much smaller than the trivets of the gas hob as this may
it is covered
by the upcomin
g flame. It
may also
24.
If the user wants to use glassware, ceramic or glazed cookware on the gas hob, please
make sure the cookware can stand and resist
sudden temperature change.
25. Do not place flame tamer, asbestos mat, aluminium foil and other additional
parts between the
king parts
coo
and the trivets.
cookware and trivets as this will
cause serious damage to both th
cooking
26. Do not remove the trivets
damage both the cookware and the burner.
and place the cookware on top of the burner
as this w
27. Do not use
be bent
and the burner could be damage badly.
cookware
that is too large or too heavy on this
gas hob as the trivets ma
During
cooking
1. When this appliance is in
parts
of the door and other accessible parts may become extremely hot and the heat w
remain for a while
appliance when
use, please
even after the gas hob turned
it is
in use.
be aware
off. Please
that both the internal and external
keep children away
from th
2. Let the gas hob and its parts to cool down before takin
burns.
g any of the parts as to avoid
3. Please
coo
use potholder and gloves when placing or lifting the pot and other larger siz
kware
on the gas hob
in order to avoid burning risk.
4. Make sure the
may cause steam
used potholder is dry
burns
if there is water dripping on the hot surface.
and heat resistant
as the wet and moist potholders
5. Do not use towel or other thick material to substitute potholders or gloves as the user
may st
ill get
burns
and the substituted material
maybe badly
damaged as well.
6. Please avoid the hot steam or hot
Do not touch the surfaces when the appliance is
of the
cookware.
air during use as to avoid serious burns
in
use but only grab and use the handle
and scalds
7. Do not touch the burners and other heated parts
even after
cooking as the heat will remain for quite
of the gas hob when
a while.
it is
in
use
and
8. When lifting up and
he hot contents sp
t
ntainer
co
on this
gas hob as they
putting
ill out especially when there are hot liquids in it. Do not use plasti
down the
may melt
cooking containers, please take care as not to let
on
it
under the high cooking temperature.
9. Never leave the gas hob unattended
when
it is
in use.
10. Do not operate this appliance without any on top of it.
e
ill
y
ill
e
e
.
c
Page 11

11
11. When openin
beginning to let the heating steam or
to avoid scalding and burnin
g the
lid
of the
g on the user.
cookware during
air to
escape
cooking. Open the
upward first. This step is necessary
lid slightly
12. Never heat
the pressure inside the food container
up or
cook the sealed or unopened food container
may build
up and cause explosion.
on top of the gas hob as
13. Never add water onto the cookware or
cooking and
it will create
a lot of hot steams which
food when they are extremely hot durin
may cause serious
burns or scalds.
14. Do not use
very dangerous and may cause serious damage and injury.
drip tray,
cooking rack
and other
cooking device’s
part
on a gas hob as
15. During
unattended as the overheated oil and
cooking food
with massive oils
fat
may cause fire hazard.
and fats, please
do not leave the appliance
16. The user
cooking as
has to
in rare situation,
be extra careful when using alcoholic liquids or ingredients
it
may cause combustion.
17. Do not blow the flame
the
gas hob or heat up the handles and edges of the
as the extended flame
may heat or light
cookware.
up other things around
18. Do not light
up the fire without
any
cookware on top of the burner.
19. Always adjust the flame output a
kware or even make
coo
the outer flames
to the user while
will catch up the sides of the
trying to hold it.
it smaller. Do not use high flame output
20. The user
ather than on other directions which may cause the handle(s) heat
r
cookware beside it.
has to
make sure the handle(s)
21. Do not heat
up empty
cookware for long as
ccordin
of the
g to the size of the bottom base of th
with small cookware as
cookware and this
cookware has to
it
may spoil the cookware.
may cause serious burn
face inward to the user
up or block the othe
22.
If the gas supply is not in normal or good condition, shut off the gas suppl
immediately and replace
assistance.
23. Make sure the cookware is place no top of the centre of burner while
placing
the flame output is wasted as well.
it at the side will
Children
1. To reduce the
hildren are not allowed to operate this appliance on their own or
C
guidance.
injury
2. Do not store items of interest to children on top of or near this appliance.
could be seriously injured
a new gas
make escaping flame heat
of children,
if they try to reach the items especially when
tank or call the
do not allow children to play with or around
gas supply company for furthe
up the handle(s) of the
even
with the adult’
it is
in use.
in th
it i
on gas ho
cooking as
cookware
The childre
and
gas ho
e
as
g
s
b
e
r
y
r
b.
s
n
Page 12

12
3. Make sure the children
se.
u
do not have any contact with the gas hob when the gas hob is i
4. The gas hob could
the
gas hob therefore ensure that the children are kept
be st
ill dangerous to the children as there are remaining heat within
away
from
it at
a safe distance.
5. Ensure the plastic wrappings of this appliance are disposed
the reach
of children.
off safely
and kept out o
6. Before discardin
the battery compartment and take out the trivets, burner rings, burner
urner seals, control
b
g an old appliance or this appliance, please remove the battery fro
base, burner caps,
knobs and other detachable parts to prevent
any danger to children.
To protect the applian
1. Do not use this
rising pressure will
ce
gas hob to heat up the sealed container
cause explosion which
will
damage the appliance.
with
food or liquid in it
as th
2. To prevent condensation which could corrode the appliance, please do not leave an
cooked foods or storing food on top of the gas hob.
3. Do not leave other items
this can lead to corrosion to the appliance.
that
may rust into the gas hob or
on top of the burner(s) as
4. Do not lean, stand, sit or place
stand
heavy weight.
heavy items on top of the appliance
as
it cannot carry o
5. Do not block the vent openings
condition.
as the appliance
needs to operate in well ventilating
6. Never store flammable material or
hazard.
liquid inside or around the gas hob to avoid fir
7. Please cover the cooked food
warm for hygiene purpose.
that is still remaining on top of the gas hob to
be kept
Appliance maintenance
1. Please clean
This is especially needed
and wipe the appliance after each use and
if the appliance is not going to
dry it if the
be used for a long period
unit is in damp
of time.
2. Do not use a steam cleaner to clean this appliance
cleaner could penetrate through the gas hob’s components and permanently damage th
gas hob or
even cause
injury
on the user.
as the heating steam from the stea
3. Do not clean this appliance right after any
parts
of the appliance are still very hot. Cleaning the
cause damage to the appliance itself
and may
cooking as both the external and internal
gas hob right after the
burn the user
as well.
cooking ma
4. The gas hob’s base plate seal is essential for firm installation therefore the seal shoul
not
be
rub roughly as
the seal gently.
it
may be damage. Use only warm
and
mild
soapy solution to clea
n
f
m
e
y
r
e
.
m
e
y
d
n
Page 13

13
5. Do not open the top plate of the gas hob and clean the internal parts
unit
and
it will void the warranty
Service Department for servicing and cleaning.
of the gas hob. Contact the Pacifica & Pacific Technica
as
it
damage th
6. Do not splash water onto the appliance to clean
it
as
it will
be spoiled.
7. Clean the sp
ills on the gas hob
that contain sugar or salt immediately.
8. Do not let the
of the gas hob.
9. The safety valve is made of delicate material therefore the user has to take good care o
it
and should not
it.
10. The igniters should always
as the safety valve, do not clean the igniters roughly or knock
on
it in order to ensure its performance.
Other safety notes
1.
If there is
shut
off the gas supply and contact the Pacifica
for repairing and servicing.
2. When the appliance is
cifica and Pacific authorized service technician. Otherwise, the given warranty
Pa
appliance
will
3. Do not interfere the electrical connections, components and mechanical parts and neve
open the outer casing of the appliance unless
authorised service personnel. Otherwise, the given product warranty will
4. Make sure the power
contact
with the gas hob as the cords could be damaged and cause danger.
5. The use of accessories that are not recommended
damage
to the appliance itself and
6. This appliance is not intended to
reduced physical, sensory or mental capab
unless they
by a person responsible for their safety.
7.
For
cooking canned food
or proper training to perform it otherwise please consult those who has experience or
proper
gas hob.
training in it. Otherwise, the user is strongly advice not to
8. As the trivets, burner rings, burner caps and burner
heat even tough they are not glowing,
with them
down before
as
cooking grease, spills and other flammable materials accumulated
use rough cleaning method
keep
in clean and
any defect or
be void.
have been given supervision or instructions concernin
it
may cause fire hazard.
any manual hand work starts on it.
damage arise, please
under
and electric cords
warranty repairs, the fixing should only
injury to the user.
be used by individuals (including children) with
with
gas hob, the user
do not let any flammable material
on
it or
knock
dry condition for proper ignition. Similar
turn
and Pacific Technical Service Department
it is
done by the Pacifica and Pacific
of other electrical appliances do not come in
by Pacifica and Pacific
ilities, or lack of experience and knowledge,
needs to
Make sure the
it or placing heavy weight o
it or placing heavy weight
off the appliance immediately an
g use of the appliance
possess very
cook canned food
base may st
gas hob has sufficient time to
ill remain
on to
be performed by
of this
be void.
may cause
good experiences
with
in extrem
come
in contact
coo
e
l
p
f
n
d
a
r
e
l
Page 14

14
9. The user
a
ccessories
has to
and etc.
be aware of the loose-fittin
and keep them
away
from the appliance.
g objects
such as garment, small tools &
10. Do not pour water
chemical or
foam type extinguisher to eliminate grease fire.
11. Do not store inflammable material under the gas hob after
counter.
they are high temperature resistance.
If there are other materials like cutlery have to store under
12.
If there is
power cord
any portable appliance to be used near the
and the appliance itself do not come
13. Remove the battery
prevent hazard.
14.
If there is
immediately,
poisoned individuals to hospital for treatment.
anyone poisoned
open
15. Do not light
gas leakage. Shut
Pacifica & Pacific Technical Service Department later for servicing and repair.
BEFORE USING THE GAS
up anything or turn
It is n
e
or fire risks.
ecessary to clean the gas hob before the user use
nsure there is not
1. Please remove
all the wrappings
on grease fire
from the battery compartment before discarding this
by the leakin
all the doors
off the gas supply,
HOB
dirt or
any material to get burn while using can
and windows to allow fresh
and left over stickers or any polyfoam pieces.
as
it will worse the situation. Only use the dr
it
was
built into
it then make sure
gas hob, please
in contact with the gas hob.
g gas, please cut
on appliances and making phone call where there is
open
all the windows and doors
it for the first time. This is to
off the gas suppl
air in.
Then, move th
and contact the
turn into
2. Clean the burners and the top plate
clean
off the soapy water
with clean cloth and water.
3. Wipe the burner and top plate to
in a well ventilated place before ignition.
4. Make sure the entire
OPEARTION INSTRUCTION
unit is dry then only
S
Before
battery compartment.
co
igniting the burner, please
Make sure the battery is
mpartment is close properly.
with clean cloth and
make them dry, if necessary, leave the
it is ready to use.
make sure the battery
in
good condition
mild
soapy solution
has inserted properly into the
and the cover
y
a
cooking
make sure the
gas hob to
y
e
bad smell
and then
unit to dry up
of th
e
s
Page 15

15
To turn on the burner
Press down the control
and stop at the maximum flame output position to turn
mitted
e
flame is formed, please continue to press and hold the control knob
utput position for 5 – 7 seconds to
o
heat up. Otherwise, the safety valve
down.
gas
will
knob hold for electric ignition and
be light
up by the sparkling igniter.
make sure the safety valve has sufficient time being
will cut off the gas supply immediately if it
turn it anticlockwise (to the left)
on gas supply. After that, th
Even tough the gas is ignited
at the maximum flam
and th
If the ignition failed, please repeat the above stated process again to turn
After successfully
turning the control
utput toward minimum flame output position.
o
turning the control
position and minimum flame output position.
turning
knob
knob anticlockwise or clockwise between the maximum flame output
on the burner, the user
(turn the control
knob anticlockwise) from maximum flame
The user
may further adjust the flame output by
can adjust the flame output by
on the burner
Both the burner ring
knob.
At minimum flame output, the burner ring’s flame is
flame stay on while at maximum output, both the burner
turned on.
and burner
cap’s flame output are controlled by one single contro
off and only the burner cap’s
ring
and burner
cap’s flames are
To turn off the burner
The user
until it stops
burner.
utput position but exceed
o
regulator
Department for repair.
does not need to press the control
If the control
on top of the gas
COOKING GUIDES
It is safer
this gas hob. Also, the suitable
on
and save more time and effort.
and more efficient
at
12 o’clock position to shut
knob cannot stops
it then the user has to shut
tank
if the user
cookware size allows the user cooks more conveniently
knob but just turn it clockwise (to the right
off the gas supply
at
12 o’clock position or at the minimum flam
off the gas supply
and call the Pacifica & Pacific Technical Service
has selected the appropriate cookware size to cook
from the gas tube to th
at the gas
1. Adjust to maximum flame output if a big size cookware is being used and lower th
flame output
if a smaller
cookware is in used.
2. Generally, the wide
narrow
and tall
cookware.
and shallow cookware cooks more evenly and faster than th
3. Usin
of the gas hob itself
the
g an oversized
gas hob.
cookware
and damage
will
cause the flame to spread out to reach the other parts
it or
even damage the other appliances which are near t
4. Do not use small size
flame will heat
also the escaped flame output is wasted.
up the sides and handle
cookware
with maximum or high flame output settin
of the
cookware which cause burnin
g risk and
g as th
e
e
e
cools
.
l
)
e
e
e
e
o
e
Page 16

16
5. Cookware
not
be used as this is very dangerous to the user.
that is too small
and cannot sit st
ill but wobblin
g on top of the trivet shoul
6. Thicker
distribute the heat
the thinner
7. As
thus the
cookware has better heat distribution while thinner
as equally
cookware can conduct heat faster but cannot distribute the heat evenl
food inside it
has to
as the thick
be stir very frequently in order to avoid burning.
cookware but
it
can heat
cookware does no
up faster.
8. The user
can use both
concave and
flat bottom
cookware on this
gas hob.
9 .The safety valve will shut off the gas supply
eliminated. Please clean
and
dry the safety valve before re-ignite the burner.
10.
If the battery
match to ignite the burner. Press down the control
maximum flame output position
time. After the burner has ignited, continue to press and hold the control knob
maximum flame output position for
ufficient time being heat up.
s
MAINTENANCE AND CLEANING
runs
flat
and there is
no replacement for the moment, the user can use
and then light up the burner with a match at the same
5 – 7 seconds to
1. Make sure the appliance and its parts have already
within
knob and
8 seconds
turn it anticlockwise t
make sure the safety valve ha
cooled down before
if the flame wa
any cleaning.
at th
2. Make sure the appliance is disconnected from the gas supply before cleaning.
3. The user should use pure
stickin
g on the appliance.
4. The burner
wipe
rough, abrasive cleaning agents.
base should
it clean and
finally
5. Please clean
discolour or distort the appliance
and
dry the appliance after
6. Never use steam cleaner to clean this gas hob as the pressurized steam could easil
damage the electrical components.
7. Do not use dishwasher to wash and clean the parts and accessories
and clean water to clean
be clean regularly.
use clean and
in long
To clean it, use a damp and clean cloth to
dry cloth to wipe
each use as the sp
run if it
gas hob as to avoid water mar
it again to dry it. Do not us
ills
from the food ma
was not removed completely.
of this appliance.
8. Never use flammable agents like thinner, petrol, acid, etc. to clean this appliance.
9. Never use cleaners that contain
agents, dishwasher detergent, lime remover
use
mild
soapy solution in cleaning this appliance.
10. Never use
lean this appliance.
c
hard brushes, scouring cloths, steel wool
11. To clean the gas hob’s internal
Technical Service Department for
sand, silica,
base, the user
such cleaning service.
soda, chlorides, ammonia or scouring
and oven spray on this appliance. Onl
can only call the Pacifica & Pacific
and other abrasive materials to
d
t
y
s
a
o
e
s
k
e
y
y
y
Page 17

17
12. Use a sponge and solution
the appliance’s top plate, control knobs, burners and other parts and then wipe
with a clean soft cloth.
of
warm water plus non abrasive
liquid detergent to clean
it dr
13. Stainless steel surfaces of the appliance
stainless steel cleaner.
can be cleaned by usin
g a non-abrasive
14. The user could apply stainless steel conditioner to prevent the stainless steel surfa
from so
iling.
15. The seal under the top plate should
be kept clean regularly.
16. Most
17. The user should clean the control
of the food residues at the burners or burner base could
sponge and solution
detergent to clean the compartment.
of
warm water plus
knobs regularly by wiping
mild detergent.
be easily removed with
Avoid
it with clean soft cloth.
usin
g abrasiv
18. Make sure there is no water, detergent or other cleaning agent left in the burner o
burner base, please clean it again
cloth.
19. Make sure there is no water, detergent or other cleaning agent leave on any
the appliance, please clean
cloth.
it again
20. Clean the control
brushes, scouring cloths, steel wool and other abrasive materials on it.
knob by wiping
21.
If the gas hob is not
upply and remove the battery from the battery compartment. Make sure the whole
s
appliance is dry
going to
and clean and the surrounding is safe
22. Never use sharp and
cracking.
Use only soft cleaning materials to clean the appliance.
hard objects to clean the gas hob to avoid
23.
All surfaces of the appliance are vulnerable to scratching therefore sharp and hard
cleaning materials should not be used
24. Soaked the hardened
then remove it
by rubbing
and stubborn
it
off
25. The burners can be clean
urner
b
damp cloth, apply
r
caps, burner
ings & caps and
base and its trivets. Clean
mild
all other parts are clean and dry.
individually
soapy solution if necessary. Make sure the holes
26. Make sure the entire gas hob is dry after cleaning.
with clean water and wipe it dry with clean soft
with clean water and wipe it dry with clean soft
with clean soft
be used for a long period
in cleaning it.
dirt with mild
with clean cloth gently.
by further separating them into burner rings
and
dry cloth and never use hard
of time, detach it
from corrosive gases.
damage like gla
soapy solution for sometimes and
each pi
eces by wiping them with clea
on the burner
part of
from
y
ce
e
r
gas
ss
,
n
Page 18
18
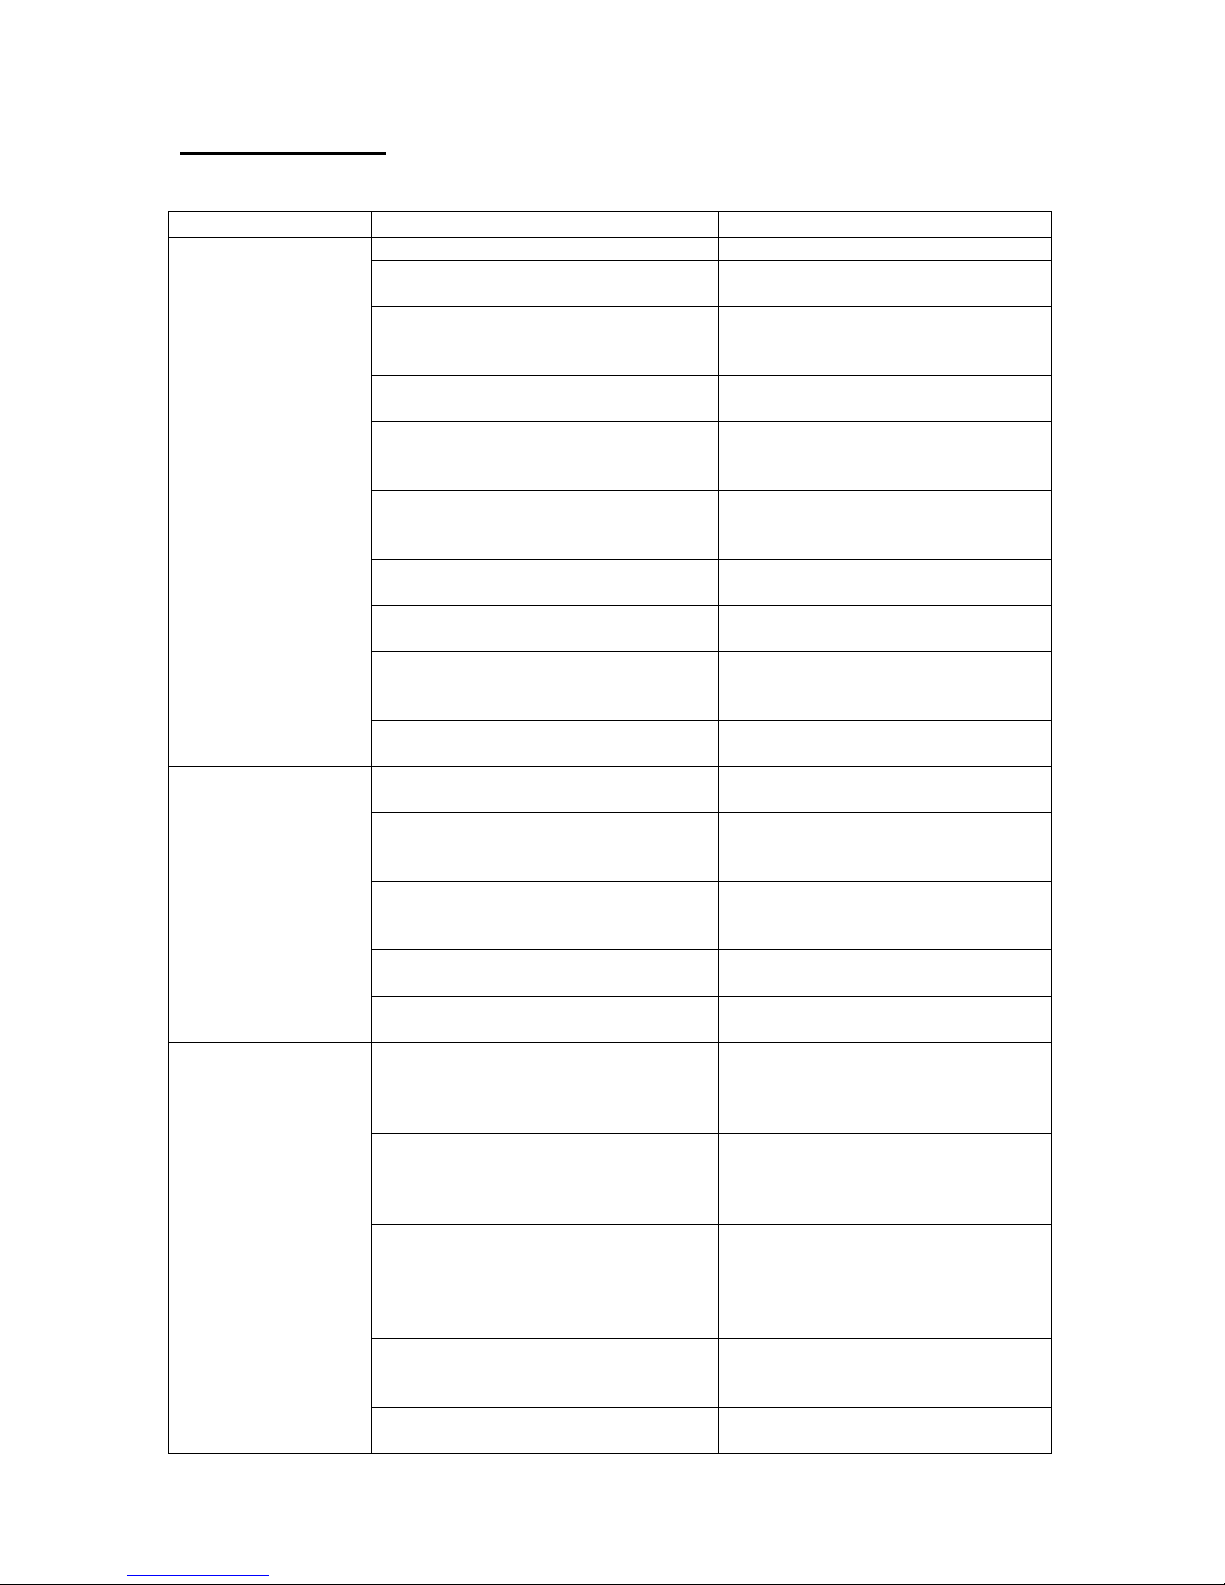
TROUBLESHOOTING
n
y
ignite the gas hob again
that are inside the
gas hob
inside the pipes is purged out
h
smoothly
h
spoiled
battery compartment
in the right position
igniter
burner cap
thermocouple
thermocouple
n
flame
almost empty
gas
tank is spoiled
pressure regulator
k
w
d
condition
d
go
d
n
s
b
are loosed
properly on the burner
sure
it fits well
on the burner
Problem
Fail to ignite
Possible
- The gas
- The gas pressure regulator on th
gas
- The gas pressure regulator is off
- There is air remain in the gas pipe
-The gas hose connected between th
gas
- The igniter (electrode) is wet o
dirty
- The battery is
cause
tank is empty
tank is spoiled
tank
and gas hob is bent
- Replace
runnin
g low or
Solution
it with a ref
e
Replace
-
pressure regulator
-
Turn
turn
s
- Repeat the ignition
-Pull
e
allow the gas flow
r
-
Dry
clean
again
- Replace a new battery
it with
off the gas hob first and th
on the gas regulator and tr
and straighten the
and clean the igniter wi
cloth and then
illed
a new gas
till all the ai
gas hose to
throug
gas tank
try ignite
e
r
t
- The battery place wrongly
- The burner
not align
The igniter is
- The
thermocouple beside the burne
cap is dirty
- The flame coming out from
burner cap did not reach th
cap’s gas outlets does
with the igniter
not align
with th
in th
th
e
- Take out the battery and place it
- Adjust the burner cap’s position a
to allow the
Adjust the igniter’s position
e
-
r
Clean
with clean cloth
e
- Adjust the burner cap and make
e
sure the flame can reach th
gas could contact th
and
dry the thermocouple
s
e
e
The flame does no
stay st
ill
t
- The thermocouple is not
position and cannot reach the flame
- The gas inside
- The gas pressure regulator on th
- There are cracks or holes on the gas
hose which is between the gas ta
and gas hob
the gas
in righ
tank is
- Adjust the thermocouple’s positi
t
and make sure it
- Replace
e
- Replace
- Replace the gas hose
n
one
make sure they are
it with a ref
it with
with screwing hose clip an
can reach th
illed
a new gas
gas tank
with a n
in
o
e
e
good
- The gas hose which is between th
gas
tank
and gas hob’s gas inlet di
not connect properly
Gas leakage
- The igniter does not work durin
ignition
- The connection between the parts
and components inside the gas ho
e
- Reconnect the
make sure both ends are well an
firmly connected
screwin
-
g
through
troubleshootin
after the previously emitted
cleared.
- Contact the service team
r
Turn
epair
g hose clip
off the gas valve and
and service
gas hose again an
and tight
the
above
g again. Ignite agai
with th
state
gas
fo
d
d
e
i
r
- The burner
cap is
not fitting
- Adjust the burner cap and make
Page 19

19
verythin
andsharpneedle
adjuste
d properl
y
normalcombustio
n
gas
tankis spoile
d
pressureregulato
r
areloose
d
k
regulator
r
spoile
d
r
spoile
d
Abnorma
combustion(normal
combustion=stabl
&bluishflame)
- The
openingsontheburnercapar
blockedbydir
- Thenozzle(s)isblockedbydirt
l
- The gasinsidethegas
almostempty
e
- The
belowthegas hob baseplateisnot
t
tankis
airventilationclipwhichis
-
e
Clean
and
dry theburnercapwith
brush
andcleancloth
- Removethedirt inthenozzlewith
Replace
-
-Adjust the
allowenough
it witharef
airventilationclipt
illed
airflowinginfo
gastank
o
r
Theflameflashou
fromtheknob
Thereispopping
duringignitio
n
- The gaspressureregulatoronthe
- The gasinsidethegas
- Theconnectionbetweenthepart
t
andcomponentsinsidethegas ho
- The gaspressurefromthe
istoohighorwiththeuse ofhigh
pressure
- The gaspressureisexcessiv
- The gas
- The burner
properlyontheburne
gasregulato
pressureisexcessive
capisnotfittin
tankisdirt
gasta
r
e
r
-Replaceit with
y
-Replaceit with
s
-Contac
epair
r
b
n
- Makesurethegas
withlowgaspressureregulator
instead
-Adjust the
o
r replace
-Adjust the
o
r replace
-
g
Adjus
sureitfitswellontheburne
t theserviceteamfor
andservic
ofhigh
gaspressureregulat
it with
gaspressureregulat
it with
t theburner
a new gas
a new gastank
e
tankisarme
gaspressur
a new one
a new one
cap andmake
d
e
o
if itis
o
if itis
r
Inth
e event
problems, please
servicesorconsultations
thattheusercannotcorrect
do not hesitate t
o contac
t the Pacifica Service Care Department for further
.
any of thestatedornotstatedtechnica
l
Pacifica Service Careline -
Tel:+603 – 780 577
Email:
25/05
Pleaserevealtheproductmodel, serial
appliancewhileyouaretalkingto
ourPacificaandPacificTechnicalServiceDepartment.
PROTECTTHEENVIRONMENT
Fordisposin
wrappingsandrecycle onlythebiodegradablepackingmaterials.Ensurethedisposedor
eusedwrappings
r
g the packin
g material, pleasereuse the cardboard boxes and plasti
and anypackingmaterialsar
Beforediscardin
disconnected
removethedoororanydetachablepartsofittopreventinjury
appliancesorthisappliance containmaterials
ntact
co
wastage
your localrecyclingcentrefo
andpollution
g anoldapplian
fromthepoweror
.
ce orthisapplianceafterlong used, makesureiti
gassupply,cutoffthepowercord(ifthereisany)
r recyclingthesevaluablematerialsastoreducethe
number
andthewarranty details
e outofreachbythe children
andotherhazards.Theol
that
can berecycledthereforeplease
of your
c
.
s
and
d
Page 20

 Loading...