

Page 1
KEEP IN A SAFETY PLACE
Before operating this hob,
Please read the instruction carefully
Page 2

IMPORTANT
- ALL PARTS & COMPONENTS MUST NOT BE REMOVED OR REPLACED UNLESS BY
QUALIFIED SERVICE PERSONNEL.
- CHECK THE DATA PLATE TO ENSURE THE APPLIANCE IS SUITABLE FOR THE AVAILABLE
GAS SUPPLY.
- TO ENSURE THE SAFETY AND CORRECT USAGE OF THIS APPLIANCE, READ THE
INSTRUCTIONS CAREFULLY AND FOLLOW THE INSTALLATION GUIDE.
- THE MANUFACTURER AND ITS DISTRIBUTORS CANNOT BE HOLD RESPONSIBLE FOR
ANY DAMAGE OR LOSS TO PERSONS OR BELONGINGS RESULTING FROM THE
INCORRECT INSTALLATION OR MISUSE OF THIS APPLIANCE
Installation Instructions pg 2
Instructions for user pg 3
Cautions pg 4
Maintenance pg 6
Hob with Safety Device pg 7
Troubleshooting pg 7
Adaptation to Different Gases pg 8
Page 3
INSTALLATION INSTR
UCTIONS
These instructions are written for qualified technicians. They serve as a
guide for installation, adjustment and maintenance in accordance with
existing laws and standards. All the procedures must be duly completed
before the appliance is connected with electricity.
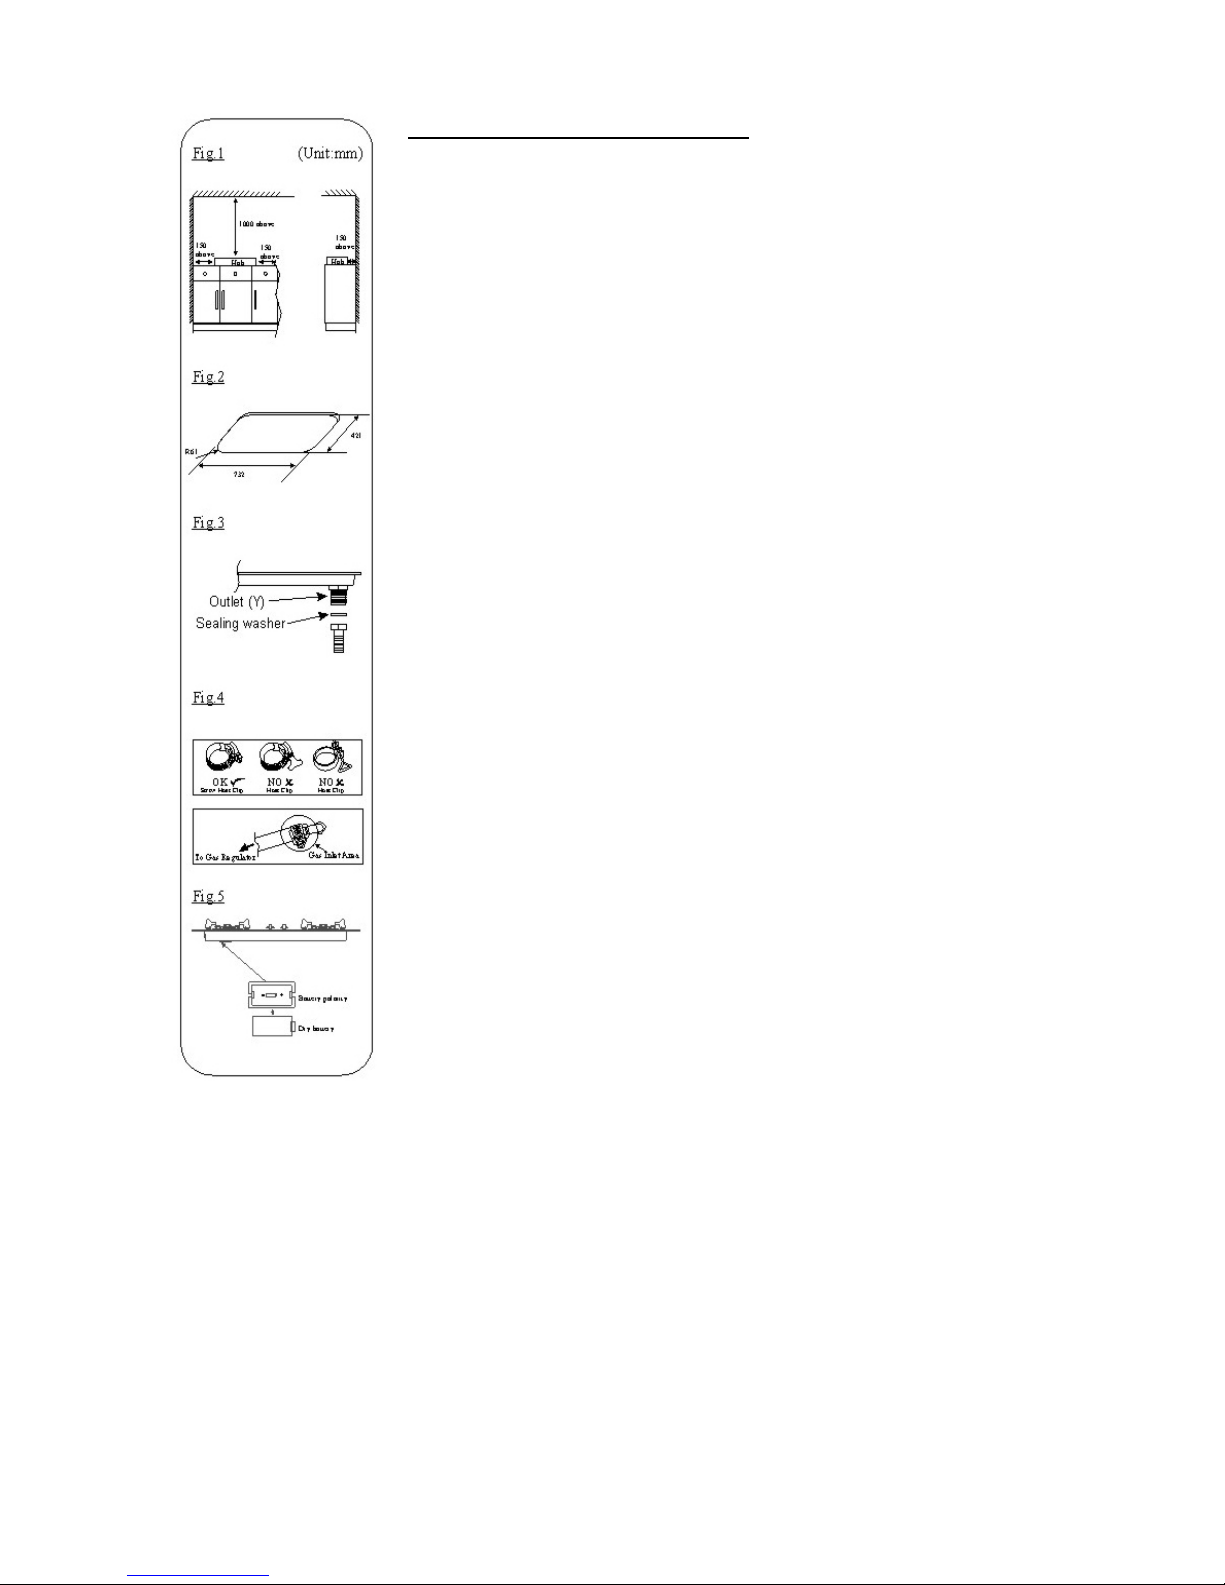
1. When installing the cooker, maintain the minimum distance from
wall and ceiling, otherwise the walls may be over heated that
could cause fire. (refer to Fig 1)
2. If the distance between the walls and periphery of the burner is
less than the specified ones, the walls must be protected with a
non-combustible coating.
3. Before installing the appliance, check that the location provides
the required distance from combustible materials and of necessary
provide protection to adjacent surfaces as required. Make
provision for the gas supply to be connected to the location.
4. Cut the opening in the bench top in accordance to the dimension
shown in Fig 2.
5. Remove the hob from the carton.
6. Install the hob into the cut-out opening.
7. Connect the gas supply by using an iron or copper pipe, starting
from the outlet Y (Fig 3). The sealing washer must be fitted
between the outlet Y and copper pipe.
8. Insert the Ø9.5mm gas hose to the gas inlet and tighten with hose
clamp (Gas valve and gas inlet – 2 positions). See Fig 4.
9. Fix the dry battery underneath the cooker into the battery
compartment as shown below. Battery polarity’s position must
place in accordance to the positive & negative placement in the
battery compartment. See Fig 5
10. Once the gas hose is connected, an inspection to check for any
gas leakage must be done. Turn the gas on and check around all
the joints using a soap solution.
11. Test the appliance: Press the control knob and turn to full flame
setting to activate the electric igniter. The burner will be ignited.
Adjust control knob to the desired setting. On initial usage you
may have to repeat this ignition function several times to allow air
flush out from the gas supply system. No adjustment should be
necessary. If any problems occur refer to the troubleshooting
chart.
12. When the sound of ignition spark becomes weaker or the flame
easily put off during ignition time, replace with new battery. Always
reserve space underneath the cooker for changing the battery.
13. If there is no gas valve or gas pipe at the installation area or the
pipe’s diameter is not suitable, then a new gas pipe must be
installed or changed the existing one. Installation or change of
new gas valve must be done by authorized contractor.
Page 4
INSTRUCTIONS FOR USERS
This hob is only used with gas only as it is indicated below the hob.
IGNITION OF BURNER
1. Check to make sure that the gas supply is accessible and set
up with the necessary and appropriate fittings/connectors.
2. Turn all control knobs to off position.
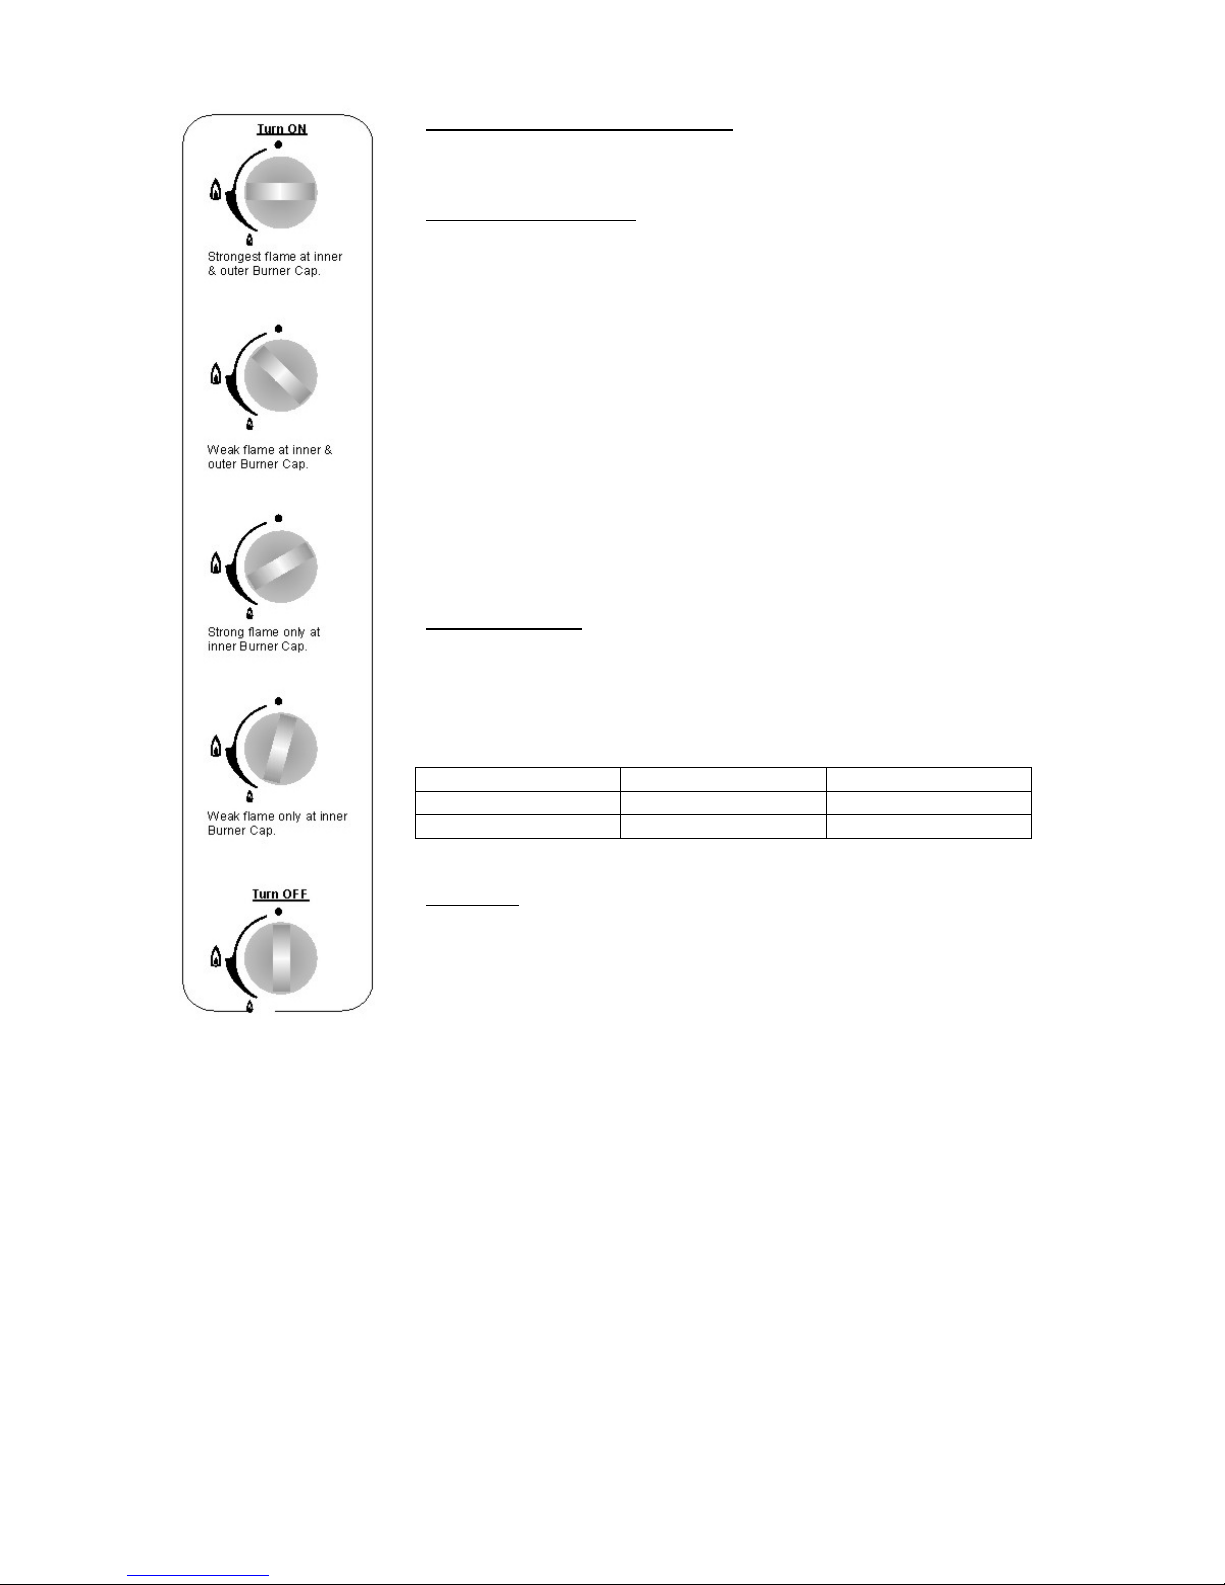
3. To ignite, press the knob and rotate it to the maximum gas
flow position.
4. When releasing, ensure flame is still on.
5. When the flame is still on, turn the knob to adjust the flame
size according to your need and this need no pressing on the
knob.
6. To off, rotate the knob clockwise to off position until you hear
the safety tap’s distinct click.
7. If the burner has been reinstalled or not been use for long
time, it will take some time to get rid of the air inside the gas
pipe.
8. Please refer to the drawing for flame adjustment
USING THE HOB
1. To ensure maximum efficiency, it is recommended that you
use only pots and pans with the bottom size that fit the size of
the burner. See Table 1.
Table 1
Burner Minimum Diameter Maximum Diameter
Big 160mm 240mm
Medium 120mm 220mm
POTTERY
1. Always use pots which properly fit what you have to cook.
2. Make sure the pans or pots are not too small in order to avoid
overflow.
3. Use pans and pots with the right diameter so the amount of
gas consumption can be reduced.
Page 5

CAUTIONS
1. The hose must never reach, in any point, a temperature of
100oc. Use the adequate sealing washer ONLY. The gas flexible
hose must never in contact with bottom panel.
2. The gas flexible hose must be fixed to the cook top connection
by metal clip.
3. Every 5 years the gas flexible hose must be replaced with a new
one.
4. When the gas hob is used, the accessible parts would become
hot. Young children must be kept away.
5. Avoid physical and temperature shock on the glass cook top.
6. Do not place anything, e.g. flame tamer, asbestos mat, between
pan and pan support as it may cause serious damage to the
appliance. See Fig 7.
7. Do not remove the pan support and enclose the burner with a
wok stand as this will concentrate the flame and deflect the heat
onto the top plate. See Fig 8.
8. Do not use large pots or heavy weights which can bend the pan
support or deflect the flame onto the top plate. See Fig 9.
9. Locate pan centrally over the burner so that it is stable and does
not overheat the appliance. See Fig 10.
10. Use only wok support supplied or recommended by the
manufacturer of the appliance. See Fig 11.
11. Improper use of the grids can result in damage to the hob:
a) Do not position the grids upside down or slice them across the
hob.
b) Do not use cast iron griddles or terra cotta (stone) pots and
pans; heat diffusers suchas metal mesh or any others types or
two burners sharing one receptacle.
12. Do not use this gas hob near flammable object; it may cause fire
or explosion.
13. This cooker is made for cooking only. Do not dry towels, clothes,
etc. over it.
14. If the gas is leaking, close stopcock, open up all windows and
call your dealer. Do refrain from turning an electric switch on or
off, lighting a match not even using a lighter.
15. Use it in a well ventilated room.
16. Do not use a vinyl hose. It is liable to be softened by heat. Use
only a rubber hose.
17. Ensure to close the ignition knob and the regulator of the
cylinder after use. Check again before you go to bed or leaving
your house.
18. Do not touch the burner, trivet and etc. immediately after use as
it is still hot.
19. The rubber hose should not has contact with the hob (except the
connection head) or lies under the hob.
20. The trivet legs would discolor after used and it is normal.
21. In the event of the burner flames being accidentally
extinguished, turn off the burner control and do not attempt to
reignite the burner for at least one minute.
22. Users should not attempt to ignite gas cooker by any other
means (manual igniter) other than the built-in igniter inside the
gas hob. Please refer to this instructions manual or calling the
dealer for assistance if the built-in ignition is not working.
Page 6
BATTERY COMPARTMENT
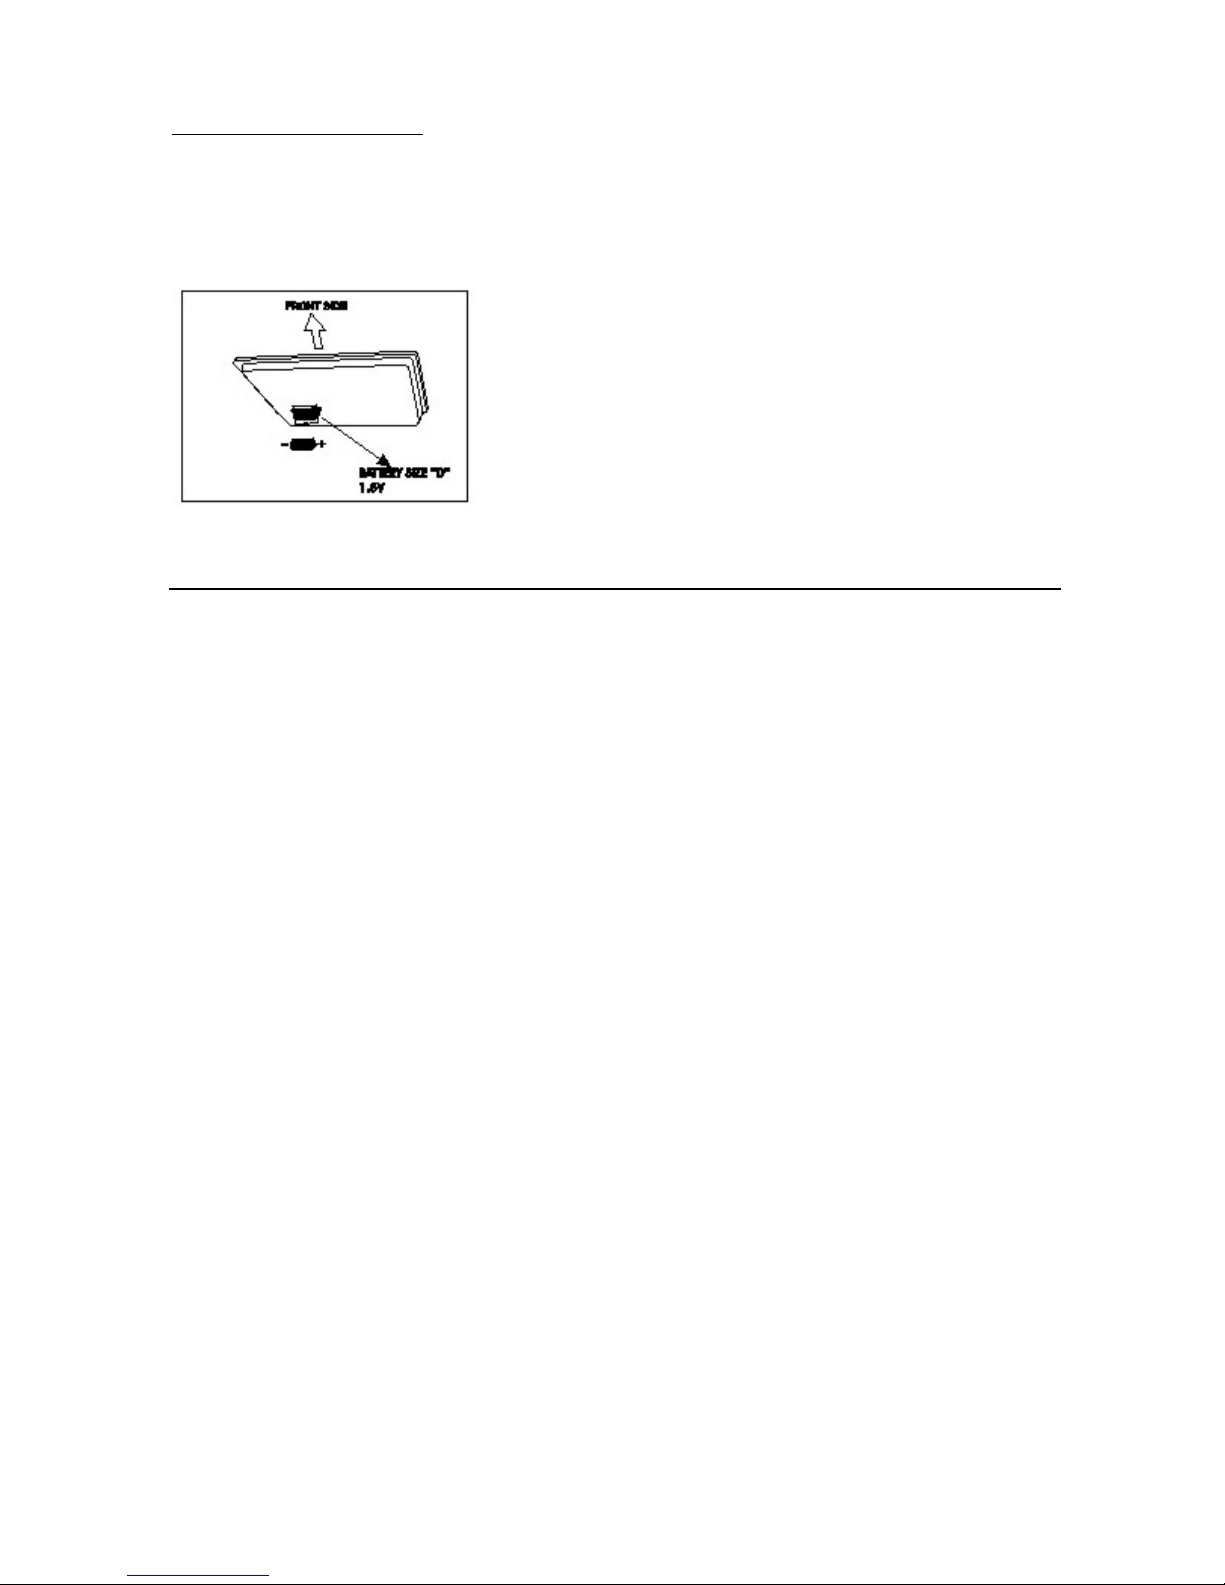
1. New battery should be replaced the old one if it runs flat.
2. The battery compartment is located as shown in the diagram. Please place the battery in
correct position as shown.
Do not spray aerosols on this hob while the flame is on as the propellant gases could break
down when heated and produce abrasive vapors that could corrode the hob.
Where this appliance is installed in a craft or in caravans, it shall not be used as an air heater.
Page 7
MAINTENANCE
CLEANING THE TOP PLATE
1. Persistent stains may require heavy rubbing with nylon brush or detergent. Harsh abrasive
CLEANING THE BURNER CAP
cleaners, powder cleaners, steel wool or wax polishes are not allowed to use as it spoil the
hob.
2. Do not use alkaline detergent, petrol, corrosive or bleaching material to clean the hob.
3. Do not put metal sheet, wire gauze or aluminum plate on top of burner for cooking purposes
as this will cause irremovable stain.
1. All burner caps can be lifted for separate cleaning.
2. Use soft cloth or foam to clean the burner cap. Use soft brush for tough stain, do not scratch
or hit the burner cap heavily.
3. Always keep burner clean. Prevent the food residual blocking the burner cap as this may
reduce the flame output.
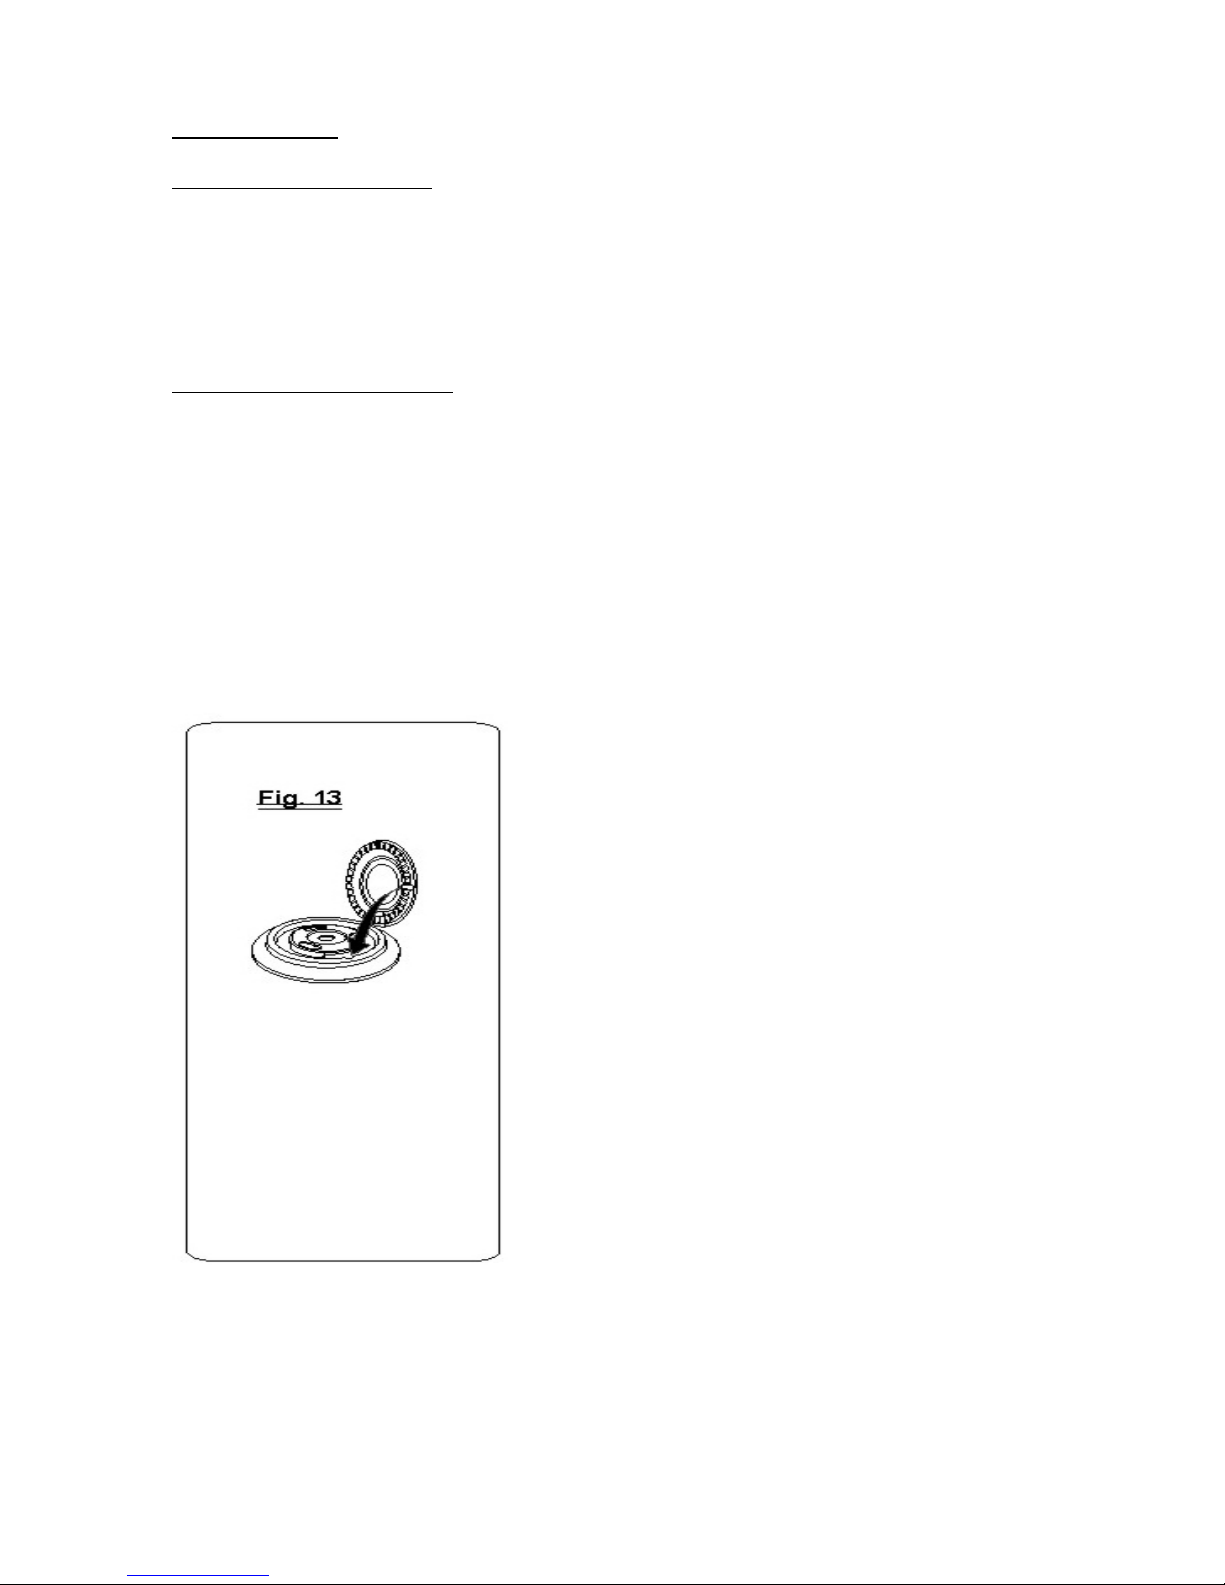
4. After washing, place the burner cap back to its original position. See Fig 13.
5. Dirt at the gas sealing surface must be cleaned off as it may cause gas leakage.
6. Use soft cloth to clean the flame failure sensor. Do not use hard object to knock the flame
failure sensor.
Page 8

HOB WITH SAFETY DEVICE
attempting to ignite the burner again.
1. Safety device is equipped with automatic shut off gadget. When the flame is extinguished by
When the burner is fitted with a flame supervision device, the device shall not operate for
more than 15 seconds during ignition. If after 15 seconds the burner still does not lit, stop
operating and open the compartment door of the cabinet and wait at least one minute before
the wind or overflow of food, this device will automatically cut off the gas supply for your
safety.
2. Turning the knob clockwise to “off” position, a click sound will be heard, the gas supply is shut
off and the flame will extinguish.
TROUBLESHOOTING
Burner does not ignite 1. Air in gas line
Fire flow back to injector 1. Excessive dirt at the
Igniter not sparking 1. Battery runs flat
Flame cannot be held 1. Incorrect turning of gas
Yellow flame 1. Accumulated grease and
Low heat or overheating 1. Incorrect size cooking
FAULT CAUSES REMEDY
1. Clean the gas line
2. Blockage in line
3. Igniter not sparking
4. Battery runs out
5. Battery is installed
wrongly
6. Gas supply valve turned
off
7. Burner cap’s holes stuck
8. Burner cap is fitted
wrongly and the ignition
cannot reach to light up
burner
2. Excessive gas pressure
2. Excess electrode gap
3. Igniter connection is
loose
4. Burner cap is blocked by
aluminum foil
control knob
dirt on burner cap (head)
utensil being used
2. Trace back and clear
3. Check the lead and electrode gap
4. Change a new battery
5. Reinstall the battery properly
6. Turn on gas supply valve
7. Clean and dry the burner cap
8. Place the burner cap back to its
proper place to reach the igniter
1. Remove and clean burner
2. Check gas regulator pressure and
adjust it if necessary
1. Replace a new battery
2. Check the gap, adjust the igniter to
fall within 4-5mm from the burner
cap.
3. Check connections to igniter, replace
it if it is faulty
4. Remove the aluminum foil
1. Press and turn the gas control knob
anti-clockwise until a ‘click’ sound is
heard. Hold for a few seconds until flame
is ignited
1. Wash burner cap (head) in warm water
with detergent. Leave it on dry and then
place it back
1. Use pans with the right diameter to fit
the burner
Page 9

Sole Distributor:
Ge Green Sdn. Bhd.
Menara Lien Hoe (HQ)
Lot 18.2, 18th Floor,
Menara Lien Hoe,
8, Persiaran Tropicana,
47410 Petaling Jaya,
Selangor.
 Loading...