

Pacific WAV-30 Installation Manual

PARTS & OPERATING MANUAL
WAV-30
WIDE AREA VACUUM
PLEASE READ THIS BOOK
This operator’s book has important informaon for the use and safe operaon of this machine. Read
this book carefully before starng the machine. Keep this book and tell all operators to read the book. If
you do not follow the instrucons, you can cause an injury or damage equipment, furniture or buildings.
For new books, please download your copy from our website www.pacicoorcare.com or write to:
Pacic Floorcare
2259 S. Sheridan Drive
Muskegon, MI 49442-6252
Carefully inspect all components to ensure that there is no concealed freight damage. If such damage is
discovered, le a “CONCEALED DAMAGE REPORT” immediately with the delivering carrier.
The contents of this manual are based on the latest product informaon available at the me of
publicaon. Pacic reserves the right to make changes or improvements without noce.
Thank you for purchasing a Pacic Floorcare product. Warranty registraon will allow us to beer
serve you over the lifeme of the product. For quick and easy registraon, go to:
www.pacicoorcare.com/Register Product.

IMPORTANT SAFETY INSTRUCTIONS
READ AND UNDERSTAND ALL WARNINGS AND INSTRUCTIONS IN THIS BOOK BEFORE USING THIS
MACHINE! If you do not understand, ask your supervisor.
WARNING: To reduce the risk of re, electric shock, or injury:
1. DO NOT USE THIS VACUUM FOR PICK UP OF WET DEBRIS.
2. Do not use outdoors or on wet surfaces.
3. Do not allow to be used as a toy. Close aenon is necessary when used by or near children.
4. You must be trained to operate this machine. Operate this machine for its intended use only.
5. Do not operate this machine unless it is completely assembled. The dust bag and/or lters must be
in place. Use only manufacturer’s aachments.
6. Keep the machine and its electrical components dry. Do not subject to rain. Store the machine in a
dry building area. Clean the machine with a dry cloth only.
7. Machines can cause an explosion when near ammable materials and vapors. Do not use or store
this machine with or near fuels, grain dust, solvents, thinners, or other ammable materials. Do not
use ammables to clean this machine.
8. Do not pick up anything that is burning or smoking, such as cigarees, matches or hot ashes.
9. Maintenance and repairs must be done by a qualied or authorized service center.
10. If the machine is not working as it should, has been dropped, damaged, le outdoors, or dropped into
water, bring it to a service center.
11. Connect to a properly grounded outlet only (See Grounding Instrucons).
12. To prevent electric shock, always remove the electrical plug from the electrical outlet before doing any
repairs or maintenance and when leaving the machine unaended. Do not handle plug or vacuum
with wet hands.
13. Do not pull cord, use cord as a handle, close a door on cord, or pull cord around sharp edges or corners.
Keep cord away from heated surfaces. Do not use with damaged cord or plug.
14. Turn o all controls before unplugging.
15. Do not put objects into openings. Do not use with any opening blocked: keep free of dust, lint, hair
and anything that may reduce airow.
16. Keep hair, loose clothing, ngers and all parts of the body away from openings and moving parts.
17. Make sure all labels, decals, warnings, cauons and instrucons are fastened to the machine.
2
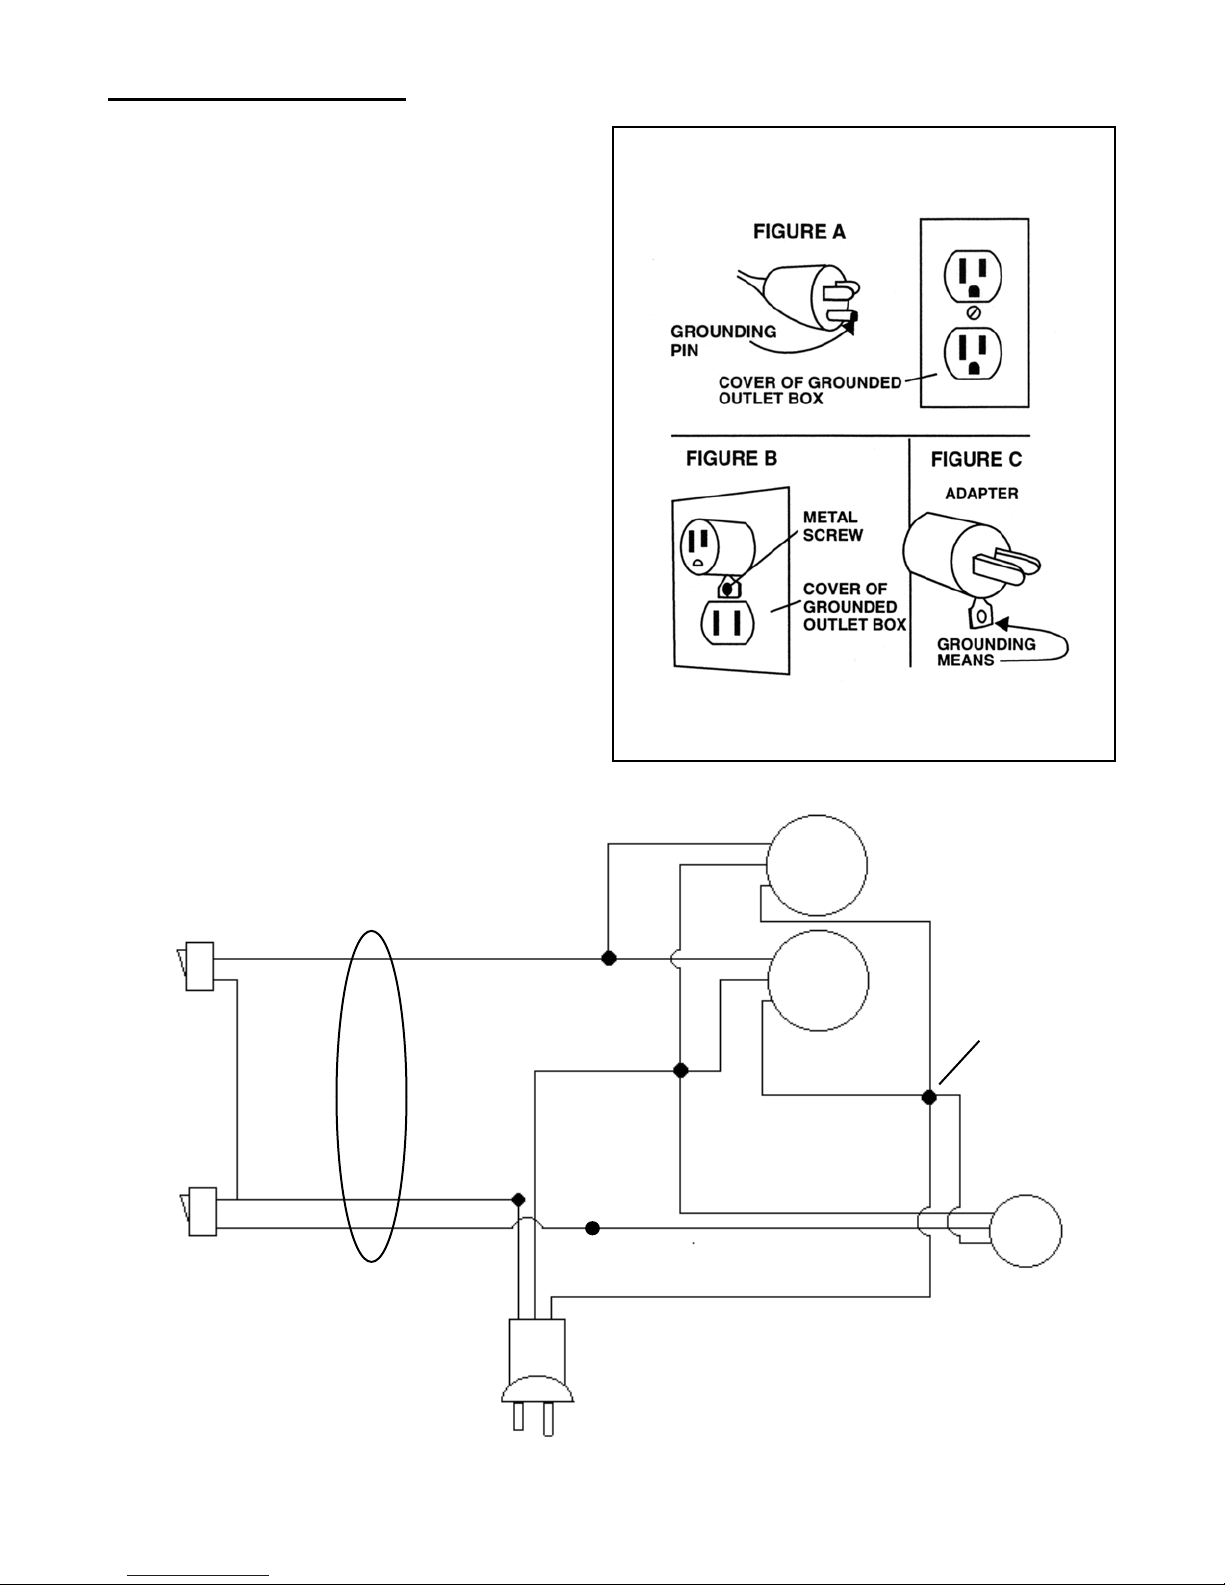
Grounding Instrucons
This machine must be grounded. If it should malfuncon or break down,
grounding provides a path of least resistance for electric current to reduce
the risk of electric shock. This machine is equipped with a cord having an
equipment-grounding conductor and grounding plug. The plug must be
inserted into an appropriate outlet that is properly installed and grounded
in accordance with all local codes and ordinances.
WARNING - Improper connecon of the equipment-grounding conductor
can result in a risk of electric shock. Check with a qualied electrician or
service person if you are in doubt as to whether the outlet is properly
grounded. Do not modify the plug provided with the machine. If it will
not t the outlet, have a proper outlet installed by a qualied electrician.
This machine is for use on a nominal 120-volt circuit, and has a grounded
plug that looks like the plug illustrated in gure A. A temporary adapter
that looks like the adapter illustrated in gures B and C may be used to
connect this plug to a 2-pole receptacle as shown in gure B if a properly
grounded outlet is not available. The temporary adapter should be used
only unl a properly grounded outlet (gure A) can be installed by a qualied electrician. The green colored rigid ear, lug, or the like extending from
the adapter must be connected to a permanent ground such as a properly
grounded outlet box cover. Whenever the adapter is used, it must be held
in place by a metal screw.
NOTE: In Canada, the use of a temporary adapter is not permied by the
Canadian Electrical Code.
EXTENSION CORDS
Use only three-wire 14/3 or larger gauge approved extension cords that
have three-prong grounding type plugs and three-pole receptacles that
accept the appliance’s plug. Replace or repair any damaged cords or plugs.
When servicing, refer to authorized person only. Use only idencal replacement parts.
NOTE: Do not use adapters shown in gures B & C in Canada
Vacuum Switch
#911089
Jumper
#911211
Brush Switch
#911089
#1 Wht
#3 Wht
#2 Wht
Wht
Blk
Blk
Blk
Wht
Gr
Cord Assembly
#908086
Blk
Blk
Vacuum
Motor
Vacuum
Motor
Gr
Blk
Gr
Wire Conectors
(5 Locaons)
#911179
Gr
Brush
Motor
3

OPERATING PROCEDURES
WARNING! For the safe operaon of this machine follow the instrucons given in this booklet and the training given by
your supervisor. Failure to do so can result in personal injury and/or damage to machine and property!
DO NOT OPERATE MACHINE IN AN EXPLOSIVE ENVIRONMENT!
NEVER USE THIS MACHINE TO PICK UP VOLATILE OR EXPLOSIVE MATERIALS!
The model shown in this manual is intended for commercial use.
PREPARATION
To prepare the machine for operaon, make sure it is of correct voltage and properly assembled. If in doubt, ask your supervisor.
1. If the vacuum is in its upright posion (page 6), raise the handle while supporng the vacuum, then slowly lower the
vacuum to the oor.
2. Properly install the lter bag in the vacuum: Li the cover from the machine. The lter bag inlet is designed with a rubber
gasket that ts securely over the bag adapter (page 7) in the cover. First push the lter bag inlet over the adapter on the
cover. Then from the outside of the cover reach inside the adapter and push the gasket on the rest of the way. Replace
the lter bag when full.
OPERATION
1. Plug the machine’s power cable into a properly grounded outlet (see Grounding Instrucons).
2. The foot pedal should be raised to the “BRUSH” posion (page 8) for wide area vacuuming.
3. Adjust the brush height with the lever located on the rear of the machine near the oor (page 8).
4. Turn the vacuum switch ON (rocker switch on operator’s right, page 7).
5. Turn the brush switch ON (rocker switch on operator’s le, page 7) and begin vacuuming.
OPERATION WITH TOOLS
Three on-board tools are available for the vacuum: the dusng tool, crevice tool and turbo tool (page 6). Twenty (20) feet of
hose is provided which allows access to rooms without moving the machine.
1. The brush and vacuum switches should be turned OFF.
2. Depress the foot pedal to the “ACCESSORY” posion.
3. Remove the rigid poron of the accessory hose from its storage area in the handle and aach the tool of choice.
4. Turn the vacuum switch ON and begin.
Note: The vacuum switch should be OFF when switching the foot pedal between the accessory and the brush posions.
MAINTENANCE
ALWAYS turn the brush and vacuum motor switches OFF and UNPLUG the power cord from the electrical outlet before doing
any clean-up or repairs, and when the machine is le unaended.
AFTER EACH USE:
1. Vacuum lter bag: If the bag is full or damaged install a new one.
Filter Bag, 10 Pack – Part Number 650602
Cloth Bag (oponal) – Part Number 650601
2. Power cord and plug: Check for cuts or nicks; if damaged, have the cord replaced at a factory authorized service center.
3. Casters and Wheels: Remove any strings or debris that may restrict the free movement of the casters.
4. Tools: Inspect the tools to ensure there is no obstrucon of airow. Remove any debris found.
5. Brush: Remove any strings or debris. Replace if becomes worn or damaged.
Storage: The handle may be folded down and the machine stored upright to reduce storage space requirements. Store the
machine in a clean dry area.
4
 Loading...