


Electronic Service
Manuals
This electronic document is provided as a service to our customers. We do not create the contents of the information contained in
this document. Should you have detailed questions pertaining to
the information contained in this document, you may contact Michco,
or the manufacturer which provided the original information in this
electronic deliverable. Michco’s only part in this electronic deliverable was the electronic assembly process.
You may contact Michco through the following methods:
Phone (517) 484-9312 or (800) 331-3339 MI, OH, IN only
2011 N. High St. -- Lansing, Michigan -- 48906
Fax: (517) 484-9836
Email: CustServ@Michco.com
Web site: www.Michco.Com
Parts Web site: www.FloorMachineParts.Com
Order Parts on Line at:
www.FloorMachineParts.Com
Directly to Parts & Service:
By Email: Shop@Michco.com
By Fax: (517) 702-2041
By Voice: Use numbers above.
Serving the Cleaning Industry Since 1922
Notice: All copyrighted material remains property of original owners, all trademarks are property of respective
owners. Manuals are subject to Manufacturer’s reproduction limitations. Originals or reproductions were provided
by manufacturers through a request. We make no warranty as to the correctness of information provided in this
document and you assume all risk.

TopVac
OPERATING & MAINTENANCE
INTRODUCTION INSTRUCTIONS
READ THIS BOOK
This operator’s book has important information for the use
and safe operation of this machine. Read this book carefully before starting the machine. Keep this book and tell
all operators to read the book. If you do not follow the
instructions, you can cause an injury or damage equipment,
furniture or buildings.
For new books write to:
Pacific
2259 S. Sheridan
Muskegon, MI 49442-6252
Carefully inspect all components to ensure that there is no
concealed freight damage. If such damage is discovered,
file a “CONCEALED DAMAGE REPORT” immediately
with the delivering carrier.
The contents of this manual are based on the latest product
information available at the time of publication. Pacific reserves the right to make changes or improvements to its
machines without notice.
FOR YOUR CONVENIENCE, RECORD THE FOLLOWING
INFORMATION:
MODEL_______________________________
SERIAL NUMBER_______________________
PART NUMBER _________________________
DATE PURCHASED ______________________
IMPORTANT SAFETY INSTRUCTIONS
When using an electrical appliance, basic precautions should always be followed, including the
following:
READ ALL INSTRUCTIONS BEFORE USING THIS MACHINE
WARNING: to reduce risk of fire, electric shock, or injury:
1. Do not leave appliance when plugged in. Unplug from outlet when not in use and before servicing.
2. Do not use outdoors or on wet surfaces.
3. Do not allow to be used as a toy. Close attention is necessary when used by or near children.
4. Use only as described in this manual. Use only manufacturer's attachments.
5. Do not use with damaged cord or plug. If appliance should not work as it should, has been dropped or
damaged, left outdoors, or dropped into water, return it to service center.
6. Do not pull or carry by cord, use cord as handle, close a door on cord or pull cord around sharp
edges or corners. Do not run appliance over cord. Keep cord away from heated surfaces.
7. Do not unplug by pulling on cord. To unplug, grasp the plug, not the cord
8. Do not handle plug or appliance with wet hands.
9. Do not put any objects into opening. Do not use with any opening blocked: keep free of dust, lint,
hair and anything that may reduce airflow.
10. Keep hair, loose cl othing, fingers and all parts of the body away from openings and moving parts.
11. Turn off all controls before unplugging.
12. Use extra care when vacuuming on stairs.
13. Do not use to pick up flammable or combustible liquids such as gasoline or use in areas where they
may be present.
14. Connect to a properly grounded outlet only.
15. Do not pick up anything that is burning or smoking, such as cigarettes, matches or hot ashes.
16. Do not use without dust bag and/or filters in place.
17. Do not use this vacuum for pick-up of wet debris; this vacuum is for dry pick-up only.
Grounding Instructions
This machine must be grounded. If it should malfunction or break
down, grounding provides a path of least resistance for electric current to reduce the risk of electric shock. This machine is equipped
with a cord having an equipment-grounding conductor and grounding
plug. The plug must be inserted into an appropriate outlet that is
properly installed and grounded in accordance with all local codes and
ordinances.
WARNING - Improper connection of the equipment-grounding conductor can result in a risk of electric shock. Check with a qualified
electrician or service person if you are in doubt as to whether the
outlet is properly grounded. Do not modify the plug provided with
the machine - if it will not fit the outlet, have a proper outlet installed
by a qualified electrician.
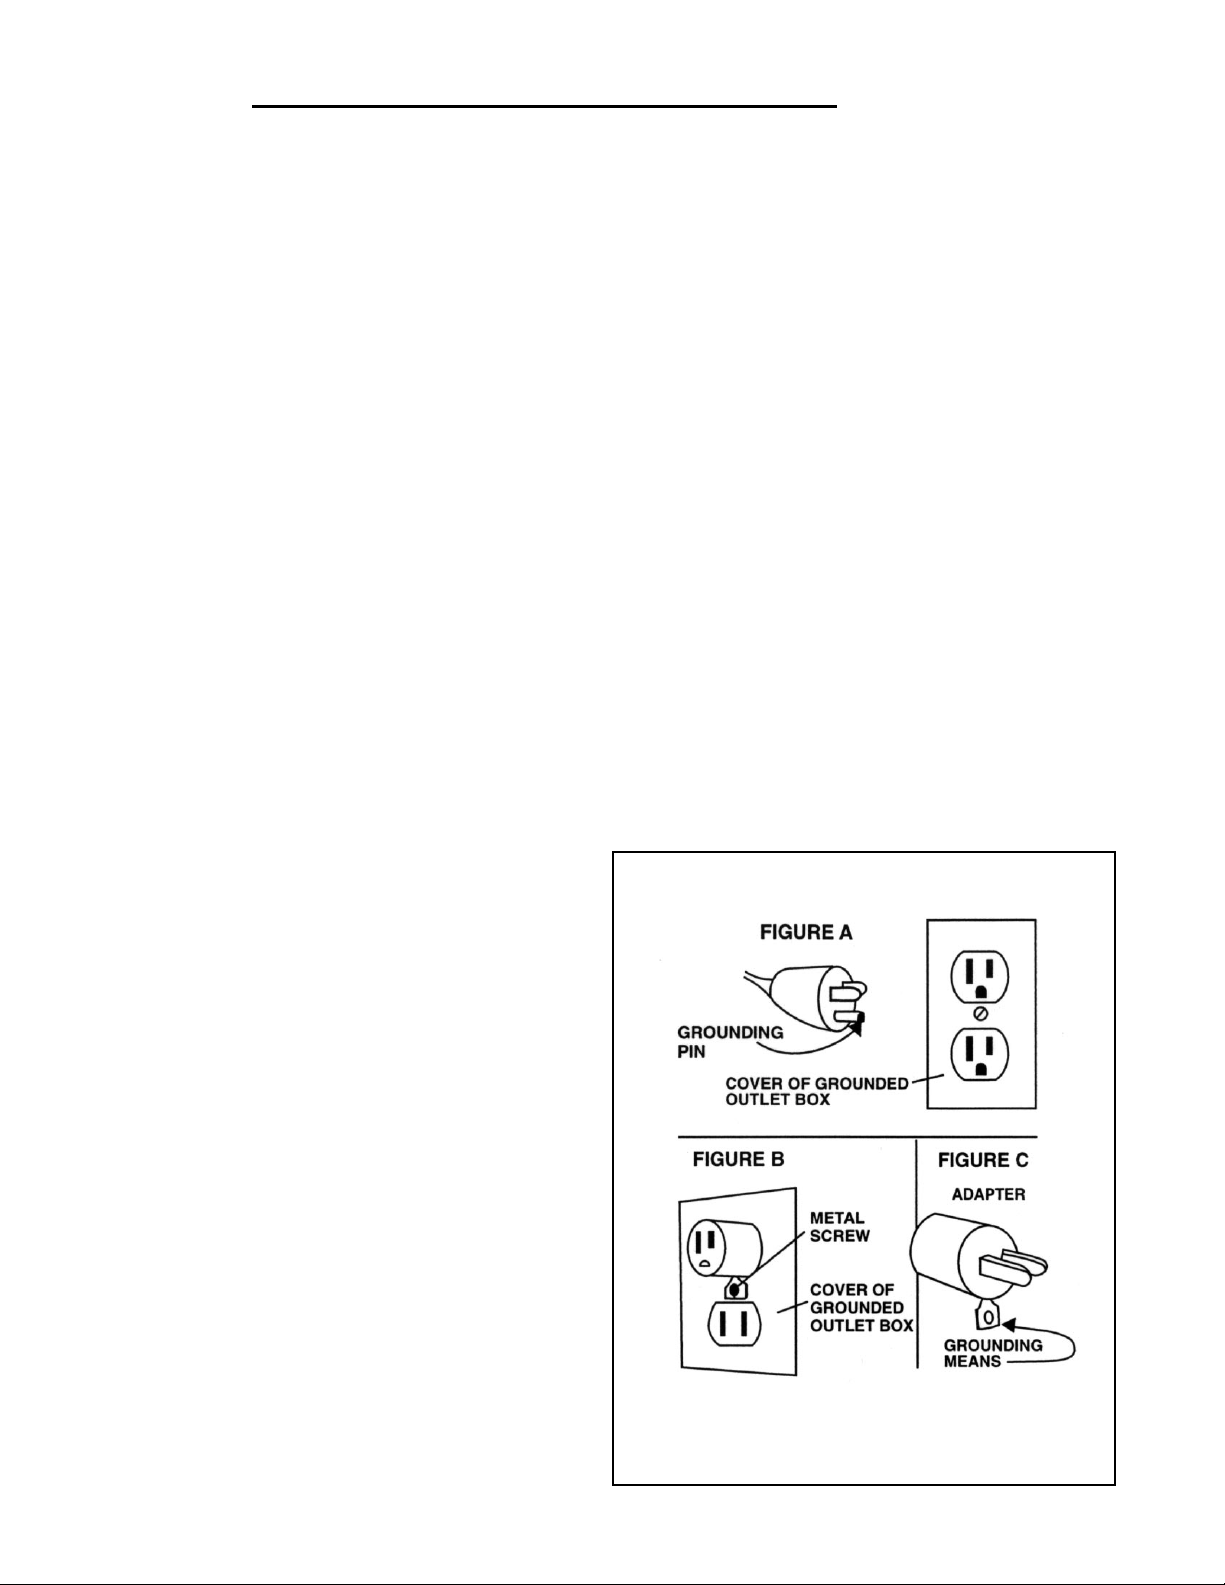
This machine is for use on a nominal 120-volt circuit, and has a
grounded plug that looks like the plug illustrated in figure A. A
temporary adapter that looks like the adapter illustrated in figures B
and C may be used to connect this plug to a 2-pole receptacle as
shown in figure B if a properly grounded outlet is not available. The
temporary adapter should be used only until a properly grounded
outlet (figure A) can be installed by a qualified electrician. The green
colored rigid ear, lug, or the like extending from the adapter must be
connected to a permanent ground such as a properly grounded outlet
box cover. Whenever the adapter is used, it must be held in place by
a metal screw.
NOTE: In Canada, the use of a temporary adapter is not permitted by
the Canadian Electrical Code
EXTENSION CORDS
Use only three-wire 16/3 or larger gauge approved extension cords
that have three-prong grounding type plugs and three-pole receptacles that accept the appliance’s plug. Replace or repair any damaged cords or plugs.
When servicing, refer to authorized person only. Use only identical
replacement parts.
NOTE: Do not use adapters shown in figures B & C in Canada

ASSEMBLY AND OPERATION
Unpack your vacuum from its carton and inspect the machine, hose assembly and tools for any damage. If there is
damage to any component, file a claim with the carrier immediately.
Assembly
This machine requires little assembly before operation. However, the following steps must be taken to ensure proper
operation.
1. Install a filter bag into the tank. Release the hook located on each side of the machine’s tank and motor
assembly. Lift the cover off and set it aside. Slide the
bag retaining plate (Item 6) off the bag adapter. Then
push the filter bag opening over the adapter and slide
the bag retaining plate over both the bag cuff and the
adapter. Be sure the filter bag follows the perimeter of
the tank; the center area must remain clear for replacement of the cover with motor assembly. Replace the
cover and fasten both hooks.
2. Insert the vacuum hose assembly into the adapter. Line
up the tabs on the vacuum hose with the notches on
the adapter and twist to secure in place. Then attach
the wand and selected tool. The wand and tools attach
by simply pushing them together.
Tools
Four tools are provided with the vacuum: the combination
floor tool, upholstery tool, crevice tool and dusting brush.
Each is used by inserting them directly into the free end of
the vacuum hose/wand.
An adjustable metal wand is also provided. Simply push
on its knob to adjust the length.
Servicing
Warning: Always unplug your vacuum before performing any service. Severe personal injury could
result if the electrical power is not disconnected.
1. Vacuum Filter Bag: When full, remove the paper filter
bag and install a new one.
2. Power Cord: Check the cord for cuts or nicks. If damaged, have the cord replaced at a factory authorized
service center.
3. Caster/Wheels: Remove any string or debris that may
restrict their free movement. Wipe the treads clean.
Operation
The Model shown in this manual is intended for commercial
use and is to be used for only dry pick-up applications.
1. Before use, be sure a filter bag has been properly installed in the machine (reference assembly instructions).
2. Attach the hose assembly, wand and selected tools.
3. Plug the power cord into a 115-volt, 60 cycle, grounded
outlet.
4. Press the power switch to start the vacuum. The switch
is located on the back left side of the vacuum, under the
accessory holder.
5. The vacuum suction is adjustable by turning the red
knob located on the back right side of the vacuum. Minor adjustments to the vacuum suction can also be made
by sliding the lever on the bent wand section of the
hose assembly. For maximum pick-up the opening must
be closed, for reduced suction expose the opening.
4. Tools and Wand: Inspect to ensure there is no obstruc-
tion of airflow. Remove any debris if found.
5. Vacuum Filter: A foam filter is provided with the
vacuum. It is located in the cover assembly; turn the
cover upside down and push the tabs toward the center
of the cover to release the filter rest (Item 5) from the top
cover (Item 2). The filter requires periodic cleaning or
replacement. Remove any dust and debris by vacuuming with a different vacuum cleaner. Note: There is also
an optional HEPA filter available for this vacuum. In
order to obtain the optimal performance from a HEPA
filter, it should be replaced when dirty.
6. Inlet Motor Filter: This vacuum has a filter to protect
the motor assembly. It requires periodic cleaning or
replacement. The filter is located inside the tank, over
the vacuum motor. Remove any dust and debris by vacuuming with a different vacuum cleaner.
7. Vacuum Motor Maintenance: Have the vacuum motor
inspected annually by a factory authorized service technician. If the carbon brushes are worn, they should be
replaced. This service will prolong the life of the vacuum
motor.
3

TopVac Canister Vacuum
1
2
3
22
15
4
6
14
13
26
28
29
30
33
31
32
5
7
9
11
12
20
21
19
10
8
16
17
18
27
41
23
24
39
42
38
40
43
25
44
34
35
36
37
46
45
4

TopVac Parts List
ITEM PART NUMBER DESCRIPTION QTY
1 612316 Decoration Cover 1
2 612317 Top Cover 1
3 613403 Gasket, Vac. Hd. 1
4 613301 Sponge Filter 1
5 613303 HEPA Filter - Optional
6 617503 Filter Rest 1
7 616605 Bag Retaining Plate 1
8 610610 Paper Bags, pack of 10
9 611305 Dustbag Block 1
10 619001 Vacuum Tube 1
11 613901 Carrying Handle 1
12 612315 Handle Cover 1
13 614501 Hook 2
14 616606 Accessory Plate 1
15 618601 Stainless Steel Tank 1
16 613302 Inlet Filter 1
17 613401 Gasket 1
18 612315 Motor Cover 1
19 618505 Sponge Bar 1
20 613402 Motor Gasket 1
21 605240 Motor 1
22 618502 Sound Deadening 1
23 618301 Support Spring for Motor 4
24 616605 Spring Plate 1
25 618503 Motor Support 1
26 908106 Power Cord 1
27 615005 Speed Control Knob 1
28 911282 PCB Vacuum Control 1
29 618506 Socket 1
30 615006 Knob - On/Off Switch 1
31 618302 Switch Spring 1
32 911283 On/Off Switch 1
33 618506 Motor Support 1
34 911284 Thermal Protector 1
35 617703 Wheel Shaft 1
36 619704 Wheel 2
37 611505 Cap - W heel 2
38 611306 Base 1
39 611205 Bumper 1
40 619705 Caster 1
41 608813 Combination Floor Tool 1
42 639802 Metal Wand - Telescoping 1
43 618807 Upholstery Tool 1
44 608815 Crevice Tool 1
45 618806 Dusting Brush 1
46 614104 Hose Asm. 1
5

WARRANTY POLICY
PACIFIC LIMITED WARRANTY
The Pacific TopVac Vacuum has been manufactured, tested and inspected in accordance with specific engineering requirements and is
WARRANTED to be free from defects in workmanship and materials as follows:
One (1) year parts & labor - All components unless excluded below.
This warranty extends to the original user/purchaser and only when used, operated and maintained in accordance with Pacific Operating
and Maintenance instructions.
This warranty does not apply to the following wear parts and accessories of the machine including:
Part Number Part Name
908106
614104
613301
610610
613302
613303
608813
618807
608815
618806
614104
Nor does it apply to damage or failure caused by improper use, abuse or neglect. Warranty credit or replacement of return parts including
motors, pumps, etc., is subject to incoming inspection of those items.
Cord Assembly
Vacuum Hose Asm
Sponge Filter
Paper Bags
Inlet Filter
HEPA Filter
Combination Floor Tool
Upholstery Tool
Crevice Tool
Dusting Brush
Hose Assembly
To secure repair under this warranty, the following procedure should be taken:
• The inoperative machine or warranted parts must be delivered to the authorized dealer with shipping and delivery charges prepaid.
If unable to locate the Dealer, you may contact Pacific at the address listed herein for the location of the nearest Pacific repair center
or agent or for other instructions pertaining to your warranty difficulty.
• Upon compliance with the above warranty procedure, all warranted repairs would be completed at no additional charge or cost to the
user.
• Only Pacific or its authorized dealers and agents may make no charge warranty repairs on this product. All others do so at their own
risk.
This warranty limits Pacific’s liability to the repair of the product and/or warranted parts replacement and does not include incidental or
consequential damages arising from the use of a Pacific machine whether defective or not.
This warranty is in lieu of all other expressed or implied warranties and is extended to the original purchaser/user.
03/03
2259 S. Sheridan • Muskegon, MI 49442
Ph: (231) 773-1330 • (800) 968-1332 • Fax (800) 863-9536
www.pacificfloorcare.com
615604
 Loading...