

Page 1
Use,Care,and lnstallation Guide
抽 油 煙 機 使 用 說 明 書
Model:PR830AS / PR836AS
型號:PR830AS / PR836AS
Model number:
Serial Number:
XP022396(1)
抽油機型號:
序 號:
XP022396(1)
Page 2

Page 3

Table of Content
目錄
I. Product Functions/Performance Specification Chart .. . 1
II.
Parts Instructions
III. Installation Guidelines …………………………………. . 3
IV. Installation Procedures …………………………..……. . 4
V. Venting Instruction…………………………………...… . 5
VI.
Installation
VII. Operating Instructions ……………………………..….. . 8
VIII. Replacing Light Bulb ……………………………..…… . 9
IX. Surface Maintenance …………………………………. . 10
X. Troubleshooting …………………………………………. . 11
Air outlet ………………………………….. . 6~7
................................................…. . 2
一.功能簡介/性能規格表………………………. . 1
二.配件說明………………………………………. 2
三.安裝原則………………………………………. 3
四.安裝步驟………………………………………. 4
五.安裝排風管 …… … … … … … … … … … … … ... 5
六.安裝出風口……………………………………. 6~7
七.按鍵說明………………………………………. 8
八.移除燈泡………………………………………. 9
九.機身表面保養和清潔 ………………………….. 10
十.排除故障……… ………………………………. 11
Page 4
一.功能簡介/性能規格表
I. Product Functions/Performance Specification Chart
A.功能簡介
1. 3速風速選擇。
2. 可控制燈的開/關,具亮、暗二段調整。
B.性能規格表
型 號
淨 重 (英磅)
尺 寸
(英吋)
最大伏特數
風 管 直 徑
燈 泡
最 大 消 耗 功 率
圓型 6吋,方型3-1/4"x10"吋
PR830AS
40.7磅
30”X22.5”X8”
120V – 60Hz
鹵素燈 35Wx2
2A/225W 2A/225W
PR836AS
44磅
36”X22.5”X8”
120V – 60Hz
圓型 6吋,方型 3-1/4"x10" 吋
鹵素燈 35Wx2
A. Product Functions
1. 3-speed options.
2. Light has varying degrees of brightness: Bright, Dim and Off.
B. Specification Chart
Models
Net weight(Pound)
Measurement (inches)
Maximum Voltage
Exhaust Pipe Diameter
Light
Maximum consumption
power
30”X22.5”X8” 36”X22.5”X8”
120V – 60Hz
Round 6 inches
Square
3-1/4"x10" inches
Halogen light 35Wx2 Halogen light 35Wx2
2A/225W 2A/225W
PR836AS PR830AS
44 lbs40.7 lbs
120V – 60Hz
Round 6 inches
Square
3-1/4"x10" inches
1.
1.
Page 5
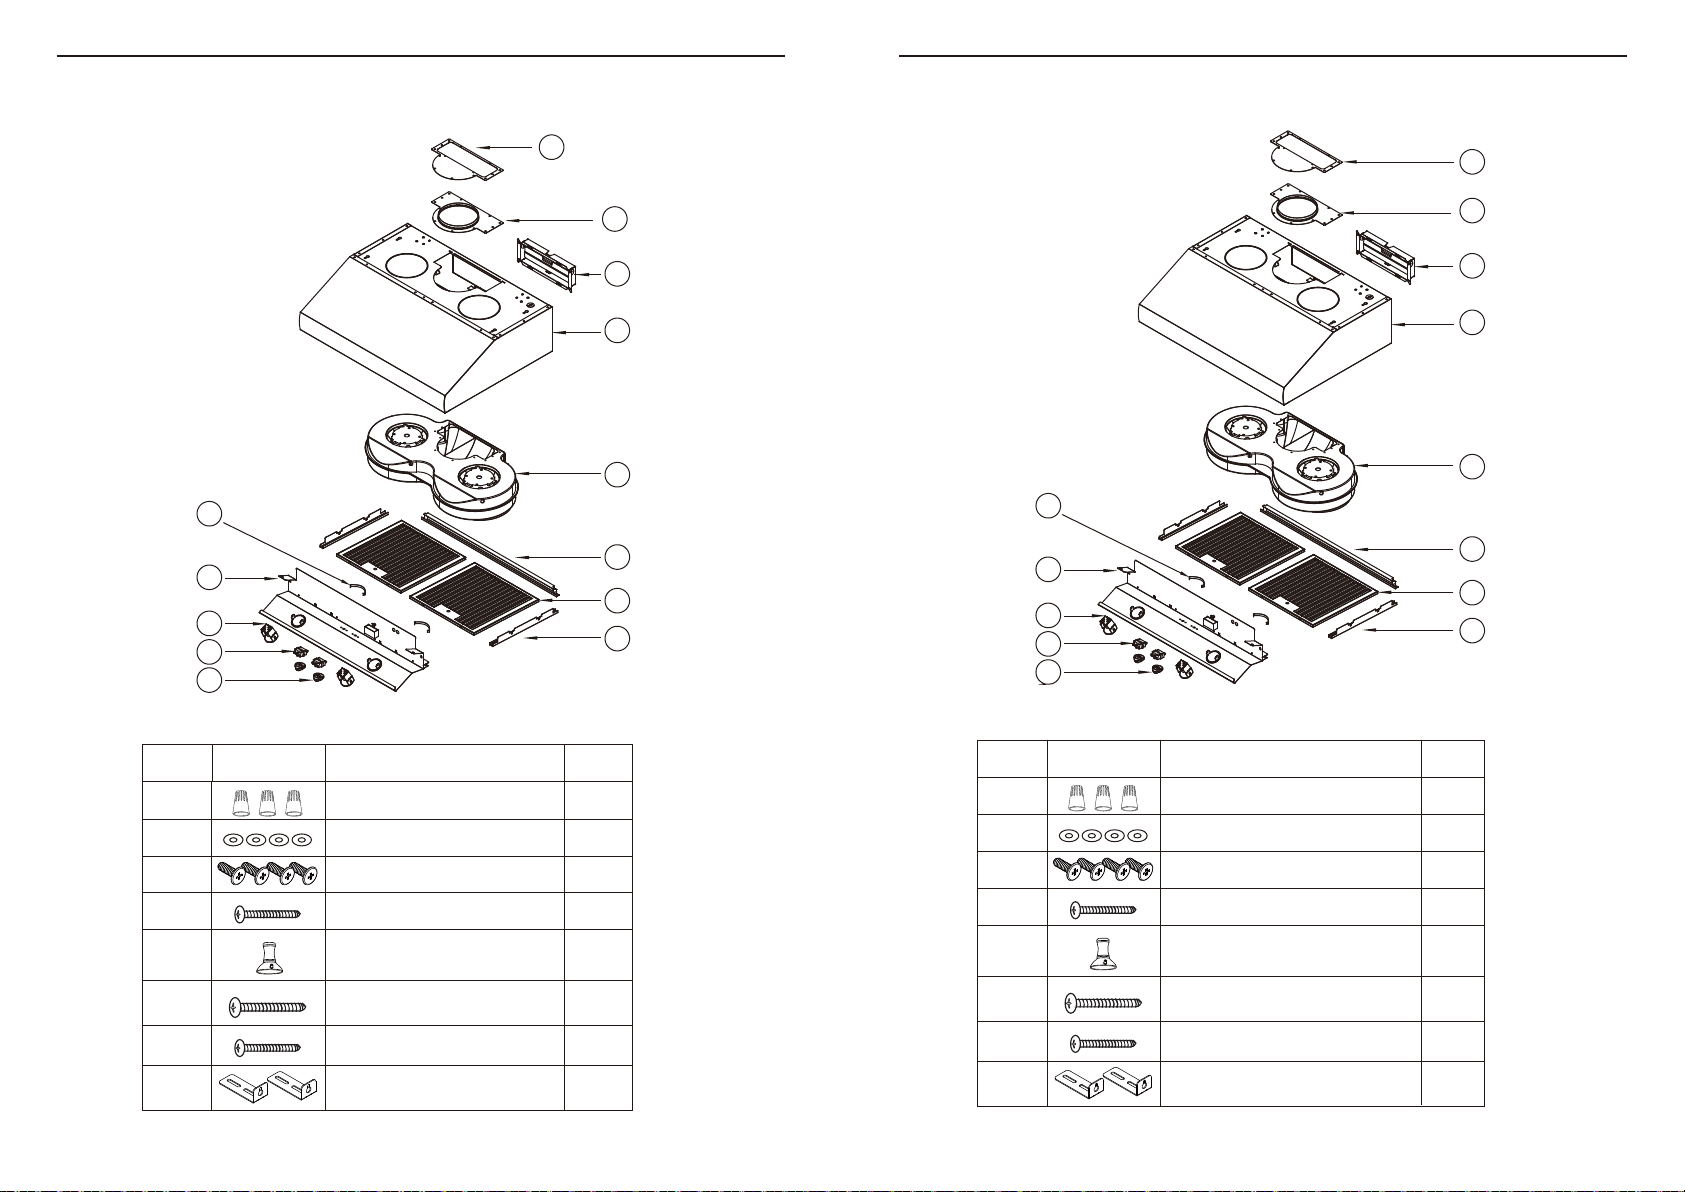
II. Parts Instructions
二.配件說明
PR830AS / PR836AS
Spring
Light panel
Halogen Light
Switch
Knob
9
10
11
12
13
1
6" round vertical transition
adapter with rectangular
transition adapter
2
6" round vertical
transition adapter
3
3-1/4"x10"
rectangular collar
4
Shell
5
Blower housing
6
Grease Tray
Baffle filter
7
Side panel
8
PR830AS / PR836AS
濾網彈片
燈飾板組
鹵素燈
馬達旋鈕開關
旋鈕開關
9
10
11
12
13
1
半圓鐵片
2
6"圓型鐵片
3
活葉轉軸組
4
機箱
5
風胃
6
油杯座
7
不鏽鋼濾網組
8
飾板
HARDWARE PACKAGE CONTENTS
TYPE
A
B
C
D
E
F
G
H
DESCRIPTION
Wire Nuts
5 x 24
m/m
Washers
3/16 x 1/2
M6 x 1-1/2” wood screws
Halogen light Suction Cup
M6 x 2” wood screws
M6 x 1” wood screws
Wall bracket
screws
2.
N°
3
4
4
4
1
4
4
2
螺絲包配件:
序號
A
B
C
D
E
F
G
H
種類 數量
P3螺母
5 x 24m/m 華司
3/16 x 1/2 平頭田丸十字螺絲
M6 x 1-1/2吋木螺絲
鹵素燈拆裝 吸 盤
M6 x 2吋木螺絲
M6 x 1吋木螺絲
吊掛組
2.
3
4
4
4
1
4
4
2
Page 6

三.安裝原則
III. Installation Guidelines
1. 周圍環境(圖一) :
抽油煙機安裝位置,如在窗上 或附近有太多門窗,
請在開動抽油煙機前,先關閉門窗,以免空氣對流
大而影嚮吸力,因當油煙上昇未至10吋之有效吸力
範圍,則無法充分發揮抽油煙最佳效果。
(圖一)
2. 安裝高度(圖二) :
門窗太多
安裝高度自本機底板至煮食爐面之距離以26~36吋
為最理想。
3. 機體應保持水平(圖三):
機體應保持前、後、左、右水平,以免氣流箱,導油
盆積油而溢出。
左、右水平可由掛碼調整,前、後水平則由鋼丁螺
絲鎖緊牆壁,以固定標準。
4. 排風管:
為增加吸力效能,請配合使用本機出風管接頭之直
徑6吋排風管,排風管長度應以適合長度最佳,不宜
過長。
5. 插座安排:
請勿與烤箱或冰箱等耗電量較高之電器產品共用一個插座。
26~36 in
、對流太大
(圖二)
2-4
(圖三)
1. Surrounding Environment (Pic.1)
Notice the surrounding of cooker hood. If there
are too many windows or a door nearby, it is
advisable to close the windows and door before
switching on the cooker hood to prevent the
external air current from affecting the suction.
The smoke has to rise up to 10inches from the
stove/grate to be within the range of suction
efficiency.
Too many windows, too much
air current.
Pic. 1
2. Installation Heights (Pic.2)
The ideal installation height is a distance of
26 to 36inches from the bottom of the hood to
26~36 in
the surface of the stove top.
3. Hood installed in parallel and horizontal level
(Pic.3)
The front, back, right and left of hood must be
in parallel and horizontal level, to avoid the oil
in the oil tub from spilling over. To ensure that
the hood is leveled when installing, it can be
measured by the hook mark for the left and right
side; and the screws fixed securely onto the wall
to ensure the front and back of the hood are parallel.
4. Exhaust duct
ln order to increase the efficiency of hood efficiency of hood,
recommending using the provided 6 inch duct to maintain maximum
air flow efficiency; the length of duct must to be minimized.
Pic. 2
Pic. 3
3.
5. Socket arrangement
Please do not arrange the hood socket with the other high electricity
consumption appliances.
3.
Page 7

IV. Installation Procedures
Hood is designed for installation under a kitchen cabinet.
See Fig.1 for details.
1. Prepare duct location on hood(vertical or
horizontal) .
2. Measure and cut out duct and electrical
openings in cabinet or wall to match up
with the hood. Make sure duct opening is
large enough to apply aluminum duct tape.
duct tape
3. Reinforce cabinet bottom with wood stips
if additional strengthening is required or if
cabinets are framed.
4. Remove baffle filters from hood.
Also remove side panels from hood using
a Phillips screwdriver to remove each of
the screws. And then remove the grease tray.
5. Use 4 wooden screws to secure the hood
to the bottom of the cabinet.
6. Lift hood onto screws located on cabinet
bottom and lock into place. Make sure all
(4) key-holes cover the screws. Tighten
each screw to secure hood to cabinet.
Fig 1
7. Install electrical.
8. Install ductwork and seal with aluminum duct tape.
9. Power up hood and check for leaks around duct tape and test all functions.
10. Reinstall grease tray., side panels and baffle filters.
duct work
elec trical
wood blocking
installation screws
and key-holes
baffle filters&
side panels
grease tray
四.安裝步驟
櫥櫃安裝說明:(如圖一)
1.請準備安裝位置及空間。
2.測量出風口及電源線孔的大小,然
後再鑽孔。
3.櫥櫃需加強本機固定的地方,建議
使用木條強化在櫥櫃內底部。
4.請先卸下不鏽鋼濾網,再用十字起
子移除兩側修飾板,並取下不鏽鋼
油杯。
5.依安裝位置設置四支木螺釘。
6.安裝時用木螺釘扣上之後,將油機
與櫥櫃用螺絲鎖緊,讓油機與櫥櫃
安全不會掉落。
7.裝設電源。
8.安裝風管並用風管膠帶密封。
9.檢查風管處是否緊密及其他功能是
否正常。
10.依序將不鏽鋼油杯、修飾板及不鏽
鋼濾網重新安裝回去。
風管膠帶
風管圈孔
電源線孔
木條
木螺釘與鑰匙孔
不鏽鋼濾網
與修飾板
油杯
圖一
4.
4.
Page 8

五.安裝排風管
V. Venting Instruction
櫥櫃安裝注意事項:
安裝之風管、牆壁、櫥櫃空間、天花板或車庫與閣樓之間的空間都要
有所保留。風管只能使用金屬材質。
安裝之連接處的金屬螺絲要鎖緊,接頭處要用有認證的銀膠帶或風管
膠帶貼緊。
風管安裝選項:
櫥櫃
用重力阻尼器
加蓋於側牆面
依梁柱底面或櫥櫃空間爬行
用重力阻尼器
加蓋於側牆面
WARNING FIRE HAZARD
NEVER exhaust air or terminate duct work into spaces between walls,
crawl spaces, ceiling, attics or garages. All exhaust must be ducted to
the outside. Use metal ductwork only.
Fasten all connections with sheet metal screws and tape all joints
with certified Silver Tape or Duct Tape.
Some Ducting Options
cabinet
side wall cap
w/gravity damper
soffit or crawl space
side wall cap
w/gravity damper
屋面坡度可以用遮雨罩或其他遮罩加蓋
背面排風
5 .
roof pitch w/
flashing & cap
Rear Ducting
5.
Page 9

VI.
Installation
Air outlet
By default the PR830/836AS is pre-configured for 6" round vertical ducting.
3-1/4"x10" Rectangular Vertical Ducting
六. 安裝出風口
在預裝情況下 PR830/836AS 安裝6"圓型排風管接頭。
上方排風
:安裝3-1/4"x10"方型風管圈。
1. Using a Philips-head screwdriver remove
the screws and 6" round vertical transition
adapter from top of hood body.
3. Place 3-1/4"x10" rectangular collar on
top of rectangular tran sit ion a dap te r.
Secure rectangular adapter and rectangular
collar to hood body using the previously
removed screws from step 1.
2.Rep lace 6" round vertical transiti on
adapter with rectangular transition adapter.
Do not secure to hood body yet.
3-1/4"x10" Rectangular Horizontal Ducting
1. 使用十字螺絲起子,移除機體上方的螺
絲和 6"圓型排風管接頭。
3. 將3-1/4"x10"方型風管圈安裝於 6"圓型轉
方型排風管接頭上方
使用步驟1移除螺絲,將風管圈和排風管
接頭鎖固於機體上。
後方排風
:安裝3-1/4"x10"方型風管圈。
。
2. 更換 6"圓型轉方型排風管接頭,且先不
固定於機體上。
1. Using a Philips-head screwdriver remove
the screws and 6" round vertical transition
adapter from the top of the hood.
2. Using a flat head screwdriver or diagonal
cutter, remove 3-1/4"x10" rectangular knock
-out cover plate from back of hood.
1. 使用十字螺絲起子,移除機體上方的螺絲
和 6"圓型排風管接頭。
6. 6.
2. 使用一字型螺絲起子或斜口鉗沿著方型輪廓
線將機體後方的3-1/4"x10"方型金屬蓋移除。
Page 10

3. 使用十字螺絲起子,移除機體後方3-1/4"
x10"的方型金屬蓋螺絲。
4. 取出兩個塑膠空氣導流座
導流座位於機體內,移除機體上方6"圓
型排風管接頭後, 即可從機體上方取出。
。
3. Using a Philips- head scre wdriver,
remove the screw s and 3-1 /4"x10"
rectangular cover plate from back of hood.
4. Remove the two plastic air diverter blocks.
The blocks are located in the hood and can
be accessed from the top when the 6" round
transition adapter is removed.
5. 更換 6"圓型轉方型排風管接頭,但先
不固定於機體上。
7. 將3-1/4"x10"方型風管圈置於機體後方,
並使用原本用來鎖固3-1/4"x10"方型金屬
蓋的螺絲鎖固於機體後方
。
6. 將3-1/4"x10"方型金屬蓋置於步驟3的6"
圓型轉方型排風管接頭上方,並使用步
驟1移除螺絲,將風管圈和排風管接頭
鎖固於機體上
。
7 .
5. Replace 6" round vertical transition
adapter with rectangular transition adapter.
Do not secure to hood body yet.
7. Place 3-1/4"x10" rectangular collar on
back of hood and secure using the screws
that previously secured the rectangular
cover plate.
6. Place 3-1/4"x10" rectangular cover plate
over the rectangular opening on top of
hood from step 3.
Secure rectangular transition adapter and
cover p late to h ood body using the
previously removed screws from step 1.
7.
Page 11

VII. Operating Instructions
1 Blower on/off/speed selection
七.按鍵說明
1 馬達開關及風速調整
2 Lights Dim/Bright Off
1. Blower on/off/speed selection:
Rotate knob to change speed levels,(1) for low speed,
(2) for medium speed and,(3) for high speed.
2. Lights Dim/Bright/Off:
Rotate knob to change light settings,(1) for dim light and
(2) for bright light.
2 燈光 明亮/微亮/關閉
1.馬達開關及風速調整:
以旋轉旋鈕調整風速:(1)低速 (2)中速 (3)高速。
2.燈光 明亮/微亮/關閉:
以旋轉旋鈕調整燈光亮度:(1)微亮 (2)明亮。
8. 8.
Page 12

八.移除燈炮
VIII. Replacing Light Bulb
鹵素燈移除注意:
當油煙機在運轉或經過長期運轉後請小心燈泡高溫。
請等待冷卻後再移除燈泡。
請再三確定油煙機電源關閉以及燈泡冷卻後再行移除。
請用黑色吸盤(隨機附上),以順時針旋轉拆除,並參考以下圖示移除燈泡。
請洽經銷商購買新燈泡。
Halogen light:
When the range hood is activated or has been running for a long time,
be careful when handling the light bulb as it may be too hot to handle.
Please double check to make sure the power supply to the range hood
is shut off and the light bulb is cool before removing it.
Remove the Halogen bulb by turning it counter-clockwise to remove.
The black rubber suction tool in the installation package. provided is for
easier rewoval of the halogen light bulb.
9.
9.
Page 13

IX. Surface Maintenance
九.機身表面保養和清潔
A. Surface Maintenance
1. Please clean the range hood surface regularly with warm soapy
water and wipe with a cotton cloth to prevent grease from
accumulating.
2. Please do not use harsh cleansers or coarse material to clean
the surface because that will damage the surface.
3. A non-invasive stainless steel polish is recommended to polish
the surface after cleaning.
4. Please use soft material for polishing because it will make your
range hood surface shinier.
5. Please do not use cleaning solutions that have bleach as an
ingredient.
B. Surface Cleaning and Maintenance
1. Always disconnect from power supply before cleaning.
2. Clean both exterior and interior of the hood for long lasting.
Do not use abrasive cleanser.
3. Filter can be placed in dishwasher. Dry filtere andre-install before
using hood.
4. No need to replace stainless steel baffle regularly, they are recommended
to be cleaned every 30 hours of use, depending on cooking habit.
(See below Figure to remove filters)
5. Make a habit of turning on the hood first before turning on the
stove to avoid high temperature in the kitchen.
一.機身表面保養
1.請定期以熱肥皂水和棉布擦拭機身以防油垢堆積。
2.請勿使用腐蝕性洗碗精和材質過粗的布料擦拭,以免傷害到機身表面。
3.擦拭完成後建議使用無刺激性的不鏽鋼拋光劑來進行第二次擦拭。
4.請使用軟布輕擦,您的油煙機表面將會更加光亮。
5.請勿使用含有漂白成分的清潔液。
二.保養和清潔
1.清潔前,務必要切斷電源。
2.定期清潔抽油煙機的內外側,可以保持抽油煙機壽命,
切勿使用研磨性清潔劑。
3.不鏽鋼濾網不需要換,可放入洗碗機清洗。
安裝前請擦乾。
4.建議每使用30小時後清潔一次不鏽鋼濾網,清潔完成後,必須重新裝回
原位。(見下圖拆卸說明)
5.在開啟煮食爐前,請先開啟抽油煙機以免廚房溫度太高。
10.
1
2
3
10.
1
2
3
Page 14

十.排除故障
with the unit is connected properly.
to eliminate the outside wind flow.
Remove all the blocking from the
燈亮但電機不運轉
1. 馬達有問題,也許卡住了
1. 更換馬達
電機運轉但燈不亮
1. 燈泡損壞
1. 更換燈泡
3. 出風口或排氣管被阻塞
3. 清理阻塞物
異常狀況 原因 處理方式
安裝後電機不運轉 1. 無電源輸入 1. 檢查斷路器,並確認電源已接
機體震動 1. 馬達不牢固 1. 檢查並鎖固馬達
油機沒有正常排煙 1. 機體與爐面距離太大 1. 重新調整抽油煙機的高度,建
金屬濾網震動 1. 金屬濾網鬆脫 1. 更換金屬濾網
上
2. 電源線和閉端沒有正確的安裝 2. 確認電源線和油機被正確的連
接
3. 旋鈕開關的電線鬆脫 3. 確認開關電線線被正確的連接
4. 開關有問題 4. 更換開關
2. 若運轉時馬達過熱將會啟動過
熱保護系統並關閉馬達
2. 待過熱保護系統冷卻後,馬達
將會再次正常運轉
3. 電容器損壞 3. 更換電容器
4. 馬達線路沒有連接 4. 確認馬達電線端子被正確地連
接
2. 風葉輪損壞 2. 更換風葉輪
3. 機體懸掛不牢固 3. 檢查並校準機體
2. 燈泡鬆脫 2. 重新旋緊燈泡
3. 開關的電線鬆脫 3. 檢查電線正常的連接
議油煙機與爐面的距離在 26”到
36”範圍之間
2. 機體周圍門窗太多,空氣對流
2. 適度關閉門窗
太大
4. 出風口逆風現象(倒灌風) 4. 調整出風口的方向
5. 排風管尺寸錯誤 5. 更換正確的排風管尺寸
2. 彈片損壞 2. 更換彈片
11.
X. Troubleshooting
Issue Cause What to do
After installation,
the unit doesn’t
work.
Light works, but
motor is not turning.
The unit is vibrating. 1. The motor is not secure in place. 1. Tighten the motor in place.
The motor is
working, but the
lights are not.
The hood is not
venting out properly.
Metal filter is
vibrating.
1. The power source is not turned
ON.
2. The power line and the cable
locking connector is not connecting
properly.
3. The wires on rotary switch are
loose.
4. The switch is defective. 4. Change the switch.
1. The motor is defective, possible
seized.
2. The thermally protected system
detects if the motor is too hot to
operate and shuts the motor down.
3. Damaged capacitor. 3. Change the capacitor.
4. The motor wire is not connected. 4. Make sure the motor wire is
2. Damaged blower wheel. 2. Change the blower wheel.
3. The hood is not secured in place. 3. Check the installation of the
1. Defective halogen bulb. 1. Change the halogen bulb.
2. The light bulb is loose. 2. Tighten the light bulb.
3. The wires on the switch are
loose.
1. The hood might be hanging to
high from the cook top.
2. The wind from the opened
windows or opened doors in the
surrounding area are affecting the
ventilation of the hood.
3. Blockage in the duct opening or
duct work.
4. The direction of duct opening is
against the wind.
5. Using the wrong size of ducting. 5. Change the ducting to correct
1. Metal filter is loose. 1. Change the metal filter.
2. Spring clip is broken. 2. Change the spring clip.
1. Make sure the circuit breaker
and the unit’s power is ON.
2. Check the power connection
3. Make sure the wires on the
switch are connected properly.
1. Change the motor.
2. The motor will function properly
after the thermally protected
system cool down.
plugged into the molex connector.
hood.
3. Make sure the wires on switch
are connected properly.
1. Adjust the distance between the
cook top and the bottom of the
hood within 26” and 36” range.
2. Close all the windows and doors
3.
duct work or duct opening.
4. Adjust the duct opening
direction.
size.
11.
 Loading...