

Pacific GULPER 12SS, GULPER 16SS Maintenance Manual

WET/DRY VACUUMS
MODELS
GULPER 12SS
GULPER 16SS
OPERATING & MAINTENANCE
INTRODUCTION INSTRUCTIONS
READ THIS BOOK
This operator’s book has important information for the
use and safe operation of this machine. Read this book
carefully before starting the machine. Keep this book
and tell all operators to read the book. If you do not
follow the instructions, you can cause an injury or damage equipment, furniture or buildings.
For new books write to:
Pacific Floor Care
2259 South Sheridan Drive
Muskegon, MI 49442
Carefully inspect all components to ensure that there is
no concealed freight damage. If such damage is discovered, file a “CONCEALED DAMAGE REPORT” immediately with the delivering carrier.
The contents of this manual are based on the latest
product information available at the time of publication.
Pacific reserves the right to make changes or improvements to its machines without notice.
FOR YOUR CONVENIENCE, RECORD THE MACHINE
MODEL AND SERIAL NUMBER:
MODEL_______________________________
SERIAL NUMBER______________________
P ART NUMBER_________________________
DA TE PURCHASED______________________
IMPORT ANT SAFETY INSTRUCTIONS
READ AND UNDERSTAND ALL WARNINGS AND INSTRUCTIONS
BEFORE USING THIS MACHINE!
WARNING! To reduce the risk of fire, electric shock, or injury:
1. Y ou must be trained to operate this machine. This machine is to be operated for its intended use only.
2. Do not operate this machine unless it is completely assembled.
3. Always use a three-wire electrical system connected to the electrical ground. For maximum protection against electrical shock, use a circuit that is protected by a ground fault circuit interrupter. Consult
your electrical contractor.
4. T o prevent electrical shock: Always remove the electrical plug from the electrical outlet before performing any repairs, maintenance or cleanup and when leaving the machine unattended.
5. To prevent electrical shock: Keep the machine surface dry; Do not subject to rain; Store the machine
in a dry building area; Clean the machine with a dry cloth only .
6. Machines can cause an explosion when near flammable materials and vapors. Do not use or store
this machine with or near fuels, grain dust, solvents, thinners, or other flammable materials. Do not
use flammables to clean this machine.
7. Maintenance and repairs must be done by a qualified or authorized person.
8. If the machine is not working as it should, has been dropped, damaged, left outdoors, or dropped into
water, return it to a service center.
9. T o avoid damage to the machine’s electrical cord, always lif t the machine over the cord. Do not run the
machine over the electircal cord.
10. Make sure all labels, decals, warnings, cautions and instructions are fastened to the machine.
Grounding Instructions
This machine must be grounded. If it should malfunction or break
down, grounding provides a path of least resistance for electric
current to reduce the risk of electric shock. This machine is equipped
with a cord having an equipment-grounding conductor and grounding plug. The plug must be inserted into an appropriate outlet that
is properly installed and grounded in accordance with all local
codes and ordinances.
WARNING - Improper connection of the equipment-grounding conductor can result in a risk of electric shock. Check with a qualified
electrician or service person if you are in doubt as to whether the
outlet is properly grounded. Do not modify the plug provided with
the machine - if it will not fit the outlet, have a proper outlet installed
by a qualified electrician.
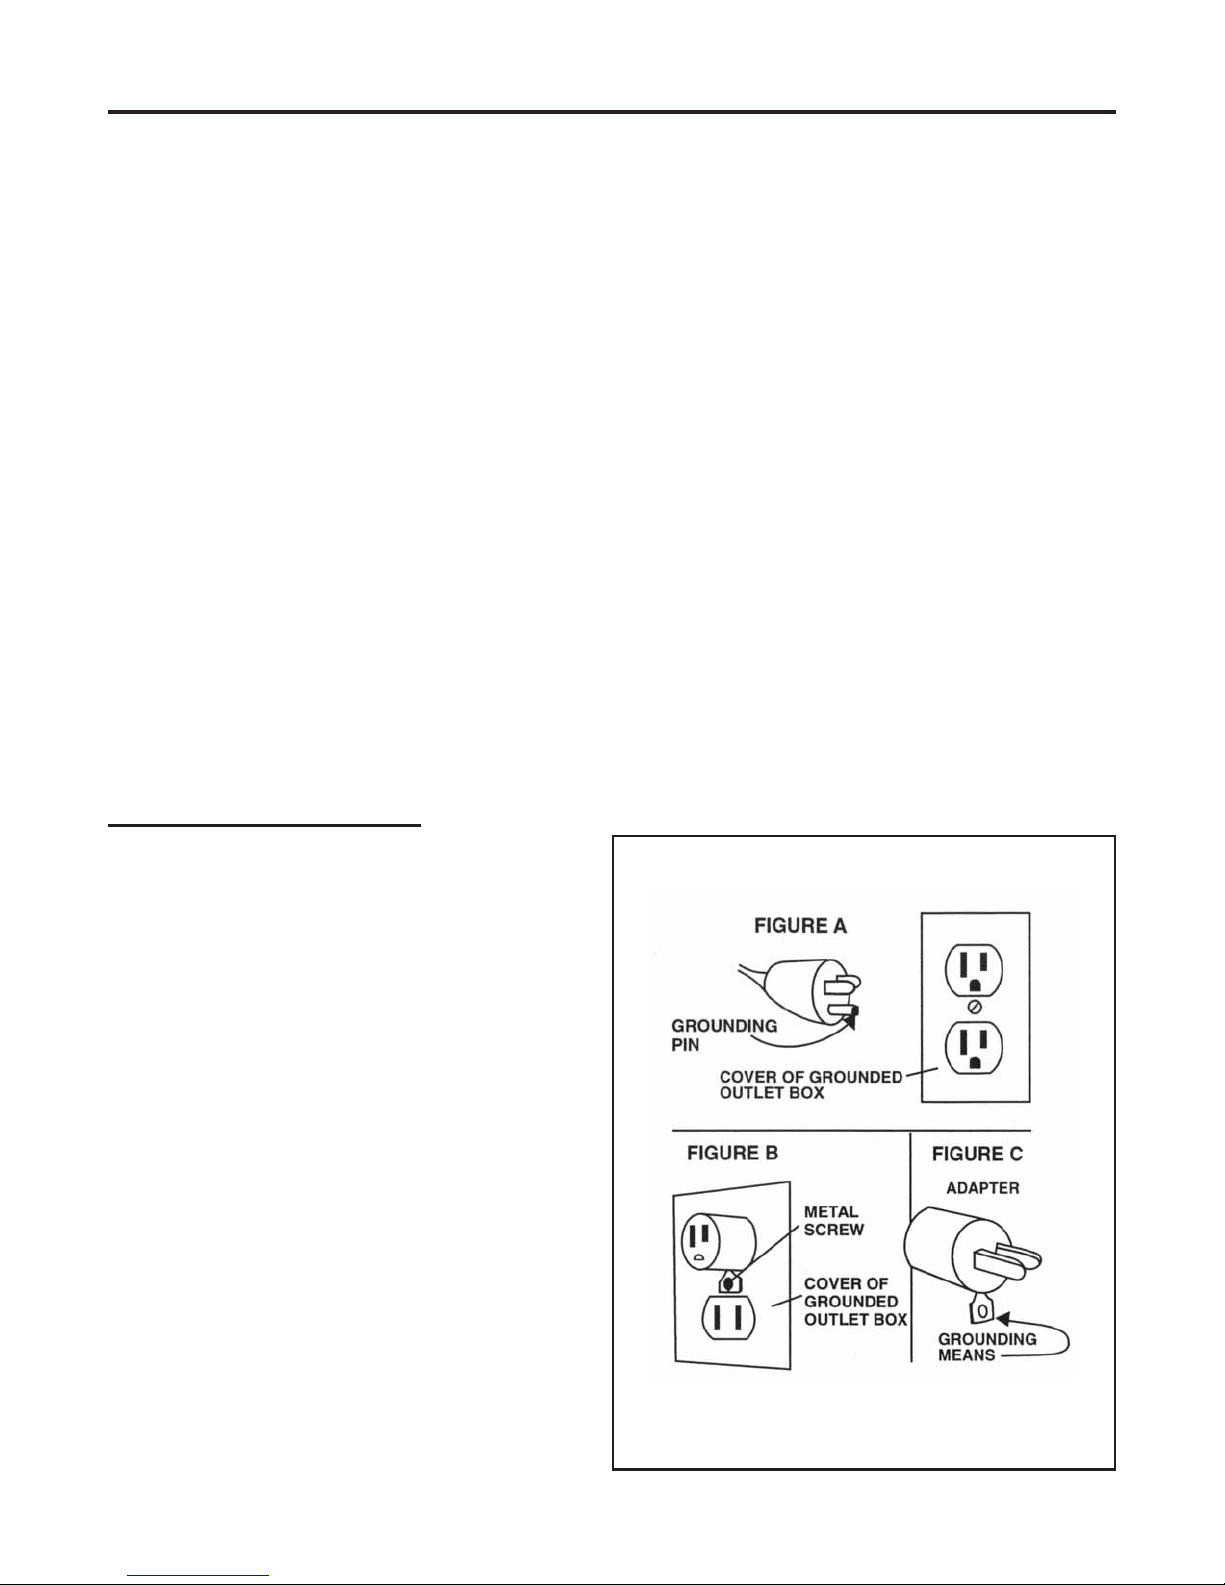
This machine is for use on a nominal 120-volt circuit, and has a
grounded plug that looks like the plug illustrated in figure A. A
temporary adapter that looks like the adapter illustrated in figures B
and C may be used to connect this plug to a 2-pole receptacle as
shown in figure B if a properly grounded outlet is not available.
The temporary adapter should be used only until a properly
grounded outlet (figure A) can be installed by a qualified electrician. The green colored rigid ear, lug, or the like extending from the
adapter must be connected to a permanent ground such as a
properly grounded outlet box cover. Whenever the adapter is
used, it must be held in place by a metal screw.
NOTE: In Canada, the use of a temporary adapter is not permitted
by the Canadian Electrical Code
EXTENSION CORDS
Use only three-wire 16/3 or larger gauge approved extension
cords that have three-prong grounding type plugs and three-pole
receptacles that accept the appliance’s plug. Replace or repair
any damaged cords or plugs.
When servicing, refer to authorized person only. Use only identical replacement parts.
NOTE: Do not use adapters shown in figures B & C in Canada
2

OPERA TING PROCEDURES
WARNING! For the safe operation of this machine follow the instructions given in this booklet
and the training given by your supervisor. Failure to do so can result in personal injury and/or
damage to machine and property!
DO NOT OPERA TE MACHINE IN AN EXPLOSIVE
ENVIRONMENT!
T o prepare the machine for operation, make sure it is of
the correct voltage and properly assembled. If in doubt,
ask your supervisor.
FOR DRY PICK-UP:
“Dry” refers to material such as dust, dirt, debris and
dry foam shampoo.
1. Release the clamp on each side of the tank and
head assembly . Lift the head assembly off and set
it aside.
2. Empty the collector tank of all dust and debris. If
the debris is wet, empty and dry the inside of the
tank thoroughly .
WARNING! NEVER USE THIS MACHINE TO PICK
UP VOLA TILE OR EXPLOSIVE MA TERIALS.
FOR WET PICK-UP:
“Wet” refers to liquids such as water, scrub solutions
and detergents; NOT VOLATILE OR EXPLOSIVE MA-
TERIALS.
1. Release the clamp on each side of the tank and
head assembly . Lift the head assembly off and set
it aside.
2. Empty the collector tank by either tilting and pouring or using the drain hose by removing the drain
hose (see page 6, item 38) out of the clip located
on the front, right of the tank and pulling out the
stopper on the hose once you have it where you
want to empty the unit. Once all debris is removed,
wipe the inside of the tank to remove clinging debris. Also remove the HEP A filter (see page 6, item
19) by flipping the head assembly over and pulling
up on the filter where it meets the float assembly
hub. Rinse the HEPA filter in a sink to clear it of
any debris.
4. Replace the head assembly and fasten both clamps.
Attach the hose, wand and floor tool of choice.
6. Plug the power cord into a 115-volt, 60 cycle
grounded outlet.
7. Turn the machine’s motor on by pressing the rocker
switch which is located on the head assembly .
3. While HEP A filter is of f, check the float shut-off device on the lower portion of the head assembly . The
float should have free movement. When the recovered liquid soilage reaches the collector tank capacity , the float will rise to shut off the air flow , stopping the liquid recovery . This prevents damaging
overflow and signals the operator when to empty
the collector tank.
4. Replace the head assembly and fasten both clamps.
Attach the hose, wand and floor tool of choice.
5. Plug the power cord into a 115-volt, 60 cycle
grounded outlet.
6. Turn the machine’s motor on by pressing the rocker
switch which is located on the head assembly .
3
 Loading...