

Pacific FURY 1500DCP Pars Manual

UHS BURNISHER
FURY 1500DCP
Parts Manual
OPERATING & MAINTENANCE
INTRODUCTION INSTRUCTIONS
READ THIS BOOK
This operator’s book has important information for the
use and safe operation of this machine. Read this book
carefully before starting the machine. Keep this book
and tell all operators to read the book. If you do not
follow the instructions, you can cause an injury or damage equipment, furniture or buildings.
For new books write to:
Pacific
2259 South Sheridan Road
Muskegon, MI 49442
Carefully inspect all components to ensure that there is
no concealed freight damage. If such damage is discovered, file a “CONCEALED DAMAGE REPORT” immediately with the delivering carrier.
The contents of this manual are based on the latest
product information available at the time of publication. Pacific reserves the right to make changes or
improvements to its machines without notice.
FOR YOUR CONVENIENCE, RECORD THE
FOLLOWING IMPORT ANT INFORMA TION:
MODEL_______________________________
SERIAL NUMBER______________________
P ART NUMBER _________________________
DA TE PURCHASED ____________________
IMPORT ANT SAFETY INSTRUCTIONS
T o assure the safe operation of this machine, you must read and understand all warnings and instructions in this book.
If you do not understand, ask your supervisor.
READ ALL INSTRUCTIONS BEFORE USING THIS MACHINE
WARNING
: To reduce the risk of fire, electric shock, or injury:
1. Y ou must be trained to operate this machine. This machine is to be operated for its intended use only.
2. Do not operate this machine unless it is completely assembled.
3. Always use a three-wire electrical system connected to the electrical ground. For maximum protection against
electrical shock, use a circuit that is protected by a ground fault circuit interrupter. Consult your electrical
contractor.
4. T o prevent electric shock, always remove the electrical plug from the electrical outlet before doing any rep airs or
maintenance and when leaving the machine unattended.
5. T o prevent electric shock, keep the machine surface dry . Do not subject to rain. S tore the machine in a dry building
area. Clean the machine with a dry cloth only .
6. Machines can cause an explosion when near flammable materials and vapors. Do not use this machine with or
near fuels, grain dust, solvents, thinners, or other flammable materials. Do not use flammables to clean this
machine.
7. A qualified or authorized person must do maintenance and repairs.
8. T o prevent damage to the power cord, do not move this machine over the power cord. Always lift the power cord over
the machine. Do not pull or carry cord, use cord as a handle, close a door on cord, or pull cord around sharp edges
or corners. Keep cord away from heated surfaces.
9. Do not use with damaged cord or plug. If the machine is not working as it should, has been dropped, damaged, left
outdoors, or dropped into water , return it to a service center.
Grounding Instructions
This machine must be grounded. If it should malfunction or break
down, grounding provides a path of least resistance for electric
current to reduce the risk of electric shock. This machine is equipped
with a cord having an equipment-grounding conductor and grounding plug. The plug must be inserted into an appropriate outlet that
is properly installed and grounded in accordance with all local
codes and ordinances.
WARNING - Improper connection of the equipment-grounding conductor can result in a risk of electric shock. Check with a qualified
electrician or service person if you are in doubt as to whether the
outlet is properly grounded. Do not modify the plug provided with
the machine - if it will not fit the outlet, have a proper outlet installed
by a qualified electrician.
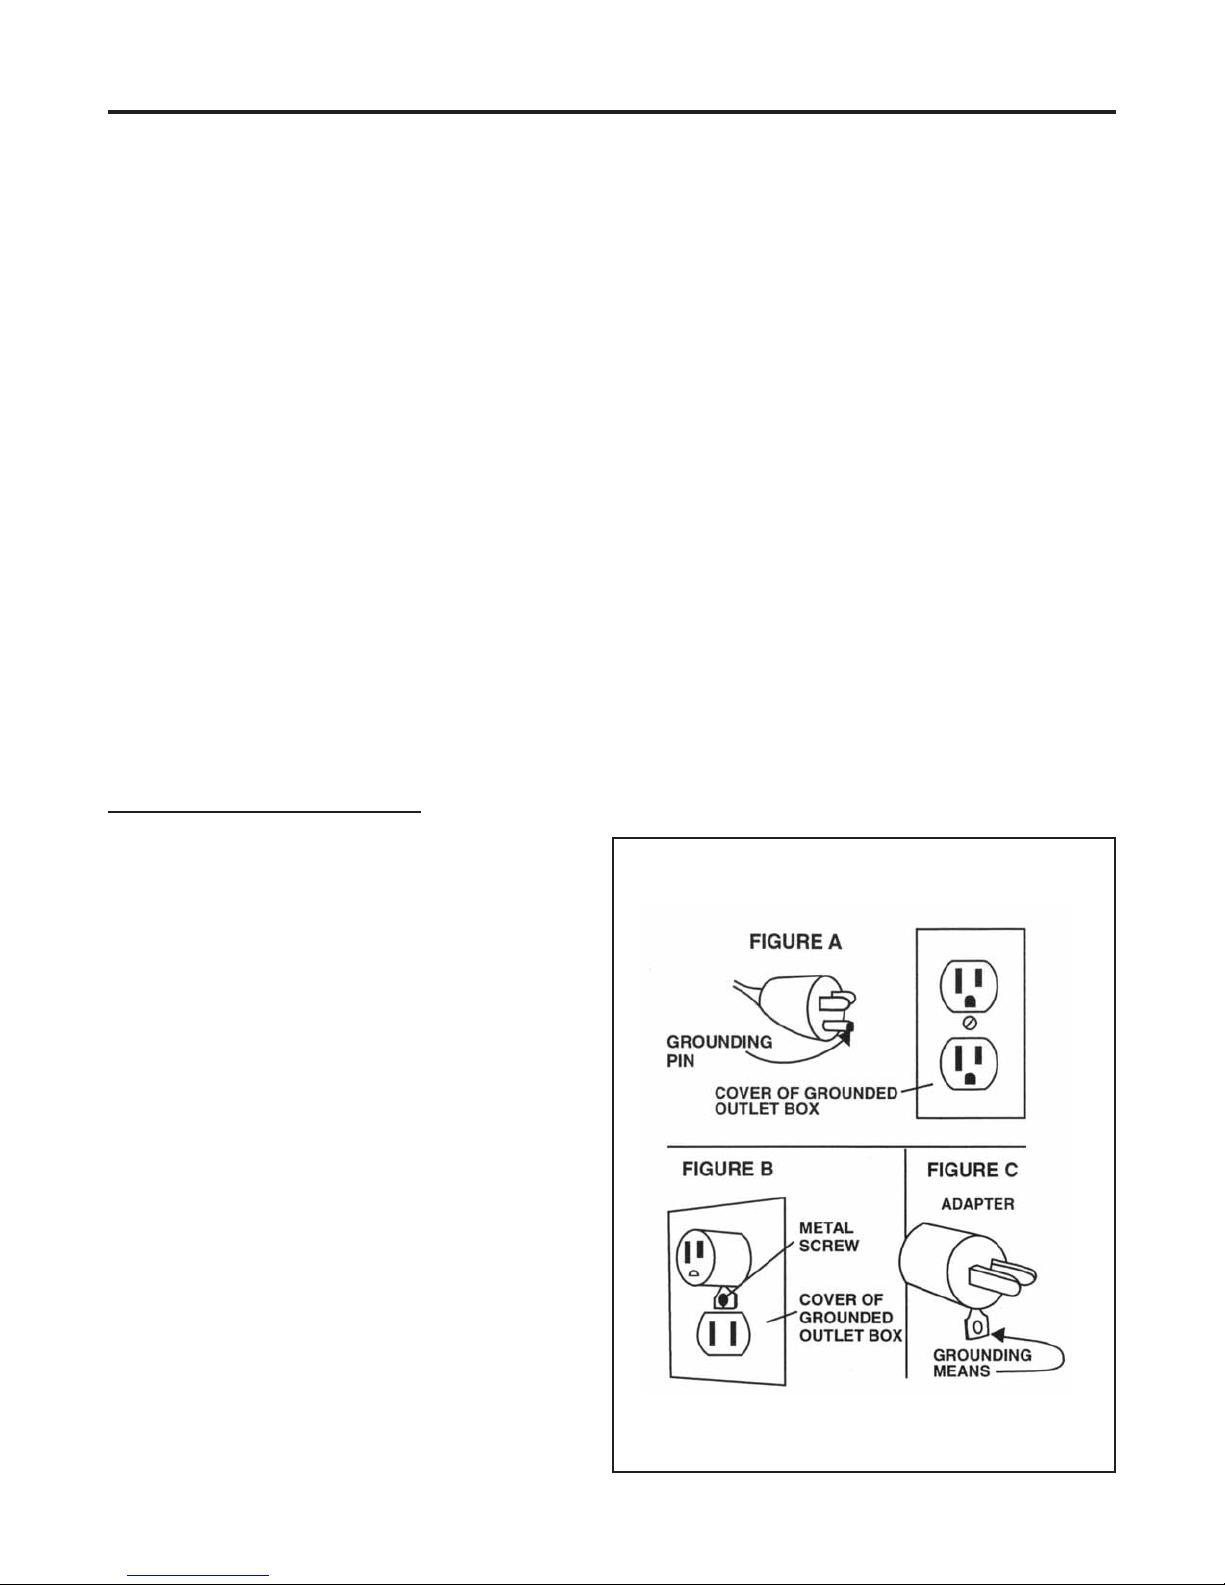
This machine is for use on a nominal 120-volt circuit, and has a
grounded plug that looks like the plug illustrated in figure A. A
temporary adapter that looks like the adapter illustrated in figures B
and C may be used to connect this plug to a 2-pole receptacle as
shown in figure B if a properly grounded outlet is not available.
The temporary adapter should be used only until a properly
grounded outlet (figure A) can be installed by a qualified electrician. The green colored rigid ear, lug, or the like extending from the
adapter must be connected to a permanent ground such as a
properly grounded outlet box cover. Whenever the adapter is
used, it must be held in place by a metal screw.
NOTE: In Canada, the use of a temporary adapter is not permitted
by the Canadian Electrical Code
EXTENSION CORDS
Use only three-wire 12/3 or larger gauge approved extension
cords that have three-prong grounding type plugs and three-pole
receptacles that accept the appliance’s plug. Replace or repair
any damaged cords or plugs.
When servicing, refer to authorized person only. Use only identical replacement parts.
NOTE: Do not use adapters shown in figures B & C in Canada
2

OPERA TING & MAINTENANCE PROCEDURES
WARNING! For the safe operation of this machine follow the instructions given in this booklet
and the training given by your supervisor. Failure to do so can result in personal injury and/or
damage to machine and property!
DO NOT OPERA TE MACHINE IN AN EXPLOSIVE
ENVIRONMENT!
DO NOT USE THIS BURNISHER FOR SPRA Y BUFF
APPLICA TIONS. DOING SO WILL VOID WARRANTY
ON MOTOR.
The models shown in this manual are intended for commercial use.
PREPARATION
T o prepare the machine for operation, make sure it is of
correct voltage and properly assembled. If in doubt,
ask your supervisor.
Y our new floor machine operates in a straight-line forward motion, rather than the normal side to side motion
of a conventional single disc machine. Be prepared by
having your floor area cleared and ready for the fast
action of a burnisher.
Prepare the floor area by sweeping, dusting or mopping
as needed. Check the proper application recommendations and procedures found on the label of your finish
container . IF IN DOUBT , CALL YOUR SUPERVISOR .
WARNING! NEVER USE THIS MACHINE WITH FLAMMABLE OR EXPLOSIVE MA TERIAL!
For Burnishing: Select the correct clean floor pad
(your supplier can help you). The lighter color floor pads
(buff or white) are normally used for the burnishing procedure.
NEVER OPERATE THE MACHINE WITHOUT THE
FLOOR P AD INSTALLED!
It is very important to select clean, dry pads of uniform
thickness. Pads with high or low sections, or hard or
soft spots are unacceptable. Pads of open weave are
recommended; because close weaves tend to load up
fast, bog down the machines, cause circuits to overload and generally give poor results.
Tip the machine back to expose the pad driver. Remove the pad center lock ring. Carefully center the pad
onto the pad driver and secure with the locking ring.
Check for level, centering and flatness.
OPERATION
Set the machine upright onto the pad. Plug the
machine’s power cable into a properly grounded outlet
(see Safety Instructions). Next, release the handle locking knob and allow the handle to lower into a comfortable position. Then secure the handle locking knob. This
will allow the operator to easily control the brush pressure.
Depress the handle slightly to elevate the pad from the
floor. This is to avoid burning the floor on initial start up,
before the operator is ready to move forward. Pull out
on the “Watch Dog” Safety Lock button and start the
machine by depressing either the left or right switch
levers.
When you’re ready to move forward, lower the machine
head and pad to the floor and proceed forward in a straight
line, at a steady pace.
MAINTENANCE
AFTER EACH USE: Store the machine in a clean dry
area. Wipe the entire machine and cord down with a
clean cloth. Remove the pad and clean thoroughly . Wrap
the machine’s electrical cord onto the handles and the
cord hook provided. CHECK the cord and plug for nicks,
cuts or damage. Report these to your supervisor for
correction.
WARNING! Always disconnect the machine’s
electrical plug from the electrical outlet before
performing any service, maintenance, pad changing or inspection of the machine.
CIRCUIT BREAKER: A circuit breaker is used to pro-
tect the motor. If the motor draws high amperage the
circuit breaker will stop the motor. The reset button is
located in the front of the switch housing. Push the
reset button to restart the motor . If the motor continues
to stop, clean or change the floor pad. If this does not
correct the problem consult an authorized service person.
MOTOR: The motor is lubricated for life under normal
use. No oiling or greasing is necessary . However, if the
machine is used in dusty areas the motor should be
cleaned. Blowing the motor out with compressed air or
with the exhaust from a vacuum is suggested. Keeping
the motor clean will allow the clear passage of air for
ventilation and prevent overheating.
BELT TENSION: Proper belt tension is important for
smooth operation and belt life. Check the belt tension
and have no more than a 1/8-inch deflection. If adjustment is needed, loosen the four (4) motor mounting
bolts. Then tip the machine back onto its transport
wheels, slide the motor back and tighten the bolts.
CARBON BRUSH INSPECTION: Long life 3000-hour
carbon brushes are installed in the motor . The machine
is also equipped with a carbon brush wear indicator light
to signal when a carbon brush change is required.
3
 Loading...