

Page 1

Electronic Service
Manuals
This electronic document is provided as a service to our customers. We do not create the contents of the information contained in
this document. Should you have detailed questions pertaining to
the information contained in this document, you may contact Michco,
or the manufacturer which provided the original information in this
electronic deliverable. Michco’s only part in this electronic deliverable was the electronic assembly process.
You may contact Michco through the following methods:
Phone (517) 484-9312 or (800) 331-3339 MI, OH, IN only
2011 N. High St. -- Lansing, Michigan -- 48906
Fax: (517) 484-9836
Email: [email protected]
Web site: www.Michco.Com
Parts Web site: www.FloorMachineParts.Com
Order Parts on Line at:
www.FloorMachineParts.Com
Directly to Parts & Service:
By Email: [email protected]
By Fax: (517) 702-2041
By Voice: Use numbers above.
Serving the Cleaning Industry Since 1922
Notice: All copyrighted material remains property of original owners, all trademarks are property of respective
owners. Manuals are subject to Manufacturer’s reproduction limitations. Originals or reproductions were provided
by manufacturers through a request. We make no warranty as to the correctness of information provided in this
document and you assume all risk.
Page 2

AURA
WIDE AREA VACUUM
OPERATING & MAINTENANCE
INTRODUCTION INSTRUCTIONS
READ THIS BOOK
This operator’s book has important information for the use
and safe operation of this machine. Read this book carefully before starting the machine. Keep this book and tell
all operators to read the book. If you do not follow the
instructions, you can cause an injury or damage equipment,
furniture or buildings.
For new books write to:
Pacific Steamex, Inc.
2259 S. Sheridan
Muskegon, MI 49442-6252
Carefully inspect all components to ensure that there is no
concealed freight damage. If such damage is discovered,
file a “CONCEALED DAMAGE REPORT” immediately
with the delivering carrier.
The contents of this manual are based on the latest product
information available at the time of publication. Pacific
Steamex reserves the right to make changes or improvements to its machines without notice.
FOR YOUR CONVENIENCE, RECORD THE
FOLLOWING IMPORTANT INFORMATION:
MODEL
SERIAL NUMBER
PART NUMBER
DATE PURCHASED
Page 3

IMPORTANT SAFETY INSTRUCTIONS
READ AND UNDERSTAND ALL WARNINGS AND INSTRUCTIONS IN THIS BOOK BEFORE
USING THIS MACHINE! If you do not understand, ask your supervisor.
WARNING: To reduce the risk of fire, electric shock, or injury:
1. DO NOT USE THIS VACUUM FOR PICK UP OF WET DEBRIS.
2. Do not use outdoors or on wet surfaces.
3. Do not allow to be used as a toy. Close attention is necessary when used by or near children.
4. You must be trained to operate this machine. Operate this machine for its intended use only.
5. Do not operate this machine unless it is completely assembled. The dust bag and/or filters must be in
place. Use only manufacturer’s attachments.
6. Keep the machine and its electrical components dry. Do not subject to rain. Store the machine in a dry
building area. Clean the machine with a dry cloth only.
7. Machines can cause an explosion when near flammable materials and vapors. Do not use or store this
machine with or near fuels, grain dust, solvents, thinners, or other flammable materials. Do not use
flammables to clean this machine.
8. Do not pick up anything that is burning or smoking, such as cigarettes, matches or hot ashes.
9. Maintenance and repairs must be done by a qualified or authorized service center.
10. If the machine is not working as it should, has been dropped, damaged, left outdoors, or dropped into
water, return it to a service center.
11. Connect to a properly grounded outlet only (See Grounding Instructions).
12. To prevent electric shock, always remove the electrical plug from the electrical outlet before doing any
repairs or maintenance and when leaving the machine unattended. Do not handle plug or vacuum with
wet hands.
13. Do not pull cord, use cord as a handle, close a door on cord, or pull cord around sharp edges or corners.
Keep cord away from heated surfaces. Do not use with damaged cord or plug.
14. Turn off all controls before unplugging.
15. Do not put objects into openings. Do not use with any opening blocked: keep free of dust, lint, hair and
anything that may reduce airflow.
16. Keep hair, loose clothing, fingers and all parts of the body away from openings and moving parts.
17. Make sure all labels, decals, warnings, cautions and instructions are fastened to the machine.
2
Page 4
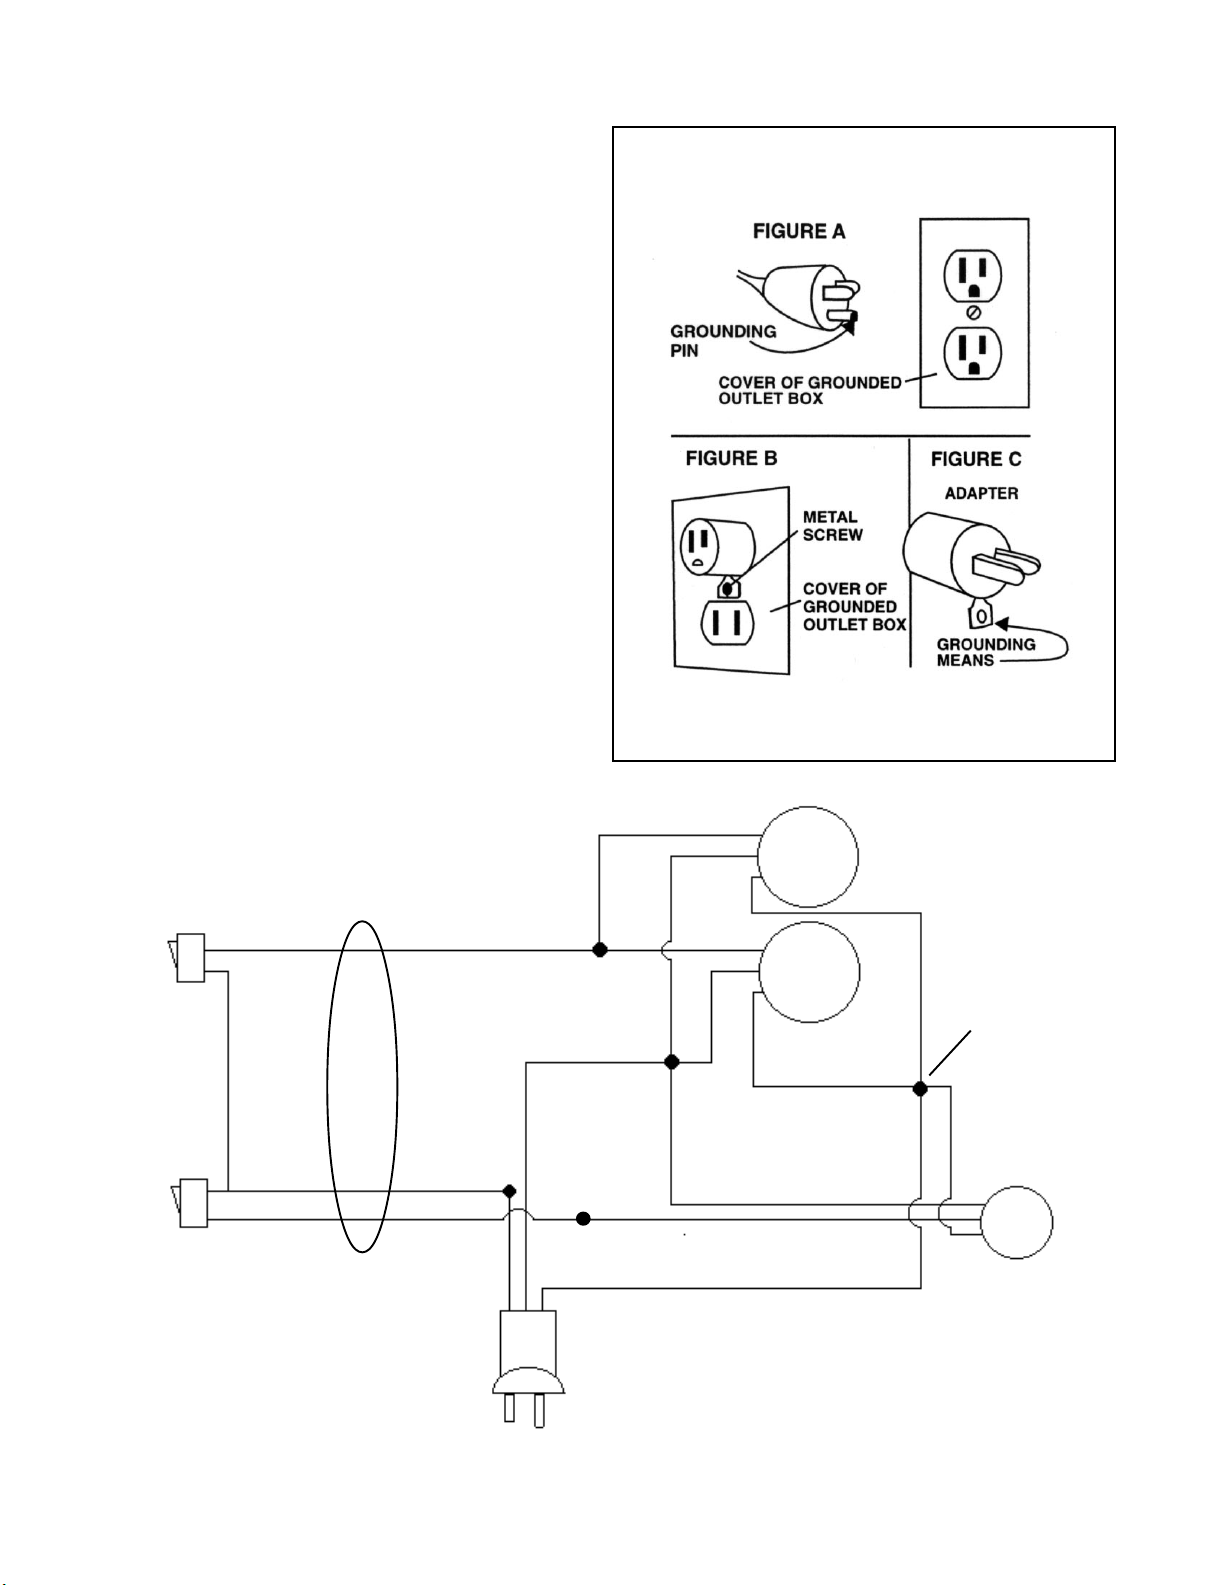
Grounding Instructions
This machine must be grounded. If it should malfunction or break down,
grounding provides a path of least resistance for electric current to reduce the
risk of electric shock. This machine is equipped with a cord having an equipment-grounding conductor and grounding plug. The plug must be inserted
into an appropriate outlet that is properly installed and grounded in accordance with all local codes and ordinances.
WARNING - Improper connection of the equipment-grounding conductor
can result in a risk of electric shock. Check with a qualified electrician or
service person if you are in doubt as to whether the outlet is properly grounded.
Do not modify the plug provided with the machine - if it will not fit the outlet,
have a proper outlet installed by a qualified electrician.
This machine is for use on a nominal 120-volt circuit, and has a grounded
plug that looks like the plug illustrated in figure A. A temporary adapter that
looks like the adapter illustrated in figures B and C may be used to connect
this plug to a 2-pole receptacle as shown in figure B if a properly grounded
outlet is not available. The temporary adapter should be used only until a
properly grounded outlet (figure A) can be installed by a qualified electrician. The green colored rigid ear, lug, or the like extending from the adapter
must be connected to a permanent ground such as a properly grounded outlet
box cover. Whenever the adapter is used, it must be held in place by a metal
screw.
NOTE: In Canada, the use of a temporary adapter is not permitted by the
Canadian Electrical Code
EXTENSION CORDS
Use only three-wire 14/3 or larger gauge approved extension cords that have
three-prong grounding type plugs and three-pole receptacles that accept the
appliance’s plug. Replace or repair any damaged cords or plugs.
When servicing, refer to authorized person only. Use only identical replacement parts.
Vacuum Switch
#911089
#1 Wht
Jumper
#911211
Blk
#3 Wht
#2 Wht
Brush Switch
Wht
#911089
Blk
NOTE: Do not use adapters shown in figures B & C in Canada
Vacuum
Motor
Blk
Blk
Vacuum
Gr
Motor
Blk
Gr
Wire Conectors
(5 Locations)
#911179
Gr
Wht
Blk
Gr
Brush
Motor
Cord Assembly
#908086
3
Page 5

OPERATING PROCEDURES
WARNING! For the safe operation of this machine
follow the instructions given in this booklet and the training given by your supervisor. Failure to do so can result
in personal injury and/or damage to machine and property!
DO NOT OPERATE MACHINE IN AN EXPLOSIVE
ENVIRONMENT!
NEVER USE THIS MACHINE TO PICK UP VOLATILE OR EXPLOSIVE MATERIALS!
The model shown in this manual is intended for commercial use.
PREPARATION
To prepare the machine for operation, make sure it is of
correct voltage and properly assembled. If in doubt, ask
your supervisor.
! If the vacuum is in its upright position (page 6), raise
the handle while supporting the vacuum, then slowly
lower the vacuum to the floor.
! Properly install the filter bag in the vacuum: Lift
the cover from the machine. The filter bag inlet is designed with a rubber gasket that fits securely over the
bag adapter (page 7) in the cover. First push the filter
bag inlet over the adapter on the cover. Then from the
outside of the cover reach inside the adapter and push
the gasket on the rest of the way. Replace the filter
bag when full.
OPERATION
1. Plug the machine’s power cable into a properly
grounded outlet (see Grounding Instructions).
OPERATION WITH TOOLS
Three on-board tools are available for the vacuum: the dusting tool, crevice tool and turbo tool (page 6). Twenty (20)
feet of hose is provided which allows access to rooms without moving the machine.
1. The brush and vacuum switches should be turned
OFF.
2. Depress the foot pedal to the “ACCESSORY” position.
3. Remove the rigid portion of the accessory hose from
its’ storage area in the handle and attach the tool of
choice.
4. Turn the vacuum switch ON and begin.
Note: The vacuum switch should be OFF when switching
the foot pedal between the accessory and the brush positions.
MAINTENANCE
ALWAYS turn the brush and vacuum motor switches
OFF and UNPLUG the power cord from the electrical
outlet before doing any clean-up or repairs, and when
the machine is left unattended.
AFTER EACH USE:
1. Vacuum filter bag: If the bag is full or damaged in-
stall a new one.
Filter Bag, 10 Pack – Part Number 650602
Cloth Bag (optional) – Part Number 650601
2. Power cord and plug: Check for cuts or nicks; if
damaged, have the cord replaced at a factory authorized service center.
2. The foot pedal should be raised to the “BRUSH”
position (page 8) for wide area vacuuming.
3. Adjust the brush height with the lever located on the
rear of the machine near the floor (page 8).
4. Turn the vacuum switch ON (rocker switch on
operator’s right, page 7).
5. Turn the brush switch ON (rocker switch on
operator’s left, page 7) and begin vacuuming.
3. Casters and Wheels: Remove any strings or debris
that may restrict the free movement of the casters.
4. Tools: Inspect the tools to ensure there is no obstruction of airflow. Remove any debris found.
5. Brush: Remove any strings or debris. Replace if becomes worn or damaged.
Storage: The handle may be folded down and the
machine stored upright to reduce storage space requirements. Store the machine in a clean dry area.
4
Page 6

MAINTENANCE
WEEKLY:
1. Inspect and clean the two vacuum inlet filters. Re-
move the cover from the machine. The filters are now
accessible (see page 10). They are constructed of foam
attached to a plastic mounting ring. Slide the filters
off and clean by shaking or vacuuming. Replace if
there are any rips, tears or can’t be cleaned.
2. Inspect and clean the exhaust filter. It is located
under the handle on the top of the machine (see page
8). Remove the filter and clean by shaking, vacuuming or washing with water. Replace if there are any
rips, tears or if it can’t be cleaned.
VACUUM MOTOR MAINTENANCE:
Have the vacuum motors inspected annually by a factory
authorized service technician. If the carbon brushes are
worn, they should be replaced. This service will prolong
the life of the motor.
5
Page 7
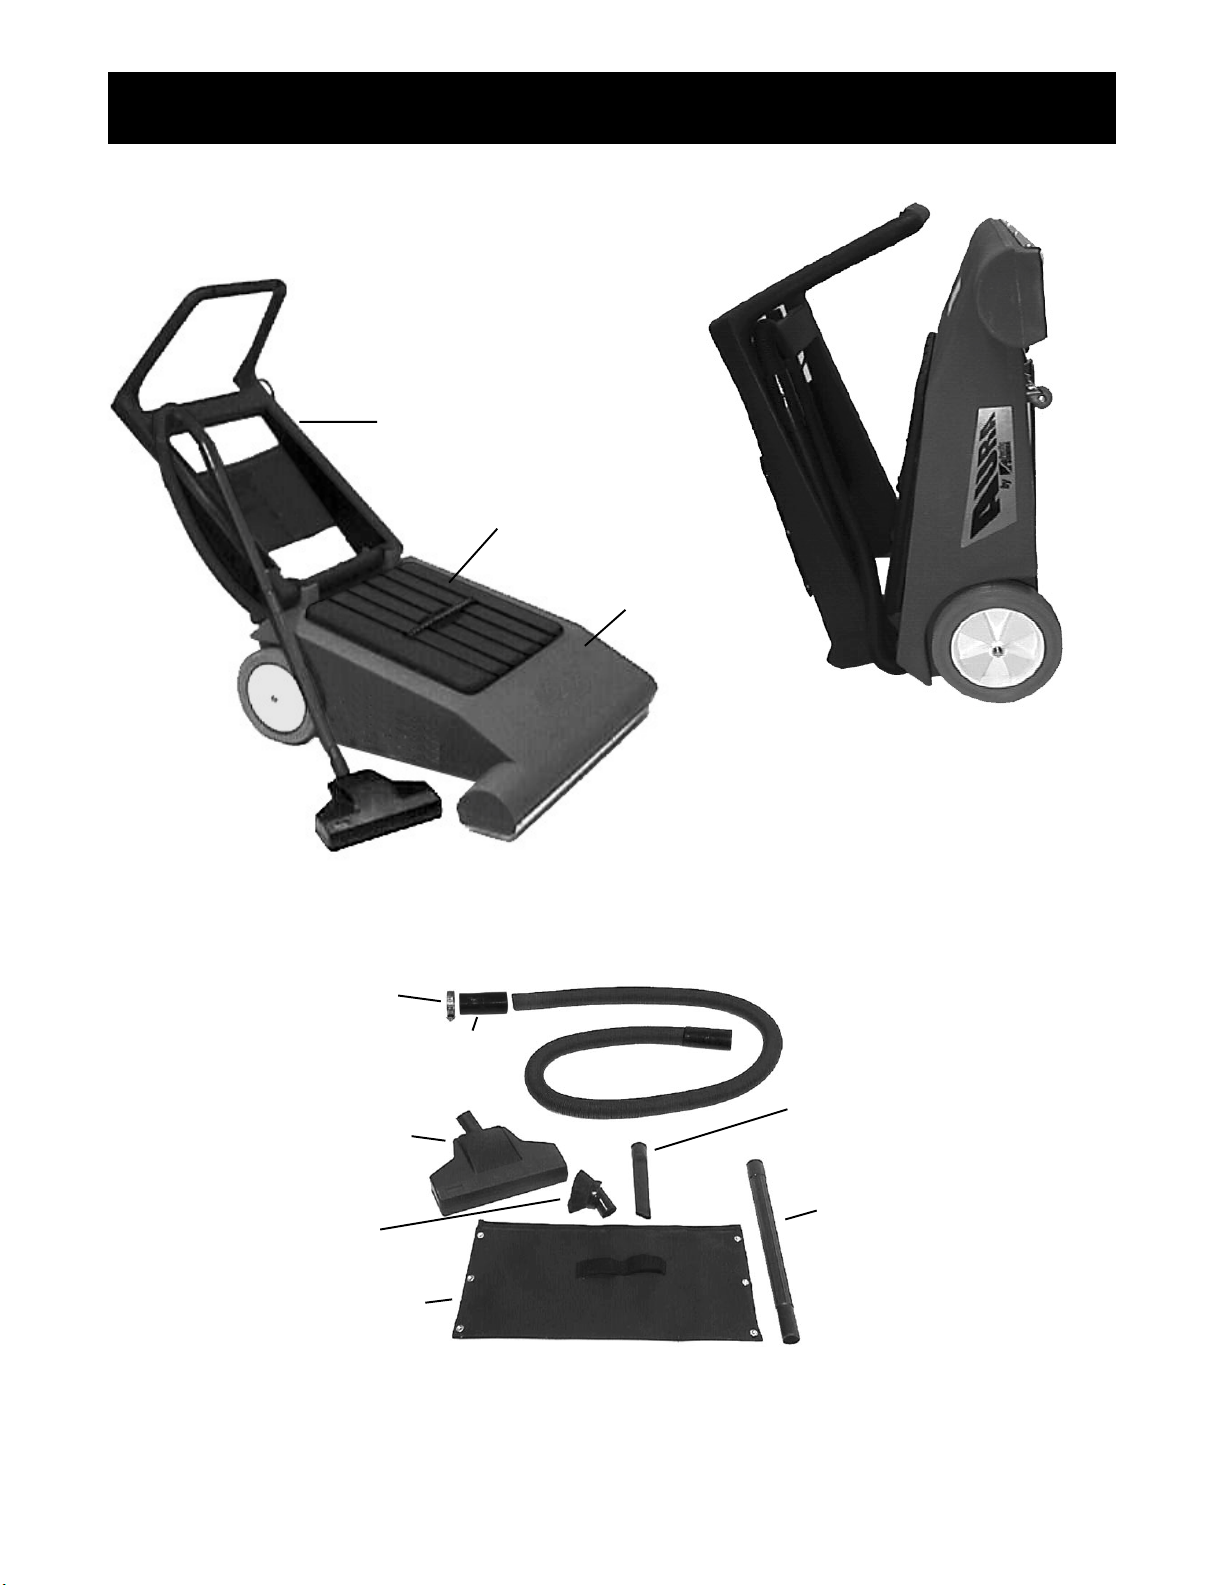
AURA WIDE AREA VACUUM
Aura Wide Area Vacuum
#655402
Handle, Machine
#653901
Cover
#652302
Upright/Storage Position
Body, Machine
#651301
Clamp with Screw
#S611A
Turbo Tool
#608844
Dusting Tool
#658801
Tool Storage Bag
#650603
Label, Aura RH
#655104
Not Shown:
Label, Aura LH
#655105
Hose
#654101
Cuff (2)
#242402
Crevice Tool
#658802
Wand (2)
#659801
6
Page 8
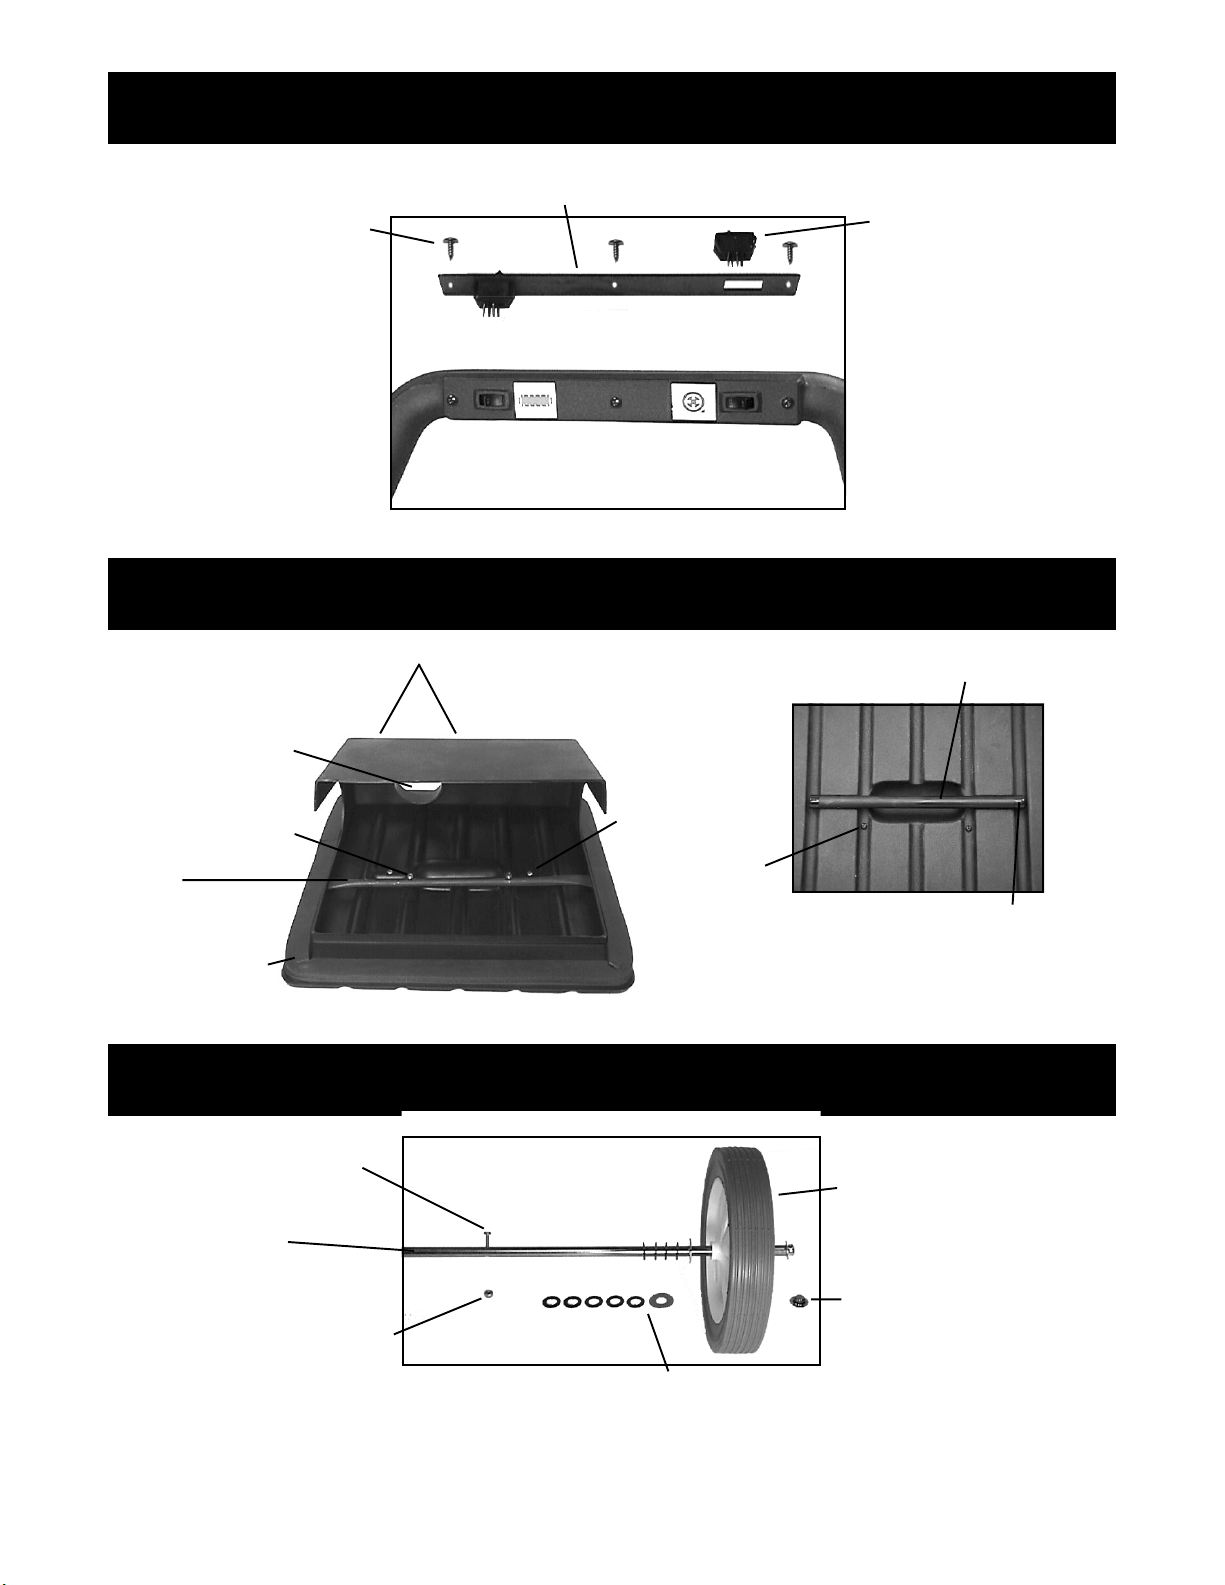
Screw, #8x1/2 THP SMS (3)
#W136D1
SWITCH ASSEMBLY
Plate, Switch
#656602
Switch, Rocker 20 Amp (2)
#911089
Not Shown:
Lead Assembly, Switch
#911211
Bag Adapter
Nut,10-20 ESNA S/S (2)
#920017
Brace
#658505
Gasket, Cover
#653402
Brush Switch
Vacuum Switch
COVER ASSEMBLY
Bag Clamp Assembly Not Seen: Screws (2)
#962029
Clamps (2)
#1394
Nuts (2)
#920017
Screws, Handle (2)
#962119
Screws, Brace (2)
#W343D
Not Shown:
Paper Vacuum Bags, 10 Pack
#650602
Cover
#652302
Optional Cloth Bag
#650601
Handle
#653902
Cap, Handle (2)
#651501
Screw, 10-24x1 PHP
#W343D
Shaft, Wheel
#657703
Nut, 10-20 ESNA S/S
#920017
WHEEL ASSEMBLY
Wheel, 10x1.75 Grey (2)
#229750
Snap Axle Cap (2)
#S482P
Two (2) Sets:
Washer, Fibre (5 one side, 6 other side)
#509820
Washer, 7/16 Flat
#W120D
7
Page 9
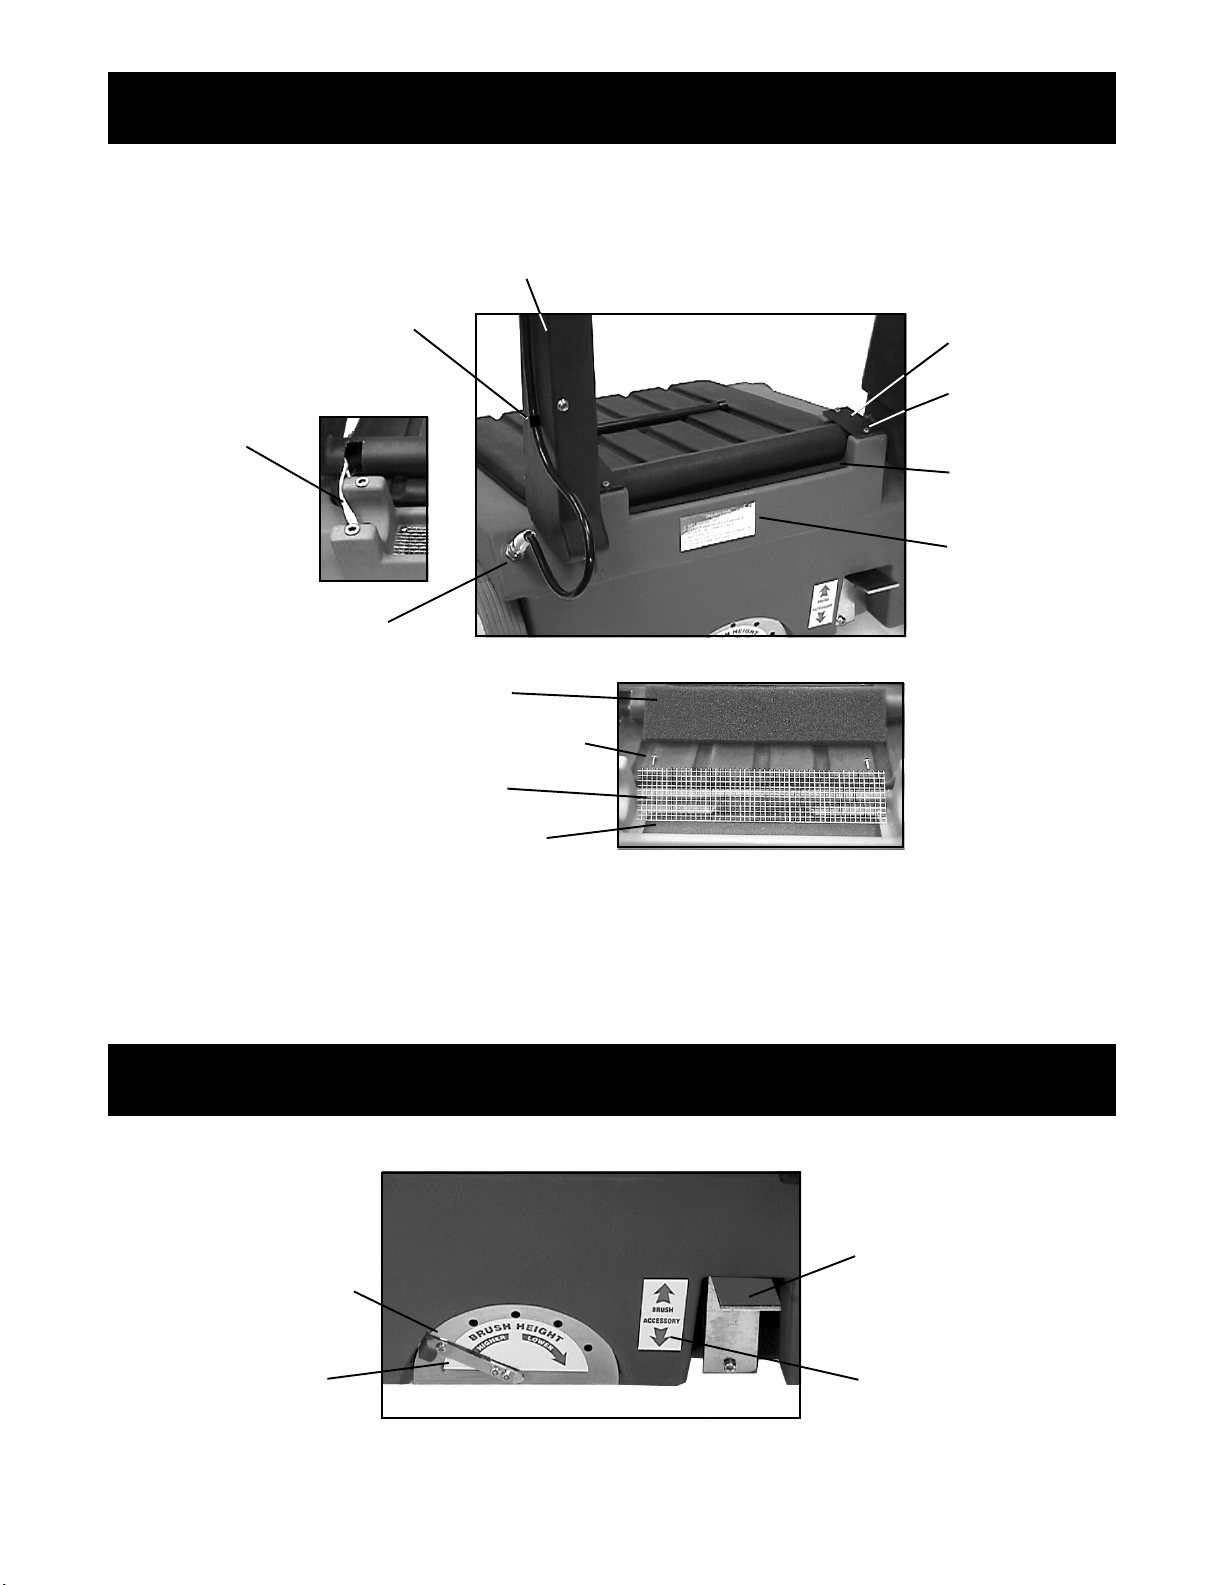
HANDLE & EXHAUST FILTER COMPONENTS
Not Shown (at top
of handle):
Clamp
#1394
Spring
#228331
Screw
#W343D
Wiring Harness
#911210
Connectors (5)
#911179
Cord Assembly, 75 Feet
#908103
Strain Relief
#508510
Nut, 1/2 Pipe Lock
#920619
Jacknut
#920026
Clamp, Cable
#612001
Screw
#W343D
Exhaust Filter
#653301
Screw, #8x1/2 THP (4)
#W136D
Screen, Filter
#658501
Sound Deadening
#658504
Handle
#653901
Two (2) Sets:
Bracket, Handle
#657201
Screw (2)
#W516D
Exhaust Filter
#653301
Label, Warning
#615102
BRUSH ADJUSTMENT & FOOT PEDAL
Brush Height Adjustment
Assembly (detail on page 11)
#650903
Label, Brush Adjustment
#655108
Brush/Accessory Foot Pedal
#655101
Label, Brush Accessory
#655109
8
Page 10
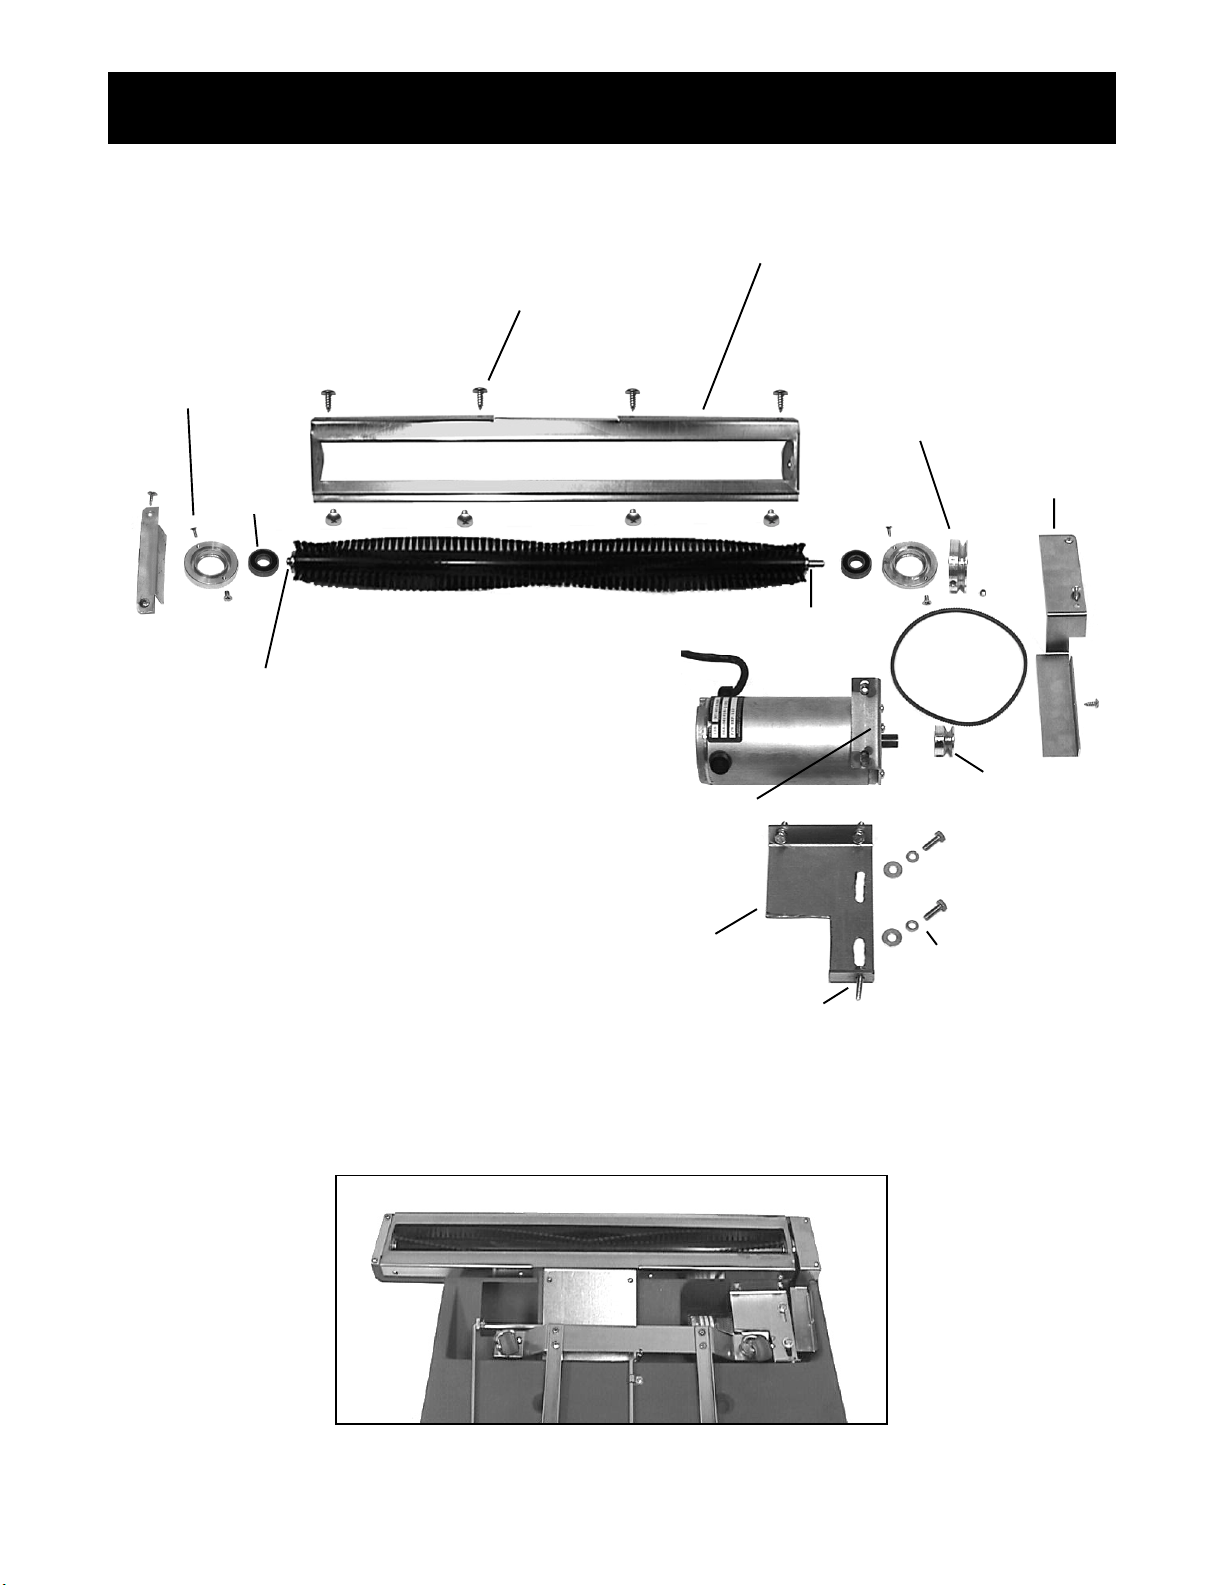
Two (2) Sets:
Bearing Housing
#654201
Screw, 8-32x3/8 Flat PH (2)
#962105
Bearing (2)
#902035
BRUSH ASSEMBLY
Screw, #8x1/2 THP (8)
#W136D
Shoe Brush
#657901
Pulley, Brush
#656901
Set Screw (2)
#W168D
Guard, Belt
#653602
Screw (4)
#W136D
Shoe End
#657902
Screw (3)
#W136D
Note: Brush Motor Internal Rectifier
#911066
Shaft, Short
#657702
Two (2) Sets,not shown:
Guard
#653601
Screw, #4x1/4 Type Z PH SMS(2)
#962144
Brush
#650901
Brush Assembly
#650902
Includes Brush
with Shafts
for Service
Support, Motor
#650801
Screws (4)
#962019
Bracket, Brush Motor
#658503
Three (3) Sets:
Screw
#962010
Washer, 1/4 Lock
#980002
Jack Nut, 1/4-20 Zinc
#920028
Shaft, Long
#657701
Brush Motor
#655201
Belt, Drive
#903018
Pulley, Motor
#656902
Set Screw (2)
#W168D
Two (2) Sets:
Screw, 1/4-20x1/2 HH
#W169D
Washer, 1/4 Lock
#980002
Washer, 1/4 Flat
#W104D
9
Page 11
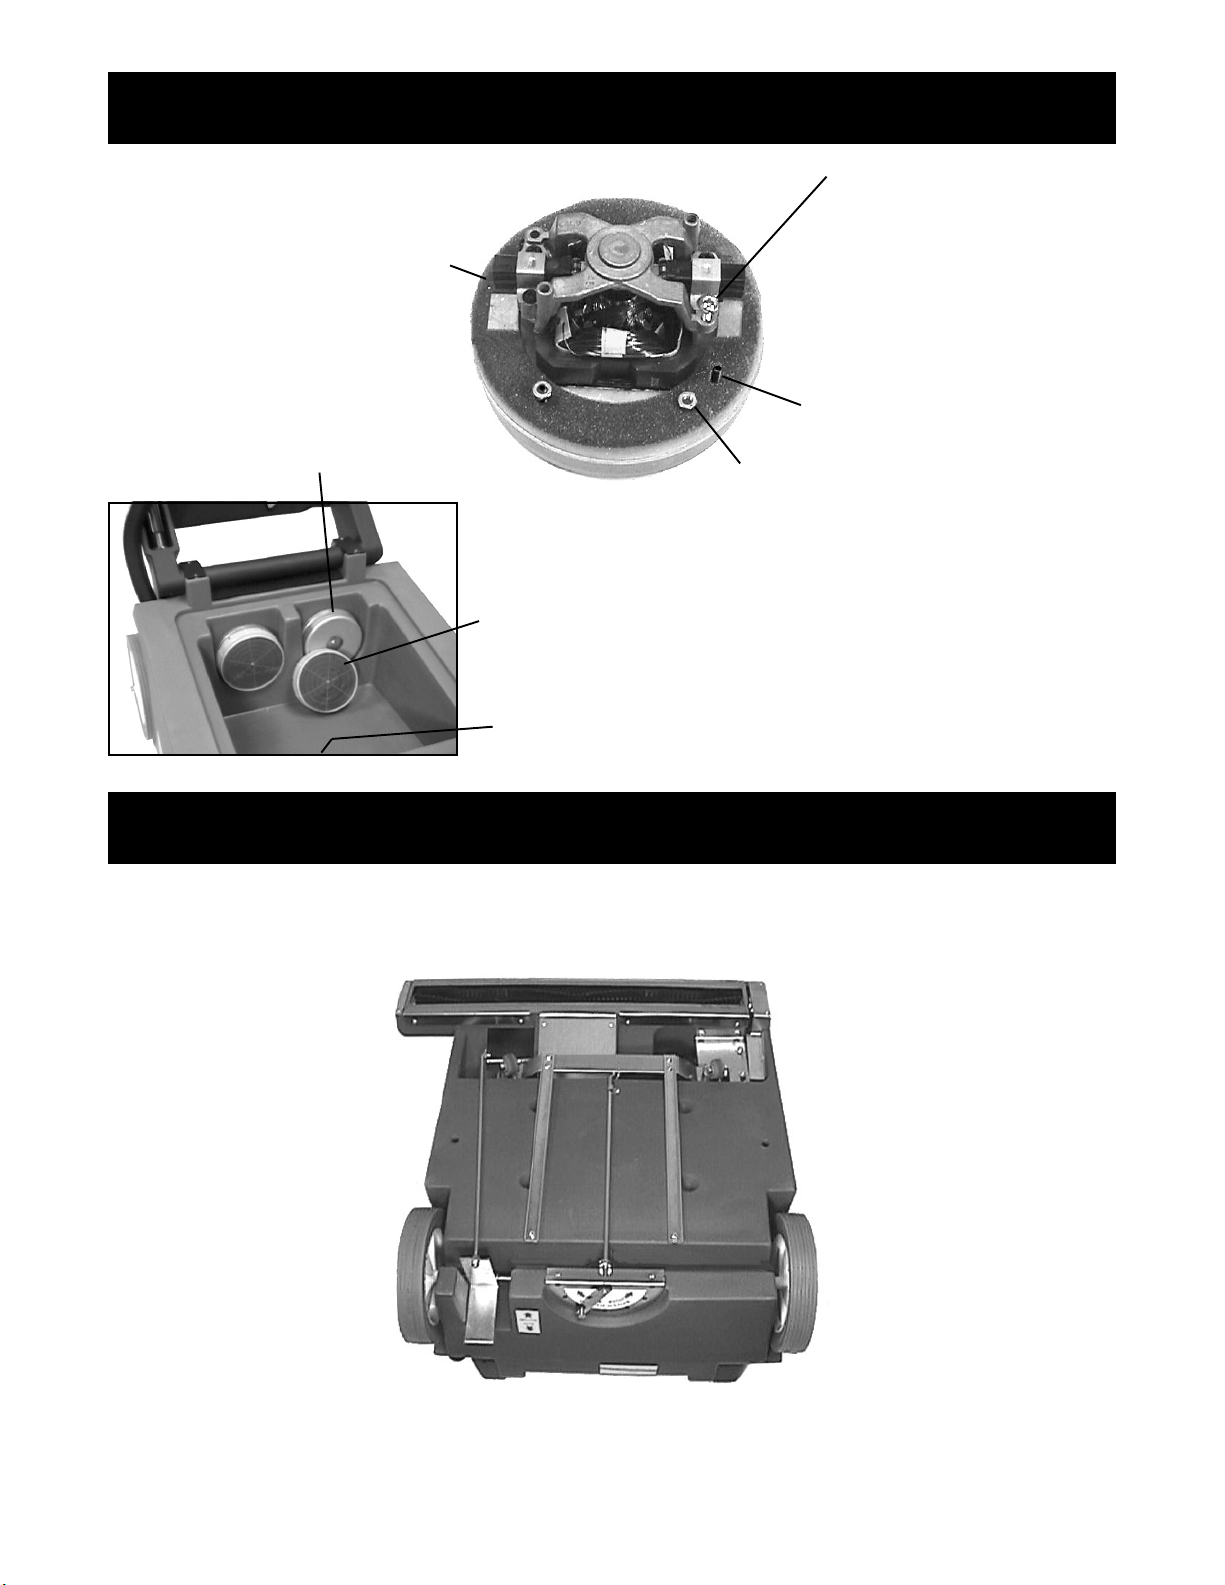
Gasket, Motor Mount (2)
#633403
Vacuum Motor, 115V (2)
#655204
Vacuum Motor, 230V (2)
#655205
VACUUM MOTOR & FILTERS
Screw, 10-32x1/2 Type F
#962030 (230V Only)
Not Shown:
Washer (1)
#W124D
Lead Assembly, Green (2)
#911212
Washer (1)
#W124D
Screw , Motor Mount (4)
#962089
Nut (4)
#W106D
Washer (4)
#W401D
(230V Only)
Vacuum Inlet Filters (2)
#633301
Not Shown:
Gasket, Hopper
#653403
BOTTOM VIEW
10
Page 12
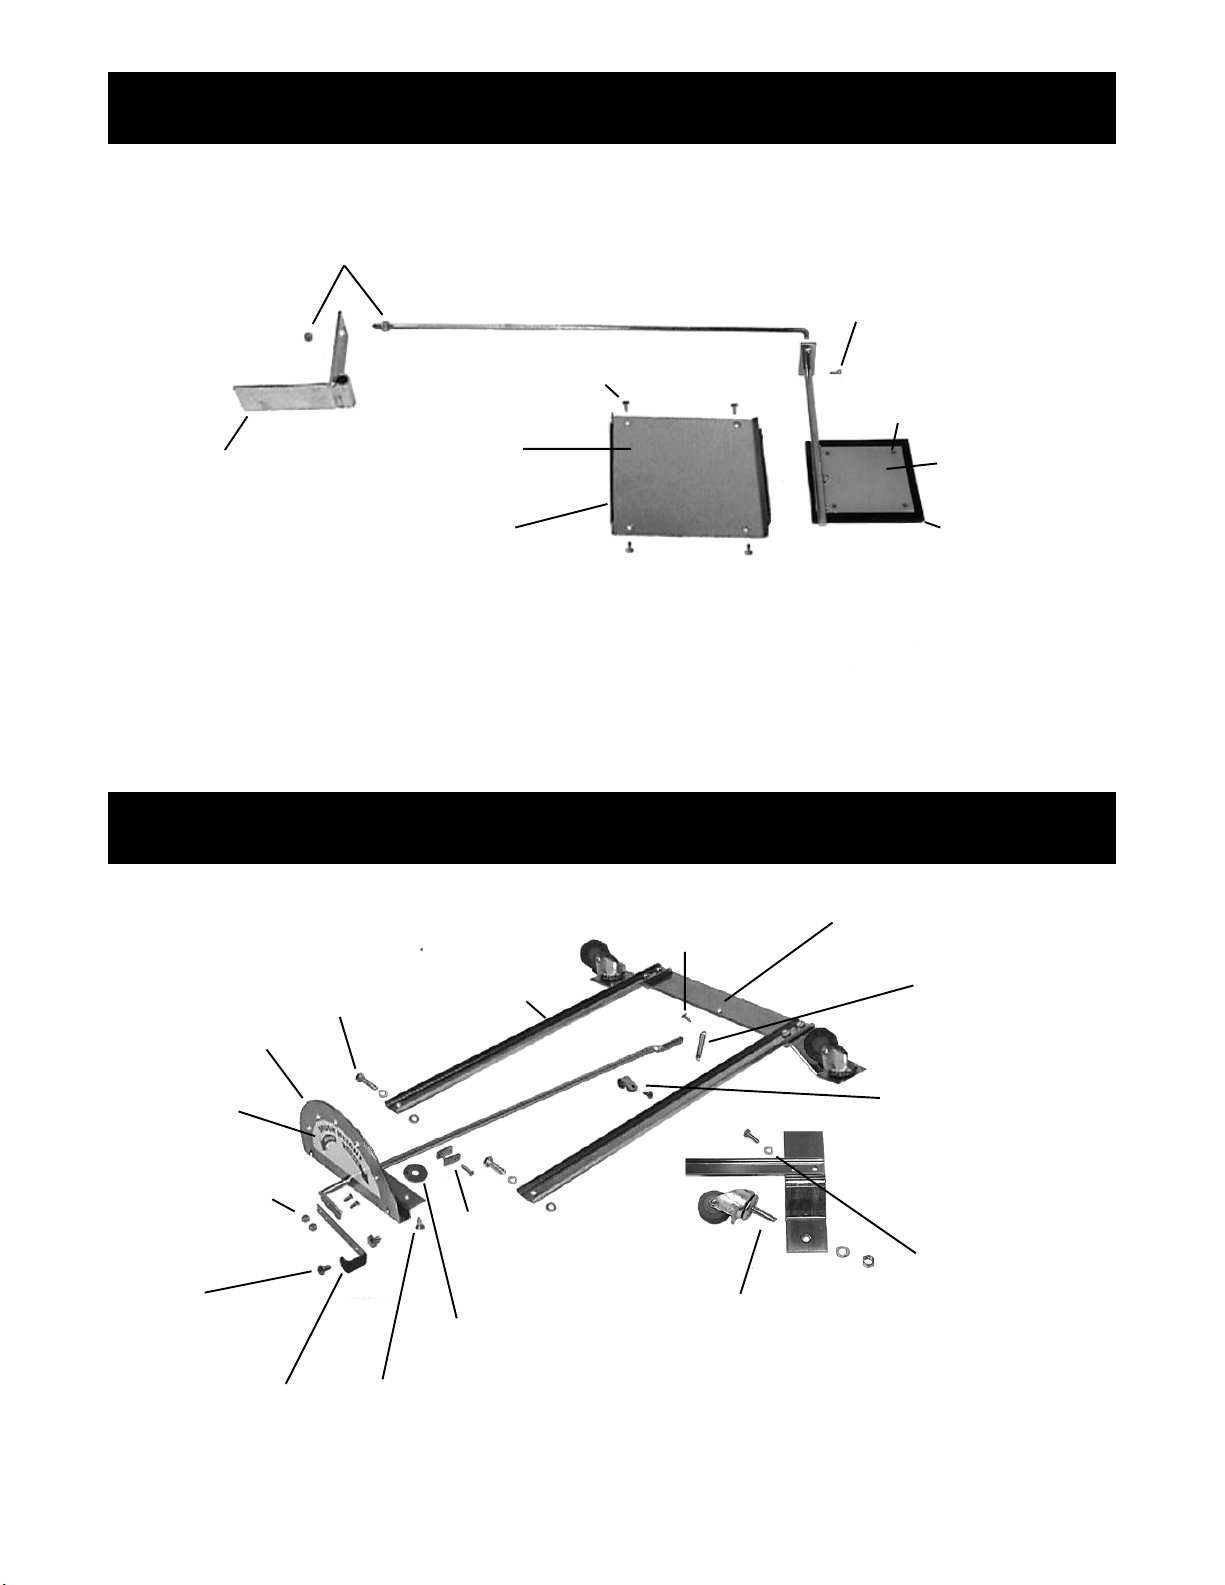
FOOT PEDAL & VACUUM ADJUSTMENT ASSEMBLY
Nut, 1/4-20 (2)
#920011
Foot Pedal (Lever for Door)
#655101
BRUSH ADJUSTMENT ASSEMBLY
Two (2) Sets:
Screw
#962010
Washer, 1/4 Lock
#980002
Nut, 1/4-20 Zinc
#920025
Plate, Adjustment
#656601
Screws, #8x1/2 THP (4)
#W136D
Plate
#652301
Gasket, Duct
#653401
Arm, Support (2)
#650301
Rod, Vacuum Adjustment
#657402
Screw, #8x1/2 THP
#W136D
Cotter Pin
#A13507
Screws, 8-32x5/16 PHP MS(4)
#W500D
Plate, Vacuum Door
#652701
Seal, Vacuum Door
#657601
Plate, Not Shown, Below Seal
#657202
Support, Caster
#658502
Spring
#658302
Label, Brush
#655108
Two (2) Sets:
Nut, 6-32 Hex w/Nyloc
#W144D
Screw, 6-32x3/8 FHP
#W152D
Screw
#962057
Nut, Connecting
#920618
Arm, Caster Adjustment
#655110
Rod
#657403
Stop, Adjustment Rod (2)
#658506
Screw, 8-32x3/4 PHP (2)
#962066
Washer, 5/16 Fender Zinc
#W212D
Screw, #8x1/2 THP (2)
#W136D
11
Two (2) Sets:
Caster
#659701
Washer, 3/8 Lock
#980009
Nut, 3/8-16 Hex
#920002
Bracket
#652001
Screw, #8x1/2 THP
#W136D
Four (4) Sets:
Screw, 1/4-20x3/4 HH
#W169D
Washer, 1/4 Lock
#980002
Page 13

WARRANTY POLICY
PACIFIC LIMITED WARRANTY
The Pacific Aura Wide Area Vacuum has been manufactured, tested and inspected in accordance with specific engineering
requirements and is WARRANTED to be free from defects in workmanship and materials as follows:
Five (5) years parts, one (1) year labor – Rotational molded components.
One (1) year parts & labor – All other components unless excluded below.
This warranty extends to the original user/purchaser and only when used, operated and maintained in accordance with Pacific
Operating and Maintenance instructions.
This warranty does not apply to the following wear parts and accessories of the machine including:
Part Number Part Name
650602
650601
633301
653301
650901
908103
654101
903018
Nor does it apply to damage or failure caused by improper use, abuse or neglect. Warranty credit or replacement of return parts
including motors, pumps, etc., is subject to incoming inspection of those items.
Paper Bag Filters
Cloth Filter Bags
Filter
Exhaust Filter
Brush
Cord Assembly
Hose Assembly
Belt
To secure repair under this warranty, the following procedure should be taken:
• The inoperative machine or warranted parts must be delivered to the authorized dealer with shipping and delivery charges
prepaid. If unable to locate the Dealer, you may contact Pacific at the address listed herein for the location of the nearest
Pacific repair center or agent or for other instructions pertaining to your warranty difficulty.
• Upon compliance with the above warranty procedure, all warranted repairs would be completed at no additional charge or
cost to the user.
• Only Pacific or its authorized dealers and agents may make no charge warranty repairs on this product. All others do so at
their own risk.
This warranty limits Pacific liability to the repair of the product and/or warranted parts replacement and does not include
incidental or consequential damages arising from the use of a Pacific machine whether defective or not.
This warranty is in lieu of all other expressed or implied warranties and is extended to the original purchaser/user.
2259 S. Sheridan • Muskegon, MI 49442
Ph: (231) 773-1330 • (800) 968-1332 • Fax (800) 863-9536
www.pacificfloorcare.com
02/03 655601
 Loading...