


ARROW
BACKP ACK V ACUUM
Parts Manual
OPERATING & MAINTENANCE
INTRODUCTION INSTRUCTIONS
READ THIS BOOK
This operator’s book has important information for the
use and safe operation of this machine. Read this book
carefully before starting the machine. Keep this book
and tell all operators to read the book. If you do not
follow the instructions, you can cause an injury or damage equipment, furniture or buildings.
For new books write to:
Pacific
2259 South Sheridan Road
Muskegon, MI 49442
Carefully inspect all components to ensure that there is
no concealed freight damage. If such damage is discovered, file a “CONCEALED DAMAGE REPORT” immediately with the delivering carrier.
The contents of this manual are based on the latest
product information available at the time of publication. Pacific reserves the right to make changes or
improvements to its machines without notice.
FOR YOUR CONVENIENCE, RECORD THE
FOLLOWING IMPORT ANT INFORMA TION:
MODEL_______________________________
SERIAL NUMBER______________________
P ART NUMBER _________________________
DA TE PURCHASED ____________________
IMPORT ANT SAFETY INSTRUCTIONS
T o assure the safe operation of this machine, you must read and understand all warnings and instructions in this book.
If you do not understand, ask your supervisor.
READ ALL INSTRUCTIONS BEFORE USING THIS MACHINE
WARNING
: To reduce the risk of fire, electric shock, or injury:
1. Y ou must be trained to operate this machine. This machine is to be operated for its intended use only.
2. Do not use outdoors or on wet surfaces.
3. Do not operate this machine unless it is completely assembled.
4. Always use a three-wire electrical system connected to the electrical ground. For maximum protection against
electrical shock, use a circuit that is protected by a ground fault circuit interrupter. Consult your electrical contractor.
5. T o prevent electric shock, always remove the electrical plug from the electrical outlet before doing any rep airs or
maintenance and when leaving the machine unattended.
6. T o prevent electric shock, keep the machine surface dry . Do not subject to rain. S tore the machine in a dry building
area. Clean the machine with a dry cloth only .
7. Machines can cause an explosion when near flammable materials and vapors. Do not use this machine with or
near fuels, grain dust, solvents, thinners, or other flammable materials. Do not use flammables to clean this
machine.
8. A qualified or authorized person must do maintenance and repairs.
9. If the machine is not working as it should, has been dropped , damaged, left outdoors, or dropped into water , return
it to a service center
10. Do not use with damaged cord or plug.
1 1. Turn off all controls before unplugging.
12. Do not use without a dust bag and/or filters in place.
13. Make sure all labels, decals, warnings, cautions and instructions are fastened to the machine.
Grounding Instructions
This machine must be grounded. If it should malfunction or break
down, grounding provides a path of least resistance for electric
current to reduce the risk of electric shock. This machine is equipped
with a cord having an equipment-grounding conductor and grounding plug. The plug must be inserted into an appropriate outlet that
is properly installed and grounded in accordance with all local
codes and ordinances.
WARNING - Improper connection of the equipment-grounding conductor can result in a risk of electric shock. Check with a qualified
electrician or service person if you are in doubt as to whether the
outlet is properly grounded. Do not modify the plug provided with
the machine - if it will not fit the outlet, have a proper outlet installed
by a qualified electrician.
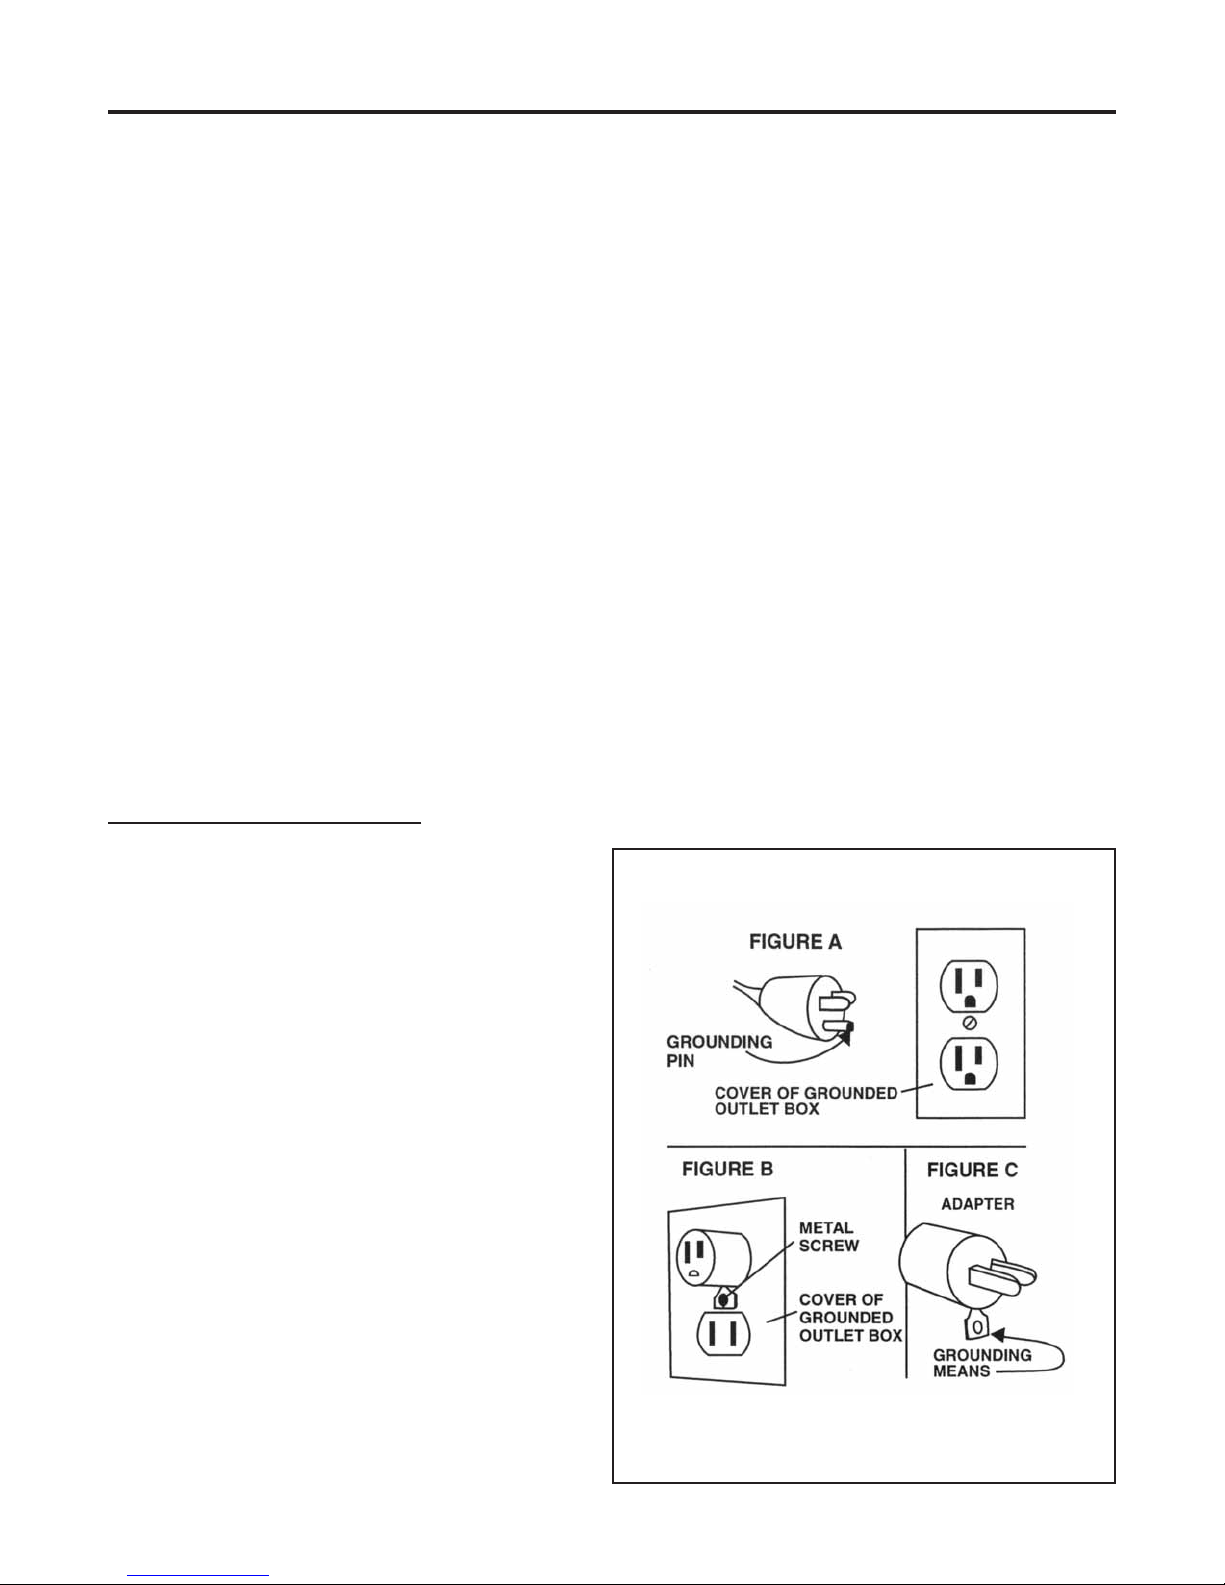
This machine is for use on a nominal 120-volt circuit, and has a
grounded plug that looks like the plug illustrated in figure A. A
temporary adapter that looks like the adapter illustrated in figures B
and C may be used to connect this plug to a 2-pole receptacle as
shown in figure B if a properly grounded outlet is not available.
The temporary adapter should be used only until a properly
grounded outlet (figure A) can be installed by a qualified electrician. The green colored rigid ear, lug, or the like extending from the
adapter must be connected to a permanent ground such as a
properly grounded outlet box cover. Whenever the adapter is
used, it must be held in place by a metal screw.
NOTE: In Canada, the use of a temporary adapter is not permitted
by the Canadian Electrical Code
EXTENSION CORDS
Use only three-wire 12/3 or larger gauge approved extension
cords that have three-prong grounding type plugs and three-pole
receptacles that accept the appliance’s plug. Replace or repair
any damaged cords or plugs.
When servicing, refer to authorized person only. Use only identical replacement parts.
NOTE: Do not use adapters shown in figures B & C in Canada
2

OPERA TING & MAINTENANCE PROCEDURES
THERMAL-PROTECTION INSTRUCTIONS:
This vacuum cleaner is equipped with a thermal-protection device, which will interrupt vacuum motor circuit
automatically to prevent the motor from overheating. Air
restrictions for an extended period will result in the
vacuum motor shutting down. If this occurs, press the
switch to turn the vacuum to the OFF position and wait
a minimum of 5 minutes for the motor to cool to a safe
termperature. Be sure to determine the cause of overheating and rectifiy the problem before using the vacuum
cleaner again or it will continued to overheat and shut
down. In some instances the vacuum motor circuit is
interrupted because of high motor temperature caused
by a dirty dust bag or an airway blockage. Please unplug the vacuum and check the inner paper dust bag
and airway. If the dust bag is too dirty and clogged,
replace it with a new one. If an airway is blocked, please
remove the blockage before reuse. The motor can be
restarted when it is cool.
REPAIR SERVICE
When servicing, use an authorized person only. Use
only identical replacement parts.
OPERATION
WARNING! - For the safe operation of this machine
follow the instructions given in this booklet and the training given by your supervisor. Failure to do so can result
in personal injury and/or damage to machine and property!
WARNING! - NEVER USE THIS MACHINE TO PICK
UP VOLA TILE, EXPLOSIVE OR HAZARDOUS MA TERIALS.
T o prepare the machine for operation, make sure it is of
the correct voltage and properly assembled. If in doubt,
ask your supervisor.
FOR DRY PICK UP ONL Y :
“Dry” refers to material such as dust, dirt, debris and
dry foam shampoo.
1. Plug the cord into a 120-volt, grounded outlet.
2. Turn the machine’s motor on by pressing the rocker
switch that is located on the power cord.
PREPARATION
Please refer to Drawing 1.
1. Remove the cover (Item #34) and cover seal ring
(Item #33), pull out the cloth filter bag (Item #31).
Check to see that filter guards (Item#1, Item #2 &
Item #3) have not shifted during shipping.
2. Install an inner paper dust bag (Item #32) inside of
the outer cloth filter bag (Item #31). At the begin
-ning of each shift, the bags should be checked.
Empty or replace as necessary.
3. Note: Never use a paper dust bag without the cloth
filter bag (Item #31).
4. Place the cover seal ring (Item #33) on the dust
bag’s opening (Item #32)
5. Replace the cover (Item #34) and clip the sunken
edge of the cover tight by pushing downward on the
cover clip (Item #7).
6. Push the connector tube (Item #35) into the cover
(Item #34).
7. Check the wear on the cord by the vacuum body and
at the plug. Pass the power supply cord (Item #13)
through the strip outside the left side of the waist
belt (Item #39).
8. Fix the switch box under the sewn strap and knot
the other strap around the switch box.
9. Adjust the shoulder strap to allow the waist belt to
be buckled around your waist.
10. Fasten the waist belt and chest belt snugly and
make sure the weight is resting comfortably on
your hips. NOTE: The back-plate is adjustable up
or down by removing the four screws (Item #27)
that attach to the vacuum body (Item #28).
3

MAINTENANCE
Good maintenance procedures assure better operation, fewer repairs and longer life for your machine.
WARNING! - Always disconnect the machine’s electrical plug from the electrical outlet before doing any clean
up, repairs or maintenance of the machine and when leaving the machine unattended.
CLEAN THE MACHINE AFTER EACH USE:
1. Each week rinse, dry and return the foam filter (Item #22) at the bottom of the vacuum tank below the vacuum motor.
2. Clean the vacuum tank. Release the clamps on each side of the top of the vacuum tank. Lift the filter assembly out
of the vacuum tank and set aside. Wipe the inside and outside of the vacuum tank with a clean dry cloth.
3. Empty and check the filter assembly . Empty the recovered soilage into a suitable container and remove and shake
the cloth filter bag to remove clinging dirt. Lightly brush the inside of the cloth filter bag to remove embedded dirt .
Check the cloth filter bag for tears or holes; repair or replace if necessary . Inst all a clean paper dust bag into
assembly into the cloth filter bag and place them back into the vacuum tank.
ELECTRICAL CABLE:
Check the cord for any nicks, cuts or damage. Report these to your supervisor for correction.
V ACUUM TANK ASSEMBL Y :
1. Gaskets: Clean the Cover Seal Ring gasket.
2. V acuum Motor Guards: Inspect for dirt or damage and replace if damaged or filled with dirt.
FIL TER MAINTENANCE
1. Check the paper dust bag (Item #32) each time you start and finish vacuuming. A clogged and dirty dust bag
restricts air flow and results in reduced suction and overheating.
2. While vacuuming, stop every two hours or as needed to shake out the paper dust bag (Item #32). Replace the paper
dust bag when necessary . Note: Lift both paper dust bag and cloth filter bag out at the same time to avoid ripping
the paper dust bag, especially when it is full.
3. Once a month (or more often if necessary) hand or machine wash the cloth dust bag (Item #31) and let it AIR DRY.
DO NOT PUT IN DRYER.
4. Once a month (or more if necessary) clean the foam filter (Item #2) between the motor guards, located inside the
vacuum tank under the paper dust bag and cloth flter bag. To do this remove the top piece of the motor guard (Item
#1) and remove the foam filter (Item #2). Shake it out, rinse it and let it air dry thoroughly . Before the next use, re install a DRY foam filter (Item #2). Replace with new foam filter if it becomes worn or damaged. Re-install motor
guard (Item #1) by firmly snapping the guard in place.
5. Each week rinse and air dry the foam filter (Item #22) at the bottom of the vacuum tank below the vacuum motor . T o
do this pull out the round rubber support (Item #21) and remove foam filter (Item #22). Rinse the foam filter and let
it air dry thoroughly . Before the next use, re-install foam filter (Item #22) then re-install round rubber support (Item
#21) into the canister to support the foam filter.
4

NOTES
5

VACUUM ASSEMBLY 1
1
23
2
28
27
24
25
22
21
20
19
18
17
16
15
3
4
5
26
14
13
12
11
10
9
8
6
7
6

BACKP ACK V ACUUM PARTS LISTING
I T EM P ART NO. DESCRIP T ION
1 633341 Fil ter Ass em bl y-HEP A
2 635240 Motor-Vacuum
3 911434 Protector-T her mal
4 635140 Latch-Cover
5 911444 Control Swit ch Ass embl y-On/ Off
6 632040 Nut-Cable Cl am p-S train Reli ef
7 632041 Clamp-Cable Part 1
8 632042 Clamp-Cable Part 2
9 964155 Screw-2.9 x 13 Sel f Thread
10 635041 Ki t-Fil t er & Support
11 964205 Screw-M3 x 10
12 633842 Guard-Plastic
13 964206 Screw-M5 x 40 & W asher
14 637340 Ring-Motor Clampi ng
15 964207 Screw-M8 x 15
16 638640 T ank-Vacuum
17 980664 Washer
18 637341 Ring-Rubber
19 630641 Bag-Cloth Fi l t er
20 630640 Bag-P aper F i lter (5 pack)
21 637342 Ring-Cover Seal
22 632341 Cover
23 600205 Adapter-1 1/2 Hos e
24 632441 Cuff-S t rai ght Swi vel
25 911438 Connector-Wire
26 633940 Handle
27 634140 Hose (No cuff or handle)
634141 Hose As sembly (I ncludes i tems #24, 26 & 27)
28 634540 Harness A s semb ly
7

WARRANTY POLICY
LIMITED WARRANTY
The
Pacific
engineering requirements. This machine is WARRANTED to be free from defects i n workmanshi p and materials
for periods as f ollows fr om the dat e of pur c hase.
One (1) Year Parts & Labor – unless exc luded below
This warranty ext ends to the original user/purchaser and only when used, operated and maintained in
accordance with
This warranty does not appl y to certain wear parts and accessories of the machine such as elect r ic al c or ds,
carbon motor brushes, ho se s, tools, filters etc., nor does it apply t o damage or failure caused by improper use,
abuse or neglect . Warranty credit of return parts including mot or s, etc., is subjec t to incoming inspection of
those items.
To secure repair under this warrant y , the following procedure should be taken:
1) The inoperative machine or warranted parts must be delivered to the authoriz ed service center with
shipping and delivery charges prepaid. If unable to locate a service center, you m ay c ontact
address listed herein for the location of the nearest repair cent er or agent or for other inst r uc tions pertaining
to your warranty dif ficulty.
2) Upon compliance wit h the above warranty procedure, all warranted repair s will be completed at no additional
charge or cost to the user.
3) Only
others do so at their own ri sk.
This warranty limits
include inci dental or consequential damages arising from the use of a
This warranty i s i n lieu of all ot her ex pr essed or implied warranties and is extended to the origi nal
purchaser/user.
Backpack Vacuum has been manufactured, tested and inspected in accordance with specif ic
Operating and Maintenance instructions.
Pacific
liability to the repai r of the product and/or warranted parts replacement and does not
Pacific
Pacific
machine whether defec tive or not.
Pacific
Pacific
or its authorized deal er s and agents may m ak e no charge warranty r epairs on this product. All
at the
Phone: 231-773-1330 Fax: 231-773-1642
www.p acificfloorcare.com info@pacificfloorcare.com
11/11
2259 South Sheridan Road
Muskegon, MI 49442
 Loading...