

Pacific AK-9800, PR-3330, EP-9800, PR-3030, EP-3030 Installation Manual
...
RANGE HOOD
USER & INSTALLATION
MANUAL
AK-9800/EP-9800
PR-3330/
PR-3030/
EP-3030
EP-3330
Pacic Range Hood Limited
Toll Free: 1-866-808-8008
MODEL

Page 2
Introduction Table of Contents
C
ongratulations on your purchase of a
Pacific Range Hood. This manual will
aid you in correctly installing and using
your new range hood, which is designed to
give many years of trouble-free service.
Warranty & Service:
The full terms and conditions of the war-
ranty are listed on page 21.
To apply for warranty please contact
Pacific Range Hood Limited at:
1-866-808-8008. Your application will be
discussed with you and appropriate action
commensurate with the warranty conditions authorized. Please note that warranty
repairs are performed at the location of the
service provider. Labour charges for
in-home repairs are charged to the cus-
tomers account.
Important Notice:
BEFORE you begin the installation of
your new range hood, make certain you
have completely read and fully understand
this manual. If, after reading this manual,
you have other questions regarding your
installation of this product, contact customer service at our toll-free number
listed as 1-866-808-8008.
W A R N I N G :
Failure to comply with the correct installation and operating instructions outlined
in this manual can result in personal injury
and/or premature failure of the range hood,
and may void your warranty.
Before you Begin:
To ensure a successful installation, be-
fore you begin make certain that you:
• Identify your product according the
model number and picture listed on
the cover of this manual;
• Measure and prepare your installation
area against the requirements outlined
in this manual for your product;
• Gather your tools together;
• Obtain the required bolts or screws for
required mounting; and
• Read this manual!
About This Manual
This manual is intended for application
with the following models of Ekolos range
hood from Pacific Range Hood Limited:
• PR-3030/PR-3330/EP-3030
• EP-3330
• AK-9800/EP-9800
The manual is divided into two sections
Section 1: OPERATION
Section 2: INSTALLATION
To quickly locate information, check the
table of contents heading information.
DISCLAIMER:
Line drawings and photographs shown
in this manual are representative of the
concept expressed. They may not be exactly as installed on your product.
Pacific Range Hood Limited reserves the
right to make changes to product specifications, installation instructions, or operating
instructions, without prior notice to the
reader. To obtain the most current manual
for your product, contact: Pacific Range
Hood Limited at 1-866-808-8008.
Congratulations on your purChase

Page 3
Table Of Contents
IMPORTANT SAFETY NOTICES ................................................................ 4
Installation: ..........................................................................................................................4
Safe Operation ......................................................................................................................4
Cleaning the Unit ..................................................................................................................4
PRODUCT OVERVIEW ........................................................................... 5
How it Works: PR-3330/PR-3030/EP-3030 .......................................................................6
OPERATING YOUR RANGE HOOD .......................................................... 6
How it Works: EP-3330........................................................................................................7
How it Works: AK-9800/EP-9800 .......................................................................................8
IMPORTANT OPERATING GUIDELINES ....................................................... 9
When Cooking ......................................................................................................................9
CARE OF YOUR RANGE HOOD .............................................................10
Cleaning the Exterior ..........................................................................................................10
Cleaning the Residue Cups ................................................................................................10
Cleaning the Drain Lines ....................................................................................................10
INSTALLATION ...................................................................................11
IMPORTANT SAFETY NOTICES ........................................................................................11
Organize Your Tools ...........................................................................................................12
Preparing the Range Hood .................................................................................................12
Selecting the Vent Option ...................................................................................................14
Top vent to 6” pipe duct: ............................................................................................14
Top Vent to 3.25” x 10” plenum duct .........................................................................14
Back Vent to 3.25” X 10” plenum duct.......................................................................15
Preparing the Work Area ....................................................................................................17
Installing The Range Hood .................................................................................................18
Connecting the Electrical Cable .........................................................................................20
Electrical Supply: .......................................................................................................20
PRODUCT WARRANTY .........................................................................21
TERMS & CONDITIONS .....................................................................................................21
WHAT IS NOT COVERED ...................................................................................................21
NOTES: ...............................................................................................................................22
REGISTRATION CARD .......................................................................................................23
OWNER DETAILS ...............................................................................................................23

Page 4
SAFETY NOTICES Product Overview
iMportant saFety notiCes
war ni ng
This product is intended to be installed by qualified persons such as trained service
technicians or persons with both electrical and mechanical installation background.
If you do not have this background, DO NOT attempt to install this unit or severe personal
injury could result.
saFety iteMs to note
Installation:
1. All Electrical wiring should be installed according to national and local electrical
codes.
2. It is strongly recommended that old duct work not be re-used. The accumulation of
grease and dirt may pose a fire hazard. To avoid vent restriction resulting in degraded performance of your range hood, old duct work less than 6” diameter or
3.25 x 10” plenum, must never be re-used.
3. Check all sections and joints of the duct work to ensure proper connection and all
joints are correctly taped and secured.
Safe Operation
4. Read all instructions contained in this manual before you operate the unit. Save this
manual for future reference.
5. NEVER operate the unit with the safety grilles removed. Operating blowers have
very strong extraction power, which could cause hair, fingers, clothing or other
loose articles to be drawn towards the fan blades.
6. NEVER dispose foreign substances, including cigarette ashes or combustibles, into
the blowers. This practice may cause grease fires in the duct work.
Cleaning the Unit
7. Always follow the correct procedures outlined in this manual to remove grease and
residue from the residue cups and fan blades (see page 10).
8. NEVER operate the fans with the grilles removed.
9. NEVER disassemble the fan blower assembly to clean it. This practice is hazardous
and will void the warranty. Pacific Range Hood Limited accepts no liability for negligence caused by this practice. If the fan housing requires service, call our Service
Center at 1-866-808-8008 for further instructions.
Page 5
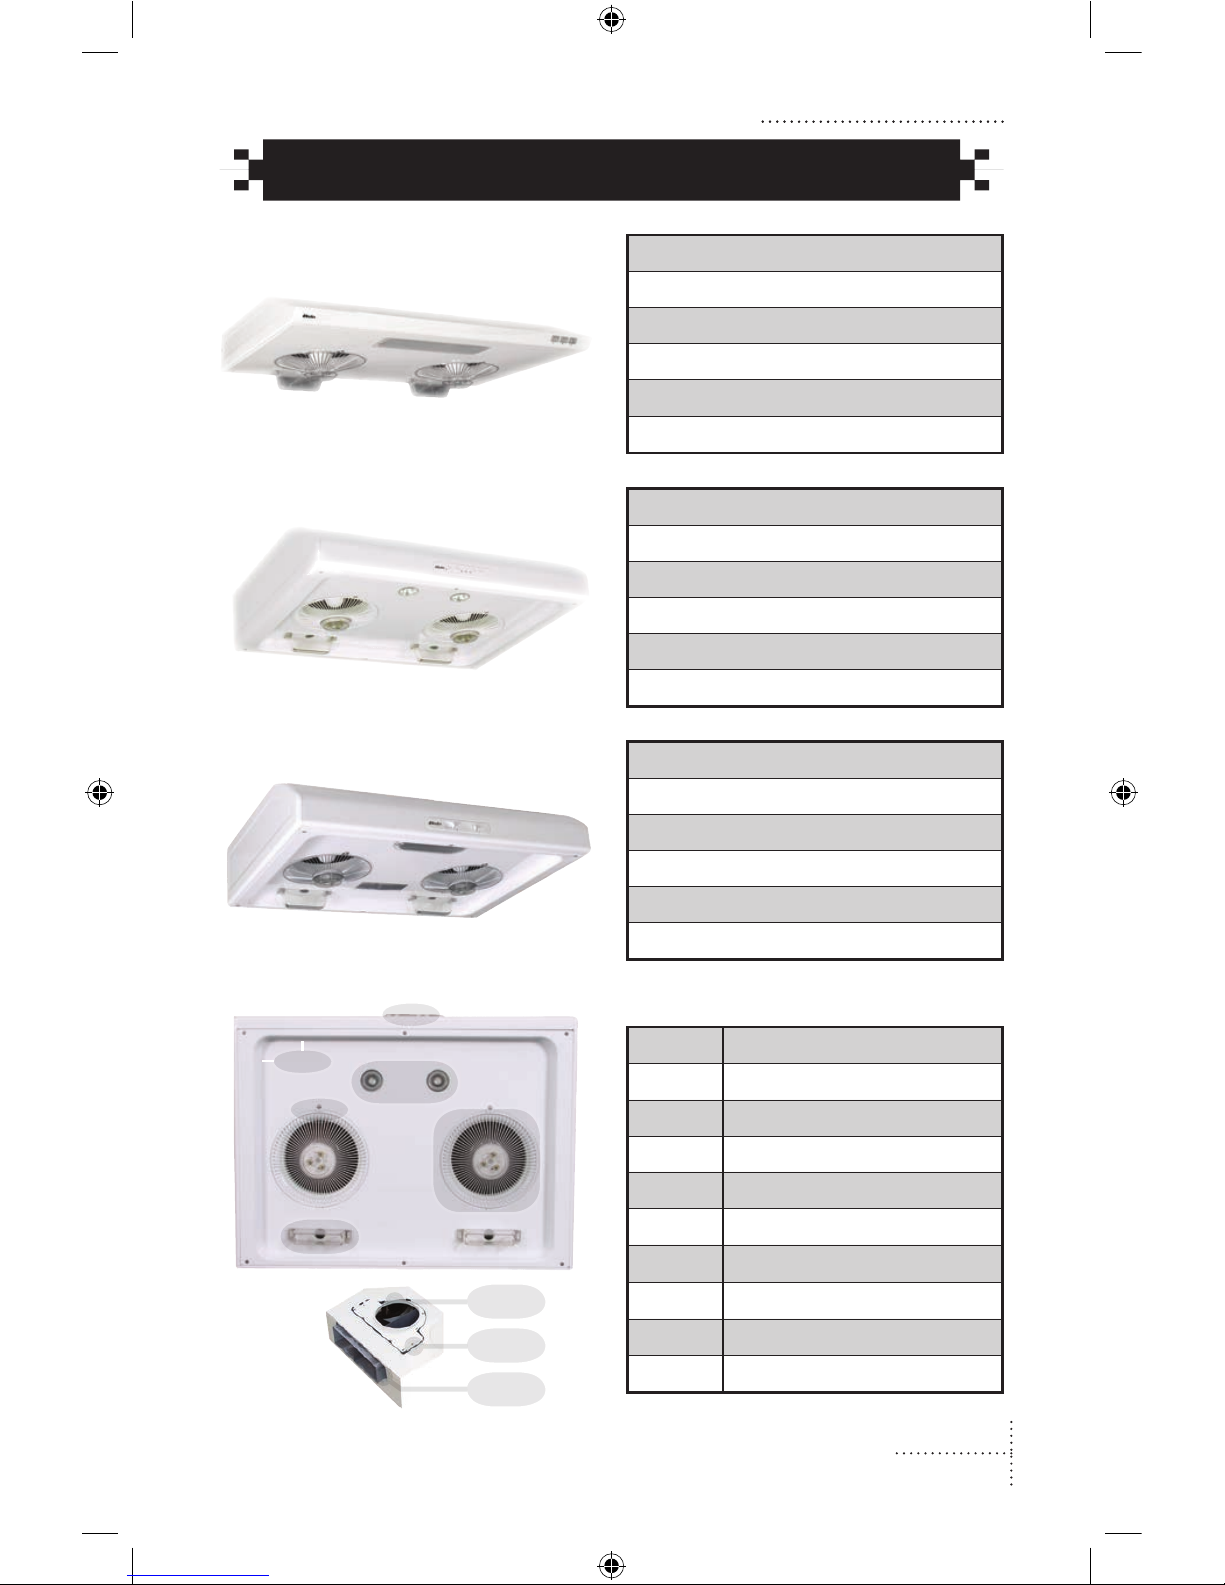
proDuCt oVerVieW
AK-9800/EP-9800
Slim line design
Single light with bezel
Dual self cleaning blowers
Top vented duct
Independent rocker switch controls
EP-3330
Dual Halogen lights
Ultra-Quiet mode
Dual self cleaning blowers
3-way convertible ducting
Electronic touchpad controls
PR-3330/PR-3030/EP-3030
Single light with bezel
Ultra-Quiet mode
Dual self cleaning blowers
3-way convertible ducting
Slide controls
FEATURE DESCRIPTION
1 Lights (halogen shown)
2 Intake fan
3 Grill & securing Screw
4 Residue cup
5 Controls (electronic shown)
6 Underside splash guard
7 Top vent
8 Top Vent Conversion Plate
9 Rear Vent
1
2
3
4
5
6
7
8
9
Page 6
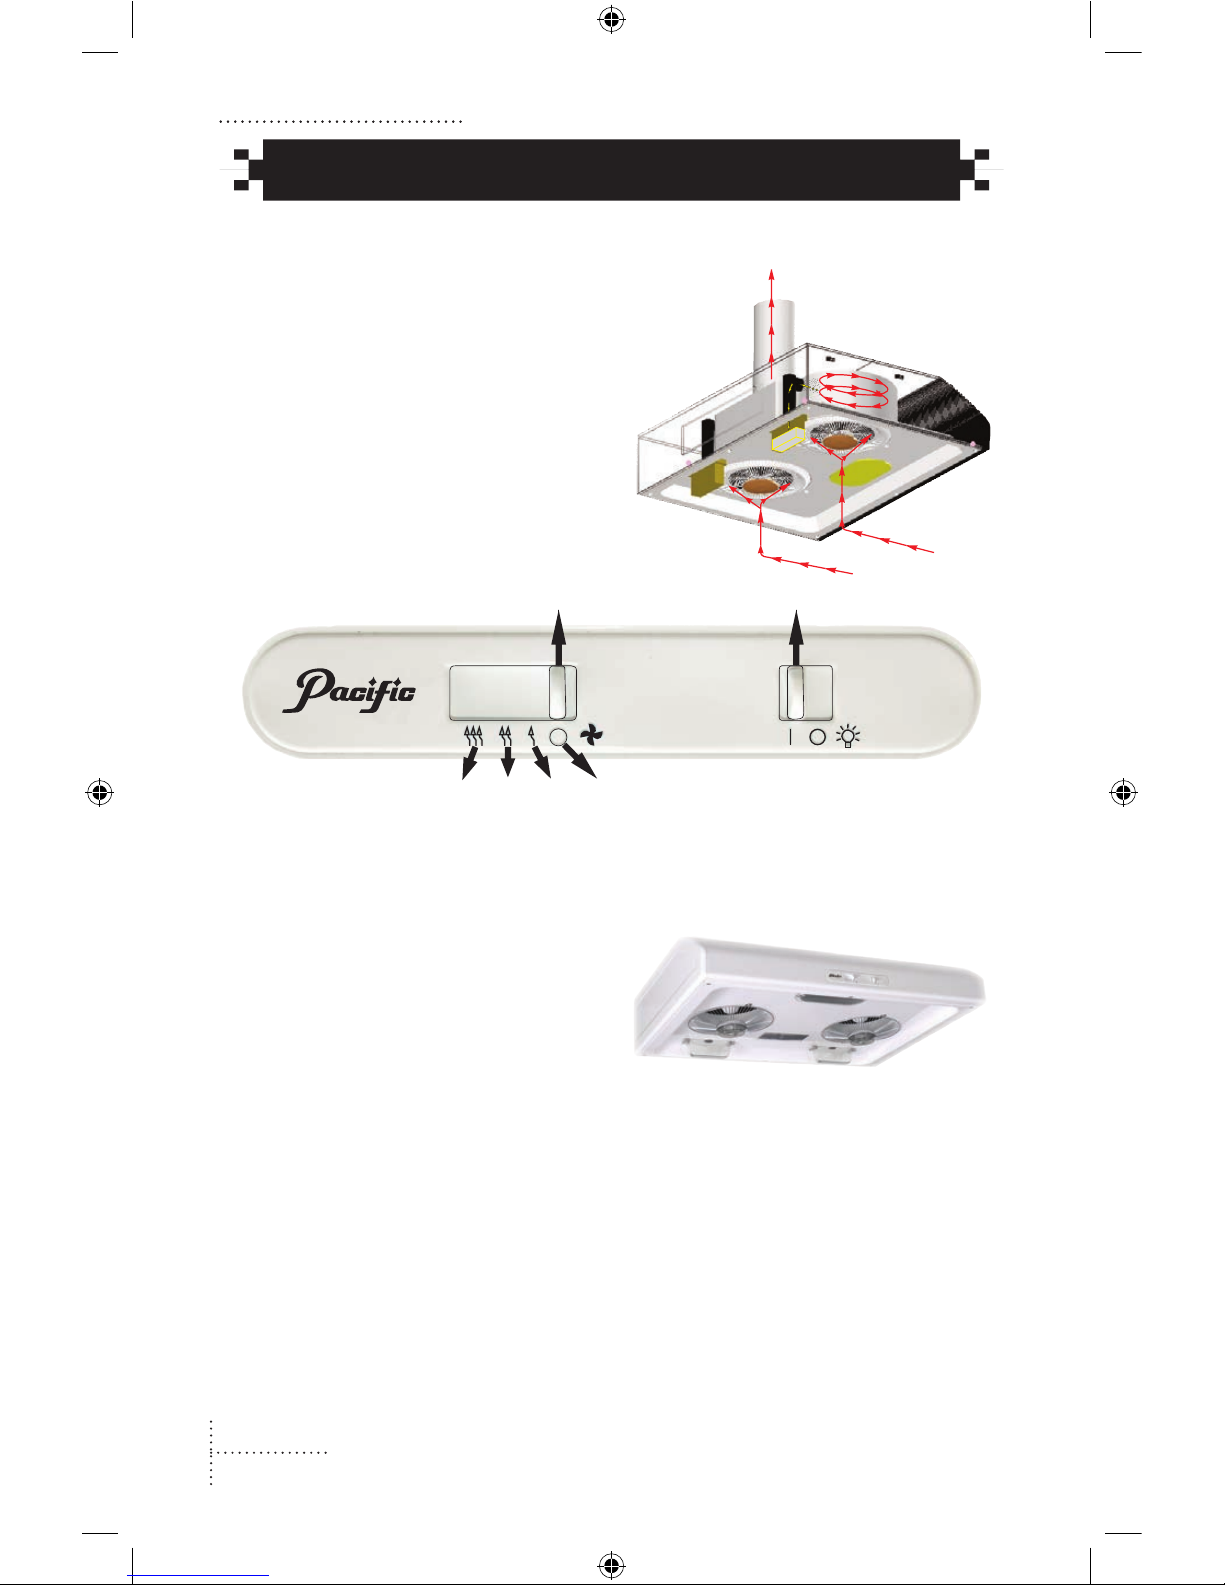
Operating the PR-3330/PR-3030/EP-3030 Operating the EP-3330
How it Works:
To evacuate air from the cooking area, air
is drawn in through the grilles by the suction fans, spun at high velocity where
grease and residue are separated and deposited into the residue cups. The cleansed
air is then forced out through the external
duct work into the outside environment.
The controls shown below are located on
the front panel of the unit.
The dual fans feature multiple speeds to
match the requirement for air extraction in
all situations. The fan speed modes are:
1 Ultra Quiet Mode - the fan speed is
set to a low idle for continuous evacuation of air with very little noise.
2 Medium Speed
3 High Speed for maximum evacuation
of air
FAN SPEED CONTROL
HI MEDIUM LO OFF
LIGHT ON / OFF
The light switch gives off/on control.
For proper care and
maintenance of your range
hood, refer to page 10.
operating your range hooD
PR-3330/PR-3030/EP-3030
Page 7
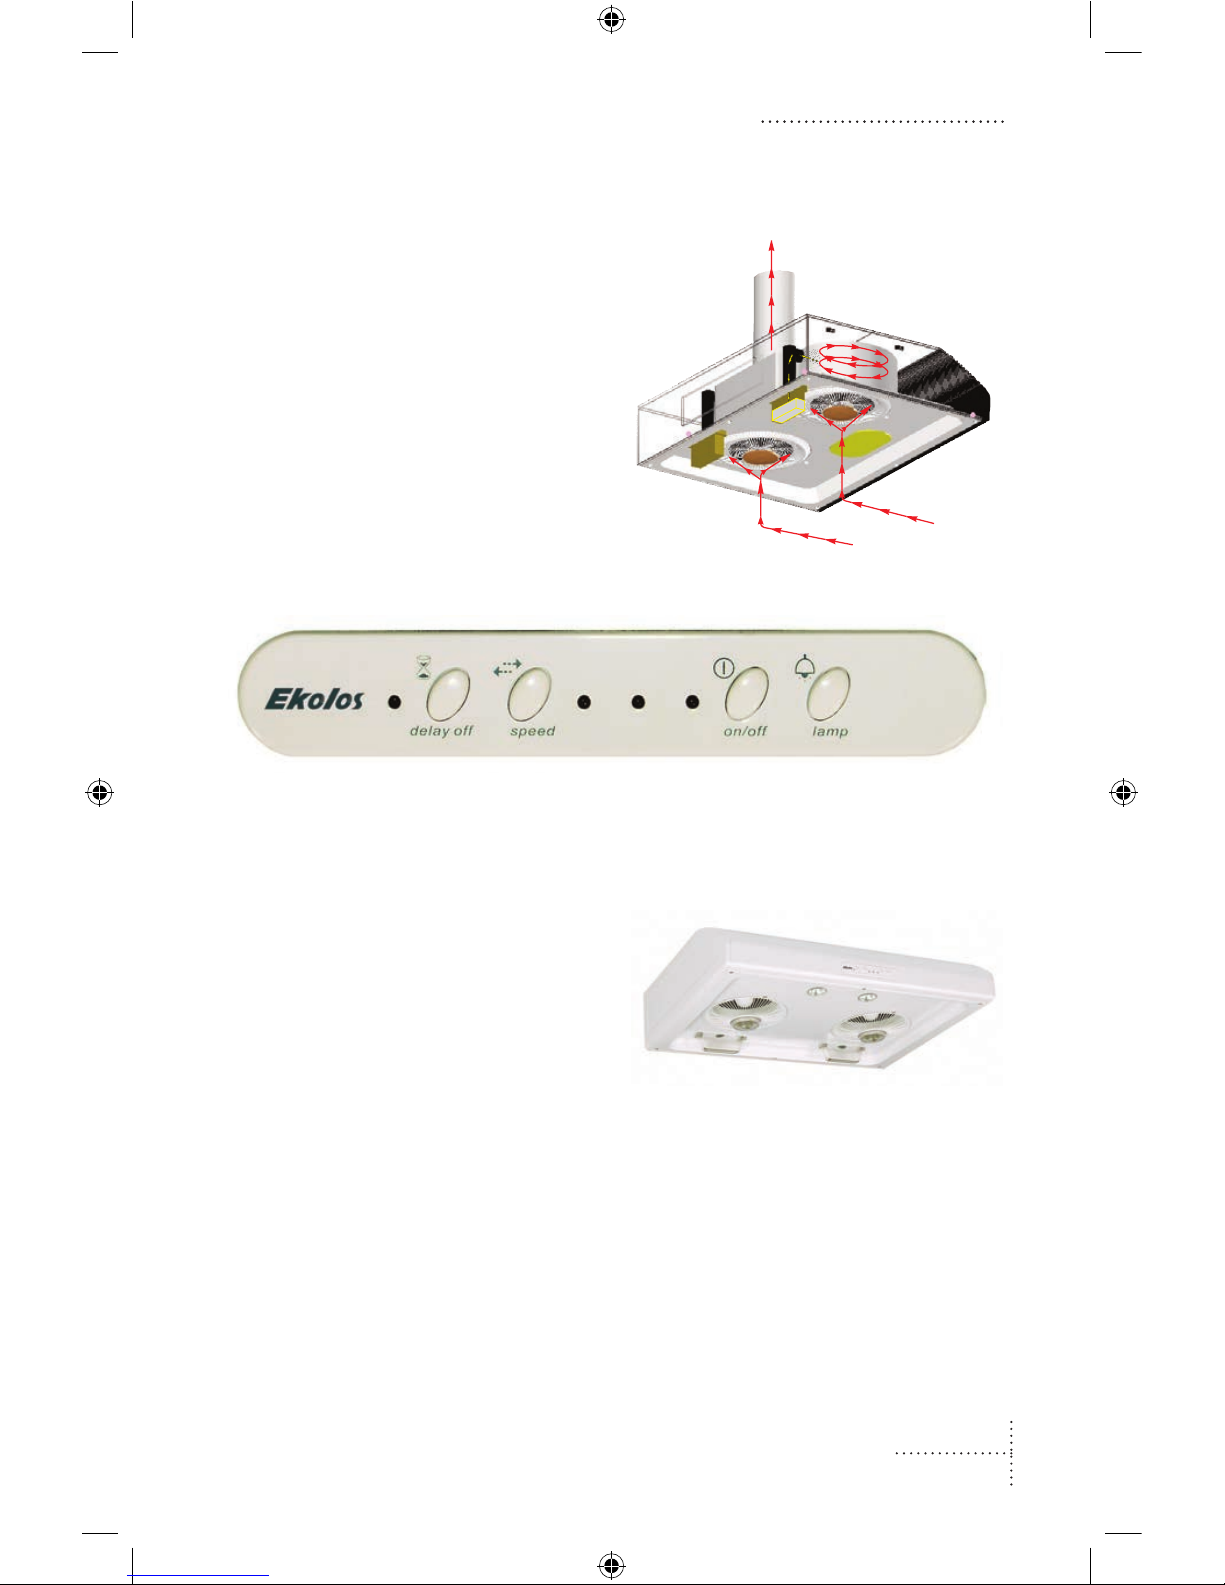
How it Works: EP-3330
To evacuate air from the cooking area, air
is drawn in through the grilles by the suction fans, spun at high velocity where
grease and residue are separated and deposited into the residue cups. The cleansed
air is then forced out through the external
duct work into the outside environment.
The controls shown below are located on
the front panel of the unit.
To operate the range hood the following
steps are suggested:
1. Depress the on/off button to start the
range hood. Depressing the button a
second time will shut the range hood
off.
2. Depress the speed button to select
the desired rate of air extraction. The
selected speed is indicated by the lit
LED. The fan speed modes are:
• Ultra Quiet Mode - the fan speed
is set to a low idle for continuous
evacuation of air with very little
noise.
• Medium Speed
• High Speed for maximum evacua-
tion of air
3. Depress the lamp button to turn the
lamp on or off.
4. To turn the unit off, depress the
on/off button once again.
For proper care and
maintenance of your range
hood, refer to page 10.
Page 8
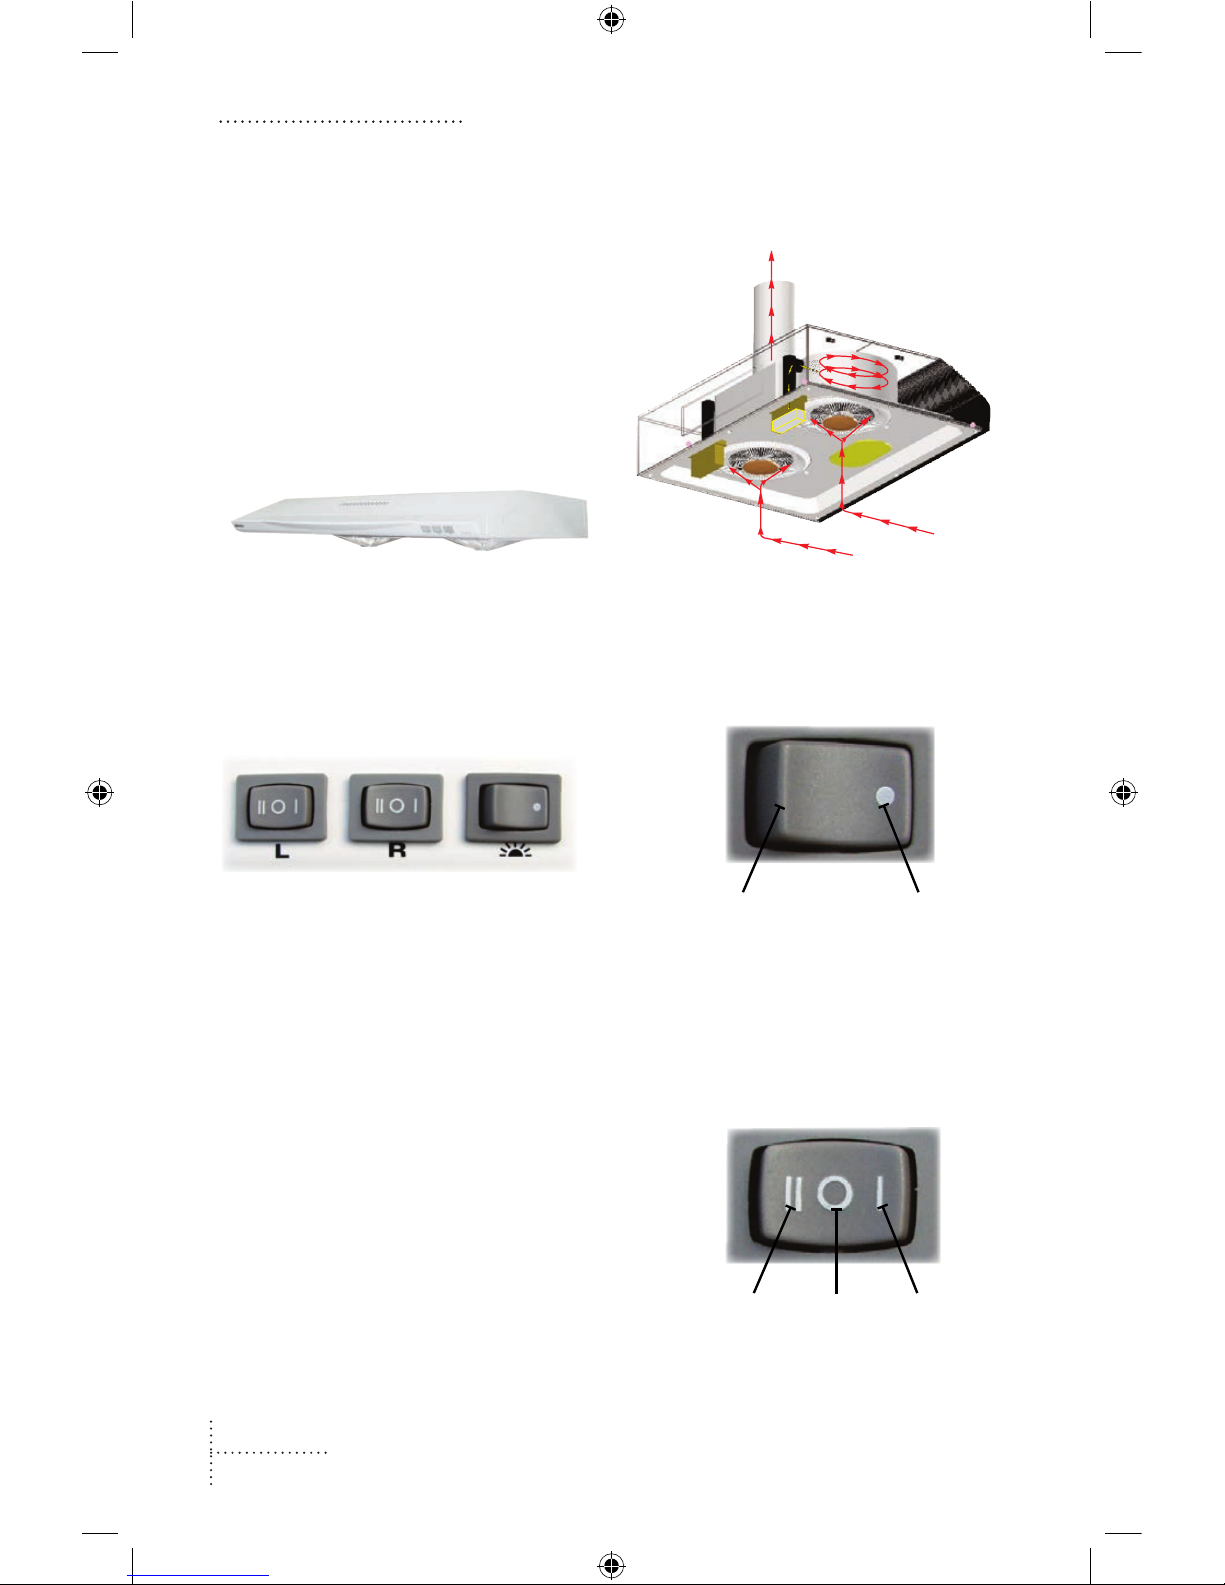
How it Works:
To evacuate air from the cooking area, air
is drawn in through the grilles by the suction fans, spun at high velocity where
grease and residue are separated and deposited into the residue cups. The cleansed
air is then forced out through the external
duct work into the outside environment.
Easy to use Rocker Switch Controls
mounted on the front of the unit, provide
two speed settings for each fan and on-off
control for the light.
The controls shown below are located on
the front panel of the unit.
Each fan has its own rocker
switch speed control to match the requirement for air extraction in all situations.
For proper care and
maintenance of your range
hood, refer to page 10.
Operating the AK-9800/EP-9800 Operating Guidelines
The Light rocker switch positions are:
OFF ON
HI OFF LO
The Fan rocker switch positions are:
AK-9800/EP-9800

Page 9
TO REDUCE THE RISK OF
A GREASE FIRE ON THE
RANGE TOP :
• NEVER leave the stove elements/
burners unattended at high heat settings;
• Always run the range hood when you
are cooking on high heat;
• Clean the ventilating fans as directed
(see page 10). Do not allow grease to
accumulate on the fan, residue cups or
housing; and
• Use the correct size pan and utensils
that are appropriate to the size of the
surface element.
iMportant operating guiDelines
IN THE EVENT OF A
GREASE FIRE ON THE
RANGE TOP:
• Smother the flames with a close-fitting lid, cookie sheet, or metal tray.
BE CAREFUL TO AVOID BURNS. If
the flames do not go out immediately, EVACUATE AND CALL THE FIRE
DEPARTMENT;
• NEVER PICK UP A FLAMING PAN;
• DO NOT USE WATER! This includes
wet dishcloths or towels. A violent
steam explosion can result; and
• Use a Fire Extinguisher ONLY if:
- it is a class ABC unit;
- you know how to operate it;
- the fire is small and contained; and
- you can fight the fire with your
back to an exit.
DISCLAIMER
The above items are based on the publication titled “Kitchen Fire Safety Tips”, which is
published by the National Fire Prevention Association. These directions are offered as a
guideline only and Pacific Range Hood Limited accepts no liability whatsoever for any
consequence due to a fire.
Page 10
Care oF your range hooD
Cleaning the Residue Cups
Over time, residue and grease will accumulate in the external residue cups. The
time varies with the amount of cooking effort so the reader is cautioned to check the
cups regularly. To clean the cups:
1. Slide the cups out of the retaining
ledge;
2. Clean the cups in warm soapy water
and, to prevent grease from sticking
to the surfaces, fill 1/4 full of soapy
water; and
3. Reinsert the containers into the retaining ledge.
Cleaning the Drain Lines
Although the fan blades and drain lines
are designed to shed grease, over time,
residue and grease will accumulate in the
external drain lines. The reader should
clean the drain lines when the residue cups
are emptied. To clean the drain lines:
1. Obtain Aqua degreaser from your
dealer or Pacific Range Hood limited,
or use a natural bubble-free cleaner.
Aqua degreaser is specially formulated to remove grease without damaging plastic or metal surfaces;
2. With the fan unit running at the lowest speed setting, spray a small
amount of Aqua degreaser onto both
fan blades through the grilles.
Water can be sprayed in to rinse off
the fan blades.
Cleaning the Exterior
Wipe the exterior with a soft cloth. A commercial cleaner rated as safe for use with
painted metal surfaces may be used. NEVER use abrasive cleaners or scouring pads/
cloths. To clean the fan grilles, remove the securing screw, slide the grill out of its retaining slot and clean it in warm soapy water.
1) Spray cleaner into
the fan grilles.
2) Remove & clean residue cups.
Care of Your Range Hood Installation Safety Notices
3. Run the unit for five (5) minutes and
than empty the residue cups (see
Cleaning Residue Cups).
NEVER OPERATE THE
RANGE HOOD WITH THE
FAN GRILLES REMOVED.

Page 11
installation
IMPORTANT SAFETY NOTICES
The installation instructions in this manual are intended for qualified installers who have
certification from local authorities to install mechanical and electrical devices, which installation conforms to local electrical and building codes.
The following safety notices must be read and fully understood before you begin installation of the range hood:
1. Use this unit only in the manner intended by the manufacturer. If you have questions
about the use of this product, please contact Pacific Range Hood Limited.
2. Before installing, servicing, or cleaning the unit, switch the electrical power OFF at
the service panel and lock out the panel to prevent power from being accidentally
applied while you are working on, or around, the range hood.
3. Installation work must be done in accordance with local electrical and construction
codes. This includes Fire Rated construction.
4. To prevent furnaces, fireplaces or other externally vented heating devices from experiencing a reverse draft (back draft) through the flu or chimney, sufficient makeup air is required for proper combustion and exhausting of gasses out of the house.
To negate this effect, local regulations may require that a damper be installed into
the ventilation duct work. The reader is cautioned to ensure that the installation of
your heating or ventilation equipment conforms to local codes.
5. When cutting into walls or ceilings, take care not to damage existing wiring or hidden utilities.
6. TO REDUCE THE RISK OF FIRE, ALWAYS USE METAL DUCT WORK! If old metal duct
work is to be reused, clean the duct work with a grease cutting solution to remove
accumulated grease and residue. Failure to do so may result in a fire. Check all sections and joints for proper connection and sealing. DO NOT use old duct work that is
less than 6” (153 mm) diameter.
7. NEVER use this range hood to exhaust explosive vapours such as gasoline, natural
gas, propane, or other similar substance - Explosions may result!
8. NEVER use this range hood to exhaust hazardous substances.
9. To avoid motor bearing damage and unbalanced fan impellers, keep drywall dust
and associated material off the fan unit.
10. It is recommended to mount the fan 24-32 inches (610-812 mm) from the cooking
surface.
11. Always exhaust external vents to the outside. Never vent into wall spaces, attics,
crawl spaces, or other enclosed areas.
12. Sharp edges are exposed around the duct opening and once the bottom grease
shield has been removed. To avoid injury, wearing protective gloves and appropriate
work clothing is recommended.
Page 12
Installation: Organize Your Tools Installation: Prepare the Range Hood
Organize Your Tools
Before starting installation the following tools and materials will be required:
• Electric Drill;
• 1/2” (13 mm) drill bit for drilling pilot holes;
• 1 1/4” (32mm) wood bit for drilling electrical wiring access hole;
• Straight blade screwdriver;
• Pliers;
• Tape measure and pencil; and
• Electrical wire and supplies to conform with local electrical codes.
For installation under cabinets with recessed bottoms:
• Two only 2” (wide) X 1” (thick) X 12” (length) (51 x 25 x 304 mm) wood strips to act
as filler pieces;
• Nuts and bolts to mount the filler strips and range hood; and
• Suitable saw to cut the filler strips to length.
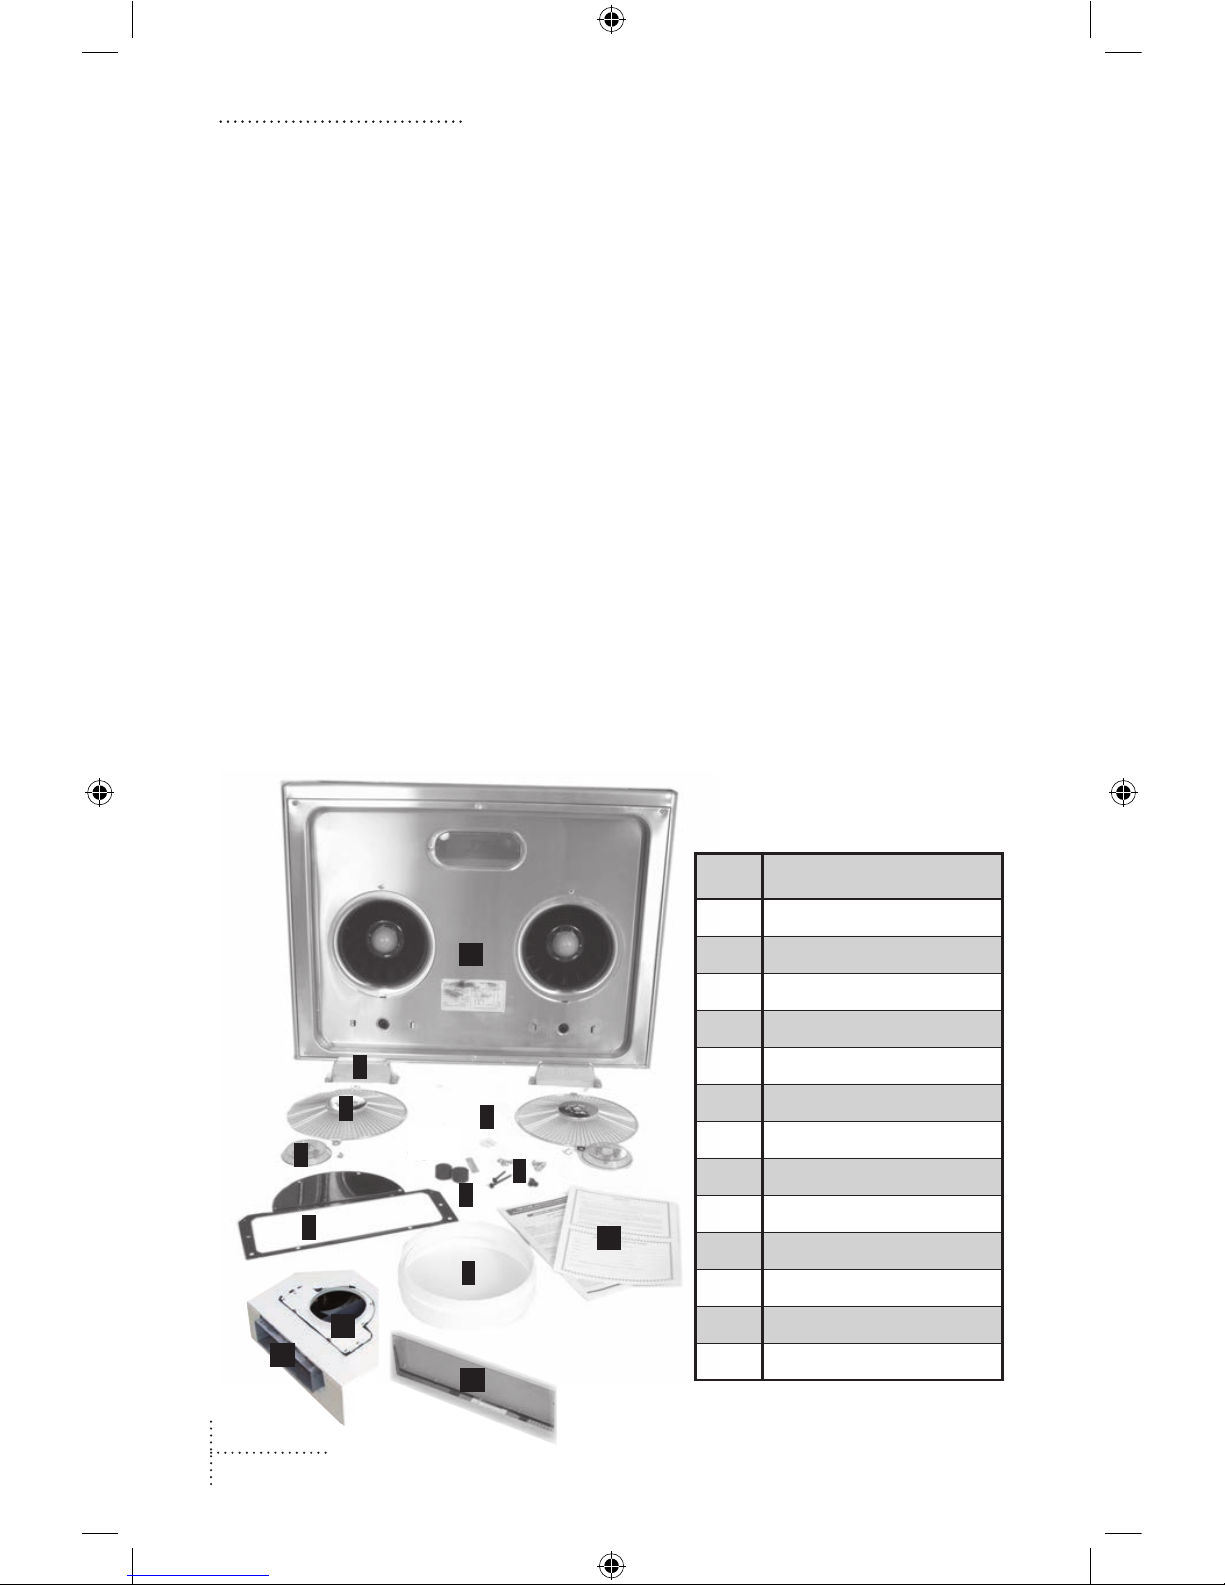
Preparing the Range Hood
Unpack the range hood and check the contents against the packing list
provided with your unit. The items shown below are for the EP-3030:
2
3
4
6
7
1
8
# Description
1 Grilles (2)
2 Residue cups (2)
3 Grill caps (2)
4 6” starting collar
5 Wiring connectors
6 Transition Adapter
7 Securing screws
8 Mounting collars
9 Starting Collar
10 Round transition adapter
11 Vent blanking plate
12 Warranty & Manual
13 Bottom splash shield
5
9
11
12
13
10
Page 13
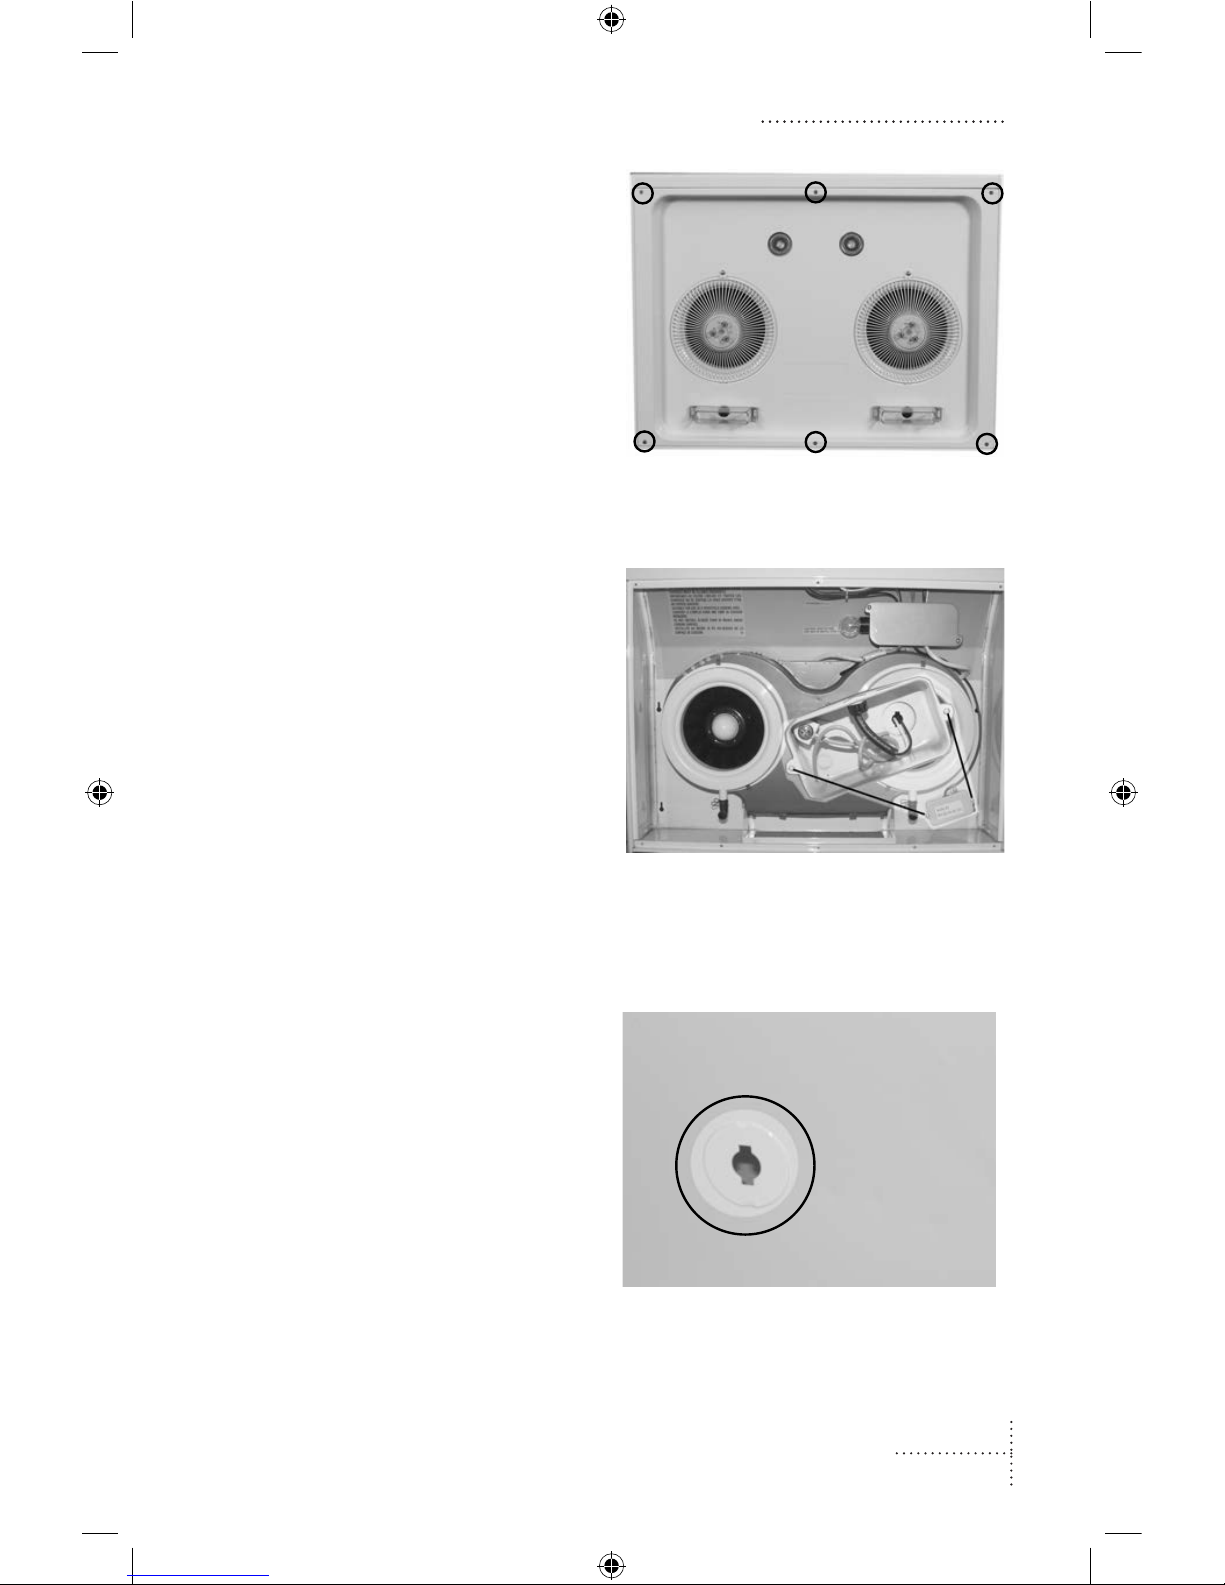
Remove the splash shield
After you have located all the parts, undo
the screws that retain the splash plate and
expose the inside of the range hood.
Remove the electrical
box cover
After exposing the inside of the unit, remove the cover for the electrical box.
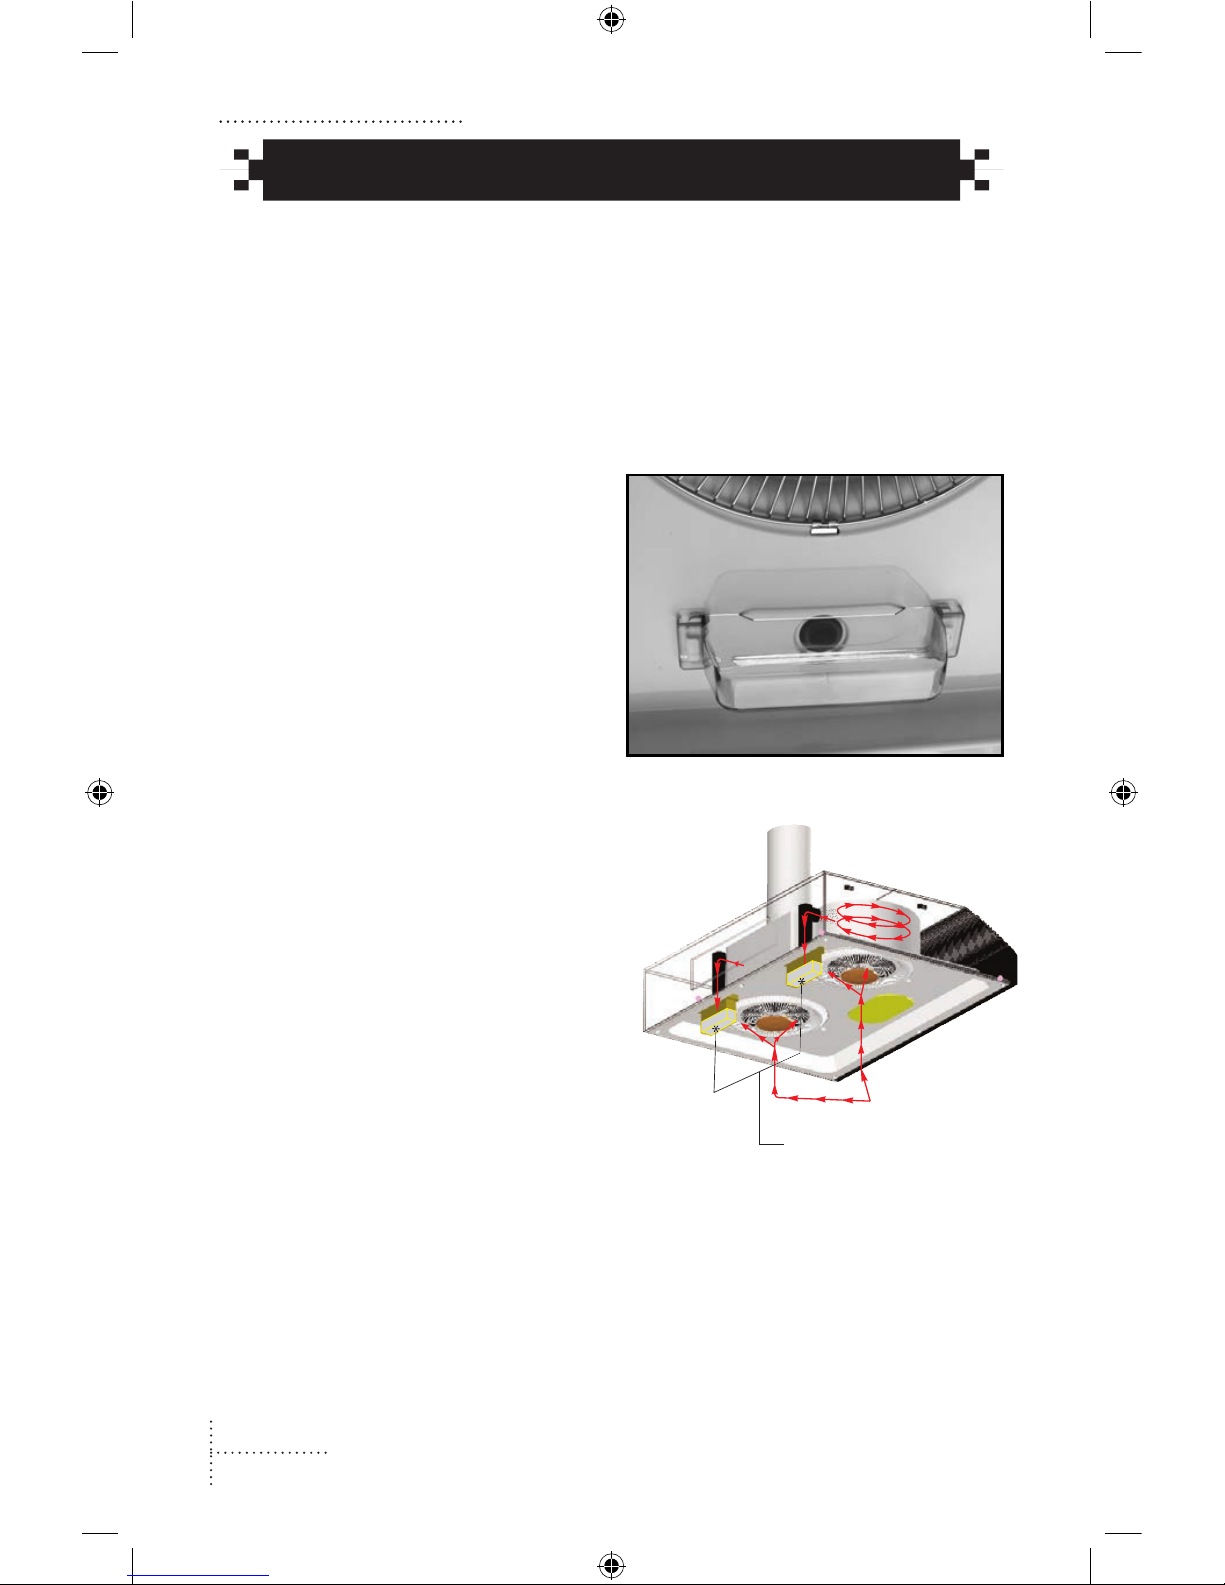
Remove the electrical
cable knock-out plug
Using a flat blade screwdriver, pry out
the knock-plug and install an electrical
cable grip.
(view shown from top of unit)
Page 14
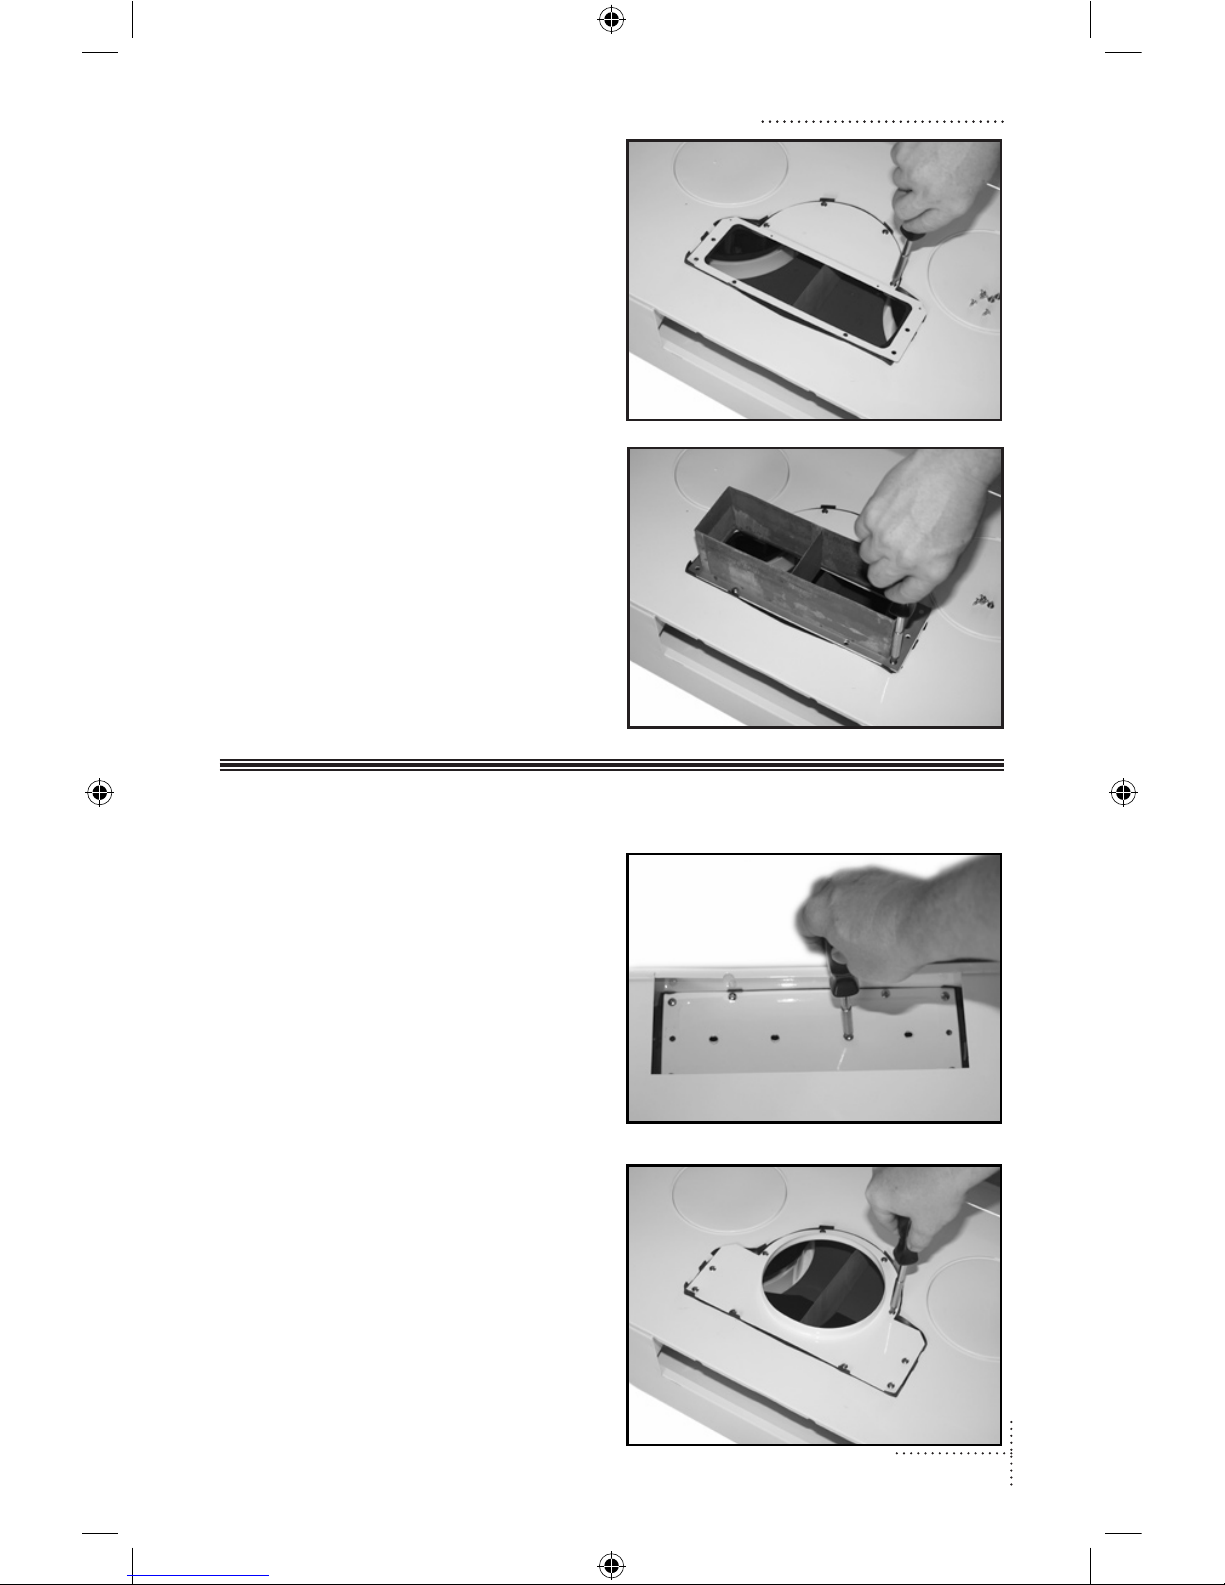
Selecting the Vent Option
The AK-9800/EP-9800 must be installed using a top vented round pipe. The PR-3330/
PR-3030/EP-3030 and EP-3330 can be vented with either top or back options. Using the
guide below, select the type of venting option required for your installation and install it on
to the range hood.
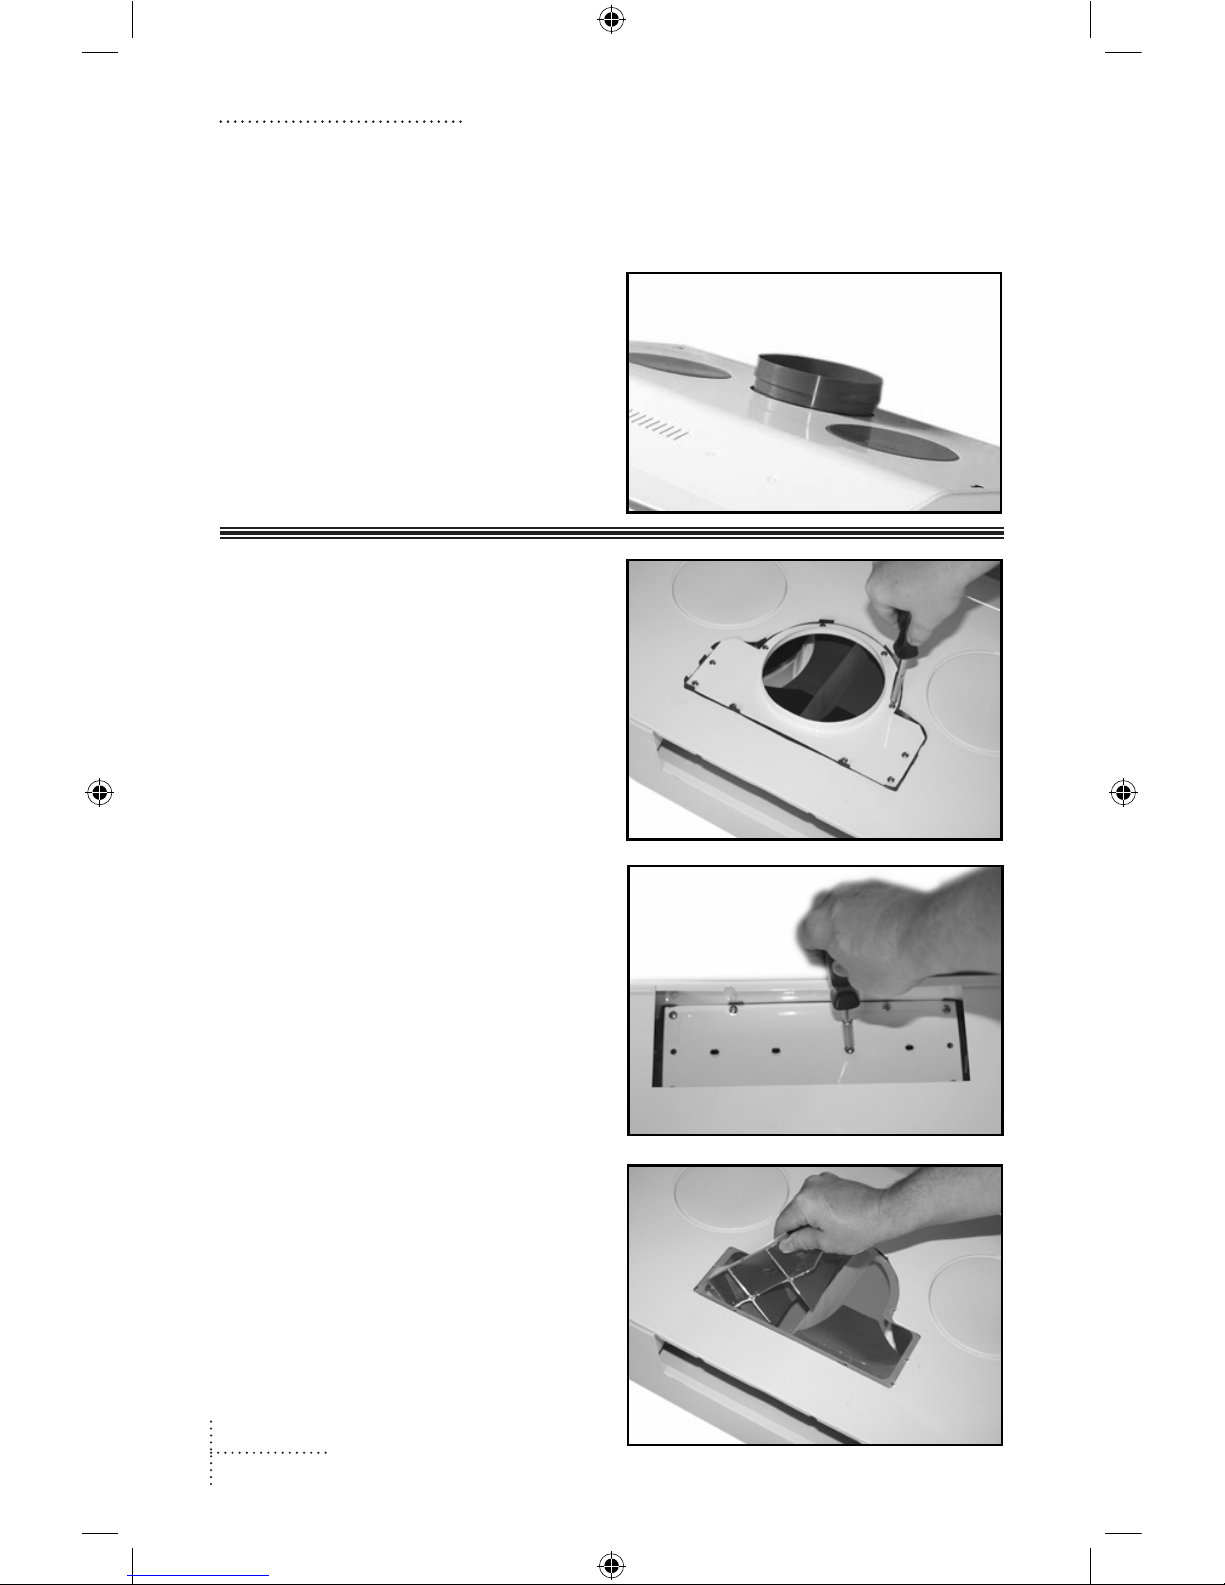
Top vent to 6” pipe duct:
When connecting to a pipe from the top
of the unit, place the adapter collar over the
pre mounted tube outlet. The unit is now
ready for installation.
Top Vent to
3.25” x 10” plenum duct
The unit will ship with a top vent to 6”
pipe duct as standard. To convert the unit
to a top vent with square plenum duct follow the steps outline below:
1. Remove the existing transition
adapter.
2. Remove the screws holding down the
vent guides.
3. Remove the vent guides.
EP-9800 Shown
Installation: Select Vent Option Installation: Select Vent Option
Page 15
4. Place the square plenum transition
adapter over the gasket and secure
the 4 screws on the round portion of
the adapter.
5. Place the plenum transition collar on
top of the transition adapter and secure it down with the remaining
screws.
Back Vent to
3.25” X 10” plenum duct
Before you install the plenum transition
collar on the back of the unit the top vent
transition plate must be removed and the
hole plugged. Follow the steps outlined
below:
1. Remove the mounting screws for the
vent guides and back plate. Remove
the back plate, leaving the gasket in
place.
2. Remove the existing top mounted
transition adapter.
 Loading...