

Pacific AC-Green Installation Manual
lfrl
r;-l
FEICt{rd
9 !lrt'"
lnstallation
I User
Manual
fH
'f,f8ffi{FH E'i,FE =
-RANGE
HOOD-
Safety
Notice
..
1
Before using
the hood&lnstallation.. ........
2
Procedure&Circuit diagram
3
Featu
res
&Controls
...
4
Cleaning....
........
5
Maintenance
o
AHTFU
.---.-7
a#)tw
.......8
n42,&Hffil8ffitlHEl*{fffi88....
.....
9
EEXrFrftAffiffiBE
.10
{*EFI;EH
11
xP022204(2)
l.WARNING-TO
REDUCE
THE
RISK
OF FIRE,
ELECTRIC
SHOCK,
OR
INJURY
TO
PERSONS,
OBSERVE THE
FOLLOWING:
a.)
Use
this unit
only
in
the
manner intended
by the
manufacturer
,lf
you
have questions,
contact
the
manufacturer.
b.
)
Before
servicing
or
cleaning
unit,
switch
power
off at service
panel
and
lock
service
panel
to
prevent
power
from
being
switched
on
accidentally.
When
the
service
disconnecting
means
cannot
be locked,
securely
fasten
a
prominent
warning
device such
as
a tag.
To
the service
panel.
c.)
Installation
work
and
electricalwiring
must
be
done
by
qualified
person(s)in
accordance
with
all applicable
codes
and standards
,
Including
Fire-Rated
construction
.
d')
Sufficient
air
needed
proper
combustion
and
exhausting
of
gases
through
the flue
(chimney)
of fuel
burning
equipment
to
prevent
back
drafting.
Follow
thJheating
equipment
manufacturer's
guideline
and safety
standards
such as
those
published
by the
national
Fire
Protection
Association (NFPA),
and
the
American
Society
for
Heating
Refrigeration
and
Air
conditioning
Engineers (ASHRAE),
and
the rocar
code authorities.
e.)When
cutting or drilling
into
wall
or
ceiling
,
do not
damage
electricalwiring
and
other hidden
utilities .
f. ) Dusted fans
must
always
be
vented
to
the
outdoors.
g.)
lf this
unit is
toy be
installed
over
a tub
or
a shower
,
it must
be
marked
as
appropriate
for
the
application
and be
connected
to
a GFCL (Ground
Fault
Interrupter protected
branch
circuit.
h.) NEVER
place
a switch
where
it
can
be reached
from
a tub
or shower.
i.
)WARNING-TO
REDUCE
THE
RISK
OF FIRE,
USE
ONLY
MENTAL
DUCT
WORK.
j.
)
Make
sure
the
power
is
off
before
installing,
wiring
or maintenance.
2. "CAUTION"-For general
ventilating
use
only. Do
not
use
to exhaust
hazardous
or explosive
materials
and
vapors.
3. WARING-TO
REDUCE
THE
RISK
OF A RANGE
TOP
GREASE
FIRE:
a.)Neverleave
surface
units
unattended
at
high
settings.
Bou
overs
cause
smoking
and
greasy
spillovers
that may
ignite,
Heat
oils
slowly
on
low
or medium
settings.
b.)Always
turn
hood
on when
cooking
at high
heat
or
when
cooking
flaming
foods.
c.) Clean
ventilating
fans
frequently.
Grease
should not
be
allowed
to accumulate
on
fan
or
filter.
d.) Use
proper
pan
size.
Always
use
cookware
appropriate
for
the size
of the
surface
element.
e.) Keep
fan, filters
and
grease
laden
surface
clean.
f.
)
Use
high hood
setting
on
hood
only
when
necessary.
g.)
Don't
leave
hood
unattended
when
cooking.
h')Always
use
cookware
and
utensils
appropriate
for
the
type
and
amount
of
food
being
prepared.
i.
)To
get
the
best
performance,
the
vertical
clearance
between
the
cook-top
and the
range
hood
should
range from
26" to
30".
4.WARNING.TO
REDUCE
THE
RISK
OF
INJURY
TO
PERSONS
IN
THE EVENT
OF
A RANGE
TOP
GREASE
FIRE
,OBSERVE
THE
FOLLOWING":
a') SMOTHER
FLAMES
with
a
close-fitting
lid,
cookie
sheet,
or metal
tray, then turn
off the
burner,
BE
CAREFUL
TO
PREVENT
BURNS.
lf
the flames
do not
go
out
immediately,
EVACUATE
AND
CALL THE
FIRE
DEPARTMENT.
b.) NEVER
PICK
UP
A FLAMING
PAN-you
may
be burned.
c.)
DO
NOT USE
WATER,
including
wet dishcloths
or
towels a violent
steam
explosion
will
result.
d.)
Use
an extinguisher
only if:
1
. You
know
you
have
a class ABC
extinguisher,
and
you
already
know how
to
operate
it.
2.The
fire is
small
and
contained
in
the area
where
it
stared.
3.The
fire
department
is being
called.
.
4.You
can
fight the
fire with
your
back
to
an
exit.
e.)
"WARNING-TO
Reduced
The Risk
Of
Fire
Or Electric
Shock, Do
Not
Use
This Fan
With
Any
Solid-State
Speed Control
Device".
"Based
on
"Kitchen
Fire
Safety
Tips"
published
by NFpA.
BeroRE
UsrNG
Tne
Hooo
Packaging
materials(plastic
bags,
polystyrene,
etc)
must
be
kept
out of
children's
reach,
as
they
are
potentially
dangerous.
Installation
must
be
carried out by a
qualified
technician;
Check
the
voltage
on
the
rating
plate
which
should
corresponds
to
the
voltage
in
your
home;
Check
the following
accessories
before installation:
Exhaust
duct
adapter,
detacha
ble oil
cup,
detachable
motor
oil
retainers;
Connect
the
power
and
switch on the
motors
and
lighting
system to
check
the
operation;
Warning!
This
appliance
must
be earthed!
lrusrnlLATtoN
1.
Location:
Air
turbulence
from
window/door
may
reduce
the
effectiveness
of hood
as
smoke
from
cooktop may
not flow
to the
effective
suction
zone(2s
cm
from hood).
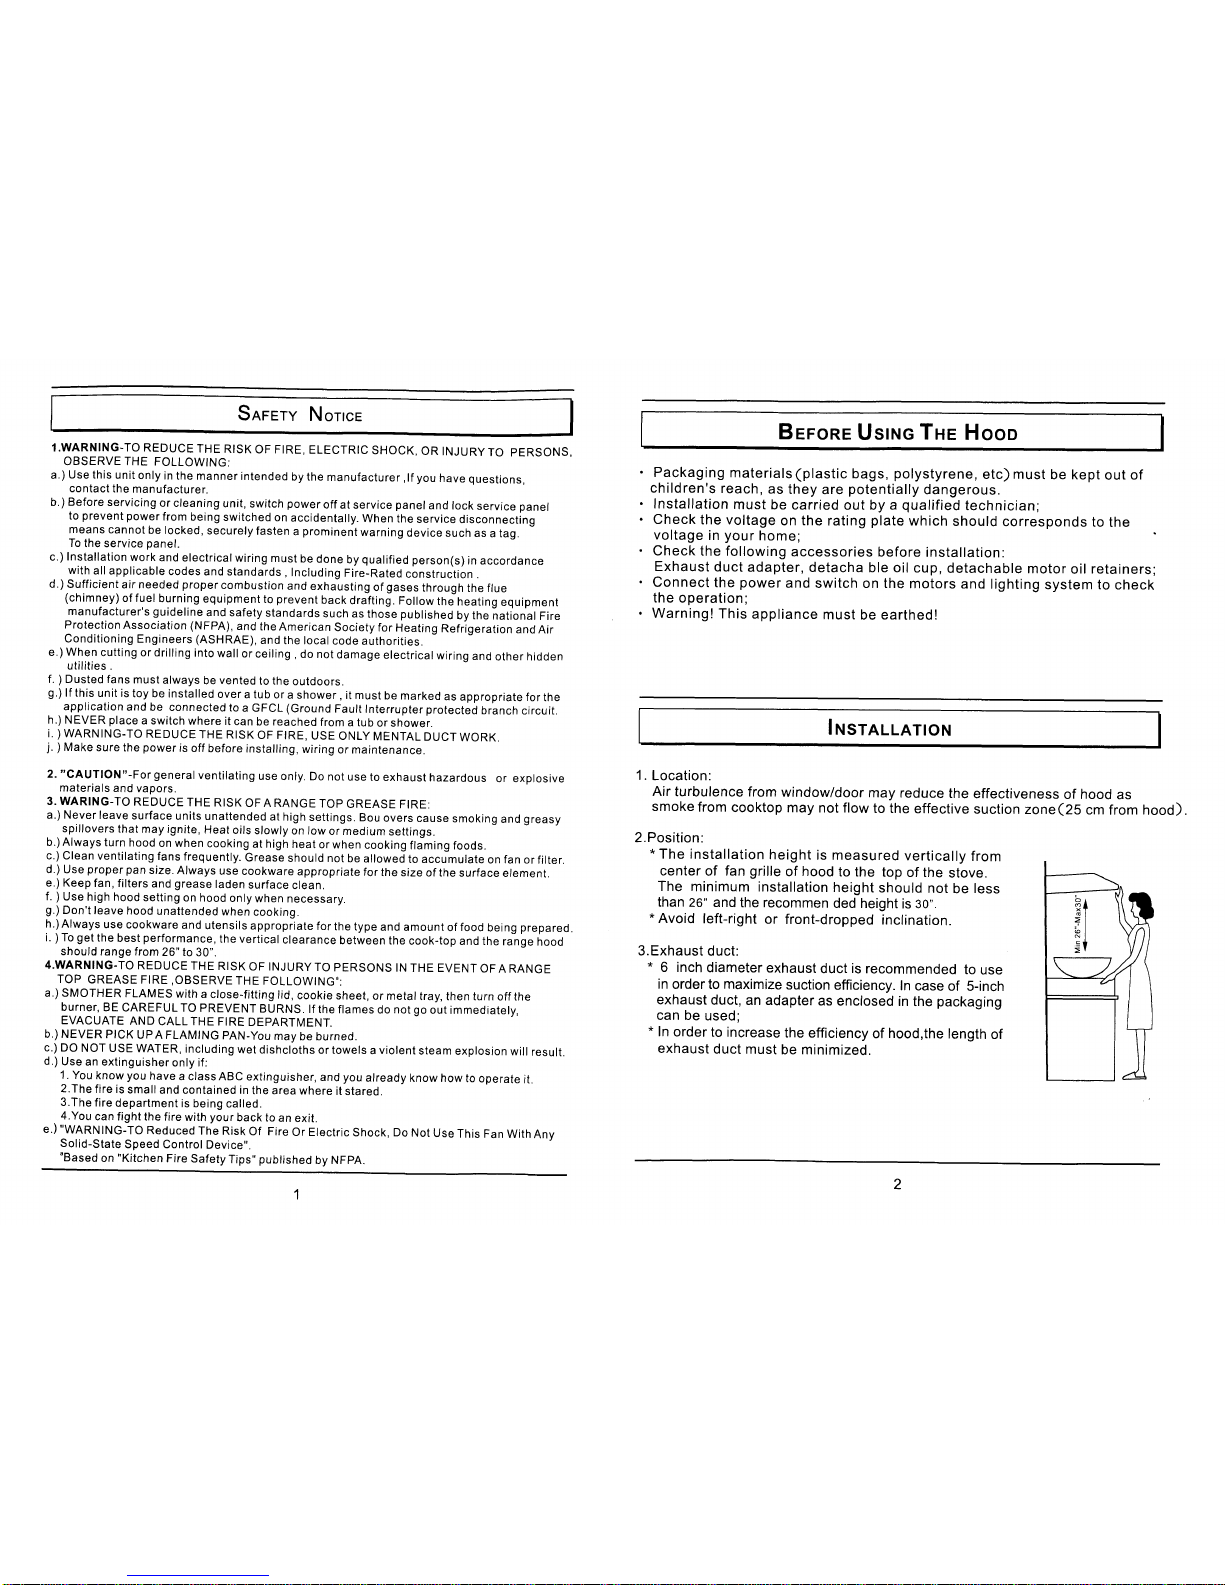
2.Position:
*
The installation
height
is measured
vertically
from
center
of
fan
grille
of
hood
to the
top
of the
stove.
The
minimum
installation
height
should
not
be
less
than
20" and
the recommen
ded height
is
go".
*
Avoid
left-right
or
front-dropped
inclination.
3.Exhaust
duct:
*
6 inch
diameter
exhaust
duct
is
recommended
to
use
in
order to
maximize
suction
efficiency.
In
case
of
S-inch
exhaust
duct, an adapter
as
enclosed
in
the
packaging
can be
used;
*
In
order
to increase
the efficiency
of
hood,the
length
of
exhaust
duct must
be minimized.
1. Find
a suitable
installation
position
of hood
which
should
be
next t o a
window and can
be cut
to
let
the exhaust
duct
pass
through;
2. lf the
exhaust
duct
has
to
pass
through
the
wall,
particular
attention
must be
paid
to the structure of
the wall as steel
reinforcement may be
embedded;
3.
Mark
the
location of exhaust outlet
hole , then
cut/drill
the
hole with care;
5.
Drive 2 steel
nails into the selected
wall with 3 mm
)maximum(
space
leave behind
for hanging the hood;
P
nocEDU RE
Fenrunes
&
CoNTRoLS
Features:
o
One touch
automatic internal cleaning
function(in
38 seconds)
Characteristics
: th is
pioneered
tech nology bri n
gs
totalconvenience
to modern families.
The automatic cleaning
function can
simply
be done by one touch
function without dissembling
the machine.
o
Three
way of fan speed adjustment
which improves
the cooking
performance
o
2way lightness
adjustment
r
Micro-Computer
Programmed functions
o
3 way automatic Delay
Off options,
remove smoke
in
great
effort
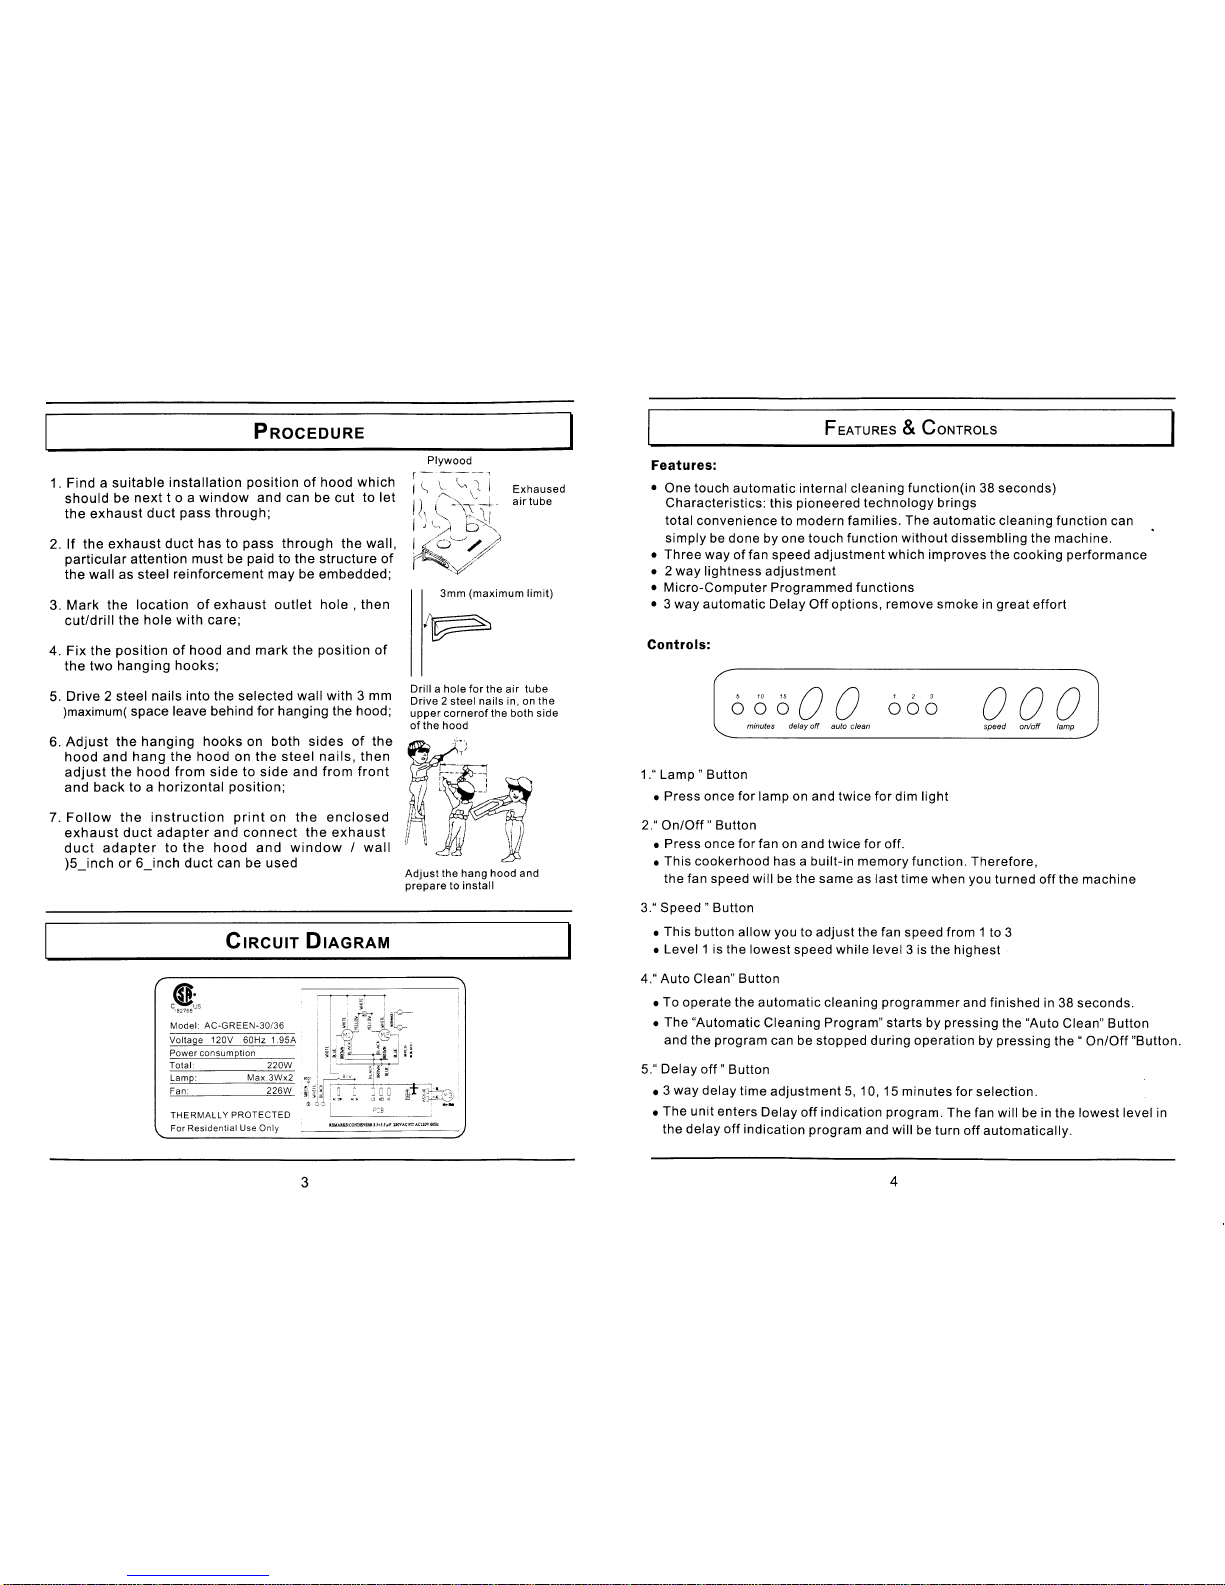
Gontrols:
1." Lamp " Button
o
Press once
for
lamp on and twice for
dim
light
2."
OnlOff
"
Button
o Press
once
for fan
on and twice
for
off.
r
This
cookerhood
has
a built-in memory function. Therefore,
the fan speed will be the same
as
last
time when
you
turned off the machine
3." Speed " Button
o
This button
allow
you
to adjust the fan
speed
from
1 to
3
o
Level 1 is the
lowest
speed
while level
3 is
the highest
4." Auto Clean"
Button
r
To
operate the automatic cleaning
programmer
and finished
in
38 seconds.
o
The
"Automatic
Cleaning Program" starts by
pressing
the
"Auto
Clean"
Button
and
the
program
can be stopped during
operation
by
pressing
the " On/Off
"Button.
5."
Delay
off
"
Butto
o
3
way delay
time
adjustment 5,
10,
15 minutes
for
selection
o The unit enters
Delay
off
indication
program.
The fan will
be
in
the
lowest level in
the delay
off indication
program
and
will
be
turn
off automatically.
4. Fix the
position
of
hood and mark the
position
of
the
two
hanging
hooks;
Drill a hole for
the air
tube
Drive 2 steel nails in, on
the
upper cornerof the
both side
of the hood
6.
Adjust
the
hanging hooks
on
both sides of the
hood
and
hang
the hood
on
the steel nails, then
adjust
the hood
from side to side and from front
and
back to a
horizontal
position;
7. Follow the
instruction
print
on the enclosed
exhaust
duct
adapter and connect the exhaust
duct
adapter
to the hood and
window / wall
)5_inch
or 6_inch duct
can be used
Adjust
the hang
hood
and
prepare
to
install
Crncurr DTAGRAM
.s;,
Model: AC-GREEN-30/36
Voltage
120V
60Hz 1 .95A
Power consumotion
Total:
220W
Max.3Wx2
Fa n:
THERMALLY
PROTECTED
For Residential
Use
Only
3mm
(maximum
limit)
lF
Plywood
r-,*
,
-l
|
.,
X
t'.,,
l-
I
li,
|
\-i
I
.,'.)
b\\
lKa''/zl
fR"r/'
Exhaused
air tube
3
nn/)
UUU
speed on/off lamp
510 15/)n
ooou
u
minutes delay off
auto
clean
123
ooo
 Loading...