

Pacific FM-ME, 515451 Installation Manual

FM-ME
EDGER/SCRUBBER FLOOR MACHINE
Model: 515451
PARTS & OPERATING MANUAL
Thank you for purchasing a Pacic Floorcare product. Carefully inspect all components for freight damage. If such
damage is discovered, le a “CONCEALED DAMAGE REPORT” immediately with the delivering carrier.
Read this manual carefully and keep it near the machine, protected from liquids and other damaging substances. Failure to
follow the instructions may result in injury or damage to equipment and property.
The contents of this manual are based on the latest product information available at the time of publication. Pacic
Floorcare reserves the right to make changes or improvements without being obliged to apply changes to the machines
New manuals can be downloaded from: www.pacicoorcare.com/manuals
previously sold.
SAFETY
Operators must read and understand all warnings and instrucons in this manual
WARNING: INDICATES A POTENTIALLY HAZARDOUS SITUATION WHICH, IF NOT AVOIDED, COULD RESULT IN DEATH
OR SERIOUS INJURY.
WARNING: Do not use the machine without reading the instrucon sheet.
WARNING:
• This machine is only to be operated for its intended use by a trained operator.
• Always wear personal protecve equipment when operang this machine.
• This machine is not intended for use by persons (including children) with reduced physical, sensory or mental capabilies,
or lack of experience and knowledge.
• Do not operate this machine unless it is completely assembled.
• A qualied or authorized person must do maintenance and repairs.
• Do not use with damaged cord or plug. If the machine is not working properly, has been dropped, damaged, le out
doors, or exposed to water, bring it to a service center.
• To prevent electric shock, keep the machine surface dry, do not expose to rain, and store in a dry locaon.
• Clean with a dry cloth.
• Machines can cause an explosion when near ammable materials and vapors. Do not use this machine near fuels, grain
dust, solvents, thinners, or other ammable materials. Do not use ammables to clean this machine.
• Always use a three-wire electrical system connected to the electrical ground.
• For maximum protecon against electrical shock, use a Ground Fault Circuit Interrupter (GFCI) protected circuit.
• Unplug the cord from the electrical outlet prior to changing pads, performing maintenance and when not in use.
• Do not move this machine over the power cord. Always li the power cord over the machine.
• Do not pull or carry cord, use cord as a handle, close a door on cord, or pull cord around sharp edges or corners.
• Keep cord away from heated surfaces.
• This machine has been designed for use with the pads specied by the manufacturer. The ng of other pads may aect
its operaonal safety.
GROUNDING
This oor-nishing machine shall be grounded while in use to protect the operator from electric shock. The machine is
provided with a three-conductor cord and a three-contact grounding type aachment plug to t the proper grounding type
receptacle. The green (or green and yellow) conductor in the cord is the grounding wire. Never connect this wire to other
than the grounding pin of the aachment plug. The plug must be inserted into a properly-grounded outlet in accordance with
all local codes and ordinances.
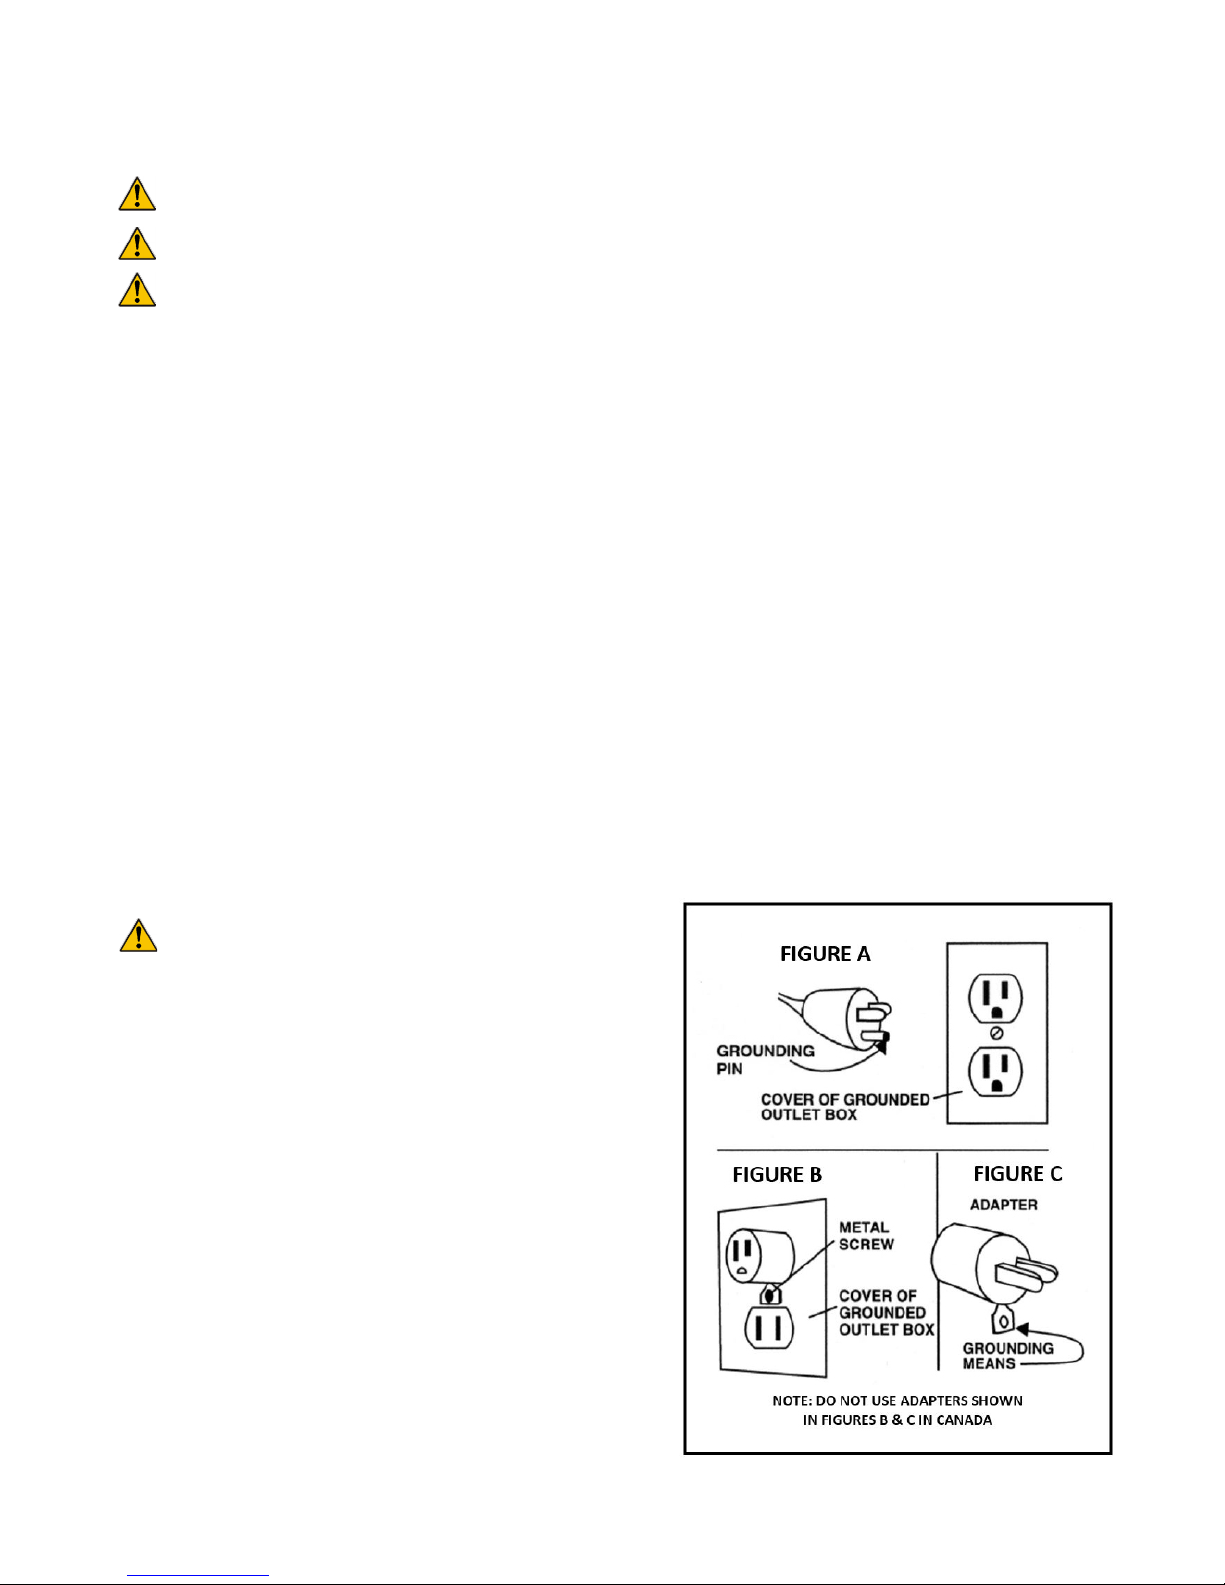
WARNING: - Do not modify the plug provided with the machine.
Improper connecon of the equipment grounding conductor can
result in a risk of electric shock. Have a qualied electrician or
service person verify whether the outlet is properly grounded.
This machine is for use on a nominal 120-volt circuit, and has a
grounded plug (see gure A). A temporary adapter that looks like
the adapter illustrated in gures B and C may be used to connect
this plug to a 2-pole receptacle as shown in gure B if a properly
grounded outlet is not available. The temporary adapter should
be used only unl a properly grounded outlet (gure A) can be
installed by a qualied electrician.
EXTENSION CORDS
Use only three-wire 12/3 or larger gauge approved
extension cords that have three-prong grounding
type plugs and three-pole receptacles that accept
the appliance’s plug.
Replace or repair any damaged cords or plugs.
Use only idencal replacement parts installed by
an authorized service technician.
2

PREPARATION
This machine is intended for commercial use
WARNING: Machines can cause an explosion when near ammable materials and vapors. Do not use this machine near fuels,
grain dust, solvents, thinners, or other ammable materials. Do not use ammables to clean this machine.
CAUTION: Do not operate the machine without the brush or pad installed
1. Remove obstrucons in intended cleaning area prior to operang the machine
2. Verify the facility and the machine have compable voltage prior to use (see Safety Instrucons)
3. Inspect the machine for loose or damaged components
4. Unplug the cord from the wall outlet and lay the machine back to expose the pad driver
5. Select the appropriate pad for the applicaon (scrubbing, nish removal, etc…)
6. Lay the machine on its side and remove the screw in the boom of the drive adaptor
7. Posion the brush or pad on the drive adaptor
8. Assemble the aachment screw and ghten
9. Check the applicaon recommendaons and procedures on the cleaning or nish instrucons
OPERATION
1. Plug the power cable into a properly grounded outlet (see Safety Instrucons)
2. Adjust the handle height to a comfortable posion
3. Start the machine by depressing the trigger switch
4. Guide the machine by slightly raising and lowering the handle
a. Raise the handle slightly to go le
b. Lower the handle slightly to go right
5. Release the switch lever to stop the machine
MAINTENANCE
WARNING: Always disconnect the machine’s electrical plug from the electrical outlet before performing any service,
maintenance, pad changing or inspecon of the machine.
NOTE: The motor is lubricated for life under normal use. No oiling or greasing is necessary.
NOTE: To prevent brush damage and reduce wobble problems, do not store the unit with the machine weight on the
brush. Either remove the brush or support the unit on a hook while in the storage posion.
AFTER EACH USE
1. Store the machine in a clean dry area
2. Wipe the enre machine and cord down with a clean cloth
3. Inspect the cord and plug for nicks, cuts or damage
4. Remove the pad or brush and clean thoroughly
WIRING DIAGRAM
3
 Loading...