

Page 1
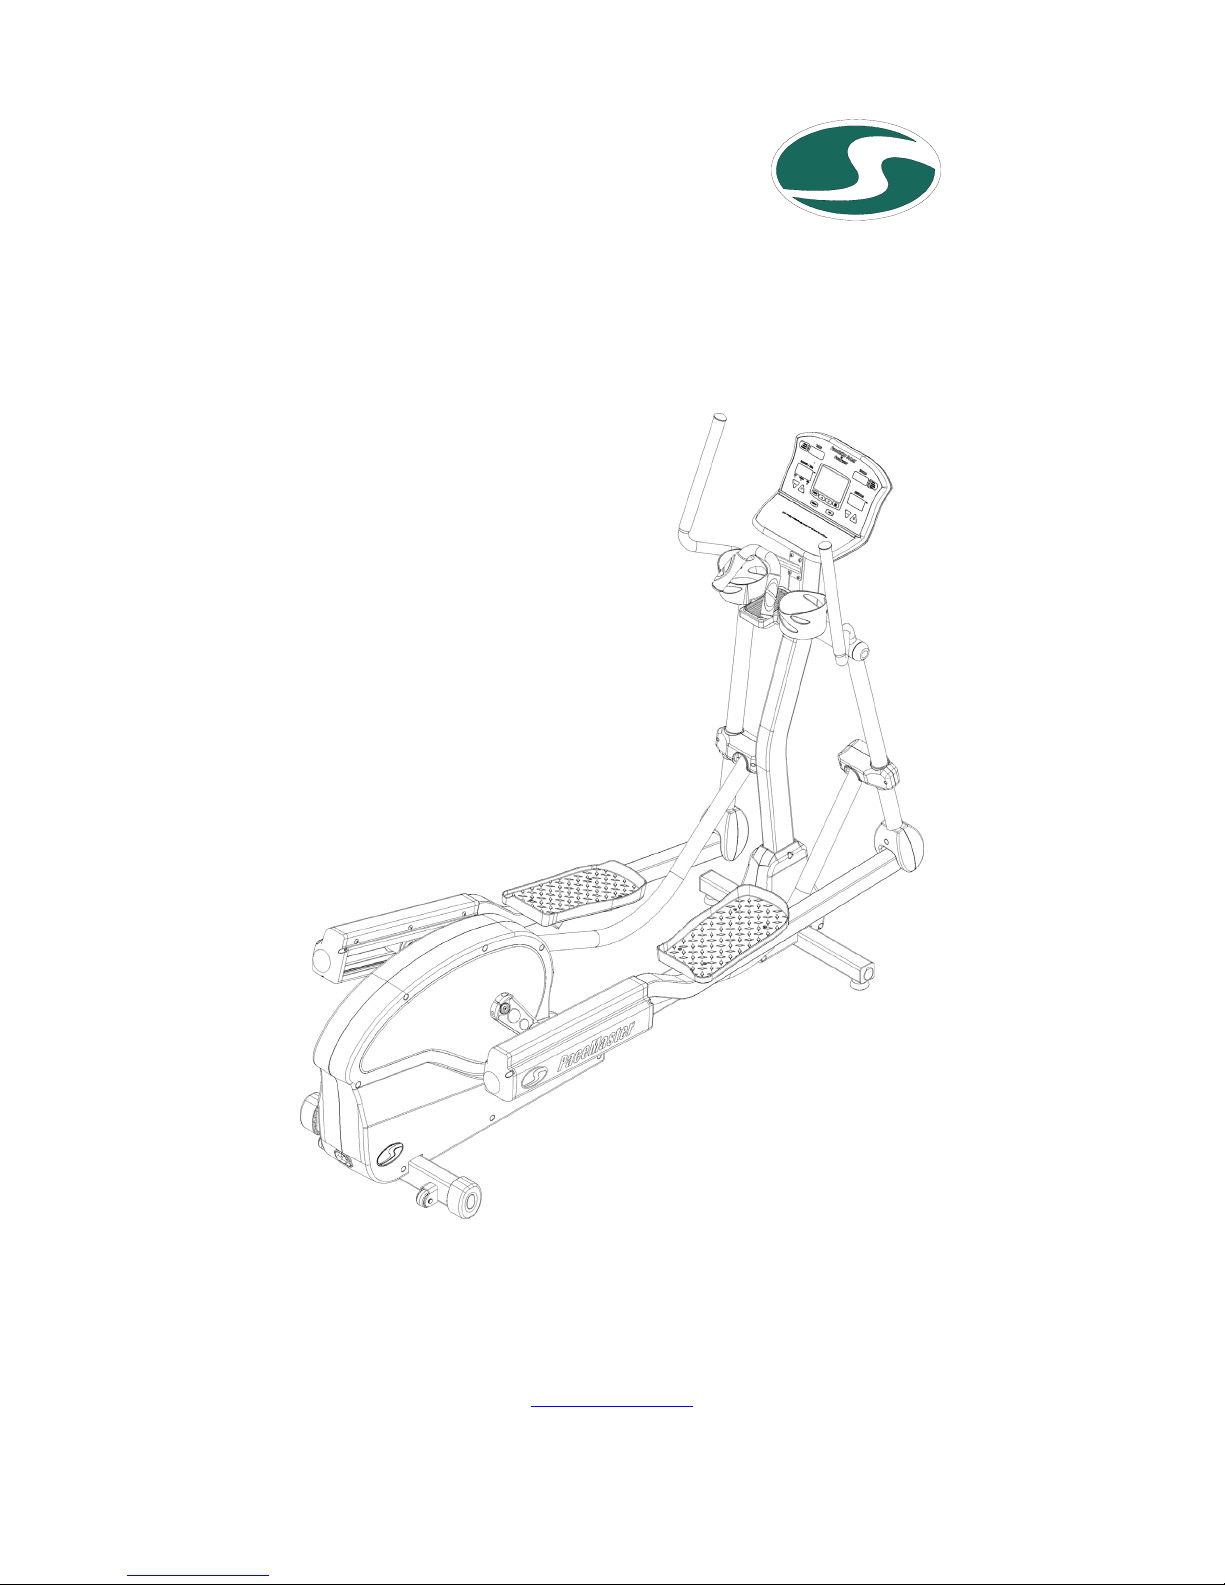
PaceMaster
Silver XT
The Mind of a Treadmill in the Body of an Elliptical™
OWNER’S MANUAL
Aerobics Inc., 34 Fairfield Place West Caldwell, NJ 07006, (973) 276-9700
Part # Silver XT Rev. 11/05/2007
www.pacemaster.com
Page 2

TABLE OF CONTENTS
INTRODUCTION 3
IMPORTANT SAFETY INSTRUCTIONS 4
ASSEMBLY INSTRUCTIONS 5-17
Installation Requirements 5
Unpacking Your Elliptical 5
Tools Required for Assembly 5
Grounding Instructions 5
Box Contents 6
Hardware Legend 7
Assembly 8-16
Testing Your Elliptical 17
THE PACEMASTER SILVER XT CONTROL PANEL 18-20
OPERATING INSTRUCTIONS 21-33
Configuring User ID’s 21-22
Quick Start 23
Manual Workout (Timed) 24
FBT (Full Body Trainer) 25
Fat Burn Workouts 26-28
F1 26
F2, F3, and F4, 27
Fat Burn Course Specifications 28
Heart Rate Workouts 29-31
Interval Workouts I1, I2, and I3 32
Interval Course Specifications 33
EXCLUSIVE PACEMASTER FEATURES 34-35
Exercise Preview 34
Aerobic Points 34
Personal Electronic Trainer 34-35
TROUBLE SHOOTING 36
FREQUENTLY ASKED QUESTIONS 37
PACEMASTER TECHNICAL SPECIFICATIONS 38/
2
Page 3

INTRODUCTION
Congratulations and thank you for choosing PaceMaster – your partner in achieving your fitness goals and mastering your well-being.
PaceMaster’s advanced digital technology allows your elliptical to process information instantly, anticipating and adjusting to meet your
needs. Think of it as your own personal trainer.
PaceMaster’s superior components and US design ensure we produce Ellipticals of the highest quality while also offering excellent value
for your dollar. PaceMaster Products have consistently received praise from a wide range of nationally recognized publications.
To get the most from your PaceMaster, please read this owner’s manual carefully before starting to use the elliptical. The manual contains
important information about the assembly, operation and maintenance of the machine.
Please ensure you read and fully understand all safety information.
important safety warnings throughout the manual. Failure to read and understand these warnings may result in personal injury or damage
to your elliptical.
Tip indicates a useful suggestion when installing, maintaining or using your Elliptical Cross Trainer.
Your PaceMaster Elliptical Cross Trainer can measure the effect of your workout in a number of different ways. For example “Aerobic
Points” is a well tested method to set workout goals based on a desired level of overall fitness. Your PaceMaster elliptical can
automatically calculate Aerobic Points for you. In this way your elliptical acts like your own personal trainer.
Please take the time to familiarize yourself with the range of functions available. This will help you work with your PaceMaster elliptical for
maximum efficiency to achieve your fitness goals and master your well-being.
We wish you an enjoyable and rewarding partnership with your PaceMaster Elliptical Cross Trainer.
The PaceMaster Silver XT Elliptical Cross Trainer is designed for home use only.
DANGER, CAUTION, or WARNING indicates
3
Page 4

IMPORTANT SAFETY INSTRUCTIONS
Read these instructions before using your Elliptical Cross Trainer
CAUTION: Before starting any exercise program, contact your personal physician and have a complete physical. This is highly
recommended if you have not been on a regular exercise program within the last year, or are over 35 years of age, or are overweight.
CAUTION: If at any time during your exercise p rogram you find the exercise abnormally difficult or you encounter dizziness, feel
faint, experience chest pains, feel as if your heart may be skipping beats, you experience forced h eavy breathing after minimal exercise or
severe pain in your legs, ankles, knees, etc. STOP EXERCISING and consult your physician.
WARNING: To reduce the risk of burns, fire, electrical shock or injury:
• Your PaceMaster Elliptical is not designed for use by children under the age of 18 without strict parental supervision.
• Close supervision is necessary when the elliptical is used by or near children, disabled persons or pets.
• Use your PaceMaster Elliptical only for its intended use as described in this manual. Do not use accessories or attachments not
recommended by Aerobics, Inc.
• Never operate your PaceMaster Elliptical if it has a damaged cord or plug, if it is not operating properly, if it has been dropped or
damaged or if it has been immersed in water. Should any of these occur, contact your authorized PaceMaster retailer or service
center for examination or repair.
• Keep the cord away from heated surfaces.
• Never drop or insert any object into any opening on the elliptical.
• Do not use outdoors.
• Always unplug your PaceMaster Elliptical during an electrical storm or during extended periods of non-use.
• Do not operate where aerosol (spray) products are being used or where oxygen is being administered.
• Position the elliptical with a minimum of 2 feet (1219mm) of clearance between the front and rear of the elliptical and any wall or
obstruction.
• Do not allow anyone to reach under or be too near your PaceMaster Elliptical while it is in use.
• Never allow more than one person on your PaceMaster Elliptical at any time.
• Never move the elliptical while it is plugged into the electrical outlet.
• Wear appropriate shoes and attire while exercising.
4
Page 5
ASSEMBLY INSTRUCTIONS
Installation Requirements
Your PaceMaster should be installed indoors on a flat, level surface near a 120 Volt outlet.. You must have a minimum of 2 feet of
clearance between the elliptical and any wall or obstruction.
TIP: If you are installing your PaceMaster on a carpeted surface, use a equipment mat or a scrap piece of carpet underneath the elliptical
to avoid soiling of the carpet. Deep pile carpet is not recommended.
Unpacking Your Elliptical
The PaceMaster elliptical is packed in 26 pieces:
• Refer to the Parts List on the next page.
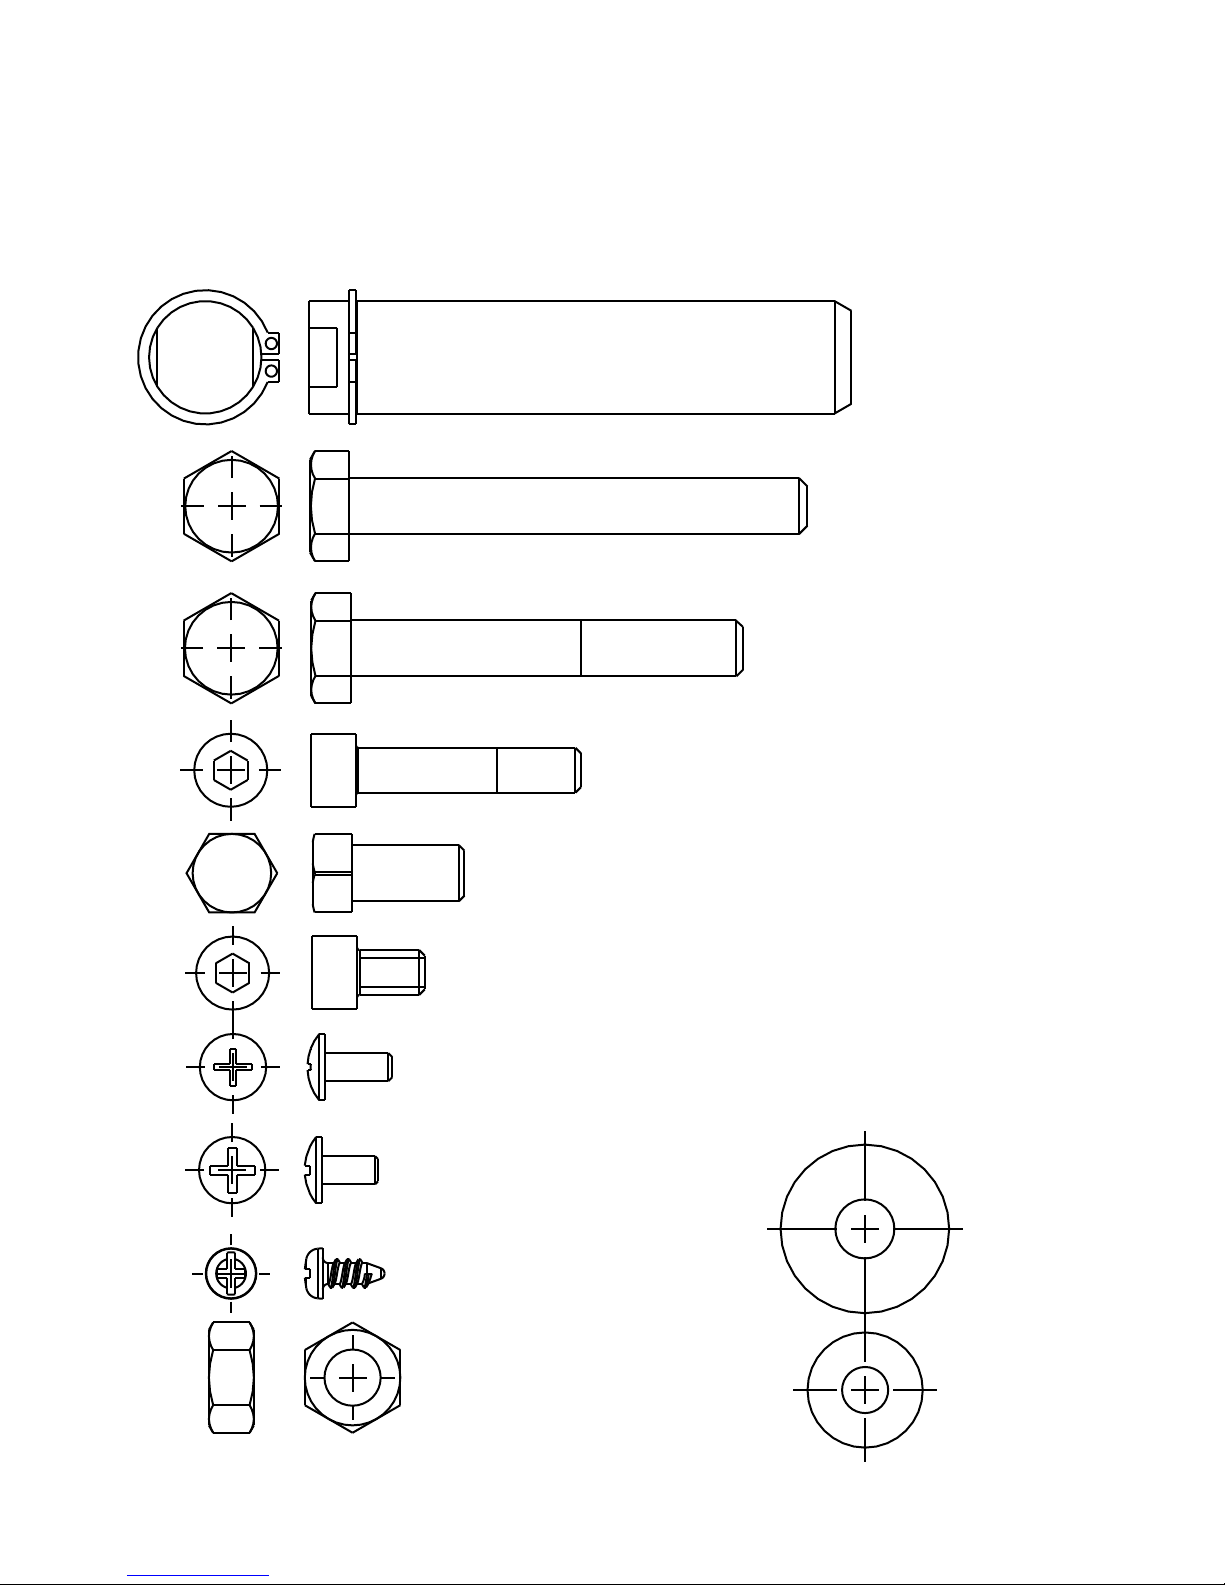
Before assembling your elliptical, open the hardware package and verify that you have the following items:
• Refer to the Hardware Legend on page 7.
If any parts are missing, contact the authorized PaceMaster retailer where you purchased your PaceMaster elliptical.
Tools Required for Assembly
• 17 mm wrench (2)
•
6 mm hex wrench
• Phillips head screwdriver
Power Supply Connections
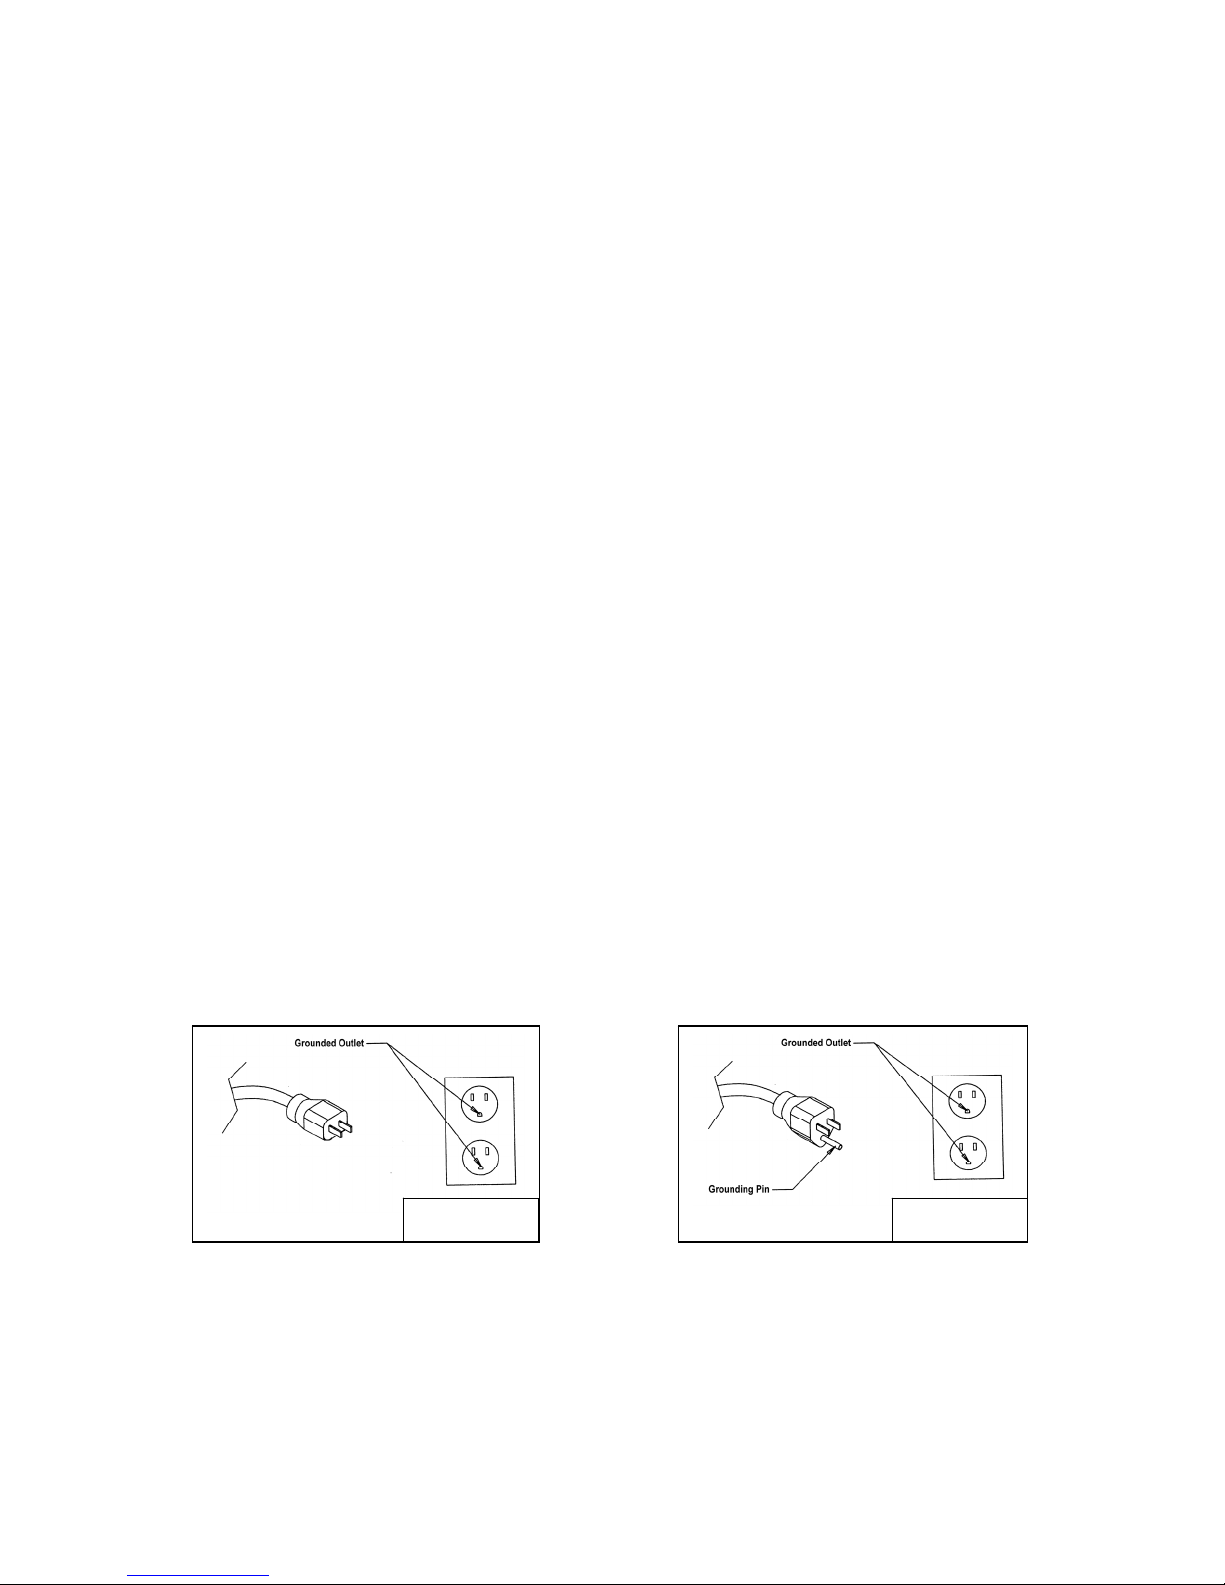
Your PaceMaster Silver XT comes with an external power supply. ONLY use the power supply that is provided with the product.
Depending on where you purchased your elliptical, the external power supply will have either a 2 or 3 prong plug. If it has a 3 prong plug, it
must be plugged into a 3 prong grounded outlet (see photo below) with a nominal rating of 120 VAC.
2 Prong plug 3 Prong plug
5
Page 6
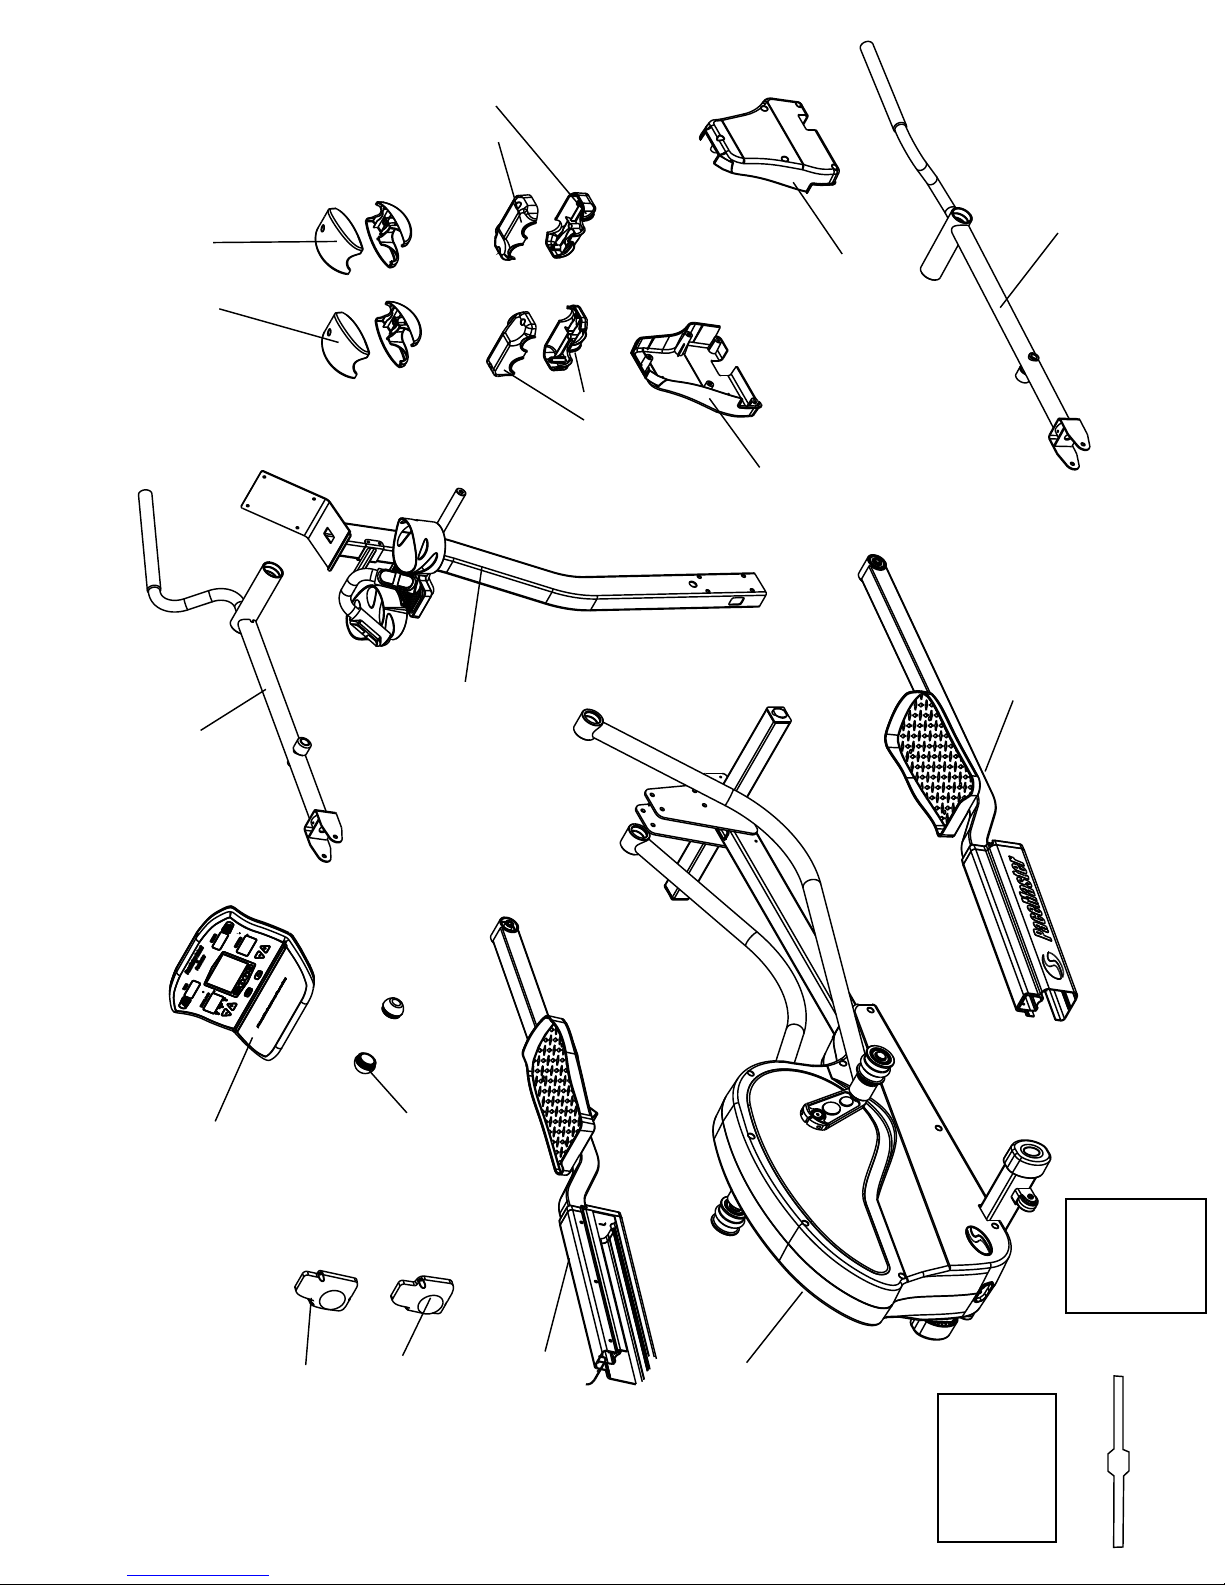
LINK COVER (R)
(2 PIECES)
RIGHT HANDLE BAR
FOOT LINK COVERS
(4 PIECES)
FRONT SHROUD (R)
LINK COVER (L)
(2 PIECES)
FRONT SHROUD (L)
RIGHT FOOT LINK ASSEMBLY
LEFT HANDLE BAR
CONTROL PANEL
CONSOLE MAST
ASSEMBLY
END CAP
MANUAL
OWNER'S
FOOT LINK
END CAP (L)
Parts List
PaceMaster Silver XT
FOOT LINK
END CAP (R)
LEFT FOOT LINK ASSEMBLY
6
FRAME ASSEMBLY
BAG
HARDWARE
WIRELESS
CHEST STRAP
Page 7
PaceMaster Silver XT
Hardware Legend
A
B
2 pcs
20-96.5 mm
2 pcs
M10-81.5 mm
C
D
E
F
G
H
I
2 pcs
M10-20 mm
2 pcs
M8-12 mm BLACK
15 pcs
M5-12 mm
4 pcs
M5-10 mm BLACK
6 pcs
M5-12 mm
2 pcs
M8-40 mm
K
4 pcs
M10-70 mm
2 pcs
10 x 30
T=3 mm
J
6 pcs
M10-8 mm
2 pcs
L
7
8.2 x 20.5
T=1.5 mm
Page 8
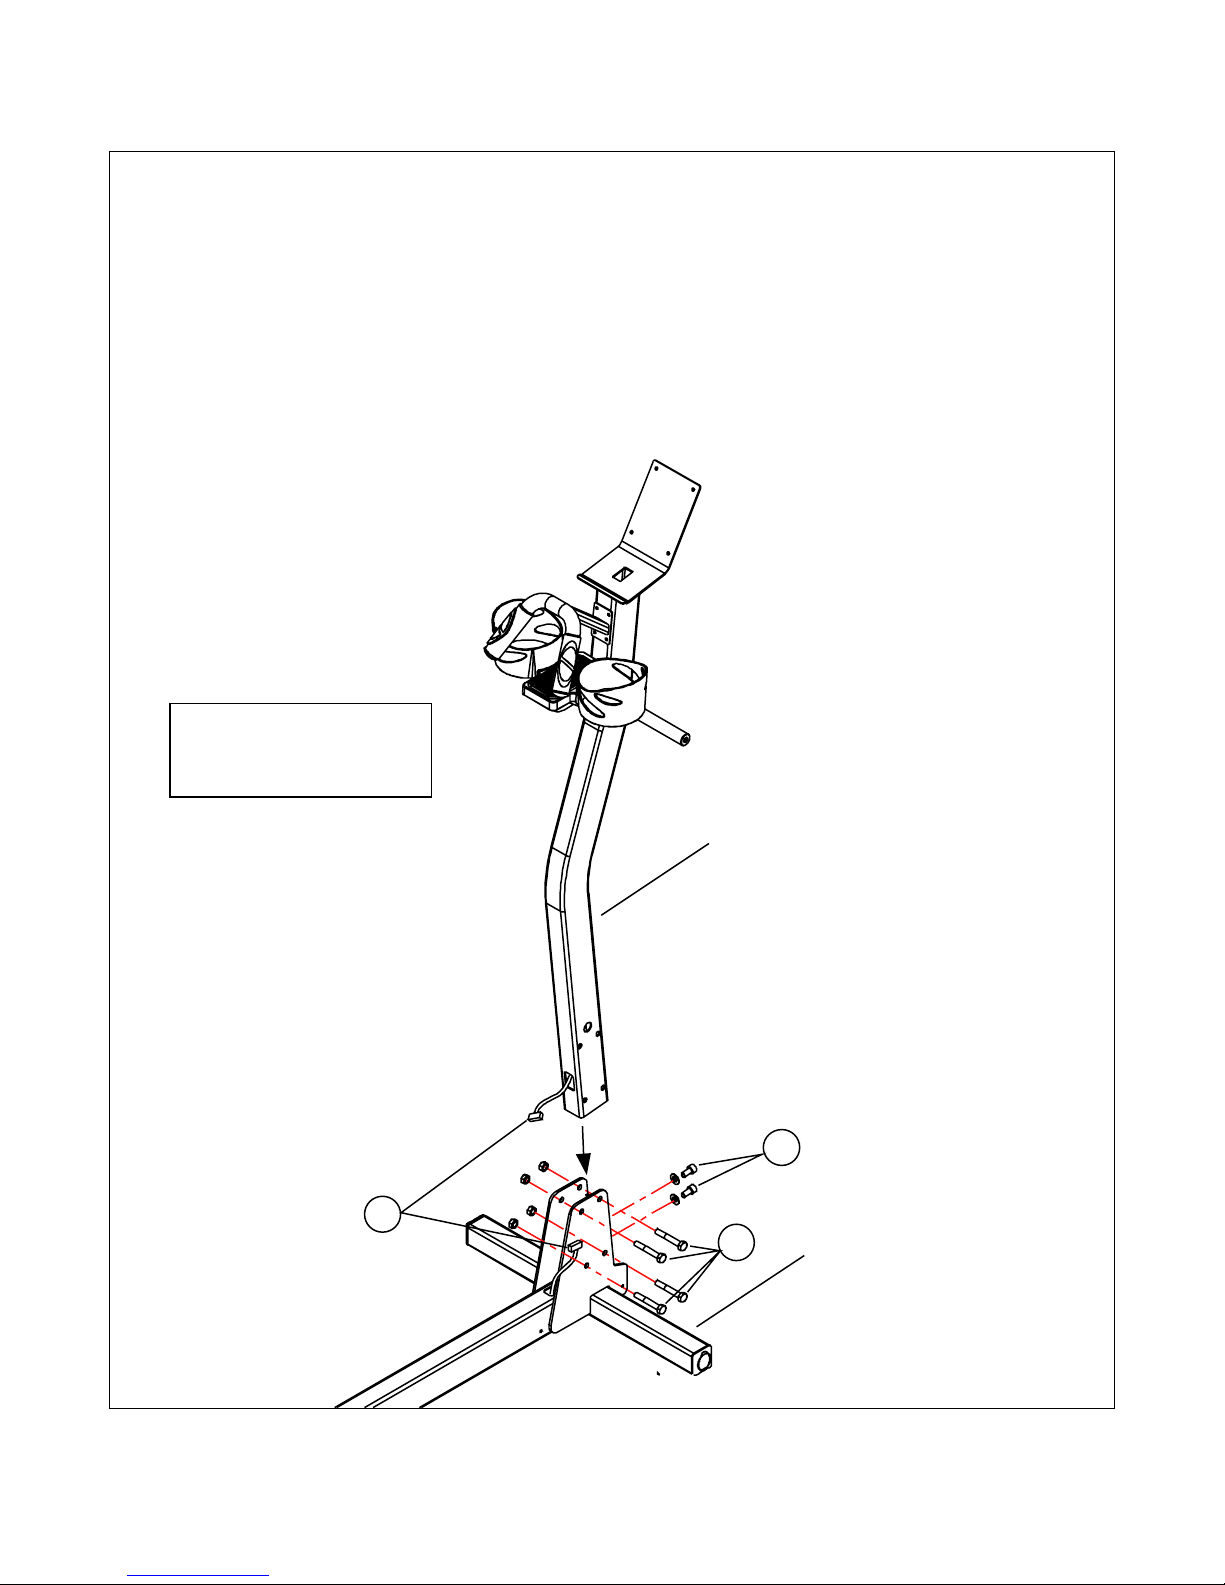
ASSEMBLY INSTRUCTIONS
STEP 1: Loosley install the 2 screws 'F' with the 2 washers 'L'.
STEP 2: Loosley install the 4 bolts 'C' with 4 nuts 'J'.
CAUTION: Do not pinch the Mast wire when installing the 4 bolts 'J'
STEP 3: Plug the Base wire into the Mast wire (make sure you stuff the extra wire
into the Mast to ensure there will be enough wire at the top when installing the control
panel). Tighten the 2 screws 'F', then tighten bolts 'J' (installed in Steps 1 & 2)
Note: Refer to Hardware
Legend on Page 7 for
fastener details.
3
Mast
2
1
Base
8
Page 9
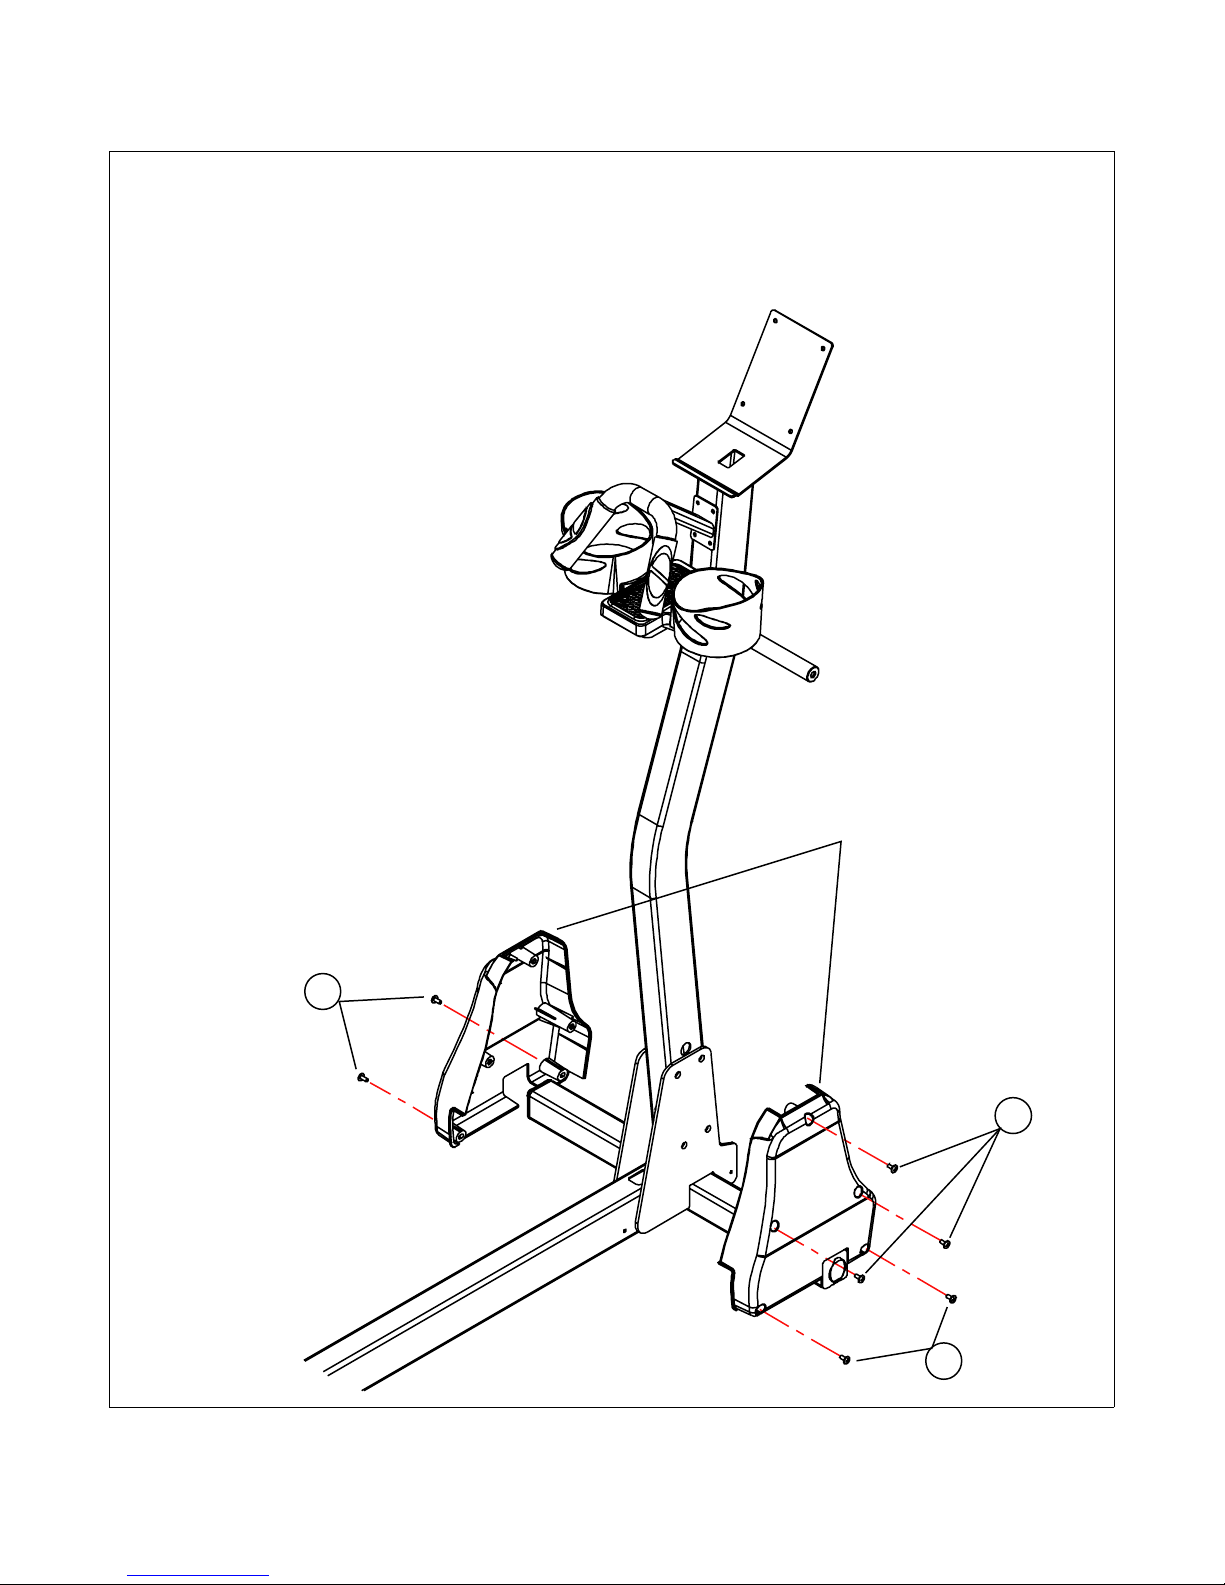
ASSEMBLY INSTRUCTIONS
STEP 4: Position and secure both pieces of the Mast Cover using 3 screws 'G'
STEP 5: Secure the assembled Mast Cover to the Base using 4 screws 'G'
Mast Cover
5
4
5
9
Page 10
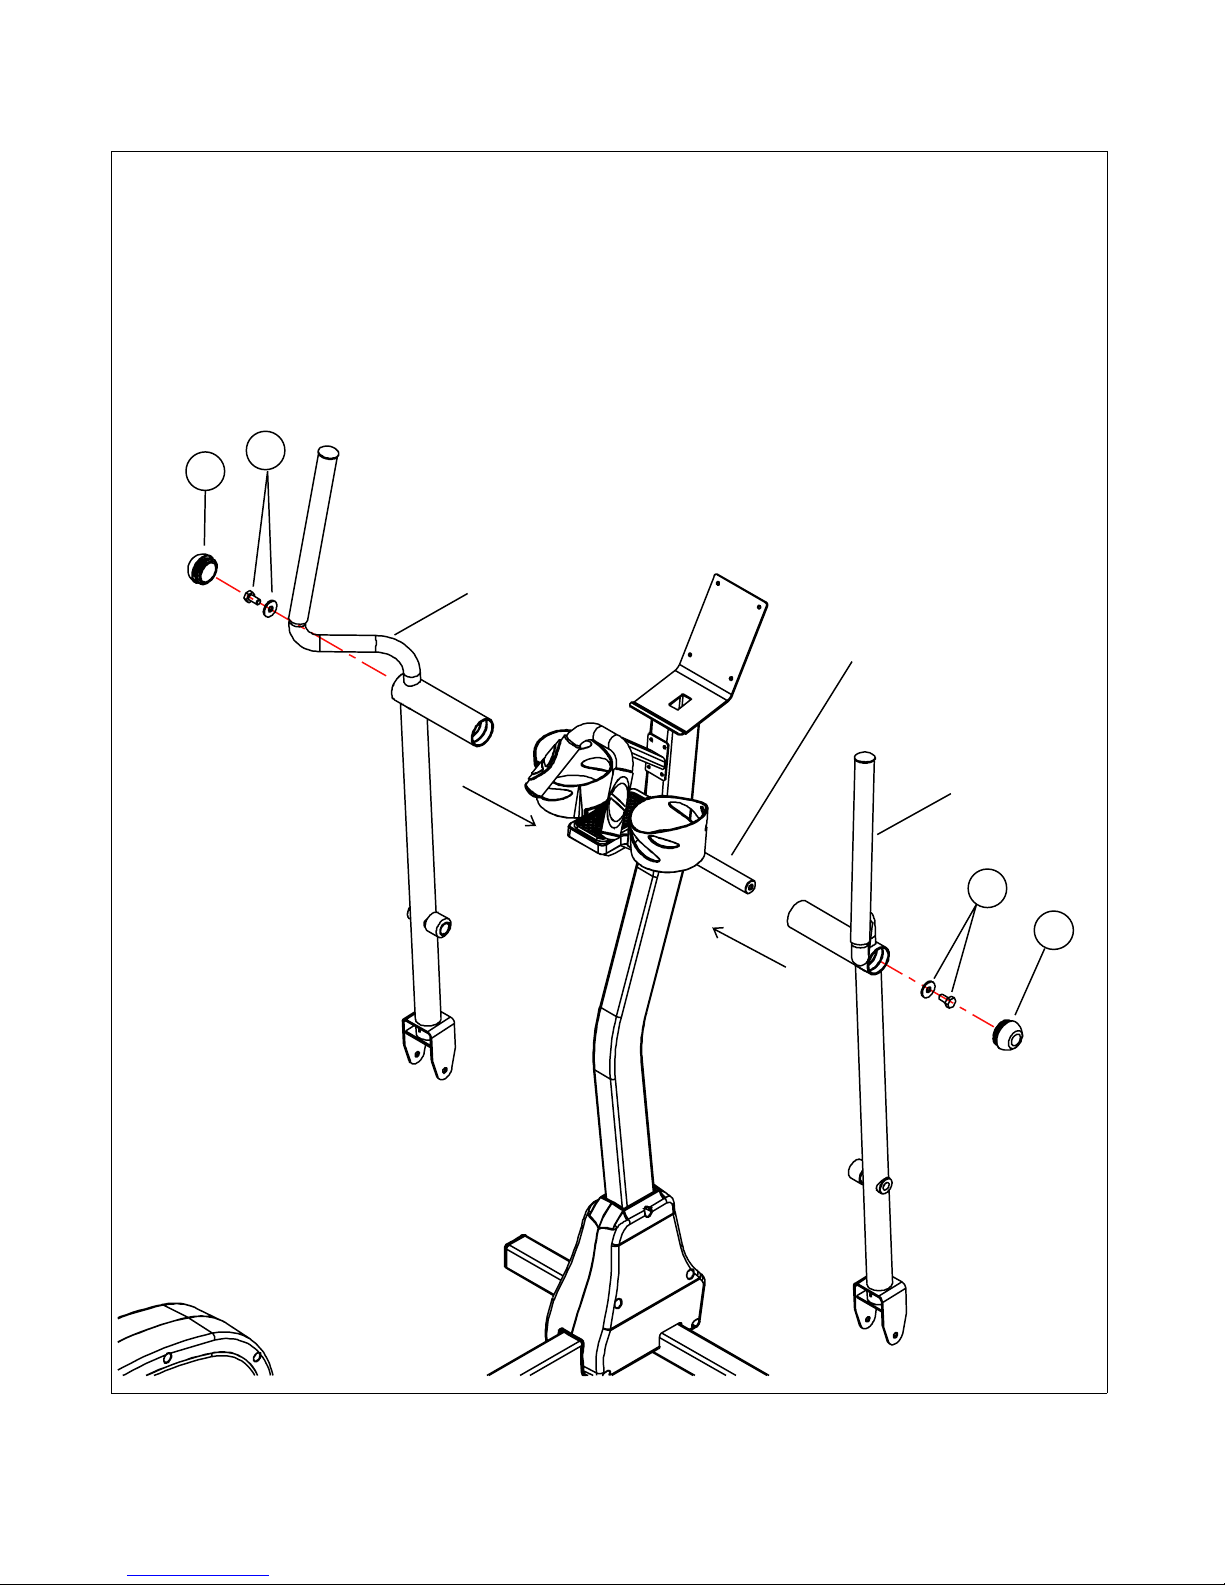
ASSEMBLY INSTRUCTIONS
STEP 6: Slide the Right Arm onto the shaft as indicated below. Secure the right arm to the
shaft using bolt 'E' and washer 'K'. Repeat this procedure for the Left Arm.
STEP 7: Install the end caps for both arms.
6
7
Left Arm
Shaft
Right Arm
6
7
ASSEMBLY INSTRUCTIONS
10
Page 11
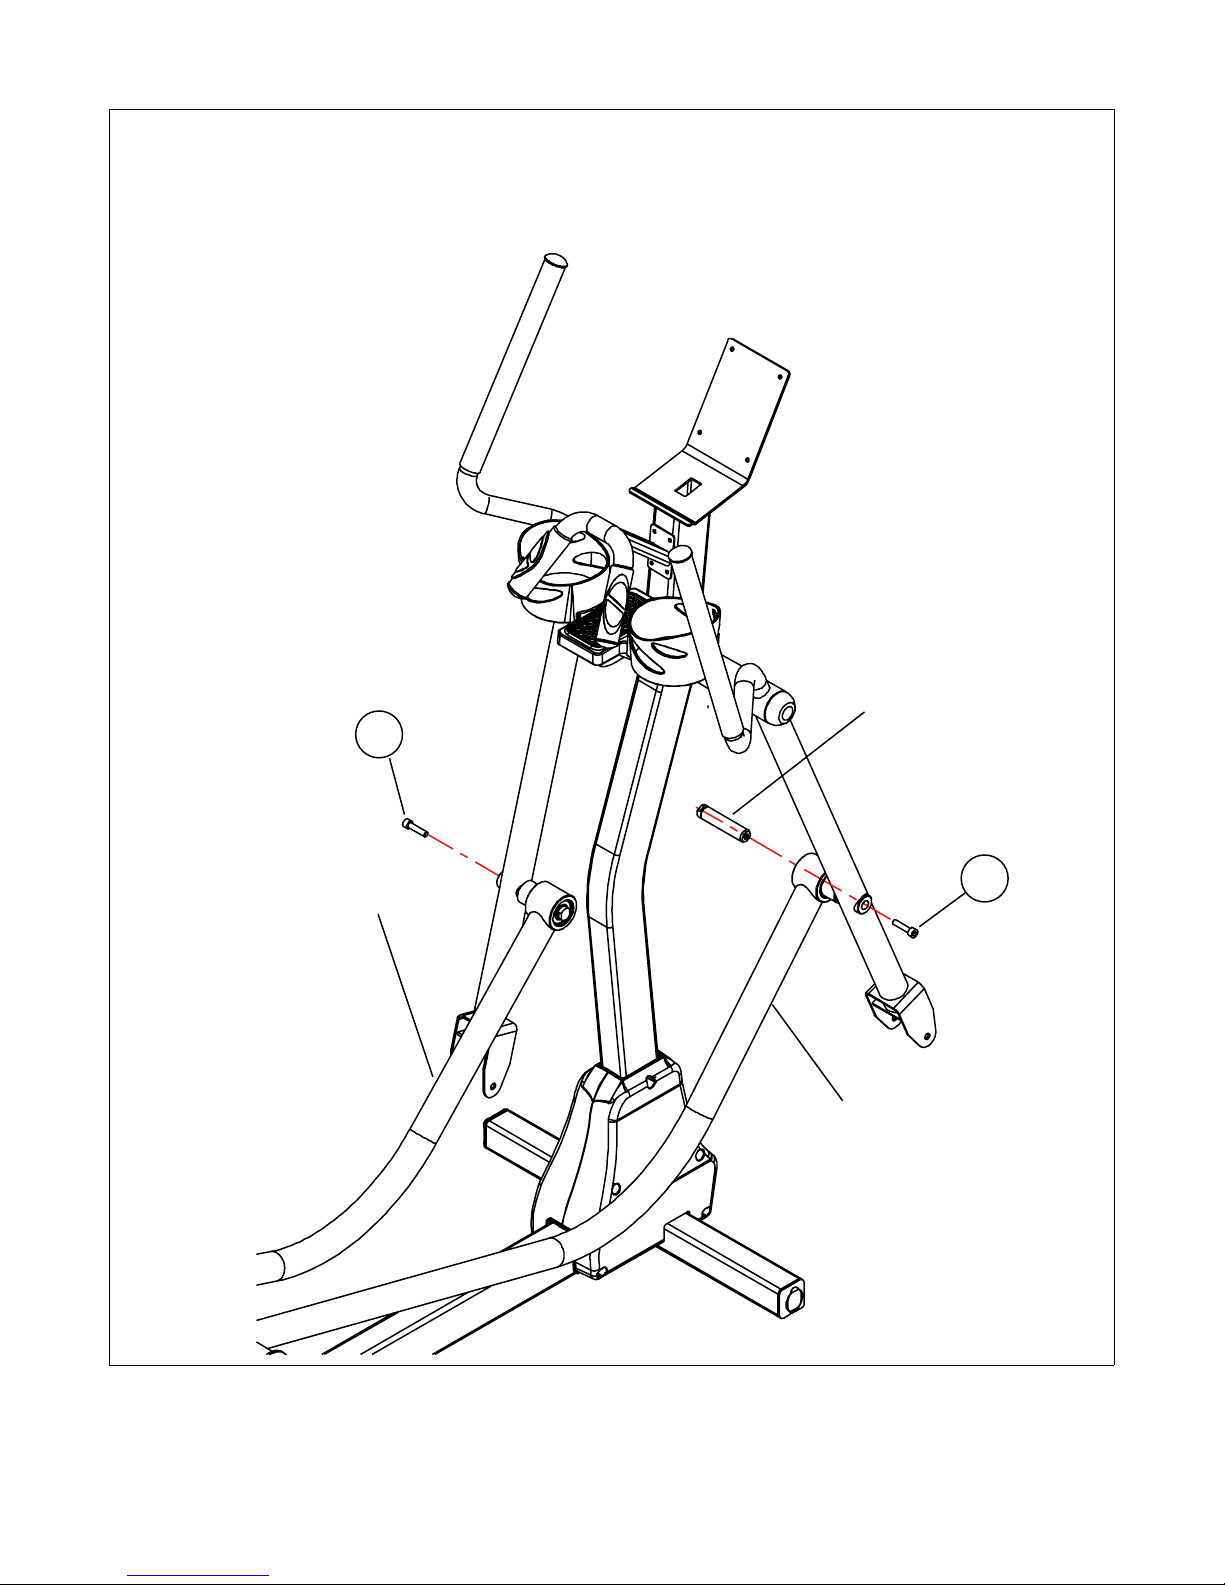
STEP 8: Insert the Link shaft through the Right link and into the hole on the Right arm as
indicated below. Use screw 'D' to secure the link shaft. Perform the same procedure for the
Left link
Link Shaft
8
Left Link
8
Right Link
11
Page 12
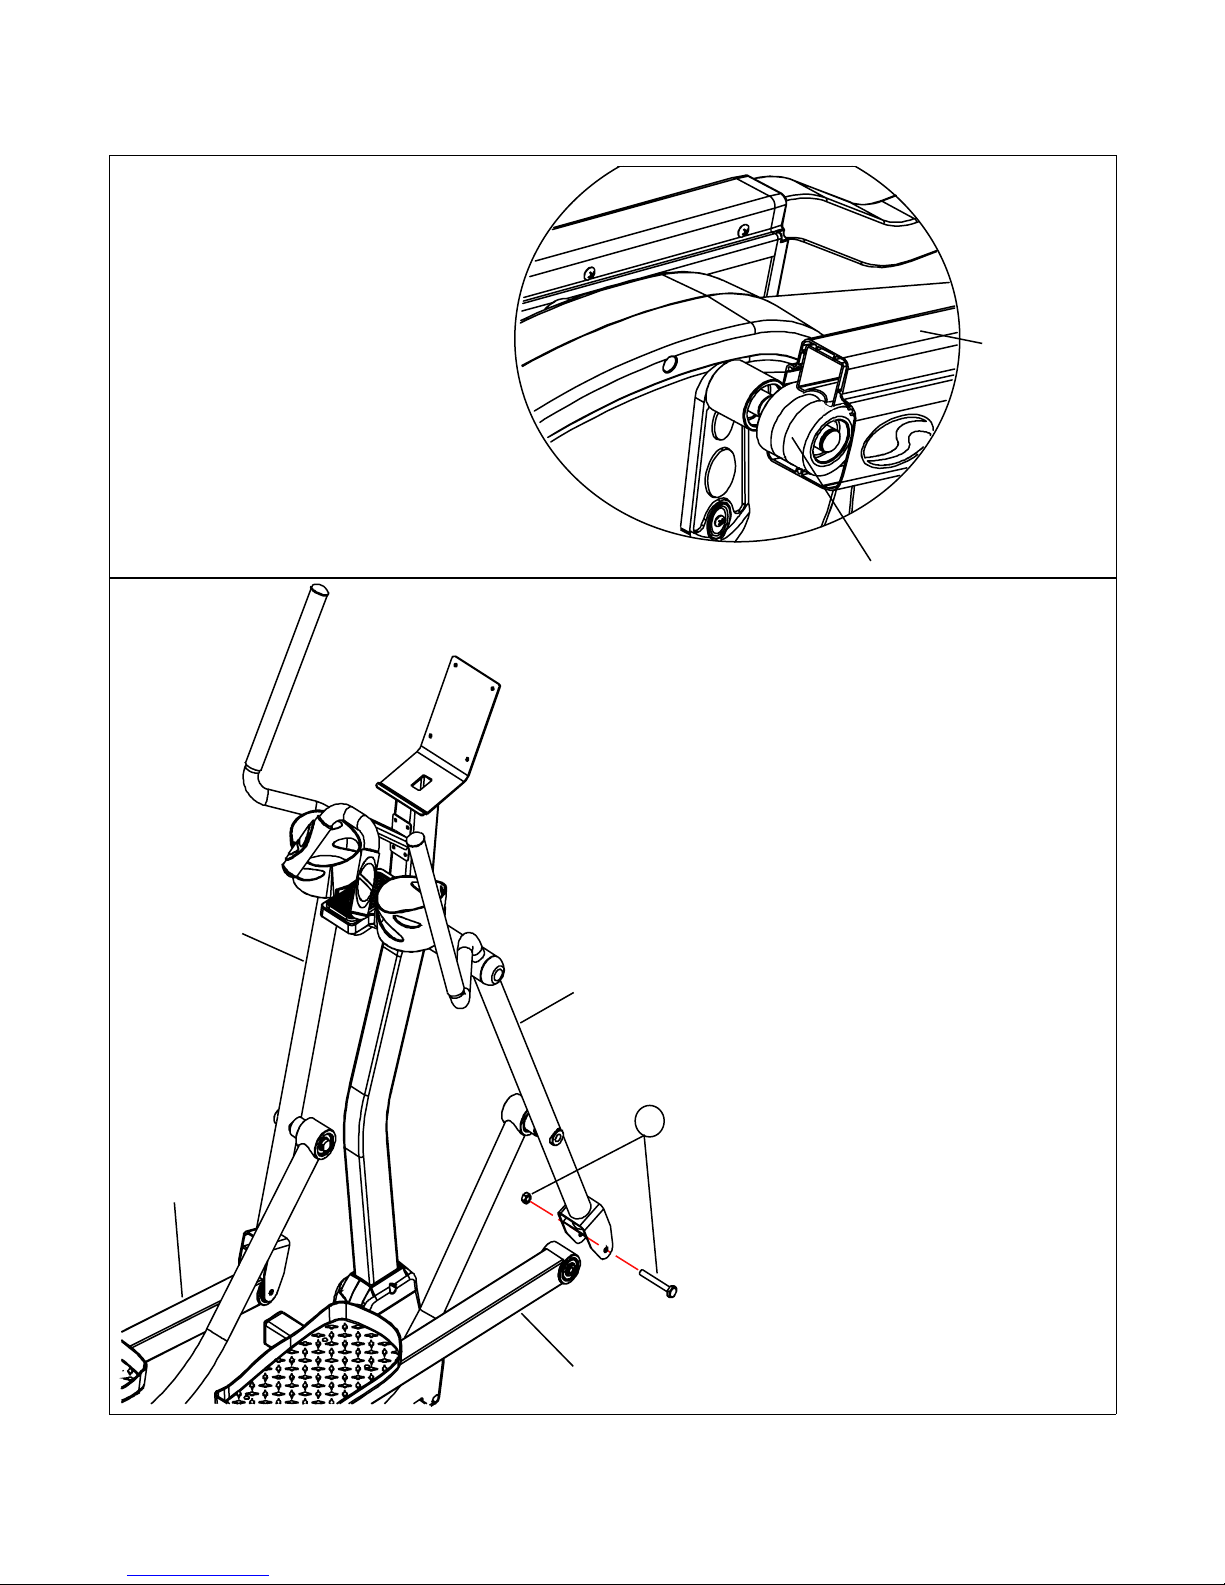
ASSEMBLY INSTRUCTIONS
STEP 9: Slide the Right Foot Link on to
the Right Foot Link Roller, as shown
to the right, making sure the convex
hump on the roller is centered with
the concave portion of the square
tube.
Right Foot Link
Right Foot Link Roller
STEP 10: Attach the Right Foot Link
to the Right Arm using Bolt 'B' and Nut 'J'
as shown below. Repeat steps 9 & 10
for the Left side.
Left Arm
Left Foot Link
Right Arm
10
Right Foot Link
12
Page 13
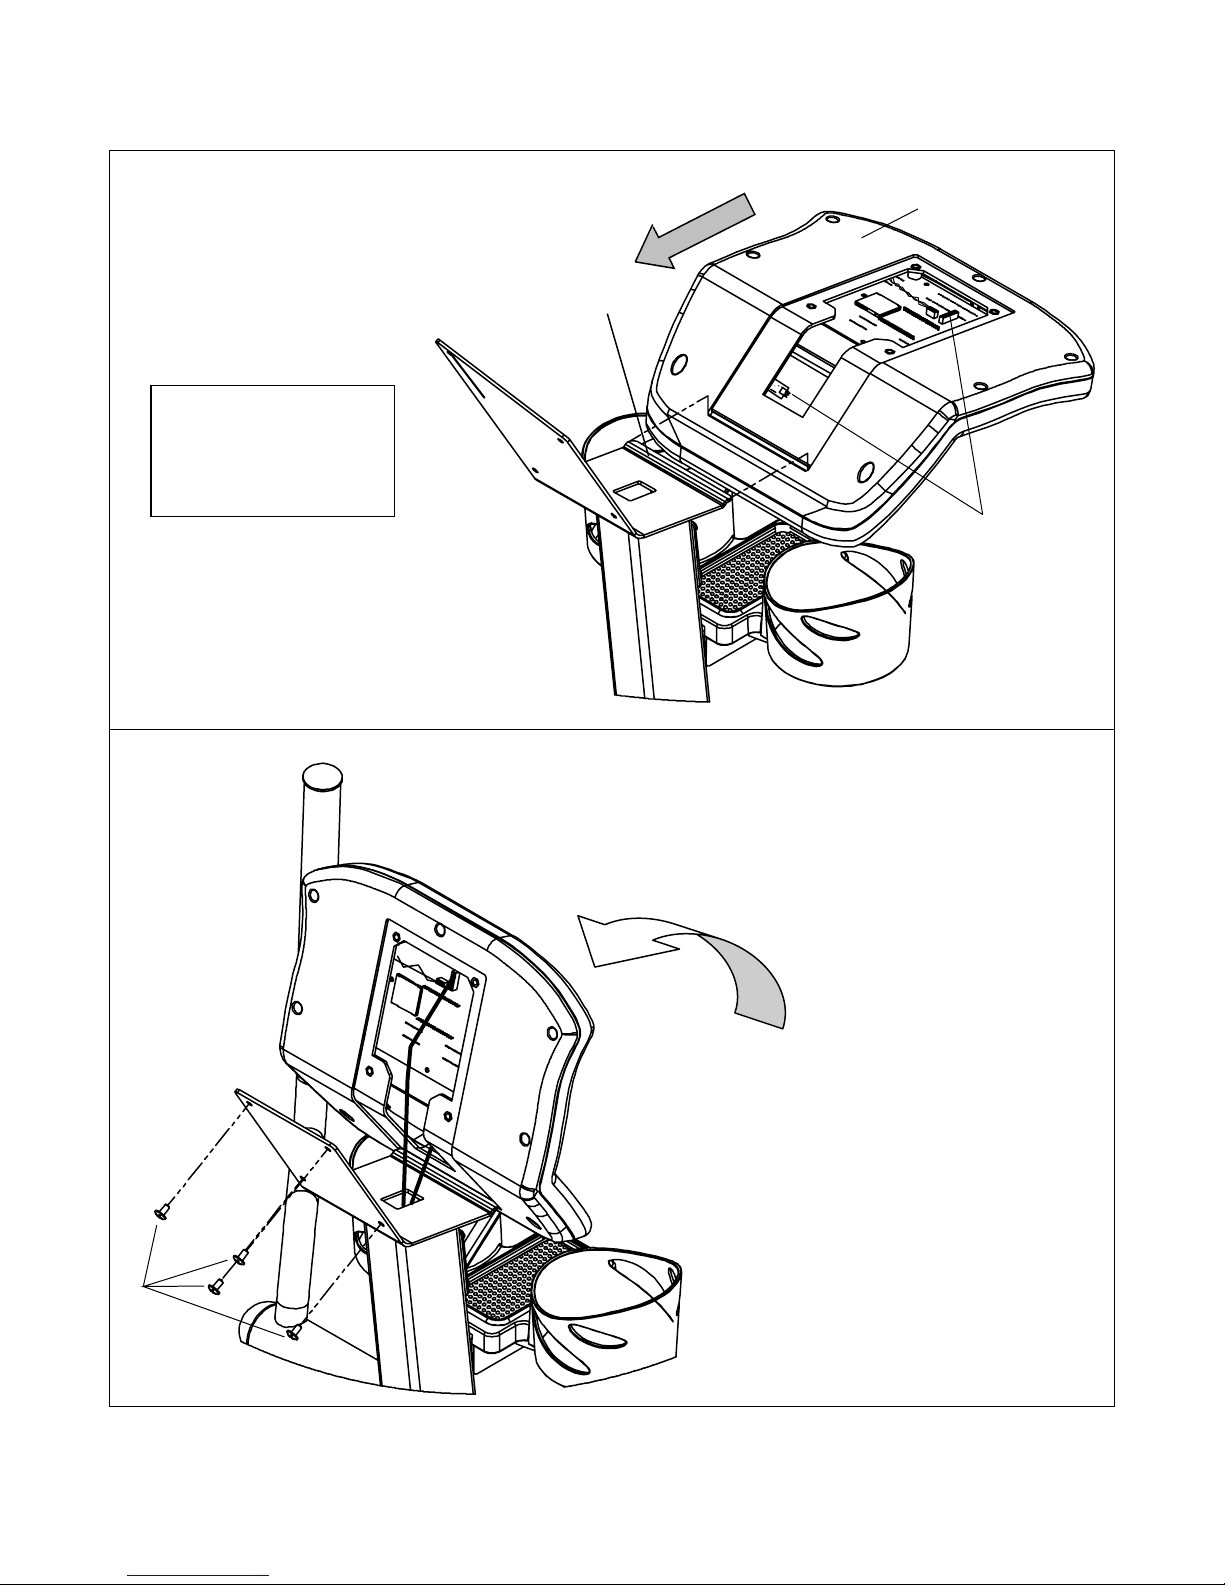
ASSEMBLY INSTRUCTIONS
g
STEP 11: Slide the Control Panel on to the Lip
on the mast as shown to the right. The lip must
slide into the control panel.
Tip: The control panel
will rest on the lip in the
upright position shown
to the right while wires
are bein
connected.
STEP 12: Connect the 2 wires coming out
of the mast to the control panel.
Control Panel
Control Panel
Lip
Connect Wires Here
STEP 13: Rotate the control panel back as
indicated below. Install the 4 screws 'H' to secure
the control panel in place. DO NOT PINCH THE
WIRES WHEN ROTATING THE CONTROL
PANEL BACK.
13
13
Page 14
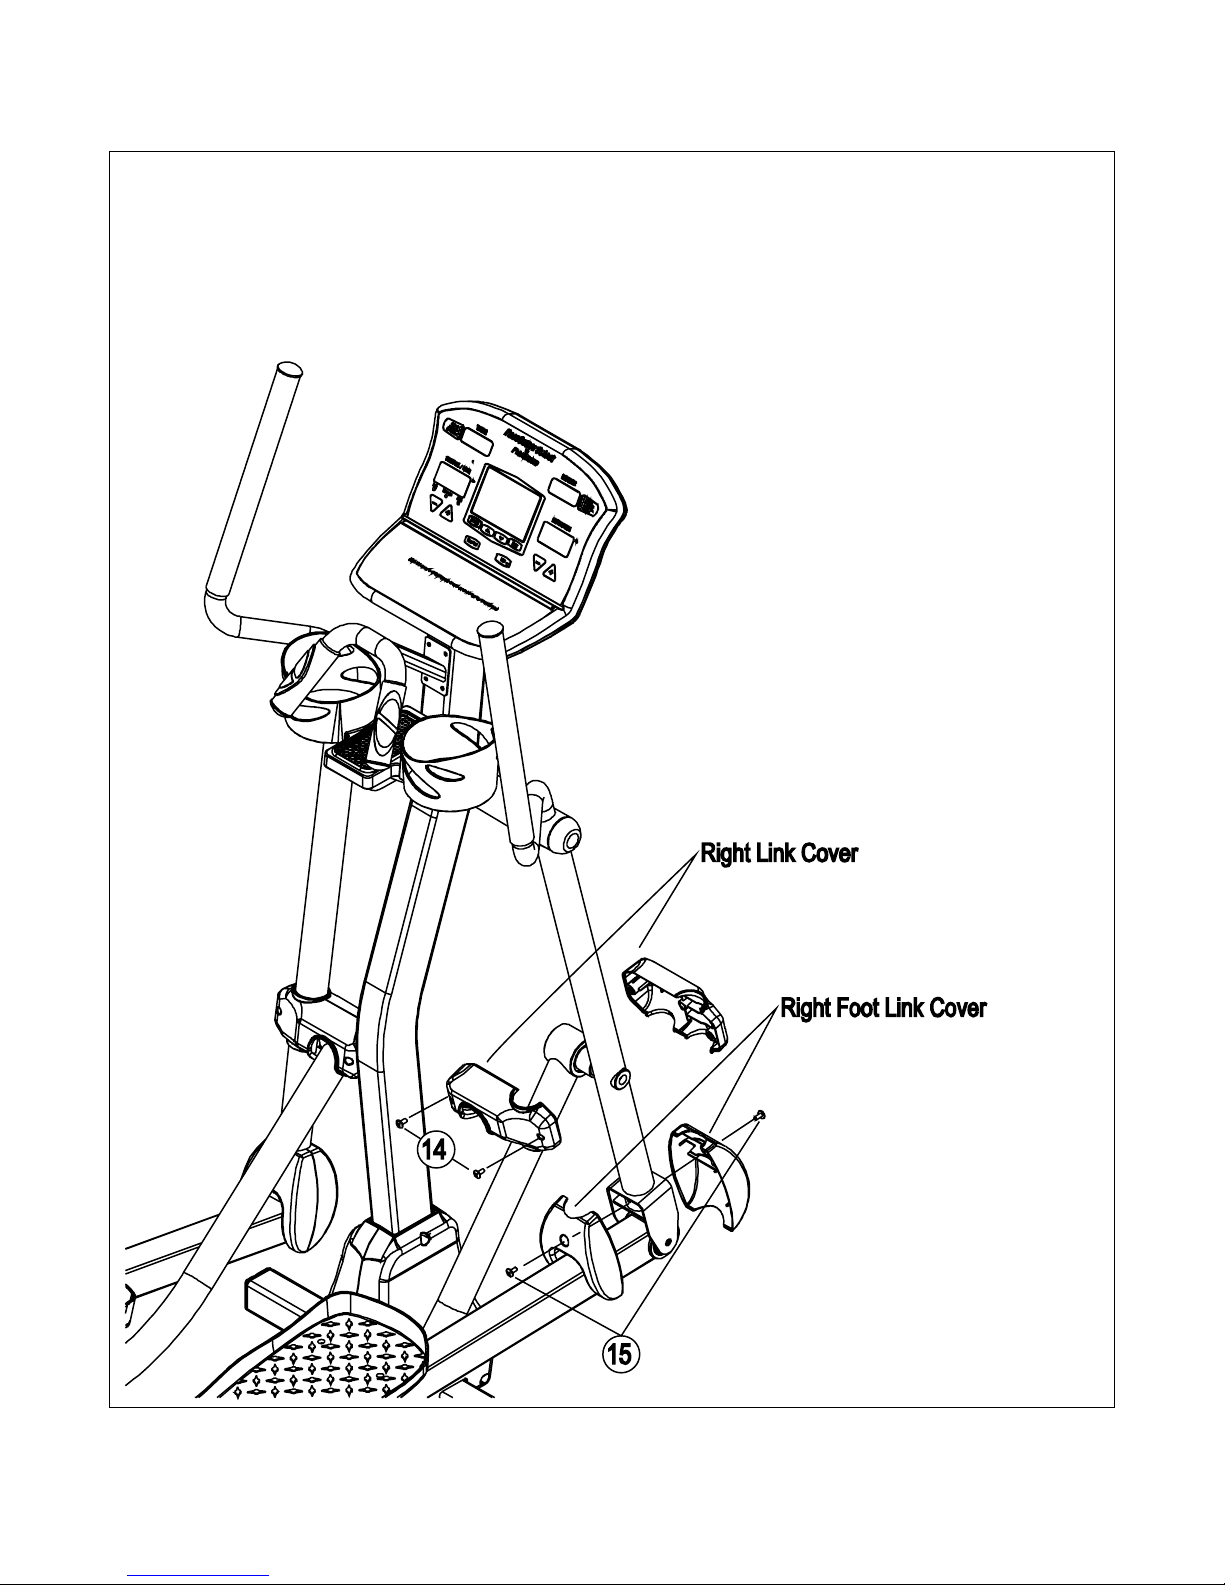
ASSEMBLY INSTRUCTIONS
STEP 14: Mount the Right Link Cover as shown below using 2 screws 'G'. Repeat this step
for the Left Link Cover.
STEP 15: Mount the Right Foot Link Cover as shown below using 2 screws 'G'. Repeat this
step for the Leftt Foot Link Cover.
14
Page 15
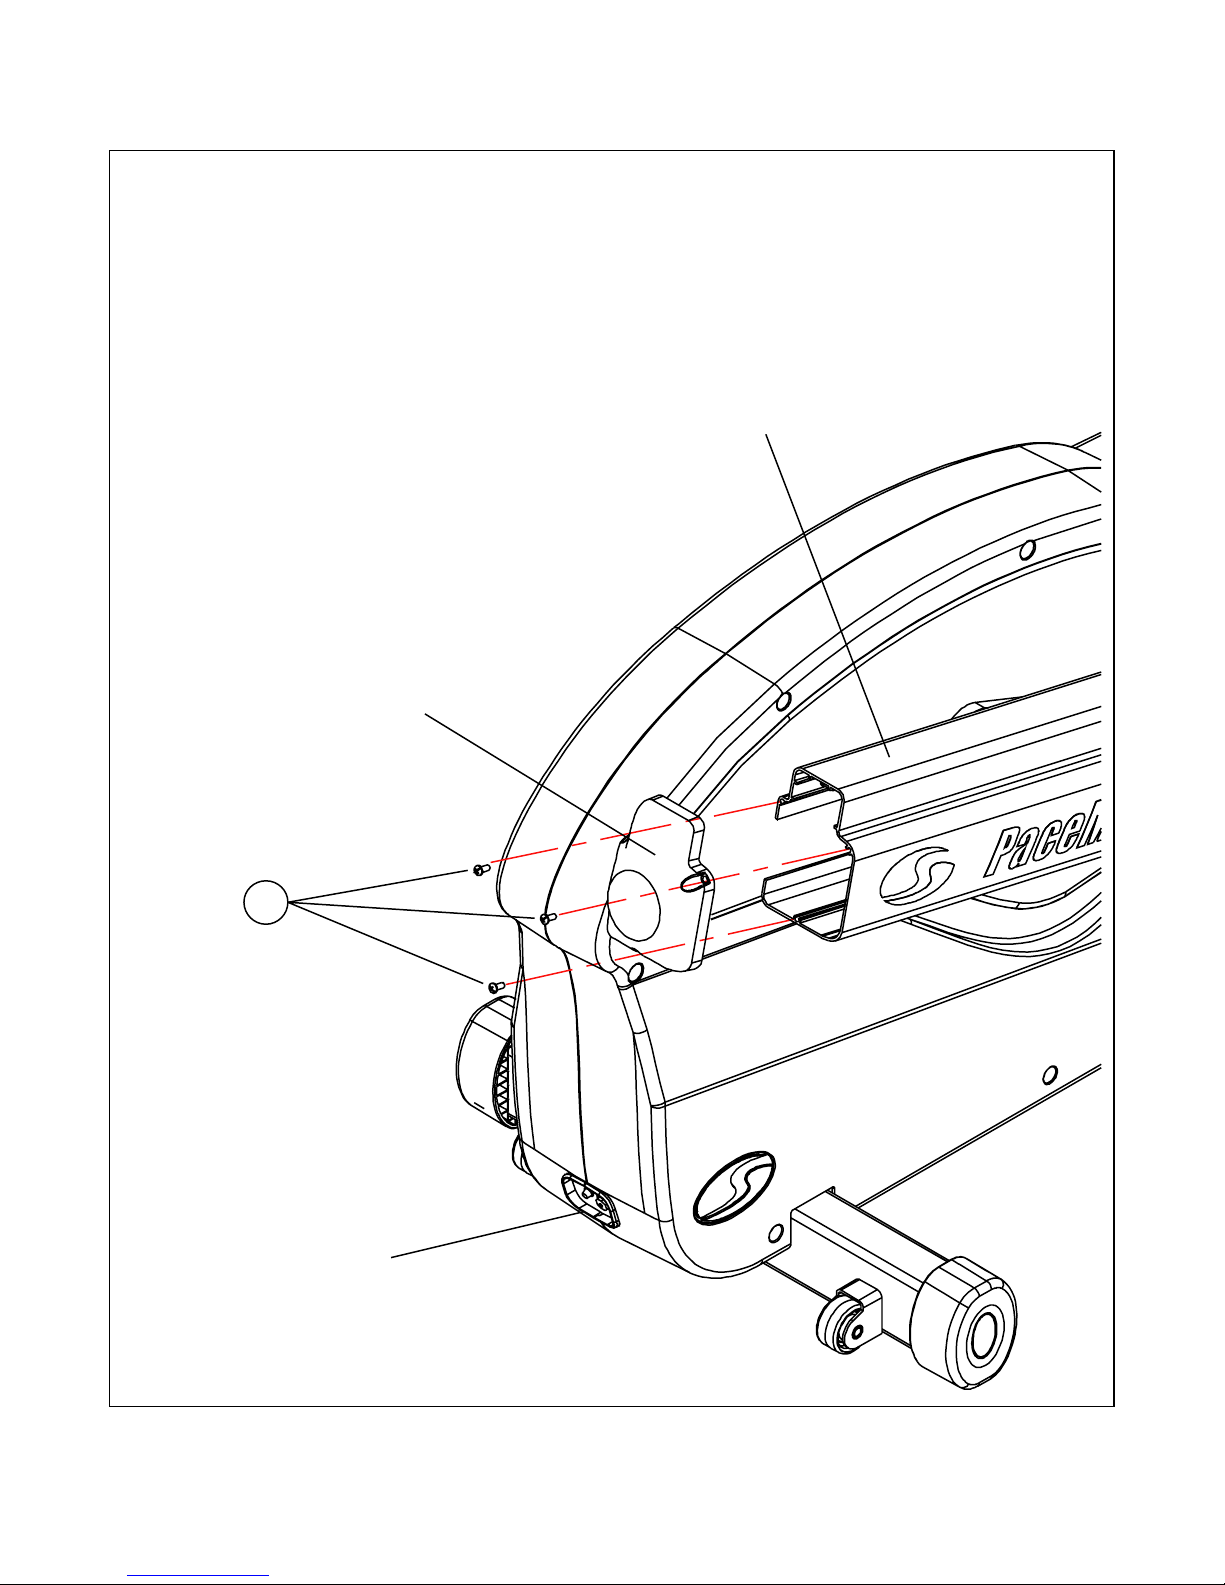
ASSEMBLY INSTRUCTIONS
STEP 16: Install the End Cap on the Right Foot Link using 3 screws 'I', as shown below.
Repeat this procedure for the Left Foot Link.
Right Foot Link
End Cap
16
Power Cord
Plugs In Here
15
Page 16
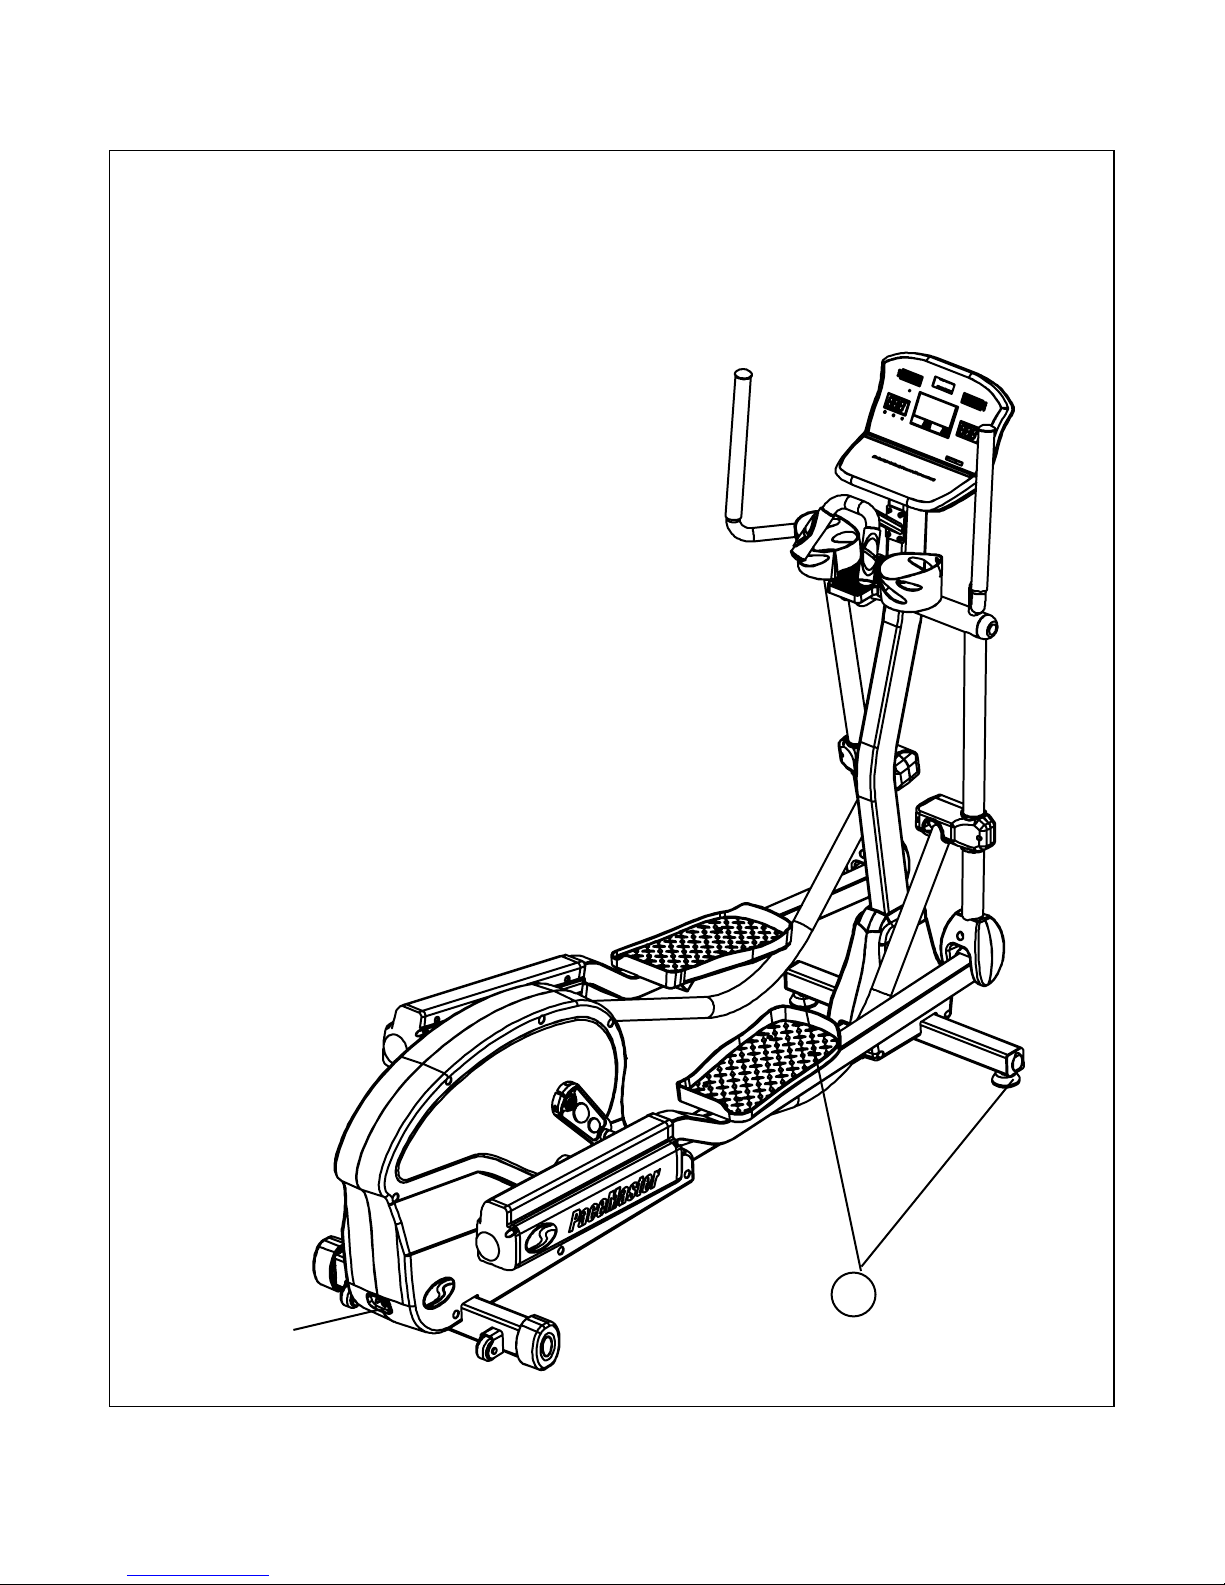
ASSEMBLY INSTRUCTIONS
STEP 17: Level the your PaceMaster Elliptical Cross Trainer using the front two leveling feet
shown below.
STEP 18: Plug in the power cord, then continue to "Testing your Elliptical Cross Trainer"
on the next page.
Power Cord
Plugs in Here
17
16
Page 17

Testing Your PaceMaster Silver XT
Your PaceMaster has been adjusted and tested at the factory. However, due to changes that can occur during shipment, it should be
tested prior to use. Once you have assembled your elliptical and it is located where it will be used, proceed as follows. (Do not make any
adjustments unless necessary.)
Follow the steps below to confirm proper operation of your elliptical after assembly.
Step One: Plug your PaceMaster Elliptical Cross Trainer into a power outlet. “PaceMaster” should appear in the Message Center.
Step Two: Pedal the elliptical; you should feel a smooth motion.
Step Three: Press the resistance (lower right window)
should feel the different in effort required to pedal the elliptical as the resistance level raises.
Step Four: Check if your strides per minute (lower left window) increase when you pedal faster and decrease as you pedal slower.
If all steps have not passed please refer to Troubleshooting for assistance.
buttons to increase the resistance to 20 and then back to 1. You
17
Page 18
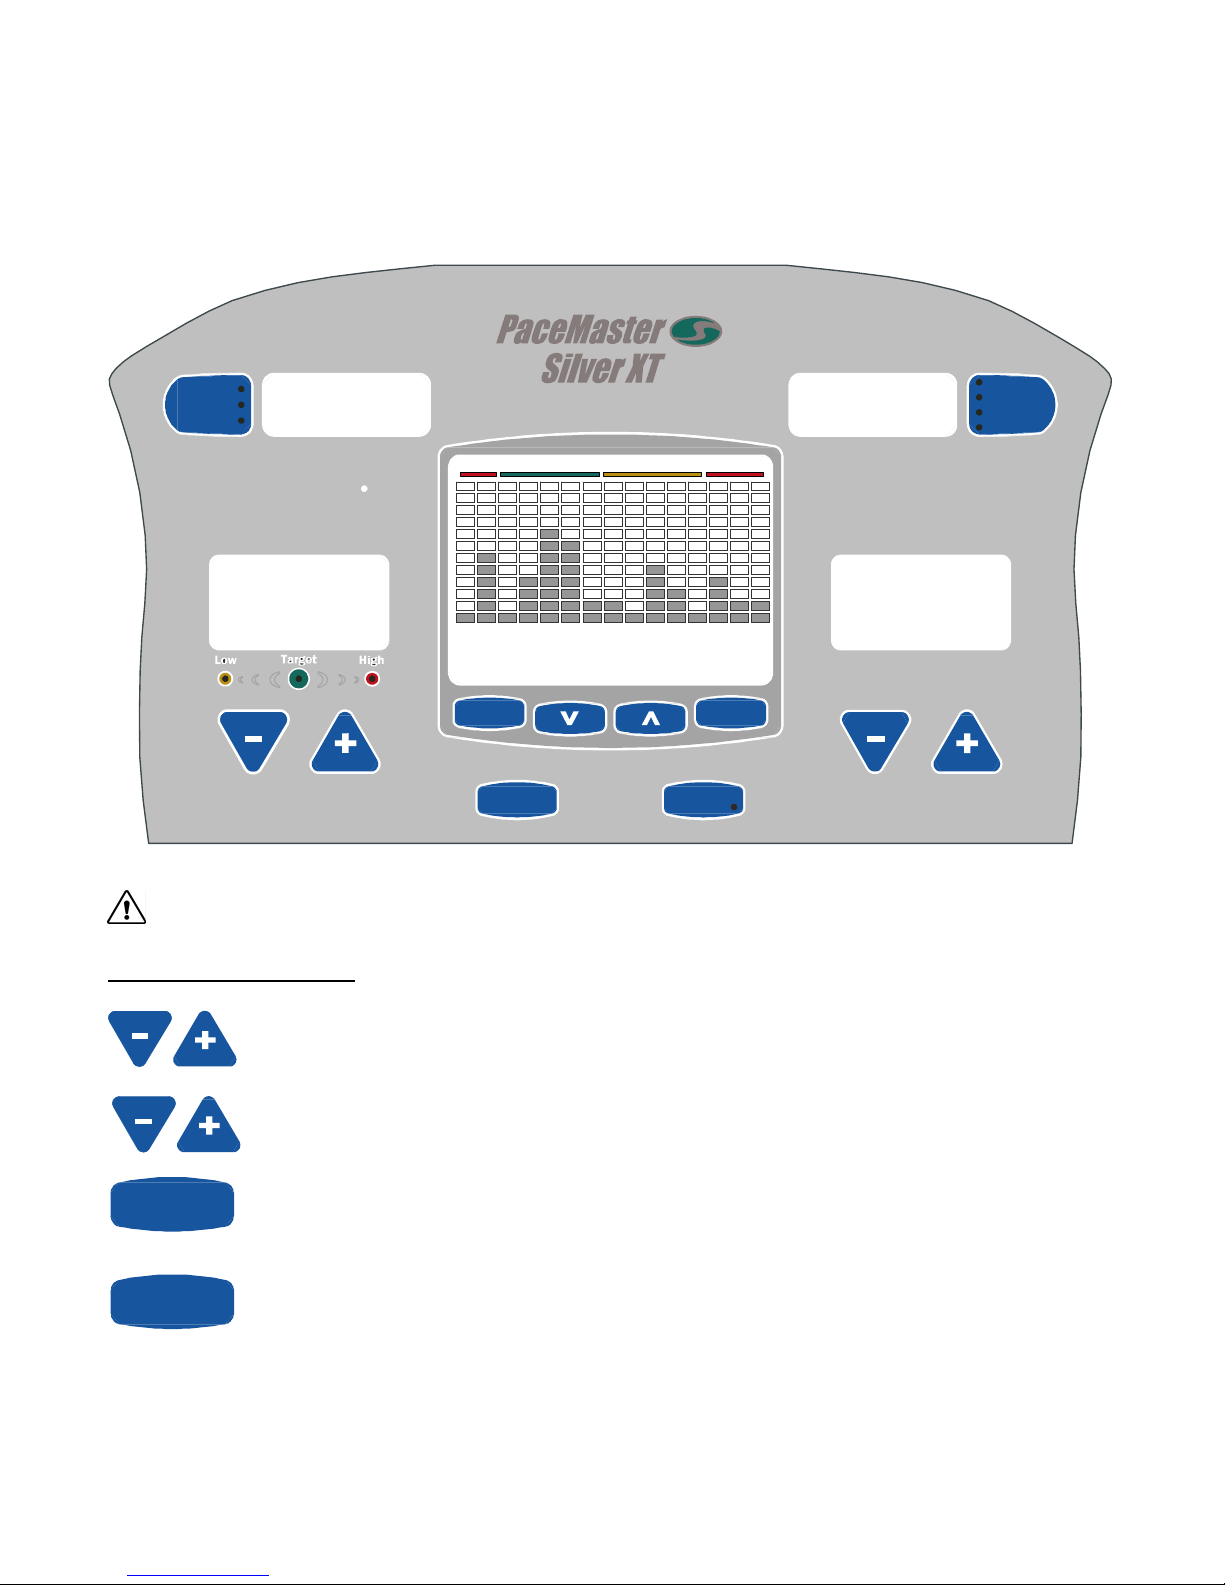
THE PACEMASTER SILVER XT CONTROL PANEL
R
Although your PaceMaster has many advanced features to provide versatility in meeting exercise needs, basic operation is extremely
easy. Basic operation involves setting your Strides per minute(SPM) and Resistance goals in Quickstart. During your exercise, current
SPM, distance traveled, calories burned and Aerobic Points earned are displayed.
Elapsed
Segment
Remaining
0000
STRIDES/MIN
00.0
CAUTION:
BUTTON DEFINITIONS
STRIDES/MIN Buttons –Use these buttons to set or change the maximum and/or target Strides/min.
RESISTANCE Buttons – Use these buttons to set or change the maximum and/or target resistance level.
Max
HEART RATE ZONE
70% to 85%< 55% 55% to 69% > 85%
MSGE CNT
PROGRAMS
USER ID
FBT
ENTER
(RESET)
RESULTSTIMER
0000
RESISTANCE
00.0
Distance
Heart Rat e
Aerobic Pts.
Calories
Max
ENTER
(RESET)
PROGRAMS
ENTER button – Has two functions. 1) Press and hold this for 2 seconds to reset the display. 2) This button is
used to enter any of the values displayed in the message center.
PROGRAMS button – 1) Press this button to select your workout program.
18
Page 19
THE PACEMASTER SILVER XT CONTROL PANEL (cont’d)
USER ID
FBT
Elapsed
Segment
Remaining
Distance
Heart Rate
Aerobic Pts.
Calories
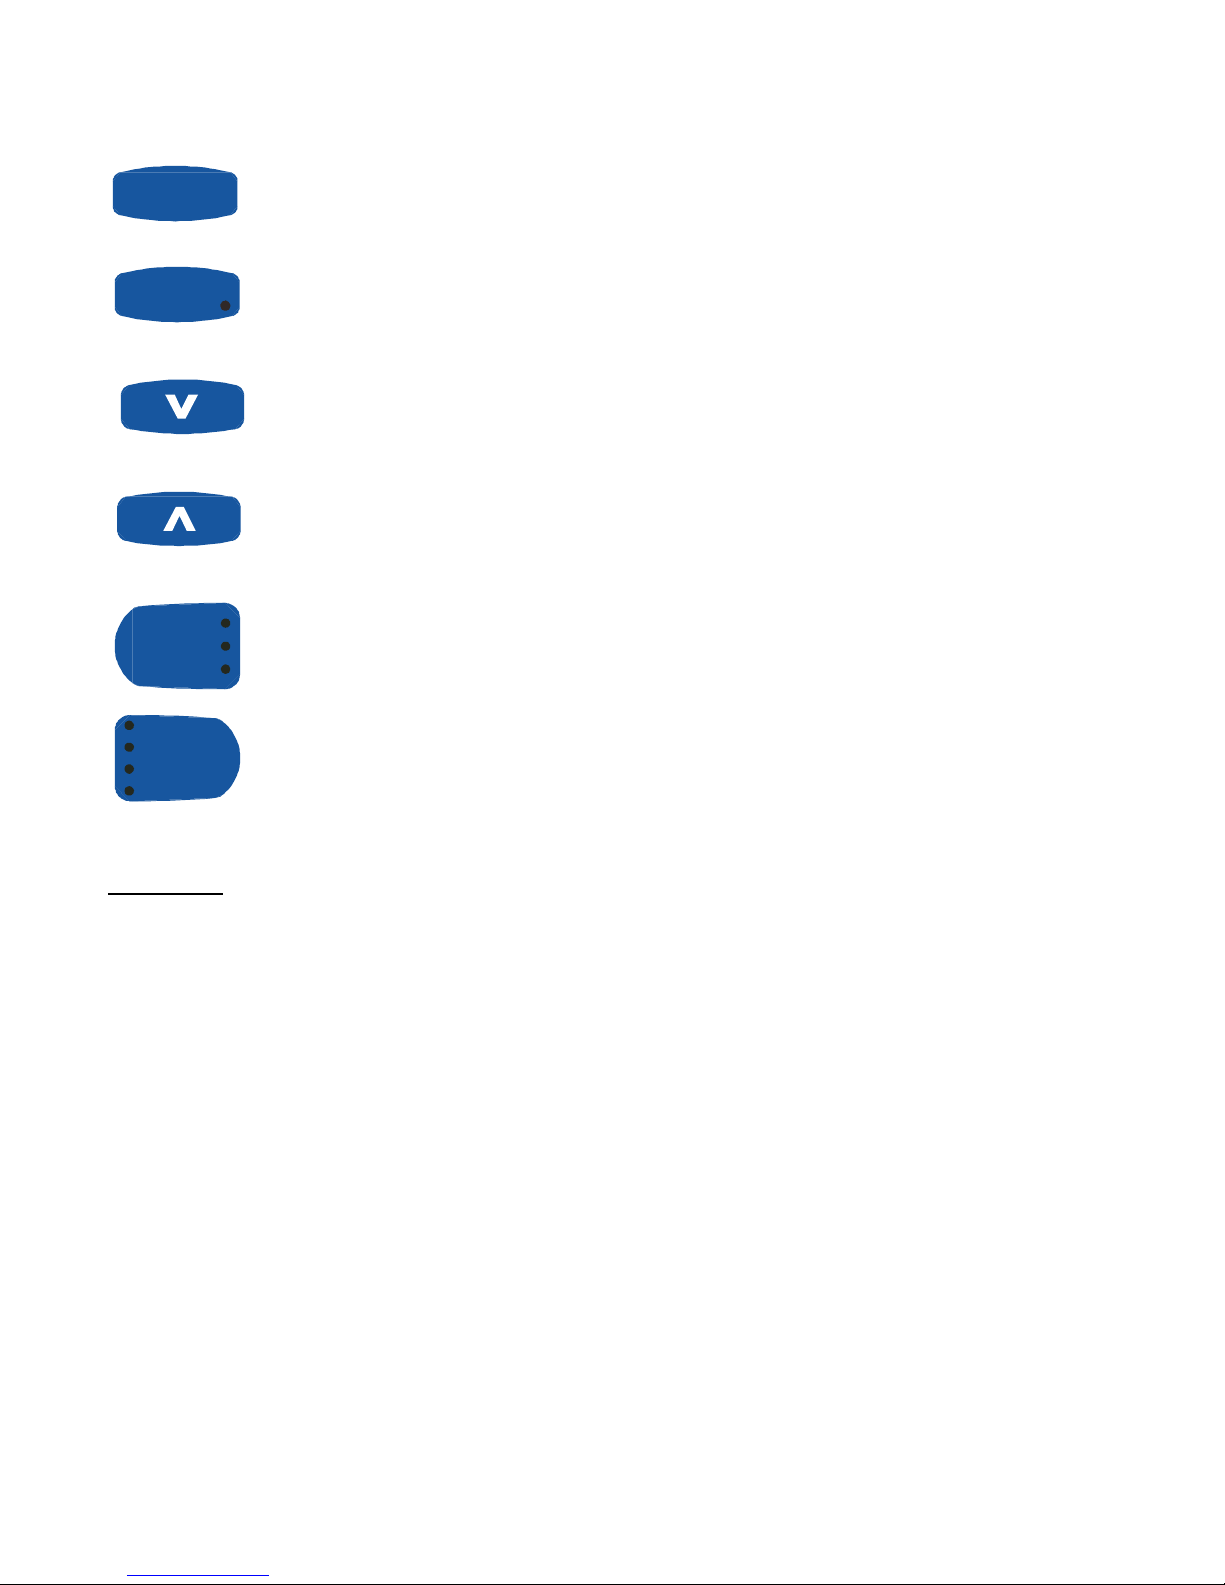
DISPLAYS
TIMER Display – Displays Elapsed time, Segment time, and Time remaining..
RESULTS Display – Displays Distance, Heart Rate, Aerobic Points and, Calories. Additionally, during the selection or use of a
programmed WORKOUT the chosen or current intensity level is displayed.
STRIDES/MIN Display – Displays Distance, Calories and Aerobic Points. Additionally, during the selection or use of a programmed
WORKOUT the chosen or current intensity level is displayed.
RESISTANCE Display – Displays Distance, Calories and Aerobic Points. Additionally, during the selection or use of a programmed
WORKOUT the chosen or current intensity level is displayed.
MESSAGE CENTER Display – Displays workout parameters during workout setup. Additionally, during your workout displays various
motivational messages and parameters of your workout.
USER ID Button – Has two functions. 1) Press this button to select the user ID prior to a workout.
2) Press and hold for this button for 2 seconds to modify the used ID you have selected.
FULL BODY TRAINER Button – During your workout, this button allows you to insert a 12 minute full body
workout within your current workout. This workout consists of 6 one minute work segment and 6 one minute rest
segments
DECREASE Button – Has two functions. 1) Prior to your workout this button is used to select or decrease, the
value or program displayed in the message center. 2) During your workout button is used to decrease the level of
intensity or target heart rate.
INCREASE Buttons – Has two functions. 1) Prior to your workout this button is used to select or increase, the
value or program displayed in the message center. 2) During your workout button is used to increase the level of
intensity or target heart rate.
TIME SELECT Button – Has two functions. 1) Use this buttons to select the value you would like to display. 2)
Press and hold this button to enter scan mode, this will display each of the values one at a time for 3 about seconds
each..
RESULTS SELECT Button – Has two functions. 1) Use this buttons to select the value you would like to display. 2)
Press and hold this button to enter scan mode, this will display each of the values one at a time for 3 about seconds
each.
19
Page 20

THE PACEMASTER SILVER XT CONTROL PANEL (cont’d)
INDICATOR LIGHTS
STRIDES/MIN Max Indicator – When illuminated during the selection of programmed workouts, the displayed Strides/Min value is the
maximum that will be encountered during the selected workout and intensity level.
Low << Target >> High Indicator – During workouts, these indicators illuminate accordingly comparing your actual Strides/Min value is to
your target Strides/Min value.
RESISTANCE Max indicator – When illuminated during selection of programmed workouts, the displayed resistance is the maximum
resistance that will be encountered during the selected workout and intensity level.
ELAPSED – SEGMENT – REMAINING Time Indicators – They tell you which value is being displayed in the Results window.
DISTANCE – HEART RATE - AEROBIC POINTS - CALORIES Indicators – They tell you which value is being displayed in the Results
window.
20
Page 21
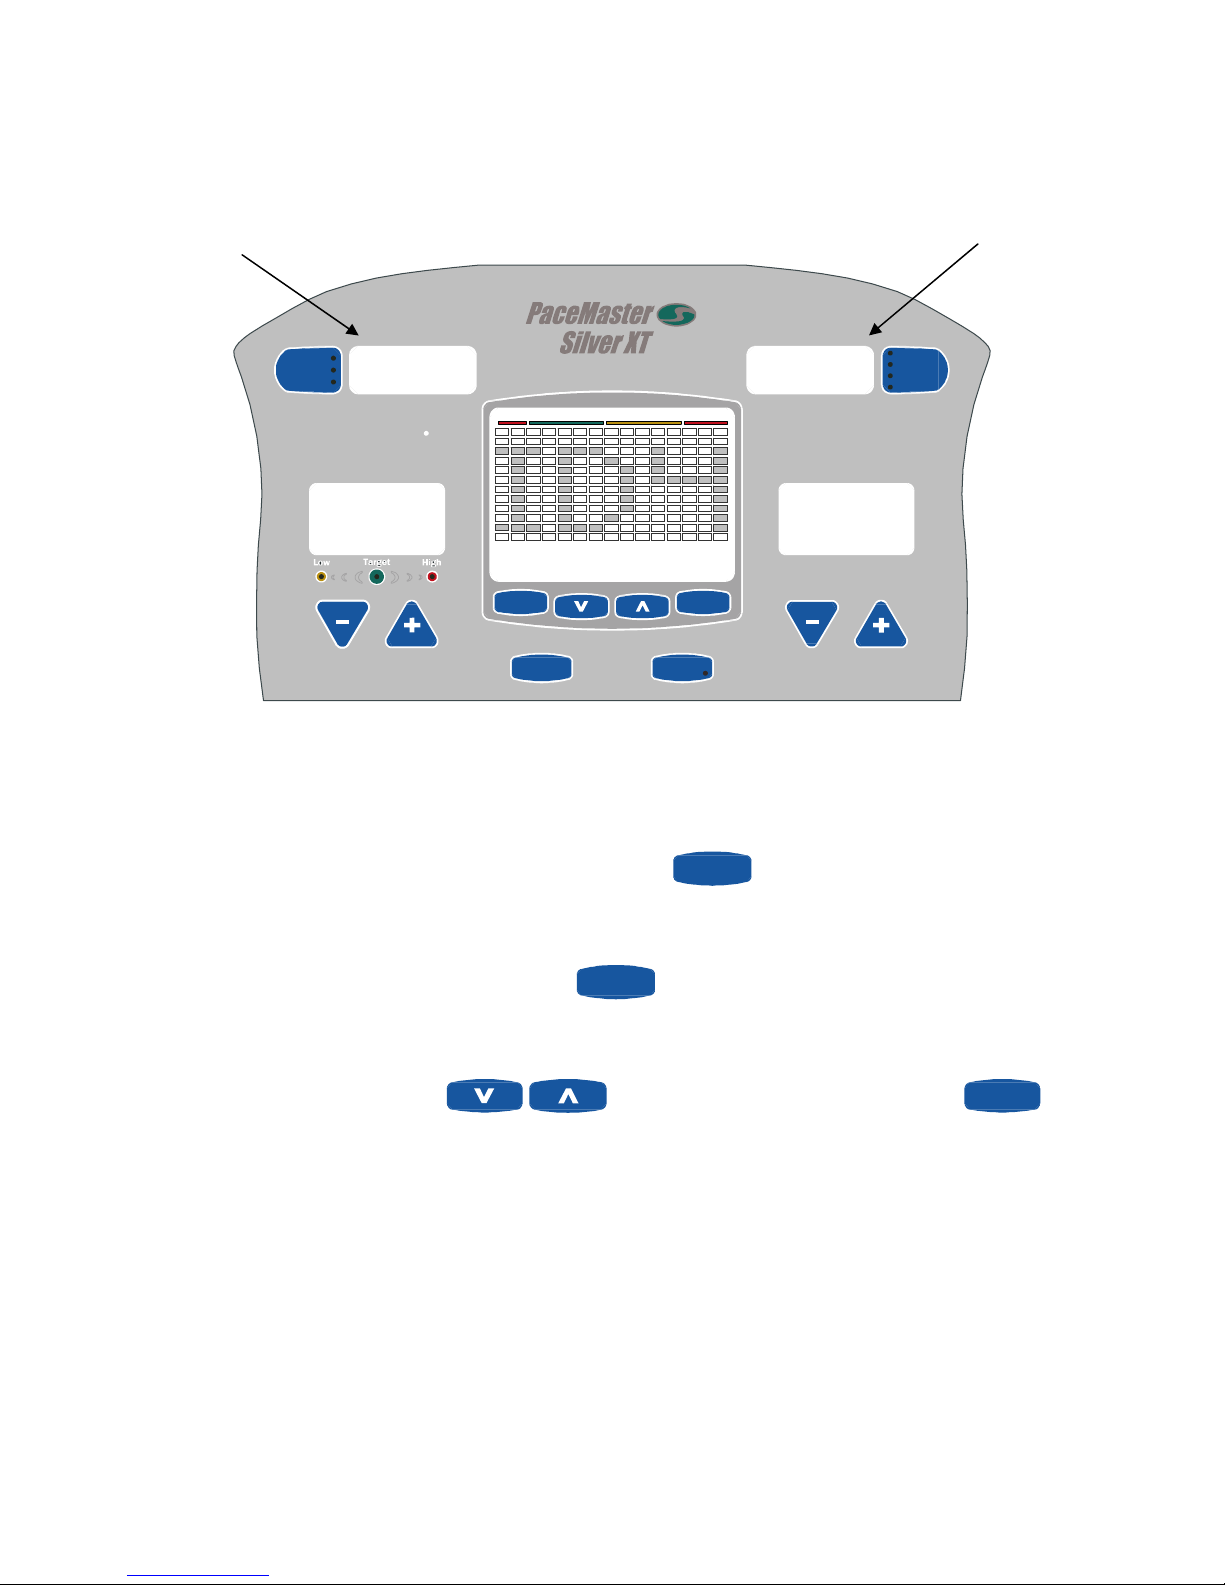
CONFIGURING USER ID’S
The four USER ID positions give you the ability to view the results from your last seven workouts. They can be recalled as a cumulative
total or as individual workouts.
USER 1 cumulative
workout time for the
last seven
workouts.
Elapsed
Segment
Remaining
3:27
HEART RATE ZONE
70% to 85%< 55% 55% to 69% > 85%
RESULTSTIMER
1324
Distance
Heart Rat e
Aerobic Pts.
Calories
USER 1 cumulative
results for the last
seven workouts.
STRIDES/MIN
Max
00.0
W 160 AG 46
PROGRAMS
USER ID
FBT
ENTER
(RESET)
RESISTANCE
Max
00.0
Selecting and setting up a USER ID
Step One: Stand on the foot pads of your elliptical.
Step Two: Select a USER ID number (ID1, ID2, ID3, or ID4) by pressing the
chosen, are displayed in the message center. The default settings for all USER ID positions are 150 lbs. for the weight and 40 years for
the age.
Step Three: To modify the user ID settings, press and hold the
weight setting will be flashing in the message center
Step Four: Press the increase and decrease
the same procedure to enter your age.
USER ID
buttons to set your weight, and then press enter
USER ID
button for two seconds, then release the button. The current
button. The current settings for the Used ID
ENTER
(RESET)
. Use
21
Page 22
ENTER
Step Five: Prior to beginning each workout, you must press and hold the
your User ID by pressing the
USER ID
button until your User ID is displayed, for your results to be stored under your used ID.
(RESET)
button to reset the display, and then you must select
Recalling the cumulative summary of your last seven workouts
Step One: Stand on the foot pads of your elliptical.
Step Two: Press the
USER ID
button until your USER ID number is displayed. Press the
Distance
Heart Rat e
Aerobic Pts.
Calories
button to scroll through a
cumulative summary of the results from your last seven workouts.
Recalling the individual workout results from your last seven workouts:
Step One: Stand on the foot pads of your elliptical.
Step Two: Press the
USER ID
button until your USER ID number is displayed.
Step Three: Use
Distance
Heart Rat e
Aerobic Pts.
Calories
button to scroll through a cumulative summary of the results for the displayed workout.
buttons to scroll through the summaries for your last seven workouts (W1 through W7). Press the
Step Three: Press
USER ID
button to get back to the USER ID display or press the
To recall and use your last workout settings:
Step One: Stand on the foot pads of your elliptical..
Step Two: Press the
settings will be displayed. Press the
USER ID
button until your USER ID number is displayed, then press the
ENTER
(RESET)
button to begin that program.
Resetting your cumulative data:
Step One: Stand on the foot pads of your elliptical.
Step Two: Press the
Press the
ENTER
(RESET)
to confirm. Once “Cleared” appears in the message center, ALL cumulative data has been erased.
USER ID
button until your USER ID number is displayed.
button 8 times, until “Clear Workout Results” appears in the message center, press
PROGRAMS
button to begin the desired program.
ENTER
(RESET)
button. Your last workout
ENTER
(RESET)
to clear and press
22
Page 23
QUICK START
Quick Start allows you to begin your workout by not pressing any buttons.
Step One: Stand on the foot pads of your elliptical.
Step Two: Begin pedaling, within a few seconds the display will say “Quick Start”.
• Adjust the Strides per Minute target at any time during your workout by pressing the SPM
• Adjust the resistance level at any time using the
resistance buttons.
buttons.
Step Three: To end your workout, Stop pedaling, wait for PAUSE, then press the
(RESET)
button to proceed to "Workout Summary",
ENTER
this will display the total time distance, calories, and Aerobic Points earned for this workout.
TIP: If you stop pedaling, you will automatically enter the 5 minute pause mode, a count down pause timer will be displayed in the
massage center. If your workout is not resumed within the 5 minute pause you will automatically enter the workout summery mode and
your workout will be over.
TIP: During your workout you can press and hold the
Distance
Heart Rat e
Aerobic Pts.
Calories
button until the word “SCAn” appears in the respective display, each
value will now be displayed for 3 seconds each on a rotating cycle.
23
Page 24
M1 – Manual (timed workout)
Timed Workout allows you to set workout time, target SPM, and resistance level for your workout. You can make target SPM and
resistance changes at any time during the workout.
ENTER
Step One: Press and hold the
Step Two: Stand on the foot pads of your elliptical.
NOTE: If you have set up a User ID, select it using the
Step Three: Press the
PROGRAMS
If you have entered your User ID go to Step 5
Step Four: Enter your weight using the increase and decrease
same procedure to enter your age.
Step Five: Set your workout time using the increase and decrease
(RESET)
button to reset the control panel.
USER ID
button, then press
once to select M1 (manual mode) then press the
ENTER
(RESET)
.
ENTER
(RESET)
button.
buttons, then press enter
buttons, and then press enter
ENTER
(RESET)
. Use the
ENTER
(RESET)
.
Step Six: Set the Strides per Minute target by pressing the SPM
ENTER
resistance buttons, when finished press the
(RESET)
button.
buttons. Set the resistance level using the
NOTE: During setup your predicted distance, calories, and Aerobic points will be displayed in the RESULTS window based on the values
you have set.
Step Seven: Begin pedaling
NOTE: After allotted workout time had counted down to zero a 3 minute cool down period will follow.
ENTER
Step Eight: To end your workout, either allow the timer to count down to zero or Stop pedaling, then press the
(RESET)
button to
proceed to "Workout Summary", this will display the total time distance, calories, and Aerobic Points earned for this workout.
TIP: If you stop pedaling, you will automatically enter the 5 minute pause mode, a count down pause timer will be displayed in the
massage center. If your workout is not resumed within the 5 minute pause you will automatically enter the workout summery mode and
your workout will be over.
TIP: During your workout you can press and hold either the
Elapsed
Segment
Remaining
or
Distance
Heart Rat e
Aerobic Pts.
Calories
button until the word “SCAn” appears in the
respective display, each value will now be displayed for 3 seconds each on a rotating cycle.
24
Page 25

FBT – Full Body Trainer
Your PaceMaster Silver XT cross trainer comes with a Full Body Trainer (FBT) program to supercharge your workout by coaching you
through a variety of movements designed to focus your exercise on specific muscles or muscle groups. The FBT adds variety and
intensity to you workouts thereby eliminating boredom and providing a more stimulating exercise experience. While in any program
(except Calorie Coach or Cardio programs) accessing the Full Body Trainer program is as simple as pressing the
the control console. Once the FBT is activated (it’s actually a program inside a program) a random selection of six exercise movements
(listed below) is displayed and you will experience a one minute workout time followed by a one minute rest period, during the rest period
the computer will reduce the resistance (DO NOT STOP PEDALING). Upon the completing of the twelve minute FBT you will return to
your original program at the point you left it. You can option out of the FBT at any time by pressing the
FBT
Squat Squat Slightly bend your knees and maintain it throughout your stride. You may find it more
comfortable and secure to hold on to the fixed bullhorns while striding. This concentrates the exercise
motion in your quadriceps and glutes.
Lower Body Stride while holding the fixed bullhorns or let your arms swing naturally at your side. Do not hold onto the movable
right and left arms. This concentrates the exercise motion in all your primary and secondary lower body muscle
groups.
Push Emphasize pushing the movable left and right arms to concentrate the exercise motion in your pectoral’s and triceps.
Pull Emphasize pulling the movable left and right arms to concentrate the exercise motion in your biceps and lats.
Reverse Stride backwards to concentrate the exercise motion focus for your entire lower body.
Lean Back Slightly lean back while holding onto the fixed bullhorns. This concentrates the exercise motion on your
quadriceps.
Step One: During use of any of the following programs (M1, F2, F3, F4, I1, I2, or I3) Press the
FBT
button.
Step Two: Follow the screen prompts displayed in the message center
NOTE: During the rest period the computer will reduce the resistance, DO NOT STOP PEDALING or you will go into PAUSE.
NOTE: At the end of the 12 minute FBT program your regular program will resume, or press the
FBT
button at anytime to resume
your workout
NOTE: The FBT program can be used as often as you like during a workout.
FBT
button on
button.
25
Page 26
F1 Calorie Coach
To assist you in reaching your fitness goals, your PaceMaster comes with a variety of programmed workouts.
F1 CALORIE COACH
The Calorie Coach program enables you to select the number of calories you want to burn. Then, based on the SPM and resistance you
enter, the elliptical computer will determine the time required to achieve your calorie expenditure goal.
USING F1 CALORIE COACH:
ENTER
Step One: Press and hold the
Step Two: Stand on the foot pads of your elliptical.
NOTE: If you have set up a User ID, select it using the
Step Three: Press the
PROGRAMS
If you have entered your User ID go to Step 5
Step Four: Enter your weight using the increase and decrease
same procedure to enter your age.
Step Five:
(RESET)
button to reset the control panel.
USER ID
button, then press
twice to select F1 (Calorie Coach) then press the
ENTER
(RESET)
.
ENTER
(RESET)
button.
buttons, then press enter
ENTER
(RESET)
. Use the
Use the
press
ENTER
(RESET)
.
buttons set the number of calories you want to burn; this is displayed in the message center, then
Step Six: Begin pedaling
NOTE: After allotted workout time had counted down to zero a 3 minute cool down period will follow.
ENTER
Step Seven: To end your workout, either allow the timer to count down to zero or Stop pedaling, then press the
(RESET)
button to
proceed to "Workout Summary", this will display the total time distance, calories, and Aerobic Points earned for this workout.
TIP: If you stop pedaling, you will automatically enter the 5 minute pause mode, a count down pause timer will be displayed in the
massage center. If your workout is not resumed within the 5 minute pause you will automatically enter the workout summery mode and
your workout will be over.
TIP: During your workout you can press and hold either the
Elapsed
Segment
Remaining
or
Distance
Heart Rat e
Aerobic Pts.
Calories
button until the word “SCAn” appears in the
respective display, each value will now be displayed for 3 seconds each on a rotating cycle.
26
Page 27
F2, F3, and F4
USING F2, F3, & F4: Each of these programmed Workouts offers 9 different levels of intensity. Additionally, workout time can be
set from 10 minutes to 2 hours in 5 minute increments.
ENTER
Step One: Press and hold the
(RESET)
button to reset the control panel.
Step Two: Stand on the foot pads of your elliptical.
NOTE: If you have set up a User ID, select it using the
Step Three: Press the
ENTER
press
(RESET)
PROGRAMS
button, then use buttons to select your program (F2, F3, or F4) , then
.
If you have entered your User ID go to Step 5
Step Four: Enter your weight using the increase and decrease
same procedure to enter your age.
Step Five: Use the
buttons to adjust the workout time, and then press enter
Step Six: Use the
buttons to adjust the workout intensity level, and then press enter
Step Seven: Begin pedaling
NOTE: After allotted workout time had counted down to zero a 3 minute cool down period will follow.
Step Seven: To end your workout, either allow the timer to count down to zero or Stop pedaling, then press the
proceed to "Workout Summary", this will display the total time distance, calories, and Aerobic Points earned for this workout.
USER ID
button, then press
ENTER
(RESET)
.
buttons, and then press enter
ENTER
(RESET)
ENTER
(RESET)
ENTER
(RESET)
ENTER
(RESET)
. Use the
button to
TIP: Use the
buttons to adjust the workout intensity level during your workout.
NOTE: After allotted workout time had counted down to zero a 3 minute cool down period will follow.
ENTER
Step Eight: To end your workout, either allow the timer to count down to zero or Stop pedaling, then press the
(RESET)
proceed to "Workout Summary", this will display the total time distance, calories, and Aerobic Points earned for this workout.
TIP: During your workout you can press and hold either the
Elapsed
Segment
Remaining
or
Distance
Heart Rat e
Aerobic Pts.
Calories
button until the word “SCAn” appears in the
respective display, each value will now be displayed for 3 seconds each on a rotating cycle.
27
button to
Page 28
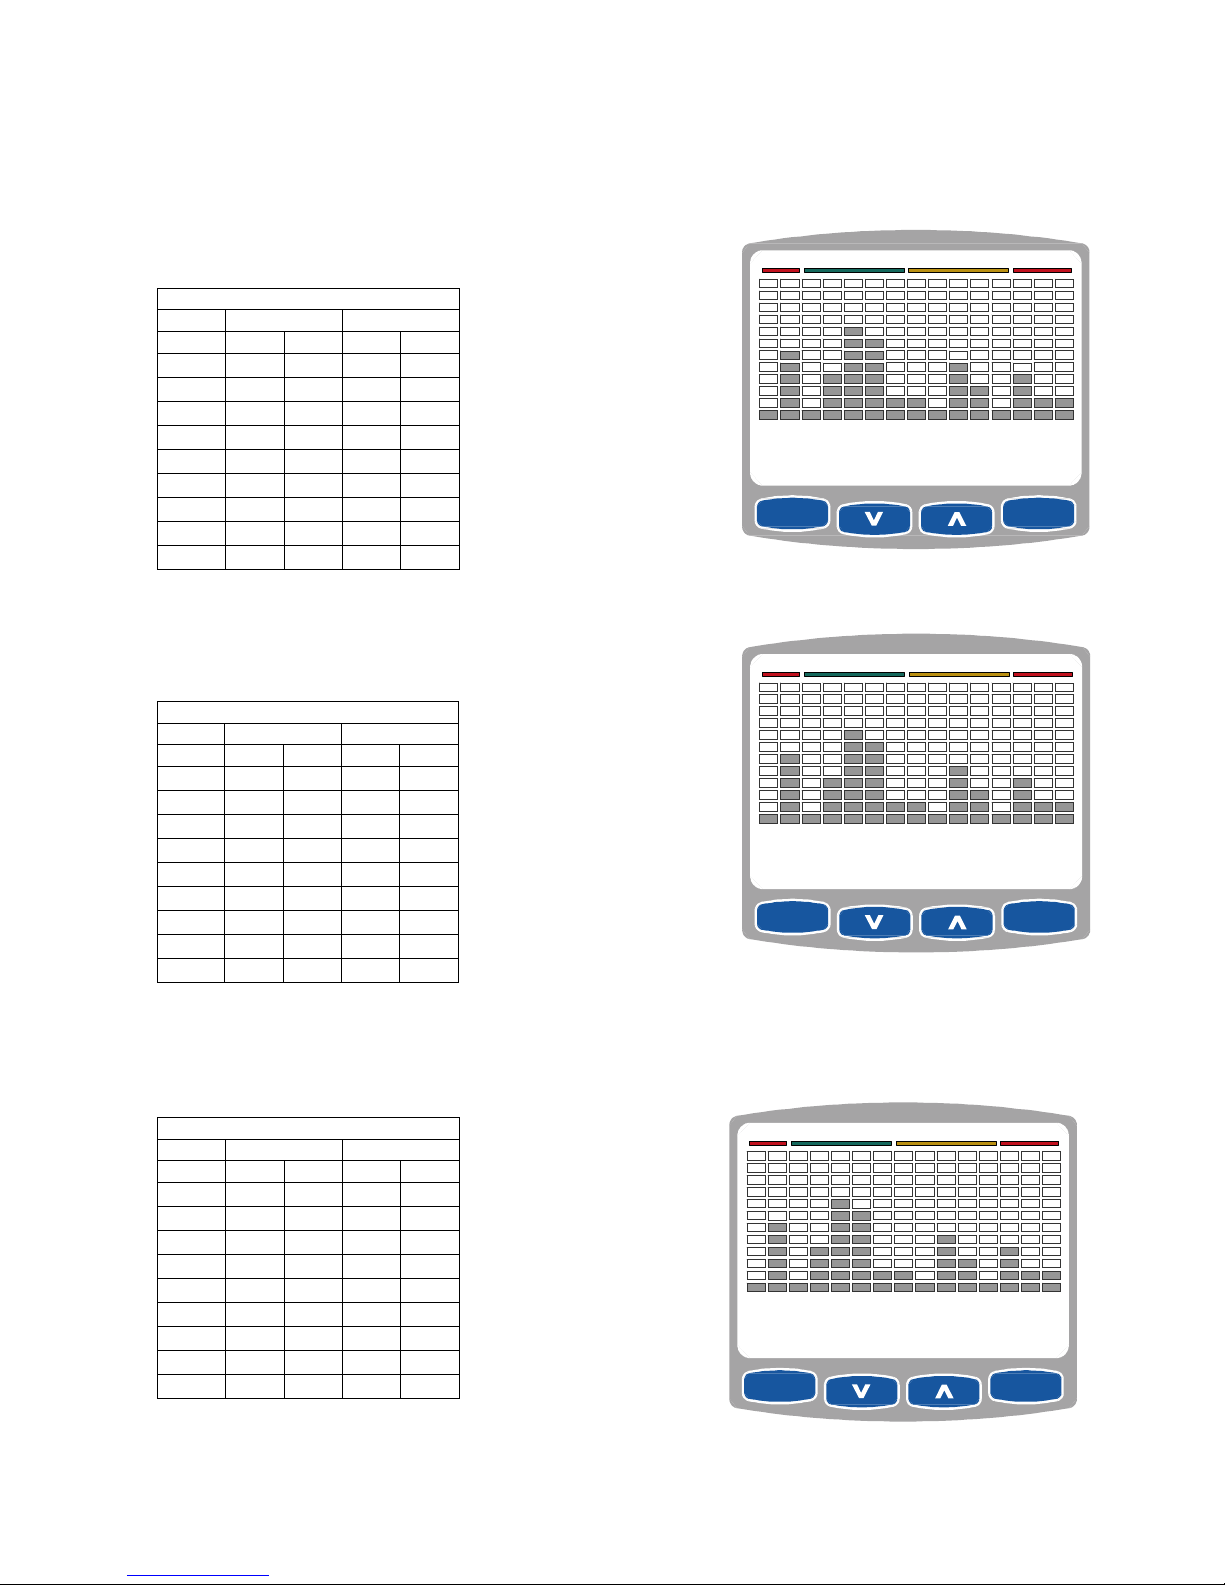
Course Specifications – F2, F3, & F4
0
0
0
F2
Level SPM Resistance
Min Max Min Max
1
30 38 2 5
2
36 44 2 6
3
42 50 2 7
4
48 56 2 8
5
54 62 2 9
6
60 68 2 10
7
66 74 2 11
8
72 80 2 12
9
78 86 2 13
F3
Level SPM Resistance
Min Max Min Max
1
30 46 2 18
2
34 50 2 18
3
38 54 2 18
4
42 58 2 18
5
46 62 2 18
6
50 66 2 18
7
54 70 2 18
8
58 74 2 18
9
62 78 2 18
HEART RATE ZONE 70% to 85%< 55% 55% to 69% > 85%
Max
000000000
PROGRAMS
HEART RATE ZONE 70% to 85%< 55% 55% to 69% > 85%
Max
ENTER
(RESET)
000000000
PROGRAMS
ENTER
(RESET)
F4
Level SPM Resistance
Min Max Min Max
1
30 42 2 14
2
36 48 2 14
3
42 54 2 14
4
48 60 2 14
5
54 66 2 14
6
60 72 2 14
7
66 78 2 14
8
72 84 2 14
9
78 90 2 14
HEART RATE ZONE 70% to 85%< 55% 55% to 69% > 85%
Max
000000000
PROGRAMS
28
ENTER
(RESET)
Page 29
USING THE CONTACT HEART RATE FEATURE
Prior to your workout:
Choose a User ID or upon entering a cardio program adjust your age and
weight, press ENTER. Follow the instructions for “During your workout”.
During your workout:
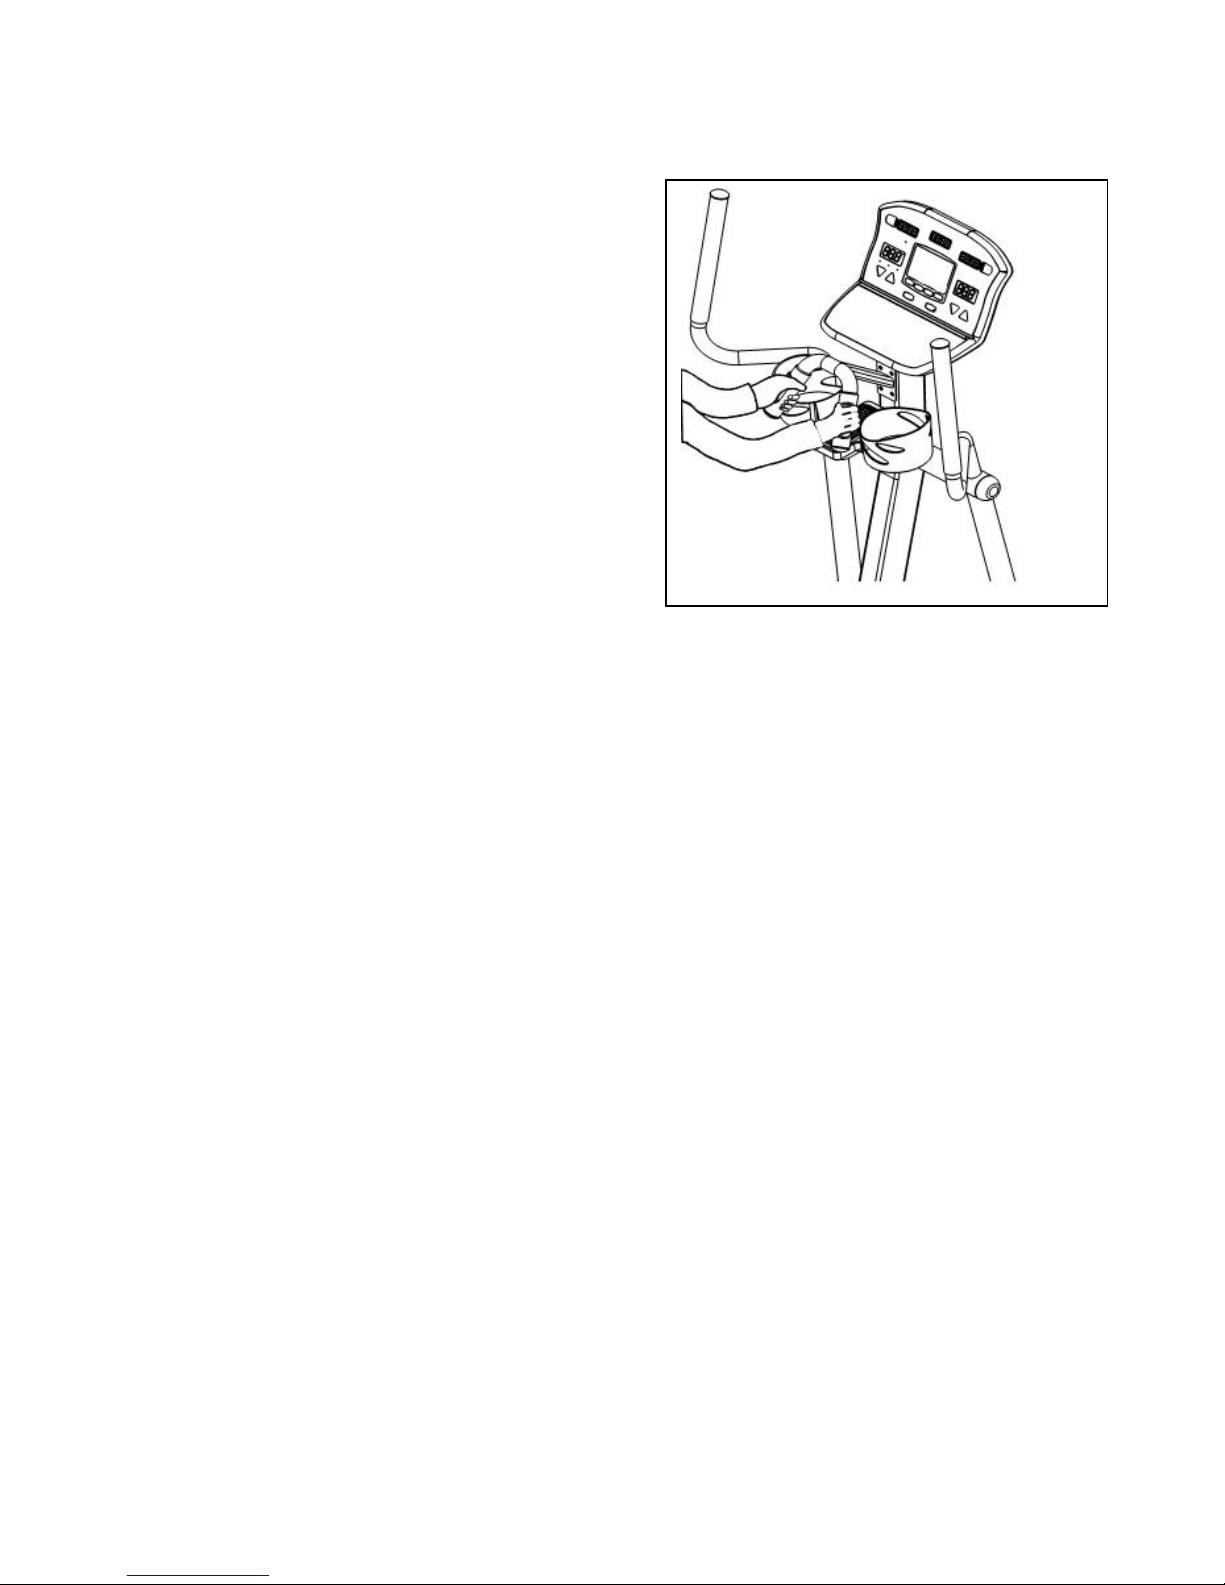
Grab on to the front bullhorn with your hands placed over the silver
contact heart rate sensors as shown in the picture to the right. Contact
must be maintained with all 4 sensors to obtain a heart rate reading.
Fours dashes will appear in the TOP RIGHT DISPLAY window indicating
that your heart rate is being acquired. This may take 20 to 30 seconds
depending on the person.
NOTE: Contact heart rate is disabled if you have activated the chest
strap receiver prior to starting a workout. As with the wireless chest
straps there is a small percentage of people that this feature may not
function for.
HEART RATE PERFORMANCE REVIEW
If you use the heart zone monitor feature C1, while wearing your wireless chest strap, and acquired your heart rate prior to beginning your
workout, you will receive the HR performance review at the end of your workout. This will be a graphic representation of your heart rate
through out your workout. This graph will be displayed in the profile window. If you spent less then 10 % of your total workout time in any
one zone, that zone will not be displayed.
29
Page 30
HEART RATE WORKOUTS
TRAIN LESS AND BENEFIT MORE FROM YOUR WORKOUTS
To maximize the benefits from your workouts, you must maintain a sufficiently high heart rate. Target heart rate training takes the
guesswork out of exercising. It provides you with the means to train within safe and effective ranges, all the while maximizing your
exercise time and effort.
The PaceMaster Silver XT has integrated heart rate control programs, which act as your personal trainer. You set your target based on
your individual fitness goal (weight management or cardiovascular improvement), the workout time, maximum SPM, maximum resistance
and the elliptical does the rest.
TIP: Based on the age entered, your PaceMaster elliptical automatically calculates your theoretical maximum heart rate and the Heart
Rate Zone bar indicates which portion of your heart rate training zone (fat burn or aerobic) you are currently training. The fat burn zone is
between 55% and 69% of your theoretical maximum heart rate. The aerobic zone is between 70% and 85% of your theoretical maximum
heart rate.
The PaceMaster Silver XT uses the Runners World standard formula to calculate your theoretical maximum heart rate. The formula is 205
minus ½ your age. For example, if you are 40 years old, your theoretical maximum is 185 beats per minute (bpm). When your heart rate
is between 102 and 128 bpm, you are training in the fat burn zone for weight management. When your heart rate is between 130 to 157
bpm, you are training in the aerobic training zone for cardiovascular improvement. The safest and most recommended method of
determining your maximum heart rate is to have a physician administer a stress test.
THE WIRELESS CHEST STRAP
TRANSMITTER
The PaceMaster Silver XT elliptical comes equipped with a
WIRELESS CHEST STRAP TRANSMITTER, which, when worn,
measures pulse (number of heart beats per minute) and relays
the information by way of RF to a receiver built into the ellipticals
computer. This system is extremely accurate to within one beat
per minute.
This chest strap must be worn to activate the HeartSmart™
Pulse Monitoring. The Heart Rate Control workouts are nonoperational unless the chest strap is worn.
PUTTING ON THE CHEST STRAP
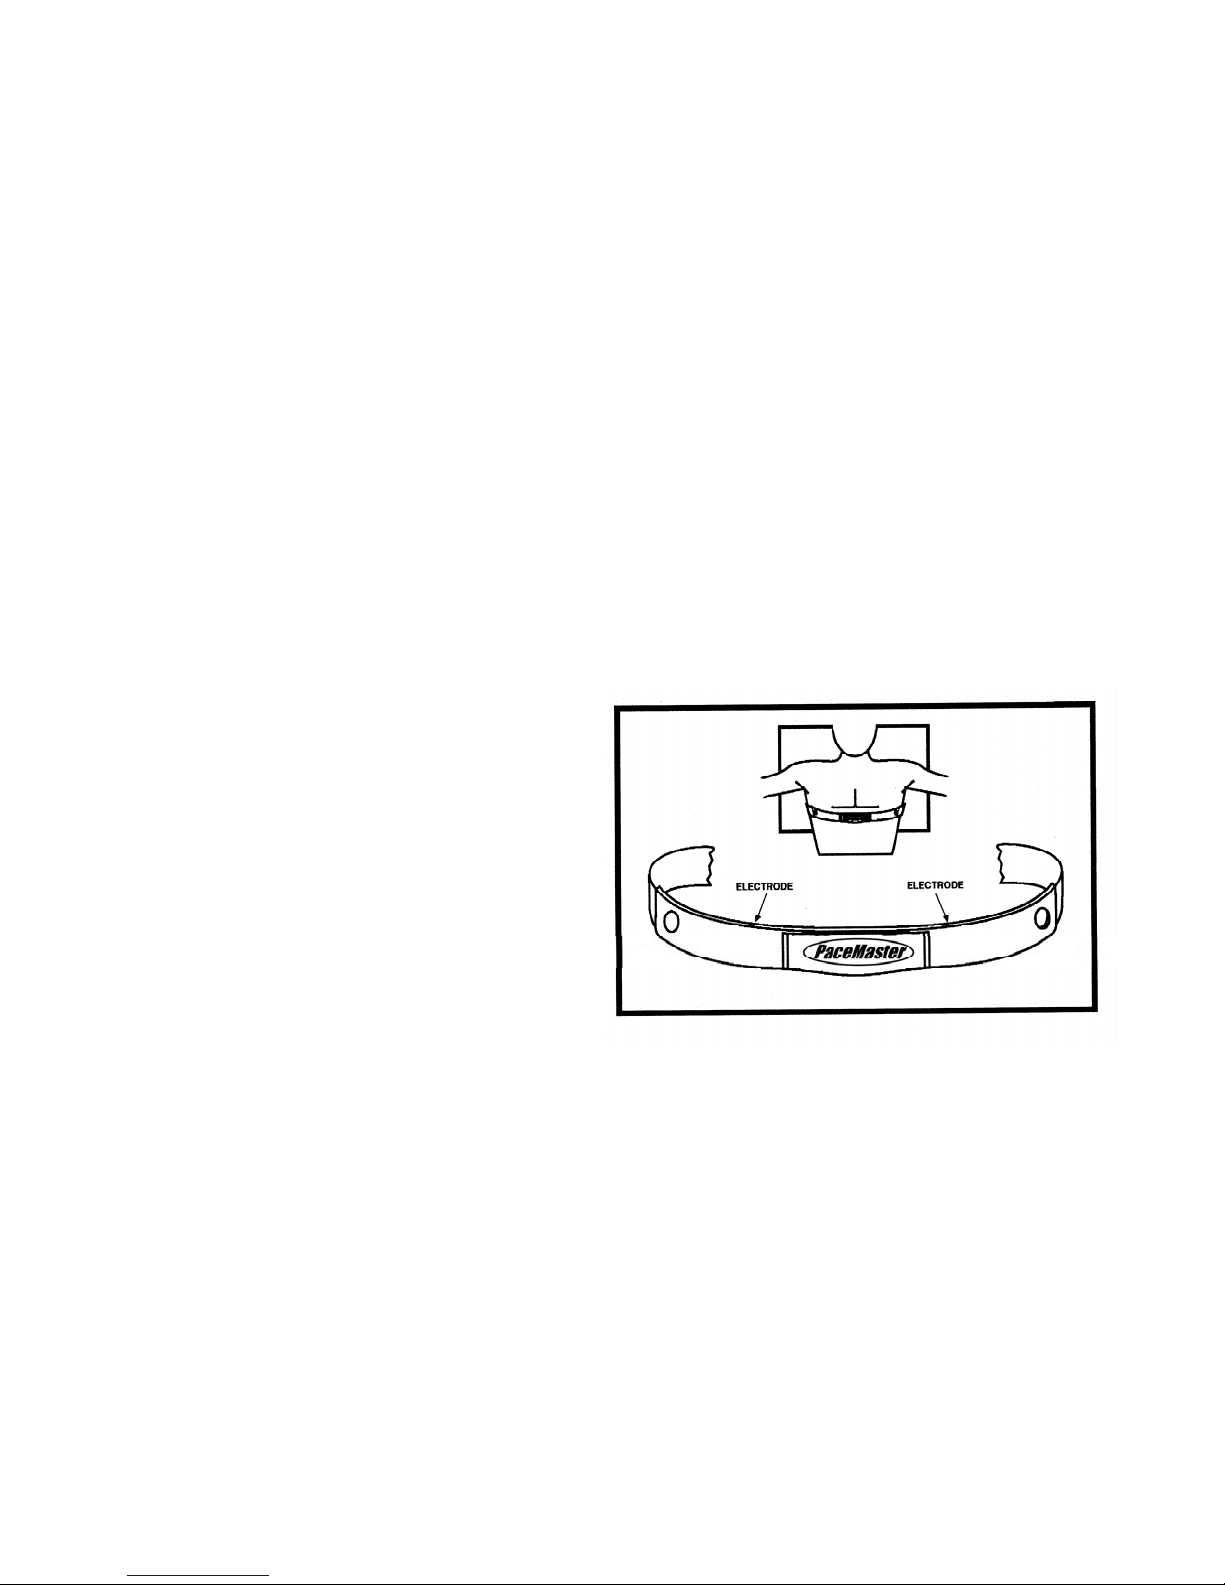
To properly wear your chest strap, adjust the strap to fit snugly
and comfortably around your chest with the electrodes (the grooved areas) directly over your sternum, as pictured to the right. For best
results, the strap should be worn against skin. Moisture is necessary for the transmitter to function properly. Usually, perspiration is
sufficient, but you may need to moisten the electrodes with water.
HEART RATE WORKOUTS
Your PaceMaster Silver XT elliptical offers the following Heart Rate Control workouts:
C1 - Target HRC: Choose your target heart rate between 55% and 85% of your theoretical maximum.
C2 - Fat Burn HRC: Choose one of five levels in the fat burn training zone, between 55% and 69% of your theoretical maximum.
C3 - Cardio HRC: Choose one of five levels in the aerobic training zone, between 70% and 85% of your theoretical maximum.
C4 - Interval HRC: The elliptical automatically alternates between a rest and work heart rate, the difference between the rest heart rate and
the work heart rate is approximately 20%.
NOTE: To avoid any undue cardiovascular stress, The PAUSE feature is limited to 30 seconds.
30
Page 31
HEART RATE WORKOUTS (cont’d)
To begin using TARGET HRC, FAT BURN HRC, CARDIO HRC, and INTERVAL HRC:
ENTER
Step One: Press and hold the
Step Two: Stand on the foot pads of your elliptical.
NOTE: If you have set up a User ID, select it using the
You must be wearing the wireless chest strap to continue (See “Putting on the chest strap” page 29).
Step Three: Press the
ENTER
press
(RESET)
PROGRAMS
.
If you have entered your User ID go to Step 5
Step Four: Enter your weight using the increase and decrease
same procedure to enter your age.
Step Five: Set the desired workout time using the
20 to 60 minutes in 5 minute increments
(RESET)
button to reset the control panel.
USER ID
button.
button, then use buttons to select your program (C1, C2, C3 or C4) , then
buttons, and then press enter
ENTER
buttons, then press
(RESET)
ENTER
(RESET)
. Use the
. Workout time can be set from
Step Six: Set the Strides per Minute target by pressing the SPM
resistance buttons. Set the desired target Heart Rate by pressing the
buttons. Set the resistance level using the
buttons,
• In C1 (Target HRC), you can choose a target heart rate in 1 beat increments from 55% to 85% of your theoretical maximum.
• In C2 (Fat Burn HRC), you can choose one of the 5 target heart rates, optimal for weight management, from 55% to 69% of your
theoretical maximum.
• In C3 (Cardio HRC), you can choose one of the 5 target heart rates, optimal for aerobic training, from 70% to 85% of your
theoretical maximum.
• In C4 (Interval HRC) you can choose one of 5 target heart rate pairs (one pair=one rest HR and one work HR) from 55% to 85%
of your theoretical maximum. The program will alternate between a 4 minute rest interval and a 4 minute work interval.
ENTER
(RESET)
Step Seven: Press the
button, and Begin pedaling
NOTE: During your workout, you can change the target Heart Rate by pressing the
buttons.
NOTE: After allotted workout time had counted down to zero a 3 minute cool down period will follow.
ENTER
Step Eight: To end your workout, either allow the timer to count down to zero or Stop pedaling, then press the
(RESET)
button to
proceed to "Workout Summary", this will display the total time distance, calories, and Aerobic Points earned for this workout.
31
Page 32
I1, I2, and I3
USING I1, I2, or I3: Each of these programmed Workouts offers 9 different levels of intensity. Additionally, workout time can be
set from 10 minutes to 2 hours in 5 minute increments.
ENTER
Step One: Press and hold the
(RESET)
button to reset the control panel.
Step Two: Stand on the foot pads of your elliptical.
NOTE: If you have set up a User ID, select it using the
Step Three: Press the
ENTER
press
(RESET)
PROGRAMS
button, then use buttons to select your program (I1, I2, or I3) , then
.
If you have entered your User ID go to Step 5
Step Four: Enter your weight using the increase and decrease
same procedure to enter your age.
Step Five: Use the
buttons to adjust the workout time, and then press enter
Step Six: Use the
buttons to adjust the workout intensity level, and then press enter
Step Seven: Begin pedaling
NOTE: After allotted workout time had counted down to zero a 3 minute cool down period will follow.
Step Eight: To end your workout, either allow the timer to count down to zero or Stop pedaling, then press the
proceed to "Workout Summary", this will display the total time distance, calories, and Aerobic Points earned for this workout.
USER ID
button, then press
ENTER
(RESET)
.
buttons, and then press enter
ENTER
(RESET)
ENTER
(RESET)
ENTER
(RESET)
ENTER
(RESET)
button to
. Use the
TIP: Use the
buttons to adjust the workout intensity level during your workout.
TIP: If you stop pedaling, you will automatically enter the 5 minute pause mode, a count down pause timer will be displayed in the
massage center. If your workout is not resumed within the 5 minute pause you will automatically enter the workout summery mode and
your workout will be over.
TIP: During your workout you can press and hold either the
Elapsed
Segment
Remaining
or
Distance
Heart Rat e
Aerobic Pts.
Calories
button until the word “SCAn” appears in the
respective display, each value will now be displayed for 3 seconds each on a rotating cycle.
32
Page 33
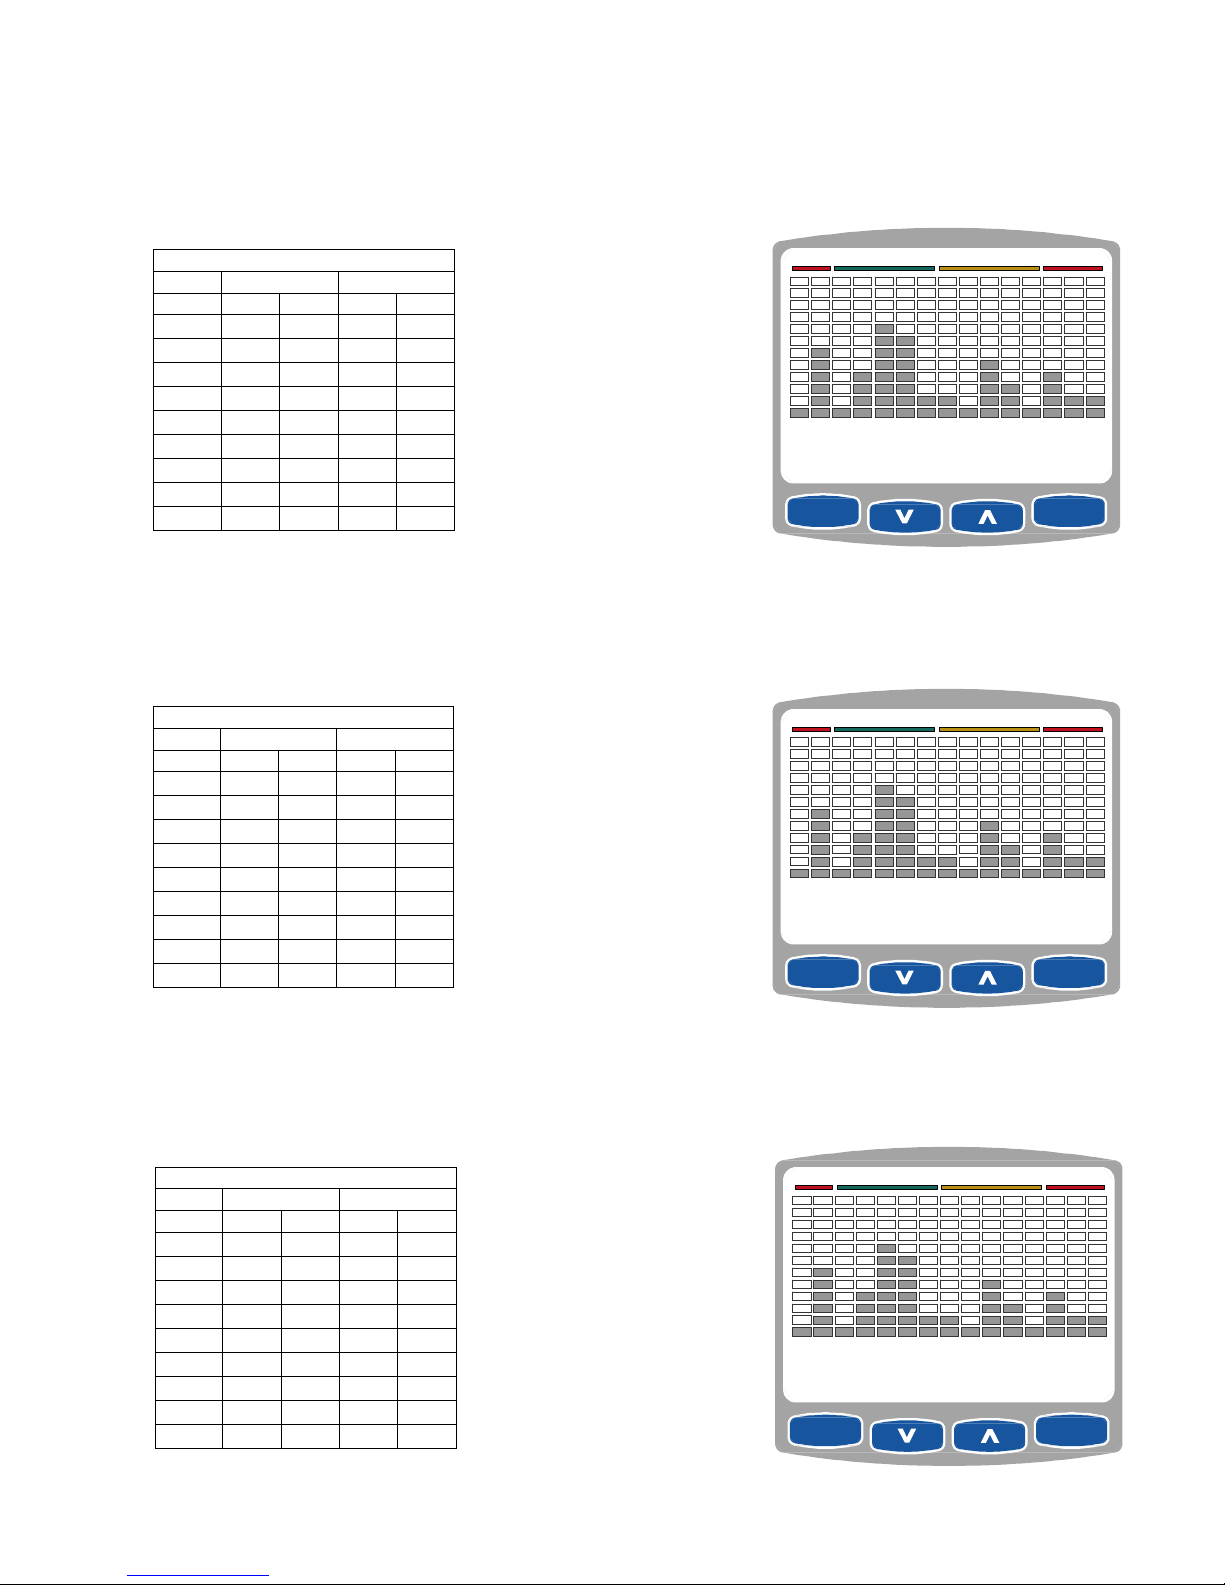
Course Specifications – I1, I2, & I3
0
0
0
I1
Level SPM Resistance
Min Max Min Max
1
30 30 2 6
2
36 36 3 7
3
42 42 4 8
4
48 48 5 9
5
54 54 6 10
6
60 60 7 11
7
66 66 8 12
8
72 72 9 13
9
78 78 10 14
I2
Level SPM Resistance
Min Max Min Max
1
30 44 2 2
2
36 50 2 2
3
42 56 2 2
4
48 62 2 2
5
54 68 2 2
6
60 74 2 2
7
66 80 2 2
8
72 86 2 2
9
78 92 2 2
Max
Max
HEART RATE ZONE 70% to 85%< 55% 55% to 69% > 85%
000000000
PROGRAMS
HEART RATE ZONE 70% to 85%< 55% 55% to 69% > 85%
ENTER
(RESET)
000000000
PROGRAMS
ENTER
(RESET)
I3
Level SPM Resistance
Min Max Min Max
1
30 42 2 14
2
36 48 2 14
3
42 54 2 14
4
48 60 2 14
5
54 66 2 14
6
60 72 2 14
7
66 78 2 14
8
72 84 2 14
9
78 90 2 14
HEART RATE ZONE 70% to 85%< 55% 55% to 69% > 85%
Max
000000000
PROGRAMS
33
ENTER
(RESET)
Page 34

EXCLUSIVE PACEMASTER FEATURES
Exercise Preview
You can see exactly what you will accomplish prior to beginning a Timed Workout (Manual), Fat Burn Workout, or Interval workout. An
EXERCISE PREVIEW predicts the total distance, caloric expenditure and Aerobic Points to be earned based on the time, Target SPM and
resistance you chose. After you have selected a workout, or have set the target spm, workout time and resistance parameters for a Timed
Workout (Manual), the predicted calories, Aerobic points, and distance will be displayed in the RESULTS window. Press the Results
SELECT button to change the displayed result. Note that any adjustments to target spm, workout time and resistance parameters will
change those figures.
Aerobic Points
One of the main reasons people stop exercising is because they don’t see the physical changes they expected. Results, however, can
only be realized when you are training properly. For this reason, the Aerobic Point System has been incorporated into the design of
PaceMaster ellipticals since 1968.
The Aerobic Point System was developed by Dr. Kenneth Cooper, the Father of Aerobics and renowned founder of The Cooper Aerobics
Center in Dallas, TX, to measure the aerobic benefit of the workout. Dr. Cooper’s formula compares the energy costs of aerobic activity
from the mathematical relationships between the oxygen expenditures assigned to each exercise at a given intensity and duration. This
formula is built into the PaceMaster computer to automatically calculate the number of AEROBIC POINTS you earn for each workout
Dr. Cooper states in his book, The Aerobics Program For Total Well Being; “The main idea of this system is that, in order to stay in good
shape and move toward a goal of total well-being, a person must earn a certain number of points each week by doing a certain amount of
aerobic exercise.” His research has determined that a man should work up to a minimum of 32 points per week and a woman should
work up to a minimum of 27 points per week. The number of weekly points you earn correlates with your level of fitness. The fitness
categories are:
Average Points per Week
Classification Men Women
Very Poor Less than 10 Less than 8
Poor 10-20 8-15
Fair 21-31 16-26
Good 32-50 27-40
Excellent 51-74 41-64
Superior 75+ 65+
If you have not been on a regular exercise program, it is highly
recommended that you gradually work up to your desired fitness category
and then develop a maintenance program.
You can see the number of AEROBIC POINTS you will earn prior to beginning your workout by pressing the Results SELECT button until
Aerobic Points indicator is illuminated. To design a workout based on the number of AEROBIC POINTS you want to earn, follow the
instructions below for PERSONAL ELECTRONIC TRAINER.
Personal Electronic Trainer
Another feature exclusive to PaceMaster ellipticals is the PERSONAL ELECTRONIC TRAINER. You can create a workout based on the
number of Aerobic Points you want to earn or the number of calories you want to burn.
To create a workout based on Aerobic Points:
ENTER
Step One: Press and hold the
Step Two: Stand on the foot pads of your elliptical.
Step Three: Press the
PROGRAMS
(RESET)
button to reset the control panel.
once to select M1 (manual mode) then press the
ENTER
(RESET)
button.
Step Four: Enter your weight using the increase and decrease
same procedure to enter your age.
ENTER
buttons, then press enter
34
(RESET)
. Use the
Page 35

Press the RESULTS SELECT
Distance
Heart Rat e
Aerobic Pts.
Calories
button until the Aerobic Points indicator is illuminated.
Step Five: Set your workout time using the increase and decrease
buttons.
Step Six: Set your Strides per Minute target by pressing the SPM
buttons. Set your maximum resistance level using the
buttons.
Step Seven:
By adjusting your target SPM, resistance and/or maximum resistance level you will begin to see the number of Aerobic points you will earn
in the RESULTS display as you change these values.
Step Seven:
Enter resistance, you will begin to see the number of Aerobic points you will earn in the RESULTS display as you increase the speed.
To create a workout based on calorie expenditure, determine how many calories you want to burn Press the RESULTS SELECT
Distance
Heart Rat e
Aerobic Pts.
Calories
button until the Calories indicator is illuminated and follow steps 5, 6 and 7 above.
35
Page 36
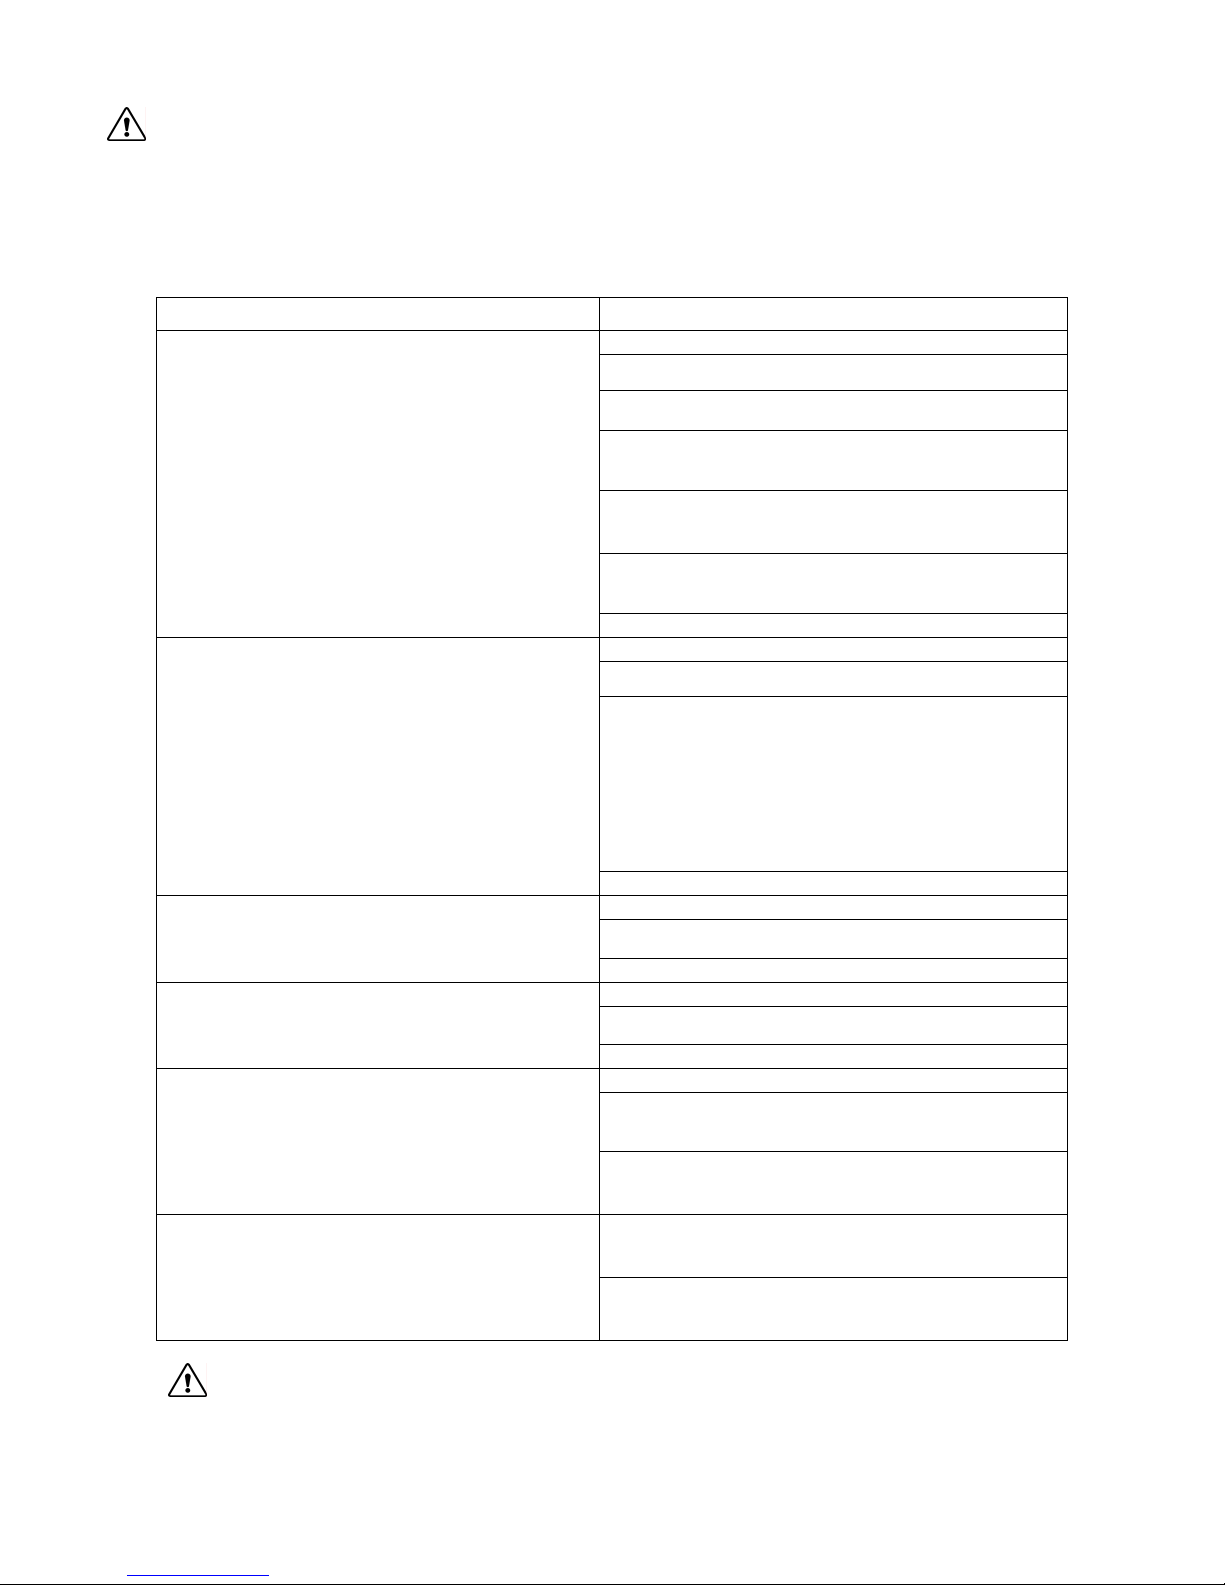
CAUTION: Unplug your elliptical before attempting any cleaning, maintenance, or service.
TROUBLESHOOTING
Problem Solution
Is elliptical plugged into the wall outlet?
Check the household circuit breaker to see if it is tripped.
Check the power light next to the power cord is on, if not
No Power
Rough motion / scraping while pedaling
Resistance does not change
Stride per minute is not displayed
Contact Heart Rate is not being
displayed
check the power cord connections again.
Make sure the wiring harness is connected (See Step 3 in the
assembly section).
Make sure the wiring harness is plugged into the display (See
Step 12 in the assembly section).
Check if plastic joint covers screws are tight.
Check if hump in roller is centered with convex area of
square tube. (See Step 9 in the assembly section.)
If not follow the steps:
1. Loosen hex bolt at front of foot link.
2. Center roller and tube at rear of foot link.
3. Re-tighten hex bolt
Call service Authorized PaceMaster Dealer
Call service Authorized PaceMaster Dealer
Check is you are wearing your wireless strap / holding the
grips correctly. (Refer to page 28 and 29 )
Check if sensor wire is plugged into the control panel. (See
step 12 in the assembly section)
Wireless Heart Rate is not being
Displayed
CAUTION: Unplug your elliptical before attempting any cleaning, maintenance, or service.
Check is you are wearing your wireless strap / holding the
grips correctly. (Refer to page 28 and 29 )
Televisions and similar devices must be at least 5 feet from
the control panel
36
Page 37

FREQUENTLY ASKED QUESTIONS
Q. Why is the letter “h” preceding the time displayed (i.e. h1:15)?
A. The elliptical computer displays time in minutes and seconds (MM:SS) for workout times less than 1 Hour, and in hours and
minutes (H:MM) for workout times 1 hour or greater. h1:15 represents one hour and 15 minutes.
Q. How do I find out the total hours and miles on my elliptical?
A. Unplug the power cord, then plug it back in. Within 5 seconds of power up, press the
followed by the total mileage will scroll across in the message center.
Distance
Heart Rat e
Aerobic Pts.
Calories
button, the total time,
37
Page 38

PaceMaster Silver XT Technical Specifications
Boxed Dimensions 82”L x 32”W x 15.5” H
Assembled Dimensions 68”L x 30.5” W x 54”H
Boxed Weight 290 lbs.
Assembled Weight 245 lbs.
Frame High Tensile Steel
SPM Range 0 to 120 spm adjustable in increments of 1
Resistance Range 0 to 20 adjustable in increments of 1
Workout Programs Quick Start, Manual, Calorie Coach, 6 Factory Workouts (each with 9 levels), 4 Cardio
HRC programs, FBT
Weight Limit 350 lbs
Warranty (Residential) Lifetime Frame, 3Years Parts, 1 Year Labor
Operating Temperature Range 50º F to 100º F
Manufacturer reserves the right to change the products specifications without notice.
© Aerobics, Inc. 2007
® PaceMaster is a registered trademark of Aerobics Inc.
™ The Mind of a Treadmill in the Body of an Elliptical is a trademark of Aerobics Inc.
38
 Loading...