

PaceMaster Pro-Plus Owner's Manual

About This Manual
This manual contains all of the information you will need to know about your PaceMaster treadmill. Please read this manual in its entirety before
attempting to use your treadmill.
For your safety and the protection of your treadmill we have included warnings and other valuable information throughout this manual. This
information will be in bold print and marked by the symbols below. Be absolutely sure to thoroughly read and understand this information.
When you see the symbol
damage to your treadmill.
When you see the symbol
CAUTION: be sure to understand and utilize this information. Failure to do so may result in personal injury or
you will find useful suggestions related to the section in which it appears.
About This Manual------------------- Front Cover Using PaceMaster for the First Time--------- 10
Important Safety Instructions-------- 2 Using the Preprogrammed Courses----------- 11
Installation Requirements------------ 3 Designing Your Own Courses----------------- 13
Unpacking our Treadmill------------ 4 Maintenance-------------------------------------- 13
Tools for Assembly------------------- 4 Troubleshooting--------------------------------- 15
Assembling your PaceMaster-------- 4 Specifications------------------------------------ 15
Understanding the Control Panel---- 7 Workout log-------------------------------------- 16
Exercise and Your Treadmill--------- 9
Manufactured by: Aerobics Inc., 34 Fairfield Place, West Caldwell NJ 07006 Tel (973) 276-9700 Fax (973) 276-9001 www.pacemaster.com
Owners Manual Pro-Plus.doc 03/14/00
Table of Contents
OWNERS MANUAL

Congratulations on the purchase of your PaceMaster Treadmill. Not only did you buy one of the highest quality treadmills on the market, you also
obtained excellent value for your dollar. Aerobics, Inc. was founded in 1968, and has over 28 years experience in designing and building treadmills.
Aerobics, Inc. is a family owned and operated business comprised of physical fitness enthusiasts. Our goal is to provide the consumer with
outstanding quality Treadmills at affordable prices.
Important Safety Instructions - Read all instructions before using (this appliance)
Before starting any exercise program, contact your personal physician and have a complete physical. Only your physician can
recommend a heart rate training zone that is suitable for you.
When using an electrical appliance, basic precautions should always be followed, including the following:
Read all instructions before using (this appliance).
DANGER - To reduce the risk of electric shock: Always unplug this appliance from the electrical outlet immediately
after using and before cleaning.
WARNING - To reduce the risk burns, fire, electrical, or injury to persons:
1. An appliance should never be left unattended when plugged in. Unplug from outlet when not in use, and before putting on or taking off parts
2. Do not operate under blanket or pillow. Excessive heating can occur and cause fire, electrical shock, or injury to persons.
3. Close supervision is necessary when this appliance is used by, on, or near children, invalids, or disabled persons.
4. Use this appliance only for its intended use as described in this manual. Do not use attachments not recommended by the manufacturer
5. Never operate this appliance if it has a damaged cord or plug, if it is not working properly, if it has been dropped or damaged, or
dropped into water. Return the appliance to a service center for examination or repair.
6. Do not carry this appliance by supply cord or use cord as a handle.
7. Keep the cord away from heated surfaces.
8. Never operate the appliance with the air openings blocked. Keep the air openings free of lint, hair, and the like.
Important Safety Instructions continued
9. Never drop or insert any object into any opening.
10. Do not use outdoors.
11. Do not operate where aerosol (spray) products are being used or where oxygen is being administered.
12. To disconnect turn all controls to the off position, then remove plug from outlet.
WARNING - Connect this appliance to a properly grounded outlet only. See grounding instructions below.
GROUNDING INSTRUCTIONS
This product must be grounded. If it should malfunction or breakdown, grounding provides a path of least resistance for electric current to reduce the
risk of electric shock. This product is equipped with a cord having an equipment-grounding conductor and a grounding plug. The plug must be
plugged into an appropriate outlet that is properly installed and grounded in accordance with all local codes and ordinances.
DANGER - Improper connection of the equipment grounding-conductor can result in a risk of electrical shock. Check with a qualified
electrician or serviceman if you are in doubt as to whether the product is properly grounded. Do not modify the plug provided with the product - if it
2

will not fit the outlet, have a proper outlet installed by a qualified electrician. This product is rated more than 15 amperes and is for use on a circuit
having a nominal rating of 120 volts and is factory equipped with a specific electric cord and plug to permit connection to a proper electric circuit.
Make sure that the product is connected to an outlet having the same configuration as the plug. No adapter should be used with this product. If the
product must be reconnected for use on a different type of electrical circuit, the reconnection should be made by qualified service personal.
CAUTION - Read owners manual carefully before operating this equipment. Keep hands and clothing away from belt
and rear roller when in motion. Do not allow children or anyone unfamiliar with its operation on or near this
treadmill.
WARNING - Remove safety key when not in use and store out of reach of children.
• If at any time during your exercise program you find the exercise abnormally difficult, or if you encounter dizziness, feel faint,
experience chest pains, feel as though your heart may be skipping beats, or you experience forced heavy breathing after minimum
exercise, or you experience severe pain in the legs, ankles, knees, etc. STOP exercising and consult your physician.
• Always use the magnetic safety key with the cord attached to yourself for the duration of your workout.
• Do not allow anyone to reach under or be near the treadmill while you are exercising.
• Never attempt to mount or dismount the treadbelt while it is still moving.
• Never allow more than one person on the treadmill at a time.
• When you are finished exercising, be sure to leave your treadmill in a non-elevated position to help prevent toys or other objects
from getting trapped under your treadmill.
• Always unplug your treadmill during a electrical storm or during prolonged periods of non-use.
• Never move the treadbelt while the power is turned off.
• The heart rate timer is not a medical device. Various factors, including your ability to find and accurately count your pulse will
affect the accuracy of the heart rate reading. It is intended as an aid in determining heart rate trends in general.
• Wear only the appropriate running or walking shoes and only the appropriate exercise attire while exercising.
Installation Requirements
• Electrical Requirements: It is the owners responsibility to be sure that the electrical requirements for PaceMaster are adequate. PaceMaster
requires standard household current (120 VAC/60 Hz.) and a dedicated 20 amp non-switched circuit. The treadmill has a three prong plug, this
grounding plug is necessary. Attempting to bypass it with an adapter or in any way defeating it's purpose can result in a serious shock hazard. As
a safety precaution you should unplug the treadmill during electrical storms or if the treadmill will not be in use for periods greater than one week.
CAUTION: If you need to use an extension cord it must be a 14 gauge three wire cord and no longer than 12 feet.
• Where to install your treadmill?: Your treadmill should be installed indoors on a flat level surface near a 120Volt/ 20Amp electrical outlet,
preferably no more than 5 feet from the outlet to eliminate the need for an extension cord. You must have a minimum of 4 feet clearance between
the rear of the treadmill and any wall or obstruction.
If you are installing your treadmill on a carpeted surface, use a pad or scrap piece of carpet in between to avoid marking or soiling of the
carpet. Deep pile carpet is not recommended.
Unpacking Your Treadmill
3
• The PaceMaster is packed in five pieces: the main unit, the handlebar, the siderails, the motor cover, and the hardware package which contains
this manual. Once you have removed all of the pieces from the box, inspection of the treadmill should be made to check for any concealed
damage that may have occurred during shipment.
• Before assembling your treadmill, open the hardware package and verify that you have the following items.
2 -------- 1/4 - 20 x 4” black carriage bolt
4 -------- 1/4-20 x 3" silver carriage bolt
6 -------- 1/4-20 kep nuts
3 -------- #8 x 1/2 black sheet metal screws
2 -------- black siderail brackets
2 -------- 1” OD fender washers
1 -------- 3/16” allen wrench
1 -------- magnetic key with garment clip
If any parts are missing please contact your authorized PaceMaster dealer.
Tools Required for Assembly
• 3/16" allen wrench (supplied)
• 7/16 combination wrench
• Phillips head screwdriver
Assembly Instructions
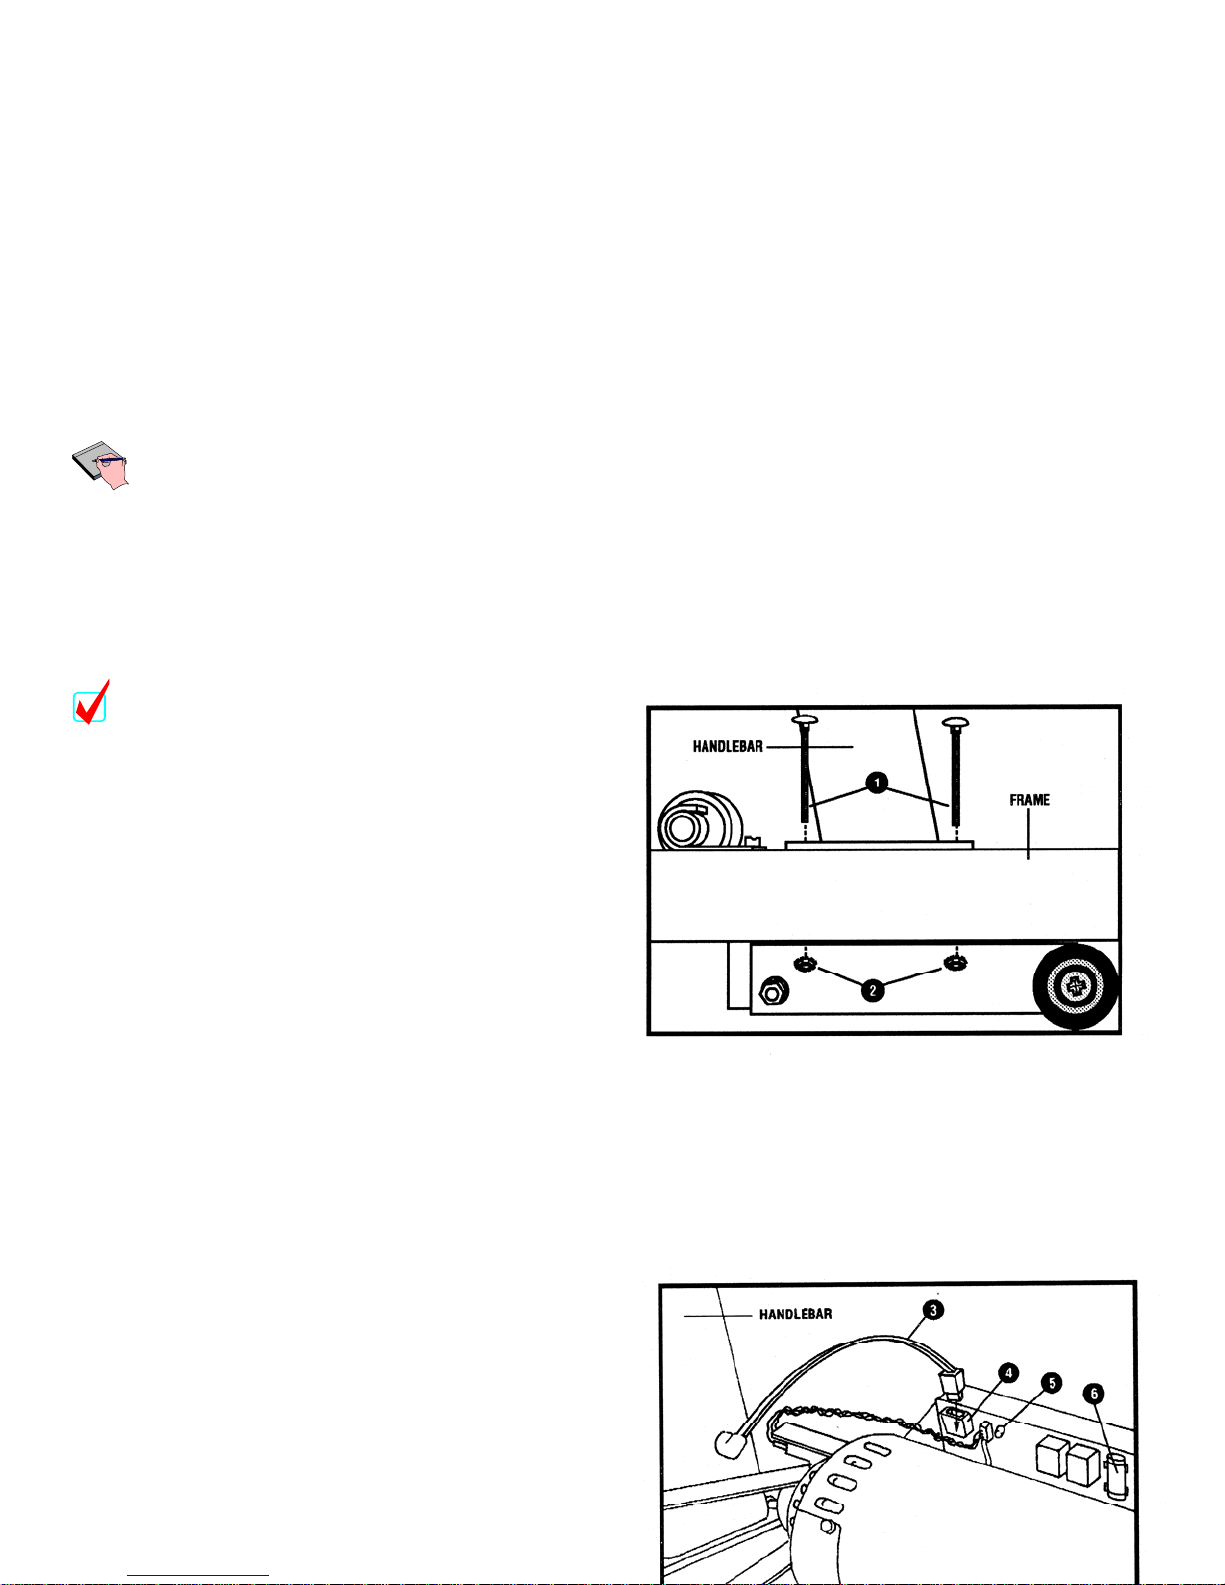
CAUTION: Be extremely careful not to damage the speed
sensor (figure 2) while installing the handlebar or motor cover.
1. Carefully place the bottom of the handlebar on the frame
so the two holes in the plate at the bottom of the handlebar
line up with the two holes in the frame. Insert two 3” carriage
bolts #1 through the handlebar and the frame and install two
kep nuts #2 to keep the handlebar in place. Follow the same
procedure for the other side of the handlebar. Do not tighten
any nuts until both sides are bolted in place.
Figure 1
2. With the handlebar in place plug the wire harness #3 into
the socket #4 on the power supply board (figure 2).
3. Take one of the siderails #7 (figure 3) and slide the end
with the grip over the end of the steel tube protruding
from the control panel. Slide the siderail on until the
grip touches the control panel.
4
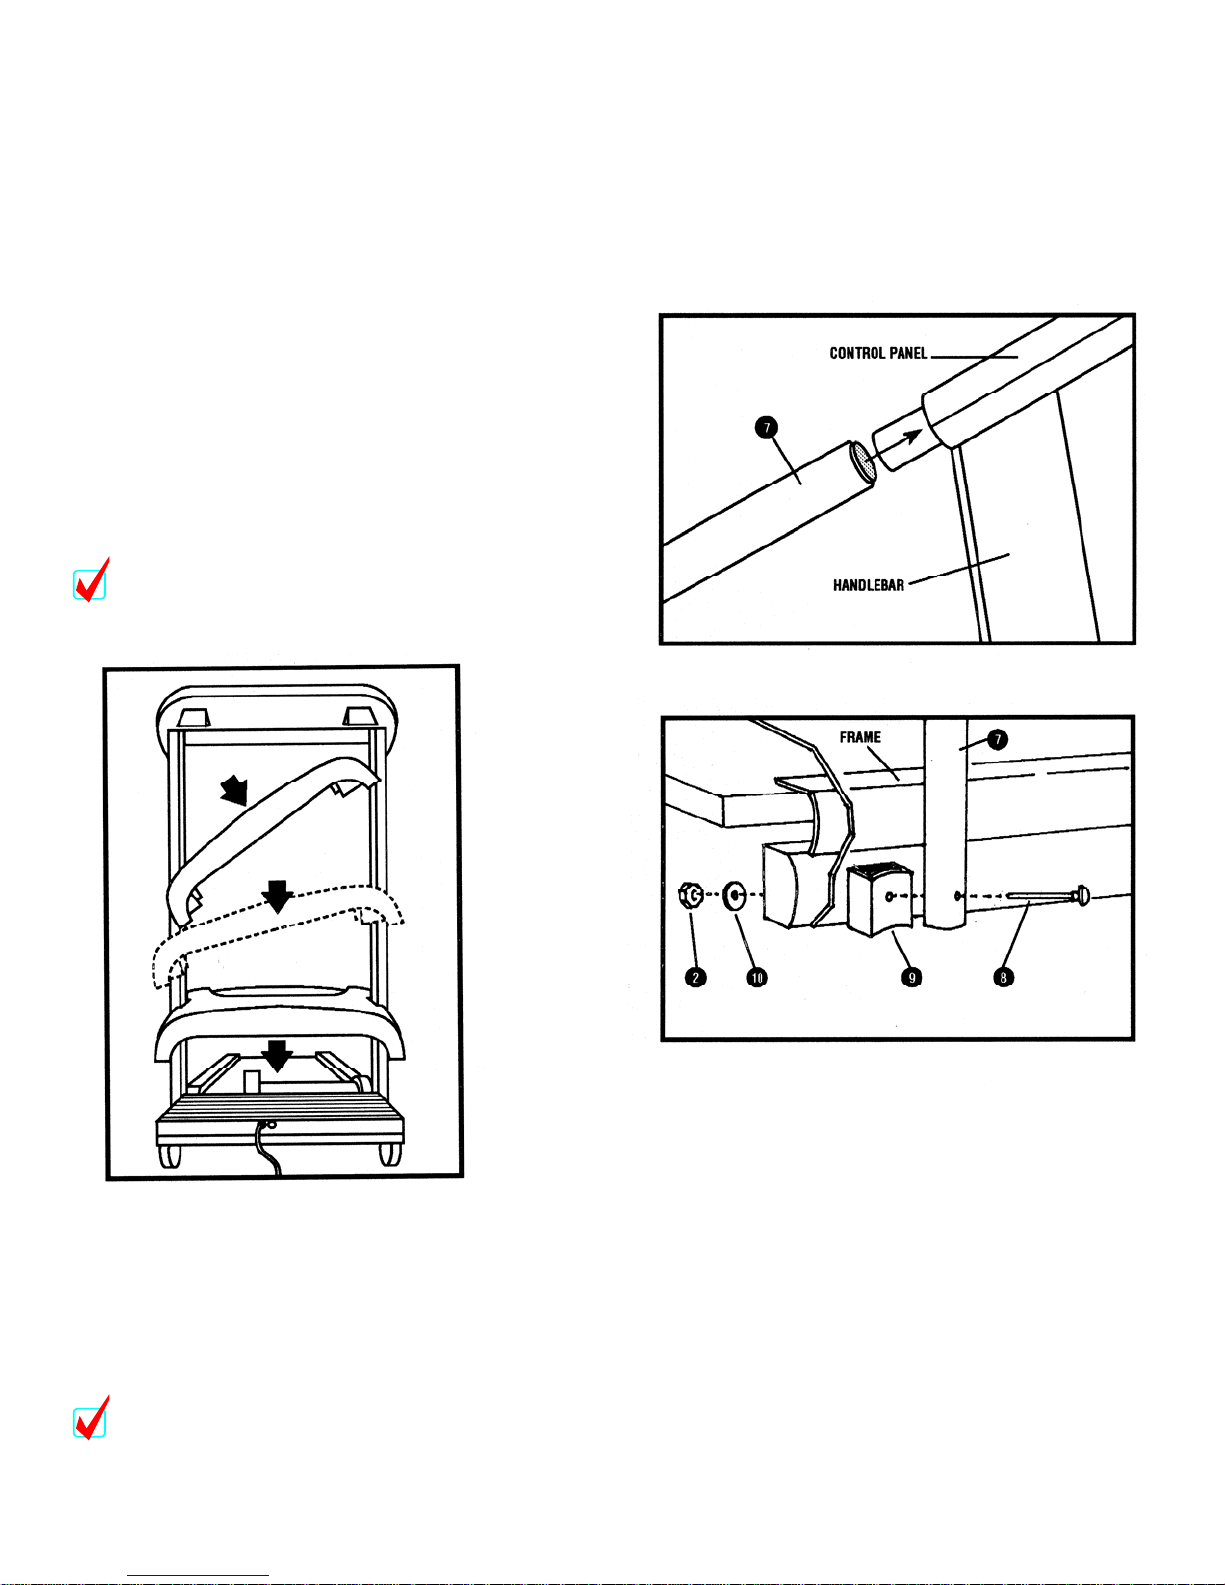
4. As shown in Figure 4 put one of the black 4” carriage bolts
#8 through the siderail #7, bracket #9 (make sure the foam
on the back of bracket #9 is facing up) and through the frame.
When the bolt is all the way through the frame install a 1” fender
washer #10 and a kep nut #2. Use this procedure to install the
other siderail and then tighten both siderails.
5. Standing in front of the treadmill (as shown in figure 5) Figure 2
pick up the motor cover so that it is level and the word
PaceMaster is upside down. Holding the motor cover
level and waist high tilt it 45 degrees by lowering your
left hand. Now slide it between the handlebar and rotate
the motor cover so that it is level by raising your left hand.
Lower the cover all the way making sure you keep it level.
Install the three #8x1/2” black sheet metal screws into the
front of the motor cover. Press down on each side of the
motor cover where it meets the gray plastic shrouds to
lock the Velcro pads in place.
CAUTION: Do not raise or lower motor cover without
it being level.
Figure 3
Figure 4
Figure 5
• Your treadmill is completely adjusted and tested at the factory. However, due to changes occurring during shipment it should be tested. Once you
have assembled your treadmill and it is located where it will be used, proceed as follows (do not make any adjustments unless necessary).
CAUTION: When performing these tests DO NOT stand on the treadbelt. Once tested, always start and finish on the treadbelt.
Testing Your Treadmill
5
 Loading...