

PaceBlade Technology PB2D110V106 Users Manual

PaceBook D110 User's Manual
Notices
PaceBlade PaceBook D110 User Manual
I

Notices
Copyright
This manual is copyrighted by PaceBlade Technology with all rights reserved. Under copyright
laws, this manual may not be reproduced in any form, in whole or in part, without the prior
written consent of PaceBlade Technology.
Disclaimer
PaceBlade Technology has thoroughly reviewed this user manual for ease of use with the
PaceBlade Technology PaceBook. All statements are believed reliable, but its accuracy and
completeness are not guaranteed or warranted. Nothing in this publication is intended to be,
or should be understood to be, a representation or warranty of the product described.
If you have any questions regarding the PaceBook, or the information containe d wit hin th is
manual, please contact PaceBlade at info@paceblade.com.
Trademark
PaceBook User's Manual
PaceBlade and PaceBook are registered trademarks of PaceBlade Technology.
Microsoft, Windows and the Microsoft logo are trademarks, or registered trademarks of
Microsoft Corporation in the United States and/or other countries.
Crusoe is a trademark of Transmeta Corporation
Other brands and product names may be trademarks or registered trademarks of their
respective owners.
Notice
Specifications and information found in this manual are subject to change without notice.
Changes may be incorporated in future editions. The manufacturer assumes no responsibility
for errors or omissions in this document.
For more information see http://www.pacebook.com.
Version 1.0
II

PaceBook D110 User's Manual
Notices
Safety Instructions
l. Please read these safety instructions carefully.
2. Please keep this User's Manual for later reference.
3. All precautions and warnings on the equipment should b e carefully noted.
4. Please disconnect the PaceBook from the AC outlet before cleaning.
Do not use sprays, liquids or cleaning detergents for cleaning the PaceBook Tablet. Use
the supplied 3M High Performance cloth or similar micro fiber cloth for cleaning the
touchscreen. Avoid the use of tissue paper since the tissue fibers can easily lodge between the
touchscreen and the top cover of the tablet.
5. Never pour liquids into any openings or directly on the PaceBook Tablet. This could result in
fire or electrical shock.
6. Ensure the voltage range of the power outlet is between 100V and 240V before connecting
the PaceBook Tablet. Exceeding the maximum rated voltage may cause damage to the AC
adapter or to the PaceBook Tablet. This could result in fire or electrical shock.
7.
When the AC adapter is plugged into an electrical outlet, place the power cord so it will not
be stepped or walked on. Do not place objects over or on the power cord.
8. If the PaceBook Tablet is not used for a long time, disconnect the AC power supply to avoid
damage by transient over voltage. Also remove the battery from the tablet.
9. Use the supplied case or Presentation Stand when using the PaceBook Tablet to avoid
damage or breakage caused by dropping the unit.
10. Use the PaceBook in a clean, dry, temperature controlled environment. Do not use the
PaceBook in areas of high humidity, around water or outdoors while it is raining.
11. Never open or disassemble the PaceBook Tablet. For safety reasons, the equipment should
only be repaired by qualified service personnel.
12. Seek qualified ser v ice pe r s onne l if a n y of the fol lowin g issues should arise:
• the AC adapter, power cord or plug is damaged
• liquid has been spilled into the PaceBook display unit
• the PaceBook has been exposed to excessive moisture
• the PaceBook exhibits errors and or does not function according to specification
•
the PaceBook Tablet has been dropped or otherwise mechanically damaged
DO NOT LEAVE THIS EQUIPMENT IN A NON-TEMPERATURE CONTROLLED ENVIRONMENT.
STORAGE TEMPERATURES BELOW -4ºC (20ºF) OR ABOVE 60ºC (140ºF) MAY DAMAGE THE
UNIT.
For battery safety, please refer to Chapter 6.
III
Notices
PaceBook User's Manual
Safety Notices
To comply with Canadian and U.S. laws, the following safety information is provided in English
and French.
Caution: To reduce the risk of an electric shock, which could cause personal
injury, follow all safety notices. The symbols shown are used in your documentation and
on your equipment to indicate safety hazards.
Attention: Afin de prévenir les risques d'électrocution, respectez toutes les
consignes de sécurité. Les symboles figurant dans la documentation et sur l'appareil
indiquent les points dangereux.
Warning: Lithium batteries can be dangerous. Improper ha ndling or
installation of lithium batteries may result in an explosion. Replace them only with an exact
replacement. Dispose of lithium batteries by returning them to your dealer.
Avertissement Les batteries lithium présentent certains risques. Une mauvaise
manipulation ou installation peut provoquer une explosion des batteries. N'utilisez que ce
type de batteries. Rapportez les batteries usées chez votre revendeur.
IT System Connectors: This equipment has not been designed for connection to all IT power
systems; if a modification is required contact your dealer or local electrical authority.
Connecteurs système IT Cet appareil n'a pas été conçu pour être connecté à tous les systèmes
d'alimentation IT et si vous avez besoin d'y apporter une modification, adressez-vous à votre
revendeur ou à un électricien.
IV

PaceBook D110 User's Manual
Notices
Safety Notices for the power cord
This equipment has a 2 or 3-wire power cord. Replace the power cord if it becomes damaged.
Contact your dealer for an exact replacement.
In the U.S.A. and Canada, the power cord must be a UL-listed detachable power cord (in
Canada, CSA-certified). For 2-wire it is SPT-2 18AWG, for 3-wire cord it is SVT or SJT, 18
AWG, 3-conductor, provided with a molded-on NEMA type (1-15 2-wire) (5-15 3-wire) P plug
cap at one end and a molded-on cord connector body at the other end. The cord length must
not exceed 3 meters.
Outside the U.S.A. and Canada, the plug must be rated for 250 VAC, 2.5 amp minimum, and
must display an intern a tion a l ag e n cy ap proval marking. The co rd m u st be su ita b le for use in
the end-user country. Consult your dealer or the local electrical authorities if you are unsure of
the type of power cord to use in your country. Voltage changes occur automatically in the
power supply.
Consignes de sécurité
Cet équipement possède un cordon d'alimentation à deux/trois fils. Si le cordon d'alimentation
venait à être abîmé, avant de le remplacer, consultez votre revendeur.
Aux Etats-Unis et au Canada, le cordon d'alimentation doit être détachable, homologué UL
(Certifié CSA pour le Canada), de type SPT-2, 18 AWG, à 2 fils (trois fils avec SVT, SJT, 18
AWG) fourni avec prise surmoulée NEMA de type 1-15P (5-15P trois fils) à une extrémité et un
cordon de raccordement surmoulé à la masse à l'autre extrémité. La longueur du cordon ne
doit pas dépasser 3 mètres.
Hors des Etats-Unis et du Canada, la prise doit être conforme pour 250 V, 2.5 A minimum; la
marque d'homologation d'un organisme international doit également figurer sur la prise. Le
cordon d'alimentation doit être conforme aux normes du pays de l'utilisateur final. Si vous ne
savez pas quel type de cordon utiliser, adressez-vous à votre revendeur ou à un électricien. Le
changement de voltage survient automatiquement dans l'alimentation.
V
Notices
PaceBook User's Manual
Warning: Under no circumstances should the user attempt to disassemble the
power supply. The power supply has no user-replaceable parts. Inside the power supply
are hazardous voltages that can cause serious personal injury. A defective power supply
must be returned to your dealer.
Attention: Ne tentez jamais de démonter le bloc d'alimentation. Vous n'êtes
pas qualifié pour en remplacer les éléments, et vous risqueriez de vous électrocuter en
touchant l'une de ses zones à haute tension. S'il est défectueux, vous devrez le rapporter
chez votre revendeur.
Safety Notices for Users outside the U.S.A. and Canada
PELV (Protected Extra-Low Voltage) Integrity - To ensure the extra-low voltage integrity of the
equipment, connect only equipment with mains-protected electrically compatible circuits to the
external ports.
Remote Earths - To prevent electrical shock, connect all local (individual office) computers and
computer support equipment to the same electrical circuit of the building wiring. If you are
unsure, check the building wiring to avoid remote earth conditions.
Earth Bonding - For safe operation, only conn ect the equipment to a building supply th at is in
accordance with current wiring regulations in your country. In the U.K., those regulations are
the IEE.
VI

PaceBook D110 User's Manual
Notices
Laser Compliance Statement for CD-ROM, DVD-ROM
and DVD/CD-RW Combo drives (Optional)
The optional CD-ROM, DVD-ROM and DVD/CD-RW Combo drive for this computer are laser
products. The classification label of the drive is located on the bottom of the drive. Below is a
sample of the classification label:
LASER KLASSE 1
LUOKAN 1 LASERLAITE
APPAREIL A LASER DE CLASSE 1
KLASS 1 LASER APPARAT
The drive is certified in the USA to comply with the requirements of the Department of Health
and Human Services 21 Code of Federal Regulations (DHHS 21 CFR) Subchapter J. for Class 1
laser products.
In other countries the drive is certified to comply with the requirements of EN60825.
CLASS 1 LASER PRODUCT
Caution:
components inside. Use of controls, adjustments and operation of procedures other than
those specified, may result in hazardous exposure to radiation. Class I (1) laser products
are not considered hazardous. The drive has an internal, Class I (1), 0.5-milliwatt,
aluminum gallium-arsenide laser that operates at a wavelength of 760 to 810 nanometers.
The design of the laser system and the drive ensures that there is no exposure to laser
radiation above a Class I (1) level during normal operation, user maintenance or servicing
conditions.
Do not open the drive. There are no user-serviceable parts or
VII

Notices
PaceBook User's Manual
NOTICE OF EMC COMPLIANCE
This equipment has been tested and found to comply with the limits for a class B digital
device, pursuant to part 15 of the FCC Rules. These limitations are designed to provide
reasonable protection against harmful interference in a residential installation. This equipment
generates, uses and can radiate radio frequency energy and, if not installed and used in
accordance with the instructions, may cause harmful interference to radio communications.
However, there is no guarantee that interference will not occur in a particular installation. If
this equipment does cause harmful interference to radio or television reception, which can be
determined by turning the equipment off and on, the user is encouraged to try to correct the
interference by one or more of the following measures:
•
Reorient or relocate the r e ce iv ing a n tenn a .
•
Increase the separation between the equipment and receiver.
•
Connect the equipment into an outlet on a circuit different from that to which the
receiver is connected.
• Consult your dealer or a Radio/TV technician for help.
Use only shielded I/O cables to connect I/O devices to this equipment.
FCC Caution: Any changes or modifications not expressly approved by the party responsible
for compliance could void the user's authority to operate this equipment.
This equipment complies with FCC radiation exposure limits set forth for an uncontrolled
environment. This transmitter must not be co-located or operating in conjunction with any
other antenna or transmitter.
You are cautioned that changes or modifications not expressly approved by the party
responsible for compliance could void your authority to use the equipment.
The highest SAR value for this model PBII tested by DASY4 for use at the touch body is
compliance with FCC SAR limits.
Canadian EMI Compliance Statement
This Class B digital apparatus meets all requirements of the Canadian Interference-Causing
Equipment Regulations.
Avis de conformité aux normes du EMI du Canada
Cet appareil numérique de la classe B respecte toutes les exigences du Règlement sur le
matériel brouilleur du Canada.
European Union CE Marking Declaration
This product has been tested and found to comply with the EMC requirements subject to the
EU directive for CE marking.
VIII

PaceBook D110 User's Manual
Notices
FCC STATEMENT FOR FAXMODEM USERS
This equipment complies with Par t 68 of the FCC rules. On the bottom of this equipment is
the label that contains, among other information, the FCC Registration Number and Ringer
Equivalence Number for this equipment. IF REQUESTED, THIS INFORMATION MUST BE
GIVEN TO THE TELEPHONE COMPANY.
The REN is useful to determine the quantity of devices you may connect to your telephone line
and still have all of those devic e s ring when your telephone number is called. In most, but not
all areas, the sum of the REN’s of all devices connected to one line should not exceed five
(5.0). To be certain of the number of devices you may connect to your line, as determined by
the REN, you should contact your local telephone company to determine the maximum REN
for your calling area. If your telephone equipment cause harm to the telephone network, the
telephone company may disconnect your service temporarily. If possible, they will notify you
in advance. But if advance notice isn’t practical, you w ill be in for med of your r ight to file a
complaint with the FCC.
Your telephone company may make changes in its facilities, equipment, operations or
procedures that could affect the proper functioning of your equipment. If they do, you will be
notified in advance to give you an opportunity to maintain uninterrupted telephone service.
The telephone company may ask you to disconnect this equipment from the network until the
problem has been corrected or until you are sure that the equipment is not malfunctioning.
This equipment may not be used on any coin service provided by the telephone company.
The Telephone Consumer Protection Act of 1991 makes it unlawful for any person to use a
computer or their electronic device to send any message via a telephone facsimile machine
unless such message clearly contains in a margin at the top or bottom of each transmitted
page or on the first page of the transmission the following information:
(1) The date and time of transmission;
(2) Identification of either business, business entity or individual sending the message;
(3) Telephone number of either the sending machine, business entity or individual.
In order to program this information into your fax/modem, please refer to the appropriate
instructions in your fax/modem manual.
IX

Notices
PaceBook User's Manual
NOTEBOOK—TNV (Total Network Voltage)
Safety Caution
CAUTION: To reduce the risk of fire, use only No. 26 AWG or larger
telecommunication line cord.
IMPORTANT SAFETY INSTRUCTIONS:
1. Do not use this product near water, for example, near a bath tub, wash bowl, kitchen sink
or laundry tub, in a wet basement or near a swimming pool.
2. Avoid using a telephone (other than a cordless type) during an electrical storm. There may
be a remote risk of electric shock from lightning.
3. Do not use the telephone to report a gas leak in the vicinity of a leak.
4. Use only the p ower cord and batteries indicated in this manual. Do not dispose of batteries
in a fire. They may explode. Check with local codes for possible special disposal
X

PaceBook User's Manual
Contents
Contents
Chapter 1 Introduction.....................................................1-1
1.1 Unpacking and setting up......................................................................................1-1
1.2 Setting up the PaceBook as a notebook..................................................................1-2
1.3 Setting up the PaceBook in portrait mode...............................................................1-3
1.4 Setting up the PaceBook as an LCD PC...................................................................1-4
1.5 Setting up the PaceBook as a Tablet PC .................................................................1-4
1.5 Setting up the PaceBook as a Tablet PC .................................................................1-5
1.6 Accessories...........................................................................................................1-5
1.7 Operating environment..........................................................................................1-5
Chapter 2 Before you begin..............................................2-1
2.1 Notebook mode ....................................................................................................2-1
2.2 LCD PC mode .......................................................................................................2-2
2.3 Tablet mode.........................................................................................................2-2
Chapter 3 Tablet..............................................................3-1
3.1 Front view............................................................................................................3-1
3.2 Bottom view.........................................................................................................3-2
3.3 Left side-view.......................................................................................................3-2
3.3 Left side-view.......................................................................................................3-3
3.4 Top side-view.......................................................................................................3-3
3.5 Power button and system status display indicators.................................................. 3-3
3.6 Touchscreen.........................................................................................................3-4
3.7 Scroll Wheel .........................................................................................................3-5
3.8 Handwriting button...............................................................................................3-5
3.9 Rotation button.....................................................................................................3-5
3.10 Menu button.........................................................................................................3-6
3.11 Cleaning...............................................................................................................3-6
3.12 CardBus / PC Card ................................................................................................3-6
Chapter 4 Keyboard.........................................................4-1
4.1 Overview..............................................................................................................4-1
4.2 Mode selection .........................................................................................................4-2
4.3Keyboard Hot Keys ....................................................................................................4-2
4.4 Keyboard power switch and power management ....................................................4-3
4.5 Touchpad.............................................................................................................4-3
4.6 Replacing the keyboard batteries...........................................................................4-3
4.7 ............................. Error! Bookmark not defined.-Error! Bookmark not defined.
4.8 Ergonomics...........................................................................................................4-5
4.8 NumLock..............................................................................................................4-6
Chapter 5 Standard Accessories........................................5-1
5.1 Case ....................................................................................................................5-1
XI

Contents
PaceBook User's Manual
5.2
5.3 ............................. Error! Bookmark not defined.-Error! Bookmark not defined.
5.4 Optical ROM drives................................................................................................5-1
5.5 Cleaning cloth.......................................................................................................5-2
5.6 Stylus...................................................................................................................5-2
5.7 VGA dongle ..........................................................................................................5-3
5.8 Optical drive and cable carry cases.........................................................................5-3
..............................................................................-Error! Bookmark not defined.
Chapter 6 Batteries..........................................................6-1
6.1 Changing the battery ............................................................................................6-1
6.2 Recharging the battery..........................................................................................6-1
6.3 Battery maintenance.............................................................................................6-2
6.4 Preparing the battery for storage...........................................................................6-2
6.5 AC adapter power output ......................................................................................6-2
6.6 Power conservation...............................................................................................6-3
6.7 CMOS battery replacement and disposal.................................................................6-3
6.8 Battery Safety notice.............................................................................................6-4
6.9 AC adapter...........................................................................................................6-5
6.10 Battery LED and alarm .......................................................................................... 6-5
6.11 Keyboard batteries................................................................................................6-5
Chapter 7 Software..........................................................7-1
7.1 ...........................................................................................................................7-1
7.2 Re-installing Windows XP ...................................................................................... 7-2
7.3 Downloading new software drivers.........................................................................7-2
Chapter 8 Power Management..........................................8-1
8.1 Power Options......................................................................................................8-1
8.2 Auto insert for CD-ROM......................................................................................... 8-1
8.3 Screen savers....................................................................................................... 8-2
8.4 Distributed computing...........................................................................................8-2
8.5 Video time-out......................................................................................................8-2
Chapter 9 Connectors and Peripherals...............................9-1
9.1 VGA port..............................................................................................................9-1
9.2 Faxmodem ...........................................................................................................9-1
9.3 LAN port...............................................................................................................9-1
9.4 Audio connectors ..................................................................................................9-1
9.5 USB port ..............................................................................................................9-1
9.6 DC-out .................................................................................................................9-2
9.7 IEEE-1394............................................................................................................9-2
9.8 IR interface ..........................................................................................................9-2
9.9 Legacy ports.........................................................................................................9-2
9.10 CardBus / PC Card ................................................................................................9-3
Appendices .................................................................... A-1
XII

PaceBook User's Manual
Contents
A.1
A.2 Memory upgrade...................................................................................................A-2
A.3 Glossary...............................................................................................................A-3
A.4 Returning your PaceBook.......................................................................................A-5
A.5 HDD Bay ..............................................................................................................A-5
A.6 FAQ .....................................................................................................................A-6
Specifications........................................................................................................A-1
XIII

PaceBook User's Manual
Introduction
Chapter 1 Introduction
Thank you for purchasing the PaceBook. We are confident it will provide you with functionality
and ease of use at home, at the office and on the road.
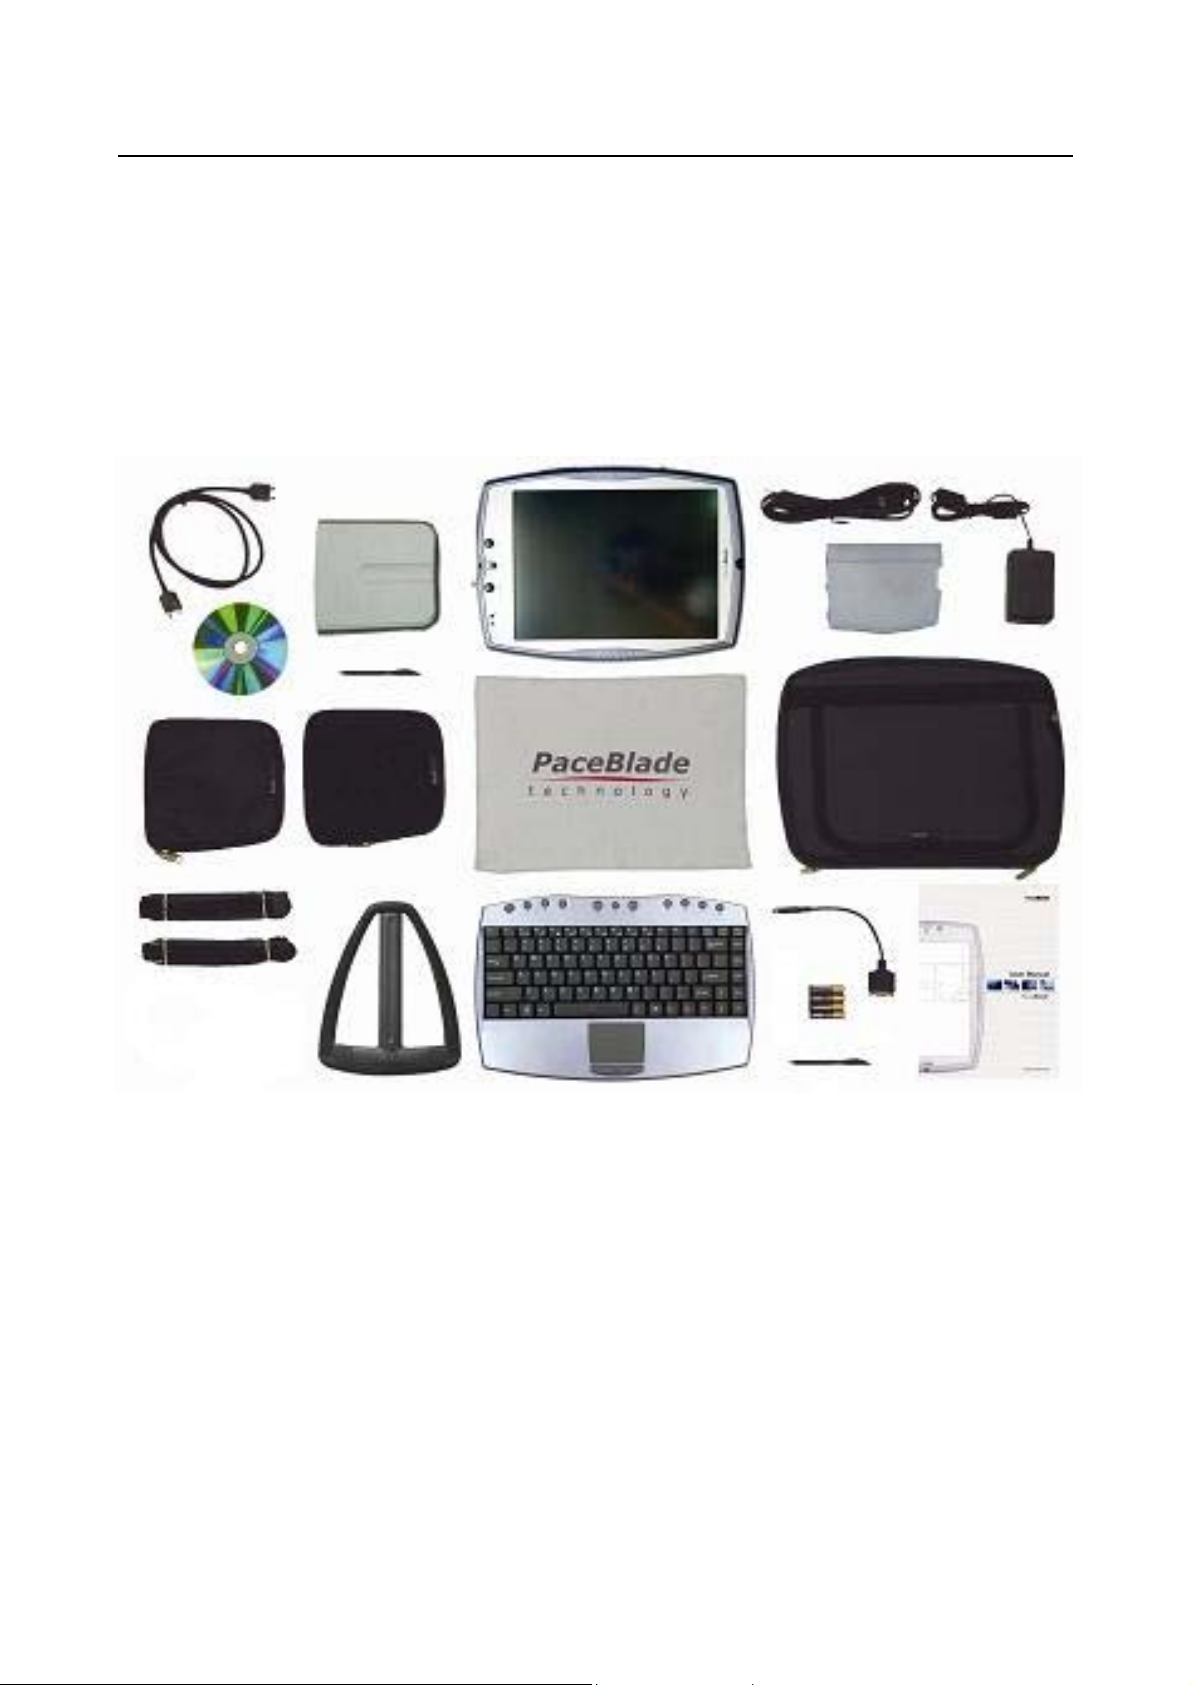
1.1 Unpacking and setting up
18.
4.
9.
17.
10.
3.
15.
5.
6.
13.
1.
12.
1. PaceBook case 2. Keyboard 3. PaceBook Tablet
4. Recovery CD 5. Power cable 6. AC-adapter
7. User Manual 8. Presentation Stand 9. Cable carry case
10. Stylus Touch 11. Digitizer Pen 12. Carry straps
13. PaceBook Battery 14. VGA dongle 15. 3M High Performance
16. 4 AAA Duracell alkaline
batteries for keyboard
* = Optional
8.
2.
17. *Optical drive with cable 18. *Optical drive carry case
14.
7.
16.
11.
Cloth
http://www.pacebook.com Page 1-1
Introduction
Manual
Please make sure that you have all the above items; if not, contact the dealer where you
bought your PaceBook. The stylus will already be installed in the main unit. Optional
accessories will be packaged separately from the PaceBook.
If you need to send your PaceBook for service or upgrade it is strongly recommended to use
the original packing box and materials.
PaceBook User's
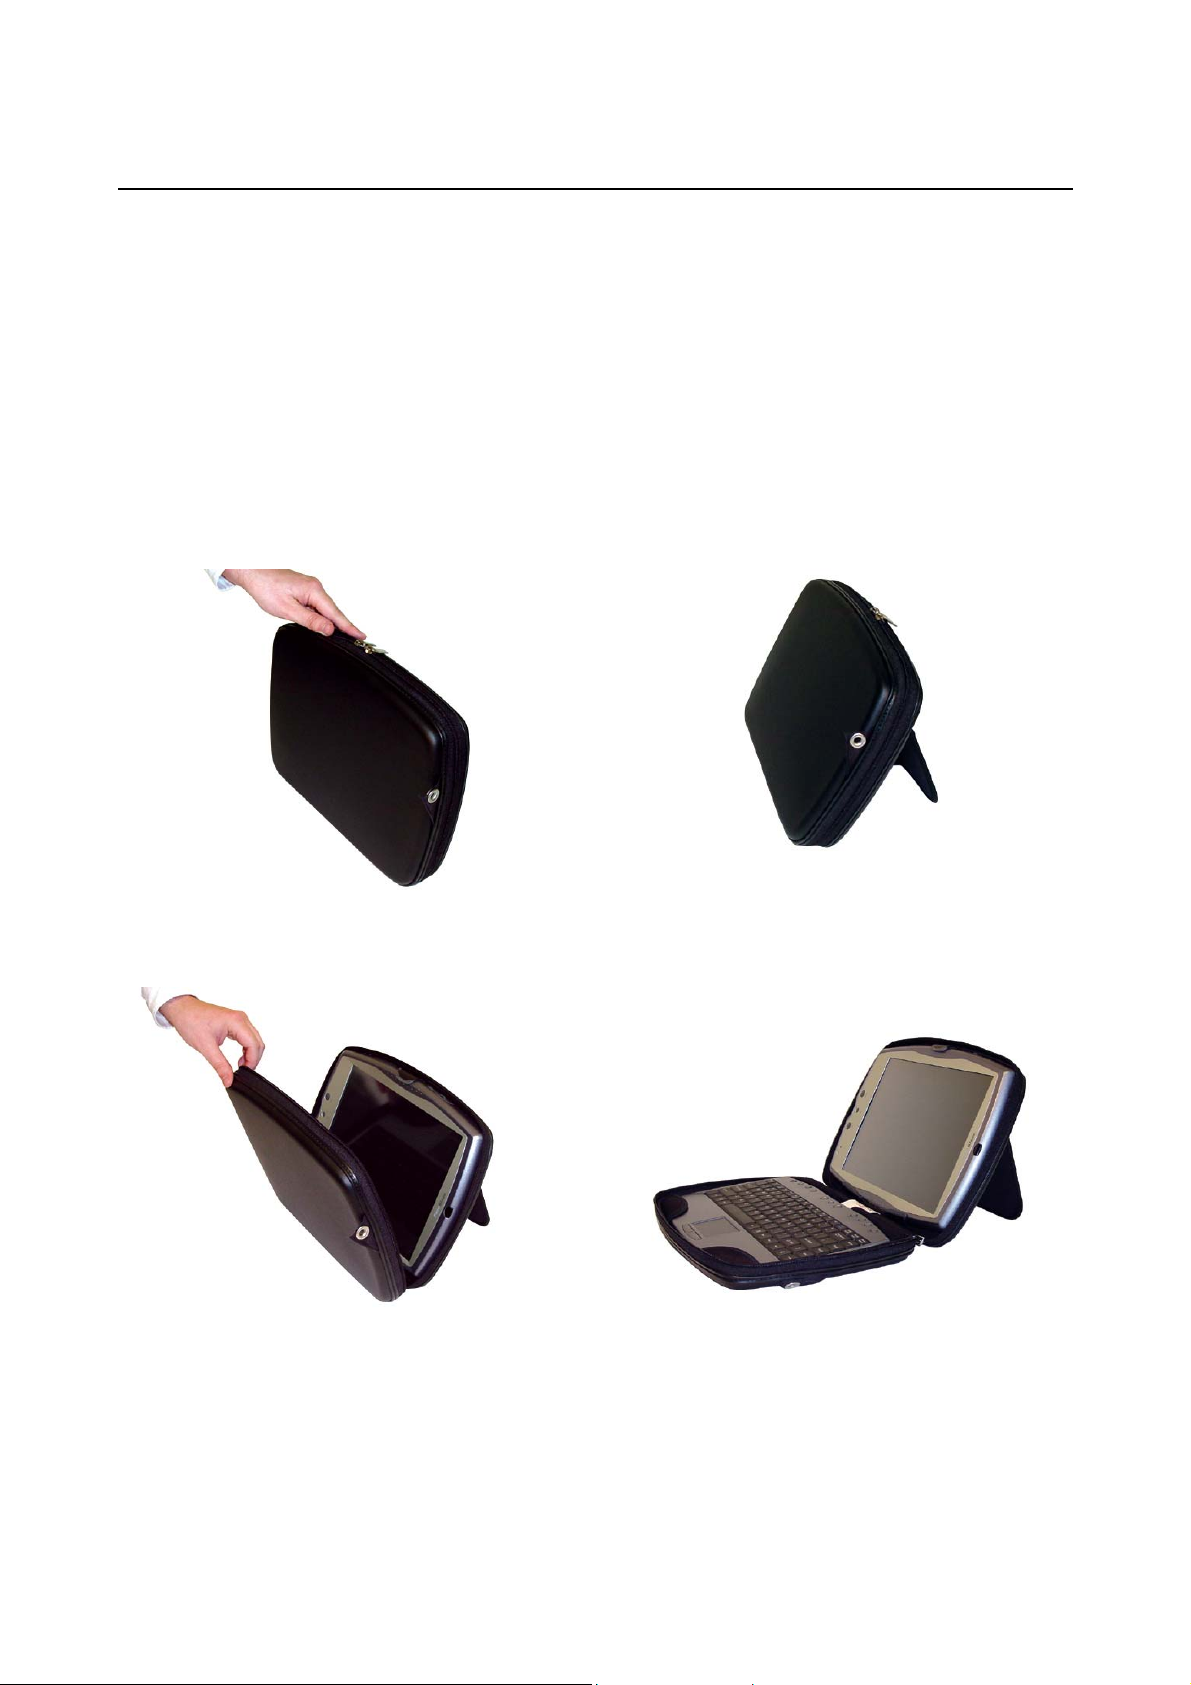
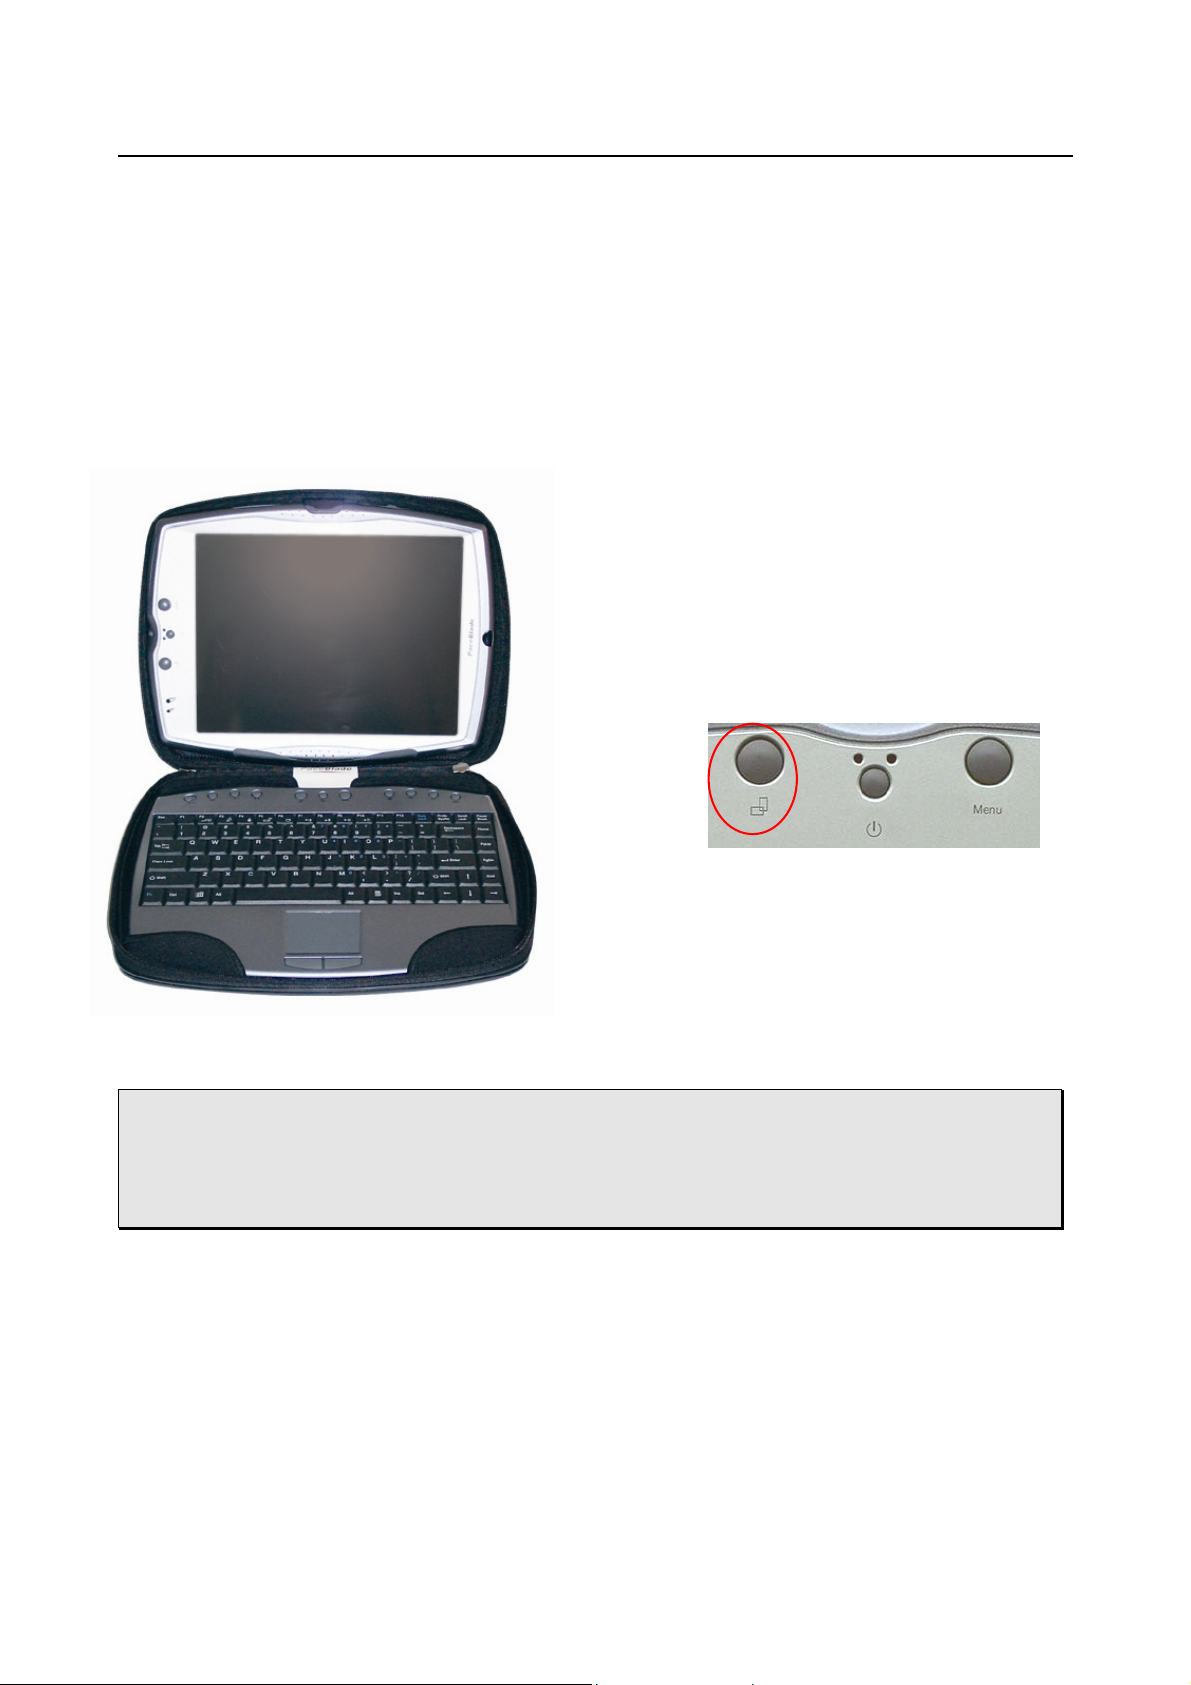
1.2 Setting up the PaceBook as a notebook
The PaceBook can be configured and used as a regular notebook. However, there is a special
procedure for preparation and use.
Hold the PaceBook upright with the flap
facing away from you.
Open the zippers and pull down the keyboard as shown above. The PaceBook is now ready to
be used as a notebook computer.
Open the flap in the rear and let the PaceBook
stand by itself. Ensure the Velcro that holds
the flap is adjusted to the proper length to
allow the PaceBook to stand upright.
Page 1-2 http://www.pacebook.com
PaceBook User's Manual
Introduction
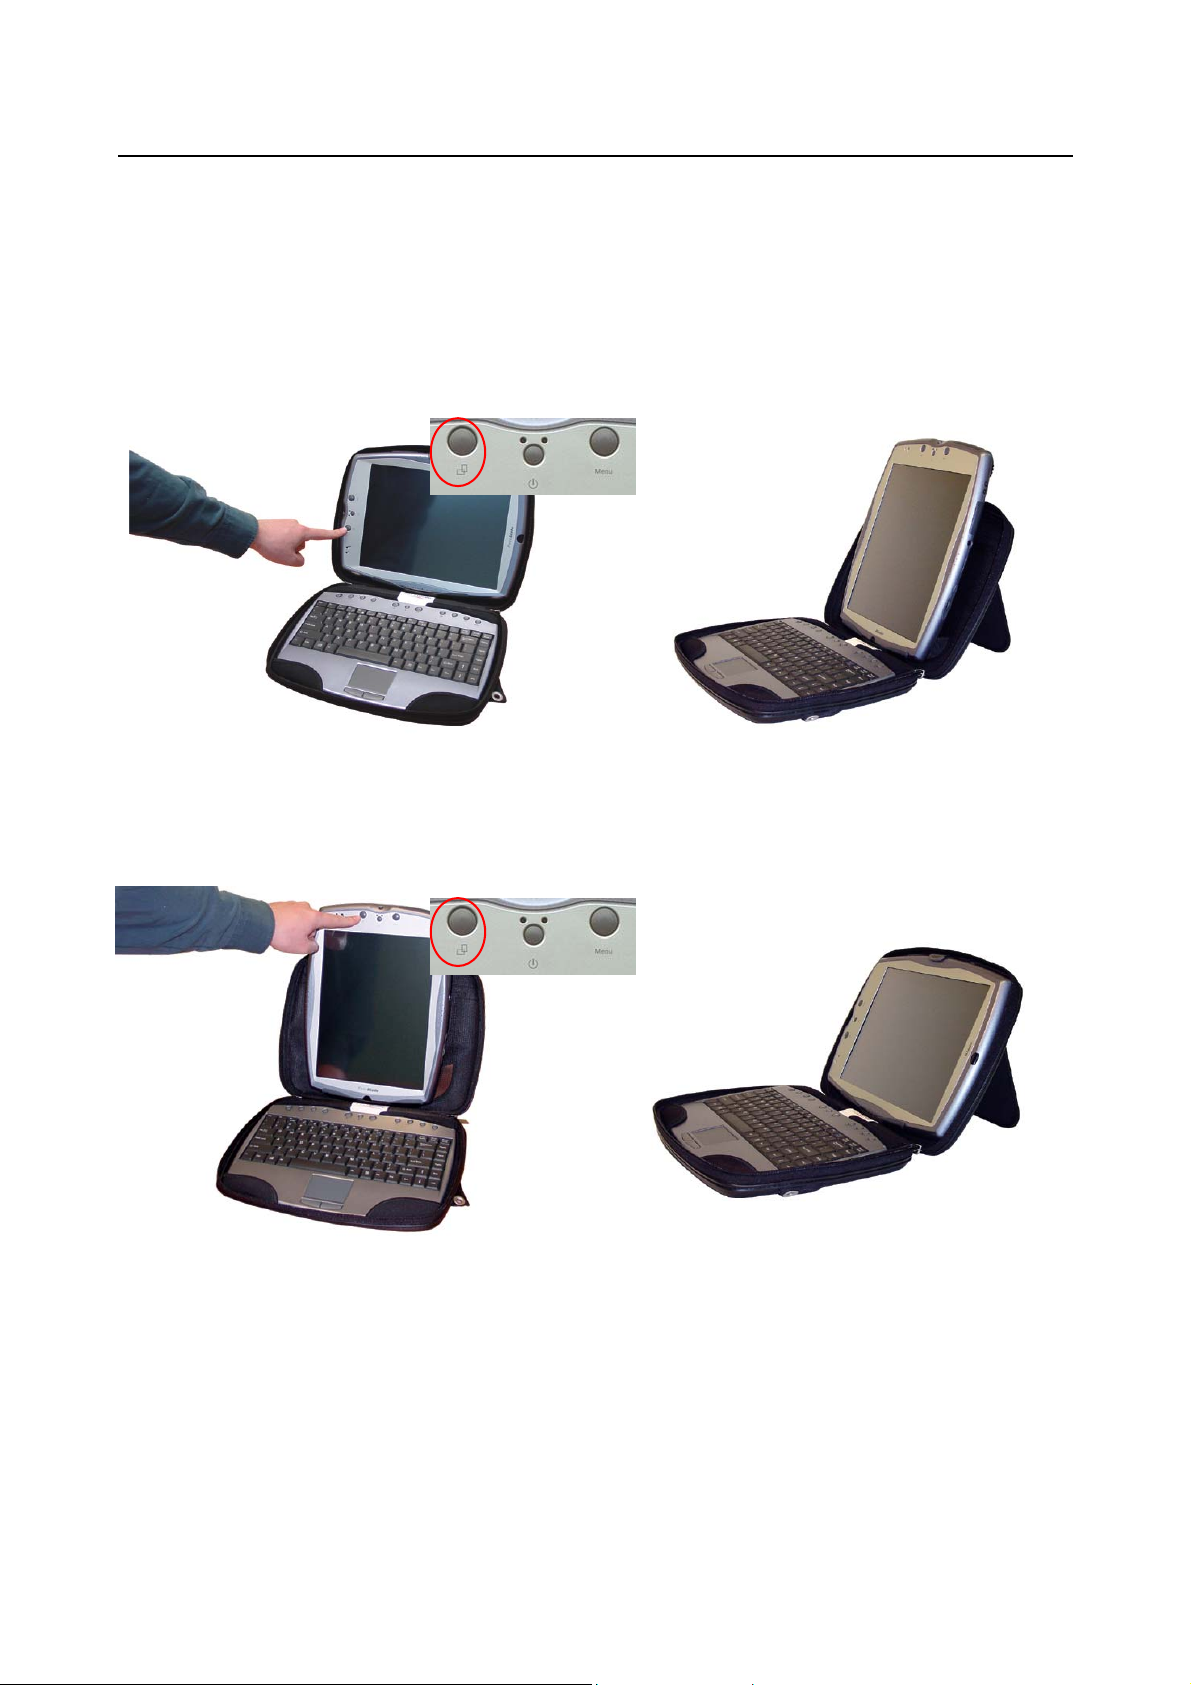
1.3 Setting up the PaceBook in portrait mode
The PaceBook’s unique design allows it to be quickly and easily transformed for use in portrait
mode, perfect for reading electronic or online documents.
Simply press the rotation button (see insert in lower left picture) to rotate the image on your
notebook 90 degrees, and you have the world’s first portrait mode notebook!
The scroll wheel (located in the lower right corner) can be used to scroll through documents if
applications support this function.
Now return to landscape mode:
http://www.pacebook.com Page 1-3
Introduction
A
Manual
PaceBook User's
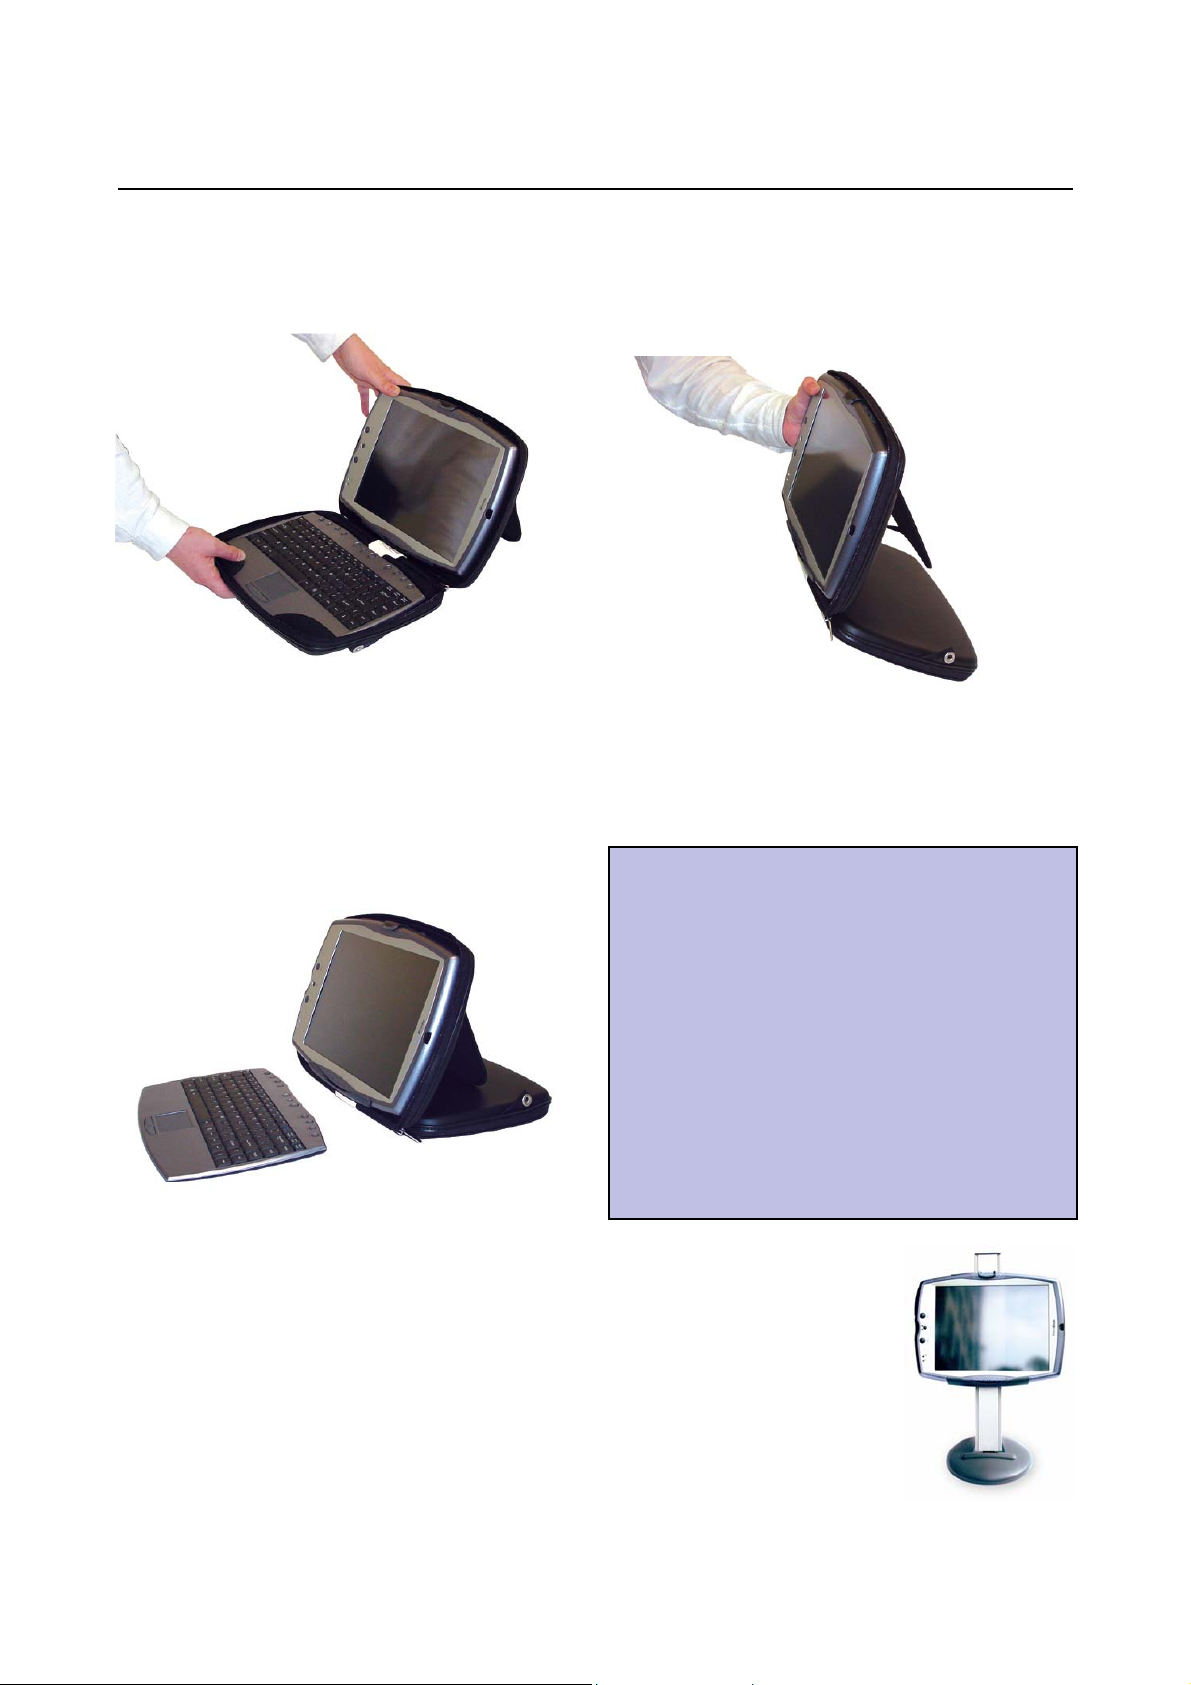
1.4 Setting up the PaceBook as an LCD PC
In seconds, your PaceBook can be easily transformed from a notebook to an ergonomic
desktop LCD PC. Use it as a notebook when you travel and as a desktop LCD PC in the office
or at home.
For maximum comfort and functionality, we strongly recommend the optional Office Stand
accessory for use in the home or office. This turns your PaceBook into a free-standing desktop
LCD PC. Your PaceBook can be easily removed when you need to take it with you.
Instructions:
Firmly hold your PaceBook as shown
above.
Remove the keyboard with your free
hand.
Flip the lower cover underneath the stand.
djust the flap so your PaceBook stands
upright.
Page 1-4 http://www.pacebook.com

PaceBook User's Manual
Introduction
1.5 Setting up the PaceBook as a Tablet PC
The PaceBook modular system also allows you to use the display
unit as a Tablet PC, for those times when using a keyboard is
impractical or unnecessary. The Tablet features a built-in
touchscreen, scroll wheel/mouse buttons, handwriting recognition
and an on-screen virtual keyboard.
Use the Rotation button to set the T ablet into landscape or portrait
mode.
1.6 Accessories
There are many standard notebook accessories available that can be used to enhance the
functionality of your PaceBook. However, PaceBlade accessories are made especially for your
PaceBook. For the latest accessories, check the PaceBook website at
http://www.pacebook.com.
Accessories purchased with the PaceBook either online or through our resellers will be shipped
in separate packaging. For additional shipping information, please contact your reseller or
check online.
1.7 Operating environment
Care should be taken while traveling with or using the PaceBook system. When selecting a
suitable working location, ensure that the environment has good ventilation and is
temperature controlled. Your PaceBook functions best at room temperature. Choose a location
free from extreme heat or cold. This environment should also be free of dust and dirt, as well
as electromagnetic and RF interference.
Whenever using your PaceBook while walking or driving (for example, as a mobile DVD player
or as a GPS receiver), it is preferable to stop while using to avoid personal injury. When
walking with the PaceBook in Tablet PC mode, you should use the optional carrier.
Warning: Do not expose the PaceBook to extreme temperatures. Do not leave
the PaceBook in a car. Do not drop, or spill fluids on the PaceBook, and do not open the
case. Failure to observe these warnings may void your warranty.
The PaceBook’s Liquid Crystal Display (LCD) may be damaged by
exposure to intense sunlight, which builds up excessive heat inside the display enclosure.
Only exposure to indirect or subdued sunlight is recommended.
http://www.pacebook.com Page 1-5

PaceBook User's Manual
Before you begin
Chapter 2 Before you begin
The PaceBook is much more than just another notebook PC. This chapter will help you
discover the various ways you can use your PaceBook.
2.1 Notebook mode
The PaceBook is a modular PC system that
allows you to use it as a notebook PC. For setup
instructions, please refer to Chapter 1, Sections
1.2 – 1.3.
All the connectors and sockets on the PaceBook
Tablet are located in the upper left corner. For
more information on the connection ports refer
to Chapter 3, Sections 3.3 and 3.4.
Once set
up and
turned
on, your
PaceBook
functions just like any other notebook PC.
However, the PaceBook also features a unique
rotation button, so that allows the screen image
can be displayed in eithe r la n ds ca pe or portrait
orientation. For more information on the rotation
feature, refer to Chapter 3, Section 3.9.
Warning: Medical experts have warned that prolonged use of notebook
computers may be harmful to your health. Repetitive Stress Injuries (RSI) to hands, wrists,
neck and lower back may occur. Please visit our website (http://www.pacebook.com) for
more information about RSI and how the ergonomic PaceBook addresses these issues.
http://www.pacebook.com Page 2-1
 Loading...