

PAC Audio RPK4-FD2101 Installation Manual
RPK4-FD2101
Integrated Climate Control Retention for Select
2015-2019 Ford F150 and 2017-2019 Ford Super Duty
Introduction and Features
Complete Radio Replacement with
The RPK4-FD2101 is a complete radio replacement kit with integrated climate control retention for the 2015-2019 Ford
F-150 and 2017-2019 Ford Super Duty equipped with the 8” screen. Parts are included for vehicles with multiple upper
button congurations and for vehicles with or without heated / air conditioned seats. This kit utilizes the factory HVAC
control knobs for a factory look and experience. All modules and cables are included to retain important features of
the factory system including: steering wheel mounted radio controls, factory reverse camera, 360-Degree camera, Pro
Trailer Camera, and AM/FM reception.
A secondary 5.2” LCD screen is added for additional vehicle control including: HVAC user interface retention, vehicle
settings retention, factory amplier control, settings for control of the RPK4.2-FD2101 interface, forced camera
activation, ability to add additional cameras, tire pressure and vehicle gauges. Features provided by the LCD screen
will vary based on the vehicle features. See Important Notes (next section) for additional information.
Four hard buttons added to the radio dash bezel (below the 5.2” LCD screen) allow user to set presets to control
functions including: specic HVAC controls, forced camera activation, LCD screen controls (Day Mode, Night Mode,
Display O). Options for hard buttons will vary based on vehicle features and which cameras are installed.
Some advanced features require additional accessories, sold separately.
Important Notes
We recommend reading this manual thoroughly to familiarize yourself with the entire process
prior to beginning the installation.
1. Transfer of the factory HVAC knobs and circuit board, and button panel is required. Professional installation is
recommended.
2. Only compatible in vehicles equipped with the 8” screen.
3. Installation with 2018+ F-150 models, DOES NOT retain the Bang & Olufsen factory amplier, APH-FD02 (sold
separately) can be used to bypass the amplier in these applications.
4. Installation with 2018 - 2019 Super Duty models DOES retain the Bang & Olufsen amplier.
5. Does Not Retain:
• Compass that is displayed in the instrument cluster. The compass feature is lost.
• Parallel park assist.
• User interface for the factory massaging seats. (Massage function still available via hard button activation).
• Auxiliary input jack in 2015 vehicles.
• Ford’s WiFi-Hotspot.
• MyKey functions that limit the radio. (Functions that limit the vehicle are retained).
• Use of the radio to re-assign the door lock keypad code. (Code can still be changed via the keypad itself).
• Surround Mode
• Speed Compensated Volume.
6. Once the radio is removed, the chimes will play through the factory piezo speaker in the dash and not the cabin speakers.
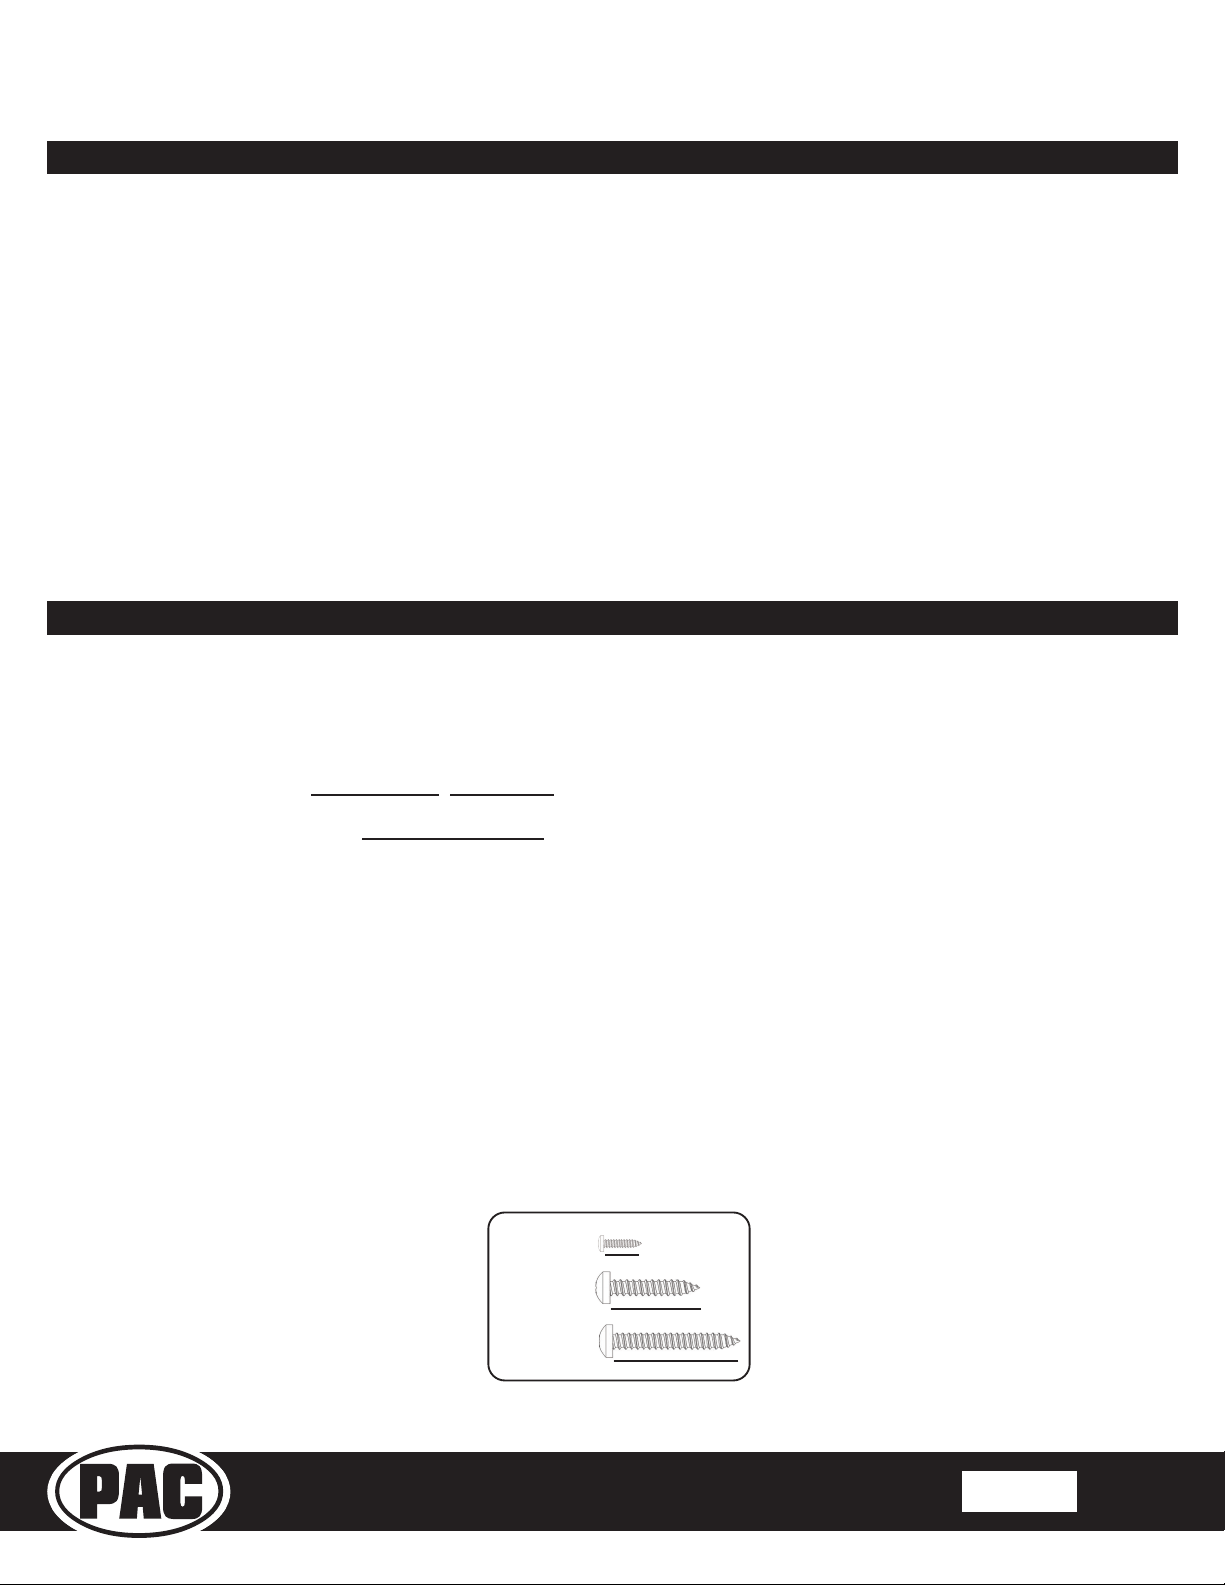
7. Use of improper length screws during kit re-assembly can result in damage to this product. See FIG A: Actual size
reference chart.
8. If you are adding additional cameras, beyond reverse cam, PAC part number RPA-16P5V (sold separately) can be
used for up to 5 total cameras.
FIG A:
6mm
1:1
16mm
22mm
Actual Size
© 2019 AAMP Global. All rights reserved. PAC is a Power Brand of AAMP Global.
PAC-audio.com
Rev: V2
Date:091319
Page 1
RPK4-FD2101
1
7
6
5
4
3
2
8
9
10
13
11
12
14
Integrated Climate Control Retention for Select
2015-2019 Ford F150 and 2017-2019 Ford Super Duty
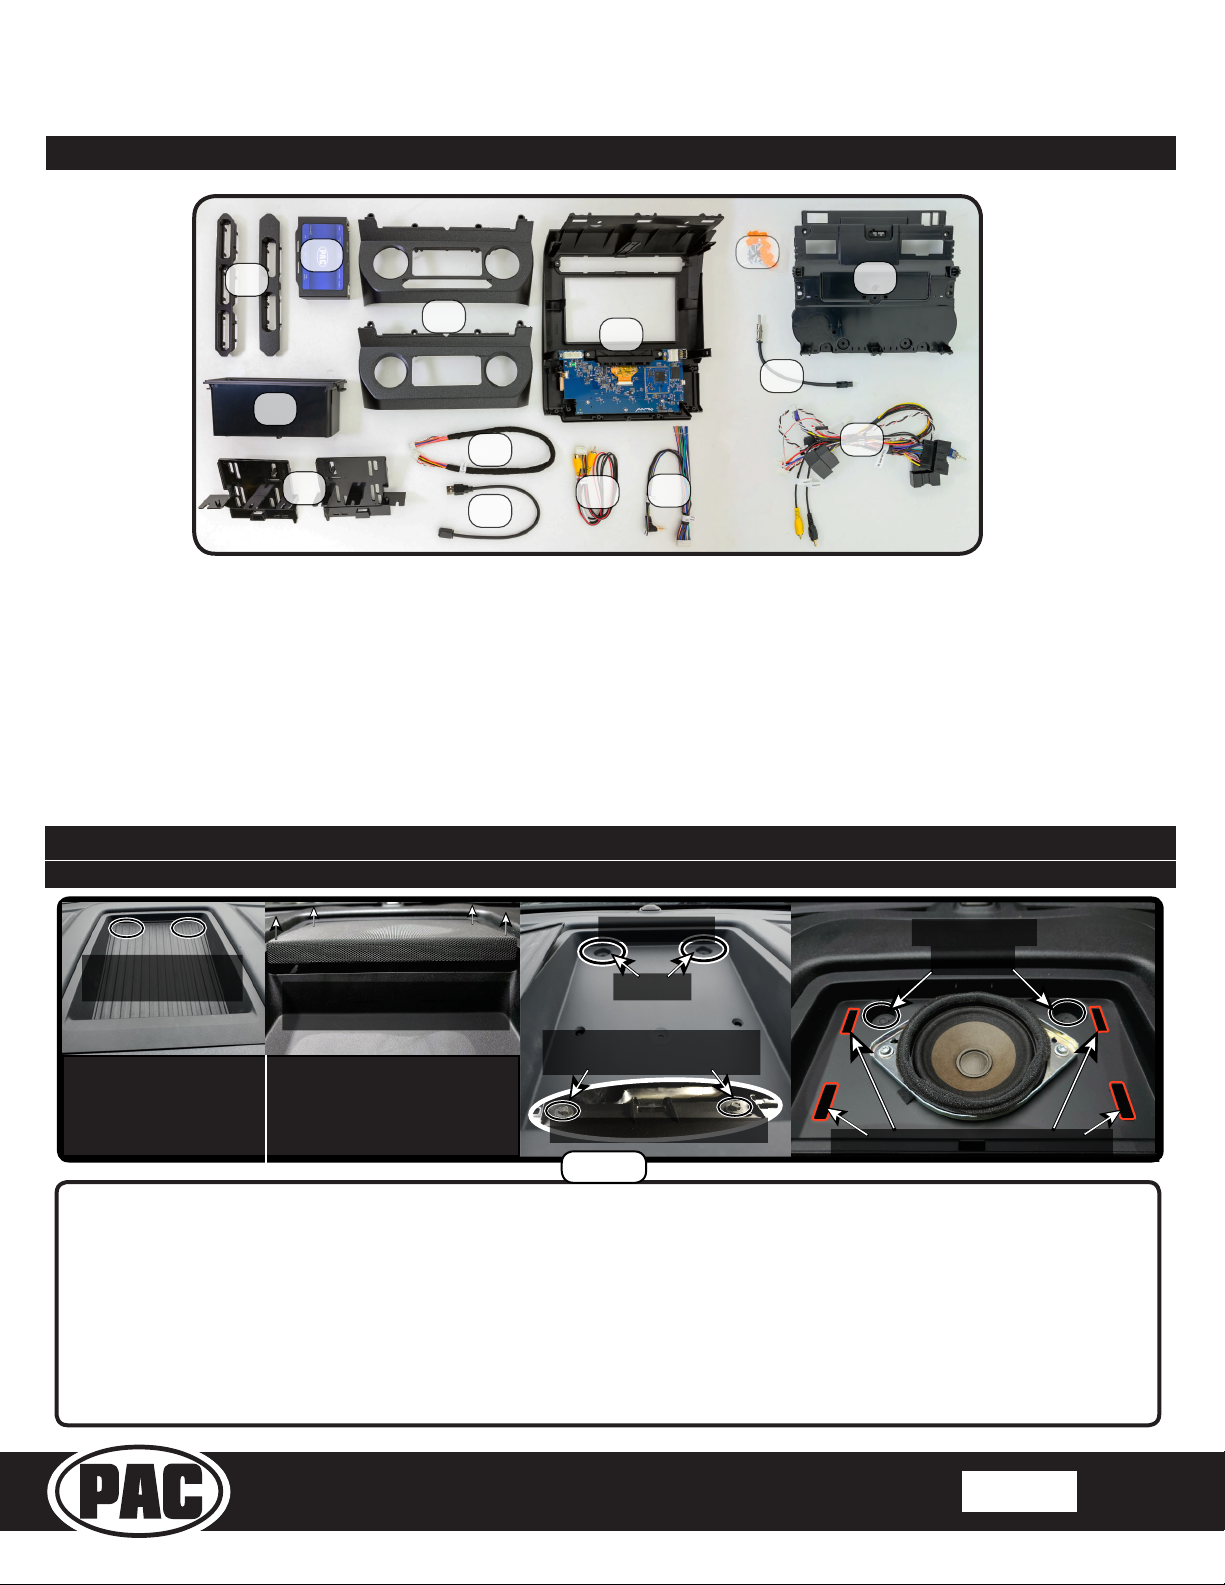
Components
Tools needed for installation : 7mm socket, 10mm socket, ratchet, T10 torx screwdriver, small athead screwdriver, plastic
panel removal tool (example - PAC part number TL-PRY2).
Complete Radio Replacement with
1. (x2) Upper Dash Button Inserts
2. RP4.2-FD2101 Interface
3. Pocket (For single DIN applications)
4. (x2) Radio Brackets (left and right)
5. (x2) HVAC Trim Panel
6. LCD Display Output Connector
7. USB Extension Cable (PAC part - USB-GM1)
9. Reverse Camera Retention Harness
10. RP4.2-FD2101 Aftermarket Radio Connection Harness
11. (x6) T10 6mm screws, (x8) Phillips Head Pan Head
Radio Mounting Screws and (x8) Dash Clips
12. Rear Panel Cover
13. AM / FM Antenna Adapter (BAA22)
14. RP4.2-FD2101 Interface Harness (FD2A-RS-HAR)
8. Radio Dash Bezel with 5.2” LCD Display
Installation
Part One: Disassembly of Factory Dash
Two 7mm Bolts
Remove Rubber Mat to
Access Two 7mm Bolts
at Back of Pocket
Without Center
Channel
Grill Held in Place By 4 Pull Tabs
Pull Upwards To Release
With Center
Channel
Pull Pocket Straight Up and
Two 7mm Bolts Below Pocket
Remove
Out to Access
Step 1
Remove the dash pocket that is at the top of the dash above the radio display.
If the vehicle does not have a center channel: Remove the the rubber mat from the pocket, remove the two 7mm bolts at
the back of the pocket, then use a plastic pry tool to pop the top pocket straight up, and out of the dash.
If the vehicle has a center channel: Use a plastic pry tool around the left and right side and front of the grill to pop the grill
straight up. There is a locking clip close to each corner of the grill. Remove the two 7mm bolts that are located at the back
of the pocket, then use a plastic pry tool to pop the top pocket straight up, and out of the dash.
Remove the two 7mm bolts that hold the radio dash panel in place that are located at the top, back side of the radio dash
panel.
Two 7mm Bolts
Remove
Grill Locking Clip Openings
© 2019 AAMP Global. All rights reserved. PAC is a Power Brand of AAMP Global.
PAC-audio.com
Rev: V2
Date:091319
Page 2
RPK4-FD2101
Top Right
Module Bracket
Previous Camera Module
Mounting Location
Camera
Module
Camera
Module
Top Right
Module Bracket
Audio Control Module
Factory Screen
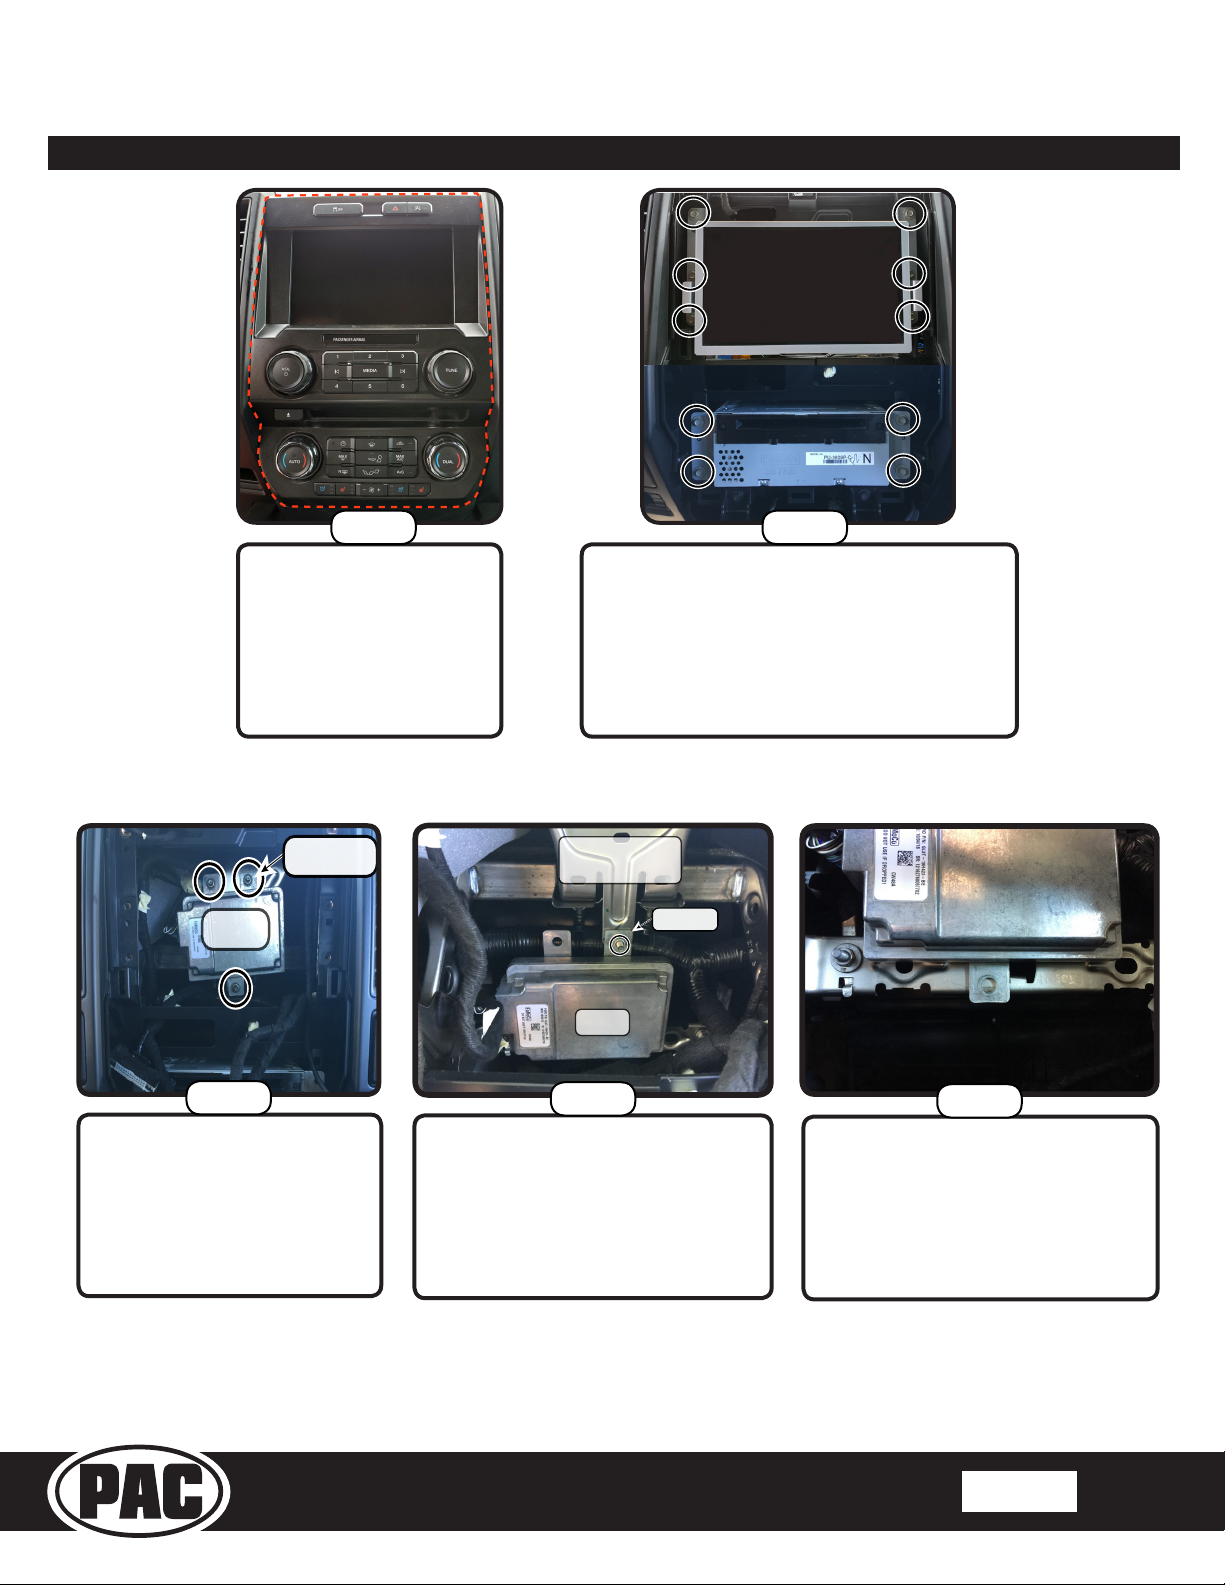
Part One: Disassembly of Factory Dash (cont.)
Complete Radio Replacement with
Integrated Climate Control Retention for Select
2015-2019 Ford F150 and 2017-2019 Ford Super Duty
Step 2
The radio dash panel
(outlined in Red) can now
be removed by pulling
toward you. A plastic
pry tool can be used if
necessary.
Step 4
If vehicle is equipped with a
factory camera module, it must
be relocated. Remove the three
nuts securing it using a 10mm
socket.
Remove the factory screen / SYNC module
(attached to the screen), and Audio Control
Module (ACM) using a 7mm socket. These
parts are no longer needed. If you intend to
reinstall the factory radio later, these pieces
will need to be stored away for use at time of
reinstallation.
Step 5
Lower the camera module in the dash
and place the top right mounting
bracket onto the previous bottom
stud mount, and loosely secure using
one of the factory 10mm nuts that
you removed in the previous step.
Step 3
Step 6
You can now secure the bottom
of the camera module by using
a zip tie or by using the fastener
of your choice. Once completed,
nish tightening the top nut from the
previous step.
© 2019 AAMP Global. All rights reserved. PAC is a Power Brand of AAMP Global.
PAC-audio.com
Rev: V2
Date:091319
Page 3
RPK4-FD2101
Dual Zone Climate Controls
Single Zone Climate Controls
Proceed to Section A
Jump to Section B
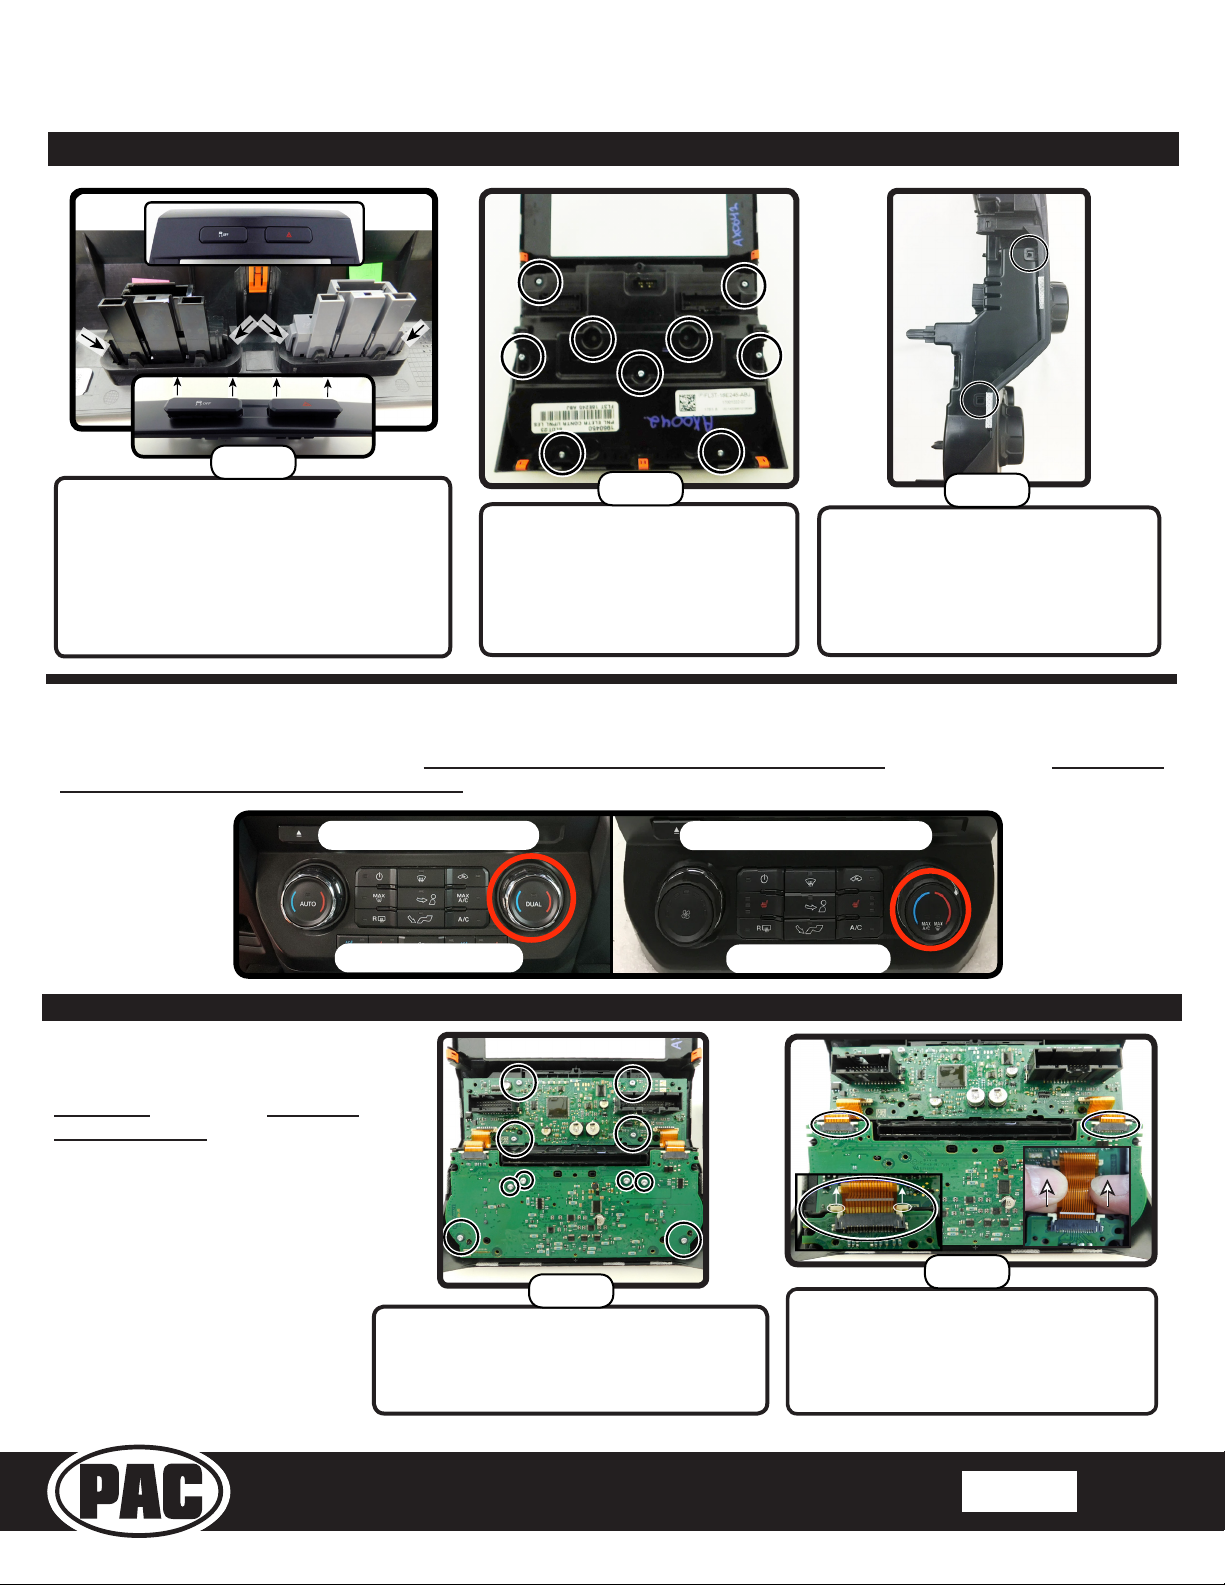
Part Two: Disassembly of Factory Dash Panel
Step 1
Remove the upper dash buttons from back of
the dash bezel and set aside for later use. To
release, squeeze the left and right release tabs
(on each button) inward. The buttons will come
out from the front of the dash bezel.
Depending on the trim package of the vehicle,
there will be two or three separate buttons. All
should be set aside.
Remove the (9) T10 22mm
screws from factory dash panel.
Set the screws aside for later
Complete Radio Replacement with
Integrated Climate Control Retention for Select
2015-2019 Ford F150 and 2017-2019 Ford Super Duty
Step 2
use.
Remove back of factory dash panel
by releasing the 2 locking tabs on
each side. The factory rear cover
panel will not be used with the
RPK4-FD2101 installation kit.
Step 3
Dual Zone or Single Zone Climate Controls?
What type of climate controls the vehicle has determines which instructions to follow for the remainder of the disassemby of
the factory dash panel. If the vehicle has
climate controls, jump ahead to Section B.
Part Two - Section A: With Dual Zone Climate Controls
dual zone climate controls, proceed to Section A.
If the vehicle has single zone
Section A:
Section A only covers dual zone
climate controls
For single zone climate controls
applications, see Section B Factory
Dash Panel Disassembly (page 5).
applications.
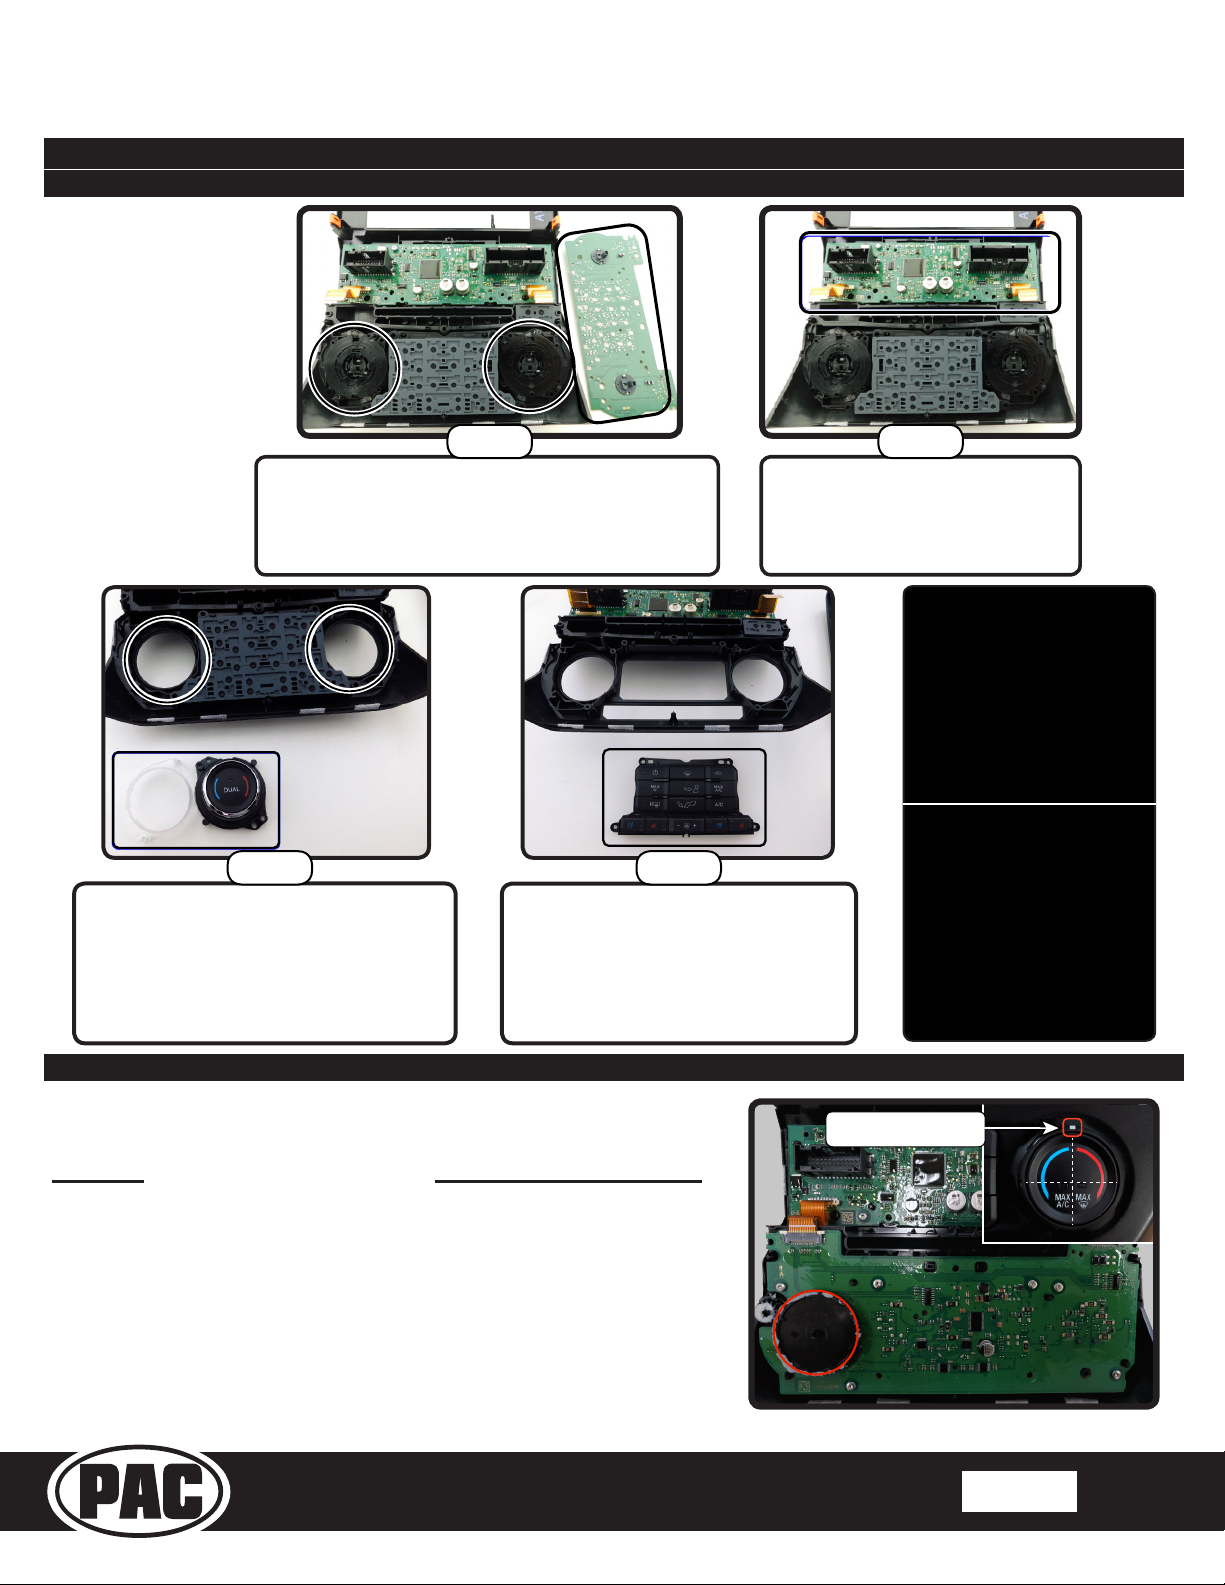
Step 4
Remove (4) T10 16mm screws from the
upper circuit board and the (6) T10 16mm
screws from the lower circuit board. Set
the screws aside for later use.
Step 5
Remove the 2 ribbon cables from the
lower circuit board by sliding each
of the locking tabs away from the
connector, and carefully pulling the
ribbon cable out of the connector.
(Continued Next Page)
© 2019 AAMP Global. All rights reserved. PAC is a Power Brand of AAMP Global.
PAC-audio.com
Rev: V2
Date:091319
Page 4
RPK4-FD2101
Center the Temperature
Control Knob
Part Two: Disassembly of Factory Dash Panel (cont.)
Section A: With Dual Zone Climate Controls
Section A (cont.):
Complete Radio Replacement with
Integrated Climate Control Retention for Select
2015-2019 Ford F150 and 2017-2019 Ford Super Duty
Remove the lower circuit board to gain access to the
temperature control and fan speed knobs, and set it
aside for later use. The temperature control and fan
speed knobs, along with the HVAC button panel, will
now be loose in the dash bezel.
Step 8 Step 9
Remove the temperature control and fan
speed knobs by pulling them out from
the back of the dash bezel, along with
the clear lighting rings (one on the left
side and one on the right side) that sit
below the knobs, and set the knobs and
light rings aside for later use.
Step 6
Remove the HVAC button panel, and
set it aside for later use.
Depending on the vehicle’s options,
the panel may, or may not include
buttons for heated and air conditioned
seats.
Step 7
Remove the HVAC upper circuit
board from the factory dash
bezel and set it aside for later
use.
Continue
To Part
Three
Bottom
of
Page 6
Part Two - Section B: With Single Zone Climate Controls
Section B:
Section B only covers applications with single zone climate controls.
For applications with dual zone climate controls, see Section A (page 4).
Prior to proceeding, center the temperature control knob so that the marker
on the knob is centered between the cold and hot scales on the face of the
knob. If the knob is not centered prior to additional steps, the temperature
control knob may not be able to adjust to the full cooling or heating positions.
(Continued Next Page)
© 2019 AAMP Global. All rights reserved. PAC is a Power Brand of AAMP Global.
PAC-audio.com
Rev: V2
Date:091319
Page 5
RPK4-FD2101
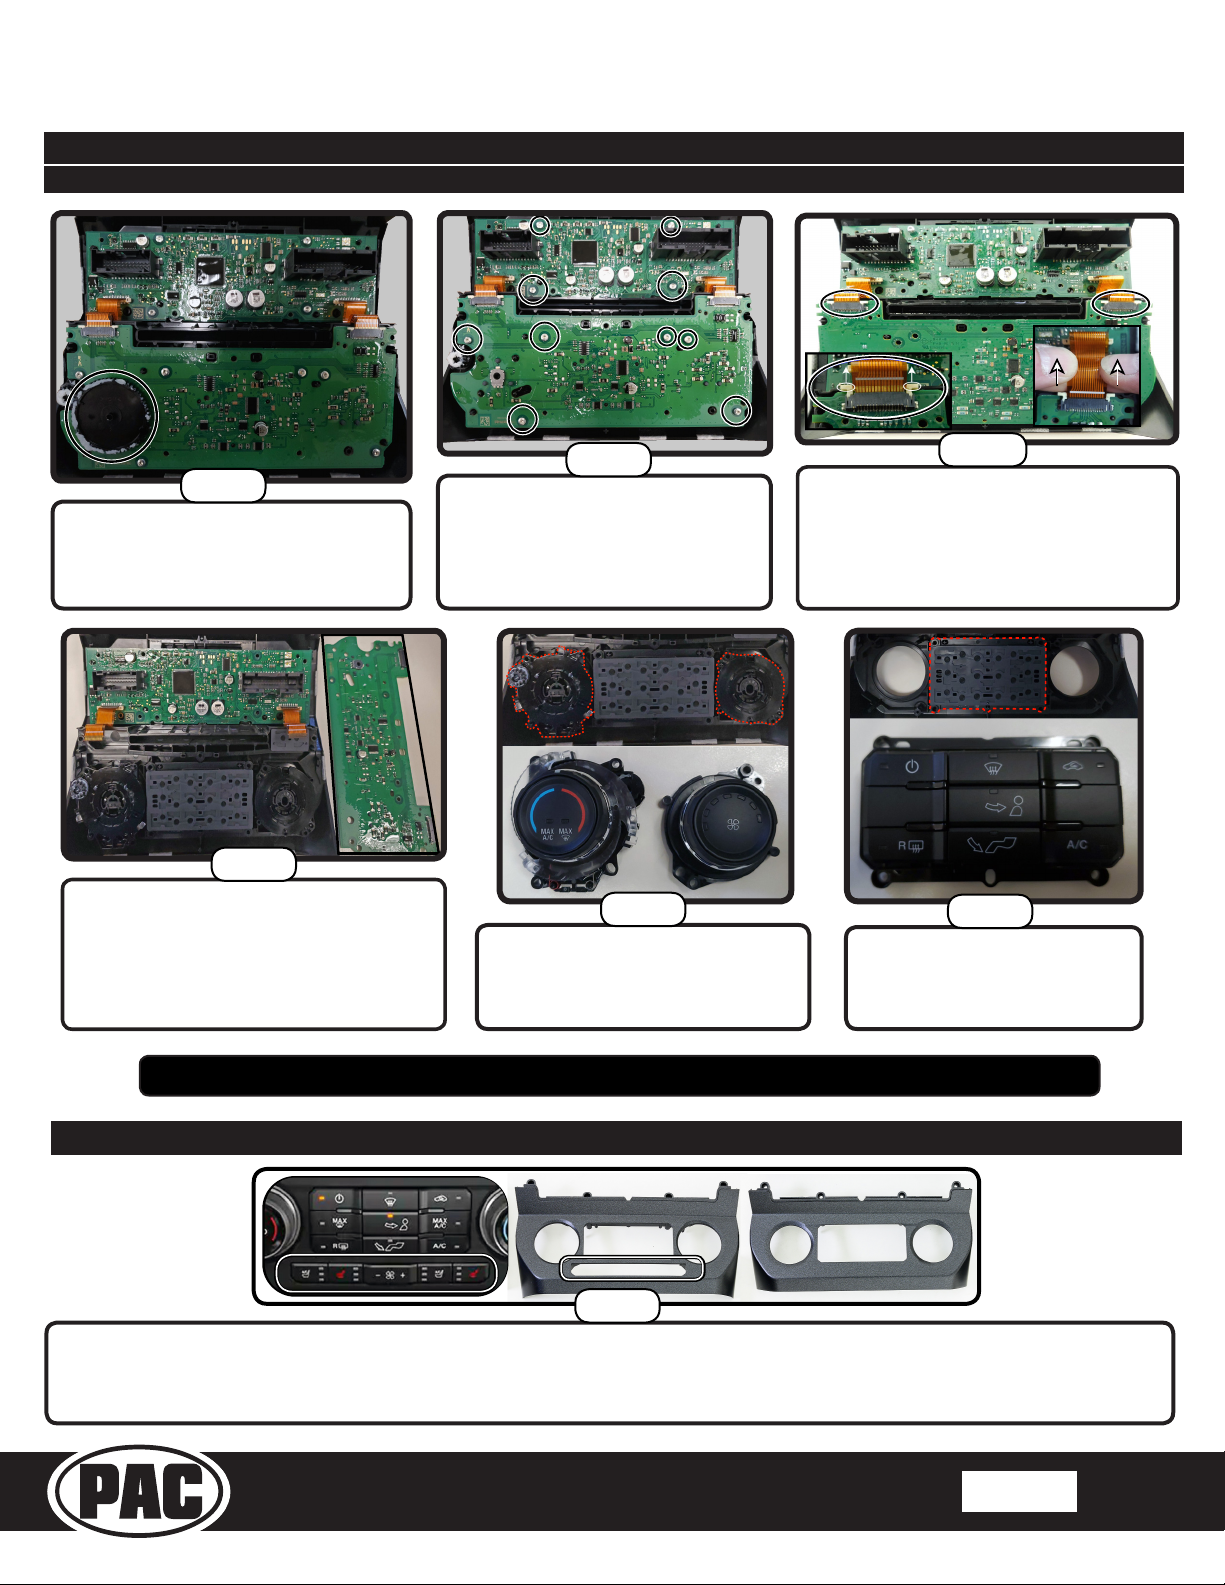
Part Two: Disassembly of Factory Dash Panel (cont.)
Section B: With Single Zone Climate Controls
Complete Radio Replacement with
Integrated Climate Control Retention for Select
2015-2019 Ford F150 and 2017-2019 Ford Super Duty
Step 4
Remove the large black plastic gear
by pulling the gear straight up from the
lower circuit board, and set aside
later use.
for
the (6) T10 16mm screws from the
lower circuit board. Set the screws
Step 7
Remove the lower circuit board to gain access
to the temperature control and fan speed
knobs, and set it aside for later use. The
temperature control and fan speed knobs,
along with the HVAC button panel, will now be
loose in the dash bezel.
Step 5
Remove (4) T10 16mm screws
from the upper circuit board and
aside for later use.
Step 8
Remove the temperature control
and fan speed knobs by pulling
them out from the back of the dash
bezel, and set aside for later use.
Step 6
Remove the 2 ribbon cables from the
lower circuit board by sliding each
side of the locking tab away from the
connector, and carefully pulling the
ribbon cable out of the connector.
Step 9
Remove the HVAC button
panel, and set it aside for later
use.
ContinueTo Part Three (Below)
Part Three: Assembly of Aftermarket Dash Kit
Step 1
Use the previously removed HVAC button panel to determine which bottom HVAC trim panel will be used. If the additional buttons
for heated / cooled seats and fan speed are present, the trim panel with the provision for the additional buttons will be used (left
trim panel in photo). If those buttons are not present, the trim panel without the additional button provision will be used (right trim
panel in photo). Refer to part 2, step 9.
© 2019 AAMP Global. All rights reserved. PAC is a Power Brand of AAMP Global.
PAC-audio.com
Rev: V2
Date:091319
Page 6
 Loading...