

Page 1

INSTRUCTION MANUAL
Pacic Accessory Corporation
1502 S. Santa Fe St. Santa Ana, CA 92705 USA
Voice: (714) 835-3022 Fax: (714) 835-3233
Copyright ©2006 PAC
iPAC-GM3
iPOD INTERFACE
WITH AUXILIARY INPUT
LAN
Page 2

Chapter 1 - Getting Started
1.1 Introduction
Thank you for purchasing the PAC’s iPAC-GM3 interface for OEM radios.
Designed for Video, Generation 3, 4, Mini, and Nano iPods. The IPACGM3 has three Modes of operation; Advanced, Manual, and Auxiliary Input. Advanced Mode allows you to use your factory stereo buttons and
steering wheel audio controls (if equipped) to directly control your iPod.
In Advanced Mode the iPod text is displayed on the factory radio. Manual
Mode allows you to control your iPod directly using the click wheel controls. Auxiliary input mode allows an external audio device to play through
your factory system.
The iPAC-GM3 works with vehicles that have navigation-equipped radios,
non-navigation radios, and vehicles equipped with XM satellite radio (refer
to section 2.1b for details). At the press of a button, you can switch between iPod, auxiliary input, and XM satellite radio (if equipped).
For updated production information, please visit PAC’s web site at www.
pac-audio.com/default.asp
1.2 Precautions (Important, Please Read)
UPDATING iPod FIRMWARE
For proper operation of the iPAC-GM3, your iPod must be updated with
the most recent version of rmware from Apple. This is done by accessing
apple’s web site: http://www.apple.com/ipod/download/.
PREVENTING DAMAGE TO YOUR VEHICLE OR iPod.
• The vehicle manufacturer recommends unplugging the iPod when not
in use.
• Do not plug in iPod until initialization is complete. Please see Section
2.2 for details.
• Prior to installation, ensure you know your radio security code.
• To eliminate the risk of an electrical short, we recommend removing the
negative terminal from the vehicles battery prior to installation.
4
Page 3

PROPER MOUNTING LOCATION
Pac
Securely install the interface in a location free from; heat, humidity, moving parts, sharp metal edges and direct sunlight. We recommend securing the interface to a suitable location using; double sided tape, Velcro,
or wire ties.
1.3 Compatibility Notes
This section will inform you of the specic requirements for your factory
radio to be compatible with the iPAC-GM3. These notes will inform you of
any issues or circumstances that can affect the compatibility of our product
with your radio, audio system, or accessories. Not all Factory radios are
compatible with the iPAC-GM3. The iPAC-GM3 will only work on models
equipped with the specications listed below. Please read and understand
these notes before proceeding:
Radio Requirements
Non navigation radios must have a
“CAT” button. Works with all XM ready
navigation radios.
1.4 Harness Selection
The harness used is determined by whether or not your vehicle has an
OEM Satellite Radio tuner installed. If you have Satellite radio installed,
use the GM3HXM harness. If no Satellite radio is installed, use the
GM3H harness. Visit the PAC’s web site at www.pac-audio.com/default.
asp for more information.
5
Page 4
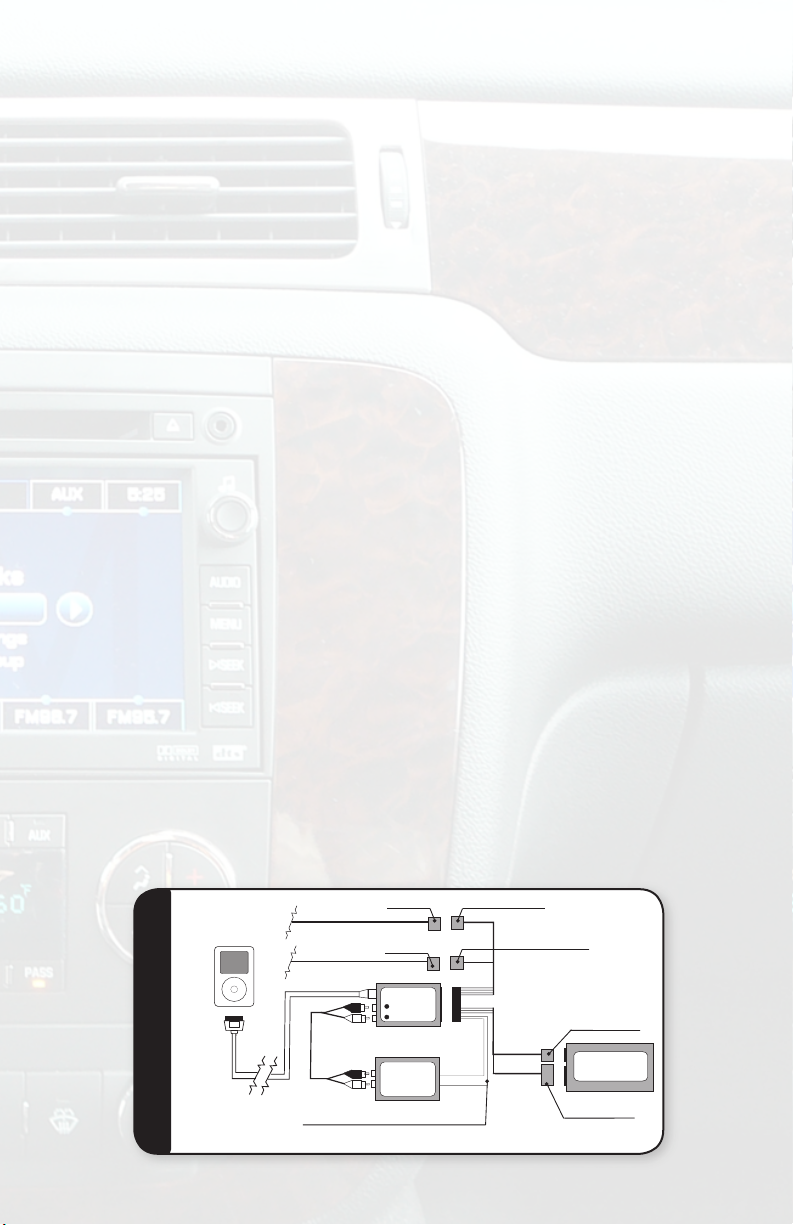
Chapter 2 - Installation:
Part
#
GM3H
Male Plug
14 Pin Female Plug
FACTORY 14 PIN HARNESS
GM3H
Harness
14 Pin Male Plug
RCA CABLE
iPod PLUG
& CABLE
iPAC-GM3
OPTIONAL
AUDIO
SOURCE
FACTORY RADIO
iPod
Red Wire From T-harness Optional
ACC +12V OUTPUT works with RAP
( Retained Accessory Power)
FACTORY 16 PIN HARNESS
16 Pin Female Plug
16 Pin Male Plug
Male Plug
This chapter will explain how to install the iPAC-GM3 interface using the
GM3H and the GM3HXM harnesses. Some installations require you to
make wiring connections. To eliminate the risk of an electrical short, we
recommend removing the negative terminal from the vehicles battery prior
to installation.If you do not feel comfortable making these connections, we
suggest you seek professional installation.
2.1a Harness GM3H: (No XM)
1. Carefully remove the radio from the dash of the vehicle.
2. Plug the 14 & 16-pin male ends of the GM3H harness into the 14 &
16-pin ports on the back of the radio. Next connect the factory 14 &
16-pin male connectors into the 14 & 16-pin female connectors on the
GM3H harness.
3. Optional Connections:
RED: Retains Accessory Power (RAP). Provides 12V(+) accessory power
after the vehicle is turned off up to 10 minutes, or until the drivers door
is open.
RED/WHITE: Non-functional wire; no connection is necessary.
Note: Insulate all wires that are on the IPAC-GM3 harness that are not
used for installation
4. Connect the 8-pin connector on the iPod docking cable to the IPACGM3 interface. (DO NOT CONNECT IPOD AT THIS TIME, WAIT UNTIL
INITIALIZATION IS COMPLETE, SEE SECTION 2.2 FOR DETAILS)
5. Plug the male 24-pin connector of the GM3H harness into the
iPAC-GM3 interface.
6
Page 5
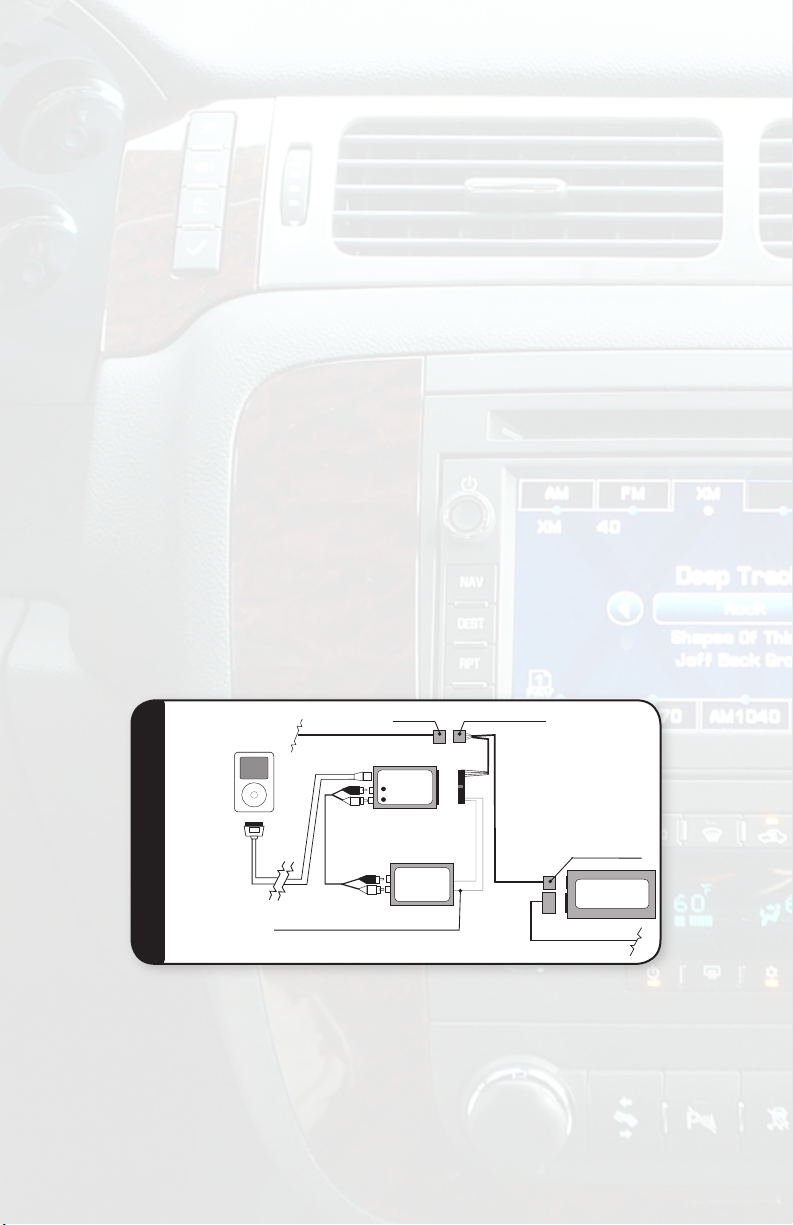
2.1b Harness GM3HXM: (With XM)
Part # GM3HXM
Male Plug
16 Pin Female Plug
Factory 16 Pin Harness
GM3HXM Harness
16 Pin Male Plug
RCA
CABLE
iPod PLUG
& CABLE
32 Pin Power
Audio Harness
iPAC-GM3
OPTIONAL
AUDIO
SOURCE
XM TUNER
iPod
Red Wire From T-harness Optional
ACC +12V OUTPUT works with RAP
( Retained Accessory Power)
1.Locate factory XM tuner. It is often located behind the glove box. Remove
any panels if necessary to access XM tuner’s 16-pin harness. Unplug the
16-pin harness.
2. Plug the male end of the GM3HXM harness into the 16-pin port on the
XM tuner. Next connect the factory male 16-pin into the 16-pin female connector on the GM3HXM harness.
3. Optional Connections:
RED: Retains Accessory Power (RAP). Provides 12V(+) accessory power
after the vehicle is turned off up to 10 minutes, or until the drivers door
is open.
RED/WHITE: Non functional wire; no connection is necessary.
Note: Insulate all wires that are on the iPAC-GM3 harness that are not
used for installation
4. Connect the 8-pin connector on the iPod docking cable to the iPACGM3 interface. (DO NOT CONNECT iPOD AT THIS TIME, WAIT UNTIL
INITIALIZATION IS COMPLETE, SEE SECTION 2.2 FOR DETAILS)
5. Plug the male 24-pin connector of the GM3H harness into the
iPAC-GM3 interface.
7
Page 6

2.2 Initialization:
Pac
Pac
Pac
Once you have completed the installation of your iPAC-GM3 interface, it
is important to allow the factory stereo time to recognize the new device.
This “hand shake” period occurs when the key is rst turned-on, and lasts
up to 10 seconds. A green LED located on the top of the IPAC-GM3 will
ash during the “hand shake.” ONCE THE GREEN LIGHT IS ON SOLID
THE INITIALIZATION IS COMPLETE. (NOTE: YOU MAY NOT SEE THE
GREEN LIGHT FLASH) Please do not press any buttons until initialization
is complete, or you will need to start the initializing “hand shake” process
over again by disconnecting and reconnecting the 24-pin plug from the
iPAC-GM3 and waiting through the “hand shake” period.
Chapter 3 - Operation:
This chapter will explain how to control the iPod from your factory radio In
Advanced, Manual, and Auxiliary Input Modes.
Note: All factory steering wheel controls (if equipped) remain functional and
operate the same as the corresponding buttons on the radio. Ex: SEEK ▲on
the steering wheel controls will function the same as pressing SEEK ▲ on
the radio.
3.1 Non-Navigation Radios:
8
Page 7

Accessing the iPod:
Pac
Pac
Pac
Pac
Pac
Pac
Pac
Press the BAND button on the radio until the display shows XM. If the
vehicle is equipped with XM, press and hold ▐◄ SEEK until a “beep” is
heard. The display will show “iPod.” If the vehicle is NOT equipped with XM
the display will immediately show “iPod” when you access the XM band.
NOTE: If the iPod navigation menu is not displayed above the presets,
press the CAT button
.
Note: When accessing menu functions using the TUNE KNOB, be sure
that none of the menu tabs above the presets are selected (See g. a
below). When menu tabs above the presets have been selected they will
be come highlighted (See g. b below). You CANNOT access the menu
functions with the TUNE KNOB when a menu tab above the presets is
highlighted. It takes approximately 30 seconds to time out.
Not all menu functions in the list are active when using the TUNE KNOB,
only access menu functions specied in the instructions.
gure a
gure b
Note: The CAT button is used to switch between the two pages of menu
options that are accessed using the presets. If the iPod menu tabs do
not appear above the presets when you access the iPod, press the CAT
button and they will appear. The menu tabs above the presets can be accessed in two ways:
1. Press either of the two buttons
located below each menu tab.
2. Use the FWD ►► or ◄◄ REW to move from one menu tab to the next.
Press the SEEK ►▌button to select the menu option.
Switching to Satellite Radio: (if equipped)
Press and hold ▐◄ SEEK button until a “beep” is heard (approximately 23 seconds) to return to Satellite Radio or Using the TUNE KNOB, turn the
knob in either direction until the display reads “Select XM Radio.” Press
the SEEK ►▌button to go to XM.
To return to the iPod, when in Satellite Mode press and hold the ▐◄ SEEK
button for approximately 2-3 seconds until a “beep” is heard.
9
Page 8

Accessing the Auxiliary Input:
Using the TUNE KNOB,(menu tabs must not be highlighted) turn the knob
in either direction until the display reads “Select AUX In.” Press the SEEK
►▌button to go to the Auxiliary input.
To return to the iPod, use the TUNE KNOB (menu tabs must not be highlighted) to scroll through menu options until “Select iPod” is displayed.
Press the SEEK ►▌to return to iPod.
Note: While in Auxiliary input mode there is an adjustment that can be
used to match the level of the auxiliary input source with the levels of the
other audio sources. To set the GAIN levels use the TUNE KNOB. Turn
the TUNE KNOB either direction until “Select Gain” is displayed. Press
the SEEK ►▌ button to switch between “Gain High” and “Gain Normal.”
3.1a Manual Mode
When the iPod is plugged in the default setting is for manual control of the
iPod. If you are in Advanced Mode; using the TUNE KNOB, (menu tabs
must not be highlighted) turn the knob in either direction until the display
reads “iPod Advanced.” Press the SEEK ►▌button to go to manual control of the iPod. The iPod will now be controllable using the click wheel
controls on the iPod. While in Manual Mode the display on the factory
radio will display “PAC iPod.”
3.1b Advanced Mode
If you are in Manual Mode; using the TUNE KNOB, (menu tabs must not
be highlighted) turn the knob in either direction until the display reads “iPod
Manual.” Press the SEEK ►▌button to go to Advanced Mode. The factory
stereo radio buttons will now control the iPod, use of the click wheel controls will be disabled while using Advanced Mode. iPod text will now be
displayed on the factory radio
Browse by Artist
Press either of the preset buttons below the text “Artist” on the display
to highlight the Artist menu tab. Use the TUNE KNOB to scroll through
the artists. To select the desired artist press the SEEK ►▌button. The
“Songs” tab on the menu will become highlighted. Use the TUNE KNOB
to scroll through the songs and press the SEEK ►▌button to select the
desired song. Once the song is selected the SEEK ►▌and ▐◄ SEEK can
be used to change the track up and down within the Artist selected.
10
Page 9

Browse by Album
Press either of the preset buttons below the text “Albums” on the display
to highlight the Album menu tab. Use the TUNE KNOB to scroll through
the albums. To select the desired album press the SEEK ►▌button. The
“Songs” tab on the menu will become highlighted. Use the TUNE KNOB
to scroll through the songs and press the SEEK ►▌button to select the
desired song. Once the song is selected, the SEEK ►▌and ▐◄ SEEK
can be used to change the track up and down within the Artist selected.
Browse by Genre
Press either of the preset buttons below the text “Genre” on the display to
highlight the Genre menu tab. Use the TUNE KNOB to scroll through the
music genres. To select the desired genre press the SEEK ►▌button. The
“Songs” tab on the menu will become highlighted. Use the TUNE KNOB
to search through the songs and press the SEEK ►▌button to select the
desired song. Once the song is selected the SEEK ►▌and ▐◄ SEEK can
be used to change the track up and down within the Genre selected.
Browse by Playlist
Press either of the preset buttons below the text “Playlists” on the display
to highlight the Playlist menu tab. Use the TUNE KNOB to scroll through
the Playlists. To select the desired Playlist press the SEEK ►▌button. The
“Songs” tab on the menu will become highlighted. Use the TUNE KNOB
to scroll through the songs and press the SEEK ►▌button to select the
desired song. Once the song is selected the SEEK ►▌and ▐◄ SEEK can
be used to change the track up and down within the Playlist selected.
Browse by Songs
Press either of the preset buttons below the text “Songs” on the display to
highlight the Song menu tab. Use the TUNE KNOB to scroll through the
songs and press the SEEK ►▌button to select the desired song. Once
the song is selected the SEEK ►▌and ▐◄ SEEK can be used to change
the Song selected.
Fast Forward
Press either of the preset buttons below the text “RWND-FFW” on the
display to highlight the Rewind/Fast Forward menu tab. Press the preset
button below “FFW” to begin Fast Forwarding. Press the same button
again to resume play.
Rewind
Press either of the preset buttons below the text “RWND-FFW” on the display to highlight the Rewind/Fast Forward menu tab. Press the preset
button below “RWND” to begin rewinding. Press the same button again to
resume play.
11
Page 10

Next Track
FAV
RPT
DEST
NAV
AUDIO
MENU
SEEK
SEEK
FAV
RPT
DEST
NAV
AUDIO
MENU
SEEK
SEEK
FAV
RPT
DEST
NAV
AUDIO
MENU
SEEK
SEEK
FAV
RPT
DEST
NAV
AUDIO
MENU
PAC iPo d
Main Menu
3:40 iPod
Avenge d Seven fol
FM9 5.3FM9 2.9AM1 300
AM FM XM AUX
DIS C
:
AM9 30AM8 20
FAV
6
XM Cate gories
Playlists
Artists
Akinelle
Back
Andre 3000
Avenged Seven
Avril Lavigne
Black eyed pea
Black eyed pea
Albums
Genre
PAC
XM Cate gories
Playlists
Artists
10,000 Days
Back
40 0z. To Freed
Bilingual
Block Rockin’ B
Breaks & Hous
Callfornication
Albums
Genre
XM Cate gories
Playlists
Artists
Select iPod
Back
iPod Manual
iPod Advanced
Goto XM Radio
Select Auxin
Aux Gain Hi/Lo
Albums
Genre
PAC
PAC
Coming
Soon
Coming
Soon
Press the SEEK ►▌button to advance forward one track.
Note: This function will not work when a menu tab above the presets is highlighted.
Previous Track
Press the ▐◄ SEEK button to go back one track.
Note: This function will not work when a menu tab above the presets is highlighted.
3.2 Navigation Radios:
Note: Due to restrictions of GM’s navigation
radios, while the vehicle is in motion the in depth
menu system of the navigation radio will not be
usable, thus some Advanced Mode functions will
not be available while the vehicle is in motion.
Accessing iPAC-GM3 Menus:
To gain access to the iPAC-GM3’s touch screen menus, touch the “Main
Menu” icon and all menu option icons will display on the screen.
Accessing the iPod:
Touch the “XM” icon on the radio display. If the vehicle is equipped
with XM, press and hold ▐◄ SEEK, or
The display will show “iPod.” If the vehicle is NOT equipped with XM the
display will immediately show “iPod” when you access the XM band.
until a “beep” is heard.
12
Page 11

FAV
RPT
DEST
NAV
AUDIO
MENU
SEEK
SEEK
XM Cate gories
Playlists
Artists
Select iPod
Back
iPod Manual
iPod Advanced
Goto XM Radio
Select Auxin
Aux Gain Hi/Lo
Albums
Genre
PAC
Switching to Satellite Radio: (if equipped)
Touch the “PAC” icon on the radio display, and then touch the “Goto XM Radio” icon. To go back to the main XM control screen touch the “Back” icon, or
press the AUDIO button.
Accessing the Auxiliary Input:
Touch the “PAC” icon on the radio display, and then touch the “Select Aux In”
icon. To go back to the previous set of options touch the “Back” icon, or press
the AUDIO button to return to the Main Menu screen. Also, simply disconnect-
ing the iPod from the docking cable will switch the interface from iPod mode
to the Auxiliary Input.
Note: While in Auxiliary input mode there is an adjustment that can be
used to match the level of the auxiliary input source with the levels of
the other audio sources. Touch the “PAC” icon on the radio display, and
then touch the “Aux Gain Hi/Lo” icon to switch between High and Low.
To return to the Main Menu screen touch the “Back” icon, or press the
AUDIO button.
3.2a Manual Mode
Touch the “PAC” icon on the radio display, and then touch the “iPod Manual”
icon. To return to the Main Menu screen touch the “Back” icon, or press the
AUDIO button. The iPod will now be controllable using the click wheel controls on the iPod. While in Manual Mode the display on the factory radio
will show “PAC iPod.”
13
Page 12

3.2b Advanced Mode
FAV
RPT
DEST
NAV
AUDIO
MENU
SEEK
SEEK
FAV
RPT
DEST
NAV
AUDIO
MENU
SEEK
SEEK
XM Cat egories
Playlists
Artists
Akinelle
Back
Andre 3000
Avenged Seven
Avril Lavigne
Black eyed pea
Black eyed pea
Albums
Genre
PAC
XM Cat egories
Playlists
Artists
Select iPod
Back
iPod Manual
iPod Advanced
Goto XM Radio
Select Auxin
Aux Gain Hi/Lo
Albums
Genre
PAC
FAV
RPT
DEST
NAV
AUDIO
MENU
SEEK
SEEK
FAV
RPT
DEST
NAV
AUDIO
MENU
SEEK
SEEK
XM Cat egories
Playlists
Artists
10,000 Days
Back
40 0z. To Freed
Bilingual
Block Rockin’ B
Breaks & Hous
Callfornication
Albums
Genre
XM Cat egories
Playlists
Artists
Select iPod
Back
iPod Manual
iPod Advanced
Goto XM Radio
Select Auxin
Aux Gain Hi/Lo
Albums
Genre
PAC
PAC
Touch the “PAC” icon on the radio display, and then touch the
“iPod Advanced” icon. The factory stereo radio buttons will now control the
iPod, use of the click wheel controls will be disabled while using Advanced
Mode. iPod text will now be displayed on the factory radio. To get to the
Main Menu touch the “Back” icon, or press the AUDIO button.
Browse by Artist
Touch the “Artists” icon on the display. Use
the and icons on the display located below the “Back” icon to scroll up and
down the list of artists. Note: Due to the re-
straints of the navigation radio, only the rst
25 Artist will be displayed. Touch the icon
with the name of the artist you wish to play.
The rst track will begin to play. To view the
song title that is currently playing, touch
the “Back” icon, or press the AUDIO button
to display the Main Menu. The track
information will be displayed below the “Main
Menu” icon.
Browse by Album
Touch the “Albums” icon on the display.
If necessary, use the and
display located below the “Back” icon to scroll
up and down the list of albums. Note: Due
to the restraints of the navigation radio, only
the rst 25 Albums will be displayed. Touch
the icon with the name of the album you wish
to play. The rst track will begin to play. To
view the song title that is currently playing,
touch the “Back” icon, or press the AUDIO
button to display the Main Menu. The track
information will be displayed below the “Main
Menu” icon.
icons on the
14
Page 13

Browse by Genre
FAV
RPT
DEST
NAV
AUDIO
MENU
SEEK
SEEK
FAV
RPT
DEST
NAV
AUDIO
MENU
SEEK
SEEK
FAV
RPT
DEST
NAV
AUDIO
MENU
SEEK
SEEK
XM Cat egories
Playlists
Artists
10,000 Days
Back
40 0z. To Freed
Bilingual
Block Rockin’ B
Breaks & Hous
Callfornication
Albums
Genre
XM Cat egories
Playlists
Artists
Alternative & P
Back
Break Beats
Dirrty
Electronica/Da
genre
Hip-Hop
Albums
Genre
XM Cat egories
Playlists
Artists
Select iPod
Back
iPod Manual
iPod Advanced
Goto XM Radio
Select Auxin
Aux Gain Hi/Lo
Albums
Genre
PAC
PAC
PAC
FAV
RPT
DEST
NAV
AUDIO
MENU
SEEK
SEEK
FAV
RPT
DEST
NAV
AUDIO
MENU
SEEK
SEEK
FAV
RPT
DEST
NAV
AUDIO
MENU
SEEK
SEEK
FAV
RPT
DEST
NAV
AUDIO
MENU
SEEK
SEEK
FAV
RPT
DEST
NAV
AUDIO
MENU
SEEK
SEEK
FAV
RPT
DEST
NAV
AUDIO
MENU
SEEK
SEEK
PAC iP od
Main Menu
3:40 iPod
Avenged Sev enfol
FM95.3FM92.9AM1300
AM FM XM AUX
DISC
:
AM930A M820
FAV
6
XM Cat egories
Playlists
Artists
Akinelle
Back
Andre 3000
Avenged Seven
Avril Lavigne
Black eyed pea
Black eyed pea
Albums
Genre
PAC
XM Cat egories
Playlists
Artists
10,000 Days
Back
40 0z. To Freed
Bilingual
Block Rockin’ B
Breaks & Hous
Callfornication
Albums
Genre
XM Cat egories
Playlists
Artists
Stinger Mini
Back
My Top Rated
new jams
Recently Added
Recently Played
Rock out
Albums
Genre
XM Cat egories
Playlists
Artists
Alternative & P
Back
Break Beats
Dirrty
Electronica/Da
genre
Hip-Hop
Albums
Genre
XM Cat egories
Playlists
Artists
Select iPod
Back
iPod Manual
iPod Advanced
Goto XM Radio
Select Auxin
Aux Gain Hi/Lo
Albums
Genre
PAC
PAC
PAC
PAC
Coming
Soon
Coming
Soon
Touch the “Genre” icon on the display. If
necessary, use the and icons on the
display located below the “Back” icon to scroll
up and down the list of artists. Touch the icon
with the name of the genre of music you wish
to play. The rst track will begin to play. To
view the song title that is currently playing,
touch the “Back” icon, or press the AUDIO
button to display the Main Menu. The track
information will be displayed below the “Main
Menu” icon.
Browse by Playlist
Touch the “Playlists” icon on the display. If
necessary, use the and icons on the
display located below the “Back” icon to scroll
up and down the list of playlists. Note: Due to
the restraints of the navigation radio, only the
rst 25 Playlists will be displayed. Touch the
icon with the name of the playlist you wish
to play. The rst track will begin to play. To
view the song title that is currently playing,
touch the “Back” icon, or press the AUDIO
button to display the Main Menu. The track
information will be displayed below the “Main
Menu” icon.
Next Track
Press the ►▌SEEK or button to advance forward one track.
Previous Track
Press the ▐◄ SEEK or
15
button to advance forward one track.
Page 14

3.3 Troubleshooting
Symptom Cause Remedy
No Power •Blown fuse in vehicle fuse
Green light not solid •The radio is not recognizing
Can not change selection in
a folder
iPod is not charging •iPod Connection cable is
block.
•24-pin harness is not
seated correctly into the
iPAC-GM3 interface
the interface
•24-pin harness is not
seated correctly into the
iPAC-GM3 interface
The folder only has one
selection i.e. Artist, Album,
Playlist or Song.
not properly mated to the
iPod
•iPod battery is defective
•Replace fuse with same
amp rating. If the fuse
blows again, call tech
support.
•Check cable and wiring
connection.
•Reinstall and verify if the
correct harness was used.
•Check cable and wiring
connection.
Use browse menu to select
new album, playlist, genre,
or artist
•Check cable and wiring
connection.
•Return to Apple for
service
CHAPTER 4 - Important Info.
4.1 Warranty
One Year Limited Warranty
The quality controls used in the manufacture of this product will ensure
your satisfaction. This warranty applies only to the original purchaser of
this product from an authorized PAC dealer.
This warranty covers any supplied or manufactured parts of this product
that, upon inspection by Pacic Accessory Corporation authorized personnel, is found to have failed in normal use due to defects in material or
workmanship. This warranty does not apply to installation expenses.
Attempting to service or modify this unit, operating this unit under
conditions other than the recommended voltage will render this WARRANTY VOID.
Unless otherwise prescribed by law, Pacic Accessory Corporation shall
not be liable for any personal injury, property damage and or any incidental
or consequential damages of any kind (including water damage) resulting
from malfunctions, defects, misuse, improper installation or alteration of
this product.
All parts of this Pacic Accessory Corporation product are guaranteed for
a period of 1 year as follows:
16
Page 15

Within the rst 12 months from date of purchase, subject to the conditions
above, Pacic Accessory Corporation will repair or replace the product
at their discretion, if it is defective in material or workmanship providing
it is returned to an Authorized Pacic Accessory Corporation’s Dealer, with PROOF OF PURCHASE from an authorized Pacic Accessory
Corporation dealer.
4.2 Warning:
This equipment may be reset by unintentional electrostatic discharge
during operation. Exposure to direct sunlight or extreme heat may cause
damage or malfunction.
4.3 FCC Class B Radio Frequency
Interference Statement
This equipment has been tested and found to comply with the limits for a
Class B digital device, pursuant to Part 15 of FCC rules. These limits are
designed to provide reasonable protection against harmful interference in
a residential installation. This equipment generates, uses, and can radiate
radio frequency energy and, if not installed and used in accordance with
the instructions, may cause harmful interference to radio communications.
However, there is no guarantee that interference will not occur in a particular installation. If this equipment does cause harmful interference to radio
or television reception, which can be determined by turning the equipment
off and on, the user is encouraged to try to correct the interference by one
or more of the following measures:
1. Reorientate or relocate the receiving antenna.
2. Increase the separation between the equipment and receiver.
3. Connect the equipment into an outlet on a circuit different from that of
which the receiver is connected.
4. Consult the dealer or an experienced radio / television technical
for help
Notice : The changes or modications not expressly approved by the
party responsible for compliance could void the user authority to operate
the equipment.
714-835-3022 Hours: 8:00 AM - 4:30 PM, PST,MON- FRI
17
For consumer technical support call:
 Loading...