

OzSpy DVR User Manual

1
OzSpy AHD DVR User Manual
OzSpy
DVR Manual

2
OzSpy AHD DVR User Manual
This product is designed especially for the security and surveillance field and is an
outstanding digital surveillance product. It introduces embedded LINUX operating system which
is more stable. It also introduces standard H.264mp video compressed format and G.711A
audio compressed format which insures the high quality image and low error coding ratio.
Strong network services greatly enhance the network data transmission capacity and remote
control capabilities.
The First Part: Basic Operation
1 Basic Installation
1.1 Hard Disk Installation
For the first use please install the hard disk.
Full Function series DVR supports 2 Sata hard disks, the Simple Function series DVR
supports 1 Sata hard disk.
Note: DVR can run and monitor normally without hard disk, it can’t record and playback.
1.2 Mouse Connection
Full Function series DVR has 1 USB connection on the back panel and 1 USB connection on the
front panel, the 2 USB connections could be used for mouse, USB stick, 3G&WIFI module, portable
HDD and USB DVR-RW.
Simple Function series has two USB connections on the back panel for mouse and USB stick.
2 Turn on
Plug the power lead in and turn on the power supply switch. When the DVR is turned on
the power supply indicator light will come on. After starting up, you will hear a beep, the
default setting of video output is multiple-window mode.

3
OzSpy AHD DVR User Manual
1 Recording
3 Video loss
Note: Restarting the DVR after abnormal power off, the DVR will automatically recover
the state before power off.
3 Turn off
There are two methods to turn off the DVR which are soft switch and hard switch. Entering
[Main menu] and choosing [Logout] in the [turn off the system] option is called soft switch.
Turning off at the power supply switch is called hard switch.
Note: The settings must be saved before replacing the battery otherwise the information
will be lost.
4 Login
When the DVR boots up, user must login and the system provides the corresponding
functions with the user purview. There are two user settings which are admin, and guest; and
they have no passwords. “Admin” is the super user purview; “Guest” is the common user
purview.
Password protection: If the password is continuously wrong three
times, the alarm will start. If the password is continuously wrong five
times, the account will be locked. (Through reboot or after half an hour,
the account will be unlocked automatically).
For your system security, please modify your password after first login.
5 Preview Picture1. Login
Login normally and choose the multi-menu preview status.
The system date, time and channel name are shown in each viewing window. The
surveillance video and the alarm status are shown in each window.
4
OzSpy AHD DVR User Manual
2 Motion
4 Camera
Table1 Preview icon
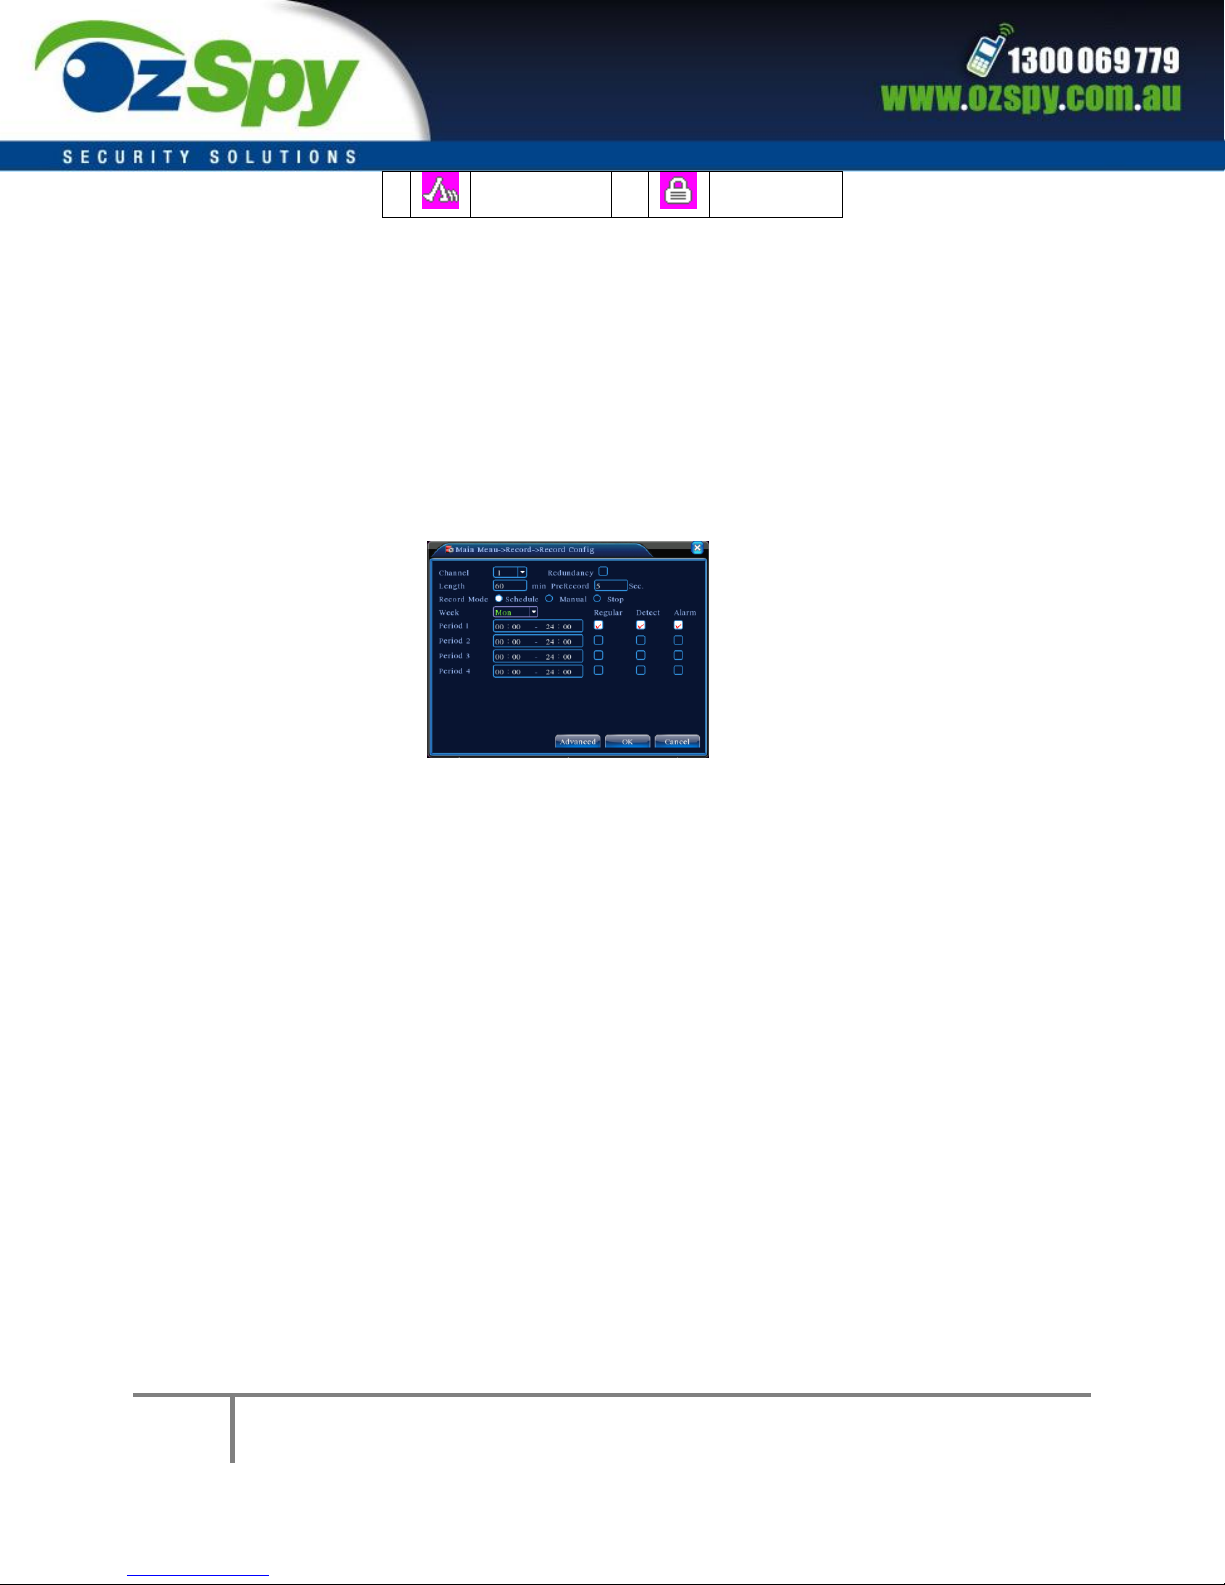
6 Recording Config
Set the recording parameters in the surveillance channel. You can enter [Main Menu]>
[Record]> [Record Config] to set. The system’s default setting is 24 hours continuous
recording.
Note: There is at least one read-write hard disk if the DVR records normally.
Picture 2
Channel - Choose the corresponding channel number to set the channel. Choose the “all”
option to set all channels.
Redundancy - Choose the recording file and backup in two hard disks. The first one is read-
write disk, the other is redundant disk.
Length - Set the time length of each video file. 60minutes is default length.
PreRec - Record 1-30 seconds before the action. (file length is decided by the code stream)
Schedule - Record according to the set video type (regular, detect and alarm) and time section.
Manual - Click the “all” button and the corresponding channel will record no matter what state
it is in.
Stop - Click the “stop” button to stop the recording in any state.

5
OzSpy AHD DVR User Manual
Period - Set the time for recording, the recording will start only in the set range.
Recording Type: regular, detection or alarm.
Regular - Perform regular recording in the set time section. The video file type is “R”.
Detect - Select the “Detect “to start the motion detection recording. The video file type is
“M”.
Alarm - Select “Alarm” to activate the external alarm when the motion detect has been
activated during the set time selection. The video file type is “A”.
7.Snapshot Storage. (partial devices supported)
Setup snapshot parameters for different channels. First time it's set for 24hours snapshot
continuously, please go to Main Menu->Record->Snapshot Storage for appropriate settings.
Note: If normal snapshot storage, please setup Snap at Main Menu->Advanced->HDD
Manage->Snapshot.
Picture3 Snapshot Storage
8 Video Playback
There are two methods for you to play the video files on the hard disk.
1. In the desktop shortcut menu.

6
OzSpy AHD DVR User Manual
2. Main Menu>Record>Playback.
Note: The hard disk that saves the video files must be set as read-write or read-only
state.
Picture4 Video Playback
Picture’s 3 and 4.
1.Playback control 2. Operating Tips 3. Record type
4.Time progress bar options 5. Switching time or file mode
6.File Search 7. Channel option 8. Date option 9. Storage Device option 10. File information 11.
File Option 12. Time
 Loading...