

Page 1

OPERATING MANUAL
FOR HR200 AND HR300 UNITS
Page 2
CONGRATULATIONS ON TAKING THE FIRST STEP IN CHANGING THE WAY YOU HUNT—FOREVER.
WITH PROPER APPLICATION, YOUR OZONICS UNIT WILL ALLOW YOU TO DESTROY THE MAIN
DEFENSE OF THE GAME YOU PURSUE … ITS SENSE OF SMELL. HOW OZONICS WORKS IS
SCIENCE, IS PROVEN AND IT’S SIMPLE: YOUR OZONICS UNIT PRODUCES OZONE, WHICH WILL
ELIMINATE, ALTER AND REDUCE THE ODOR YOU EMIT DURING EVERY SECOND OF YOUR HUNT.
THAT IS THE DEFINITION OF ACTIVE SCENT CONTROL, AND THAT IS THE DEFINITION OF SUCCESS.
IF IT’S
NOT OZONICS
TM
IT’S NOT ELIMINATION.
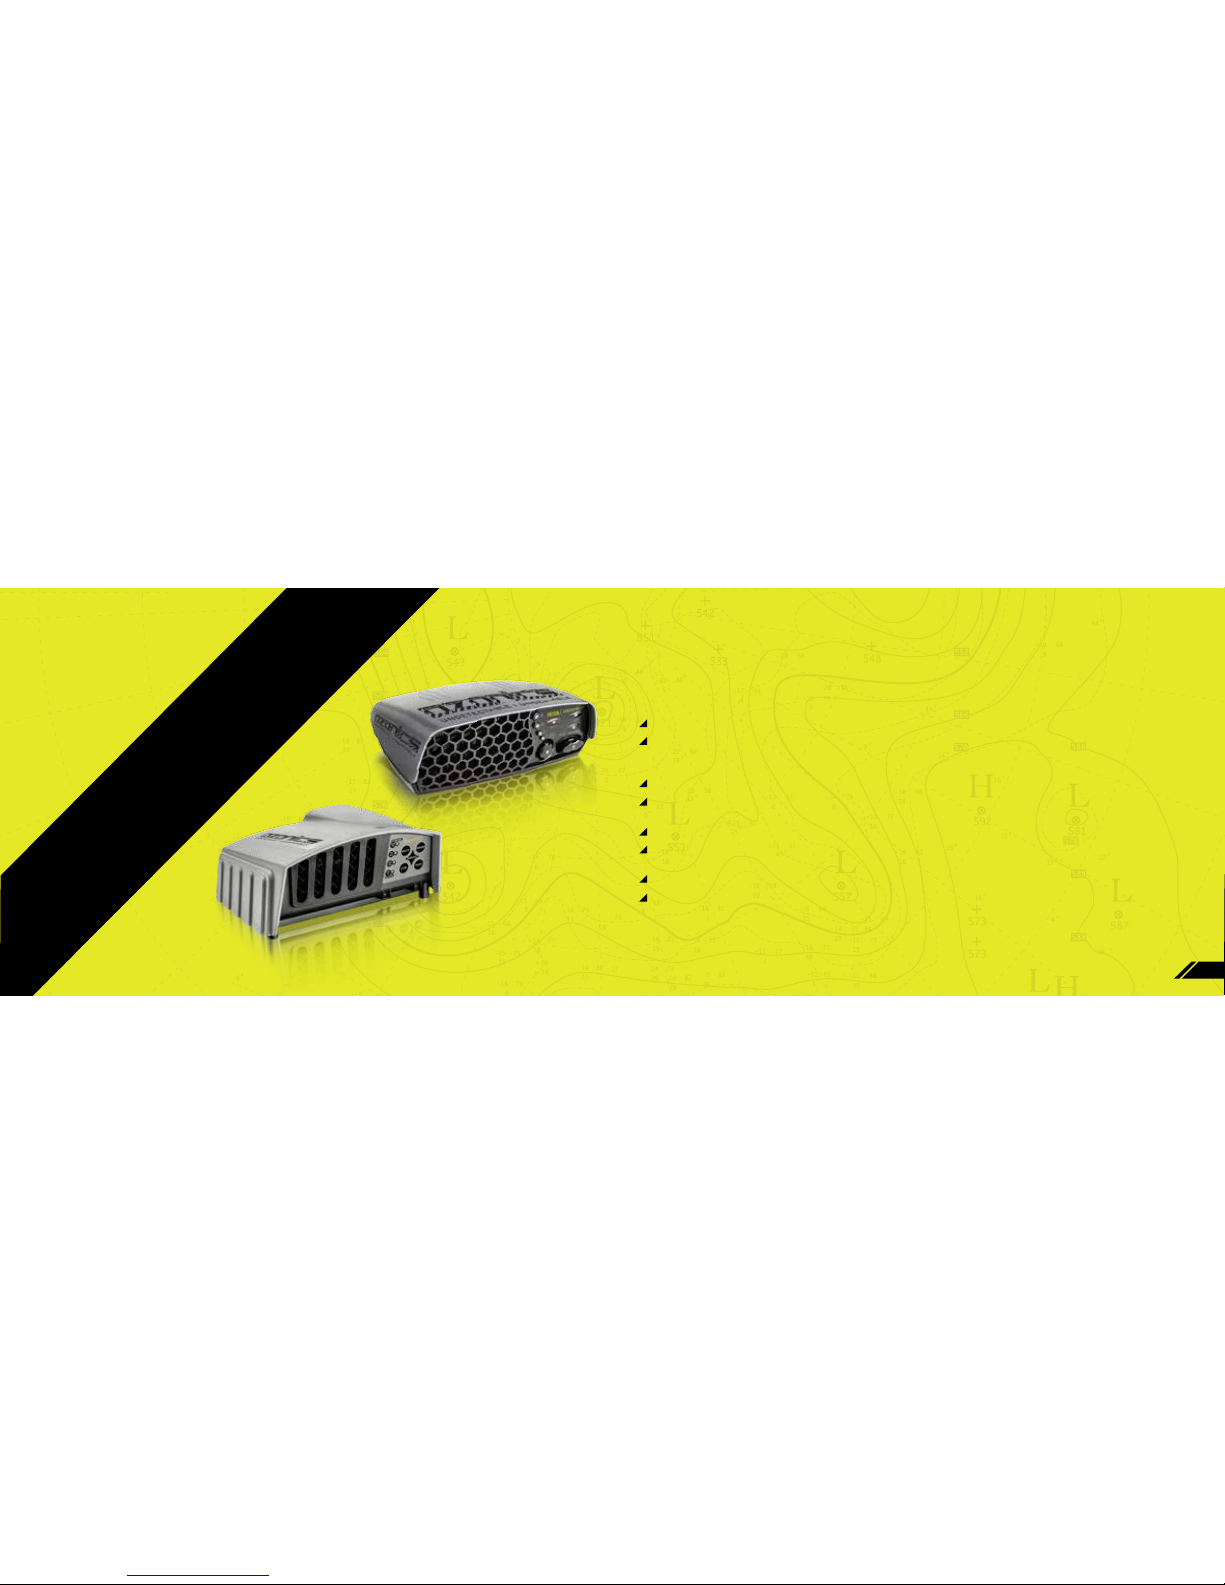
HR
200
}
}
HR
300
}
}
2
IMPORTANT: READ THE INSTRUCTIONS THOROUGHLY BEFORE OPERATING OZONICS
TM
The OzonicsTM ozone generator operates in excess of 10,000 volts.
Do not place fingers or any metal object into fan inlet/outlet grilles. If dirt or debris gets into unit, use gentle
compressed air to remove. If you cannot remove debris, or if the air cell or fan needs replacement, contact
Ozonics for service.
Do not use Boost mode in any closed environment.
When using the Ozonics
TM
ozone generator in a hunting enclosure, adequate ventilation is required to prevent
the build-up of ozone within the enclosure.
The Ozonics
TM
ozone generator operates in an oxygen-rich environment. Do not use in vicinity of combustible gases.
Do not immerse Ozonics
TM
in water. Use a clean, dry rag to remove external dirt and dust. Do not use chemicals
(e.g., gasoline, kerosene, acetone) to clean plastic.
Use only the rechargeable battery and charger supplied by Ozonics.
Ozone™ can be an irritant and powerful oxidizing agent. Like many products, ozone can be dangerous if used
improperly. So, follow the instructions herein. Should you experience dry eyes or a sore, scratchy throat, turn the
Ozonics
TM
ozone generator off immediately and get fresh air. Please refer to ozone and battery Material Safety
Data Sheet (MSDS) for further information (available from Ozonics). Ozonics, LLC manufactures to meet or
exceed Federal Safety Standards (e.g., NIOSH, OSHA, EPA, etc.) when used as directed.
Introduction & warnings 1-2
How to use Ozonics
™
for optimal performance 3-4
How to operate the HR200 5-6
How to operate the HR300 7-8
Guarantee/Warranty information 9-10
Page 3
43
THE ONLY SCENT CONTROL PRODUCT THAT
ACTIVELY ADDRESSES YOUR SCENT ZONE
The Ozonics ozone generator is the first and only
in-the-field ozone generator. Each Unit actively blankets
your scent with odor-destroying ozone. Unlike any other
scent control product, the Ozonics ozone generator actively
deals with the scent in your area between you and the deer or
other game animals, cleansing the air-stream in this scent zone so
game won’t smell you.
THE OZONICSTM OZONE GENERATOR ELECTRONICALLY CHANGES
OXYGEN (O
2) MOLECULES INTO OZONE (O3) MOLECULES
The OzonicsTM ozone generator produces ozone via corona discharge, con-
verting oxygen to ozone through the introduction of electricity. This ozone gas
is a very strong oxidizing agent that is commonly used to destroy odors and other
organic contaminants. The Ozonics
TM
ozone generator projects the ozone downwind
with a quiet, built-in fan.
HEAVY, UNSTABLE OZONE MOLECULES FALL THROUGH SCENT ZONE
AND BOND WITH SCENT MOLECULES
Because ozone molecules are heavier than air, they disperse from the Ozonics ozone generator and
fall into your scent zone. And because ozone molecules are also extremely unstable, they instantly
bond with any molecules they encounter—your scent molecules—eliminating, altering, or reducing your
human odor to the point it is no longer distinguishable to game animals.
THE BOTTOM LINE: YOU WILL NOTICE A DRAMATIC REDUCTION IN THE NUMBER OF GAME
ANIMALS THAT SMELL YOU, DRASTICALLY INCREASING YOUR SUCCESS.
HOW TO USE
THE OZONICS
TM
TM
OZONE
GENERATOR FOR OPTIMAL
SCENT-DESTROYING PERFORMANCE
TREESTAND USE
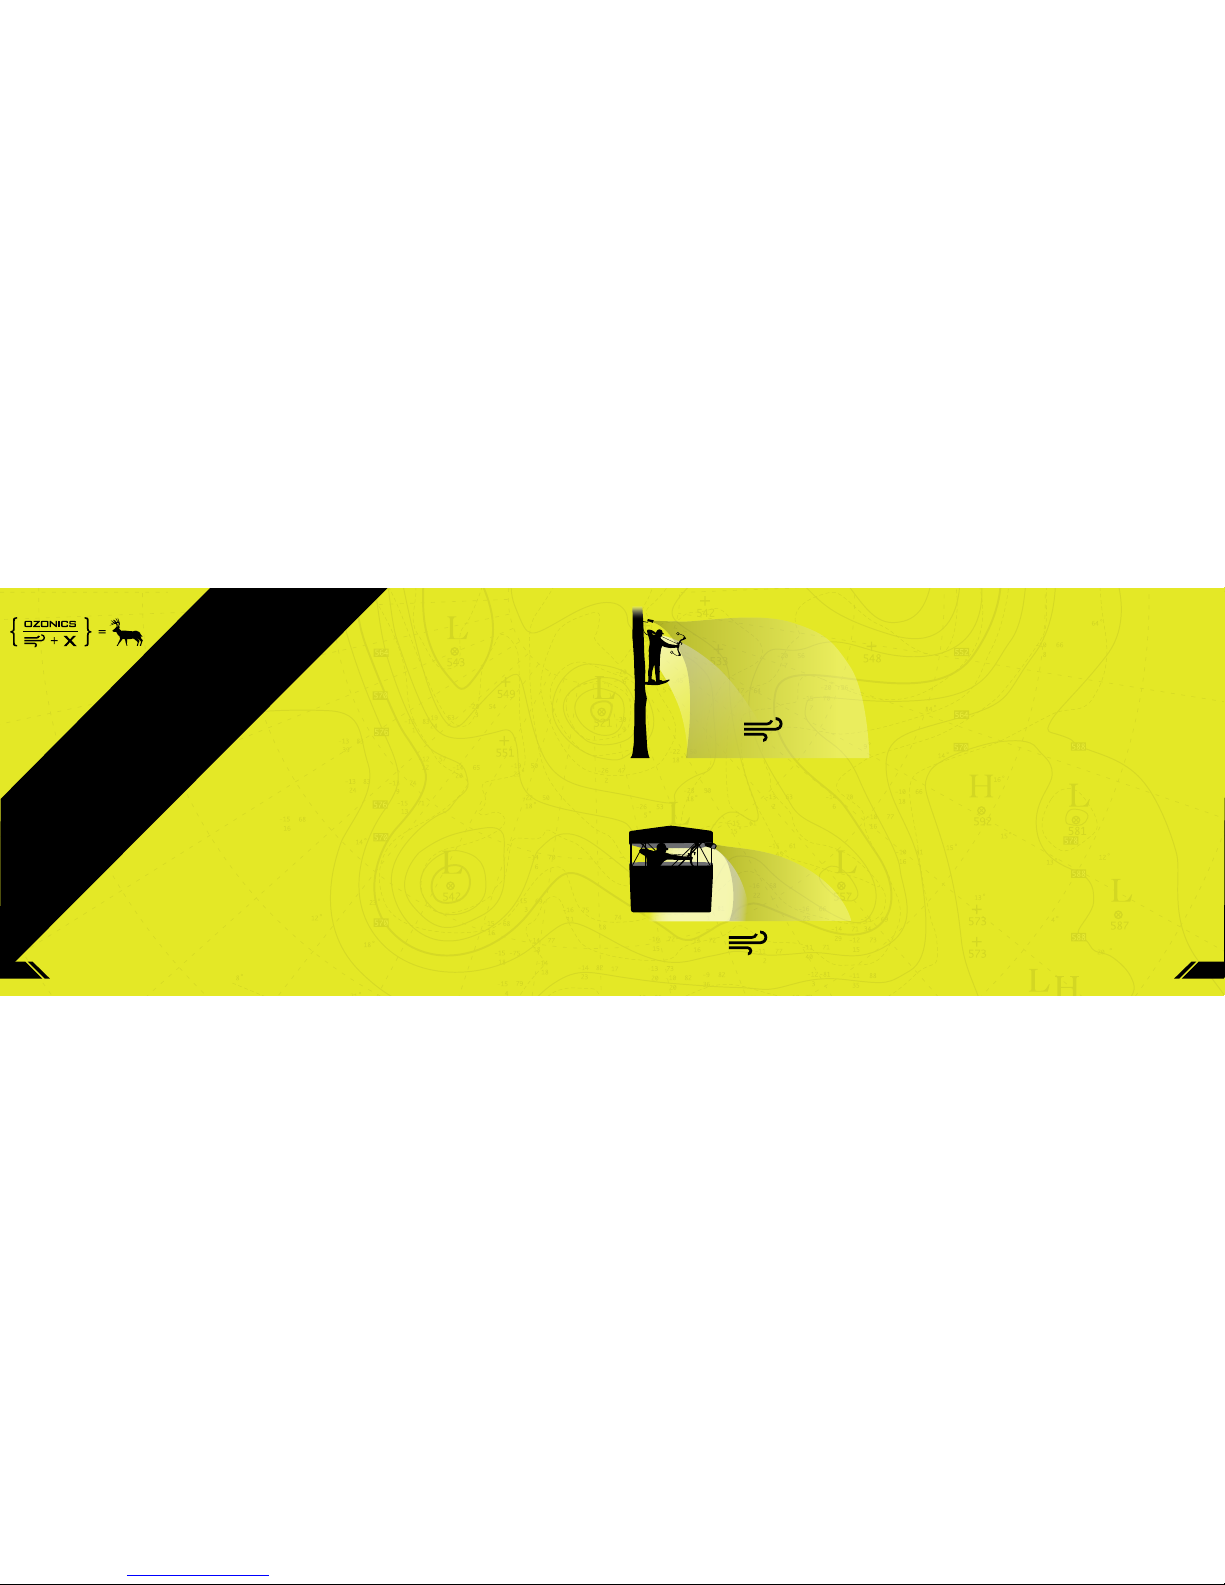
1. Attach the tree mounting screw provided so the OzonicsTM ozone generator
will be approximately 6 to 12 inches above the top of your head and facing
at a slightly downward (30°) angle. The most effective use of the Ozonics
TM
ozone generator is keeping your scent profile as minimal as possible.
2. Connect the Ozonics
TM
ozone generator to tree mount, ensuring that it is
facing downwind and that it gets proper air flow.
3. Turn the Ozonics
TM
ozone generator on (see pages 5-6 and 7-8 for operating
instructions) ozone other than from an occasional change in wind speed
or direction, you are improperly set up. Determine the new wind direction
and correctly position your unit facing in the down wind direction—this is
known as “chasing the wind.” With an Ozonics Unit, always chase the wind.
GROUND BLIND USE
1. Determine dominant wind direction and slightly open window on downwind side
of blind to create a controlled airflow. Attach ground blind mounting bracket to
blind’s roof frame. Connect the Ozonics ozone generator to the bracket so that
the generator’s outlet will be positioned 12-18 inches from the opening in the
blind aimed toward the downwind ventilation. The goal is to hyper-ozonate
human scent as it leaves the blind through this single location.
2. Do not direct the ozone at any occupant of the blind. Ozone is relatively heavy
and without proper ventilation, the Ozonics
TM
ozone generator can create excess
concentration of ozone, primarily found in the lower levels of the blind.
3. Turn the Ozonics
TM
ozone generator on (see operating instructions on
subsequent pages). Do not operate an Ozonics HR200 or HR300 ozone generator
on Boost mode in a ground blind.
4. If you smell ozone other than just with an occasional change in wind speed or
direction, you are improperly set up.
ozone from
ozonics unit
ozone
from
ozonics
unit
human
scent
human scent
wind direction
wind direction
Page 4
65
HOW TO OPERATE THE
OZONICS
TM
HR200 OZONE GENERATOR
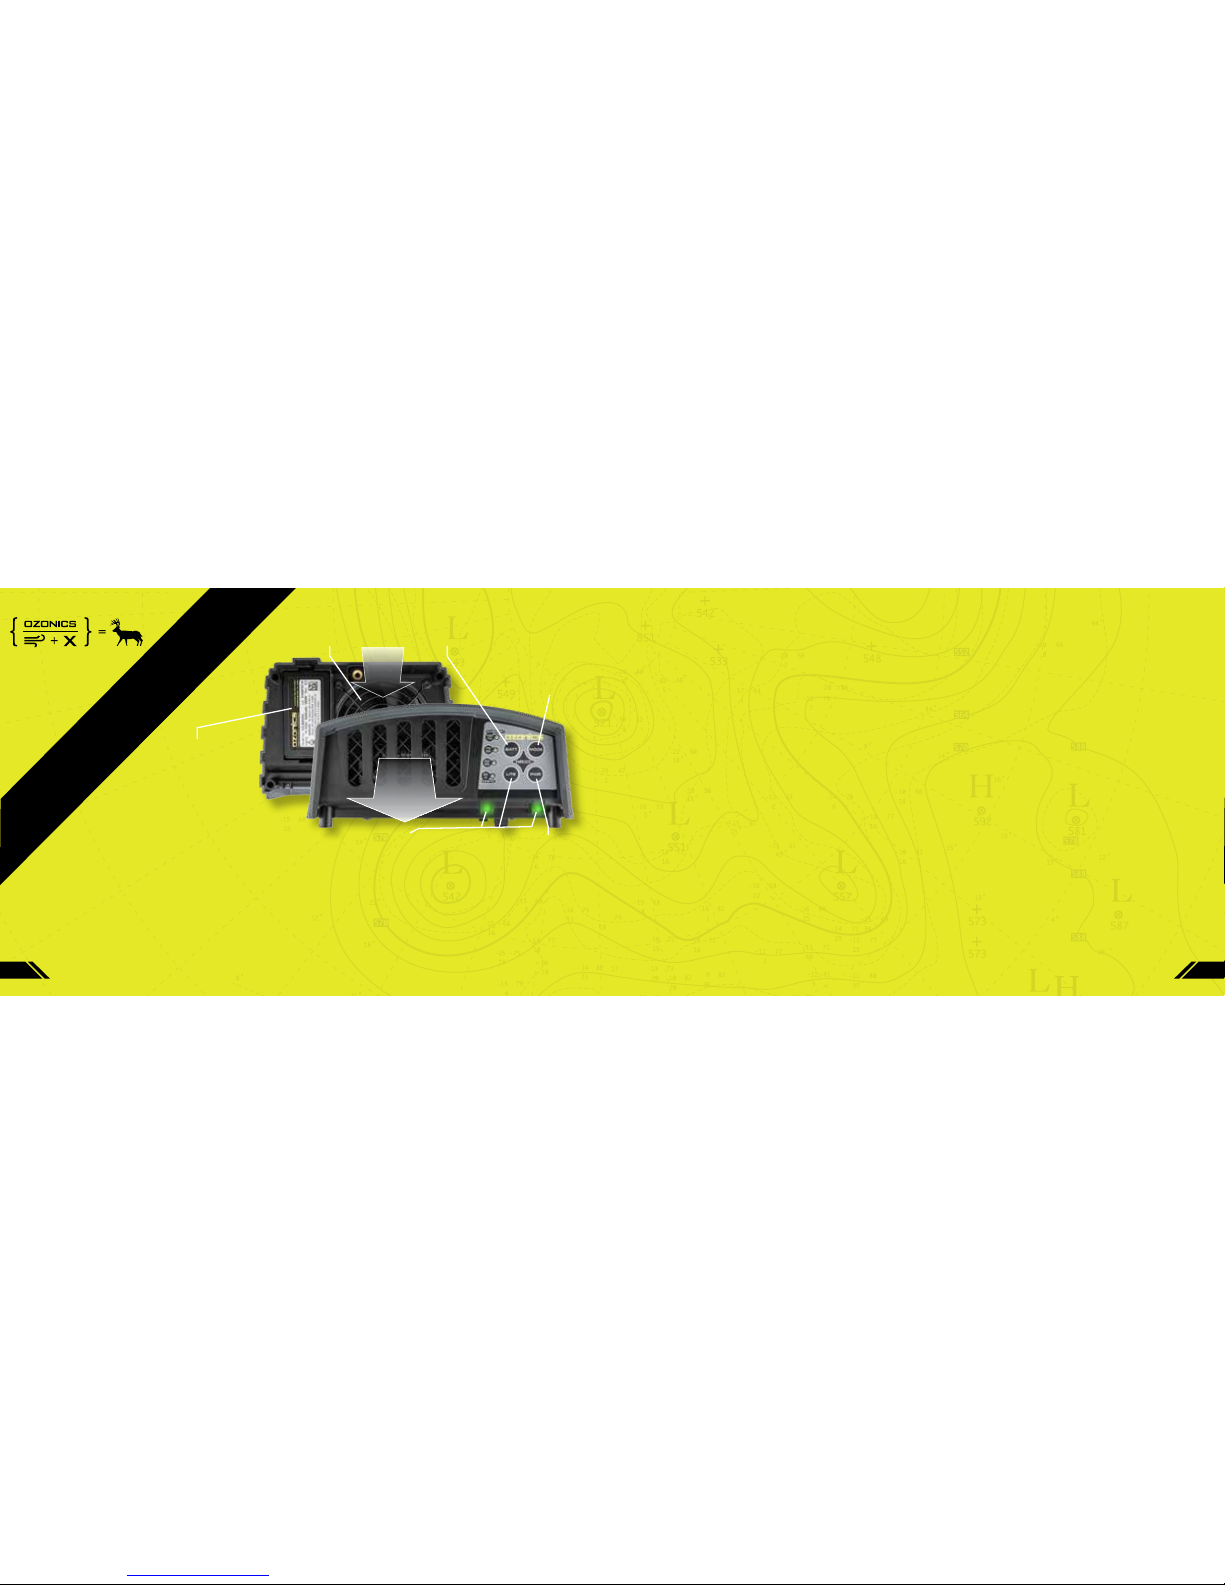
3. BATTERY LEVEL INDICATION: On the left side of the faceplate are four battery level indicator LEDs. Next to each LED
is a battery level percentage indicating the amount of remaining capacity in the battery. The top battery indicates an
estimated remaining battery life of 100-75%, the second light down indicates 74-50%, the third one down indicates
49-25% and bottom LED indicates less than 25% battery life remaining. To check the estimated battery level, press
the “BATT” button on the faceplate of the HR200 Unit and the corresponding battery level indicator LED will
illuminate, informing you of the estimated remaining battery life.
4. LOW BATTERY WARNING: When the HR200 unit determines that the battery has been depleted, the bottom red LED
will flash for 5 seconds and then the unit will automatically shut down.
5. BATTERY CHARGE LEVEL NOTE: When you receive your HR200 unit, it comes with a battery that is not fully charged
specifically for storage purposes. This battery should be fully charged in the HR200 battery charger before use. To get
optimal performance out of your HR200 unit, always start your hunt with a fully charged battery.
6. CHARGING THE BATTERY: To charge the battery, take the Ozonics HR200 battery charger and plug the AC wall supply
into an available wall outlet. The LED on the AC wall supply will illuminate green. Insert the HR200 battery into the
charger pocket. The LED on the AC wall supply will turn red, indicating the battery is charging. When the battery is
fully charged, the LED on the AC wall supply will turn green and is ready for use. Remove the battery from the charger. Do not store the battery in the charger.
7. INCORPORATED UTILITY LIGHTS ARE GREEN SO GAME WON’T SEE THEM: External LED lights are for use whenever extra
illumination is needed. Push the “LITE” button to activate or deactivate. These lights are green because green lights
have been proven to minimize alerting game while maximizing illumination for the user.
8. TRANSPORTING BATTERIES WITHIN PASSENGER BAGGAGE: Certain restrictions apply to the carriage of lithium ion batteries when carried by passengers as baggage. Ozonics™ original batteries have successfully passed testing outlined
in Part III, Sub-Section 38.3 of the UN Manual of tests, allowing them to be carried in passenger baggage. Because
of the risks associated with the carriage of batteries, these may NOT be transported within passenger CHECKED
BAGGAGE. Batteries MUST be in CARRY-ON BAGGAGE. Batteries must be installed in the device or individually
protected to prevent short circuit by insulating the terminals (e.g., taping over terminals, or by placing batteries in
a separate bag or protective pouch). Although not defined, a “reasonable” number of spare batteries can be carried
within a passenger’s carry-on baggage in context of the equipment used by the passenger and his or her itinerary.
(see http://www.safetravel.dot.gov)
OXYGEN
OZONE
Battery level indicator (BATT).
Push button to determine
percentage of charge.
Mode switch (MODE).
Switches between Standard
(default) and Boost modes.
12-volt rechargeable
battery. Removable
quick-charge battery
lasts up to 5 hours
in Standard mode, 4
hours in Boost mode.
Built-in fan projects
generated ozone silently
over scent zone.
Power switch (PWR). Silently
turns machine on or off.
Green utility lights (LITE). Illuminates
without warning nearby game.
1. TURN THE OZONICS HR200 OZONE GENERATOR ON OR OFF WITH THE POWER BUTTON: To turn the unit ON, press the
PWR button. The battery level indicator lights will illuminate from bottom to top in sequence. The fan will start and
unit will start producing ozone within 10-30 seconds.
2. CHOOSE BETWEEN STANDARD (STD) OR BOOST MODE:
The HR200 features a “Mode” button, which will change Ozone
output from STD to Boost. When the HR200 unit is turned on, the unit first starts in STD setting. To change to Boost,
push the Mode button and release. The “BOOST” indicator will illuminate. You will hear an increase in the fan speed as it
goes into Boost mode. Pressing the Mode button again will toggle back to STD setting and the “STD” indicator will
illuminate. The Boost mode was designed and is recommended for hunting in a treestand or other open-air environment.
Page 5
87
HOW TO OPERATE THE
OZONICS
TM
HR300 OZONE GENERATOR
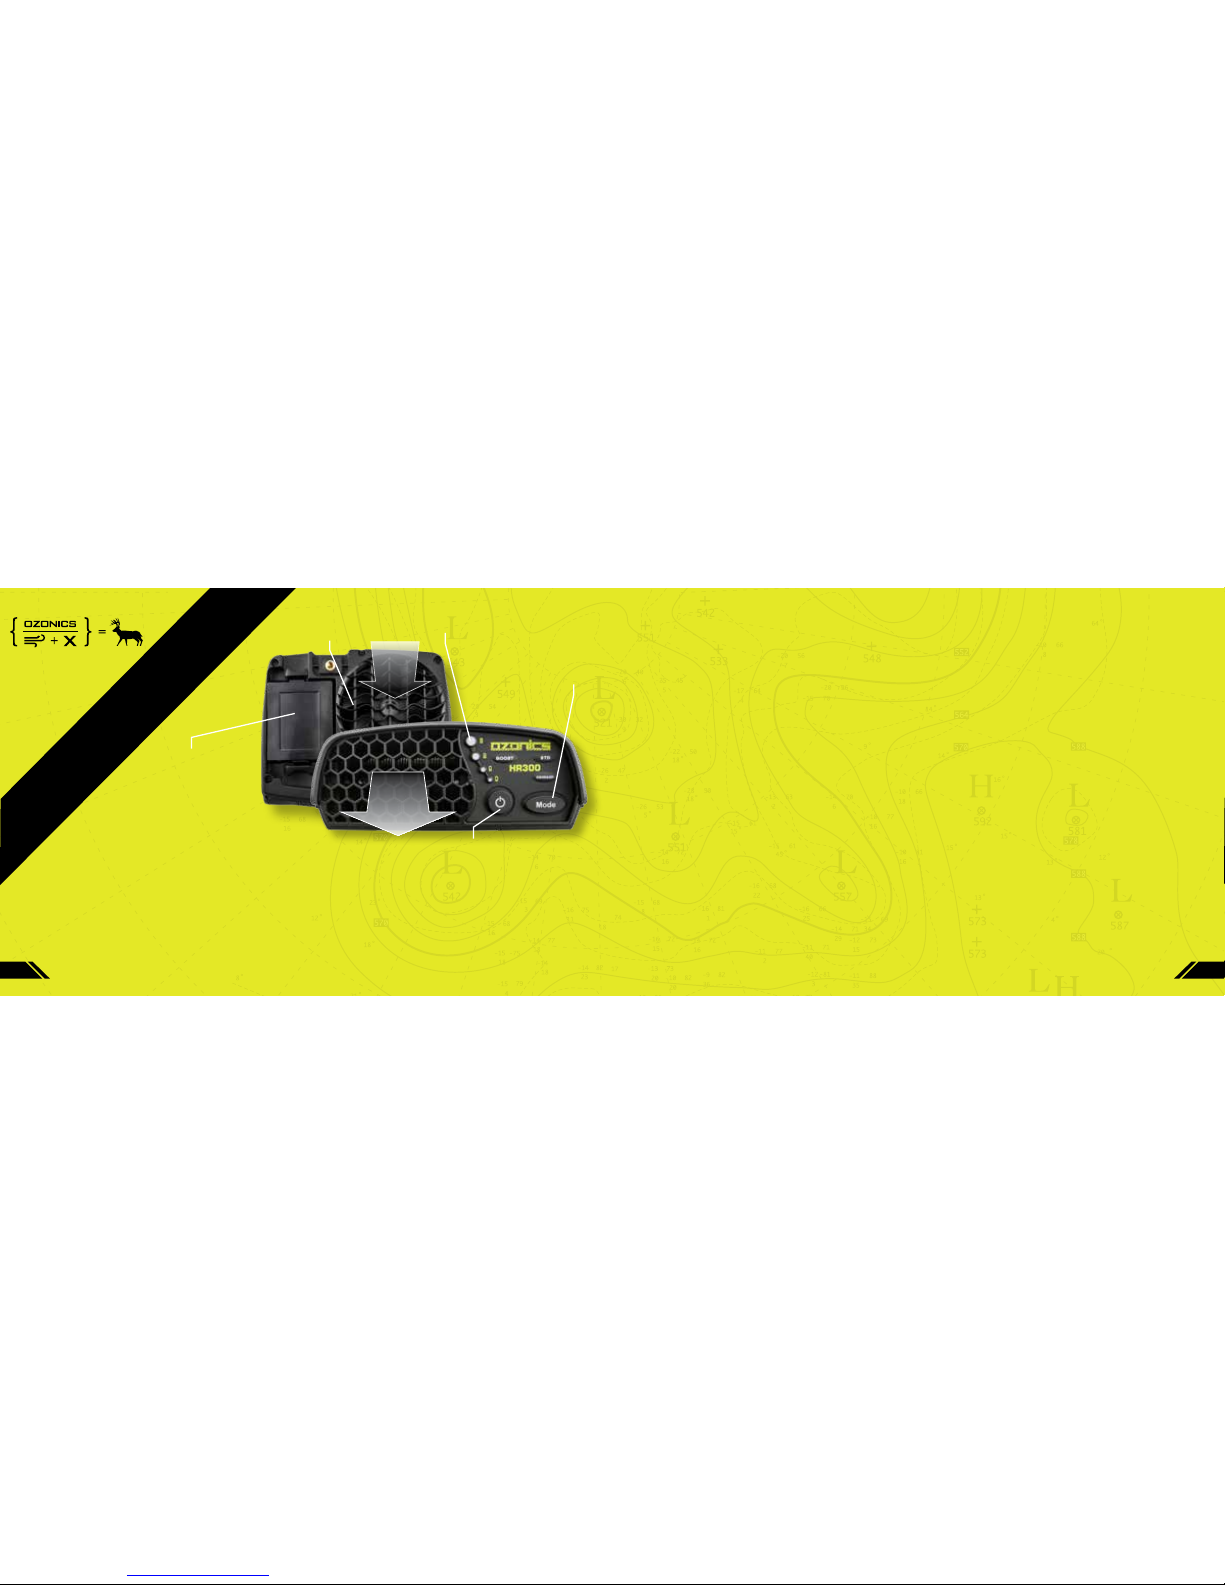
3. BATTERY LEVEL INDICATION: On the left side of the faceplate are four battery level indicator LEDs. Next to each LED is a battery level
symbol indicating the amount of remaining capacity in the battery. The top LED indicates a remaining battery life of 100-75%, the second
from top indicates 74-50%, the third one down indicates 49-25% and the bottom LED indicates less than 25% battery life remaining. The
HR300 Unit and the battery work on a “Smart Battery” platform that allows the Unit to better gauge the precise level of run time left in
the battery based on the current Mode setting of the unit.
4. LOW BATTERY WARNING: When the HR300 Unit determines there is less than 20 minutes of battery run time remaining, the bottom red
LED will flash once every 20 seconds, as a warning to be prepared to change the battery. When the Unit determines the battery has been
fully depleted, the bottom red LED will flash for approximately 5 seconds and then the Unit will turn itself off.
5. BATTERY CHARGE LEVEL NOTE: When you receive your HR300 Unit, it comes with a battery that is not fully charged for storage purposes.
This battery should be fully charged in the HR300 battery charger before use. To get optimal performance out of your HR300 Unit, always
start your hunt with a fully charged battery.
6. CHARGING THE BATTERY:
To charge the battery, plug the AC cord into the supplied power supply, and then into an AC outlet. The green
light on the power supply will illuminate, letting you know it’s functioning properly. Plug the DC barrel connector into the back of the HR300
charger. After plugging the power supply into the charger, allow 10 seconds before you place the HR300 battery into the charger (the charger
performs a self-check during this time period). If you put the battery into the charger during this time, the charger might either a) display no
LEDs or b) the red LED might flash. If either of these happen, remove the battery, wait 10 seconds and then re-insert the battery. The red
“charging” LED should illuminate. Leave the battery in the charger until the red LED turns off and the green “ready” LED illuminates.
7. STORAGE MODE: The HR300 battery charger is equipped with a “Storage Cycle,” which is to be used only at the end of the hunting
season to put the battery into optimal charge level for prolonged periods of non-use. To initiate the Storage Cycle, place the battery into a
powered battery charger. Once the battery is in the charger, press and hold the “Storage” button until the red LED begins to flash. Once
the LED starts to flash, release the button and the charger will complete the storage cycle on its own. When the cycle is complete, the
LEDs will toggle between red and green. Caution: During the Storage Cycle, the battery and charger might get very warm to the touch—this
is normal.
8. DRIWASH MODE: The HR300 Unit has a special mode that’s used in companion with the DriWash accessory bag (sold separately). To use
the DriWash system, hang the DriWash bag and loosely hang your clothing inside. You can then zip the front panel closed. Take the HR300
Unit and turn it on and cycle through the Mode Settings by pressing the Mode button until the DriWash indicator illuminates. Place the
HR300 Unit in the slot on the top of the DriWash bag so the output of the unit projects into the hole in the back of the slot and the
fan on the unit is pointing up. Secure the HR300 Unit in the DriWash bag with included clip straps. The HR300 unit will run for
approximately 10 minutes in the DriWash mode and then turn itself off.
OXYGEN
OZONE
Battery level indicator lights (BATT)
indicate percentage of charge.
Mode switch (MODE). Switched
between Standard (default),
Boost and DRiWASH modes.
12-volt rechargeable
Smart Battery that lasts
up to 5 hours in Stan
dard mode and 4 hours
in Boost mode.
Built-in fan silently
projects generated
ozone over scent zone.
Power switch (PWR). Silently turns machine ON or OFF
1. TURN THE OZONICS HR300 OZONE GENERATOR ON OR OFF WITH THE POWER BUTTON: To turn the unit ON, simply press and hold
the power button until the power and Mode button illuminate, along with the STD indicator and battery level indicator. Release the
power button and the battery level indicator lights will illuminate from top to bottom in sequence. The fan will start and unit will
begin producing ozone within 10-30 seconds.
2. CHOOSE BETWEEN STANDARD (STD), BOOST OR DRIWASH MODE: The HR300 features a “Mode” button, which will change ozone
output from STD to Boost, and then to DriWash. When the HR300 Unit is turned on, the Unit first starts in STD setting. To change
to Boost, push the Mode button and release. The “BOOST” indicator will illuminate, along with the power and Mode buttons. If the
Mode button is pressed again, the unit will toggle to the “DriWash” setting (see DriWash instructions, Step 8). The DriWash indica
-
tor will illuminate and the fan speed will increase. Pressing the Mode button again will toggle the Unit back to STD setting.
Page 6

109
MANUFACTURER’S
WARRANTY
HR UNITS 1 year from purchase date
HR BATTERY 6 months from purchase date
HR MOUNT 6 months from purchase date
OZONICARE RECERTIFICATION
To have your HR200 or HR300 cleaned and recertified
to Ozonics Quality Standards (OQS), contact Ozonics at
979-285-2401 or www.ozonicshunting.com/contact-us/
EXCEPT AS EXPRESSLY PROVIDED, OZONICS MAKES NO WARRANTY,
EXPRESS OR IMPLIED, INCLUDING WARRANTIES OF MERCHANTABILITY
OR FITNESS FOR A PARTICULAR PURPOSE.
OZONICS MAKES NO WARRANTY CONCERNING HUNTING SUCCESS. NEITHER
OZONICS NOR ANY AFFILIATE OF OZONICS, LLC SHALL BE RESPONSIBLE TO
CUSTOMER OR OTHERS FOR LOST REVENUES, LOST PROFITS, OR OTHER SPECIAL,
INCIDENTAL, DIRECT, INDIRECT, OR CONSEQUENTIAL DAMAGES OR FOR LOSS OR
DAMAGE OR OTHER EXPENSE DIRECTLY OR INDIRECTLY ARISING FROM CUSTOMER’S,
OR ANY OTHER PERSON’S USE OF OR INABILITY TO USE OZONICS
TM
PRODUCT OR FOR
COMMERCIAL LOSS OF ANY KIND. NO RECOVERY AGAINST OZONICS, LLC, WHETHER IN
CONTRACT, TORT (INCLUDING NEGLIGENCE), STRICT LIABILITY OR OTHERWISE, SHALL BE
GREATER THAN THE AMOUNT PAID BY CUSTOMER FOR THE OZONICSTM PRODUCT.
Page 7
OZONICS LLC.
1511 SOUTH GARFIELD PLACE
MASON CITY, IA 50401
 Loading...