

Ozone Ozium User Manual


YOUR HARNESS IS HERE
CONTENTS
Manual (Eng) 2 > 17
Manuel (Fr) 18 > 34
Handbuch (D) 35 > 50
Technical Specifications 51
Version 2.1 March 2016
OZONE GLIDERS
1258 Route de Grasse, 06620, Le Bar sur Loup, France

hank you for choosing Ozone.
As a team of free flying enthusiasts, competitors and adventurers, our mission is to produce paragliding equipment of the highest quality using
T
cutting edge designs and the best technical materials available.
Our development team is based in the south of France. This area, which includes the sites of Gourdon, Monaco and Col de Bleyne, guarantees us
more than 300 flyable days per year. This is a great asset in the development of the Ozone range. We know that quality and value for money are
essential considerations when choosing equipment, so to keep costs low and quality high we build all our wings and harnesses in our own production facility. During production all Ozone products undergo numerous rigorous quality control checks. This way we can guarantee that our equipment
meets the same high standards that we expect ourselves.
If you need any further information about Ozone, the Ozium, or any of our products please check www.flyozone.com. Or you can contact your local
dealer, paragliding school or any of us here at Ozone.
It is essential that you read this manual before using your Ozium for the first time.
Safe Flying!
Team Ozone
ENGLISH
3
WARNING
YOUR OZIUM
Paragliding is a potentially dangerous sport that can cause serious
injury including bodily harm, paralysis and death.
Flying using Ozone equipment is undertaken with the full knowledge
that paragliding involves risks.
As the owner of an Ozone harness you take exclusive responsibility
for all risks associated with its use. Inappropriate use and or abuse
of your equipment will increase these risks.
Any liability claims resulting from use of this product towards the
manufacturer, distributor or dealers is excluded.
Make sure you complete a thorough daily and pre-flight inspection of
all of your equipment. Never attempt flying with unsuitable or damaged equipment.
Always wear a helmet, gloves and boots.
All pilots should have the appropriate level of license for their respective country and third party insurance.
Make sure that you are physically and mentally healthy before flying.
Choose the correct wing, harness and conditions for your level of
experience.
Pay special attention to the terrain you will be flying and the weather
conditions before you launch. If you are unsure then don’t fly, and
always add a large safety margin to all your decisions. Avoid flying in
rain, snow, strong wind, and turbulent weather conditions or clouds.
If you use good, safe judgement you will enjoy many years of paragliding.
Remember, PLEASURE is the reason for our sport.
The Ozium is an incredibly lightweight XC pod harness for pilots who
need a compact and lightweight solution for adventure flying. The
Ozium concept and design was thoroughly proven during the 2013
RedBull X-Alps, the toughest and most brutal adventure race in the
world. Ozone Team Pilots flew the Ozium for long XC flights in intense
Alpine conditions, and carried it through the heart of the Alps for days
on end.
We have taken the X-Alps competition prototype and added a bit more
durability and user-friendliness, making it an excellent choice for pilots
seeking a lightweight pod system that is comfortable and features a
very low pack volume. The Ozium features a foam back-protector and
a rear-integrated reserve compartment, all weighing in at just 2.6kg
in total.
Available with the option of an LTF certified foam back-protector,
or a non-LTF lighter thinner back protector - both versions are EN
certified, but we recommend the LTF version for the added protection it offers.
Sizing
The Ozium comes in two harness sizes; M and L and three pod sizes;
S, M and L combined to make a total of four different available sizes.
We recommend the following pilot suitability:
Size
160 - 176 cm
175 - 182 cm
181 - 189 cm
188 - 198 cm
Harness
M S
M M
L M
L L
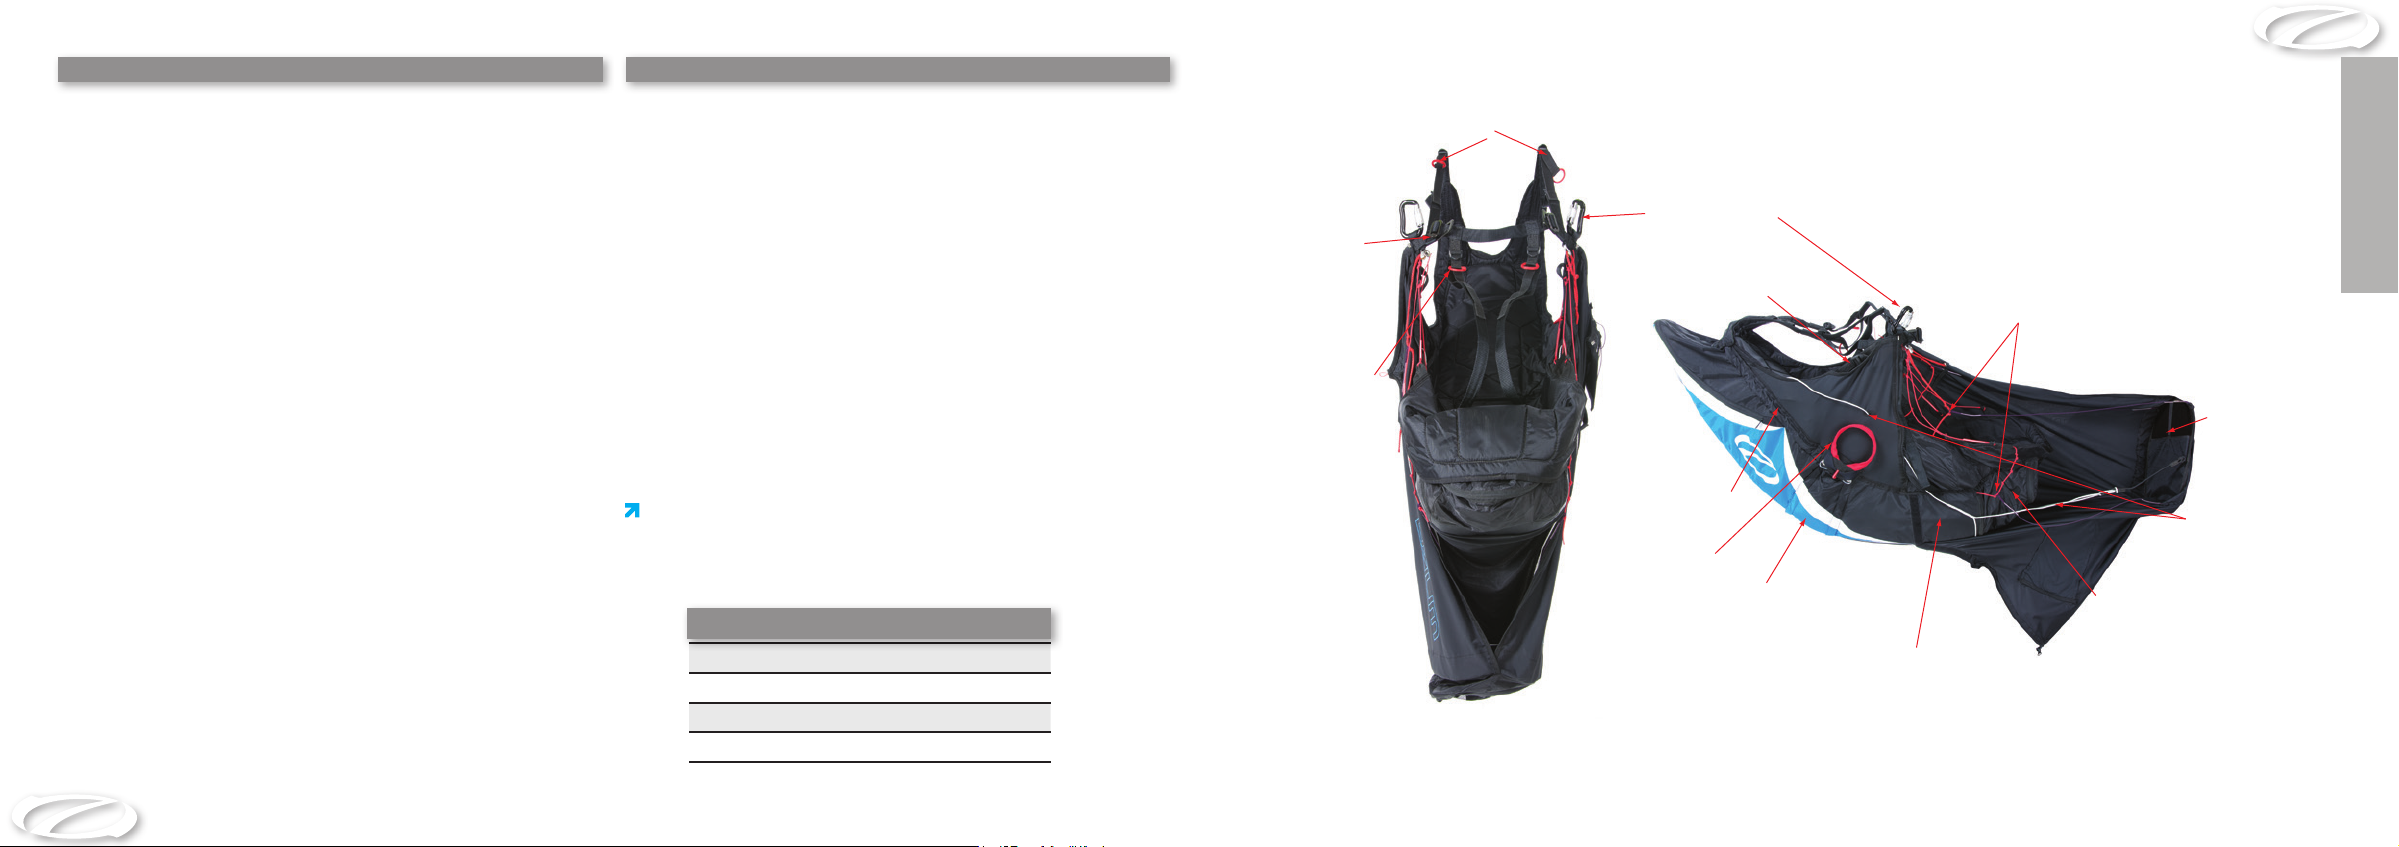
Pod
Shoulder
adjustment straps
Leg/chest strap
buckles
Leg strap
adjustments
Main Hangpoints
Lumber support
adjustment strap
Harness bridle
routing
Reserve handle
Reserve parachute
container
ENGLISH
Foot plate angle
adjustments
Foot plate
Speed system
Ballast pocket
Back protection pocket
4
5
ASSEMBLY
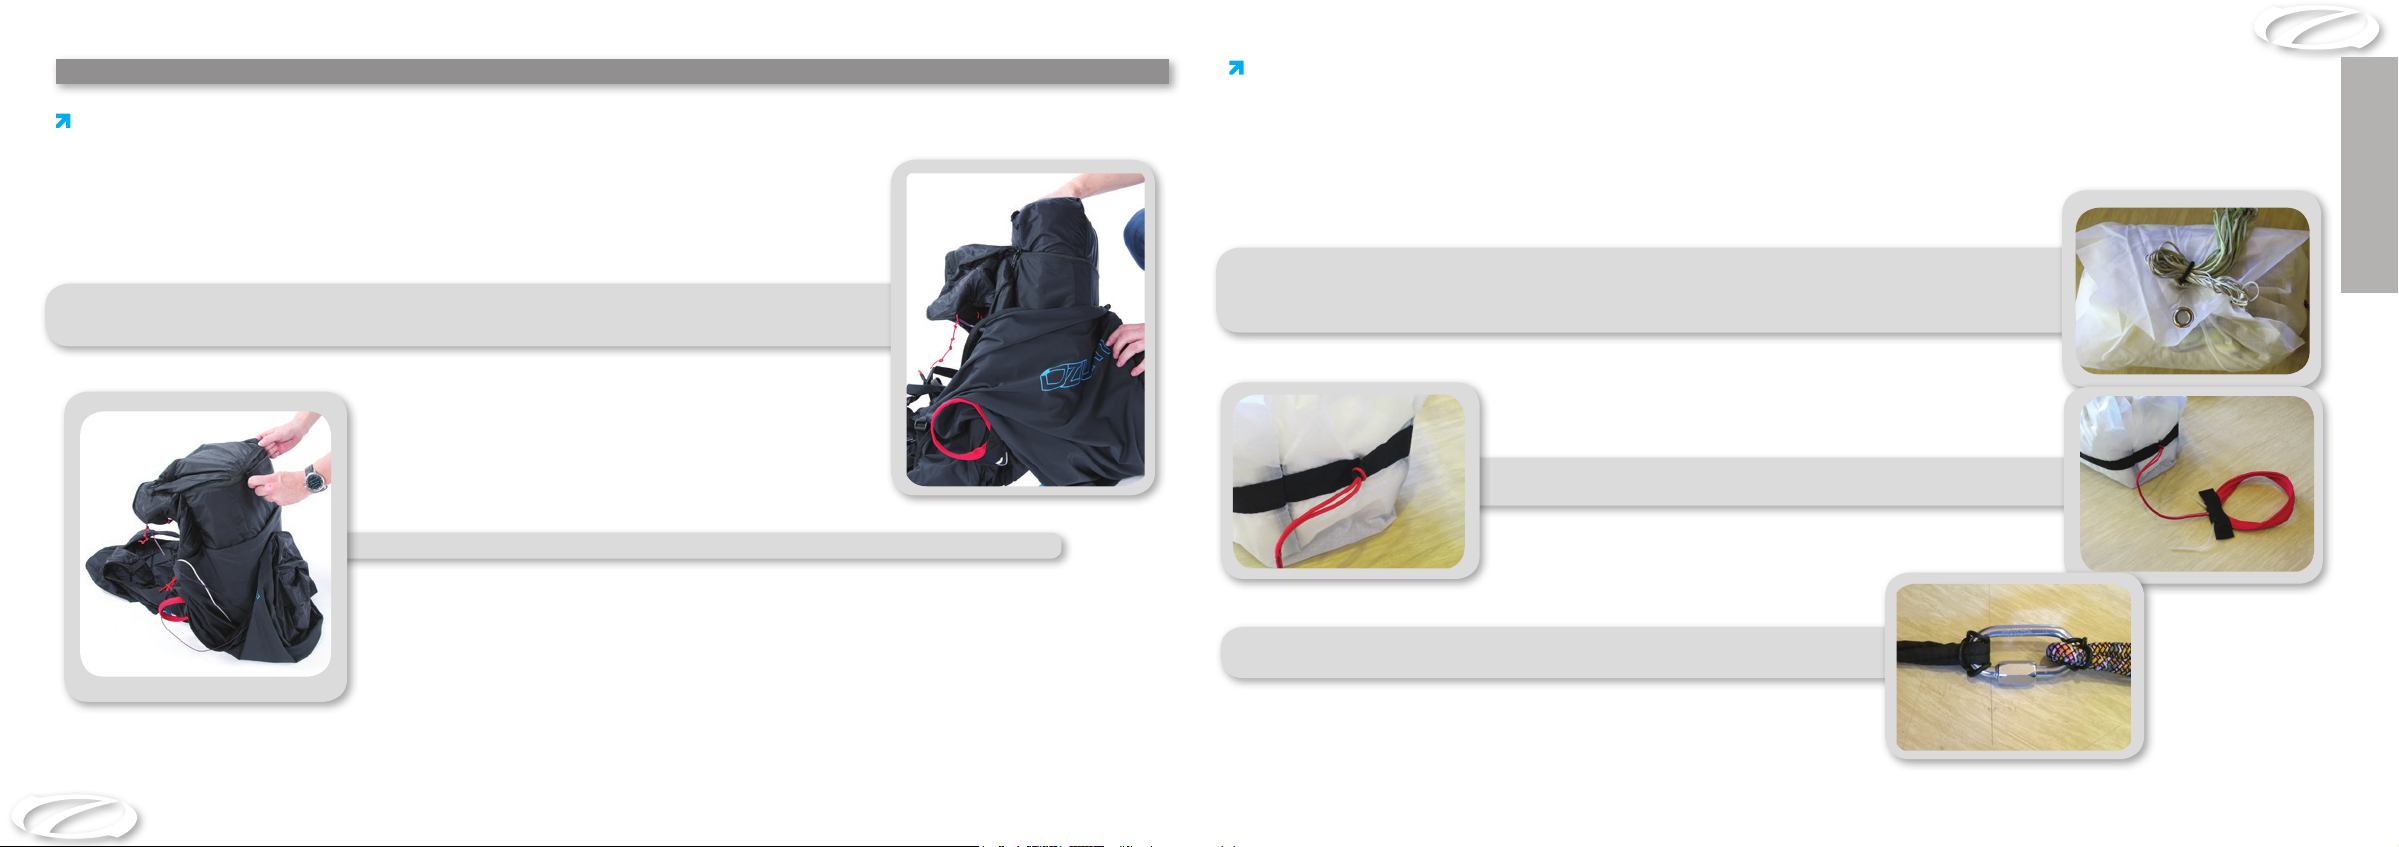
Back Protection
Upon delivery the back protection needs to be placed into the structure of the harness.
Insert the back protector into the second, rear most zipped pocket located under the seat, do not try to
force it into the smaller front ballast pocket. The back protector is marked top and front, ensure that it
is inserted correctly, the narrow end should be facing forwards.
It should be a snug fit but you should be able to close the pocket without forcing the zip.
Reserve Parachute Installation
The Ozium has an integral reserve parachute container with its own specific parachute deployment bag. With a volume of 5ltrs the
reserve pocket of the Ozium will accept most modern reserve parachutes.
IMPORTANT: It is strongly recommended to use the deployment bag supplied with the harness.
WARNING: Ozone strongly recommends that the reserve parachute system is installed by a
qualied professional. Always seek experienced advice if you have any doubts.
ENGLISHFRANCAIS
To install a reserve parachute you should first pack the parachute so that it matches the shape and
dimension of the supplied deployment bag. Insert the parachute into the deployment bag and secure the
deployment bag with the lines in the normal way. Depending on the size of your parachute you can use
either eyelet for the tightest fit.
Attach the reserve handle to the deployment bag using a larks foot
through the loop.
Attach the harness bridles to the parachute’s bridle using a suitable connector
(not supplied).
Please note, the Ozium is only suitable for reserve parachutes with a short bridle.
6
7
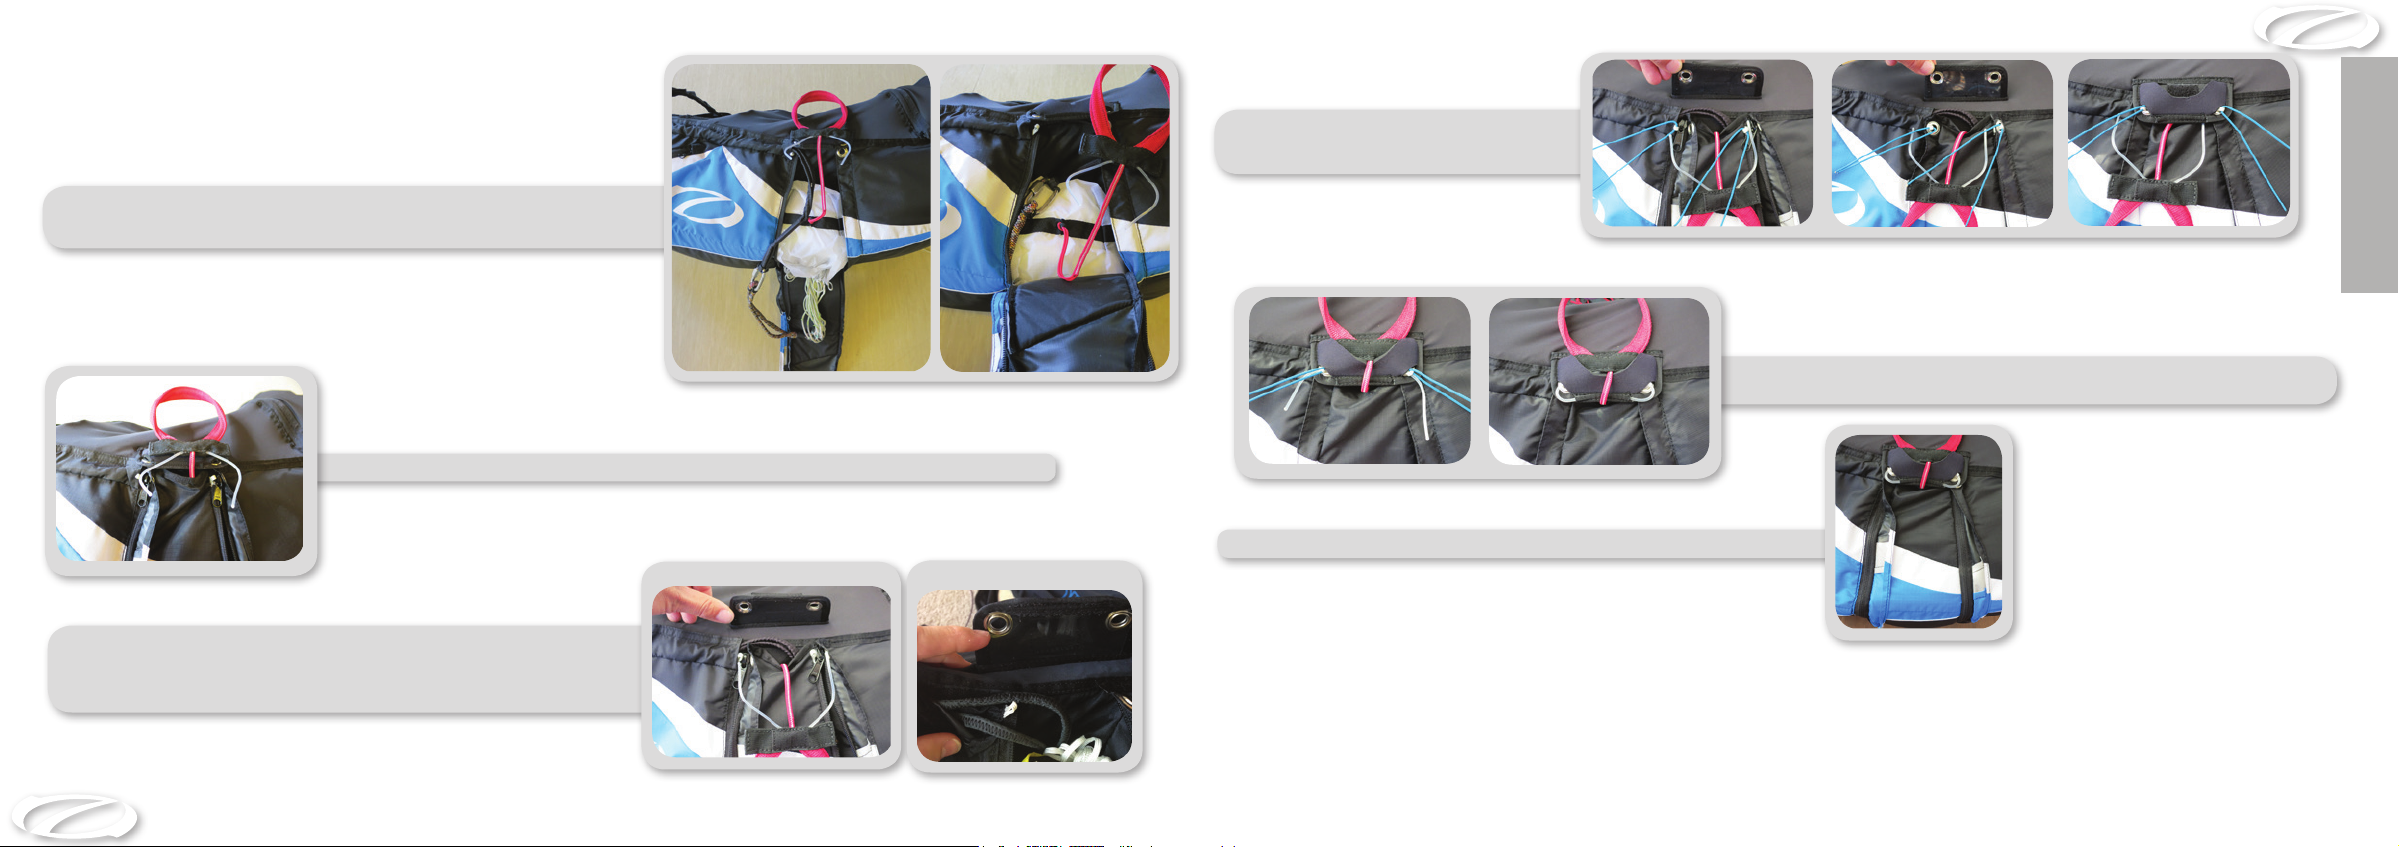
Open the reserve parachute container on the rear of the harness by tearing open the zips. Place the deployment bag in the space provided with the
lines facing to the outside and the handle positioned correctly as shown.
The container can now be closed by running the both zips forward, all the way to the eyelets.
Ensure that the main bridle is correctly routed through the middle of the
opening and around the top of the white reserve pin loop. Do not go either side of it, or through the zipped part as this will cause the reserve
pocket to inadvertently open when under pressure.
Using suitable pieces of magic string or
plastic pull the white loops through the
parachute container eyelets.
ENGLISH
Put the handle in place and push the pins through the white loops. The
ends of the pins can be neatened into the available hole exactly as shown.
Now run both zips all the way to the back to close the parachute container.
Correct Incorrect
Make sure you perform a practice throw from a static hang point. Not only does this ensure the correct functioning of your deployment
system it also allows you to become more familiar with the installation process.
Please note, the parachute can only be deployed with the right hand.
8 9

PRE FLIGHT SET UP
Speed System
An integrated speed-bar is included and already assembled. The glider-attachment ends are left intentionally long
in order to allow you to route it through the glider’s speed system if desired. If you choose to use the traditional
Brummel-hook system, simply trim the speed system to the desired length.
The speed system lines are routed through the holes found between the seat structure and the side skirt - just in
front of the pulleys on the side of the harness. After the pulleys the speed system lines go up through the small holes
located on the side panel. If you ever remount the speed system make sure that the lines pass to the outside of all
straps and underneath the lower foot plate lines on the inside of the pod.
Ensure the speed system lines are of equal length. Check that the lines are not too
short as this may inadvertently activate the speed system when under tension in the
air. Double check on the ground before flying.
To put the harness on first place the shoulder straps over your shoulders and bring the
leg/chest strap through your legs.
ENGLISH
Fasten the leg/chest strap by placing the male buckles through
the female buckles on each side
IMPORTANT: Make sure the structural
lines of the pod are running free and are
not caught around the leg/chest straps
when you fasten them.
Fitting the Ozium
Before your first flight, we recommend to suspend the harness from a suitably
strong point to check that it fits you correctly and to become familiar with the
features and adjustments. You can set the shoulder adjustment-straps to find
the best fit, and adjust the lumber support so that they leave you in a comfortably reclined position.
10
The automatic pod closing system should now be connected. First attach the right hand side, the
metal button can be found by the pulley under the right hand hang point. Put this button through the
loop on the left hand side of the pod.
Now pass the button on the left through the loop on the right hand
pod.
11
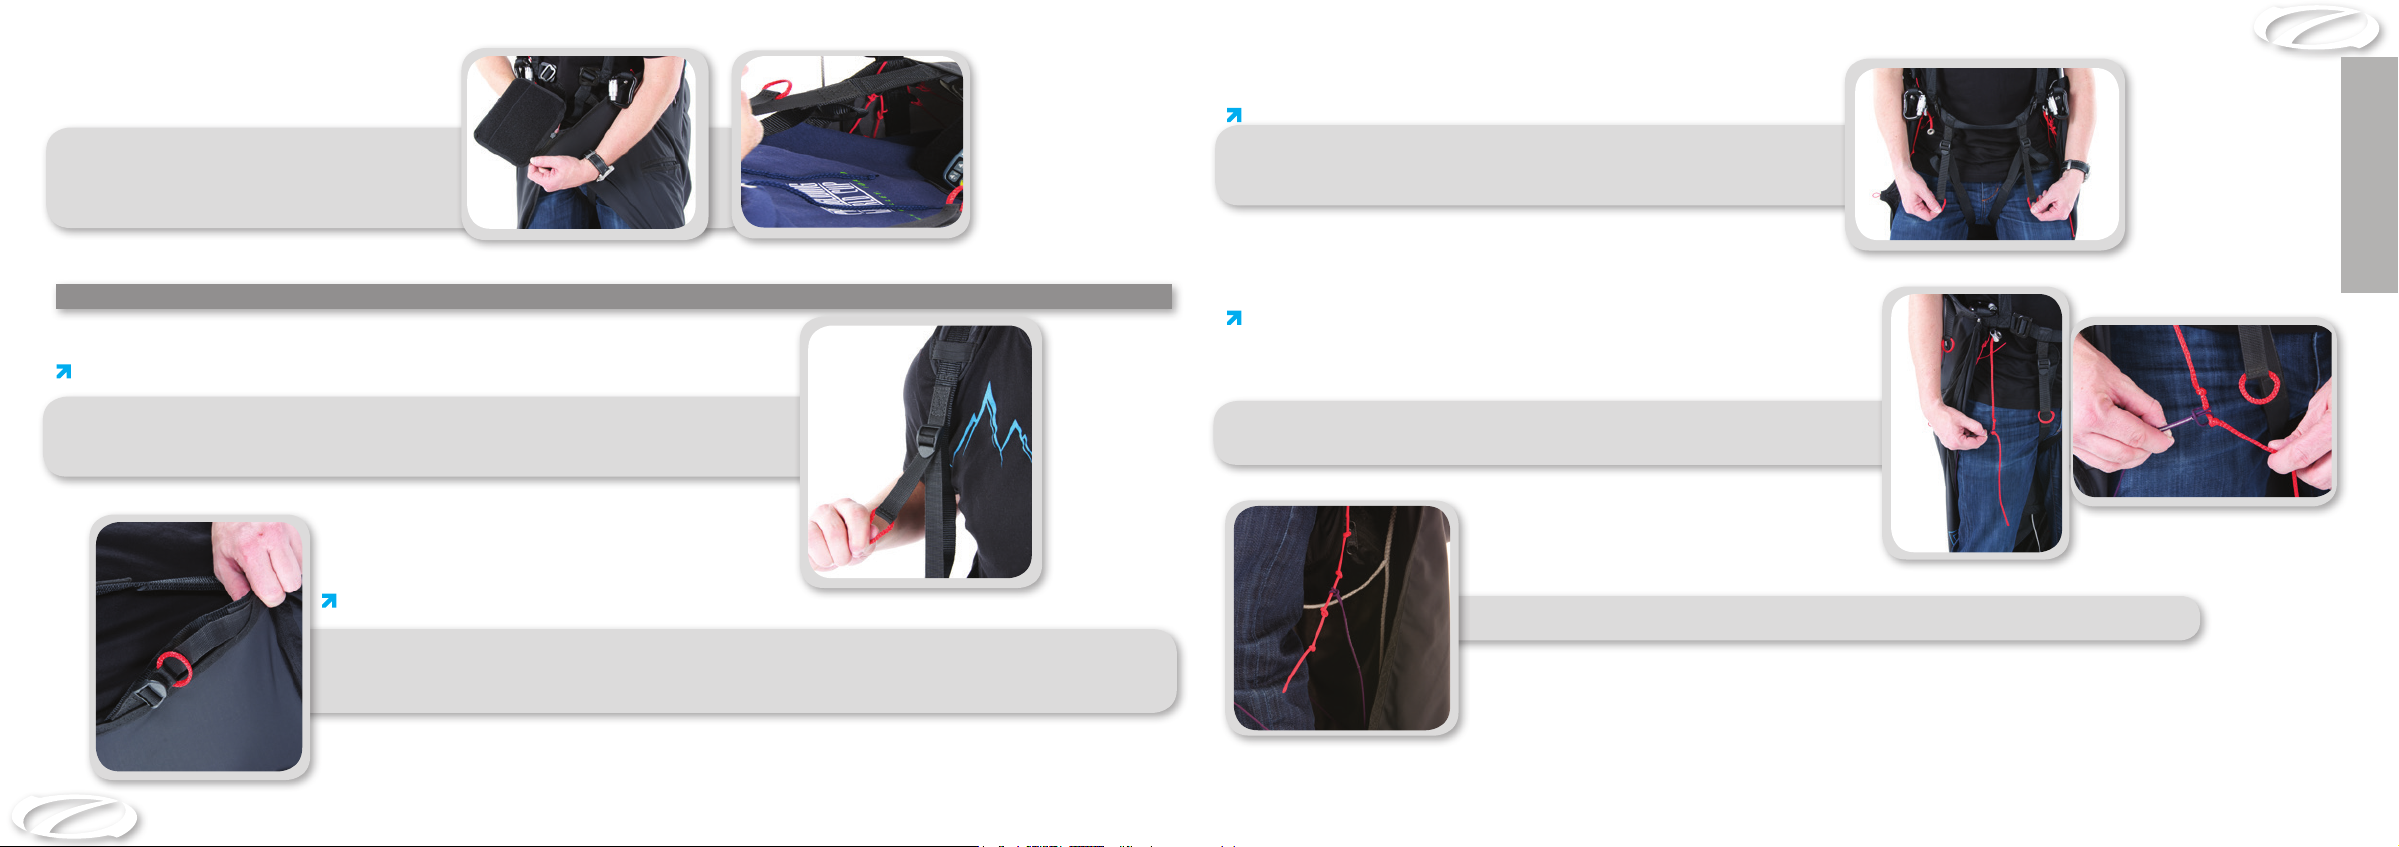
The Cockpit is zipped to the top of the pod.
In the air it rests over the top of the chest strap
The supplied elastic chord is optional. It can be
placed over your head and allows the cockpit to
maintain a good position during launch
ADJUSTMENTS
Shoulder straps
Leg straps
The length of the leg straps affects the overall stability of the harness. For
maximum weightshift the leg straps should be left in the longest position.
For greater stability the straps can be tightened. It is important to test fly
and find the best position for your style of flying and comfort
ENGLISH
Fine tuning of the pod
The harness has been set up so that it will suite the majority of pilots and further
adjustments should not be necessary, however if you wish to make changes it is
possible to do so. This must be done on the ground and is not possible in the air.
The length of the Shoulder straps can be modified using the adjustment straps. Adjust the
shoulders whilst standing up with the harness on so that they are comfortably snug. Whilst
suspended in the seated position ensure the straps are comfortable and supportive, they
should not be too tight nor too lose.
Lumber Support
The Lumber support should be adjusted for a comfortable flying position. Precise adjustments can be made
in the air so that your lower back is completely supported and there is no tension in your stomach muscles. Be sure to adjust the lumber supports carefully, setting them too loose will result in a very reclined
position in the air.
12
The foot plate at the end of the pod is supported by 4 lines (purple), these control
the overall length of the pod and the angle of the foot plate. The overall length can
be adjusted by moving the position of the lines on the knots.
Make sure that the lines are mounted symmetrical if any adjustments are made.
The angle of the foot plate can be changed by moving the bottom lines on the adjustable knots.
If you do choose to make a change, take your time to find the position that suites you best and only make small adjustments each time.
13
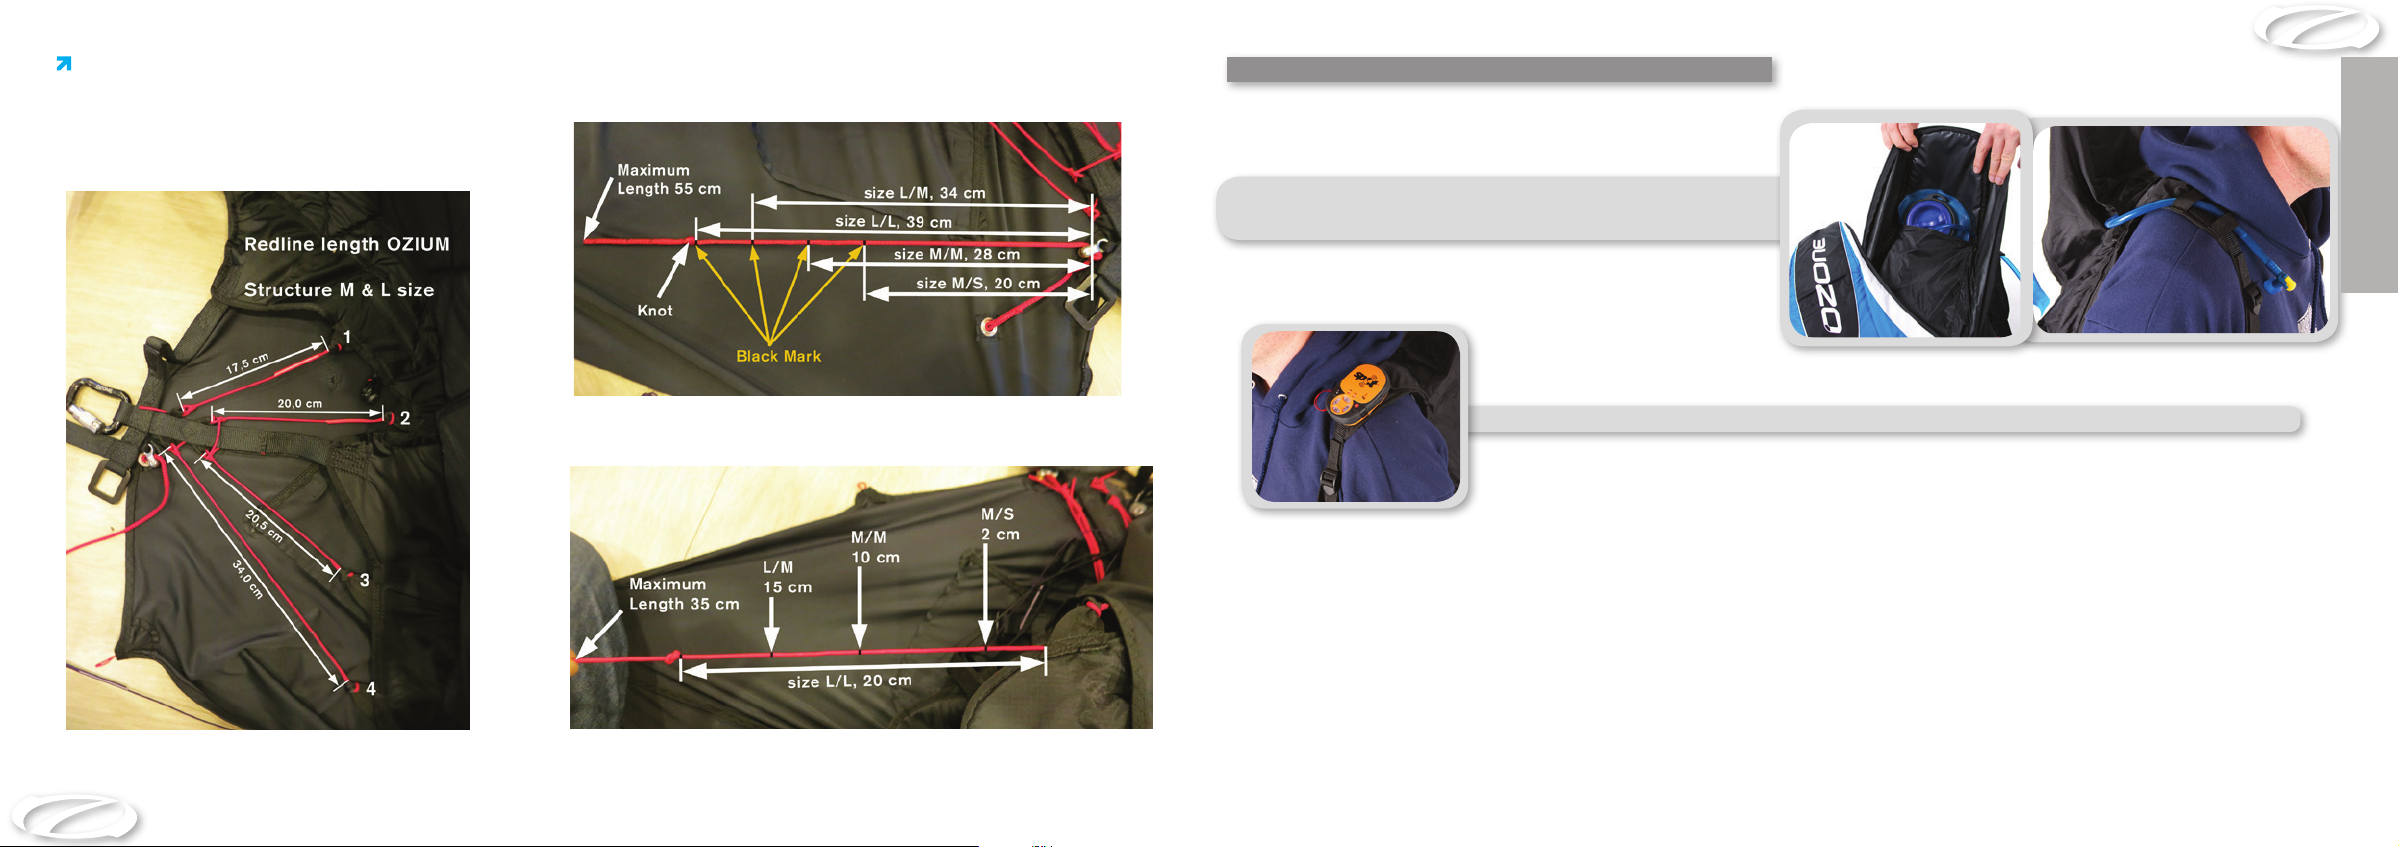
Factory settings
Harness Structure
It is strongly recommended to not adjust harness’s
structure factory setting.
Upper pod line
Lower pod line
FEATURES
The Ozium includes a hydration access system consisting of an inner
pocket located in the rear pocket with an opening and anchor points
for your hydration tube.
On the opposite shoulder strap, there is a lightweight Velcro mounting point for a vario, Spot or radio.
ENGLISH
14
15
 Loading...